sketchup 2015 hands-on advanced exercises - 3dvinci3dvinci.net/sketchup2015advancedsampler.pdf ·...
TRANSCRIPT
SketchUp® 2015 Hands-On
Advanced ExercisesBy Bonnie Roskes
Exercises, tips, and tricks that will help take your designs, models, and presentations
to a whole new level.
a 3DVinci Publicationwww.3dvinci.net

Table of Contents
i
Chapter 1: IntroductionAbout this Book . . . . . . . . . . . . . . . . . . . . . . . . . . . . . . . . . . . . . . . . . . . . . . . . . . . . . . . . . . . . . . . . . . . . . . . . . . 1How this Book is Set Up . . . . . . . . . . . . . . . . . . . . . . . . . . . . . . . . . . . . . . . . . . . . . . . . . . . . . . . . . . . . . . . . . . . 1
SketchUp 2015 Hands-On: Basic Exercises . . . . . . . . . . . . . . . . . . . . . . . . . . . . . . . . . . . . . . . . . . . . . . 1SketchUp 2015 Hands-On: Advanced Exercises . . . . . . . . . . . . . . . . . . . . . . . . . . . . . . . . . . . . . . . . . . 1
About Bonnie Roskes. . . . . . . . . . . . . . . . . . . . . . . . . . . . . . . . . . . . . . . . . . . . . . . . . . . . . . . . . . . . . . . . . . . . . . 2About the Cover . . . . . . . . . . . . . . . . . . . . . . . . . . . . . . . . . . . . . . . . . . . . . . . . . . . . . . . . . . . . . . . . . . . . . . . . . . 2
Chapter 2: Advanced Intersect and Follow MeCreating a Table Leg . . . . . . . . . . . . . . . . . . . . . . . . . . . . . . . . . . . . . . . . . . . . . . . . . . . . . . . . . . . . . . . . . . . . . . 3Placing Skylights in a Roof . . . . . . . . . . . . . . . . . . . . . . . . . . . . . . . . . . . . . . . . . . . . . . . . . . . . . . . . . . . . . . . . . 7Creating a Faucet . . . . . . . . . . . . . . . . . . . . . . . . . . . . . . . . . . . . . . . . . . . . . . . . . . . . . . . . . . . . . . . . . . . . . . . . . 9Rounding Sharp Corners . . . . . . . . . . . . . . . . . . . . . . . . . . . . . . . . . . . . . . . . . . . . . . . . . . . . . . . . . . . . . . . . . . 13Engraving: 3D Text with Intersect Faces. . . . . . . . . . . . . . . . . . . . . . . . . . . . . . . . . . . . . . . . . . . . . . . . . . . . . . 20Creating Portholes . . . . . . . . . . . . . . . . . . . . . . . . . . . . . . . . . . . . . . . . . . . . . . . . . . . . . . . . . . . . . . . . . . . . . . . 23Creating a Log Cabin . . . . . . . . . . . . . . . . . . . . . . . . . . . . . . . . . . . . . . . . . . . . . . . . . . . . . . . . . . . . . . . . . . . . . 28
Creating Flat-Sided Logs . . . . . . . . . . . . . . . . . . . . . . . . . . . . . . . . . . . . . . . . . . . . . . . . . . . . . . . . . . . 28Creating Notches. . . . . . . . . . . . . . . . . . . . . . . . . . . . . . . . . . . . . . . . . . . . . . . . . . . . . . . . . . . . . . . . . . 28Building the Cabin . . . . . . . . . . . . . . . . . . . . . . . . . . . . . . . . . . . . . . . . . . . . . . . . . . . . . . . . . . . . . . . . 30Door and Window Cutouts . . . . . . . . . . . . . . . . . . . . . . . . . . . . . . . . . . . . . . . . . . . . . . . . . . . . . . . . . . 34
Chapter 3: Advanced Groups and ComponentsThe Outliner: Organizing Groups and Components . . . . . . . . . . . . . . . . . . . . . . . . . . . . . . . . . . . . . . . . . . . . . 35
Setting Up the Model . . . . . . . . . . . . . . . . . . . . . . . . . . . . . . . . . . . . . . . . . . . . . . . . . . . . . . . . . . . . . . 35Making Changes to the Model . . . . . . . . . . . . . . . . . . . . . . . . . . . . . . . . . . . . . . . . . . . . . . . . . . . . . . . 41
Window Components: Cutting Thick Walls . . . . . . . . . . . . . . . . . . . . . . . . . . . . . . . . . . . . . . . . . . . . . . . . . . . 46Cutting Walls with a Single Component. . . . . . . . . . . . . . . . . . . . . . . . . . . . . . . . . . . . . . . . . . . . . . . . 46
Opening in a “Hollow” Wall . . . . . . . . . . . . . . . . . . . . . . . . . . . . . . . . . . . . . . . . . . . . . . . . . . 46Opening in a Thick Wall . . . . . . . . . . . . . . . . . . . . . . . . . . . . . . . . . . . . . . . . . . . . . . . . . . . . . 48Window with Glass in a Thick Wall . . . . . . . . . . . . . . . . . . . . . . . . . . . . . . . . . . . . . . . . . . . . 50
Cutting Walls with a Nested Component . . . . . . . . . . . . . . . . . . . . . . . . . . . . . . . . . . . . . . . . . . . . . . . 51Wall of Unknown Thickness . . . . . . . . . . . . . . . . . . . . . . . . . . . . . . . . . . . . . . . . . . . . . . . . . . 51Wall of Known Thickness . . . . . . . . . . . . . . . . . . . . . . . . . . . . . . . . . . . . . . . . . . . . . . . . . . . . 56
Cutting Faces in a Curved Wall . . . . . . . . . . . . . . . . . . . . . . . . . . . . . . . . . . . . . . . . . . . . . . . . . . . . . . 60Using Components for Symmetry . . . . . . . . . . . . . . . . . . . . . . . . . . . . . . . . . . . . . . . . . . . . . . . . . . . . . . . . . . . 62
Making Symmetric Buildings . . . . . . . . . . . . . . . . . . . . . . . . . . . . . . . . . . . . . . . . . . . . . . . . . . . . . . . . 62Symmetry without Seams . . . . . . . . . . . . . . . . . . . . . . . . . . . . . . . . . . . . . . . . . . . . . . . . . . . . . . . . . . . 65
Replacing and Reloading Components . . . . . . . . . . . . . . . . . . . . . . . . . . . . . . . . . . . . . . . . . . . . . . . . . . . . . . . 67Attributes / Classifiers . . . . . . . . . . . . . . . . . . . . . . . . . . . . . . . . . . . . . . . . . . . . . . . . . . . . . . . . . . . . . . . . . . . . 71

SketchUp 2015 Hands-On: Advanced Exercises
ii
Chapter 4: Advanced Materials and TexturesTexture Positioning. . . . . . . . . . . . . . . . . . . . . . . . . . . . . . . . . . . . . . . . . . . . . . . . . . . . . . . . . . . . . . . . . . . . . . .77
Fixed Pins . . . . . . . . . . . . . . . . . . . . . . . . . . . . . . . . . . . . . . . . . . . . . . . . . . . . . . . . . . . . . . . . . . . . . . .77Positioning a Texture around Curved Faces . . . . . . . . . . . . . . . . . . . . . . . . . . . . . . . . . . . . . . . . . . . . .82
Example 1 - Positioning a Tiled Image . . . . . . . . . . . . . . . . . . . . . . . . . . . . . . . . . . . . . . . . . .82Example 2 - Positioning a Single Image . . . . . . . . . . . . . . . . . . . . . . . . . . . . . . . . . . . . . . . . .84
Editing Textures and Unique Textures . . . . . . . . . . . . . . . . . . . . . . . . . . . . . . . . . . . . . . . . . . . . . . . . . . . . . . . .88Tips for Efficiency with Materials . . . . . . . . . . . . . . . . . . . . . . . . . . . . . . . . . . . . . . . . . . . . . . . . . . . . . . . . . . .90
Chapter 5: Working with Digital ImagesTexture Positioning with Free Pins. . . . . . . . . . . . . . . . . . . . . . . . . . . . . . . . . . . . . . . . . . . . . . . . . . . . . . . . . . .91Using Images for Face-Camera Components . . . . . . . . . . . . . . . . . . . . . . . . . . . . . . . . . . . . . . . . . . . . . . . . . . .94Editing Images . . . . . . . . . . . . . . . . . . . . . . . . . . . . . . . . . . . . . . . . . . . . . . . . . . . . . . . . . . . . . . . . . . . . . . . . .101Using Photos to Create 3D Models . . . . . . . . . . . . . . . . . . . . . . . . . . . . . . . . . . . . . . . . . . . . . . . . . . . . . . . . .102
Creating 3D Models with Free Pins . . . . . . . . . . . . . . . . . . . . . . . . . . . . . . . . . . . . . . . . . . . . . . . . . .102Creating a Painted 3D Bus . . . . . . . . . . . . . . . . . . . . . . . . . . . . . . . . . . . . . . . . . . . . . . . . . . .103Creating a Painted Playhouse . . . . . . . . . . . . . . . . . . . . . . . . . . . . . . . . . . . . . . . . . . . . . . . . .107
Match Photo. . . . . . . . . . . . . . . . . . . . . . . . . . . . . . . . . . . . . . . . . . . . . . . . . . . . . . . . . . . . . . . . . . . . .110Match Photo with an Unpainted Model and One Photo. . . . . . . . . . . . . . . . . . . . . . . . . . . . .110Match Photo with an Unpainted Model and Two Photos. . . . . . . . . . . . . . . . . . . . . . . . . . . .116Building a Model from a Photo: Example 1 - Playhouse. . . . . . . . . . . . . . . . . . . . . . . . . . . .119Building a Model from a Photo: Example 2 - Table . . . . . . . . . . . . . . . . . . . . . . . . . . . . . . .122Building a Model from Two Photos. . . . . . . . . . . . . . . . . . . . . . . . . . . . . . . . . . . . . . . . . . . .126
Projecting an Image onto a Topographical Face . . . . . . . . . . . . . . . . . . . . . . . . . . . . . . . . . . . . . . . . . . . . . . .130Painting with Photo Textures (Street View). . . . . . . . . . . . . . . . . . . . . . . . . . . . . . . . . . . . . . . . . . . . . . . . . . .133
Using Street View for a Group of Buildings . . . . . . . . . . . . . . . . . . . . . . . . . . . . . . . . . . . . . . . . . . . .133Using Street View Images for Partial Painting . . . . . . . . . . . . . . . . . . . . . . . . . . . . . . . . . . . . . . . . . .139
Chapter 6: SectioningSectioning Overview . . . . . . . . . . . . . . . . . . . . . . . . . . . . . . . . . . . . . . . . . . . . . . . . . . . . . . . . . . . . . . . . . . . .141Using Sections for Interior Design . . . . . . . . . . . . . . . . . . . . . . . . . . . . . . . . . . . . . . . . . . . . . . . . . . . . . . . . . .145Using Section Planes to Create Floor Plans . . . . . . . . . . . . . . . . . . . . . . . . . . . . . . . . . . . . . . . . . . . . . . . . . . .149Using Section Planes for Repeating Patterns . . . . . . . . . . . . . . . . . . . . . . . . . . . . . . . . . . . . . . . . . . . . . . . . . .152
Creating a Striped Vase . . . . . . . . . . . . . . . . . . . . . . . . . . . . . . . . . . . . . . . . . . . . . . . . . . . . . . . . . . . .152Creating a Striated Pyramid. . . . . . . . . . . . . . . . . . . . . . . . . . . . . . . . . . . . . . . . . . . . . . . . . . . . . . . . .155
Simultaneous Section Cuts . . . . . . . . . . . . . . . . . . . . . . . . . . . . . . . . . . . . . . . . . . . . . . . . . . . . . . . . . . . . . . . .159Using Inferences to Create Sections . . . . . . . . . . . . . . . . . . . . . . . . . . . . . . . . . . . . . . . . . . . . . . . . . . . . . . . . .161
Chapter 7: Styles and Sketchy EdgesStyles. . . . . . . . . . . . . . . . . . . . . . . . . . . . . . . . . . . . . . . . . . . . . . . . . . . . . . . . . . . . . . . . . . . . . . . . . . . . . . . . .163
Pre-Defined Styles. . . . . . . . . . . . . . . . . . . . . . . . . . . . . . . . . . . . . . . . . . . . . . . . . . . . . . . . . . . . . . . .163Editing and Creating Styles . . . . . . . . . . . . . . . . . . . . . . . . . . . . . . . . . . . . . . . . . . . . . . . . . . . . . . . . .165Fast Styles . . . . . . . . . . . . . . . . . . . . . . . . . . . . . . . . . . . . . . . . . . . . . . . . . . . . . . . . . . . . . . . . . . . . . .170Mixing Styles. . . . . . . . . . . . . . . . . . . . . . . . . . . . . . . . . . . . . . . . . . . . . . . . . . . . . . . . . . . . . . . . . . . .173

Table of Contents
iii
Watermarks and Backgrounds . . . . . . . . . . . . . . . . . . . . . . . . . . . . . . . . . . . . . . . . . . . . . . . . . . . . . . 177Exploring an Existing Watermark Style . . . . . . . . . . . . . . . . . . . . . . . . . . . . . . . . . . . . . . . . 177Creating a Watermark Style. . . . . . . . . . . . . . . . . . . . . . . . . . . . . . . . . . . . . . . . . . . . . . . . . . 179Logos and Markings . . . . . . . . . . . . . . . . . . . . . . . . . . . . . . . . . . . . . . . . . . . . . . . . . . . . . . . 183
Sketchy Edges . . . . . . . . . . . . . . . . . . . . . . . . . . . . . . . . . . . . . . . . . . . . . . . . . . . . . . . . . . . . . . . . . . . . . . . . . 187Exploring Sketchy Edges . . . . . . . . . . . . . . . . . . . . . . . . . . . . . . . . . . . . . . . . . . . . . . . . . . . . . . . . . . 187Creating Your Own Sketchy Edges . . . . . . . . . . . . . . . . . . . . . . . . . . . . . . . . . . . . . . . . . . . . . . . . . . 190
Chapter 8: Presentation and AnimationScenes. . . . . . . . . . . . . . . . . . . . . . . . . . . . . . . . . . . . . . . . . . . . . . . . . . . . . . . . . . . . . . . . . . . . . . . . . . . . . . . . 191
Using Scenes for Working Models . . . . . . . . . . . . . . . . . . . . . . . . . . . . . . . . . . . . . . . . . . . . . . . . . . . 196Layers. . . . . . . . . . . . . . . . . . . . . . . . . . . . . . . . . . . . . . . . . . . . . . . . . . . . . . . . . . . . . . . . . . . . . . . . . . . . . . . . 198
Using Layers to Hide Objects . . . . . . . . . . . . . . . . . . . . . . . . . . . . . . . . . . . . . . . . . . . . . . . . . . . . . . . 198Using Layers for Labelled Presentations . . . . . . . . . . . . . . . . . . . . . . . . . . . . . . . . . . . . . . . . . . . . . . 201Using Layers to Explore Design Options . . . . . . . . . . . . . . . . . . . . . . . . . . . . . . . . . . . . . . . . . . . . . . 205Using Layers to Simulate Animation . . . . . . . . . . . . . . . . . . . . . . . . . . . . . . . . . . . . . . . . . . . . . . . . . 208Layers of Groups and Components. . . . . . . . . . . . . . . . . . . . . . . . . . . . . . . . . . . . . . . . . . . . . . . . . . . 211
Walk-Throughs . . . . . . . . . . . . . . . . . . . . . . . . . . . . . . . . . . . . . . . . . . . . . . . . . . . . . . . . . . . . . . . . . . . . . . . . 214Creating Walk-Through Scenes . . . . . . . . . . . . . . . . . . . . . . . . . . . . . . . . . . . . . . . . . . . . . . . . . . . . . 214Adding and Updating Scenes . . . . . . . . . . . . . . . . . . . . . . . . . . . . . . . . . . . . . . . . . . . . . . . . . . . . . . . 221
Shadows . . . . . . . . . . . . . . . . . . . . . . . . . . . . . . . . . . . . . . . . . . . . . . . . . . . . . . . . . . . . . . . . . . . . . . . . . . . . . . 223Fog . . . . . . . . . . . . . . . . . . . . . . . . . . . . . . . . . . . . . . . . . . . . . . . . . . . . . . . . . . . . . . . . . . . . . . . . . . . . . . . . . . 227Using Sections and Styles in an Animation . . . . . . . . . . . . . . . . . . . . . . . . . . . . . . . . . . . . . . . . . . . . . . . . . . . 230Animation in Stages . . . . . . . . . . . . . . . . . . . . . . . . . . . . . . . . . . . . . . . . . . . . . . . . . . . . . . . . . . . . . . . . . . . . . 237
Dividing the Model into Parts (Groups and Components) . . . . . . . . . . . . . . . . . . . . . . . . . . . . . . . . . 237Sectioning Each Model Part . . . . . . . . . . . . . . . . . . . . . . . . . . . . . . . . . . . . . . . . . . . . . . . . . . . . . . . . 240
Chapter 9: Miscellaneous Advanced ExercisesCreating a Steel Frame. . . . . . . . . . . . . . . . . . . . . . . . . . . . . . . . . . . . . . . . . . . . . . . . . . . . . . . . . . . . . . . . . . . 245
Downloading the Structural Sections . . . . . . . . . . . . . . . . . . . . . . . . . . . . . . . . . . . . . . . . . . . . . . . . . 245Creating the Column - Beam Connection . . . . . . . . . . . . . . . . . . . . . . . . . . . . . . . . . . . . . . . . . . . . . . 246Adding Floor Joists and Connectors . . . . . . . . . . . . . . . . . . . . . . . . . . . . . . . . . . . . . . . . . . . . . . . . . . 248Completing the Frame. . . . . . . . . . . . . . . . . . . . . . . . . . . . . . . . . . . . . . . . . . . . . . . . . . . . . . . . . . . . . 252
Creating a Spiral Staircase . . . . . . . . . . . . . . . . . . . . . . . . . . . . . . . . . . . . . . . . . . . . . . . . . . . . . . . . . . . . . . . . 254Aligning Any Two Faces . . . . . . . . . . . . . . . . . . . . . . . . . . . . . . . . . . . . . . . . . . . . . . . . . . . . . . . . . . . . . . . . . 2583D Geometric Objects . . . . . . . . . . . . . . . . . . . . . . . . . . . . . . . . . . . . . . . . . . . . . . . . . . . . . . . . . . . . . . . . . . . 260
Starting from a Cube . . . . . . . . . . . . . . . . . . . . . . . . . . . . . . . . . . . . . . . . . . . . . . . . . . . . . . . . . . . . . . 260Starting from a Golden Section. . . . . . . . . . . . . . . . . . . . . . . . . . . . . . . . . . . . . . . . . . . . . . . . . . . . . . 262
Creating a Model from 2D Plans . . . . . . . . . . . . . . . . . . . . . . . . . . . . . . . . . . . . . . . . . . . . . . . . . . . . . . . . . . . 264Creating the Walls. . . . . . . . . . . . . . . . . . . . . . . . . . . . . . . . . . . . . . . . . . . . . . . . . . . . . . . . . . . . . . . . 265Adding Components . . . . . . . . . . . . . . . . . . . . . . . . . . . . . . . . . . . . . . . . . . . . . . . . . . . . . . . . . . . . . . 267

SketchUp 2015 Hands-On: Advanced Exercises
iv
Chapter 10: Sandbox Tools (Organic Surfaces)Creating a Sandbox (TIN) . . . . . . . . . . . . . . . . . . . . . . . . . . . . . . . . . . . . . . . . . . . . . . . . . . . . . . . . . . . . . . . .273
Sandbox from Scratch . . . . . . . . . . . . . . . . . . . . . . . . . . . . . . . . . . . . . . . . . . . . . . . . . . . . . . . . . . . . .273Smoove . . . . . . . . . . . . . . . . . . . . . . . . . . . . . . . . . . . . . . . . . . . . . . . . . . . . . . . . . . . . . . . . . . . . . . . .274Sandbox from Contours. . . . . . . . . . . . . . . . . . . . . . . . . . . . . . . . . . . . . . . . . . . . . . . . . . . . . . . . . . . .277
Drape and Stamp. . . . . . . . . . . . . . . . . . . . . . . . . . . . . . . . . . . . . . . . . . . . . . . . . . . . . . . . . . . . . . . . . . . . . . . .279Drape . . . . . . . . . . . . . . . . . . . . . . . . . . . . . . . . . . . . . . . . . . . . . . . . . . . . . . . . . . . . . . . . . . . . . . . . . .281Stamp. . . . . . . . . . . . . . . . . . . . . . . . . . . . . . . . . . . . . . . . . . . . . . . . . . . . . . . . . . . . . . . . . . . . . . . . . .282Drape with Groups. . . . . . . . . . . . . . . . . . . . . . . . . . . . . . . . . . . . . . . . . . . . . . . . . . . . . . . . . . . . . . . .284Stamp in 3D. . . . . . . . . . . . . . . . . . . . . . . . . . . . . . . . . . . . . . . . . . . . . . . . . . . . . . . . . . . . . . . . . . . . .286
Adding Detail to a Sandbox . . . . . . . . . . . . . . . . . . . . . . . . . . . . . . . . . . . . . . . . . . . . . . . . . . . . . . . . . . . . . . .287Organic Shapes . . . . . . . . . . . . . . . . . . . . . . . . . . . . . . . . . . . . . . . . . . . . . . . . . . . . . . . . . . . . . . . . . . . . . . . . .289
Organic Shapes from Contours . . . . . . . . . . . . . . . . . . . . . . . . . . . . . . . . . . . . . . . . . . . . . . . . . . . . . .289Organic Shapes from TIN . . . . . . . . . . . . . . . . . . . . . . . . . . . . . . . . . . . . . . . . . . . . . . . . . . . . . . . . . .290
Chapter 11: Solid ToolsWhat is a SketchUp Solid? . . . . . . . . . . . . . . . . . . . . . . . . . . . . . . . . . . . . . . . . . . . . . . . . . . . . . . . . . . . . . . . .293Overview of Solid Tools. . . . . . . . . . . . . . . . . . . . . . . . . . . . . . . . . . . . . . . . . . . . . . . . . . . . . . . . . . . . . . . . . .294Outer Shell and Union . . . . . . . . . . . . . . . . . . . . . . . . . . . . . . . . . . . . . . . . . . . . . . . . . . . . . . . . . . . . . . . . . . .297Trim and Subtract . . . . . . . . . . . . . . . . . . . . . . . . . . . . . . . . . . . . . . . . . . . . . . . . . . . . . . . . . . . . . . . . . . . . . . .299Intersect. . . . . . . . . . . . . . . . . . . . . . . . . . . . . . . . . . . . . . . . . . . . . . . . . . . . . . . . . . . . . . . . . . . . . . . . . . . . . . .303
Chapter 12: Dynamic ComponentsWhere to Find Dynamic Components . . . . . . . . . . . . . . . . . . . . . . . . . . . . . . . . . . . . . . . . . . . . . . . . . . . . . . .307Using Dynamic Components . . . . . . . . . . . . . . . . . . . . . . . . . . . . . . . . . . . . . . . . . . . . . . . . . . . . . . . . . . . . . .309
Furnishing a Dynamic Room. . . . . . . . . . . . . . . . . . . . . . . . . . . . . . . . . . . . . . . . . . . . . . . . . . . . . . . .309Dynamically Accessorizing a House. . . . . . . . . . . . . . . . . . . . . . . . . . . . . . . . . . . . . . . . . . . . . . . . . .316
Dynamic Door . . . . . . . . . . . . . . . . . . . . . . . . . . . . . . . . . . . . . . . . . . . . . . . . . . . . . . . . . . . .316Dynamic Windows . . . . . . . . . . . . . . . . . . . . . . . . . . . . . . . . . . . . . . . . . . . . . . . . . . . . . . . . .318Dynamic Trees . . . . . . . . . . . . . . . . . . . . . . . . . . . . . . . . . . . . . . . . . . . . . . . . . . . . . . . . . . . .323Dynamic Fencing . . . . . . . . . . . . . . . . . . . . . . . . . . . . . . . . . . . . . . . . . . . . . . . . . . . . . . . . . .324
Chapter 13: Advanced ExtensionsInstalling Extensions. . . . . . . . . . . . . . . . . . . . . . . . . . . . . . . . . . . . . . . . . . . . . . . . . . . . . . . . . . . . . . . . . . . . .327
Extension Warehouse . . . . . . . . . . . . . . . . . . . . . . . . . . . . . . . . . . . . . . . . . . . . . . . . . . . . . . . . . . . . .327SketchUcation Plugins. . . . . . . . . . . . . . . . . . . . . . . . . . . . . . . . . . . . . . . . . . . . . . . . . . . . . . . . . . . . .328RBZ, ZIP Files. . . . . . . . . . . . . . . . . . . . . . . . . . . . . . . . . . . . . . . . . . . . . . . . . . . . . . . . . . . . . . . . . . .328Updating, Uninstalling, and Disabling Plugins . . . . . . . . . . . . . . . . . . . . . . . . . . . . . . . . . . . . . . . . . .329
Extensions Listed in this Book . . . . . . . . . . . . . . . . . . . . . . . . . . . . . . . . . . . . . . . . . . . . . . . . . . . . . . . . . . . . .329Guide Tools . . . . . . . . . . . . . . . . . . . . . . . . . . . . . . . . . . . . . . . . . . . . . . . . . . . . . . . . . . . . . . . . . . . . .329Mirror. . . . . . . . . . . . . . . . . . . . . . . . . . . . . . . . . . . . . . . . . . . . . . . . . . . . . . . . . . . . . . . . . . . . . . . . . .330Align . . . . . . . . . . . . . . . . . . . . . . . . . . . . . . . . . . . . . . . . . . . . . . . . . . . . . . . . . . . . . . . . . . . . . . . . . .331Edge Tools. . . . . . . . . . . . . . . . . . . . . . . . . . . . . . . . . . . . . . . . . . . . . . . . . . . . . . . . . . . . . . . . . . . . . .332Proxy View . . . . . . . . . . . . . . . . . . . . . . . . . . . . . . . . . . . . . . . . . . . . . . . . . . . . . . . . . . . . . . . . . . . . .333Round Corner . . . . . . . . . . . . . . . . . . . . . . . . . . . . . . . . . . . . . . . . . . . . . . . . . . . . . . . . . . . . . . . . . . .334Hole Punching . . . . . . . . . . . . . . . . . . . . . . . . . . . . . . . . . . . . . . . . . . . . . . . . . . . . . . . . . . . . . . . . . . .335

Table of Contents
v
Shape Bender . . . . . . . . . . . . . . . . . . . . . . . . . . . . . . . . . . . . . . . . . . . . . . . . . . . . . . . . . . . . . . . . . . . 336View Parts . . . . . . . . . . . . . . . . . . . . . . . . . . . . . . . . . . . . . . . . . . . . . . . . . . . . . . . . . . . . . . . . . . . . . . 338[Re]Scene . . . . . . . . . . . . . . . . . . . . . . . . . . . . . . . . . . . . . . . . . . . . . . . . . . . . . . . . . . . . . . . . . . . . . . 339Keyframe Animation. . . . . . . . . . . . . . . . . . . . . . . . . . . . . . . . . . . . . . . . . . . . . . . . . . . . . . . . . . . . . . 340SketchThis. . . . . . . . . . . . . . . . . . . . . . . . . . . . . . . . . . . . . . . . . . . . . . . . . . . . . . . . . . . . . . . . . . . . . . 342Artisan Organic Toolset . . . . . . . . . . . . . . . . . . . . . . . . . . . . . . . . . . . . . . . . . . . . . . . . . . . . . . . . . . . 344Triangulate Faces . . . . . . . . . . . . . . . . . . . . . . . . . . . . . . . . . . . . . . . . . . . . . . . . . . . . . . . . . . . . . . . . 347Curviloft . . . . . . . . . . . . . . . . . . . . . . . . . . . . . . . . . . . . . . . . . . . . . . . . . . . . . . . . . . . . . . . . . . . . . . . 348
Curviloft: Loft by Splines . . . . . . . . . . . . . . . . . . . . . . . . . . . . . . . . . . . . . . . . . . . . . . . . . . . 349Curviloft: Loft along Path . . . . . . . . . . . . . . . . . . . . . . . . . . . . . . . . . . . . . . . . . . . . . . . . . . . 353Curviloft: Skinning . . . . . . . . . . . . . . . . . . . . . . . . . . . . . . . . . . . . . . . . . . . . . . . . . . . . . . . . 357
TopoShaper . . . . . . . . . . . . . . . . . . . . . . . . . . . . . . . . . . . . . . . . . . . . . . . . . . . . . . . . . . . . . . . . . . . . . 358Try These, Too . . . . . . . . . . . . . . . . . . . . . . . . . . . . . . . . . . . . . . . . . . . . . . . . . . . . . . . . . . . . . . . . . . . . . . . . . 360
Chapter 14: Additional ResourcesOfficial SketchUp Help . . . . . . . . . . . . . . . . . . . . . . . . . . . . . . . . . . . . . . . . . . . . . . . . . . . . . . . . . . . . . . . . . . 361Tutorials . . . . . . . . . . . . . . . . . . . . . . . . . . . . . . . . . . . . . . . . . . . . . . . . . . . . . . . . . . . . . . . . . . . . . . . . . . . . . . 361
YouTube Tutorials . . . . . . . . . . . . . . . . . . . . . . . . . . . . . . . . . . . . . . . . . . . . . . . . . . . . . . . . . . . . . . . 3613D Warehouse Tutorials . . . . . . . . . . . . . . . . . . . . . . . . . . . . . . . . . . . . . . . . . . . . . . . . . . . . . . . . . . . 361SketchUcation . . . . . . . . . . . . . . . . . . . . . . . . . . . . . . . . . . . . . . . . . . . . . . . . . . . . . . . . . . . . . . . . . . . 362MasterSketchUp . . . . . . . . . . . . . . . . . . . . . . . . . . . . . . . . . . . . . . . . . . . . . . . . . . . . . . . . . . . . . . . . . 362Concept 3D . . . . . . . . . . . . . . . . . . . . . . . . . . . . . . . . . . . . . . . . . . . . . . . . . . . . . . . . . . . . . . . . . . . . . 362School . . . . . . . . . . . . . . . . . . . . . . . . . . . . . . . . . . . . . . . . . . . . . . . . . . . . . . . . . . . . . . . . . . . . . . . . . 362SketchUp Artists . . . . . . . . . . . . . . . . . . . . . . . . . . . . . . . . . . . . . . . . . . . . . . . . . . . . . . . . . . . . . . . . . 363
Materials and Textures. . . . . . . . . . . . . . . . . . . . . . . . . . . . . . . . . . . . . . . . . . . . . . . . . . . . . . . . . . . . . . . . . . . 3633D Warehouse. . . . . . . . . . . . . . . . . . . . . . . . . . . . . . . . . . . . . . . . . . . . . . . . . . . . . . . . . . . . . . . . . . . 363Image Search. . . . . . . . . . . . . . . . . . . . . . . . . . . . . . . . . . . . . . . . . . . . . . . . . . . . . . . . . . . . . . . . . . . . 363Form Fonts . . . . . . . . . . . . . . . . . . . . . . . . . . . . . . . . . . . . . . . . . . . . . . . . . . . . . . . . . . . . . . . . . . . . . 363cadyou . . . . . . . . . . . . . . . . . . . . . . . . . . . . . . . . . . . . . . . . . . . . . . . . . . . . . . . . . . . . . . . . . . . . . . . . . 363SketchUp Texture . . . . . . . . . . . . . . . . . . . . . . . . . . . . . . . . . . . . . . . . . . . . . . . . . . . . . . . . . . . . . . . . 363
Models (Components) . . . . . . . . . . . . . . . . . . . . . . . . . . . . . . . . . . . . . . . . . . . . . . . . . . . . . . . . . . . . . . . . . . . 364SketchUp Components . . . . . . . . . . . . . . . . . . . . . . . . . . . . . . . . . . . . . . . . . . . . . . . . . . . . . . . . . . . . 364Form Fonts, cadyou. . . . . . . . . . . . . . . . . . . . . . . . . . . . . . . . . . . . . . . . . . . . . . . . . . . . . . . . . . . . . . . 364GrabCAD . . . . . . . . . . . . . . . . . . . . . . . . . . . . . . . . . . . . . . . . . . . . . . . . . . . . . . . . . . . . . . . . . . . . . . 364Thingiverse . . . . . . . . . . . . . . . . . . . . . . . . . . . . . . . . . . . . . . . . . . . . . . . . . . . . . . . . . . . . . . . . . . . . . 364
Rendering and Presentation . . . . . . . . . . . . . . . . . . . . . . . . . . . . . . . . . . . . . . . . . . . . . . . . . . . . . . . . . . . . . . . 364

SketchUp 2015 Hands-On: Advanced Exercises
12
23. Here’s another way to get the same results. Use Undo to return to this: the base and untrimmed handles, with intersection edges.
24. Select all intersection edges at one handle (you may end up selecting other edges as well, which is OK. Copy the edges (Edit / Copy).
25. Edit the handle where you selected the edges, and paste in the copied edges using Edit / Paste in Place.
26. Now you can trim the handles as you did before, and remove the intersection circles from the base.
27. Undo again to the untrimmed handles and base, with no intersection edges.
This method will create a more realistic faucet, with separate “solid” pieces rather than hollow shells.
28. We will now shorten the handle so that it just barely protrudes into the base. Edit a handle, and use the guide point to draw a vertical circle. (Remember, you can Shift-lock a circle’s orientation before you click its center point.)
29. Move this circle slightly toward the end of the handle.
30. This time use Intersect Faces / With Selected (not With Model), so that you get intersection edges with the circle, but not with the faucet base. Then trim extra edges.
31. Close the handle, then use Intersect Faces on the base to get the intersection edges.
SketchUp 2015 Hands-On: Advanced Exercises
44
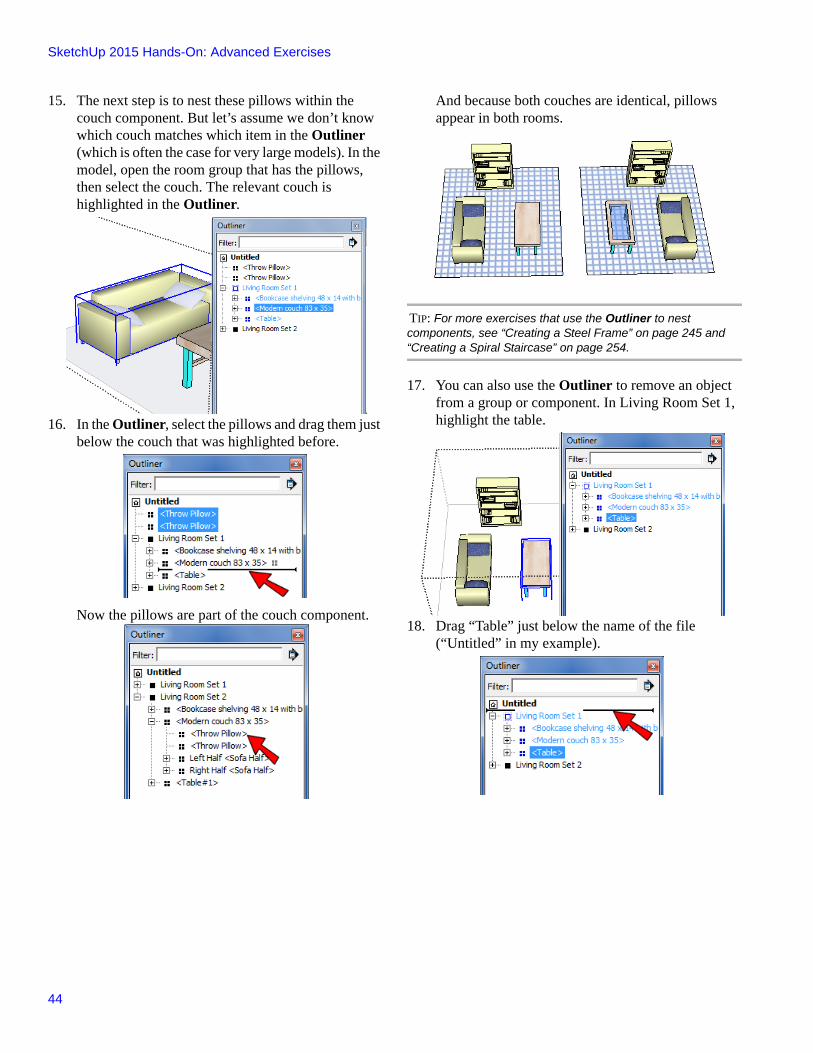
15. The next step is to nest these pillows within the couch component. But let’s assume we don’t know which couch matches which item in the Outliner (which is often the case for very large models). In the model, open the room group that has the pillows, then select the couch. The relevant couch is highlighted in the Outliner.
16. In the Outliner, select the pillows and drag them just below the couch that was highlighted before.
Now the pillows are part of the couch component.
And because both couches are identical, pillows appear in both rooms.
TIP: For more exercises that use the Outliner to nest components, see “Creating a Steel Frame” on page 245 and “Creating a Spiral Staircase” on page 254.
17. You can also use the Outliner to remove an object from a group or component. In Living Room Set 1, highlight the table.
18. Drag “Table” just below the name of the file (“Untitled” in my example).
Chapter 4: Advanced Materials and Textures
79
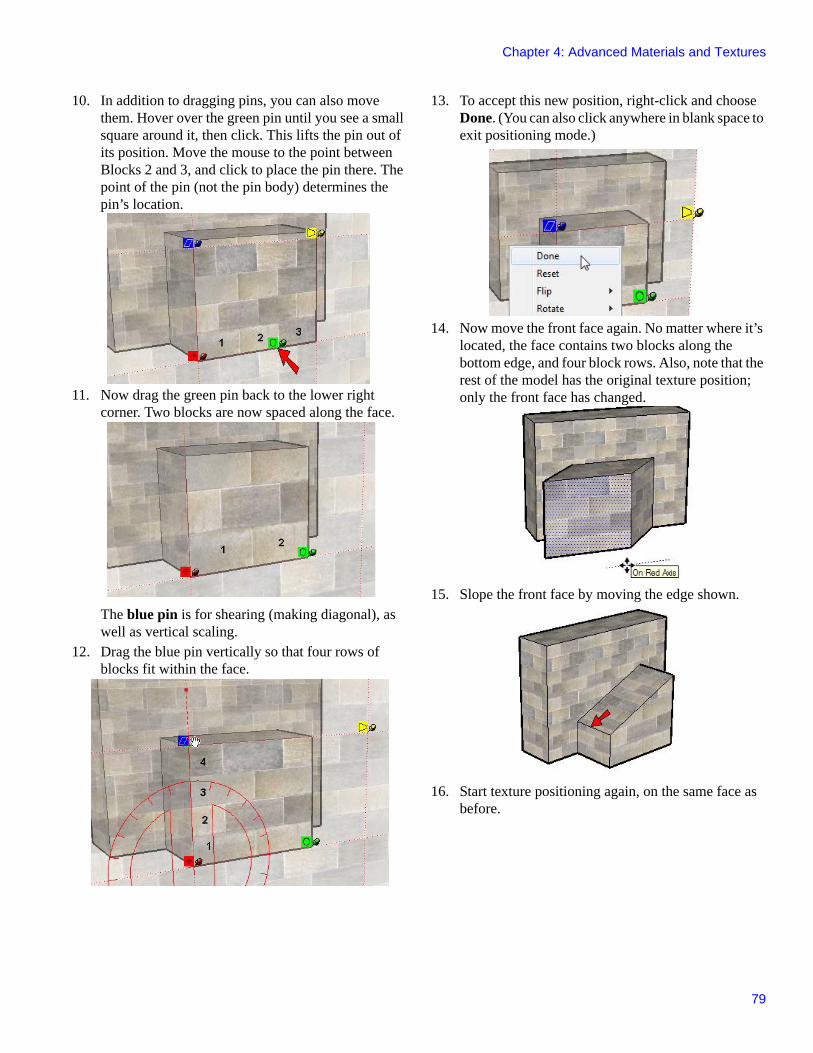
10. In addition to dragging pins, you can also move them. Hover over the green pin until you see a small square around it, then click. This lifts the pin out of its position. Move the mouse to the point between Blocks 2 and 3, and click to place the pin there. The point of the pin (not the pin body) determines the pin’s location.
11. Now drag the green pin back to the lower right corner. Two blocks are now spaced along the face.
The blue pin is for shearing (making diagonal), as well as vertical scaling.
12. Drag the blue pin vertically so that four rows of blocks fit within the face.
13. To accept this new position, right-click and choose Done. (You can also click anywhere in blank space to exit positioning mode.)
14. Now move the front face again. No matter where it’s located, the face contains two blocks along the bottom edge, and four block rows. Also, note that the rest of the model has the original texture position; only the front face has changed.
15. Slope the front face by moving the edge shown.
16. Start texture positioning again, on the same face as before.

SketchUp 2015 Hands-On: Advanced Exercises
124
13. Go back to the photo’s scene tab, right-click on the new face, and choose Project Photo. This applies the photo only to the new face.
14. Trace around the front face of this leg:
15. Remove the rest of the vertical face, leaving only the front face of the table leg.
16. Go back to the photo and pull the leg face back to match the photo.
17. Select all of the leg faces (you can triple-click any face to select them all), right-click on a selected face, and choose Project Photo. Overwriting existing materials will have no effect, since no other painted faces are selected. Click Yes to trim unpainted faces.
NOTE: If you were projecting the photo onto all visible faces, and not just the selected faces, some of the solid colors you applied to the inner walls of the tables would be overwritten, even though those faces are within a group!
18. Then orbit to a view like this. Partially visible faces are only partially painted, and SketchUp has made the unpainted portions into separate faces.
19. To see the dividing edges, choose View / Hidden Geometry, then erase each hidden edge. Then toggle hidden geometry back off. If any other faces need their material adjusted, do this with free pins. Use a solid red color for all unpainted faces.
TIP: You could have also painted this leg without trimming unpainted faces - the red texture would be extended into the unpainted parts, which would look just fine in this part of the table.
SketchUp 2015 Hands-On: Advanced Exercises
148
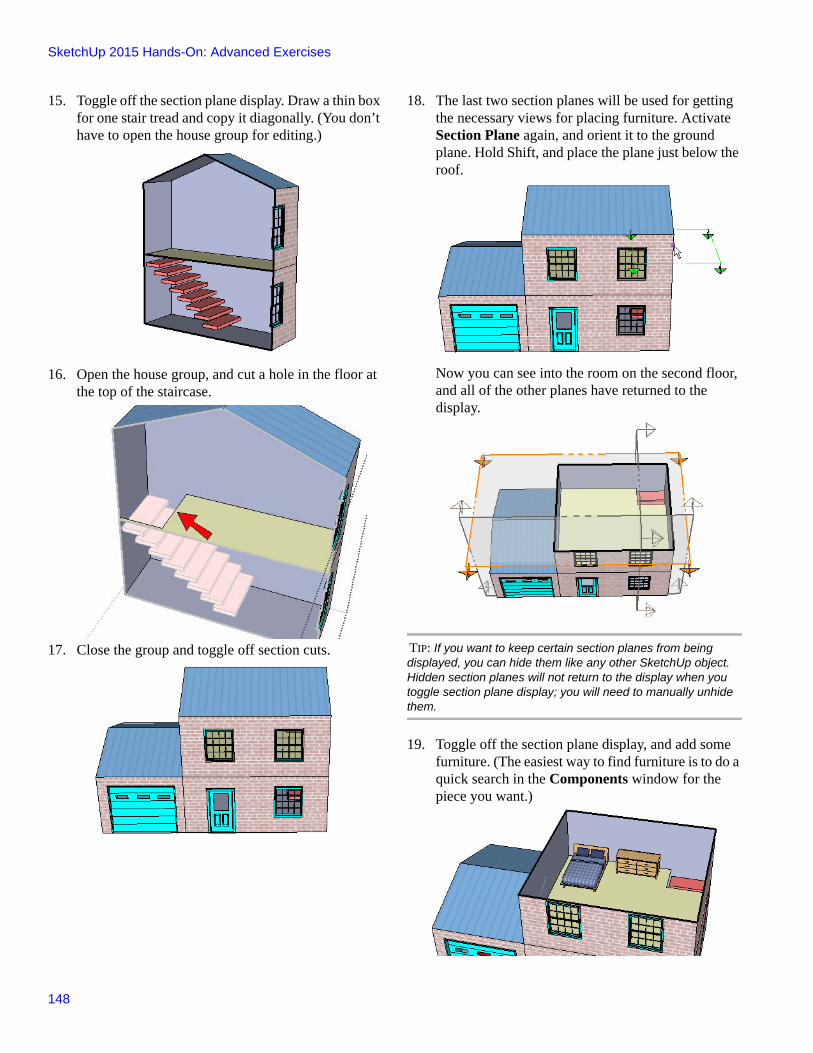
15. Toggle off the section plane display. Draw a thin box for one stair tread and copy it diagonally. (You don’t have to open the house group for editing.)
16. Open the house group, and cut a hole in the floor at the top of the staircase.
17. Close the group and toggle off section cuts.
18. The last two section planes will be used for getting the necessary views for placing furniture. Activate Section Plane again, and orient it to the ground plane. Hold Shift, and place the plane just below the roof.
Now you can see into the room on the second floor, and all of the other planes have returned to the display.
TIP: If you want to keep certain section planes from being displayed, you can hide them like any other SketchUp object. Hidden section planes will not return to the display when you toggle section plane display; you will need to manually unhide them.
19. Toggle off the section plane display, and add some furniture. (The easiest way to find furniture is to do a quick search in the Components window for the piece you want.)

SketchUp 2015 Hands-On: Advanced Exercises
176
14. Finally, apply “Marker with Depth Cue” to Background Settings.
Since “Marker with Depth Cue” has no ground plane, and its background is white, the current style gets the same properties.
15. Let’s say we changed our mind and want that ground plane back after all. That property originally came from “Base Style” so click it in the lower pane.
16. Apply this style to Background Settings, and the background returns to what it was before.
17. The next change will be to the face colors. Click “Reddish Brown.”
18. Apply this style to Face Settings. Now the yellow and red face colors match those in the “Reddish Brown” style.
SketchUp 2015 Hands-On: Advanced Exercises
220
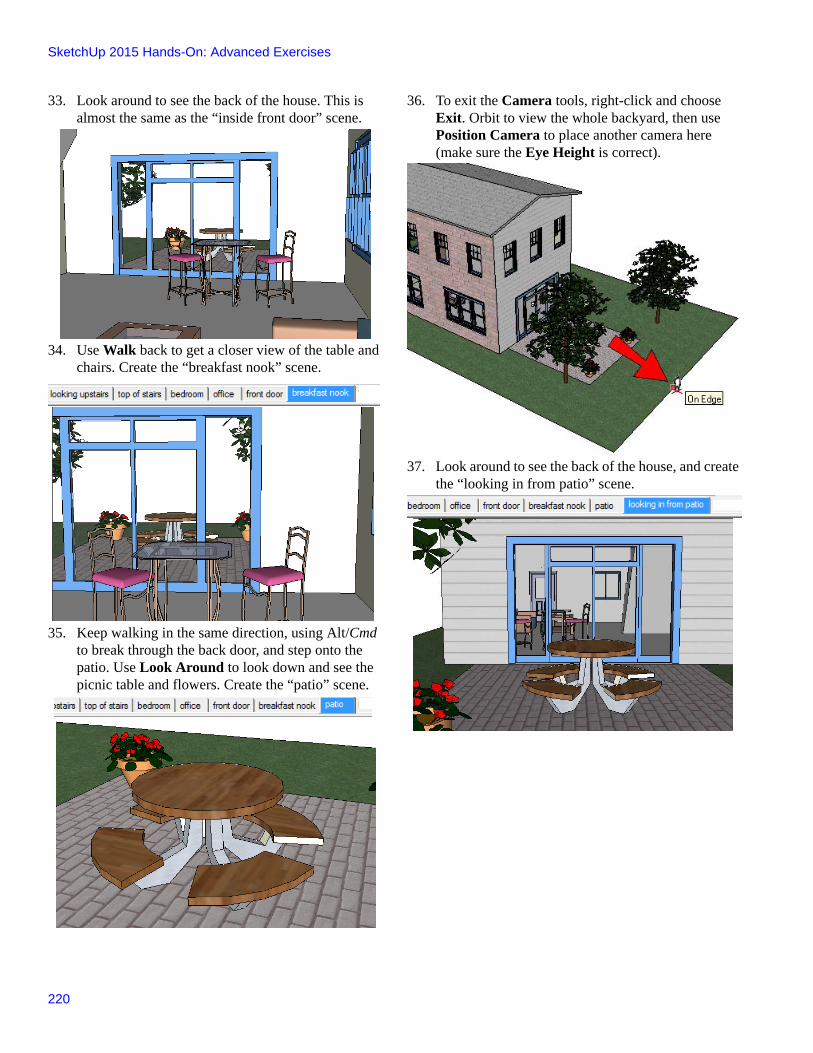
33. Look around to see the back of the house. This is almost the same as the “inside front door” scene.
34. Use Walk back to get a closer view of the table and chairs. Create the “breakfast nook” scene.
35. Keep walking in the same direction, using Alt/Cmd to break through the back door, and step onto the patio. Use Look Around to look down and see the picnic table and flowers. Create the “patio” scene.
36. To exit the Camera tools, right-click and choose Exit. Orbit to view the whole backyard, then use Position Camera to place another camera here (make sure the Eye Height is correct).
37. Look around to see the back of the house, and create the “looking in from patio” scene.
SketchUp 2015 Hands-On: Advanced Exercises
256
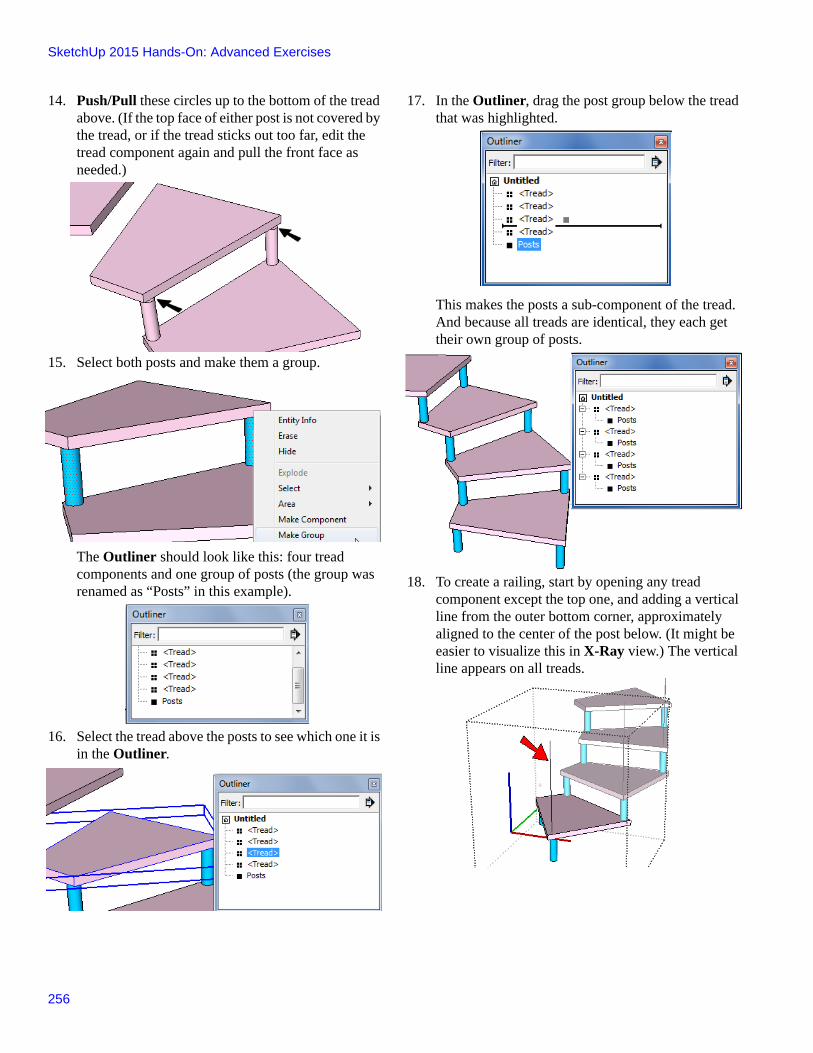
14. Push/Pull these circles up to the bottom of the tread above. (If the top face of either post is not covered by the tread, or if the tread sticks out too far, edit the tread component again and pull the front face as needed.)
15. Select both posts and make them a group.
The Outliner should look like this: four tread components and one group of posts (the group was renamed as “Posts” in this example).
16. Select the tread above the posts to see which one it is in the Outliner.
17. In the Outliner, drag the post group below the tread that was highlighted.
This makes the posts a sub-component of the tread. And because all treads are identical, they each get their own group of posts.
18. To create a railing, start by opening any tread component except the top one, and adding a vertical line from the outer bottom corner, approximately aligned to the center of the post below. (It might be easier to visualize this in X-Ray view.) The vertical line appears on all treads.
Chapter 10: Sandbox Tools (Organic Surfaces)
281
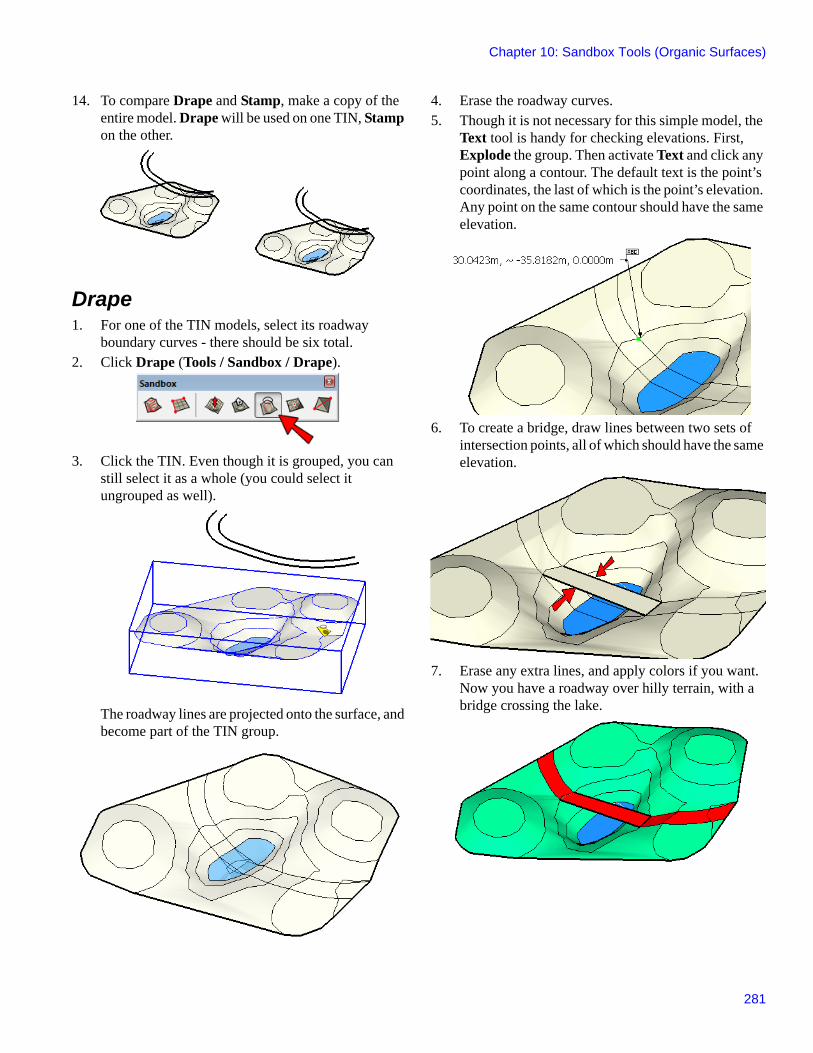
14. To compare Drape and Stamp, make a copy of the entire model. Drape will be used on one TIN, Stamp on the other.
Drape1. For one of the TIN models, select its roadway
boundary curves - there should be six total.2. Click Drape (Tools / Sandbox / Drape).
3. Click the TIN. Even though it is grouped, you can still select it as a whole (you could select it ungrouped as well).
The roadway lines are projected onto the surface, and become part of the TIN group.
4. Erase the roadway curves.5. Though it is not necessary for this simple model, the
Text tool is handy for checking elevations. First, Explode the group. Then activate Text and click any point along a contour. The default text is the point’s coordinates, the last of which is the point’s elevation. Any point on the same contour should have the same elevation.
6. To create a bridge, draw lines between two sets of intersection points, all of which should have the same elevation.
7. Erase any extra lines, and apply colors if you want. Now you have a roadway over hilly terrain, with a bridge crossing the lake.
SketchUp 2015 Hands-On: Advanced Exercises
302
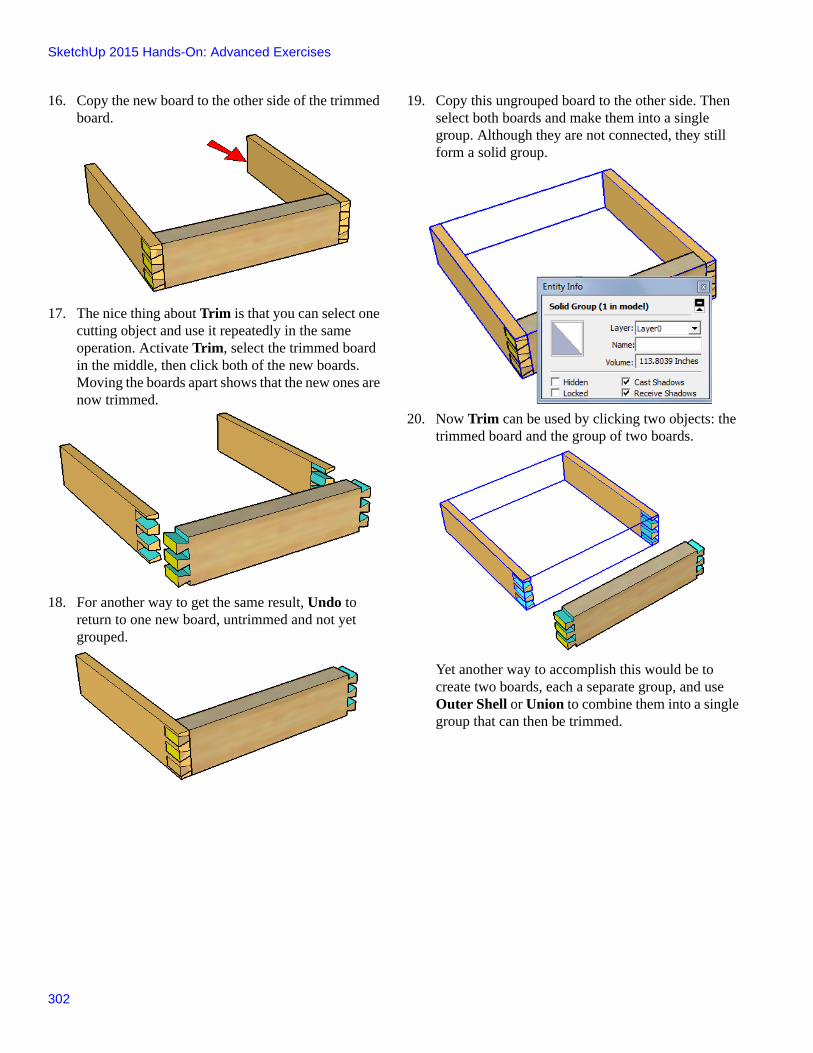
16. Copy the new board to the other side of the trimmed board.
17. The nice thing about Trim is that you can select one cutting object and use it repeatedly in the same operation. Activate Trim, select the trimmed board in the middle, then click both of the new boards. Moving the boards apart shows that the new ones are now trimmed.
18. For another way to get the same result, Undo to return to one new board, untrimmed and not yet grouped.
19. Copy this ungrouped board to the other side. Then select both boards and make them into a single group. Although they are not connected, they still form a solid group.
20. Now Trim can be used by clicking two objects: the trimmed board and the group of two boards.
Yet another way to accomplish this would be to create two boards, each a separate group, and use Outer Shell or Union to combine them into a single group that can then be trimmed.

Chapter 12: Dynamic Components
315
25. Drag the handle in the red direction and stretch the table to the other end of the room. While you are scaling, the entire model seems to elongate. . .
26. . . . but as soon as you release the drag handle, the chairs return to normal, and a few more chairs are added to accommodate the new length.
27. Scale the table in the green direction too, for a large, square table with lots of chairs. Sang is ready for entertaining.
28. This DC also has Interact capability. Activate Interact and move the cursor over the component - you can only interact with the chairs.
29. Click a few chairs, and they disappear.
30. To bring them back, Scale the table again. Start to scale it either in the red or green direction (don’t click the end the scale) . . .
31. . . . and enter 1 for the scale value.

Chapter 13: Advanced Extensions
337
You need three objects for Shape Bender:
• A single group or component (the 3D text “Bendy!” shown below)
• A single straight line parallel to the red axis, defining the horizontal limits of the group or component.
• The curve you want the resulting group or component to have (the double-arc shown below)
4. First, select the group or component (the 3D text). Then activate Shape Bender.
5. Click the straight line, which indicates the current start and end points along the group or component’s length.
6. Finally, click the curvy line (a series of connected lines or curves will be recognized as a single curve). The green preview shows you what the results will look like; in this case the resulting text is backward.
7. Press the Up arrow if you want to toggle the results - now the text reads correctly.
8. When the preview looks good, press Enter to complete. The text string was stretched and bent to match the double-arc curve. The resulting text is also a component.
TIP: To fix the distortion you might get when using arcs (like the large letter “d” above), you can try increasing the number of segments in the arcs. This can be done in the arc’s Entity Info window.
9. Here’s another example: a short ramp that’s made into a group, a straight line defining the ramp’s current length, and a hairpin curve defining the desired path for the ramp.