sivaraja b et al, international journal of computer ... · pdf filesivaraja b et al,...
TRANSCRIPT

PRISONER LOCALIZATION AND
ESCAPE PREVENTION INSIDE THE
PRISON
AUTHORS:
SIVARAJA.B MUKIL BHARATHI.RD PURUSHOTHAMAN.D
KAVITHA.M(PROFESSOR
SRM University
)
ABSTRACT
Existing researches on location tracking
focus either entirely on indoor or entirely on
outdoor by using different devices and
techniques. Several solutions have been
proposed to adopt a single location sensing
technology that fits in both situations. This
paper aims to track a user position in both
indoor and outdoor environments by using a
single wireless device with minimal tracking
error. RSSI (Received Signal Strength
Indication) technique together with
enhancement algorithms is proposed to cater
this solution. The proposed RSSI-based
tracking technique is divided into two main
phases, namely the calibration of RSSI
coefficients (deterministic phase) and the
distance along with position estimation of
user location by iterative trilateration
(probabilistic phase). A low complexity RSSI
smoothing algorithm is implemented to
minimize the dynamic fluctuation of radio
signal received from each reference node
when the target node is moving. Experiment
measurements are carried out to analyze the
sensitivity of RSSI. The results reveal the
feasibility of these algorithms in designing a
more accurate real-time position monitoring
system.
KEYWORDS Global robot localization, Kalman
filtering,radio frequency identification (RFID)
technology, redundantsensors
COMPARISON OF EXISTING AND
PROPOSED SYSTEM
Existing System Proposed System
In this
system, there
is CCTV
device to
monitor the
localization
of the
prisoner
inside the jail.
Need to
review the
camera
continuously
until the
patient is
tracked.
Drawbacks
Targets may
escape in the
CCTV
camera.
In this system, RSSI
zigbee is used to
track the prisoner
location at any time.
The RSSI
zigbeetechnology
helps in reading the
prisoner which tells
the current location.
Advantages
Fast response.
Low cost and
wireless.
Sivaraja B et al, International Journal of Computer Technology & Applications,Vol 8(2),204-219
IJCTA | Mar-Apr 2017 Available [email protected]
204
ISSN:2229-6093

High cost.
OVER ALL DIAGRAM
Receiver section:section 1 (Prisoner1):
TRASMITTER SCTION2(CONTROL
ROOM):
PROPOSED SYSTEM
In the proposed system, we use RSSI
technology to monitor the location and
position of prisoner will always hold the RSSI
Zigbeeand neuron stimulator. For example, if
the prisoner is try to move outside the jail it
automatically indicate through buzzer in the
control room based on the signal strength. The
control room automatically sends a control to
activate neuron simulator. If the prisoner is try
to break the module is sense by vibration
sensor, it will automatically produce alarm in
the prisoner section and control section. The
RSSI ZIGBEE inside the room reads the
location and distance to the control section. In
the receiver section, the data is gathered and
stored in the PC for the future use. LCD will
display the location and action performed by
the microcontroller.
HARDWARE REQUIRMENTS AND
EXPLANATION
MODULES
1. CONTROLLER MODULE
2. RSSI MODULE
3. SENSOR MODULE
4. AUXILIARY MODULE
PIC Microcontroller
AT89c51 microcontroller
RSSI zigbee
Neuro-stimulator
LCD
Buzzer
Vibration sensor
1. CONTROLLER MODULE
8051
Micro
Controller RSSI
Zigbee
Power
Supply
LCD
PC
Buzzer
pic
Micro
Controller
RSSI
Zigbee
Power
Supply
LCD
Neuro-
stimulator
Vibration
sensor
Sivaraja B et al, International Journal of Computer Technology & Applications,Vol 8(2),204-219
IJCTA | Mar-Apr 2017 Available [email protected]
205
ISSN:2229-6093
PIC Microcontroller:
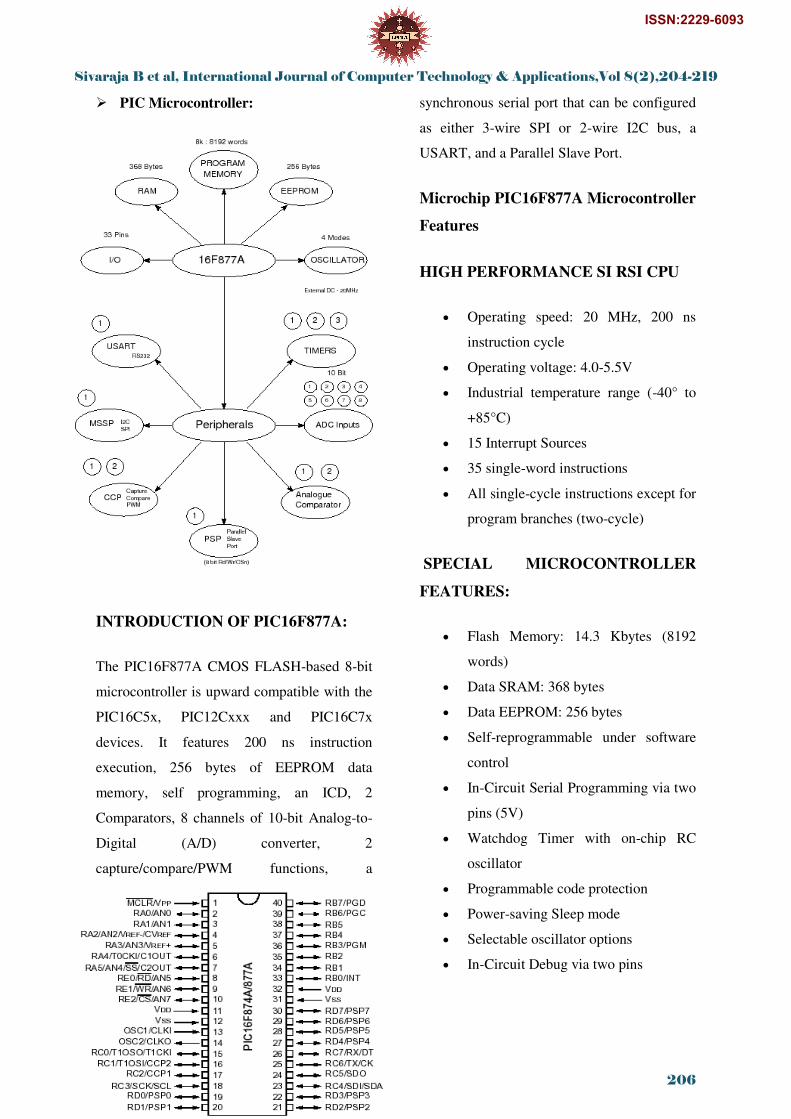
INTRODUCTION OF PIC16F877A:
The PIC16F877A CMOS FLASH-based 8-bit
microcontroller is upward compatible with the
PIC16C5x, PIC12Cxxx and PIC16C7x
devices. It features 200 ns instruction
execution, 256 bytes of EEPROM data
memory, self programming, an ICD, 2
Comparators, 8 channels of 10-bit Analog-to-
Digital (A/D) converter, 2
capture/compare/PWM functions, a
synchronous serial port that can be configured
as either 3-wire SPI or 2-wire I2C bus, a
USART, and a Parallel Slave Port.
Microchip PIC16F877A Microcontroller
Features
HIGH PERFORMANCE SI RSI CPU
Operating speed: 20 MHz, 200 ns
instruction cycle
Operating voltage: 4.0-5.5V
Industrial temperature range (-40° to
+85°C)
15 Interrupt Sources
35 single-word instructions
All single-cycle instructions except for
program branches (two-cycle)
SPECIAL MICROCONTROLLER
FEATURES:
Flash Memory: 14.3 Kbytes (8192
words)
Data SRAM: 368 bytes
Data EEPROM: 256 bytes
Self-reprogrammable under software
control
In-Circuit Serial Programming via two
pins (5V)
Watchdog Timer with on-chip RC
oscillator
Programmable code protection
Power-saving Sleep mode
Selectable oscillator options
In-Circuit Debug via two pins
Sivaraja B et al, International Journal of Computer Technology & Applications,Vol 8(2),204-219
206
ISSN:2229-6093

PERIPHERAL FEATURES
33 I/O pins; 5 I/O ports
Timer0: 8-bit timer/counter with 8-bit
prescaler
Timer1: 16-bit timer/counter with
prescaler
o Can be incremented during Sleep
via external crystal/clock
Timer2: 8-bit timer/counter with 8-bit
period register, prescaler and postscaler
Two Capture, Compare, PWM modules
o 16-bit Capture input; max
resolution 12.5 ns
o 16-bit Compare; max resolution
200 ns
o 10-bit PWM
Synchronous Serial Port with two modes:
o SPI Master
o I2C Master and Slave
USART/SCI with 9-bit address detection
Parallel Slave Port (PSP)
o 8 bits wide with external RD, WR
and CS controls
Brown-out detection circuitry for Brown-
Out Reset
ANALOG FEATURES
10-bit, 8-channel A/D Converter
Brown-Out Reset
Analog Comparator module
o 2 analog comparators
o Programmable on-chip
voltage reference module
o Programmable input
multiplexing from device
inputs and internal VREF
o Comparator outputs are
externally accessible
MEMORY OF THE PIC16F877
DIVIDED INTO 3 TYPES OF
MEMORIES:
PROGRAM MEMORY- A
memory that contains the program(which we
had written), afte we've burned it. As
a reminder, Program Counter executes
commands stored in the program memory, one
after the other.
DATA MEMORY– This is RAM
memory type, which contains a special
registers like SFR (Special Faction Register)
and GPR (General Purpose Register). The
variables that we store in the Data Memory
during the program are deleted after we turn of
the micro.
These two memories have separated
data buses, which makes the access to
each one of them very easy.
DATA EEPROM (Electrically
Erasable Programmable Read-
Only Memory) - A memory that
allows storing the variables as a result
of burning the written program.
Each one of them has a different role. Program
Memory and Data Memory two memories that
Sivaraja B et al, International Journal of Computer Technology & Applications,Vol 8(2),204-219
IJCTA | Mar-Apr 2017 Available [email protected]
207
ISSN:2229-6093

are needed to build a program, and Data
EEPROM is used to save data after the
microcontroller is turn off.
Program Memory and Data EEPROM they are
non-volatile memories, which store the
information even after the power is turn off.
These memories called Flash OrEEPROM. In
contrast, Data Memory does not save the
information because it needs power in order to
maintain the information stored in the chip.
PIC16F87XA PROGRAM MEMORY
The PIC16F87XA devices have a 13-bit
program counter capable of addressing an 8K
word x 14 bit program memory space. This
memory is used to store the program after we
burn it to the microcontroller. The
PIC16F876A/877A devices have 8K words x
14 bits of Flash program memory that can be
electrically erased and reprogrammed. Each
time we burn program into the micro, we erase
an old program and write a new one.
PIC16F876A/877A program memory map and
stack
Program Counter (PC) keeps track of the
program execution by holding the address of
the current instruction. It is automatically
incremented to the next instruction during the
current instruction execution.
The PIC16F87XA family has an 8-level deep
x 13-bit wide hardware stack. The stack space
is not part of either program or data space and
the stack pointer is not readable or writable. In
the PIC microcontrollers, this is a special
block of RAM memory used only for this
purpose.
The CALL instruction is used to jump to a
subroutine, which must be terminated with the
RETURN instruction. CALL has the address
Sivaraja B et al, International Journal of Computer Technology & Applications,Vol 8(2),204-219
IJCTA | Mar-Apr 2017 Available [email protected]
208
ISSN:2229-6093

of the first instruction in the subroutine as its
operand. When the CALL instruction is
executed, the destination address is copied to
the PC. The PC is PUSHed onto the stack
when a CALL instruction is executed, or an
interrupt causes a branch. The stack is POP’ed
in the event of a RETURN, RETLW or a
RETFIE instruction execution.
The stack operates as a circular buffer. This
means that after the stack has been PUSHed
eight times, the ninth push overwrites the
value that was stored from the first push. The
tenth push overwrites the second push (and so
on).
Each time the main program execution starts at
address 0000 - Reset Vector. The address 0004
is “reserved” for the “interrupt service routine”
(ISR).
If we plan to use an interrupt, our program will
begin after the Interrupt Vector; and if not we
can start to write from the beginning of the
Reset Vector.
Here is a code where we use interrupt:
ORG 0x000 ; processor reset vector
goto main ; go to beginning of main program
ORG 0x004 ; interrupt vector location
movwfw_temp ; save off current W register
contents
movfSTATUS,w ; move status register into W
register
movwfstatus_temp ; save off contents of
STATUS register
.
.
RETFIE
main
Some of the memory is divided into the pages
that are designed for write/burn the program
into them; the remaining memory (Stack,
Interrupt Vector, and Reset Vector) is
hardware registers.
Attention!
Program Memory is divided into the pages,
where the program is stored. Data Memory is
divided into the banks. The banks are located
inside the RAM, where the special registers
and the data located.
PIC16F87XA DATA MEMORY
ORGANAIZATION
The data memory is partitioned into multiple
banks which contain the General Purpose
Registers and the Special Function Registers.
Number of banks may vary depending on the
microcontroller; for example, micro PIC16F84
has only two banks.
Each bank extends up to 7Fh (128 bytes). The
lower locations of each bank are reserved for
the Special Function Registers. Above the
Special Function Registers are General
Purpose Registers, implemented as static
RAM. While program is being executed, it is
working with the particular bank. The default
bank is BANK0.
Sivaraja B et al, International Journal of Computer Technology & Applications,Vol 8(2),204-219
IJCTA | Mar-Apr 2017 Available [email protected]
209
ISSN:2229-6093

To access a register that is located in another
bank, one should access it inside the program.
There are special registers which can be
accessed from any bank, such as STATUS
register.
PIC16F876A/877A register file map
In order to start programming and build
automated system, there is no need to study all
the registers of the memory map, but only a
few most important ones:
STATUS register – changes/moves
from/between the banks
PORT registers – assigns logic values
(“0”/”1”) to the ports
TRIS registers - data direction register
(input/output)
You can learn about other registers at a later
stage or as needed.
STATUS REGISTER
In most cases, this register is used to switch
between the banks (Register Bank Select), but
also has other capabilities.
PIC STATUS register
With the help of three left bits (IRP, RP1, and
RP0) one can control the transition between
the banks:
IRP - Register Bank Select bit, used
for indirect addressing method.
RP1:RP0: - Register Bank Select
bits, used for direct addressing
method.
To distinguish between the two methods, at
this point, the will use the definition of
fundamental concepts. Later on, the two
methods will be studied in detail.
When the IRP Equal to 0, the program will
work with banks 0, 1.
When the IRP Equal to 1, the program will
work with banks 2, 3.
Sivaraja B et al, International Journal of Computer Technology & Applications,Vol 8(2),204-219
IJCTA | Mar-Apr 2017 Available [email protected]
210
ISSN:2229-6093

The following table demonstrates, which of
the Banks the program is working with, based
on the selection of the RP0 and RP1 bits:
RP1:RP0 BANK
00 0
01 1
10 2
11 3
An example of using STATUS register and
Register Bank Select bit:
1. bsf STATUS, 5 ; Change to Bank 1
2. clrf TRISB ; Set PORTB as output
3. bcf STATUS, 5 ; Change to Bank 0
In the first line, we are in changing/setting the
5th bit, RP0, in the STATUS register to 1, and
thus, base on the table we are
switching/selecting Bank 1. After PortB was
set as output in the second line, we switched
back to Bank 0 by in changing/setting the 5th
bit, RP0, in the STATUS register to 0, in the
third line.
C: Carry/borrow bit (ADDWF,
ADDLW,SUBLW,SUBWF instructions)
1 = A carry-out from the Most Significant bit
of the result occurred
0 = No carry-out from the Most Significant bit
of the result occurred
An example of using STATUS register and
Carry/borrow bit:
1. Movlw 200
2. Addwf 100, 0
In this example, we are assigning value of 200
to the W (working) register. Then, we are
adding the value of 100 and the W register
together. The result is stored in W register and
should be 300 (200+100).
However, the maximum value is 256, resulting
in carry out. The C (bit 0) of the STATUS
register becomes 1 (C = 1). Register W will
contain the reminder: 44.
DC: Digit carry/borrow bit (ADDWF,
ADDLW,SUBLW,SUBWF instructions) (for
borrow, the polarity is reversed)
1 = A carry-out from the 4th low order bit of
the result occurred
0 = No carry-out from the 4th low order bit of
the result
Z: Zero bit
1 = The result of an arithmetic or logic
operation is zero
0 = The result of an arithmetic or logic
operation is not zero
The bits 3 and 4 are used with WDT -
Watchdog Timer.
PD: Power-down bit
1 = After power-up or by the CLRWDT
instruction
0 = By execution of the SLEEP instruction
Sivaraja B et al, International Journal of Computer Technology & Applications,Vol 8(2),204-219
IJCTA | Mar-Apr 2017 Available [email protected]
211
ISSN:2229-6093

TO: Time-out bit
1 = After power-up, CLRWDT instruction or
SLEEP instruction
0 = A WDT time-out occurred
PORT REGISTER
The role of the PORT register is to receive the
information from an external source (e.g.
sensor) or to send information to the external
elements (e.g. LCD). The 28-pin devices have
3 I/O ports, while the 40/44-pin devices, like
PIC16F877, have 5 I/O ports located in the
BANK 0.
1. PORTA is a 6-bit wide, bidirectional port.
The corresponding data direction register
is TRISA.
Setting a TRISA bit (= 1) will make the
corresponding PORTA pin an input.
Clearing a TRISA bit (= 0) will make the
corresponding PORTA pin an output.
2. PORTB is an 8-bit wide, bidirectional
port. The corresponding data direction
register is TRISB.
Setting a TRISB bit (= 1) will make the
corresponding PORTB pin an input.
Clearing a TRISB bit (= 0) will make the
corresponding PORTB pin an output.
3. PORTC is an 8-bit wide, bidirectional
port. The corresponding data direction
register is TRISC.
Setting a TRISC bit (= 1) will make the
corresponding PORTC pin an input.
Clearing a TRISC bit (= 0) will make the
corresponding PORTC pin an output.
4. PORTD is an 8-bit port with Schmitt
Trigger input buffers. Each pin is
individually configurable as an input or
output.
5. PORTE has three pins (RE0/RD/AN5,
RE1/WR/AN6 and RE2/CS/AN7) which
are individually configurable as inputs or
outputs. These pins have Schmitt Trigger
input buffers.
We can control each port by using an assigned
address of specific port, but there is much
easier way to control the port. We are allowed
to use the names of the ports without
considering their addresses.
For example:
# define SWITCH PORTA, 0
We define a variable named SWITCH, which
received a value of bit number 0 of the
PORTA. Usually we define the ports at the
beginning of the program, and then we use
only the given names.
TRIS REGISTER
The TRIS register is data direction register
which defines if the specific bit or whole port
will be an input or an output. Each PORT has
its own TRIS register. Here's a map of the
locations:
Sivaraja B et al, International Journal of Computer Technology & Applications,Vol 8(2),204-219
IJCTA | Mar-Apr 2017 Available [email protected]
212
ISSN:2229-6093

BANK0 BANK1
PORTA TRISA
PORTB TRISB
PORTC TRISC
PORTD TRISD
PORTE TRISE
The default mode of each TRIS is input. If you
want to set a specific port as exit you must
change the state of the TRIS to 0.
Keep in mind: to change a specific port to an
output, one should first move to the BANK1,
make the change, and then return to BANK0.
The default state of the banks is BANK0.
The running program is working only with one
bank at all time. If not set otherwise, then as
stated, the default bank is BANK0. Part of the
registers located inside BANK0, and some are
not. When we need to access a register that is
not located inside BANK0, we are required to
switch between the banks.
For example, the access to PORT registers is
done inside BANK0. However, to change port
from an input to an output and vice versa, we
need to access TRIS register that is located
inside BANK1. From the moment we moved
to the BANK1, the program will always work
with BANK1; at this time, to access registers
inside BANK0, we will have to return to the
situation in which our program will work with
BANK0.
Direct Addressing: Using this method we are
accessing the registers directly by detecting
location inside Data Memory from Opcode
and by selecting the bank using bits RP1 and
RP0 of the STATUS register.
DIRECT AND INDIRECT REGISTER
Indirect Addressing: To implement indirect
addressing, a File Select Register (FSR) and
indirect register (INDF) are used. In addition,
when using this method we choose bank using
bit IRP of the STATUS register. Indirect
addressing treated like a stack pointer,
allowing much more efficient work with a
number of variables. INDF register is not an
actual register (it is a virtual register that is not
found in any bank).
Don’t be confused! There is SFR (Special
Function Register) - special registers of RAM,
and there is FSR (File Select Register).
The following figure shows the two addressing
methods:
Sivaraja B et al, International Journal of Computer Technology & Applications,Vol 8(2),204-219
IJCTA | Mar-Apr 2017 Available [email protected]
213
ISSN:2229-6093

Pin diagram of PIC16F877A
To the left you can see the direct addressing
method, where the bank selection is made by
RP bits and the referencing is made directly
from memory Opcode by using the variable
name.
To the right you can see the indirect
addressing method, where the bank selection is
made by IRP bit and accessing the variable by
pointer FSR.
Let’s explore the differences between the 2
methods:
We want to assign number 5 to the variable
TEMP located at address 0X030. In the first
row of each example, we will define the
variable TEMP at the address 0X030.
Example of direct addressing:
1. TEMP Equ 0x030
2. Movlw 5
3. Movwf TEMP
It's easy to understand, that direct addressing
method means working directly with the
variables. In the second line we put the
number 5 into the working register W, and in
the line 3, the content of the W passes to the
TEMP variable.
Example of indirect addressing:
1. TEMP Equ 0x030
2. Movlw 0x030
3. Movwf FSR
4. Movlw 5
5. Movwf INDF
In the second line, we put a value into the W
register. In the third line, the value passes to
the FSR register, and from this moment FSR
points to the address of the TEMP variable. In
the fourth line, the number 5 passes to the W
register, and in the fifth line, we move the
contents of W register (which is 5) to the
INDF. In fact INDF performs the following: it
takes the number 5 and puts it in the address
indicated by FSR register.
POWER SUPPLY AND 8051
MICRO CONTROLLER
This section describes how to
generate +5V DC power supply
Sivaraja B et al, International Journal of Computer Technology & Applications,Vol 8(2),204-219
IJCTA | Mar-Apr 2017 Available [email protected]
214
ISSN:2229-6093
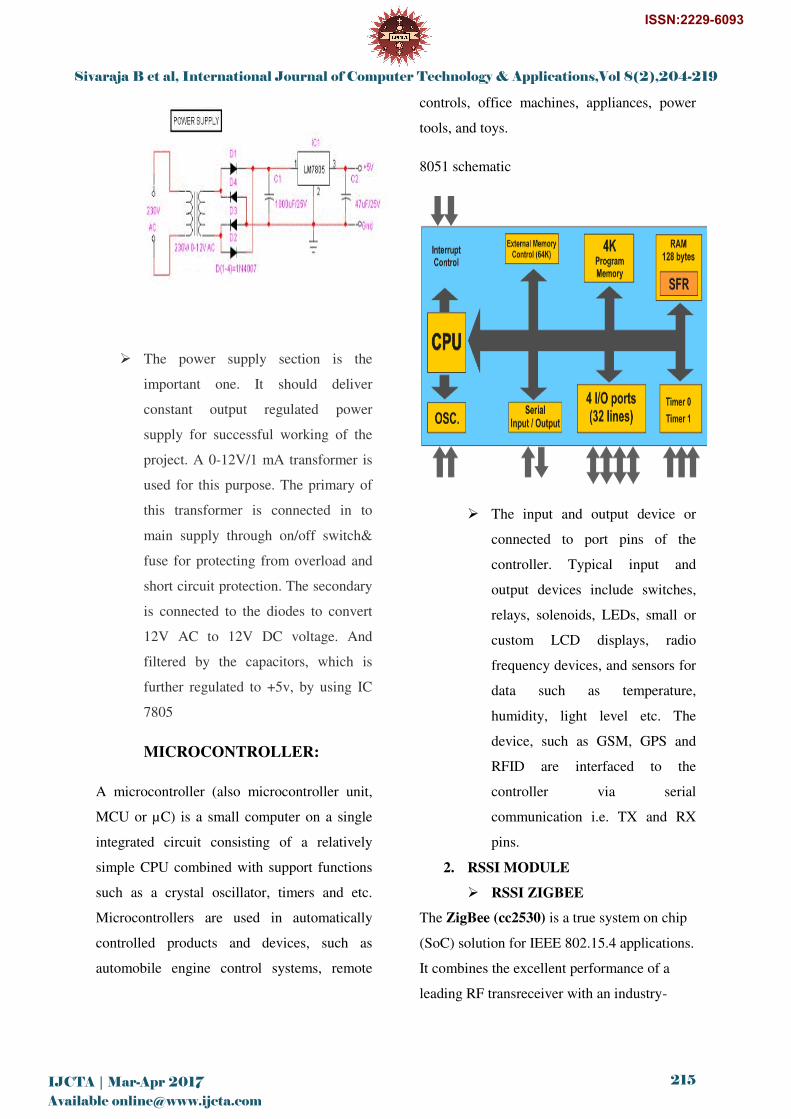
The power supply section is the
important one. It should deliver
constant output regulated power
supply for successful working of the
project. A 0-12V/1 mA transformer is
used for this purpose. The primary of
this transformer is connected in to
main supply through on/off switch&
fuse for protecting from overload and
short circuit protection. The secondary
is connected to the diodes to convert
12V AC to 12V DC voltage. And
filtered by the capacitors, which is
further regulated to +5v, by using IC
7805
MICROCONTROLLER:
A microcontroller (also microcontroller unit,
MCU or µC) is a small computer on a single
integrated circuit consisting of a relatively
simple CPU combined with support functions
such as a crystal oscillator, timers and etc.
Microcontrollers are used in automatically
controlled products and devices, such as
automobile engine control systems, remote
controls, office machines, appliances, power
tools, and toys.
8051 schematic
The input and output device or
connected to port pins of the
controller. Typical input and
output devices include switches,
relays, solenoids, LEDs, small or
custom LCD displays, radio
frequency devices, and sensors for
data such as temperature,
humidity, light level etc. The
device, such as GSM, GPS and
RFID are interfaced to the
controller via serial
communication i.e. TX and RX
pins.
2. RSSI MODULE
RSSI ZIGBEE
The ZigBee (cc2530) is a true system on chip
(SoC) solution for IEEE 802.15.4 applications.
It combines the excellent performance of a
leading RF transreceiver with an industry-
Sivaraja B et al, International Journal of Computer Technology & Applications,Vol 8(2),204-219
IJCTA | Mar-Apr 2017 Available [email protected]
215
ISSN:2229-6093

standard enhanced 8051 MCU, in system
programmable flash memory, 8 kB RAM, and
many other powerful features. Received Signal
Strength Indicator (RSSI) is a measurement of
power present in a received radio signal.
FEATURES
• Supply voltage: 5v DC
• RS232 output
• Output power: up to 4.5dBm–
• Detection range: (10-20) m
• Frequency: 2.4GHz
• Ultra-low power consumption
APPLICATIONS
• Remote control systems
• Home/building automation
• Lighting systems
• Consumer electronics
• Health care
3. SENSOR MODULE
VIBRATION SENSOR
Sensor is mounted at the bottom of the
unit. The unit should be fixed with the
vibrating body firmly the sensitivity is
adjusted for the required vibration/ shock is
detected the output goes low and the delay is
provided for proper operation vibrating
frequency and amplitude can be detected.
SPEC:
Supply- DC +2v ripple free
Output current-PNP 100ma
Analog o/p- 10ma
Sensors available to detect the flame / fire
smoke flow level speed position Temp Bio
medical application.
Special sensor can be developed against
specific requirement.
4. AUXILIARY MODULE
LIQUID CRYSTAL
DISPLAYS:
The LCD standard requires 3 control lines and
8 I/O lines for the data bus.
• 8 data pins D7:D0
Bi-directional data/command pins.
Alphanumeric characters are sent in
ASCII format.
• RS: Register Select
RS = 0 -> Command Register is
selected
RS = 1 -> Data Register is selected
• R/W: Read or Write
0 -> Write, 1 -> Read
• E: Enable (Latch data)
The 8 data lines are connected to
PORT 1 of 8051 microcontroller. The
three control lines( RS,RW and EN )
are connected to PORT 3.5,3.6 and 3.7
respectively.
SOFTWARE EXPLANATION
Embedded C:
As time progressed, use of
microprocessor-specific assembly-only as the
programming language reduced and embedded
systems moved onto C as the embedded
Sivaraja B et al, International Journal of Computer Technology & Applications,Vol 8(2),204-219
IJCTA | Mar-Apr 2017 Available [email protected]
216
ISSN:2229-6093

programming language of choice. C is the
most widely used programming language for
embedded processors/controllers. Assembly is
also used but mainly to implement those
portions of the code where very high timing
accuracy, code size efficiency, etc. are prime
requirements.
Initially C was developed by Kernighan and
Ritchie to fit into the space of 8K and to write
(portable) operating systems. Originally it was
implemented on UNIX operating systems. As
it was intended for operating systems
development, it can manipulate memory
addresses. Also, it allowed programmers to
write very compact codes. This has given it the
reputation as the language of choice for
hackers too.
As assembly language programs are specific to
a processor, assembly language didn’t offer
portability across systems. To overcome this
disadvantage, several high level languages,
including C, came up. Some other languages
like PLM, Modula-2, Pascal, etc. also came
but couldn’t find wide acceptance. Amongst
those, C got wide acceptance for not only
embedded systems, but also for desktop
applications. Even though C might have lost
its sheen as mainstream language for general
purpose applications, it still is having a strong-
hold in embedded programming. Due to the
wide acceptance of C in the embedded
systems, various kinds of support tools like
compilers & cross-compilers, ICE, etc. came
up and all this facilitated development
of embedded systems using C.
MPLAB:
Microchip has a large suite of software
and hardware development tools integrated
within one software package called MPLAB
Integrated Development Environment (IDE).
MPLAB IDE is a free, integrated toolset for
the development of embedded applications on
Microchip's PIC and dsPIC microcontrollers. It
is called an Integrated Development
Environment, or IDE, because it provides a
single integrated environment to develop code
for embedded microcontrollers.
MPLAB IDE runs as a 32-bit
application on MS Windows, is easy to use
and includes a host of free software
components for fast application development
and super-charged debugging. MPLAB IDE
also serves as a single, unified graphical user
interface for additional Microchip and third
party software and hardware development
tools. Moving between tools is a snap, and
upgrading from the free software simulator to
hardware debug and programming tools is
done in a flash because MPLAB IDE has the
same user interface for all tools.
COMPONENTS OF MPLAB IDE: The
MPLAB IDE has both built-in components
and plug-in modules to configure the system
for a variety of software and hardware tools.
PROJECT MANAGER: The project
manager provides integration and
Sivaraja B et al, International Journal of Computer Technology & Applications,Vol 8(2),204-219
IJCTA | Mar-Apr 2017 Available [email protected]
217
ISSN:2229-6093

communication between the IDE and the
language tools.
EDITOR: The editor is a full-featured
programmer's text editor that also serves as a
window into the debugger.
ASSEMBLER/LINKAGE LANGUAGE
TOOLS: The assembler can be used stand-
alone to assemble a single file, or can be used
with the linker to build a project from separate
source files, libraries and recompiled objects.
The linker is responsible for positioning the
compiled code into memory areas of the target
microcontroller.
DEBUGGER: The Microchip debugger
allows breakpoints, single stepping, watch
windows and all the features of a modern
debugger for the MPLAB IDE. It works in
conjunction with the editor to reference
information from the target being debugged
back to the source code.
EXECUTION ENGINES: There are
software simulators in MPLAB IDE for all
PICmicro MCU and dsPIC DSC devices.
These simulators use the PC to simulate the
instructions and some peripheral functions of
the PICmicro MCU and dsPIC DSC devices.
Optional in-circuit emulators and in-circuit
debuggers are also available to test code as it
runs in the applications hardware.
Key Features
MPLAB IDE is a Windows® Operating
System (OS) based Integrated Development
Environment for the PIC MCU families and
the dsPIC Digital Signal Controllers.
The MPLAB IDE provides the ability to:
Create and edit source code using the built-in
editor.
Assemble, compile and link source code.
Debug the executable logic by watching
program flow with the built-in simulator or in
real time with in-circuit emulators or in-circuit
debuggers.
Make timing measurements with the simulator
or emulator.
View variables in Watch windows.
Program firmware into devices with device
programmers
KEIL
Compilers are programs used to
convert a High Level Language to object code.
Desktop compilers produce an output object
code for the underlying microprocessor, but
not for other microprocessors. I.E the
programs written in one of the HLL like ‘C’
will compile the code to run on the system for
a particular processor like x86 (underlying
microprocessor in the computer). For example
compilers for Dos platform is different from
the Compilers for Unix platform
So if one wants to define a compiler
then compiler is a program that
translates source code into object code. The
compiler derives its name from the way it
works, looking at the entire piece of source
code and collecting and reorganizing
Sivaraja B et al, International Journal of Computer Technology & Applications,Vol 8(2),204-219
IJCTA | Mar-Apr 2017 Available [email protected]
218
ISSN:2229-6093
the instruction. See there is a bit little
difference between compiler and
an interpreter. Interpreter just interprets whole
program at a time while compiler analyzes and
execute each line of source code in succession,
without looking at the entire program.
The advantage of interpreters is that they
can execute a program immediately. Secondly
programs produced by compilers run much
faster than the same programs executed by an
interpreter. However compilers require some
time before an executable program emerges.
Now ascompilers translate source code into
object code, which is unique for each type of
computer, many compilers are available for the
same language.
SUMMARY AND CONCLUSIONS
The RSSI and the phase can be considered two
redundant measurements of the same quantity:
the distance of the robot from the projection of
the tag on the floor. However, the information
delivered by these two quantities presents
different features, for some aspects
complementary: phase measurements are more
sensitive than the RSSI to a change in the
robot position but suffer from a cycle
ambiguity, which complicates matters. The
optimal combination of the two measurements
is not straightforward and represents a
challenging problem,dual in a sense to the
problem of the dynamic allocation of
redundant actuators. An effective solution is
proposed in this paper by considering an
algorithm characterized by two stages: in the
first stage, only the RSSI is used for estimation
purposes, while in the second stage, also the
phase measurements are considered. A
dynamic criterion, based on the observation of
the variance of the estimation of the tag
coordinates, is adopted to decidethe switching
time between the two stages, which is
performed independently on each tag. The
proposed two-stage algorithm estimates the
robot pose and simultaneously improves the
estimate on the tag coordinates.Errors up to
about 1 m can be tolerated by the algorithm on
the initial estimate of the tag positions. If no
informationis available at the beginning on the
tag coordinates, rangeonly SLAM techniques
could be considered to solve the problem,
capitalizing on the ideas presented in this
paper to properly combine RSSI and phase
measurements.
REFFERENCE
1. Jon, "Designing with 802.15.4 and
ZigBee", Industrial Wireless
Applications Summit San Diego, pp.
11, Mar. 2004.
2. I.F. Akyyiliz, S. Weilian, Y.
Sankarasubramaniam, E. Cayirci, "A
Survey on Sensor Networks", IEEE
Communications Magazine, pp. 102-
114, Aug. 2
3. K. Kaemarungsi, Design of Indoor
positioning system based on location
fingerprint technique, University of
Pittsburgh, 2005
.
Sivaraja B et al, International Journal of Computer Technology & Applications,Vol 8(2),204-219
IJCTA | Mar-Apr 2017 Available [email protected]
219
ISSN:2229-6093