single, compact, cost-effective luminaire control
TRANSCRIPT

Single, compact, cost-effective luminaire controlPhilips EasySense SNS210 MC
July 2020
Design-in Guide
Sensors
EasyAir
SNS210
Sensors
EasySense
SNS210 MC
2 Design-in Guide - EasySense SNS210 MC July 2020
Contents
Introduction to this guide 3More information or support 3
Warnings and instructions 4
Introduction of EasySense SNS210 MC 5
Product characteristics 6EasySense SNS210 MC overview 6Zigbee and Bluetooth Low Energy 6Motion detector 7Sensor view shield 8Light sensor 9LED indicator 9
Mechanical design-in 10Wire strip length 10Wire insertion 10Wire separation from the connector 10Wiring Information 10Wire distance for remote mounting 11Luminaire-to-luminaire distance 11Recommendations to design-in around EasySense SNS210 MC with good RF signal 11Recommendations to design-in a luminaire around EasySense SNS210 MC with good RF signal 11Mounting to a luminaire 12Mounting in a bracket (SMB-50) 13Installing EasySense SNS210 MC with ceiling mount bracket (SNS210 MCCMP) 14
Installer Label Instructions 15
EasySense SNS210 MC with multiple Philips Xitanium SR LED drivers (1:N application) 16
Luminaire Production Test 17
FAQ 18
Contact details 20Philips EasySense SNS210 MC 20
Disclaimer 21

3 Design-in Guide - EasySense SNS210 MC July 2020
Introduction to this guide
Thank you for choosing Philips EasySense SNS210 MC. In this guide luminaire manufacturers will find the informationrequired to design this product into a luminaire andconfigure it to suit specific applications. This design-inguide covers sensor functionality, mechanical mounting,wiring details, configuration and commissioning (grouping)method, application notes and frequently asked questions.
More information or supportFor further information or support, please consult your local Signify sales representative.
Philips EasySense SNS210 MC

4 Design-in Guide - EasySense SNS210 MC July 2020
Warnings and instructions
• EasySense SNS210 MC must be used with Philips Xitanium SR LED drivers.
• Do not apply mains power directly to the sensor.• Do not cover the sensor during operation or mount the
sensor internal to the luminaire.• External infrared light source in the space might have
influence on occupancy detection.• Incorrect location of sensor (e.g., with setting up of
multiple SNS210 devices into a single network or a group with addition of qualified wireless switches obstructions in viewing angle) will result in incorrect functioning of occupancy detection.
• Faulty settings of the sensor might result in undefined startup.
• Make sure the sensor, especially the occupancy detection lens, is protected from damage during shipment and handling.
• The application area of EasySense SNS210 MC is designed for a typical indoor environment (open/private offices, conference rooms, classrooms, corridors, etc.) in normally heated and ventilated areas. EasySense SNS210 MC has no protection against aggressive chemicals or water.
• Make sure the the EasySense SNS210 MC Zigbee/Bluetooth antenna is not covered by metal for proper RF communication.

5 Design-in Guide - EasySense SNS210 MC July 2020
Introduction to EasySense SNS210 MC
The Philips EasySense SNS210 MC is the ideal solution forper-luminaire control of smart luminaires. It combinesoccupancy sensing, daylight harvesting and task tuning in asingle, compact package for easy OEM luminaire assembly.EasySense SNS210 MC operates with the established Xitanium SR LED driver standard to make a simple two-wire connection between sensor and driver, thus eliminating the need for multiple components and auxiliary devices. The result is a cost-effective and easy-to-design-in solution ideal for energy-savings. An intuitiveMasterConnect app makes commissioning andconfiguration during and after installation fast and easy.
EasySense SNS210 MC enables grouping allows scene setting on a wireless switch (e.g., presentation mode for a conference room) as well as occupancy sharing (i.e., luminaires within a group can be programmed to remain at prescribed light levels so long as occupancy is detected anywhere in the group).
For more details on specification and ordering codes,please refer to the SNS210 MC datasheet on the technicaldownloads page.
6 Design-in Guide - EasySense SNS210 MC July 2020
Product characteristics
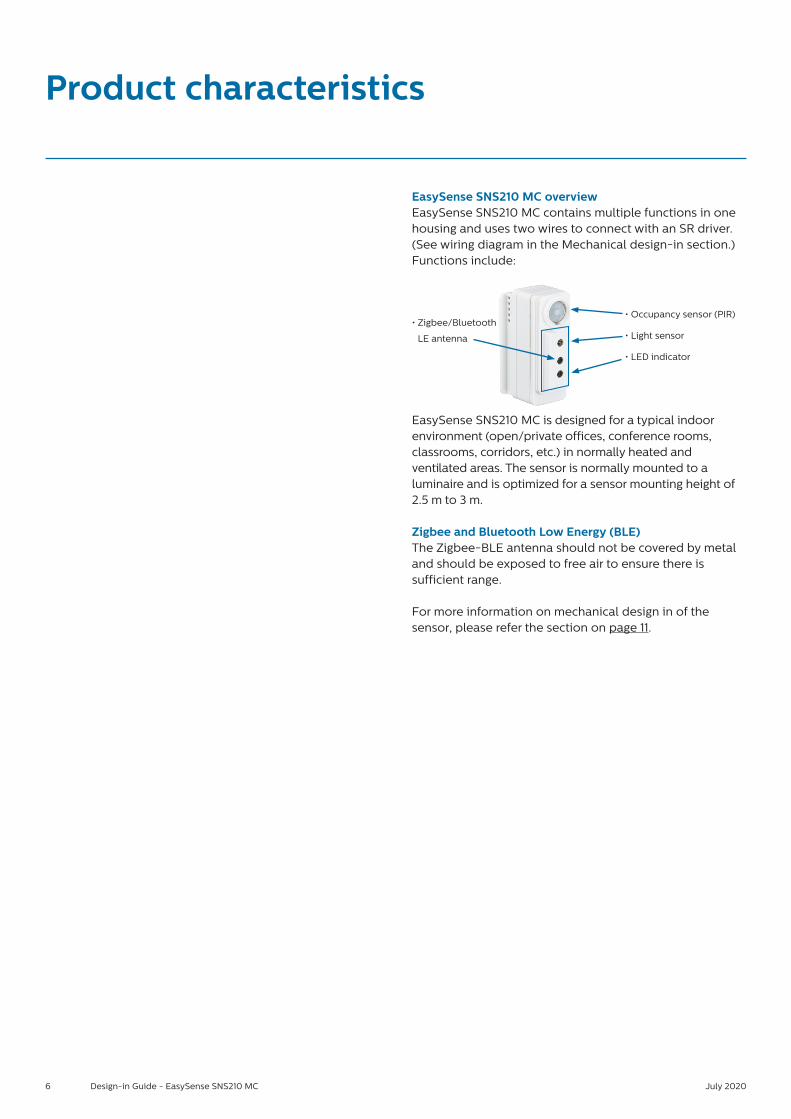
EasySense SNS210 MC overviewEasySense SNS210 MC contains multiple functions in one housing and uses two wires to connect with an SR driver. (See wiring diagram in the Mechanical design-in section.) Functions include:
• Zigbee/Bluetooth
LE antenna
• Occupancy sensor (PIR)
• Light sensor
• LED indicator
EasySense SNS210 MC is designed for a typical indoor environment (open/private offices, conference rooms, classrooms, corridors, etc.) in normally heated and ventilated areas. The sensor is normally mounted to a luminaire and is optimized for a sensor mounting height of 2.5 m to 3 m.
Zigbee and Bluetooth Low Energy (BLE)The Zigbee-BLE antenna should not be covered by metal and should be exposed to free air to ensure there is sufficient range.
For more information on mechanical design in of the sensor, please refer the section on page 11.

7 Design-in Guide - EasySense SNS210 MC July 2020
X1
X2
Y1Y2
H
Motion detectorThe occupancy sensor is a PIR (Passive Infrared) sensorthat detects movement with an X-Y cross-area under anangle of X = 62° and Y = 84°. Two types of movementsare defined as follows:• Major movement: movement of a person walking into or
through an area.• Minor movement: movement of a person sitting at an
office desk reaching for a telephone, turning the pages in a book, opening a file folder, picking up a coffee cup, etc.
When installed in a typical office ceiling at height, thesensor is sensitive to minor movements within X1 by Y1area. It will respond to minor movements down to a fewcentimeters at the task area of a desk and is sensitive to major movements within a range of X2 by Y2. The directions X1, X2 are parallel to direction X; likewise for Y1, Y2 being parallel to Y. The maximum recommended height to place the sensor in the ceiling is 3 m to assure movement coverage and detection. The PIR sensor reacts on movement by means of a temperature difference, such as the human body temperature versus its surrounding temperature e.g. people. People sitting behind a transparent shield or glass window are not seen by PIR sensor of SNS210. Please refer to the table below for coverage area details.
Figure 1. Motion detection area. H: ceiling height. Minor movement detection area: X1 by Y1. Major movement detection area: X2 by Y2.
X
Y
Minor movement Major movement
Height X1 Y1 X2 Y2
2.4m 1.9 2.9 2.9 4.3
3.0m 2.4 3.6 3.6 5.4

8 Design-in Guide - EasySense SNS210 MC July 2020
Sensor view shieldThe sensor comes with an occupancy view shield that canbe used to block the movement detection by the sensor ina certain area. The shield comes inverted. (See Figure 2.)This view shield can be pulled out, flipped and insertedback in the sensor and then rotated so the correct area isshielded off from the detection area. If such shield is notneeded in the application, it can be easily pulled out fromthe sensor or left as in the original position.
To prevent false triggers, the EasySense SNS210 MC mustbe mounted more than 2 m away from air vents in all directions, see figures below:
> 2m
> 2m
Luminaire
> 2m
> 2m
• Occupancy view shield
Figure 2. Sensor view shield.

9 Design-in Guide - EasySense SNS210 MC July 2020
Photocell
Window
h
Windowsill
�eld of view(= 0.7 x h)
Field of viewY (cm)
H (cm)
100
120
90
60
30
0150 200 300250
Light sensorThe light sensor is a photo diode that reads the average light level captured under an angle of approximately 40°. This level depends on the amount of artificial and/or natural light supplied in the office, as well as how this light is reflected toward the ceiling/sensor. The EasySense SNS210 MC converts the illuminance signal into ON/OFF or dimming commands to the Philips Xitanium SR LED driver in order to maintain a constant light level on the desk.
The sensor should be installed with a minimum distance of 0.6 m to the window to avoid the sensor looking outside. When the sensor is mounted too close to the window it will look partly outside. Sun reflection from cars or snow can reflect directly into the sensor. The sensor will then measure such high illumination levels that it will drive the artificial light to its minimal level or even switch off the artificial lights. The optimum distance [Y] from the window to EasySense SNS210 MC can be obtained from Figure 4. This graph shows the relation between the distance from the window to the sensor [Y] and the height [H] of the sensor (H, height of the sensor measured from ceiling to bottom of window sill).
LED indicatorThe product contains a LED indicator. This is enabled bydefault, and it can be disabled through the app. The behavior of the LED is as follows:
Yellow LED on: = vacancy & light sensor are functional.
Red LED on: = motion is detected and hold time is not expired yet.
Figure 3. Sensor placement.
Figure 4. Sensor mounting height from window sill (Y) vs. sensor horizontal distance from window sill (H).
10 Design-in Guide - EasySense SNS210 MC July 2020
Mechanical design-in
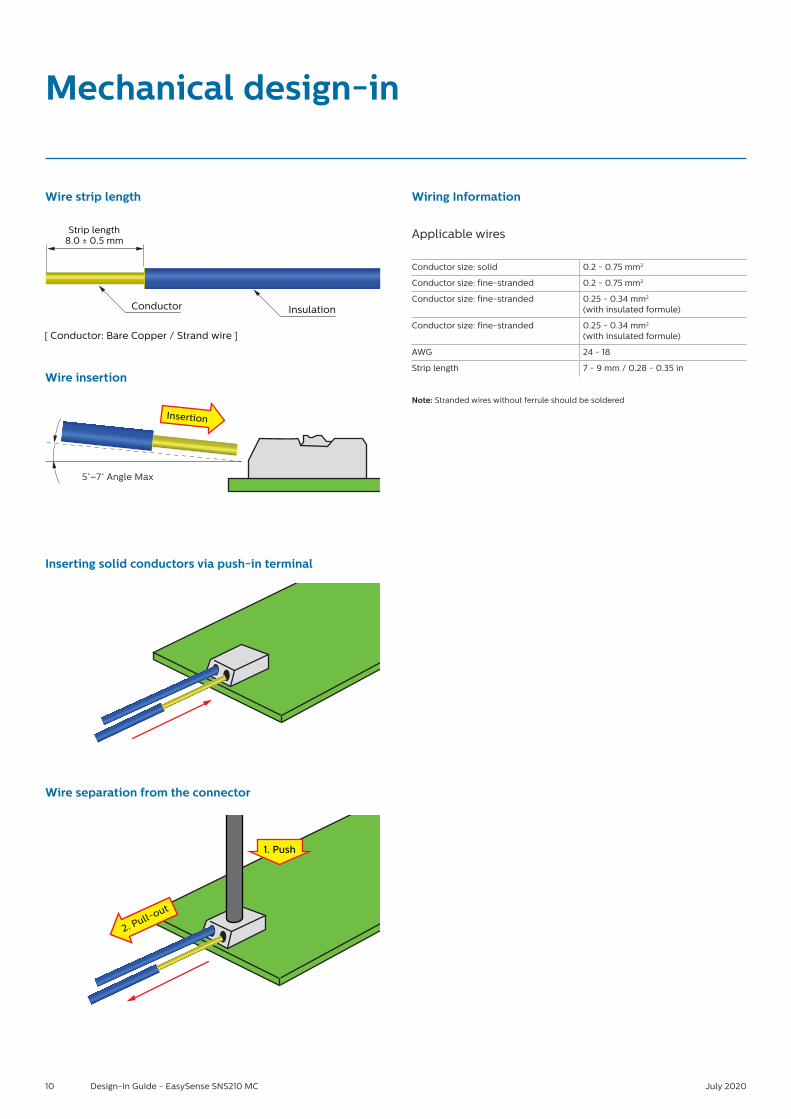
Wiring Information
Applicable wires
Conductor size: solid 0.2 - 0.75 mm2
Conductor size: fine-stranded 0.2 - 0.75 mm2
Conductor size: fine-stranded 0.25 - 0.34 mm2
(with insulated formule)
Conductor size: fine-stranded 0.25 - 0.34 mm2
(with insulated formule)
AWG 24 - 18
Strip length 7 - 9 mm / 0.28 - 0.35 in
Note: Stranded wires without ferrule should be soldered
Strip length8.0 ± 0.5 mm
Conductor
[ Conductor: Bare Copper / Strand wire ]
Insulation
5°~7° Angle Max
Insertion
[ Inserting solid conductors via push-in terminal ]
2. Pull-out
1. Push
Wire strip length
Wire insertion
Wire separation from the connector
Inserting solid conductors via push-in terminal
11 Design-in Guide - EasySense SNS210 MC July 2020
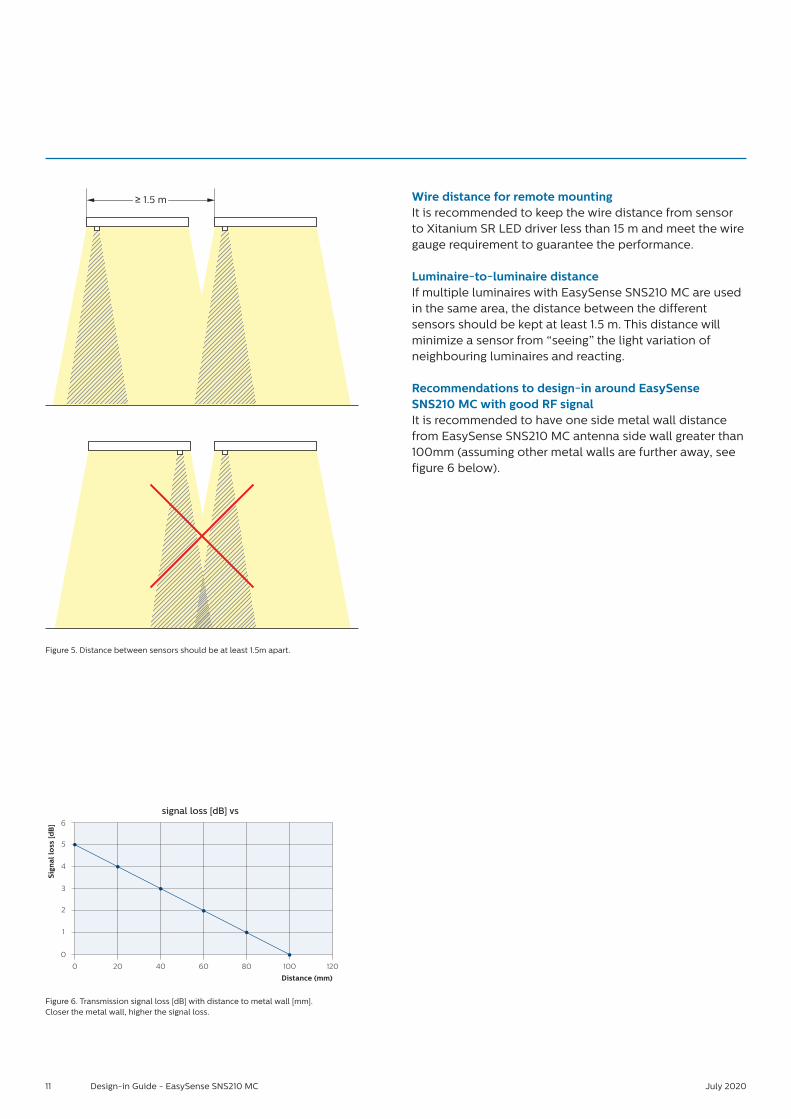
Wire distance for remote mountingIt is recommended to keep the wire distance from sensor to Xitanium SR LED driver less than 15 m and meet the wire gauge requirement to guarantee the performance.
Luminaire-to-luminaire distance If multiple luminaires with EasySense SNS210 MC are used in the same area, the distance between the different sensors should be kept at least 1.5 m. This distance will minimize a sensor from “seeing” the light variation of neighbouring luminaires and reacting.
Recommendations to design-in around EasySense SNS210 MC with good RF signal It is recommended to have one side metal wall distancefrom EasySense SNS210 MC antenna side wall greater than100mm (assuming other metal walls are further away, seefigure 6 below).
0
0
1
2
3
4
5
6
20 40
signal loss [dB] vs
60 80 100 120
Distance (mm)
Sign
al lo
ss [d
B]
Figure 6. Transmission signal loss [dB] with distance to metal wall [mm]. Closer the metal wall, higher the signal loss.
Figure 5. Distance between sensors should be at least 1.5m apart.
≥ 1.5 m ≥ 1.5 m

12 Design-in Guide - EasySense SNS210 MC July 2020
Mounting in a luminaireEasySense SNS210 MC is a luminaire-mount sensor that is directly powered by a Xitanium SR LED driver. It can be mounted to a slot or a cut-out in sheet metal.
Note: When daylight sensing is enabled, it is advised to add a light shield in between LED module and EasySense SNS210 MC in case the sensor is placed close to the LED module and in the same cavity. Without the shield some light can tunnel through the white housing and impact daylight sensing.
LED module
SNS210 Light shield

13 Design-in Guide - EasySense SNS210 MC July 2020
Mounting in a bracket (SMB-50)The EasySense SNS210 MC can be mounted in a bracket (SMB 50). Refer the figures for details on mounting and design-in into luminaire. All dimensions are in mm.
65 Max.
26 Max.
64 Max.
24 Max.
8 Max.
22 ± 0.2
60 ± 0.2
Press springs inwards on both sides before the bracket can slide-in the luminaire hole.

14 Design-in Guide - EasySense SNS210 MC July 2020
Installing EasySense SNS210 MC with ceiling mount bracket (CMP/W)The ceiling mount CMP bracket is available as a bracket without any pre-mounted sensor or cable. The luminairemanufacturer needs to mount the sensor in the CMP bracket and attach cable to it. The cable and screws are available with the accessory.Caution: The cable length from the EasySense sensor to SR driver should be kept <2m.For cut-out in the ceiling and mounting, refer to the figures below. All dimensions are in mm.
744
68
6
Ø 63
Ø 74
Radius min 5 mm

15 Design-in Guide - EasySense SNS210 MC July 2020
SNS210 MC sensors are supplied with three labels which each contain the assigned ZigBee MAC Address. For a typical application, the top two labels can be removed and discarded.
For a network application using a gateway, the labels can be used to identify a luminaire and where it is installed in the building.
Label 1 - Apply to the luminaireLabel 2 - Apply to the floor planLabel 3 - Remains on the sensor
Installer Label Instructions
Using the installer code labelsWhen the sensor isn’t operated with a gateway, the installer code label can be thrown away
When the sensor is used with a gateway, remove the 2 top labelsTear of the 2nd and 3rd label, take care to hold 1 label on the sensor
1 label must remain on the sensor,put 1 label on the luminaire, put 1 label on the floorplan (for more information see website)
Hereby, Signify declares that the radio equipment type EasyAir is in compliance with Directive 2014/53/EU. The full text of the EU declaration of conformity and technical information is available at the following internet address: https://www.lighting.philips.co.uk/oem-emea/products/connected-lighting/easyair-sensors
4422-947-76641 February 2020

16 Design-in Guide - EasySense SNS210 MC July 2020
When a group of luminaires is in the same daylightcondition and needs to be operated at the same level, it ispossible to use one sensor to control multiple luminaires.This can be done in two ways:(a) Use an SR bridge which can then connect to multipleDALI drivers. For details on SR bridge, please refer todesign in guide of SR bridge.(b) add multiple SR drivers together.
In case EasySense SNS210 MC is connected to multiple Philips Xitanium SR LED drivers, the number of drivers is limited to 10. Not more than 4 drivers should have DALI power supply enabled. To minimize unnecessary losses, it is recommended to turn on only two DALI power supplies.Each SR driver provides approximately 55mA of current onthe DALI bus, and EasySense SNS210 MC is limited to 250mA.
EasySense SNS210 MC sends commands to all connecteddrivers (using broadcast command); it does not havecapabilities to address individual drivers. The lightcommands are sent as a broadcast command, sooccupancy-/daylight-based lighting control and tasktuning operate the same on all connected drivers. Thereadout of energy information from the connected driverswill not function. The energy readout of multiple drivers isforeseen in our roadmap.
EasySense SNS210 MC with multiple Philips Xitanium SR LED drivers (1:N application)
EASYSENSEDADA
Xitanium SR LED Driver
LED+LED+
LED-LED-
RSET2SGND
NFC ANTENNA
DA-
Connectors
DA+
LINENEUTRALGROUND
NC
Enable DALI PS
LED+LED+
LED-LED-
RSET2SGND
NFC ANTENNA
SR-
Connectors
SR+
LINENEUTRALGROUND
NC
Enable DALI PS
LED+LED+
LED-LED-
RSET2SGND
NFC ANTENNA
SR-
Connectors
SR+
LINENEUTRALGROUND
NC
Enable DALI PS
LED+LED+
LED-LED-
RSET2SGND
NFC ANTENNA
SR-
Connectors
SR+
LINENEUTRALGROUND
NC
Xitanium SR LED DriverDA-DA+
Xitanium SR LED DriverDA-DA+
Xitanium SR LED DriverDA-DA+
Warning:Please note the DALI power supply can only beturned on/off on the Philips Xitanium SR LEDdriver through the MultiOne tool. For thisapplication, please also make sure all drivers thatare connected to the sensor have the same wiringpolarity. SR drivers are shipped with the powersupply on as default.
i

17 Design-in Guide - EasySense SNS210 MC July 2020
To ensure that a luminaire has been assembled correctly i.e. the wiring of the EasySense SNS210 MC sensor to Xitanium SR driver is correct; a visible check can be made.The luminaire on power up dims up to 30% of maximum light output in the 1st second followed by dimming up to 100% in the next second. This behaviour is only visible in non-commissioned devices i.e. once grouped using Philips MasterConnect app, this behaviour will cease to exist.
Luminaire Production Test

18 Design-in Guide - EasySense SNS210 MC July 2020
FAQ
Can you use a wall dimmer with EasySense SNS210 MC? EasySense SNS210 MC can be used with a wireless wall dimmer, e.g., Zigbee green power switch. For list of supported switches, please visit our website
How does EasySense SNS210 MC compare to Philips ActiLume? Occupancy sensing and daylight harvesting are similar.Form factors are also similar, with the face of the sensoroutside the luminaire having the same size. The portion ofEasySense SNS210 MC within the luminaire is slightly deeper and longer to accommodate added functionality. EasySense SNS210 MC includes granular dimming together with energy reporting and works with Philips Xitanium SR LED drivers to eliminate the cost and complexity of a separate power pack.
Is EasySense SNS210 MC a DALI sensor? EasySense SNS210 MC works with Philips Xitanium SRLED drivers, which have inbuilt power supply. Itcannot be used with DALI drivers and therefore,EasySense SNS210 is not a DALI sensor.
Can I use EasySense SNS210 MC outside a luminaire? An accessory option called CMP/w is available toenable ceiling mounting. Wiring to the driver must bekept less than 2m.
Can I use one sensor with multiple luminaires? Yes, and the ceiling mount option is likely utilized in thisuse case (called 1:N operation as opposed to 1:1). It usuallymeans turning off the SR power supplies in all but one ofthe SR drivers. See EasySense SNS210 MC with multiple SRdrivers 1:N application section.

19 Design-in Guide - EasySense SNS210 MC July 2020
Does EasySense SNS210 MC make sense if I only want to do occupancy sensing?
Yes. Keep “Occupancy Control” enabled in MC App and disable “Daylight Control”
How does the daylight harvesting feature work? EasySense SNS210 MC does inbuilt calibration to a fixed lux at desk level. Auto-calibration to a desired light level will be enabled in future release.
Is EasySense SNS210 MC “failsafe”? Unlike traditional occupancy sensors, EasySense SNS210 MC does not have a mechanical relay. This is a benefit ofPhilips SR LED drivers, as on/off is done relay-free withinthe driver. Devices with mechanical relays should bedesigned so that relay failure results in “lights on.” If an SRdriver does not see a digital signal from a device for a longperiod of time (e.g., loose connection, sensor failure), thedriver goes to full programmed output.
Does EasySense SNS210 MC work on 0-10v drivers? No. EasySense SNS210 MC works on Philips Xitanium SR LED drivers to enable two-way digital communication directly to the driver and to eliminate the need for other auxiliary devices.

20 Design-in Guide - EasySense SNS210 MC July 2020
Philips EasySense SNS210 MC
Product information:contact your local Signify sales representative.
Contact details

21 Design-in Guide - EasySense SNS210 MC July 2020
©2020 Signify Holding B.V. All rights reserved.
Note that the information provided in this document is subject to change.
This document is not an official testing certificate and cannot be used or construed as a document authorizing or otherwise supporting an official release of a luminaire. The user of this document remains at all times liable and responsible for any and all required testing and approbation prior to the manufacture and sale of any luminaire.
The recommendations and other advice contained in this document, are provided solely for informational purposes for internal evaluation by the user of this document. Signify does not make and hereby expressly disclaims any warranties or assurances whatsoever as to the accuracy, completeness, reliability, content and/or quality of any recommendations and other advice contained in this document, whether express or implied including, without limitation, any warranties of satisfactory quality, fitness for a particular purpose or non-infringement. Signify has not investigated, and is under no obligation or duty to investigate, whether the recommendations and other advice contained in this document are, or may be, in conflict with existing patents or any other intellectual property rights. The recommendations and other advice contained herein are provided by Signify on an “as is” basis, at the user’s sole risk and expense.
Specifically mentioned products, materials and/or tools from third parties are only indicative and reference to these products, materials and/or tools does not necessarily mean they are endorsed by Signify. Signify gives no warranties regarding these and assumes no legal liability or responsibility for any loss or damage resulting from the use of the information thereto given here.
Disclaimer

© 2020 Signify Holding. All rights reserved. The information provided herein is subject to change, without notice. Signify does not give any representation or warranty as to the accuracy or completeness of the information included herein and shall not be liable for any action in reliance thereon. The information presented in this document is not intended as any commercial offer and does not form part of any quotation r contract, unless otherwise agreed by Signify.
PLt-20023DG-EasySense_SNS210_DIG 07/20 philips.com/lighting
Signify North America Corporation 200 Franklin Square Drive, Somerset, NJ 08873 Telephone 855-486-2216
Signify Canada Ltd. 281 Hillmount Road, Markham, ON, Canada L6C 2S3 Telephone 800-668-9008
Philips and the Philips Shield Emblem are registered trademarks of Koninklijke Philips N.V. All other trademarks are owned by Signify Holding or their respective owners.