simman / simbaby installation
TRANSCRIPT

SimMan / SimBaby InstallationSimMan / SimBaby Installation
The following abbreviated steps will assist you in steps will assist you in installing SimMan/SimBaby software and hardware for this class.
Please refer to the full installation guide for installation guide for detailed directions.

Latex WarningLatex Warning
The veins in the IV arm, and The veins in the IV arm, and
pneumothorax bladders contain
latex. Users who suffer from latex
allergy should take precautions while
using or handling the latex parts by
wearing non-latex protective gloves
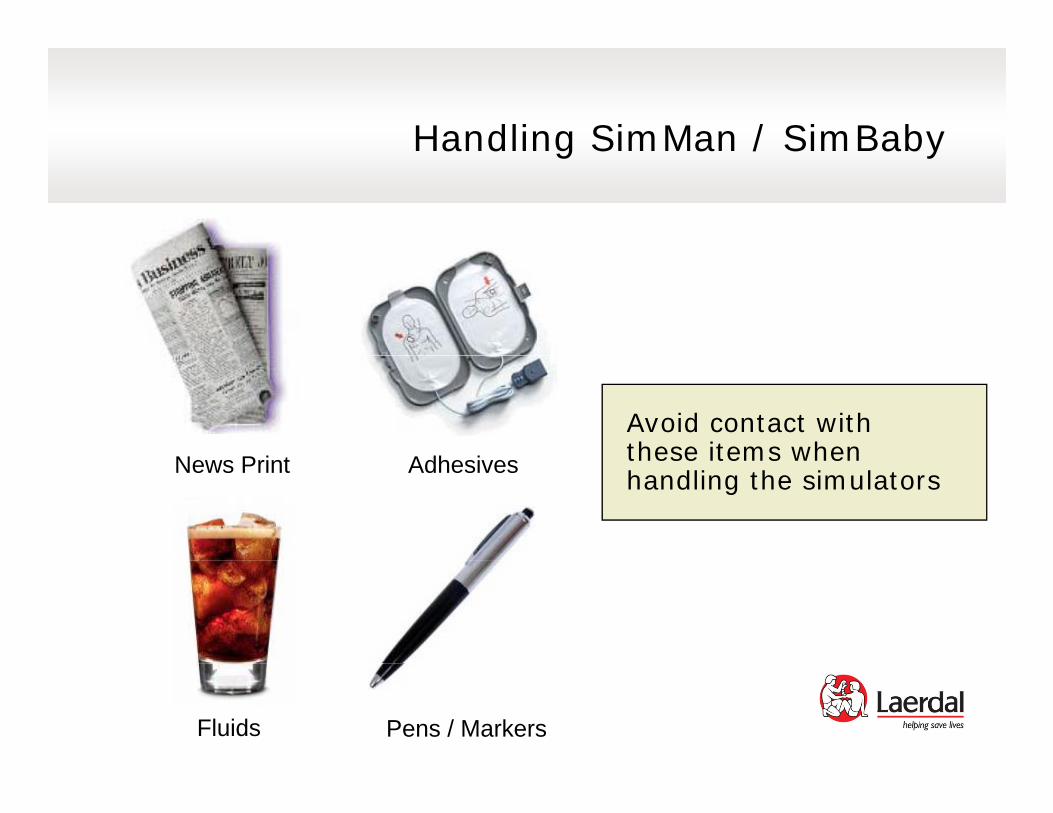
Handling SimMan / SimBabyHandling SimMan / SimBaby
Avoid contact with these items when N P i t Adh i these items when handling the simulators
News Print Adhesives
Fluids Pens / Markers

SimMan / SimBaby Installation CComponents
USB Hub (optional)Expands number of USB ports
CompressorProvides air and CO2 to manikin
Link BoxConnects manikin to computer
ELO Simulated Patient MonitorTouch screen monitor provides clinical feedback
ComputerOperates software that
USB Web CameraCamera with built-in
provides clinical feedbackcontrols manikin microphone enables debriefing

SimMan / SimBaby Installation C blCables
Video Cable – 15 PinConnects patient monitor and PC
USB CableConnects patient monitorand USB hub
Audio CableConnects PC, monitorand link box
Serial Cable – 9 PinConnects computer tolink box
Air / CO2Connects manikin to
Manikin Cable – 15 PinConnects manikin to
link boxcompressor link box

SimMan / SimBaby Installation S 1 L d S fStep 1 – Load Software
If not already installed:Insert software CDS l t “I t ll”Select “Install”
If prompted by Windows to stop installation, click “Next” or “Continue Anyway”
Do not start application yet!Do not start application yet!
Software may be loaded on ymultiple PCs without additional licenses
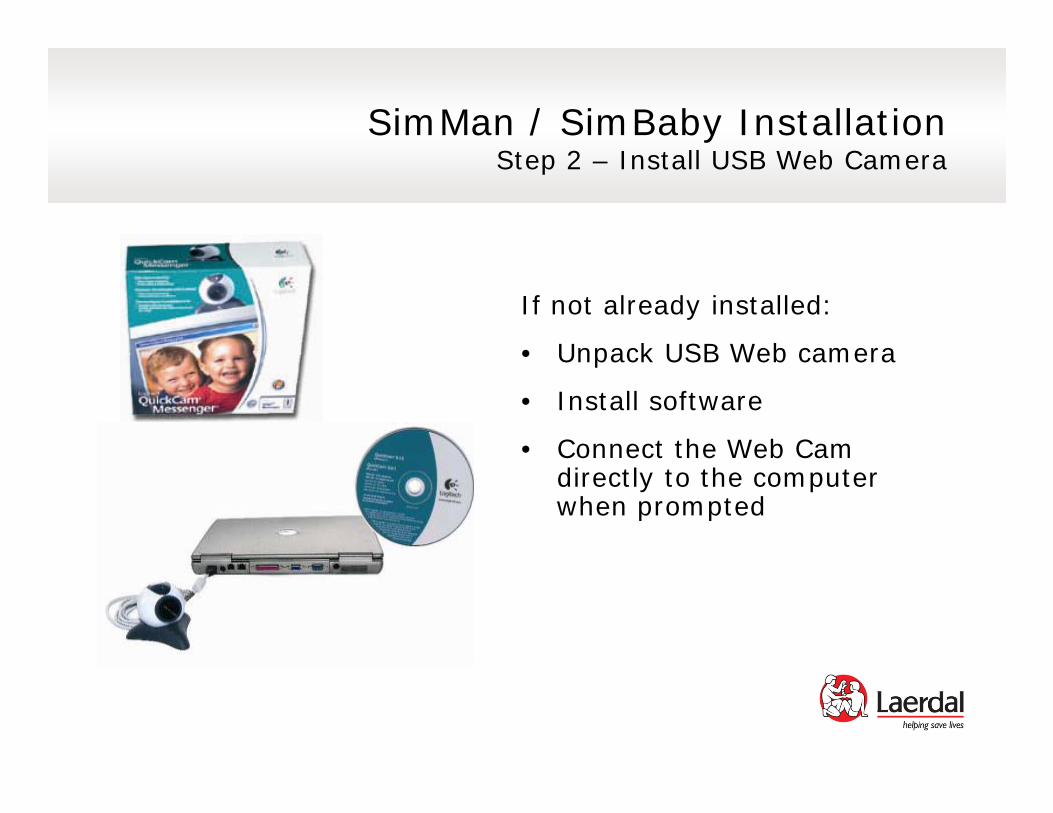
SimMan / SimBaby InstallationS 2 I ll USB W b CStep 2 – Install USB Web Camera
If not already installed:
• Unpack USB Web camera • Unpack USB Web camera
• Install software
• Connect the Web Cam Co ect t e eb Cadirectly to the computer when prompted
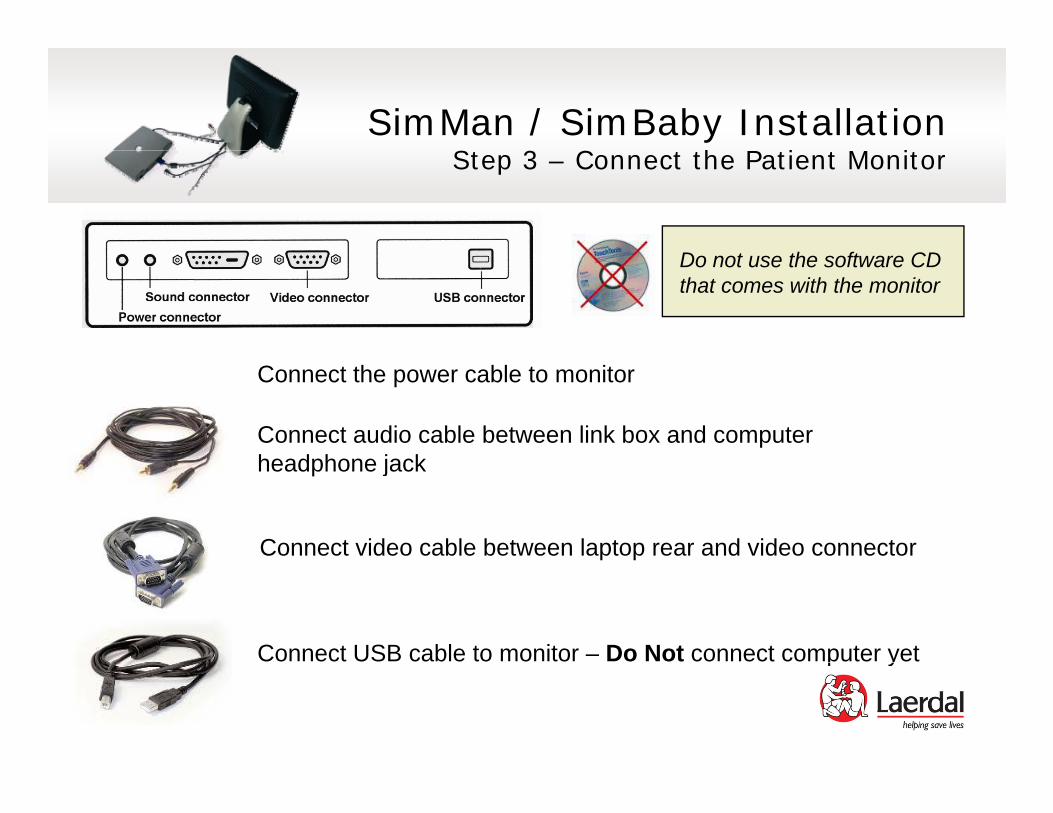
SimMan / SimBaby Installation S 3 C h P i M iStep 3 – Connect the Patient Monitor
D t th ft CDDo not use the software CD that comes with the monitor
Connect audio cable between link box and computer h d h j k
Connect the power cable to monitor
headphone jack
Connect video cable between laptop rear and video connector
Connect USB cable to monitor – Do Not connect computer yetp y
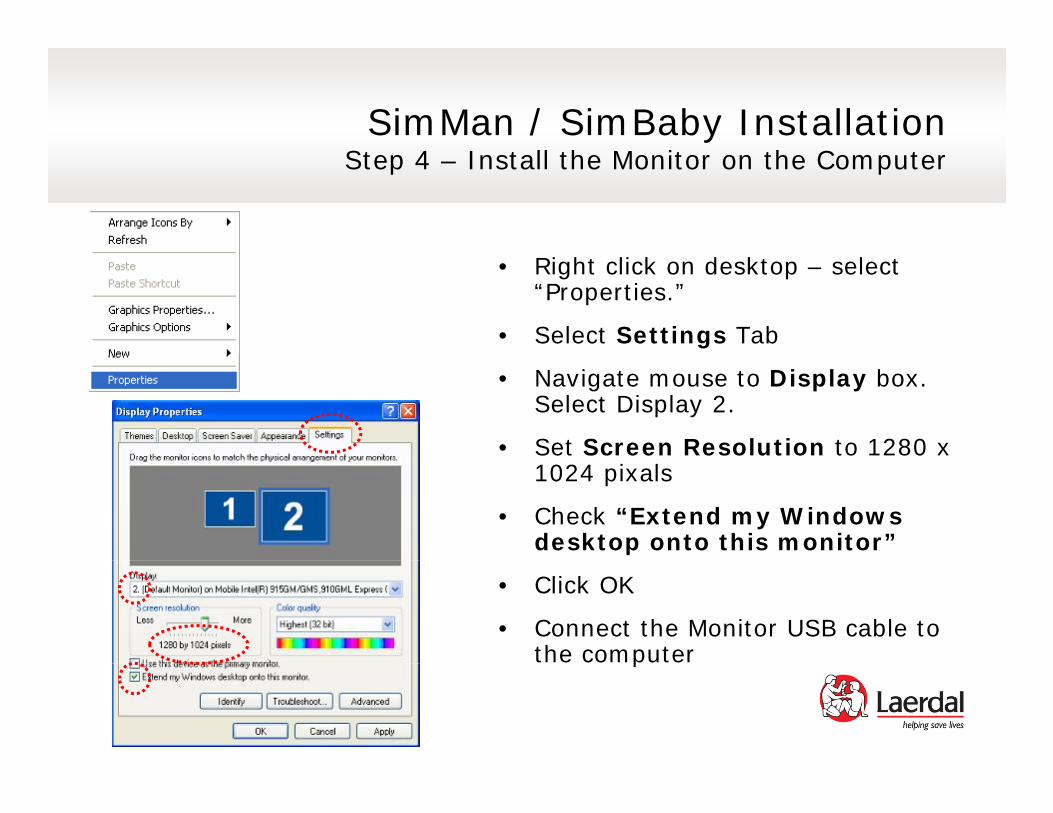
SimMan / SimBaby InstallationS 4 I ll h M i h CStep 4 – Install the Monitor on the Computer
• Right click on desktop – select “Properties.”
• Select Settings Tab
• Navigate mouse to Display box. Select Display 2.
• Set Screen Resolution to 1280 x 1024 pixals
• Check “Extend my Windows desktop onto this monitor”
• Click OK
• Connect the Monitor USB cable to the computerp
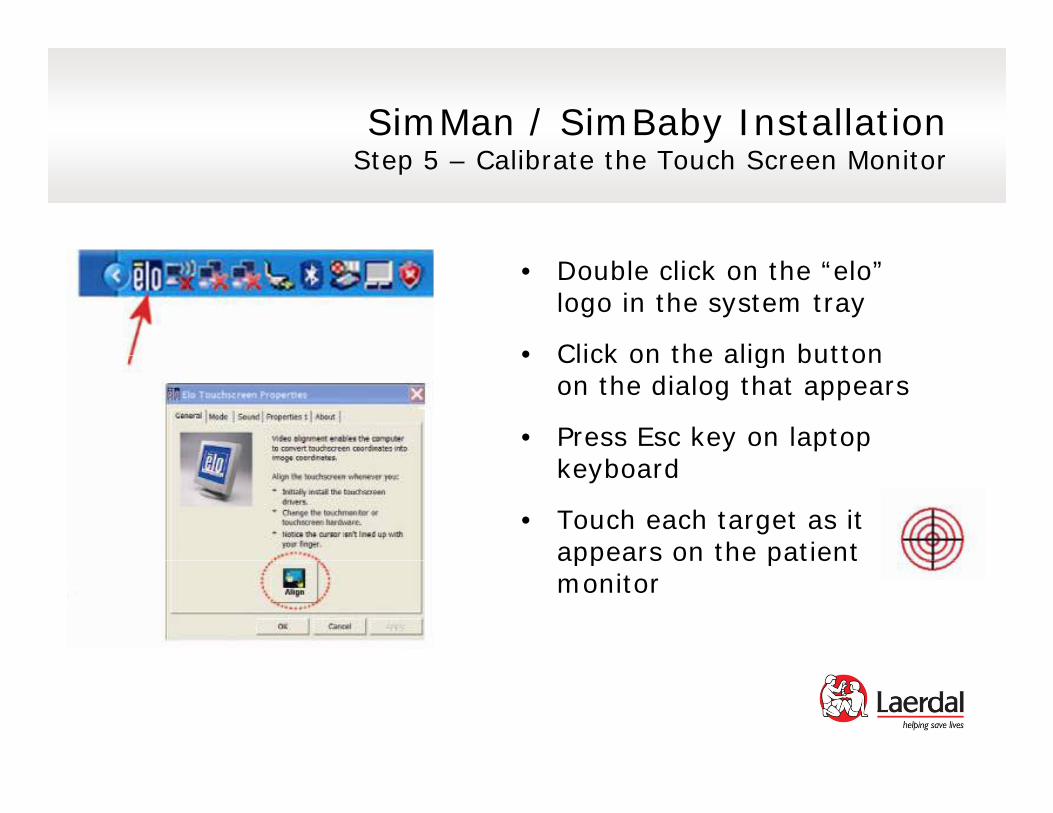
SimMan / SimBaby InstallationS 5 C lib h T h S M iStep 5 – Calibrate the Touch Screen Monitor
• Double click on the “elo” logo in the system tray
• Click on the align button • Click on the align button on the dialog that appears
• Press Esc key on laptop k b dkeyboard
• Touch each target as it appears on the patient appears on the patient monitor

SimMan / SimBaby InstallationS 6 C h M iki h CStep 6 – Connect the Manikin to the Computer
X
Connect 9-Pin i l bl f
Connect 15-Pin Connect audio serial cable from the link box to the computer
manikin cable from the link box to the manikin
cable to the link box

SimMan / SimBaby InstallationS 7 U d h f i h M iki d Li k BStep 7 – Update the software in the Manikin and Link Box
Perform this step only if you are upgrading software
• Start the manikin update program from the start menumenu
• Start update
• This program will • This program will automatically update all software in the link box and in the manikinand in the manikin
Software should be closed when updating. Make sure Linkbox is turned on and p gconnected to computer and simulator

SimMan / SimBaby InstallationS 8 I ll h CStep 8a – Install the Compressor
• Connect power cable to compressor and wall outlet
• Connect dual-lumen air tube Connect dual lumen air tube to manikin and compressor

SimMan / SimBaby InstallationS 8b O i h CStep 8b – Operating the Compressor
• Set power to off position “o”• Set power to off position o
• Close drain valve
• Close air valve and CO2 valve• Close air valve and CO2 valve
• Switch power to on position “I”
• Compressor will start and run for Compressor will start and run for approximately 45 seconds
• When compressor stops, open the i lair valve
• The compressor will start and stop with different intervalsDAILY: When compressor is
turned off, the air tank must be drained

SimMan / SimBaby InstallationS 9 C h BP ff d S O2 b h Li k BStep 9 – Connect the BP cuff and SpO2 probe to the Link Box
• Connect BP cuff to air input on the link box
Connect SpO2 probe to SpO2 input on the link b
• Calibrate BP cuff after system is completely installed until calibration is
f l
box
successful

LoginLogin
• Create a user account –Suggestion: Use a generic user name such as “Sim”
• Enter registration dataEnter registration data
• Once registration is complete, a password may be enteredbe entered
• Passwords may be left blank
See FAQ section on scenario sharing

SimMan FeaturesH dHead
• Vocal sounds• Vocal sounds
• Interchangeable pupils
• Carotid pulsesp
• Emits CO2
• Multiple airway skills
• Trismus
• Tongue edema
Pharyngeal edema• Pharyngeal edema
• Laryngospasm
• Decreased cervical range Decreased cervical range of motion

SimMan FeaturesTTorso
• Simulated spontaneous respiration
• Decreased lung compliance
Heart and lung sounds• Heart and lung sounds
• Pneumothorax decompression
• Stomach decompressionStomach decompression
• Extensive ECG library
• ECG monitoring
• Defibrillation
• External pacing
• Chest compression

SimMan FeaturesP l i d E i iPelvis and Extremities
• Male and female urinary catheterization
• IV training arm
• Subcutaneous / intramuscular injectionsinjections
• Blood pressure
• Pulses Pulses – Bilateral: Carotid, Femoral,
Dorsalis Pedis, and Posterial Tibial– Left: Brachial and Radial, ,

SimManR d d Adj SiRecommended Adjunct Sizes
Item Description Size
ET Tube 7.5 mm
Laryngeal Mask Airway(Classic, Unique, and Fastrach)
4
Combitube Trainer oractual device
IV Catheters 18g IV22g Decompression

SimBaby FeaturesH dHead
• Anatomical realistic airway
• Simulated spontaneous respiration
A t id f • Accepts wide range of airway management devices
• Pharyngeal obstruction
• Grunting
• Tongue edema
• Laryngospasm
• Cyanosis
• Emits CO2

SimBaby FeaturesTTorso
• Simulated body movement
• Variable breathing patterns and chest rise
• Heart and lung auscultation
• Decreased lung compliance
• Pneumothorax decompression
• Chest compression
• Stomach decompression
• ECG monitoring
• Defibrillation

SimBaby FeaturesE i iExtremities
• Palpable pulses• Blood pressure
IV d IO • IV and IO access• Leg reservoir may hold up to
65 ml

SimBabyR d d Adj SiRecommended Adjunct Sizes
Item Description Size
ET Tube 3.5 mm
Laryngeal Mask Airway(Classic and Unique)
1.5
IV Catheters 22g IV22g Decompression14g IO
Intra Osseous 15 Gauge

MaintenanceMaintenance
• Skin – clean with mild soap • Skin – clean with mild soap and water
• Modules – rinse, drain and air dryair dry
• Injection pads – squeeze to eliminate excess fluid.
• Inside of chest skin –powder with corn starch to decrease plastic rubbing
dsound• Lubricate airway – Use silicon
spray sparingly