simatic hmi 3 - siemens · simatic hmi ® third parties ... safe operation of a plant ... all...
TRANSCRIPT
� �RemoteOperate V3
___________________
___________________
___________________
___________________
___________________
___________________
___________________
SIMATIC HMI
Software RemoteOperate V3
Programming Manual
11/2011 A5E03754256-01
Preface
Overview 1
Range of functions of the RemoteOperate software
2
Hardware and software requirements
3
Installing RemoteOperate 4
Server and client administration
5
Using a client 6

Legal information
Legal information Warning notice system
This manual contains notices you have to observe in order to ensure your personal safety, as well as to prevent damage to property. The notices referring to your personal safety are highlighted in the manual by a safety alert symbol, notices referring only to property damage have no safety alert symbol. These notices shown below are graded according to the degree of danger.
DANGER indicates that death or severe personal injury will result if proper precautions are not taken.
WARNING indicates that death or severe personal injury may result if proper precautions are not taken.
CAUTION with a safety alert symbol, indicates that minor personal injury can result if proper precautions are not taken.
CAUTION without a safety alert symbol, indicates that property damage can result if proper precautions are not taken.
NOTICE indicates that an unintended result or situation can occur if the relevant information is not taken into account.
If more than one degree of danger is present, the warning notice representing the highest degree of danger will be used. A notice warning of injury to persons with a safety alert symbol may also include a warning relating to property damage.
Qualified Personnel The product/system described in this documentation may be operated only by personnel qualified for the specific task in accordance with the relevant documentation, in particular its warning notices and safety instructions. Qualified personnel are those who, based on their training and experience, are capable of identifying risks and avoiding potential hazards when working with these products/systems.
Proper use of Siemens products Note the following:
WARNING Siemens products may only be used for the applications described in the catalog and in the relevant technical documentation. If products and components from other manufacturers are used, these must be recommended or approved by Siemens. Proper transport, storage, installation, assembly, commissioning, operation and maintenance are required to ensure that the products operate safely and without any problems. The permissible ambient conditions must be complied with. The information in the relevant documentation must be observed.
Trademarks All names identified by ® are registered trademarks of Siemens AG. The remaining trademarks in this publication may be trademarks whose use by third parties for their own purposes could violate the rights of the owner.
Disclaimer of Liability We have reviewed the contents of this publication to ensure consistency with the hardware and software described. Since variance cannot be precluded entirely, we cannot guarantee full consistency. However, the information in this publication is reviewed regularly and any necessary corrections are included in subsequent editions.
Siemens AG Industry Sector Postfach 48 48 90026 NÜRNBERG GERMANY
A5E03754256-01 Ⓟ 11/2011
Copyright © Siemens AG 2011. Technical data subject to change

RemoteOperate V3 Programming Manual, 11/2011, A5E03754256-01 3
Preface
Purpose of the programming manual This programming manual forms part of the documentation for HMI devices supplied with the RemoteOperate V3 software package. The manual will help you to install and use RemoteOperate V3.
This manual is intended for:
● RemoteOperate users
RemoteOperate users connect to a server using the RemoteOperate Client software package. They operate and monitor the system during the process control phase.
The following chapters are relevant to RemoteOperate users:
– Overview
– Range of functions of the RemoteOperate software
– Using a client
● RemoteOperate administrators
RemoteOperate administrators install and configure the RemoteOperate system. They define and control client access to the RemoteOperate Server before and during the process control phase.
The following chapters are relevant to RemoteOperate administrators:
– Overview
– Range of functions of the RemoteOperate software
– Hardware and software requirements
– Installing RemoteOperate
– Server and client administration
Basic knowledge required General knowledge of automation technology and process communication is required to understand the programming manual.
It is also assumed that those using the manual have experience in using personal computers and knowledge of Microsoft operating systems.
Validity of the programming manual The programming manual is valid for the RemoteOperate V3 software package used in conjunction with an HMI device.
The software description in this document takes precedence over information provided in the operating instructions of the HMI device.

Preface
RemoteOperate V3 4 Programming Manual, 11/2011, A5E03754256-01
Conventions The following designations for hardware and software are used in this manual: Name Meaning RemoteOperate Server The RemoteOperate Server software package RemoteOperate Client The RemoteOperate Client software package RemoteOperate The RemoteOperate software package (Server and Client) Server A system on which the RemoteOperate Server software is
installed or runs. Client, HMI device A system on which the RemoteOperate Client software
package runs.
The following text notation will facilitate reading this manual: Notation Scope "Add screen" • Terminology that appears in the user interface, for example
dialog names and buttons • Required inputs, for example, an IP address • Path information
"File > Edit" Operating sequences, for example, menu commands, shortcut menu commands
<F1>, <Alt + P> Keyboard actions
Please observe notes labeled as follows:
Note
Notes containing important information about the product and its use or a specific section of the documentation to which you should pay particular attention.
Figures This manual includes illustrations of the described software. The specification of the copyright in these illustrations can deviate from the state of delivery of the described software. The copyright © 2011 applies to the described software.
Trademarks HMI® SIMATIC® SIMATIC HMI®
Third parties using for their own purposes any other names in this document which refer to trademarks might infringe upon the rights of the trademark owners.

Preface
RemoteOperate V3 Programming Manual, 11/2011, A5E03754256-01 5
Technical Support Technical support for the products covered in the manual is available on the Internet at:
● Technical Support (http://www.siemens.de/automation/csi_en_WW)
● Support Request (http://www.siemens.com/automation/support-request)
● Service (http://support.automation.siemens.com/WW/view/en/16604318)
● Contacts and office locations (http://www.automation.siemens.com/mcms/aspa-db/en/Pages/default.aspx)
● Training center (http://sitrain.automation.siemens.com/sitrainworld/?AppLang=en)
Additional information on SIMATIC products is available on the Internet at:
● Industry Portal (http://www.automation.siemens.com/_en/portal/index.htm)
● Overall SIMATIC documentation (http://www.siemens.com/simatic-tech-doku-portal)
RemoteOperate V3 6 Programming Manual, 11/2011, A5E03754256-01
Table of contents
Preface ...................................................................................................................................................... 3
1 Overview.................................................................................................................................................... 7
2 Range of functions of the RemoteOperate software .................................................................................. 9
3 Hardware and software requirements ...................................................................................................... 11
4 Installing RemoteOperate ........................................................................................................................ 13
5 Server and client administration............................................................................................................... 15
5.1 Overview ..................................................................................................................................... 15
5.2 The "RemoteOperate V3 Server" dialog box .............................................................................. 16
5.3 Add client .................................................................................................................................... 17
5.4 Editing client properties............................................................................................................... 19
5.5 Removing a client........................................................................................................................ 22
5.6 Changing server settings ............................................................................................................ 23
6 Using a client ........................................................................................................................................... 27
6.1 Creating/editing a server selection list ........................................................................................ 27
6.2 Connecting a client...................................................................................................................... 30
6.3 Changing the server.................................................................................................................... 34
6.4 Closing the RemoteOperate Client ............................................................................................. 35
6.5 Example: Assigning operator authorization ................................................................................ 37
Index........................................................................................................................................................ 41

RemoteOperate V3 Programming Manual, 11/2011, A5E03754256-01 7
Overview 1
The use of PCs in automation is essential today. To lower the expenses for hardware, software and maintenance, several screens are often used on one PC. Several screens also offer the option to operate and monitor a plant from several locations. The use of simple displays with a standard video cable often does not work because of limited cable lengths and EMC contamination in industrial environments. Ethernet networks are the first choice regarding interference resistance and cabling costs in such an environment.
The RemoteOperate software package The RemoteOperate software provides access to process data regardless of your location as well as implementation of economic client-server solutions at machine level.
Using RemoteOperate you can monitor or operate a server from a client. The range of operations covers all the functions of the server.

Overview
RemoteOperate V3 8 Programming Manual, 11/2011, A5E03754256-01
The RemoteOperate Client/Server structure The following illustration is an example for the structure of a RemoteOperate client/server structure.
The nodes in the network communicate via Ethernet.
Safe operation of a plant
CAUTION Protective measures
In order to guarantee safe operation of a plant, you need to take suitable protective measures, including IT security such as network segmentation. You will find more information on the topic of industrial security on the Internet (http://www.siemens.com/industrialsecurity).
The RemoteOperate user interface The user interface of the RemoteOperate software has a simple design and is easy to operate. All buttons and authorization displays are identified by language-neutral icons.

RemoteOperate V3 Programming Manual, 11/2011, A5E03754256-01 9
Range of functions of the RemoteOperate software 2Server and client
After installation, the RemoteOperate software runs on the server as a task in the Windows task scheduler. The RemoteOperate Server software is started when a user logs on.
When a client connects to a server, the screen contents of the server are displayed on the client's screen. This is known as a "server-identical screen".
Depending on its access authorization, a client can either monitor or operate the server.
Range of functions of RemoteOperate Server The RemoteOperate Server software offers the following functions:
● Add a client: You can connect up to six clients to one server, either manually or by confirmation of an incoming operator request.
● Remove a client: You can delete entries from the list of authorized clients.
● Edit the properties of a client: You can define the server access authorization for each authorized client: "No access", "Access", "Monitor" or "Operate".
● Change the server settings, for example:
– Specify the path to the configuration file "roServer.ini".
– Specify the network adaptor for the Ethernet connection.
● Access control: Only one client can operate the server at any one time. The RemoteOperate Server assigns the operator authorization. The following types of operator authorization are available:
– The "operate" mode: A client receives the operator authorization. Other clients can make an operator request.
– The "operate exclusively" mode: A client receives the exclusive operator authorization. Other clients can only make another operator request if the "operate exclusively" mode was released once again using the RemoteOperate Client software.
– "Forced Exclusive" mode: A client receives the exclusive operator authorization via a bit that was set in the PLC, for example with a switch close to an HMI device. Only if the "Forced Exclusive" mode is disabled by resetting the bit in the PLC, will other clients be able to make an operator request. The "Forced Exclusive" mode can only be used in connection with mobile HMI devices. Additional information on "Forced Exclusive" mode is available in the following chapter.

Range of functions of the RemoteOperate software
RemoteOperate V3 10 Programming Manual, 11/2011, A5E03754256-01
Range of functions of RemoteOperate Client The RemoteOperate Client software offers the following functions:
● Create or edit the server selection list.
● Connect the client to a server.
● Monitor or operate a server as an identical screen.
● Operate the server exclusively. A client can block and release the operator authorization that has been granted. Other clients cannot request operator authorization until it has been released.
● Automatic reconnection after interruption: If the network connection between the client and server is unintentionally interrupted, RemoteOperate Client automatically establishes a new connection to the server.
The client is immediately ready for operation again after a short-term network problem. In case of an ongoing network problem, the client will permanently try to establish a connection again. You can choose to abort this repeated attempt to establish a connection.
See also Add client (Page 17)
Removing a client (Page 22)
Creating/editing a server selection list (Page 27)
Connecting a client (Page 30)
Editing client properties (Page 19)
Changing server settings (Page 23)
RemoteOperate V3 Programming Manual, 11/2011, A5E03754256-01 11
Hardware and software requirements 3Server hardware
RemoteOperate supports the SIMATIC HMI IPC677C as server.
Server operating system The RemoteOperate Server software is compatible with Windows 7, 64-bit.
Client hardware RemoteOperate supports the following devices as client:
● MP 377
● Mobile Panel 277 RO.
Client operating system The following is pre-installed on the HMI devices:
● The Microsoft Windows CE 5.0 operating system
● Optional: RemoteOperate Client V3 or a previous version

Hardware and software requirements
RemoteOperate V3 12 Programming Manual, 11/2011, A5E03754256-01
HMI software To use the "Forced Exclusive" mode for Mobile Panels, you will have to implement the following mechanisms in the HMI software that runs on the server.
● Monitoring the control bits that enable and disable the "Forced Exclusive" mode. The control bits can be interconnected, for example, with switches.
● Evaluation of the control bit and detection of the connection box ID of the mobile HMI device that may operate the server in "Forced Exclusive" mode.
● Create the following registry entry of the type REG_SZ (string or character string) on the server if the registry entry does not exist yet: HKEY_LOCAL_MACHINE\SOFTWARE\SIEMENS\RemoteOperate_V3\ForceExclusive
● Enter the connection box ID as value of the registry entry "ForceExclusive."
The valid range of values for the entry "ForceExclusive" is "0" to "255."
This entry is permanently monitored by a polling mechanism of the RemoteOperate Server software. As soon as the registry entry "ForceExclusive" receives a value between "0" and "255," the exclusive operator authorization will be assigned to the mobile HMI device with this connection box ID.
● Delete the registry entry "ForceExclusive" as soon as one of the following states is assumed:
– The control bit of the client operated in "Forced Exclusive" mode will be reset. Reset of the control bit can, for example, be triggered by pressing the switch once again.
– The HMI software running on the server will be closed.
WARNING
Restart required
The HMI software is to take over administration of the registry entry "ForceExclusive" and check validity of the entry.
Errors in the registry entry "ForceExclusive" may force a restart of the RemoteOperate Server software or the server.
Note
The registry entry "ForceExclusive" will be automatically reset after a restart of the server and the RemoteOperate Server software.

RemoteOperate V3 Programming Manual, 11/2011, A5E03754256-01 13
Installing RemoteOperate 4RemoteOperate Client software – Requirements
● The HMI device is connected to a PC on which ProSave is installed.
● The data channel is configured on the HMI device.
Installing RemoteOperateClient Proceed as follows:
1. Start the "setup.exe" installation program in the "\roClient" directory of the installation CD.
2. Follow the instructions of the installation program.
3. From the Windows Start menu, start ProSave on the PC.
4. Select the HMI device type in the "General" tab.
5. Select the type of connection between the HMI device and the PC, then set the connection parameters.
6. Select the "Options" tab.
7. Select the "RemoteOperate Client V3.1 VW edition" option under "Available options".
8. Set "Transfer" mode on the HMI device.
If automatic transfer mode is enabled on the HMI device, the device automatically sets "Transfer" mode when the installation of an option is initiated.
9. Start the installation of the option in ProSave with the ">>" button.
Follow the instructions in ProSave. A status display appears indicating the progress of the installation.
10. After the installation of the option has been completed, carry out a restart of the HMI device.
RemoteOperate Server software - requirements Make sure that the following requirements have been satisfied before starting to install the RemoteOperate Server software.
● The PC on which you are installing RemoteOperate Server satisfies the requirements described in the "Hardware and software requirements" chapter.
● You have administrator rights for the server. Administrator rights are only needed for installing RemoteOperate. After installation you can use RemoteOperate on the server without administrator rights.

Installing RemoteOperate
RemoteOperate V3 14 Programming Manual, 11/2011, A5E03754256-01
Previous versions of RemoteOperate Server RemoteOperate or a previous version of RemoteOperate may not be already installed on the server.
● Select "Start > Settings > Control Panel > Software".
● Enable the entry "RemoteOperate Server Vx.x.x.x."
● Remove the previous version of the RemoteOperate software with the "Change/Remove" button.
● Make sure that the "Siemens RemoteOperate V3 MirrorDisplay" driver is not present on the server. You can verify this setting in the Control Panel: "Start > Settings > Control Panel > System"> Hardware" tab > "Device Manager" button > "Display adapters."
If the "Siemens RemoteOperate V3 MirrorDisplay" driver is still on the server, remove it prior to installation.
Settings in the Windows Control Panel Check the following settings in the Windows Control Panel:
● If you use a firewall, ensure that the "roServer.exe" file is included in the exceptions list.
● Set the screen resolution of the server to 1024 × 768.
Installing RemoteOperate Server Proceed as follows:
1. Start the "setup.exe" installation program in the "\roServer" directory of the installation CD.
2. Follow the instructions of the installation program.
Note
Read the information provided in the file "readme.rtf".
3. Restart the server after an error-free installation.
4. After the restart, log on with the same logon used for the installation process.
If installation completes successfully, the RemoteOperate icon is shown in the Windows taskbar.
Result You have successfully installed the RemoteOperate software.

RemoteOperate V3 Programming Manual, 11/2011, A5E03754256-01 15
Server and client administration 55.1 Overview
This chapter describes the tasks and processes involved in server configuration and client administration.
Requirement ● You have successfully installed the RemoteOperate Server software on the server. The
"RemoteOperate V3 Server" software is running in the background after logon to the server.
● You have logged on to the server as a user.
Server and client administration RemoteOperate offers the following functions for server and client administration:
● Add a client manually or via an incoming connection request;
● Edit the properties of a client;
● Remove a client.
● Change the following settings of the RemoteOperate Server software:
– Specify the path to the configuration file "roServer.ini".
– Define a shortcut to display the "RemoteOperate V3 Server" dialog box.
– Specify the server network adapter used for the Ethernet connection.
See also Editing client properties (Page 19)
Changing server settings (Page 23)
Installing RemoteOperate (Page 13)
Connecting a client (Page 30)
Add client (Page 17)
Removing a client (Page 22)

Server and client administration 5.2 The "RemoteOperate V3 Server" dialog box
RemoteOperate V3 16 Programming Manual, 11/2011, A5E03754256-01
5.2 The "RemoteOperate V3 Server" dialog box
Opening the "RemoteOperate V3 Server" dialog box The "RemoteOperate Server" icon is located at the lower right corner of the Windows taskbar.
Click the "RemoteOperate Server" icon to open the "RemoteOperate V3 Server" dialog box.
Alternatively, you can open the "RemoteOperate V3 Server" dialog box using a shortcut you have defined in the server settings.
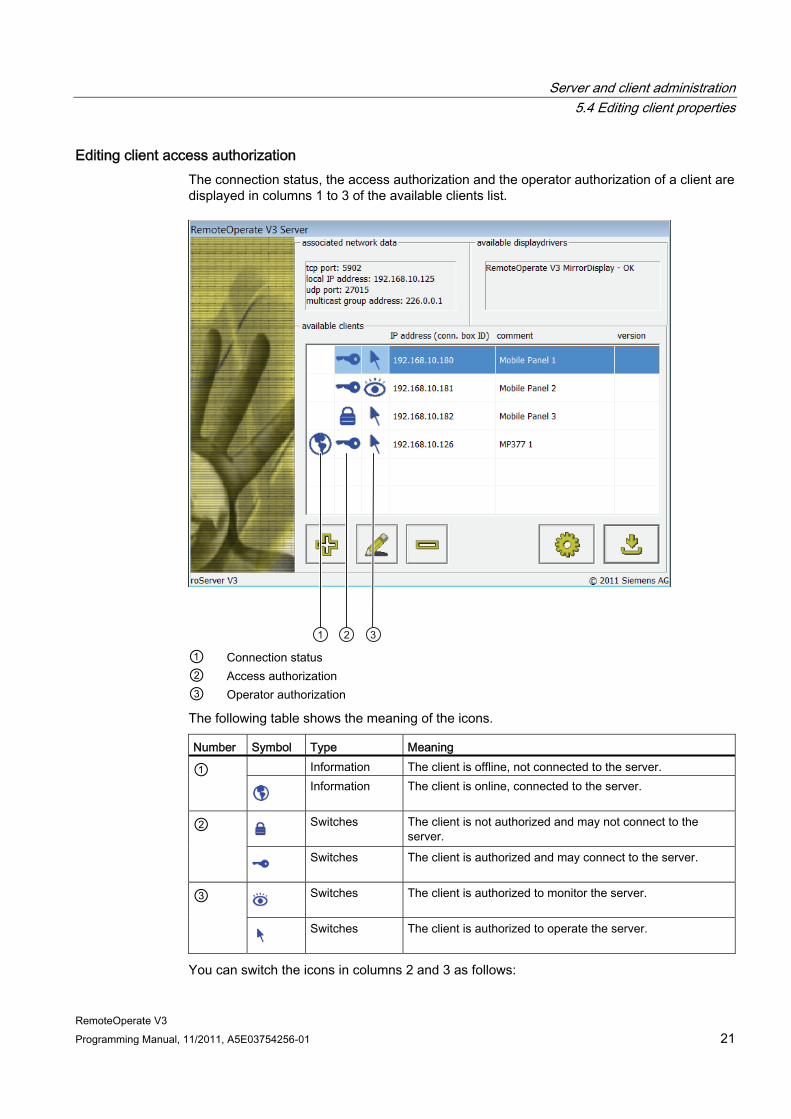
Description of the "RemoteOperate V3 Server" dialog box The diagram below shows the "RemoteOperate V3 Server" dialog box:
① Network data for the RemoteOperate Server ② Status of the RemoteOperate V3 mirror display driver ③ List of available clients ④ Status, authorization, IP address, and description of a client ⑤ "Add client" button

Server and client administration 5.3 Add client
RemoteOperate V3 Programming Manual, 11/2011, A5E03754256-01 17
⑥ "Edit client" button ⑦ "Remove client" button ⑧ "Edit server settings" button ⑨ "Close server dialog box" button
Closing the "RemoteOperate V3 Server" dialog box
Minimize the "RemoteOperate V3 Server" dialog box by clicking the button.
See also Changing server settings (Page 23)
5.3 Add client
Requirement ● The "RemoteOperate V3 Server" dialog box is open.
Procedure Proceed as follows:
1. With the button, open the "RemoteOperate" dialog box to create a new client.
2. Enter in the "IP address:" box the physical address of the client which you want to add to
the list of clients.
3. Optional: Enter a comment in the "comment:" box.
The comment is then displayed in the list of "available clients" as a text description of the client next to its IP address. Choose a meaningful comment, such as the name or type of HMI device.
4. Click to confirm your inputs.
The "RemoteOperate" dialog box is closed.

Server and client administration 5.3 Add client
RemoteOperate V3 18 Programming Manual, 11/2011, A5E03754256-01
Result You have added a new client to the list of "available clients":
You can include a maximum of six clients in the list of "available clients" of a server.
Alternative procedure If a client makes a connection request during operation, the following dialog box is displayed on the server screen:
Select "Yes" to add the client that made the connection request to the list of "available clients." The client is granted authorization to connect at the same time.
If you select "No", you add the client that made the connection request to the list of available clients, but the client is not granted authorization to connect.
Server and client administration 5.4 Editing client properties
RemoteOperate V3 Programming Manual, 11/2011, A5E03754256-01 19
Note Adding a comment
After processing a connection request, the comment box to the right of the IP address of the new client in the list of available clients is still blank.
Click to edit the client properties and add a comment.
See also Editing client properties (Page 19)
The "RemoteOperate V3 Server" dialog box (Page 16)
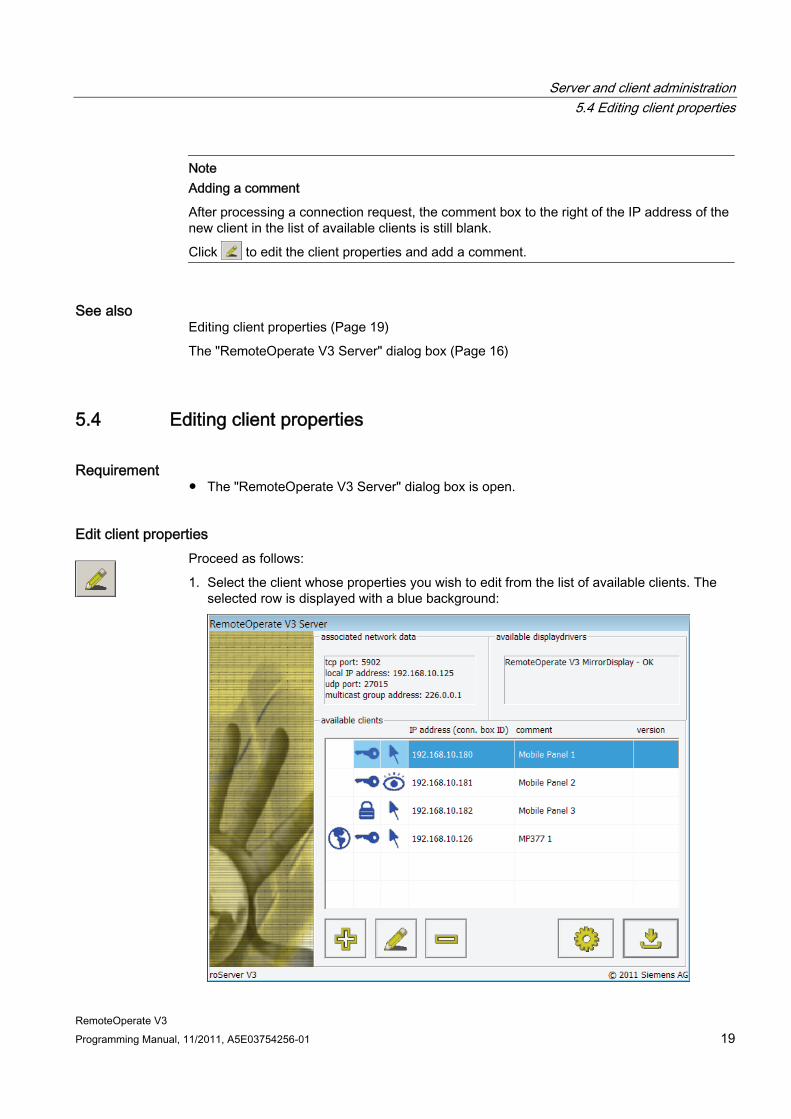
5.4 Editing client properties
Requirement ● The "RemoteOperate V3 Server" dialog box is open.
Edit client properties Proceed as follows:
1. Select the client whose properties you wish to edit from the list of available clients. The selected row is displayed with a blue background:
Server and client administration 5.4 Editing client properties
RemoteOperate V3 20 Programming Manual, 11/2011, A5E03754256-01
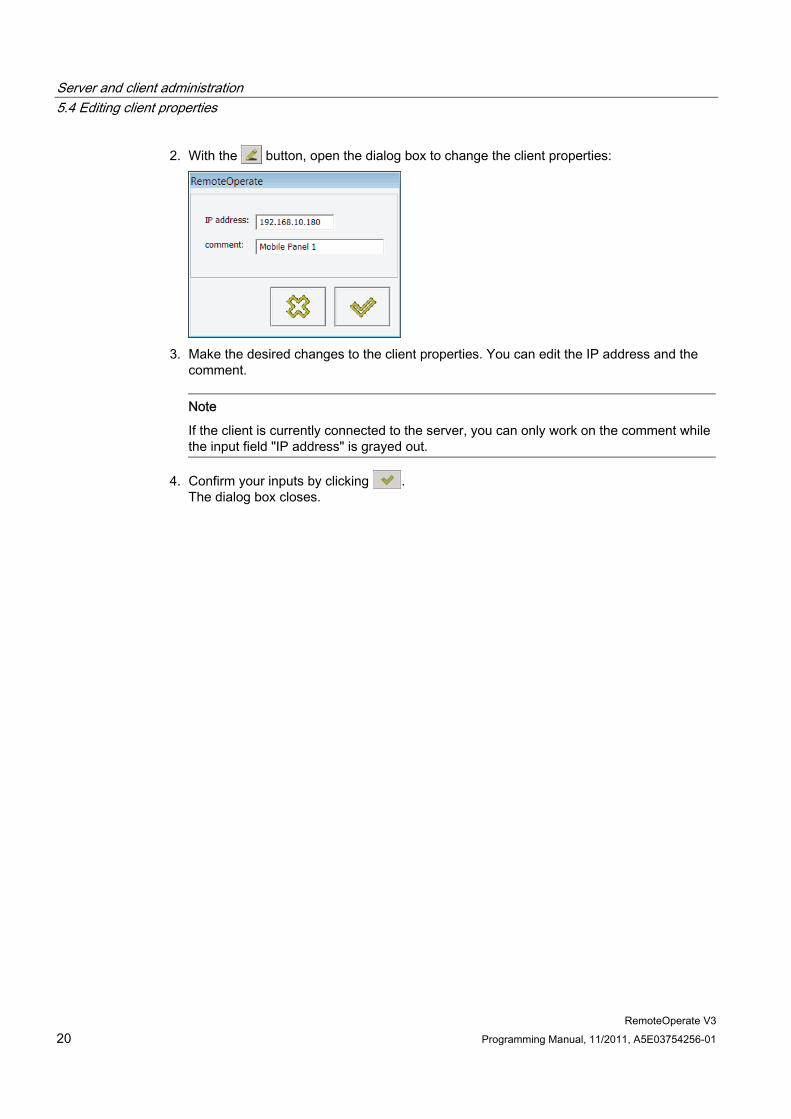
2. With the button, open the dialog box to change the client properties:
3. Make the desired changes to the client properties. You can edit the IP address and the
comment.
Note
If the client is currently connected to the server, you can only work on the comment while the input field "IP address" is grayed out.
4. Confirm your inputs by clicking . The dialog box closes.
Server and client administration 5.4 Editing client properties
RemoteOperate V3 Programming Manual, 11/2011, A5E03754256-01 21
Editing client access authorization The connection status, the access authorization and the operator authorization of a client are displayed in columns 1 to 3 of the available clients list.
① Connection status ② Access authorization ③ Operator authorization
The following table shows the meaning of the icons. Number Symbol Type Meaning
Information The client is offline, not connected to the server. ①
Information The client is online, connected to the server.
Switches The client is not authorized and may not connect to the server.
②
Switches The client is authorized and may connect to the server.
Switches The client is authorized to monitor the server. ③
Switches The client is authorized to operate the server.
You can switch the icons in columns 2 and 3 as follows:
Server and client administration 5.5 Removing a client
RemoteOperate V3 22 Programming Manual, 11/2011, A5E03754256-01
● Mouse operation: Click the icon.
● Touch operation: Touch the icon.
DANGER
Full access to the server
The icon denotes full access to the server.
Improper use of the server by unauthorized personnel may cause the server to malfunction. Malfunctions can result in death or serious injury. You should assign passwords to the HMI devices. Develop an operator authorization plan. This will enable you to ensure that only authorized personnel are given full access to the server.
Result You have changed the properties and access authorization of the client.
See also The "RemoteOperate V3 Server" dialog box (Page 16)
5.5 Removing a client
Requirement ● The "RemoteOperate V3 Server" dialog box is open.
Procedure Proceed as follows:
1. Select the client that you wish to remove from the list of available clients.
2. Remove the selected client from the list of available clients using the button.
Result You have removed the selected client. The client is no longer displayed in the list of available clients.
See also The "RemoteOperate V3 Server" dialog box (Page 16)

Server and client administration 5.6 Changing server settings
RemoteOperate V3 Programming Manual, 11/2011, A5E03754256-01 23
5.6 Changing server settings
Requirement ● The "RemoteOperate V3 Server" dialog box is open.
Procedure Proceed as follows:
1. Open the "RemoteOperate - Config" dialog box using the button.
2. You can specify a path to the configuration file roServer.ini in the "Path to store
roServer.ini" text box. The specified path must exist. If this input box is empty, the file "roServer.ini" ...in the "ProgramData\Siemens\RemoteOperate" directory in the system partition will be used.
3. In the "Hot-Key to show/hide roServer Dialog" input box, enter a shortcut for opening and closing the "RemoteOperate V3 Server" dialog box. Do this by pressing a letter key or a combination of one or more control keys and a letter key on the keyboard or the screen keyboard.
Examples: <CTRL+R>, <SHIFT+S>, <ALT+T>, <CTRL+ALT+S>

Server and client administration 5.6 Changing server settings
RemoteOperate V3 24 Programming Manual, 11/2011, A5E03754256-01
4. From the "Select network adapter" list, select the IP address of the network adapter which connects the server to the Ethernet network.
5. Confirm your settings with .
Note Screen resolution of the clients
The screen content of the server will be automatically scaled to match the screen size of the client.
Result You have changed and saved the settings for the RemoteOperate server.
If you have specified a new path under "Path to store roServer.ini", a copy of the "roServer.ini" file will be created there. If you have entered an invalid path in the "Path to store roServer.ini" text box, an error message will be output. After the RemoteOperate Server software has been restarted, the "roServer.ini" file in the new path will be used.
Advanced settings in the "roServer.ini" file The "roServer.ini" file contains advanced configuration settings. The "roServer.ini" file is contained in the directory specified in the "RemoteOperate - Config" dialog box. If you have not specified a directory, the "roServer.ini" file will be located in the "ProgramData\Siemens\RemoteOperate" directory of the system partition.
The "roServer.ini" file is divided into two areas:
● The [CONFIG] area contains the definition of wait times during client/server operation.
● The [CONNECT] area contains the server network parameters required for client/server communication.
To adjust client/server operation to your requirements, proceed as follows:
1. Stop the task "RemoteOperate V3 Server" using the task scheduler: "Start > Accessories > System programs > Task scheduler".
2. Make your changes to the "roServer.ini" file.
3. Start the task "RemoteOperate V3 Server" using the task scheduler: "Start > Accessories > System programs > Task scheduler".
Server and client administration 5.6 Changing server settings
RemoteOperate V3 Programming Manual, 11/2011, A5E03754256-01 25
You can change the following variables: Tag Value
range Default value
Meaning
TIMEIDLE 1-60 seconds
5 If the client is not used within this time, the server switches to "idle" mode. All server and client traffic lights change to green.
TIMENEXTREQUEST 1-60 seconds
5 Time for which the server waits before a new operator request can be made.
TIMEWAITACCESS 1-60 seconds
10 Time for which the operator request dialog box is displayed. At the end of this time, operator authorization is automatically granted.
TIMETOOLBAR 1-60 seconds
5 Time for which the user must press the touch screen of the HMI device to open the RemoteOperate toolbar.
NOTICE Connection reliability
You should only change the values of the variables listed above. Leave all other settings unchanged.
Otherwise, a reliable client/server connection cannot be guaranteed.
See also The "RemoteOperate V3 Server" dialog box (Page 16)

Server and client administration 5.6 Changing server settings
RemoteOperate V3 26 Programming Manual, 11/2011, A5E03754256-01

RemoteOperate V3 Programming Manual, 11/2011, A5E03754256-01 27
Using a client 66.1 Creating/editing a server selection list
When you switch on the HMI device and once the HMI device starts up, the server selection list is displayed in the "Client - RemoteOperate" dialog box:
Note
When you switch on the HMI device for the first time, the server selection list is empty. You must first create a new server.
Password protection If your HMI device is password-protected, the icon also appears in the "Client - RemoteOperate" dialog box.
The password will be queried with the following actions:
● Create server
● Change server properties
● Delete server
● Close RemoteOperate Client

Using a client 6.1 Creating/editing a server selection list
RemoteOperate V3 28 Programming Manual, 11/2011, A5E03754256-01
Creating a new server
Note Limited number of servers per client
RemoteOperate supports a maximum of ten servers in a client's server selection list.
If you wish to create a new server, make sure that there are no more than nine servers in the server selection list.
Proceed as follows:
1. With the button, open the dialog box to create a server:
2. Enter in the "tree path:"box the path of the server in the server drop down list box. "Path"
denotes the node in the server tree under which the server will be created. For example, if you specify "\Area1\", the IP address of the server will subsequently appear under the "Area1" node:

Using a client 6.1 Creating/editing a server selection list
RemoteOperate V3 Programming Manual, 11/2011, A5E03754256-01 29
Note
The path of the server selection list has a maximum of three levels. Specify no more than three path levels for a server, for example "\Area2\Segment1\Place2\". If the path already exists in the server selection list, the new server will be inserted at this point. If the path does not yet exist, it is created automatically.
3. Enter the IP address of the new server in the "IP address:" text box. On
4. Enter the name of the new server in the "comment:" text box that is displayed in addition to the IP address in the tree of the server drop down list box.
5. Confirm your settings with .
Changing the properties of a server Proceed as follows:
1. Select the server whose properties you wish to edit.
2. With the button, open the dialog box to change the server properties.
3. Follow steps 2 to 5 of the instructions for creating a new server.
Remove server Proceed as follows:
1. Select the server that you wish to remove from the server selection list.
2. Remove the selected server from the server selection list using the button.
Result You have created a new server selection list or changed an existing server selection list.

Using a client 6.2 Connecting a client
RemoteOperate V3 30 Programming Manual, 11/2011, A5E03754256-01
6.2 Connecting a client
Requirement ● You have switched on the HMI device.
Note
If you have switched on the HMI device for the first time, the server selection list is empty. Create a new server selection list.
Procedure Proceed as follows:
1. Select the name of the server to which you want to connect.
DANGER
Full access to the server
Depending on your access authorization, when you connect to the server, you have full access.
Improper use of the server by unauthorized personnel may cause the server to malfunction. Malfunctions can result in death or serious injury. You should assign passwords to the HMI devices. Develop an operator authorization plan. This will enable you to ensure that only authorized personnel are given full access to the server.

Using a client 6.2 Connecting a client
RemoteOperate V3 Programming Manual, 11/2011, A5E03754256-01 31
2. Connect the client to the selected server using the button.
While the client is trying to connect to the server, the following message is displayed on your HMI device:
Note Response to a network fault
If a transient or long-term network fault occurs, the client repeatedly tries to establish a
connection to the server. You can abort this repeated attempt to establish a connection
with the button.
Result Once a connection to the server has been established, the following options are available:
● The server grants you access. The project running on the server is displayed. Depending on your authorization, you can either monitor or operate the project on the server.
● The server grants you access. The Windows desktop of the server is displayed. If you have operator authorization, you can launch your project via the appropriate desktop icon.
● The server does not grant you access. The following message is displayed on your HMI device:
You can abort the attempt to establish a connection using the button.
Once the server has rejected your access attempt, your client will remain unauthorized until the server explicitly grants you access.

Using a client 6.2 Connecting a client
RemoteOperate V3 32 Programming Manual, 11/2011, A5E03754256-01
The operator authorization window ("traffic lights") The operator authorization window, known as "traffic lights", are displayed in the foreground on the server screen and the screens of all connected clients with operator authorization. The traffic lights can assume the following states: Traffic light icon Activated by Meaning
Touching the touch screen on a client with operator authorization or enabling exclusive operator authorization on another client with operator authorization.
You have authorization to operate the server. Other clients can make an operator request.
Two rapid touches (double-click) on the traffic lights of the current client with operator authorization.
You have exclusive authorization to operate the server. Other clients will only be able to make an operator request when you relinquish the exclusive operator authorization by double-clicking the traffic light once again.
Enable the "Forced Exclusive" mode, for example with a switch close to the Mobile Panel.
You have exclusive authorization to operate the server. Other clients will only be able to make an operator request when you relinquish the exclusive operator authorization disabling the "Forced Exclusive" mode.
Touching the touch screen on another client with operator authorization.
Another client has authorization to operate the server. You can make an operator request on your client by touching the touch screen.
Double-click on the traffic lights on another client with operator authorization.
Another client has exclusive authorization to operate the server. You cannot make another operator request until the other client has given up the exclusive operator authorization by double-clicking the traffic light.
Enable the "Forced Exclusive" mode, for example with a switch close to the Mobile Panel.
Another client has exclusive authorization to operate the server. You cannot make another operator request until the other client has given up the exclusive operator authorization by disabling the "Forced Exclusive" mode.
Using a client 6.2 Connecting a client
RemoteOperate V3 Programming Manual, 11/2011, A5E03754256-01 33
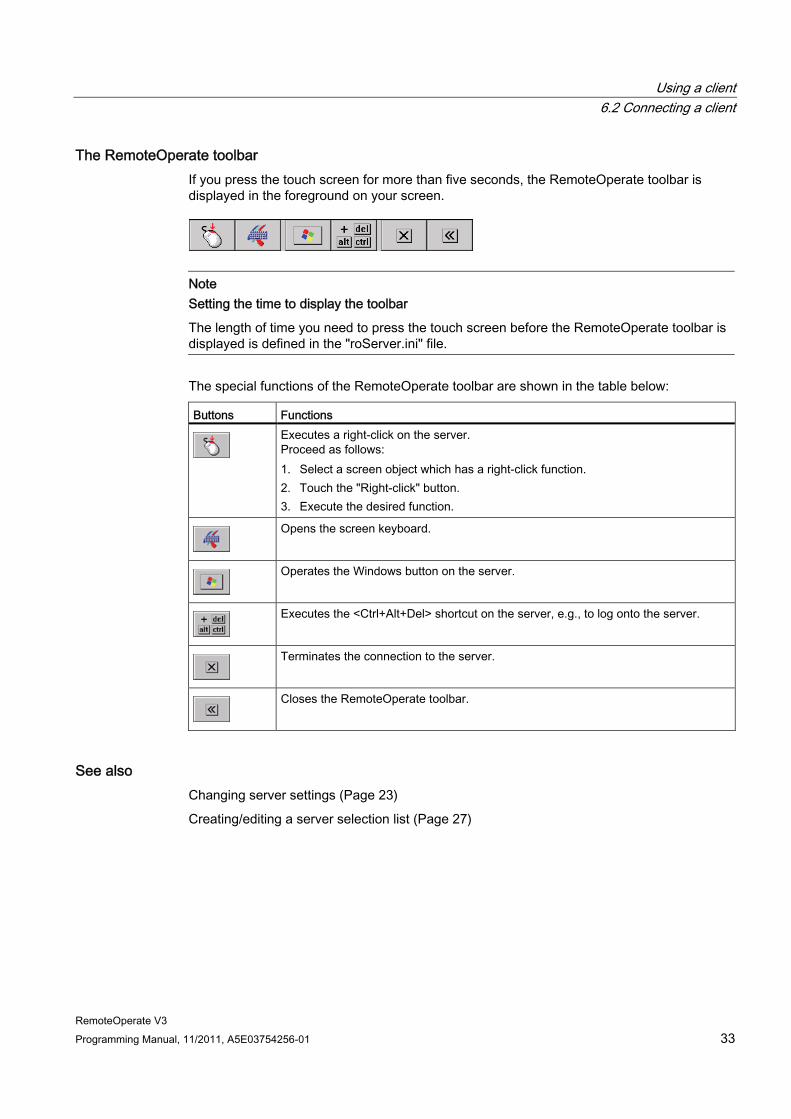
The RemoteOperate toolbar If you press the touch screen for more than five seconds, the RemoteOperate toolbar is displayed in the foreground on your screen.
Note Setting the time to display the toolbar
The length of time you need to press the touch screen before the RemoteOperate toolbar is displayed is defined in the "roServer.ini" file.
The special functions of the RemoteOperate toolbar are shown in the table below: Buttons Functions
Executes a right-click on the server. Proceed as follows: 1. Select a screen object which has a right-click function. 2. Touch the "Right-click" button. 3. Execute the desired function.
Opens the screen keyboard.
Operates the Windows button on the server.
Executes the <Ctrl+Alt+Del> shortcut on the server, e.g., to log onto the server.
Terminates the connection to the server.
Closes the RemoteOperate toolbar.
See also Changing server settings (Page 23)
Creating/editing a server selection list (Page 27)

Using a client 6.3 Changing the server
RemoteOperate V3 34 Programming Manual, 11/2011, A5E03754256-01
6.3 Changing the server
Requirements ● The HMI device is connected as a client to a server.
Procedure Proceed as follows:
1. Press the touch screen until the RemoteOperate toolbar is displayed.
Note Setting the time to display the toolbar
The length of time you need to press the touch screen before the RemoteOperate toolbar is displayed is defined in the "roServer.ini" file.
2. Terminate the connection to the server using the button.
The server selection list is displayed:
3. Connect to a different server, following the instructions in the "Connecting a client"
chapter.
Result You have connected to a different server.

Using a client 6.4 Closing the RemoteOperate Client
RemoteOperate V3 Programming Manual, 11/2011, A5E03754256-01 35
See also Connecting a client (Page 30)
Changing server settings (Page 23)
6.4 Closing the RemoteOperate Client
Procedure Proceed as follows:
If you are still connected to a server, terminate the connection as follows:
1. Press the touch screen until the RemoteOperate toolbar is displayed:
Note Setting the time to display the toolbar
The length of time you need to press the touch screen before the RemoteOperate toolbar is displayed is defined in the "roServer.ini" file.
2. Terminate the connection to the server using the button.
The server selection list is displayed:

Using a client 6.4 Closing the RemoteOperate Client
RemoteOperate V3 36 Programming Manual, 11/2011, A5E03754256-01
Close the RemoteOperate Client software using the button in the upper right corner of the window.
Note Password protection
If your HMI device is password protected, you will be prompted for the password at this point. To close RemoteOperate Client, enter the password for the HMI device.
Result You have closed the RemoteOperate Client software. The loader is displayed:
The loader contains the following four buttons:
● Use the "Transfer" button to transfer data from a PC to the HMI device
● Use the "Start" button to open the server selection list
● Use the "Control Panel" button to configure the operating system
● Use the "Taskbar" button to activate the taskbar when the Windows CE Start menu is open
See also Changing server settings (Page 23)

Using a client 6.5 Example: Assigning operator authorization
RemoteOperate V3 Programming Manual, 11/2011, A5E03754256-01 37
6.5 Example: Assigning operator authorization
Introduction This chapter describes how to assign operator authorization on the server to different clients in succession.
The description uses an example configuration with one server and three HMI devices connected to the server as clients via Ethernet.

Using a client 6.5 Example: Assigning operator authorization
RemoteOperate V3 38 Programming Manual, 11/2011, A5E03754256-01
Sequence of the example scenario During the operation of a plant control system, the request, refusal and transfer of operator authorizations could look like this:
Client 1, client 2, and client 3 are entered in the list of "available clients" on the server. All clients are granted the right to connect to the server and to operate on the server.
● Client 1, client 2, and client 3 connect to the server. All clients can see the project that is running on the server on their screen. If neither client executes an operation, all traffic lights are green at first:
Client 1 Client 2 Client 3 Server
● A user starts to operate on client 1 by pressing the touch screen. Client 1 is immediately granted operator authorization since no other user is operating on the server. The traffic light for client 1 stays green. The traffic lights for client 2, client 3, and the server turn red:
Client 1 Client 2 Client 3 Server
● The user on client 1 touches the green traffic light twice in quick succession (double-click). Client 1 is granted exclusive operator authorization. The traffic light for client 1 turns entirely green. The traffic lights for client 2, client 3, and the server turn completely red:
Client 1 Client 2 Client 3 Server
● A user tries to operate on client 2. Client 2 is not granted operator authorization because the user on client 1 has exclusive operator authorization. All traffic lights remain unchanged.

Using a client 6.5 Example: Assigning operator authorization
RemoteOperate V3 Programming Manual, 11/2011, A5E03754256-01 39
● The user on client 1 touches the green traffic light twice in quick succession (double-click) and gives up exclusive operator authorization. Client 1 continues to operate. The traffic light for client 1 turns green. The traffic lights for client 2, client 3, and the server turn red:
Client 1 Client 2 Client 3 Server
● A user tries to operate on client 2. The operator request dialog opens on the screens of client 1, client 2, client 3 as well as the server screen:
● Since the user on client 1 has operator authorization, he decides on whether to transfer operator authorization:
– If the operator on client 1 with the button denies the operator request of client 2 within the specified time, client 1 will still have operator authorization. All traffic lights will remain unchanged.
– If the user on client 1 ignores the operator request, client 2 is granted operator authorization after a predefined time. The traffic light for client 2 turns green. The traffic lights for client 1, client 3, and the server turn red:
Client 1 Client 2 Client 3 Server
Note
The time interval for the automatic transfer of operator authorization is defined by the "TIMEWAITACCESS" variable in the "roServer.ini" file on the server. The "roServer.ini" file is part of the advanced server settings.

Using a client 6.5 Example: Assigning operator authorization
RemoteOperate V3 40 Programming Manual, 11/2011, A5E03754256-01
● The operator at client 1 enables the "Forced Exclusive" mode, for example with a switch close to the HMI device. The traffic light of client 1 turns completely green and all other traffic lights turn completely red. The traffic lights also come equipped with a key symbol:
Client 1 Client 2 Client 3 Client 4
Client 1 has exclusive operator authorization. Only when the operator at client 1 has disabled the "Forced Exclusive" mode, will operators at other clients or the server be able to make other operator requests.
● The operator at client 1 disables the "Forced Exclusive" mode, for example by pressing the switch close to the HMI device.
If the operator at client 1 continues operation, the traffic light will stay green while all other traffic lights will turn red:
Client 1 Client 2 Client 3 Server
If the operator at client 1 stops operation, all traffic lights will turn green:
Client 1 Client 2 Client 3 Server

RemoteOperate V3 Programming Manual, 11/2011, A5E03754256-01 41
Index
A Administration
Requirement, 15 Server and client, 15
Available clients list Add client, 17 Edit client properties, 19 Editing client access authorization, 21 Remove client, 22
B Basic knowledge
Required, 3 Buttons
Add client, 16, 17 Close RemoteOperate Client, 36 Close server dialog box, 17 Close toolbar, 33 Connect client, 31 Create server, 28 Ctrl+Alt+Del, 33 Edit client, 17 Edit client properties, 20 Edit server settings, 17, 23 Editing server properties, 29 RemoteOperate Server, 16 Remove client, 17, 22 Remove server, 29 Right-click, 33 Screen keyboard, 33 Terminate connection, 33 Windows button, 33
C Changing
Client properties, 19 IP address of server, 24 Server, 34 Server properties, 29 Server selection list, 28
Client Add (via connection request), 18 Adding, 17 Closing, 35 Comment, 17 Connect to a new server, 34 Connect to a server, 30 Definition, 4 Editing access authorization, 21 Editing properties, 19 IP address, 17, 20 Removing, 22 Supported hardware, 11 Supported operating systems, 11
Client/server structure, 8 Closing
RemoteOperate Client, 35 'RemoteOperate V3 Server' dialog box, 17
Comment input box Comment box for the client, 17 Server comment box, 29
Connect Client to a server, 30
Connection request, 18 Contact person, 5 Control Panel
Settings, 14 Control Panel button, 36 Conventions, 4 Creating
Client in the 'available clients' list, 17 Server in server selection list, 28
D Dialog box
Closing RemoteOperate V3 Server, 17 Connection request, 18 Opening RemoteOperate V3 Server, 16 RemoteOperate - Config, 23 RemoteOperate V3 Server, 16
Documents SIMATIC complete, 5

Index
RemoteOperate V3 42 Programming Manual, 11/2011, A5E03754256-01
E Editing
Client access authorization, 21 Client properties, 19 Server properties, 29 Server selection list, 27
Ethernet, 8
F Full access to the server, 22, 30 Functional scope
RemoteOperate, 9 RemoteOperate Client, 10 RemoteOperate Server, 9
H Hardware and software requirements, 11 HMI device, 4 Hot-Key to show/hide roServer Dialog input box, 23
I Icons
Client access authorization, 21 RemoteOperate Server, 16
Industry Portal, 5 Installation
RemoteOperate Client, 13 RemoteOperate Server, 14 Requirements, 13
IP address Changing the server, 24
IP address input box IP address of client, 17, 20 IP address of server, 29
L Loader, 36
'Control Panel' button, 36 'Start' button, 36 'Taskbar' button, 36 'Transfer' button, 36
Logon Server, 33
N Network
Response to a fault, 31 Network fault, 31
O Office location, 5 Operator authorization, 21, 37 Operator authorization window, 32
P Password protection, 27
For closing the client, 36 Symbol, 27
Path to store roServer.ini - text box, 23 Previous version
Removing, 14 Programming manual
Purpose of the, 3 Scope, 3
R RemoteOperate
Client/server structure, 8 Definition, 4 Functional scope, 9 Overview, 7
RemoteOperate Client Changing the server, 34 Closing, 35 Definition, 4 Functional scope, 9 Installing, 13
RemoteOperate Server Add client, 17 Definition, 4 Dialog box, 16 Edit client properties, 19 Editing client access authorization, 21 Functional scope, 9 Installing, 14 Opening the Server dialog box, 16 Previous versions, 14 Remove client, 22 Requirements, 13 Server settings, 23 Server settings, advanced, 24 Settings in the Control Panel, 14 TIMEIDLE, 25 TIMENEXTREQUEST, 25 TIMETOOLBAR, 25 TIMEWAITACCESS, 25

Index
RemoteOperate V3 Programming Manual, 11/2011, A5E03754256-01 43
Removing Client from available clients list, 22 Server from server selection list, 29
roServer.ini, 24 [CONFIG], 24 [CONNECT], 24
S Select network adapter list, 24 Server
Changing, 34 Comment, 29 Definition, 4 Full access, 30 IP address, 29 Settings, 23 Supported hardware, 11 Supported operating systems, 11
Server selection list Changing the server, 29 Create server, 28 Creating, 27 Password protection, 27 Remove server, 29
Server settings, 23 Service, 5 Settings
RemoteOperate Server, 23 RemoteOperate Server, advanced, 24
Start button, 36 Support
Technical, 5 Support request, 5
T Taskbar button, 36 Technical support, 5 TIMEIDLE, 25 TIMENEXTREQUEST, 25 TIMETOOLBAR, 25 TIMEWAITACCESS, 25 Toolbar
'Screen keyboard' button, 33 'Close' button, 33 'Ctrl+Alt+Del' button, 33 'Right-click' button, 33 'Terminate' button, 33 'Windows' button, 33
Trademarks, 4 Traffic lights, 32 Training center, 5 Transfer button, 36 Tree path input box, 28
V Validity of the programming manual, 3

Index
RemoteOperate V3 44 Programming Manual, 11/2011, A5E03754256-01