silencerco maxim 9 · components of the maxim 9. only adjust the maxim 9 as directed in this manual...
TRANSCRIPT

SILENCERCO MAXIM 9
INSTRUCTION MANUAL
™

Thank you for choosing to add a SilencerCo Maxim® 9 to your collection. We manufacture all of our products here in the USA and are proud to deliver only the best to our community. We hope you will enjoy using this product as much as we enjoyed making it. Welcome to the SilencerCo family.
Sincerely and Silently,
Joshua Waldron SilencerCo Co-Founder & CEO
WE AT SIL ENCERC O ® HOP E T HAT YOU ENJOY T HE TECHNOLOGICAL ADVANCEMENTS OFFERED BY THE MAXIM 9 INTEGRALLY SUPPRESSED PISTOL. TO PROVIDE FOR YOUR SAFE T Y AND THE EFFECTIVE USE OF THIS PRODUCT, IT IS CRITICAL THAT THE OWNER AND ANY USER OF THIS PRODUCT READ THE ENTIRE MANUAL AND FOLLOW STRICTLY THE WARNINGS AND INSTRUCTIONS WI T HIN. T HIS PRODUC T IS IN T ENDED TO BE USED ONLY BY THOSE WHO ARE WELL-VERSED IN THE SAFE OPERATION OF FIREARMS.

Failure to follow installation and maintenance instructions detailed in this manual may result in serious personal injury and damage to the weapon. Do not attempt to use this product unless you have specific training and experience in the use of firearms.
Before operating the Maxim 9, be sure that the weapon is unloaded and the action is opened so that it is visibly clear of any ammunition. If you are at all unsure as to the proper procedures to ensure that your firearm is unloaded after reading this manual, please consult a properly licensed dealer or SilencerCo’s Customer Service department.
Assembly and disassembly should never be performed while the Maxim 9 is loaded.
Because suppressed firearms make less noise than unsuppressed firearms, it is easy to forget that they are still firearms and capable of causing bodily injury and property damage. It is of vital importance
to remember that a suppressed firearm is just as dangerous as an unsuppressed firearm and that the same safe handling requirements still apply.
Check that there are no gaps between the baffles of the silencer portion of the Maxim 9 before firing. The seams of the baffles must be fully seated together to ensure personal safety and proper operation. DO NOT fire the Maxim 9 if there is a gap between the baffles.
Silencers must be free of obstructions such as mud, dirt, etc. Do NOT attempt to shoot through an obstructed silencer.
When using the Maxim 9, use extreme caution as it may be hot to the touch after firing.
Before performing maintenance, open the action, ensure firearm is unloaded, and be sure the chamber is empty. Failure to do so can result in property damage, injury, or death.
WARNING MADE IN USA
The Maxim 9 is the world’s first integrally suppressed 9mm handgun that is holster-able and hearing safe with all types of 9mm ammunition. Shipped in its full-length configuration, the Maxim 9 comes with everything the user needs to shorten the overall length by more than 1”; in the short configuration, the Maxim 9 remains hearing safe with subsonic ammunition.
Regardless of which configuration you use, the Maxim 9 represents one of the greatest strides made in both pistol and suppressor technology ever. No more choosing between keeping your pistol as short as possible and enduring deafening sound or adding a silencer and dealing with the added length and weight. Now, you can have the best of all worlds with the Maxim 9.

SPECS
SHORT CONFIGURATION
CALIBER 9mm
MUZZLE AVERAGE 147 gr: 139.9 dB
*Hearing safe with 9mm subsonic ammunition - 147gr or above.
WEIGHT 2 LB, 5 OZ
LENGTH 9.54”
DIMENSIONS 1.58” X 5.41”
LONG CONFIGURATION
CALIBER 9mm
MUZZLE AVERAGE 115gr: 137.1 dB124gr: 138.3 dB147gr: 136.3 dB
*Hearing safe with all 9mm ammunition, including JHP.
WEIGHT 2 LB, 7 OZ
LENGTH 10.75”
DIMENSIONS 1.58” X 5.41”
—Uniquely designed striker fired action creates space for suppression, reduces recoil, and provides best possible balance.
—Fixed 4.38” barrel with 1:10 twist ensures reliable accuracy.
—Ambidextrous controls allow for easy right- or left-hand manipulation.
—Pistol comes pre-cut for select aftermarket optics; ships with cover.
—User-configurable length for maximum adaptability; all parts included.
—Trigger safety passes both SAAMI and NIJ drop tests.
—Compatible with Glock® 17 magazines, including aftermarket magazines.
—Ships with (2) Magpul® PMAG™ 17 GL9 magazines.
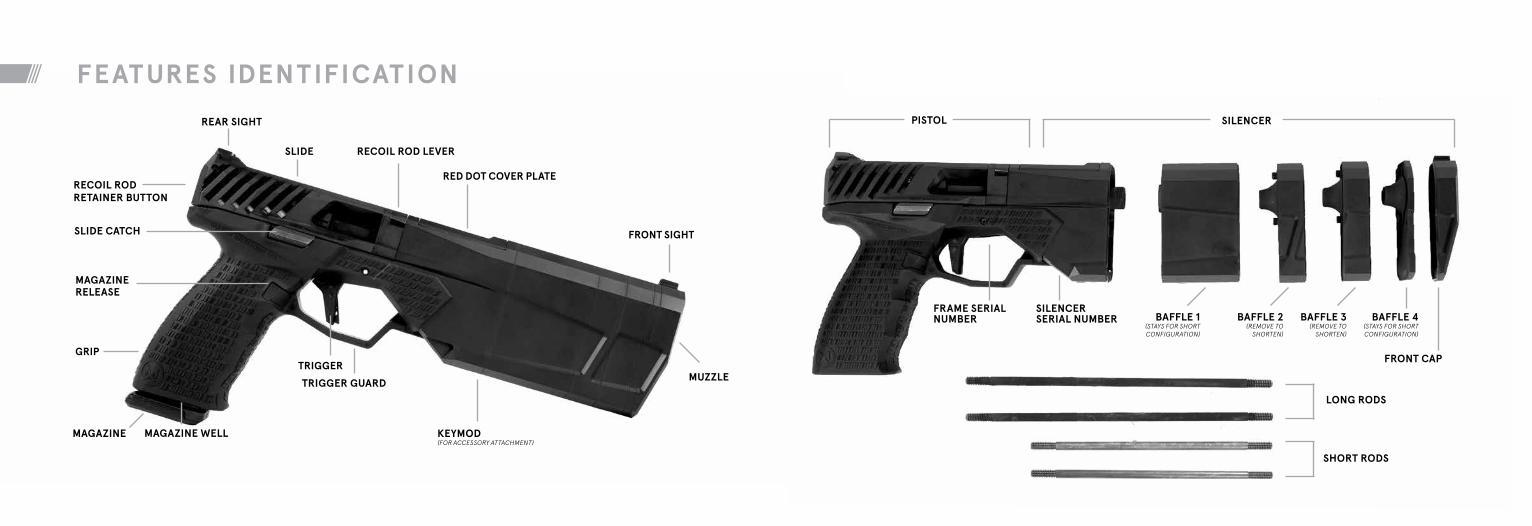
FRONT SIGHT
REAR SIGHT
SLIDE
MUZZLETRIGGER
MAGAZINE RELEASE
SLIDE CATCH
GRIP
MAGAZINE KEYMOD (FOR ACCESSORY ATTACHMENT)
RECOIL RODRETAINER BUTTON
RECOIL ROD LEVER
RED DOT COVER PLATE
TRIGGER GUARD
FEATURES IDENTIFICATION
SILENCER
BAFFLE 4 (STAYS FOR SHORT CONFIGURATION)
BAFFLE 3 (REMOVE TO
SHORTEN)
BAFFLE 2 (REMOVE TO
SHORTEN)
BAFFLE 1 (STAYS FOR SHORT CONFIGURATION)
SILENCER SERIAL NUMBER
FRAME SERIAL NUMBER
MAGAZINE WELL
FRONT CAP
PISTOL
SHORT RODS
LONG RODS

SAFE T Y

Safety should be your top priority when operating the Maxim 9 or any other firearm. Use the following safety information when operating any firearm. If you feel uncertain about any step of the operation of the Maxim 9, stop what you are doing and immediately contact SilencerCo’s Customer Service department at 801.417.5384 before proceeding.
If you are unfamiliar with the operation of firearms in general, formal training should be attended before operating the Maxim 9.
KEEP YOUR FIREARM POINTED IN A SAFE DIRECTION. Do not point a firearm, whether loaded or unloaded, at anything or anyone you do not intend to shoot. Take particular care when loading, unloading, or field stripping the firearm.
TREAT EVERY FIREARM AS IF IT IS LOADED. Regardless of whether someone tells you that a firearm is unloaded, always verify for yourself. Do not pass a firearm to another individual unless the action is open and you have visually inspected that it is unloaded. Keep the firearm unloaded and safely stored when not in use.
DO NOT PUT YOUR FINGER ON THE TRIGGER UNTIL YOU ARE READY TO FIRE. Take care that other objects do not enter the trigger guard or snag the trigger.
USER RESPONSIBILITIES
KNOW YOUR TARGET AS WELL AS WHAT IS IN FRONT OF AND BEHIND IT. Consider the path of the bullet and what it might encounter before and after its intended target. Make sure your target has a back stop that is free of obstructions, water, or other surfaces that could cause ricochets. Do not fire haphazardly into the sky.
IT IS YOUR RESPONSIBILITY TO ENSURE SAFE HANDLING OF THIS AND ANY FIREARM UNDER YOUR SUPERVISION. Firearms can cause serious injury or death if improperly handled or misused. Utilize firearms training if you do not feel 100% comfortable with these guidelines. Contact your firearms dealer, local sportsmen’s club, law enforcement agency, or the NRA for more information on classes near you.
SAFELY STORE AND LOCK FIREARM WHEN NOT IN USE. Safeguard the firearm from use by unauthorized individuals, including children.
FOLLOW ALL LOCAL, STATE, AND FEDERAL LAWS AND REGULATIONS WHEN OPERATING YOUR FIREARM. It is YOUR responsibility to ensure that you are complying with all laws and ordinances when using your firearm.
STORE AMMUNITION AWAY FROM FIREARM. Do not store your firearm and ammunition in the same location.
USE EYE PROTECTION WHEN OPERATING ANY FIREARM. Ensure eyewear is rated for use with firearms. Utilize hearing protection if you are using ammunition that will render the Maxim 9 non-hearing safe.
NEVER USE PRODUCTS THAT CAUSE IMPAIRMENT WHILE OPERATING A FIREARM. Do not consume alcohol, drugs, medication, or anything else that causes impaired mental or physical ability while operating a firearm.
WARNING: ALL SAFETY GUIDELINES IN THIS MANUAL MUST BE FOLLOWED TO ENSURE THE SAFE OPERATION OF THIS FIREARM. FAILURE TO FOLLOW THESE INSTRUCTIONS AND WARNINGS COULD LEAD TO SERIOUS PERSONAL INJURY OR DEATH TO YOU OR OTHERS AND/OR DAMAGE TO PROPERTY.

USE YOUR FIREARM IN A PROPERLY VENTILATED AREA. Discharging or cleaning a firearm or handling ammunition in a poorly ventilated area can result in exposure to lead and other harmful substances that are known to cause serious physical injury. Read all warnings on ammunition and cleaning supplies before using. Wash hands thoroughly after handling these items.
DO NOT ALLOW INDIVIDUALS WHO DO NOT UNDERSTAND FIREARM SAFETY OR PROPER OPERATION TO HANDLE THE FIREARM. ONLY USE RECOMMENDED AND CORRECT AMMUNITION WITH YOUR FIREARM. Do not use reloaded, “hand loaded”, or non-standard ammunition that has not been subjected to internal ballistic pressure testing.
DO NOT ATTEMPT TO FIRE THROUGH AN OBSTRUCTED BARREL. Ensure the barrel and silencer portion of the Maxim 9 are clear of obstructions before use. Even a small obstruction can cause catastrophic failure.
ENSURE ACCESSORIES ARE COMPATIBLE WITH YOUR FIREARM BEFORE USE. Holsters, optics, etc. should be verified as compatible with the Maxim 9 before being used in conjunction with the firearm.
DO NOT DISASSEMBLE THE MAXIM 9 BEYOND WHAT IS OUTLINED IN THIS MANUAL. Should further disassembly be required, contact SilencerCo’s Customer Service department at 801.417.5384.
DO NOT MAKE ADJUSTMENTS TO THE INTERNAL COMPONENTS OF THE MAXIM 9. Only adjust the Maxim 9 as directed in this manual or by a SilencerCo Customer Service representative.
YOU ARE RESPONSIBLE FOR THE SAFE HANDLING AND OPERATION OF THE MAXIM 9. SILENCERCO WILL NOT BE RESPONSIBLE FOR ANY PERSONAL INJURY, DEATH, OR PROPERTY DAMAGE THAT RESULTS FROM : (1) THE CRIMINAL OR NEGLIGENT USE OF THIS FIREARM; (2) A DISREGARD FOR THESE SAFETY INSTRUCTIONS AND WARNINGS; (3) IMPROPER OR CARELESS HANDLING OF THIS FIREARM; (4) THE USE OF NON-STANDARD, DEFECTIVE, IMPROPER, OR RELOADED AMMUNITION; OR; (5) IMPROPER OR NEGLIGENT MODIFICATIONS OR REPAIRS TO THE FIREARM.

Failure to use the correct type or caliber of ammunition can result in injury, death, and/or destruction of property. The caliber designation can be located on the barrel block (1A).
AMMUNITION
Always ensure your firearm is locked and unloaded when storing or transporting. Improperly stored firearms can result in serious injury, death, or property damage. Use the lock provided by SilencerCo to secure your Maxim 9 when not in use. Ammunition should be stored in a separate, secure location when not in use. Consult your local firearms dealer or law enforcement agency for further advice on proper and safe storage of firearms and ammunition. Do not lock a loaded firearm and do not load a locked firearm. Be sure to follow all laws and regulations; some
jurisdictions have laws that make it a crime to keep a firearm unlocked and accessible to children or others. Obey all laws regarding the storage of your firearm.
By purchasing and/or using this firearm, you accept the responsibility of safely operating as well as storing and securing the firearm at all times.
SAFE STORAGE & TRANSPORTATION
WARNING: ONLY USE AMMUNITION THAT IS SPECIFICALLY DESIGNED TO BE USED IN YOUR FIREARM.
1A 1A CLOSEUP

It is your responsibility to select the proper ammunition for your firearm. Always inspect ammunition before loading it into your firearm; do not use dirty, corroded, or otherwise damaged ammunition. Only use commercially manufactured ammunition with internal ballistic pressures that are in accordance with the specifications of the Sporting Arms and Ammunition Manufacturers’ Institute (SAAMI). If you are unsure of what ammunition to use, contact SilencerCo’s Customer Service department at 801.417.5384. Some types or brands of ammunition can cause difficulty when extracting casings from the chamber. Should this situation arise, remove the casing and thoroughly clean the chamber with
a recommended solvent. Should you continue to experience that issue, SilencerCo recommends switching to a different brand of ammunition.
The Maxim 9 is rated for ammunition up to +P+ in the full-length configuration. Using ammunition with higher pressures may make your firearm dirtier, wear down parts faster, and could result in the need for more frequent cleaning and parts replacement. To remain hearing safe, only subsonic ammunition of 147gr or heavier weight should be used in the Maxim 9 while in the short configuration.
AMMUNITION CONTINUED

Inspect your Maxim 9 to familiarize yourself with the features identified in the previous section. Before inspecting the Maxim 9, first ensure it is unloaded. Reference the UNLOADING section of this manual for instructions.
Once the Maxim 9 is unloaded, look in the chamber (NOT from the end of the muzzle) to verify it is unloaded, then visually and physically check for obstructions (2A).
Follow this procedure each time a firearm leaves and reenters your possession, undergoes cleaning, is handled by another person, is transported, etc.
INSPECTING YOUR MAXIM
2A
SAFE T Y FEATURES
The Maxim utilizes a passive safety system which uses three components for engaging or disengaging the safety features each time trigger is pulled.
Firing Pin Block: Mechanically blocks the firing pin channel until the trigger is depressed.
Sear: Engages the firing pin in order to prevent it from moving forward without pulling the trigger.
Trigger Safety: With the trigger in the forward position, prevents the trigger from moving to the rear. The trigger safety and trigger must be depressed at the same time in order to fire the pistol.

FUNCTION & OPERATION

The Maxim 9 is compatible with Glock® 17 magazines, including aftermarket magazines such as the Magpul® PMAG™ 17 GL9 (included).
Follow all instructions included here as well as instructions that are specific to the type of magazine you are using. Failure to use appropriate magazines and follow instructions can result in injury, death, or property damage.
To load the magazine, press the cartridge head down onto the forward portion of the magazine follower and then slide the cartridge under the side lips of the
magazine until the cartridge head rests against the rear of the magazine. If there is already a cartridge loaded, press downward on the case of the already-loaded cartridge and slide the cartridge to the rear of the magazine (3A).
Repeat this process until desired or maximum capacity reached. DO NOT attempt to load more rounds than the magazine is intended to accept.
Inspect your Maxim 9 as noted in the INSPECTING YOUR MAXIM and UNLOADING sections to ensure that it is unloaded before proceeding.
While holding the Maxim 9 with the muzzle pointed in a safe direction and with your finger off the trigger, insert the loaded magazine into the magazine well of the grip until it is firmly seated in place (3B). You will hear an audible “click” indicating the magazine is properly seated.
LOADING
DO NOT LOAD THE MAXIM 9 UNTIL YOU HAVE READ AND FULLY UNDERSTOOD THIS MANUAL. DO NOT LOAD THE MAXIM 9 UNTIL YOU ARE READY TO USE IT.
3A 3B

WARNING: LOADING A ROUND INTO THE CHAMBER SHOULD ONLY BE DONE BY FEEDING IT FROM A MAGAZINE. ANY OTHER METHODS ARE NOT ENCOURAGED BY SILENCERCO AND COULD RESULT IN SEVERE INJURY OR DEATH.
Rounds should face toward muzzle of the Maxim 9.
Don’t use excessive force when inserting the loaded magazine, as this could cause the slide to move forward thereby chambering a round.
After you insert a magazine, gently pull downward on the base of the magazine to ensure that it is securely seated and locked in place.
Once the magazine is seated, pull the slide fully to the rear (3C) and then release it completely, ensuring not to guide it forward. Your hand should not touch the slide while it is traveling forward. This action will strip a cartridge from the magazine and insert it into the barrel chamber.
CAUTION: THE MAXIM 9 IS NOW ABLE TO BE FIRED. IF YOU REMOVE THE MAGAZINE, REMEMBER THAT THERE IS STILL A LIVE CARTRIDGE IN THE CHAMBER. TO EJECT THIS CARTRIDGE ONCE THE MAGAZINE IS REMOVED, PULL THE SLIDE FULLY TO THE REAR. AFTER EJECTING, VERIFY THE CHAMBER IS CLEAR BY FOLLOWING THE PROCEDURES SET FORTH IN THE UNLOADING SECTION. THIS WILL EJECT THE ROUND.WARNING: IF YOU EXPERIENCE A FAILURE
TO FEED, IMMEDIATELY STOP AND REMOVE THE MAGAZINE, LOCK THE SLIDE TO THE REAR, AND VERIFY THAT THE CHAMBER IS EMPTY. WARNING: THE MAXIM 9 CAN BE FIRED
WITHOUT A MAGAZINE INSERTED.
3C
LOADING CONTINUED

SilencerCo does not recommend “staging” the trigger in anticipation of firing a round. Staging refers to
“taking up the slack” in the trigger to the point where it is about to fire. This practice can result in unsafe handling conditions and could cause a negligent discharge. SilencerCo recommends that you keep your finger off of the trigger until you are ready to fire the Maxim 9 in accordance with universally accepted safety rules regarding firearms.
To fire the Maxim 9, acquire a firm grasp of the grip. Once you are ready to shoot, place your finger on the trigger and squeeze straight to the rear (4A). At this point, the striker assembly will be released which will strike the primer on the cartridge. At the point of firing, the slide will move to the rear and the spent casing will be extracted and ejected, then a new cartridge will be loaded from the magazine. After firing, allow the trigger to reset fully, otherwise you will not be able to fire again. Once all ammunition has
been fired from the magazine, the magazine follower will place upward pressure against the slide catch, which engages the slide and holds it “open.”
FIRING CLEARING MISFIRES
If you experience a misfire, follow the below protocol, escalating from Step 1 to Step 2 as needed.
STEP 1: IMMEDIATE ACTION If you experience a misfire, keep the muzzle pointed in a safe direction, firmly tap the bottom of the magazine to ensure that it is securely seated. Next, pull the slide back fully to eject any ammunition currently in the chamber and load a new round. Resume firing. This is commonly referred to as the
“tap, rack, bang” method.
WARNING: IF THE MAXIM 9 SEEMS TO BE OPERATING INCORRECTLY OR SIMPLY
“FEELS OR SOUNDS WRONG,” STOP FIRING IMMEDIATELY. POINT THE MAXIM 9 IN A SAFE DIRECTION, UNLOAD IT, AND HAVE IT INSPECTED BY A QUALIFIED GUNSMITH.
WARNING: ONLY ATTEMPT THIS METHOD OF ACTION IF YOUR MAXIM 9 HAS NOT BEEN RENDERED INOPERABLE OR OTHERWISE UNSAFE. STEP 1 IS INTENDED TO REMEDY SITUATIONS WHICH ARE BENIGN IN NATURE AND ARE LIKELY THE RESULT OF A CASING NOT EJECTING, MAGAZINE NOT BEING SEATED PROPERLY, OR THE SHOOTER NOT PROVIDING ENOUGH RESISTANCE FOR THE FIREARM TO CYCLE PROPERLY (OTHERWISE KNOWN AS “LIMP-WRISTING”).
4A
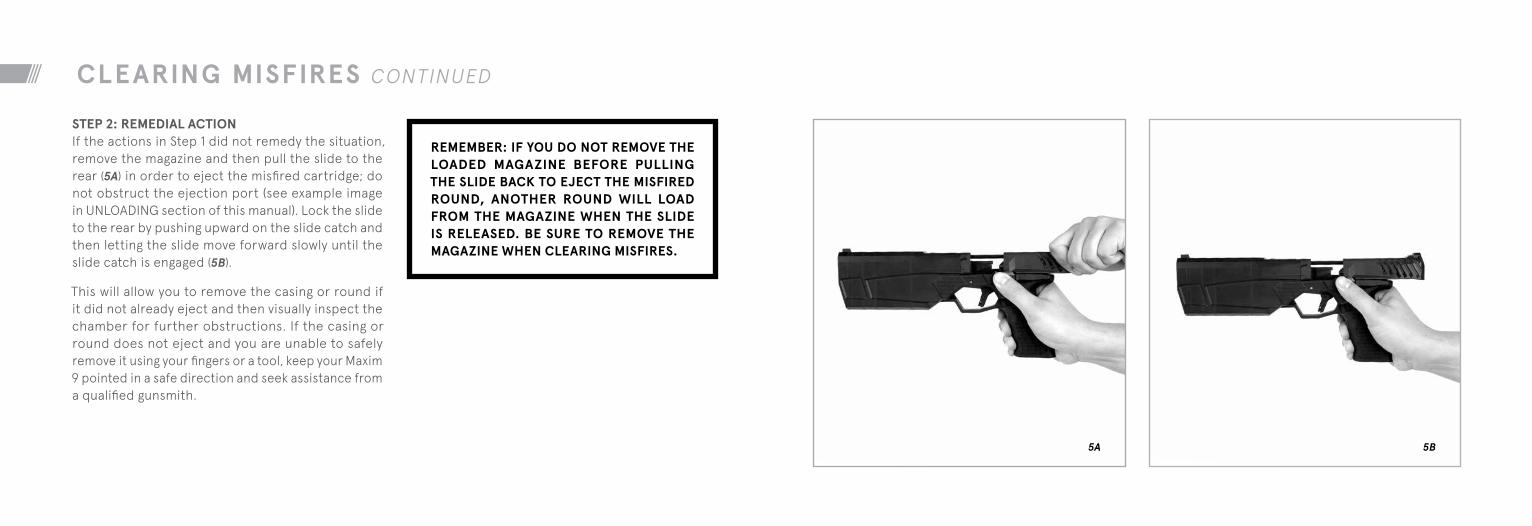
STEP 2: REMEDIAL ACTION If the actions in Step 1 did not remedy the situation, remove the magazine and then pull the slide to the rear (5A) in order to eject the misfired cartridge; do not obstruct the ejection port (see example image in UNLOADING section of this manual). Lock the slide to the rear by pushing upward on the slide catch and then letting the slide move forward slowly until the slide catch is engaged (5B).
This will allow you to remove the casing or round if it did not already eject and then visually inspect the chamber for further obstructions. If the casing or round does not eject and you are unable to safely remove it using your fingers or a tool, keep your Maxim 9 pointed in a safe direction and seek assistance from a qualified gunsmith.
REMEMBER: IF YOU DO NOT REMOVE THE LOADED MAGAZINE BEFORE PULLING THE SLIDE BACK TO EJECT THE MISFIRED ROUND, ANOTHER ROUND WILL LOAD FROM THE MAGAZINE WHEN THE SLIDE IS RELEASED. BE SURE TO REMOVE THE MAGAZINE WHEN CLEARING MISFIRES.
5A 5B
CLEARING MISFIRES CONTINUED

UNLOADING
Point the muzzle of the Maxim 9 in a safe direction.
Push the magazine release and remove the magazine. The magazine will either drop freely or will require gentle pulling to eject from the magazine well (6A).
After the magazine is removed, pull the slide back fully in a swift motion. This action will eject any cartridge that is currently in the chamber.
WARNING: KEEP THE MAXIM 9 POINTED IN A SAFE DIRECTION. KEEP YOUR FINGER OFF THE TRIGGER AND OUTSIDE OF THE TRIGGER GUARD WHILE UNLOADING.
Next, lock the slide to the rear by pushing upward on the slide catch while the slide is in the rearward position then allowing the slide to move forward slowly until the slide catch is engaged.
Do not obstruct the ejection port while unloading; doing so can interfere with ejecting the cartridge.
Visually inspect the chamber, barrel, and the magazine well to ensure that no ammunition remains in the Maxim 9.
Unload the magazine by holding it with the projectile end of the ammunition facing away from you, then push each round forward and out of the magazine, until the magazine is empty (6B).
6A 6B

FIELD STRIPPING & CHANGING SILENCER LENGTH

Depress the recoil rod retainer button, located on the rear of the slide (7A).
While the button is depressed, lift the recoil rod lever (7B).
After the recoil rod lever is fully raised, release the recoil rod retainer button. Pull the slide to the rear. Once the slide is halfway removed, tilt the rear of the slide downward (7C) so that the front of the slide clears the internal catch, then remove the slide completely (7D).
YOU DO NOT NEED TO, NOR SHOULD YOU, PULL THE TRIGGER BEFORE OR DURING THE FIELD STRIPPING OF THE MAXIM 9.
FIELD STRIPPING
WARNING: BEFORE TAKING YOUR MAXIM 9 APART, ENSURE THAT IT IS UNLOADED AND POINTED IN A SAFE DIRECTION. NEVER ATTEMPT TO FIELD STRIP A LOADED FIREARM. NEVER ATTEMPT TO ALTER THE FACTORY CONFIGURATION OF YOUR MAXIM 9 BEYOND THE APPROVED SHORTENING OF THE SILENCER PORTION.
WARNING: SILENCERCO RECOMMENDS WEARING EYE PROTECTION WHILE FIELD STRIPPING AND CLEANING THIS OR ANY OTHER FIREARM.
7A 7B
7C 7D

The frame of the Maxim 9 has two rails that run parallel to each other. The underside of the slide has corresponding channels that mate with these rails. (8A)
To reassemble the Maxim 9, align the rails of the frame with the channels in the slide. Tilt the slide at a 30 degree angle while seating the slide to engage the rails with the channels. (8B)
Press the slide forward slightly until the channel and rails engage, then drop the front of the slide down to meet the frame. At this point, the slide is able to move back and forth along the rails. (8C)
Push the slide forward completely. Once the slide is forward, depress the recoil rod retainer button and close the slide lever. (8D)
The Maxim 9 is now reassembled. Cycle the slide to confirm proper function.
ASSEMBLY AF TER FIELD STRIPPING
8A 8B
8C 8D

CHANGING SILENCER LENGTH
The Maxim 9 is shipped in its full-length configuration. The user is able to shorten the Maxim 9 by 1.21” by removing two baffles.
Remove the slide of the Maxim 9 before changing the baffle configuration (see FIELD STRIPPING section).
Using the provided Allen key, unscrew the sex bolts in the front cap of the Maxim 9 (9A). Remove the bolts.
The rods might come out with the sex bolt; this is dependent on carbon buildup and is not cause for concern.
Remove the front cap and the subsequent short baffle and set aside. These will be reinstalled at a later step (9B).
Remove the next two baffles. Store for safekeeping.
WARNING: ENSURE THAT YOUR MAXIM 9 IS UNLOADED BEFORE ATTEMPTING TO MAKE ANY ALTERATIONS. ALTERING THE LENGTH OF THE SILENCER PORTION OF THE MAXIM 9 SHOULD ONLY BE PERFORMED BY THOSE WHO ARE WELL-VERSED IN THE OPERATION OF THE MAXIM 9. IF AT ANY TIME YOU ARE UNSURE OF WHAT STEPS TO PERFORM, STOP IMMEDIATELY AND CONTACT SILENCERCO’S CUSTOMER SERVICE TEAM.
9ALEFT: SHORT BAFFLE RIGHT: FRONT CAP
9B

Unscrew the two threaded rods that the baffles were previously seated onto (9C).
Pliers might be required to apply sufficient torque depending on carbon buildup.
Once the rods are removed, place the short baffle and front cap back onto the silencer assembly (9D).
Thread the sex bolts onto one end of each short rod that came with your Maxim 9. These are not the rods you just removed from the Maxim 9, but are a separate set (9E).
Insert the ends of the short rods into the holes in the front cap of the Maxim 9 (9F). Ensure these rods are starting into the corresponding threads at the back of the Maxim 9 suppressor.
Tighten the sex bolts to 45 in/lbs (9G).
To return the Maxim 9 to its original length, reverse these steps and use the long rods that were originally installed in your Maxim 9.
CHANGING SILENCER LENGTH CONTINUED
9E
9C 9F 9G
9D

CLEANING

GENERAL
Your firearm is a precision instrument. To ensure reliable function it is necessary to follow a routine maintenance procedure. After firing your firearm, be sure to unload it following the procedure outlined in the UNLOADING section before performing any cleaning or maintenance procedure.
This Maxim 9 was treated by SilencerCo with a corrosion inhibitor prior to leaving our facilities to protect against potential oxidation during shipping and storage. Before using the Maxim 9, SilencerCo recommends a full cleaning and lubrication by following the FULL CLEANING procedure in this manual.
The exterior of the Maxim 9 can be cleaned with a non-abrasive cloth and light amount of gun oil.
DO NOT use an ultrasonic cleaner when cleaning your Maxim 9.
WARNING: ONLY CLEAN THE MAXIM 9 PISTOL IN A WELL-VENTILATED AREA. CLEANING, HANDLING AMMUNITION, OR DISCHARGING THE MAXIM 9 IN A POORLY VENTILATED AREA CAN LEAD TO EXPOSURE TO LEAD AND OTHER SUBSTANCES THAT ARE KNOWN TO CAUSE BIRTH DEFECTS AND OTHER SERIOUS INJURY. WASH YOUR HANDS THOROUGHLY AFTER EACH TIME YOU USE OR CLEAN THE MAXIM 9.
CAUTION: SOME TYPES OF CLEANERS CAN CAUSE DAMAGE TO THE MAXIM 9. ONLY USE SOLVENTS AND SOLUTIONS SPECIFICALLY DESIGNED FOR FIREARMS. THE FINISH OF THE MAXIM 9 CAN BECOME DAMAGED IF IMPROPER CLEANING PRODUCTS ARE USED. AMMONIATED SOLVENTS OR OTHER SUCH STRONG ALKALINE SOLVENTS SHOULD NOT BE USED ON THE MAXIM 9.
WARNING: ONLY DISASSEMBLE THE MAXIM 9 TO THE LEVELS OUTLINED IN THIS MANUAL. ONLY USE CLEANING SUPPLIES THAT ARE SUITABLE SPECIFICALLY FOR FIREARMS MAINTENANCE. FIREARMS DEALERS OFTEN OFFER COMPLETE CLEANING KITS FOR THE SPECIFIC CALIBER OF YOUR FIREARM. ADHERE TO ALL INSTRUCTIONS INCLUDED IN THE CLEANING SUPPLIES USED. ANY MAINTENANCE NOT OUTLINED IN THIS MANUAL SHOULD ONLY BE PERFORMED BY A QUALIFIED GUNSMITH, OTHERWISE THERE IS A RISK FOR SERIOUS INJURY, PROPERTY DAMAGE, OR DEATH.

SUGGESTED CLEANING INTERVALS FIELD CLEANING: After every firing or exposure to the elements or contaminants. FULL CLEANING: Every 500 – 1,000 rounds, or as required.
FIELD CLEANING Field cleaning is performed by first disassembling your Maxim 9 as noted in the FIELD STRIPPING portion of this manual.
Once field stripped, use a reputable CLP (cleaner, lubricant, preservative) specifically formulated for firearm use and soft brush or cloth to wipe and/or gently scrub the points of friction. Example locations shown in the following images.
Apply lubrication to same locations once they have been cleaned.
At this point, you can run a caliber-specific brush or cleaning wipe down the barrel of the Maxim 9. Follow all instructions outlined in your firearms cleaning kit.
CLEANING PISTOL
1. Frame Rails
2. Disconnecter to Pin
3. Disconnecter to Frame
4. Sear Assembly to Frame
12
3 4
After you are done cleaning the Maxim 9, apply a light coating of gun oil to coat the internal and external metal parts.
Take care to clean and lubricate your Maxim 9 after it has been exposed to dust, extreme humidity, water, or other conditions.
If your firearm will be used in a cold climate, be sure to use an oil of an appropriate weight so that it will not congeal in cold temperatures, causing the interaction of important parts to be slowed or halted.
PERFORM MAINTENANCE BEFORE STORAGE
Do not store your Maxim 9 inside of anything that will attract or hold moisture, such as leather or a heavy cloth. Do not store your Maxim 9 with a plugged front cap. Prior to storing your Maxim 9 for an extended period, take care to apply a high quality gun lubricating oil to the bore, chamber, and internal working mechanisms. Coat the external working mechanisms, such as the barrel, with an anti-rust oil. Clean your Maxim 9 prior to using it after a storage period. Each time you clean the Maxim 9, inspect for signs of wear. If you note excessive wear, contact SilencerCo’s Customer Service team before using the Maxim 9.
GENERAL CONTINUED

FULL CLEANING To fully clean your Maxim 9, first complete the field stripping steps then remove the grip to access the trigger assembly.
To remove the grip, locate the trigger assembly roll pin (12A). Place a rubber mat or other shock-absorbing, non-metallic object between the Maxim 9 and a hard work surface. Using a 5/32 punch or similar device, remove the roll pin from the Maxim 9 grip (12B).
Once the roll pin is removed, grasp the silencer portion of the Maxim 9 with one hand while pulling the grip of the Maxim 9 in a down and rearward direction (12C).
There are two lugs (12D) that seat into the rear of the top portion of the grip. User might have to rock the grip back and forth to clear these lugs.
1. Slide Delay Wing to Slide
2. Slide to Slide
3. Firing Pin Block
4. Firing Pin Assembly
1
2
3
4
12A 12B
12C 12D
CLEANING PISTOL CONTINUED

Now that the grip has been removed, the user can access the parts of the trigger assembly to clean. SilencerCo recommends using a soft brush and a reputable CLP (cleaner, lubricant, preservative) specifically formulated for firearms use. Take care to clean all parts that are subjected to friction. Example locations shown to the right (12E).
Apply lubrication to same locations once they have been cleaned.
To reassemble, first place the trigger through the trigger cutout in the frame (12F). The trigger cutout is the larger and rearmost cutout in the trigger guard area.
Once the trigger passes through the opening, pull the grip of the Maxim 9 rearward while bringing the grip up to meet the frame to ensure the lugs in the rear of the frame assembly seat into the grip (12G).
12E DISCONNECTER
12E SEAR ASSEMBLY TO FRAME
12F 12G
CLEANING PISTOL CONTINUED

Because the Maxim 9 has such a substantial amount of internal volume, there is no need to regularly clean the baffles. The Maxim 9 baffles can be cleaned during Full Cleaning; it is not necessary to clean the baffles during Field Cleaning.
To clean the baffles, reference the CHANGING SILENCER LENGTH portion of this manual for silencer disassembly. Once the silencer portion of the Maxim 9 is disassembled, continue to the below instructions.
SilencerCo recommends using a damp cloth or non-abrasive brush to gently wipe or scrub away debris. For particularly difficult debris, soak the baffles in a hydrocarbon-based solvent such as WD-40 and certain mineral spirits and/or lacquer thinners.
After soaking, wipe or scrub away debris with a non-abrasive brush or cloth. Ensure that the baffles are completely dry before reassembling. If a water-based cleaner was used, make sure to lightly coat the baffles
with oil or other corrosion-resistant product after cleaning. DO NOT use an ultrasonic cleaner.
If the finish of the baffles becomes discolored, wipe them with any high quality gun oil to restore the finish to factory condition.
Should additional cleaning advice be required, contact SilencerCo’s Customer Service team.
Should your Maxim 9 require maintenance beyond what is covered in this manual, please contact SilencerCo’s Customer Service team for questions or to arrange service for your Maxim 9. [email protected] or 801.417.5384
CLEANING BAFFLES
After the frame lugs are seated into the grip, fully seat the frame into the grip. Ensure the grip hole aligns with the corresponding hole in the frame (12H).
Replace the roll pin that was removed in earlier steps (12J).
12H 12J
CLEANING PISTOL CONTINUED

ACCESSORIES

The Maxim 9 is compatible with KeyMod rail sections (sold separately) to allow for attachment of a light or other rail-mounted accessories.
To attach a KeyMod rail section to the bottom of the silencer portion of your Maxim 9, align the KeyMod Nuts on the underside of the rail section with the corresponding KeyMod Slots in the underside of the Maxim 9 (10A).
Insert the KeyMod Nuts into the KeyMod Slots and slide the rail forward so that the KeyMod Recoil Lug falls into place and the rail section “locks” into the narrow section of the KeyMod Slots (10B).
After “locking” the rail section into place, tighten the screws of the rail section down until there is no play between the rail section and the Maxim 9 (10C).
KEYMOD™ RAIL SECTIONS
10A 10B 10C

OP TICS
The Maxim 9 is compatible with a variety of aftermarket optics through the use of interchangeable adapter plates (sold separately).
To attach an optic via an adapter plate, first remove the Red Dot Cover Plate from the top of the Maxim 9 by unscrewing the mounting hardware using a 2mm Allen key (11A). Do not remove the two screws located under the Red Dot Cover Plate.
Select the adapter plate and mounting hardware that is compatible with your particular optic.
Attach the adapter plate to your Maxim 9 where the Red Dot Cover Plate was previously located.
Align the holes in the adapter plate with the corresponding holes in the top of the Maxim 9
11B 11C11A
(11B), place the adapter plate flush with the top of the Maxim 9, then insert and tighten the mounting hardware using an Allen key (11C) to 11 in/lbs. There should be no play between the adapter plate and the Maxim 9.
Follow the instructions included with your optic to mount your optic to the adapter plate and finish installation.

LIFE TIME WARRANT Y
We proudly stand behind the quality of our products with a lifetime warranty, no matter what—even if it’s not a product defect. Our 48 hour repair turnaround even warranties stupid…once. If you experience any issues, please contact our Customer Service team at 801.417.5384.
If your silencer has a defect in manufacturing or materials, there will be no charges for service or replacement through our SilencerCo facility.
If we determine that a claim is not covered under warranty, a discounted replacement option will be granted.
This warranty does not cover damage to the silencer or host firearm resulting from careless or
irresponsible handling, adjustments or modifications to design, negligence, or other abuse. SilencerCo assumes no liability for unsafe or illegal use of the Maxim 9 by its purchaser or any other user that comes in contact with the product after purchase. SilencerCo assumes no responsibility for physical injury or property damage resulting from careless or irresponsible handling or by any use contrary to the recommendations, warnings, and cautions generally listed in this manual. SilencerCo does not cover damage to the Maxim 9 resulting from improper hand-loaded, reloaded, or defective ammunition.
TROUBLESHOOTING
Have a question that wasn’t answered in this manual? Our Customer Service team will be happy to assist.
Contact them at [email protected] or 801.417.5384

Register Your SilencerCo Product Online To Activate Your Lifetime Warranty SIL ENCERC O.C OM/REGIST ER

Protect Your Rights | Protect Your Hearing The American Suppressor Association is fighting to protect and expand your silencer rights. Join the fight today! LEARN MORE AT AMERICANSUPPRESSORASSOCIATION.COM
JOIN NOW
FOR QUESTIONS, CONTACT OUR CUSTOMER SERVICE TEAM AT 801.417.5384 OR [email protected]
© 2017 SilencerCo, LLC. All Rights Reserved. The contents of this publication may not be reproduced in any form or by any means in whole or in part without the prior written permission of the copyright owner.

READ THE INSTRUCTIONS AND WARNINGS IN THIS MANUAL CAREFULLY BEFORE USING THIS FIREARM