sierra series 830/840/860 side-trak and auto-trak mass ... · sierra series 830/840/860...
TRANSCRIPT

Sierra Series 830/840/860
Side-Trak™ and Auto-Trak™
Mass Flow Meters and Controllers
Instruction Manual Part Number IM-83/84/86
Revision G.6 - 10/08
CORPORATE HEADQUARTERS 5 Harris Court, Building L Monterey, CA 93940
Phone (831) 373-0200 (800) 866-0200 Fax (831) 373-4402 www.sierrainstruments.com
EUROPE HEADQUARTERS Bijlmansweid 2 1934RE Egmond aan den Hoef
The Netherlands Phone +31 72 5071400 Fax +31 72 5071401
ASIA HEADQUARTERS Rm. 618, Tomson Centre, Bldg A, 188 Zhang Yang Road
Pu Dong New District, Shanghai, P.R.China Phone: + 8621 5879 8521 Fax: +8621 5879 8586

Table of Contents Series 830/840/860 Instruction Manual
0-2 IM-83/84/86-H
Customer Notice Sierra Instruments, Inc. is not liable for any damage or personal injury, whatso-ever, resulting from the use of Sierra Instruments standard mass flow meters or controllers for oxygen gas. You are responsible for determining if this mass flow meter or controller is appropriate for your oxygen application. You are responsible for cleaning the mass flow meter or controller to the degree required for your oxy-gen flow application.
© COPYRIGHT SIERRA INSTRUMENTS 1994 No part of this publication may be copied or distributed, transmitted, transcribed, stored in a retrieval system, or translated into any human or computer language, in any form or by any means, electronic, mechanical, manual, or otherwise, or disclosed to third parties without the express written permission of Sierra Instruments. The information contained in this manual is subject to change without notice. TRADEMARKS Side-Trak™, Auto-Trak™ and Cal-Bench™ are trademarks of Sierra Instruments, Inc. Other product and company names listed in this manual are trademarks or trade names of their respective manufacturers.

Series 830/840/860 Instruction Manual Table of Contents
IM-83/84/86-H 0-3

Table of Contents Series 830/840/860 Instruction Manual
0-4 IM-83/84/86-H
Table of Contents
Chapter 1 Introduction Introduction..............................................................................1-1 Using this Manual...............................................................1-1 Safety Information..............................................................1-2 Receipt of System Components ..........................................1-2 Technical Assistance ..........................................................1-2 The Series 800 Flow Sensing Principle.....................................1-3
Chapter 2 Installation Quick Installation Guide...........................................................2-1 Installation Overview ...............................................................2-2 Installing the Transducer ..........................................................2-3 Compression Fittings..........................................................2-3 VCO Fittings ......................................................................2-3 VCR Fittings ......................................................................2-4 NPT and 1/2-inch Fittings...................................................2-4 Wiring the Transducer..............................................................2-5 Recommended Wire Gauges...............................................2-5 Wiring Transducers with 20-Pin Card Edge Connectors .....2-6 Wiring Transducers with 15-Pin D Connectors .................2-10 Motor-Operated Valve Circular 10-Pin Connector ............2-14
Chapter 3 Operation Mass Flow Meter Operation .....................................................3-1 Mass Flow Controller Operation...............................................3-2 Electromagnetic Valve Controllers .....................................3-2 Motor-Operated Rotary Valve Controllers ..........................3-3 Mass Flow Controller Features.................................................3-4 Over-Range and Cold Sensor Lockout Circuit ....................3-4 Controller Auto Shut-Off Feature .......................................3-4 On-Off Control and Soft Start Option .................................3-5 Valve Purge Function .........................................................3-6
Chapter 4 Maintenance Flow Path Maintenance ............................................................4-1 Changing the Laminar Flow Element..................................4-1 Sensor Maintenance .................................................................4-6 Sensor Cleaning and Inspection ..........................................4-6 Sensor Electrical Test .........................................................4-7 Valve Maintenance...................................................................4-8

Series 830/840/860 Instruction Manual Table of Contents
Electromagnetic Valves -Low and Medium Flow ..................... 4-8 Electromagnetic Valves - High Flow .............................................. 4-9 Motor-Operated Rotary Valves ..................................................... 4-11 Valve Adjustment .................................................................. 4-12 Transducer Calibration .................................................................... 4-15
Chapter 5 Troubleshooting
Troubleshooting Procedures .................................................................... 5-1 Frequently Asked Questions ................................................................... 5-4 Returning Equipment to the Factory ............................................................. 5-7
Appendix A Conversion Formulas and Gas Tables
Appendix B Production Specifications
List of Figures
1-1. Flow Paths through the Transducer ............................... 1-3 1-2. Flow Measuring Principle ............................................... 1-3 1-3. Sensor Temperature Distribution .................................... 1-4 1-4. Linear Range of the Transducer’s Output Signal .......... 1-4 2-1. Piping Requirements for NPT & 1/2-inch Connections ...... 2-3 2-2. Input Power Connections (20-Pin Connector) ..................... 2-5 2-3. Output Signal Connections (20-Pin Connector) ................... 2-5 2-4. Local Command Set Point (20-Pin Connector) ...................... 2-6 2-5. External Command Set Point (20-Pin Connector) ............... 2-6 2-6. 15 Volt Valve Purge and Off (20-Pin Connector) .................. 2-7 2-7. 30 Volt Valve Purge and Off (20-Pin Connector) .................. 2-7 2-8. Input Power (15-Pin D Connector) ..................................... 2-8 2-9. Output Signal (15-Pin D Connector) .................................. 2-8 2-10. Local Command Set Point (15-PinD Connector) ................. 2-9 2-11. External Command Set Point (15-Pin D Connector) .............. 2-9 2-12. 15 Volt Valve Purge and Off (15-Pin D Connector) ............ 2-10 2-13. 30 Volt Valve Purge and Off (15-Pin D Connector) ............ 2-10 2-14. Motor-Operated Valve Circular 10-Pin Connector .............. 2-11 3-1. Soft Start Response Times ............................................... 3-5 4-1. Low Flow Transducer LFE Cleaning ............................... 4-2 4-2. Medium Flow Transducer LFE Cleaning ......................... 4-3 4-3. High Flow Transducer L F E Cleaning. ................................... 4-4 4-4. NPT Transducer LFE Cleaning ........................................... 4-5 4-5. Sensor Wire Access ............................................................ 4-7 4-6. Transducer Potentiometers Used for Calibration ................ 4-12
List of Tables 2-1. Recommended Wire Gauges ................................................. 2-4
IM-83/84/86-H 0-5

Table of Contents Series 830/840/860 Instruction Manual
0-6 IM-83/84/86-H

Series 830/840/860 Instruction Manual Table of Contents
IM-83/84/86-H 0-7
Warnings and Cautions
Warning! Follow National Electric Code or your local code safety practices when wiring or connecting this unit to a power source. Only qualified personnel should install and wire the transducer. Warning! Always remove main power before disassembling the transducer.
Caution! During operation, the mass flow controller valve becomes hot. Caution! Do not use the manual purge function when RS-485 is active (Model 860 only). Caution! Always fully neutralize any toxic gas trapped inside the transducer before re-moving from the gas line. Caution! Only qualified personnel should perform transducer service, calibration or troubleshooting procedures. Caution! Printed circuit boards are sensitive to electrostatic discharge. To avoid damag-ing the board, follow these precautions to minimize the risk of damage: • before handling the assembly, discharge your body by touching a grounded, metal
object • handle all cards by their edges unless otherwise required • when possible, use grounded electrostatic discharge wrist straps when handling
sensitive components

Series 830/840/860 Instruction Manual Chapter 1 Introduction
IM-83/84/86-H 1-1
Chapter 1 Introduction Sierra’s Side-Trak™ and Auto-Trak™ mass flow meters and con-trollers are designed to accurately measure and control flows of process gases. This instruction manual covers the installation, op-eration and maintenance of the entire Side-Trak and Auto-Trak product lines, which include the following Sierra models: • 830 Side-Trak Mass Flow Meter • 840 Side-Trak Mass Flow Controller • 860M Auto-Trak Mass Flow Meter with RS-485 interface • 860C Auto-Trak Mass Flow Controller with RS-485 interface Sierra’s mass flow meters and controllers offer a broad range of sizes, control electronics, process connections, cables and connectors for flexibility and versatility. The meter’s patented straight sensor tube with access ports permits easy cleaning and reduces maintenance down-time. The platinum sensor eliminates zero-drift and ensures long-term repeatability. The primary standard calibration ensures starting point accuracy and NIST traceability. All wetted surfaces are constructed of 316 stainless steel with Viton® seals standard. Control-lers incorporate either an electromagnetic valve (up to 500 slpm) or a motor-operated rotary valve (100 slpm to 200 scfm). The Auto-Trak 860 digital microprocessor features automatic bridge-balancing cir-cuitry and provides simultaneous analog and digital RS-485 commu-nication.
Using This Manual This manual is organized into five chapters: • Chapter 1 includes the introduction and theory of operation • Chapter 2 provides installation and wiring instructions • Chapter 3 describes system operation and controller features • Chapter 4 covers maintenance and calibration procedures • Chapter 5 provides troubleshooting advice Gas tables and conversion formulas are found in Appendix A. The product specifications and dimensional drawings are found in Ap-pendix B. The Model 860 Auto-Trak RS-485 communications program in-cludes an “Auto-Net” Software Addendum as a supplement to this manual. Please refer to this addendum for all RS-485 operating in-structions.
Chapter 1 Introduction Series 830/840/860 Instruction Manual
1-2 IM-83/84/86-H
Throughout this manual, we use the word transducer as a ge-neric term to represent all Side-Trak and Auto-Trak mass flow meters and controllers.

Series 830/840/860 Instruction Manual Chapter 1 Introduction
IM-83/84/86-H 1-3
Safety Information Caution and warning statements are used throughout this book to draw your attention to important information.
Warning! Caution! This statement appears with information that is important to protect people and equipment from damage. Pay very close attention to all warnings that apply to your application.
This statement appears with information that is important for protecting your equipment and performance. Read and follow all cautions that apply to your application.
Receipt of System Components When receiving a Sierra transducer, carefully check the outside packing carton for damage incurred in shipment. If the carton is damaged, notify the local carrier and submit a report to the factory or distributor. Remove the packing slip and check that all ordered components are present and match your specifications (as ordered). Make sure any spare parts or accessories are not discarded with the packing material. Do not return any equipment to the factory with-out first contacting Sierra Customer Service.
Technical Assistance If you encounter a problem with your transducer, review the configuration information for each step of the installation, operation and set up procedures. Verify that your settings and adjustments are consistent with factory recommendations. Refer to Chapter 5, Trou-bleshooting, for specific information and recommendations. If the problem persists after following the troubleshooting proce-dures outlined in Chapter 5, contact Sierra Instruments by fax or by E-mail (see inside front cover). For urgent phone support you may call (800) 866-0200 or (831) 373-0200 between 8:00 a.m. and 5:00 p.m. PST. In Europe contact Sierra Instruments bv at +31 20 6145810. When contacting Technical Support, make sure to include this information:
• the flow range, serial number and Sierra order number and model number (all marked on the transducer nameplate)
• the problem you are encountering and any correc-tive action taken
• application information (gas, pressure, temperature and piping configuration)

Chapter 1 Introduction Series 830/840/860 Instruction Manual
1-4 IM-83/84/86-H
The Series 800 Flow Sensing Principle The operating principle of Sierra’s Side-Trak and Auto-Trak flow meters and controllers is based on heat transfer and the first law of thermodynamics. During operation process gas enters the instru-ment’s flow body and divides into two flow paths, one through the sensor tube, the other through the laminar flow element bypass. The laminar flow element bypass generates a pressure drop, P1–P2, forcing a small fraction of the total flow to pass through the sensor tube (m1) which is then monitored.
Figure 1-1. Flow Paths through the Transducer Two resistance temperature detector (RTD) coils around the sensor tube direct a constant amount of heat (H) into the gas stream. In ac-tual operation, the gas mass flow carries heat from the upstream coil to the downstream coil. The resulting temperature difference (∆T) is detected by the RTD coils.
Figure 1-2. Flow Measuring Principle

Series 830/840/860 Instruction Manual Chapter 1 Introduction
IM-83/84/86-H 1-5
Figure 1-3. Sensor Temperature Distribution Figures 1-2 and 1-3 show the mass flow through the sensor tube as inversely proportional to the temperature difference of the coils. The coils are legs of a bridge circuit with an output voltage in direct pro-portion to the difference in the coils’ resistance; the result is the tem-perature difference (∆T). Two other parameters, heat input (H) and coefficient of specific heat (Cp) are both constant. The resulting out-put is nearly linear over the transducer’s normal operating range.
Figure 1-4. Linear Range of the Transducer’s Output Signal For mass flow controllers, once the gas flows through the monitor-ing section, it is then controlled by the built-in servo-control valve. For flows up to 500 slpm, Sierra’s proprietary high-efficiency Fast-Trak Electromagnetic Valve is used. The normally closed Fast-Trak valve is similar to an on/off solenoid valve, except that the current to the valve coil, and hence the magnetic field, is modu-lated so that the ferromagnetic valve armature, or valve plug, as-sumes the exact height above the valve’s orifice required to main-tain the valve’s command flow. The result is nearly infinite resolu-tion. All controllers with the Fast-Trak valves are available with a “Soft-Start” option for those processes that require it. For higher flows of 50 to 200 scfm, controllers are equipped with Si-erra’s microprocessor-controlled, motor-operated rotary valve. While the rotary valve does not provide a completely positive shut-off, it does offer accurate control for higher flow installations.
Series 830/840/860 Instruction Manual Chapter 2 Installation
IM-83/84/86-H 2-1
Chapter 2 Installation Quick-Installation Instructions For
830/840 L, M and H Meters And Controllers
1. NEVER TEST FOR LEAKS WITH LIQUID LEAK DETECTOR. If liquid seeps into the electronics or the sensor compartment below, the instrument may be damaged. Use a pressure-decay test in-stead.
2. Install an appropriate in-line filter upstream if the gas contains any particulate matter or condensed moisture. (A 15-micron par-ticulate filter for full-scale flows up to 30 liters/minute is recom-mended, 30 micron for flows above 30).
3. Mount with a horizontal gas-flow. This orientation is preferable unless the factory calibration was specifically performed for a ver-tical flow. Consult your calibration certificate. (Horizontal flow is assumed unless vertical flow upward or downward is specified).
4. DO NOT APPLY POWER TO THE OUTPUT LOOP on units equipped and calibrated for a 4-20 mA output signal. This is NOT a loop-powered device. Damage will occur.
5. Wire the instrument per the diagrams on the back of this card or the Operator’s Manual, Chapter 2. Controllers require a separate ground wire for the Valve Return signal as well as a Setpoint sig-nal (no wire connected to the setpoint may cause the valve to float open).
6. Apply the gas listed on the label to the inlet at the recommended inlet pressure as listed on the calibration certificate. On a meter, obtain this pressure by blocking off the flow downstream. On a controller, confirm that there is no gas flowing through it with a zero setpoint. (If there is a flow, consult the Valve Adjustment Procedure in the manual).
7. Apply power and verify or adjust the zero setting after allowing a 15-minute warm-up period. The zero adjustment potentiometer is accessed through the upper hole in the side of the electronics cover. (See the Operator’s Manual, Chapter 3).
8. DO NOT LEAVE A SETPOINT APPLIED TO A CONTROLLER WHEN NO GAS IS AVAILABLE TO THE INLET FITTING. The control circuit will apply the maximum voltage to the valve coil re-sulting in eventual overheating. Damage may occur. (Instead, consult the Operator’s Manual for use of the “Valve Off” feature).
9. An ANNUAL factory evaluation and calibration is recom-mended.
Email Technical Support: [email protected]
Website Self Service: www.sierrainstruments.com

Chapter 2 Installation Series 830/840/860 Instruction Manual
2-2 IM-83/84/86-H
Installation Overview Side-Trak™ and Auto-Trak™ transducers are supplied with either compression, VCO, VCR or NPT process connections. To ensure a successful installation, inlet and outlet tubing should be in a clean state prior to plumbing the transducer into the system. The ship-ping caps covering the inlet/outlet fittings should not be removed until immediately prior to installation. Before installing the transducer, verify the following: 1. Make sure the installation site meets the specific operating pa-
rameters recorded on the transducer’s nameplate. Each trans-ducer is factory-configured for a specific gas and flow range, pressure differential, temperature range and mounting position.
2. Do not locate the transducer in areas subject to sudden tem-
perature changes, moisture, drafts or near equipment radiating significant amounts of heat. Make sure to allow adequate space for cable connectors and wiring.
3. Make sure the location meets the minimum number of recom-
mended pipe diameters upstream and downstream of any NPT or 1/2-inch process connection. A minimum of two inches is always recommended.
4. If the gas contains any particulate matter, install an in-line fil-
ter prior to the transducer. Recommended filter size: 15 mi-cron for flows of 10 to 30 slpm, 30 micron for above 30 slpm.
5. If the transducer is mounted in any position other than horizontal
and it was not calibrated specifically for that position, contact Si-erra’s Customer Service Department for instructions.
6. For meters, if a potential over-flow condition exists, insert a
valve or critical orifice in the line to limit flow to approxi-mately 25 percent above the full scale range of the meter.
7. For controllers, use a properly-sized pressure controller and
verify the controller orifice size is the smallest in the system. There can be no restrictions (such as valves, tubing or piping internal diameters, reducers, etc.) upstream or downstream of the controller less than the valve orifice diameter.
8. Confirm that the transducer o-ring material is compatible with
the gas to be measured.

Series 830/840/860 Instruction Manual Chapter 2 Installation
IM-83/84/86-H 2-3
Installing the Transducer Follow the installation instructions that are applicable to your trans-ducer’s process connection. For all NPT and 1/2-inch size fittings, see the piping recommendations given on page 2-3. Before use, all plumbing should be checked carefully for leaks and the transducer purged with dry nitrogen. Make sure that the tubing is free from burrs, or rims caused by cutting.
Compression Fittings 1. Position the transducer with the flow direction arrow pointing
downstream in the direction of flow.
2. Verify the position of the
front and back ferrule as shown at right. Insert the tubing into the fitting. Make sure that the tubing rests firmly on the shoulder of the fitting and that the nut is finger tight. Scribe the nut at the six o’clock position.
3. While holding the fitting body steady with a backup wrench,
tighten the nut 1-1/4 turns, watching the scribe mark make one complete revolution and continue to the nine o’clock position. For 1/16-inch, 1/8-inch and 3/16-inch (2, 3 and 4 mm) sizes, tighten only 3/4 turn from finger tight. Do not over-tighten!
4. Check the system’s entire flow path thoroughly for leaks. (Do
not use liquid leak detectors, instead monitor pressure decay. Over-exposing the transducer to leak detector fluid may dam-age the unit.)
VCO Fittings 1. Position the transducer with the flow direction arrow pointing
downstream in the direction of flow. 2. Tighten the nut finger tight, and then 1/4 turn tighter with a
wrench. Do not over-tighten! 3. Check the system’s entire flow path thoroughly for leaks. (Do
not use liquid leak detectors, instead monitor pressure decay. Over-exposing the transducer to leak detector fluid may dam-age the unit.)
Caution!
Only qualified personnel should in-stall the transducer.

Chapter 2 Installation Series 830/840/860 Instruction Manual
2-4 IM-83/84/86-H
VCR Fittings 1. Position the transducer with the flow direction arrow pointing
downstream in the direction of flow. 2. Install new washers compatible with the gas to be used. (Do
not mix or interchange parts of tube fittings made by different manufacturers.)
3. Tighten the nut finger tight, and then 1/4 turn tighter with a
wrench. Do not over-tighten! 4. Check the system’s entire flow path thoroughly for leaks. (Do
not use liquid leak detectors, instead monitor pressure decay. Over-exposing the transducer to leak detector fluid may dam-age the unit.)
NPT Fittings and 1/2-Inch Connections - All Types 1. Install a section of straight pipe at least five pipe diameters in
length upstream of the transducer. For flow meters only, also allow at least two pipe diameters downstream for accurate op-eration. DO NOT use reducers.
2. Position the transducer with the flow direction arrow pointing
downstream in the direction of flow. 3. Tighten fittings until leak tight (refer to published standards for
specific recommendations). 4. Check the system’s entire flow path thoroughly for leaks. (Do
not use liquid leak detectors, instead monitor pressure decay. Over-exposing the transducer to leak detector fluid may dam-age the unit.)
Figure 2-1. Piping Requirements for NPT and 1/2-Inch Process Connections

Series 830/840/860 Instruction Manual Chapter 2 Installation
Warning!
Follow National ElectricCode or your local code
safety practices when wir-ing or connecting this unit
to a power source. Onlyqualified personnel should
wire the transducer.
Wiring the Transducer
Side-Trak and Auto-Trak transducers require a +15, 0, –15 VDC power supply and a readout device. Additionally, controllers require a set point input(0-5 VDC standard, 4-20 mA optional). Transducers are connected to the power supply, output signal and set point control through either a 20-pin card-edge connector or 15-pin D-connector. Motor-operated rotary valves use a 10-pin circular connector. Wiring instructions are given for each type of connector on the following pages. If you are replacing another manufacturer’s transducer with a Sierra product, see the factory-supplied wiring supplement for instructions specific to your installation.
Recommended Wire Gauges
Using the correct wire gauge for cabling runs to transducers en-hances system reliability. For cable runs over 150 feet (46 m), con-sider using a local power supply.
IM-83/84/86-H 2-5
Table 2-1. Recommended Wire Gauges

Chapter 2 Installation Series 830/840/860 Instruction Manual
2-6 IM-83/84/86-H

Series 830/840/860 Instruction Manual Chapter 2 Installation
Wiring Transducers with 20-Pin Card-Edge Connectors Input
Power Connections
Figure 2-2. Input Power Connections (20-Pin Connector)
Output Signal Connections
Standard output for all transducers is a 0-5 V DC signal, which di-rectly corresponds to the0 to 100% mass flow full scale range. Output signals are linear and require a minimum load resistance of 1000 Ohms (4-20 mA output600 Ohms maximum loop resistance). The Auto-Trak 860 allows transmission of all available input/output signals to your computer’s R S-485 communications port (connection details are given below). For additional information, refer to the “Auto- Net” Software Addendum included with this manual.
Figure 2-3. Output Signal Connections (20-Pin Connector)
Notes: 1. Controllers require a separate, dedicated ground wire between pin 2 and the power supply common to carry the valve coil current.
2. 4-20 mA output signal is ground-referenced (“non-isolated”). Warning: Do NOT apply any external voltage to this loop.
IM-83/84/86-H 2-7
Chapter 2 Installation Series 830/840/860 Instruction Manual
Input Signal Connections (Controllers Only)
The0-5 VDC (4-20 mA optional) set point command input signal
allows you to set the flow to any desired value within the range of
the controller. The set point input signal is a direct linear represen-tation of 0 to 100 percent of the controller’s mass flow full scale
value.
For 0–5 V DC set point control, connect a manual-adjust potentiome-ter as shown below. Any potentiometer value between 5K and 100K
may be used but is limited to a V DC input signal only. For 4-20 mA set point control, use a 4-20 mA generator.
If the set point input is not connected to some type of control device, the valve on/off switch must be activated in the off position. If no set point command is present on the controller when powered-up and the valve is not switched off, the valve will drift wide open.
Figure 2-4.
Local Command Set Point Potentiometer (20-Pin Connector)
Figure 2-5.
External Command Set Point Source (20-Pin Connector)
2-8 IM-83/84/86-H

Series 830/840/860 Instruction Manual Chapter 2 Installation
IM-83/84/86-H 2-9
Valve Purge and Valve Off Connections (Controllers Only) Depending on the valve voltage, connect as shown below.
COM Purge
On
OffOpen collector output
Valve Off
On
Off
123456789
10
ABCDEFGHIJ
15 Volt Valve
Figure 2-6. Valve Purge and Valve Off (20-Pin Connector)
+15V
Purge
On
OffOpen collector output
Valve Off
On
Off
123456789
10
ABCDEFGHIJ
30 Volt Valve
COM
Figure 2-7.Valve Purge and Valve Off (20-Pin Connector)
Note: Typically controllers for 10 slpm or below will be equipped with a 15-volt valve circuit, while those above 10 slpm with a 30-volt cir-cuit. Consult Technical Support if necessary.

Chapter 2 Installation Series 830/840/860 Instruction Manual
2-10 IM-83/84/86-H
Figure 2-8. 20-PinConnector Pin Designations
Note: Prior to 2001, sierra supplied separate cables for controllers and meters.These are now combined into one style for 830/840 devices and one style for860M/C.
SETCOMCOMTEST-15
+RS-485-RS-485OFF
123456789
10
ABCDEFGHIJ
CASECOM
V OUT+15
V REF
+154-20
COM
PIN NO.
12345678910ABCDEFGHIJ
DESCRIPTIONChassis groundCommon, valve returnOutput high+15 VDC supplyNo connection+5 VDC for local set pointNot avail. - connector key+15 VDC4-20 mA (for 4-20 mA meters only)Common, input low0-5 VDC/4-20 mA set point inputCommon, output lowCommon, power supplyVavle test point (electromagnetic valve)No connection-15 VDC supplyNot avail. - connector key+RS-485-RS-485Valve off
WIRECOLOR830/840ShieldVioletWhiteRed--------
(White)GrayBrownBlackBlue
Green--
Orange------
Yellow
860M/860CShieldVioletWhiteRed--------
(White)ÐÐ
BrownBlack
--Green
--Orange
--GrayBlue
Yellow

Series 830/840/860 Instruction Manual Chapter 2 Installation
Wiring Transducers with 15-Pin D-Connectors
Input Power Connections
Figured 2-9. Input Power (15-Pin D-Connector)
Note: Use separate, dedicated wires for pins 9 and 10 to the power supply com-mon on meters and pins 9,10 and 3 on controllers.
Output Signal Connections
Standard output for all transducers is a 0-5 V DC signal, which di-rectly corresponds to the0 to 100% mass flow full scale range.
Output signals are linear and require a minimum load resistance of
1000 Ohms (4-20 mA output600 Ohms maximum loop resis-tance).
Figure 2-10. Output Signal (15-Pin D-Connector)
Notes:
1. Panel meter or read-out device should be wired to beat the
same ground potential as the power supply.
2. 4-20 mA output signal is ground referenced (“non-isolated”).
Warning: Do not apply any external voltage to this loop.
-15V
+15/0/-15 Vdc
Power Supply
+
Pin 3 connection for
controllers only
12345678
9101112131415
COM
+15V
Case
IM-83/84/86-H 2-11

Chapter 2 Installation Series 830/840/860 Instruction Manual
Input Signal Connections (Controllers Only)
A 0-5 VDC (4-20 mA optional) set point command inputs ignal allows you to set the f low to any desired value within the range of the controller. The set point input signal is a direct linear representation of 0 to 100 percent of the controller’s mass flow full scale value.
For 0–5 V DC set point control, connect a manual-adjust potentiometer as shown below. Any potentiometer value between 5K and 100K may be used but is limited to a V DC input signal only. For 4-20 mA or 0–5 V DC set point control, use a PLC or other digital device.
If the set point input is not connected to some type of control device,
the valve on/off switch must be activated in the off position. If no set
point command is present on the controller when powered-up and the valve is not switched off, the valve will drift wide open.
Figure 2-11.
Local Command Set Point Potentiometer (15-Pin D-Connector)
Figure 2-12.
External Command Set Point Source (15-Pin D-Connector)
2-12 IM-83/84/86-H
Series 830/840/860 Instruction Manual Chapter 2 Installation
IM-83/84/86-H 2-13
Valve Purge and Valve Off Connections (Controllers Only) Depending on the valve voltage, connect as shown below.
12345678
9101112131415 Purge
On
Off
Open collector
output
Valve Off
On
Off
15 Volt Valve
COM
Figure 2-13. Valve Purge and Valve Off (15-Pin D-Connector)
12345678
9101112131415
Purge
On
Off
Open collector
output
Valve Off
On
Off
30 Volt Valve
COM
+15V
Figure 2-14. Valve Purge and Valve Off (15-Pin D-Connector)
Note: Typically controllers for 10 slpm or less will be equipped with a 15-volt valve circuit, while those above 10 slpm with a 30-volt circuit. Con-sult Technical Support if necessary.

Chapter 2 Installation Series 830/840/860 Instruction Manual
2-14 IM-83/84/86-H
Figure 2-15. 15-PinD-Connector PinAssignments
Note: Prior to 2001, Sierra supplied separate cables for controllers and meters.These are now combined into one style for 830/840 devices and one style for860M/C
12345678
9101112131415
COMOUTPUTCOMPURGECOM-15+15SET
PIN NO.123456789101112131415
DESCRIPTIONSignal commonOutput signalPower common (valve return)PurgePower common-15 VDC supply+15 VDC supply (optional connection)Command set point inputPower commonSignal common+5 volt referenceValve off+15 VDC supplyNCChassis ground (shield)
WIRECOLOR830/840GreenWhiteVioletGray--
Orange--
BrownBlueBlack--
YellowRed--
Shield
COM COMREFOFF+15NC
CASE

Series 830/840/860 Instruction Manual Chapter 2 Installation
Motor-Operated Valve Circular 10-Pin Connector
Figure 2-16. Motor-Operated Rotary Valve Connector (10-Pin Connector)
Notes:
1. Both pin 2 and4 should be connected to the power supply common via separate, dedicated wires to assure no ground loops.
2. 4-20 mA output signal is ground- referenced (“non-isolated”).
Warning: Do not apply any external voltage to this loop.
IM-83/84/86-H 2-15

Series 830/840/860 Instruction Manual Chapter 3 Operation
IM-83/84/86-H 3-1
Chapter 3 Operation This chapter covers transducer operation and controller features available on Sierra’s Side-Trak™ and Auto-Trak™ models. For more information on the advanced digital RS-485 commands available on Auto-Trak transducers, refer to the Series 860 “Auto-Net” Software Addendum included with this manual. Standard output for all transducers is a linear 0-5 VDC output signal directly corresponding to 0 to 100% of the mass flow full scale range. For mass flow controllers an input signal of 0-5 VDC (4-20 mA optional) allows set point flow control to any desired value within the range of the model. The input signal is a direct linear rep-resentation of 0 to 100% of the mass flow full scale value. A 0 VDC (or 4 mA) set point will cause a condition of 0% flow to occur and a 5.00 VDC (20 mA) set point will cause a flow condition equivalent to 100% of flow to occur.
Mass Flow Meter Operation When the transducer is installed and the system has undergone a complete leak check: 1. Apply power. Allow thirty minutes of warm-up time. (When
power is first applied, the output signal from the transducer remains fixed at a much higher than normal level until the sen-sor warms up to its normal operating temperature range.)
2. Turn on the gas supply. Perform an initial zero output check
(only required for first-time start ups). Set flow to zero. Connect a digital multimeter to V+out (4-20 mA out) and COM termi-nals.
3. Check the reading. If it is not within ±10 mV (±0.10 mA) of
zero, adjust the zero potentiometer to zero the transducer. (The zero pot is located behind the upper metal button on the side of the transducer or behind the swing-out plastic door.)

Chapter 3 Operation Series 830/840/860 Instruction Manual
3-2 IM-83/84/86-H
Mass Flow Controller Operation
Electromagnetic Valve Controllers When the transducer is installed and the system has undergone a complete leak check: 1. Make sure the set point is zero before applying power. If the
set point input is not connected to some type of control device, set the valve on/off switch in the off position. (No connection may cause the setpoint to float). Note: The valve opens mo-mentarily when power is first applied.
2. Apply power. Allow thirty minutes of warm-up time. (When
power is first applied, the output signal from the transducer remains fixed at a much higher than normal level until the sen-sor warms up to its normal operating temperature range.)
3. Turn on the gas supply. Perform an initial zero output check
(only required for first-time start ups). Set flow to zero. Connect a digital multimeter to V+out (4-20 mA out) and COM termi-nals.
4. Check the reading. If it is not within ±50 mV (±0.16 mA) of
zero, adjust the zero potentiometer to zero the transducer. (The zero pot is located behind the upper metal button on the side of the transducer or behind the swing-out plastic door.)
5. Adjust the controller set point to the desired flow rate.
Caution: Never leave the controller with no gas supply while supplying a setpoint. The valve will open to its maximum position and eventually overheat causing possible damage to the control circuit. If it is desired to interrupt the gas flow for an extended period, consider utilizing the “Valve-Off” circuit.
Caution!
During operation, the mass flow controller valve becomes hot.

Series 830/840/860 Instruction Manual Chapter 3 Operation
IM-83/84/86-H 3-3
Motor-Operated Rotary Valve Controllers When the transducer is installed and the system has undergone a complete leak check: 1. Make sure the valve set point is zero before applying power. 2. Apply power. Allow thirty minutes of warm-up time. (When
power is first applied, the output signal from the transducer remains fixed at a much higher than normal level until the sen-sor warms up to its normal operating temperature range.)
3. Turn on the gas supply. Verify that no flow exists. Perform an
initial zero output check (only required for first-time start ups). Set flow to zero. Connect a digital multimeter to V+out (4-20 mA out) and COM terminals.
4. Check the reading. If it is not within ±10 mV (±0.10 mA) of
zero, adjust the zero potentiometer to zero the transducer. (The zero pot is located behind the upper metal button on the side of the transducer or behind the swing-out plastic door.)
5. Adjust the controller set point to the desired flow rate. All motor-operated rotary valves seek a “deadband” where the flow is identical to the set point within specified tolerances. Keep this in mind when checking the instrument’s performance. For in-stance, a 100 scfm flow controller may have a set point of 2.500 volts (50 scfm) and a flow indication of 2.550 volts (51 scfm). This controller is working correctly, since the difference between the flow and the set point is within 1 scfm, which is the specified accu-racy of ±1% of full scale (0.01 x 100 scfm = 1 scfm). The width of the deadband varies with the valve size and range of each control-ler. During operation, the motor runs only when it needs to. If the pres-sure differential across the valve is insufficient to obtain set point, the valve will open fully and the motor will cease to run. Con-versely, if the set point is zero, the valve will close, and the motor will cease to run. In either case, there will be no control action. Check for adequate pressure differential and that set point command voltage is present at the motor operator connector.

Chapter 3 Operation Series 830/840/860 Instruction Manual
3-4 IM-83/84/86-H
Mass Flow Controller Features
Over-Range and Cold Sensor Lockout Circuit Side-Trak Models incorporate an over-range circuit which disables the output signal when the sensor is heating to its normal operating range, or if an over flow condition exists. The operation of this cir-cuit can be verified by observing the 5 VDC (20 mA) output signal during power up. The cold sensor lockout safety circuit automatically closes the valve if a fault condition is detected that could result in uncon-trolled flow (valve wide open). The circuit operates by monitoring the temperature of the sensor elements. If the temperature falls be-low a preset limit the circuit forces the output signal to a fixed high level which disables the output signal. The cold sensor lockout cir-cuit is enabled during initial start-up. This feature is not available if liquid is present in the flow path. There are several conditions which could trigger the cold sensor lockout circuit: 1. Operation at a temperature below the instrument’s rating. 2. Power failure while running at or near full scale. Upon resump-
tion of power, the valve will remain closed until the minimum operating temperature is again reached.
3. Sensor failure. If needed, the cold sensor lockout circuit and/or over-range indicator can be disabled by removing CR1 from the main 830 circuit board.
Controller Auto Shut-Off Feature All flow controllers are normally provided with an Auto Shut-Off feature that closes the valve at a command signal level of approxi-mately 2% of full scale, or less. (All electromagnetic valves fail normally-closed). On 840 controllers, this value can be reduced. Contact the factory for details on this option.

Series 830/840/860 Instruction Manual Chapter 3 Operation
IM-83/84/86-H 3-5
On-Off Control and Soft Start Option On-off control is provided for all models equipped with an elec-tromagnetic valve. This feature is available by connecting a man-ual on-off switch to the transducer connector as shown in Chapter 2. Certain processes cannot tolerate the normally fast response of Si-erra mass flow controllers. In these cases a “soft start” circuit slows the mass flow controller’s valve response characteristics to avoid any bursts of flow that could disrupt a delicate process or perhaps stir up particulate. The standard soft start time constant is 1.5 seconds, providing a 7.5 second response time to within 2 percent of final value. The time constant is factory-set to fit your exact requirements.
Figure 3-1. Soft Start Response Times The Model 860 provides valve on-off and soft start control with ei-ther the manual hardware option, or with digital (software) control via RS-485. For more information, refer to the Series 860 “Auto-Net” Software Addendum.
Caution!
Do not use the manual valve-off feature when
RS-485 is active.

Chapter 3 Operation Series 830/840/860 Instruction Manual
3-6 IM-83/84/86-H
Valve Purge Function Electromagnetic valves are driven with either 15 or 30 volts de-pending on the range and pressure. In general, units below 10 slpm have the 15 volt valve. When the purge function occurs, electro-magnetic valves are driven fully open regardless of the set point input. Furthermore, the purge function will override any valve-off function. This option is not available on motor-operated rotary valves. Motor-operated valves are purged by setting the command signal to full scale. There is no equivalent monitor function. The Model 860 allows valve monitoring and the purge function to be utilized in either analog or digital (RS-485) mode. If both hard-ware and software control options are used simultaneously on an 860, conflicts may occur that can produce undesired results. For +15 Volt Valve Controllers: The valve purge function is acti-vated when the Valve Test Point/Purge connection is connected to ground. The maximum valve voltage is indicated in the “comments” field of the calibration certificate. (Units with ranges below 10 slpm) For +30 Volt Valve Controllers: The valve purge function is acti-vated when the Valve Test Point/Purge connection is connected to +15 VDC. The maximum valve voltage is indicated in the “com-ments” field of the calibration certificate. A Sierra controller intended as a replacement for another manufac-turer’s controller may have Pin D and other pins disconnected. Some options may not be available.
Purging Non-Reactive Gases: Purge the transducer with clean, dry nitrogen for a minimum of two hours.
Purging Reactive Gases: One of the following methods may be used: • Cycle purge. This is done by alternately evacuating and purg-
ing the transducer for two to four hours with clean, dry nitro-gen.
• Purge the transducer with clean, dry nitrogen for eight to twenty-four hours.
• Evacuate the transducer for eight to twenty-four hours. When toxic or corrosive gases are used, purge unit thoroughly with inert dry gas before disconnecting from the gas line. If a transducer used with a toxic or corrosive gas is returned to the factory, a Ma-
Caution!
Do not use the man-ual purge function
when RS-485 is ac-tive.
Caution!
Always fully neutralize any toxic gas trapped inside the transducer before removing
from the gas line.

Series 830/840/860 Instruction Manual Chapter 3 Operation
IM-83/84/86-H 3-7
terial Safety Data Sheet must be enclosed with the unit upon its re-turn.
Series 830/840/860 Instruction Manual Chapter 4 Maintenance
IM-83/84/86-H 4-1
Chapter 4 Maintenance Side-Trak™ and Auto-Trak™ transducers essentially require no scheduled maintenance other than periodic flow path cleaning if the gas is dirty. If an in-line filter is used, the filtering element should be periodically be replaced or ultrasonically cleaned. In-cluded in this chapter are general instructions for: • Flow Path Maintenance ...............page 4-1 • Sensor Maintenance.....................page 4-6
• Valve Maintenance......................page 4-8 • Valve Adjustment......................page 4-12
• Transducer Calibration ..............page 4-15
Flow Path Maintenance The transducer flow path is 316 stainless steel (wetted magnetic parts of the solenoid valve are 430F stainless steel) with Viton® Neoprene® or Kal-Rez® (or equivalent) seals, depending on the gas used. The flow path should be periodically inspected and cleaned as required. When toxic or corrosive gases are used, purge unit thoroughly with inert dry gas before disconnecting from the gas line. A transducer used with toxic or corrosive gas must NOT be returned to the fac-tory. Contact Technical Support for details.
Cleaning the Laminar Flow Element The laminar flow element (LFE) is a precision flow divider which diverts a preset amount of flow through the sensor tube. The LFE is made of precision machined 316 stainless steel. The particular LFE used depends on the gas and flow range of the instrument and is identified by the number on the transducer nameplate. Should the LFE require cleaning or inspection due to deposition, use the appropriate cleaning procedure given on the following pages.
CAUTION! : REMOVING THE LFE WILL SHIFT THE CALIBRATION OF THE INSTRUMENT. DO NOT REMOVE THE LFE UNLESS YOU PLAN ON RE-CALIBRATING THE TRANSDUCER.
Caution!
It is important that this transducer be serviced
only by qualified personnel.
Caution!
Always fully neutralize any toxic gas trapped in-
side the transducer before removing from
the gas line.

Chapter 4 Maintenance Series 830/840/860 Instruction Manual
4-2 IM-83/84/86-H
Figure 4-1. Low Flow Transducer LFE Cleaning
Low Flow Transducers: The LFE is accessed by unscrewing the main inlet fitting and re-moving it from the flow body. The LFE is screwed into the inlet fitting, which has been specially machined for this purpose. To ac-cess the components: 1. Remove the unit from the system. 2. The inlet filter screen is held in place in the inlet fitting by the
LFE. Disassemble by holding the fitting steady with a wrench and unscrewing the LFE with a medium flat-tipped screw-driver.
3. Remove the LFE assembly taking care not to bend the inlet
screen. Inspect the sealing O-ring and replace if necessary. In-spect the inlet screen and replace if corroded or damaged. Light to medium particulate contamination can be cleaned by back washing with a suitable solvent. Air dry thoroughly.
4. Inspect the LFE for damage and replace if necessary. Replace-
ment of the LFE or inlet screen requires transducer re-calibration.
5. Re-assemble components. When the transducer is re-installed
in the system, leak test the connection.
6. Check transducer calibration.
Caution!
Removing or re-positioning the LFE may
alter the calibration..
Series 830/840/860 Instruction Manual Chapter 4 Maintenance
IM-83/84/86-H 4-3
Figure 4-2. Medium Flow Transducer LFE Cleaning
Medium Flow Transducers: In the medium flow body, the LFE assembly consists of the honey-comb laminar flow element, inlet screen, 0.63 inch long standoff, two ranging washers, 2-1/4 inch long 4-40 screw and 4-40 nut. Range changes in the honeycomb element are made with various diameter ranging washers. To access the components: 7. Remove the unit from the system. 8. Access the LFE by unscrewing the four 10-32 socket head cap
screws from the inlet side of the flow body and remove the in-let end cap.
9. Remove the LFE assembly taking care not to bend the inlet
screen. Inspect the sealing O-ring and replace if necessary. In-spect the inlet screen and replace if corroded or damaged. Light to medium particulate contamination can be cleaned by back washing with a suitable solvent. Air dry thoroughly.
10. Inspect the honeycomb element for damage and replace if nec-
essary. Replacement of the LFE or inlet screen requires trans-ducer re-calibration.
11. Re-assemble components. When the transducer is re-installed
in the system, leak test the connection. 12. Check transducer calibration.
Chapter 4 Maintenance Series 830/840/860 Instruction Manual
4-4 IM-83/84/86-H
Figure 4-3. High Flow Transducer LFE Cleaning
High Flow Transducers: The high flow LFE is similar to the honeycomb element used in the medium flow body but larger in diameter. The high flow body con-sists of four parts: inlet tube, inlet cap, main flow body and end cap. The inlet tube is only removed to inspect and replace the sealing O-ring between the inlet tube and inlet cap. To access the components: 1. Remove the unit from the system. 2. To remove the inlet screen, remove the four 1/4-28 socket head cap
screws on the inlet side of the flow body and separate the inlet cap from the main flow body.
3. Inspect the inlet screen for damage and corrosion and replace if neces-
sary. Light to medium particulate contamination can be cleaned by back washing with a suitable solvent. Air dry thoroughly.
4. Inspect the sealing O-ring for damage and replace if necessary.
The inlet screen is mounted with the fine mesh side facing the inlet. 5. To remove the LFE loosen and remove the four threaded rods hold-
ing the end cap to the main flow body. Separate the end cap from the main flow body and remove the LFE assembly. The LFE assembly consists of: 6-32 x 31/8 inch long screw, a #6 washer, two ranging washers, honeycomb LFE, spacer, inlet filter and 6-32 nut.
6. Inspect the honeycomb element for damage and replace if necessary.
Replacement of the LFE or inlet screen requires transducer re-calibration.
` 7. Re-assemble components. When the transducer is re-installed in the system,
leak test the connection. 8. Check transducer calibration.

Series 830/840/860 Instruction Manual Chapter 4 Maintenance
IM-83/84/86-H 4-5
Figure 4-4. NPT Transducer LFE Cleaning
NPT-Type Transducers: The NPT flow body is comprised of a stainless steel pipe termi-nated on either end by an end cap sealed with an O-ring. The end caps are held in place by four tie rods which run the length of the flow meter and are fastened with eight 3/8-16 nuts and washers. The inlet screen is mounted to the inside of the inlet end cap on three standoffs. The LFE is a cylindrical honeycomb element lo-cated in the flow body between the two sensing ports. In most cases, the LFE can be cleaned without removing it from the flow body. If it cannot be cleaned by back washing, return for factory service. To access the components: 1. Remove the unit from the system. 2. To remove the inlet filter screen, stand the flow body on end
with the inlet facing up and remove the four 3/8-16 nuts on the ends of the tie rods. Carefully lift the end cap and filter screen assembly up and off the meter.
3. Inspect the inlet screen for damage and corrosion and replace if
necessary. Light to medium particulate contamination can be cleaned by back washing with a suitable solvent. Air dry thor-oughly before re-assembly. Mount the inlet screen with the fine mesh side facing the inlet.
4. Inspect the sealing O-ring for damage and replace if necessary. 5. Re-assemble components. When the transducer is re-installed
in the system, leak test the connection. 6. Check transducer calibration.
Caution!
Removing or re-positioning the LFE may
alter the calibration..

Chapter 4 Maintenance Series 830/840/860 Instruction Manual
4-6 IM-83/84/86-H
Sensor Maintenance The sensor tube is straight and has a relatively large, 0.031 inch ID, which makes inspection and cleaning easy. Sensor mainte-nance consists of: • inspecting and cleaning the sensor flow path • checking the sensor for proper electrical function
Sensor Cleaning and Inspection Cleaning is accomplished by simply rodding out the sensor with the Sensor Cleaning Stylette, part number “CK”, available from Sierra for this purpose. (A 0.020 inch to 0.028 inch diameter piano wire may also be used.) To access the sensor for inspection or cleaning: 1. Remove the unit from the system. 2. Remove the two socket head ac-
cess port plugs with a 1/4 inch Allen wrench.
3. Visually inspect the sensing ports
and sensor. 4. Use a hemostat or tweezers to push the cleaning wire into the
downstream opening of the sensor tube. Do not force the clean-ing wire; move it back and forth–DO NOT TWIST OR ROTATE.
5. Flush the sensor tube with a non-residuous solvent. In cases
where solids are deposited in sensor, units should be returned to factory for complete cleaning and re-calibration.
6. Blow dry all parts with dry nitrogen and re-assemble. 7. When the transducer is re-installed in the system, leak test the
connection. 8. Check transducer calibration.
Caution!
Do not remove the sen-sor cover, this could shift
transducer calibration.
Caution!
When using toxic or cor-rosive gases, purge the
unit thoroughly with inert dry gas before discon-
necting from the gas line.

To check the electrical integrity of the sensor windings:
1. Remove the unit from the system.
2. Remove the two 4-40 Phillips head screws located on top ofthe electronics enclosure and slide the enclosure up and off.Use a nut driver to remove the two standoffs supporting theprinted circuit boards. Tilt the boards to access the three sensorwires as shown below.
3. Locate the black, red and white wires connecting the sensor tothe main circuit board.
4. Connect one lead of an Ohm meter to the white wire and meas-ure the resistance between the red and white wires. Next,measure the resistance between the black and white wires.These readings should each be approximately 50 Ohms. Lowor zero Ohm readings on either indicates a short circuit. Highor infinite Ohms readings indicate an open circuit.
5. Next, measure the resistance between the case (metal part ofthe flow body) and any one of the sensor wires. This readingshould be 2 Megohms or greater. Incorrect readings requiresensor replacement and re-calibration.
6. When the transducer is re-installed in the system, leak test theconnection. Check transducer calibration.

Chapter 4 Maintenance Series 830/840/860 Instruction Manual
4-8 IM-83/84/86-H
Valve Maintenance Electromagnetic valves may require spring-tension adjustments for various reasons (See Valve Adjust Procedure). No maintenance is required under normal operating conditions other than an occa-sional cleaning. Use of certain corrosive gases may require fre-quent replacement of the valve plug and O-rings. This indicates a need for a different elastomer. Viton is standard, with Neoprene, Kal-Rez (or equivalent), and PFA Teflon offered as options. Do not attempt any valve adjustments while the meter is “on-line” with any dangerous gas. All controllers should be thoroughly leak-tested following any valve adjustment. For the Model 860 Auto-Trak, refer to “Piston Tube Calibration Procedure” for instructions on how to re-adjust the electromagnetic valve for proper operation.
Electromagnetic Valves - Low and Medium Flow Controllers Controllers with a low or medium flow body use the same valve; high flow models use a larger version. Cleaning can often be ac-complished by opening the valve, using the purge function and flushing in both directions. Alternatively, the valve may be manu-ally opened by loosening the 6-32 lock nut on top of the valve and turning the adjustment screw fully counterclockwise. To disassemble the low and medium flow valve for inspection: 1. Remove the unit from the system. 2. Remove the two 4-40 Phillips head screws on top of the enclo-
sure. Remove the enclosure by sliding it up and off. Remove the metal cap on top of the valve by inserting a flat tip screw-driver into the slots provided and prying upward.
3. Use a 5/8 inch nut driver to loosen and remove the 5/8 inch
nut at the top of the valve. Remove the coil, coil enclosure and warp washer.
Caution!
When using toxic or cor-rosive gases, purge the
unit thoroughly with inert dry gas before discon-
necting from the gas line.

Series 830/840/860 Instruction Manual Chapter 4 Maintenance
IM-83/84/86-H 4-9
4. The small circuit board may be separated from the main board
to ease removal of the coil. To separate, first remove the plastic #4 mounting screw located in the center of the main circuit board and carefully pull the two boards apart. Remove the four 4-40 socket head cap screws at the base of the valve. Separate the valve from the flow body.
5. There are three O-rings sealing the valve assembly: one be-
tween the base and the flow body, one under the valve seat (orifice), and one on the top adjusting screw inside the valve. Inspect the O-rings for damage and replace as necessary. (You should replace all O-rings whenever the valve is disassembled.)
6. Inspect the valve seat and plug for corrosion or roughness and
replace as necessary. 7. Re-assemble components. Note: the 5/8 inch nut must not be
tightened with more than 10 in-lb of torque. 8. When the controller is re-installed in the system, leak test the
connection. 9. Adjust the valve for proper operation as given in the controller
valve adjustment procedure.
Electromagnetic Valves - High Flow Controllers The high flow electromagnetic valve is similar in design to the low flow valve. As with the low flow valve, cleaning can often be ac-complished by opening the valve using the purge function and flushing in both directions. Alternatively, the valve may be manu-ally opened by loosening the 6-32 lock nut on top of the valve and turning the adjustment screw fully counterclockwise. To disassemble the high flow valve: 1. Remove the unit from the system. 2. Remove the two 4-40 Phillips head screws from the top of the
enclosure. Remove the enclosure by sliding it up and off. Re-move the metal cap on top of the valve by inserting a flat tip screwdriver between the two parts and lifting upward.
Caution!
When using toxic or cor-rosive gases, purge the
unit thoroughly with inert dry gas before discon-
necting from the gas line.

Chapter 4 Maintenance Series 830/840/860 Instruction Manual
4-10 IM-83/84/86-H
3. Unscrew the coil cover with a 11/16 inch wrench. Remove the
coil and coil enclosure. Note the location of any washers or spacers for re-assembly.
4. The small circuit board may be separated from the main board
to ease removal of the coil. To separate, first remove the mounting screw located in the center of the main circuit board and carefully pull the two boards apart.
5. Remove the four 1/4-28 socket head cap screws at the base of
the valve. Separate the valve from the flow body, taking care not to lose any small parts.
6. There are three O-rings sealing the valve assembly: one be-
tween the base and the flow body, one under the valve seat (orifice), and one on the top adjusting screw inside the valve. Inspect the O-rings for damage and replace as necessary. (You should replace all O-rings whenever the valve is disassembled.)
7. Inspect the valve seat and plug for corrosion or roughness and
replace as necessary. 8. Re-assemble the components. When the controller is installed
in the system, leak test the connection. 9. Adjust the valve for proper operation as given in the controller
valve adjustment procedure.

Series 830/840/860 Instruction Manual Chapter 4 Maintenance
IM-83/84/86-H 4-11
Motor-Operated Rotary Valves The electronic components in the Model 840 motorized valve flow controllers require no maintenance with the exception of the motor, which requires replacement when its service life has ended. This will be evidenced by “hunting,” or the inability to maintain set point without a constant motion back and forth, or outright failure. The motor normally has a long service life, typically more than five years, and all other possibilities should be explored before considering replacement. To disassemble the motor-operated rotary valve: 1. To allow for component removal, set the valve to the fully
open position before removing power. 2. Remove the unit from the system. 3. If desired, remove the valve from the flow body to make disas-
sembly easier. Unplug the connector and remove the four bolts holding the valve assembly to the flow body. Inspect the sealing O-ring and replace as necessary.
4. Unscrew the six 4-40 Phillips head screws from the valve mo-
tor enclosure and remove the lid. Loosen the lower set screws in the motor shaft coupling (there are two set screws in each location to prevent loosening during operation). Inspect the valve rotor shaft and coupling for scoring and replace if neces-sary.
5. Remove the three 8-32 screws holding the valve to the enclo-
sure and separate the valve body from the enclosure. 6. Unscrew the four 6-32 x 7/8 inch flat head screws from the top
of the valve and remove the valve base plate and spacer. Re-move the valve bonnet, rotor and Teflon washers. Inspect the valve rotor and body for wear and replace the O-ring and seal in the valve bonnet.
7. Inspect and replace the Teflon valve leaves and upper and
lower Teflon washers if they are worn or damaged. 8. Re-assemble the components. When the controller is re-
installed in the system, leak test the connection.
Caution!
When using toxic or cor-rosive gases, purge the
unit thoroughly with inert dry gas before discon-
necting from the gas line.

Chapter 4 Maintenance Series 830/840/860 Instruction Manual
4-12 IM-83/84/86-H
840 L, M and H series Valve Adjustment Procedure
The Sierra 840 L, M and H (low, medium or high-flow units) con-trol the flow with a proportional electromagnetic valve that is set up for certain process conditions. Variables, which affect their op-eration, include orifice size, spring selection and adjustment, input and output pressures and gas-flow orientation (horizontal or verti-cal). If operating conditions change it may be necessary to make a valve spring adjustment. An adjustment may also become neces-sary due to a valve-seat depression or spring sag, both of which can cause a change in the internal tension of the valve spring and electrical current. An incorrectly adjusted valve can be detected by OSCILLATION (UNSTABLE OUTPUT), NOT OBTAINING MAXIMUM FLOW, OR LEAKAGE AT A ZERO SET POINT (LEAK-BY). The following valve adjustment procedure may correct the above conditions. Equipment needed:
L and M: 1/16” hex wrench
5/16” nut driver H: Standard screwdriver 3/8” nut driver (Quick fix for leak-by). If your unit is experiencing leak-by, first confirm that this condition is mechanical in nature rather than elec-trical by shutting down the power. If leak-by stops (check for downstream flow), the problem is electrical in nature and the in-strument may require factory repair. If leak-by continues, the problem is mechanical and may be fixed by an adjustment. Re-move the small cover that is on top of the silver solenoid to the right of the rectangular electronic enclosure. (On some 840L-units this may require removing the plastic electronic enclosure to ex-pose the valve coil.) With the power off, apply the appropriate in-let pressure to the controller per the inlet/outlet operating pres-sures listed on your label and apply a zero setpoint. Loosen the lock nut. Adjust the center adjustment screw slowly clockwise (increasing the spring tension) 1/4 turn at a time until this leak-by subsides. (Putting your finger over the outlet fitting can confirm

Series 830/840/860 Instruction Manual Chapter 4 Maintenance
IM-83/84/86-H 4-13
the no-leak condition). Now, adjust this screw clockwise one quar-ter turn past this point, tighten the locknut and replace the cap. Apply power and test the controller for proper operation. (Quick fix for oscillation). If your unit is experiencing oscillations at lower flows, apply power, apply the desired setpoint, and adjust the valve spring adjustment screw ¼ turn at a time clockwise (in-creasing the spring tension – see procedure above) during flow un-til the symptoms disappear. Adjust ¼ turn further and tighten the locknut. If your unit is experiencing other symptoms listed above, you may require this more involved adjustment method. Obtain a voltmeter and prepare to monitor the voltage found on pins 4 to 6 on a D-connector, or D to F on a card-edge connector. Or, if these pins are inaccessible, turn off the power and remove the cable. 1. Remove the screws and/or nuts on the top of the controller
electronics cover. Cut the yellow calibration sticker. Remove the silver zero and/or span plugs on the right side of the enclo-sure or turn the plastic access-hole doors to the vertical posi-tion. Pull the cover up and off. Re-connect the cable, apply gas pressure, and apply power to the controller. Connect a voltmeter to the two wires on the back PCA that are routed to the solenoid and set the scale for 30 volts or higher.
2. Determine if this controller has a 15-volt control circuit or a
30-volt control circuit. (Don’t confuse this with the setpoint or output signals – this is an internal voltage that energizes the valve coil to raise the valve seat and open the internal orifice). M and H instruments are ALWAYS 30-volt circuits, while L instruments can be either one, based mainly on their flow-rates. Units scaled for below 10 slpm are typically set up for 15 volts while those 10 slpm or over are set up for 30 vdc. (Note: this voltage is typically listed on the calibration certificate in the “Comment” section). If there is any question, contact the fac-tory for clarification.
3. Apply a 100% set point and monitor this valve voltage, allow-
ing at least three minutes for stabilization. The voltage “win-dow” for a 100% setpoint is 13-18 volts for the 30-volt circuit and 9-11 volts for the 15-volt circuit. If the voltage is out of this specification, loosen the lock nut, and adjust the center ad-justment screw. Clockwise (downward) will increase the valve voltage, while counterclockwise will decrease it. Adjust

Chapter 4 Maintenance Series 830/840/860 Instruction Manual
4-14 IM-83/84/86-H
slowly, 1/8 turn at a time and observe until the desired voltage is obtained.
4. Now apply a 5% setpoint signal and confirm that the voltage
does not drop below 11 volts on the 30-volt circuit or 6 volts on the 15-volt circuit. Go back and forth between these set-tings and make sure that the voltages stay within these bounda-ries. When this voltage “window” is obtained, the symptoms should disappear and the lock nut can be re-tightened.
5. Re-install the electronics cover by powering down the control-
ler, removing the cable, putting the cover back on and replac-ing the access door plugs. Reconnect the cable and apply the power. A final check for leak-by with a zero set point and proper flow with various control signals should be conducted.
Notes: Adjusting the valve voltage does not change the calibration of the controller. If these adjustments do not obtain the desired operation, contact Sierra directly.

Series 830/840/860 Instruction Manual Chapter 4 Maintenance
IM-83/84/86-H 4-15
Transducer Calibration Calibration of Sierra’s flow meters and controllers requires a cali-bration standard of at least equal accuracy and preferably an order of magnitude of at least four times better than the transducer. Si-erra’s Cal-Bench Automated Primary Calibration System is the preferred method of calibration and is used at the factory for all calibrations from 10 sccm up to 5600 slpm.
Sierra Instruments maintains a fully-equipped calibration labora-tory. All measuring and test equipment used in the calibration of Sierra transducers are traceable to NIST standards. Sierra is ISO-9001 registered and conforms to the requirements of ANSI/NCSL-Z540 and ISO/IEC Guide 25. If the flow body or electronics have been damaged or you simply want to have the transducer re-calibrated, contact the factory for return shipping instructions
Caution!
It is important that this transducer be calibrated
only by qualified personnel.

Series 830/840/860 Instruction Manual Chapter 5 Troubleshooting
IM-83/84/86-H 5-1
Chapter 5 Troubleshooting This chapter is provided to help locate the cause of a transducer failure. It is not intended to be an all inclusive repair manual. In the case of major repairs, the unit should be returned to the fac-tory for service. Contact Sierra Customer Service for return shipping instructions (page 5-4). When you suspect that the transducer is not operating correctly, there are a few simple checks that can be made before dismantling the unit: 1. Make certain that there are no leaks in the line. 2. Check that all cables are connected and are in good condition. 3. Verify that the power supply is of the correct polarity and
voltage and properly connected to the transducer. 4. For controllers, check for adequate pressure differential across
the controller. Check the valve voltage. 5. Double check connector pin outs when replacing another
manufacturer’s transducer. After verifying the factors above, follow the troubleshooting proce-dures outlined on the next page.
Warning!
Always remove main power before disassembling
the transducer.
Caution!
Only qualified personnel should perform trouble-
shooting procedures.

Chapter 5 Troubleshooting Series 830/840/860 Instruction Manual
5-2 IM-83/84/86-H
Flow Meters and Flow Controllers with Electromagnetic Valves
Problem Possible Cause Solution No output Clogged sensor
PCB defective Inlet filter screen clogged
Clean or replace sensor Repair or replace PCB Clean or replace screen
Unit will not zero Gas leak
Application requires high pressure and non-horizontal mounting PCB defective
Find and correct leaks Re-zero transducer Repair or replace PCB
Controller does not respond to set point
Low or no gas pressure Faulty cable or connector Set point is below 2% of full scale
Set correct gas pressure Correct or replace Increase set point or disable auto shut off circuit
Flow does not match set point No gas pressure
Inlet filter screen clogged Out of adjustment
Set correct gas pressure Clean or replace Adjust R22 balance on 840 models, consult factory for others
Reads full scale with no flow or with valve shut
Defective sensor Gas leak
Return to factory for replacement Find and correct leaks
Out of calibration Dirty or clogged sensor
Change in composition of gas Gas leak PCB defective LFE dirty Inlet filter screen clogged Incorrect inlet conditions (high flow and NPT models)
Clean or replace sensor See K-factory tables Find and correct leaks Repair or replace PCB Clean LFE Clean or replace screen Re-plumb transducer correctly

Series 830/840/860 Instruction Manual Chapter 5 Troubleshooting
IM-83/84/86-H 5-3
Flow Controllers with Motor-operated Rotary Valves
Problem Possible Cause Solution Valve “hunts” back and forth continuously
Pressure differential too great Motor coupling set screws loose Valve motor failure
Reduce pressure Tighten set screws Replace motor
Valve rotates continuously Limit switch out of adjustment or bro-
ken Microprocessor failed
Adjust or replace switch Replace microprocessor
Valve does not rotate Contaminant blocking valve
Motor fuse blown
Remove blockage Replace 1 amp fast blow fuse on motor valve board
Flow reading is erratic Inlet filter screen clogged Clean or replace screen Reads full scale with no flow or with valve shut
Defective sensor Q1 shorted U10 failed
Return to factory for replacement Replace with same type part Replace with same type part
Flow does not match set point within specifications
Insufficient pressure differential Increase pressure or reduce set point

Chapter 5 Troubleshooting Series 830/840/860 Instruction Manual
5-4 IM-83/84/86-H
Returning Equipment to the Factory
Factory Calibration—All Models
Sierra Instruments maintains a fully-equipped calibration laboratory. All measuring and test equipment used in the calibration of Sierra transducers are traceable to NIST Standards. Sierra is ISO-9001 registered and con-forms to the requirements of ANSI/NCSL-Z540 and ISO/IEC Guide 25.
Instructions for Returning Your Instrument for Service
The following information will help you return your instrument to Sierra Instruments' Factory Service Center and will ensure that your order is processed promptly. We will assign an RMA (Return Materials Authoriza-tion) number prior to the unit’s return and send you an estimate of charges within 24 hours of receiving your unit. Prices may vary depending on the flow range, type of gas and operating pressure of your unit. To request de-tailed pricing contact your local Sierra Instruments distributor or contact one of our offices directly. Our expedite fees are: three-day turnaround 25%, two-day turnaround 40%.
Please follow these easy steps to return your instrument for fac-tory service:
1. Obtain a Return Materials Authorization (RMA) number from Si-erra Instruments. You may obtain this from the factory by calling (800) 866 0200 between 8:00 a.m. and 5:00 p.m. PST Monday through Friday. You may also obtain this number via e-mail by contacting [email protected].
2. Once you have obtained an RMA number, complete the form. If you require service beyond calibration, but do not know which service(s) will be required, describe the symptoms as accurately as possible on the RMA form. Submit electronically or by fax to (831) 373-2414.
3. Pack your instrument carefully (bubble wrap or molded foam sug-gested-NOT PEANUTS) and include a copy of the RMA form (complete with Sierra supplied RMA number) with the unit(s).
Ship the unit(s) to the following address:
Caution!
Always fully neutralize any toxic gas trapped in-
side the instrument before removing it from the gas
line.

Series 830/840/860 Instruction Manual Chapter 5 Troubleshooting
IM-83/84/86-H 5-5
RETURN ADDRESS: Sierra Instruments, Inc. Attention: Factory Service Center 5 Harris Court, Building L Monterey, CA 93940 USA
CUSTOMER SERVICE AND SUPPORT INFORMATION: Email Technical Support: [email protected] Email Sales: [email protected] FACTORY USA (recommended): TOLL FREE: 800-866-0200
PHONE: 831-373-0200 FAX: 831-373-4402 EMAIL: [email protected]
European Sales & Service Center:
PHONE: +31 72 5071400 FAX: +31 72 5071401 EMAIL: [email protected]
Asia Sales & Service Center:
PHONE: + 86 203435 4870 FAX: +86 203435 4872

Series 830/840/860 Instruction Manual Appendix A
IM-83/84/86-H A-1
Appendix A Conversion Formulas and Gas Tables
Conversion of Flow Rate to Other T and P Conditions The flow rate of your transducer is referenced to certain “standard” conditions of temperature and pressure. Unless otherwise specified in your order, these standard conditions are 21°C (70°F) and 760 mm of mercury (1 atmosphere). If you wish to convert to other “stan-dard” conditions or to find the “actual” conditions in the pipe where your instrument is installed, use the following relationship: P1 T2 Q2 = Q1 (1) P2 T1 ( )1 = The standard conditions under which your instrument was calibrated, ( ) 2 = The new standard conditions or the actual temperature and pressure conditions in the pipe, Q1 = The gas mass flow rate referenced to the calibrated standard conditions (sccm or slm), Q2 = The gas mass flow rate referenced to the new standard or actual conditions (sccm or slm—“S” means “standard,” accm or alm—“A” means “actual”), P = Absolute pressure (kg/cm2 or psia), and T = Absolute temperature (°K or °R) (°K = °C + 273, °R = °F + 460). Example 1: Changing “Standard” Conditions If your transducer has a flow rate reading of 10.00 slm and was cali-brated at standard conditions of 70°F (21°C) and 1 atmosphere (14.7 psia), and if you wish to convert this reading to standard conditions of 32°F (0°C) and 1 atmosphere, then you would use Equation (1) as fol-lows: 14.7 460 + 32 Q2 = (10.0) = 9.28 slm 14.7 460 + 70 The flow rate referenced to 0°C will be approximately 7% lower than when referenced to standard conditions of 21°C. Example 2: Finding the “Actual” Flow Rate If the flow rate and calibrated standard conditions are as given in Example 1 and you wish to find the actual flow rate at 100°F and 30 psig, then you would use Equation (1) as follows:

Appendix A Series 830/840/860 Instruction Manual
A-2 IM-83/84/86-H
14.7 460 + 100 Q2 = (10.00) = 3.47 lm 14.7 + 30 460 + 70

Series 830/840/860 Instruction Manual Appendix A
IM-83/84/86-H A-3
Calculating For a Single Gas The following tables provide K-factors and thermodynamic prop-erties of gases commonly used with mass flow meters and control-lers. The purpose of these tables is two-fold: 1. Calibrating an “actual” gas with a reference gas. This is par-
ticularly useful if the actual gas is not a common gas or if it is toxic, flammable, corrosive, etc.
2. Interpreting the reading of a flow meter or flow controller
which has been calibrated with a gas other than the actual gas. In applying the tables, the following fundamental relationship is used: Q1/Q2 = K1/K2 (1) Where: Q = The volumetric flow rate of the gas referenced to standard conditions of 0°C and 760 mm Hg (sccm or slm), K = The K-factor defined in equation (6), ( ) 1 = Refers to the “actual” gas, and ( ) 2 = Refers to the “reference” gas. The K-factor is derived from the first law of thermodynamics ap-plied to the sensor tube, as described in Chapter 1:
H =mC !T•
N
p (2)

Appendix A Series 830/840/860 Instruction Manual
A-4 IM-83/84/86-H
Where: H = The constant amount of heat applied to the sensor tube,
m = The mass flow rate of the gas (gm/min)•
Cρ = The coefficient of specific heat of the gas (Cal/gm); Cρ is given in the Table (at 0°C), ∆T = The temperature difference between the downstream and upstream coils, and N = A correction factor for the molecular structure of the gas given by the following table:
Number of Atoms in the Gas Molecule N Monatomic 1.040 Diatomic 1.000 Triatomic 0.941
Polyatomic 0.880
The mass flow rate, m, can also be written as:•
m = Q•
!(3)
Where: ρ = The gas mass density at standard conditions (g/l); ρ is given in the tables (at 0°C, 760 mm Hg). Furthermore, the temperature difference, ∆T, is proportional to the output voltage, E, of the mass flow meter, or ∆T = aE (4) where: a = A constant. If we combine equations (3) and (4), insert them into equation (2), and solve for Q, we get Q = (bN/ρCp) (5) where: b = H/aE = a constant if the output voltage is constant.

Series 830/840/860 Instruction Manual Appendix A
IM-83/84/86-H A-5
For our purposes, we want the ratio of the flow rate, Q1, for an ac-tual gas to the flow rate of a reference gas, Q2, which will produce the same output voltage in a particular mass flow meter or control-ler. We get this by combining equations (1) and (5): Q1/Q2 = K1/K2 = (N1/ ρ1Cp1)/(N2/ρ2CP2) (6) Please note that the constant b cancels out. Equation (6) is the funda-mental relationship used in the accompanying tables. For conven-ience, the tables give “relative” K-factors, which are the ratios K1/K2, instead of the K-factors themselves. In the tables, the relative K-factor is Kactual/KN2 where the reference gas is the commonly used gas, nitrogen (N2). The remaining columns give Cp and ρ, enabling you to calculate K1/K2 directly using Equation (6). In some instances, K1/K2 from the tables may be different from that which you calculate directly. The value from the tables is preferred because in many cases it was ob-tained by experiment. Sierra calibrates every transducer with primary standards using the actual gas or a molecular equivalent reference gas. The calibration certificate accompanying the transducer cites the refer-ence gas used. Example 1: A transducer is calibrated for nitrogen (N2), and the flow rate is 1000 sccm for a 5.000 VDC output signal. The flow rate for car-bon dioxide at a 5.000 VDC output is: QCO2/QN2 = KCO2/K N2, or QCO2 = (0.74/1.000)1000 = 740 sccm Example 2: A transducer is calibrated for hydrogen (H2), and the flow rate is 100 sccm for a 5.000 VDC output signal. The flow rate for nitrous oxide (N2O) is found as follows: QN2O/QH2 = K N2O/K H2, or Q N2O = (0.71/1.01) 100 = 70.3 sccm Note that the K-factors relative to nitrogen must be used in each case. Example 3: We want a transducer to be calibrated for use with dichlorosilane (SiH2Cl2) at a 100 sccm full scale flow. We wish to use the pre-ferred reference gas Freon-14 (CF4). What flow of CF4 must we generate to do the calibration? QSiH2CL2 /QCF4 = K SiH2CL2 /K CF4 100/Q CF4 = 0.869 Q CF4 = 100/0.869 = 115 sccm

Appendix A Series 830/840/860 Instruction Manual
A-6 IM-83/84/86-H
Calculating Dual Gas Mixtures Equation (6) is used for gas mixtures, but we must calculate N/ρCp for the mixture. The equivalent values of ρ, Cp, and N for a dual gas mixture are given as follows: The equivalent gas density is:
m •! = ( / ) + ( / )m
•1 T
!1
m •
2 m •
T!
2 Where:
•Tm = m •
1 m •2+ = Total mass flow rate (gm/min),
( )1 = Refers to gas #1, and ( )2 = Refers to gas #2 The equivalent specific heat is: Cp = F1Cp1 + F2Cp2 Where:
1 m •
!
m •1!
1
m •2
m •T!
2
F = ( )/( ) and
T!F = ( )/( )
2 The equivalent value of N is:
m •! = ( / ) ! + ( / ) !m
•1 T 1 m
•2 m
•T 2
The equivalency relationships for ρ, Cp, and N for mixtures of more than two gases have a form similar to the dual-gas relation-ship given above. IMPORTANT NOTE ABOUT K-FACTORS: Please note that if you have a transducer calibrated for a gas such as methane and wish to use the K-factors to measure a gas such as air, that the inaccuracy of the measurement can range from ±5 to 10%. The use of K-factors is, at best, only a rough approximation and should not be used in applications that require a better than ±5 to 10% accuracy. It should also be noted that certain gases, in similar “families,” will work exceptionally well with K-factors; however, those instances are only true when similar thermal properties of the gas are pre-sent.

Series 830/840/860 Instruction Manual Appendix A
IM-83/84/86-H A-7
Gas Tables and K- factors
Actual GasChemicalSymbol
K-factor Relative N2
Cp(Cal/g)
Density(g/l) @ 0°C
Elastomer O-ring* Valve Seat
Acetylene C 2H2 .58 .4036 1.162Air 1.00 .240 1.293Allene (Propadiene) C 3H4 .43 .352 1.787 KRAmmonia NH 3 .73 .492 .760 NEO NEOArgon Ar 1.45 .1244 1.782Arsine AsH 3 .67 .1167 3.478 KRBoron Trichloride BCl3 .41 .1279 5.227 KR KRBoron Tri�uoride BF3 .51 .1778 3.025 KRBromine Br 2 .81 .0539 7.130Boron Tribromide Br 3 .38 .0647 11.18 KRBromine Penta�uoride BrF5 .26 .1369 7.803 KRBromine Tri�uoride BrF3 .38 .1161 6.108 KRBromotri�oromethane(Freon -13 B1)
CBrF3 .37 .1113 6.644
1,3 -Butadiene C 4H6 .32 .3514 2.413Butane C 4H10 .26 .4007 2.5931-Butane C 4H8 .30 .3648 2.503 NEO KR2-Butane C 4H8 CIS .324 .336 2.503 NEO KR2-Butane C 4H8 TRANS .291 .374 2.503Carbon Dioxide CO 2 .74 .2016 1.964Carbon Disul�de CS2 .60 .1428 3.397Carbon Monoxide CO 1.00 .2488 1.250Carbon Tetrachloride CCl4 .31 .1655 6.860 KRCarbon Tetra�uoride(Freon -14)
CF4 .42 .1654 3.926
Carbonyl Fluoride COF2 .54 .1710 2.945Carbonyl Sul�de COS .66 .1651 2.680Chlorine CL 2 .86 .114 3.163 KRChlorine Tri�uoride CIF3 .40 .1650 4.125 KRChlorodi�uoromethane(Freon -22)
CHClF2 .46 .1544 3.858 KR
Chloroform CHCI 3 .39 .1309 5.326 KRChloropenta�uoroethane(Freon -115)
C 2CIF5 .24 .164 6.892 KR
Chlorotri�uromethane(Freon -13)
CCIF3 .38 .153 4.660 KR
Cyanogen C 2N2 .61 .2613 2.322 KRCyanogen Chloride CICN .61 .1739 2.742Cychlopropane C 3H5 .46 .3177 1.877 KRDeuterium D2 1.00 .17 22 1.799Diborane B 2H6 .44 .508 1.235 KRDibromodi�uoromethane CBr2 F2 .19 .15 9.362 KRDibromethane .47 .075 7.76 KRDichlorodi�uoromethane(Freon -12)
CCI 2 F 2 .35 .1432 5.395 KR
Dichloro�uoromethane(Freon -21)
CHCl2 F .42 .140 4.952 KR

Appendix A Series 830/840/860 Instruction Manual
A-8 IM-83/84/86-H
Actual GasChemicalSymbol
K-factorRelative N2
Cp(Cal/g)
Density(g/l) @ 0°C
ElastomerO-ring* Valve Seat
Dichloromethylsilane (CH3) 2SiCl2 .25 .1882 5.758 KRDichlorosilane SiH2Cl2 .40 .150 4.506 KRDichlorotetrafluoroethane(Freon-114)
C2Cl2F4 .22 .1604 7.626 KR
1,1-Difluoroethylene(Freon-1132A)
C2H2F2 .43 .224 2.857 KR
Dimethylamine (CH3) 2NH .37 .366 2.011 KRDimethyl Ether (CH3) 2O .39 .3414 2.055 KR2,2-Dimethylpropane C3H12 .22 .3914 3.219 KREthane C2H6 .50 .4097 1.342Ethanol C2H6O .39 .3395 2.055 KREthylAcetylene C4H6 .32 .3513 2.413 KREthyl Chloride C2H5CI .39 .244 2.879 KREthylene C2H4 .60 .1365 1.251Ethylene Oxide C2H4O .52 .268 1.965 KR KRFluorine F2 .980 .1873 1.695 KRFluoroform (Freon-23) CHF3 .50 .176 3.127 KRFreon-11 CCI3F .33 .1357 6.129 KRFreon-12 CCI2F2 .35 .1432 5.395 KRFreon-13 CCIF3 .38 .153 4.660 KRFreon-13 B1 CFrF3 .37 .1113 6.644 KRFreon-14 CF4 .42 .1654 3.926Freon-21 CHCI2F .42 .140 4.952 KRFreon-22 CHCIF2 .46 .1544 3.858 KRFreon-113 CCI2FCCIF2 .20 .161 8.360 KRFreon-114 C2Cl2F4 .22 .160 7.626 KRFreon-115 C2ClF5 .24 .164 6.892 KRFreon-C318 C4F8 .17 .185 8.397 NEO NEOGermane GeH4 .57 .1404 3.418Germanium Tetrachloride GeCL4 .27 .1071 9.565 KRHelium He 1.454 1.241 .1786Hexafluoroethane(Freon-116)
C2F6 .24 .1834 6.157 KR
Hexane C6H14 .18 .3968 3.845 KRHydrogen H2 1.01 3.419 .0899Hydrogen Bromide HBr 1.000 .0861 3.610 KRHydrogen Chloride HCl 1.000 .1912 1.627 KR KRHydrogen Cyanide HCN 1.070 .3171 1.206 KRHydrogen Fluoride HF 1.000 .3479 .893
KR
KR KRHydrogen Iodide HI 1.000 .0545 5.707 KRHydrogen Selenide H2Se .79 .1025 3.613 KRHydrogen Sulfide H2S .80 .2397 1.520 KRIodine Pentafluoride IF5 .25 .1108 9.90 KRIsobutane CH(CH3)3 .27 .3872 3.593 KRIsobutylene C4H8 .29 .3701 2.503 KRKrypton Kr 1.453 .0593 3.739Methane CH4 .72 .5328 .715Methanol CH3OH .58 .3274 1.429Methyl Acetylene C3H4 .43 .3547 1.787 KRMethyl Bromide CH3Br .58 .63 .1106 4.236Methyl Chloride CH3Cl .1926 2.253 KRMethyl Fluoride CH3F .68 .3221 1.518 KR

Series 830/840/860 Instruction Manual Appendix A
IM-83/84/86-H A-9
Actual GasChemicalSymbol
K-factorRelative N2
Cp(Cal/g)
Density(g/l) @ 0°C
ElastomerO-ring* Valve Seat
Methyl Mercaptan CH3SH .52 .2459 2.146 KRMethyl Trichlorosilane (CH3) SiCl3 .25 .164 6.669 KRMolybdenum Hexafluoride MoF6 .21 .1373 9.366 KRMonoethylamine C2H5NH2 .35 .387 2.011 KRMonomethylamine CH3NH2 .51 .4343 1.386 KRNeon NE 1.46 .245 .900Nitric Oxide NO .990 .2328 1.339Nitrogen N2 1.000 .2485 1.25Nitrogen Dioxide NO2 .74 .1933 2.052Nitrogen Trifluoride NF3 .48 .1797 3.168 KRNitrosyl Chloride NOCl .61 .1632 2.920 KRNitrous Oxide N2O .71 .2088 1.964Octafluorocyclobutane(Freon-C318)
C4F6 .17 .185 8.397 KR
Oxygen Difluoride OF2 .63 .1917 2.406Oxygen O2 1.000 .2193 1.427Ozone O3 .446 .3 2.144Pentaborane B5H9 .26 .38 2.816 KRPentane C5HI2 .21 .398 3.219 KRPerchloryl Fluoride CIO3F .39 .1514 4.571 KRPerfluoropropane C3F8 .174 .197 8.388 KRPhosgene COCl2 .44 .1394 4.418 KRPhosphine PH3 .76 .2374 1.517 KRPhosphorous Oxychloride POCl3 .36 .1324 6.843 KRPhosphorous Pentafluoride PH5 .30 .1610 5.620 KRPhosphorous Trichloride PCl5 .30 .1250 6.127 KRPropane C3H8 .36 .3885 1.967 KRPropylene C3H6 .41 .3541 1.877Silane SiH4 .60 .3189 1.433 KRSilicon Tetrachloride SiCl4 .28 .1270 7.580 KRSilicon Tetrafluoride SiF4 .35 .1691 4.643 KRSulfur Dioxide So2 .69 .1488 2.858 KRSulfur Hexafluoride SF6 .26 .1592 6.516Sulfuryl Fluoride SO2F2 .39 .1543 4.562 KRTeos .090 KR KRTetrafluorahydrazine N2F4 .32 .182 4.64 KRTrichlorofluormethane(Freon-11)
CCl3F .33 .1357 6.129 KR
Trichlorisilane SiHCl3 .33 .1380 6.043 KR1,1,2-Trichloro-1,2,2 CCl2FCClF2 .20 .161 8.360 KRTrifluorethane (Freon-113)Trisobutyl Aluminum (C4H9)Al .061 .508 8.848 KRTitanium Tetrachloride TiCl4 .27 .120 8.465 KRTrichloro Ethylene C2HCl3 .32 .163 5.95 KRTrimethylamine (CH3)3N .28 .3710 2.639 KRTungsten Hexasfuoride WF6 .25 .0810 13.28 KR TeflonUranium Hexafluoride UF6 .20 .0888 15.70 KRVinyl Bromide CH2CHBr .46 .1241 4.772 KRVinyl Chloride CH2CHCl .48 .12054 2.788 KRXenon Xe 1.44 .0378 5.858
KRKR
Series 830/840/860 Instruction Manual Appendix B Specifications
IM-83/84/86-F B-1
Appendix B Product Specifications
Operating Specifications
Gases All clean gases; specify when ordering Mass Flow Rates 0 to 10 sccm to 0 to 5600 slpm; flow ranges specified are for an equiva-
lent flow of nitrogen at 760 mm Hg and 21°C (70°F); other ranges in other units are available (e.g. scfh or nm3/h)
Gas Pressure 500 psig (34 barg) maximum; 30 psig (2 barg) optimum Gas, Ambient Temperature 32° to 176°F (0 to 80°C); above 122°F(50°C) requires HT or RT option. Leak Integrity 5 X 10⁻⁹ atm cc/sec of helium maximum Pressure Drop 830/860M (low) .......0.08 psi (0.006 bar) differential max; 15 slpm: 1.5 psi (0.20 bar) differential max 830/860M (med) .....0.08 psi (0.006 bar) differential max; 100 slpm: 1.5 psi (0.20 bar) differential max 830/860M (high)......100 to 199 slpm: 2 psi (0.15 bar) differential max; 200 to 500 slpm: 8.5 psi (0.58 bar) differential max 830 NPT..................1.5 psi (0.20 bar) differential maximum Differential Pressure Requirements ......................30 psi (2.1 bar) differential optimum for all 840/860C (low) .......5 to 50 psi (1.0 to 3.4 bar) differential standard; 30 psi (2.1 bar) differential optimum; lower or higher (100 psi maximum) ∆P available on special order 840/860C (med)......15 to 50 slpm: 5 to 50 psi (1.0 to 3.4 bar) differential;
51 to 100 slpm: 15 to 50 psi (1.0 to 2.8 bar) differential standard
840/860C (high) ......100 to 199 slpm: 10 to 50 psi (1.0 to 3.4 bar) differential; 200 to 500 slpm: 10 to 40 psi (0.7 to 2.8 bar) differential standard 840 (NPT) ...............10 to 50 psi (0.7 to 3.4 bar) differential standard; Power Requirements 830/860M................+ 15 VDC @ 80 mA, 1.2 watts and -15 VDC @ 10 mA, 0.15 watts 840/860C (low) .......+15 VDC @ 130 mA, 2.0 watts and -15 VDC @ 200 mA, 2.6 watts 840/860C (med)......+15 VDC @ 400 mA, 6.0 watts and -15 VDC @ 300 mA, 4.5 watts 840/860C (high) ......+15 VDC @ 1.13 A, 17 watts and -15 VDC @ 1.06 A 16 watts 840 (NPT) ...............+15 VDC @ 230 mA, 3.5 watts and -15 VDC @ 170 mA, 2.6 watts

Appendix B Specifications Series 830/840/860 Instruction Manual
B-2 IM-83/84/86-F
Control Range 840/860 (all sizes).. 2 to 100% of full scale; valve shuts between 1 to 2.5% of full scale
840 (NPT) .............. 10 to 100% of full scale Command Signal 0-5 VDC, 20 megaohms minimum input impedance 4-20 mA, 250 Ohms maximum input impedance, optional RS-485 digi-
tal signal standard on Model 860C Output Signal Linear 0-5 VDC, 1000 Ohms minimum load resistance Linear 4-20 mA, 500 Ohms maximum loop resistance
Performance Specifications
Accuracy ±1% of full scale including linearity over 15 to 25°C and 10 to 60 psia
(0.7 to 4 bara); ±2% of full scale including linearity over 0 to 50°C and 5 to 50 psia (0.3 to 10 bara); ±1% of full scale accuracy at a specific tem-perature and pressure is available with special calibration;
For the models 840 (NPT), the accuracies above are 1.5%, ±3%, and ±1.5%, respectively
Repeatability ±0.15% of full scale ±0.5% of full scale for 840 (NPT) Temperature Coefficient 0.08% of full scale per °F (0.15% of full scale per °C), or better Pressure Coefficient 0.01% of full scale per psi (0.15% of full scale per bar), or better Response Time 830 (all) .................. 300 ms time constant; 2 seconds (typical) to within ±2% of set point over 20 to 100% of full scale 840 (low, med) ....... 300 ms time constant; 2 seconds (typical) to within ±2% of set point over 20 to 100% of full scale 840 (high)............... 600 ms time constant; 4 seconds (typical) to within ±2% of set point over 20 to 100% of full scale 840 (NPT) .............. 800 ms time constant; 4 seconds (typical) to within ±5% of set point over 20 to 100% of full scale 860 (all) .................. 0.6 to 1 second to within ±2% of set point over 20 to 100% of full scale
Physical Specifications
Wetted Materials 830 (all) .........................316 stainless steel, Viton® O-rings standard; Neoprene® and Kal-Rez® optional 840/860 (low, med, high) ............316 stainless steel, 430F stainless steel, Viton O-rings and valve seat standard; Neoprene and Kal-Rez optional
PFA Teflon valve seat available 840 (NPT) 316 stainless steel, Teflon® valve set, Viton O-rings Control Valve Type 840/860C (low, med, high) ............Electromagnetic 840 (NPT) .....................Rotary plug valve
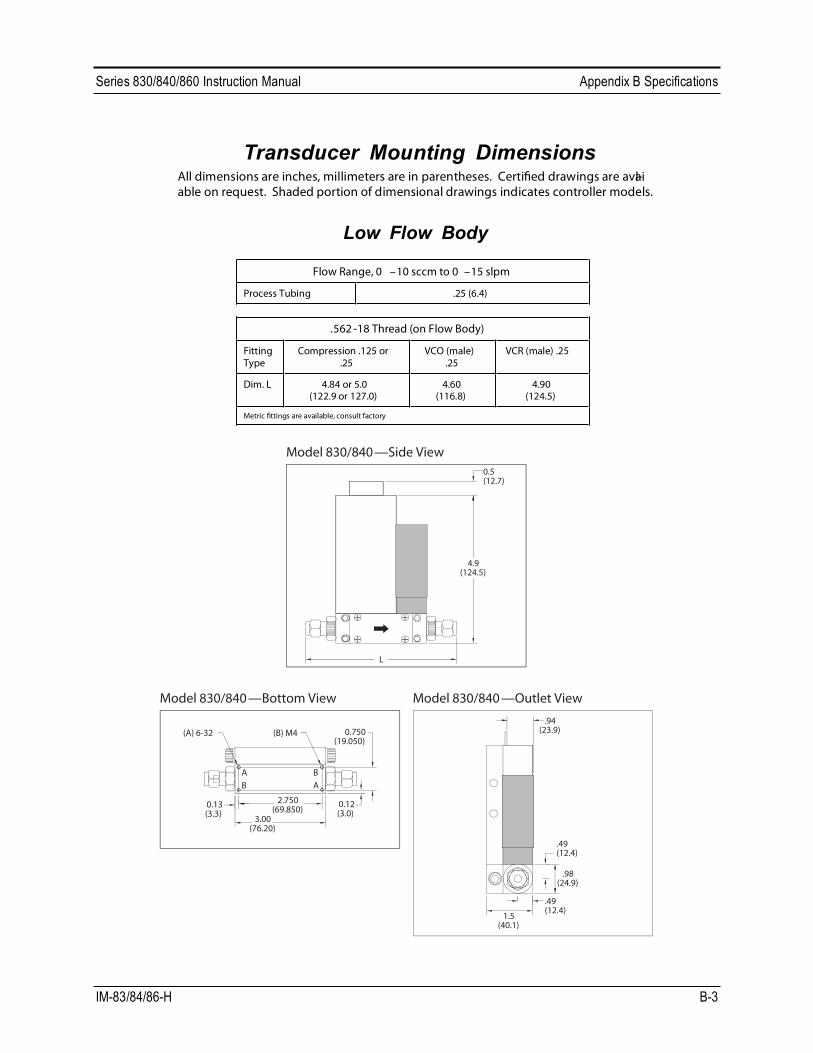
Series 830/840/860 Instruction Manual Appendix B Specifications
IM-83/84/86-H B-3
Transducer Mounting DimensionsAll dimensions are inches, millimeters are in parentheses. Certi�ed drawings are avail-able on request. Shaded portion of dimensional drawings indicates controller models.
Low Flow Body
Flow Range, 0 –10 sccm to 0 –15 slpm
Process Tubing .25 (6.4)
.562 -18 Thread (on Flow Body)
Fitting Type
Compression .125 or .25
VCO (male) .25
VCR (male) .25
Dim. L 4.84 or 5.0(122.9 or 127.0)
4.60(116.8)
4.90(124.5)
Metric �ttings are available, consult factory
Model 830/840—Side View0.5(12.7)
4.9(124.5)
L
Model 830/840—Bottom View
2.750(69.850)
3.00(76.20)
0.13(3.3)
(B) M4(A) 6-32
AB A
B
0.12(3.0)
0.750(19.050)
Model 830/840—Outlet View
1.5(40.1)
.94(23.9)
.49(12.4)
.49(12.4)
.98(24.9)

Appendix B Specifications Series 830/840/860 Instruction Manual
B-4 IM-83/84/86-H
Medium Flow Body
Flow Range, slpm
0–15 0–30 0–50, 100 0–100
Process Tubing
.25 or .375(6.4 or 9.5)
.25 or .375(6.4 or 9.5)
.25 or .375(6.4 or 9.5)
.375(9.5)
.562 -18 Thread ( on Flow Body)
Fitting Type Compression.25 or .375
VCO (male).25 or .375
VCR (male).25 or .375
Dim. L 6.27 or 6.39(159.3 or
162.3)
5.81 or 6.25(147.6 or
158.8)
6.13 or 6.43(155.7 or 163.3)
Metric �ttings are available, consult factory
Model 830/840—Side View
L
5.4(137.2)
0.5(12.7)
Model 830/840—Bottom View
BA B
A
1.9(48.3)
2.000(50.8)
4.25(108.0)
0.23(5.8)
(A) M6(B) 8-32 1.000
(25.4)
Model 830/840—Outlet View1.3(33.0)
0.73(18.5)
0.73(18.5)
1.45(36.83)
2.05(52.1)

Series 830/840/860 Instruction Manual Appendix B Specifications
IM-83/84/86-H B-5
High Flow Body
Flow Range, slpm
0–100 0–200 0–300 0–400 0–500
Process Tubing
.375 or .50(9.5 or 12.7)
.375 or .50(9.5 or 12.7)
.50(12.7)
.50(12.7)
.50(12.7)
.75 -16 Thread (on Flow Body)
Fitting Type Compression.375 or .50
VCO (male).375
VCR (male).375
Dim. L830
11.90 or 12.10(302.3 or 307.3)
11.80(299.7)
12.19(309.6)
Dim. L2840
14.10 or 14.30(358.1 or 363.2)
14.00(355.6)
14.40(365.8)
Metric �ttings are available, consult factory
Model 830/840—Side View
Model 830/840—Bottom View
B A
A B
3.00(76.20)
2.000(50.80)
7.0(177.8)
12.0 (840/860)(304.8)
0.22(5.6)
2.000(50.80)(A) 10-32
(B) M6
9.75(247.7)
(304.8)
Model 830/840—Outlet View

Series 830/840/860 Instruction Manual Appendix B Specifications
IM-83/84/86-H B-6
NPT Flow Body
830 Flow Range, SCFM
0–50 0–100 0–200
Inlet FNPT 1-inch 1.5 -inch 2-inch
Outlet FNPT
1-inch 1.5 -inch 2-inch
Dim. D 4.95(125.7)
5.95(151.1)
7.95 (201.9)
Dim. H 10.72 (272.3)
11.72(297.7)
13.78(350.0)
Dim. H2 8.25(209.6)
8.75(222.3)
9.81(249.2)
Dim. L 10.10(256.5)
12.10(307.3)
16.10(408.9)
inches (mm)
Model 830—Side View
H2
2.0(50.8)
L
H
Model 830—Bottom View
D
Model 830—Outlet View
1.64(41.7)

Appendix B Specifications Series 830/840/860 Instruction Manual
B-7 IM-83/84/86-H
NPT Flow Body
840 Flow Range, SCFM
0–50 0–100 0–200
Inlet FNPT 1-inch 1.5-inch 2-inch
OutletFNPT
3/4-inch 3/4-inch 1.5-inch
Dim. A 2.92 (74.2) 4.30 (109.2) 6.64 (168.7)
Dim. B 1.0 (25.4) 1.88 (47.8) 2.87 (72.9)
Dim. C 2.25 (57.2) 1.37 (34.8) .38 (9.7)
Dim. D 4.95 (125.7) 5.95 (151.1) 7.95 (201.9)
Dim. H 10.72 (272.3) 11.72 (297.7) 13.78 (350.0)
Dim. H2 8.25 (209.6) 8.75 (222.3) 9.81 (249.2)
Dim. L 10.10 (256.5) 12.10 (307.3) 16.10 (408.9)
inches (mm)
Model 840—Side View
L A
4.95(125.7)
2.0(50.8)
C
B
H2
H
CL
Model 840—Bottom View
4.8(121.9)
D
Model 840—Outlet View
3.25(82.6)
8.5(215.9)