siebel data warehouse nstallation and … · bridge provides a way to map your siebel 6.3...
TRANSCRIPT

SIEBEL DATA WAREHOUSEINSTALLATION AND
ADMINISTRATION GUIDE
VERSION 7.5, REV. C
FEBRUARY 2003
12-FSJOZZ
Siebel Systems, Inc., 2207 Bridgepointe Parkway, San Mateo, CA 94404Copyright © 2003 Siebel Systems, Inc. All rights reserved.Printed in the United States of America
No part of this publication may be stored in a retrieval system, transmitted, or reproduced in any way, including but not limited to photocopy, photographic, magnetic, or other record, without the prior agreement and written permission of Siebel Systems, Inc.
Siebel, the Siebel logo, TrickleSync, TSQ, Universal Agent, and other Siebel product names referenced herein are trademarks of Siebel Systems, Inc., and may be registered in certain jurisdictions.
Other product names, designations, logos, and symbols may be trademarks or registered trademarks of their respective owners.
U.S. GOVERNMENT RESTRICTED RIGHTS. Programs, Ancillary Programs and Documentation, delivered subject to the Department of Defense Federal Acquisition Regulation Supplement, are “commercial computer software” as set forth in DFARS 227.7202, Commercial Computer Software and Commercial Computer Software Documentation, and as such, any use, duplication and disclosure of the Programs, Ancillary Programs and Documentation shall be subject to the restrictions contained in the applicable Siebel license agreement. All other use, duplication and disclosure of the Programs, Ancillary Programs and Documentation by the U.S. Government shall be subject to the applicable Siebel license agreement and the restrictions contained in subsection (c) of FAR 52.227-19, Commercial Computer Software - Restricted Rights (June 1987), or FAR 52.227-14, Rights in Data—General, including Alternate III (June 1987), as applicable. Contractor/licensor is Siebel Systems, Inc., 2207 Bridgepointe Parkway, San Mateo, CA 94404.
Proprietary InformationSiebel Systems, Inc. considers information included in this documentation and in Siebel eBusiness Applications Online Help to be Confidential Information. Your access to and use of this Confidential Information are subject to the terms and conditions of: (1) the applicable Siebel Systems software license agreement, which has been executed and with which you agree to comply; and (2) the proprietary and restricted rights notices included in this documentation.

Contents
Siebel Data Warehouse Installation and Administration Guide 1
IntroductionWho Should Use This Guide . . . . . . . . . . . . . . . . . . . . . . . . . . . . . . . . 10
How This Guide Is Organized . . . . . . . . . . . . . . . . . . . . . . . . . . . . . . . 11
Third-Party Products and Documentation . . . . . . . . . . . . . . . . . . . . . . . 13
Revision History . . . . . . . . . . . . . . . . . . . . . . . . . . . . . . . . . . . . . . . . . 15
Chapter 1. Overview of Siebel Data WarehouseData Flow into the Data Warehouse . . . . . . . . . . . . . . . . . . . . . . . . . . . 20
Server and Client Configuration . . . . . . . . . . . . . . . . . . . . . . . . . . . . . . 21
Planning the Installation . . . . . . . . . . . . . . . . . . . . . . . . . . . . . . . . . . . 23
The Administrator Workstation . . . . . . . . . . . . . . . . . . . . . . . . . . . . . . . . . 23
The Data Warehouse Server . . . . . . . . . . . . . . . . . . . . . . . . . . . . . . . . . . . 23The Siebel Server . . . . . . . . . . . . . . . . . . . . . . . . . . . . . . . . . . . . . . . . . . . 24
The Web Server . . . . . . . . . . . . . . . . . . . . . . . . . . . . . . . . . . . . . . . . . . . . 24
Creating Multiple Instances of Siebel Data Warehouse . . . . . . . . . . . . . . . . 24
Requirements for Server Components . . . . . . . . . . . . . . . . . . . . . . . . . . 25
Siebel Data Warehouse Requirements . . . . . . . . . . . . . . . . . . . . . . . . . . 26
DB2-Specific Database Requirements . . . . . . . . . . . . . . . . . . . . . . . . . . . . . 27Oracle-Specific Database Requirements . . . . . . . . . . . . . . . . . . . . . . . . . . . 29SQL Server-Specific Database Requirements . . . . . . . . . . . . . . . . . . . . . . . . 31
Overview of the Configuration Chapters . . . . . . . . . . . . . . . . . . . . . . . . 33
Version 7.5, Rev. C Siebel Data Warehouse Installation and Administration Guide 3

Contents
Chapter 2. Installing and Configuring the Siebel Data Warehouse
Installing Informatica Client Software . . . . . . . . . . . . . . . . . . . . . . . . . 36
Creating Database Connections for OLAP and OLTP . . . . . . . . . . . . . . . 38
Setting Up the Siebel Data Warehouse . . . . . . . . . . . . . . . . . . . . . . . . . 40
Installing the Siebel Data Warehouse . . . . . . . . . . . . . . . . . . . . . . . . . . . . . 41
Post-Installation Wizard Tasks . . . . . . . . . . . . . . . . . . . . . . . . . . . . . . . . . . 49Changing the System Variables . . . . . . . . . . . . . . . . . . . . . . . . . . . . . . . . . 50
Configuring Informatica Server and Repository . . . . . . . . . . . . . . . . . . . . 51
Configuring the Informatica Server Under Windows . . . . . . . . . . . . . . . . . . 51
Configuring Unicode Under Windows . . . . . . . . . . . . . . . . . . . . . . . . . . . . 52Configuring Informatica Repository Manager . . . . . . . . . . . . . . . . . . . . . . . 54
Changing the Informatica Server Host Name . . . . . . . . . . . . . . . . . . . . . . . 55Verifying the Informatica Server Host Name . . . . . . . . . . . . . . . . . . . . . . . . 56Configuring the Informatica Repository . . . . . . . . . . . . . . . . . . . . . . . . . . . 57Starting the Informatica Service Under Windows . . . . . . . . . . . . . . . . . . . . 59Setting the Environment Variables for Informatica Server Under UNIX . . . . . 60Configuring Informatica Server . . . . . . . . . . . . . . . . . . . . . . . . . . . . . . . . . 61Configuring Informatica Client . . . . . . . . . . . . . . . . . . . . . . . . . . . . . . . . . 64Configuring Informatica Server Database Connection . . . . . . . . . . . . . . . . . 65
Chapter 3. Setting System Preferences and Using Exception Reports
Using the Exception Report and Diagnostic Views . . . . . . . . . . . . . . . . . 69
Understanding Exceptions . . . . . . . . . . . . . . . . . . . . . . . . . . . . . . . . . . . . . 69Executing Exception Reports . . . . . . . . . . . . . . . . . . . . . . . . . . . . . . . . . . . 73
Chapter 4. Administering and Troubleshooting the Siebel Data Warehouse
Populating the Initial Siebel Data Warehouse . . . . . . . . . . . . . . . . . . . . 78
Full Load Optimizer Settings in Oracle . . . . . . . . . . . . . . . . . . . . . . . . . . . . 79Refresh Optimizer Settings in Oracle . . . . . . . . . . . . . . . . . . . . . . . . . . . . . 81
4 Siebel Data Warehouse Installation and Administration Guide Version 7.5, Rev. C
Contents
Administering the Informatica Repository . . . . . . . . . . . . . . . . . . . . . . . 83
Performing a Full Load of the Siebel Data Warehouse . . . . . . . . . . . . . . . . . 83Performing the ETL Process . . . . . . . . . . . . . . . . . . . . . . . . . . . . . . . . . . . 84
Troubleshooting the ETL Process . . . . . . . . . . . . . . . . . . . . . . . . . . . . . . . . 87Verifying Successful Loading of the Siebel Data Warehouse . . . . . . . . . . . . . 89Disabling Dimension, Fact, and SCD Batches . . . . . . . . . . . . . . . . . . . . . . . 90
Performing a Refresh Load of the Siebel Data Warehouse . . . . . . . . . . . . . . 90
Modifying the Batch Processes for Industry Applications . . . . . . . . . . . . 92
Optional Customization Procedures . . . . . . . . . . . . . . . . . . . . . . . . . . . 94
Improving Performance of Full_Load_Siebel_DW . . . . . . . . . . . . . . . . . . . . 94Linking Batches . . . . . . . . . . . . . . . . . . . . . . . . . . . . . . . . . . . . . . . . . . . . 96
Importing Syndicated Data Into the Siebel Data Warehouse . . . . . . . . . . 99
Analytics Data Loading Matrix for Syndicated Data . . . . . . . . . . . . . . . . . 101Data Source Values for Syndicated Data Attributes . . . . . . . . . . . . . . . . . . 105
Informatica Metadata Reporter (IMR) . . . . . . . . . . . . . . . . . . . . . . . . . .106
Siebel Analytics for Life Sciences Data Considerations . . . . . . . . . . . . . .107
Data Loading Issues . . . . . . . . . . . . . . . . . . . . . . . . . . . . . . . . . . . . . . . . 107Supported Incremental Updates in the LS Dimension Tables . . . . . . . . . . . 109
Troubleshooting Siebel Data Warehouse . . . . . . . . . . . . . . . . . . . . . . . .112
Installation and Initial Configuration Issues . . . . . . . . . . . . . . . . . . . . . . . 112
Informatica and Loading Issues . . . . . . . . . . . . . . . . . . . . . . . . . . . . . . . . 113
Chapter 5. Extending the Siebel Data WarehouseCommon Methods to Extend Siebel Data Warehouse . . . . . . . . . . . . . . 120
Identify Fields . . . . . . . . . . . . . . . . . . . . . . . . . . . . . . . . . . . . . . . . . . . . 120
Design the ETL Process . . . . . . . . . . . . . . . . . . . . . . . . . . . . . . . . . . . . . 120Add Fields to Tables . . . . . . . . . . . . . . . . . . . . . . . . . . . . . . . . . . . . . . . . 121
Rebuild the Siebel Data Warehouse . . . . . . . . . . . . . . . . . . . . . . . . . . . . . 121
ETL Process Description . . . . . . . . . . . . . . . . . . . . . . . . . . . . . . . . . . 122
Working With the Custom Folder . . . . . . . . . . . . . . . . . . . . . . . . . . . . . . 122
Custom Batches . . . . . . . . . . . . . . . . . . . . . . . . . . . . . . . . . . . . . . . . . . . 123
Version 7.5, Rev. C Siebel Data Warehouse Installation and Administration Guide 5

Contents
Using Custom Templates . . . . . . . . . . . . . . . . . . . . . . . . . . . . . . . . . . . . . 124Description of Custom Templates . . . . . . . . . . . . . . . . . . . . . . . . . . . . . . 127
Appendix A. The Siebel ePharma 6.3 to 7.5 Analytics BridgeInstallation Process . . . . . . . . . . . . . . . . . . . . . . . . . . . . . . . . . . . . . . 132
Analytics Bridge Installation . . . . . . . . . . . . . . . . . . . . . . . . . . . . . . . . . . 133Siebel Application 6.3 OLTP Update Patch . . . . . . . . . . . . . . . . . . . . . . . . 134Siebel Analytics 7.5 Repository Modification . . . . . . . . . . . . . . . . . . . . . . 139
Authentication Block Changes . . . . . . . . . . . . . . . . . . . . . . . . . . . . . . . . . 139Login Properties Block Changes . . . . . . . . . . . . . . . . . . . . . . . . . . . . . . . 140
Authorization Properties Block Changes . . . . . . . . . . . . . . . . . . . . . . . . . 140Adding 7.5 Siebel Analytics Responsibilities to 6.3 Siebel ePharma Users . . 141Using ETL Alignment Version System Preferences . . . . . . . . . . . . . . . . . . . 147
Siebel ePharma 6.3 To 7.5 Star Matrix . . . . . . . . . . . . . . . . . . . . . . . . . 148
Appendix B. The Siebel eBusiness 6.3 to 7.5 Analytics BridgeInstallation Process . . . . . . . . . . . . . . . . . . . . . . . . . . . . . . . . . . . . . . 150
Begin the Standard Installation of Siebel Analytics 7.5 . . . . . . . . . . . . . . . 151
Pause the Standard Installation of Siebel Analytics . . . . . . . . . . . . . . . . . . 152
Replace the Informatica Repository File . . . . . . . . . . . . . . . . . . . . . . . . . . 152
Continue the Standard Installation of Siebel Analytics . . . . . . . . . . . . . . . 152Replace the Siebel Analytics Repository File . . . . . . . . . . . . . . . . . . . . . . . 153Import New Siebel OLTP Schema Definitions . . . . . . . . . . . . . . . . . . . . . . 154Apply Schema Definitions to the Physical Database . . . . . . . . . . . . . . . . . 155
Import Language-Independent Siebel Seed Data . . . . . . . . . . . . . . . . . . . . 156
Import Locale Seed Data . . . . . . . . . . . . . . . . . . . . . . . . . . . . . . . . . . . . . 157Siebel eBusiness Application 6.3 Analytics Bridge Files . . . . . . . . . . . . . . . 159
Configuration Considerations . . . . . . . . . . . . . . . . . . . . . . . . . . . . . . . 161
Creating Siebel Analytics Users in Siebel 6.3 eBusiness Applications . . . . . 161Creating Database Tables for Siebel Delivers/Scheduler . . . . . . . . . . . . . . 162
6 Siebel Data Warehouse Installation and Administration Guide Version 7.5, Rev. C
Contents
Appendix C. Installing and Configuring the Siebel Data Warehouse in DB2 for OS/390
Prerequisites for Installing DB2 under OS/390 . . . . . . . . . . . . . . . . . . . 164
Installing Siebel Data Warehouse for DB2 under OS/390 . . . . . . . . . . . 165
Installing the Star Schema Tables on DB2 for OS/390 . . . . . . . . . . . . . . 169
Index
Version 7.5, Rev. C Siebel Data Warehouse Installation and Administration Guide 7

Contents
8 Siebel Data Warehouse Installation and Administration Guide Version 7.5, Rev. C
Introduction
This guide explains how to configure the Siebel Data Warehouse (the physical OLAP database) and its related components. Before it can be installed, the Siebel Data Warehouse must be created manually by a database administrator.
It is strongly recommended that the installation of Siebel Data Warehouse be done through the Installer Wizard in the Siebel Analytics installation. Use this guide together with Siebel Analytics Installation and Configuration Guide during the Siebel Data Warehouse installation.
NOTE: This version of the guide (7.5 Rev. C) applies to the 7.5.2.210 and 7.5.2.211 maintenance releases of Siebel Analytics and Siebel Data Warehouse. If you do not have the 7.5.2.210 or 7.5.2.211 maintenance release software, you should obtain it before using this guide. The 7.5.2.210 and 7.5.2.211 maintenance releases supersede the 7.5.2.200, 7.5.2.101, 7.5.2, and 7.5 releases.
Version 7.5, Rev. C Siebel Data Warehouse Installation and Administration Guide 9

Introduction
Who Should Use This Guide
Who Should Use This GuideThis book will be useful primarily to people whose titles or job descriptions match one of the following:
Database Administrators
Persons who administer the database system, including data loading, system monitoring, backup and recovery, space allocation and sizing, and user account management.
Siebel Application Administrators
Persons responsible for planning, setting up, and maintaining Siebel applications.
Siebel Application Developers
Persons who plan, implement, and configure Siebel applications, possibly adding new functionality.
Siebel System Administrators
Persons responsible for the whole system, including installing, maintaining, and upgrading Siebel applications.
10 Siebel Data Warehouse Installation and Administration Guide Version 7.5, Rev. C

Introduction
How This Guide Is Organized
How This Guide Is OrganizedThis guide is organized according to the sequence of events necessary to complete the installation for an enterprise.
■ Siebel Data Warehouse is a multiple-component product. The first two chapters explain what software components (especially third-party components) need to be installed on which computers.
■ Chapter 3, “Setting System Preferences and Using Exception Reports,” explains how to use the application System Preferences and Exception Reports views to make sure your Siebel Data Warehouse installation is configured correctly.
■ Chapter 4, “Administering and Troubleshooting the Siebel Data Warehouse,” covers the ongoing tasks administrators need to perform, such as the process of importing data into a data warehouse, as well as some troubleshooting hints.
■ Chapter 5, “Extending the Siebel Data Warehouse,” provides the optional steps of adding additional fields to the Siebel Data Warehouse.
■ Appendix A, “The Siebel ePharma 6.3 to 7.5 Analytics Bridge,” discusses the installation of the Siebel ePharma 6.3 to 7.5 Analytics Bridge. If you are using Siebel ePharma 6.3 and have also licensed version 7.5 of Siebel Analytics, you will need to install the Siebel ePharma 6.3 to 7.5 Analytics Bridge in order to use the newer functionality of Siebel Analytics 7.5 with your Siebel ePharma 6.3 transactional database data. The Siebel ePharma 6.3 to 7.5 Analytics Bridge provides a way to map your Siebel ePharma 6.3 transactional database data to the Siebel Data Warehouse repository.
NOTE: You should review Appendix A before you begin the Siebel ePharma 6.3 to 7.5 Analytics Bridge installation process.
Version 7.5, Rev. C Siebel Data Warehouse Installation and Administration Guide 11

Introduction
How This Guide Is Organized
■ Appendix B, “The Siebel eBusiness 6.3 to 7.5 Analytics Bridge,” discusses the installation of the Siebel eBusiness 6.3 to 7.5 Analytics Bridge. If you are using a Siebel eBusiness 6.3 application and have also licensed version 7.5 of Siebel Analytics, you will need to install the Siebel eBusiness 6.3 to 7.5 Analytics Bridge in order to use the newer functionality of Siebel Analytics 7.5 with a Siebel eBusiness 6.3 application. The Siebel eBusiness 6.3 to 7.5 Analytics Bridge provides a way to map your Siebel 6.3 application’s transactional database data to the Siebel Data Warehouse repository.
NOTE: You should review Appendix B before you begin the Siebel eBusiness 6.3 to 7.5 Analytics Bridge installation process.
■ If you are using IBM DB2 UDB running under OS/390, the repository and the star schema must be installed in separate databases. Appendix C, “Installing and Configuring the Siebel Data Warehouse in DB2 for OS/390,” provides the installation settings for installing the Siebel Data Warehouse in this case.
12 Siebel Data Warehouse Installation and Administration Guide Version 7.5, Rev. C

Introduction
Third-Party Products and Documentation
Third-Party Products and DocumentationSiebel Data Warehouse uses third-party data integration products from Informatica. The Informatica applications (Data Warehouse Server) extract, transform, and load legacy, relational, and Enterprise Resource Planning (ERP) data into the Siebel Data Warehouse. The load process builds a series of star schemas in the Siebel Data Warehouse.
NOTE: Installation requires specific versions of the third-party products. Depending on the Informatica product you are licensed to use, install either Informatica PowerMart or PowerCenter. This guide refers to Informatica PowerMart, but all information applies as well to Informatica PowerCenter functionality. For versions of Siebel eBusiness Applications higher than 6.3, it is strongly recommended that Informatica version 5.1 be used; however, this is not mandatory. For all versions, read Siebel System Requirements and Supported Platforms.
Version 7.5, Rev. C Siebel Data Warehouse Installation and Administration Guide 13
Introduction
Third-Party Products and Documentation
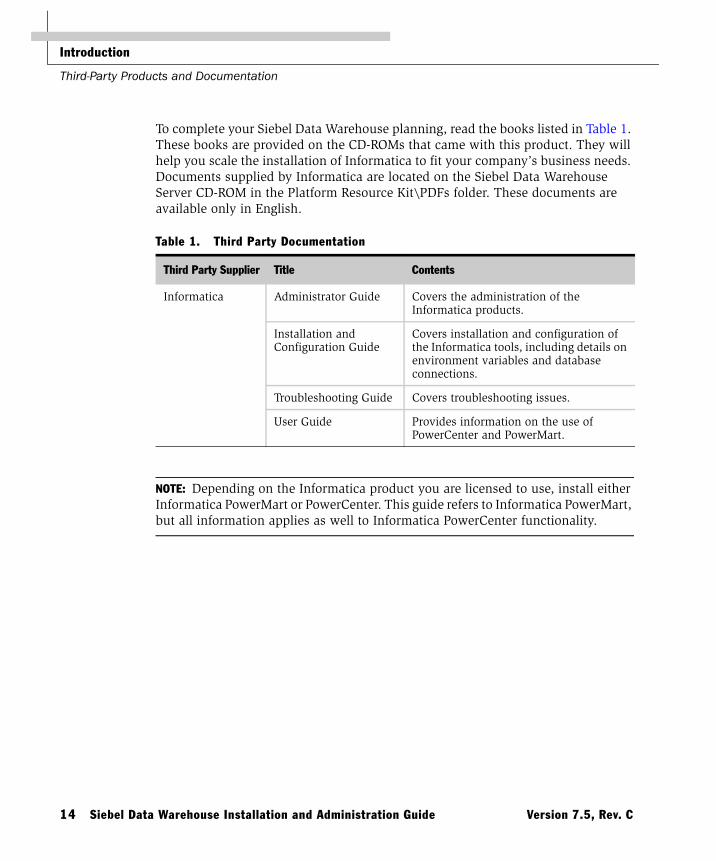
To complete your Siebel Data Warehouse planning, read the books listed in Table 1. These books are provided on the CD-ROMs that came with this product. They will help you scale the installation of Informatica to fit your company’s business needs. Documents supplied by Informatica are located on the Siebel Data Warehouse Server CD-ROM in the Platform Resource Kit\PDFs folder. These documents are available only in English.
NOTE: Depending on the Informatica product you are licensed to use, install either Informatica PowerMart or PowerCenter. This guide refers to Informatica PowerMart, but all information applies as well to Informatica PowerCenter functionality.
Table 1. Third Party Documentation
Third Party Supplier Title Contents
Informatica Administrator Guide Covers the administration of the Informatica products.
Installation and Configuration Guide
Covers installation and configuration of the Informatica tools, including details on environment variables and database connections.
Troubleshooting Guide Covers troubleshooting issues.
User Guide Provides information on the use of PowerCenter and PowerMart.
14 Siebel Data Warehouse Installation and Administration Guide Version 7.5, Rev. C

Introduction
Revision History
Revision HistorySiebel Data Warehouse Installation and Administration Guide, Version 7.5, Rev. C
March 2003 BookshelfTable 2. Changes Made in 7.5 Rev. C Published February 2003
Topic Revision
7.5.2.210/.211 Maintenance Release requirement
Added a note to the Introduction stating that this guide assumes that you are using the 7.5.2.210 or 7.5.2.211 maintenance release.
Appendix B, “The Siebel eBusiness 6.3 to 7.5 Analytics Bridge”
Added appendix for installation of the Siebel eBusiness 6.3 to 7.5 Analytics Bridge. The Bridge is not installed by the installer program and must be done manually.
Added a note to Installer procedure regarding a new choice to install the Analytics Bridge, with cross-reference to Appendix B, where the Analytics Bridge is described.
Added a note to Installer procedure that if an Analytics Bridge will be installed, to read the appendix before beginning.
Importing Data with Siebel EIM This section, of interest only to those customers using the Siebel Life Sciences Data Warehouse, has been moved to Siebel Life Sciences Guide.
Version 7.5, Rev. C Siebel Data Warehouse Installation and Administration Guide 15

Introduction
Revision History
Siebel Data Warehouse Installation and Administration Guide, Version 7.5 Rev. B
January 2003 BookshelfTable 3. Changes Made in 7.5 Rev. B Published December 2002
Topic Revision
7.5.2.200 Maintenance Release requirement
Added a note to the Introduction stating that this guide assumes that you are using the 7.5.2.200 maintenance release.
Appendix A, “The Siebel ePharma 6.3 to 7.5 Analytics Bridge”
Added Appendix on installation of Siebel ePharma Data Warehouse 6.3 to 7.5 Analytics Bridge.
Added note to Installer procedure regarding a new choice to install the Analytics Bridge, with cross-reference to Appendix A, where the Analytics Bridge is described.
Appendix C, “Installing and Configuring the Siebel Data Warehouse in DB2 for OS/390”
The Siebel Analytics installer does not work for installation of the data warehouse for DB2 for OS/390. Appendix C provides instructions on using the previous SES installer to install the data warehouse.
In the Chapter 4, “Administering and Troubleshooting the Siebel Data Warehouse,” restoration of “Analytics Data Loading Matrix for Syndicated Data” and “Siebel Analytics for Life Sciences” sections of book
The material in the “Analytics Data Loading Matrix for Syndicated Data,” “Siebel Analytics for Life Sciences,” and EIM loading sections is about loading data from the OLTP into the Siebel Data Warehouse. It was removed from the previous version of the book but has been restored.
16 Siebel Data Warehouse Installation and Administration Guide Version 7.5, Rev. C

Introduction
Revision History
Siebel Data Warehouse Installation and Administration Guide, Version 7.5.2.101
7.5.2.101 Maintenance Release, November 2002Table 4. Changes for Version 7.5.2.101 Published November 2002
Topic Revision
New installer wizard in “Installing the Siebel Data Warehouse”
Added notes in the Introduction and “Installing and Configuring the Siebel Data Warehouse” chapter, to specify that the Siebel Data Warehouse must be installed through the Siebel Analytics installation.
Installation section rewritten to reflect new installation program.
Deleted “Analytics Data Loading Matrix for Syndicated Data“and “Siebel Analytics for Life Sciences” sections from the “Administering and Troubleshooting the Siebel Data Warehouse” chapter
This material is not about the data warehouse, but rather about loading data into the OLTP. These sections are to be moved to more appropriate books.
Third-party product information reorganized in “Third Party Documentation”
The third-party products and documentation sections, previously widely separated, were combined into one table.
Version 7.5, Rev. C Siebel Data Warehouse Installation and Administration Guide 17

Introduction
Revision History
Siebel Data Warehouse Installation and Administration Guide, Version 7.5.2 Rev. A
October 2002 BookshelfTable 5. Changes for Version 7.5.2 Rev. A Published October 2002
Topic Revision
General platform-specific information
Most information about supported platforms was removed to Siebel System Requirements and Supported Platforms. However, where platform variations influence the configuration process, this information was retained, clarified, or added (see below).
Informatica Client requirements
In “Installing Informatica Client Software” on page 36, added warning notes about configuring specific operating system platforms with a specific DBMS.
Oracle DBMS requirements Added tablespace and binary sorting requirements to “Oracle-Specific Database Requirements” on page 29.
SQL Server requirements Added “To modify the DB Library Options setting” on page 31.
UNIX installation requirements
Added note to “Notes on Special Cases of Informatica Installations” on page 61 that this installation must be from a CD-ROM.
Added installation step Added “To check the log file” on page 49.
System variable changes Rewrote “Changing the System Variables” on page 50 as a procedure, and added NLS_LANG information.
Added HP-UX, Solaris, and AIX settings to “Setting the Environment Variables for Informatica Server Under UNIX” on page 60.
Data Code Pages Added “Data Code Pages Validation” on page 37 to resolve operating system conflicts with languages.
Added note that Code Page 1252 must run on the Informatica Server (Siebel Data Warehouse Server) to “Configuring the Informatica Server Under Windows” on page 51.
18 Siebel Data Warehouse Installation and Administration Guide Version 7.5, Rev. C

Overview of Siebel Data Warehouse 1
The Siebel Data Warehouse is a unified data repository for all customer, sales, service, product, marketing, employee, and partner data.
The Siebel Data Warehouse includes:
■ A data integration engine that combines data from the Siebel Transaction Database, other operational products, and enterprise data warehouses.
■ An open architecture to allow organizations to use third-party analytical tools in conjunction with the Siebel Data Warehouse using the Siebel Analytics Server.
■ Optional prebuilt data extractors to incorporate data from external applications into the Siebel Data Warehouse.
■ An ETL (extract-transform-load) process bridge between Siebel ePharma 6.3 transactional data and the 7.5 Siebel Data Warehouse tables.
■ An ETL (extract-transform-load) process bridge between Siebel eBusiness 6.3 application transactional data and the 7.5 Siebel Data Warehouse tables.
Version 7.5, Rev. C Siebel Data Warehouse Installation and Administration Guide 19

Overview of Siebel Data Warehouse
Data Flow into the Data Warehouse
Data Flow into the Data WarehouseHigh-level analytical queries, like those commonly used in Siebel Analytics, scan and analyze large volumes of data using complex formulas. This process can take a long time when querying a transactional (OLTP) database, which impacts overall system performance.
For this reason, the Siebel Data Warehouse is an online analytical processing (OLAP) database, which allows you to selectively extract, analyze, and view data. To facilitate this kind of analysis, OLAP data is stored in a relational database that considers each data attribute (such as product, account, and time period) as a separate dimension.
The OLAP is designed using dimensional modeling techniques to support the analysis requirements of Siebel Analytics. The data warehouse derives its data from Siebel operational applications, and includes a prebuilt Informatica repository plus all the scripts necessary to create tables and relationships within the data warehouse. Several prebuilt mappings within the Informatica repository allow the initial loading and periodic refreshing of the Siebel Data Warehouse.
Figure 1 illustrates the data flow into the Siebel Data Warehouse.
Figure 1. Data Flow From OLTP to OLAP
20 Siebel Data Warehouse Installation and Administration Guide Version 7.5, Rev. C

Overview of Siebel Data Warehouse
Server and Client Configuration
Server and Client ConfigurationThe Siebel Data Warehouse product requires that you install server component software on your server computers.
NOTE: Installation on a Windows NT Primary Domain Controller or Backup Domain Controller is not supported. Read Siebel Global Deployment Guide for more details.
Figure 2 shows the recommended configuration for the server components.
Figure 2. Recommended Configuration
Version 7.5, Rev. C Siebel Data Warehouse Installation and Administration Guide 21

Overview of Siebel Data Warehouse
Server and Client Configuration
This document refers to these computers by the designated computer names in Table 1.
Table 1. Computer Names and Their Server Components
Computer Server Components
Siebel Server Siebel ServerSiebel Web Engine
Web Server Web Server softwareSiebel Web Server Extension
Data Warehouse Server Informatica Server
Administrator Workstation Informatica Client
22 Siebel Data Warehouse Installation and Administration Guide Version 7.5, Rev. C

Overview of Siebel Data Warehouse
Planning the Installation
Planning the InstallationBefore installing the Siebel eBusiness Data Warehouse, you should plan the installation using the information provided in this document and in documents from third-party suppliers.
NOTE: Before it can be installed, the Siebel Data Warehouse (the physical OLAP database) must be created manually by a database administrator.
The Administrator WorkstationThe Administrator Workstation holds the client software for Informatica (PowerMart). The Administrator Workstation can be an existing workstation for the person who takes on the designer role. You do not need to obtain a computer solely dedicated to being an Administrator Workstation. A dedicated computer is preferred, but not required. Although your installation needs only one Administrator Workstation, you can have multiple Administrator Workstations.
For easy access, make sure that the Administrator Workstation is located in a private or public workspace away from the secure server room.
The Data Warehouse ServerThe Data Warehouse Server initially loads the Siebel Data Warehouse and performs subsequent incremental loads. Depending upon your business needs, you might incrementally refresh the Siebel Data Warehouse once a day, once a week, once a month, or other similar scheduling. When the computer is loading or refreshing the Siebel Data Warehouse, it is recommended that the server be dedicated to that activity. However, when the Data Warehouse Server is not loading or refreshing the Siebel Data Warehouse, you can use it for other purposes. Companies that increment daily may prefer that the Data Warehouse Server be dedicated to that purpose. Companies that increment monthly may prefer that the server be shared with other applications and server software.
Version 7.5, Rev. C Siebel Data Warehouse Installation and Administration Guide 23

Overview of Siebel Data Warehouse
Planning the Installation
The Siebel ServerYour company may have one or multiple Siebel Servers. The Siebel Data Warehouse installation does not access files on the Siebel Server.
The Web ServerThe Web Server is the point of contact for the client workstations. It takes the client requests and passes them to the Siebel Server. Your company may have one or multiple Web Servers.
Creating Multiple Instances of Siebel Data WarehouseYou can create multiple instances of Siebel Data Warehouse. Typically you do this to create a development environment where you can test customizations and other modifications without inconveniencing the production users. The procedures for creating a new instance are beyond the scope of this document. Please contact Expert Services for assistance with the planning and implementation.
24 Siebel Data Warehouse Installation and Administration Guide Version 7.5, Rev. C
Overview of Siebel Data Warehouse
Requirements for Server Components
Requirements for Server ComponentsTo install the server components, the computers need to meet the conditions specified in Siebel System Requirements and Supported Platforms.
Additional Data Warehouse Server Requirements for Windows NTIf the Data Warehouse Server runs under Windows NT, the following requirements must be in place to use the “post-session” email feature of Informatica. This feature sends a confirmation email when the Siebel Data Warehouse is populated with new data.
■ A Microsoft Outlook mail client must be configured on the Data Warehouse Server. This works with all versions of Outlook except Outlook 2000. For more information read “Informatica and Loading Issues” on page 113.
■ Microsoft Outlook must be running on the Microsoft Exchange server.
■ The account that sends post-session emails must have rights to start the Informatica service.
■ The account must have a Microsoft Outlook account.
For more information, read the Informatica user guide.
Changing the Regional SettingsIn order to install the Informatica help, readme file, and documentation files, the workstation’s regional settings must be set to English prior to installing Informatica PowerMart. After installation you can restore this setting to its original value. The help, readme, and documentation files are only available in English.
To change the regional settings
1 Click Start > Settings > Control Panel > Regional Settings.
2 Choose English.
3 Check the Set as system default locale box.
4 To make the change effective, reboot the computer.
Version 7.5, Rev. C Siebel Data Warehouse Installation and Administration Guide 25

Overview of Siebel Data Warehouse
Siebel Data Warehouse Requirements
Siebel Data Warehouse RequirementsThe Siebel Data Warehouse is a database that contains the star schemas created by Informatica. Although it is technically possible to put the Siebel Data Warehouse in the same database as the Siebel Transaction Database, it is not recommended for performance reasons. The Siebel Transaction Database is structured as an Online Transaction Processing (OLTP) database, whereas the Siebel Data Warehouse is structured as an Online Analytical Processing (OLAP) database. Each is optimized for its own purpose. The reasons for not combining the two databases are:
■ The OLAP queries interfere with normal use of the OLTP, which is entering and managing individual transactions.
■ The data in an OLTP is normalized for update efficiency. Analytical queries join several normalized queries and will be slow (as opposed to prejoined, denormalized OLAP tables).
■ Historical data cannot be purged from an OLTP, even if not required for current transaction processing because you need it for analysis (as opposed to OLAP being the warehouse for historical as well as current data). This causes the OLTP to further slow down.
■ OLTP databases are tuned for one specific application and it is not productive to use these separate OLTP databases for analytical queries that usually span more than one functional application.
■ The OLAP database can be specifically tuned for the analytical queries and Extract-Transform-Load (ETL) processing. These are quite different from OLTP requirements.
■ The Siebel Data Warehouse repository stores all of the Informatica object definitions for the ETL mappings that populate the Siebel Data Warehouse. It is a series of repository tables that are stored in a database, which can be the OLTP, OLAP, or a separate database.
The Siebel Data Warehouse works with native database management systems (DBMS). In addition to the general requirements, there are additional DBMS-specific requirements depending on the DBMS you are using.
26 Siebel Data Warehouse Installation and Administration Guide Version 7.5, Rev. C

Overview of Siebel Data Warehouse
Siebel Data Warehouse Requirements
DB2-Specific Database RequirementsThe following requirements apply to DB2 RDBMS usage:
■ IBM DB2 UDB for Windows NT.
■ ODBC driver for all connections must use the IBM DB2 ODBC Driver.
■ Make the appropriate connections using DB2 Client Configuration Assistant.
■ Create the user accounts that access the database. They must have “SSE_ROLE” and be set so that the ddl commands can be run (permissions to create tables).
■ All tablespaces (including System) should be of 16K or 32K page size and they should be database-managed.
■ In your Siebel Transaction Database (OLTP database), move the following tables to a tablespace separate from all other tables in the OLTP database:
■ S_ETL_COSTLST
■ S_ETL_CURR_RUN
■ S_ETL_ERRHLP
■ S_ETL_ERRLOG
■ S_ETL_EXCH_RATE
■ S_ETL_INC_STAT
■ S_ETL_I_IMAGE
■ S_ETL_LOV
■ S_ETL_PARAM
■ S_ETL_RUN
■ S_ETL_VI_IMAGE
These tables are used by the Siebel Data Warehouse and should not be part of the routine backup processes.
■ Datafile size must be at least fifty percent of Siebel Transaction Database size.
Version 7.5, Rev. C Siebel Data Warehouse Installation and Administration Guide 27

Overview of Siebel Data Warehouse
Siebel Data Warehouse Requirements
■ One login user needs to be created in an empty database. The database objects will be created using this user login.
■ Make sure that isolation level is cursor stability.
■ Use these baseline parameters:
■ locklist - 5,000
■ maxlock - 50
■ applheapsz - 2,560
■ logfilsiz - 2,500
■ logprimary - 5
■ logsecond - 20
For more information, read IBM’s DB2 database configuration guide.
28 Siebel Data Warehouse Installation and Administration Guide Version 7.5, Rev. C

Overview of Siebel Data Warehouse
Siebel Data Warehouse Requirements
Oracle-Specific Database RequirementsThe following requirements apply to Oracle RDBMS usage:
■ Make the appropriate connections using Oracle Net8 Assistant.
■ Create the user accounts that access the database. They must have “SSE_ROLE” and be set so that the ddl commands can be run (permissions to create tables).
■ Set the tablespace for the Siebel Data Warehouse. The tablespace should be at least fifty percent of Siebel Transaction Database size. Default Pctincrease should be zero. Default Initial and Next extent size should be 20M.
■ Create a login user with the above mentioned tablespace as the default tablespace. The database objects will be created using this user login.
■ Make sure the temporary tablespace has adequate space.
■ Use these baseline parameters:
Init.ora parameters==================================DB_BLOCK_SIZE 16384DB_BLOCK_BUFFERS large enough depending on available physical memory.SHARED_POOL_SIZE 36000000 LOG_BUFFER 11468800DB_FILE_MULTIBLOCK_READ_COUNT 32DB_FILE_DIRECT_IO_COUNT 64SORT_MULTIBLOCK_READ_COUNT 4SORT_AREA_SIZE 10MSORT_AREA_RETAINED_SIZE 2MHASH_AREA_SIZE 20MOPTIMIZER_MODE see NOTE following these parametersLOG FILE CONFIGURATION for Database=====================================
Version 7.5, Rev. C Siebel Data Warehouse Installation and Administration Guide 29

Overview of Siebel Data Warehouse
Siebel Data Warehouse Requirements
NOTE: For OPTIMIZER_MODE settings, refer to “Full Load Optimizer Settings in Oracle” on page 79 for full load and “Incremental Load Optimizer Settings in Oracle” on page 90 for incremental refresh. For a full load, the optimizer should be set to Rule based in the in the init.ora parameters, thus: OPTIMIZER_MODE RULE.For an incremental load, the optimizer should be switched to Cost based in the in the init.ora parameters, after analyzing all the data warehouse (W_*) tables, thus: OPTIMIZER_MODE ALL_ROWS.
■ 4 log file groups
■ 10 MB files
■ Siebel eBusiness Applications under Oracle support only binary sorting. If you are running an Oracle client, do one of the following:
■ Set the NLS_SORT parameter to BINARY.
■ Choose a NLS_LANG setting that includes binary.
These settings are required for adequate performance from the Dedicated Web Client.
30 Siebel Data Warehouse Installation and Administration Guide Version 7.5, Rev. C

Overview of Siebel Data Warehouse
Siebel Data Warehouse Requirements
SQL Server-Specific Database RequirementsSQL Server Databases should be created with ANSI NULL option checked.
NOTE: SQL Server users must make sure the SQL Server client software is installed.
To set the ANSI NULL option
1 In Enterprise Manager, select Database.
2 Right-click and choose Database properties.
3 Click the Options tab and check the box for ANSI NULL default.
In a SQL Server 2000 environment, when loading Analytics tables with international data, or loading more than one language, modify the DB Library Options setting.
To modify the DB Library Options setting
1 In the program menu Microsoft SQL Server, launch the Client Network utilities.
2 Select the DB Library Options tab.
3 Uncheck the option Automatic ANSI to OEM.
NOTE: SQL Server 2000 automatically tunes many of the server configuration options, therefore an administrator is required to do little, if any, tuning. Although these configuration options can be modified, the general recommendation is that these options be left at their default values, allowing SQL Server to automatically tune itself based on run-time conditions.
To create the user accounts that access the database
1 Assign these user accounts SSE_ROLE.
2 Set these accounts to run the DDL commands (that is, set permissions to create tables).
Version 7.5, Rev. C Siebel Data Warehouse Installation and Administration Guide 31

Overview of Siebel Data Warehouse
Siebel Data Warehouse Requirements
If necessary, the following components can be configured to optimize performance:
■ SQL Server memory: Make sure adequate memory is available.
■ Transaction logs and TempDB: Reside on a separate disk from those used by database data.
■ Full load: Full Recovery model for the database.
■ Incremental load: Change from Full to Bulk-Logged Recovery model.
32 Siebel Data Warehouse Installation and Administration Guide Version 7.5, Rev. C

Overview of Siebel Data Warehouse
Overview of the Configuration Chapters
Overview of the Configuration ChaptersThe installation chapters have been organized according to the computer on which the software will be installed.
■ Chapter 2, “Installing and Configuring the Siebel Data Warehouse”
■ Chapter 3, “Setting System Preferences and Using Exception Reports”
When installing, use the materials listed in Table 2.
Table 2. Materials Provided
Item Name Contains
Siebel 7 eBusiness Applications Bookshelf Acrobat (PDF) versions of all documentation
Siebel Data Warehouse Extractor for PeopleSoft Informatica PowerConnect for PeopleSoft (licensed separately)
Siebel Analytics CD-ROM for 7.5.2.210 Informatica PowerMart or PowerCenter (depending on your license)
Informatica License Key Letter License keys for Informatica components
Version 7.5, Rev. C Siebel Data Warehouse Installation and Administration Guide 33
Overview of Siebel Data Warehouse
Overview of the Configuration Chapters
34 Siebel Data Warehouse Installation and Administration Guide Version 7.5, Rev. C

Installing and Configuring theSiebel Data Warehouse 2
The following is an overview of the Administrator Workstation installation:
■ “Installing Informatica Client Software” on page 36
■ “Creating Database Connections for OLAP and OLTP” on page 38
■ “Setting Up the Siebel Data Warehouse” on page 40
■ “Configuring Informatica Server and Repository” on page 51
Version 7.5, Rev. C Siebel Data Warehouse Installation and Administration Guide 35

Installing and Configuring the Siebel Data Warehouse
Installing Informatica Client Software
Installing Informatica Client SoftwareInformatica client utilities are used throughout the Siebel Data Warehouse.
■ Informatica Server Manager creates the Siebel Data Warehouse build.
■ Informatica Repository Manager restores and manages the Siebel Data Warehouse repository.
■ Informatica Designer configures and updates the Siebel Data Warehouse mappings, transformations, and metadata.
NOTE: If you are using both SQL Server 2000 and Oracle (for example, Oracle for the Siebel Transaction Database and SQL Server 2000 for the Siebel Data Warehouse), then follow the procedural steps relating to odbcbcp.dll.
Refer to the Informatica Installation and Configuration Guide for the following procedure.
To install PowerMart Client on the Administrator Workstation
1 Prior to installing the PowerMart Client, rename ODBCbcp.dll in C:\\winnt\system32 by appending .old.
2 In the Informatica Suite Setup window, check the Install PowerMart Client box.
NOTE: Oracle users should also check the Install ODBC box.
3 After installation, delete the ODBCbcp.dll that was installed and rename the old dll file by taking out the .old.
4 Reboot after installing the PowerMart Client and ODBC drivers.
36 Siebel Data Warehouse Installation and Administration Guide Version 7.5, Rev. C

Installing and Configuring the Siebel Data Warehouse
Installing Informatica Client Software
Data Code Pages ValidationAt the end of the Informatica installation, on the Setup Complete page, uncheck the check box for Enable Data Code Pages Validation if either of these two conditions is true:
■ If the source and target databases are Unicode, or
■ If the source or target database code page is different from the Informatica server operating system’s code page.
NOTE: Informatica Server must be run on an operating system that uses Code Page 1252. For example, Japanese users need to run the ETL process from a machine that has an English-language version of Windows installed. In addition, use a period (.) as the decimal delimiter for this server to function properly. The data source and target can be on any Siebel Systems–supported code page, including non-European and double-byte, provided that the data source and data target code pages are the same.
Version 7.5, Rev. C Siebel Data Warehouse Installation and Administration Guide 37

Installing and Configuring the Siebel Data Warehouse
Creating Database Connections for OLAP and OLTP
Creating Database Connections for OLAP and OLTPThe Administrator Workstation needs an ODBC connection and a native connection to the Siebel Data Warehouse (which holds the Informatica repository), and a native connection to the Siebel Transaction Database, as shown in Figure 3.
To define the ODBC connections between the Administrator Workstation and the Siebel Data Warehouse, you need the setup information shown in Table 3. You also use this same information when configuring Informatica (read “To configure Informatica Repository Manager” on page 54).
NOTE: When creating a password, do not use any spaces. Also, the password must not be blank (null).
Figure 3. Native and ODBC Connections
Table 3. ODBC Connect Information for the Siebel Data Warehouse
Field Description
Connect String The native connect string to the Siebel Data Warehouse. For DB2, use the Data Source Name. For Oracle, use the native connect string.
ODBC Data Source The Data Source Name (DSN) for the Siebel Data Warehouse.
38 Siebel Data Warehouse Installation and Administration Guide Version 7.5, Rev. C
Installing and Configuring the Siebel Data Warehouse
Creating Database Connections for OLAP and OLTP
To create database connections for DB2 installations
1 Using DB2 Client Configuration Assistant, create a database connection to the Siebel Data Warehouse (OLAP), the Siebel Transaction Database (OLTP), and the Siebel Data Warehouse repository. Use the parameters in Table 3 on page 38.
2 In the ODBC control panel, System DSN tab, create an ODBC connection to the Siebel Data Warehouse using an ODBC driver.
3 Test the connections to make sure they work.
To create database connections for Oracle installations
1 Using Net8 Assistant, create a native connect string (net service name) to the Siebel Data Warehouse (OLAP), the Siebel Transaction Database (OLTP), and the Siebel Data Warehouse repository. Use the parameters in Table 3 on page 38.
2 In the ODBC control panel, System DSN tab, create an ODBC connection to the Siebel Data Warehouse using an Oracle ODBC driver.
3 In the ODBC control panel, System DSN tab, create an ODBC connection to the Siebel Data Warehouse using the driver named “Merant Closed 3.5 32-Bit Oracle8.” This ODBC driver was installed during Informatica Client installation.
4 Test the connections to make sure they work.
To create database connections for SQL Server installations
1 Create a database connection to the Siebel Data Warehouse (OLAP), the Siebel Transaction Database (OLTP), and the Siebel Data Warehouse repository. Use the parameters in Table 3 on page 38.
2 In the ODBC control panel, System DSN tab, create an ODBC connection to the Siebel Data Warehouse using a SQL Server ODBC driver.
3 Test the connections to make sure they work.
Version 7.5, Rev. C Siebel Data Warehouse Installation and Administration Guide 39

Installing and Configuring the Siebel Data Warehouse
Setting Up the Siebel Data Warehouse
Setting Up the Siebel Data WarehouseThe Siebel Data Warehouse consists of the following components:
■ Siebel Data Warehouse repository (Informatica repository)
■ Star schema tables that hold the Siebel Data Warehouse information (populated by Informatica)
These two components are installed in the same database or in different databases.
Prerequisites to Setting Up the Siebel Data WarehouseBefore you execute the batches with Informatica, you must do the following:
■ Restore the Informatica repository and create the data warehouse tables.
These tables are empty until populated by the predefined batches as covered in Table 5 on page 79, Predefined Full Load Batch Processes.
■ Make sure that a role named SSE_ROLE is created for both Siebel Data Warehouse (OLAP) and Siebel Transaction Database (OLTP).
40 Siebel Data Warehouse Installation and Administration Guide Version 7.5, Rev. C
Installing and Configuring the Siebel Data Warehouse
Setting Up the Siebel Data Warehouse
Installing the Siebel Data Warehouse■ Before beginning the installation, check that the physical OLAP (the Siebel Data
Warehouse) has been created already by a database administrator.
■ You must install the Siebel Data Warehouse through the Siebel Analytics installer program, when you select the data warehouse for the Siebel eBusiness Application or for the Siebel Industry Application to install. This choice is made in the Prerequisite Check screen. The installer program creates a Start Menu item and Windows Desktop icon which, when selected, run a wizard to configure the Siebel Data Warehouse repository after the installation.
■ You may install either from the installation CD-ROM or from a network location that contains the installation files.
■ Use this installer on ENU language installations only, not on PSE.
NOTE: Only the three Siebel Data Warehouse installation-specific screens are described in detail in this book. For a description of the other screens, see Siebel Analytics Installation and Configuration Guide.
To install the Siebel Data Warehouse using the Siebel Analytics installer
1 Run the program setup.exe.
(On Windows 2000, an Installshield message screen may appear, stating that an older version of the Windows Installer is being used. Ignore this message. Close the message window and proceed with the installation.)
The installation wizard prompts you through each screen. For details of Steps 1 through 12, see Siebel Analytics Installation and Configuration Guide. The first twelve screens are:
(1) License Agreement
(2) Prerequisite Check
(3) DSN Configuration
(4) Destination Folder
(5) Setup type
Version 7.5, Rev. C Siebel Data Warehouse Installation and Administration Guide 41

Installing and Configuring the Siebel Data Warehouse
Setting Up the Siebel Data Warehouse
2 Prerequisite Check screen: Check one or more choices as appropriate.
a Database client type:
❏ For Siebel Analytics operational applications installation only: If you are using MS SQL Server for your OLTP or OLAP, the installer proceeds to the DSN Configuration screen. You set up the Data Source Names (DSNs) using the Microsoft ODBC Driver Manager. (The actual configuration is done after all the files have been copied. Choose the database connectivity client from the choices given.)
❏ For other databases, you are not prompted for DSN configuration. However, you should set up the DSNs appropriately later. For example, for IBM DB2, use the DB2 Client Configuration Assistant to set up the database connectivity and DSNs.
b If you are installing a data warehouse, specify which one:
❏ Horizontal (Siebel Enterprise Application)
(6) Cache Configuration
(7) Language selection
(8) COM Service Type
(9) Logon Service
(10) Temporary Folders
(11) Mail Server
(12) Scheduler Server
42 Siebel Data Warehouse Installation and Administration Guide Version 7.5, Rev. C

Installing and Configuring the Siebel Data Warehouse
Setting Up the Siebel Data Warehouse
❏ Vertical (Siebel Industry Applications)
❏ Siebel ePharma Data Warehouse 6.3 to 7.5 ETL Bridge
NOTE: If you are using Siebel ePharma 6.3, and are installing a licensed version 7.5 of Siebel Analytics, you will need to install the Siebel ePharma 6.3 to 7.5 Analytics Bridge. See Appendix A, “The Siebel ePharma 6.3 to 7.5 Analytics Bridge,” before continuing the installation.
NOTE: Although this option is not listed in the Prerequisite Check screen, you may also install a Siebel eBusiness 6.3 to 7.5 Analytics Bridge. To complete the Siebel eBusiness 6.3 to 7.5 Analytics Bridge installation, select the Horizontal (Siebel Enterprise Application) option. See Appendix B, “The Siebel eBusiness 6.3 to 7.5 Analytics Bridge,” for additional information before continuing the installation.
3 Install the Siebel Data Warehouse.
You are prompted to create, delete, or configure an Informatica repository, or to create or drop Siebel Data Warehouse tables. The requested information is shown in the tables.
CAUTION: If you are installing the Siebel eBusiness 6.3 to 7.5 Analytics Bridge, you must pause your installation at this point to replace the standard 7.5 Informatica repository (.rep) file with the Bridge-specific Informatica repository file. For further information regarding this procedure, see Appendix B, “The Siebel eBusiness 6.3 to 7.5 Analytics Bridge.”
NOTE: If you are installing DB2 UDB under OS/390, use the procedure in Appendix C, “Installing and Configuring the Siebel Data Warehouse in DB2 for OS/390.”
Version 7.5, Rev. C Siebel Data Warehouse Installation and Administration Guide 43

Installing and Configuring the Siebel Data Warehouse
Setting Up the Siebel Data Warehouse
a Fill out the Setup Type page, using the following table as a guide, and click Next.
NOTE: Determine the values for these options before beginning the installation.
Option Action
Create Informatica repository
For creating an Informatica repository into a fresh database or from an existing data warehouse, check this box.
Delete existing Informatica repository
For a new installation, this is not needed; leave unchecked.
For an installation from an existing data warehouse, check this box.
For a failed installation (requiring a clean installation), check this box.
Configure Informatica repository (enter source and target information)
For creating an Informatica repository into a fresh database or from an existing data warehouse, check this box.
Create Siebel Data Warehouse Tables
Check this to create star schema tables within the Siebel Data Warehouse. The Data Warehouse Server populates these star schema tables when you run a build process. For more information, read Chapter 4, “Administering and Troubleshooting the Siebel Data Warehouse.”
Drop existing Siebel Data Warehouse Tables
For a new installation, this is not needed; leave unchecked.
For an installation from an existing data warehouse, check this box.
For a failed installation (requiring a clean installation), check this box.
Check this to drop (remove) existing Siebel Data Warehouse (star schema) tables and create new Data Warehouse tables.
44 Siebel Data Warehouse Installation and Administration Guide Version 7.5, Rev. C

Installing and Configuring the Siebel Data Warehouse
Setting Up the Siebel Data Warehouse
b Specify the connection (source) information to be used for the Siebel transactional database. This information will be placed in the Informatica repository, to be used by Informatica to access the Siebel transactional database. Fill out the form on this window using the following table as a guide, then click Next.
Field Description
Platform Choose the DBMS platform. If you choose MS SQL, then you must also fill out the MS SQL DBMS Name field.
Connect String Enter the native connect string to the Siebel transactional database (or the database alias).
Table Owner Enter a valid user name with database owner privileges of the Siebel transactional database.
Password Enter the password (double-entry confirmation).
MS SQL DBMS Name If you chose MS SQL as the platform above, then enter the name of the database. For DB2 and Oracle platforms, leave this blank.
Unicode Check the option box if your database is Unicode.
ODBC Data Source Enter the Data Source Name (DSN) for the Siebel transactional database.
Version 7.5, Rev. C Siebel Data Warehouse Installation and Administration Guide 45

Installing and Configuring the Siebel Data Warehouse
Setting Up the Siebel Data Warehouse
c Specify the connection (target) information to the Siebel Data Warehouse. When you create the connections to the Siebel Data Warehouse on the Data Warehouse Server (read “Creating Database Connections for OLAP and OLTP” on page 38), it must use the same information. Fill out the form, using the following table as a guide, then click Next.
Fields Description
Platform Choose the DBMS platform. If you choose MS SQL then when you click Next, the installer prompts you for the MS SQL DBMS Name.
Connect String Enter the native connect string or to the Siebel Data Warehouse (or database alias name). You created this connection on the Data Warehouse Server in “Creating Database Connections for OLAP and OLTP” on page 38.
Table Owner Enter a valid user name with database owner privileges of the Siebel Data Warehouse.
Password Enter the password (double-entry confirmation).
ODBC Data Source Enter the Data Source Name (DSN) for the Siebel Data Warehouse. You created this connection on the Data Warehouse Server in “Creating Database Connections for OLAP and OLTP” on page 38.
NOTE: Oracle users should select a Data Source that uses an Oracle ODBC driver and not a Merant ODBC driver. You created this in Step 2 of “To create database connections for Oracle installations” on page 39.
Unicode Check the option box.
Email address Leave this field blank.
46 Siebel Data Warehouse Installation and Administration Guide Version 7.5, Rev. C

Installing and Configuring the Siebel Data Warehouse
Setting Up the Siebel Data Warehouse
d If you checked “Delete existing Informatica repository” or “Drop existing Siebel Data Warehouse Tables” on the Setup Type window of the installer, then the installer displays the Siebel Old Data Warehouse Information window.
If you do not want to drop an existing Informatica repository or data warehouse tables, click Back until you get the Setup Type window of the installer, and clear the checkboxes for “Delete existing Informatica Repository” and “Drop existing Siebel Data Warehouse Tables.”
NOTE: To check the status of the repository restoration, read the dwdb.log file.
e The Siebel Data Warehouse Tablespace Information screen is for Oracle use only. Specify the tablespace for the target data warehouse by clicking Next to use the default tablespace information.
Version 7.5, Rev. C Siebel Data Warehouse Installation and Administration Guide 47

Installing and Configuring the Siebel Data Warehouse
Setting Up the Siebel Data Warehouse
f Specify the location of the Siebel Data Warehouse repository location (target) information in the Configure Informatica Service screen. (This repository can reside in any database.) Fill out the form, using the following table as a guide.
When you click Next, the installer connects to the Siebel Data Warehouse and creates the following components:
❏ Informatica repository
❏ Data warehouse tables that hold the Siebel Analytics information
NOTE: The default Informatica repository has the extension .rep.
At the completion of the Siebel Data Warehouse configuration during the initial installation, a Start Menu item and a desktop icon (“Siebel Data Warehouse Configurator”) are created. Use these to perform subsequent incremental data warehouse configuration.
Field Description
Platform Choose the RDBMS platform.
Connect String Enter the native connect string to the Siebel Data Warehouse.
Table Owner Enter a valid database user.
Password Enter a valid database password.
Administrator Login Enter “Administrator.”
Administrator password Enter “Administrator.”
MS SQL DBMS Name If you chose MS SQL as the platform earlier, then enter the name of the database. For DB2 and Oracle platforms, leave this blank.
Repository Name Enter a name for your Siebel Data Warehouse repository, such as “Siebel_DW_Rep.”
48 Siebel Data Warehouse Installation and Administration Guide Version 7.5, Rev. C

Installing and Configuring the Siebel Data Warehouse
Setting Up the Siebel Data Warehouse
4 When the installation Wizard is finished, a screen prompt asks if you want to view the Readme file.
5 After the installation wizard is finished, check the log file and change the system variables as necessary.
To check the log file
1 Open $INSTALL_DIR\dwdb\dwdb.log. This file shows the number of tables installed in the Siebel Data Warehouse.
2 Click Finish to close the window.
Post-Installation Wizard TasksAfter the Installation Wizard has ended, you must perform several tasks for the installation to take effect.
1 Insert your license keys for any Siebel Analytics Web components you installed. See the section on inserting Siebel Analytics Web license keys in Siebel Analytics Installation and Configuration Guide.
2 Restart your computer before using the Siebel Analytics software. The installation prompts you to restart the computer now, or at a later time. Select your preference and click OK.
Version 7.5, Rev. C Siebel Data Warehouse Installation and Administration Guide 49

Installing and Configuring the Siebel Data Warehouse
Setting Up the Siebel Data Warehouse
Changing the System VariablesAfter installing Siebel Analytics and the Siebel Data Warehouse, you may need to change system variables as necessary.
To change the data warehouse system variables
1 From the Administrator Workstation, navigate to Control Panel > System.
2 Click the Advanced tab, then click Environment Variables.
3 In System variables section, click New.
4 Create the system variable name.
■ For Oracle databases:
❏ In the OLAP, run the commandSELECT * FROM V$NLS_PARAMETERS
❏ Mark the NLS_LANG [NLS_LANGUAGE]_[NLS_TERRITORY].[NLS_CHARACTERSET].
For example:American_America.UTF8
❏ In the Variable Value field, enter NLS_LANG.
■ For DB2 databases:
❏ In Variable Name field, enter DB2CODEPAGE.
❏ In Variable Value field, enter 1208.
5 Click OK to close.
6 Reboot the machine after creating the variables.
50 Siebel Data Warehouse Installation and Administration Guide Version 7.5, Rev. C

Installing and Configuring the Siebel Data Warehouse
Configuring Informatica Server and Repository
Configuring Informatica Server and RepositoryAfter you restore the Informatica repository on the Administrator Workstation, you need to configure it. Set up and configure the repository connectivity, then set up the client to point to the correct Informatica Server (Data Warehouse Server) machine.
Configuring the Informatica Server Under Windows
NOTE: Informatica Server (Data Warehouse Server) must be run using Code Page 1252. For example, Japanese users need to run the ETL process from a machine that has an English-language version of Microsoft Windows installed. In addition, use a period (.) as the decimal delimiter for this server to function properly. Although the Informatica server must be run on a Code Page 1252 operating system, the data source and target can be on any Siebel Systems–supported code page, including non-European and double-byte, provided that the data source and data target code pages are the same.
To configure the Informatica Server under Windows
1 Go to Start > Programs > Informatica Server > Informatica Server Setup.
2 Select Configure Informatica Service and click Configure.
3 In the Keys tab, enter the Platform Key, Oracle Key, Microsoft SQL Server Key, DB2 Key, and ODBC Key. Click Apply.
4 In the Network tab, in TCP/IP Host Address field, enter the machine name where Informatica Server is installed.
5 Oracle only: Navigate to Compatibility tab. In Oracle Version field, select Oracle 8.
6 Navigate to Repository tab. In the Repository Name field, enter the name that you entered for your repository. (The example used Siebel_DW_Rep.) In the Repository user and Repository password fields, enter “Administrator.”
Version 7.5, Rev. C Siebel Data Warehouse Installation and Administration Guide 51
Installing and Configuring the Siebel Data Warehouse
Configuring Informatica Server and Repository
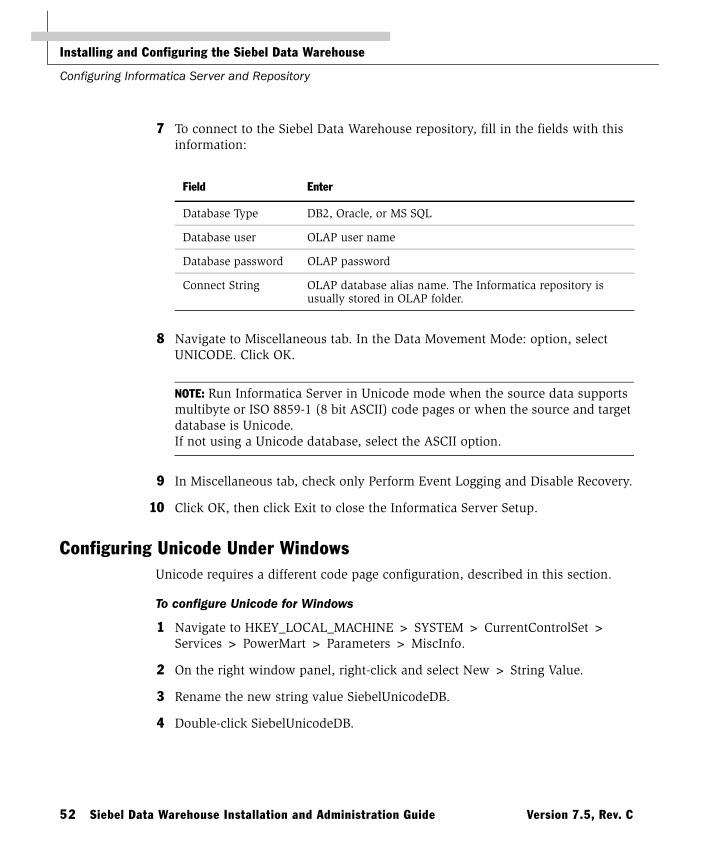
7 To connect to the Siebel Data Warehouse repository, fill in the fields with this information:
8 Navigate to Miscellaneous tab. In the Data Movement Mode: option, select UNICODE. Click OK.
NOTE: Run Informatica Server in Unicode mode when the source data supports multibyte or ISO 8859-1 (8 bit ASCII) code pages or when the source and target database is Unicode. If not using a Unicode database, select the ASCII option.
9 In Miscellaneous tab, check only Perform Event Logging and Disable Recovery.
10 Click OK, then click Exit to close the Informatica Server Setup.
Configuring Unicode Under WindowsUnicode requires a different code page configuration, described in this section.
To configure Unicode for Windows
1 Navigate to HKEY_LOCAL_MACHINE > SYSTEM > CurrentControlSet > Services > PowerMart > Parameters > MiscInfo.
2 On the right window panel, right-click and select New > String Value.
3 Rename the new string value SiebelUnicodeDB.
4 Double-click SiebelUnicodeDB.
Field Enter
Database Type DB2, Oracle, or MS SQL
Database user OLAP user name
Database password OLAP password
Connect String OLAP database alias name. The Informatica repository is usually stored in OLAP folder.
52 Siebel Data Warehouse Installation and Administration Guide Version 7.5, Rev. C

Installing and Configuring the Siebel Data Warehouse
Configuring Informatica Server and Repository
5 In the Value data: field, enter your [user_OLTP]@[connectString_OLTP] [user_OLAP]@[ConnectString_OLAP].
For example, siebel@db204007 siebel@db204008.
■ For Oracle and DB2, leave a space between siebel@db204007 and siebel@db204008.
■ For MSSQL, use system DNS name for [connectString_OLTP] and [connectString_OLAP].
6 Navigate to Control Panel > System and click Advanced tab. Click Environment Variables.
7 In System variables section, click New.
8 Create the system variable name.
■ For Oracle databases:
❏ In the OLAP, run the commandSELECT * FROM V$NLS_PARAMETERS
❏ Mark the NLS_LANG [NLS_LANGUAGE]_[NLS_TERRITORY].[NLS_CHARACTERSET].
For example:American_America.UTF8
❏ In the Variable Value field, enter NLS_LANG.
■ For DB2 databases:
❏ In Variable Name field, enter DB2CODEPAGE.
❏ In Variable Value field, enter 1208.
9 Click OK to close.
10 Reboot the machine after creating the variables.
Version 7.5, Rev. C Siebel Data Warehouse Installation and Administration Guide 53

Installing and Configuring the Siebel Data Warehouse
Configuring Informatica Server and Repository
Configuring Informatica Repository Manager
To configure Informatica Repository Manager
1 Navigate to Start > Programs > PowerMart Client > Repository Manager.
2 Highlight the repository named Siebel_DW_Rep.
NOTE: If the repository name does not exist, click the Repository menu bar and select Add repository.
3 Click Repository menu and select Edit Connection Information.
NOTE: Make sure that the name of the repository (for example, SIEBEL_DW_REP) matches the name of the repository you entered in the section “Setting Up the Siebel Data Warehouse” on page 40. Do not change the name of the Administrator account (Administrator). There are predefined components that rely upon these names.
4 In the Edit Connection Information window, Connect to Repository section, for Username and Password fields, enter “Administrator.”
5 In Connect to Database section, fill out the fields using the following table as a guide.
NOTE: For Oracle, Informatica client uses MERANT ODBC driver.
Field Description
ODBC data source Pull down the menu and choose the ODBC data source you set up in Table 3 on page 38.
Database username Use the information you set up in Table 3 on page 38.
Database password
Native connect string
54 Siebel Data Warehouse Installation and Administration Guide Version 7.5, Rev. C

Installing and Configuring the Siebel Data Warehouse
Configuring Informatica Server and Repository
6 Click Connect.
If the connection information was entered correctly, you see a message, “Connection Information Changed Successfully.”
If the connection is not successful, troubleshoot the ODBC connection to the Siebel Data Warehouse and resume at Step 5 on page 54 of this procedure.
7 Exit from the Informatica Repository Manager.
Changing the Informatica Server Host Name
To change Informatica Server host name
NOTE: Make sure Informatica service is not running.
1 Click Start > Programs > PowerMart Client > Server Manager.
2 Connect to the repository using the Administrator account by double-clicking Siebel_DW_Rep repository.
3 In the Connect to Repository box, enter “Administrator” in both Username and Password fields.
4 Right-click SIEBEL_DW_SERVER and select Edit.
5 In the Server window Host Name (Name or dotted IP address) field, enter the name of the machine hosting the Informatica Server (Data Warehouse Server).
6 Click the Advanced button.
7 In the Server Variables section, Attribute Value column of row 1, change the path to the PowerMart Server directory path.
8 Click OK.
In the Output window (bottom window), the message “Server SIEBEL_DW_SERVER acknowledged the request to update server information” appears.
Version 7.5, Rev. C Siebel Data Warehouse Installation and Administration Guide 55

Installing and Configuring the Siebel Data Warehouse
Configuring Informatica Server and Repository
Verifying the Informatica Server Host NameAfter changing the Server host name, verify the name change.
To verify that Informatica Server host name has been changed
1 Right-click SIEBEL_DW_SERVER and select Monitor.
A red triangle appears next to the SIEBEL_DW_SERVER icon.
2 In Server Manager, highlight Siebel_DW_Rep. Click Server Configuration from menu bar and select Database Connections.
The Database Connections window opens. If you checked Configure Informatica Repository (enter source and target information) from the Siebel Data Warehouse installation, the Siebel Data Warehouse and Siebel Transaction Database should be configured already.
3 Highlight OLAP and click Edit button. Verify that all information for target database is correct. In Data Source field, verify that it is OLAP. Click OK or Cancel.
The target information should be the same as during the Siebel Data Warehouse installation.
NOTE: If using an Oracle Unicode database, select UTF-8 encoding of Unicode in Code Page field. For other Unicode databases, use the default Code Page.
4 Highlight OLTP and click Edit button. Verify that all information for source database is correct. In Data Source field, verify that it is OLTP. Click OK or Cancel.
The target information should be the same as during the Siebel Data Warehouse installation.
56 Siebel Data Warehouse Installation and Administration Guide Version 7.5, Rev. C

Installing and Configuring the Siebel Data Warehouse
Configuring Informatica Server and Repository
Configuring the Informatica RepositoryConfigure the Informatica repository using the following procedure.
To configure the Informatica repository
1 Start the Informatica Server Manager.
2 In the Repositories list, select the SIEBEL_DW_REP repository.
3 Pull down the Repository menu and choose Connect.
The Connect to Repository window opens.
4 Log in using the Administrator account (the password is also Administrator).
5 Click Connect.
6 Once connected, select the SIEBEL_DW_Server under the SIEBEL_DW_REP icon.
7 Pull down the Server Configuration menu and choose Edit Server.
8 In the Host Name field, enter the Computer Name (as shown in the Network control panel) of the Data Warehouse Server.
9 Optionally, configure the Code Page setting:
■ If the Data Warehouse Server uses AIX or Solaris, pull down the Code Page menu and choose Western European.
■ If the Data Warehouse Server uses Windows, leave the setting unchanged.
Version 7.5, Rev. C Siebel Data Warehouse Installation and Administration Guide 57

Installing and Configuring the Siebel Data Warehouse
Configuring Informatica Server and Repository
10 Click Advanced. In the Advanced window, check to see if $PMRootDir points to the directory where the Informatica server is to be installed, as in the following examples.
■ For Windows platforms:
C:\Program Files\Informatica\PowerMart Server
■ For UNIX platforms:
/export/home/informatica/pm
NOTE: If you follow the recommended installation, the Informatica server installs on the Data Warehouse Server. If you install it on a different directory, make sure to update the $PMRootDir variable with the new location.
11 Close the Server window.
Some error messages appear in the Messages pane. These are normal because the Informatica Server is not yet installed.
12 Select Siebel_DW_Server, right-click it, and choose Monitor a process.
A process monitoring window opens. Use this window monitor the Siebel Data Warehouse loading process.
13 Exit from Informatica PowerMart Server Manager.
58 Siebel Data Warehouse Installation and Administration Guide Version 7.5, Rev. C

Installing and Configuring the Siebel Data Warehouse
Configuring Informatica Server and Repository
Starting the Informatica Service Under WindowsThe following procedure shows how to set up the Informatica service on Windows.
To start the Informatica Service on Windows
1 In the Control Panel, open the Services panel.
2 Select the Informatica service, then double-click it.
3 In the Startup Type frame, select Automatic. In the Log On As frame, select System Account, then click OK.
NOTE: Do not use System Account if you plan on using email notification. Use “This account” with the appropriate user name and domain.
4 In the Services control panel, click Start to start the Informatica Service.
NOTE: If the Informatica Repository Manager and Server Manager are not pointing to the Siebel Data Warehouse, the Informatica service cannot start.
5 Close the Services control panel.
Version 7.5, Rev. C Siebel Data Warehouse Installation and Administration Guide 59

Installing and Configuring the Siebel Data Warehouse
Configuring Informatica Server and Repository
Setting the Environment Variables for Informatica Server Under UNIXBefore configuring the server, add setenv variables to .cshrc.
■ For Solaris, in the root directory, add these to command lines to .cshrc:
setenv PATH ${PATH}:<path of Informatica Server dir>:.
setenv LD_LIBRARY_PATH ${LD_LIBRARY_PATH}:<path of Informatica Server dir>
For example:
setenv PATH ${PATH}:/export/home/informatica/pm:.
setenv LD_LIBRARY_PATH ${LD_LIBRARY_PATH}:/export/home/informatica/pm
■ For AIX, in the root directory, add these command lines to .cshrc:
setenv PATH ${PATH}:<path of Informatica Server dir>:.
setenv LIBPATH ${LIBPATH}:<path of Informatica Server dir>
For example:
setenv PATH ${PATH}:/export/home/informatica/pm:.
setenv LIBPATH ${LIBPATH}:/export/home/informatica/pm
■ For HP-UX, in the root directory, add these command lines to .cshrc:
setenv PATH ${PATH}:<path of Informatica Server dir>:.
setenv SHLIB_PATH ${SHLIB_PATH}:<path of Informatica Server dir>
For example:
setenv PATH ${PATH}:/export/home/informatica/pm:.
setenv SHLIB_PATH ${SHLIB_PATH}:/export/home/informatica/pm
60 Siebel Data Warehouse Installation and Administration Guide Version 7.5, Rev. C

Installing and Configuring the Siebel Data Warehouse
Configuring Informatica Server and Repository
Configuring Informatica Server
NOTE: If you are using both SQL Server 2000 and Oracle (for example, Oracle for the Siebel Transaction Database and SQL Server 2000 for the Siebel Data Warehouse), then follow the procedural steps relating to odbcbcp.dll.
Notes on Special Cases of Informatica Installations■ For installations under UNIX, install the Informatica software directly from the
CD-ROM.
NOTE: If you cannot install the software directly, you must use ftp in binary mode. Otherwise, the installation will fail.
■ Informatica Server (Data Warehouse Server) must be run using Code Page 1252. For example, Japanese users need to run the ETL process from a machine that has an English-language version of Microsoft Windows installed. In addition, use a period (.) as the decimal delimiter for this server to function properly.
Although the Informatica server must be run on a Code Page 1252 operating system, the data source and target can be on any Siebel Systems–supported code page, including non-European and double-byte, provided that the data source and data target code pages are the same.
To configure Informatica Server
1 At the prompt, enter
./pmconfig
2 Alter the pmconfig script.
+------------------------------------------++ Informatica Server Configuration Utility ++ Copyright (c) Informatica Corp. 1996-2001+* All Rights Reserved. ++-------------------------------------------+
Configuration file name [pmserver.cfg]:
ServerPort[4001]:
Version 7.5, Rev. C Siebel Data Warehouse Installation and Administration Guide 61
Installing and Configuring the Siebel Data Warehouse
Configuring Informatica Server and Repository
RepositoryName[RepositoryName]: Siebel_DW_Rep
DBUser[DatabaseUser]: _________
DBPassword[************]: _________
PMUser[Administrator]:
PMPassword[*************]:
DatabaseType[Oracle]:
ConnectString[]: _________
ErrorLogFile[pmserver.err]:
EventLogFile[pmserver.log]:
PerformEventLogging[Yes]:
DataMovementMode[ASCII]:
MaxSessions[10]:
LMSharedMem[2000000]:
KeepRepeatSessionInShm[No]:
LMStayConnectToRepositDuration[300]:
PMCacheDir[.]:
PlatformKey[enter_unix_platform_key]: _________
OracleKey[enter_oracle_database_key]: _________
SybaseKey[enter_sybase_database_key]:
InformixKey[enter_informix_database_key]:
DB2Key[enter_db2_database_key]: _________
ODBCKey[enter_odbc_database_key]: _________
DisableRecovery[No]: Yes
DisableRecovery[No]: Yes
OverrideExecLocking[0]:
62 Siebel Data Warehouse Installation and Administration Guide Version 7.5, Rev. C

Installing and Configuring the Siebel Data Warehouse
Configuring Informatica Server and Repository
DateHandling40Compatibility[No]:
Pmserver3XCompatability[0]:
AggregateTreatNullAsZero[0]:
AggregateTreatRowAsInsert[0]:
OracleVersion[7]: 8
DateDisplayFormat[DY MON DD HH24:MI:SS YYYY]:
ValidateDataCodePages[Yes]: No
LoadManagerAllowDebugging[No]:
CreateIndicatorFiles[No]:
XMLWarnDupRows[No]:
MaxLookupSPDBConnections[0]:
MaxSybaseConnections[100]:
MaxMSSQLConnections[100]:
SybaseIQLocalToPmServer[No]:
NumOfDeadlockRetries[10]:
DeadlockSleep[0]:
ValidateDataCodePages[No]: <----existing>
SessionLogInUTF8[No]:
<end>
Version 7.5, Rev. C Siebel Data Warehouse Installation and Administration Guide 63

Installing and Configuring the Siebel Data Warehouse
Configuring Informatica Server and Repository
Configuring Informatica ClientConfigure the Informatica client in the same manner as Informatica Server (Data Warehouse Server) for Windows, and include the following steps.
To configure the Informatica client
1 In Informatica Server Manager, right-click SIEBEL_DW_SERVER and select Edit.
2 In the Host Name (Name or dotted IP address) field, enter the machine name of where Informatica Server will be running.
3 Enter the UNIX machine name where Informatica Server is running from.
4 Click Advanced.
The Server Variables section appears.
5 In Code Page field, select ISO 8859-1 Western European.
This code page is for UNIX environment.
6 In the Attribute Value column of row 1, change the value to that of the path of the PowerMart server directory.
64 Siebel Data Warehouse Installation and Administration Guide Version 7.5, Rev. C

Installing and Configuring the Siebel Data Warehouse
Configuring Informatica Server and Repository
Configuring Informatica Server Database ConnectionFrom the menu bar, click Server Configuration and select Database Connections. When this process is completed, proceed to build the Siebel Data Warehouse.
To configure the Informatica Server database connection
1 For both OLTP and OLAP, use the default value for the Code Page field.
2 Start Informatica Server Service.
a At the Informatica Server root directory, enter pmserver to start the service.
b Check pmserver.log file to see if it has started successfully. It has started successfully if it says Server initialization completed successfully.
3 To stop the server, enter
./pmcmd stopserver <repository username> <repository password> <port #>.
For example:
./pmcmd stopserver Administrator Administrator 4001
4 Check whether Informatica server is running by entering the command
ps –elf |grep pmserver.
If it lists pmserver process, the server is running. If it lists grep pmserver, that is the process of the ps command.
5 Set Environment for Unicode.
a Add the environment following variables.
■ For Oracle, enter:
setenv NLS_LANG american_america.UTF8
■ For DB2, enter:
setenv DB2CODEPAGE 1208
CAUTION: Do not put these setenv commands in the .cshrc file. Other machines and usernames also use this file, and this command will corrupt their non-Unicode environments.
Version 7.5, Rev. C Siebel Data Warehouse Installation and Administration Guide 65
Installing and Configuring the Siebel Data Warehouse
Configuring Informatica Server and Repository
b For all UNIX platforms, add the following line to pmserver.cfg:
SiebelUnicodeDB=<oltp_tableowner>@<oltp_connectstring> <olap_tableowner>@<olap_connectstring>
NOTE: There should be a space between <oltp_connectstring> and <olap_tableowner>.
For example:
SiebelUnicodeDB=siebel@DB204166 siebel@DB204167
6 In Informatica Server Manager, right-click SIEBEL_DW_SERVER and select Edit.
7 Click on Advanced. In Code Page field, select ISO 8859-1 Western European.
This code page is for UNIX environment, not Unicode specific.
8 Click Server Configuration from menu bar and select Database Connections.
9 If you are using Oracle Unicode database, select UTF-8 encoding of Unicode in Code Page field, for both OLTP and OLAP databases. For other Unicode databases, use the default Code Page.
66 Siebel Data Warehouse Installation and Administration Guide Version 7.5, Rev. C

Setting System Preferences and UsingException Reports 3
This section describes how to configure the System Preferences to optimize the Extraction-Transform-Load process.
The System Preferences contain settings that are customized to your installation. Many preferences have default values, but all preferences should be checked to make sure they are correct for your installation.
Navigate to the System Preferences view (Site Map > ApplicationAdministration > System Preferences). There are many System Preferences covering many products. Table 4 lists the preferences for Siebel Analytics.
Table 4. System Preferences for Siebel Analytics
Preference Name Comments
ETL Alignment Version Set this to N if you want to make changes to existing alignment. Set this to Y if you want to create a new alignment version. These preferences are used by Life Sciences to control loading of changes in assignment rules in Siebel Assignment Manager. Note that configuration of the ETL Alignment flag is different for the Siebel ePharma 6.3 to 7.5 Analytics Bridge. See “Using ETL Alignment Version System Preferences” on page 147.
ETL Analysis End When extracting data from the data sources, this is the ending date range to include. Make sure it follows the format specified in the ETL Date Format preference. Suggestion: to extract the most current information, set this to a date in the future, such as December 31, 2055 (20551231).
ETL Analysis Start When extracting data from the data sources, this is the earliest date range to include. Make sure it follows the format specified in the ETL Date Format preference.
Version 7.5, Rev. C Siebel Data Warehouse Installation and Administration Guide 67

Setting System Preferences and Using Exception Reports
ETL Base Exchange Currency Set the base currency to which all the financial amounts will be converted.
ETL Date Format Set the format to be used for representing dates. The typical format is: YYYYMMDD.
ETL Default Continent Set the default continent, such as North America.
ETL Default Country Set the default country, such as USA.
ETL Default Currency Set the currency that will be used in the Siebel Transaction Database, such as USD for US Dollars, if the currency for an amount is not specified.
ETL Default Language Set the default language, such as ENU for English.
ETL LOV Maximum Value Leave this as 9999999999 unless you have a special need to reduce this maximum.
ETL LOV Minimum Value This is 0 (zero) unless you have a special need to increase this minimum.
ETL Unknown Exchange Rate Set the exchange rate to be used for unknown currencies. Typically this is set to 1.
Siebel Web Engine Server Set this to the URL of your Siebel Web Server Engine. Example: http://www.siebel.com.
SqlStyle Identify the RDBMS used for the OLAP. Enter either DB2, Microsoft SQL Server, or Oracle.
SubSqlStyle For DB2 installations only, specify: DB2UWO.
Table 4. System Preferences for Siebel Analytics
Preference Name Comments
68 Siebel Data Warehouse Installation and Administration Guide Version 7.5, Rev. C

Setting System Preferences and Using Exception Reports
Using the Exception Report and Diagnostic Views
Using the Exception Report and Diagnostic ViewsException reports provide insight about the source data used for the ETL processes. They provide information about the source data that can lead to erroneous results in the Siebel Data Warehouse or may cause data loss during the ETL process. These reports point out some of the known problematic areas but they should not be relied upon to find all potential data inconsistencies in the source data.
Understanding ExceptionsException reports are defined for the following components:
■ List of Values. Identifies gaps and overlaps for certain LOV types.
■ Cost Lists. Identifies products for which the cost lists have not been defined. Identifies the cost lists which define costs for a product in a certain currency for overlapping periods of time.
■ Exchange Rates. Currency Exchange rates that do not change over a period of time. If exchange rates are not defined for more than 30-day intervals, then they are flagged as an exception.
■ Hierarchies. Entities that have circular references are flagged as exceptions. The Siebel Data Warehouse supports 10 levels of hierarchies. If there are entities that have more than 10 levels of hierarchies defined, they are flagged as exceptions.
List Of Values ExceptionsList of Values include High and Low values that can be used as bucket values in categories for effective analysis. If these values are not contiguous (such as gaps or overlaps in defined values), the ETL process cannot accurately categorize the values.
Example:
Type Name Low High
MY_TYPE < 100 10 100
MY_TYPE 80 – 200 80 200
MY_TYPE 250 – 300 250 300
MY_TYPE 350 – 400 350 400
Version 7.5, Rev. C Siebel Data Warehouse Installation and Administration Guide 69
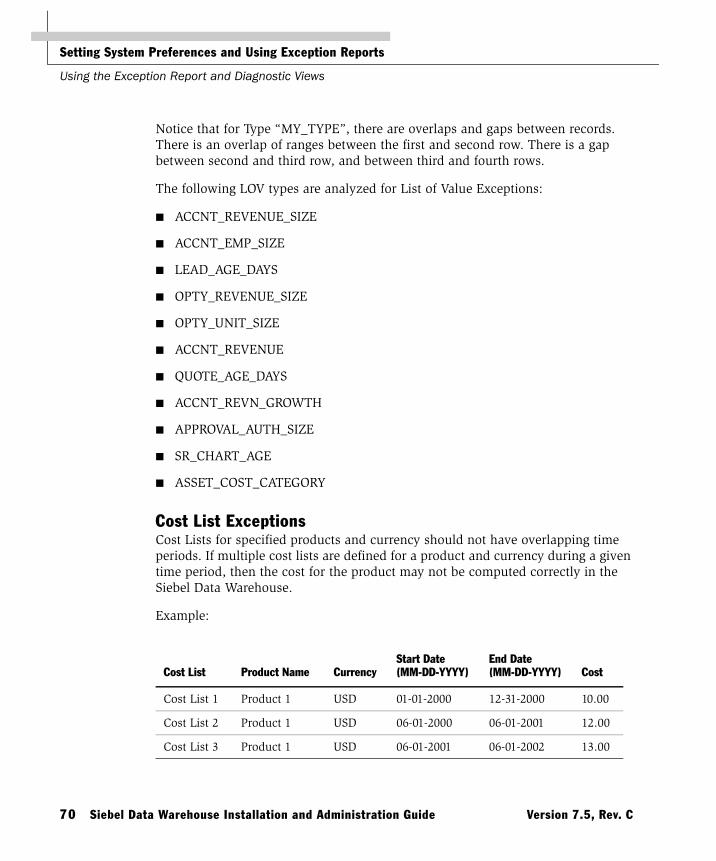
Setting System Preferences and Using Exception Reports
Using the Exception Report and Diagnostic Views
Notice that for Type “MY_TYPE”, there are overlaps and gaps between records. There is an overlap of ranges between the first and second row. There is a gap between second and third row, and between third and fourth rows.
The following LOV types are analyzed for List of Value Exceptions:
■ ACCNT_REVENUE_SIZE
■ ACCNT_EMP_SIZE
■ LEAD_AGE_DAYS
■ OPTY_REVENUE_SIZE
■ OPTY_UNIT_SIZE
■ ACCNT_REVENUE
■ QUOTE_AGE_DAYS
■ ACCNT_REVN_GROWTH
■ APPROVAL_AUTH_SIZE
■ SR_CHART_AGE
■ ASSET_COST_CATEGORY
Cost List ExceptionsCost Lists for specified products and currency should not have overlapping time periods. If multiple cost lists are defined for a product and currency during a given time period, then the cost for the product may not be computed correctly in the Siebel Data Warehouse.
Example:
Cost List Product Name CurrencyStart Date (MM-DD-YYYY)
End Date (MM-DD-YYYY) Cost
Cost List 1 Product 1 USD 01-01-2000 12-31-2000 10.00
Cost List 2 Product 1 USD 06-01-2000 06-01-2001 12.00
Cost List 3 Product 1 USD 06-01-2001 06-01-2002 13.00
70 Siebel Data Warehouse Installation and Administration Guide Version 7.5, Rev. C

Setting System Preferences and Using Exception Reports
Using the Exception Report and Diagnostic Views
In the example, Cost List 1 and 2 have definitions of cost overlapping over 06-01-2000 to 12-31-2000.
Products Without a Cost ListDuring the ETL process, the costs of the products are calculated based on the Cost List table. If the cost lists are not defined correctly, the cost of the products cannot be calculated correctly in the Siebel Data Warehouse. This exception mapping queries the product table and looks for a minimum of one cost list to be defined. The products with no cost list definition are flagged as exceptions.
Exchange Rate ExceptionsThe Siebel Data Warehouse supports transactions in many different currencies. Siebel Analytics converts all currencies in the Siebel Data Warehouse to a single currency for analysis purposes. The ETL Base Exchange Currency parameter in System Preferences, indicates the currency to which all the financial amounts will be converted. The Exchange rates are derived from the Exchange Rate tables in the Siebel Transaction Database. If the currency exchange rates do not change for a period of 30 days, then Siebel Analytics flags it as an exception.
If there are time period gaps in the exchange rate data, the ETL process defaults to the most recent recorded exchange rate. If the actual exchange rate is significantly more or less favorable than what is recorded in the database, the outdated exchange rate distorts the true value of currency amounts in the Siebel Data Warehouse.
NOTE: Exchange rates are derived from records that are of type “Daily” in the Siebel Transaction Database. If any other types have been defined, they are not handled without some customization.
Invalid Hierarchy ExceptionsAccounts, divisions, products, and opportunities can all have hierarchical relationships. These entities are denormalized within the Siebel Data Warehouse database to a fixed number of levels. Siebel Analytics supports up to ten hierarchies levels in the Siebel Transaction Database. If the depth of hierarchies extends beyond this number, results become inconsistent or incomplete.
Version 7.5, Rev. C Siebel Data Warehouse Installation and Administration Guide 71

Setting System Preferences and Using Exception Reports
Using the Exception Report and Diagnostic Views
Circular Hierarchy ExceptionsCircular Hierarchies arise when the parent-child relationship has a circular references. For example:
Siebel Analytics flags exceptions for two levels. Circular references over two hierarchies are not flagged. For example:
These produce infinite levels of hierarchies. The same records will be captured under the Invalid Hierarchy exceptions as their hierarchy depths will increase beyond 10 levels.
Child Parent
A1 A2
A2 A1
Child Parent
A1 A2
A2 A3
A3 A1
72 Siebel Data Warehouse Installation and Administration Guide Version 7.5, Rev. C

Setting System Preferences and Using Exception Reports
Using the Exception Report and Diagnostic Views
Executing Exception ReportsBefore loading the Siebel Data Warehouse for the first time and for the subsequent refreshes, you should plan to spend time cleansing your Siebel Transaction Database data using the exception reports. The process is iterative, and requires coordination with other team members who have responsibility for data in the Siebel Transaction Database, such as the Siebel database administrator. After the initial cleansing, you should generate the exception reports on a scheduled basis to maintain the integrity of your data.
NOTE: Rerunning the exception reports overwrites all data contained in this view.
To cleanse the Siebel Transaction Database, repeat these actions until the exception report is empty:
■ In Informatica Server Manager, run the Exception_Reports batch.
■ In the Siebel user interface, navigate to Analytics Administration > Exception Reports.
■ For every line in the ETL Exception Reports list, fix the cause of the problem. For information on fixing problems, read “Cleansing Data.”
Cleansing DataUse a combination of the Exception Reports and the Diagnostic views to assess changes that need to be made external to the Siebel Transaction Database, and changes to the Siebel Transaction Database directly.
The ETL Exception Reports list contains one record for each exception flagged in the Siebel Transaction Database. The ETL Exception Explanation form, located below the ETL Exception Reports list, describes the selected exception, its effect on the Siebel Data Warehouse building process, and offers suggestions for repairing the data.
To fix an exception
1 Select an exception record.
2 Read and understand the text in the ETL Exception Explanation form.
Version 7.5, Rev. C Siebel Data Warehouse Installation and Administration Guide 73

Setting System Preferences and Using Exception Reports
Using the Exception Report and Diagnostic Views
3 Click the report link.
The object’s data appears. (For example, if the object is an account, then the Account form appears. If the object is a cost list, then the Cost List list appears.)
4 Repair the problem, using the text in the ETL Exception Explanation form as a guide.
5 Return to the ETL Exception Reports list and place a check mark in the Fixed column to indicate to others that this exception has now been fixed.
Using the List of Values ViewUse the List of Values view, shown in Figure 4, to visually compare how the list of values data extracted from the Siebel Transaction Database coordinates with the values loaded into the Siebel Data Warehouse. The ETL process removes duplicates and overlaps and fills data gaps. Values are extended to span the List of Values (LOV) minimum and maximum values. Duplicates, Range Gaps, and Overlaps are flagged by the exception reports.
Figure 4. List of Values List
74 Siebel Data Warehouse Installation and Administration Guide Version 7.5, Rev. C

Setting System Preferences and Using Exception Reports
Using the Exception Report and Diagnostic Views
The top List of Values list shows values from the Siebel Transaction Database and the bottom List of Values (Data Warehouse) list shows the data that is to be used in ETL process. You can edit the Siebel Transaction Database data directly in this view, but the Siebel Data Warehouse list is read-only.
NOTE: The List of Values is extracted into the Siebel Data Warehouse where the language is the same as the ETL Default Language set in the System Preferences, or whose translate flag is set to “N,” or those that are active.
Using the Exchange Rates ViewUse the Exchange Rates view to diagnose currency translation issues in the Siebel Data Warehouse. The ETL process removes duplicates, fills gaps, and removes overlaps. The ETL process computes exchange rates based on commutative and associative properties, such as product and reverse rates.
The top Exchange Rates list shows currencies, the middle Exchange Rates list shows the Siebel Data Warehouse values for active currencies and their exchange rates, and the bottom Exchange Rates (Data Warehouse) list shows the values loaded into the Siebel Data Warehouse for the selected currency in the upper Exchange Rates list to the ETL Base Exchange Currency. The Exchange Rates (Data Warehouse) list is read-only.
■ The Active Currencies predefined query restricts the list to the active currencies in the Siebel Transaction Database.
■ The exception reports flag any exchange rates to the ETL Base Exchange Currency that have not been refined within a specified period (30 days).
Using the Cost List ViewUse the Cost List view to display the cost lists from the Siebel Transaction Database from the point of view of the product, and a read-only view of the values to be loaded into the Siebel Data Warehouse. The ETL process removes duplicates, overlaps, and fills gaps.
The Cost List list (top) shows products, and the Cost List Line Items list (middle) shows the cost lists associated with the selected product. The Cost Lists (Data Warehouse) list (bottom) shows the data as it is transformed for the Siebel Data Warehouse.
Version 7.5, Rev. C Siebel Data Warehouse Installation and Administration Guide 75

Setting System Preferences and Using Exception Reports
Using the Exception Report and Diagnostic Views
■ The exception reports flag products that do not appear in the Cost List list or have Cost List time gaps and overlaps.
■ The Siebel Data Warehouse contains only one Cost List for a product and a currency at a time.
Using the ETL History ViewAfter all of the exceptions are corrected, the building of the data warehouse can be initiated. This view lists the history of the ETL processes and their statuses. When each ETL batch starts, the name of the process along with the timestamp is set, the status is set to STARTED. When the batch completes, its status is updated to COMPLETED.
Additional ExceptionsThe above mentioned exceptions are not an exhaustive list of all possible exceptions. Other exceptions are:
■ The Analysis start and end date in the System Preferences (Application Administration > System Preferences) must span the entire period of time during which the transactions have occurred. For example, you may want to choose an early and late date range to cover the entire time period you are analyzing. These dates in System Preferences are crucial for the building of Day Dimension, flattening of Exchange Rates, Cost Lists, and KPI (Key Performance Indicator fact) calculations.
■ The System Preferences — ETL Date Format, ETL Analysis Start, ETL Analysis End parameters, and the List of Values — ETL_UNSPEC_DATE must be defined in the same data format. If one is changed, the others must be changed accordingly.
■ List of Values must be defined appropriately. If there is no appropriate entry in List of Values, the strings that depend on List of Values in the Siebel Transaction Database will not be translated.
■ There must be exchange rates defined for the currencies your organization deals with. If the appropriate exchange values are not found, the ETL process uses the ETL Unknown Exchange Rate defined in the System Preferences.
76 Siebel Data Warehouse Installation and Administration Guide Version 7.5, Rev. C

Administering and Troubleshooting the SiebelData Warehouse 4
This chapter discusses administrative tasks and troubleshooting procedures for Siebel Data Warehouse. It provides information on:
■ “Populating the Initial Siebel Data Warehouse” on page 78
■ “Administering the Informatica Repository” on page 83
■ “Modifying the Batch Processes for Industry Applications” on page 92
■ “Optional Customization Procedures” on page 94
■ “Importing Syndicated Data Into the Siebel Data Warehouse” on page 99
■ “Informatica Metadata Reporter (IMR)” on page 106
■ “Siebel Analytics for Life Sciences Data Considerations” on page 107
■ “Troubleshooting Siebel Data Warehouse” on page 112
Version 7.5, Rev. C Siebel Data Warehouse Installation and Administration Guide 77

Administering and Troubleshooting the Siebel Data Warehouse
Populating the Initial Siebel Data Warehouse
Populating the Initial Siebel Data WarehouseThe Siebel Data Warehouse Server populates the Siebel Data Warehouse using prebuilt ETL (Extract, Transform, Load) processes residing in the Siebel _DW Rep. The source database is the Siebel Transaction Database (OLTP). To populate the Siebel Data Warehouse, you can do a full load or a refresh load.
A full load completely populates the Siebel Data Warehouse. You normally do a full load once upon installing Siebel Analytics, and after subsequent customizations of the star schemas (read “Performing the ETL Process” on page 84).
Typically you do a refresh load on a regular basis, such as once a week or once a month, depending upon your business needs (read “To do a refresh load” on page 91).
Siebel Analytics has batch processes predefined in the Server Manager.
78 Siebel Data Warehouse Installation and Administration Guide Version 7.5, Rev. C

Administering and Troubleshooting the Siebel Data Warehouse
Populating the Initial Siebel Data Warehouse
Full Load Optimizer Settings in OracleWhen doing full loads with Oracle Data Warehouse only, the optimizer rule should be set to Rule based in the init.ora parameters (OPTIMIZER_MODE RULE).
Table 5 lists and provides a description of the full load batch processes.
Table 5. Predefined Full Load Batch Processes
Batch Name Description
Exception_Reports This produces an exception report, which checks for data integrity of the Siebel Data Warehouse. This should be run before running Full_Load_Siebel_DW or Refresh_Siebel_DW. The results of the exception report can be used to make necessary corrections to the Siebel Transaction Database.
When this batch process completes, you can view the results in the Siebel Analytics’ Analytics Administration view. For more information, read “Using the Exception Report and Diagnostic Views” on page 69.
Full_Extract_Siebel_DW_Horizontal
Truncates the Image tables (S_ETL_I_IMAGE and S_ETL_R_IMAGE) and the S_ETL_RUN table on the Siebel Transaction Database, and the General and System tables (W_PARAM_G, W_COSTLST_G, W_LST_OF_VAL_G, W_EXCH_RATE_G, W_DIM_TABLES_G, W_DUAL_G, W_ETL_RUN_S, and so on) in the Siebel Data Warehouse. It extracts all the horizontal data from the Siebel Transaction Database. It also truncates and loads Day Dimension (W_DAY_D) and List of Values Dimension (W_LOV_D).
Full_Extract_Siebel_DW_Vertical
Truncates the Image tables (S_ETL_I_IMAGE and S_ETL_R_IMAGE) and the S_ETL_RUN table on the Siebel Transaction Database, and the General and System tables (W_PARAM_G, W_COSTLST_G, W_LST_OF_VAL_G, W_EXCH_RATE_G, W_DIM_TABLES_G, W_DUAL_G, W_ETL_RUN_S, and so on) in the Siebel Data Warehouse. It extracts all the vertical data from the Siebel Transaction Database. It also truncates and loads Day Dimension (W_DAY_D) and List of Values Dimension (W_LOV_D).
Full_Load_Siebel_DW_Dimensions
Truncates the dimensions and slowly changing dimensions and loads all the data extracted by Full_Extract_Siebel_DW for the Dimensions.
Version 7.5, Rev. C Siebel Data Warehouse Installation and Administration Guide 79

Administering and Troubleshooting the Siebel Data Warehouse
Populating the Initial Siebel Data Warehouse
Full_Load_Siebel_DW_Facts
Truncates the facts, hierarchy tables and helper tables in the Siebel Data Warehouse. It loads all the data extracted by Full_Extract_Siebel_DW for the Facts. It also updates those fields in the Dimension tables that need to be calculated from the Facts and also loads PriceList Slowly Changing Dimension besides loading Hierarchy and Helper tables.
Full_Load_Siebel_DW_SCD
Loads into the Slowly Changing Dimension Table when the following attributes in the Dimension change:
Person — Marital status Household — Net worth (Wealth amount)Product — Product Name
Load_Aggregates Truncates the Sub-Dimensions and the Aggregate tables and loads the aggregate Data.
Load_Pipeline Loads into Pipeline Fact the snapshot of the Opportunity Header rows in Revenue Fact. All open opportunities and opportunities closed in the current quarter form the snapshot. This should be typically run once a week.
Visibility_Initial_Load Truncates the visibility tables and load the Visibility information into the Visibility Tables.
Table 5. Predefined Full Load Batch Processes
Batch Name Description
80 Siebel Data Warehouse Installation and Administration Guide Version 7.5, Rev. C

Administering and Troubleshooting the Siebel Data Warehouse
Populating the Initial Siebel Data Warehouse
Refresh Optimizer Settings in OracleTable 6 lists and provides a description of the refresh batch processes.
Table 6. Predefined Refresh Batch Processes
Batch Name Description
Exception_Reports This produces an exception report, which checks for data integrity of the Siebel Data Warehouse. This should be run before running Full_Load_Siebel_DW or Refresh_Siebel_DW. The results of the exception report can be used to make necessary corrections to the Siebel Transaction Database.
When this batch process completes, you can view the results in the Siebel Analytics’ Analytics Administration view. For more information, read “Using the Exception Report and Diagnostic Views” on page 69.
Refresh_Extract_Siebel_DW_Horizontal
Contains all horizontal processes.
Refresh_Extract_Siebel_DW_Vertical
Contains all vertical enhanced processes.
Refresh_Load_Siebel_DW_Dimensions
Incrementally extracts from the Siebel Transactional Database changes to the source data since the most recent batch executed. However, the General tables (W_PARAM_G, W_COSTLST_G, W_LST_OF_VAL_G, W_EXCH_RATE_G) and Day Dimension (W_DAY_D, W_TIME_DAY_D, W_MONTH_D, W_QTR_D) are not reloaded or updated.
Refresh_Load_Siebel_DW_Facts
All the Facts are incrementally loaded and updated. The Hierarchy and Position Helper tables are truncated and reloaded. It also updates those fields in the Dimension tables that need to be calculated from the Facts and also refreshes Price List Slowly Changing Dimension.
Refresh_Load_Siebel_SCD Loads into the Slowly Changing Dimension Table when the following attributes change in the Dimension:
■ Person — Marital status
■ Household — Net worth (Wealth amount)
■ Product — Product Name
Version 7.5, Rev. C Siebel Data Warehouse Installation and Administration Guide 81

Administering and Troubleshooting the Siebel Data Warehouse
Populating the Initial Siebel Data Warehouse
For a complete understanding of the population process, including error recovery, read the documentation from Informatica, specifically, the Designer guide, session and server guide, and troubleshooting guide.
Load_Aggregates Truncates the Sub-Dimensions and the Aggregate tables and loads the aggregate Data.
Load_Pipeline Loads into Pipeline Fact the snapshot of the Opportunity Header rows in Revenue Fact. All open opportunities and opportunities closed in the current quarter form the snapshot. This should be typically run once a week.
Visibility_Refresh Refreshes the visibility information. Please choose to run this when deemed necessary.
Table 6. Predefined Refresh Batch Processes
Batch Name Description
82 Siebel Data Warehouse Installation and Administration Guide Version 7.5, Rev. C

Administering and Troubleshooting the Siebel Data Warehouse
Administering the Informatica Repository
Administering the Informatica RepositoryThe Siebel Data Warehouse provides an administrative user account (Administrator) for the installation, setup, and maintenance of the Informatica repository. The Administrator account is authorized to perform customizations on the Siebel Data Warehouse and can add, change, and delete all objects within the repository.
Additionally, there is an operational user account (Operator) that has the authorization to execute the various ETL batches and read-only access to all objects in the Siebel_DW_Rep repository.
Performing a Full Load of the Siebel Data WarehouseThe steps for populating the Siebel Data Warehouse are described here.
■ “Performing the ETL Process” on page 84
■ “Troubleshooting the ETL Process” on page 87
Version 7.5, Rev. C Siebel Data Warehouse Installation and Administration Guide 83

Administering and Troubleshooting the Siebel Data Warehouse
Administering the Informatica Repository
Performing the ETL ProcessThe ETL process extracts the OLTP data, transforms it, and loads it into the OLAP.
To start the ETL process
1 Make sure that there is no data in the Siebel Transaction Database table S_ETL_INC_STAT.
NOTE: Once you have started the full or incremental ETL process, do not truncate the data. In case of failure, use the Restart Sessions within the batches from the point where the failure occurred. If you cannot restart for any reason and should start from the beginning, truncate the data. See “Troubleshooting the ETL Process” on page 87.
2 If the language of the Siebel Transaction Database is not ENU, change the language value using the Siebel application’s Application Administration screen.
a In the Siebel application, navigate to Application Administration > System Preferences.
b Perform a query for ETL Default Language.
c Change the value to the language code of the OLTP system.
To do a full load
1 Make sure Informatica service is running.
2 Make sure that no clients are accessing reports.
3 Run the Informatica Server Manager and connect to the repository using the Administrator account.
4 Open the Siebel_DW_Rep folder.
5 (Optional, but recommended.) Right-click the batch named Exception_Reports and start it. When it completes, view the results in the Siebel Analytics’ Analytics Administration view. For more information, read “Using the Exception Report and Diagnostic Views” on page 69.
84 Siebel Data Warehouse Installation and Administration Guide Version 7.5, Rev. C

Administering and Troubleshooting the Siebel Data Warehouse
Administering the Informatica Repository
6 Right-click the batch named Full_Extract_Siebel_DW and select Start.
Wait until you see a message display on the output window, then wait one or two more minutes before continuing to next step. The displayed message “Request to start batch is unsuccessful in the message window” is normal behavior.
7 Repeat Step 8 through Step 10 for each of the following batches.
■ Full_Extract_Siebel_DW_Dimension
■ Full_Load_Siebel_DW_Dimensions
■ Full_Load_Siebel_DW_Facts
■ Full_Load_Siebel_DW_SCD (Optional if you want to track the Dimensions described in Step 9 by the attributes)
■ Load_Aggregates
■ Load_Pipeline
■ Visibility_Intial_load (Optional, if you want data level security)
8 Right-click the batch and start it.
9 Monitor the load process. For information on monitoring, read Informatica’s Administrator Guide.
10 If the load process fails, stop it by right-clicking the batch name and choosing Stop. Check the log and fix the problem.
11 Find the last entry of “RestartNextBatch #” before the failed session, and restart the batch process from that point. Continue monitoring the load process.
Version 7.5, Rev. C Siebel Data Warehouse Installation and Administration Guide 85

Administering and Troubleshooting the Siebel Data Warehouse
Administering the Informatica Repository
To monitor the ETL process
1 Click the Poll sessions icon to monitor the process.
Watch the monitor window and wait until it completes the last session, which is Extract_Completed, before continuing to the next step.
2 In the monitor window, click on the Completed Time column.
Click the Poll sessions icon again so that the triangle is pointing down. This method allows you to see the latest completed sessions at the top of the list.
Poll Sessions auto-refresh the monitoring tool and the monitor window approximately every 30 seconds.
3 When Full_Extract_Siebel_DW batch is finished, click Stop Polling icon to stop the monitoring the sessions.
4 Right-click the batch named Full_Load_Siebel_DW_Dimensions and select start. While you wait for it to communicate to the server and fetch data, go to the next step to see when it will finish fetching data.
NOTE: The batch is started even though the status message is “Request to start batch is unsuccessful.”
To check the status of the request to start the batch
1 Verify that the loading process has started by opening Repository Manager and connect to the repository as Administrator.
2 In Repository Manager, select Edit > Show Locks.
86 Siebel Data Warehouse Installation and Administration Guide Version 7.5, Rev. C

Administering and Troubleshooting the Siebel Data Warehouse
Administering the Informatica Repository
3 In Object Locks window, click the Refresh button about every half minute to see the change in Object Name field.
The Lock Type field should be Fetch. Repeat clicking Refresh until you see Execute in the Type field.
When the Lock Type field shows Fetch, the sessions are loaded into memory. When the type changes to Execute, it means the process of loading sessions definition into memory is finished.
Continue to the next step and do Polling Sessions in Server Manager.
4 Go back to Server Manager. Click the Polling sessions icon or click Server Request menu and select Start Polling.
Polling status will appear in the monitor window panel.
5 Continue through the Batches in Table 6 on page 81 until the Siebel Data Warehouse is created.
Troubleshooting the ETL Process
To troubleshoot ETL
1 If the load process fails, stop it by right-clicking the batch name that is executing (for example, Refresh DataMart) and choosing Stop.
2 Check the log in \PowerMart Server\SessLogs. You should see the error in the log file.
3 If you receive the Server Manager error message, “The system cannot find the file specified,” the session log files have not been set up properly.
You may need to change the text editor.
4 If the log does not show enough information to solve the problem, check the Event Viewer by going to Start > Control Panel > Administrative Tools > Event Viewer.
5 Click on Application Log and look at the most current messages.
Version 7.5, Rev. C Siebel Data Warehouse Installation and Administration Guide 87
Administering and Troubleshooting the Siebel Data Warehouse
Administering the Informatica Repository
6 Restart the batch process after fixing problems.
7 After fixing the problem, find the last entry of RestartNextBatch # before the failed session, and restart the batch process from that point. Continue monitoring the load process.
The process should start from the point it was stopped.
Deadlock or Timeout While Running ETL (DB2)In DB2, a heavy read/write load on the OLTP database (Siebel transactional database) can cause deadlock or timeout problems in the ETL process. You can work around this problem by changing the registry settings on the Informatica server machine (Data Warehouse Server) so that Informatica can perform a “dirty read.”
To change Data Warehouse Server registry settings in Windows
1 Run regedt32.
2 Go to the following path:
HKEY_LOCAL_MACHINE\SYSTEM\CurrentControlSet\Services\ PowerMart\Parameters\MiscInfo
3 Click on Edit and select New String Value. Add Value as DB2Isolation.
4 Double-click on Set its value to 1.
To change Data Warehouse Server registry settings in UNIX
1 Open pmserver.cfg.
2 Add DB2Isolation=1.
3 Save and close pmserver.cfg.
NOTE: It is important that this change be evaluated carefully. Even if you roll back an OLTP batch load process, the data may be loaded by the ETL process into the Siebel Data Warehouse. It is better to minimize OLTP load processes when ETL is in progress.
88 Siebel Data Warehouse Installation and Administration Guide Version 7.5, Rev. C

Administering and Troubleshooting the Siebel Data Warehouse
Administering the Informatica Repository
Verifying Successful Loading of the Siebel Data Warehouse
To verify that Siebel Data Warehouse has loaded
1 Look through the Monitor in the Server Manager whether the following Session SIL_CopyUpdatedRunTableToOLTP1 has been successfully completed.
The monitor should show that it is completed.
2 In the Siebel application, navigate to Data Warehouse Administration > ETL Run.
■ If the ETL process completed successfully, the final record in the applet shows the status Completed.
■ If the ETL process did not complete successfully, the final record in the applet shows the status Running.
3 The status should be “Completed.” Use this SQL command to get more info: select * from W_ETL_RUN_S.
4 Query the OLTP table S_ETL_RUN and check the status. Select status_cd from S_ETL_RUN. If the status is Completed, then the Data Warehouse has been successfully completed.
The status should be Completed. Use this SQL command to get more info: select * from S_ETL_RUN.
Version 7.5, Rev. C Siebel Data Warehouse Installation and Administration Guide 89

Administering and Troubleshooting the Siebel Data Warehouse
Administering the Informatica Repository
Disabling Dimension, Fact, and SCD BatchesWhen the extract process finishes successfully, disable the following batches:
To disable the batches after performing an extraction
1 Right-click the batch and choose Edit.
2 Clear the Enabled box to make sure that you do not run the batch by accident.
NOTE: If you want to run the full extract again, you must check the Enabled box for this batch.
Performing a Refresh Load of the Siebel Data WarehouseOnce the full extract and load has completed, you can do a refresh load. This saves time because only the General tables and the Hierarchy tables are truncated and reloaded. The Refresh load extracts only data modified or created after the previous extract from the Siebel Transaction Database.
NOTE: Make sure all your mobile users have synchronized their data before running a load. If they have not synchronized, the load will not contain their data. Any data synchronized late will be captured in later loads.
Incremental Load Optimizer Settings in OracleWhen doing incremental loads with Oracle Data Warehouse only, the optimizer rule should be switched to Cost based in the init.ora parameters after analyzing all the data warehouse W_* tables (that is, OPTIMIZER_MODE ALL_ROWS.).
■ Full_Extract_Siebel_DW_Dimension
■ Full_Load_Siebel_DW_Dimensions
■ Full_Load_Siebel_DW_Facts
■ Full_Load_Siebel_DW_SCD
90 Siebel Data Warehouse Installation and Administration Guide Version 7.5, Rev. C

Administering and Troubleshooting the Siebel Data Warehouse
Administering the Informatica Repository
To do a refresh load
1 Make sure the Informatica service is up and running.
2 Make sure that no clients are accessing reports.
3 Run the Informatica Server Manager and connect to the repository using the Administrator account.
4 Open the Siebel_DW_Rep folder.
5 (Optional, but recommended.) Right-click the batch named Exception_Reports and start it. When it completes, view the results in the Siebel Analytics’ Analytics Administration view. For more information, read “Using the Exception Report and Diagnostic Views” on page 69.
6 Repeat Steps 7–10 for each of the following batches.
■ Refresh_Extract_Siebel_DW_Dimensions
■ Refresh_Load_Siebel_DW_Dimensions
■ Refresh_Load_Siebel_DW_Facts
■ Refresh_Load_Siebel_SCD (Optional, if you want to track the Dimensions described in Table 6 on page 81 by the attributes)
■ Load_Aggregates
■ Load_Pipeline (Optional, but running this once a week is recommended)
■ Visibility_Refresh (Optional, if you want data level security to be refreshed)
7 Right-click the batch and start it.
8 Monitor the load process. For information on monitoring, read Informatica’s Administrator Guide.
9 If the load process fails, stop it by right-clicking the batch name and choosing Stop. Check the log and fix the problem.
10 Find the last entry of “RestartNextBatch #” before the failed session, and restart the batch process from that point. Continue monitoring the load process.
Using the Informatica Server Manager, you can schedule the refresh loads to occur at specific intervals, such as daily, weekly, monthly, or any desired time period.
Version 7.5, Rev. C Siebel Data Warehouse Installation and Administration Guide 91

Administering and Troubleshooting the Siebel Data Warehouse
Modifying the Batch Processes for Industry Applications
Modifying the Batch Processes for Industry ApplicationsIf you are using one of the following industry applications, you should modify the batch processes to optimize the mappings for your industry.
■ Automotive
■ Communications
■ Consumer Sector
■ Energy
■ Life Sciences
■ Media
If you do not modify the batch processes, then every session in the batch is processed. For example, if you use the Life Sciences application, you do not need the Automotive sessions contained within the batch processes. You can safely remove all Automotive sessions. Leaving the sessions in the batch process does not prevent the batch from completing successfully, but it does take extra time to process. For optimum performance, it is recommended that you remove all sessions that do not apply to your industry.
The session names have a naming convention. Some session names are preceded by a prefix and an underscore (_). Sessions that have no prefixes and sessions that begin with the SIA prefix are common to all industry applications and should be kept (example: SIA_SIL_AssetDimension). Sessions that are specific to an industry have a two-letter prefix that indicates the type of industry (example: LS_SIL_ProdRankDimension, where LS indicates Life Sciences). Table 7 has a listing of industries and sessions.
Table 7. Industry and Applicable Session Prefixes
Industry
Prefixes
None SIA AT CS LS
Automotive X X X
Communication X X
92 Siebel Data Warehouse Installation and Administration Guide Version 7.5, Rev. C
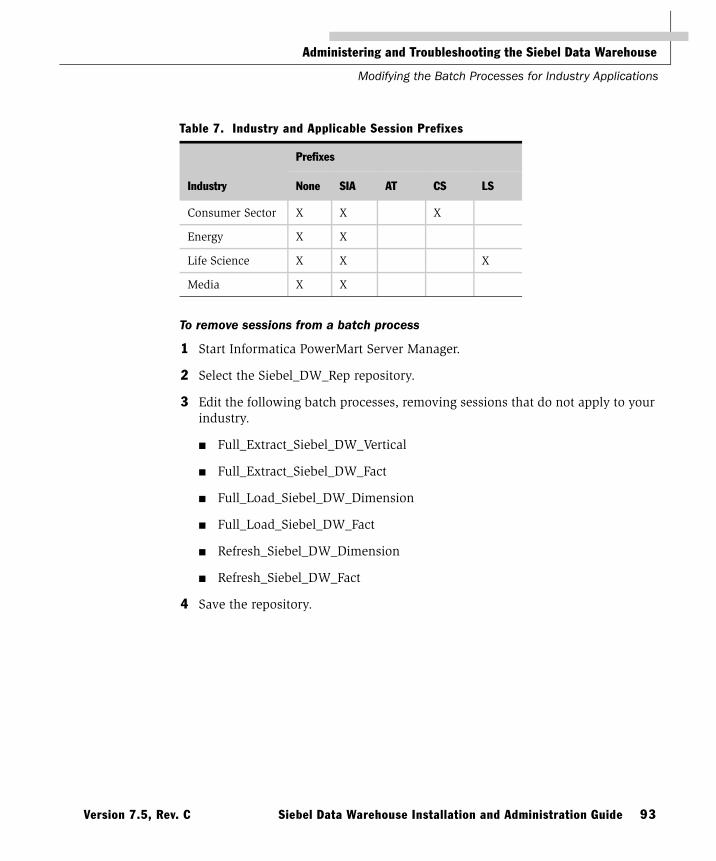
Administering and Troubleshooting the Siebel Data Warehouse
Modifying the Batch Processes for Industry Applications
To remove sessions from a batch process
1 Start Informatica PowerMart Server Manager.
2 Select the Siebel_DW_Rep repository.
3 Edit the following batch processes, removing sessions that do not apply to your industry.
■ Full_Extract_Siebel_DW_Vertical
■ Full_Extract_Siebel_DW_Fact
■ Full_Load_Siebel_DW_Dimension
■ Full_Load_Siebel_DW_Fact
■ Refresh_Siebel_DW_Dimension
■ Refresh_Siebel_DW_Fact
4 Save the repository.
Consumer Sector X X X
Energy X X
Life Science X X X
Media X X
Table 7. Industry and Applicable Session Prefixes
Industry
Prefixes
None SIA AT CS LS
Version 7.5, Rev. C Siebel Data Warehouse Installation and Administration Guide 93

Administering and Troubleshooting the Siebel Data Warehouse
Optional Customization Procedures
Optional Customization ProceduresThis section contains optional procedures that you can use to customize your implementation of Siebel Analytics.
■ “Improving Performance of Full_Load_Siebel_DW”
■ “Linking Batches” on page 96
Improving Performance of Full_Load_Siebel_DWTo improve the performance for the Full_Load, drop and recreate the query indexes. The query indexes that are used for analysis purposes can be dropped and recreated before and after the full load batch.
To drop the indexes before running the full load, use ODBCSQL utility and the file drop_query_indexes.sql found in the dwrep folder to drop the indexes. Usage:
c:\sea700\dwdb\bin\odbcsql /s [ODBCName] /u [TableOwnerName] /p [TableOwnerPassword] /l [LogFileName] /a /c "--" c:\sea700\dwdb\dwrep\drop_query_indexes.sql
where ODBCName is the ODBC Entry created for the Siebel Data Warehouse. Use the Siebel-provided ODBC drivers or native ODBC database drivers.
Table 8 lists the flags used in the odbcsql command.
Table 8. odbcsql Flag Explanations
Flag Description
/a Turn on ODBC auto-commit for session
/c Specify string which begins a comment (at BOL)
/l Specify file to write error and status to
/p Specify user password to login to database
/s Specify ODBC source to use for database
/u Specify user name to login to database
94 Siebel Data Warehouse Installation and Administration Guide Version 7.5, Rev. C
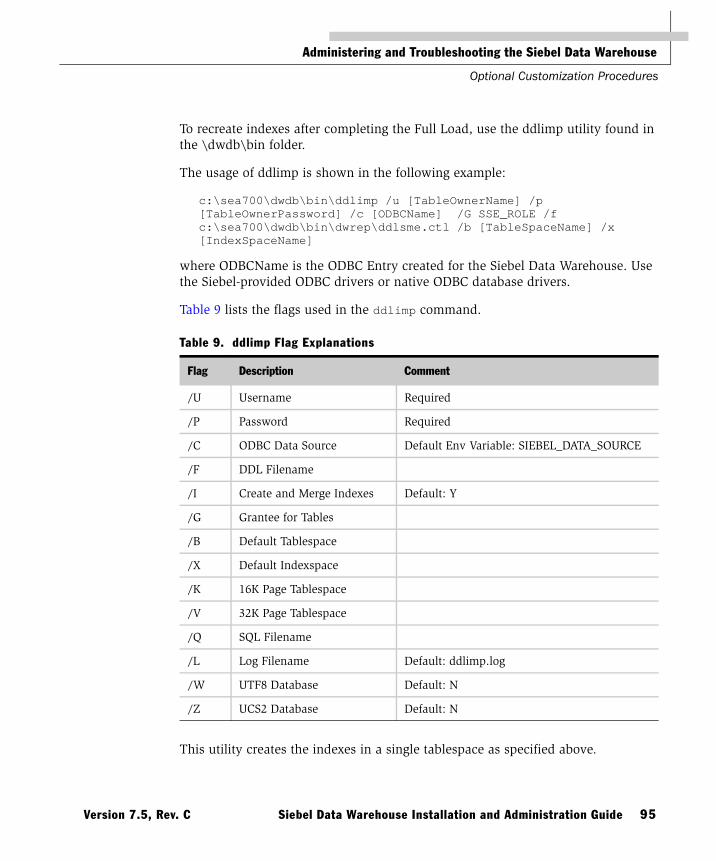
Administering and Troubleshooting the Siebel Data Warehouse
Optional Customization Procedures
To recreate indexes after completing the Full Load, use the ddlimp utility found in the \dwdb\bin folder.
The usage of ddlimp is shown in the following example:
c:\sea700\dwdb\bin\ddlimp /u [TableOwnerName] /p [TableOwnerPassword] /c [ODBCName] /G SSE_ROLE /f c:\sea700\dwdb\bin\dwrep\ddlsme.ctl /b [TableSpaceName] /x [IndexSpaceName]
where ODBCName is the ODBC Entry created for the Siebel Data Warehouse. Use the Siebel-provided ODBC drivers or native ODBC database drivers.
Table 9 lists the flags used in the ddlimp command.
This utility creates the indexes in a single tablespace as specified above.
Table 9. ddlimp Flag Explanations
Flag Description Comment
/U Username Required
/P Password Required
/C ODBC Data Source Default Env Variable: SIEBEL_DATA_SOURCE
/F DDL Filename
/I Create and Merge Indexes Default: Y
/G Grantee for Tables
/B Default Tablespace
/X Default Indexspace
/K 16K Page Tablespace
/V 32K Page Tablespace
/Q SQL Filename
/L Log Filename Default: ddlimp.log
/W UTF8 Database Default: N
/Z UCS2 Database Default: N
Version 7.5, Rev. C Siebel Data Warehouse Installation and Administration Guide 95

Administering and Troubleshooting the Siebel Data Warehouse
Optional Customization Procedures
Linking BatchesYou may require running consecutive batches from the Siebel_DW_REP folder and the Custom_Folder. For example, you may customize your Data Warehouse and wish to link a batch in the custom folder (in the Siebel_DW_Rep repository) to one of the standard batches such as Refresh_Extract_Siebel_DW_Dimensions. The Informatica Session Manager does not allow you to schedule sessions from two different folders. Therefore, to start the customization batch defined in your custom folder upon completion of a standard batch such as: Full_Load_Siebel_DW or Refresh_Extract_Siebel_DW_Dimensions, you must use Informatica’s pmcmd utility. You may also link the Full_Extract_Siebel_DW and the Full_Load_Siebel_DW batches to load your initial Siebel Data Warehouse.
Linking ExampleIf the following command is entered on the Post Session Commands and Email On Success of the last session, it executes a batch named Custom_Batch in the Custom folder.
"$PMRootDir\bin\PMCMD" start %INFA_USER %INFA_PASSWORD 4001 Custom:Custom_BATCH 0 0
■ The environment variables %INFA_USER and %INFA_PASSWORD hold the Informatica user name and password.
■ 4001 is the port number. If your Informatica Server listens on a different port then use the appropriate port.
■ Custom:Custom_BATCH is the name of the Custom_BATCH in the Custom folder.
■ The first 0 means it is a batch and the second is for the nowait option.
For detailed information on how to use “pmcmd,” refer to the Informatica documentation.
96 Siebel Data Warehouse Installation and Administration Guide Version 7.5, Rev. C

Administering and Troubleshooting the Siebel Data Warehouse
Optional Customization Procedures
Environment VariablesYou must set up environment variables to start a session or batch. Environment variables are strings that contain information such as account name, drive, path, or file name. Environment variables control the behavior of various programs. In the case of linking batches, use an environment variable to control the behavior of Informatica.
Account passwords must be encrypted when used in environment variables. Informatica provides the pmpasswd utility to encrypt them. For example, if the account password is Administrator, you would issue this command:
pmpasswd Administrator
The pmpasswd utility responds with:
Informatica PowerMart Password Encryption UtilityEncrypted string -->]T288<ibjbpoq9okq<--
The text between the “-->” and the “<--” symbols is the encrypted password. If the encrypted text includes a special character, such as the “<” in this example, then use quotation marks around the text when creating the environment variable. For example, in AIX or Solaris you would use this command:
export PMPASS="]T288<ibjbpoq9okq"
where PMPASS is the name of the environment variable you are creating. On Windows, use the Control Panel to define the environment variable (Start > Settings > Control Panel > System > Environment).
Create one environment variable for the account name and password in a command. For example, if the account name for your repository is Administrator, and the account password is also Administrator, you would create an environment variable for each, like this (for AIX and Solaris):
export PMUSER=Administratorexport PMPASS="]T288<ibjbpoq9okq"
Version 7.5, Rev. C Siebel Data Warehouse Installation and Administration Guide 97

Administering and Troubleshooting the Siebel Data Warehouse
Optional Customization Procedures
When using pmcmd, you specify a command, the environment variable for the account name, the environment variable for the password, and any other parameters the command requires. All environment variables must be proceeded by “%” to signify to pmcmd that the value that follows is an environment variable. For example, the ping command requires the account name, password, and a machine identifier, like this:
pmcmd ping %PMUSER %PMPASS columbo:8159
The pmcmd utility responds with:
pmcmd is starting.Connecting to pmserver at ...[Transport: TCP/IP, Address: 10.1.21.23, Port: 8159]pmcmd exiting with successful value for ping
When starting the next batch with pmcmd, do not use wait mode or the final session will hang.
98 Siebel Data Warehouse Installation and Administration Guide Version 7.5, Rev. C

Administering and Troubleshooting the Siebel Data Warehouse
Importing Syndicated Data Into the Siebel Data Warehouse
Importing Syndicated Data Into the Siebel Data Warehouse
This section covers how to import syndicated data into the Siebel Life Sciences database.
Pharmaceutical companies purchase weekly and monthly sales and prescription data, known as syndicated data, from third-party vendors such IMS, NDC, and Cegedim. Syndicated data is read-only data about certain measures that is used for sales force analysis reporting and customer targeting. Once delivered, this syndicated data must be loaded into the Siebel ePharma Analytics database in a timely fashion and made available to users in order for them to make use of sales force analysis reporting.
The options for loading syndicated data into the Siebel Data Warehouse include the following:
■ Loading from the Siebel operational application transactional database (OLTP) S_SYND_DATA table
Syndicated data can be loaded from the S_SYND_DATA table into the Siebel Data Warehouse. Existing syndicated data from the Siebel application OLTP database, stored in the S_SYND_DATA table, is extracted, transformed, and loaded by prebuilt routines and populated into the W_SYND_DATA_F and W_SYND_MKT_F Fact tables in the Siebel Data Warehouse. These tables provide information to the Rx Sales subject areas and prebuilt Rx Sales dashboards. (For more information, see the section on Importing, Extracting, and Routing Syndicated Data in Siebel Life Sciences Guide.)
Siebel ePharma Analytics supports multiple data types and period types. Therefore, in order to correctly use the ETL process, S_SYND_DATA must be loaded in a special way to make sure support for all data types and correct population of the Siebel Data Warehouse (see “Analytics Data Loading Matrix for Syndicated Data” on page 101).
Version 7.5, Rev. C Siebel Data Warehouse Installation and Administration Guide 99

Administering and Troubleshooting the Siebel Data Warehouse
Importing Syndicated Data Into the Siebel Data Warehouse
■ Loading from a flat file source using syndicated data staging tables
Syndicated data source files can be loaded directly into Siebel Data Warehouse staging tables. In the staging tables, Siebel foreign keys are matched with external sources keys for joining the external source keys with Siebel Analytics keys.
The Data Loading Matrix (“Analytics Data Loading Matrix for Syndicated Data” on page 101) illustrates the correct loading of S_SYND_DATA data into the Siebel Data Warehouse. The following data types are supported:
Monthly Rx data by Contact
Monthly indirect sales data by Brick
Monthly indirect sales by Account
Monthly indirect sales by ZIP Code
Monthly direct sales by Account
Monthly direct sales by Brick
Monthly direct sales by ZIP Code
Weekly Rx data by Contact
Monthly plan level Rx Data
Monthly sales market—incentives by ZIP Code
Monthly sales market—modified by ZIP Code
Monthly plan level physician Rx Data
Monthly Rx data by ZIP Code
Monthly Rx data by Brick
To make sure the data is correctly loaded in the Siebel Data Warehouse, the Siebel source table, S_SYND_DATA needs to be populated correctly, based on Table 10 on page 101 and Table 11 on page 105.
100 Siebel Data Warehouse Installation and Administration Guide Version 7.5, Rev. C

Administering and Troubleshooting the Siebel Data Warehouse
Importing Syndicated Data Into the Siebel Data Warehouse
Analytics Data Loading Matrix for Syndicated DataThe Data Loading Matrix, shown in Table 10, and the Attribute by Data Source Matrix, shown in Table 11 on page 105, are provided to facilitate loading sales and Rx data. The following list explains the table headings:
■ Screen. Name of the Siebel Analytics screen.
■ View. Name of the Siebel Analytics view.
■ Data Source. Value that determines which view displays the data stored in the record. The valid values are RXPrf, SlsIndBrk, SlsIndAct, SlsIndZip, SlsDirAct, SlsDirBrk, SlsDirZip, RXEVM, RXPT, RXSMI, RXSMM, RXXPT, RXZip, and RXBrk.
■ Mandatory Id. Value that indicates the ID field that must be non-NULL for a database record to be displayed in the corresponding view. There are four key ID fields: Account Id, Contact Id, Territory Id, and Zip Id. For each view listed in the table, one of these ID fields is required and the other three must be NULL.
■ Plan Type. Value that indicates the type of plan ID a database record must have to be displayed in the view.
Table 10. Data Loading Matrix
Screen View Dashboard Page Source OLAP table
OLTP Data Source from S_SYND_DATA to populate Source Star
S_SYND_DATA Mandatory ID
Plan Type
Rx Sales Analytics
Sales Analytics
Pharma Sales
Market Share
W_SYND_DATA_FW_SYND_MKT_F
RxPrf Contact ID TOTAL
Rx Sales Analytics
Sales Analytics
Pharma Sales
Product Growth
W_SYND_DATA_FW_SYND_MKT_F
RxPrf Contact ID TOTAL
Rx Sales Analytics
Sales Analytics
Pharma Sales
Sales Force Index
W_SYND_DATA_FW_SYND_MKT_F
RxPrf Contact ID TOTAL
Rx Sales Analytics
Sales Analytics
Pharma Sales
Market Share (Brick)
W_SYND_DATA_FW_SYND_MKT_F
SlsIndBrk Area ID TOTAL
Rx Sales Analytics
Sales Analytics
Pharma Sales
Product Growth (Brick)
W_SYND_DATA_FW_SYND_MKT_F
SlsIndBrk Area ID TOTAL
Version 7.5, Rev. C Siebel Data Warehouse Installation and Administration Guide 101

Administering and Troubleshooting the Siebel Data Warehouse
Importing Syndicated Data Into the Siebel Data Warehouse
Rx Sales Analytics
Sales Analytics
Pharma Sales
Sales Force Index (Brick)
W_SYND_DATA_FW_SYND_MKT_F
SlsIndBrk Area ID TOTAL
Rx Sales Analytics
Sales Objectives Analytics
Pharma Objectives
Contact Frequency & Reach
W_OBJECTIVE_F RxPrf (NRx, TRx Objectives)SlsIndZip (Indirect Sales Objectives)
Contact IDZip ID
TOTAL
Rx Sales Analytics
Sales Objectives Analytics
Pharma Objectives
Account Frequency & Reach
W_OBJECTIVE_F RxPrf (NRx, TRx Objectives)SlsIndZip (Indirect Sales Objectives)
Contact IDZip ID
TOTAL
Rx Sales Analytics
Sales Objectives Analytics
Pharma Objectives
Contact Frequency & Reach (Brick)
W_OBJECTIVE_F SlsIndBrk Area ID TOTAL
Rx Sales Analytics
Sales Objectives Analytics
Pharma Objectives
Account Frequency & Reach (Brick)
W_OBJECTIVE_F SlsIndBrk Area ID TOTAL
Call Activity Analytics
Contact Call Analytics
Pharma Contact Call Effectiveness
Contact Effort vs. Potential
W_ACT_PROD_FW_SYND_DATA_FW_SYND_MKT_F
RxPrf Contact ID TOTAL
Call Activity Analytics
Contact Call Analytics
Pharma Contact Call Effectiveness
Contact Priority & Indication
W_ACT_PROD_F Not Applicable Not Applicable
Not Applicable
Call Activity Analytics
Contact Call Analytics
Pharma Contact Call Effectiveness
Contact Effort vs. Potential (Brick)
W_ACT_PROD_FW_SYND_DATA_FW_SYND_MKT_F
SlsIndBrk Area ID TOTAL
Table 10. Data Loading Matrix
Screen View Dashboard Page Source OLAP table
OLTP Data Source from S_SYND_DATA to populate Source Star
S_SYND_DATA Mandatory ID
Plan Type
102 Siebel Data Warehouse Installation and Administration Guide Version 7.5, Rev. C

Administering and Troubleshooting the Siebel Data Warehouse
Importing Syndicated Data Into the Siebel Data Warehouse
Call Activity Analytics
Contact Call Analytics
Pharma Contact Call Effectiveness
Contact Priority & Indication (Brick)
W_ACT_PROD_F Not Applicable Not Applicable
Not Applicable
Call Activity Analytics
Account Call Analytics
Pharma Account Call Effectiveness
Account Effort vs. Potential
W_ACT_PROD_FW_SYND_DATA_FW_SYND_MKT_F
SlsIndZip Zip ID or Account ID
TOTAL
Call Activity Analytics
Account Call Analytics
Pharma Account Call Effectiveness
Account Priority & Indication
W_ACT_PROD_F Not Applicable Not Applicable
Not Applicable
Call Activity Analytics
Account Call Analytics
Pharma Account Call Effectiveness
Account Effort vs. Potential (Brick)
W_ACT_PROD_FW_SYND_DATA_FW_SYND_MKT_F
SlsIndBrk Area ID TOTAL
Call Activity Analytics
Account Call Analytics
Pharma Account Call Effectiveness
Account Priority & Indication (Brick)
W_ACT_PROD_F Not Applicable Not Applicable
Not Applicable
Pharma ROI Analytics
Call Activity Profit & Loss Analytics
Pharma Call Activity Profit & Loss
Call Activity Profit & Loss
W_ACT_PROD_FW_SYND_DATA_FW_SYND_MKT_F
RxPrf Contact ID TOTAL
Pharma ROI Analytics
Call Activity Profit & Loss Analytics
Pharma Call Activity Profit & Loss (Brick)
Call Activity Profit & Loss (Brick)
W_ACT_PROD_FW_SYND_DATA_FW_SYND_MKT_F
SlsIndBrk Area ID TOTAL
Medical Education Analytics
MedEd Analytics
Pharma Medical Education
Event Analysis
W_MED_ED_F Not Applicable Not Applicable
Not Applicable
Table 10. Data Loading Matrix
Screen View Dashboard Page Source OLAP table
OLTP Data Source from S_SYND_DATA to populate Source Star
S_SYND_DATA Mandatory ID
Plan Type
Version 7.5, Rev. C Siebel Data Warehouse Installation and Administration Guide 103

Administering and Troubleshooting the Siebel Data Warehouse
Importing Syndicated Data Into the Siebel Data Warehouse
Medical Education Analytics
MedEd Analytics
Pharma Medical Education
Speaker Analysis
W_MED_ED_F Not Applicable Not Applicable
Not Applicable
Medical Education Analytics
MedEd Analytics
Pharma Medical Education
Budget Analysis
W_MED_ED_F Not Applicable Not Applicable
Not Applicable
Medical Education Analytics
MedEd Analytics
Pharma Medical Education
Event ROI W_MED_ED_FW_SYND_DATA_F
RxPrf Contact ID TOTAL
Sales Rep Analytics
Sales Rep Analytics
Sales Rep Analytics
Activity W_ACT_PROD_FW_SYND_DATA_FW_SYND_MKT_F
RxPrf Contact ID TOTAL
Sales Rep Analytics
Sales Rep Analytics
Sales Rep Analytics
Sales W_SYND_DATA_FW_SYND_MKT_F
RxPrf Contact ID TOTAL
Sales Rep Analytics
Sales Rep Analytics
Sales Rep Analytics
Customer W_SYND_DATA_FW_SYND_MKT_F
RxPrf Contact ID TOTAL
Sales Rep Analytics
Sales Rep Analytics
Sales Rep Analytics
Objective W_OBJECTIVE_F RxPrf (NRx, TRx Objectives)SlsIndZip (Indirect Sales Objectives)
Contact IDZip ID
TOTAL
Pharma Executive Analytics
Sales Executive Analytics
Pharma Sales Executive Analytics
Sales Overview Page
W_ACT_PROD_FW_SYND_DATA_FW_SYND_MKT_FW_OBJECTIVE_FW_MED_ED_F
RxPrfSlsIndZip Contact IDZip ID
Pharma Executive Analytics
Sales Executive Analytics
Pharma Sales Executive Analytics
Sales Overview Page (Brick)
W_ACT_PROD_FW_SYND_DATA_FW_SYND_MKT_FW_OBJECTIVE_FW_MED_ED_F
RxPrfSlsIndBrk Contact IDArea ID
Table 10. Data Loading Matrix
Screen View Dashboard Page Source OLAP table
OLTP Data Source from S_SYND_DATA to populate Source Star
S_SYND_DATA Mandatory ID
Plan Type
104 Siebel Data Warehouse Installation and Administration Guide Version 7.5, Rev. C

Administering and Troubleshooting the Siebel Data Warehouse
Importing Syndicated Data Into the Siebel Data Warehouse
Data Source Values for Syndicated Data AttributesTable 11 indicates, by data source, the data values that should be loaded into the syndicated data table (S_SYND_DATA) attribute fields.
NOTE: Analytics Codes are used in the Life Sciences logical model to identify the syndicated data sources.
Table 11. S_SYND_DATA Attribute by Data Source
Data Source Description Analytics Codes Attribute 1 Attribute 2 Attribute 3 Attribute 4
RXPrf Prescription data by Contact
1 NRx TRx Market NRx Market TRx
SlsIndBrk Indirect Sales Brick Level
22 Product Sales $ Product Sales Units
Market Sales $ Market Sales Units
SlsIndAct Indirect Sales Account Level
21 Product Sales $ Product Sales Units
Market Sales $ Market Sales Units
SlsIndZip Indirect Sales Zip Level
23 Product Sales $ Product Sales Units
Market Sales $ Market Sales Units
SlsDirAct Direct Sales Account Level
11 Product Sales $ Product Sales Units
SlsDirBrk Direct Sales Brick Level
12 Product Sales $ Product Sales Units
SlsDirZip Direct Sales Zip Level
13 Product Sales $ Product Sales Units
RXEVM Weekly RX Data 0 Product NRx Product TRx Market NRx Market TRx
RXPT Plan Level Rx Data 6 Product NRx Product TRx Market NRx Market TRx
RXSMI Sales Market - Incentives
3 Product NRx Product TRx Market NRx Market TRx
RXSMM Sales Market - Modified
4 Product NRx Product TRx Market NRx Market TRx
RXXPT Plan Level Physician Rx Data
5 Product NRx Product TRx Market NRx Market TRx
RXZip Prescription data by ZIP Code
7 Product NRx Product TRx Market NRx Market TRx
RXBrk Prescription data by Brick
8 Product NRx Product TRx Market NRx Market TRx
Version 7.5, Rev. C Siebel Data Warehouse Installation and Administration Guide 105

Administering and Troubleshooting the Siebel Data Warehouse
Informatica Metadata Reporter (IMR)
Informatica Metadata Reporter (IMR)The Informatica Metadata Reporter is a Web-based application for running reports against the Siebel Data Warehouse repository (Siebel_DW_Rep). Use it to examine source tables, target tables, mappings, routines, and so on without directly accessing the Siebel_DW_Rep repository. You can create custom reports against any object in the Siebel_DW_Rep repository. For more information on the Metadata Reporter, read Informatica’s Metadata Reporter Guide. See the Siebel Bookshelf Third-Party Documentation portal page for a copy of this guide.
106 Siebel Data Warehouse Installation and Administration Guide Version 7.5, Rev. C

Administering and Troubleshooting the Siebel Data Warehouse
Siebel Analytics for Life Sciences Data Considerations
Siebel Analytics for Life Sciences Data ConsiderationsThe following issues are specific to Analytics for Life Sciences and do not affect other products.
■ “Data Loading Issues”
■ “Troubleshooting the ETL Process” on page 87
■ “Supported Incremental Updates in the LS Dimension Tables” on page 109
Data Loading IssuesSiebel Analytics for Life Sciences updates the Siebel Data Warehouse with a full refresh or using incremental updates. In Informatica, the Full_Load_Siebel_DW batch does a complete refresh and is usually only used for the initial build. Refresh_Siebel_DW incrementally updates the Siebel Data Warehouse.
Running Full_Load_Siebel_DW deletes all existing information stored in the fact and dimension tables. The following types of incremental updates rules are supported on the fact tables.
■ Activity Product Fact. Add new records (call activity) to the fact table.
■ Rx Sales (syndicated data) Fact. ETL does not support incremental updates. When running Full_Load_Siebel_DW, all records in the fact and dimension tables are deleted. To maintain a history in the dimension tables (such as multiple alignments), use Refresh_Siebel_DW. If you need to incrementally update the RxSales fact table for incremental syndicated data loading, use one of the following strategies:
■ For incremental insert. Load the data directly into staging and modify the session not to truncate the fact table. Then use the existing ETL to load it to the fact table.
■ For incremental update. Create a new mapping that does a lookup against the fact table and run the update.
■ Objective. Add new records as per the new ePharma Objective. Update existing records with a changed ePharma Objective to the fact table.
Version 7.5, Rev. C Siebel Data Warehouse Installation and Administration Guide 107

Administering and Troubleshooting the Siebel Data Warehouse
Siebel Analytics for Life Sciences Data Considerations
■ Profile Rank. Add new records to the fact table and update existing records in the fact table.
■ Med Ed. Add new MedEd events to the fact table. A MedEd event is assumed to be locked in the Siebel ePharma MedEd. If the information is changed in an existing MedEd event, the ETL creates a new record in the fact table. If an existing MedEd event is changed, the ETL process does not load the data. The ETL always skips already loaded MedEd events.
Known Issues with the RxSales Fact TableThe following are known issues with creation of aggregate measure columns in the RxSales fact table.
■ With large volumes of syndicated data, the creation of aggregate measures in the Siebel Data Warehouse can take four times the amount of time needed to load the fact table. This may be unacceptable under circumstances when there are large amounts of syndicated data.
■ All aggregate measures have been recreated at the metadata level except for MAT. MAT can be entered as a formula for ad-hoc analysis in Siebel ePharma Answers using the function msum(measure, window). For more information, read Siebel Analytics User Guide.
■ The LS syndicated fact table contains following aggregate measure columns to speed enterprise wide reporting: TTD, TTDLY, TTDPT, MAT, YTD. To update these aggregate columns ETL process requires following steps:
Upgrading aggregate columns
1 Join the syndicated data to the day dimension to denormalize by time.
2 Create a second set of time denormalized syndicated data.
3 Join these two data sets to obtain appropriate measure for TTD, TTDLY, TTDPT, MAT, and YTD aggregation.
4 Aggregate the measures.
5 Update the syndicated data aggregate columns.
108 Siebel Data Warehouse Installation and Administration Guide Version 7.5, Rev. C

Administering and Troubleshooting the Siebel Data Warehouse
Siebel Analytics for Life Sciences Data Considerations
Supported Incremental Updates in the LS Dimension TablesIn the LS dimension tables, the following incremental updates are supported. Some dimensions have more than one set of attributes.
W_ALIGNMT_DHSlowly Changing Dimension Type. 2
Attribute. Link between ZIP, Brick, Account, and Contact Hierarchy
Description. Tracks historical alignments.
■ If ETL Alignment Version is set to N, ETL makes changes to existing alignment if there is a change on an assignment rule.
■ If ETL Alignment Version is set to Y, it creates a new alignment version.
The dimension has these characteristics:
■ The first alignment after Full load is 1.
■ A new version is created when a new assignment rule (new position or position relationship) or an assignment criteria is modified (change in postal code, brick, contact, or account) if ETL Alignment Version is set to Y.
■ Activation date changes have to be entered manually. The ETL looks for the change and creates a new version, even though the rules have not been applied to the Siebel transactional database.
■ Assignment criteria:
❏ Contact ZIP Code or Account ZIP Code cannot use ZIP Code ranges. Each ZIP Code assigned to a territory needs to be on a separate row, so the same value needs to be entered for both ZIP Code Low and ZIP Code High. For example, if ZIP Code 09654 is assigned to a territory, the value for both ZIP Code High and ZIP Code Low should be 09654. Also, the same ZIP Code should not be assigned twice to the same territory and a ZIP Code should be unique to a territory when using assignment criteria for Contact ZIP Code or Account ZIP Code.
❏ Contact Brick or Account Brick require unique bricks assigned to a territory.
Version 7.5, Rev. C Siebel Data Warehouse Installation and Administration Guide 109

Administering and Troubleshooting the Siebel Data Warehouse
Siebel Analytics for Life Sciences Data Considerations
■ Every new version increases the counter by one and is a sequential number. When a dimension table gets too large, your administrator can create an SQL query to delete all attributes for version numbers.
■ Effective date of the alignment is assignment activation date.
W_ORG_DSlowly Changing Dimension Type. 3
Attributes. ACCNT_TYPE_CD, ACCNT_TYPE_CD1, ACCNT_TYPE_CD2, ACCNT_TYPE_CD3
Description. Tracks three past account types. If the account type changes a fourth time, the first change is deleted and only the past three changes are maintained. Effective date is ETL run date to each group of attributes.
Attributes. NAME, NAME1, NAME2, NAME3
Description. Tracks three past account names. If the account name changes a fourth time, the first change is deleted and only the past three changes are maintained. Effective date is ETL run date.
Attributes. NUMB_OF_BEDS, NUMB_OF_BEDS1, NUMB_OF_BEDS2, NUMB_OF_BEDS3
Description. For an account type of hospital and clinic, tracks three past quantities. If the number of beds changes a fourth time, the first change is deleted and only the past three changes are maintained. Effective date is ETL run date.
Attributes. PAR_INTEGRATION_ID, PAR_ITGR_ID1, PAR_ITGR_ID2, PAR_ITGR_ID3
Description. Tracks three past parent accounts. If the parent account changes a fourth time, the first change is deleted and only the past three changes are maintained. Effective date is ETL run date.
110 Siebel Data Warehouse Installation and Administration Guide Version 7.5, Rev. C
Administering and Troubleshooting the Siebel Data Warehouse
Siebel Analytics for Life Sciences Data Considerations
W_POSTN_CON_DSlowly Changing Dimension Type. 3
Attributes. STATUS, STATUS1, STATUS2, STATUS3
Description. Tracks three past contact statuses. If the contact status changes a fourth time, the first change is deleted and only the past three changes are maintained. Effective date is ETL run date.
W_POSITION_DSlowly Changing Dimension Type. 3
Attributes. EMP_FST_NAME, EMP_MID_NAME, EMP_LAST_NAME, EMP_FST_NAME_H1, EMP_MID_NAME_H1, EMP_LAST_NAME_H1, EMP_FST_NAME_H2, EMP_MID_NAME_H2, EMP_LAST_NAME_H2, EMP_FST_NAME_H3, EMP_MID_NAME_H3, EMP_LAST_NAME_H3
Description. Tracks three past employee names assigned to a position. If the employee name changes a fourth time, the first change is deleted and only the past three changes are maintained. Effective date is ETL run date.
W_PROD_RANK_DSlowly Changing Dimension Type. 3
Attributes. RANKING, RANKING1, RANKING2, RANKING3
Description. Keep three previous rankings to allow restatement. Effective date is ETL run date.
Attributes. RATING, RATING1, RATING2, RATING3
Description. Keep three previous ratings to allow restatement. Effective date is ETL run date.
W_PRODUCT_DSlowly Changing Dimension Type. 3
Attributes. VENDOR_LOC, VENDOR_LOC1, VENDOR_LOC2, VENDOR_LOC3
Description. Tracks three past vendor locations. If the vendor location changes a fourth time, the first change is deleted and only the past three changes are maintained. Effective date is ETL run date.
Version 7.5, Rev. C Siebel Data Warehouse Installation and Administration Guide 111

Administering and Troubleshooting the Siebel Data Warehouse
Troubleshooting Siebel Data Warehouse
Troubleshooting Siebel Data WarehouseLook up any problems, error messages, and other issues in the following topics.
■ “Installation and Initial Configuration Issues”
■ “Informatica and Loading Issues” on page 113
Installation and Initial Configuration IssuesProblem. Cannot connect to the Siebel Data Warehouse running on DB2.
Possible cause. Make sure that the DB2 configuration matches the requirements listed in “DB2-Specific Database Requirements” on page 27
Problem. After installing Informatica’s ODBC driver (V3.5) on a Windows computer, you can not open the Query Analyzer and the Enterprise Manager shows an error message.
Probable cause. The ODBC driver installation replaces the odbcbcp.dll file with an older version. The Informatica documentation contains the procedure for correcting this problem.
Problem. Cannot connect to Siebel Transaction Database from Informatica.
Possible cause. Make sure that the server running the Informatica Server software has an ODBC connection to the Siebel Transaction Database using a Siebel ODBC driver, and an ODBC connection to the Siebel Data Warehouse using the Merant Closed 3.5 32-bit driver.
Problem. Error: ORA-12541: TNS:no listener.
Possible cause. Check the Compatibility tab in Informatica service configuration. It should be Oracle 8. If it is not set to Oracle 8, change it and restart the Informatica server.
Problem. Error 2140 (Informatica service failed to start).
Possible causes. The server may not be started or the Informatica Service may not be started. Read the Informatica Installation and Configuration Guide for detailed information.
112 Siebel Data Warehouse Installation and Administration Guide Version 7.5, Rev. C

Administering and Troubleshooting the Siebel Data Warehouse
Troubleshooting Siebel Data Warehouse
Problem. Informatica installation fails with an "Unhandled Exception" error and displays a message similar to this: “Error Number: 0x80040707. Description: Dll function call crashed: ISRT._DoInstall.”
Possible causes. Most likely the computer is running out of virtual memory. Restart the computer and reinstall Informatica.
Informatica and Loading IssuesDouble-click the batch to view the log file details.
Problem. Double-clicking the batch yields a Server Manager error message: “The system cannot find the file specified.”
Probable Cause. The session log files are not set up properly. You also may need to change the text editor.
Problem. Using Oracle, some mappings hang when running when performance statistics are switched on.
Probable Cause. When running some Informatica mappings for loading the Siebel Data Warehouse, turning on the Performance Statistics can cause the mapping to hang. The only workaround is to increase the values of the LMSharedMemory and MaxSessions variables in Informatica. The risk of increasing the LMSharedMemory too much is that it may start to have a serious effect on overall performance of the machine that the Informatica server is running on.
Problem. When you execute a batch on the Informatica Server Manager, you get the following error message:
“Request to start batch (batch name) on server (server name) not successful.”
Probable cause. This can happen due to a server time-out property that is usually set to 20 or 40 seconds. When you try to run a large batch, every session in that batch is fetched into the server's memory. If this takes longer than the server time-out property, the server returns a message that the batch was unable to run. However, the batch is running, but the server just needs time to complete fetching the sessions into memory. Double-click the batch to view the log file details.
Problem. When running Full_Extract_Siebel_DW or Refresh_Extract_Siebel_DW, Informatica returns errors similar to:
Version 7.5, Rev. C Siebel Data Warehouse Installation and Administration Guide 113

Administering and Troubleshooting the Siebel Data Warehouse
Troubleshooting Siebel Data Warehouse
TE_7007 Transformation Evaluation Error; current row skipped...
TE_7007 [<<Transformation Error>> [to_date]: Date function error to_date('19010101', 'DD-MON-YYYY')
Probable cause. Incorrect date entry in the SME Date Format field in the System Preferences. The format is YYYYMMDD.
Problem. When running Full_Load_Siebel_DW, Informatica returns errors similar to:
CMN_1014 Error creating semaphore...
TM_6006 Error initializing DTM for session...
TM_6006 [s_CR18a1. Load W_PROG_DM_TMP - Program Records]
Probable cause. Insufficient semaphores allocated. Allocate more semaphores on the Data Warehouse Server. The change becomes effective when you reboot.
Problem. Informatica (RDBMS is DB2) gives this error message:
Error occurred unlocking [SDE_ServiceRequestDimension1].
An error occurred while accessing the repository[[IBM][CLI Driver][DB2/6000] SQL0955C
Sort memory cannot be allocated to process the statement. Reason code = "".
SQLSTATE=57011]
DB2 Fatal Error[FnName: ExecuteDirect -- SQLSTATE=57011 [IBM][CLI Driver][DB2/6000]
Probable cause. The DB2 parameter “SHEAPTHRES” is too small.
Problem. Informatica produces the error “Unable to connect to the server” when running a full load of the Siebel Data Warehouse (Full_Load_Siebel_DW_Dimensions).
Probable cause. The last Designer session was not validated. Part of the development process of working with Designer is to always validate any changes to Informatica mappings definitions and sessions after the change is saved in repository.
Problem. When loading the data warehouse, Informatica reports a lock problem.
114 Siebel Data Warehouse Installation and Administration Guide Version 7.5, Rev. C

Administering and Troubleshooting the Siebel Data Warehouse
Troubleshooting Siebel Data Warehouse
Probable cause. Either someone has a session open or there is a dead session. Make sure no one has any open sessions. If no sessions are open, then follow the Informatica documentation on removing locks caused by dead sessions.
Problem. After changing an Informatica mapping, you may get an error message when trying to execute “Full_Load_Siebel_DW_Facts.” The error message is “Unable to connect to the server.”
Probable Cause. This is due to Informatica mapping objects that have been modified and this does not automatically validate the session objects. You must validate all changes to any existing mappings in the Informatica repository.
Problem. Session SDE_RecordLoadStart fails due to unique constraint error while executing Full_Load_Siebel_DW_Dimensitons or Full_Load_Siebel_DW_Facts.
Probable Cause. This could be because the previous full load did not complete successfully. Fix the problem that caused the previous load session to fail. Make sure you start the process from last entry of “Load_RestartNextBatch #” before the failed session, and restart the batch process from that point.
If you have to reextract the data from the Siebel Transaction Database because something had to be fixed in source database to resolve the load error then you must restart the ETL process. Truncate S_ETL_INC_STAT in the Siebel Transaction Database, then enable the Extract and Load batches and rerun them.
Problem. Session SDEINC_RecordExtractStart fails due to unique constraint error while executing a Refresh batch.
Probable Cause. This could be because the previous load or refresh did not complete successfully. Fix the problem that caused the previous refresh session to fail. Make sure you start the process from last entry of “%RestartNextBatch #” before the failed session, and restart the batch process from that point.
Problem. The session fails and you receive the following error code:
Error "TE_7042 Aggregate Error: File Operation Error
Probable Cause. This is due to a disk space limitation. Check the /Informatica/PowerMart/Cache/Check directory for available disk space, also check the limits (ulimit) of the account used to start PowerMart.
Version 7.5, Rev. C Siebel Data Warehouse Installation and Administration Guide 115

Administering and Troubleshooting the Siebel Data Warehouse
Troubleshooting Siebel Data Warehouse
Problem. Informatica sessions get deadlocked and eventually fail when they try to do a “select” from the repository table OPB_OBJECT_LOCKS. This problem sometimes occurs on MSSQL server databases.
Probable Cause. This is possibly caused by a limited number of resources on the MSSQL Database Server. The workaround is to execute the following MSSQL specific SQL command on the Siebel Data Warehouse:
DROP INDEX OPB_OBJECT_LOCKS.OPB_OBJ_LOCKS_IDX
DROP INDEX OPB_OBJECT_LOCKS.OPB_OBJ_LOCKS_IDX2
DROP INDEX OPB_OBJECT_LOCKS.OPB_OBJ_LOCKS_IDX3
Upon completion of executing these commands, proceed executing the batch processes to load the Siebel Data Warehouse.
Problem. An error may occur when trying to send a post session email notification using MS Outlook 2000. See Informatica 5.1 release notes for further information.
Probable Cause. After installing Informatica Server on Windows, copy the file mapi32.dll from winnt\\system32 to the bin folder where the Informatica Server is installed, overwriting the existing mapi32.dll in that directory. Start the Informatica Server so that the Informatica Server can use the new mapi32.dll.
The Extended MAPI Error. MAPILogonEx failed[2147746065] error indicates that the logon is not configured correctly. Check the following:
1 Under Services > Informatica> Logon, make sure the login (domain\\username) and password are correct.
2 Under Control Panel > Mail (it may also be called Mail and Fax or Exchange) > Services > Show Profiles, make sure the mail profile is correct.
3 Under Programs> Informatica Server > Informatica Server Setup> Miscellaneous, make sure the MS Exchange profile is correct.
Problem. While creating a custom session, bulkload mode does not work properly with SQLServer.
Probable Cause. Change the mode to “normal” in Informatica repository for the session. The “normal” mode must be used everywhere for SQLServer in all of your custom sessions.
116 Siebel Data Warehouse Installation and Administration Guide Version 7.5, Rev. C

Administering and Troubleshooting the Siebel Data Warehouse
Troubleshooting Siebel Data Warehouse
Problem. When running IMR, you may receive an error message box which states “The evaluation period for this Oracle ODBC driver has expired. Please call Merant to obtain a production version of this Oracle ODBC driver.”
Probable Cause. This is caused by a down-level ODBC driver license key. Rename or move ivodbc.lic, lvodbc.lic (if it exists), and lvdw.lic (if it exists). Make sure you have only one license file named ivdw.lic in winnt\system32. This eliminates the problem.
Problem. Outlook closes when sending out a notification of finishing the ETL process.
Probable Cause. Informatica is closing Outlook. This issue is known to Informatica and is scheduled to be resolved in an upcoming release. Until then, create a second profile in Outlook and add that profile name to the Informatica server setup.
Version 7.5, Rev. C Siebel Data Warehouse Installation and Administration Guide 117

Administering and Troubleshooting the Siebel Data Warehouse
Troubleshooting Siebel Data Warehouse
118 Siebel Data Warehouse Installation and Administration Guide Version 7.5, Rev. C

Extending the Siebel Data Warehouse 5
The Siebel Data Warehouse can be modified or extended in many ways.
Before making any modifications, you must be familiar with the table structures and the Siebel Data Warehouse architecture. Refer to Siebel Data Warehouse Data Model Reference for a detailed description of the architecture and table structures used in the Siebel Data Warehouse. Additionally, do not attempt to extend the data warehouse without expert knowledge of Informatica. Refer to the Informatica PowerMart documentation. Informatica offers courses to supplement their formal documentation. The guidelines provided here assume you have expertise with the third-party tools and your relational database.
Version 7.5, Rev. C Siebel Data Warehouse Installation and Administration Guide 119

Extending the Siebel Data Warehouse
Common Methods to Extend Siebel Data Warehouse
Common Methods to Extend Siebel Data WarehouseThere are several ways to extend the Siebel Data Warehouse. This section outlines a few of the most common ways. In general, the method is as follows:
■ “Identify Fields”
■ “Design the ETL Process”
■ “Add Fields to Tables” on page 121
■ “Rebuild the Siebel Data Warehouse” on page 121
Identify Fields
To identify Siebel Data Warehouse fields
1 Determine the source fields in the Siebel Transaction Database and other sources that hold the information you need.
2 For each source field, note its name, table, and data type.
3 Determine what fields you want added, deleted, or modified in the Siebel Data Warehouse.
Design the ETL ProcessUse Informatica PowerMart Client Designer for this process.
To design the ETL process
1 Add the source fields into the Source definitions.
2 Transform the source field definitions as needed (for example, calculations).
3 Save the repository.
120 Siebel Data Warehouse Installation and Administration Guide Version 7.5, Rev. C

Extending the Siebel Data Warehouse
Common Methods to Extend Siebel Data Warehouse
Add Fields to TablesIf you have created new star schemas or added columns to any star schemas in the Siebel Data Warehouse, make sure to add the corresponding columns to the tables and create the new tables in your relational database.
Rebuild the Siebel Data WarehouseTo rebuild, run an initial build to completely repopulate the Siebel Data Warehouse.
NOTE: Siebel Systems, Inc. does not support the use of EAI for populating the Siebel Data Warehouse, nor does it support use of the Siebel Data Warehouse as a data source for EAI. Use Informatica for all data transfers into the Siebel Data Warehouse.
Version 7.5, Rev. C Siebel Data Warehouse Installation and Administration Guide 121
Extending the Siebel Data Warehouse
ETL Process Description
ETL Process DescriptionThe ETL process extracts information from the Siebel Transaction Database and other data sources, transforms the data, and loads it into the Siebel Data Warehouse. This process uses Informatica Power Center.
To properly customize the Siebel Data Warehouse for your business needs, you should be familiar with Informatica and the ETL process used in your implementation. Informatica provides its own documentation and training classes. This section presents the ETL process used in the standard Siebel Analytics implementation. Siebel Systems, Inc. has made every effort to make customization both flexible enough to accommodate most every business need, but also easy to achieve.
The ETL process covers the transport of information from the data source to the star schema tables in the Siebel Data Warehouse. The following strategies can help you in implementing customizations.
Do not delete or change any Siebel-supplied ETL objects (source fields and transformations). Instead, add new source fields, new data sources, transformations, extend existing star schemas, or add new star schemas.
Prior to planning any customizations, familiarize yourself with Siebel Data Warehouse Data Model Reference and the batch jobs Full_Load_Siebel_DW and Refresh_Siebel_DW.
Working With the Custom FolderThe Siebel Data Warehouse provides a folder within the repository specifically designed for your customized changes to your implementation. This folder is named Custom_DW_Rep. Using Informatica Designer, you should make your modifications only in the Custom_DW_Rep folder.
■ You should never add, modify, or delete any objects in the Siebel_DW_Rep folder. This folder may be overwritten in future upgrades. All changes should be placed in the Custom_DW_Rep folder within Informatica Designer.
■ The easiest way to modify an object is to copy an existing object from Siebel_DW_Rep into Custom_DW_Rep to reuse existing business components, source and target definitions, transformations, mapplets, or mappings before you make any changes.
122 Siebel Data Warehouse Installation and Administration Guide Version 7.5, Rev. C

Extending the Siebel Data Warehouse
ETL Process Description
■ If you must extend source tables (after copying into the Custom_DW_Rep folder), then you must manually edit the source table in Informatica Designer. Do not import from the database as it changes the source table definitions for the entire Siebel Data Warehouse.
■ If you are importing new tables from the database into the Custom_DW_Rep folder, then use the Siebel Data Warehouse and Siebel Transaction Database ODBC database connections to connect to the source and target databases.
■ After importing your new table definitions, change the database type to Oracle in the Informatica repository, regardless of your database platform. This has no effect on your choice of relational database.
Custom BatchesCustom batches must be created to execute your changes created in Informatica Designer. When creating your custom batches, you should create a custom batch Load_Custom_DW for a full load and a custom batch Refresh_Custom_DW for refresh loads. Add all of the respective custom sessions to these batches.
The custom batches you created should be run after their respective batches in the Siebel_DW_Rep folder have successfully completed. This can be accomplished one of two ways:
1 You can manually run the custom batches after verifying that their respective batches in Siebel_DW_Rep have successfully been executed.
2 If you would like to start the customization batch defined in your custom folder upon completion of the standard batches, then you can use the pmcmd utility provided by Informatica to start the custom batches. This process is explained in “Optional Customization Procedures” on page 94.
Version 7.5, Rev. C Siebel Data Warehouse Installation and Administration Guide 123

Extending the Siebel Data Warehouse
ETL Process Description
Using Custom TemplatesUse the custom templates provided in Custom_DW_Rep for ALL changes and modifications. For more information, read “Description of Custom Templates” on page 127.
Adding Extra Columns From the Same Source TableFollow these guidelines:
■ Use predefined columns in an existing extension table or create a new extension table with the appropriate columns.
■ Create a custom mapping by copying an existing mapping (templates SDE and SIL) to load the extension table column based on the provided templates.
■ Create new sessions for the new map in the customization folder, Custom_DW_Rep.
Adding Extra Columns From a Related Source TableFollow these guidelines:
■ Use predefined columns in an existing extension table or create a new extension table with appropriate columns.
■ Create new map (SDE and SIL) to load the extension table column based on the provided templates. The related table should be joined in Source Qualifier’s SQL (first transform in a mapping).
■ Create new sessions for the new map in the customization folder, Custom_DW_Rep.
Modifying Columns in the Siebel Data WarehouseFollow these guidelines:
■ Do not modify the existing column.
■ Use extension tables column for new values.
■ Use the guidelines in “Adding Extra Columns From the Same Source Table” and “Adding Extra Columns From a Related Source Table.”
124 Siebel Data Warehouse Installation and Administration Guide Version 7.5, Rev. C

Extending the Siebel Data Warehouse
ETL Process Description
Creating a New Dimension and Using it in an Existing FactFollow these guidelines:
■ Create a DDL for new dimension based on the standard structure (with appropriate system columns). Create staging table for this dimension.
■ Add an entry of the source table in S_ETL_SRC_TABLE with table ID starting from 10,000.
■ Create custom SDEINC_FindInsertUpdate_passX to map create image table.
■ Create corresponding custom SDEINC_IdentifyDeletes_passX map.
■ Add sessions in the Create Incremental Image batch in appropriate place (details table processed first).
■ Create a new custom map SDE_XYZ to populate the dimension. Add the incremental row image join section in the SQL so that it pulls only the incremental data. Use existing maps as examples on how to populate the system columns.
■ Create a custom mapping SIL_XYZ to populate the new dimension from the staging table. Use existing maps as an examples on how to populate the system columns.
■ Use an extension table’s predefined foreign keys of the fact table that will join to this new dimension or create a new extension table with predefined structure to hold a new foreign key if you have exhausted the foreign keys in existing extension table.
■ Create new mappings (SDE and SIL) by copying existing SDE and SIL mappings to populate the extension table columns.
■ Create appropriate sessions in the customized sessions area.
Version 7.5, Rev. C Siebel Data Warehouse Installation and Administration Guide 125

Extending the Siebel Data Warehouse
ETL Process Description
Creating a New Dimension for New FactsFollow these guidelines:
■ Follow the guidelines in “Creating a New Dimension and Using it in an Existing Fact” on page 125 (for capturing incremental for both dimensions as well as facts) but you do not have to modify the existing facts. It is an entirely new set.
■ Use lookups for getting foreign keys to the new dimension.
■ Use existing maps as examples.
Creating a New FactFollow these guidelines:
■ Same as Creating a New Dimension for New Facts (for capturing incremental for both dimension as well as fact).
■ Use lookups for getting foreign keys to the existing dimension.
■ Use existing maps as examples.
126 Siebel Data Warehouse Installation and Administration Guide Version 7.5, Rev. C

Extending the Siebel Data Warehouse
ETL Process Description
Description of Custom TemplatesThe custom templates provided in Custom_DW_Rep is described in this section.
Dimension With Mapping Table EntryThis set of templates shows you how to get the column Race from the S_CONTACT table.
CustomTemplateSDE_PersonDimensionUsing the SDE map, populate the attrib_02 column of extension stage table (W_PERSON_DSX) with value from S_CONTACT.RACE source column. This is a fairly straightforward map. The different transformations are:
SQ_S_CONTACT. The SQL in the SQL override section contains the link to the “increment row image” table so that only the incremental data is captured.
EXPTRANS. There is a lookup (LKP_DATASOURCE_NUM_ID) to get the datasource_num_id from W_PARAM_G table. The W_PARAM_G gets populated in the beginning of Refresh_Extract_Siebel_DW” batch. Note that all the system columns are being populated in addition to the attrib column. The attrib_01 is populated with string “Contact” because the combination of (Integration_id, Datasource_num_id, Contact_type) is used to lookup for the ROW_WID value. In most of the dimensions only the (Integration_id, Datasource_num_id) is used for this purpose.
CustomTemplateSIL_PersonDimensionUsing the SIL map, populate the attrib_02 column of the final extension table to the person dimension (W_PERSON_DX). The different transformations are:
SQ_W_PERSON_DSX. There is no SQL in the override. It is straight query from W_PERSON_DSX table that has been populated with incremental rows.
EXPTRANS1. Defines W_DIMENSION_WID for the dimension. This dimension has an entry in the W_DIM_TABLES_G because it has mapping data entry in the mapping table W_MAP_DIM_M.
LKP_W_MAP_DIM_M. Lookup the W_MAP_DIM_M table to get ROW_WID for the row.
LKP_W_PERSON_DX. Lookup the target table to find out “Insert or Update.” This information will be used by update strategy.
Version 7.5, Rev. C Siebel Data Warehouse Installation and Administration Guide 127

Extending the Siebel Data Warehouse
ETL Process Description
EXPTRANS. To get the Insert/Update flag and ETL_PROC_WID by using lookup LKP_ETL_PROC_WID from W_PARAM_G table. This table is populated in the beginning of the Refresh_Extract_Siebel_DW batch.
FILTRANS. Passing only those rows that have entry in the parent dimension table.
UPDTRANS. Does Insert or update based on the Insert/Update flag.
CustomTemplateSDE_WaveDimensionThis is similar to “Dimension With Mapping Table Entry” on page 127, with the difference that in SIL map there is a lookup transform to the parent dimension table W_WAVE_D instead of a lookup to mapping table. There is no mapping data entry for the wave dimension.
CustomTemplateSIL_WaveDimensionThis is similar to “Dimension With Mapping Table Entry” on page 127, with the difference that in SIL map there is a lookup transform to the parent dimension table W_WAVE_D instead of a lookup to mapping table. There is no mapping data entry for the wave dimension.
Facts, Attributes, and MeasuresThis template shows how to attach an existing dimension (account dim) to a fact (Asset fact).
CustomTemplateSDE_AssetFactUsing this SDE map, populate the staging extension table for the Asset fact with incremental data. The different transformations are:
SQ_S_ASSET. This selects the OWNER_ACCNT_ID that will ultimately be used to join with the account dim in the fact. Note the extra WHERE clause joining to the incremental image table.
EXPTRANS. This gets DATASOURCE_NUM_ID using lookup LKP_DATA_SOURCE_NUM_ID from table W_PARAM_G. This table is populated in the beginning of “Refresh Siebel DW.”
Finally the FK_01_ID field of the extension stage table W_ASSET_FSX gets populated. All the system columns are also getting populated.
128 Siebel Data Warehouse Installation and Administration Guide Version 7.5, Rev. C

Extending the Siebel Data Warehouse
ETL Process Description
CustomTemplateSIL_AssetFactUsing this SIL map, populate the final extension table for the asset fact. The different transformations are:
SQ_W_ASSET_FSX. Note the SQL in the override. This joins with the dimension table W_ACCOUNT_D to get the ROW_WID of the dimension row to be populated in the foreign key id column of the extension table.
LKP_W_ASSET_F. To get the ROW_WID of the parent fact table W_ASSET_F.
LKP_W_ASSET_FX. To get the Insert/Update flag that will be used by the update strategy to find out whether to insert or update this row.
EXPTRANS. Gets ETL_PROC_WID using the lookup LKP_ETL_PROC_WID from table W_PARAM_G. This table gets populated in the beginning of Refresh Siebel DW. Also generates the Insert/Update flag based on the previous transform LKP_W_ASSET_FSX.
UPDTRANS. Updates or inserts based on the Insert/Update flag.
Version 7.5, Rev. C Siebel Data Warehouse Installation and Administration Guide 129

Extending the Siebel Data Warehouse
ETL Process Description
130 Siebel Data Warehouse Installation and Administration Guide Version 7.5, Rev. C

The Siebel ePharma 6.3 to 7.5 AnalyticsBridge A
If you are using Siebel ePharma 6.3 and have also licensed version 7.5 of Siebel Analytics, you will need to use the Siebel ePharma 6.3 to 7.5 Analytics Bridge. Installation of the Analytics Bridge allows you to use the newer functionality of Siebel Analytics 7.5 with your Siebel ePharma 6.3 transactional database data.
If you plan to use this Bridge application, you should review this appendix before you begin the installation process.
This appendix describes the installation background for the Analytics Bridge, including the files required, the update patch, postinstallation configuration, and the version 7.5 Siebel ePharma Data Warehouse stars populated.
CAUTION: Because of inherent differences in the underlying application schemas, the Siebel ePharma 6.3 to 7.5 Analytics Bridge may not perform a complete mapping of all Presentation layer columns in the Siebel Analytics repository. This may also affect those dashboard reports built from the columns that are not mapped. See Siebel Applications Technical Note 429 on Siebel SupportWeb for a list of Presentation layer columns and reports known to be affected.
Version 7.5, Rev. C Siebel Data Warehouse Installation and Administration Guide 131

The Siebel ePharma 6.3 to 7.5 Analytics Bridge
Installation Process
Installation ProcessThe installation process for the Siebel ePharma 6.3 to 7.5 Analytics Bridge is divided into four parts:
■ “Analytics Bridge Installation” on page 133
■ “Siebel Application 6.3 OLTP Update Patch” on page 134
■ “Siebel Analytics 7.5 Repository Modification” on page 139
■ “Using ETL Alignment Version System Preferences” on page 147
In addition, “Siebel ePharma 6.3 to 7.5 OLAP Star Matrix” on page 148 shows table mappings.
132 Siebel Data Warehouse Installation and Administration Guide Version 7.5, Rev. C

The Siebel ePharma 6.3 to 7.5 Analytics Bridge
Installation Process
Analytics Bridge InstallationBoth parts of the Analytics Bridge installation process are incorporated into the Siebel Data Warehouse installation wizard, which runs as part of the Siebel Analytics 7.5 installation.
NOTE: The screens in the following procedure are part of the Siebel Analytics installation wizard. Please refer to Chapter 2 of this book and to the installation chapter of Siebel Analytics Installation and Configuration Guide.
1 In the Prerequisite Check Screen, click the radio button for Siebel ePharma Data Warehouse 6.3 to 7.5 ETL Bridge. Click Next.
2 In the Setup Type screen, click the Data Warehouse radio button. Click Next.
3 In the second Setup Type screen, check the boxes as appropriate.
■ If this is first-time installation or a new installation:
❏ Uncheck the box Delete Existing Informatica Repository.
❏ Check the boxes for Create Data Warehouse and Configure Informatica Repository.
■ If there is a pre-existing Informatica repository that you want to overwrite with the new (bridged) repository:
❏ Check the box for Create Informatica Repository.
❏ Check the box for Delete Existing Informatica Repository.
Click Next.
When the installer finishes copying files, the Data Warehouse installer begins.
4 Provide the appropriate OLAP information where prompted.
5 Proceed to “Siebel Application 6.3 OLTP Update Patch” on page 134.
Version 7.5, Rev. C Siebel Data Warehouse Installation and Administration Guide 133
The Siebel ePharma 6.3 to 7.5 Analytics Bridge
Installation Process
Siebel Application 6.3 OLTP Update PatchAfter the Siebel ePharma 6.3 to 7.5 Bridge installation and configuration process has been completed, update the 6.3 Siebel Application database (the OLTP database) to enable it to support the Siebel ePharma 6.3 to 7.5 Analytics Bridge process.
This section consists of the following parts:
■ “Files Required by the Analytics Bridge” on page 135
■ “Setting Up the Update Patch Files” on page 137
■ “Copying the Update Patch Files” on page 138
134 Siebel Data Warehouse Installation and Administration Guide Version 7.5, Rev. C

The Siebel ePharma 6.3 to 7.5 Analytics Bridge
Installation Process
Files Required by the Analytics BridgeTable 12 shows the files used by the 7.5 Siebel Data Warehouse to source its data from the 6.3 Siebel ePharma database.
The Siebel ePharma 6.3 to 7.5 Analytics Bridge installation process installs the .ctl, .bat, and .dat files provided in the directory $INSTALL_DIR:\sea750\dwdb\DWREP.
Table 12. Files Used by the Analytics Bridge
File Name Purpose of File
Siebel_DW_Rep.rep The Informatica Repository file that contains the objects and code required to populate the 7.5 Siebel Industry Application Data Warehouse with the 6.3 Siebel ePharma data. (This file replaces the preconfigured version 7.5 Siebel Industry Application Data Warehouse Informatica Repository.)
Dwpcdb.ctl Contains the database tables and indexes required by the ETL to control the load process, log exception errors and control the incremental images for refreshes. (These tables are created on the OLTP database. In the 7.5 Siebel Application installation, these tables and indexes are automatically created with the rest of the database objects. However, they do not exist in the Siebel ePharma 6.3 transactional database.) This file is used by the utility ddlimp utility shipped on the Siebel Industry Application Data Warehouse 7.5 CD-ROM.
Createwpctables.bat This batch file invokes the ddlimp utility, which uses the Dwpcdb.ctl file, plus the ODBC connect string, tablespace name, username and password you provide during the Siebel Data Warehouse installation wizard, to create the database objects in the target database (6.3 Siebel ePharma database). It creates the log file dwpcdb.log, which displays the results of the process.
ETLDataSourceNum.dat Contains the data source definition for 6.3 Siebel ePharma database. Data in this file is loaded into S_ETL_DATASRC, a version 7.5 Siebel applications table that is not in version 6.3 Siebel applications.
ETLSourceTableData.dat Text file that contains a list of Siebel ePharma 6.3 database tables. These tables are used by the ETL process to source data for the version 7.5 Siebel Data Warehouse. This data is loaded into the S_ETL_SRC_TABLES table, created by the process from the ETLDataSourceNum.bat file.
Version 7.5, Rev. C Siebel Data Warehouse Installation and Administration Guide 135

The Siebel ePharma 6.3 to 7.5 Analytics Bridge
Installation Process
LOVGenUn_6375delta.dat Text file that contains the List of Values (LOV) used by the ETL process, which are not in the 6.3 Siebel ePharma database. This data is loaded into the S_LOV_UNSPEC_DELTA table. The data from this table is used, in addition to the stock 6.3 Siebel Application LOV values, to populate the W_LOV_D table in the 7.5 Siebel Data Warehouse.
SysPrefDelta.dat Text file containing one additional entry not in 6.3 S_SYS_PREF: ETL Alignment Version. The values for this are 'Y' or 'N'. This data is loaded into the S_SYS_PREF_DELTA table. From this table, data is loaded into W_PARAM_G table.
cpyETLBridgeData.bat A utility batch file that copies these four data files to the informatica directory:
■ ETLSourceTableData.dat
■ ETLDataSourceNum.dat
■ LOVGenUn_6375delta.dat
■ SysPrefDelta.dat
Table 12. Files Used by the Analytics Bridge
File Name Purpose of File
136 Siebel Data Warehouse Installation and Administration Guide Version 7.5, Rev. C
The Siebel ePharma 6.3 to 7.5 Analytics Bridge
Installation Process
Setting Up the Update Patch FilesThis update patch uses the .bat file and the .ctl file provided to create necessary tables in 6.3 ePharma OLTP database.
To set up the update patch files
1 Open a command window.
2 Navigate to the directory $INSTALL_DIR:\sea750\dwdb\DWREP.
3 Open and edit Createwpctables.bat by right-clicking on the file name and choosing Edit in Explorer.
4 Assign the appropriate values to each of the following variables:
Variable Value
OLTP_ODBC ODBC Data Source to access Siebel OLTP Database
OLTP_OWNER The login NAME (all UPPERCASE) of the Siebel OLTP database table owner
OLTP_OWNER_PSWD Password of the Siebel OLTP database table owner
SIEBEL_DISK Name of the disk where the Siebel SME database scripts are installed
DATA_AREA Database storage area (tablespace) for tables
INDX_AREA Database storage area (tablespace) for indexes
UNICODEDB /W if Oracle, /Z otherwise
UNICODEFLG Y if a Unicode Database, N otherwise
Version 7.5, Rev. C Siebel Data Warehouse Installation and Administration Guide 137

The Siebel ePharma 6.3 to 7.5 Analytics Bridge
Installation Process
Copying the Update Patch FilesIn addition, in order for the ETL process to load necessary data warehouse seed data, you must copy the .dat files to the directory on which Informatica Server has been installed.
To copy update patch batch files to the Informatica directory
1 Run Createwpctables.bat.
This batch file creates the table and index objects (provided in the .ctl file) in the target OLTP database (Siebel ePharma 6.3). To make sure the tables and indexes were successfully created, view the Dwpcdp.log file.
2 After dwpcdb.ctl has run successfully, copy the four .dat files to the directory on which Informatica Server has been installed, typically \Informatica\PowerMart Server\SrcFiles.
a In the command window opened in Step 1, run the batch file cpyETLBridgeData.bat.
b Type in the command and the target directory. For example:
cpyETLBridgeData "d:\Informatica\PowerMart Server\SrcFiles"
NOTE: You can also copy the files manually.
3 In Informatica Server Manager, run Load_6375DeltaSeedFromFile.
This loads the seed data from the .dat files copied in Step 2.b to the OLTP database.
138 Siebel Data Warehouse Installation and Administration Guide Version 7.5, Rev. C

The Siebel ePharma 6.3 to 7.5 Analytics Bridge
Installation Process
Siebel Analytics 7.5 Repository ModificationThis section describes the modifications necessary for the Siebel ePharma Analytics 7.5 repository to work against the Siebel ePharma 6.3 operational application database (OLTP). These modifications permit login authentication and authorization. In the Siebel ePharma 6.3 operational application databases, employee login information is stored in S_EMPLOYEE table; in Siebel Analytics 7.5 employee login information is stored in S_USER table.
Make modifications to the following OLTP-based initialization blocks using the Siebel Analytics Server Administration Tool:
■ Authentication
■ Login Properties
■ Authorization
Authentication Block ChangesModify the Authentication block definitions.
To change the Authentication block definitions
1 Using the Siebel Analytics Server Administration Tool, open SiebelAnalytics.rpd.
2 From the top menu, select Manage > Variables. In the Variable Manager window, select Initialization Blocks from left pane.
3 Double-click on Authentication block.
4 Change the value in the initialization string as follows:
Select ':USER' from VALUEOF(TBO).S_EMPLOYEE U WHERE U.LOGIN=':USER'
Click OK will close & update this block.
Version 7.5, Rev. C Siebel Data Warehouse Installation and Administration Guide 139

The Siebel ePharma 6.3 to 7.5 Analytics Bridge
Installation Process
Login Properties Block ChangesModify the Login properties.
To change the Login properties
1 From the same Variable Manager window, double-click on Login Properties initialization block.
2 Change the initialization string as follows:
Select U.FST_NAME, 3
from VALUEOF(TBO).S_EMPLOYEE U
WHERE U.LOGIN=':USER'
Authorization Properties Block ChangesModify the Authorization Properties block.
To change the Authorization properties
1 From the same Variable Manager window, double-click on Authorization Block.
2 In the new window, change the initialization string as follows:
Select 'GROUP', R.NAME
from VALUEOF(TBO).S_RESP R, VALUEOF(TBO).S_PER_RESP P, VALUEOF(TBO).S_EMPLOYEE U
where U.LOGIN=':USER' and U.ROW_ID=P.PER_ID and P.RESP_ID=R.ROW_ID
140 Siebel Data Warehouse Installation and Administration Guide Version 7.5, Rev. C

The Siebel ePharma 6.3 to 7.5 Analytics Bridge
Installation Process
Adding 7.5 Siebel Analytics Responsibilities to 6.3 Siebel ePharma UsersThe Siebel Analytics 7.5 repository has predefined Analytics responsibilities.
To see predefined Analytics responsibilities
1 Using the Siebel Analytics Server Administration Tool, open the repository.
2 Select Manage > Security.
3 From the left pane of Security Manager, select Groups.
NOTE: These responsibilities are also defined in the Siebel 7.5 operational OLTP. They are used for dashboard and page visibility and for data visibility.
All Pharma Analytics responsibilities have the following characteristics:
■ In the Security Manager Groups view, their names are preceded by PH.
■ Data level security for Pharma Analytics responsibilities is based on Siebel Position ID.
■ Data level security for Pharma Analytics responsibilities is always resolved through the Fact table.
■ For administrative roles, data visibility is unconstrained.
■ For other roles, data visibility is controlled by one of two forms of position-based security: Brick or ZIP Code.
■ The data warehouse stores the relationship position-to-Brick/ZIP Code in the W_ALIGNMT_DH table: align_item_type = Zipcode or Brick.
■ The relationship user-to-position is stored in the W_PARTY_LOGIN table.
Therefore, users see only the data from the bricks or ZIP Codes that are available to their positions.
Version 7.5, Rev. C Siebel Data Warehouse Installation and Administration Guide 141

The Siebel ePharma 6.3 to 7.5 Analytics Bridge
Installation Process
■ This security is enforced for all queries, with the exception of queries that deal exclusively with the following elements:
■ Time Period
■ Product
■ Invitee Status
The Siebel Analytics 7.5 responsibilities shown in the Siebel Analytics Server Administration Tool do not exist in the Siebel ePharma transactional database for version 6.3. You must first create the responsibilities in the Siebel ePharma transactional database, then assign them to Siebel Analytics users, depending on the visibility that you desire each user group to have.
NOTE: To enable Horizontal (Siebel eBusiness Application) options, add them to the users.
Table 13 lists the Siebel ePharma Analytics responsibilities and their functions.
Table 13. ePharma Analytics Responsibilities and Functions.
ePharma Analytics 7.5 Responsibility
ePharma Analytics 7.5 Data Visibility Constraint
ePharma Analytics 7.5 Dashboard or Page Access
LS Administrator Unrestricted access to entire application
Dashboards—All
Pages—All
Subject Areas—All
PH US Sales Analytics User
Restricts data access to these relationships in the W_ALIGNMT_DH table:
■ Login Position ID
■ Zip to Position ID
Dashboard—Pharma Sales
Pages—All except Brick
Subject Area—Pharma Sales Effectiveness (Brick)
Dashboard—Pharma Sales Objectives
Pages—All except Brick
Subject Area—Pharma Objective Achievement (non-Brick)
142 Siebel Data Warehouse Installation and Administration Guide Version 7.5, Rev. C
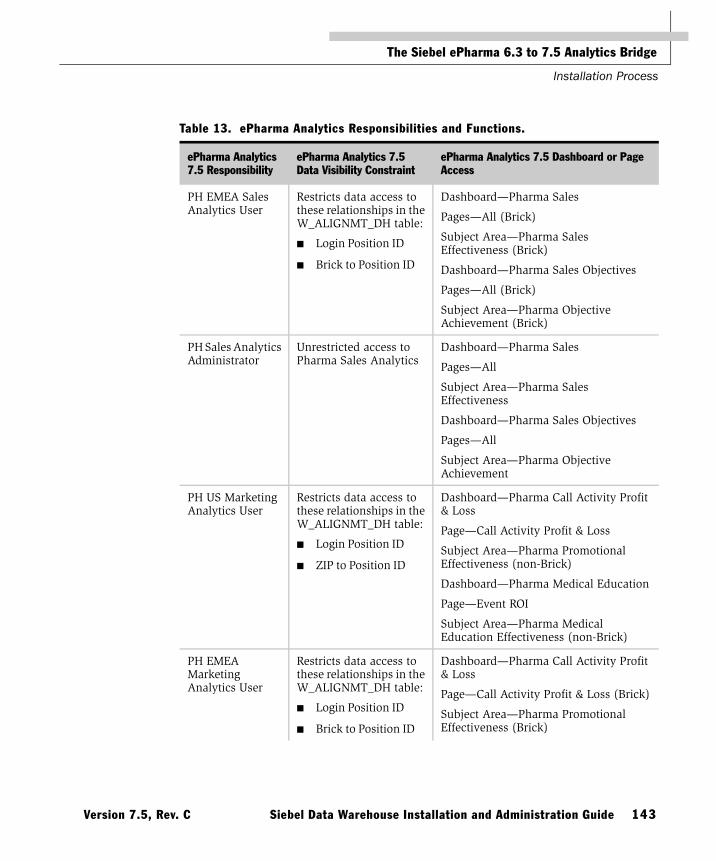
The Siebel ePharma 6.3 to 7.5 Analytics Bridge
Installation Process
PH EMEA Sales Analytics User
Restricts data access to these relationships in the W_ALIGNMT_DH table:
■ Login Position ID
■ Brick to Position ID
Dashboard—Pharma Sales
Pages—All (Brick)
Subject Area—Pharma Sales Effectiveness (Brick)
Dashboard—Pharma Sales Objectives
Pages—All (Brick)
Subject Area—Pharma Objective Achievement (Brick)
PH Sales Analytics Administrator
Unrestricted access to Pharma Sales Analytics
Dashboard—Pharma Sales
Pages—All
Subject Area—Pharma Sales Effectiveness
Dashboard—Pharma Sales Objectives
Pages—All
Subject Area—Pharma Objective Achievement
PH US Marketing Analytics User
Restricts data access to these relationships in the W_ALIGNMT_DH table:
■ Login Position ID
■ ZIP to Position ID
Dashboard—Pharma Call Activity Profit & Loss
Page—Call Activity Profit & Loss
Subject Area—Pharma Promotional Effectiveness (non-Brick)
Dashboard—Pharma Medical Education
Page—Event ROI
Subject Area—Pharma Medical Education Effectiveness (non-Brick)
PH EMEA Marketing Analytics User
Restricts data access to these relationships in the W_ALIGNMT_DH table:
■ Login Position ID
■ Brick to Position ID
Dashboard—Pharma Call Activity Profit & Loss
Page—Call Activity Profit & Loss (Brick)
Subject Area—Pharma Promotional Effectiveness (Brick)
Table 13. ePharma Analytics Responsibilities and Functions.
ePharma Analytics 7.5 Responsibility
ePharma Analytics 7.5 Data Visibility Constraint
ePharma Analytics 7.5 Dashboard or Page Access
Version 7.5, Rev. C Siebel Data Warehouse Installation and Administration Guide 143

The Siebel ePharma 6.3 to 7.5 Analytics Bridge
Installation Process
PH Marketing Analytics Administrator
Unrestricted data access to Pharma ROI Analytics
Dashboard—Pharma Call Activity Profit & Loss
Page—Call Activity Profit & Loss
Subject Area—Pharma Promotional Effectiveness
Dashboard—Pharma Medical Education
Page—Event ROI
Subject Area—Pharma Medical Education Effectiveness (non-Brick)
PH Mobile Analytics User
Restricts data access to these relationships in the W_ALIGNMT_DH table:
■ Login Position ID
■ ZIP to Position ID
Dashboard—Pharma Sales Rep
Pages—All
Subject Areas—Pharma Objective Achievement, Pharma Sales, Pharma Promotional Effectiveness
PH Mobile Analytics Admin
Unrestricted data access to Pharma Sales Rep Analytics
Dashboard—Pharma Sales Rep
Pages—All
Subject Areas—Pharma Objective Achievement, Pharma Sales, Pharma Promotional Effectiveness
PH Medical Education Analytics User
Restricts data access to these relationships in the W_ALIGNMT_DH table:
■ Login Position ID
■ ZIP to Position ID
Dashboard—Pharma Medical Education
Pages—Event Analysis, Speaker Analysis, Budget Analysis
Subject Area—Medical Education Effectiveness
PH Medical Education Analytics Admin
Unrestricted data access to Pharma Medical Education Analytics
Dashboard—Pharma Medical Education
Pages—Event Analysis, Speaker Analysis, Budget Analysis, Event ROI
Subject Area—Medical Education Effectiveness
Table 13. ePharma Analytics Responsibilities and Functions.
ePharma Analytics 7.5 Responsibility
ePharma Analytics 7.5 Data Visibility Constraint
ePharma Analytics 7.5 Dashboard or Page Access
144 Siebel Data Warehouse Installation and Administration Guide Version 7.5, Rev. C

The Siebel ePharma 6.3 to 7.5 Analytics Bridge
Installation Process
PH US Call Activity Analytics User
Restricts data access to these relationships in the W_ALIGNMT_DH table:
■ Login Position ID
■ ZIP to Position ID
Dashboard—Pharma Contact Call Effectiveness
Pages—Contact Effort vs Potential, Contact Priority & Indication
Subject Area—Promotional Effectiveness
PH EMEA Call Activity Analytics User
Restricts data access to these relationships in the W_ALIGNMT_DH table:
■ Login Position ID
■ Brick to Position ID
Dashboard—Pharma Contact Call Effectiveness
Pages—Contact Effort vs Potential, Contact Priority & Indication (Brick)
Subject Area—Promotional Effectiveness (Brick)
PH EMEA Call Activity Analytics Admin
Unrestricted data access to Call Activity Analytics option
Dashboard—Pharma Contact Call Effectiveness
Pages—Contact Effort vs Potential, Contact Priority & Indication, Contact Effort vs Potential (Brick), Contact Priority & Indication (Brick)
Subject Areas—Promotional Effectiveness, Promotional Effectiveness (Brick)
PH US Executive Analytics User
Restricts data access to these relationships in the W_ALIGNMT_DH table:
■ Login Position ID
■ ZIP to Position ID
Dashboard—Pharma Sales Executive
Page—Pharma Sales Executive
Subject Area—All US
Table 13. ePharma Analytics Responsibilities and Functions.
ePharma Analytics 7.5 Responsibility
ePharma Analytics 7.5 Data Visibility Constraint
ePharma Analytics 7.5 Dashboard or Page Access
Version 7.5, Rev. C Siebel Data Warehouse Installation and Administration Guide 145

The Siebel ePharma 6.3 to 7.5 Analytics Bridge
Installation Process
PH EMEA Executive Analytics User
Restricts data access to these relationships in the W_ALIGNMT_DH table:
■ Login Position ID
■ Brick to Position ID
Dashboard—Pharma Sales Executive
Page—Pharma Sales Executive (Brick)
Subject Area—All Brick
PH Executive Analytics Admin
Unrestricted access to all ePharma Analytics options with ZIP territories
Dashboard—Pharma Sales Executive
Page—Pharma Sales Executive
Subject Area—All US and EMEA
Table 13. ePharma Analytics Responsibilities and Functions.
ePharma Analytics 7.5 Responsibility
ePharma Analytics 7.5 Data Visibility Constraint
ePharma Analytics 7.5 Dashboard or Page Access
146 Siebel Data Warehouse Installation and Administration Guide Version 7.5, Rev. C

The Siebel ePharma 6.3 to 7.5 Analytics Bridge
Installation Process
Using ETL Alignment Version System PreferencesSeed data needs to be updated in certain Lists of Values (LOV) to make sure that the ETL process correctly populates the alignment type and product category relationships in the Siebel Data Warehouse.
Changing the ETL Alignment Version System PreferencesThese preferences are used by the Siebel Life Sciences operational database to control loading of changes in assignment rules in Siebel Assignment Manager.
To change the alignment version system preferences
1 Using a standard text editor, open the SysPrefDelta.dat file.
2 Change the Y/N value to the desired setting:
■ If you want to make changes to the existing alignment, set Alignment Version to N.
■ If you want to create a new alignment version, set Alignment Version to Y.
3 Save the file.
4 Run the full or incremental ETL batch as you would normally.
The changes will occur during the loading process as a part of prerequest loading; alignment loading will be processed according to the setting.
Version 7.5, Rev. C Siebel Data Warehouse Installation and Administration Guide 147

The Siebel ePharma 6.3 to 7.5 Analytics Bridge
Siebel ePharma 6.3 To 7.5 Star Matrix
Siebel ePharma 6.3 To 7.5 Star MatrixTable 14 shows the Fact and Dimension tables that are populated in the Siebel Data Warehouse by the Analytics Bridge.
Table 14. Siebel ePharma 6.3 to 7.5 OLAP Star Matrix
Stars Fact Tables
Dimension Tables
W_D
AY_D
W_PE
RSO
N_D
W_O
RG
_D
W_G
EO_D
W_PRO
DU
CT
_D
W_P
OST
N_C
ON
_D
W_IN
S_PLAN
_D
W_O
BJEC
TIV
E_D
W_LO
V_D
W_M
ED_EV
T_D
W_M
ED
_PLAN
_D
W_P
LAN
_PRO
MO
_D
W_PR
OD
CAT
_DH
W_A
REA
_D
W_PRO
D_R
AN
K_D
W_A
LIGN
MT
_DH
W_PO
SITIO
N_D
Activity Product Star W_ACT_PROD_F X X X X X X X X X X X X
Medical Education Star W_MED_ED_F X X X X X X X X X X X X X
Objective Star W_OBJECTIVE_F X X X X X X X X X X X X X
Profile Rank Star W_PER_RANK_F X X X X X X X
Syndicated Data Star W_SYND_DATA_F X X X X X X X X X X X
148 Siebel Data Warehouse Installation and Administration Guide Version 7.5, Rev. C

The Siebel eBusiness 6.3 to 7.5 AnalyticsBridge B
If you are using a Siebel eBusiness application version 6.3 and have also licensed version 7.5 of Siebel Analytics, you will need to use the Siebel eBusiness 6.3 to 7.5 Analytics Bridge (referred to as the Analytics Bridge throughout this chapter). Installation of the Analytics Bridge allows you to use the newer functionality of Siebel Analytics 7.5 with a Siebel eBusiness 6.3 application.
If you plan to use this Bridge application, you should review this appendix before you begin the installation process.
This appendix is in two sections:
■ “Installation Process” on page 150
■ File installation process
■ Analytics Bridge file information table (Table 15 on page 159)
■ “Configuration Considerations” on page 161
■ Creating Siebel Analytics users
■ Creating database tables for Siebel Delivers
CAUTION: Because of inherent differences in the underlying application schemas, the Analytics Bridge may not perform a complete mapping of all Presentation layer columns in the Siebel Analytics repository. This may also affect those dashboard reports built from the columns that are not mapped. See Siebel Applications Technical Note 429 on Siebel SupportWeb for a list of Presentation layer columns and reports known to be affected.
Version 7.5, Rev. C Siebel Data Warehouse Installation and Administration Guide 149

The Siebel eBusiness 6.3 to 7.5 Analytics Bridge
Installation Process
Installation ProcessThe Analytics Bridge installation process consists of configuring the Siebel Analytics application to read Bridge-specific repository files instead of the standard Analytics repositories. All of the Analytics Bridge-specific files have been shipped on the Siebel Analytics Installation CD-ROM and are located in the 63_752_Horz_Bridge folder. The files in this folder need to be installed in the appropriate Siebel Analytics directories and then manually configured. This section describes the specific steps to complete the installation process and describes what to do with the various files provided in the 63_752_Horz_Bridge folder.
The installation process for the Analytics Bridge consists of nine major steps:
1 “Begin the Standard Installation of Siebel Analytics 7.5” on page 151
2 “Pause the Standard Installation of Siebel Analytics” on page 152
3 “Replace the Informatica Repository File” on page 152
4 “Continue the Standard Installation of Siebel Analytics” on page 152
5 “Replace the Siebel Analytics Repository File” on page 153
6 “Import New Siebel OLTP Schema Definitions” on page 154
7 “Apply Schema Definitions to the Physical Database” on page 155
8 “Import Language-Independent Siebel Seed Data” on page 156
9 “Import Locale Seed Data” on page 157(Perform this step only if you wish to view Siebel Analytics data in a non-English environment.)
150 Siebel Data Warehouse Installation and Administration Guide Version 7.5, Rev. C

The Siebel eBusiness 6.3 to 7.5 Analytics Bridge
Installation Process
Begin the Standard Installation of Siebel Analytics 7.5Chapter 2, “Installing and Configuring the Siebel Data Warehouse,” provides the detailed instructions for installing the standard version of Siebel Analytics, which consists of four major steps:
1 “Installing Informatica Client Software” on page 36
2 “Creating Database Connections for OLAP and OLTP” on page 38
3 “Setting Up the Siebel Data Warehouse” on page 40
4 “Configuring Informatica Server and Repository” on page 51
Before you install the Analytics Bridge, you must have completed Step 1 through Step 3, up to the Siebel Analytics–Siebel Data Warehouse Configuration Setup screen shown in Figure 5. At this point, you must pause the Analytics Installer, then proceed to the configuration of the Siebel application for Bridge-specific operation. (Review Chapter 2, “Installing and Configuring the Siebel Data Warehouse,” for further information about Steps 1 through 3.)
Figure 5. Setup Screen
Version 7.5, Rev. C Siebel Data Warehouse Installation and Administration Guide 151

The Siebel eBusiness 6.3 to 7.5 Analytics Bridge
Installation Process
Pause the Standard Installation of Siebel AnalyticsAt the point that the installer displays the Siebel Analytics–Siebel Data Warehouse Configuration Setup screen, do the following:
■ Tab out of the Installation Wizard (do not close out of it).
Replace the Informatica Repository FileThe Analytics Bridge product contains a dedicated Informatica repository (.rep) file that provides the Bridge ETL functionality. You must move the Informatica repository file manually into the appropriate folder location in Siebel Analytics to enable this functionality.
To replace the Informatica repository file
■ Import the Informatica 6.3 Analytics Bridge repository file:
Continue the Standard Installation of Siebel AnalyticsOnce you have replaced the standard .rep file with the Bridge-specific .rep file, resume the remainder of the standard Siebel Analytics Installation Wizard. Specifically, complete the remaining parts of Step 3 (“Setting Up the Siebel Data Warehouse” on page 40) and all of Step 4 (“Configuring Informatica Server and Repository” on page 51).
NOTE: When continuing with the standard installation, you are prompted to provide the name of your Informatica .rep file. Use the name Siebel_DW_Rep_63_752.rep.
Copy From To
Siebel_DW_Rep_63_752.rep 63_752_Horz_Bridge folder SiebelAnalytics\DW\dwrep\Informatica\Repository\
152 Siebel Data Warehouse Installation and Administration Guide Version 7.5, Rev. C
The Siebel eBusiness 6.3 to 7.5 Analytics Bridge
Installation Process
Replace the Siebel Analytics Repository FileThe Analytics Bridge product also contains a Siebel Analytics repository (.rpd) file, which provides customized metadata for the Bridge application. You must move this .rpd file manually into the appropriate folder location in Siebel Analytics to enable this functionality.
To replace the Siebel Analytics repository file
1 Import the Siebel 6.3 Analytics Bridge-specific Siebel Analytics repository file:
2 Configure Siebel Analytics to point to the Bridge-specific .rpd file.
In order for Siebel Analytics to access the 6.3 Bridge-specific repository (.rpd) file, you must change a configuration setting in the NQSConfig.ini file. Initially, the Repository section of the NQSConfig.ini file shows the following entry:
[ REPOSITORY ]Star = siebelanalytics.rpd, DEFAULT;
Comment out the original Siebel Analytics repository entry and create a new entry for the 6.3 Bridge-specific .rpd file, as follows:
[ REPOSITORY ]Star = siebelanalytics_63_752.rpd DEFAULT;#Star = siebelanalytics.rpd, DEFAULT;
Copy From To
SiebelAnalytics_63_752.rpd 63_752_Horz_Bridge folder SiebelAnalytics\Repository\
Version 7.5, Rev. C Siebel Data Warehouse Installation and Administration Guide 153

The Siebel eBusiness 6.3 to 7.5 Analytics Bridge
Installation Process
Import New Siebel OLTP Schema DefinitionsAfter the Bridge-specific Siebel Analytics and Informatica repositories have been installed, update the 6.3 Siebel eBusiness operational application’s database (the OLTP database).
NOTE: This process requires the use of Siebel Tools.
To import new schema definitions into the OLTP application
1 Copy the following files:
2 Open Siebel Tools, pointing to the development database.
3 Navigate to Repository\Import from Archive, and select the objects_63_752_bridge.sif file.
4 Select Open. The Import Wizard—Preview screen appears, listing the Analytics Bridge tables.
5 Select Next.
NOTE: All the objects imported in this process should be new to your 6.3 repository, therefore there should be no conflict due to an import. In case of conflict, choose the second Conflict Resolution option: Merge the object definition from the archive file with the definition in the Repository.
6 Select Next. A dialog box appears, informing you that the operation will modify your repository, and how many objects will be added, and asking if you wish to proceed. Select Yes.
7 In the next screen, select Finish to complete the import process.
Copy From To
objects_63_752_bridge.sif 63_752_Horz_Bridge folder \tools\objects
154 Siebel Data Warehouse Installation and Administration Guide Version 7.5, Rev. C

The Siebel eBusiness 6.3 to 7.5 Analytics Bridge
Installation Process
Apply Schema Definitions to the Physical DatabaseOnce imported into Siebel Tools, the new schema must be applied to the physical database.
To apply schema definitions to the physical database
1 In Siebel Tools, go to the Table screen. Search for S_ETL*. You should see the following tables:
2 Select all these tables, and click the Apply button at the top of the screen.
S_ETL_COSTLST
S_ETL_CTRYREGN
S_ETL_DATASRC
S_ETL_DAY
S_ETL_ERRHLP
S_ETL_ERRLOG
S_ETL_EXCH_RATE
S_ETL_I_IMAGE
S_ETL_INC_STAT
S_ETL_INDUS_VER
S_ETL_LOV
S_ETL_PARAM
S_ETL_R_IMAGE
S_ETL_REF_PARAM
S_ETL_RUN
S_ETL_SRC_TABLE
S_ETL_TIME_DAY
S_ETL_VI_IMAGE
S_ETL_VR_IMAGE
Version 7.5, Rev. C Siebel Data Warehouse Installation and Administration Guide 155

The Siebel eBusiness 6.3 to 7.5 Analytics Bridge
Installation Process
3 In the next window (Apply Schema), under the entry Tables, select Current Query from the dropdown. Under the subsequent entries, enter the connection parameters for the development database. (Your connection information will vary depending on your particular database platform and on the configuration of your particular database environment.)
4 Click the Apply button.
Import Language-Independent Siebel Seed DataSiebel seed data must also be installed to enable a fully functioning Bridge. This updates the seed data in the Siebel transactional database for items such as responsibility data and lists of values information.
To import language-independent seed data
1 Copy the following files:
2 Open a command line, and go to the same directory where you copied the .dat and .inp files.
3 Run one of the import commands from the following table, after replacing these connection parameters with the values appropriate to your database environment:
■ Connection parameters:
❏ UserName
❏ Password
Copy From To
seed_63_752_bridge.dat 63_752_Horz_Bridge folder Local Machine
seed_63_752_bridge_<xxx>.inp
(where <xxx> corresponds to the database platform you are using)
63_752_Horz_Bridge folder Local Machine
156 Siebel Data Warehouse Installation and Administration Guide Version 7.5, Rev. C

The Siebel eBusiness 6.3 to 7.5 Analytics Bridge
Installation Process
❏ ODBCDataSource
❏ DatabaseOwner
■ Import command (one of the following):
NOTE: The command you run depends on which database platform you are using.
Import Locale Seed DataIf your organization requires that Siebel Analytics data be viewed in a language other than English, you must also import Locale seed data into the Siebel transactional (OLTP) database. This process must be performed once for each language in which your data is to be viewed.
Database Platform Run Import Command
DB2UDB $SIEBELSERVERROOT\bin\dataimp /u $UserName /p $Password /c "$ODBCDataSource" /d $DatabaseOwner /f seed_63_752_bridge.dat /w y /q 100 /h Log /x f /i seed_63_752_bridge_db2udb.inp /l seed_63_752_bridge_db2udb.log
MSSQL $SIEBELSERVERROOT\bin\dataimp /u $UserName /p $Password /c "$ODBCDataSource" /d $DatabaseOwner /f seed_63_752_bridge.dat /w y /q 100 /h Log /x f /i seed_63_752_bridge_mssql.inp /l seed_63_752_bridge_mssql.log
Oracle $SIEBELSERVERROOT\bin\dataimp /u $UserName /p $Password /c "$ODBCDataSource" /d $DatabaseOwner /f seed_63_752_bridge.dat /w y /q 100 /h Log /x f /i seed_63_752_bridge_oracle.inp /l seed_63_752_bridge_oracle.log
Version 7.5, Rev. C Siebel Data Warehouse Installation and Administration Guide 157

The Siebel eBusiness 6.3 to 7.5 Analytics Bridge
Installation Process
To import Locale seed data into the Siebel OLTP database
1 Copy the following files:
2 Open a command line, and navigate to the same directory where you copied the .dat and .inp files.
3 Run the following import command after replacing these connection parameters with the values appropriate to your database environment. Replace <lan> in the command with the appropriate code for the language to be installed.
■ Connection parameters:
❏ UserName
❏ Password
❏ ODBCDataSource
❏ DatabaseOwner
■ Import command:
$SIEBELSERVERROOT\bin\dataimp /u $UserName /p $Password /c "$ODBCDataSource" /d $DatabaseOwner /f seed_63_752_bridge_<lan>.dat /w y /q 100 /h Log /x f /i seed_63_752_bridge_<lan>.inp /l seed_63_752_bridge_<lan>.log
Copy From To
seed_63_752_bridge__<lan>.dat
(where <lan> corresponds to the language being used)
63_752_Horz_Bridge\Localization folder
Local Machine
seed_63_752_bridge_<lan>.inp
(where <lan> corresponds to the language to be installed)
63_752_Horz_Bridge\Localization folder
Local Machine
158 Siebel Data Warehouse Installation and Administration Guide Version 7.5, Rev. C

The Siebel eBusiness 6.3 to 7.5 Analytics Bridge
Installation Process
Siebel eBusiness Application 6.3 Analytics Bridge FilesTable 15 details the contents of each of the files included in the 63_752_Horz_Bridge folder.
Table 15. Files Used by the Analytics Bridge
File Name Purpose of File
Siebel_DW_Rep_63_752.rep The Informatica repository file that contains the objects and code required to populate the 7.5 Siebel Data Warehouse with the 6.3 Siebel transactional data. (This file replaces the standard .rep file provided with Siebel Analytics version 7.5.)
SiebelAnalytics_63_752.rpd The Siebel Analytics repository file that contains all of the analytical metadata mapping rules to take physical data warehouse tables and columns and map them to presentation layer metrics and facts.(This file replaces the standard .rpd file provided with Siebel Analytics version 7.5.)
objects_63_752_bridge.sif The Siebel Archive File which contains the logical definition of the ETL tables.
seed_63_752_bridge.dat The Siebel Seed Data file which contains language-independent seed data records for the following three tables:
■ S_LST_OF_VAL
■ S_RESP
■ S_APP_VIEW
■ S_APP_VIEW_RESP
■ seed_63_752_bridge_db2udb.inp
■ seed_63_752_bridge_mssql.inp
■ seed_63_752_bridge_oracle.inp
Import file used to control the import of the seed_63_752_bridge.dat file to a particular database platform.
Version 7.5, Rev. C Siebel Data Warehouse Installation and Administration Guide 159
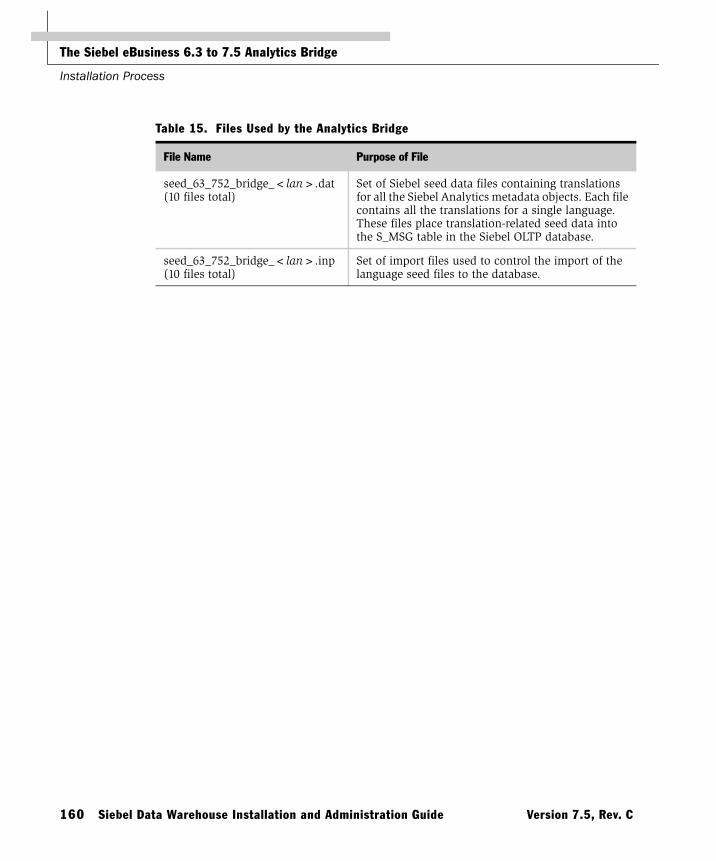
The Siebel eBusiness 6.3 to 7.5 Analytics Bridge
Installation Process
seed_63_752_bridge_<lan>.dat(10 files total)
Set of Siebel seed data files containing translations for all the Siebel Analytics metadata objects. Each file contains all the translations for a single language. These files place translation-related seed data into the S_MSG table in the Siebel OLTP database.
seed_63_752_bridge_<lan>.inp(10 files total)
Set of import files used to control the import of the language seed files to the database.
Table 15. Files Used by the Analytics Bridge
File Name Purpose of File
160 Siebel Data Warehouse Installation and Administration Guide Version 7.5, Rev. C

The Siebel eBusiness 6.3 to 7.5 Analytics Bridge
Configuration Considerations
Configuration ConsiderationsAfter installing the Analytics Bridge, replacing the applicable repositories, and loading new Siebel seed data files, you must also create Siebel Analytics users and, if applicable to your organization, configure the database tables for Siebel Delivers.
Creating Siebel Analytics Users in Siebel 6.3 eBusiness ApplicationsSiebel Analytics uses responsibilities defined in the Siebel operational application to control access to its data objects. (For more information on Siebel Analytics security configuration and integration with Siebel operational applications, refer to the chapter on user authentication in Siebel Analytics Installation and Configuration Guide.)
The language-independent seed data step of the Bridge installation process creates Siebel Analytics responsibilities in your organization’s Siebel 6.3 eBusiness application. After the installation of these responsibilities, you must assign users in your organization to these new Siebel Analytics responsibilities using the operational application’s Responsibilities module. The responsibilities assigned to a particular user control the level of access that user has within Siebel Analytics. Users not assigned to any Siebel Analytics responsibility cannot access the Siebel Analytics application.
Version 7.5, Rev. C Siebel Data Warehouse Installation and Administration Guide 161

The Siebel eBusiness 6.3 to 7.5 Analytics Bridge
Configuration Considerations
Creating Database Tables for Siebel Delivers/Scheduler
NOTE: This step is applicable only is you are using the Siebel Delivers application.
Siebel Analytics Scheduler uses four database tables to store pertinent information about a report job, its instances, and its parameters. For users of Siebel 7.5 eBusiness operational applications, these four tables reside within the Siebel operational (OLTP) database and are installed as part of the Siebel 7.5 operational applications installation process.
These tables do not exist in the Siebel 6.3 OLTP schema. Customers using Siebel eBusiness 6.3 operational applications who wish to make use of the Siebel Delivers product, must manually install the four database tables to one of their organization's databases. It is recommended that these tables be created in the same database as the Siebel operational application's database schema. However, these tables can be created in an independent database as well. The section on creating and configuring Siebel Analytics tables in Siebel Analytics Installation and Configuration Guide describes the process of creating these tables.
NOTE: The table-creation process described in Siebel Analytics Installation and Configuration Guide must be followed by every customer who configures the Siebel eBusiness 6.3 to 7.5 Analytics Bridge and intends to use the Siebel Delivers product, even though the reference documentation states that it is only required for Siebel Analytics Stand-Alone customers.
For more information on the Siebel Delivers application, see Siebel Analytics Scheduler Guide.
162 Siebel Data Warehouse Installation and Administration Guide Version 7.5, Rev. C

Installing and Configuring the Siebel DataWarehouse in DB2 for OS/390 C
The Siebel Data Warehouse consists of the following components:
■ Informatica repository
■ Star schema tables that hold the Siebel Data Warehouse information (populated by Informatica)
For most databases, these two components are installed in the same database. However, if you are using IBM DB2 UDB running under OS/390, then these two components (the repository and the star schema) must be installed in separate databases. The differences in installation between DB2 UDB on OS/390 and DB2 UDB on other platforms are these:
■ The Informatica repository cannot be installed on DB2 UDB running under OS/390.
■ The Informatica repository must be installed on some other supported RDBMS (such as DB2 running under Windows or UNIX, or MS SQL or Oracle).
■ The Siebel Data Warehouse tables can be installed on DB2 for OS/390.
This appendix describes Siebel Data Warehouse installation and configuration for the DB2 UDB running under OS/390.
NOTE: Prior to executing the batches with Informatica, restore the Informatica repository and create the data warehouse tables. These tables are empty until populated by the predefined batches. See “Populating the Initial Siebel Data Warehouse” on page 78.
Version 7.5, Rev. C Siebel Data Warehouse Installation and Administration Guide 163

Installing and Configuring the Siebel Data Warehouse in DB2 for OS/390
Prerequisites for Installing DB2 under OS/390
Prerequisites for Installing DB2 under OS/390To install the Siebel Data Warehouse, first make sure the following prerequisites are met:
■ You are an experienced DB2 DBA or have the assistance of an experienced DB2 DBA.
■ You have installed the Gateway Server, Siebel Server, and Database Server.
■ An OLAP database has been created for the Siebel Data Warehouse on DB2 for OS/390.
■ You have created and configured an ODBC connection from the Administrator's workstation to the Siebel Data Warehouse, using DB2 Connect.
■ A database has been created for the Informatica repository. This database cannot be on DB2 for OS/390. This database can be on a DB2, Oracle, or SQL Server RDBMS.
■ You have created, configured, and tested an ODBC connection from the Administrator's workstation to the Informatica repository database.
■ The login to the database is the same as the schema qualifier.
■ For installing the star schema tables, you have done one of the following:
■ You have already installed the Siebel Installer on the Administrator Workstation.
■ You are running the Siebel Installer on the Administrator Workstation from the Siebel Windows Server Programs CD-ROM. Navigate to the SES folder on that CD and run setup.exe.
164 Siebel Data Warehouse Installation and Administration Guide Version 7.5, Rev. C

Installing and Configuring the Siebel Data Warehouse in DB2 for OS/390
Installing Siebel Data Warehouse for DB2 under OS/390
Installing Siebel Data Warehouse for DB2 under OS/390The following are the main steps required to complete the installation of the Siebel Data Warehouse:
a “To install the Informatica repository on DB2 for OS/390”
b “To configure the Informatica repository on DB2 for OS/390” on page 167
c “To install the star schema tables for DB2 on OS/390” on page 169
NOTE: Do not use the following procedures unless you have completed “To install the Siebel Data Warehouse using the Siebel Analytics installer” on page 41.
To install the Informatica repository on DB2 for OS/390
1 In Step 3 of “To install the Siebel Data Warehouse using the Siebel Analytics installer” on page 41, fill out the Prerequisite Check screen to create and configure the Informatica repository, using the following table as a guide, and then click Next. Do not create the Siebel Data Warehouse tables. That is covered in “Installing the Star Schema Tables on DB2 for OS/390” on page 169.
Option Default Setting Comments
Create Informatica Repository
Checked Check this to create an Informatica repository specific to Siebel Analytics.
Delete existing Informatica Repository
Clear Check this only when you need to delete an existing Informatica Repository. This is not needed for a new installation, as there is no existing Informatica Repository. However, if you have a failed installation and need to do a clean install, check this box.
Configure Informatica Repository (enter source and target information)
Checked Check this to configure the Informatica repository's connection to the Siebel Transaction Database.
Version 7.5, Rev. C Siebel Data Warehouse Installation and Administration Guide 165

Installing and Configuring the Siebel Data Warehouse in DB2 for OS/390
Installing Siebel Data Warehouse for DB2 under OS/390
2 Specify the connection information to be used for the Siebel Transaction Database.
This information will be placed in the Informatica Repository, to be used by Informatica to access the Siebel Transaction Database. Fill out the form, using the following table as a guide, and then click Next.
Create Siebel Data Warehouse Tables
Checked Clear this box. You create the Siebel Data Warehouse (star schema) tables using a separate installer after completing the Informatica repository configuration. For information on creating the Siebel Data Warehouse tables, refer to “Installing the Star Schema Tables on DB2 for OS/390” on page 169.
Drop existing Siebel Data Warehouse Tables
Clear Do not check this. If you need to drop existing tables, have your DBA drop them.
Option Default Setting Comments
Field Description
Platform Choose DB2.
Connect String Enter the native connect string (example: server@database) to the Siebel Transaction Database.
Table Owner Identify the table owner of the Siebel Transaction Database.
Password Enter the password (double-entry confirmation).
MS SQL DBMS Name
Leave this blank.
Unicode Do not check. This is reserved for future compatibility with Unicode databases.
ODBC Data Source
Enter the Data Source Name (DSN) for the Siebel Transaction Database.
166 Siebel Data Warehouse Installation and Administration Guide Version 7.5, Rev. C
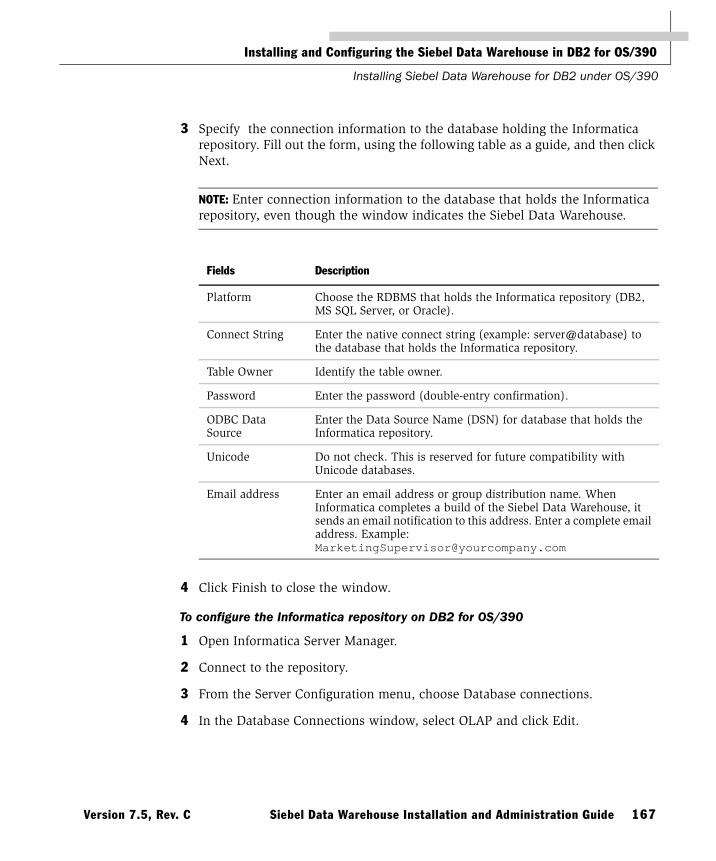
Installing and Configuring the Siebel Data Warehouse in DB2 for OS/390
Installing Siebel Data Warehouse for DB2 under OS/390
3 Specify the connection information to the database holding the Informatica repository. Fill out the form, using the following table as a guide, and then click Next.
NOTE: Enter connection information to the database that holds the Informatica repository, even though the window indicates the Siebel Data Warehouse.
4 Click Finish to close the window.
To configure the Informatica repository on DB2 for OS/390
1 Open Informatica Server Manager.
2 Connect to the repository.
3 From the Server Configuration menu, choose Database connections.
4 In the Database Connections window, select OLAP and click Edit.
Fields Description
Platform Choose the RDBMS that holds the Informatica repository (DB2, MS SQL Server, or Oracle).
Connect String Enter the native connect string (example: server@database) to the database that holds the Informatica repository.
Table Owner Identify the table owner.
Password Enter the password (double-entry confirmation).
ODBC Data Source
Enter the Data Source Name (DSN) for database that holds the Informatica repository.
Unicode Do not check. This is reserved for future compatibility with Unicode databases.
Email address Enter an email address or group distribution name. When Informatica completes a build of the Siebel Data Warehouse, it sends an email notification to this address. Enter a complete email address. Example: [email protected]
Version 7.5, Rev. C Siebel Data Warehouse Installation and Administration Guide 167
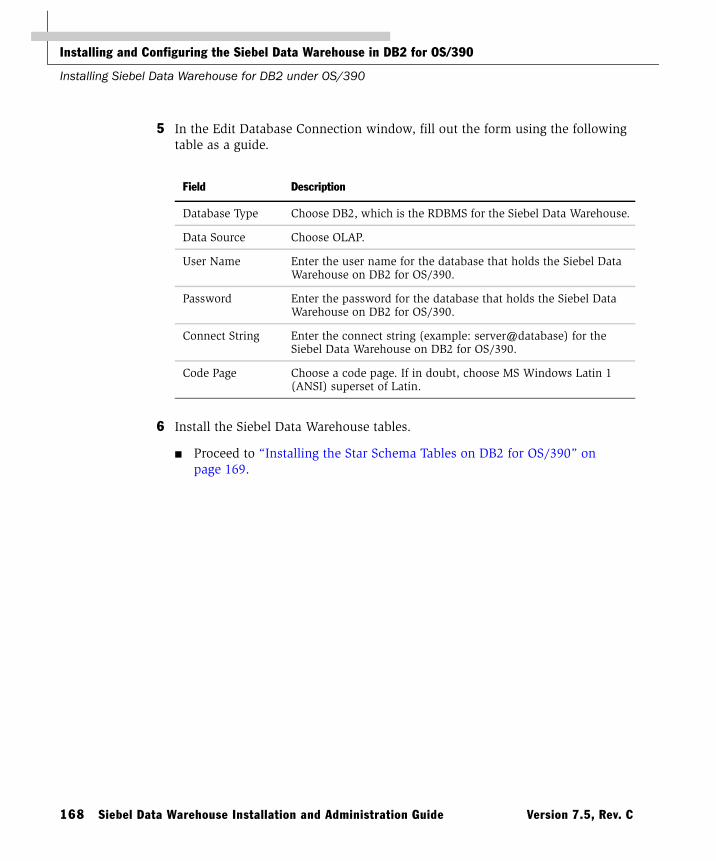
Installing and Configuring the Siebel Data Warehouse in DB2 for OS/390
Installing Siebel Data Warehouse for DB2 under OS/390
5 In the Edit Database Connection window, fill out the form using the following table as a guide.
6 Install the Siebel Data Warehouse tables.
■ Proceed to “Installing the Star Schema Tables on DB2 for OS/390” on page 169.
Field Description
Database Type Choose DB2, which is the RDBMS for the Siebel Data Warehouse.
Data Source Choose OLAP.
User Name Enter the user name for the database that holds the Siebel Data Warehouse on DB2 for OS/390.
Password Enter the password for the database that holds the Siebel Data Warehouse on DB2 for OS/390.
Connect String Enter the connect string (example: server@database) for the Siebel Data Warehouse on DB2 for OS/390.
Code Page Choose a code page. If in doubt, choose MS Windows Latin 1 (ANSI) superset of Latin.
168 Siebel Data Warehouse Installation and Administration Guide Version 7.5, Rev. C

Installing and Configuring the Siebel Data Warehouse in DB2 for OS/390
Installing the Star Schema Tables on DB2 for OS/390
Installing the Star Schema Tables on DB2 for OS/390The following procedure installs the star schema tables into the Siebel Data Warehouse for DB2 on OS/390.
NOTE: There is no automated utility to drop the star schema tables. In the event of a failed installation, have a DBA drop the tables before you reinstall.
To install the star schema tables for DB2 on OS/390
1 From the Start menu, choose Programs > Siebel Enterprise Server 7.5 > Configure DB Server.
2 In the Siebel Software Configuration Utility window, click Next to accept the default values for the following pages:
■ Gateway Server Address
■ Siebel Server Directory
■ Siebel Database Server Directory
3 In the RDBMS Platform page, select IBM DB2 UDB for OS/390 and z/OS, and then click Next.
4 In the Siebel Database Operation page, select Install Database, and then click Next.
5 In the Select Installation Operation page, click Install Siebel Data Warehouse Database, and then click Next.
6 In the ODBC Data Source Name page, enter the ODBC Data Source Name for the Siebel Data Warehouse, and then click Next.
7 In the Database User Name page, enter the Database User Name and Database Password (with double entry confirmation), and then click Next.
8 In the Siebel Schema Qualifier page, enter the Schema Qualifier for the Siebel Data Warehouse, a Security Group ID (default is SSEROLE), and then click Next.
9 In the Select Installation Type page, click Standard Install, and then click Next.
Version 7.5, Rev. C Siebel Data Warehouse Installation and Administration Guide 169

Installing and Configuring the Siebel Data Warehouse in DB2 for OS/390
Installing the Star Schema Tables on DB2 for OS/390
10 In the Select Installation Mechanism page, click either Generate DDL into Files or Run DDL Automatically, and then click Next. You may prefer to generate DDL into files if you wish to examine the DDL information prior to executing it. If you clicked Generate DDL into Files, the installer prompts for a file name.
11 Accept the default or change the path name. You can use the Browse feature to specify a fully qualified path name. Make sure to run the DDL before proceeding to the next step.
12 In the Siebel Schema Layout page, click an option button, and then click Next.
13 In the Storage Group for Table Spaces page, enter Storage group for Table spaces (default is SYSDFLT) and Storage group for Indexes (default is SYSDFLT), and then click Next.
14 In the 4 KB Buffer Pool Name page, enter the names of the 4 KB Buffer pool (default is BP1) and the 16 KB Buffer pool (default is BP16K1) for the Siebel Data Warehouse, and then click Next.
15 In the 32 KB Buffer Pool Name page, enter the names of the 32 KB Buffer pool (default is BP32K1) and the Index Buffer pool (default is BP2) for the Siebel Data Warehouse, and then click Next.
16 In the Database Name Prefix page, enter the Database Name Prefix, and then click Next.
17 In the Encoding Scheme page, click ASCII or EBCDIC, and then click Next. If you are not sure which to choose, then choose ASCII.
18 In the Configuration Parameter Review page, review the entries. If any are incorrect, then click Previous and repair the problem. If all entries look correct, click Finish.
19 In the runnow window, click OK.
The Siebel Upgrade Wizard window opens. A command line window opens. The installer creates the Storage.ctl file and then executes the install using the parameters you specified. When complete, the command line window closes.
20 In the Siebel Upgrade window, when the word Complete appears in the window's title bar, click OK.
170 Siebel Data Warehouse Installation and Administration Guide Version 7.5, Rev. C

Index
AAdministrator Workstation
installation planning overview 23PowerMart Client, installing on 36regional language settings, changing 25server component 22
Analytics Bridge. See Siebel ePharma 6.3 to 7.5 Analytics Bridge; Siebel eBusiness 6.3 to 7.5 Analytics Bridge
ANSI NULL option, setting 31audience for guide 10
Bbatch processes, modifying for industry
applicationsSee also batchesabout batching processes and list of
industry applications 92industries and sessions (table) 92session, removing from a batch process
93batches
See also batch processes, modifying for industry applications
consecutive batches, about running 96custom batches, creating 123environment variables, setting up 97error message when executing on the
Informatica Server Manager, probable cause 113
extraction, disabling after performing 90linking batches example 96Server Manager error message, probable
cause 113bulkload mode, error while creating a
custom session 116
Ccircular hierarchy exceptions, about and
example 72Code Page 1252, about running the
Informatica Server 51computer names and components (table) 22Cost List exceptions
See also exception reportsabout and example 70Cost lists, using to display 75products without a cost list 71
currency, diagnosing translation issues 75custom folder, working with 122
Ddata flow
OLTP to OLAP, diagram 20Online Analytical Processing (OLAP)
database, about and diagram 20data import
data loading matrix, table of 101syndicated data loading, overview 99
data loadingSee also Data Loading MatrixSiebel Analytics for Life Sciences, issues
when loading 107troubleshooting, Informatica and data
loading issues 113Data Loading Matrix
Informatica Metadata Reporter (IMR), about and use 106
table of 101Data Source Matrix, table of 105Data Warehouse Server
See also Informatica Server and repository, configuring
Version 7.5, Rev. C Siebel Data Warehouse Installation and Administration Guide 171

installation overview 23registry settings, changing in UNIX 88server component 22
database connections, creatingDB2 installations, creating database
connections for 39native and ODBC connection (diagram)
38ODBC connection information, table of 38Oracle installation, creating database
connections for 39DB Library Options setting, modifying 31DB2
database connections, creating for 39Siebel Data Warehouse requirements 27Siebel Data Warehouse, cannot connect to
112DB2 running under OS/390
components, about 163Informatica repository, configuring 167Informatica repository, installing 165installation prerequisites 164star schema tables, installing 169
ddlimp utility, using to recreate indexes 95dimension
new dimension, guidelines for creating new facts 126
new dimension, guides for creating and using it in an existing fact 125
documentationrequired reading 14third-party, table of 14
EEAI, about using for populating Siebel Data
Warehouse 121email notification, Outlook error when
sending post session email 116Enterprise Manager, error displayed after
installing ODBC driver 112environment variables, setting up 97
errors. See troubleshootingETL alignment version system preferences,
changing 147ETL batches. See Informatica Repository,
administeringETL History view, using to view the history
of the ETL processes and statuses 76ETL process
See also Siebel Data Warehouse, modifying
custom batches, creating 123custom folder, working with 122custom templates, using 124described and customizing 122designing 120starting 84troubleshooting 87
exception reportsSee also Cost List exceptions; system
preferencesadditional exceptions, list of 76circular hierarchy exceptions, about and
example 72cleansing the data, process and diagram
73ETL History view, using to view the
history of the ETL processes and statuses 76
exception report components, list of 69exception, fixing 73exchange rate exceptions, about 71Exchange Rate view, using to diagnose
currency translation issues 75executing the report, cleansing steps 73invalid hierarchy exceptions, about 71List of Values exceptions 69List of Values view, using to compare
values with Siebel Data Warehouse 74exchange rate exceptions, about 71Exchange Rate view, using to diagnose
currency issues 75
172 Siebel Data Warehouse Installation and Administration Guide Version 7.5, Rev. C

Ffact
existing fact, guidelines for creating a new dimension and using it in 125
new fact, guidelines for creating 126new fact, guidelines for creating a new
dimension 126Full_Extract_Siebel_DW, error returned by
Informatica 113Full_Load_Siebel_DW
error when running 114improving performance of 94indexes, dropping before running 94indexes, recreating 95
Full_Load_Siebel_DW_Facts, error message when executing 115
Gguide
audience for 10organization of 11revision history 15
Hhierarchical relationships, invalid hierarchy
exceptions, about 71history, revision history 15
IInformatica .rep file name 152Informatica client software
configuring (procedure) 64Enable Data Code Pages Validation,
checking if conditions met 37PowerMart Client, installing on the
Administrator Workstation 36Informatica Metadata Reporter (IMR)
about and use 106error when running, probable cause 117
Informatica PowerMart Client, installing on the Administrator Workstation 36
Informatica Repository ManagerSee also Informatica Repository,
administeringconfiguring, when installing 54configuring, when starting 57
Informatica Repository, administeringSee also performanceabout 83batches, disabling after performing an
extraction 90Data Warehouse Server registry setting in
Windows, changing 88Data Warehouse Server registry settings,
changing in UNIX 88DB2 running under OS/390, configuring
for 167DB2 running under OS/390, installing on
165Dimension, Fact, and SCD batches,
disabling 90ETL process, monitoring 86ETL process, starting 84full load, doing 84refreshing load, doing in Oracle 90Siebel Data Warehouse had loaded,
verifying 89status of the request, checking to start the
batch 86troubleshooting ETL process 87
Informatica ServerSee also Informatica Server and
repository, configuring; Informatica Server host name
Code Page 1252, running on operating systems using 37
database connection, configuring 65installing on other than default location
58Informatica Server and repository,
configuringSee also Informatica Server
Version 7.5, Rev. C Siebel Data Warehouse Installation and Administration Guide 173

configuring (procedure) 61Informatica client, configuring 64Informatica Repository Manager,
configuring 54Informatica repository, configuring 57Informatica Server database connection,
configuring 65Informatica Server host name, changing
55Informatica Server host name, verifying
the change 56special cases, notes on 61Unicode mode, about running 52Unicode mode, configuring under
Windows 52UNIX, setting environment variables 60Windows, configuring under 51Windows, setting up Informatica service
under 59Informatica Server host name
See also Informatica Server; Informatica Server and repository, configuring
changing 55verifying that it has been changed 56
Informatica Service, unable to start on Windows 59
installationSee also DB2 running under OS/390Informatica client software 36Informatica Server, installing on other
than default directory 58materials provided (table) 33planning 23Siebel eBusiness 6.3 to 7.5 Analytics
Bridge 150Siebel ePharma 6.3 to 7.5 Analytics
Bridge 133troubleshooting issues 112
JJapanese users, about running the
Informatica Server 51
LList of Values
exceptions, about and example 69view, using to compare values with the
Siebel Data Warehouse 74loads, refreshing 91LS dimension tables, supported incremental
updates (table) 109
MMandatory Id fields, description 101materials provided, table of 33Microsoft Outlook
closes when finishing ETL process, probable cause 117
error when sending post session email 116
mobile Web users, about synchronizing before running load 90
OODBCSQL utility, using to drop indexes 94OLAP. See Online Analytical Processing
databaseOnline Analytical Processing database
about 26Data Warehouse, data flow into 20note, about creation of db 23Star Matrix, ePharma 6.3 to 7.5 (table)
148Online Transaction Processing database
See also Siebel Application 6.3 OLTP update patch
Online Analytical Processing database, differences from 26
OPB_OBJECT_LOCKS Informatica session deadlocked, probable cause 116
Oracledatabase connections, creating for 39full load optimizer settings 79mappings hang, probable cause 113
174 Siebel Data Warehouse Installation and Administration Guide Version 7.5, Rev. C

predefined full load batch process (table) 79
predefined refresh batch processes (table) 81
refresh load, doing 90Siebel Data Warehouse requirements 29Unicode database, about changing the
Informatica Server host name 56organization of guide 11OS/390. See DB2 running under OS/390Outlook
closes when finishing ETL process, probable cause 117
error when sending post session email 116
Pparent-child relationship, circular hierarchy
exceptions 72performance
components configured to optimize performance 32
Full_Load_Siebel_DW, improving performance of 94
plan types, data loading matrix value 101PowerMart Client, installing on the
Administrator Workstation 36preferences. See system preferences
QQuery Analyzer, can not open after
installing ODBC driver 112
RRDBMS error message, probable cause 114reading, required 14rebuilding Siebel Data Warehouse 121refresh loads 91Refresh_Extract_Siebel_DW
error returned by Informatica 113regional setting, changing 25.rep file, Informatica file 152
repositorySiebel 7,5, modifications for Analytics
Bridge 139repository. See Informatica Repository
Manager; Informatics Repository, administering
requirements, Siebel Data Warehouse 26responsibilities
7.5 responsibilities, adding to 6.3 ePharma users 141
ePharma responsibilities and functions (table) 142
Restart Sessions, using in case of failure 84revision history 15
SS_SYND_DATA attribute by data source
matrix, table of 105SDE_RecordLoadStart session fails,
probable cause 115SDEINC_RecordExtractStart session fails,
probable cause 115seed data, importing Locale seed data into
the OLTP database 158server component software
See also server components, installation requirements
computer names and server components (table) 22
configuration, recommended 21server components, installation
requirementsSee also server component softwareSiebel Data Warehouse, about 26Windows NT, additional Data Warehouse
server requirements 25session, removing from batch process 93Siebel 7.5
See also Siebel ePharma 6.3 to 7.5 Analytics Bridge
repository modifications for Analytics Bridge 139
Version 7.5, Rev. C Siebel Data Warehouse Installation and Administration Guide 175

responsibilities, adding to 6.3 ePharma users 141
Star Matrix, ePharma 6.3 to 7.5 (table) 148
Siebel Analytics for Life Sciencesdata loading issues 107LS dimension tables, supported
incremental updates (table) 109Siebel Application 6.3 OLTP update patch
about 134Analytics Bridge, files required (table)
135Informatica directory, copying update
patch files into 138installation directory, location of 137update patch files, setting up 137
Siebel Data WarehouseSee also individual Siebel Data
Warehouse entriesDB2 requirements 27loaded, verifying 89multiple instances, about creating 24Oracle requirements 29rebuilding 121requirements 26SQL server-specific requirements 31star schemas, creating or adding columns
to 121troubleshooting configuration issues 112
Siebel Data Warehouse, modifyingSee also individual Siebel Data
Warehouse entries and ETL process; templates, using custom templates
about 119ETL process description 122ETL process, designing 120rebuilding Data Warehouse 121source fields, identifying 120tables, adding fields to 121
Siebel Data Warehouse, populatingSee also individual Siebel Data
Warehouse entriesabout 78
full load optimizer settings in Oracle 79predefined full load batch processing in
Oracle (table) 79predefined refresh batch processes in
Oracle (table) 81Siebel Data Warehouse, setting up
See also individual Siebel Data Warehouse entries
components and about setting up 40system variables 50
Siebel Delivers/Scheduler, creating database tables for 162
Siebel eBusiness 6.3 to 7.5 Analytics BridgeAnalytics Bridge files (table) 159Configuration Setup screen, pausing
when displayed 152Informatica .rep file name 152Informatica repository file, replacing 152installation process overview 150OLTP schema definitions, importing new
definitions 154physical database, applying schema
definitions to 155seed data, importing language-
independent seed data 156seed data, importing Locale seed data 158Siebel Analytics 7.5, beginning standard
installation 151Siebel Analytics repository file, replacing
153Siebel Analytics users, creating 161Siebel Delivers/Schedules, creating
database tables for 162Siebel ePharma
data loading matrix, table of 101Siebel ePharma 6.3 to 7.5 Analytics Bridge
7.5 Siebel Analytics responsibilities, adding to 6.3 users 141
7.5 Star Matrix, ePharma 6.3 to 7.5 (table) 148
about 131Analytics Bridge installation 133
176 Siebel Data Warehouse Installation and Administration Guide Version 7.5, Rev. C

Authentication block definitions, changing 139
Authorization Properties block, changing 140
ePharma responsibilities and functions (table) 142
ETL alignment version system preferences, changing 147
Login property changes 140Siebel Analytics 7.5 repository
modifications, about 139Siebel Application 6.3 OLTP update patch
134Siebel Server
See also individual Informatica server entries
installation planning overview 24server components 22
Siebel Transaction Databaseconnection error 112connections required 38Cost lists, displaying 75extracting information from 122Siebel Data Warehouse, differences from
26source fields, identifying 120
source fields, identifying 120SQL Server
DB Library Options setting, modifying 31Siebel Data Warehouse requirements 31
star schemascolumns, adding 121creating new 121DB2 running under OS/390, installing for
169synchronizing mobile users before running
load, about 90syndicated data
importing, overview 99table (S_SYND_DATA), attribute fields
105
system preferencesSee also exception reportsnavigating to 67table of 67
system variables, changing 50
Ttablespace, Oracle-specific requirements 29Technical Note 429, about problems using
Analytics Bridge 149templates, using custom templates
columns in the Siebel Data Warehouse, guidelines for modifying 124
custom templates, description of 127extra columns, guidelines for adding from
a related source table 124extra columns, guidelines for adding from
the same source table 124new dimension, guidelines for creating
and using it in an existing fact 125new dimension, guidelines for creating
new facts 126new fact, guidelines for creating 126
third-party documentation, table of 14troubleshooting
ETL process 87Informatica and data loading issues 113installation and configuration issues 112
UUnicode mode
multibyte or ISO 8859-1, about running Informatica Server in 52
Windows, configuring under 52UNIX
Informatica Server, setting environment variables 60
installation of Informatica software, about installing from CD-ROM 61
Version 7.5, Rev. C Siebel Data Warehouse Installation and Administration Guide 177

WWeb Server
installation planning overview 24sever components 22
WindowsSee also Windows NTData Warehouse Server registry settings,
changing 88Informatica Server, configuring under 51
Informatica Server, setting up under 59Unicode mode, configuring under
Windows 52Windows NT
See also WindowsData Warehouse server requirements,
additional 25Primary Domain Controller and Backup
Domain Controller, support of 21
178 Siebel Data Warehouse Installation and Administration Guide Version 7.5, Rev. C