siding installation guide u.s. version - maibec · 2019-03-26 · genuine wood siding siding...
TRANSCRIPT
GENUINE WOOD SIDING SIDING INSTALLATION GUIDE | U.S. VERSION
IMPORTANT: COMPLIANCE WITH MAIBEC’S INSTALLATION, STORAGE AND MAINTENANCE REQUIREMENTS, AND WITH THE APPLICABLE BUILDING CODES IN YOUR REGION IS MANDATORY. PROBLEMS CAUSED BY FAILURE TO COMPLY WITH THESE REQUIREMENTS AND CODES MAY NOT BE COVERED UNDER APPLICABLE WARRANTIES.
1
Siding Installation Guide U.S. VERSION
This installation guide applies to Maibec textured-face finish and Maibec URBAHN® brushed-face finish siding.For optimal performance and appearance, and to benefit from all the advantages the Maibec warranty has to offer, Maibec siding must be installed with great care. Before installing your siding, carefully read this guide completely to understand the correct steps and precautions to take to ensure a proper installation.
IMPORTANT: Compliance with Maibec’s installation, storage and maintenance requirements, and with the applicable building codes in your region is mandatory. Problems caused by failure to comply with these requirements and codes may not be covered under applicable warranties. For any questions, please contact Maibec’s technical service toll-free at 1-800-363-1930, Monday to Friday from 8:30 a.m. to 4:30 p.m.
For use on exterior vertical walls only
If Maibec siding is installed in Coastal regions*, unstained stainless steel grade 316 ringed nails must be used for installing siding and trim. Failure to comply with this requirement will void the warranties.* COASTAL REGIONS ARE DESCRIBED AS LOCATED LESS THAN 3,000 FEET FROM THE COASTLINE.
Warning
Do not install products which appear to be or which you believe to be non-conforming. For more details, contact us.
Before you begin, consult the applicable building codes in your region for requirements regarding the installation of siding, weather barrier (housewrap), caulking, etc. Follow the manufacturer’s instructions for installing the weather barrier and applying caulking.
Storage
• Store the siding in a dry and well-ventilated area. Do not place it directly on the ground. • Always cover any unused siding after a day’s work. • Do not store the siding in a heated space, which can dry out the wood.
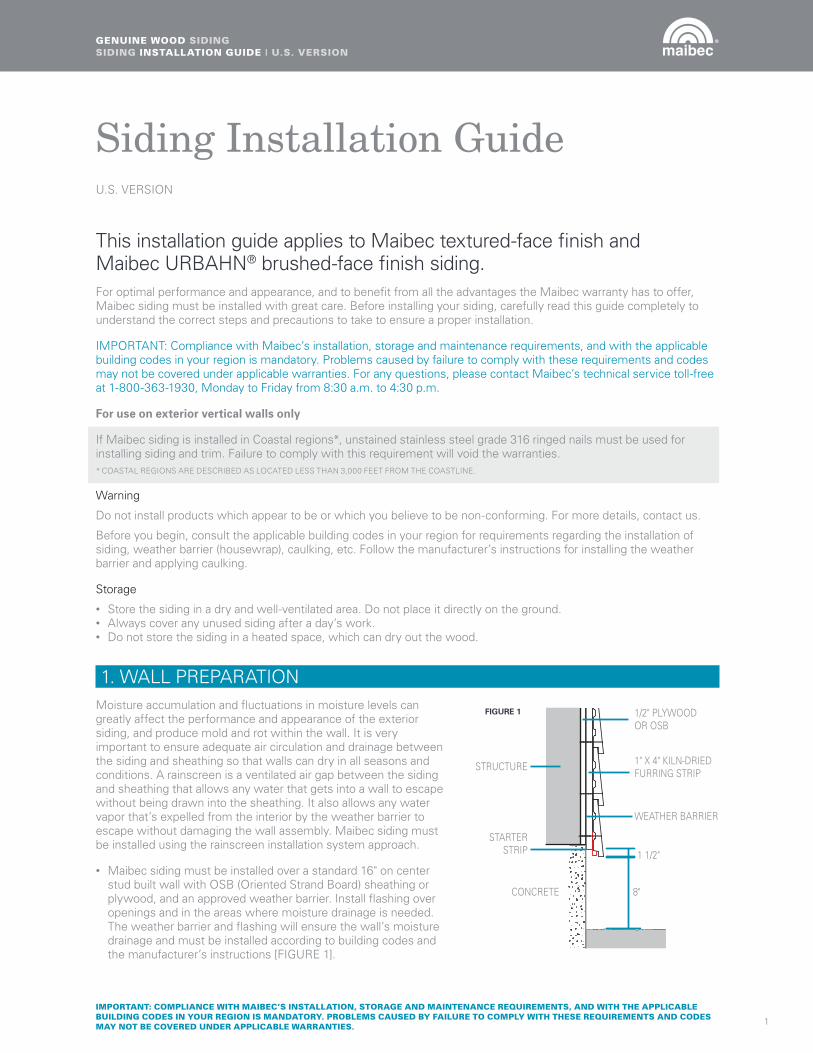
1. WALL PREPARATIONMoisture accumulation and fluctuations in moisture levels can greatly affect the performance and appearance of the exterior siding, and produce mold and rot within the wall. It is very important to ensure adequate air circulation and drainage between the siding and sheathing so that walls can dry in all seasons and conditions. A rainscreen is a ventilated air gap between the siding and sheathing that allows any water that gets into a wall to escape without being drawn into the sheathing. It also allows any water vapor that’s expelled from the interior by the weather barrier to escape without damaging the wall assembly. Maibec siding must be installed using the rainscreen installation system approach.
• Maibec siding must be installed over a standard 16" on center stud built wall with OSB (Oriented Strand Board) sheathing or plywood, and an approved weather barrier. Install flashing over openings and in the areas where moisture drainage is needed. The weather barrier and flashing will ensure the wall’s moisture drainage and must be installed according to building codes and the manufacturer’s instructions [FIGURE 1].
STRUCTURE
STARTER STRIP
CONCRETE
1" X 4" KILN-DRIED FURRING STRIP
1 1/2"
8"
FIGURE 1 1/2" PLYWOOD OR OSB
WEATHER BARRIER

GENUINE WOOD SIDING SIDING INSTALLATION GUIDE | U.S. VERSION
IMPORTANT: COMPLIANCE WITH MAIBEC’S INSTALLATION, STORAGE AND MAINTENANCE REQUIREMENTS, AND WITH THE APPLICABLE BUILDING CODES IN YOUR REGION IS MANDATORY. PROBLEMS CAUSED BY FAILURE TO COMPLY WITH THESE REQUIREMENTS AND CODES MAY NOT BE COVERED UNDER APPLICABLE WARRANTIES.
2
1. Wall Preparation (cont’d)• Verify the structural integrity of the wall, making certain that it is solid, straight and ready for the siding to
be installed. • The siding must be installed over furring strips to ensure airflow, allow for moisture drainage and reduce the risk
of premature aging. Use new 1" x 4" furring strips (1" x 3" strips are acceptable). They must be kiln-dried, straight, without splits or nail holes to ensure a proper fastening base. If the existing furring strips are not in good condition, they must be replaced with new ones. Furring strips must overlap the foundation by 1" [FIGURE 1].Consult the applicable building codes in your region.
The use of furring strips will increase the wall thickness by up to 3/4", making the window stick out by that much. Maibec siding MUST NOT be installed over concrete forms (ICF), foam sheathing, Home Slicker® † or similar products.
• Use approved exterior tape around windows, doors and all other openings to ensure a tight seal with the weather barrier.
• To provide proper drainage for the wall and to prevent rodent and certain insect infestations, use the ventilated metallic starter strip or staple screening at the base of the wall [FIGURES 5 and 6].
• Allow a minimum clearance of: • 8" from the ground• 1" from adjacent horizontal structures (e.g. deck, low wall, trim)• 2" from roof shingles
† Registered trade-mark property of Benjamin Obdyke Inc.
2. FURRING STRIPSFurring strips will create the air gap needed to ensure uninterrupted ventilation and drainage behind the siding. Remove any materials that may hinder airflow or drainage behind the siding.
VERTICAL FURRING STRIPS (For installing siding horizontally)
• Use 1" x 4" kiln-dried furring strips (with a moisture level less than 19%). It is the installer’s responsibility to ensure the furring strips are properly secured to the structure.
• Ensure a maximum spacing of 16" center to center (c/c) between furring strips [FIGURE 2]. Use 2 nails to nail the strip into the stud every 12" to 16". Stagger the nails slightly.
• Leave a 1" space between furring strips or at every 8’ to allow for uninterrupted ventilation and drainage behind the siding. Stagger this spacing.
HORIZONTAL FURRING STRIPS (For installing siding vertically)
• Use 1" x 4" kiln-dried furring strips (with a moisture level less than 19%). It is the installer’s responsibility to ensure the furring strips are properly secured to the structure.
• Ensure a maximum spacing of 16" center to center (c/c) between furring strips [FIGURE 3]. Use 2 nails to nail the strip into the stud. Stagger the nails slightly.
• Leave a 1" space between furring strips or at every 8' to allow for uninterrupted ventilation and drainage behind the siding. Stagger this spacing.
FIGURE 2 VERTICAL FURRING STRIPS
FIGURE 3 HORIZONTAL FURRING STRIPS
STRUCTURE
MAXIMUM SPACING OF 16" C/C BETWEEN FURRING STRIPS
1" x 4" KILN-DRIED FURRING STRIP
STRUCTURE
1" x 4" KILN-DRIED
FURRING STRIP
MAXIMUM SPACING OF
16" C/C BETWEEN FURRING STRIPS
GENUINE WOOD SIDING SIDING INSTALLATION GUIDE | U.S. VERSION
IMPORTANT: COMPLIANCE WITH MAIBEC’S INSTALLATION, STORAGE AND MAINTENANCE REQUIREMENTS, AND WITH THE APPLICABLE BUILDING CODES IN YOUR REGION IS MANDATORY. PROBLEMS CAUSED BY FAILURE TO COMPLY WITH THESE REQUIREMENTS AND CODES MAY NOT BE COVERED UNDER APPLICABLE WARRANTIES.
3
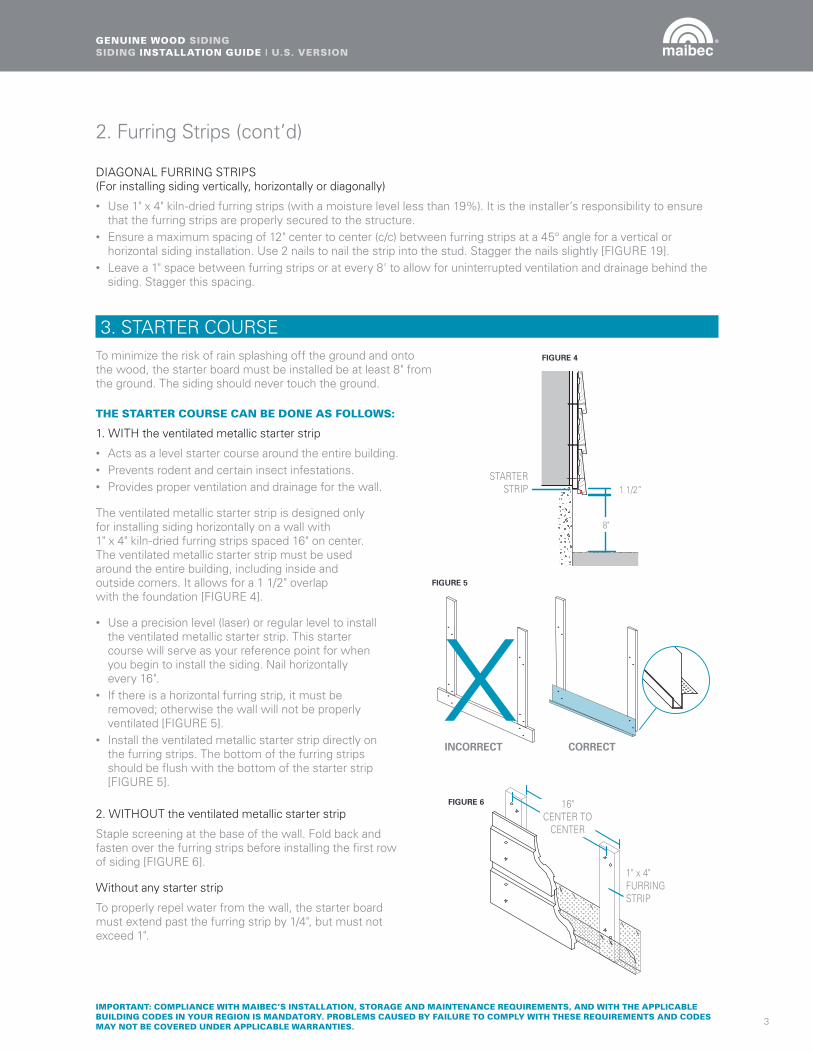
3. STARTER COURSETo minimize the risk of rain splashing off the ground and onto the wood, the starter board must be installed be at least 8" from the ground. The siding should never touch the ground.
THE STARTER COURSE CAN BE DONE AS FOLLOWS:
1. WITH the ventilated metallic starter strip
• Acts as a level starter course around the entire building. • Prevents rodent and certain insect infestations. • Provides proper ventilation and drainage for the wall.
The ventilated metallic starter strip is designed only for installing siding horizontally on a wall with 1" x 4" kiln-dried furring strips spaced 16" on center. The ventilated metallic starter strip must be used around the entire building, including inside and outside corners. It allows for a 1 1/2" overlap with the foundation [FIGURE 4].
• Use a precision level (laser) or regular level to install the ventilated metallic starter strip. This starter course will serve as your reference point for when you begin to install the siding. Nail horizontally every 16".
• If there is a horizontal furring strip, it must be removed; otherwise the wall will not be properly ventilated [FIGURE 5].
• Install the ventilated metallic starter strip directly on the furring strips. The bottom of the furring strips should be flush with the bottom of the starter strip [FIGURE 5].
2. WITHOUT the ventilated metallic starter strip
Staple screening at the base of the wall. Fold back and fasten over the furring strips before installing the first row of siding [FIGURE 6].
Without any starter strip
To properly repel water from the wall, the starter board must extend past the furring strip by 1/4", but must not exceed 1".
FIGURE 6 16" CENTER TO
CENTER
1" x 4" FURRING STRIP
FIGURE 4
1 1/2”
8"
2. Furring Strips (cont’d)
DIAGONAL FURRING STRIPS (For installing siding vertically, horizontally or diagonally)
• Use 1" x 4" kiln-dried furring strips (with a moisture level less than 19%). It is the installer’s responsibility to ensure that the furring strips are properly secured to the structure.
• Ensure a maximum spacing of 12" center to center (c/c) between furring strips at a 45° angle for a vertical or horizontal siding installation. Use 2 nails to nail the strip into the stud. Stagger the nails slightly [FIGURE 19].
• Leave a 1" space between furring strips or at every 8' to allow for uninterrupted ventilation and drainage behind the siding. Stagger this spacing.
FIGURE 5
INCORRECT CORRECT
STARTER STRIP

GENUINE WOOD SIDING SIDING INSTALLATION GUIDE | U.S. VERSION
IMPORTANT: COMPLIANCE WITH MAIBEC’S INSTALLATION, STORAGE AND MAINTENANCE REQUIREMENTS, AND WITH THE APPLICABLE BUILDING CODES IN YOUR REGION IS MANDATORY. PROBLEMS CAUSED BY FAILURE TO COMPLY WITH THESE REQUIREMENTS AND CODES MAY NOT BE COVERED UNDER APPLICABLE WARRANTIES.
4
5. END JOINTS
BOARD-TO-BOARD AND TRIM-TO-TRIM END JOINTS:
The ends of boards and trim to be butted must be cut at a 45° angle. Apply touch-up stain as recommended. No caulking is required [FIGURE 7].
FOR CUTTING RABBETED BEVEL SIDING, PLACE THE VISIBLE SIDE FACE DOWN.
If the boards or trim will be installed vertically, they must be installed with the cut angled as shown [FIGURE 9].
BOARD-TO-TRIM END JOINTS:
Cut the board at a 90° angle, apply touch-up stain and butt to the molding.
Apply caulking to the joint according to building codes and the manufacturer’s recommendations [FIGURE 10].
SIDING SIDING
1" x 4" FURRING STRIP
45° BOARD JOINT
WALL STRUCTURE
CORRECT INCORRECT
90° BOARD JOINT
SIDING TRIM
1" x 4" FURRING STRIP
WALL STRUCTURE
CAULKING
WALL STRUCTURE
SIDING
SIDING
1" x 4" FURRING STRIP
45° BOARD JOINT
FIGURE 7
FIGURE 9
FIGURE 10
FIGURE 8
6. TOUCH-UP STAINApply touch-up stain to all cut or planed surfaces and to all bare wood, even if it is not visible once the siding is installed. It is imperative to touch up boards before they are installed.
For touch-ups to Natural Tones siding, use the Maibec touch-up applicator. You need (2) bottles to touch up Natural tones siding – one bottle for the siding CUTS and the other bottle for the NAILS. Apply a sufficient amount of touch-up stain to entirely seal the wood.
When using touch-up stain in a can, use a polyester, nylon, or any synthetic applicator with firm bristles approved for water-based coatings [FIGURE 11].
Touch-up stain should only be used where needed. It must not, under any circumstance, be applied over non-damaged factory coated material.
For more information, see the touch-up guide that comes with the touch-up stain cans or kits, or go to maibec.com/us.
APPLY PRECISELY DO NOT SPILLOVER OR OVERBRUSH
FIGURE 11
4. BEFORE YOU BEGINCarefully plan the distribution of the boards on the walls. First, check the tally on the pallet identifying the product and the number of boards in each length. Position boards over the wall area so as to limit the number of joints and cuts. Use longer boards above and below windows and on large areas. Use short segments for small areas such
as spaces between doors and windows. Alternate board lengths to avoid joint alignment. Boards measuring 4 feet to 10 feet in length should be installed between boards measuring 11 feet to 16 feet in length. For a flawless finish, distribute the joints evenly on the entire surface. Never install 2 boards longer than 12 feet end to end.

GENUINE WOOD SIDING SIDING INSTALLATION GUIDE | U.S. VERSION
IMPORTANT: COMPLIANCE WITH MAIBEC’S INSTALLATION, STORAGE AND MAINTENANCE REQUIREMENTS, AND WITH THE APPLICABLE BUILDING CODES IN YOUR REGION IS MANDATORY. PROBLEMS CAUSED BY FAILURE TO COMPLY WITH THESE REQUIREMENTS AND CODES MAY NOT BE COVERED UNDER APPLICABLE WARRANTIES.
5
7. NAILSUse only Maibec hot dipped zinc galvanized ring shank nails with textured heads, factory-stained to match the siding color. Use a plastic hammer end cap to protect the wood.
Lengths:
• 2" for siding and 1" trim (fascia) • 3" for all other trim and the batten (Board and
Batten profile)• 2 1/2" coil nails for pneumatic nailers for siding
and trim. Verify nail gun compatibility. Not color-matched.
Unstained stainless steel grade 316 ringed nails must be used for installing siding and trim in Coastal regions*. Failure to comply with these requirements will void the warranties. To touch up nail heads, see section 6 of this guide.
* COASTAL REGIONS ARE DESCRIBED AS LOCATED LESS THAN 3,000 FEET FROM THE COASTLINE.
Ensure nails have a minimum penetration of 1 1/4" in a solid substrate.
The nail must be driven so that the head sits flush on the wood’s surface [FIGURE 12].
Each end on a board joint must be nailed on a 45° angle, independently of one another [FIGURE 13].
8. SIDING INSTALLATIONHORIZONTAL INSTALLATION (Vertical Furring Strips)
Nailing 1" x 6" sidingRabbeted Bevel – One nail every 16" at 1" from the bottom of the board [FIGURE 14].
V-Joint and Modern – Two nails every 16" at: • 1" from the bottom of the board.• 1/2" from the bottom of the smooth
portion of the board [FIGURE 15].
Nailing 1" x 8" siding Two nails every 16" at: • 1" from the bottom of the board. • 1" from the top of the board [FIGURE 16].
VERTICAL INSTALLATION (Horizontal Furring Strips)
1" x 10" Board & BattenWhen installing 1" x 10" Board & Batten siding, first staple screening at the base of the wall and then nail support furring strips horizontally on 16" centers. Leave a 1" gap where furring ends meet, to allow for continuous air flow and moisture drainage [FIGURE 17].
INCORRECT CORRECT
FIGURE 12
FIGURE 14 1" x 6" RABBETED BEVEL
FIGURE 15 1" x 6" V-JOINT AND MODERN
FIGURE 16 1" x 8" SIDING
FIGURE 13
16"
BOARD
BATTEN
BOTTOM FURRING STRIP: 1" TO 2” SPACING IS NECESSARY
BETWEEN FURRING STRIPS AT EVERY 24"
1" x 4" FURRING STRIP
1"
1" x 4" FURRING STRIP
1"
1" x 4" FURRING STRIP
1"
1"
FIGURE 17
1/2"
GENUINE WOOD SIDING SIDING INSTALLATION GUIDE | U.S. VERSION
IMPORTANT: COMPLIANCE WITH MAIBEC’S INSTALLATION, STORAGE AND MAINTENANCE REQUIREMENTS, AND WITH THE APPLICABLE BUILDING CODES IN YOUR REGION IS MANDATORY. PROBLEMS CAUSED BY FAILURE TO COMPLY WITH THESE REQUIREMENTS AND CODES MAY NOT BE COVERED UNDER APPLICABLE WARRANTIES.
6
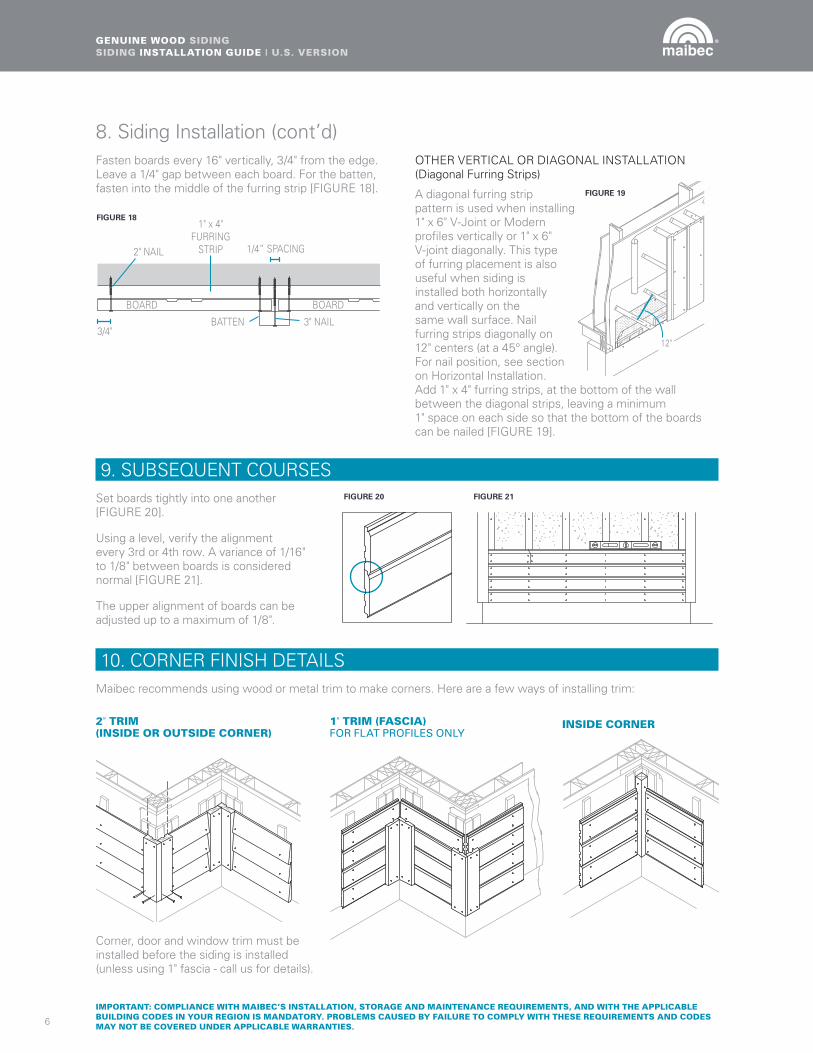
8. Siding Installation (cont’d)Fasten boards every 16" vertically, 3/4" from the edge. Leave a 1/4" gap between each board. For the batten, fasten into the middle of the furring strip [FIGURE 18].
OTHER VERTICAL OR DIAGONAL INSTALLATION (Diagonal Furring Strips)
A diagonal furring strip pattern is used when installing 1" x 6" V-Joint or Modern profiles vertically or 1" x 6" V-joint diagonally. This type of furring placement is also useful when siding is installed both horizontally and vertically on the same wall surface. Nail furring strips diagonally on 12" centers (at a 45° angle). For nail position, see section on Horizontal Installation. Add 1" x 4" furring strips, at the bottom of the wall between the diagonal strips, leaving a minimum 1" space on each side so that the bottom of the boards can be nailed [FIGURE 19].
2" NAIL
BOARD BOARD
3" NAILBATTEN
1" x 4" FURRING
STRIP
3/4"
1/4” SPACING
FIGURE 18
12"
FIGURE 19
9. SUBSEQUENT COURSESSet boards tightly into one another [FIGURE 20].
Using a level, verify the alignment every 3rd or 4th row. A variance of 1/16" to 1/8" between boards is considered normal [FIGURE 21].
The upper alignment of boards can be adjusted up to a maximum of 1/8".
FIGURE 20 FIGURE 21
10. CORNER FINISH DETAILSMaibec recommends using wood or metal trim to make corners. Here are a few ways of installing trim:
Corner, door and window trim must be installed before the siding is installed (unless using 1" fascia - call us for details).
2" TRIM (INSIDE OR OUTSIDE CORNER)
INSIDE CORNER1" TRIM (FASCIA) FORFLATPROFILESONLY

GENUINE WOOD SIDING SIDING INSTALLATION GUIDE | U.S. VERSION
IMPORTANT: COMPLIANCE WITH MAIBEC’S INSTALLATION, STORAGE AND MAINTENANCE REQUIREMENTS, AND WITH THE APPLICABLE BUILDING CODES IN YOUR REGION IS MANDATORY. PROBLEMS CAUSED BY FAILURE TO COMPLY WITH THESE REQUIREMENTS AND CODES MAY NOT BE COVERED UNDER APPLICABLE WARRANTIES.
7
NAILING TRIM
Every 16", fasten 2 nails 3/4" to 1" from each edge.
TO AVOID
Do not join two pieces of siding cut at a 45° angle to make corners. Not only will this limit your options for making adjustments during the installation, but the shifts that occur naturally in wood will become more noticeable over time.
INCORRECT3/4" TO 1"
3/4" TO 1"
16"
10. Corner Finish Details (cont’d)
11. WINDOW OR DOOR FINISH DETAILS1. Choosing a Window or Door
• If you plan to install Maibec trim, you must properly set the window or door depth according to the thickness of the furring strips (strapping), the chosen siding and the trim. It is important that the trim does not extend too far past the window or door frame in areas where water can accumulate (header and sill). See the diagrams in #3 of this section.
• If the siding butts to the frame, the frame must be as deep as the thickness of the wall plus the thickness of the siding [FIGURE 22].
2. Header Flashing
Aluminum or steel flashing is essential to avoid water infiltration. It must be installed under the barrier and tape, so that it covers and extends beyond the header trim that will later be installed.
Leave a 1/4" to 1/2" space between the siding and the flashing for effective water drainage.
The drawing shows a flashing with a 2" trim (inside or inside corner). If you use a 1" trim (fascia), please contact Maibec for details [FIGURE 23].
3. Siding Installation
Install the siding only after the trim has been installed. All flat horizontal surfaces (such as a window sill trim) are prone to water or snow accumulation. The use of flashing, caulking or a miter cut on the trim is necessary to prevent this accumulation [FIGURE 24].
3"
FIGURE 22
FIGURE 23
FLASHING EXTENDING PAST TRIM ANGLE MORE THAN 95%
BARRIER
TRIM
SIDING
FURRING STRIP
WINDOW FRAME
1/2" SPACING
95%
FIGURE 24
INCORRECT
Caulking
Caulking
CORRECT
Caulking
Caulking
Caulking
Caulking
GENUINE WOOD SIDING SIDING INSTALLATION GUIDE | U.S. VERSION
8
IMPORTANT: COMPLIANCE WITH MAIBEC’S INSTALLATION, STORAGE AND MAINTENANCE REQUIREMENTS, AND WITH THE APPLICABLE BUILDING CODES IN YOUR REGION IS MANDATORY. PROBLEMS CAUSED BY FAILURE TO COMPLY WITH THESE REQUIREMENTS AND CODES MAY NOT BE COVERED UNDER APPLICABLE WARRANTIES.
® REGISTERED TRADE-MARK PROPERTY OF MAIBEC INC. © COPYRIGHT - MAIBEC INC. JULY 2016 A1616349A
Drawings not to scale.
1 800 363-1930 maibec.com
202 – 1984, 5e Rue, Lévis QC G6W 5M6 Canada
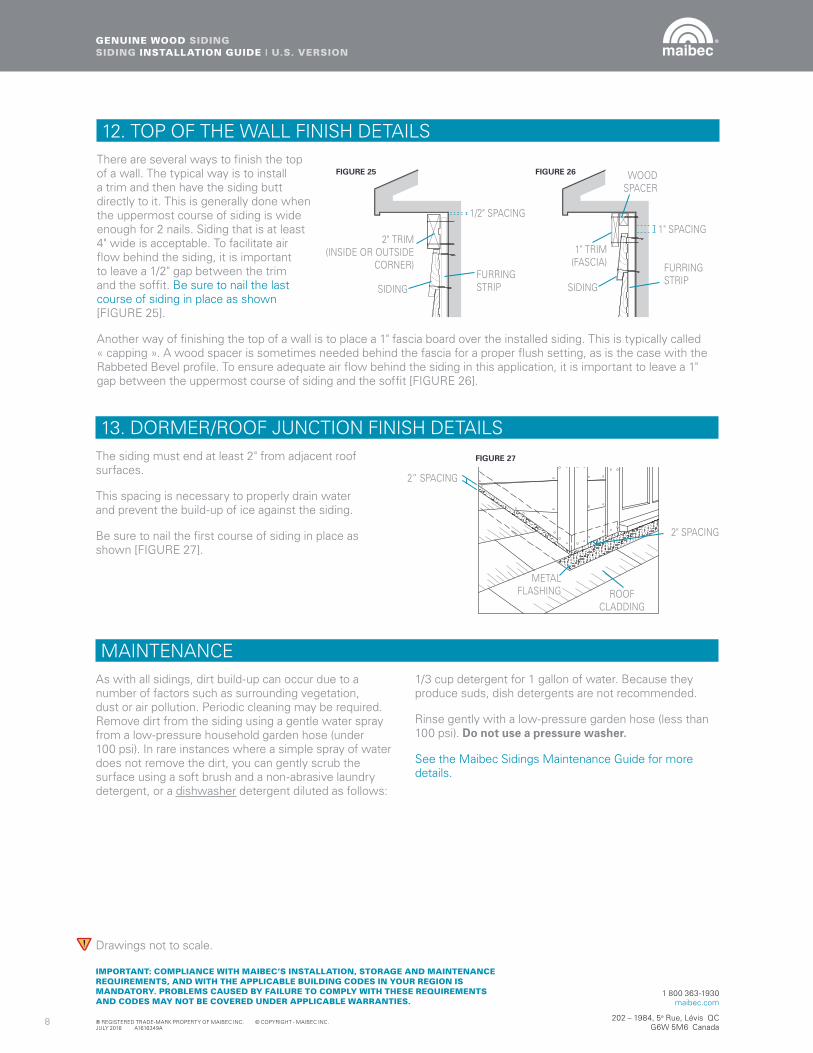
12. TOP OF THE WALL FINISH DETAILSThere are several ways to finish the top of a wall. The typical way is to install a trim and then have the siding butt directly to it. This is generally done when the uppermost course of siding is wide enough for 2 nails. Siding that is at least 4" wide is acceptable. To facilitate air flow behind the siding, it is important to leave a 1/2" gap between the trim and the soffit. Be sure to nail the last course of siding in place as shown [FIGURE 25].
Another way of finishing the top of a wall is to place a 1" fascia board over the installed siding. This is typically called « capping ». A wood spacer is sometimes needed behind the fascia for a proper flush setting, as is the case with the Rabbeted Bevel profile. To ensure adequate air flow behind the siding in this application, it is important to leave a 1" gap between the uppermost course of siding and the soffit [FIGURE 26].
FIGURE 25
1" SPACING
1" TRIM (FASCIA)
WOOD SPACER
SIDING
FURRING STRIP
2" TRIM (INSIDE OR OUTSIDE
CORNER)
SIDINGFURRING STRIP
1/2" SPACING
FIGURE 26
13. DORMER/ROOF JUNCTION FINISH DETAILSThe siding must end at least 2" from adjacent roof surfaces.
This spacing is necessary to properly drain water and prevent the build-up of ice against the siding.
Be sure to nail the first course of siding in place as shown [FIGURE 27].
MAINTENANCEAs with all sidings, dirt build-up can occur due to a number of factors such as surrounding vegetation, dust or air pollution. Periodic cleaning may be required. Remove dirt from the siding using a gentle water spray from a low-pressure household garden hose (under 100 psi). In rare instances where a simple spray of water does not remove the dirt, you can gently scrub the surface using a soft brush and a non-abrasive laundry detergent, or a dishwasher detergent diluted as follows:
1/3 cup detergent for 1 gallon of water. Because they produce suds, dish detergents are not recommended.
Rinse gently with a low-pressure garden hose (less than 100 psi). Do not use a pressure washer.
See the Maibec Sidings Maintenance Guide for more details.
2” SPACING
METAL FLASHING ROOF
CLADDING
2" SPACING
FIGURE 27