shelbynext | financials: accounts payable best...
TRANSCRIPT

©2018 Shelby Systems, Inc. Other brand and product names are trademarks or registered trademarks of the respective holders.
ShelbyNext | Financials: Accounts Payable
Best Practices (Course #F210)
Presented by: Carmen Dea, Shelby Consultant

2
Objective
This session covers information that goes beyond the basics to provide best practices for using Accounts Payable in ShelbyNext | Financials.
Topics covered in this session:
• Quick Entry Tips • Modifying Company Information • Vendor Information • Processing ACH & Email Vouchers • Recurring Payments • Undoing Invoices • Correcting 1099s • Attaching Invoices • Distributions
3
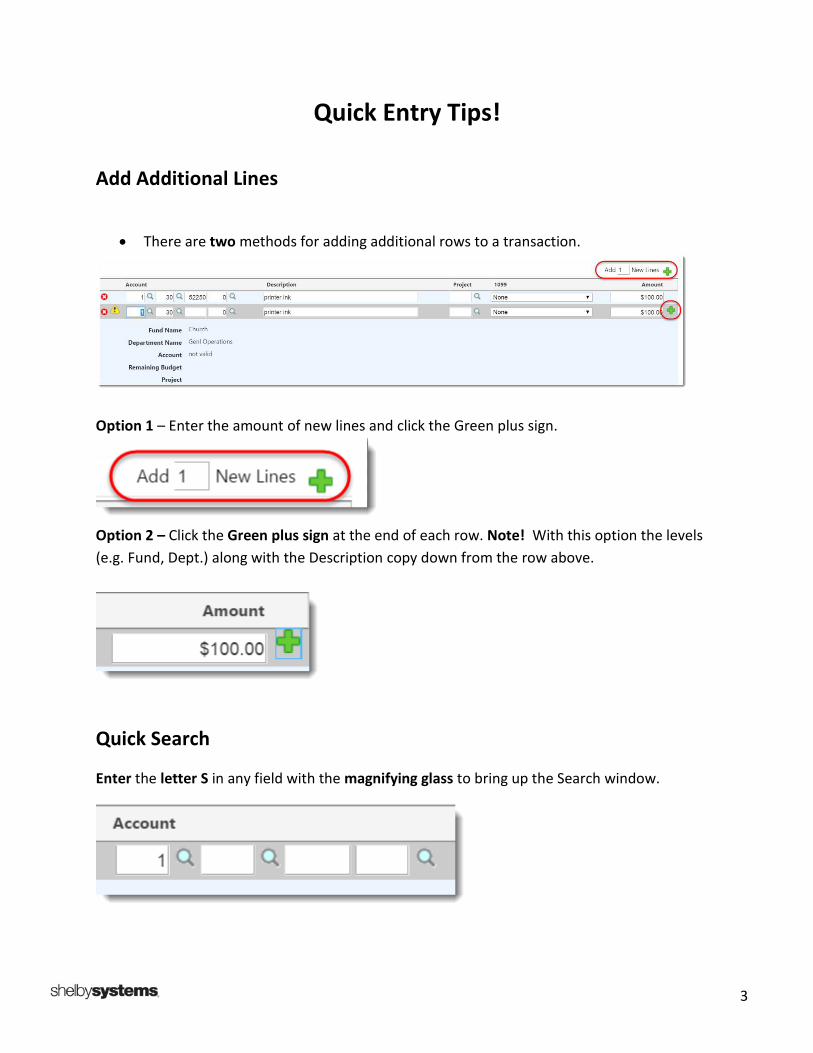
Quick Entry Tips!
Add Additional Lines
• There are two methods for adding additional rows to a transaction.
Option 1 – Enter the amount of new lines and click the Green plus sign.
Option 2 – Click the Green plus sign at the end of each row. Note! With this option the levels (e.g. Fund, Dept.) along with the Description copy down from the row above.
Quick Search
Enter the letter S in any field with the magnifying glass to bring up the Search window.
4
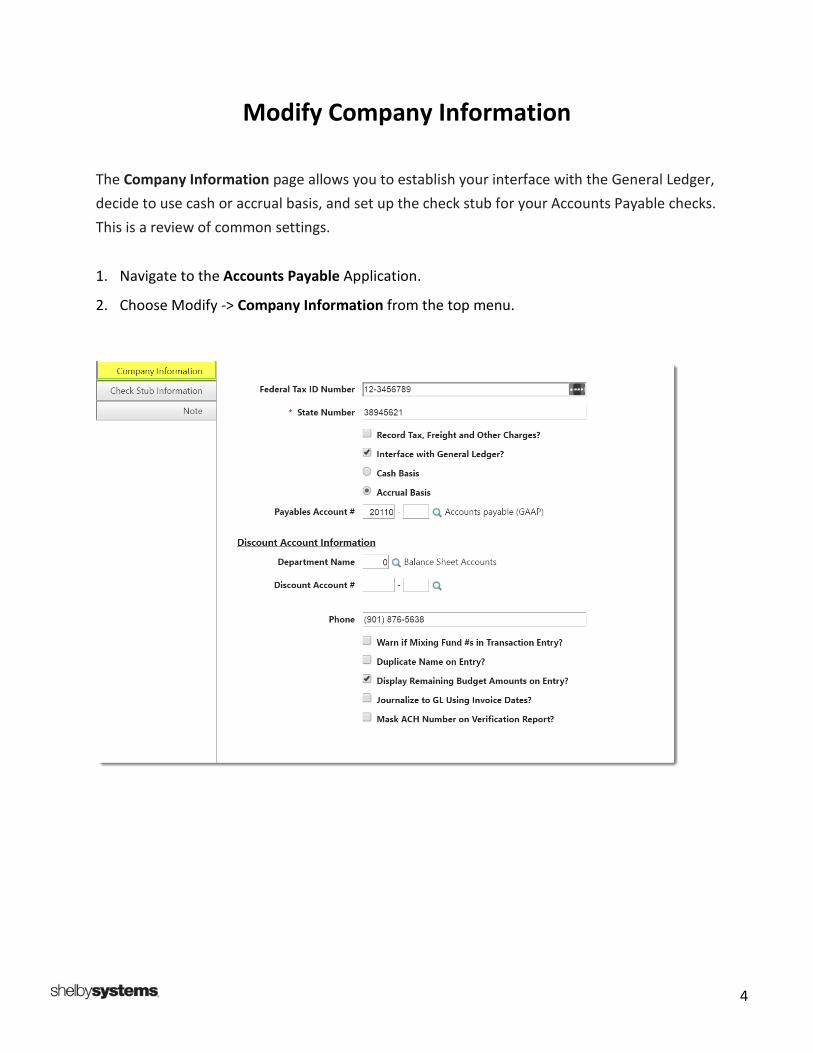
Modify Company Information
The Company Information page allows you to establish your interface with the General Ledger, decide to use cash or accrual basis, and set up the check stub for your Accounts Payable checks. This is a review of common settings.
1. Navigate to the Accounts Payable Application.
2. Choose Modify -> Company Information from the top menu.

5
Common Company Information Settings
• Federal Tax ID & State Tax ID Numbers are required for 1099s.
• Cash vs. Accrual Basis Accounting:
o Cash Basis: Click the Cash Basis radio button to bypass the General Ledger when
invoices are entered and updated.
The bank account is credited, and the expense or other accounts being charged are debited when checks are written.
o Accrual Basis: Click the Accrual Basis radio button to display the Payables Account
number field. Select the liability account for your payables in that field.
This method sends entries to the General Ledger when invoices are entered and updated. The payables account is credited, and the expense or other accounts being charged are debited. Once the checks are written and updated, the payables account is debited, and the bank account is credited.
NOTE! If changing from Accrual to Cash (or vice versa), there cannot be ANY unpaid invoices.
• Enter your company phone number, which is required, to print on 1099s. • Warning if Mixing Fund Numbers in Invoice Processing: This option prompts a warning
when an invoice is being distributed to more than one fund. This does not prevent posting to multiple funds if you are using the same bank account.
• Duplicate Name on Entry: This option causes the vendor name to stay on the invoice entry page. Use this feature if you often enter a large number of invoices for the same vendor.
• Display Remaining Budget Amounts on Entry: This option causes the remaining budget amount for the period and the total annual budget amount to display on the invoice entry page.
• Journalize to GL Using Invoice Dates: This option causes the entries sent to General Ledger to use the invoice date.
• Mask ACH Number on Verification Report: This option masks all but the last four digits of the bank routing number and account number on the verification report.

6
Check Stub Information Tab
• Print Summarized Invoice on Check Stubs: A summarized invoice prints on the stub. When
selected, Amount, Discount & Net, and Show Net Only are the only available options in the Information to Print on Check Stub section.
• Print Invoice Memos on Check Stubs: The memos entered on invoices print on the stub.
• Print Fund Name on Check Stubs: The bank account fund (e.g. department) prints on the stub.
• Print Salutations for Organization: This option allows you to substitute the salutation for the name of an organization, when entered, on the check.
• Print Checks in Order Entered: This option prints checks in the order in which they are entered. When this option is selected and invoices are entered in order (not separated by another vendor's invoices), Accounts Payable combines invoices for a vendor on one check. The default is vendor name order.
• Print Expense Account Description Instead of Line Item Description: This option is not available when Print Summarized Invoice on Check Stubs is selected.
• Print One Line Address for Vendor: This option causes the check stub to display Address Line 1, City, State, and Zip on a single line.

7
Sample with Expense Account instead of Line Item Description, Expense Account & Line Amount, and One Line Address for Vendor
Sample with Summarized Invoice, Show Net Only, Print Invoice Memo and Fund Name
Sample with Expense Account & Line Amount
Payment Methods allow you to either Print directly on pre-printed check stock or process checks using ShelbyMICR Plus. The ShelbyMICR Plus prints the checks on plain check stock.
• Amount, Discount & Net
• Show Net Only
• Show Net Only with Expense Account: This option is not available when Print Summarized Invoice on Check Stubs is selected.
• Show Invoice Total, Expense Account & Line Amount: This option is not available when Print Summarized Invoice on Check Stubs is selected.
The setup and design of checks are completed in Bank Management -> Modify -> Bank Account Information.

8
Modify Vendor Information
1. Navigate to Accounts Payable -> Modify -> Vendor Information and search by Name, Address, City, State and/or Postal Code.
Individuals – Search by First Name and Last Name, or Last Name, First Name or comma (,) First Name, or just last name.
Note: Vendors who are also Employees do not have the option to change the Type from Individual to Organization. This is because you can only issue Form W2 to individuals.
Businesses – Search by first letters of name.
2. To Add a New Vendor, click on the Add New Vendor link.
3. To Edit a Vendor, click on the pencil icon to the left of the name.

9
10
4. Is this Vendor Active? Box is checked. If not, Uncheck box. This is used in filters and reporting within Accounts Payable.
5. Select the Invoice Entry Defaults as either Account or Distribution. • If selecting Account, specify the levels and Account Number. • When selecting Distribution, select from the drop-down list. Distributions are used when you enter invoices. Invoices are charged to different
General Ledger account numbers based on a percentage of the total amount of the invoice.
6. The last Invoice Date, Number, and Amount display historical information for the vendor. 7. (Informational Only) Product Line: Enter the product line for this vendor (e.g., paper
supplies). 8. Terms: Enter the terms for the vendor. The discount is calculated using the format: 2/10/30
where 2 is 2%, 10 is the number of days the discount applies (2% discount if paid within 10 days of the invoice date), and 30 is net 30 (informational only).
o When you select to pay invoices, Accounts Payable uses the check date entered to determine whether the discounts are valid.
o You are prompted to correct any invalid discounts. o Terms also appear on the Invoice Entry page for reference.
9. Print on Check: Can print on the check stub. Primarily used to print your account number
with the vendor (e.g., Acct. # 12345). 10. Default 1099 Status and 1099R Box 7 Codes. Hover over the information icon for list of Box
7 codes and descriptions.
11. (Informational Only) Approval: Search to select the person responsible for approvals (e.g., Office Manager).
12. (Informational Only) Contact Name: for this vendor (e.g., Bill Smith).
13. (Informational Only) Note: Place to enter internal only information regarding this vendor.

11
14. ACH Accounts – Enter Checking or Savings Bank Routing and Account Numbers for Vendor Payment.
15. Add or Edit Phone Type and Number. Area codes are required.

12
16. Add or Edit Email Address. Required if sending Vouchers for ACH payments.
17. Add or Edit Street Address. Required to mail checks and 1099s.
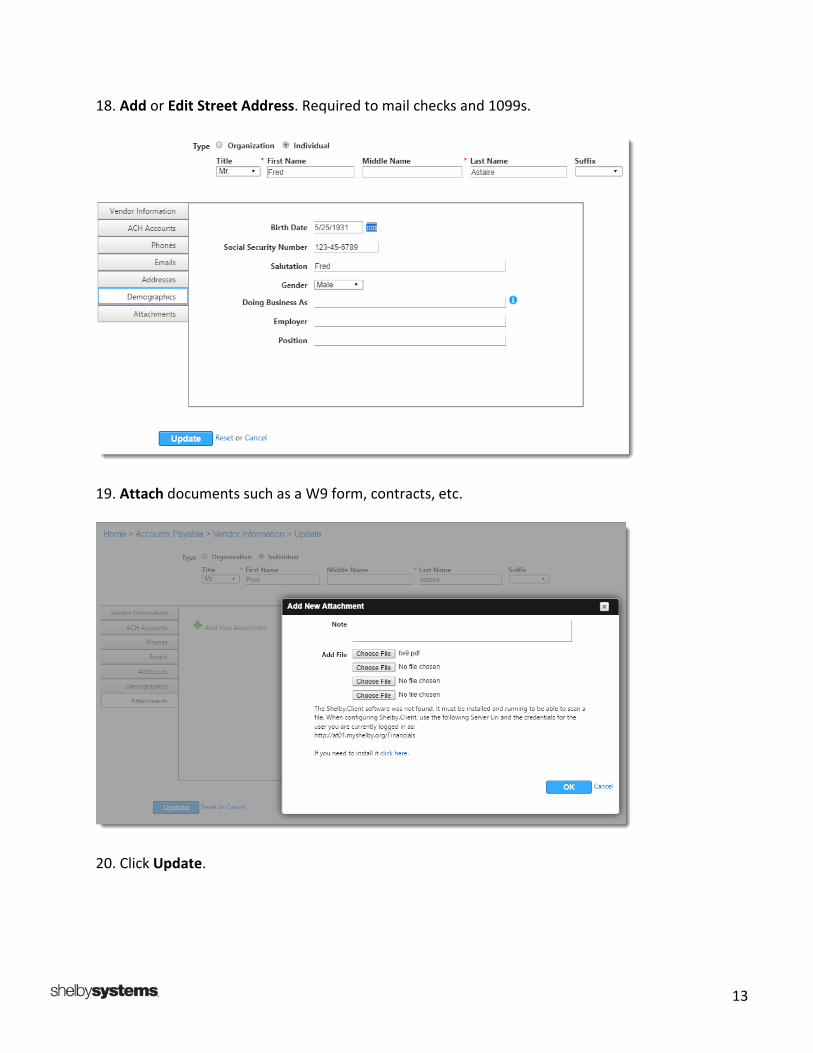
13
18. Add or Edit Street Address. Required to mail checks and 1099s.
19. Attach documents such as a W9 form, contracts, etc.
20. Click Update.
14
Process ACH & Email Vouchers
These steps show how to process a transaction using ACH for payment processing and sending an email voucher. As these steps are intended to show a more advanced process, they do not cover all the details of how to process a transaction.
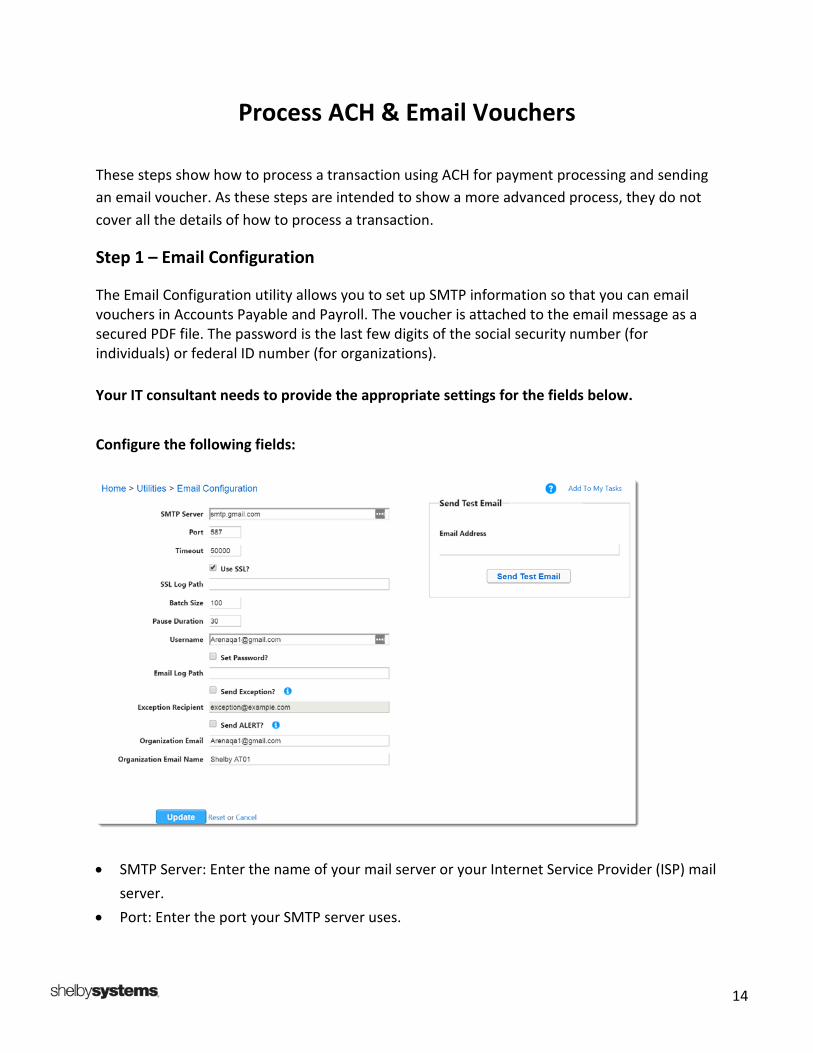
Step 1 – Email Configuration
The Email Configuration utility allows you to set up SMTP information so that you can email vouchers in Accounts Payable and Payroll. The voucher is attached to the email message as a secured PDF file. The password is the last few digits of the social security number (for individuals) or federal ID number (for organizations). Your IT consultant needs to provide the appropriate settings for the fields below.
Configure the following fields:
• SMTP Server: Enter the name of your mail server or your Internet Service Provider (ISP) mail
server. • Port: Enter the port your SMTP server uses.

15
• Timeout: The timeout value in milliseconds. The default timeout when this field is left blank is 20,000 (20 seconds).
• Use SSL: If this box is checked, use the SSL Log Path field to specify the location of the SSL log.
• Batch Size: This setting determines how many emails are sent to the mail server in each batch.
• Pause Duration: This setting determines how long (in seconds) the program pauses between sending each batch of emails to the mail server.
• Username • Password: This setting only shows if you select the Set Password option. • Email Log Path • Send Exception: If this box is checked, use the Exception Recipient field to specify an email
address to which the system sends any exceptions. No exception notifications are sent if the Exception Recipient field is unpopulated.
• Exception Recipient – Use in conjunction with the Send Exception option. Any exceptions that occur when you send email from the program cause the email address in this field to be notified.
• Send ALERT – If this box is checked, the system notifies Shelby Support of any exceptions. • Organization Email – Enter the from and return address for the emails sent from the
program. • Organization Email Name – Enter your organization name or other name for the emails sent
from the program. You can test your email configuration using the Send Test Email area. Enter an Email Address in the field provided and click Send Test Email. The system then attempts to send you an email message informing you that your configuration is working. Customers who are self-hosted cannot send emails unless the user agent is configured properly. Please reference How to Use ShelbyNext | Financials User Agents for instructions. Click the Update button to save your changes, the Reset link to undo all changes since the last time the Email Configuration utility was updated, or the Cancel link to return to the main Financials page.
16
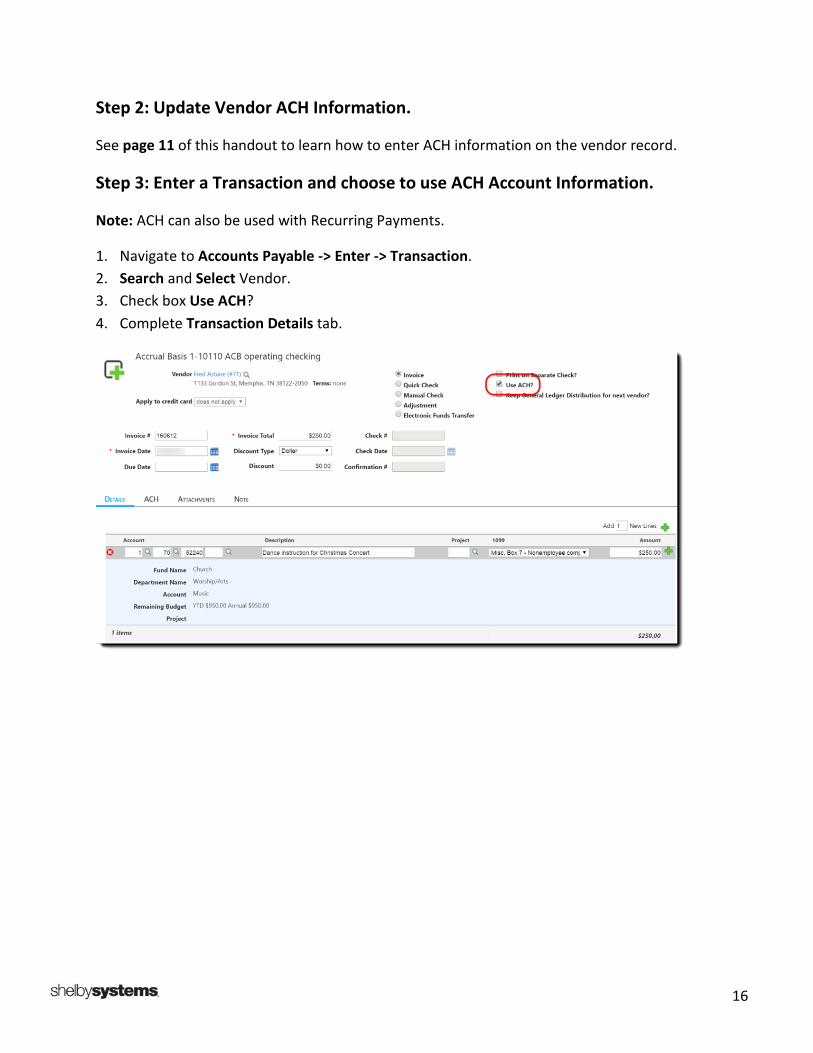
Step 2: Update Vendor ACH Information.
See page 11 of this handout to learn how to enter ACH information on the vendor record.
Step 3: Enter a Transaction and choose to use ACH Account Information.
Note: ACH can also be used with Recurring Payments.
1. Navigate to Accounts Payable -> Enter -> Transaction. 2. Search and Select Vendor. 3. Check box Use ACH? 4. Complete Transaction Details tab.

17
5. Click ACH Tab and choose assigned Account.
6. Click Update.

18
Step 4: Payment Processing
1. Navigate to Manage -> Unposted Transactions and Post Transactions as usual. 2. Navigate to Payment Processing. Note the filter to process ACH only or include with a check
run. Process Payment as usual.
3. If you want to send an email with the payment voucher, choose Email Vouchers? and click OK.
19
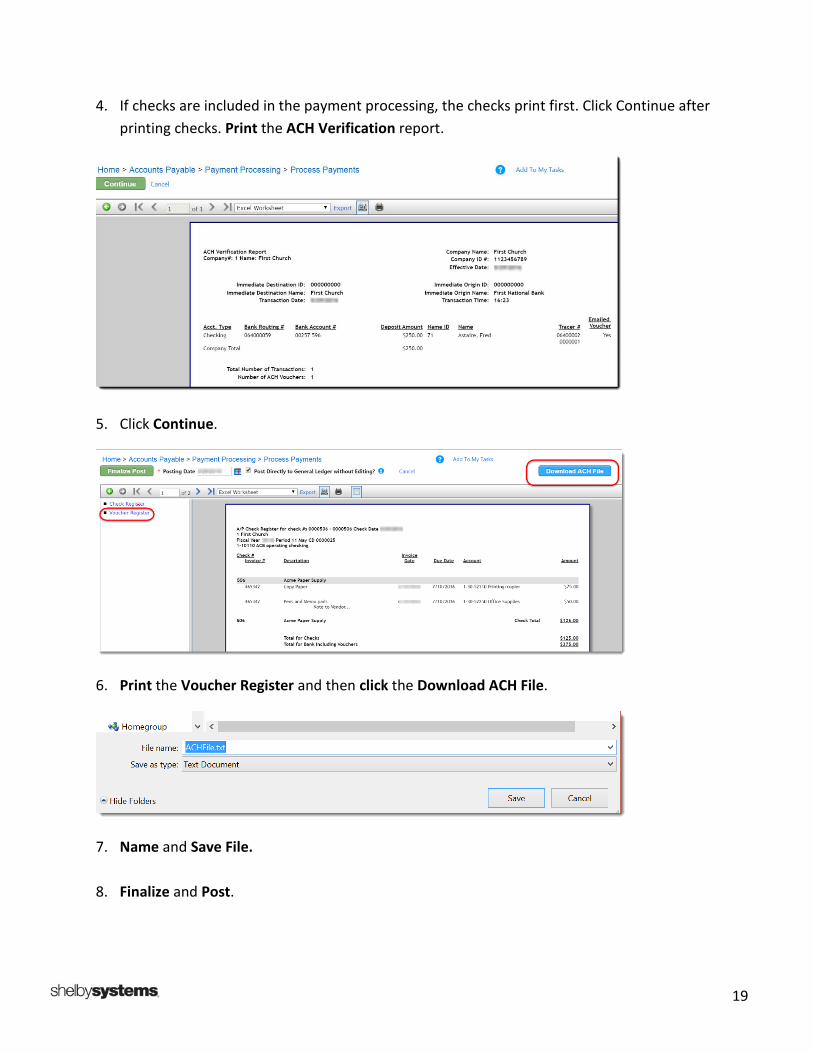
4. If checks are included in the payment processing, the checks print first. Click Continue after printing checks. Print the ACH Verification report.
5. Click Continue.
6. Print the Voucher Register and then click the Download ACH File.
7. Name and Save File. 8. Finalize and Post.

20
Recurring Payments
These steps show how to create and transfer a recurring payment. All other steps for payment processing are the same as those for entering a manual transaction.
Step 1: Set up New Recurring Payment.
1. Navigate to Accounts Payable -> Enter -> Recurring Payment. 2. Search and Select Vendor.
3. Complete the Transaction as usual, however, note three differences.
• When you assign an Invoice #, the recurring payment Invoice # is combined with the Due Date when it transfers.
• Assign a Due Day (e.g., 1 for 1st of Month or 15th, etc.). • Assign a Frequency. Options are Monthly, Quarterly, Semi-Annual, Annual, or Weekly.
4. Click Update.

21
Step 2: Transfer Recurring Payments
1. Navigate to Accounts Payable -> Manage -> Recurring Payments. Using the Filters, choose which transactions need to be processed.
2. Run Edit Report (optional) and then click Transfer Recurring Payments to continue.
3. Enter the Invoice and Due Date. Click OK.
4. Continue to Manage -> Unposted Transactions and process as usual.
22
Editing Posted Invoices
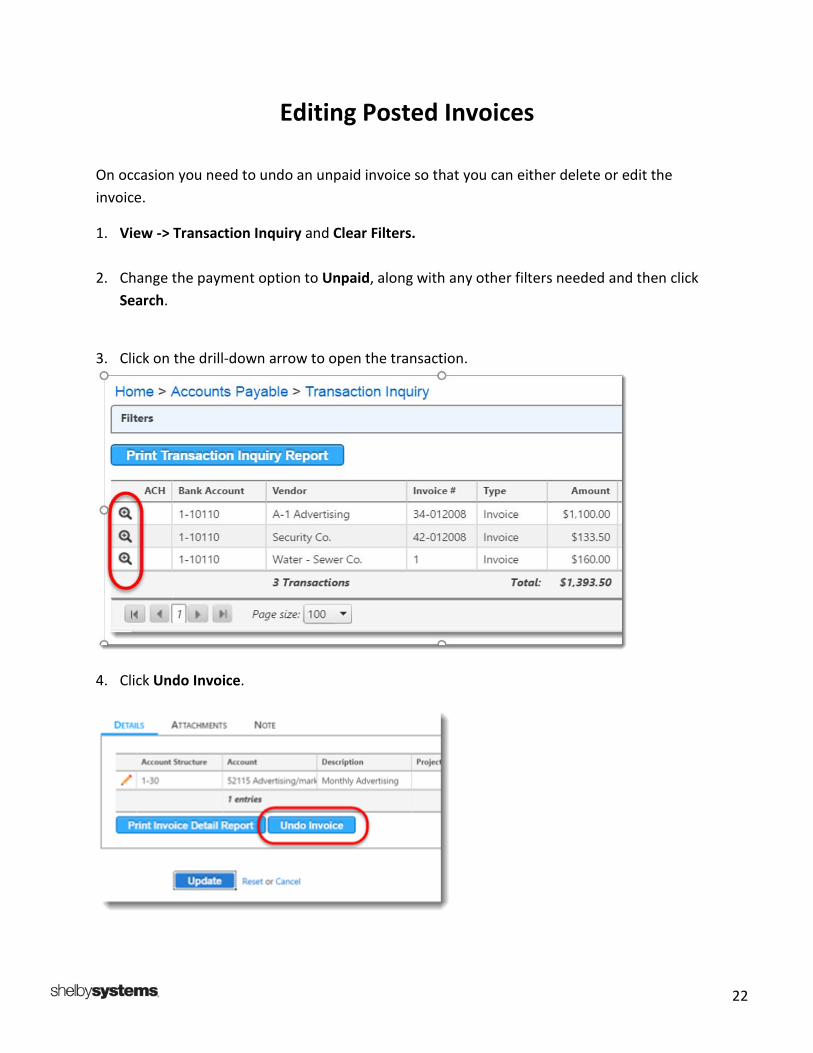
On occasion you need to undo an unpaid invoice so that you can either delete or edit the invoice.
1. View -> Transaction Inquiry and Clear Filters.
2. Change the payment option to Unpaid, along with any other filters needed and then click Search.
3. Click on the drill-down arrow to open the transaction.
4. Click Undo Invoice.

23
5. Print Undo GL Input Audit Report and then click Undo Transaction.
6. Go to Manage Transactions and Edit or Delete Transaction.
24
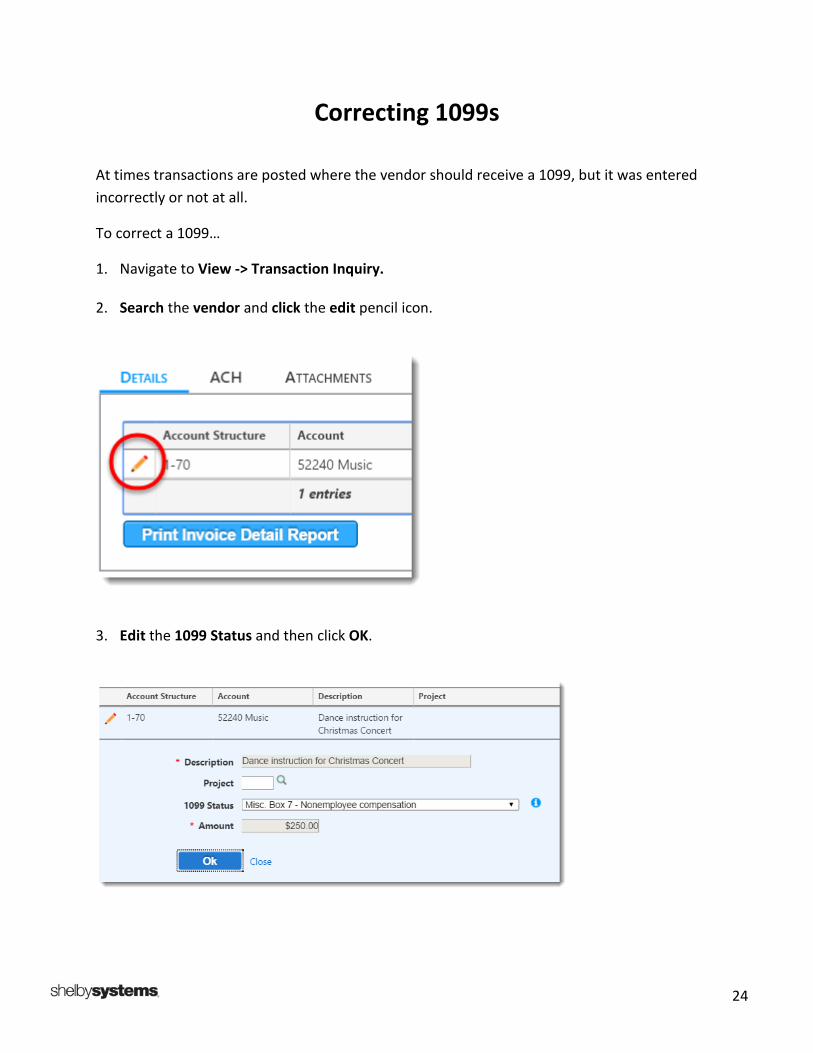
Correcting 1099s
At times transactions are posted where the vendor should receive a 1099, but it was entered incorrectly or not at all.
To correct a 1099…
1. Navigate to View -> Transaction Inquiry.
2. Search the vendor and click the edit pencil icon.
3. Edit the 1099 Status and then click OK.

25
Attaching Invoices
Many ministries are seeking ways to save money and the environment by using less paper. Attaching invoices to Transactions provides a way to do just that.
1. Click the Add New Attachment link.
2. Enter a Note regarding the attachment if needed.
3. Click the Choose File button by any of the four Add File fields to attach files.
Note: You can also click the Scan link by Scanned Files where you can paste or scan an image.
Choose the click here link to install a scanner.
4. Click OK.
26
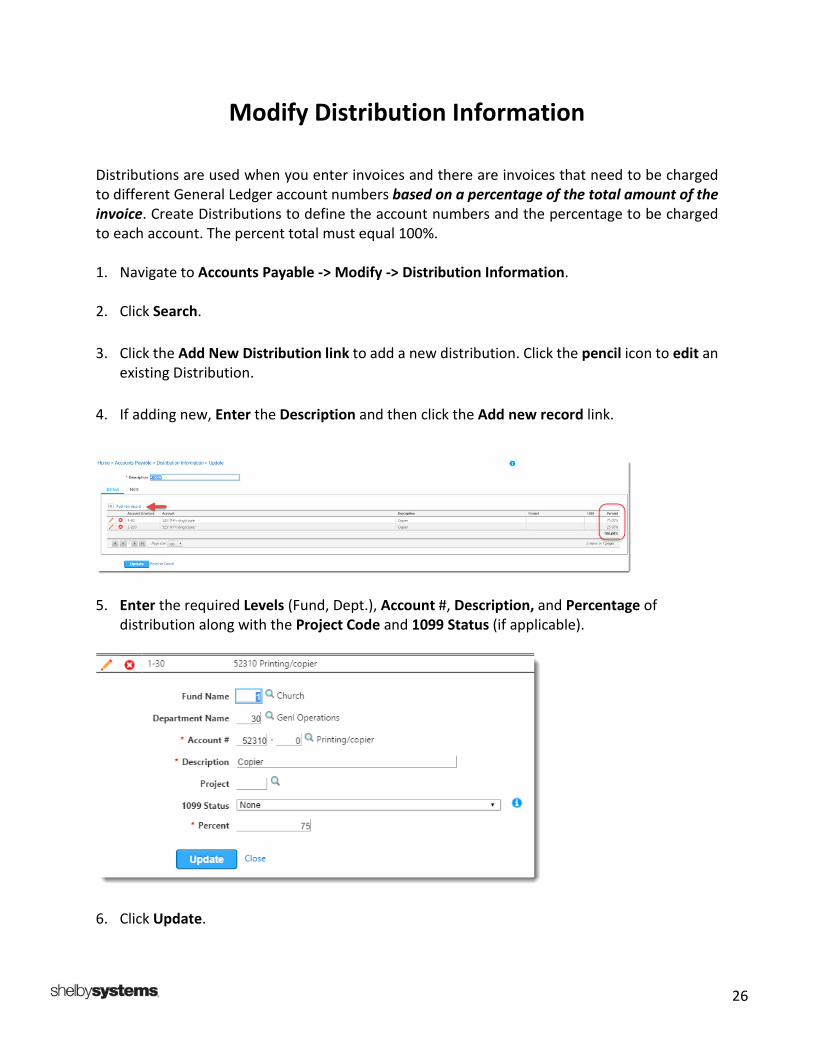
Modify Distribution Information
Distributions are used when you enter invoices and there are invoices that need to be charged to different General Ledger account numbers based on a percentage of the total amount of the invoice. Create Distributions to define the account numbers and the percentage to be charged to each account. The percent total must equal 100%. 1. Navigate to Accounts Payable -> Modify -> Distribution Information. 2. Click Search.
3. Click the Add New Distribution link to add a new distribution. Click the pencil icon to edit an
existing Distribution.
4. If adding new, Enter the Description and then click the Add new record link.
5. Enter the required Levels (Fund, Dept.), Account #, Description, and Percentage of
distribution along with the Project Code and 1099 Status (if applicable).
6. Click Update.

27
Q&A
Class Discussion

©2018 Shelby Systems, Inc. Other brand and product names are trademarks or registered trademarks of the respective holders.
Carmen Dea
Shelby Consultant [email protected]
Carmen trains on all Shelby product lines. She has been a trainer and consultant for churches and non-profit organizations since 2000. Carmen works with customers in both the United States and internationally helping them integrate Shelby Systems to meet their needs and their culture. Her experience prior to working with Shelby includes serving as the Volunteer Director for a missions organization and being responsible for the Shelby database and training in a large church.