sheer horizontal shadings cord loop1 a few simple tools are required: - measuring tape - power...
TRANSCRIPT

CORD LOOPDesigner Head Rail
Installation & Care Instructions 152053B1/17/2020
Sheer Horizontal Shadings
1
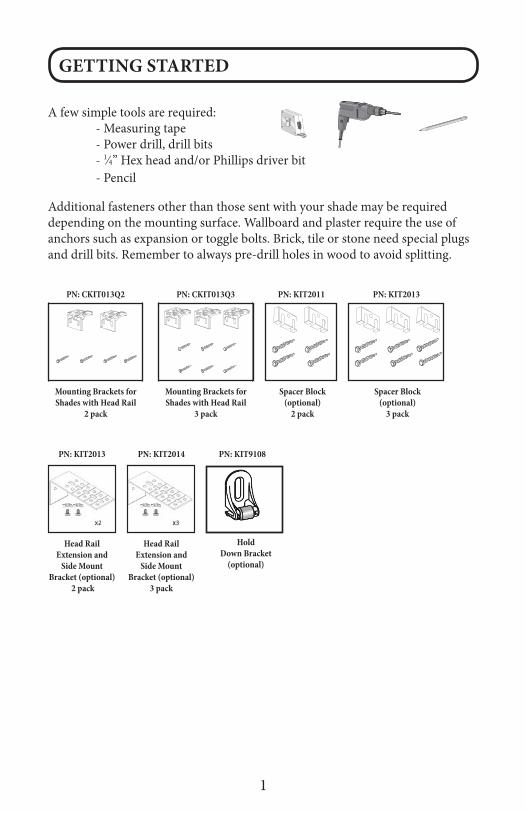
A few simple tools are required: - Measuring tape - Power drill, drill bits - 1⁄4” Hex head and/or Phillips driver bit - Pencil
GETTING STARTED
Additional fasteners other than those sent with your shade may be required depending on the mounting surface. Wallboard and plaster require the use of anchors such as expansion or toggle bolts. Brick, tile or stone need special plugs and drill bits. Remember to always pre-drill holes in wood to avoid splitting.
Hold Down Bracket
(optional)
PN: KIT9108
Head Rail Extension and
Side Mount Bracket (optional)
2 pack
PN: KIT2013
Head Rail Extension and
Side Mount Bracket (optional)
3 pack
PN: KIT2014
PN: KIT2011
Spacer Block (optional)
2 pack
PN: KIT2013
Spacer Block (optional)
3 pack
PN: CKIT013Q3PN: CKIT013Q2
Mounting Brackets for Shades with Head Rail
2 pack
Mounting Brackets for Shades with Head Rail
3 pack

2
STEP 1: BRACKET INSTALLATION
Shades are shipped with the required number of brackets for proper installation. End brackets should be located approximately 3” from either end. Depending on the width of the shade, additional brackets may be necessary, evenly spaced between the two end brackets.
Using the installation bracket as a template, measure to the edge of the bracket and mark the hole locations with a pencil for drilling.
Brackets must be in line and level. Shim brackets on inside mounts if necessary. The head rail must be level for the shade to operate properly.
Shade Width # of BracketsUp to 40” 2>40” - 72” 3>72”- 84” 4
>84” and up 5
SHADES WITH HEAD RAIL
INSIDE MOUNT
The minimum mounting depth for an inside mount is 1”.
A minimum of 3 3⁄4” is needed to fully recess the shading.
Make sure the brackets are level and aligned.
Attach each bracket using two screws.
Inside MountShallow Mount - Minimum 1” surfaceFlush Mount - Minimum 3 3⁄4” surface
1”

3
OUTSIDE MOUNT
The minimum mounting height for outside mounted shadings is 1”.
Make sure the brackets are level and aligned.
Attach each bracket using two screws.Outside Mount
Minimum 3⁄4” surface
1”
EXTENSION BRACKETS (OPTIONAL)
Optional extension brackets are used to project the back of the shading up to 2 1⁄2” from the mounting surface.
Attach the mounting bracket to the extension bracket with the nut and bolt provided.
SPACER BLOCKS (OPTIONAL)
Each spacer block projects brackets 3⁄8” away from mounting surface.
Make sure the brackets are level and aligned.
Attach each bracket using two screws. Screws should be long enough to secure the bracket to the mounting surface.
Outside Mount with Spacer Blocks
Outside Mount with Extension BracketsMinimum 2” surface
1 1⁄2”
2 1⁄2”

4
SIDE MOUNT (OPTIONAL)
Measure from window sill up to desired mounting position on each side of the window frame. Mark position.
Mount side mount brackets on each side of window frame as shown. Make sure to confirm the head rail will sit perfectly level.
Once side mount brackets are installed and properly positioned, attach the mounting brackets using the nuts and bolts provided.
Side MountMinimum 11⁄2” surface
11⁄2”
STEP 2: SHADE INSTALLATION
Push the rail back until it is fully engaged
Center the shading in the window opening and push the head rail into the mounting brackets as shown.
OPERATION
Pulling down on the back cord will lower the shading. When the window shading is completely lowered, pulling down on the back cord will open the vanes. Continued pulling in this direction will raise the fabric with the vanes in the open position. The window shading must only be raised a maximum of 24” in this manner to avoid damaging the fabric.
Pulling down on the front cord will close the vanes and then raise the shading.

5
CHILD SAFETY - INSTALL TENSION DEVICE
WARNING To avoid entanglement and strangulation, keep cords out of reach of young children. Move cribs and furniture away from shading cords.
TENSION DEVICE
The tension device reduces the hazards of strangulation and entanglement of young children by limiting access to the control cord.
The cord tensioner must be installed to make the shading fully operable.
Read the instructions in the mounting hardware packet prior to installing the tensioner.
SAFETY LABELS
In compliance with WCMA/ANSI safety standards, the warning labels on the bottom rail are designed to be permanent. DO NOT remove the permanent warning label on the bottom rail. This assures that future owners of this product will be aware of potential dangers associated with corded window shades.
6
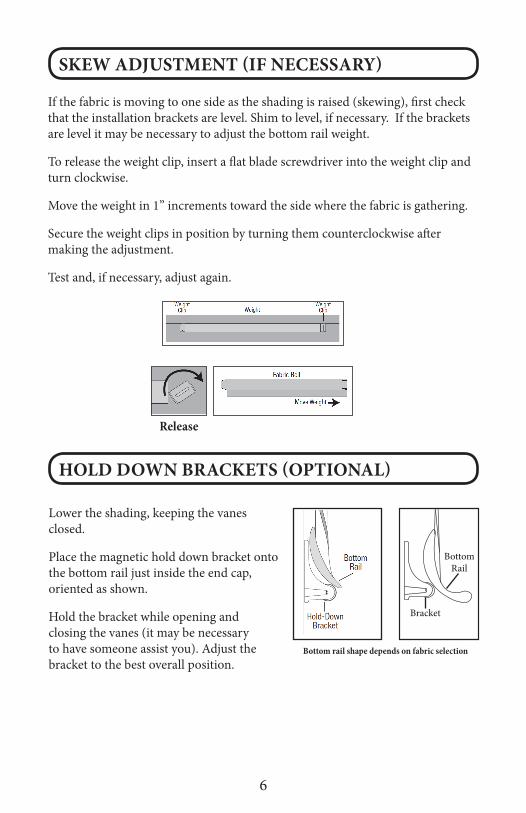
SKEW ADJUSTMENT (IF NECESSARY)
If the fabric is moving to one side as the shading is raised (skewing), first check that the installation brackets are level. Shim to level, if necessary. If the brackets are level it may be necessary to adjust the bottom rail weight.
To release the weight clip, insert a flat blade screwdriver into the weight clip and turn clockwise.
Move the weight in 1” increments toward the side where the fabric is gathering.
Secure the weight clips in position by turning them counterclockwise after making the adjustment.
Test and, if necessary, adjust again.
Release
HOLD DOWN BRACKETS (OPTIONAL)
Lower the shading, keeping the vanes closed.
Place the magnetic hold down bracket onto the bottom rail just inside the end cap, oriented as shown.
Hold the bracket while opening and closing the vanes (it may be necessary to have someone assist you). Adjust the bracket to the best overall position.
Bottom Rail
Bracket
Bottom rail shape depends on fabric selection

7
OUTSIDE MOUNT
INSIDE MOUNT
Preferred
Preferred
Alternate
Alternate
Mark the screw location using the mounting options shown to the right.
The screw should be placed in the middle of the slot. This will allow for adjustment.
Drill the screw holes using a 3⁄32” drill bit.
IMPORTANT: Use drywall anchors when mounting into drywall.
Attach the hold down brackets to the mounting surface using the screws provided.
If necessary, adjust bracket height by loosening the screw and sliding the bracket up or down.
SHADING REMOVAL
Partially lower the shading and insert a flat head screwdriver as shown.
Twist the screwdriver until the head rail disengages from the bracket.
As you release the brackets, support the head rail to keep it from falling.
CLEANING AND CARE
The shading fabric is easy to care for. Regular dusting with a feather duster or vacuum cleaner brush is recommended. Most stains can be blotted with a damp sponge and mild detergent. Before using anything stronger than mild detergent and lukewarm water, test an unobtrusive corner of the shade. If you have any questions, call your dealer for advice.

POWER TOUCHTM RECHARGEABLE
with Touch & Go Feature
Installation & Care Instructions 152715B1/17/2020
Sheer Horizontal Shadings

1
GETTING STARTED
A few simple tools are required: - Measuring tape - Power drill, drill bits - 1⁄4” Hex head and/or Phillips driver bit - Pencil
Additional fasteners other than those sent with your shading may be required depending on the mounting surface. Wallboard and plaster require the use of anchors such as expansion or toggle bolts. Brick, tile or stone need special plugs and drill bits. Remember to always pre-drill holes in wood to avoid splitting.
Charger
PN: CKIT037
Hold Down Bracket
(optional)
PN: KIT9108PN: KIT2013 PN: KIT2014
PN: KIT2011
Spacer Block (optional)
2 pack
PN: KIT2013
Spacer Block (optional)
3 pack
PN: CKIT013Q3PN: CKIT013Q2
Mounting Brackets for Shades with Head Rail
2 pack
Mounting Brackets for Shades with Head Rail
3 pack
Head Rail Extension and
Side Mount Bracket (optional)
2 pack
Head Rail Extension and
Side Mount Bracket (optional)
3 pack

2
STEP 1: BRACKET INSTALLATION
Shadings are shipped with the required number of brackets for proper installation. End brackets should be located approximately 3” from either end. Depending on the width of the shading, additional brackets may be necessary, evenly spaced between the two end brackets.
Using the installation bracket as a template, measure to the center of the bracket and mark the hole locations with a pencil for drilling.
Brackets must be in line and level. Shim brackets on inside mounts if necessary. The headrail must be level for the shading to operate properly.
Shading Width
# of Brackets
Up to 40” 2>40” - 72” 3>72”- 84” 4
>84” -114” 5 3” 3”
INSIDE MOUNT
The minimum mounting depth for an inside mount is 1”.
A minimum of 3 3⁄4” is needed to fully recess the shading.
Make sure the brackets are level and aligned.
Attach each bracket using two screws.
Inside MountShallow Mount - Minimum 1” surfaceFlush Mount - Minimum 3 3⁄4” surface
1”
OUTSIDE MOUNT
The minimum mounting height for outside mounted shadings is 1”.
Make sure the brackets are level and aligned.
Attach each bracket using two screws.
Outside MountMinimum 3⁄4” surface
1”

3
Optional extension brackets are used to project the back of the shading up to 2 1⁄2” from the mounting surface.
Attach the mounting bracket to the extension bracket with the nut and bolt provided.
SPACER BLOCKS (OPTIONAL)
Each spacer block projects brackets 3⁄8” away from mounting surface. Make sure the brackets are level and aligned.
Attach using two screws. Screws should be long enough to secure the bracket to the mounting surface.
EXTENSION BRACKETS (OPTIONAL)
SIDE MOUNT (OPTIONAL)
Measure from window sill up to desired mounting position on each side of the window frame. Mark position.
Mount side mount brackets on each side of window frame as shown. Make sure to confirm the head rail will sit perfectly level.
Once side mount brackets are installed and properly positioned, attach the mounting brackets using the nuts and bolts provided.
STEP 2: CONNECT WAND
Plug the control wire into the wand wire . The plugs will only fit together one way. The wires are bundled at the back of the head rail.
Outside Mount with Spacer Blocks
2”
Outside Mount with Extension Brackets
Minimum 11⁄2” surface
2 1⁄2”
Side MountMinimum 11⁄2” surface
11⁄2”

4
STEP 3: SHADING INSTALLATION
Center the shading in the window opening and push the head rail into the mounting brackets as shown.
Push the rail back until it is fully engaged
Touch & Go Feature:
To fully raise or lower the shading, simply press the UP or DOWN button for 2 seconds and then release. The shading will automatically stop when it reaches the upper or lower limit. (If the upper or lower limits are not set at the desired positions, see the Adjust Motor Limits section below)
Please note: the factory set lower limit is the shading fully lowered with the vanes in the open position.
Note: Upper and lower limits stops are set at the factory. An intermediate, or “favorite” position is not set at the factory. See page 5 for more information.
OPERATION
Up
Down
Stop/Favorite
Tapping the UP or DOWN button for less than 2 seconds will move the shading in short steps. Holding the UP or DOWN button down for more than 2 seconds before releasing will operate the shading in the faster standard speed.
Press the DOWN or UP button to lower or raise the shading. Press the STOP/FAVORITE to stop the shading at the desired position.
When the shading is fully lowered, tapping the UP button will close the vanes.

5
ADJUST MOTOR LIMITS (IF DESIRED)
The upper and lower limits have been set at the factory. If you need to make adjustments to the limits, follow the instructions below.
Press the SETTING button on the back of the wand and hold it in until the motor stops beeping. This will clear both the upper and lower factory limits as well as a favorite if one was set.
Set Upper Limit - Press the UP button to get the shading close to the desired upper limit and then press the STOP button to stop the shading. Tap the UP or DOWN button to move the shading to the desired position. To save the location, press the SETTING button until the motor beeps.
Set Lower Limit - Press the DOWN button to get the shading close to the desired lower limit and then press the STOP button to stop the shading. Tap the UP or DOWN button to move the shading to the desired position. To save the location, press the SETTING button until the motor beeps.
SettingButton
Up
Down
Stop/Favorite
6
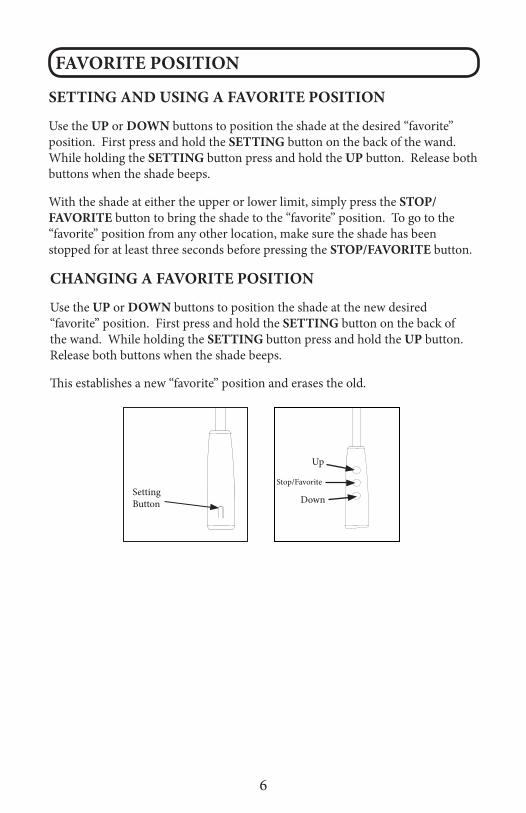
FAVORITE POSITION
CHANGING A FAVORITE POSITION
Use the UP or DOWN buttons to position the shade at the new desired “favorite” position. First press and hold the SETTING button on the back of the wand. While holding the SETTING button press and hold the UP button. Release both buttons when the shade beeps.
This establishes a new “favorite” position and erases the old.
SETTING AND USING A FAVORITE POSITION
Use the UP or DOWN buttons to position the shade at the desired “favorite” position. First press and hold the SETTING button on the back of the wand. While holding the SETTING button press and hold the UP button. Release both buttons when the shade beeps.
With the shade at either the upper or lower limit, simply press the STOP/FAVORITE button to bring the shade to the “favorite” position. To go to the “favorite” position from any other location, make sure the shade has been stopped for at least three seconds before pressing the STOP/FAVORITE button.
SettingButton
Up
Down
Stop/Favorite

7
If the fabric is moving to one side as the shading is raised (skewing), first check that the installation brackets are level. Shim to level, if necessary. If the brackets are level it may be necessary to adjust the bottom rail weight.
To release the weight clip, insert a flat blade screwdriver into the weight clip and turn clockwise.
Move the weight in 1” increments toward the side where the fabric is gathering.
Secure the weight clips in position by turning them counterclockwise after making the adjustment.
Test and, if necessary, adjust again.
Release
SKEW ADJUSTMENT (IF NECESSARY)

8
OUTSIDE MOUNT
INSIDE MOUNT
Preferred
Preferred
Alternate
Alternate
Mark the screw location using the mounting options shown to the right.
The screw should be placed in the middle of the slot. This will allow for adjustment.
Drill the screw holes using a 3⁄32” drill bit.
IMPORTANT: Use drywall anchors when mounting into drywall.
Attach the hold down brackets to the mounting surface using the screws provided.
If necessary, adjust bracket height by loosening the screw and sliding the bracket up or down.
HOLD DOWN BRACKETS (OPTIONAL)
Lower the shading, keeping the vanes closed.
Place the magnetic hold down bracket onto the bottom rail just inside the end cap, oriented as shown.
Hold the bracket while opening and closing the vanes (it may be necessary to have someone assist you). Adjust the bracket to the best overall position.
Bottom Rail
Bracket
Bottom rail shape depends on fabric selection

9
CHARGING THE MOTOR BATTERY
When the shade begins to operate slower than normal, or only beeps when you attempt to operate, it is time to charge the battery.
Plug the 8.4v charger into the port on the wand.
Plug the charger into an electrical outlet.
A red light on the charger indicates that the battery is charging.
Allow the batteries to charge until the light on the charger turns green. A typical charge cycle can take between 4-6 hours.
Do not leave the charger plugged in for more than 24 hours. This could prematurely age the battery.
Charging Port
SHADING REMOVAL
Partially lower the shading and insert a flat head screwdriver as shown.
Twist the screwdriver until the head rail disengages from the bracket.
As you release the brackets, support the head rail to keep it from falling.

10
CLEANING AND CARE
TROUBLE SHOOTING
The Shading fabric is easy to care for. Regular dusting with a feather duster or vacuum cleaner brush is recommended. Most stains can be blotted with a damp sponge and mild detergent. Before using anything stronger than mild detergent and lukewarm water, test an unobtrusive corner of the shading. If you have any questions, call your dealer for advice.
PROBLEM SOLUTIONThe motor does not work or runs slowly.
Recharge battery.
The shade moves the opposite direction of the control buttons.
Press and hold the SETTING button, then press and hold the STOP button. Hold both until the motor jogs (approx. 10 seconds).
Tapping the up or down button for less than 2 seconds does not operate the shade in short steps (helpful for tilting vanes).
Press the reset button on the back of the wand pendant 8 times until the shade beeps.