sharepoint list aggregator - kwizcom€¦ · source lists ... support microsoft project server web...
TRANSCRIPT

SharePoint List Aggregator
Administration Guide

Copyright © 2005-2013 KWizCom corp. All rights reserved. www.KWizCom.com
2
Copyright © 2005-2013 KWizCom Corporation. All rights reserved.
Company Headquarters
KWizCom
50 McIntosh Drive, Unit 109
Markham, Ontario
ON L3R 9T3, Canada
E-mail: [email protected]
Web site: http://www.KWizCom.com
Sales
E-mail: [email protected]
Telephone: +1-905-370-0333

Copyright © 2005-2013 KWizCom corp. All rights reserved. www.KWizCom.com
3
Table of Contents
Table of Contents ...................................................................................... 3
Introduction ............................................................................................... 5
Overview ...................................................................................................... 6
Key Features & Benefits _____________________________________________ 14
Installation ............................................................................................... 16
Software prerequisites ______________________________________________ 16
Installation Procedure ______________________________________________ 17
Post Installation ____________________________________________________ 19
Un-installation procedure ___________________________________________ 20
Translating a KWizCom component _________________________________ 21
Component Activation .......................................................................... 23
Administrator Guide .............................................................................. 29
Introduction ________________________________________________________ 29
Web Part Properties & Configuration Options _______________________ 30 Source Lists ................................................................................................................... 31 Aggregation Views Definitions ................................................................................... 33 Custom Grouping ......................................................................................................... 35 Additional Site Collections .......................................................................................... 37 Caching ........................................................................................................................... 39 Look And Feel ................................................................................................................ 44
Table Viewer Properties & Configuration Options ___________________ 47 Table Provider Web Part Example ............................................................................ 49
FAQ ............................................................................................................... 50
What does the List Aggregator do? __________________________________ 50
What type of SharePoint installation is needed for this web part to
work? _______________________________________________________________ 50
Do I have to install anything on my company's client-PCs? __________ 50
What do I need the Table Viewer For? ______________________________ 50
Technical Support ................................................................................... 51
Appendix A - How to edit/add a skin .............................................. 52
Appendix B – Cached mode ................................................................ 56


Copyright © 2005-2013 KWizCom corp. All rights reserved. www.KWizCom.com
5
Introduction
KWizCom SharePoint List Aggregator enables you to view and use
SharePoint list and document libraries from different sites and site
collections.
KWizCom SharePoint List Aggregator Supports MOSS 2007 / WSS 3.0 and
SharePoint 2010 Server/Foundation.
This document provides all the information needed to install, evaluate and
deploy this KWizCom product:
Product overview
Installation guide
Component activation
Administrator guide
FAQ
Technical Support
Appendix A

Copyright © 2005-2013 KWizCom corp. All rights reserved. www.KWizCom.com
6
Overview
Easily aggregate data from a variety of lists and libraries, across your
SharePoint Farm, into a single clear, great looking consolidated view!
True aggregation (roll-up) capabilities – across SharePoint sites and site-
collections, great looking skins and AJAX-based inline editing capabilities!
KWizCom SharePoint List Aggregator web part provides ultimate
aggregation (roll-up) capabilities plus some great usability features that
make it easy to use and deploy:

Copyright © 2005-2013 KWizCom corp. All rights reserved. www.KWizCom.com
7
Aggregate data across Site-Collections
Yes! No more site-collection barrier! The SharePoint List Aggregator
enables you to run cross site collection queries and easily implement the
needed reports and views for your business needs.
List Aggregator Professional edition, enables companies with large
SharePoint deployments to aggregate thousands of items across web
applications in just few seconds, by connecting to KWizCom Enterprise
Aggregation Caching Feature!
In-place list item editing
With KWizCom SharePoint List Aggregator's AJAX-based inline form you
can update any aggregated list item within the aggregator web part, with
no additional page refresh!

Copyright © 2005-2013 KWizCom corp. All rights reserved. www.KWizCom.com
8
Support grouping and sorting
KWizCom SharePoint List Aggregator enables you to group number of lists
from the entire site collection or a specific list from a single site. You can
group the list items by site or by a list property.
Sorting is available by all the list properties or by site name.

Copyright © 2005-2013 KWizCom corp. All rights reserved. www.KWizCom.com
9
Drag & drop columns functionality
When adding KWizCom SharePoint List Aggregator to your web part page
in editing mode, it is possible to change the columns order by dragging &
dropping list columns.

Copyright © 2005-2013 KWizCom corp. All rights reserved. www.KWizCom.com
10
End-users can toggle between views
With KWizCom SharePoint List Aggregator you can use the available views
to present to your users and users can change the current view by
choosing a different view in the views drop down control.

Copyright © 2005-2013 KWizCom corp. All rights reserved. www.KWizCom.com
11
Different skins
KWizCom SharePoint List Aggregator enables you to change the web
part’s look and feel easily by choosing one of the various great-looking
skins:
Export to CSV and PDF
With KWizCom SharePoint List you can export the list items to PDF format
by clicking on or to CSV format by clicking on
Enable filtering
You can filter your list items by all kind of filter options like: contains,
stars with, equal to and etc.

Copyright © 2005-2013 KWizCom corp. All rights reserved. www.KWizCom.com
12
Support Microsoft Project Server web access list types
KWizCom SharePoint List Aggregator supports also the Project Web
Access (PWA) list types: Deliverables, Issues and Risks:

Copyright © 2005-2013 KWizCom corp. All rights reserved. www.KWizCom.com
13
This makes the KWizCom List Aggregator the perfect tool for Enterprise
Project Management (EPM), SharePoint-based solutions. By using the List Aggregator web part, you can easily provide a project
management dashboard that aggregates all project information from the various project workspaces. You can roll-up information such as:
High probability risks Open issues
Recent deliverables
Produce custom reports
By using the List Aggregator - Table Viewer web part together with the
KWizCom List Filter Plus version 3.2.03 or above, you can easily
implement any SharePoint-based custom report!

Copyright © 2005-2013 KWizCom corp. All rights reserved. www.KWizCom.com
14
Key Features & Benefits
Feature KWizCom List
Aggregator
(Standard
Edition)
KWizCom List
Aggregator
(Professional
Edition)
SharePoint
2007/2010
Aggregation availability Available for all types of
SharePoint servers.
Available for all types of
SharePoint servers.
Available with CQWP*, not
available in WSS.
Sleek, AJAX-based user interface, with minimum post backs.
Aggregate by list type and by content type
Support dynamic grouping and sorting by drag & drop
Supports dynamic column resizing
Reorder columns by Drag & drop
Provide great looking editable skins
Aggregation of various list types (libraries, tasks, announcements)
Cross-site aggregation
Supports Cross-site Collection aggregation
Refine the aggregation scope by site/list names (“All lists that begin with ‘ProjA’ “) – Much more flexible than only aggregating by content types!
Support tokens in site names – enables easy deployment as a part of site template
Enable editing list items in the web part itself
Enable column filtering
Save current end-user settings (filtering, sorting, grouping etc.) using persistant cookies.
Reporting by exporting to EXCEL and PDF
Support Microsoft Project Server web access list types
Enables producing custom reports
Support cross site collection and cross web application aggregations by connecting to the KWizCom's Enterprise Aggregation Caching feature.
Enable running heavy, farm-level aggregations at very fast response time with minimal load on the WFE servers by using caching services provided by KWizCom's Enterprise Aggregation Caching feature.

Copyright © 2005-2013 KWizCom corp. All rights reserved. www.KWizCom.com
15
Cross browser support: Support IE, Mozilla Firefox and Google Chrome
Multilingual (standard for all KWizCom components)
Support accessibility standard (WCAG)
* CQWP = Content Query Web Part, which is available only in MOSS or SharePoint 2010 server.

Copyright © 2005-2013 KWizCom corp. All rights reserved. www.KWizCom.com
16
Installation
Software prerequisites
Server Requirements
1. SharePoint 2007 / WSS 3.0 or
2. SharePoint Server/Foundation 2010
Client PC Requirements
1. Windows 7/8 or iOS X V10.8.2
2. Microsoft Internet Explorer 9+ or Firefox Mozilla (Latest version)
or Google Chrome (Latest version) or Safari (Latest version)

Copyright © 2005-2013 KWizCom corp. All rights reserved. www.KWizCom.com
17
Installation Procedure
SharePoint 2007
1. Log in using SharePoint administrator account to your SharePoint
front-end server.
2. Download the product’s latest evaluation version from KWizCom’s
internet web site. This evaluation version is fully functional for 30
days. Further details about product activation can be found in the
Administrator guide (next section).
3. Unzip the product’s zip file on your SharePoint server.
4. Uninstall existing older version.
5. Double-click the .msi file in order to begin the web installation.
6. When the installation process is complete it will recycle all
application pools automatically.

Copyright © 2005-2013 KWizCom corp. All rights reserved. www.KWizCom.com
18
SharePoint 2010
1. Log in as SharePoint administrator account to your SharePoint
front-end server.
2. Download the product’s latest evaluation version (zip file) from
KWizCom’s internet web site. This evaluation version is fully
functional for 30 days.
3. Download the KWizCom SharePoint Foundation zip file:
http://www.kwizcom.com/objects/KWizCom%20SharePoint%20201
0%20Foundation/KWizCom%20SharePoint%20Foundation.zip
REMARK:
KWizCom SharePoint Foundation is a WSP package that includes
all KWizCom’s shared utilities and licensing modules for
SharePoint 2010.
4. Extract both zip files’ content into the same folder on your
SharePoint’s disk.
You will need now to install and deploy these standard SharePoint
WSP packages. This can be done by using SharePoint’s
stsadm/Powershell tools, according to Microsoft’s guidelines for
installing WSP packages.
5. For a much quicker automatic installation, right-click the
“SP-WSPsInstaller.ps1” Powershell script file and select “Run with
Powershell”. This will start the automatic installation and
deployment process.
At the end of the installation process, you should see all packages
deployed in the Central Admin “Server Solutions” page, and the KWizCom
SharePoint Foundation package should be deployed also in the Central
Admin’s web application.

Copyright © 2005-2013 KWizCom corp. All rights reserved. www.KWizCom.com
19
Post Installation
SharePoint 2007
1. After completion of the installation, you will see a new KWizCom entry
in Windows Start -> All Programs -> KWizCom -> SharePoint List
Aggregator Web Part containing the following programs:
About SharePoint List Aggregator Web Part
Display General Information about the component.
Activate SharePoint List Aggregator Web Part
This utility enables you (the SharePoint Administrator) to activate the
downloaded evaluation version.
SharePoint SharePoint List Aggregator Resource Editor
This utility enables you (the SharePoint Administrator) to translate the
component to your local language.
Please review the next sections for further details about component
localization and activation.
SharePoint 2010
1. After completing the package installation and deployment, Activate the
feature in site collection/s where you want this feature to be available:

Copyright © 2005-2013 KWizCom corp. All rights reserved. www.KWizCom.com
20
Un-installation procedure
SharePoint 2007
1. Log in using SharePoint administrator account to your SharePoint
front-end server.
2. Go to Control Panel and double-click Add or Remove Programs.
3. Select product entry and click Remove button.
4. Click Yes to approve the removal of the component.
5. Once the product was un-installed, close the Add or Remove Programs
screen.
SharePoint 2010
1. Retract and remove the solution using SharePoint central admin or by
using stsadm/powershell command line.

Copyright © 2005-2013 KWizCom corp. All rights reserved. www.KWizCom.com
21
Translating a KWizCom component
SharePoint 2007
1. On your Windows task bar, select:
Start->All Programs->KWizCom->SharePoint List Aggregator Web
Part-> SharePoint List Aggregator Web Part Resource Editor
2. Select your target language on the "Select Culture" drop-down list.
3. For translation to French Spanish German and Russian-
Click "Load" and upload the translations resource file.
4. For translation to any other language-Translate all the displayed strings
in the strings grid by entering a translated value in the "Localized Value"
column.
5. Click the "Create"/"Update" button in order to create/save a resource
file for the selected target language.
6. If you want to create additional resource files for more target languages,
simply repeat stages 2-5 for each language.
7. Close the utility by clicking the "Close" button.
SharePoint 2010
1. Go to: C:\Program Files\Common Files\Microsoft Shared\Web Server
Extensions\14\Resources.
2. Copy the product’s resource file:
KWizCom.SharePoint.WebParts.ListAggregator.resx
to a new resource file, and add to its name the requested language’s
suffix.
Example: to create a French resource file, copy the file to the following
file name:
KWizCom.SharePoint.WebParts.ListAggregator.fr-FR.resx
3. Update the copied resource file and replace the English strings with the
translated strings. The translatable strings are located inside the <data
name> nodes, in their <value> attributes.

Copyright © 2005-2013 KWizCom corp. All rights reserved. www.KWizCom.com
22
Example:
<data name="btnAccept" xml:space="preserve">
<value>Accept Changes</value>
</data>
4. Save the new resource file.
REMARK:
You can also use the KWizCom Resource Translator Free utility to quickly
translate any KWizCom add-on to your preferred language.

Copyright © 2005-2013 KWizCom corp. All rights reserved. www.KWizCom.com
23
Component Activation
KWizCom components are available for evaluation prior to purchase. This
way you can try our components and verify that they indeed meet your
needs. An evaluation version for each KWizCom component contains all
features of the component's production version. The only difference is that
an evaluation version is time-limited, and will operate for a period of one
month.
Once you decide to order a KWizCom component, you will need to follow
the following steps:
SharePoint 2007
1. Order the component on the KWizCom website –
www.KWizCom.com.
2. Send us the installed evaluation version's product Code (you will
see the product Code on the "About" product page:
Please use the Activation Request web form, on KWizCom web site
Copyright © 2005-2013 KWizCom corp. All rights reserved. www.KWizCom.com
24
to send us your product code.
3. Get the component activation key – this key will be sent to you by
email once your order is processed.
4. Activate your installed evaluation version -
click Start -> All Programs -> KWizCom -> SharePoint List
Aggregator Web Part -> Activate SharePoint List
Aggregator Web Part
5. When you browse your SharePoint Portal/ Windows SharePoint
services site, a new KWizCom SharePoint List Aggregator Web Part
will be available for you under "virtual Server Gallery".
SharePoint 2010
1. Order the product on the KWizCom website – www.KWizCom.com,
or contact our sales team at [email protected].
2. After the order was made, you can activate your installed
evaluation version. Activation is done by the following steps:
a. Open SharePoint Central Admin. On the main “Central
Administration” page, you will see the “KWizCom Features
Administration” icon:

Copyright © 2005-2013 KWizCom corp. All rights reserved. www.KWizCom.com
25
b. Click the KWizCom Features Administration icon. You will be
redirected to a page that allows you to manage all your
installed KWizCom products’ licenses:
c. Click the “Manage License” link next to the product that you
wish to activate. You will be redirected to that product’s
license management page:

Copyright © 2005-2013 KWizCom corp. All rights reserved. www.KWizCom.com
26
d. Click on the “Request product code and start your evaluation
now” link, under the required license type (Farm, Web
application, Site Collection).
A product code will be generated and displayed as in the
following screenshot:
e. Copy the product code.
f. Browse the Product Activation Request page on KWizCom’s
web site: http://www.kwizcom.com/ProductReg.

Copyright © 2005-2013 KWizCom corp. All rights reserved. www.KWizCom.com
27
Copy your Product Code into the “Product Code” field, and
after you fill-out all other form fields, click “Send Activation
Request button.
g. Once your order is confirmed, you will receive the Activation
Code for your product by email.
h. Copy the activation code into the “Activation Code” field in
the product’s license management page and click “Activate
now!” link.

Copyright © 2005-2013 KWizCom corp. All rights reserved. www.KWizCom.com
28
That’s it! Your product is now fully activated.
Copyright © 2005-2013 KWizCom corp. All rights reserved. www.KWizCom.com
29
Administrator Guide
Introduction
When you browse your SharePoint Portal/ Windows SharePoint services
site, a List Aggregator Web Part will be available for you under "virtual
Server Gallery"
This section reviews List Aggregator web part's properties and configuration
abilities.

Copyright © 2005-2013 KWizCom corp. All rights reserved. www.KWizCom.com
30
Web Part Properties & Configuration Options
The web part's properties are grouped in the following categories:
Source Lists
Aggregations Views Definitions
Custom Grouping
Additional Site Collections
Caching
Look And Feel
In order to set these settings click on Modify Web Part Settings button
The following sections provide details about each category.

Copyright © 2005-2013 KWizCom corp. All rights reserved. www.KWizCom.com
31
Source Lists
Use this section to define the lists/libraries that should be aggregated and
the scope of aggregation.
Root Site URL – This site will be used as the aggregation starting
point.
Aggregation Scope – Select the aggregation scope from the drop
down
List type–choose the list base type from the drop-down. You may
also choose “All list types” to aggregate all types.

Copyright © 2005-2013 KWizCom corp. All rights reserved. www.KWizCom.com
32
Show items for this content type group – if you wish to
aggregate items that belong to some content type, select a content
type group, this will reveal the next property “Show items for this
content type”
Show items for this content type - after you selected a content
type group (the property above), select the specific content type that
you wish to aggregate.
Look in sites named as- you can filter the aggregated sites by the
names you insert in this field. If you do not wish to filter these items
returned with a specified name, leave this field empty.
Look in lists named as - you can filter the aggregated items by the
names you insert in this field, you may insert more than one name.
If you do not wish to filter these items returned with a specified
name, leave this field empty.

Copyright © 2005-2013 KWizCom corp. All rights reserved. www.KWizCom.com
33
Aggregation Views Definitions
The list aggregator uses an "Aggregation Views list” - standard
SharePoint list that contains the queries (views) that will be used to
perform the data aggregation.
This means that after you plan your required aggregations, you should
create a list that will include the columns and the views that will be used
to perform the actual cross-site queries (aggregations).
Views List Web Site Url –insert here the SharePoint site address
where the aggregation list is located. After typing the address click
on "Load..."
Copyright © 2005-2013 KWizCom corp. All rights reserved. www.KWizCom.com
34
Aggregation Views List – Choose the exact list that will be used
for the aggregation.
Default View – here you choose the default view to be presented in
the web part.
Show views picker – check this check box if you wish to show the
views picker to the users.
Hide views – allows you to select the views which will not be
visible to the end-users.
Copyright © 2005-2013 KWizCom corp. All rights reserved. www.KWizCom.com
35
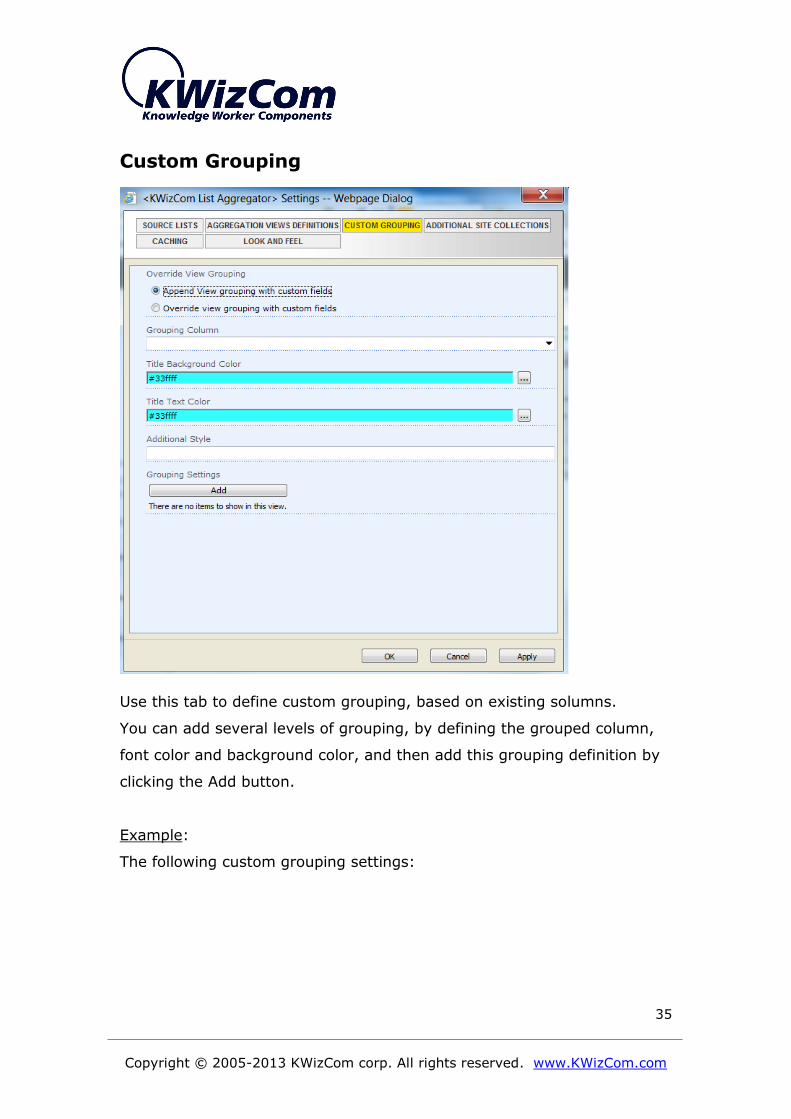
Custom Grouping
Use this tab to define custom grouping, based on existing solumns.
You can add several levels of grouping, by defining the grouped column,
font color and background color, and then add this grouping definition by
clicking the Add button.
Example:
The following custom grouping settings:

Copyright © 2005-2013 KWizCom corp. All rights reserved. www.KWizCom.com
36
define 2 level of grouping (for task lists aggregation): by Assigned to field
and then by the Status field.
The run-time result of these settings looks like this:

Copyright © 2005-2013 KWizCom corp. All rights reserved. www.KWizCom.com
37
Additional Site Collections
The list aggregator web part allows you to aggregate items from several
site collections. Use this tab to define the additional site collections from
which the web part should aggregate items according to the defined
aggregation view.
IMPORTANT NOTE:
SharePoint 2007/2010 does not provide any API for cross site collection
queries. The KWizCom’s List Aggregator web part aggregates each site
collection seperatelly and renders each site collection’s aggregated results
in a separate grid.
If you have more than few site collections, or if you need also cross web
application aggregation, you can use the KWizCom’s Enterprise
Copyright © 2005-2013 KWizCom corp. All rights reserved. www.KWizCom.com
38
Aggregation Caching Feature solution together with the List Aggregator
web part Professional Edition, to display heavy aggregations in much
faster time response and with less load on your SharePoint WFE servers.
See more details in the “Caching” section.
Copyright © 2005-2013 KWizCom corp. All rights reserved. www.KWizCom.com
39
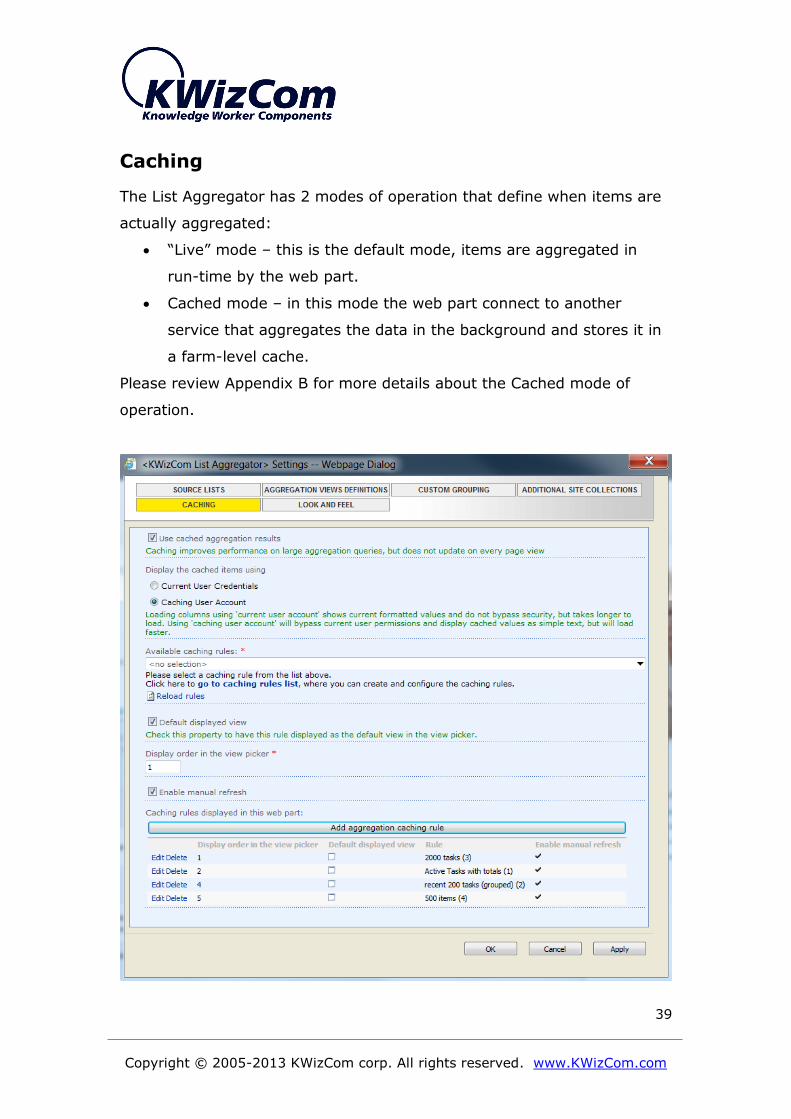
Caching
The List Aggregator has 2 modes of operation that define when items are
actually aggregated:
“Live” mode – this is the default mode, items are aggregated in
run-time by the web part.
Cached mode – in this mode the web part connect to another
service that aggregates the data in the background and stores it in
a farm-level cache.
Please review Appendix B for more details about the Cached mode of
operation.

Copyright © 2005-2013 KWizCom corp. All rights reserved. www.KWizCom.com
40
This tab is available only in the List Aggregation web part
Professional edition.
If you have the KWizCom’s Enterprise Aggregation Caching Feature
solution, you can connect to its aggregation caching services using this
tab.
Remark:
KWizCom's Enterprise Aggregation Caching Feature is a smart server-based solution, that enables
end-users to run extensive queries with quick response time and minimal load on your SharePoint
Front End servers.
By executing cross web application queries and storing the results in a farm-level cache, the data
becomes accessible to Web Parts that display results. You can use the KWizCom List aggregator Web
Part (Professional Edition), or other custom web parts that can connect to the farm-level cache by
using KWizCom's public API.
In order to connect to the Enterprise Aggregation Caching Feature, check
the “Used cached aggregation results” checkbox.
Once the checkbox is checked, the web part will be in “cached” mode,
which means – it does not aggregate data by itself anymore, but gets the
aggregated date from a farm-level cache provided by the Enterprise
Aggregation Caching Feature.
In this mode, the following tabs will be inactive:
Source Lists
Aggregation Views Definitions
Custom Grouping
Additional Site Collections
The Enterprise Aggregation Caching Feature manages Aggregation
Caching Rules, each defines an aggregation query, scope of aggregation,
aggregation period and user account used to perform the aggregation.

Copyright © 2005-2013 KWizCom corp. All rights reserved. www.KWizCom.com
41
By using the “Caching” tab, you can connect the web part to one or more
aggregation caching rules, and display them in the web part as views.

Copyright © 2005-2013 KWizCom corp. All rights reserved. www.KWizCom.com
42
The following table describes this tab properties used to connect the web
part to aggregation caching rules:
Property Description
Use cached
aggregation results
Check this property to have the web part displayed cached
aggregated data provided by the Enterprise Aggregation
Caching Feature.
Display the cached
items using
Current User Credentials –
In this mode of operation the list aggregator web part connects
to the caching service and retrieves the aggregated items’ id’s.
It then retrieves each item’s live values by using the current
user’s credentials so there will not be any security bypassing.
The live items’ values are then rendered using their field
controls (so each field value is rendered according to its type).
Caching User Account –
In this mode of operation the list aggregator web part connects
to the caching service and retrieves the entire cached
aggregated items’ details.
The displayed data is completely cached, and all items are
displayed from the cache regardless of the current user’s
permissions.
The retrieved data is rendered as raw text data without any
formatting.
Use this mode of operation if you wish to have the best
possible time response.
Available caching
rules
This drop-down displays all active aggregation caching rules.
Select the one you wish to connect the web part to. After you
select a caching rule, you’ll see its properties in read-only
labels.
Default displayed
view
Check this property if you wish that the selected caching rule
will be displayed to end-users as the default view in the view
picker.
Display order in the
view picker
Type an integer value that will define the caching rule’s order
among other selected caching rules, in the view picker.
Enable manual
refresh
Check this property if you want to enable end-users to be able
to manually refresh the caching rule’s cache.
Add aggregation
caching rule
After you’ve selected a caching rule and configured its display
properties, click this button to add that caching rule to the list

Copyright © 2005-2013 KWizCom corp. All rights reserved. www.KWizCom.com
43
of displayed caching rules. All these caching rules will be
displayed to end-users as views in the view picker.

Copyright © 2005-2013 KWizCom corp. All rights reserved. www.KWizCom.com
44
Look And Feel
Enable AJAX – Allow better experience with minimum page
refreshing
Enable column reorder – Allow better experience by letting the
user reorder columns for his convenience
Enable drag & drop to groups – enable users to group the
displayed data by required columns. Users will just drag & drop a
column to the top part of the grid (same as done in Outlook).
Choose skin – here you can choose the web part’s color scheme.

Copyright © 2005-2013 KWizCom corp. All rights reserved. www.KWizCom.com
45
REMARK: You can also customize skins to match your exact web
site’s graphic design or even add your own new skin. Please review
Appendix A for details.
Allow editing – enable in-line editing of list items in the aggregator.
Show export options – enable users to export the items to PDF and
CSV
Allow filtering – enable filtering of the list items in the web part.
Expand groups by default – if you check this checkbox by default
when you use grouping the groups will be expanded.
Group items by site name - when checking this checkbox the list
items will be grouped by site name
Group items by list name - when checking this checkbox the items
will be grouped by list name
Specify items per page – type the number of items you wish to be
presented when paging is activated.
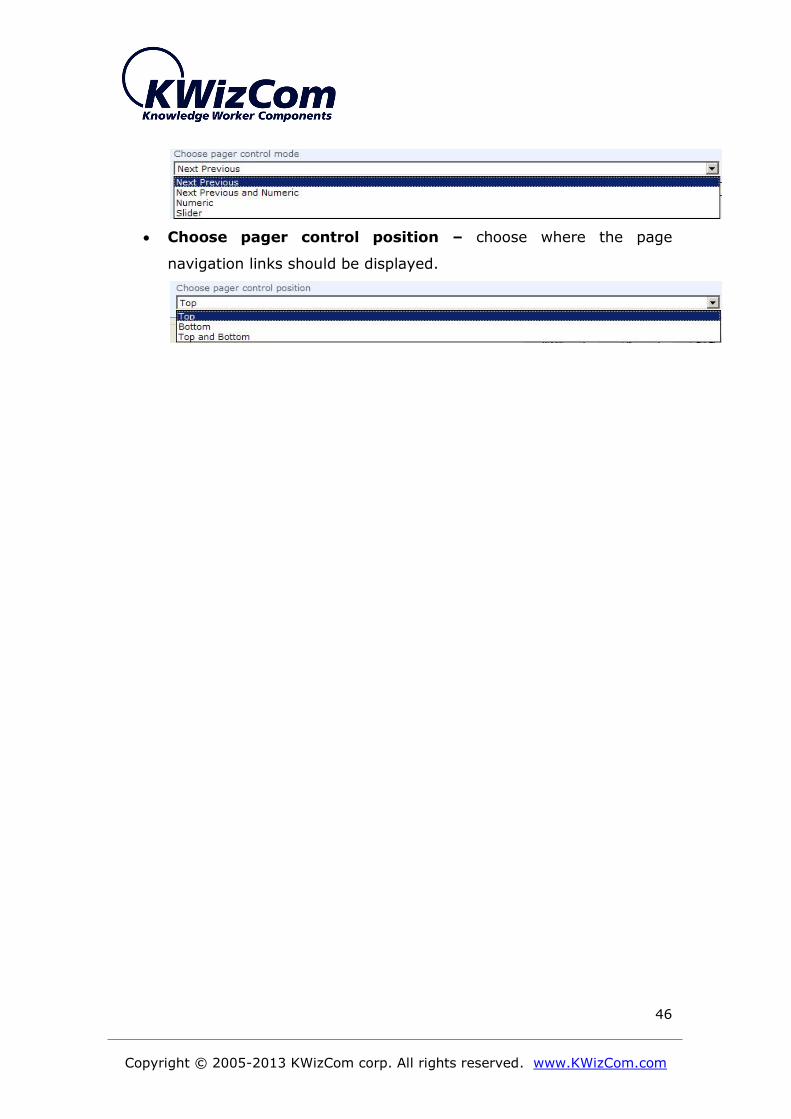
Choose pager control mode – choose pager control mode.
Copyright © 2005-2013 KWizCom corp. All rights reserved. www.KWizCom.com
46
Choose pager control position – choose where the page
navigation links should be displayed.

Copyright © 2005-2013 KWizCom corp. All rights reserved. www.KWizCom.com
47
Table Viewer Properties & Configuration Options
The Table Viewer is an additional web part that is included in the SharePoint
List aggregator installation.
The purpose of this web part is to display data coming from other web parts
(DataTable providers) in a powerful Grid display, that enables sorting,
filtering and exporting of the data.
This web part works in conjunction with KWizCom’s SharePoint List Filter
web part, which can be configured to provide the Table Viewer web part
with data it queries according to various criteria.
(To use this web part please review the KWizCom SharePoint List Filter Plus’
user guide).
After configuring the SharePoint List filter plus web part with the desired
filter fields you should connect the List Filter to provide data to the Table
Viewer as follows:
In Edit mode, click edit on the List Filter Plus and choose Connections<
Set DataTable To<KWizCom List Aggregator- Table Viewer:
(Note that if you changed the display name of the Tree Viewer, the new
name will appear under Set DataTable To)

Copyright © 2005-2013 KWizCom corp. All rights reserved. www.KWizCom.com
48
Same as you do for the SharePoint List aggregator, you can configure the
Look & Feel of the Table Viewer web part:
These settings are equivalent to the Look and Feel settings of the List
aggregator web part with a few additions:

Copyright © 2005-2013 KWizCom corp. All rights reserved. www.KWizCom.com
49
Show item columns- add a view link to the item to view it from
the Table Viewer
Allow deleting- add a delete button to the items displayed by the
Table Viewer
Table Provider Web Part Example
The List Aggregator installation includes a pre-configured example of the Table Viewer web part. In order to use it follow these simple steps:
1. Log on to the Top level site as the site collection administrator 2. Click Site Actions<Site Settings<Modify All Site Settings
3. Under Galleries open Web Parts 4. Click New 5. Find the
KWizCom.SharePoint.WebParts.ListAggregator.TableProviderWebPart_Example and check the checkbox next to it:
6. Click Populate Gallery and you're done!
Now the exemplary web part is available to be added and viewed from any site in the site collection.
Note that source code for the Table Viewer example web part is available for you as well!
To receive it please contact [email protected]

Copyright © 2005-2013 KWizCom corp. All rights reserved. www.KWizCom.com
50
FAQ
What does the List Aggregator do?
KWizCom List Aggregator web part enables you to run cross-site and cross
site collection queries, and display the result in a single consolidated view.
This enables you to gather information from multiple sites and created
functional views such as: "Open issues from all project sites", "All active
announcements", "Latest press-releases from all sub sites", "Most rated
blog posts of the week" etc.
What type of SharePoint installation is
needed for this web part to work?
The KWizCom List aggregator works both on MOSS 2007 and WSS 3.0.
Do I have to install anything on my
company's client-PCs?
No. The KWizCom SharePoint Multiple Drop-Down Filter Web Part is a server
installation. Once installed on the server, it can be used from any client-PC
connected to it.
What do I need the Table Viewer For?
KWizCom List Aggregator - Table Viewer web part enables you to display
data provided by other web parts (Data Table providers), and display
them in an advanced, customizable grid display.
Together with KWizCom’s List Filter web part you can implement custom
reports with custom filtering forms.

Copyright © 2005-2013 KWizCom corp. All rights reserved. www.KWizCom.com
51
Technical Support
You can obtain technical support using any of the following methods:
The KWizCom Web site
The KWizCom website at www.KWizCom.com contains the most updated
valuable information, including:
Answers to frequently asked questions (FAQ's) about our products –
usability and technical questions.
Product updates, which provide you with bug fixes and new features.
The Web Form
For technical support through the Internet, please fill in our support web
form on our web site

Copyright © 2005-2013 KWizCom corp. All rights reserved. www.KWizCom.com
52
Appendix A - How to edit/add a skin If you would like to use your own skin, you can edit an existing skin or add
a new one to be presented in the List Aggregator web part. This can be
done by someone with administrator permissions on the SharePoint front-
end server (all skin theme files are located on the server’s file system).
Customize an existing skin
Step 1: To edit an existing skin, you need to choose one of the available
skins that appear in the “Choose skin” drop-down:

Copyright © 2005-2013 KWizCom corp. All rights reserved. www.KWizCom.com
53
Step 2: the actual files that a skin is built of are located in the following
path on the SharePoint server:
C:\Program Files\Common Files\Microsoft Shared\
web server extensions\12\TEMPLATE\LAYOUTS\KWizCom_Aggregator\
RadControls\Grid\Skins
There you will see a folder for every skin:
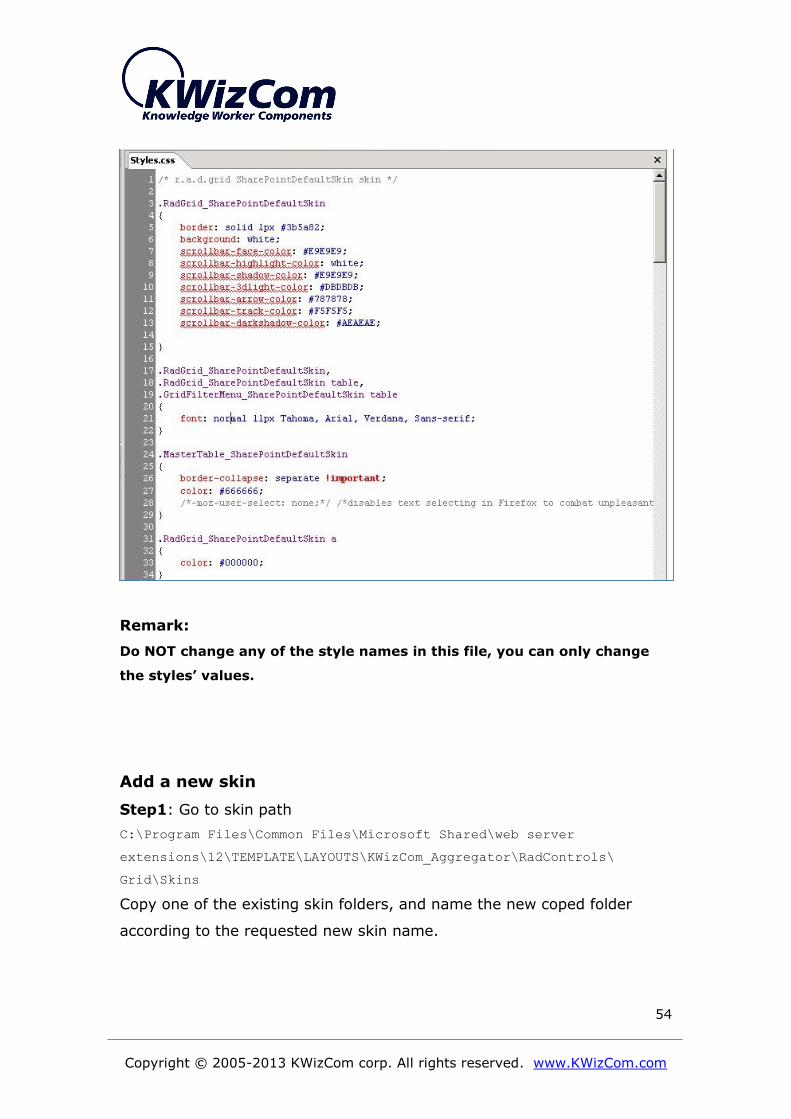
Step 3: To edit a skin, you just need to edit Styles.css file in the
requested skin’s folder.
In the following example we wish to edit the “SharePointDefaultSkin” skin:
Copyright © 2005-2013 KWizCom corp. All rights reserved. www.KWizCom.com
54
Remark:
Do NOT change any of the style names in this file, you can only change
the styles’ values.
Add a new skin
Step1: Go to skin path
C:\Program Files\Common Files\Microsoft Shared\web server
extensions\12\TEMPLATE\LAYOUTS\KWizCom_Aggregator\RadControls\
Grid\Skins
Copy one of the existing skin folders, and name the new coped folder
according to the requested new skin name.

Copyright © 2005-2013 KWizCom corp. All rights reserved. www.KWizCom.com
55
Step 2: Open Styles.css file under the new skin’s folder, replace all the
strings that include the skin name with your new skin’s name.
In the following example we copied the “SharePointDefaultSkin” skin, so
we have to replace the string “SharePointDefaultSkin” to the new skin’s
name:
Step 4: Save the style.css updated file.
Step 5: To view your new skin you need to go Start>Run and type
iisreset command.
Then open the List Aggregator toolpart, and look for the new skin in the
Look and Feel configuration tab.

Copyright © 2005-2013 KWizCom corp. All rights reserved. www.KWizCom.com
56
Appendix B – Cached mode The List Aggregator web part can work in 2 modes:
Live mode – in this mode dara is reteived from lists in real time.
Cached mode (Professional edition only) – list items are
periodically aggregated by a server job and saved in a fast access
repository (Cache). The List Aggregator web part gets the data
from that cache instead of running the aggregation query in real-
time.
Cache mode is required when there’s a lot of data to aggregate and many
lists/sites. Working in this mode enables getting the aggregated data and
displaying it to users in a much faster response time, with less load on the
SharePoint server/s.
When the List Aggregator web part is configured to work in Cached mode,
you will see the Cache mode indicator icon at the top-right area of the
web part:

Copyright © 2005-2013 KWizCom corp. All rights reserved. www.KWizCom.com
57
The cache mode indicator displays different icons, depending on the
current state of the displayed cached data.
The following table presents the various icons and what each of them
means:
Status Cache mode indicator
Cache mode indicator
Web part display Description
Icon Tooltip
Caching service not available
(in red color)
The web part cannot connect to the caching service. Please contact your sys administrator.
Empty with the same error message
In this status the list aggregator web part is not able to connect to the caching service and cannot displayed the cached data.
Normal (cached data displayed)
Green
Cached results from [date & time]
Cached results Cached data displayed
Normal + clickable Green
Cached results from [date & time] Click to refresh the cache
Cached results The icon is clickable, when clicking it a request is sent to the caching service to refresh the cache.
Normal + manual cache refresh request queued
(Yellow, rotating slowly)
Cached results from [date & time] ”This view is queued to be collected in the background.”
Cached results Cached data is displayed, and the manual request for cache refresh has been queued.
Normal + Cache being refreshed
(Green, rotating slowly)
Cached results from [date & time] The cache is now being refreshed in the background.
Cached results Cached data is displayed, and currently a new cache is being created in the background.(this indication will show after a manual request was marked in the rule’s item)

Copyright © 2005-2013 KWizCom corp. All rights reserved. www.KWizCom.com
58
Normal + newer cache is available
Slowly
blinking
Cached results from [date & time] New cache is available, click to refresh your display.
Cached results Old cached data is displayed, and a newer cache is available.
Cache not ready + Cache being refreshed
(Green, left icon rotating)
Results are being collected in the background. Please try again soon
Empty display with the same message
The 1st cache was not created yet by the job, but there is a positive indication that the cache is being created.
Cache not ready + manual cache refresh request queued
(Yellow, left icon rotating)
This view is queued to be collected in the background. Please try again soon.
Empty display with the same message
The 1st cache was not created yet by the job, but there is a positive indication that the cache is being created.
When you work with the List Aggregator web part in cached mode, it
means that you are viewing cached data, which may not be fully up to
date due to recent changes.
The caching data is periodically refreshed, according to the configurations
made by the administrator. However, you can manually refresh the cach if
you need to view the most updated data. Manually refreshing the cach is
done by simply clicking the Cache mode indicator icon. Once you click it, it
will start rotate and when you hover over it you will see the exact status
of your manual cache refresh request. When a new updated cache is
available, the indicator icon will blink; click it to refresh the web part’s
display with te new updated cache results.