sharepoint: fundamentals - university of wisconsin … sharepoint: fundamentals this class will...
TRANSCRIPT
1/22/18
SharePoint: Fundamentals This class will introduce you to SharePoint and cover components available to end users in a typical SharePoint
site. To access SharePoint, you will need to log into Office 365.
Accessing and Logging In
Office 365 is available on any device with an internet connection. Office 365 works with desktop computers,
laptops, tablets, and mobile devices. To access and log into Office 365 go to:
uwm.edu/office365
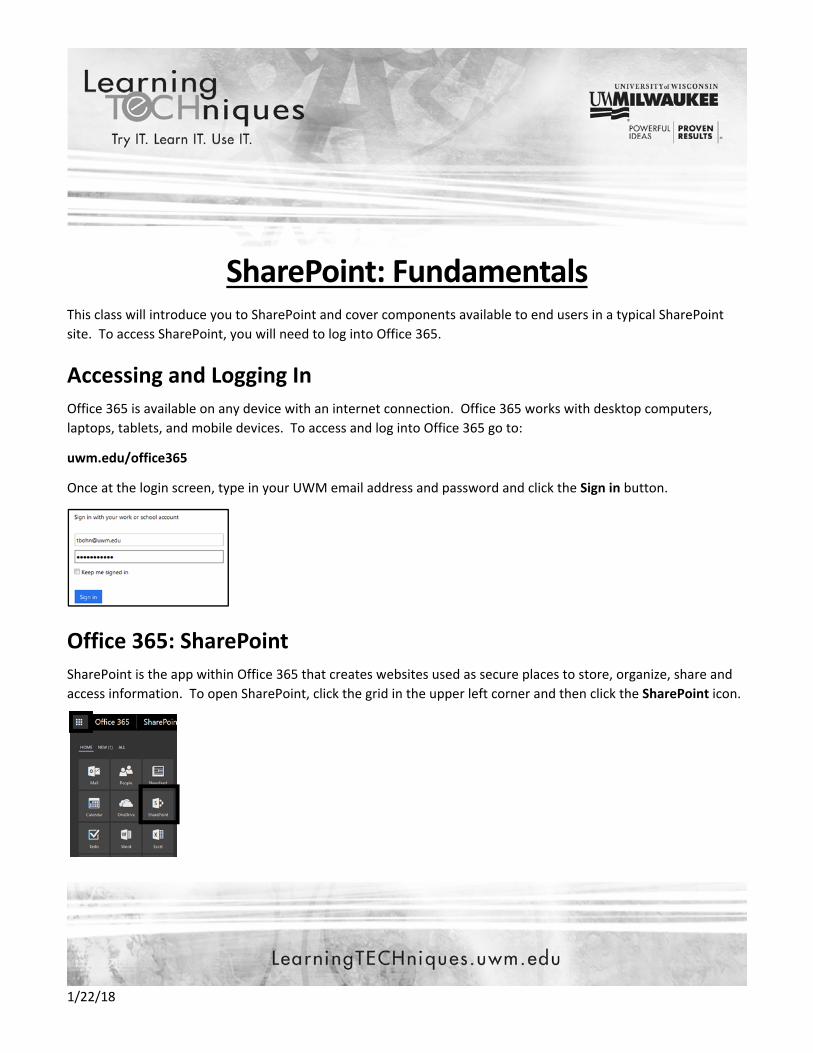
Once at the login screen, type in your UWM email address and password and click the Sign in button.
Office 365: SharePoint
SharePoint is the app within Office 365 that creates websites used as secure places to store, organize, share and
access information. To open SharePoint, click the grid in the upper left corner and then click the SharePoint icon.

2
What is SharePoint?
SharePoint is a part of Office 365 that allows users to create and access websites used to collaborate,
communicate, organize and access information from almost any device using a browser. A SharePoint site can be
as simple as a repository for documents to complex multi‐page sites housing tools such as task lists, contact
information and calendars. Because of the integration with Office 365, you can create and edit Microsoft Office
files (such as Excel, PowerPoint and Word) within SharePoint.
Locate, Follow and View a Site
To visit a SharePoint site, the site owner must grant you permissions to access the site. Depending on the level of
access to the site, you may be restricted to viewing documents on the screen or possibly be granted permissions
to edit the site. In this class, you will be a Site Member and have Edit permissions to the content in the training
site; you may have more or less permissions for other SharePoint sites shared to you. This document will note any
actions that cannot be performed if you have less than Edit permissions to a site.
After a site is shared to you, there are multiple ways to locate that SharePoint site.
Email Invite
When someone gives you permissions for a SharePoint site, you receive an email message:
1. To visit the site, click the link in the email message.
2. The email also gives you the option to Follow the site; this makes locating the site easier on future visits
and you do not have to use the email message to locate the site. Click the Follow link to follow the site.
SharePoint App
If you do not want to use the email invite to access the site, you can go directly to SharePoint in Office 365.
1. Click on the App Launcher in the upper left corner of the screen. From the grid of tiles, choose
SharePoint.
2. When the SharePoint app loads, you see a list of all the sites you can access. The pane on the left
contains a list of the sites you are Following and a list of Recent sites you visited. The middle of the
screen also shows Frequent sites.

3
3. Sites that have an empty star are sites that are shared to you that you have not yet followed. To follow a
site, click inside of the star to fill it in, this will work in the Recent and Frequent sections.
4. Click on the name of the site you want to visit in the Following, Recent or Frequent section.
5. If you cannot find the site you want to visit, click in the Search bar at the top of the left pane and type in
the name of the site.
Web Browser
Because SharePoint sites are web pages, you can type in the URL for a SharePoint site or bookmark a SharePoint
site in your browser.
Type in the URL
1. Open a web browser (i.e. Internet Explorer, Chrome or Firefox).
2. Type in the URL for the SharePoint site in the Address bar of your browser.
Bookmark a SharePoint Site
1. If you do not know the URL, log into Office 365, click the App Launcher in the upper left corner of the
window and choose SharePoint. Click on the SharePoint site you want to bookmark.
2. After the site loads on the page, you can use the Bookmark tool in your web browser to bookmark the
site.
NOTE: If you do not know how to locate or use the Bookmark tool in your browser, read the browser help
files for instructions.
3. Once the site is bookmarked, you can go to your bookmarks and click on the link for the site at any time to
visit the SharePoint site. You may be prompted to log into Office 365 before you can access the site.
FollowedSite
SiteNotFollowed
FollowedSite
SiteNotFollowed

4
SharePoint Working Screen
Section Description
1 App Launcher Allows you to move between the different apps in Office 365 such as Outlook and OneDrive.
2 Ribbon
From the Home page of your SharePoint site, the Ribbon contains a BROWSE and PAGE tab. The BROWSE tab is activated by default and allows you to browse the SharePoint site. The PAGE tab contains tools for editing the page, if you have permissions to do so. Other parts of your SharePoint site may contain additional ribbon tabs. If you do not see the ribbon, go to the Settings (Gear icon) in the upper right corner of the screen and choose Show Ribbon.
3 Site Options Contains buttons for sharing, following and editing the site as well as the Focus on Content button that hides the site navigation buttons.
4 Quick Launch or Left Navigation
Lists features of the site and provides a quick way to navigate and access the content on the site. Can be customized or removed.
5 Top Link Bar or Global Navigation
Series of links to other sites within a collection of sites. For standalone sites, there will only be one link unless the administrator adds other links. Can be customized or removed.
6 Search Bar Used to search for items on the SharePoint site. The down‐arrow on the right side of the box allows you to specify where to search.
7 Page Content Shows contents of the SharePoint site including elements like the Document library and newsfeed.
NOTE: Office 365 is a cloud service updated and maintained by Microsoft. As a cloud service, Microsoft can
update and change features in Office 365 as needed. UWM has little to no control over these changes and
parts of this document may be incorrect after printing/publishing because of these updates.
1
2
4
3
5
7
6

5
Navigating a Site
The navigation elements covered in this section are based on default SharePoint site settings. Other SharePoint
sites you use may have customized navigation elements with more or less options than what you see in training.
Navigation Bars
There are two main navigation components found on most SharePoint sites, the Quick Launch and the Top Link
Bar.
The Quick Launch is typically located on the left side of the SharePoint site, but your site administrator can move
it to the top of the screen. Quick Launch is a list of links that take you to other parts of the SharePoint site or to
outside links such as your departmental website.
The Top Link Bar is typically located at the top of the SharePoint screen and typically contains a link to the home
page of the site. Your site administrator can also add links to other parts of the SharePoint site and to external
web pages.
SharePoint Apps
In addition to navigational elements, a SharePoint site also can have site apps. Below are some commonly used
apps; your site may have more or less apps than the table below.
App Description Image
Documents
Found on most SharePoint sites. Upload, create, update and collaborate on files with other site members. Searchable and sortable columns help to manage and organize content.
List
Collection of data shared with other site members. SharePoint contains a number of templates such as a contact list.

6
Calendar
Calendar that can be added to a site for viewing or scheduling events; visible to all site members.
Tasks
List of tasks to be completed that can be assigned to other members of the SharePoint site.
Subsite
Nested within the main site and can contain another Document Library, Lists and other SharePoint apps. May be used to give separate permissions, organize information or to have a different site type.
If you are not sure what elements are contained in the SharePoint site you are using, you can view the site
contents.
1. In the Quick Launch, click the link for Site Contents. This opens a window containing all the contents of
the site.
‐OR‐
1. If there is no Quick Launch for the site or the Sites Contents link is not in the list, in the upper right corner
of your screen click the Settings button (Gear icon).
2. From the menu, choose Site Contents.
Searching
A SharePoint site can house many subsites, pages, libraries and lists and if you do not know where something is it
can be difficult to locate using site navigation. Because of this, SharePoint has a variety of search features for
helping you to locate items on the site.
Most pages in a SharePoint site have a Search this site box in the upper right corner. If you do not see one,
navigate to the Home page of the site.
1. To begin a search, type in your search term or terms in the Search this site box in the upper right corner
of the screen.

7
2. To specify where SharePoint should search, click the down‐arrow and choose from the list. Click the
magnifying glass to search.
3. The search results appear on the screen. To refine the search, type in additional terms or change where
the search runs. In addition, the pane on the left side has filters such as type of file, author name and
date.
Using the Document Library
Most SharePoint sites contain one or more Document libraries that house the files used by the members of the
site. The library allows you to create, update and collaborate on files and provides basic information such as who
last modified a file and when it happened. A Document library is like a “super folder” and using the extensive
searching, filtering and sorting tools in SharePoint you can quickly find your files.
Working with Files
With sufficient permissions, you can add and edit files in a SharePoint Document library. There are multiple ways
to add files to the Document library. When uploading files to SharePoint the files must have content; SharePoint
will not upload empty files. If you have less than Edit permissions to a site, you cannot upload, create or edit files.
Upload Button
1. Navigate to the Document library in the SharePoint site.
2. Click the Upload button on the library toolbar.
3. If there are multiple files you want to upload in the same folder, use Shift + Click or Ctrl + Click to select all
the files.
4. Click OK. The file uploads to the library.
Drag and Drop
1. Navigate to the Document library in the SharePoint site.
2. Locate the file on your computer by opening the folder where it is located.

8
3. Resize the browser window and the folder window so that you can see both on your screen.
4. Left click and hold the file you want to upload then drag and drop it to the Document library. Once you
release the mouse button, the file upload begins. If there are multiple files you want to upload in the
same folder, use Shift + Click or Ctrl + Click to select all the files before the drag and drop.
Create a New File
Because SharePoint is a part of Office 365, online versions of Microsoft Excel, PowerPoint and Word are available
in SharePoint. Using the online version of these apps, you can create new files directly in SharePoint.
1. Navigate to the Document library in the SharePoint site.
2. Click the New button on the library toolbar.
3. From the menu, choose the type of file you want to create.
4. The online version of the Office app you selected appears on the screen. To name the file, click in the
black bar at the top of the screen on the word Document, Book or Presentation. Once selected, type the
desired name for the file.
5. Create the file. When finished, click the name of the SharePoint site in the upper left corner of the screen
to return to the site. Because the Office apps are integrated with Office 365, you do not have to save the
file manually, it saves automatically.

9
Edit a File
If a file stored in the Document library was created using Excel, PowerPoint or Word you can edit the file from
within SharePoint or using your desktop versions of the applications. While the online versions of Excel,
PowerPoint and Word contain many commonly used features, be aware that you may need to use the desktop
version of the application to perform advanced actions.
To edit a file directly in SharePoint:
1. In the Document library, click the file you wish to edit to open it in read‐only view.
2. In the upper right corner of the screen, click the Edit button (Edit Document, Edit Presentation or Edit
Workbook). From the list, choose Edit in Browser.
3. This opens the online version of the application (Excel, PowerPoint or Word). Edit the file as needed. If
you need to rename the file, you can change the name of the file by clicking the file name at the top
center of the screen.
4. When you are finished editing, click the name of the SharePoint site in the upper left corner of the screen
to return to the Document library.
NOTE: When editing a file directly from SharePoint, changes save automatically.
To open a file and edit using the desktop version of Office:
1. In the Document library, click the file you wish to edit to open it in read‐only view.
2. In the upper right corner of the screen, click the Edit button (Edit Document, Edit Presentation or Edit
Workbook). From the list, choose Edit in Excel or Edit in PowerPoint or Edit in Word.
3. The file opens in Excel, PowerPoint or Word on your computer. Edit the file as needed.

10
4. When you are finished editing, you must save the file for your changes to be reflected in the document
stored on SharePoint. Notice that the Save button in the application looks different, there are two green
arrows on the icon. When you click the Save button or use the keyboard command (Ctrl + S) the right
corner of the status bar indicates that the file is saving to SharePoint.
NOTE: Using this method, you cannot rename the file in Excel, PowerPoint or Word. You will need to
rename the file using SharePoint. To do so, right click the file in the Document library and choose
Rename from the menu. However, you can use the Save As command in Excel, PowerPoint and Word to
save the file with a different name in the SharePoint Document library.
Search, Sort and Filter in a Library
Libraries can contain many items and there may be times when you cannot see all the items in the library on one
screen. Visually scanning a library for a file can be difficult, but the searching and sorting tools in SharePoint make
it easy to locate a file quickly. Searching in a library will search for the term or terms in any of the visible fields
(Name, Modified, Modified By) and within the files themselves. In addition, your site owner can create custom
fields to use in searching, sorting or filtering the library.
For a more specific search, you can use a prefix followed by a colon (:). For example, typing into the search box
author:”Therese E Bohn” will return all documents in the library authored by Therese Bohn. The table below has
additional search prefixes:
Prefix What it does
author: Searches the author field
modifiedby: Searches the Modified By field
filename: Searches file names
filetype: Searches by file type (For example: docx, xlsx)
NOTE: When searching for a phrase, type it in quotes (“ “) so SharePoint searches for the string of terms instead
of the words individually.
1. Navigate to a library or list within the SharePoint site.
2. In the upper left corner of the screen (above the Quick Launch), locate the search box that says Search.
Type your search term or terms in the box and press the Enter key on the keyboard to search.
3. To remove the search and see all items in the library, click the X in the search box.
Save (upload)
to SharePoint
button
Upload to
SharePoint
indicator
11
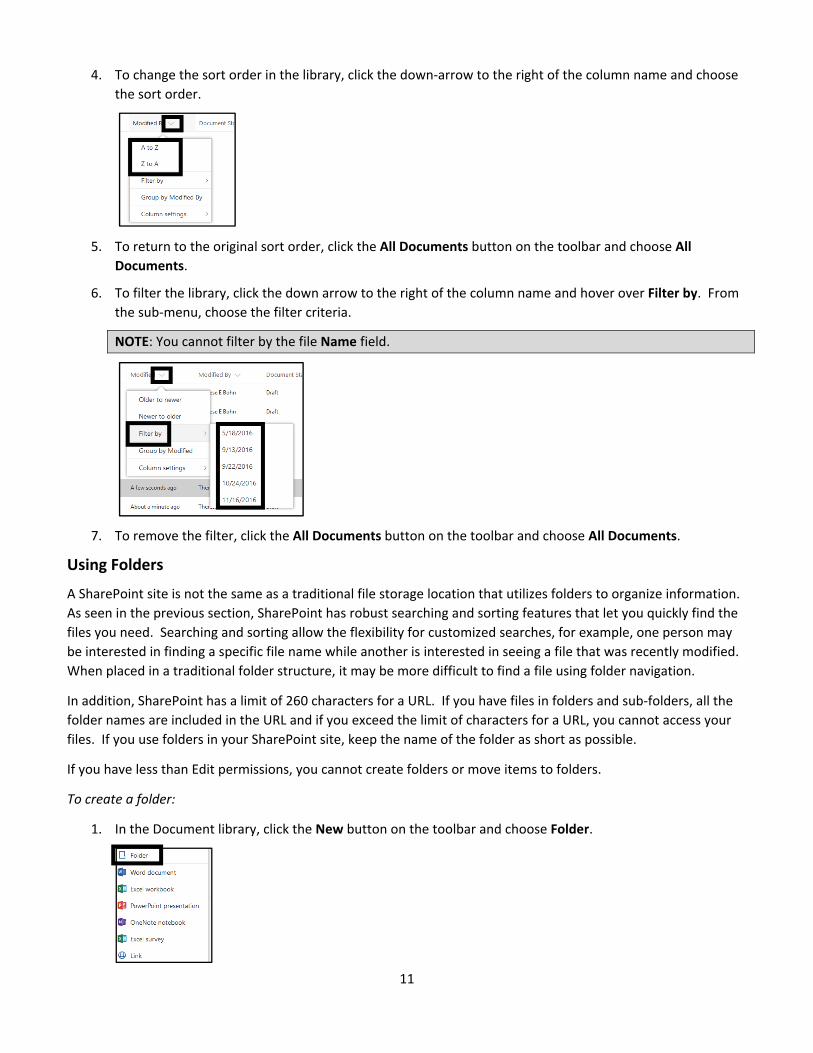
4. To change the sort order in the library, click the down‐arrow to the right of the column name and choose
the sort order.
5. To return to the original sort order, click the All Documents button on the toolbar and choose All
Documents.
6. To filter the library, click the down arrow to the right of the column name and hover over Filter by. From
the sub‐menu, choose the filter criteria.
NOTE: You cannot filter by the file Name field.
7. To remove the filter, click the All Documents button on the toolbar and choose All Documents.
Using Folders
A SharePoint site is not the same as a traditional file storage location that utilizes folders to organize information.
As seen in the previous section, SharePoint has robust searching and sorting features that let you quickly find the
files you need. Searching and sorting allow the flexibility for customized searches, for example, one person may
be interested in finding a specific file name while another is interested in seeing a file that was recently modified.
When placed in a traditional folder structure, it may be more difficult to find a file using folder navigation.
In addition, SharePoint has a limit of 260 characters for a URL. If you have files in folders and sub‐folders, all the
folder names are included in the URL and if you exceed the limit of characters for a URL, you cannot access your
files. If you use folders in your SharePoint site, keep the name of the folder as short as possible.
If you have less than Edit permissions, you cannot create folders or move items to folders.
To create a folder:
1. In the Document library, click the New button on the toolbar and choose Folder.

12
2. Name the folder and then click the Create button. Remember to keep the name as short as possible to
avoid exceeding the number of characters allowed in a SharePoint URL.
To move a file to a folder:
1. Locate the file you want to move to a folder. Hover over the name of the file until you see a circle to the
left of the file name. Click inside the circle to select the file.
2. From the toolbar, click the … (ellipsis) button and choose Move to.
3. Select the folder from the pane on the right and click Move here.
Deleting Files
If there are files in a Document library that you no longer need, you can delete the files by moving them to the
Recycle bin. Files will remain in the Recycle bin for 90 days, after that point, they move to the Second‐stage
recycle bin and only the site collection administrator can retrieve them. After 90 days, files are permanently
deleted from the Second‐stage recycle bin.
If you have less than Edit permissions, you cannot delete files or see the site Recycle bin.
1. In the Document library, locate the file you want to delete and hover over the file and click inside the
circle to the left of the file name to select the file.
2. On the toolbar at the top of the screen, choose Delete. When the confirmation box appears, click Delete
to delete the file.
3. The file moves to the site Recycle bin.
NOTE: If you want to delete a folder, follow the same steps as above but select the folder instead of a
specific file.
4. To restore a file that you sent to the Recycle bin, in the Quick Launch on the left side of the screen, click
the link for Recycle bin. If you do not see a link to the Recycle bin, in the upper right corner of the screen
click the Settings button (Gear icon) and choose Site contents. Click the link for Recycle bin in the upper
right corner.

13
5. Locate the file you want to recover and check the box in front of it. Click the Restore button to return the
file to its original location.
NOTE: You can only recover files that you have sent to the Recycle bin, if someone else deletes a file from
the SharePoint site, only that person or the site collection administrator can recover that file.
6. To delete the file from the Recycle bin, click the Delete button, the file will move to the Second‐stage
recycle bin.
Collaborating in the Document Library
Once you have files in your SharePoint site, you can begin to collaborate with others using those files. This may
include sharing the file, commenting on the file, editing in real‐time with others, viewing versions, checking a file
out and in and setting up an alert.
Share a File
If there is a file on your SharePoint site that you need to share with someone who is not a member of the
SharePoint site you can use the Share and Get a link tools to share the file.
If you have less than Edit permissions, you can share files, but the owner of the site must approve the file share.
1. In the Document library, locate the file you want to share and hover over the file and click the circle to the
left of the file name to select the file.
2. On the toolbar at the top of the screen, click the Share button.
3. In the box that appears, click the down‐arrow for who the file is shared with.
a. Anyone: anyone can access the link with or without logging into Office365
b. People in UWM: only people logged into Office365 from UWM can access the link
c. People with existing access: does not change permissions but will send a link to someone who
already has access
d. Specific people: enter email addresses of specific people whom you want to give access to
4. Choose an option from the list, if you want people to be able to edit the file, check the Allow editing box,
otherwise. Click the Apply button.
5. If you are sharing with specific users, enter their email address and an optional message. Click Send.
6. If you are sharing a link, click the Copy Link button and then copy the link displayed in the dialog box.

14
7. If you no longer want to share the file, return to the Share dialog box and click the ... (ellipsis) button and
choose Manage Access. In the pane on the right, click the link for Stop sharing.
Simultaneous Editing
In previous sections, you learned how to create and edit files using Excel, PowerPoint and Word online. In this
section, you will see how to edit files with other members of the SharePoint site using simultaneous editing.
If you have less than Edit permissions, you cannot simultaneously edit files.
1. In the Document library, locate the file you want to simultaneously edit and click on the name of the file
to open it in read‐only view.
2. In the upper right corner of the screen, click the Edit button (Edit Document, Edit Presentation or Edit
Workbook). From the list, choose Edit in Browser.
3. This opens the online version of the application (Excel, PowerPoint or Word). When another user or users
are simultaneously editing the document, you will see other people are here in the upper right corner of
the screen. If you click the down‐arrow, you will see the name or names of the other editors and a cursor
that coordinates to the color of their name will appear in the area of their changes.
Version History
The Version History allows you to keep track of changes made to a file. It also allows you to revert to a previous
version of the file should you need to do so.
If you have less than Edit permissions, you can only view the Version History.
NOTE: Versioning typically saves the 500 most recent versions of a file in its entirety, which may take up a lot of
quota for a single document. Because of this, versioning may not be enabled for your SharePoint site.

15
1. Select the document whose version history you would like to check.
2. On the top toolbar, click the … (ellipsis) button and choose Version history.
3. From the list that appears, locate the version that you need.
4. Hover the cursor over the date stamp under the Modified heading then click the down arrow.
5. Select View or Restore.
Checking Files Out and In
When collaborating with others on the same file you may want to limit editing to only one person at a time (i.e.,
disable simultaneous editing).
If you have less than Edit permissions, you cannot check files out and in.
Checking Out
1. Select the file that you would like to check out.
2. On the top toolbar, click the … (ellipsis) button and choose Check out.
3. The file is checked out to you and no other users can edit the file. The file’s icon will change to indicate
the checked out status.
16
Checking In
1. Select the currently checked out file that you would like to check in.
2. On the top toolbar, click the … (ellipsis) button and choose Check in.
3. If desired, leave a comment describing the changes you made to this version. Click Check in when
finished.
4. To see comments associated with a file, access the file’s version information.
NOTE: If you would like to check in a file without keeping any changes, select Discard check out from the top
toolbar.
Alerts
An Alert allows you to monitor when changes are made to files or libraries. An alert can be set on a specific file or
on an entire library.
Setting an Alert on a File
Setting up an alert on a file will send you an email message when changes are made to a specific file.
1. Select the file you would like to set up an alert for.
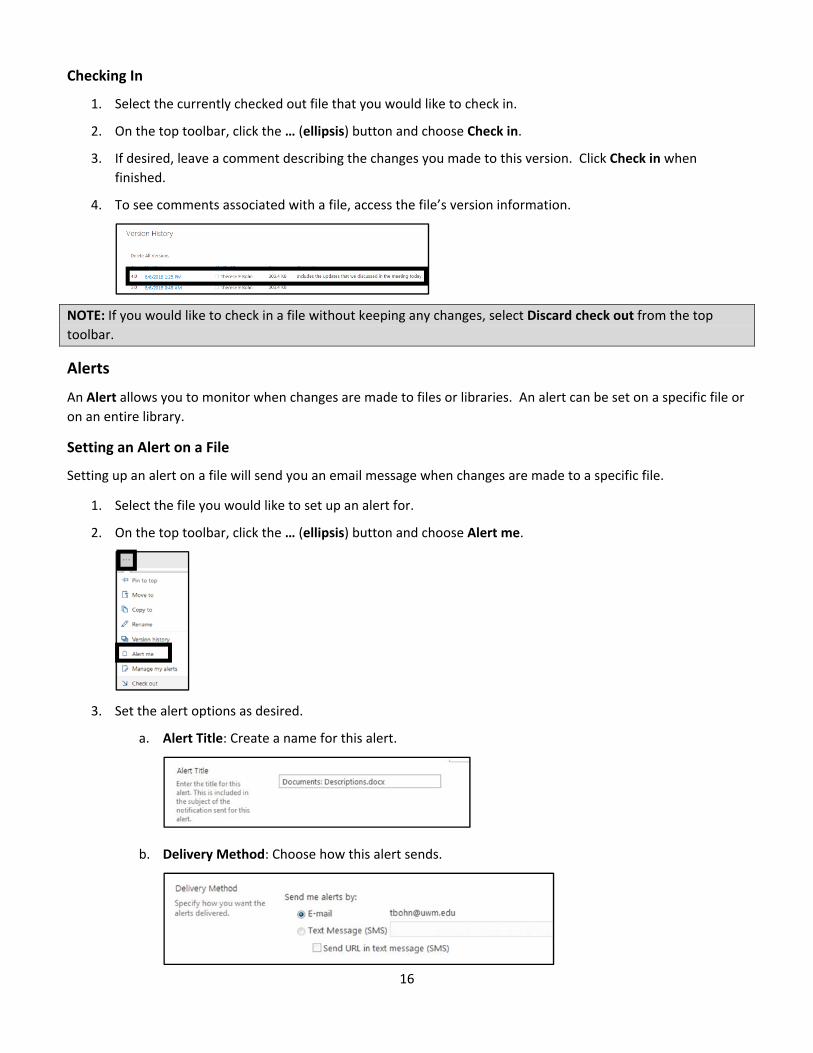
2. On the top toolbar, click the … (ellipsis) button and choose Alert me.
3. Set the alert options as desired.
a. Alert Title: Create a name for this alert.
b. Delivery Method: Choose how this alert sends.

17
c. Send Alerts for These Changes: Choose which events trigger an alert.
d. When to Send Alerts: Choose the frequency of the alerts.
4. Click OK when finished. You will receive an email notifying you of the created alert.
Setting an Alert on a Library
Setting up an alert on a library will let you know if anything is changed in a library.
1. On the top toolbar, click the … (ellipsis) button and choose Alert me.
2. Customize the settings of the alert and then click OK.
Managing and Deleting Alerts
1. On the top toolbar, click the … (ellipsis) button and choose Manage my alerts.
2. You will see a list of your alerts for this SharePoint site.
To Manage an alert:
1. Select the alert that you would like to manage by clicking the title.
2. Make changes to the alert and click OK to save your changes.
18
To Delete an alert:
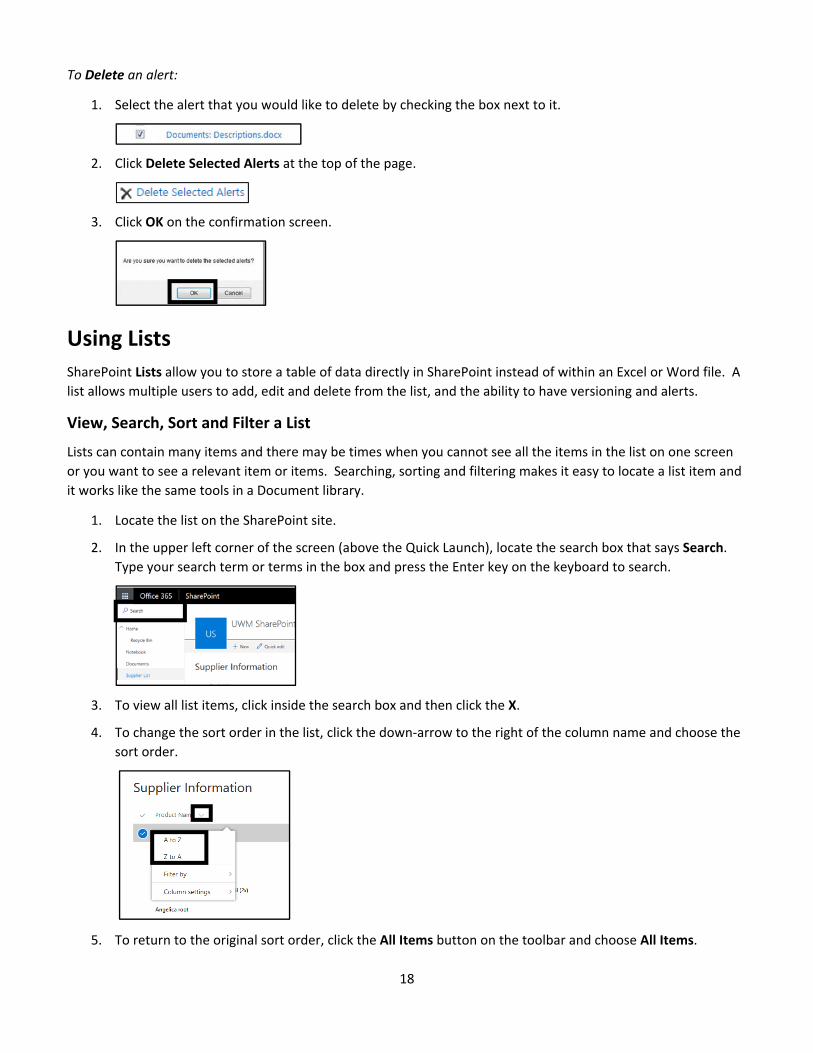
1. Select the alert that you would like to delete by checking the box next to it.
2. Click Delete Selected Alerts at the top of the page.
3. Click OK on the confirmation screen.
Using Lists
SharePoint Lists allow you to store a table of data directly in SharePoint instead of within an Excel or Word file. A
list allows multiple users to add, edit and delete from the list, and the ability to have versioning and alerts.
View, Search, Sort and Filter a List
Lists can contain many items and there may be times when you cannot see all the items in the list on one screen
or you want to see a relevant item or items. Searching, sorting and filtering makes it easy to locate a list item and
it works like the same tools in a Document library.
1. Locate the list on the SharePoint site.
2. In the upper left corner of the screen (above the Quick Launch), locate the search box that says Search.
Type your search term or terms in the box and press the Enter key on the keyboard to search.
3. To view all list items, click inside the search box and then click the X.
4. To change the sort order in the list, click the down‐arrow to the right of the column name and choose the
sort order.
5. To return to the original sort order, click the All Items button on the toolbar and choose All Items.

19
6. To filter the list, click the down arrow to the right of the column name and hover over Filter by. From the
sub‐menu, choose the filter criteria.
7. To remove the filter, click the All Items button on the toolbar and choose All Items.
Add a List Item
If you have less than Edit permissions, you cannot add items to a list.
1. Click the New button at the top of the list; this will open a form with all the fields in the list.
2. Fill in the fields and click Save when finished.
Edit a List Item
If you have less than Edit permissions, you cannot edit list items.
1. From the top toolbar, choose Quick edit.
2. Edit the list and then click the Done button.

20
Delete a List Item
If you have less than Edit permissions, you cannot delete list items.
1. Locate the row you want to delete and click inside of the circle that appears to the left of the row. On the
top toolbar, click the Delete button.
2. Click Delete in the confirmation box.
Version History
You can view the Version history of individual items in a list. Once you are in the Version History window, the
commands are the same as in the Version History of a Document library.
1. Locate and select the row you want to view the Version History of in the list, click the … (ellipsis) button
on the top toolbar. From the menu, choose Version history.
2. In the window that appears, you can revert to a previous version by hovering over the date/time stamp,
clicking the down‐arrow and choosing to View or Restore a version.

21
Alerts
You can create an Alert on both individual list items and on an entire list. Once you are in the Alert window, the
options are the same as the alerts in the Document library.
To set an alert on a list item:
1. Locate the row where the alert should be set and click the circle to the left of the list item. On the top
toolbar click the … (ellipsis) button; from the menu choose Alert me.
2. Customize the settings of the alert and then click OK.
To set an alert on a list:
1. On the top toolbar, click the ... (ellipsis) button and from the menu choose Alert me.
2. Customize the settings of the alert and then click OK.
Getting Help
For a full listing of all Short Courses offered, visit uwm.edu/learningtechniques. For 24/7 access to online
technical training videos, visit uwm.edu/lynda.
For technical assistance, contact the UWM Help Desk by calling 414‐229‐4040 (toll‐free 877‐381‐3459) or visit
GetTechHelp.uwm.edu.