sf 160 kjs manual
TRANSCRIPT

33
3WPL062081-5
Thank you for purchasing HitachiFully Automatic Washing Machine.
• Please read this instruction manualcarefully for proper operation of themachine.
• Please keep this instruction manualfor future reference.
¢Õ∫§ÿ≥∑ÿ°∑à“π∑’ˉ¥â‡≈◊Õ°´◊ÈÕ
‡§√◊ËÕß —°ºâ“Œ‘µ“™‘√–∫∫Õ—µ‚π¡—µ‘
• °√ÿ≥“Õà“π§Ÿà¡◊Õπ’ȇæ◊ËÕ∑à“π®–‰¥â„™â‡§√◊ËÕß´—°ºâ“Œ‘µ“™‘‰¥âÕ¬à“ß∂Ÿ°«‘∏’
• °√ÿ≥“‡°Á∫§Ÿà¡◊Õπ’ȉ«â‡æ◊ËÕ„™âÕâ“ßÕ‘ß„π‚Õ°“ µàÕ‰ª
Instruction Manual§Ÿà¡◊Õ°“√„™â
HITACHI Fully Automatic Washer‡§√◊ËÕß´—°ºâ“Œ‘µ“™‘√–∫∫Õ—µ‚π¡—µ‘
Model SF-160KJS
Contents “√∫—≠
Rep
air,
Mai
nte
nan
ce a
nd
Cu
sto
mer
Ser
vice
°“√¥
Ÿ·≈
√—°
…“·
≈–∫
√‘°
“√À
≈—ß°
“√¢“¬
Bef
ore
Was
hing
°àÕ
π°
“√„™âß“π
Was
hin
g &
Sp
in P
r og
ram
mes
°“√´
—°º
â“·
≈–°
“√ª
íòπ·
ÀâßÀ
≈“¬
√Ÿª
·∫
∫
Det
erg
ents
an
d K
een
Was
hin
g
°“√´
—°º
â“Õ
¬à“ß™“≠
©≈
“¥
Features / §ÿ≥≈—°…≥–摇»… ......................................................................................2Precautions / ¢âÕ§«√√–«—߇æ◊ËÕ°“√„™âß“πÕ¬à“ߪ≈Õ¥¿—¬ ..................................3Technical Descriptions / √“¬≈–‡Õ’¬¥¢Õß™‘Èπ à«π ..........................................7Control Panel / ·ºßÀπ⓪í∑¡å§«∫§ÿ¡ ...................................................................8Before You Start Washing / °àÕπ‡√‘Ë¡∑”°“√´—° ............................................. 10Child Lock / √–∫∫≈ÁÕ§ªÑÕß°—π‡¥Á° ....................................................................... 10Easy to Wash Course (FUZZY Course)
√Ÿª·∫∫°“√´—°Õ—µ‚π¡—µ‘ (‚ª√·°√¡Õ—µ‚π¡—µ‘) ................................................ 11Washing Course for clothes with DRY Cleaning label
(WOOL Course) / √Ÿª·∫∫°“√´—°ºâ“∑’Ë¡’©≈“°µ‘¥«à“
ç ”À√—∫´—°·Àâßé (‚ª√·°√¡°“√´—°ºâ“¢π —µ«å) ............................................. 11Washing Heavily Stained Clothes (JEANS Course)
‚ª√·°√¡°“√´—°ºâ“∑’Ë °ª√°¡“° (‚ª√·°√¡°“√´—°ºâ“∑’Ë °ª√°) ............ 12Rapid Washing (SPEEDY Course)
‚ª√·°√¡°“√´—°ºâ“·∫∫√«¥‡√Á« (‚ª√·°√¡‡√Á«) ........................................... 12Washing delicate clothes (DELICATE Course)
√Ÿª·∫∫°“√´—°ºâ“∫Õ∫∫“ß (‚ª√·°√¡∂πÕ¡ºâ“) ........................................... 13Washing Comforters, Blanket, Bedspread (BLANKET Course)
¢—ÈπµÕπ°“√´—°ºâ“Àà¡, ºâ“§≈ÿ¡‡µ’¬ß·≈–ºâ“™‘Èπ„À≠à
(‚ª√·°√¡°“√´—°ºâ“Àà¡) ....................................................................................... 13Using the Washing NET
°“√„™â∂ÿßµ“¢à“¬„π°“√ªíòπ·Àâß ............................................................................... 14Detail Washing (SOAK Course)
√“¬≈–‡Õ’¬¥„π°“√∑”ß“π (‚ª√·°√¡°“√·™àºâ“) ........................................... 15Spinning with blowing air (Air Jet Course)
°“√ªíòπ·Àâß‚¥¬°“√∂à“¬‡∑¢Õß≈¡ (‚ª√·°√¡°“√ªíòπ·Àâß摇»…) .......... 15How to use Spin Control / «‘∏’°“√‡≈◊Õ°®”π«π√Õ∫°“√ªíòπ·Àâß .............. 16
Laundry Load and Detergent Amountª√‘¡“≥°“√„™âºß —°øÕ°·≈–πÈ”Àπ—°¢Õߺâ“∑’Ë®– —° ...................................... 16
Using the Timer for Washing / °“√µ—È߇«≈“´—°≈à«ßÀπâ“ ............................ 17Washing Process / ¢—ÈπµÕπ„π°“√∑”ß“π ....................................................... 18Manual Operation / °“√„™âß“π‚¥¬ºŸâ„™âª√—∫µ—È߇Õß ........................................ 20When Using Liquid Detergent, Bleach and Fabric Softener
¢—ÈπµÕπ„π°“√„™âπÈ”¬“´—°ºâ“, πÈ”¬“øÕ°ºâ“¢“«·≈–πÈ”¬“ª√—∫ºâ“πÿà¡ ....... 22Using Powder Detergent (Natural oils and fats)
°“√„™âºß´—°øÕ°™π‘¥æ‘‡»… (πÈ”¡—π∏√√¡™“µ‘·≈– ∫Ÿà´—°ºâ“) ..................... 23Reusing Cleansing Water / °“√„™âπÈ”´È”‡æ◊ËÕ´—°Õ’°§√—Èß .............................. 23How to Change Sound (Melodious) of Buzzer
«‘∏’°“√‡ª≈’Ë¬π‡ ’¬ß¢Õß —≠≠“≥‡µ◊Õπ .............................................................. 24Using Starch / ¢—ÈπµÕπ„π°“√„™âºßÕ—¥°≈’∫ ..................................................... 24Helpful Tips / §”·π–π”„π°“√´—° ....................................................................... 24Troubleshooting Guide / ªí≠À“·≈–°“√·°â‰¢ .............................................. 25Repair and Maintenance / °“√´àÕ¡·≈–°“√∫”√ÿß√—°…“ ............................. 26Install the machine / °“√µ‘¥µ—È߇§√◊ËÕß´—°ºâ“ ................................................... 28Where to Install, How to Install / ∂“π∑’˵‘¥µ—Èß, «‘∏’°“√µ‘¥µ—Èß ................ 29How to Adjust the Legs / «‘∏’°“√ª√—∫¢“µ—Èß .................................................... 29Safety Check / ¢âժؑ∫—µ‘‡æ◊ËÕ§«“¡ª≈Õ¥¿—¬„π°“√„™âß“π .......................... 30How to Install The Rat Guard / «‘∏’°“√ª√–°Õ∫∞“π°—πÀπŸ ....................... 30How to Install Drain Hose
«‘∏’°“√µ‘¥µ—Èß∑àÕ√–∫“¬πÈ”∑‘Èß (Drain Hose) ........................................30How to Install the Joint / «‘∏’°“√µ‘¥µ—ÈߢâÕµàÕ°äÕ°πÈ” ................................... 31How to Install Water Supply Hose / «‘∏’°“√µ‘¥µ—Èß∑àÕ®à“¬πÈ” ................... 31Washing Machine Repair / °“√´àÕ¡‡§√◊ËÕß´—°ºâ“ .......................................... 32Specifications / √“¬≈–‡Õ’¬¥¢Õ߇§√◊ËÕß ............................................................. 32
2
3WPL062081-5
Features§ÿ≥≈—°…≥–摇»…
Easy-to-operate
Program TimerThe finishing time can be set 3-12 hours later.
ßà“¬µàÕ°“√„™âß“π
¥â«¬‚ª√·°√¡°“√µ—È߇«≈“≈à«ßÀπâ“
“¡“√∂µ—È߇«≈“≈à«ßÀπⓉ¥â∂÷ß 3-12 ™—Ë«‚¡ß
Washing Capacity 16 kg.You no longer have to wash large items such as blankets and sheets separately; with this washer,you can now wash them together in one load. It saves you more time, water and energy.
“¡“√∂∑”°“√ —°‰¥â∂÷ß 16 °°. µàÕ§√—Èß
§ÿ≥‰¡àµâÕß·¬° ‘Ëß∑’˧ÿ≥µâÕß°“√´—°®”π«π¡“°Ê ÕÕ°®“°°—πÕ’°µàÕ‰ª·≈â«´÷ËßµÕππ’ȧÿ≥ “¡“√∂∑’Ë®–∑”°“√´—°‰¥â„π§√—È߇¥’¬«π—ËπÀ¡“¬∂÷ß °“√ª√–À¬—¥‡«≈“, πÈ” ·≈–æ≈—ßß“π‰øøÑ“
Automatic RestartIn case of the power shut-down washer stops operation but will continue washing process from the point where it stopped as soon as power resumes.
°“√‡√‘Ë¡µâπ´—°Õ—µ‚π¡—µ‘À≈—߉øøÑ“¥—∫
·¡â«à“‡§√◊ËÕß®–À¬ÿ¥∑”ß“π„π√–À«à“ß∑’ˉøøÑ“¥—∫À√◊Õ¢—¥¢âÕß ‡¡◊ËÕ‰øøÑ“¡“‡ªìπª°µ‘ ‡§√◊ËÕß®–‡√‘Ë¡∑”ß“π®“°µ”·Àπàß∑’Ë∑”ß“π§â“߉«â ·µà¬°‡«âπ„π°√≥’∑’˵—Èß°“√Àπà«ß‡«≈“„π°“√∑”ß“π ‡¡◊ËÕ‰øøÑ“¥—∫ ‡§√◊ËÕß®–‰¡à∑”ß“πµàÕ ¥—ßπ—Èπ µâÕß∑”°“√µ—Èß§à“°“√∑”ß“π„À¡àÕ’°§√—Èß
Nano Titanium CatalystMany agents can be put in position. It’ s dense enough to catch the smallestmicrobes.
°“√ªÑÕß°—π·≈–¢®—¥‡™◊ÈÕ·∫§∑’‡√’¬¥â«¬√–∫∫ Nano Titanium®–¡’‡ âπ„¬‡≈Á°Ê Õ¬Ÿà®”π«π¡“°´÷Ëß®–∑”Àπâ“∑’Ë„π°“√¥—°®—∫‡™◊ÈÕ·∫§∑’‡√’¬ ·≈–°≈‘Ëπ‰¡à„À⇢ⓠŸà‡π◊ÈÕºâ“∑’ËÕ¬Ÿà„π‡§√◊ËÕß´—°ºâ“‰¥â
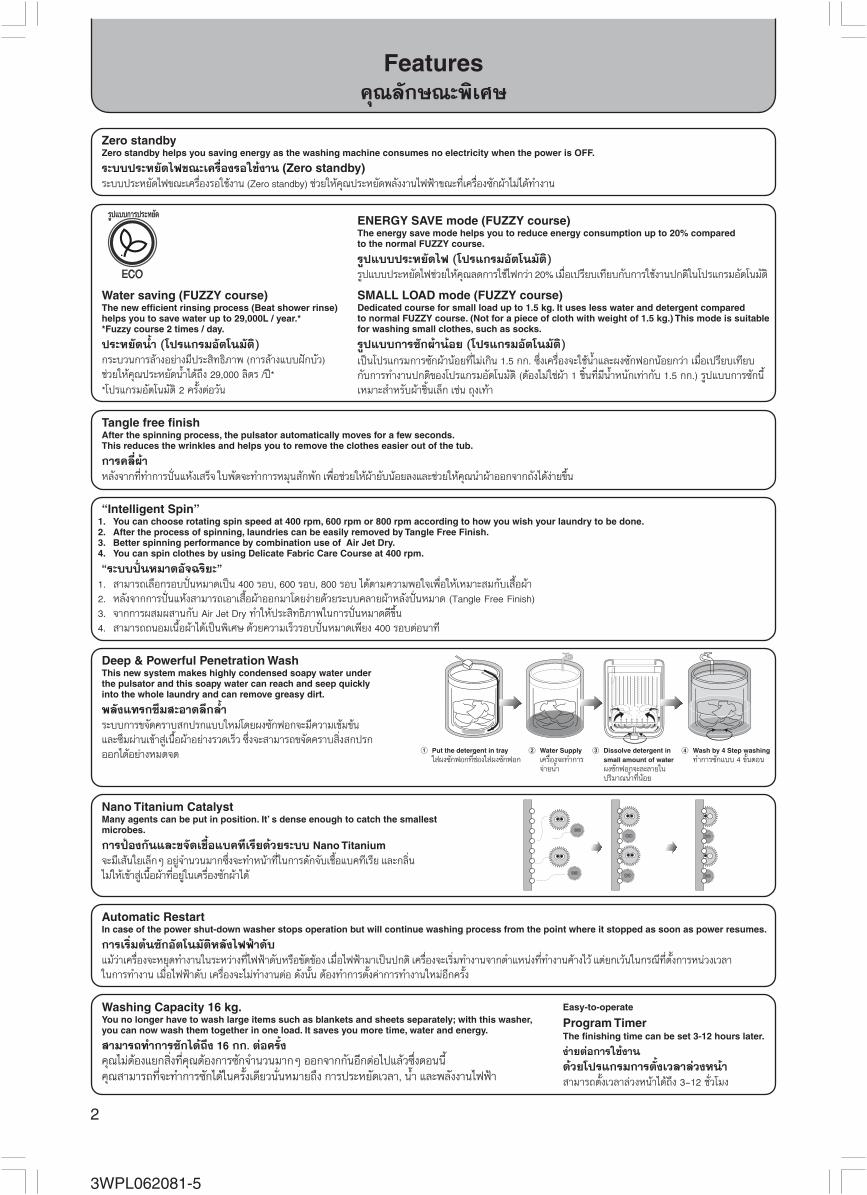
Deep & Powerful Penetration WashThis new system makes highly condensed soapy water underthe pulsator and this soapy water can reach and seep quicklyinto the whole laundry and can remove greasy dirt.
æ≈—ß·∑√°´÷¡ –Õ“¥≈÷°≈È”
√–∫∫°“√¢®—¥§√“∫ °ª√°·∫∫„À¡à‚¥¬ºß´—°øÕ°®–¡’§«“¡‡¢â¡¢âπ·≈– ÷¡ºà“π‡¢â“ Ÿà‡π◊ÈÕºâ“Õ¬à“ß√«¥‡√Á« ÷Ëß®– “¡“√∂¢®—¥§√“∫ ‘Ëß °ª√°ÕÕ°‰¥âÕ¬à“ßÀ¡¥®¥ 1 Put the detergent in tray
„ àºß´—°øÕ°∑’Ë™àÕß„ àºß´—°øÕ°4 Wash by 4 Step washing
∑”°“√´—°·∫∫ 4 ¢—ÈπµÕπ3 Dissolve detergent in
small amount of waterºß´—°øÕ°®–≈–≈“¬„πª√‘¡“≥πÈ”∑’ËπâÕ¬
2 Water Supply‡§√◊ËÕß®–∑”°“√®à“¬πÈ”
“Intelligent Spin”1. You can choose rotating spin speed at 400 rpm, 600 rpm or 800 rpm according to how you wish your laundry to be done.2. After the process of spinning, laundries can be easily removed by Tangle Free Finish.3. Better spinning performance by combination use of Air Jet Dry.4. You can spin clothes by using Delicate Fabric Care Course at 400 rpm.
ç√–∫∫ªíòπÀ¡“¥Õ—®©√‘¬–é
1. “¡“√∂‡≈◊Õ°√Õ∫ªíòπÀ¡“¥‡ªìπ 400 √Õ∫, 600 √Õ∫, 800 √Õ∫ ‰¥âµ“¡§«“¡æÕ„®‡æ◊ËÕ„Àâ‡À¡“– ¡°—∫‡ ◊ÈÕºâ“2. À≈—ß®“°°“√ªíòπ·Àâß “¡“√∂‡Õ“‡ ◊ÈÕºâ“ÕÕ°¡“‚¥¬ßà“¬¥â«¬√–∫∫§≈“¬ºâ“À≈—ߪíòπÀ¡“¥ (Tangle Free Finish)3. ®“°°“√º ¡º “π°—∫ Air Jet Dry ∑”„Àâª√– ‘∑∏‘¿“æ„π°“√ªíòπÀ¡“¥¥’¢÷Èπ4. “¡“√∂∂πÕ¡‡π◊ÈպⓉ¥â‡ªìπ摇»… ¥â«¬§«“¡‡√Á«√Õ∫ªíòπÀ¡“¥‡æ’¬ß 400 √Õ∫µàÕπ“∑’
Tangle free finishAfter the spinning process, the pulsator automatically moves for a few seconds.This reduces the wrinkles and helps you to remove the clothes easier out of the tub.
°“√§≈’˺â“
À≈—ß®“°∑’Ë∑”°“√ªíòπ·Àâ߇ √Á® „∫æ—¥®–∑”°“√À¡ÿπ —°æ—° ‡æ◊Ëՙ૬„Àâºâ“¬—∫πâÕ¬≈ß·≈–™à«¬„Àâ§ÿ≥π”ºâ“ÕÕ°®“°∂—߉¥âßà“¬¢÷Èπ
Zero standbyZero standby helps you saving energy as the washing machine consumes no electricity when the power is OFF.
√–∫∫ª√–À¬—¥‰ø¢≥–‡§√◊ËÕß√Õ„™âß“π (Zero standby)√–∫∫ª√–À¬—¥‰ø¢≥–‡§√◊ËÕß√Õ„™âß“π (Zero standby) ™à«¬„Àâ§ÿ≥ª√–À¬—¥æ≈—ßß“π‰øøÑ“¢≥–∑’ˇ§√◊ËÕß´—°ºâ“‰¡à‰¥â∑”ß“π
Water saving (FUZZY course)The new efficient rinsing process (Beat shower rinse)helps you to save water up to 29,000L / year.**Fuzzy course 2 times / day.
ª√–À¬—¥πÈ” (‚ª√·°√¡Õ—µ‚π¡—µ‘)
°√–∫«π°“√≈â“ßÕ¬à“ß¡’ª√– ‘∑∏‘¿“æ (°“√≈â“ß·∫∫Ωí°∫—«)™à«¬„Àâ§ÿ≥ª√–À¬—¥πÈ”‰¥â∂÷ß 29,000 ≈‘µ√ /ªï**‚ª√·°√¡Õ—µ‚π¡—µ‘ 2 §√—ÈßµàÕ«—π
ENERGY SAVE mode (FUZZY course)The energy save mode helps you to reduce energy consumption up to 20% comparedto the normal FUZZY course.
√Ÿª·∫∫ª√–À¬—¥‰ø (‚ª√·°√¡Õ—µ‚π¡—µ‘)
√Ÿª·∫∫ª√–À¬—¥‰ø™à«¬„Àâ§ÿ≥≈¥°“√„™â‰ø°«à“ 20% ‡¡◊ËÕ‡ª√’¬∫‡∑’¬∫°—∫°“√„™âß“πª°µ‘„π‚ª√·°√¡Õ—µ‚π¡—µ‘
SMALL LOAD mode (FUZZY course)Dedicated course for small load up to 1.5 kg. It uses less water and detergent comparedto normal FUZZY course. (Not for a piece of cloth with weight of 1.5 kg.) This mode is suitablefor washing small clothes, such as socks.
√Ÿª·∫∫°“√ —°ºâ“πâÕ¬ (‚ª√·°√¡Õ—µ‚π¡—µ‘)
‡ªìπ‚ª√·°√¡°“√ —°ºâ“πâÕ¬∑’ˉ¡à‡°‘π 1.5 °°. ´÷Ë߇§√◊ËÕß®–„™âπÈ”·≈–ºß —°øÕ°πâÕ¬°«à“ ‡¡◊ËÕ‡ª√’¬∫‡∑’¬∫°—∫°“√∑”ß“πª°µ‘¢Õß‚ª√·°√¡Õ—µ‚π¡—µ‘ (µâÕ߉¡à„™àºâ“ 1 ™‘Èπ∑’Ë¡’πÈ”Àπ—°‡∑à“°—∫ 1.5 °°.) √Ÿª·∫∫°“√´—°π’ȇÀ¡“– ”À√—∫ºâ“™‘Èπ‡≈Á° ‡™àπ ∂ÿ߇∑â“
3
3WPL062081-5
Precautions¢âÕ§«√√–«—߇æ◊ËÕ°“√„™âß“πÕ¬à“ߪ≈Õ¥¿—¬
Warning§”‡µ◊Õπ
Before operating the machine, please read the precautions carefully for proper operation. Precautions and warnings in this manual
Classification and description of types of damages and dangers caused by incorrect operation:
• This appliance is not intended for use by persons (including children) with reduced physical, sensory or mental capabilities, or lackof experience and knowledge, unless they have been given supervision or instruction on how to use the appliance safely.
• Children should be supervised to ensure that they do not play with the appliance.°àÕπ°“√„™âß“π‡§√◊ËÕß —°ºâ“ °√ÿ≥“Õà“π·≈–∑”§«“¡‡¢â“„® ç¢âÕ§«√√–«—߇æ◊ËÕ°“√„™âß“πÕ¬à“ߪ≈Õ¥¿—¬é „À⥒°àÕπ ‡æ◊ËÕ°“√„™âß“π∑’Ë∂Ÿ°µâÕß
”À√—∫¢âÕ§«√√–«—ß §”‡µ◊Õπµà“ßÊ ∑’Ë· ¥ß‰«â ≥ ∑’Ëπ’È
·∫àߪ√–‡¿∑ ·≈–Õ∏‘∫“¬∂÷ß√–¥—∫¢Õߧ«“¡‡ ’¬À“¬À√◊ÕÕ—πµ√“¬∑’ˇ°‘¥®“°°“√„™âß“π∑’˺‘¥«‘∏’„À⥟‰¥âµ“¡√“¬≈–‡Õ’¬¥¥—ßπ’È
• Õÿª°√≥åπ’ȉ¡à‰¥â¡’„Àℙ₥¬‡¥Á°, ∫ÿ§§≈∑’ˉ¡à·¢Áß·√ß À√◊Õ ÿ¢¿“殑µ‰¡àª°µ‘ ¬°‡«âπ®–‰¥â√—∫°“√¥Ÿ·≈Õ¬à“ß„°≈♑¥®“°∫ÿ§§≈∑’Ë√—∫º‘¥™Õ∫
• ‡æ◊ËÕ„Àâ¡—Ëπ„®«à“ “¡“√∂„™â‡§√◊ËÕ߉¥âÕ¬à“ߪ≈Õ¥¿—¬ ‡¥Á°‡≈Á°§«√‰¥â√—∫°“√¥Ÿ·≈‡æ◊ËÕ¡‘„Àâ‡≈àπ°—∫Õÿª°√≥å
Warning§”‡µ◊Õπ
Caution√–«—ß
This means there is a risk of injury or death.§«“¡À¡“¬„π™àÕßπ’ȧ◊Õ çÕ“®®–°àÕ„À⇰‘¥Õ“°“√∫“¥‡®Á∫À√◊Õ‡ ’¬™’«‘µ‰¥âé
This means there is a risk of injury or damage.§«“¡À¡“¬„π™àÕßπ’ȧ◊Õ çÕ“®®–°àÕ„À⇰‘¥°“√∫“¥‡®Á∫À√◊Õ‡ ’¬À“¬µàÕ∑√—æ¬å ‘π‰¥âé
This means warning or precautionÀ¡“¬∂÷ß ç°“√‡µ◊ÕπÀ√◊Õ¢âÕ§«√√–«—ßé
This means something that cannot or must not be doneÀ¡“¬∂÷ß ‘Ëß∑’ˉ¡à§«√°√–∑”À√◊ÕÀâ“¡∑”
This means something that must be doneÀ¡“¬∂÷ß ‘Ëß∑’˧«√ªØ‘∫—µ‘µ“¡
Examples of picturesµ—«Õ¬à“ß¿“æ∑’Ë„™â„π°“√· ¥ß
Do not open, modify or change.Àâ“¡∂Õ¥ à«πª√–°Õ∫ ¥—¥·ª≈ß ·°â‰¢‡Õß‚¥¬‡¥Á¥¢“¥
• This could cause fire, electric shock or injury.• For repair, please contact our stores.• ‡ªì𠓇Àµÿ¢Õ߇æ≈‘߉À¡â ‰ø¥Ÿ¥ À√◊Õ∫“¥‡®Á∫‰¥â• °“√´àÕ¡·´¡·°â‰¢ °√ÿ≥“µ‘¥µàÕµ—«·∑π®”Àπà“¬‡∑à“π—Èπ
Use 220V alternating current, and do not connectanother plug at the same socket.„™â ”À√—∫‰øøÑ“°√–· ≈—∫ 220V ‡∑à“π—Èπ ·≈–‰¡à§«√„™â
ª≈—Í°‰ø√à«¡°—∫‡§√◊ËÕß„™â‰øøÑ“Õ◊Ëπ
• Using the washing machine plug together withother electrical systems may cause over heatingin the plug and result in fire.
• ∂â“„™âª≈—Í°√à«¡°—∫‡§√◊ËÕß„™â‰øøÑ“Õ◊ËπÊ ·≈â«Õ“®‡°‘¥§«“¡√âÕπº‘¥ª°µ‘¢÷Èπ∫√‘‡«≥ª≈—Í°µàÕ ·≈–Õ“®‡°‘¥‰ø‰À¡â‰¥â
Use electricitysafely
°“√„™â‰øøÑ“
Õ¬à“ߪ≈Õ¥¿—¬
Do not openor remove
Àâ“¡∂Õ¥ à«π
ª√–°Õ∫
Earth wire must be properly connected§«√∑”°“√µàÕ “¬¥‘πÕ¬à“ß∂Ÿ°µâÕ߇À¡“– ¡
• If the machine is not earthed and current isleaking, there may be an electric shock hazard.To earth your machine please contact ourshops or customer service centre.
• ∂Ⓡ°‘¥°√–· ‰øøÑ“√—Ë«‚¥¬∑’ˉ¡à‰¥âµàÕ “¬¥‘πÕ“®∑”„À⇰‘¥‰ø¥Ÿ¥‰¥â °“√µàÕ “¬¥‘π°√ÿ≥“µ‘¥µàÕµ—«·∑π®”Àπà“¬ À√◊Õ»Ÿπ¬å∫√‘°“√
Do not install in a damp place such as a bathroomor a place exposed to rain.§«√À≈’°‡≈’ˬ߉¡àµ‘¥µ—Èß„π∫√‘‡«≥∑’Ë¡’§«“¡™◊Èπ Ÿß‡™àπÀâÕß
Õ“∫πÈ” À√◊Õ∫√‘‡«≥∑’ËΩπ “¥∂÷ßKeep dry
Àâ“¡«“ß„π∑’ˇªï¬°™◊Èπ
„Àâ«“ß„π∑’Ë·Àâß
Ground
“¬¥‘π
EarthWire “¬¥‘π
Do not use an electric socket or connection whichis damaged or loose.‰¡à„™âß“π “¬‰øÀ√◊Õª≈—Í°‰ø∑’Ë¡’√Õ¬¢’¥¢à«π‡ ’¬À“¬ À√◊Õ
À≈«¡§≈Õπ
Do not insert plug with a wet hand.„π¢≥–∑’Ë¡◊Õ‡ªï¬°πÈ” Àâ“¡‡ ’¬∫À√◊Õ¥÷ߪ≈—Í°
• This can cause an electric shock or ashort circuit which may start a fire.
• Õ“®‡ªì𠓇Àµÿ¢Õ߉ø¥Ÿ¥ ‰ø™ÁÕµ ‰ø‰À¡â‰¥â• This could cause an electric shock.• Õ“®‡ªì𠓇Àµÿ¢Õ߉ø¥Ÿ¥‰¥â
Do not touchwith wet handsÀâ“¡®—∫¢≥–∑’Ë
¡◊Õ‡ªï¬°
Don’t do this
Àâ“¡∑”
• Risk of fire, electric shock, current leakage or product damage.• ‡ ’ˬß∑’Ë®–‡°‘¥‰ø‰À¡â, ‰ø¥Ÿ¥, ‰ø√—Ë« À√◊Õ‡°‘¥§«“¡‡ ’¬À“¬µàÕº≈‘µ¿—≥±å‰¥â

4
3WPL062081-5
Precautions (Cont.)¢âÕ§«√√–«—߇æ◊ËÕ°“√„™âß“πÕ¬à“ߪ≈Õ¥¿—¬ (µàÕ)
Warning§”‡µ◊Õπ
• This could cause an explosion or fire.• Õ“®‡ªì𠓇Àµÿ¢Õß°“√√–‡∫‘¥À√◊Õ‰ø‰À¡â¢÷Èπ‰¥â
Do not mark, cut or damage the power cable.Do not cut, modify, bend or fold it.‰¡à∑”„À⇰‘¥√Õ¬©’°¢“¥∑’Ë “¬‰ø
‰¡à∑”„À⇰‘¥√Õ¬©’°¢“¥ ¥—¥·ª≈ß·°â‰¢ æ—∫ßÕÕ¬à“ß·√ß
¥÷ß ¡â«π«“ß∑—∫¥â«¬¢ÕßÀπ—° Àπ’∫ ‡ªìπµâπ
• Damaged power cable can cause fire or an electric shock.• “¬‰ø∑’ˇ ’¬À“¬®–‡ªì𠓇Àµÿ¢Õ߉ø‰À¡â ‰ø¥Ÿ¥‰¥â
Don’t do this
Àâ“¡∑”
• This could cause an electric shock.• Õ“®‡ªì𠓇Àµÿ¢Õß°“√™ÁÕµ ‰ø¥Ÿ¥‰¥â
Clean off all the dust on the plug.§«√∑”§«“¡ –Õ“¥ª≈—Í°‰ø ‰¡à„ÀâΩÿÉπ®—∫
• A dirty or dusty plug may cause a fire.• Õ“®‡ªì𠓇Àµÿ¢Õ߉ø‰À¡â‰¥â
Cleaning
∑”§«“¡ –Õ“¥
Always disconnect the plug before cleaning it.°àÕπ∑”§«“¡ –Õ“¥ °√ÿ≥“¥÷ߪ≈—Í°ÕÕ°∑ÿ°§√—Èß
• Leaving the plug connected during cleaningcould cause an electric shock or injury.
• À“°∑”§«“¡ –Õ“¥‚¥¬‰¡à∂Õ¥ª≈—Í°Õ“®‡°‘¥‰ø¥Ÿ¥À√◊Õ°“√∫“¥‡®Á∫¢÷Èπ‰¥â
Take off plug
¥÷ߪ≈—Í°ÕÕ°
Don’t do this
Àâ“¡∑”
Do not put your hand into the drum while it iswashing or spinning.‰¡à¬◊Ëπ¡◊Õ≈߉ª„π‡§√◊ËÕß —°ºâ“„π¢≥–∑’Ë∑”°“√´—° À√◊Õ
ªíòπºâ“Õ¬Ÿà
• Even when the drum is spinning gently, your hand could get stuck in thespinning clothes (so please press pause before opening the drum)
• During washing and draining, the drum is still spinning at low speed, soplease be careful.
• ∂÷ß·¡â∂—ß®–À¡ÿπ§àÕ¬Ê °Áµ“¡ ºâ“∑’Ë´—°Õ¬ŸàÕ“®®–æ—π‡¢â“°—∫¡◊Õ§ÿ≥®π∑”„À⇰‘¥°“√∫“¥‡®Á∫¢÷Èπ‰¥â (°√ÿ≥“°¥ªÿÉ¡ PAUSE „ÀâÀ¬ÿ¥∑”ß“π™—Ë«§√“« ·≈â«®÷߇ªî¥Ω“‡§√◊ËÕß)
• „π√–À«à“ß°“√´—° (WASH) À√◊Õ‡√‘Ë¡µâπ°“√ª≈àÕ¬πÈ”∑‘Èß (DRAIN) π—Èπ ∂—ß —°®–À¡ÿπ¥â«¬§«“¡‡√Á«µË” ®÷ßµâÕß√–¡—¥√–«—߇ªìπ摇»…
Don’t do this
Àâ“¡∑”
Do not let a child climb onto the washing machineor open the drum lid. Do not leave a box or chairnear the washing machine which could enablea child to climb onto it.Õ¬à“𔇰â“Õ’ÈÀ√◊Õ°≈àÕß∑’ˇ¥Á° “¡“√∂
ªïπ¢÷Èπ‰¥â¡“«“߉«â∫√‘‡«≥„°≈â°—∫
‡§√◊ËÕß´—°ºâ“ªÑÕß°—π‡¥Á°®–ªïπ≈߉ª
¿“¬„π∂—߇§√◊ËÕß —°ºâ“‰¥â
• A child could fall into the drum and get injured.• ‡¥Á°Õ“®®–µ°≈߉ª„π∂—ß ·≈–∫“¥‡®Á∫‰¥â
Do not put anything inflammable in or near themachine (gas, diesel, petrol, thinner, alcohol orclothes stained with these substances)‰¡àπ”«—µ∂ÿ‰«‰ø„ à≈ß„π∂—ß´—° À√◊Õπ”‡¢â“„°≈âÕ¬à“߇¥Á¥¢“¥
(πÈ”¡—π°ä“¥ πÈ”¡—π¥’‡´≈ πÈ”¡—π‡∫π ‘π ∑‘π‡πÕ√å ·Õ≈°ÕŒÕ≈å
À√◊Õ‡ ◊ÈÕºâ“∑’Ë¡’ “√‡À≈à“π’Ȫπ‡ªóôÕπ)
Don’t do this
Àâ“¡∑”
Do not pour water on the machine when it isrunning.Õ¬à“√“¥πÈ”‚¥¬µ√ß∑’˵—«‡§√◊ËÕß ¢≥–∑’ˇ§√◊ËÕß∑”ß“πÕ¬Ÿà
Don’t do this
Àâ“¡∑”
Do not place fire sources such as a candle orcigarette near the machine.‰¡à«“ß«—µ∂ÿµâπ‡æ≈‘ß ‡™àπ ‡∑’¬π‰¢ ¬“®ÿ¥°—π¬ÿß À√◊Õ∫ÿÀ√’Ë
∫π‡§√◊ËÕß —°ºâ“
• Risk of fire.• ¡’§«“¡‡ ’Ë¬ß«à“®–‡°‘¥‰ø‰À¡â¢÷Èπ‰¥â
No naked flame
√–«—߉ø
Do not install on a board with castors or anunstable place.
‰¡à§«√µ‘¥µ—È߇§√◊ËÕß∫πæ◊Èπ∑’Ë¡’≈âÕÀ√◊Õ∫πæ◊Èπ∑’ˉ¡à ¡Ë”‡ ¡Õ
Don’t do this
Àâ“¡∑”
Do not put too much detergent into the tub.‰¡à§«√„ àºß —°øÕ°≈ß„π‡§√◊ËÕß¡“°‡°‘π‰ª
Don’t do this
Àâ“¡∑”
• This may cause injury or malfunction due to abnormal vibration.• Õ“®∑”„À⇰‘¥Õ—πµ√“¬À√◊Õ°“√∑”ß“πº‘¥ª°µ‘®“°°“√ —Ëπ¢Õ߇§√◊ËÕß
• This may cause malfunction by excess foam and result in water leakage orelectric shock.
• Õ“®∑”„À⇰‘¥øÕß∑’Ë¡“°‡°‘π‰ª≈âπÕÕ°¡“À√◊Õ∑”„À⇰‘¥‰ø™ÁÕµ‰¥â

5
3WPL062081-5
Caution√–«—ß
• It may cause damage or break down of the machine.
• Õ“®∑”„À⇧√◊ËÕ߉¥â√—∫§«“¡‡ ’¬À“¬‰¥â• It may cause deformation or fire.
• Õ“®∑”„À⇠’¬√Ÿª∑√ßÀ√◊Õ‰ø‰À¡â‰¥â
Grip the body of the plug when pulling it out of asocket.„Àâ®—∫∑’ËÀ—«ª≈—Í°∑ÿ°§√—È߇¡◊ËÕµâÕß°“√∂Õ¥ª≈—Í°
• Failure to disconnect a plug properly couldcause a short circuit, electric shock or fire.
• À“°¥÷ߪ≈—Í°º‘¥«‘∏’Õ“®‡°‘¥°“√™ÁÕµ À√◊Õ‰ø¥Ÿ¥∑”„À⇰‘¥°“√≈ÿ°‰À¡â¢÷Èπ‰¥â
Must be done
§«√ªØ‘∫—µ‘
If you don’t use the machine for a long time,please remove the plug from the socket.‡¡◊ËÕ‰¡à‰¥â„™âß“π‡ªìπ‡«≈“π“π °√ÿ≥“¥÷ߪ≈—Í°ÕÕ°®“°
‡µâ“‡ ’¬∫
• Failure to do so may cause a fire, leaking currentor electric shock due to an ineffective insulator.
• À“°‰¡àªØ‘∫—µ‘µ“¡Õ“®‡ªì𠓇Àµÿ¢Õ߉ø‰À¡â ‰ø√—Ë«À√◊Õ‰ø¥Ÿ¥®“°°“√‡ ◊ËÕ¡ ¿“æ¢Õß©π«π‰¥â
Take off plug
¥÷ߪ≈—Í°ÕÕ°
Do not wash fabrics or sheets which cannot bepermeated by water.Do not use washing machine other than washingclothes.Àâ“¡π”ºâ“À√◊Õ·ºàπ™’∑∑’Ë¡’≈—°…≥–°—ππÈ”¡“ —°À√◊Õªíòπ·Àâß
Àâ“¡„™â‡§√◊ËÕß´—°ºâ“„™âß“πÕ¬à“ßÕ◊ËππÕ°®“°°“√´—°ºâ“
• This could create a risk of an electric shock or leaking current due todamaged plastics.
• ¡’§«“¡‡ ’ˬ߫à“Õ“®®–‡°‘¥‰ø¥Ÿ¥‰ø√—Ë«®“°°“√‡ ’¬√Ÿª∑√ßÀ√◊Õ§«“¡‡ ’¬À“¬¢Õß™‘Èπ à«πæ≈“ µ‘°‰¥â
• Fabrics of this type may be ejected, or the machinemight not work properly. This may cause injury ordamage the machine, the floor, the wall, or theclothes. Examples of this type of fabrics include:raincoats, swimming costumes, wet suits, ski suits,sleeping bags and etc.
• ºâ“∑’Ë´—°Õ¬ŸàÕ“®®–°√–‡¥ÁπÕÕ°¡“ À√◊Õ‡°‘¥°“√ —ËπÕ¬à“ߺ‘¥ª°µ‘ ∑”„À⇰‘¥°“√∫“¥‡®Á∫¢ÕߺŸâ„™â À√◊Õ§«“¡‡ ’¬À“¬°—∫‡§√◊ËÕß´—°ºâ“ ºπ—ß æ◊Èπ µ≈Õ¥®πºâ“∑’Ë´—°‡ ’¬À“¬‰¥â(‡™àπ ‡ ◊ÈÕ°—πΩπ ™ÿ¥Õ∫´“«πà“ ™ÿ¥°’Ó∑“ßπÈ” (WET SUIT) ™ÿ¥ °’ ∂ÿßπÕπ)
Don’t do this
Àâ“¡∑”
Don’t do this
Àâ“¡∑”
After turning off the water, or removing or fitting awater hose, turn off the water tap before pressing thestart button, then turn on the tap. (The same appliesif you do not use the machine for a long time.)„π°√≥’∑’Ë¡’°“√∂Õ¥ “¬®à“¬πÈ”ÕÕ°·≈⫵âÕß°“√ª√–°Õ∫
‡¢â“‰ª„À¡àÕ’°π—Èπ „Àâªî¥°äÕ°πÈ” ®“°π—È𰥪ÿÉ¡ START ·≈â«
®÷ߧàÕ¬‡ªî¥°äÕ°πÈ” (‡À¡◊Õπ°—π°—∫°√≥’∑’ˉ¡à‰¥â„™âß“π‡ªìπ
‡«≈“π“π)
If detergent, softener or bleach spills on the surfaceof the machine, clean it up with a damp clothimmediately.„π°√≥’∑’˺ߴ—°øÕ°, πÈ”¬“ª√—∫ºâ“πÿà¡À√◊ÕπÈ”¬“øÕ°ºâ“¢“«
À°„ à∑’˵—«‡§√◊ËÕß „Àâ„™âºâ“™ÿ∫πÈ”æÕÀ¡“¥Ê ‡™Á¥ÕÕ°∑—π∑’Must be done
§«√ªØ‘∫—µ‘
Must be done
§«√ªØ‘∫—µ‘
• If there is air in the water pipe, the air pressure could damage the machine,causing leaking water or an injury.
• ‡π◊ËÕß®“°¿“¬„𠓬∑àÕ®à“¬πÈ” ∑àÕª√–ª“¡’Õ“°“»¢—ßÕ¬Ÿà¿“¬„π ®÷ß¡’§«“¡‡ ’Ë¬ß«à“§«“¡¥—πÕ“°“»∑’Ë∂Ÿ°Õ—¥π—Èπ Õ“®∑”§«“¡‡ ’¬À“¬„Àâ°—∫µ—«‡§√◊ËÕß ‡°‘¥πÈ”√—Ë«À√◊Õ°“√∫“¥‡®Á∫¢÷Èπ‰¥â
• Otherwise this could damage the plastics or steel parts.
• ¡‘©–π—Èπ Õ“®®–‡°‘¥°“√‡ ’¬À“¬°—∫™‘Èπ à«πæ≈“ µ‘°·≈–‡À≈Á°‰¥â
Do not press the button with pointed objects.‰¡à„™â ‘ËߢÕߪ≈“¬·À≈¡°¥≈ß∫π·ºßÀπ⓪í∑¡å
Do not install machine around fire sources suchas heater or cigarettes.‰¡à§«√µ‘¥µ—È߇§√◊ËÕß„°≈â°—∫·À≈àß°”‡π‘¥§«“¡√âÕ𠇙àπ
‡§√◊ËÕß∑”§«“¡√âÕπ À√◊Õ∫ÿÀ√’ËDon’t do this
Àâ“¡∑”
Don’t do this
Àâ“¡∑”
Do not use water hotter than 50°C when washing.Àâ“¡„™âπÈ”∑’Ë¡’Õÿ≥À¿Ÿ¡‘ Ÿß°«à“ 50 Õß»“‡´≈‡´’¬ „π°“√´—°
If you find any abnormal situations such as malfunction, smoke, peculiar smell, etc., stop using the machineimmediately and contact an authorized service dealer or a service agent for repair.∂â“æ∫ ‘Ëߺ‘¥ª°µ‘∫“ßÕ¬à“߇™àπ‡§√◊ËÕß∑”ß“πº‘¥ª°µ‘, §«—π, °≈‘Ëπ·ª≈°Ê À√◊ÕÕ◊ËπÊ „ÀâÀ¬ÿ¥°“√„™âß“π‚¥¬∑—π∑’·≈–µ‘¥µàÕ‰ª¬—ßµ—«·∑π
®”Àπà“¬À√◊Õ»Ÿπ¬å∫√‘°“√‡æ◊ËÕ∑”°“√·°â‰¢Must be done
§«√ªØ‘∫—µ‘
• It may cause electric shock or fire.
• Õ“®∑”„Àâ‰ø™ÁÕµÀ√◊Õ‡°‘¥‡æ≈‘߉À¡â‰¥â

6
3WPL062081-5
Caution√–«—ß
Precautions (Cont.)¢âÕ§«√√–«—߇æ◊ËÕ°“√„™âß“πÕ¬à“ߪ≈Õ¥¿—¬ (µàÕ)
Do not climb over the machine or put heavyobjects on it.‰¡à§«√ªïπ¢÷Èπ∫π‡§√◊ËÕß —°ºâ“ À√◊Õ«“ߢÕßÀπ—°∫π‡§√◊ËÕß
´—°ºâ“
Do not place your hand or foot under the machinewhile it is working.‰¡à§«√ Õ¥¡◊ÕÀ√◊Õ‡∑Ⓡ¢â“‰ª∑’Ë∫√‘‡«≥„µâ‡§√◊ËÕß´—°ºâ“ „π
¢≥–∑’ˇ§√◊ËÕß —°ºâ“¬—ߧß∑”ß“πÕ¬Ÿà
• This may cause injury or damage the machine.• ¡’§«“¡‡ ’ˬß∑’Ë®–‡°‘¥°“√∫“¥‡®Á∫À√◊Õ‡§√◊ËÕßÕ“®‡°‘¥°“√‡ ’¬À“¬‰¥â
• Spinning fan may cause injury.
• ‡π◊ËÕß®“°¡’ à«π∑’ËÀ¡ÿπÕ¬Ÿà®÷ß¡’§«“¡‡ ’ˬ߫à“Õ“®‡°‘¥°“√∫“¥‡®Á∫¢÷Èπ‰¥â
Don’t do this
Àâ“¡∑”
Don’t do this
Àâ“¡∑”
Check if there is leakage before starting to wash°àÕπ°“√ —°ºâ“ µâÕßµ√«® Õ∫¥Ÿ°àÕπ«à“‰¥â‡ªî¥°äÕ°πÈ”·≈â«
·≈–‰¡à¡’πÈ”√—Ë«‡°‘¥¢÷Èπ
Turn off the water tap when the machine is not inuse.‡¡◊ËÕ‰¡à„™â‡§√◊ËÕß´—°ºâ“·≈â« °√ÿ≥“ªî¥°äÕ°πÈ”‰«â
• If a screw has become loose, water may leak from the machine and causedamage.
• ∂â“ °√ŸÀ≈«¡·≈â« ®–‡°‘¥πÈ”√—Ë« ·≈–∑”„À⇰‘¥§«“¡‡ ’¬À“¬µà“ßÊ ‰¥â• This will prevent any leaking.
• ‡æ◊ËÕ‡ªìπ°“√ªÑÕß°—ππÈ”√—Ë«∑’ËÕ“®‡°‘¥¢÷Èπ‰¥â
Water leakage
√–«—ßπÈ”√—Ë«
Water leakage
√–«—ßπÈ”√—Ë«
Checkµ√«® Õ∫
Screw union nut tightly.¢—ππäÕµ‡™◊ËÕ¡µàÕµ—«‡§√◊ËÕß —°ºâ“°—∫∑àÕ®à“¬πÈ”„Àâ·πàπ
• A loose nut may cause a leak.• Check union nut regularly because it may cause leaking and damage a
machine. If the nut has become loose, screw it tight.
• πäÕµ∑’ËÀ≈«¡Õ“®‡ªì𠓇Àµÿ¢ÕßπÈ”√—Ë«‰¥â• ®“°°“√„™âß“π‡ªìπ‡«≈“π“π ∂⓬Ÿ‡π’¬ππ—∑‡°‘¥°“√À≈«¡·≈â«®–‡°‘¥πÈ”√—Ë« ·≈–
∑”„À⇰‘¥§«“¡‡ ’¬À“¬µà“ßÊ ∑’˧“¥‰¡à∂÷ߢ÷Èπ‰¥â ¥—ßπ—Èπ ®÷ߧ«√µ√«®‡™Á§‡ªìπ√–¬–„π°√≥’∑’ËÀ≈«¡§≈Õπ·≈â« °√ÿ≥“¢—π‡¢â“„Àâ·πàπ
Use only one connecting element B and screw itfirmly in place.„™â¢âÕµàÕ°äÕ°πÈ” (ONE TOUCH)
·≈–¢—π¢âÕµàÕ B „Àâ·πàπ
• If you use any other type of joint than theaccessory we supply, it may cause the leakage.
• Check connectors regularly because a loose connector may cause leakingand damage the machine. Screw it tightly.
• À“°∑à“π„™âÕÿª°√≥凙◊ËÕ¡µàÕÕ◊ËπÊ ∑’ËπÕ°‡Àπ◊Õ®“°Õÿª°√≥å‡ √‘¡ Õ“®∑”„À⇰‘¥πÈ”√—Ë«‰À≈‰¥â
• ®“°°“√„™âß“π‡ªìπ‡«≈“π“π ∑—Èß °√ŸÀ√◊Õ¢âÕµàÕÕ“®‡°‘¥°“√À≈«¡·≈â«®–‡°‘¥πÈ”√—Ë«·≈–∑”„À⇰‘¥§«“¡‡ ’¬À“¬µà“ßÊ ∑’˧“¥‰¡à∂÷ߢ÷Èπ‰¥â ¥—ßπ—Èπ ®÷ߧ«√µ√«®‡™Á§‡ªìπ√–¬–„π°√≥’∑’ËÀ≈«¡§≈Õπ·≈â« °√ÿ≥“¢—π‡¢â“„Àâ·πàπ
Water leakage
√–«—ßπÈ”√—Ë«
When installing the machine, fit the concertina-shaped end of the drain hose firmly to the rim ofthe machine.¢≥–µ‘¥µ—È߇§√◊ËÕß —°ºâ“ „Àⵑ¥µ—Èß à«π∑’ˇªìπ¢¥¢Õß∑àÕ√–∫“¬
πÈ”∑‘È߉«â∑’˪≈“¬¢Õ∫¢Õ߇§√◊ËÕß —°ºâ“
• A loose hose inside a machine may cause damage or leaking.• ∂â“∑àÕ‡°‘¥À¬àÕπÕ¬Ÿà¿“¬„π·≈â« ‰ª —¡º— ∂Ÿ°°—∫™‘Èπ à«πÕ◊ËπÊ ∑”„Àâ∑àÕ‡°‘¥‡ ’¬À“¬
‡°‘¥πÈ”√—Ë« ·≈–∑”„À⇰‘¥§«“¡‡ ’¬À“¬µà“ßÊ
Proper care after use.°“√¥Ÿ·≈À≈—ß°“√„™âß“πÕ¬à“ß∂Ÿ°µâÕß
1 Turn off the tap.ªî¥°äÕ°πÈ”
2 Unplug the unit.∂Õ¥ª≈—Í°ÕÕ°
• Otherwise water leakage or fire may occur.
• Õ“®∑”„ÀâπÈ”√—Ë«À√◊Õ‰ø‰À¡â‰¥â
Must be done
§«√ªØ‘∫—µ‘
Must be done
§«√ªØ‘∫—µ‘
Concertina-shaped part à«π∑’ˇªìπ¢¥
Checkµ√«® Õ∫
Union nutπäÕµ¢âÕµàÕ
not more than 2 mm.‰¡à‡°‘π 2 ¡¡.
Connector B¢âÕµàÕ B
Water leakage
√–«—ßπÈ”√—Ë«

7
3WPL062081-5
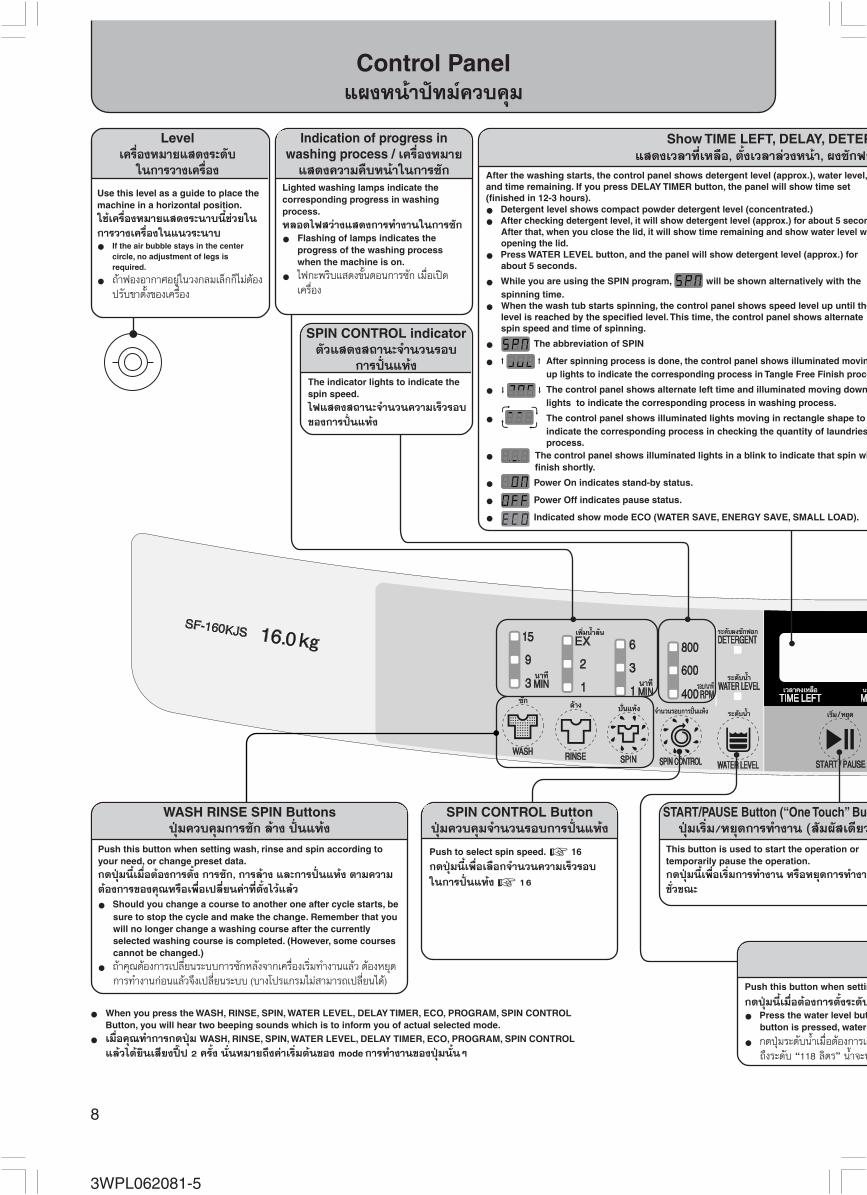
Technical Descriptions√“¬≈–‡Õ’¬¥¢Õß™‘Èπ à«π
Back Panel·ºßªî¥¥â“πÀ≈—ß
Level√–¥—∫πÈ”
Liquid Bleach inlet™àÕß„ àπÈ”¬“øÕ°¢“«
Control Panel 8 - 9·ºßÀπ⓪í∑¡å§«∫§ÿ¡(¥Ÿ√“¬≈–‡Õ’¬¥Àπâ“ 8 - 9)
Start/Pause Button(One touch Button)ªÿÉ¡‡√‘Ë¡/ªÿÉ¡À¬ÿ¥(·∫∫ —¡º— )
Power SwitchªÿÉ¡°“√∑”ß“π
Adjustable Leg
How to use the AdjustableLeg page 29 (To adjust the heightof front leg)¢“ª√—∫‰¥â¥Ÿ«‘∏’°“√„™â·≈–°“√ª√—∫¢“µ—Èß„πÀπâ“29 (ª√—∫§«“¡ Ÿß¢Õߢ“Àπâ“)
LidΩ“ªî¥
Water Inlet Hose∑àÕπÈ”‡¢â“
Wash Tub∂—ß´—°
Power Cord “¬‰ø
Earth wire “¬¥‘π
Pulsator·°π´—°
• If the washing machine is to be connected to the water mains, please use new water supply hose.
• ∂⓵âÕß∑”°“√µàÕ‡§√◊ËÕß´—°ºâ“‡¢â“°—∫°äÕ°πÈ”„Àâ„™â∑àÕ®à“¬πÈ”‡¢â“µ—«„À¡à
Drain Hose∑àÕπÈ”∑‘Èß
Top Cover‚§√ß √â“ß à«π∫π
Hose Hook à«π∑’Ë·¢«π∑àÕπÈ”∑‘Èß
Softener Dispenser™àÕß„ àπÈ”¬“ª√—∫ºâ“πÿà¡
Upper lint Filter 27µ—«°√Õß„¬ºâ“¥â“π∫π(¥Ÿ√“¬≈–‡Õ’¬¥Àπâ“ 27)
Jet Filter 26µ–·°√ß°√Õß„¬ºâ“(¥Ÿ√“¬≈–‡Õ’¬¥Àπâ“ 26)
Accessories Check that the following is contained in the washer package
Õÿª°√≥å·∂¡ µ√«®‡™Á§«à“¡’¢Õß·∂¡‡À≈à“π’ÈÀ√◊Õ‰¡à
Water supply hose (1)
™ÿ¥∑àÕ®à“¬πÈ”‡¢â“ (1 ™ÿ¥)One touch joint (1)
¢âÕµàÕ°äÕ°πÈ” (1 Õ—π)Leg Cap
µ—«√Õߢ“µ—ÈßRat Guard
∞“πªî¥°—πÀπŸ
Screws (11) °√Ÿ (11 µ—«)
Washing Net (1)
∂ÿßµ“¢à“¬ (1 „∫)
2 mm. (2)
2 ¡¡. (2 ™‘Èπ)
Plug spacer (1)
∞“π√Õߢ“ª≈—Í° (1 ™‘Èπ)
8
3WPL062081-5
Control Panel·ºßÀπ⓪í∑¡å§«∫§ÿ¡
Lighted washing lamps indicate thecorresponding progress in washingprocess.À≈Õ¥‰ø «à“ß· ¥ß°“√∑”ß“π„π°“√ —°
• Flashing of lamps indicates theprogress of the washing processwhen the machine is on.
• ‰ø°–æ√‘∫· ¥ß¢—ÈπµÕπ°“√´—° ‡¡◊ËÕ‡ªî¥‡§√◊ËÕß
Indication of progress inwashing process / ‡§√◊ËÕßÀ¡“¬
· ¥ß§«“¡§◊∫Àπâ“„π°“√´—°
The indicator lights to indicate thespin speed.‰ø· ¥ß ∂“π–®”π«π§«“¡‡√Á«√Õ∫
¢Õß°“√ªíòπ·Àâß
SPIN CONTROL indicatorµ—«· ¥ß ∂“π–®”π«π√Õ∫
°“√ªíòπ·Àâß
• When you press the WASH, RINSE, SPIN, WATER LEVEL, DELAY TIMER, ECO, PROGRAM, SPIN CONTROLButton, you will hear two beeping sounds which is to inform you of actual selected mode.
• ‡¡◊ËÕ§ÿ≥∑”°“√°¥ªÿÉ¡ WASH, RINSE, SPIN, WATER LEVEL, DELAY TIMER, ECO, PROGRAM, SPIN CONTROL
·≈⫉¥â¬‘π‡ ’¬ßªïöª 2 §√—Èß π—ËπÀ¡“¬∂÷ß§à“‡√‘Ë¡µâπ¢Õß mode °“√∑”ß“π¢ÕߪÿÉ¡π—ÈπÊ
Push this button when setting wash, rinse and spin according toyour need, or change preset data.°¥ªÿÉ¡π’ȇ¡◊ËÕµâÕß°“√µ—Èß °“√ —°, °“√≈â“ß ·≈–°“√ªíòπ·Àâß µ“¡§«“¡
µâÕß°“√¢Õߧÿ≥À√◊Õ‡æ◊ËÕ‡ª≈’ˬπ§à“∑’˵—È߉«â·≈â«
• Should you change a course to another one after cycle starts, besure to stop the cycle and make the change. Remember that youwill no longer change a washing course after the currentlyselected washing course is completed. (However, some coursescannot be changed.)
• ∂ⓧÿ≥µâÕß°“√‡ª≈’ˬπ√–∫∫°“√´—°À≈—ß®“°‡§√◊ËÕ߇√‘Ë¡∑”ß“π·≈â« µâÕßÀ¬ÿ¥°“√∑”ß“π°àÕπ·≈â«®÷߇ª≈’ˬπ√–∫∫ (∫“ß‚ª√·°√¡‰¡à “¡“√∂‡ª≈’ˬπ‰¥â)
WASH RINSE SPIN ButtonsªÿÉ¡§«∫§ÿ¡°“√´—° ≈â“ß ªíòπ·Àâß
Push to select spin speed. 16
°¥ªÿÉ¡π’ȇæ◊ËÕ‡≈◊Õ°®”π«π§«“¡‡√Á«√Õ∫
„π°“√ªíòπ·Àâß 16
SPIN CONTROL ButtonªÿÉ¡§«∫§ÿ¡®”π«π√Õ∫°“√ªíòπ·Àâß
START/PAUSE Button (“One Touch” ButªÿÉ¡‡√‘Ë¡/À¬ÿ¥°“√∑”ß“π ( —¡º— ‡¥’¬«
This button is used to start the operation ortemporarily pause the operation.°¥ªÿÉ¡π’ȇæ◊ËÕ‡√‘Ë¡°“√∑”ß“π À√◊ÕÀ¬ÿ¥°“√∑”ß“π
™—Ë«¢≥–
Push this button when settin
°¥ªÿÉ¡π’ȇ¡◊ËÕµâÕß°“√µ—Èß√–¥—∫
• Press the water level butbutton is pressed, water
• °¥ªÿÉ¡√–¥—∫πÈ”‡¡◊ËÕµâÕß°“√‡µ‘∂÷ß√–¥—∫ ç118 ≈‘µ√é πÈ”®–À
Use this level as a guide to place themachine in a horizontal position.„™â‡§√◊ËÕßÀ¡“¬· ¥ß√–π“∫π’ș૬„π
°“√«“߇§√◊ËÕß„π·π«√–π“∫
• If the air bubble stays in the centercircle, no adjustment of legs isrequired.
• ∂â“øÕßÕ“°“»Õ¬Ÿà„π«ß°≈¡‡≈Á°°Á‰¡àµâÕߪ√—∫¢“µ—ÈߢÕ߇§√◊ËÕß
Level‡§√◊ËÕßÀ¡“¬· ¥ß√–¥—∫
„π°“√«“߇§√◊ËÕß After the washing starts, the control panel shows detergent level (approx.), water level,and time remaining. If you press DELAY TIMER button, the panel will show time set(finished in 12-3 hours).
• Detergent level shows compact powder detergent level (concentrated.)
• After checking detergent level, it will show detergent level (approx.) for about 5 seconAfter that, when you close the lid, it will show time remaining and show water level wopening the lid.
• Press WATER LEVEL button, and the panel will show detergent level (approx.) forabout 5 seconds.
• While you are using the SPIN program, will be shown alternatively with thespinning time.
• When the wash tub starts spinning, the control panel shows speed level up until thelevel is reached by the specified level. This time, the control panel shows alternatespin speed and time of spinning.
• The abbreviation of SPIN
• After spinning process is done, the control panel shows illuminated movinup lights to indicate the corresponding process in Tangle Free Finish proce
• The control panel shows alternate left time and illuminated moving downlights to indicate the corresponding process in washing process.
• The control panel shows illuminated lights moving in rectangle shape toindicate the corresponding process in checking the quantity of laundriesprocess.
• The control panel shows illuminated lights in a blink to indicate that spin wifinish shortly.
• Power On indicates stand-by status.
• Power Off indicates pause status.
• Indicated show mode ECO (WATER SAVE, ENERGY SAVE, SMALL LOAD).
Show TIME LEFT, DELAY, DETER· ¥ß‡«≈“∑’ˇÀ≈◊Õ, µ—È߇«≈“≈à«ßÀπâ“, ºß´—°øÕ

9
3WPL062081-5
• Never push two or more buttons simultaneously. Otherwise, it may result in malfunction.
• ‰¡à§«√°¥ªÿÉ¡ ÕߪÿÉ¡æ√âÕ¡°—π Õ“®∑”„Àâ√–∫∫∑”ß“πº‘¥æ≈“¥‰¥â
PROGRAM ButtonªÿÉ¡√Ÿª·∫∫°“√´—°
8 courses are available, depending on the typeof washing and the level of dirtiness and includetub clean, tub dry course for cleaning of basket.√–∫∫°“√´—° 8 ‚ª√·°√¡¢÷ÈπÕ¬Ÿà°—∫™π‘¥¢Õß°“√
´—°·≈–√–¥—∫¢Õߧ«“¡ °ª√°¢Õߺâ“æ√âÕ¡
‚ª√·°√¡°“√∑”§«“¡ –Õ“¥∂—ß´—°·≈–
‚ª√·°√¡∑”„Àâ∂—ß´—°·Àâß
One Touch” Button)“π ( —¡º— ‡¥’¬«)
he operation ortion.
À√◊ÕÀ¬ÿ¥°“√∑”ß“π
WATER LEVEL ButtonªÿÉ¡§«∫§ÿ¡√–¥—∫πÈ”
button when setting water level according to your needs.
ÕµâÕß°“√µ—Èß√–¥—∫πÈ”µ“¡§«“¡µâÕß°“√¢Õߧÿ≥
he water level button when you wish to add water during the washing and rinsing processes. While theis pressed, water is continuously fed. (When the water level reaches 118 L, the water feed will stop.)
–¥—∫πÈ”‡¡◊ËÕµâÕß°“√‡µ‘¡πÈ”„π√–À«à“ß°“√´—°·≈–°“√≈â“ß„π¢≥–∑’˪ÿÉ¡∂Ÿ°°¥®–¡’°“√‡µ‘¡πȔլà“ßµàÕ‡π◊ËÕß (‡¡◊ËÕ√–¥—∫πÈ”ç118 ≈‘µ√é πÈ”®–À¬ÿ¥‡µ‘¡‚¥¬Õ—µ‚π¡—µ‘)
DELAY TIMER ButtonªÿÉ¡µ—È߇«≈“ —°≈à«ßÀπâ“
For timed washing. 17Washing can be set to finish atany hour within 12-3 hours.
”À√—∫‡«≈“„π°“√´—° 17
“¡“√∂µ—È߇«≈“ —°≈à«ßÀπⓉ¥â
12-3 ™—Ë«‚¡ß
prox.), water level,show time set
ated.)for about 5 seconds.
how water level while
vel (approx.) for
natively with the
d level up until theshows alternate
illuminated movinge Free Finish process.
ted moving downg process.
ctangle shape toantity of laundries
dicate that spin will
SMALL LOAD).
ELAY, DETERGENT, WATER LEVEL, SPIN SPEEDßÀπâ“, ºß´—°øÕ°, √–¥—∫πÈ”, ®”π«π§«“¡‡√Á«√Õ∫¢Õß°“√ªíòπ·Àâß
¿“¬À≈—ß®“°°“√‡√‘Ë¡∑”ß“π (START) ·≈â«®–· ¥ß√–¥—∫ºß´—°øÕ° (ª√–¡“≥) √–¥—∫πÈ”·≈–‡«≈“∑’ˇÀ≈◊Õ∂â“°¥ªÿÉ¡µ—È߇«≈“≈à«ßÀπâ“·≈â« ®–· ¥ß‡«≈“µ—Èß≈à«ßÀπâ“ (‡ √Á® ‘Èπ„π 12-3 ™¡.)
• √–¥—∫ºß —°øÕ°π—Èπ®–· ¥ß∂÷ߺߴ—°øÕ°™π‘¥ºß·∫∫ (COMPACT) (‡¢â¡¢âπ)
• À≈—ß®“°µ√«® Õ∫∂÷ß√–¥—∫ºß´—°øÕ°·≈â«π—Èπ ®–· ¥ß√–¥—∫ºß —°øÕ° (‚¥¬ª√–¡“≥) ª√–¡“≥5 «‘π“∑’ À≈—ß®“°π—Èπ‡¡◊ËÕªî¥Ω“®–· ¥ß‡«≈“∑’ˇÀ≈◊Õ ·≈–∂Ⓡªî¥Ω“ ®–· ¥ß√–¥—∫πÈ”
• ∂Ⓡªî¥Ω“·≈–°¥ªÿÉ¡√–¥—∫πÈ” (WATER LEVEL) ·≈â« ®–· ¥ß√–¥—∫ºß´—°øÕ° (‚¥¬ª√–¡“≥)ª√–¡“≥ 5 «‘π“∑’
• „π¢≥–∑’ˇ¢â“ Ÿàà‚À¡¥°“√ªíòπ·Àâß®–· ¥ß —≠≈—°…≥å ≈—∫°—∫‡«≈“¢Õß°“√ªíòπ·Àâß
• ‡¡◊ËÕ∂—ß´—°‡√‘Ë¡À¡ÿπ∑”°“√ªíòπ·Àâß®–· ¥ßº≈§«“¡‡√Á«√Õ∫¢÷Èπ‡ªìπ≈”¥—∫µ≈Õ¥‡«≈“ ®π°√–∑—Ëß∂÷ߧ«“¡‡√Á«√Õ∫∑’Ë°”Àπ¥‰«â®–· ¥ßº≈§«“¡‡√Á«√Õ∫ ≈—∫°—∫‡«≈“¢Õß°“√ªíòπ·Àâß
• §”¬àÕ¢Õß SPIN (°“√ªíòπ·Àâß)
• À≈—ß®“° ‘Èπ ÿ¥°“√ªíòπ·Àâß∂â“Àπ⓪í∑¡å¢Õ߇§√◊ËÕß· ¥ß —≠≈—°…≥å‰ø°“√‡§≈◊ËÕπµ—«‰ª„π∑‘»∑“ߥâ“π∫ππ—Èπ· ¥ß«à“µ—«‡§√◊ËÕß°”≈—ß∑”°“√§≈’˺â“∑’ËÕ¬Ÿà„π∂—ß´—° (Tangle FreeFinish)
• Àπ⓪í∑¡å¢Õ߇§√◊ËÕß· ¥ß —≠≈—°…≥å‰ø°“√‡§≈◊ËÕπµ—«‰ª„π∑‘»∑“ߥâ“π≈à“ß ≈—∫°—∫µ—«‡≈¢¢Õ߇«≈“∑’ˇÀ≈◊ÕÕ¬Ÿàπ—Èπ· ¥ß«à“µ—«‡§√◊ËÕß°”≈—ß∑”°“√´—°
• Àπ⓪í∑¡å¢Õ߇§√◊ËÕß· ¥ß —≠≈—°…≥å‰ø°“√‡§≈◊ËÕπµ—«‡ªìπ√Ÿª ’ˇÀ≈’ˬ¡º◊πºâ“π—Èπ· ¥ß«à“‡§√◊ËàÕß°”≈—ß∑”°“√µ√«® Õ∫ª√‘¡“≥ºâ“
• Àπ⓪í∑¡å¢Õ߇§√◊ËÕß· ¥ß —≠≈—°…≥å‰ø°–æ√‘∫· ¥ß∂÷ß™à«ß°“√À¬ÿ¥∂—ß„π¢≥–ªíòπ·Àâß
• §◊Õ Power On · ¥ß ∂“π–¢Õßµ—«‡§√◊ËÕßæ√âÕ¡„™âß“π (‡ªî¥‡§√◊ËÕß)
• §◊Õ Power Off · ¥ß ∂“π–°“√À¬ÿ¥°“√∑”ß“π¢Õßµ—«‡§√◊ËÕß (ªî¥‡§√◊ËÕß)
• · ¥ß —≠≈—°…≥å«à“Õ¬Ÿà„π‚À¡¥¢Õß√Ÿª·∫∫°“√ª√–À¬—¥ (ª√–À¬—¥πÈ”, ª√–À¬—¥‰ø, ‡ ◊ÈÕºâ“πâÕ¬)
CAUTION¢âÕ§«√√–«—ß
Button to select the ECO modeªÿÉ¡„™â ”À√—∫‡≈◊Õ°√Ÿª·∫∫°“√ª√–À¬—¥
ECO ButtonªÿÉ¡‡≈◊Õ°√Ÿª·∫∫°“√ª√–À¬—¥
Power SwitchªÿÉ¡‡ªî¥-ªî¥°“√∑”ß“π
Button to turn the machine ON or OFFDo not keep the button pushing for a longtime. Otherwise it may cause malfunction.ªÿÉ¡°¥‡ªî¥/ªî¥ °“√∑”ß“π
Àâ“¡∑”°“√°¥ªÿÉ¡∑‘È߉«âπ“π ¡‘©–π—ÈπÕ“®∑”„À⇧√◊ËÕß
º‘¥ª°µ‘‰¥â
• When the operation finishes, the buzzer beepsand the machine will be turned off automatically.
• ‡¡◊ËÕ ‘Èπ ÿ¥°“√∑”ß“π®–¡’‡ ’¬ß‡µ◊Õπ ·≈–®–ªî¥°“√∑”ß“π‚¥¬Õ—µ‚π¡—µ‘
ECO indicatorµ—«· ¥ß ∂“π–√Ÿª·∫∫°“√ª√–À¬—¥
Indication of program‡§√◊ËÕßÀ¡“¬· ¥ß√–∫∫°“√∑”ß“π
Indicator of the selected course lights up. Each time thePROGRAM button is pressed, a different courseindicator lights up accordingly.
‚ª√·°√¡∑’Ë∂Ÿ°‡≈◊Õ°®–µ‘¥ «à“ßµ“¡°“√°¥‡≈◊Õ°
Indicator will light up when lid is locked.‡¡◊ËÕ√–∫∫≈ÁÕ§ªÑÕß°—π‡¥Á°∑”ß“π®–¡’‰øµ‘¥· ¥ß°“√∑”ß“π
Indication of child lock‡§√◊ËÕßÀ¡“¬· ¥ß√–∫∫≈ÁÕ§ªÑÕß°—π‡¥Á°
Indicator of the selected mode ECO lights up. Each timethe ECO button is pressed, a different mode indicatorlights up accordingly.√Ÿª·∫∫°“√ª√–À¬—¥∑’Ë∂Ÿ°‡≈◊Õ°®–µ‘¥ «à“ßµ“¡°“√°¥‡≈◊Õ°
• Water save LED lights up when FUZZY, SOAK or AIRJET is selected.
• ‰ø LED · ¥ß°“√ª√–À¬—¥πÈ”µ‘¥ «à“ߢ÷Èπ‡¡◊ËÕ‡≈◊Õ°‚ª√·°√¡FUZZY, SOAK À√◊Õ AIR JET
FUZZY DELICATE BLANKETJEANS
TUB DRY SOAK SPEEDY WOOLTUB CLEAN AIR JET
FUZZY DELICATE BLANKETJEANS
TUB DRY SOAK SPEEDY WOOLTUB CLEAN AIR JET
10
3WPL062081-5
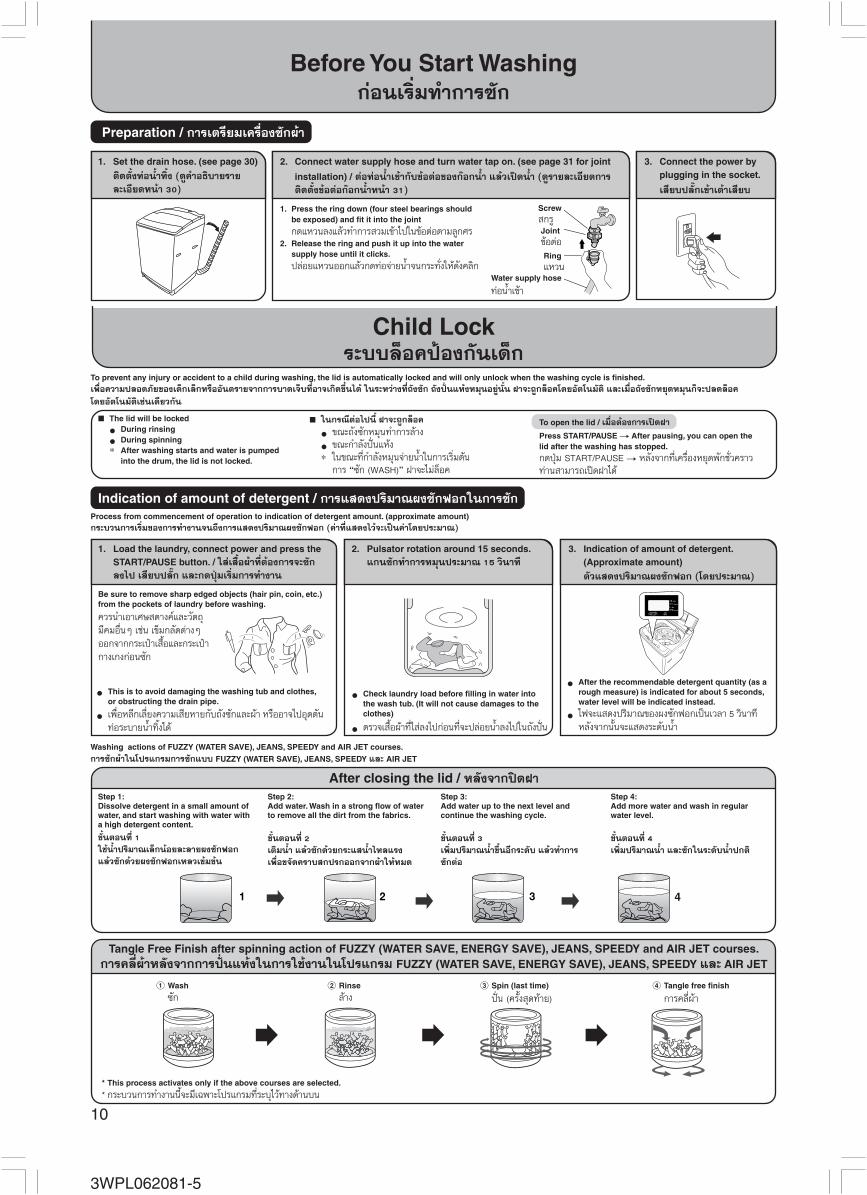
Before You Start Washing°àÕπ‡√‘Ë¡∑”°“√ —°
Preparation / °“√‡µ√’¬¡‡§√◊ËÕß´—°ºâ“
Indication of amount of detergent / °“√· ¥ßª√‘¡“≥ºß´—°øÕ°„π°“√ —°
Process from commencement of operation to indication of detergent amount. (approximate amount)°√–∫«π°“√‡√‘Ë¡¢Õß°“√∑”ß“π®π∂÷ß°“√· ¥ßª√‘¡“≥ºß´—°øÕ° (§à“∑’Ë· ¥ß‰«â®–‡ªìπ§à“‚¥¬ª√–¡“≥)
Child Lock√–∫∫≈ÁÕ§ªÑÕß°—π‡¥Á°
To prevent any injury or accident to a child during washing, the lid is automatically locked and will only unlock when the washing cycle is finished.‡æ◊ËÕ§«“¡ª≈Õ¥¿—¬¢Õ߇¥Á°‡≈Á°À√◊ÕÕ—πµ√“¬®“°°“√∫“¥‡®Á∫∑’ËÕ“®‡°‘¥¢÷Èπ‰¥â „π√–À«à“ß∑’Ë∂—ß´—° ∂—ߪíòπ·ÀâßÀ¡ÿπÕ¬Ÿàπ—Èπ Ω“®–∂Ÿ°≈ÁÕ§‚¥¬Õ—µ‚π¡—µ‘ ·≈–‡¡◊ËÕ∂—ß´—°À¬ÿ¥À¡ÿπ°Á®–ª≈¥≈ÁÕ§
‚¥¬Õ—µ‚π¡—µ‘‡™àπ‡¥’¬«°—π
To open the lid / ‡¡◊ËÕµâÕß°“√‡ªî¥Ω“
Press START/PAUSE t After pausing, you can open thelid after the washing has stopped.
°¥ªÿÉ¡ START/PAUSE t À≈—ß®“°∑’ˇ§√◊ËÕßÀ¬ÿ¥æ—°™—Ë«§√“«∑à“π “¡“√∂‡ªî¥Ω“‰¥â
The lid will be locked
• During rinsing
• During spinning
* After washing starts and water is pumpedinto the drum, the lid is not locked.
„π°√≥’µàÕ‰ªπ’È Ω“®–∂Ÿ°≈ÁÕ§
• ¢≥–∂—ß´—°À¡ÿπ∑”°“√≈â“ß
• ¢≥–°”≈—ߪíòπ·Àâß* „π¢≥–∑’Ë°”≈—ßÀ¡ÿπ®à“¬πÈ”„π°“√‡√‘Ë¡µâπ
°“√ ç —° (WASH)é Ω“®–‰¡à≈ÁÕ§
1 Wash
´—°4 Tangle free finish
°“√§≈’˺â“3 Spin (last time)
ªíòπ (§√—Èß ÿ¥∑⓬)2 Rinse
ʼnҧ
Washing actions of FUZZY (WATER SAVE), JEANS, SPEEDY and AIR JET courses.
°“√´—°ºâ“„π‚ª√·°√¡°“√´—°·∫∫ FUZZY (WATER SAVE), JEANS, SPEEDY ·≈– AIR JET
Step 1:Dissolve detergent in a small amount ofwater, and start washing with water witha high detergent content.
¢—ÈπµÕπ∑’Ë 1
„™âπÈ”ª√‘¡“≥‡≈Á°πâÕ¬≈–≈“¬ºß —°øÕ°
·≈â«´—°¥â«¬ºß´—°øÕ°‡À≈«‡¢â¡¢âπ
Step 2:Add water. Wash in a strong flow of waterto remove all the dirt from the fabrics.
¢—ÈπµÕπ∑’Ë 2
‡µ‘¡πÈ” ·≈â«´—°¥â«¬°√–· πÈ”‰À≈·√ß
‡æ◊ËÕ¢®—¥§√“∫ °ª√°ÕÕ°®“°ºâ“„ÀâÀ¡¥
Step 3:Add water up to the next level andcontinue the washing cycle.
¢—ÈπµÕπ∑’Ë 3
‡æ‘Ë¡ª√‘¡“≥πÈ”¢÷ÈπÕ’°√–¥—∫ ·≈â«∑”°“√
´—°µàÕ
Step 4:Add more water and wash in regularwater level.
¢—ÈπµÕπ∑’Ë 4
‡æ‘Ë¡ª√‘¡“≥πÈ” ·≈–´—°„π√–¥—∫πÈ”ª°µ‘
After closing the lid / À≈—ß®“°ªî¥Ω“
4
Tangle Free Finish after spinning action of FUZZY (WATER SAVE, ENERGY SAVE), JEANS, SPEEDY and AIR JET courses.°“√§≈’˺â“À≈—ß®“°°“√ªíòπ·Àâß„π°“√„™âß“π„π‚ª√·°√¡ FUZZY (WATER SAVE, ENERGY SAVE), JEANS, SPEEDY ·≈– AIR JET
Water supply hose
∑àÕπÈ”‡¢â“
Screw °√ŸJoint¢âÕµàÕRing·À«π
1. Set the drain hose. (see page 30)
µ‘¥µ—Èß∑àÕπÈ”∑‘Èß (¥Ÿ§”Õ∏‘∫“¬√“¬
≈–‡Õ’¬¥Àπâ“ 30)
2. Connect water supply hose and turn water tap on. (see page 31 for joint
installation) / µàÕ∑àÕπÈ”‡¢â“°—∫¢âÕµàÕ¢Õß°äÕ°πÈ” ·≈⫇ªî¥πÈ” (¥Ÿ√“¬≈–‡Õ’¬¥°“√
µ‘¥µ—ÈߢâÕµàÕ°äÕ°πÈ”Àπâ“ 31)
1. Press the ring down (four steel bearings shouldbe exposed) and fit it into the joint
°¥·À«π≈ß·≈â«∑”°“√ «¡‡¢â“‰ª„π¢âÕµàÕµ“¡≈Ÿ°»√2. Release the ring and push it up into the water
supply hose until it clicks.
ª≈àÕ¬·À«πÕÕ°·≈â«°¥∑àÕ®à“¬πÈ”®π°√–∑—Ëß„À⥗ߧ≈‘°
3. Connect the power byplugging in the socket.
‡ ’¬∫ª≈—Í°‡¢â“‡µâ“‡ ’¬∫
1. Load the laundry, connect power and press theSTART/PAUSE button. / „ à‡ ◊ÈÕºâ“∑’˵âÕß°“√®–´—°
≈߉ª ‡ ’¬∫ª≈—Í° ·≈–°¥ªÿÉ¡‡√‘Ë¡°“√∑”ß“π
2. Pulsator rotation around 15 seconds.·°π´—°∑”°“√À¡ÿπª√–¡“≥ 15 «‘π“∑’
3. Indication of amount of detergent.(Approximate amount)
µ—«· ¥ßª√‘¡“≥ºß —°øÕ° (‚¥¬ª√–¡“≥)
Be sure to remove sharp edged objects (hair pin, coin, etc.)from the pockets of laundry before washing.
§«√π”‡Õ“‡»… µ“ߧå·≈–«—µ∂ÿ¡’§¡Õ◊ËπÊ ‡™àπ ‡¢Á¡°≈—¥µà“ßÊÕÕ°®“°°√–‡ªÜ“‡ ◊ÈÕ·≈–°√–‡ªÜ“°“߇°ß°àÕπ —°
• This is to avoid damaging the washing tub and clothes,or obstructing the drain pipe.
• ‡æ◊ËÕÀ≈’°‡≈’ˬߧ«“¡‡ ’¬À“¬°—∫∂—ß´—°·≈–ºâ“ À√◊ÕÕ“®‰ªÕÿ¥µ—π∑àÕ√–∫“¬πÈ”∑‘È߉¥â
• After the recommendable detergent quantity (as arough measure) is indicated for about 5 seconds,water level will be indicated instead.
• ‰ø®–· ¥ßª√‘¡“≥¢Õßºß —°øÕ°‡ªìπ‡«≈“ 5 «‘π“∑’À≈—ß®“°π—Èπ®–· ¥ß√–¥—∫πÈ”
• Check laundry load before filling in water intothe wash tub. (It will not cause damages to theclothes)
• µ√«®‡ ◊ÈÕºâ“∑’Ë„ à≈߉ª°àÕπ∑’Ë®–ª≈àÕ¬πÈ”≈߉ª„π∂—ߪíòπ
* This process activates only if the above courses are selected.
* °√–∫«π°“√∑”ß“ππ’È®–¡’‡©æ“–‚ª√·°√¡∑’Ë√–∫ÿ‰«â∑“ߥâ“π∫π

11
3WPL062081-5
Easy to Wash Course (FUZZY Course)√Ÿª·∫∫°“√´—°Õ—µ‚π¡—µ‘ (‚ª√·°√¡Õ—µ‚π¡—µ‘)
This course is designed to wash clothes with normal stain. ( 18 for details)
‚ª√·°√¡π’ȉ¥âÕÕ°·∫∫¡“ ”À√—∫´—°ºâ“∑’˧√“∫ °ª√°ª°µ‘ª√–®”«—π ( ¥Ÿ§”Õ∏‘∫“¬√“¬≈–‡Õ’¬¥ Àπâ“ 18)
According to the recommended detergentquantity (as a rough measure) indicated on thecontrol panel, put the measured detergent into
the Detergent Dispenser. / ‡µ‘¡ª√‘¡“≥¢Õߺߴ—°øÕ°µ“¡µ—«‡≈¢∑’Ë· ¥ß‰«â
• When using liquid detergent, bleach andfabric softener 22
• Spinning cycle does not start when lidremains open.
• „π°√≥’„™âπÈ”¬“ —°ºâ“ µ—«øÕ°¢“«·≈–πÈ”¬“ª√—∫ºâ“πÿà¡ „À⥟√“¬≈–‡Õ’¬¥Àπâ“ 22
•∂—ߪíòπ®–‰¡àÀ¡ÿπ‡¡◊ËÕ‡ªî¥Ω“‡§√◊ËÕß∑‘È߉«â
5. When washing finish.‡¡◊ËÕ‡ √Á® ‘Èπ°“√∑”ß“π
The sound of buzzer (melodious) indicates washing completion.
‡¡◊ËÕ‡§√◊ËÕß∑”ß“π‡ √Á® ¡∫Ÿ√≥å®–¡’‡ ’¬ß¥πµ√’¥—ߢ÷Èπ• The sound of buzzer (melodious) indicates washing completion,
electric supply will also be automatically cut off. (Auto Off Function)
• ‡ ’¬ß¥πµ√’®–¥—ߢ÷Èπ ‡æ◊ËÕ· ¥ß«à“‡§√◊ËÕ߉¥â∑”ß“π‡ √Á® ¡∫Ÿ√≥å·≈⫇§√◊ËÕß®–∑”°“√µ—¥‰ø‚¥¬Õ—µ‚π¡—µ‘
4. Pour in powdered detergent and close the lid.‡√‘Ë¡°“√∑”ß“π„ àºß´—°øÕ°·≈⫪î¥Ω“‡§√◊ËÕß
Preparation (Pretreatment)°“√‡µ√’¬¡°“√°àÕπ´—°
Machine-washable itemsºâ“∑’Ë “¡“√∂ —°‡§√◊ËÕ߉¥â
Non-machine-washable itemsºâ“∑’ˉ¡à “¡“√∂ —°‡§√◊ËÕ߉¥â
• Leather product, leather ornament
• Garments with ornament
• Blended yarn fabric, such as rayonand cupro
• Non-colorfast articles
• Necktie, suits, and coat
• Items to which coating and resin(or adhesive) is applied or emboss(convex and concave patterns)processing is given.
• Wool or silk items using forciblystranded threads (hard twist yarn),especially woven fabrics.
• Pile fabrics, such as velvets andcorduroys
• “WOOL” course cannot be used with timer. • ‚ª√·°√¡°“√´—°ºâ“¢π —µ«å‰¡à “¡“√∂µ—È߇«≈“´—°≈à«ßÀπⓉ¥â
• Prior to washing, wash away dirtbeforehand from heavily soiled laundry,if any.
• Turn clothes inside out first to whichbuttons or embroiders are attached,then wash them.
• In the event that the washed laundry isshrunk excessively, it is advisable tokeep its dress-pattern paper to restoreits shape to the original form.
•°àÕπ∑”°“√ —°§«√ªí¥ΩÿÉπ∑’˵‘¥ÕÕ°°àÕπ
•°≈—∫‡ ◊ÈÕ¥â“π„πÕÕ° µ‘¥°√–¥ÿ¡• „π°√≥’∑’ˇ ◊ÈÕºâ“À¥¡“°„Àâ„ à‡ ◊ÈÕ„π
°√–¥“…·µàß∑√߇æ◊ËÕ„À⇢â“√Ÿª‡¥‘¡
1. Put laundry into the tub.π”ºâ“∑’˵âÕß°“√ —°„ à≈߉ª„π∂—ß
• Put the laundry into the tub.
• The maximum load of laundry is 3.5 kg.or less.
•π”ºâ“∑’Ë®–´—°„ à≈߉ª„π∂—ß•ª√‘¡“≥ºâ“‰¡à§«√‡°‘π 3.5 °°.
2. Turn the power switch ON and selectthe “WOOL” course / °¥ªÿÉ¡‡ªî¥‡§√◊ËÕß
·≈⫇≈◊Õ°‚ª√·°√¡ ç —°ºâ“¢π —µ«åé
3. Put the liquid detergent„ àπÈ”¬“ —°ºâ“
• When you wash clothes with a tag indicating “Dry Cleaning”,be sure to use a detergent (liquid detergent) for exclusiveuse, for that kind of material. Mild detergent (liquiddetergent) can also be used for those clothes that arelabeled with “Hand Washing”.
• For amount of detergent, follow its instruction.
• Dilute liquid detergent with water and pour it gently intothe washtub through the liquid detergent inlet.
• Do not use powder detergent because it does not dissolvewell in water.
• ‡¡◊ËÕ∑”°“√´—°ºâ“∑’Ë¡’©≈“°µ‘¥«à“ —°·ÀâßµâÕß„™âπÈ”¬“´—°ºâ“„Àâ‡À¡“– ¡°—∫ºâ“ πÈ”¬“´—°ºâ“™π‘¥ÕàÕπ “¡“√∂„™â°—∫ºâ“∑’Ë¡’©≈“°µ‘¥«à“´—°¡◊Õ
• „™âª√‘¡“≥πÈ”¬“ —°ºâ“µ“¡∑’Ë√–∫ÿ„π§Ÿà¡◊Õ°“√„™âß“π• ‡®◊Õ®“ßπÈ”¬“ —°ºâ“„ππÈ” ·≈–√‘π„π™àÕß„ àπÈ”¬“ —°ºâ“Õ¬à“ß™â“Ê• ‰¡à§«√„™âºß´—°øÕ°‡æ√“–≈–≈“¬πÈ”‰¥â‰¡à¥’
• ‡§√◊ËÕßÀπ—ß, ‡§√◊ËÕߪ√–¥—∫Àπ—ß
• ‡ ◊ÈÕºâ“∑’Ë¡’‡§√◊ËÕߪ√–¥—∫
• „¬º ¡ ‡™àπ ‡√¬Õπ
• «—µ∂ÿ∑’Ë ’µ°ßà“¬
• ‡π§‰∑, Ÿ∑·≈–‡ ◊ÈÕ‚§â™
• «—µ∂ÿ∑’Ë¡’°“√‡§≈◊ËÕπ·≈–µ‘¥°“«πŸπ
•ºâ“¢π —µ«åÀ√◊պⓉÀ¡∑’Ë„™â‡™◊Õ°¥â“¬∑Õ
•ºâ“°”¡–À¬’ËÀ√◊պⓠ—°À≈“¥
Liquid detergent dispenser
™àÕ߇µ‘¡πÈ”¬“´—°ºâ“
Washing Course for clothes with DRY Cleaning label (WOOL Course)√Ÿª·∫∫°“√´—°ºâ“∑’Ë¡’©≈“°µ‘¥«à“ ç ”À√—∫´—°·Àâßé (‚ª√·°√¡°“√ —°ºâ“¢π —µ«å)
• Sweater, cardigan (wool,angora)
• Trousers and skirt
• Blouse, shirt, one-piecedress (silk, hemp, etc.)
• ‡ ◊ÈÕ¢π —µ«å, ‡ ◊ÈÕ°—Í°(¢π·°–, ¢π°√–µà“¬)
•°“߇°ß·≈–°√–‚ª√ß
• ‡ ◊ÈÕ·¢π¬“«, ‡ ◊ÈÕ‡™‘ȵ,™ÿ¥ µ√’ (ºâ“‰À¡,ºâ“ªÉ“π Õ◊ËπÊ)
Clothes with “Dry Cleaning” or “Hand Washing” label can be washed gently and carefully through optimizedwater current. However, since some materials can not be washed, check if the laundry you wish to wash ismachine-washable prior to the washing. (For details of the washing processes of each course, 18)
“¡“√∂ —°ºâ“∑’Ë¡’©≈“°µ‘¥«à“ ”À√—∫´—°·Àâß·≈– ”À√—∫´—°¡◊Õ‰¥â‚¥¬°√–· πÈ”‰À≈‡«’¬π∑’Ëπÿà¡π«≈ Õ¬à“߉√°Áµ“¡§«√∑”°“√µ√«® Õ∫°àÕπ∑”°“√ —°«à“ºâ“™π‘¥„¥∫â“ß∑’ˉ¡à “¡“√∂ —°‰¥â (¥Ÿ√“¬≈–‡Õ’¬¥∑’ËÀπâ“ 18) Machine-washable clothes and articles are as follows :
ºâ“∑’Ë “¡“√∂ —°‡§√◊ËÕ߉¥â¡’¥—ßπ’È
Caution¢âÕ§«√√–«—ß
Precaution to bear in mind when washing clothes with “Dry Cleaning”label
¢âÕ§«√√–«—ß„π°“√´—°ºâ“∑’Ë¡’©≈“°µ‘¥«à“ ”À√—∫´—°·ÀâßUse a suitable amount of detergent / „™âª√‘¡“≥ºß´—°øÕ°„Àâ‡À¡“– ¡• You cannot make any difference in washing results even though you use larger
amount of detergent than the specified amount.On the contrary, however, it may result in a poor rinsing performance, causing theclothes to be damage.
• Do not use bleach. Because bleach is extremely alkaline, it causes damage to fabrics.
•°“√„™âª√‘¡“≥ºß —°øÕ°¡“°°«à“∑’Ë√–∫ÿ‰«â ‰¡à “¡“√∂‡æ‘Ë¡ª√– ‘∑∏‘¿“æ„π°“√ —°·µàÕ“®∑”„À⧫“¡ “¡“√∂„π°“√≈â“ß≈¥≈ß
• ‰¡à§«√„™âπÈ”¬“øÕ°¢“« ‡æ√“–πÈ”¬“øÕ°¢“«¡’§«“¡‡ªìπ¥à“ß ŸßÕ“®∑”„À⇠◊ÈպⓇ ’¬À“¬
Caution / ¢âÕ§«√√–«—ß
• When washing items other than those mentioned above, read the instructions ofdetergent you are using.
• ‡¡◊ËÕ´—°ºâ“™π‘¥Õ◊ËπÊ ∑’ˉ¡à‰¥â√–∫ÿ‰«â °√ÿ≥“∑”µ“¡§”·π–π”¢Õߺߴ—°øÕ° Checking laundry for colorfastness °“√µ√«®ºâ“∑’Ë¡’ ’µ°
• Please check whether those clothes that may not be colorfast are easily discoloredor not. (For this purpose, use a white clean towel dampened with a small amount ofliquid detergent and rub it against the hidden portion of the clothes to check whetheror not color is transferred to the towel.) If you find that color is transferred from theclothes to towel, do not wash it.
• °√ÿ≥“µ√«® Õ∫«à“ºâ“∑’Ë —°®– ’µ°‰¥âßà“¬‡æ’¬ß‰√ (‚¥¬°“√„™âºâ“‡™Á¥µ—« ’¢“«∑’Ë¡’πÈ”¬“´—°ºâ“‡≈Á°πâÕ¬∂Ÿ°—∫ºâ“∑’Ë®–´—°) ∂â“æ∫«à“¡’ ’µ‘¥∑’˺Ⓡ™Á¥µ—«°Á‰¡à§«√ —°ºâ“™‘Èππ—Èπ
• Water level is designed to automatically reach “75L” .If necessary, the level can be changed to any level inthe range from “48L” to “118L”.
• A suitable water level should be the one when thewhole laundry is submerged into water.
• If you use spin control, please see page 16
• √–¥—∫πÈ”®–∂Ÿ°µ—Èß‚¥¬Õ—µ‚π¡—µ‘‰«â∑’Ë ç75 ≈‘µ√é ·≈– “¡“√∂ª√—∫√–¥—∫πÈ”‰¥â®“° ç48 ≈‘µ√é ∂÷ß ç118 ≈‘µ√é
• √–¥—∫πÈ”∑’ˇÀ¡“– ¡ºâ“µâÕß®¡Õ¬Ÿà„µâπÈ”•∂⓵âÕß°“√‡≈◊Õ°„™â®”π«π√Õ∫°“√ªíòπ·Àâß√à«¡°—∫
°“√∑”ß“π „À⥟√“¬≈–‡Õ’¬¥Àπâ“ 16
1. Turn power on°¥ªÿÉ¡‡ªî¥‡§√◊ËÕß
2. Select the FUZZY course (Water saving course)‡≈◊Õ°‚ª√·°√¡Õ—µ‚π¡—µ‘ (‚ª√·°√¡ª√–À¬—¥πÈ”)
Note : Whenever you turn on the power, the FUZZY course is selected automatically.
À¡“¬‡Àµÿ: ‡¡◊ËÕ∑”°“√°¥ªÿÉ¡‡ªî¥ «‘∑™å∑ÿ°§√—È߇§√◊ËÕß®–‡µ√’¬¡æ√âÕ¡∑’Ë‚ª√·°√¡Õ—µ‚π¡—µ‘
3. Press START button.°¥ªÿÉ¡‡√‘Ë¡°“√∑”ß“π
• The pulsator rotates forapproximately 15 seconds todetect laundry load. Water supplywill start after detergent amountand water level are indicated.
• ·°π —°®–∑”°“√À¡ÿπª√–¡“≥15 «‘π“∑’ ‡æ◊ËÕµ√«®«—¥ª√‘¡“≥¢Õߺâ“∑’Ë´—°æ√âÕ¡°—∫· ¥ßª√‘¡“≥¢Õߺߴ—°øÕ° ·≈–√–¥—∫πÈ”µ“¡≈”¥—∫
• If you use spin control, please see page 16
•∂⓵âÕß°“√‡≈◊Õ°„™â®”π«π√Õ∫°“√ªíòπ·Àâß√à«¡°—∫°“√∑”ß“π„À⥟√“¬≈–‡Õ’¬¥Àπâ“ 16
If you want to save energy, select the ENERGY SAVE mode by pressing the ECO button 1 time. (ENERGY SAVE indicator turn on.)*It requires a longer washing time compared to normal FUZZY courseNotice for ENERGY SAVE mode : Washing machine may stop agitating up to 10 minutes during the washing process. This isa soaking process to save energy and it is not malfunction.
∂ⓧÿ≥µâÕß°“√ª√–À¬—¥‰ø„Àâ‡≈◊Õ°∑’Ë√Ÿª·∫∫ª√–À¬—¥‰ø‚¥¬°¥ªÿÉ¡ ECO 1 §√—Èß ( —≠≈—°…≥å¢Õß√Ÿª·∫∫ª√–À¬—¥‰ø®–¡’‰øµ‘¥)*‡§√◊ËÕß®–„™â‡«≈“„π°“√ —°¡“°°«à“‡¡◊ËÕ‡ª√’¬∫‡∑’¬∫°—∫°“√∑”ß“πª°µ‘¢Õß‚ª√·°√¡Õ—µ‚π¡—µ‘®ÿ¥ —߇°µ°“√∑”ß“π¢Õß√Ÿª·∫∫ª√–À¬—¥‰ø : ‡§√◊ËÕß´—°ºâ“Õ“®À¬ÿ¥ 10 π“∑’ „π√–À«à“ß°√–∫«π°“√´—°´÷Ë߇ªìπ°“√·™àºâ“‡æ◊ËÕ°“√ª√–À¬—¥‰ø ·≈–‰¡à‰¥â‡ªì𧫓¡º‘¥ª°µ‘¢Õ߇§√◊ËÕß
If you want to wash small loads (max. 1.5 kg.), select SMALL LOAD mode by pressing ECO button 2 times. (SMALL LOADindicator turns on)*It requires less water compared to normal FUZZY course.
• Do not put laundries more than 1.5 kg., otherwise this may cause detergent remaining in clothes or machine malfunction.
∂ⓧÿ≥µâÕß°“√´—°ºâ“πâÕ¬ (‰¡à‡°‘π 1.5 °°.) „Àâ‡≈◊Õ°‰ª∑’Ë√Ÿª·∫∫‡ ◊ÈÕºâ“πâÕ¬‚¥¬°¥ªÿÉ¡ ECO 2 §√—Èß ( —≠≈—°…≥å¢Õß√Ÿª·∫∫‡ ◊ÈÕºâ“πâÕ¬®–¡’‰øµ‘¥)*‡§√◊ËÕß®–„™âπÈ”πâÕ¬°«à“‡¡◊ËÕ‡ª√’¬∫‡∑’¬∫°—∫°“√∑”ß“πª°µ‘¢Õß‚ª√·°√¡Õ—µ‚π¡—µ‘
• ‰¡à§«√„ àºâ“‡°‘π 1.5 °°. ¡‘©–π—ÈπÕ“®∑”„Àâ¡’ºß´—°øÕ°µ°§â“ß∑’˺â“À√◊Õ‡§√◊ËÕß∑”ß“πº‘¥ª°µ‘

12
3WPL062081-5
Washing Course for clothes with DRY Cleaning label (WOOL Course) (Cont.)√Ÿª·∫∫°“√ —°ºâ“∑’Ë¡’©≈“°µ‘¥«à“ ç ”À√—∫´—°·Àâßé (‚ª√·°√¡°“√´—°ºâ“¢π —µ«å) (µàÕ)
JEANS course is designed to wash heavily stained clothes such as sports wear.JEANS and socks with strong water currents. ( 18 for details)‚ª√·°√¡π’ȇªìπ‚ª√·°√¡∑’ËÕÕ°·∫∫¡“‡æ◊ËÕ´—°ºâ“∑’Ë¡’√Õ¬‡ªóôÕπ¡“° ‡™àπ ™ÿ¥°’Ó °“߇°ß¬’π
∂ÿ߇∑â“ ´÷Ëß®–∑”°“√ —°¥â«¬°√–· πÈ”∑’ˉÀ≈·√ß ( ¥Ÿ§”Õ∏‘∫“¬√“¬≈–‡Õ’¬¥Àπâ“ 18)
1. Turn power on and select JEANS course.°¥ªÿÉ¡°“√∑”ß“π·≈⫇≈◊Õ° √Ÿª·∫∫ JEANS
2. Press the START button.°¥ªÿÉ¡‡√‘Ë¡°“√∑”ß“π
3. Pour in powdered detergent and close the lid.‡ªî¥Ω“‡æ◊ËÕ„ àºß´—°øÕ°·≈⫪î¥Ω“‡§√◊ËÕ߇æ◊ËÕ‡√‘Ë¡°“√∑”ß“π
• Spinning cycle does not start when lid remains open.
• ∂—ߪíòπ®–‰¡à∑”ß“π∂Ⓡªî¥Ω“‡§√◊ËÕß∑‘È߉«â
You can do something else until the buzzer sounds signaling that washing has been completed.§ÿ≥ “¡“√∂‰ª∑”ß“πÕ◊ËπÊ ‰¥â ‡¡◊ËÕ‡§√◊ËÕß∑”ß“π‡ √Á®·≈â«®–¡’‡ ’¬ß‡µ◊ÕπÕ—µ‚π¡—µ‘
Rapid Washing (SPEEDY Course)‚ª√·°√¡°“√´—°ºâ“·∫∫√«¥‡√Á« (‚ª√·°√¡‡√Á«)
This course is designed to wash clothes which are lightly stained only. ( 18 for details)‚ª√·°√¡π’ȉ¥âÕÕ°·∫∫¡“ ”À√—∫´—°ºâ“∑’Ë °ª√°πâÕ¬Ê ‡∑à“π—Èπ ( ¥Ÿ§”Õ∏‘∫“¬√“¬≈–‡Õ’¬¥Àπâ“ 18)
3. Pour in powdered detergent and close the lid.‡ªî¥Ω“‡æ◊ËÕ„ àºß´—°øÕ°·≈⫪î¥Ω“‡§√◊ËÕ߇æ◊ËÕ‡√‘Ë¡°“√∑”ß“π
2. Press the START button.°¥ªÿÉ¡‡√‘Ë¡°“√∑”ß“π
1. Turn power on and select SPEEDY course.°¥ªÿÉ¡°“√∑”ß“π ·≈⫇≈◊Õ°√Ÿª·∫∫ SPEEDY
• Laundry load shouldnot exceed 7.0 Kg.when you are usingSPEEDY course.
• ‰¡à§«√„™â√Ÿª·∫∫°“√´—°·∫∫√«¥‡√Á«π’È ∂â“πÈ”Àπ—°ºâ“‡°‘π 7.0 °°.
• Spinning cycle does not start when lid remains open.
• ∂—ߪíòπ®–‰¡à∑”ß“π∂Ⓡªî¥Ω“‡§√◊ËÕß∑‘È߉«â
You can do something else until the buzzer sounds signaling that washing has been completed.§ÿ≥ “¡“√∂‰ª∑”ß“πÕ◊ËπÊ ‰¥â ‡¡◊ËÕ‡§√◊ËÕß∑”ß“π‡ √Á®·≈â«®–¡’‡ ’¬ß‡µ◊ÕπÕ—µ‚π¡—µ‘
Washing Heavily Stained Clothes (JEANS Course)‚ª√·°√¡°“√´—°ºâ“∑’Ë °ª√°¡“° (‚ª√·°√¡°“√´—°ºâ“∑’Ë °ª√°)
• Be sure to close the main lid completely.(Opening the lid causes the washtub tostop rotating)
• ªî¥Ω“‡§√◊ËÕß„Àâ‡√’¬∫√âÕ¬ (∂—ߪíòπ®–‰¡à∑”ß“π∂Ⓡªî¥Ω“∑‘È߉«â)
You can do something else until the buzzer sounds signaling that washing has been completed.§ÿ≥ “¡“√∂‰ª∑”ß“πÕ◊ËπÊ ‰¥â ‡¡◊ËÕ‡§√◊ËÕß∑”ß“π‡ √Á®·≈â«®–¡’‡ ’¬ß‡µ◊ÕπÕ—µ‚π¡—µ‘
5. When the washing finishes‡¡◊ËÕ°“√ —°‡ √Á® ‘Èπ
• Keep sweater of wool, angora and cashmere in shape first and let it dry in the shade in ahorizontal position.
• Laying these items flat on such objects ensures that they retain their shape.
• ‡°Á∫™ÿ¥°—Í°ºâ“¢π —µ«å, ¢π°√–µà“¬ ·≈–¢π·°– ·≈–µ“°∫πæ◊Èπ√“∫
• µ“°ºâ“∫πæ◊Èπ√“∫• Keep the shape of blouse or onepiece dress neatly and
let it dry by hanging it on a hanger in the shade.
• √—°…“√Ÿª∑√ߢÕ߇ ◊ÈÕ µ√’„Àâ‡√’¬∫√âÕ¬·≈–·¢«π∑’ˉ¡â·¢«π√—°…“√Ÿª∑√ß
4. Close the lid and Press the START/PAUSE buttonªî¥Ω“‡§√◊ËÕß·≈–°¥ªÿÉ¡‡√‘Ë¡°“√∑”ß“π
How to remove dirt / «‘∏’°“√¢®—¥§√“∫
Helpful tips for effective washing / ‡§≈Á¥≈—∫„π°“√´—°
• Keep a steam iron off thelaundry to spray steamonto it, so that is may keepin shape.
• „™â‡µ“√’¥‰ÕπÈ”√’¥„Àâ§ß‡¥‘¡
• After spraying a large amount steam overthe laundry, use its dress-pattern paper tostretch it out until its shape is restored tothe original form.
• À≈—ß®“°ª≈àÕ¬‰ÕπÈ”∫πºâ“·≈â«„™â°√–¥“…·µàß∑√ß„Àâºâ“‡¢â“√Ÿª‡¥‘¡
Finish (How to correct shrunk and slightly deformed laundry) ‡¡◊ËÕ´—°‡ √Á® («‘∏’∑”„Àâºâ“∑’ËÀ¥µ—« À√◊Õ‡ ’¬√Ÿª∑√ß„Àâ‡À¡◊Õπ‡¥‘¡)
Dress-pattern paper°√–¥“…·µàß∑√ß
• Place a clean towel on the reverse side of laundry first, then apply a smallamount of liquid detergent to the dirty spot. Pat the spot lightly through the useof brush or the like to remove the dirt.
• Apply a small amount of liquid detergent to a stained spot on cuffs, collars, hemsand other areas around pockets of laundry. Then, give a brush finish to itunidirectionally to scour a stain away.
• „™âºâ“‡™Á¥µ—«∑’Ë –Õ“¥«“ß„µâºâ“·≈–„™âπÈ”¬“ —°ºâ“‡≈Á°πâÕ¬‡∑≈ß∫π®ÿ¥∑’Ë °ª√°·≈–„™â·ª√ß∂ŸÕÕ°
• „ àπÈ”¬“´—°ºâ“‡≈Á°πâÕ¬∑’˧Շ ◊ÈÕ·≈–∫√‘‡«≥∑’Ë °ª√° ·≈–„™â·ª√ß∂ŸÕÕ°
• If you use spin control, pleasesee page 16
• ∂⓵âÕß°“√‡≈◊Õ°„™â®”π«π√Õ∫°“√ªíòπ·Àâß√à«¡°—∫°“√∑”ß“π „À⥟√“¬≈–‡Õ’¬¥Àπâ“ 16
• The water level is automatically(If necessary, the water level can bechanged to any level in the rangefrom 48L to 118L [in 12 levels]).
• If you use spin control, please seepage 16
• √–¥—∫πÈ”µ—ÈßÕ—µ‚π¡—µ‘ („π°√≥’∑’Ë®–µ—Èß√–¥—∫πÈ” “¡“√∂∑”°“√‡ª≈’ˬπ·ª≈߉¥â„π™à«ß 48 ≈‘µ√ - 118 ≈‘µ√ [12 √–¥—∫])
• ∂⓵âÕß°“√‡≈◊Õ°„™â®”π«π√Õ∫°“√ªíòπ·Àâß√à«¡°—∫°“√∑”ß“π„À⥟√“¬≈–‡Õ’¬¥Àπâ“ 16
According to the recommended detergentquantity (as a rough measure) indicated on thecontrol panel, put the measured detergent intothe Detergent Dispenser
‡µ‘¡ª√‘¡“≥¢Õߺߴ—°øÕ°µ“¡µ—«‡≈¢∑’Ë· ¥ß‰«â
According to the recommended detergentquantity (as a rough measure) indicated on thecontrol panel, put the measured detergent intothe Detergent Dispenser
‡µ‘¡ª√‘¡“≥¢Õߺߴ—°øÕ°µ“¡µ—«‡≈¢∑’Ë· ¥ß‰«â

13
3WPL062081-5
Washing delicate clothes (DELICATE Course)√Ÿª·∫∫°“√´—°ºâ“∫Õ∫∫“ß (‚ª√·°√¡∂πÕ¡ºâ“)
The pulsator rotates and creates “Blanket washing current” and “Soak” course for gentle wash. ( 18 for details)
• Please note that the washing net should be used if the size or weight of comforter or blanket exceeds the following,or exceeds 30 cm after being folded and rolled. Otherwise, comforter or blanket may pop out from the wash tub whilespinning and damage the washing machine.
• BLANKET Course cannot be used with timer.·°π´—°®–¡’°“√À¡ÿπ ≈—∫°—∫°“√·™àºâ“‡ªìπ™à«ßÊ µ≈Õ¥°“√∑”ß“π ‡æ◊ËÕ§«“¡‡À¡“– ¡ ( ¥Ÿ√“¬≈–‡Õ’¬¥Àπâ“ 18)
• §«√„™â∂ÿßµ“¢à“¬‡¡◊ËÕ¡’°“√„™âß“π ∂â“¢π“¥À√◊ÕπÈ”Àπ—°¢Õߺâ“Àࡇ°‘π°«à“°”Àπ¥∑’Ë®–°≈à“«µ“¡√“¬≈–‡Õ’¬¥µàÕ‰ªÀ√◊ÕÀ≈—ß®“°∑’Ë∑”°“√æ—∫ ·≈–¡â«πºâ“Àà¡·≈⫧«“¡ Ÿß‡°‘π 30 ´¡. ¡‘©–π—Èπ ºâ“§≈ÿ¡‡µ’¬ßÀ√◊Õºâ“Àà¡Õ“®À≈ÿ¥ÕÕ°®“°∂—ß´—°√–À«à“ߢ—ÈπµÕπ°“√ªíòπ ·≈–∑”„À⇧√◊ËÕß´—°ºâ“‡ ’¬À“¬‰¥â
• ‚ª√·°√¡°“√ —°ºâ“Àࡉ¡à “¡“√∂µ—È߇«≈“ —°≈à«ßÀπⓉ¥â
Washing Comforters, Blanket, Bedspread (BLANKET Course)¢—ÈπµÕπ°“√´—°ºâ“Àà¡, ºâ“§≈ÿ¡‡µ’¬ß·≈–ºâ“™‘Èπ„À≠à (‚ª√·°√¡°“√´—°ºâ“Àà¡)
1. Turn the power switch ON and select the(DELICATE) course.°¥ªÿÉ¡°“√∑”ß“π·≈⫇≈◊Õ°√Ÿª·∫∫ DELICATE
2. Press the START/PAUSE button.°¥ªÿÉ¡‡√‘Ë¡°“√∑”ß“π
3. Put the detergent in and close the lid.‡ªî¥Ω“‡æ◊ËÕ„ àºß —°øÕ°·≈⫪î¥Ω“‡§√◊ËÕ߇¡◊ËÕ‡√‘Ë¡
°“√∑”ß“π
You can do something else until the buzzer sounds signaling that washing has been completed.§ÿ≥ “¡“√∂‰ª∑”ß“πÕ◊ËπÊ ‰¥â ‡¡◊ËÕ‡§√◊ËÕß∑”ß“π‡ √Á®·≈â«®–¡’‡ ’¬ß‡µ◊ÕπÕ—µ‚π¡—µ‘
‡¡◊ËÕ —°‡ √Á®
§«√À≈’°‡≈’ˬ߰“√µ“°¥â«¬°“√·¢«π‡æ√“–®–∑”„À⇠◊ÈպⓇ ’¬√Ÿª∑√ß• §«√„™â°“√µ“°‚¥¬°“√«“ߺâ“√“∫°—∫æ◊ÈπÀ≈’°‡≈’ˬ߰“√‡ ’¬√Ÿª∑√ß
When the washing finishes.It is important to hang wool sweaters in amanner to ensure that the shape holds.• Laying these items flat on such objects
ensures that they retain their shapes
Caution / ¢âÕ§«√√–«—ß
Do not wash the following items.
• Items which come with a “DRY” label but not with a “HAND WASH” label.
• Animal hair materials excluding wool, such as cashmere, angora and mohair.
• Special Knit items such as lace.
‘Ëß∑’˧«√À≈’°‡≈’ˬ߷≈–‰¡à§«√π”¡“„™â°—∫‡§√◊ËÕß
• ‡ ◊ÈÕºâ“∑’˵‘¥©≈“° —°·ÀâßÕ¬à“߇¥’¬« ¬°‡«âπ‡ ◊ÈÕºâ“∑’˵‘¥©≈“°´—°¥â«¬¡◊Õ
• ºâ“∑’Ë∑”®“°¢π —µ«å¬°‡«âπ¢π·°– ‡™àπ ¢π·§™‡¡’¬√å, ·Õß‚°√à“, ‚¡·Œ√å
• ‡ ◊ÈÕºâ“∑’Ë∂—° ‡™àπ ºâ“≈“¬≈Ÿ°‰¡â
• Be sure to use the kind of detergent specified by thesymbol attaches to clothes items to be washed.
• When using liquid detergent, be sure to dilute it withwater and gently pour it from the liquid detergent inlet.
• °√ÿ≥“„™âºß —°øÕ°∑’Ë¡’§ÿ≥ ¡∫—µ‘∑’Ë∂Ÿ°µâÕß°—∫‡ ◊ÈÕºâ“∑’Ë„™â —°
• ‡¡◊ËÕ∑”°“√„™âºß —°øÕ°∑’Ë¡’≈—°…≥–‡À≈«§«√π”¡“º ¡°—∫πÈ”„À⇮◊Õ®“ß°àÕππ”≈߉ª„™â°—∫‡§√◊ËÕß
Liquid detergent inlet™àÕ߇µ‘¡πÈ”¬“´—°ºâ“
• The water level is automatically set to “75L”
• If you use spin control, please see page 16
• √–¥—∫πÈ”®–µ—Èß∑’Ë√–¥—∫ ç75 ≈‘µ√é ®–‡ªìπ°“√∑”ß“π‚¥¬Õ—µ‚π¡—µ‘
• ∂⓵âÕß°“√‡≈◊Õ°„™â®”π«π√Õ∫°“√ªíòπ·Àâß√à«¡°—∫°“√∑”ß“π „À⥟√“¬≈–‡Õ’¬¥Àπâ“ 16
Soft water current is suitable for washing delicate items such as knit products or lingerie etc.( 18 for course details)°√–· πÈ”∑’Ëπÿà¡π«≈Õ¬à“߇À¡“– ¡ ”À√—∫°“√´—°·∫∫∂πÕ¡ºâ“ ‡™àπ ºâ“∂—°·≈–‡ ◊Èպⓠÿ¿“æ µ√’ Õ◊ËπÊ
(¥Ÿ√“¬≈–‡Õ’¬¥Àπâ“ 18)
Washable Comforter.
• Comforter filled with synthetic(Polyester) fiber.
• Size and weight:150 cm x 200 cm, weight below 1.5 kg.(Without using washing net.)174 cm x 225 cm, weight below 2.0 kg.(Using washing net.)
Washable Blanket
• Blankets with “Hand Washing” label.
• Material Types : Acrylic, tufted andwoven blankets, which are made ofacrylic and polyester. (double-sizedblanket : 1.6 kg x 3 pcs. (Acrylic orpolyester))
• When washing a “machine-washableelectric blanket”, observe itsinstruction manual.
ºâ“∑’Ë “¡“√∂ —°‰¥â‚¥¬‰¡à∑”§«“¡‡ ’¬À“¬„Àâ°—∫„¬ºâ“
• “¡“√∂ —°ºâ“ª√–‡¿∑„¬ —߇§√“–À剥â
• ¢π“¥·≈–πÈ”Àπ—°150 ´¡. x 200 ´¡. πÈ”Àπ—°‰¡à‡°‘π 1.5 °°.(‰¡àµâÕß„™â∂ÿßµ“¢à“¬„π°“√´—°)174 ´¡. x 225 ´¡. πÈ”Àπ—°‰¡à‡°‘π 2.0 °°.(µâÕß„™â∂ÿßµ“¢à“¬„π°“√´—°)
ºâ“Àà¡∑’Ë “¡“√∂π”¡“ —°‰¥â
• ºâ“Àà¡∑’˵‘¥©≈“°«à“´—°¥â«¬¡◊Õ
• ºâ“Àà¡∑’Ë∑”®“°Õ–§√‘≈‘§, ºâ“∑Õ ´÷Ëß∑”®“°Õ–§√‘≈‘§·≈– ‚æ≈’‡Õ ‡µÕ√å (∑’Ë¡’πÈ”Àπ—° 1.6 °°. x 3 ™‘Èπ(Õ–§√‘≈‘§ À√◊Õ‚æ≈’‡Õ ‡µÕ√å))
• ‡¡◊ËÕ∑”°“√´—°ºâ“ÀࡉøøÑ“ §«√¥Ÿ§Ÿà¡◊Õª√–°Õ∫
Other machine-washable items
• Bed pad with “Hand Washing”label
• Cushion with “Hand Washing”label (which is stuffed withsynthetic fiber, such aspolyester).
ºâ“Õ◊ËπÊ ∑’Ë “¡“√∂´—°‰¥âºâ“Õ◊ËπÊ ∑’Ë “¡“√∂´—°‰¥â
• øŸ°À√◊Õ∑’ËπÕπ∑’˵‘¥©≈“°«à“ —°¥â«¬¡◊Õ
• À¡Õπ∑”¥â«¬„¬ —߇§√“–Àå
14
3WPL062081-5
Washing Comforters, Blanket, Bedspread (BLANKET Course) (Cont.)¢—ÈπµÕπ°“√´—°ºâ“Àà¡, ºâ“§≈ÿ¡‡µ’¬ß·≈–ºâ“™‘Èπ„À≠à (‚ª√·°√¡°“√´—°ºâ“Àà¡) (µàÕ)
Using the Washing NET°“√„™â∂ÿßµ“¢à“¬„π°“√ªíòπ·Àâß
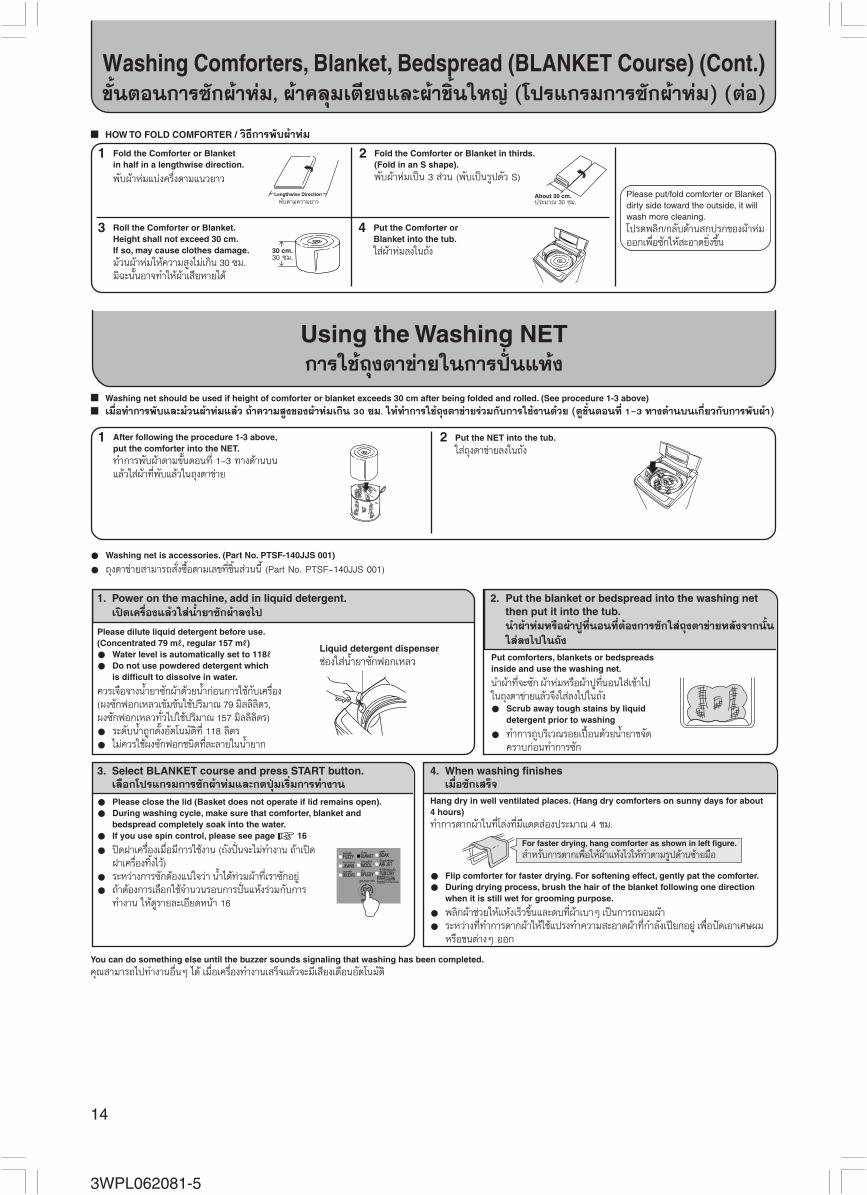
HOW TO FOLD COMFORTER / «‘∏’°“√æ—∫ºâ“Àà¡
• Washing net is accessories. (Part No. PTSF-140JJS 001)
• ∂ÿßµ“¢à“¬ “¡“√∂ —Ëß´◊ÈÕµ“¡‡≈¢∑’Ë™‘Èπ à«ππ’È (Part No. PTSF-140JJS 001)
Fold the Comforter or Blanketin half in a lengthwise direction.
æ—∫ºâ“Àà¡·∫àߧ√÷Ëßµ“¡·π«¬“«
Fold the Comforter or Blanket in thirds.(Fold in an S shape).æ—∫ºâ“Àࡇªìπ 3 à«π (æ—∫‡ªìπ√Ÿªµ—« S)
Roll the Comforter or Blanket.Height shall not exceed 30 cm.If so, may cause clothes damage.¡â«πºâ“Àà¡„À⧫“¡ Ÿß‰¡à‡°‘π 30 ¡.¡‘©–π—ÈπÕ“®∑”„Àâºâ“‡ ’¬À“¬‰¥â
After following the procedure 1-3 above,put the comforter into the NET.∑”°“√æ—∫ºâ“µ“¡¢—ÈπµÕπ∑’Ë 1-3 ∑“ߥâ“π∫π·≈â«„ àºâ“∑’Ëæ—∫·≈â«„π∂ÿßµ“¢à“¬
Put the Comforter orBlanket into the tub.„ àºâ“Àà¡≈ß„π∂—ß
Please put/fold comforter or Blanketdirty side toward the outside, it willwash more cleaning.
‚ª√¥æ≈‘°/°≈—∫¥â“π °ª√°¢Õߺâ“Àà¡ÕÕ°‡æ◊ËÕ´—°„Àâ –Õ“¥¬‘Ëߢ÷Èπ
ª√–¡“≥ 30 ´¡.About 30 cm.
1 2
3
1
4
1. Power on the machine, add in liquid detergent.‡ªî¥‡§√◊ËÕß·≈â«„ àπÈ”¬“´—°ºâ“≈߉ª
2. Put the blanket or bedspread into the washing netthen put it into the tub.π”ºâ“Àà¡À√◊պ⓪Ÿ∑’ËπÕπ∑’˵âÕß°“√´—°„ à∂ÿßµ“¢à“¬À≈—ß®“°π—Èπ
„ à≈߉ª„π∂—ßPlease dilute liquid detergent before use.(Concentrated 79 mS, regular 157 mS)
• Water level is automatically set to 118S
• Do not use powdered detergent whichis difficult to dissolve in water.
§«√‡®◊Õ®“ßπÈ”¬“´—°ºâ“¥â«¬πÈ”°àÕπ°“√„™â°—∫‡§√◊ËÕß(ºß —°øÕ°‡À≈«‡¢â¡¢âπ„™âª√‘¡“≥ 79 ¡‘≈≈‘≈‘µ√,ºß´—°øÕ°‡À≈«∑—Ë«‰ª„™âª√‘¡“≥ 157 ¡‘≈≈‘≈‘µ√)
• √–¥—∫πÈ”∂Ÿ°µ—ÈßÕ—µ‚π¡—µ‘∑’Ë 118 ≈‘µ√
• ‰¡à§«√„™âºß´—°øÕ°™π‘¥∑’Ë≈–≈“¬„ππÈ”¬“°
Liquid detergent dispenser™àÕß„ àπÈ”¬“´—°øÕ°‡À≈« Put comforters, blankets or bedspreads
inside and use the washing net.
π”ºâ“∑’Ë®–´—° ºâ“Àà¡À√◊պ⓪Ÿ∑’ËπÕπ„ à‡¢â“‰ª„π∂ÿßµ“¢à“¬·≈â«®÷ß„ à≈߉ª„π∂—ß• Scrub away tough stains by liquid
detergent prior to washing
• ∑”°“√∂Ÿ∫√‘‡«≥√Õ¬‡ªóôÕπ¥â«¬πÈ”¬“¢®—¥§√“∫°àÕπ∑”°“√ —°
Washing net should be used if height of comforter or blanket exceeds 30 cm after being folded and rolled. (See procedure 1-3 above)
‡¡◊ËÕ∑”°“√æ—∫·≈–¡â«πºâ“Àà¡·≈â« ∂ⓧ«“¡ Ÿß¢Õߺâ“Àࡇ°‘π 30 ´¡. „Àâ∑”°“√„™â∂ÿßµ“¢à“¬√à«¡°—∫°“√„™âß“π¥â«¬ (¥Ÿ¢—ÈπµÕπ∑’Ë 1-3 ∑“ߥâ“π∫π‡°’Ë¬«°—∫°“√æ—∫ºâ“)
Put the NET into the tub.
„ à∂ÿßµ“¢à“¬≈ß„π∂—ß2
3. Select BLANKET course and press START button.‡≈◊Õ°‚ª√·°√¡°“√ —°ºâ“Àà¡·≈–°¥ªÿÉ¡‡√‘Ë¡°“√∑”ß“π
4. When washing finishes‡¡◊ËÕ´—°‡ √Á®
• Please close the lid (Basket does not operate if lid remains open).
• During washing cycle, make sure that comforter, blanket andbedspread completely soak into the water.
• If you use spin control, please see page 16
• ªî¥Ω“‡§√◊ËÕ߇¡◊ËÕ¡’°“√„™âß“π (∂—ߪíòπ®–‰¡à∑”ß“π ∂Ⓡªî¥Ω“‡§√◊ËÕß∑‘È߉«â)
• √–À«à“ß°“√´—°µâÕß·πà„®«à“ πÈ”‰¥â∑à«¡ºâ“∑’ˇ√“´—°Õ¬Ÿà
• ∂⓵âÕß°“√‡≈◊Õ°„™â®”π«π√Õ∫°“√ªíòπ·Àâß√à«¡°—∫°“√∑”ß“π „À⥟√“¬≈–‡Õ’¬¥Àπâ“ 16
• Flip comforter for faster drying. For softening effect, gently pat the comforter.
• During drying process, brush the hair of the blanket following one directionwhen it is still wet for grooming purpose.
• æ≈‘°ºâ“™à«¬„Àâ·Àâ߇√Á«¢÷Èπ·≈–µ∫∑’˺Ⓡ∫“Ê ‡ªìπ°“√∂πÕ¡ºâ“
• √–À«à“ß∑’Ë∑”°“√µ“°ºâ“„Àℙⷪ√ß∑”§«“¡ –Õ“¥ºâ“∑’Ë°”≈—߇ªï¬°Õ¬Ÿà ‡æ◊ËÕªí¥‡Õ“‡»…º¡À√◊Õ¢πµà“ßÊ ÕÕ°
Hang dry in well ventilated places. (Hang dry comforters on sunny days for about4 hours)∑”°“√µ“°ºâ“„π∑’Ë‚≈àß∑’Ë¡’·¥¥ àÕߪ√–¡“≥ 4 ™¡.
For faster drying, hang comforter as shown in left figure.
”À√—∫°“√µ“°‡æ◊ËÕ„Àâºâ“·Àâ߉«„Àâ∑”µ“¡√Ÿª¥â“π´â“¬¡◊Õ
You can do something else until the buzzer sounds signaling that washing has been completed.§ÿ≥ “¡“√∂‰ª∑”ß“πÕ◊ËπÊ ‰¥â ‡¡◊ËÕ‡§√◊ËÕß∑”ß“π‡ √Á®·≈â«®–¡’‡ ’¬ß‡µ◊ÕπÕ—µ‚π¡—µ‘

15
3WPL062081-5
3. Open the Air Jet lid.‡ªî¥Ω“ªíòπ·Àâß摇»…
2. Press the START/PAUSE button and add in thedetergent and close the lid. / °¥ªÿÉ¡‡√‘Ë¡°“√∑”ß“π
START/PAUSE ·≈–„ àºß´—°øÕ°ªî¥Ω“‡§√◊ËÕß
1. Turn the power switch ON and select the Air Jet course.°¥ªÿÉ¡‡ªî¥‡§√◊ËÕß·≈–‡≈◊Õ°‚ª√·°√¡ªíòπ·Àâß摇»…
• If you need to change Air Jet time, push program button. Time will change automatically to 15, 45, 90 min.
• If you use spin control, please see page 16.
• If delay start is selected before Air Jet course, LED above delay button will blink to distinguishAir Jet time from delay start time.
• ∂⓵âÕß°“√‡ª≈’ˬπ‡«≈“„π°“√ªíòπ·Àâß摇»…„Àâ°¥ªÿÉ¡‚ª√·°√¡∑’≈–§√—Èß ‡«≈“°Á®–‡ª≈’ˬπÕ—µ‚π¡—µ‘ 15, 45, 90 π“∑’
• ∂⓵âÕß°“√‡≈◊Õ°„™â®”π«π√Õ∫°“√ªíòπ·Àâß√à«¡°—∫°“√∑”ß“π„À⥟√“¬≈–‡Õ’¬¥Àπâ“ 16
• ∂â“∑”°“√°¥ªÿÉ¡µ—È߇«≈“ —°≈à«ßÀπâ“°àÕπ°“√‡≈◊Õ°‚ª√·°√¡°“√ªíòπ·Àâß摇»… ™àÕ߉ø∑’ËÕ¬Ÿà¢â“ß∫πªÿÉ¡°¥µ—È߇«≈“ —°≈à«ßÀπâ“®–°–æ√‘∫ ‡æ◊ËÕ∑”°“√·¬°∂÷߇«≈“„π°“√ªíòπ·Àâß摇»…·≈–‡«≈“„π°“√µ—È߇«≈“ —°≈à«ßÀπâ“
You can do something else until thebuzzer sounds signaling that washinghas been completed.§ÿ≥ “¡“√∂‰ª∑”ß“πÕ¬à“ßÕ◊Ëπ‰¥â ‡¡◊ËÕ‡§√◊ËÕß∑”ß“π‡ √Á®®–¡’‡ ’¬ß‡µ◊Õπ¥—ߢ÷ÈπÕ—µ‚π¡—µ‘
Air Jet lid
Ω“ªíòπ·Àâß摇»…
Detail Washing (SOAK Course)√“¬≈–‡Õ’¬¥„π°“√∑”ß“π (‚ª√·°√¡°“√·™àºâ“)
This course is designed to soak load for 1, 3 or 5 hours for thorough washing without causing any damages.( 18 for details)‚ª√·°√¡π’ȉ¥â∂Ÿ°ÕÕ°·∫∫¡“„Àâ “¡“√∂‡≈◊Õ°∑”°“√·™àºâ“‰¥â 1, 3 À√◊Õ 5 ™—Ë«‚¡ß ‡æ◊ËÕÀ≈’°‡≈’ˬߧ«“¡‡ ’¬À“¬¢Õߺâ“
(¥Ÿ√“¬≈–‡Õ’¬¥Àπâ“ 18)
What is SOAK course? ‚ª√·°√¡°“√·™àºâ“∑‘È߉«â§◊ÕÕ–‰√?
Soaking means to soak laundry load with gentle water currents to thoroughly wash heavily stained parts such as collars and cuffs.°“√·™àºâ“∑‘È߉«â§◊Õ°“√·™à‡ ◊ÈÕºâ“∑‘È߉«â„ππÈ”‡æ◊ËÕ∑’Ë®–¢®—¥§√“∫ °ª√°Õ¬à“ß≈–‡Õ’¬¥ ‡™àπ √Õ¬‡ªóôÕπ∑’ËÕ¬Ÿàµ“¡§Õ‡ ◊ÈÕ·≈–ª≈“¬·¢π‡ ◊ÈÕ‡ªìπµâπ
Precautions / ¢âÕ§«√√–¡—¥√–«—ß
• Please do not wash clothes of easily-fadeaway colors.
• ‰¡à§«√∑”°“√´—°‚ª√·°√¡π’È°—∫ºâ“∑’Ë ’µ°‰¥âßà“¬
It’s an economic mode of drying without heating.
• Keep room free of mugginess so that temperature will not rise. Be able to control the black mildew in the washing tub. ‡ªìπ‚ª√·°√¡¢Õß°“√ªíòπ·Àâß‚¥¬„™â≈¡∑’˪√“»®“°§«“¡√âÕπ
• §«√„™â„π ∂“π∑’Ë∑’Ë¡’Õ“°“»∂à“¬‡∑ –¥«° ‡æ◊ËÕÀ≈’°‡≈’ˬßÕÿ≥À¿Ÿ¡‘∑’Ë Ÿß “¡“√∂§«∫§ÿ¡‡™◊ÈÕ√“„π∂—ß´—°
You can do something else until the buzzer sounds signaling that washing has been completed.§ÿ≥ “¡“√∂‰ª∑”ß“πÕ◊ËπÊ ‰¥â ‡¡◊ËÕ‡§√◊ËÕß∑”ß“π‡ √Á®·≈â«®–¡’‡ ’¬ß‡µ◊ÕπÕ—µ‚π¡—µ‘
1. Press power button and select SOAK course.°¥ªÿÉ¡°“√∑”ß“π·≈⫇≈◊Õ°‚ª√·°√¡¢Õß°“√·™àºâ“
2. Press STARTbutton/°¥ªÿÉ¡‡√‘Ë¡
°“√∑”ß“π
3. Pour in powdered detergent and closethe lid. / ‡ªî¥Ω“‡æ◊ËÕ∑”°“√„ àºß´—°øÕ°·≈â«
ªî¥Ω“‡§√◊ËÕ߇æ◊ËÕ‡√‘Ë¡°“√∑”ß“π
• Soak time setting is 1 hr. automatically.
• If you need to change soak time, pushprogram button. Time will changeautomatically to 1, 3, 5 hr.
• If delay start is selected before soakcourse, LED above delay button will blinkto distinguish soak time from delay start time.
• If you use spin control, please see page 16.
• ‡«≈“„π°“√·™àºâ“®–µ—È߉«â∑’Ë 1 ™—Ë«‚¡ß ‚¥¬Õ—µ‚π¡—µ‘
• ∂⓵âÕß°“√‡ª≈’ˬπ‡«≈“„π°“√·™àºâ“„Àâ°¥ªÿÉ¡‚ª√·°√¡∑’≈–§√—È߇«≈“°Á®–‡ª≈’Ë¬π‚¥¬Õ—µ‚π¡—µ‘ 1, 3, 5 ™—Ë«‚¡ß
• ∂â“∑”°“√°¥ªÿÉ¡µ—È߇«≈“ —°≈à«ßÀπâ“°àÕπ°“√‡≈◊Õ°‚ª√·°√¡ °“√·™àºâ“ ™àÕ߉ø∑’ËÕ¬Ÿà¢â“ß∫πªÿÉ¡°¥µ—È߇«≈“´—°≈à«ßÀπâ“®–°–æ√‘∫ ‡æ◊ËÕ∑”°“√·¬°∂÷߇«≈“„π°“√·™àºâ“·≈–‡«≈“„π°“√µ—È߇«≈“´—°≈à«ßÀπâ“
• ∂⓵âÕß°“√‡≈◊Õ°„™â®”π«π√Õ∫°“√ªíòπ·Àâß√à«¡°—∫°“√∑”ß“π„À⥟√“¬≈–‡Õ’¬¥Àπâ“ 16
To prevent wrinkles, this mode only spins in timedcycle.
• To set spin manually 20‡æ◊ËÕªÑÕß°—πºâ“¬—∫‡§√◊ËÕß®–µ—È߇«≈“ªíòπ·Àâ߇©æ“–‚ª√·°√¡∑’˵—È߇«≈“‡ √Á®≈à«ßÀπâ“·≈⫇∑à“π—Èπ
• µ—Èß°“√ªíòπ·∫∫∏√√¡¥“„À⥟Àπâ“ 20
According to the recommended detergent quantity(as a rough measure) indicated on the control panel, putthe measured detergent into the Detergent Dispenser.
‡µ‘¡ª√‘¡“≥¢Õßºß —°øÕ°µ“¡µ—«‡≈¢∑’Ë· ¥ß‰«â
Spinning with blowing air (Air Jet Course)°“√ªíòπ·Àâß‚¥¬°“√∂à“¬‡∑¢Õß≈¡ (‚ª√·°√¡°“√ªíòπ·Àâß摇»…)

16
3WPL062081-5
Spinning with blowing air (Air Jet Course) (Cont.)°“√ªíòπ·Àâß‚¥¬°“√∂à“¬‡∑¢Õß≈¡ (‚ª√·°√¡°“√ªíòπ·Àâß摇»…) (µàÕ)
Laundries not applicable to Air-Jet
• Comforters and blankets
• Shoes
• Laundries inclined to decolor
• Laundries with the label for washing
• Laundries inclined to be reshaped.
ºâ“∑’ˉ¡à§«√„™â°—∫°“√ªíòπ·Àâß摇»…•ºâ“æ—π§Õ·≈–ºâ“Àà¡• √Õ߇∑â“•ºâ“∑’Ë ’µ°•ºâ“∑’Ë¡’‡§√◊ËÕßÀ¡“¬ ”À√—∫´—°•ºâ“∑’˧àÕπ¢â“ß√—¥√Ÿª¡’∑√«¥∑√ß
• Excessive use of detergent may cause insufficient Air-Jet or unexpected corrugations.
•°“√„™âºß´—°øÕ°¡“°‡°‘π‰ªÕ“®¡’º≈µàÕ°“√ªíòπ·ÀâßÀ√◊Õ∑”„Àâºâ“¬àπ• Please never handle the waterproof laundries with Air-Jet mode.
• ‰¡à§«√„™â°—∫ºâ“°—πΩπ„π°√–∫«π°“√∑”ß“ππ’È
When using other program without setting Air-Jet process, take out the laundries afterwashing process, rearrange them evenly and then put them into the washing tub. Pressthe Air-Jet button to set the Air-Jet duration and cancel washing and rinsing process.Press the START button to start operation.
Attention / °“√¥Ÿ·≈
• Please rearrange the laundries well before putting them into the washing tub.
•§«√®—¥ºâ“„Àâ ¡¥ÿ≈°àÕπ„ à≈ß„π∂—ßExcessive or poorly-rearranged laundries may cause operation failure.
∂â“°“√®—¥ºâ“‰¡à ¡¥ÿ≈Õ“®∑”„Àâ°“√∑”ß“π¢Õ߇§√◊ËÕß´—°ºâ“¢—¥¢âÕß
• Please pause the operation after the operation failure, reduce the amount of laundry and correct the laundrydeclination or enwinding, then press the start button. If the failure remains after repeating the above procedure2 or 3 times, please contact an authorized service dealer.
• „ÀâÀ¬ÿ¥°“√„™âß“π™—Ë«§√“«¿“¬À≈—ß∑’Ë°“√∑”ß“π¢Õ߇§√◊ËÕߺ‘¥ª°µ‘ ·≈–≈¥®”π«πºâ“∑’˪íòπ·Àâß≈ß·≈–®—¥„Àâ ¡¥ÿ≈·≈â«°¥ªÿÉ¡ START ∂⓬—ߢ—¥¢âÕßÕ’°À≈—ß®“°∑”´È” 2-3 §√—Èß °√ÿ≥“µ‘¥µàÕ»Ÿπ¬å∫√‘°“√‡æ◊ËÕ∑”°“√·°â‰¢µàÕ‰ª
Laundry Load and Detergent Amountª√‘¡“≥°“√„™âºß —°øÕ°·≈–πÈ”Àπ—°¢Õߺâ“∑’Ë®– —°
CAUTION / ¢âÕ§«√√–«—ß
‡¡◊ËÕ¡’°“√„™â‚ª√·°√¡Õ◊ËπÕ¬Ÿà ‚¥¬∑’ˉ¡à‰¥âµ—Èß°“√ªíòπ·Àâß摇»…‰«â „Àâπ”ºâ“ÕÕ°®“°∂—ßÀ≈—ß®“°∑’Ë —°‡ √Á® ·≈â«„ à‡¢â“‰ª„À¡à ‚¥¬°“√®—¥ºâ“„À≥⠡¥ÿ≈„π∂—ß´—° ·≈⫇≈◊Õ°°“√ªíòπ·Àâß摇»… ·≈–¬°‡≈‘°°“√ —°·≈–°“√≈â“ßÕÕ°®“°‚ª√·°√¡
How to use Spin Control«‘∏’°“√‡≈◊Õ°®”π«π√Õ∫°“√ªíòπ·Àâß
You can choose from three rotating spin speeds according to how you wish your laundry to be done, 400 rpm is for gentle finish, 600 rpm is for fluffy finish, and 800 rpm is for thorough dried finish.
§ÿ≥ “¡“√∂‡≈◊Õ°®”π«π√Õ∫°“√ªíòπ·Àâ߉¥â 3 √–¥—∫ µ“¡™π‘¥¢Õߺâ“∑’˧ÿ≥µâÕß°“√§◊Õ 400 √Õ∫/π“∑’ ”À√—∫ºâ“∑’Ë∫Õ∫∫“ß 600 √Õ∫/π“∑’ ”À√—∫ºâ“∑’Ëπÿà¡øŸ ·≈– 800 √Õ∫/π“∑’ ”À√—∫ºâ“Àπ“∑’Ë
µâÕß°“√„Àâ·Àâ߇√Á«‡µÁ¡ª√– ‘∑∏‘¿“æ
3. Press the START/PAUSE button and put thedetergent and close the lid. / °¥ªÿÉ¡‡√‘Ë¡°“√∑”ß“π
START/PAUSE ·≈–„ àºß´—°øÕ°ªî¥Ω“‡§√◊ËÕß
1. Turn the power switch ON and select the favoritecourse. / °¥ªÿÉ¡‡ªî¥‡§√◊ËÕß·≈–‡≈◊Õ°‚ª√·°√¡∑’˵âÕß°“√
You can do something else until the buzzer sounds signaling that washing has been completed.
§ÿ≥ “¡“√∂‰ª∑”ß“πÕ¬à“ßÕ◊Ëπ‰¥â ‡¡◊ËÕ‡§√◊ËÕß∑”ß“π‡ √Á®®–¡’‡ ’¬ß‡µ◊Õπ¥—ߢ÷ÈπÕ—µ‚π¡—µ‘
• The detergent quantity (rough measure) indication is determined based on one measuring spoon with the max.capacity of about 35g (for such detergent that 20g is enough to wash laundry at 30L water level)If you are using a different measuring spoon from the said one, use a proper amount of detergent which is suitablefor the desired water level, in accordance with the instruction of your detergent.
• For washing lightly stained laundry, amount of detergent which is almost one-half the normal quantity (approx. 50 to60%) will do.
• Do not use excessive amount of detergent. Otherwise, it may result in poor rinsing performance or excessive foamswhich may cause some trouble.
•ª√‘¡“≥ºß´—°øÕ° (‚¥¬ª√–¡“≥) §”π«≥®“°™âÕπµ«ß∑’Ë¢π“¥ 35 °√—¡ ( ÷Ëߺߴ—°øÕ° 20 °√—¡ “¡“√∂´—°ºâ“∑’Ë√–¥—∫πÈ” 30 ≈‘µ√) ∂⫬µ«ßª√‘¡“≥¢Õߺߴ—°øÕ°Õ“®®–‰¡à‡∑à“°—π·≈â«·µà∫√‘…—∑ºŸâº≈‘µ §«√∑”°“√µ«ßµ“¡¢π“¥∑’Ë√–∫ÿ¢â“ß°≈àÕß
• „π°“√´—°ºâ“∑’Ë °ª√°πâÕ¬ ®–„™âª√‘¡“≥ºß´—°øÕ°πâÕ¬°«à“ª°µ‘§√÷ËßÀπ÷Ëß (ª√–¡“≥ 50-60%)
• ‰¡à§«√„™âºß —°øÕ°ª√‘¡“≥¡“°‡°‘π‰ª ¡‘©–π—Èπ ºâ“®–≈â“߉¡à –Õ“¥ À√◊Õ¡’øÕß¡“°‡°‘π‰ª
Amount of laundry
ª√‘¡“≥ºâ“∑’Ë´—°• Amount of laundry as shown in the table above may vary according to the type, size
and thickness of the laundry to be washed.
• When normal clothes are washed the approximate amount of washing load is about 70to 80 percent of the amount indicated. If the clothes stop moving, it means that the loadis too large. Adjust the load by looking at how the clothes are moving in the machine.
•ª√‘¡“≥ºâ“∑’Ë· ¥ß‰«â “¡“√∂‡ª≈’ˬπ·ª≈߉¥âµ“¡§«“¡Àπ“, ¢π“¥·≈–™π‘¥¢Õ߇ ◊ÈÕºâ“
• ‡ ◊ÈÕºâ“∑’Ëπ”„ à≈߉ª„π∂—ß §«√®–ª√–¡“≥ 70-80% ¢ÕßπÈ”Àπ—°∑’Ë· ¥ß‰«â∑’˵“√“ß ∂⓺Ⓣ¡à‡§≈◊ËÕπ‰À«· ¥ß«à“„ àºâ“¡“°‡°‘π‰ª ·≈â«∑”°“√≈¥ª√‘¡“≥ºâ“≈ß®πºâ“‡§≈◊ËÕπ‰À«‰¥â¥’
2. Press the spin control button toselect the spin speed. / °¥ªÿÉ¡
‡≈◊Õ°®”π«π√Õ∫¢Õß°“√ªíòπ·Àâß
• Maximum mass of dry cloth 16 kg. •§«“¡®ÿ„π°“√ —° Ÿß ÿ¥ 16 °°.
400 rpm is for gentle finish. Gentle spin drying isfor lingerie and clothes made of delicate fabricsthat may easily stretch and lose their shape.
400 √Õ∫ ”À√—∫ºâ“∫Õ∫∫“ß ‡ªìπ°“√ªíòπ·Àâß∑’Ëπÿà¡π«≈‡À¡“– ”À√—∫‡ ◊Èպ⓷≈–°“߇°ß¢Õß µ√’∑’Ë∑”®“°ºâ“‰À¡, ºâ“ΩÑ“¬·≈–ºâ“∑’ˇ ’¬√Ÿª‰¥âßà“¬
600 rpm is for fluffy finish, leaving clothes soft andbouncy. This is the ideal spin dry speed for shirts,woolens and items that wrinkle easily.
600 √Õ∫ ”À√—∫ºâ“∑’Ëπÿà¡øŸ ‡ªìπ°“√ªíòπ·Àâß∑’ˇÀ¡“–∑’Ë ÿ¥ ”À√—∫‡ ◊ÈÕ‡™‘ȵ, ºâ“¢π·°–·≈–ºâ“∑’ˬ—∫ßà“¬
800 rpm is for thorough dried finish. It can quickly andthoroughly dry hard-to-dry items made of tougherfabrics such as jeans and blankets.
800 √Õ∫ ”À√—∫ºâ“Àπ“∑’˵âÕß°“√„Àâ·Àâ߇√Á«‡µÁ¡ª√– ‘∑∏‘¿“æ ‡ªìπ°“√ªíòπ·Àâß∑’Ë√«¥‡√Á«·≈– ¡∫Ÿ√≥å·∫∫‡À¡“– ”À√—∫ºâ“∑’ËÀπ“ ‡™àπ °“ß‡°ß¬’π·≈–ºâ“Àà¡
2.0 spoonful quantity
1.8 spoonful quantity
1.6 spoonful quantity
1.4 spoonful quantity
1.3 spoonful quantity
1.2 spoonful quantity
1.1 spoonful quantity
1.0 spoonful quantity
0.9 spoonful quantity
0.8 spoonful quantity
0.7 spoonful quantity
0.6 spoonful quantity
16 °°.
14 °°.
12 °°.
9 °°.
8 °°.
7 °°.
6 °°.
5 °°.
4 °°.
3 °°.
2 °°.
16 kg
14 kg
12 kg
9 kg
8 kg
7 kg
6 kg
5 kg
4 kg
3 kg
2 kg
1.7 °°.1.7 kg
118 ≈‘µ√
110 ≈‘µ√
105 ≈‘µ√
93 ≈‘µ√
87 ≈‘µ√
80 ≈‘µ√
75 ≈‘µ√
70 ≈‘µ√
64 ≈‘µ√
59 ≈‘µ√
53 ≈‘µ√
48 ≈‘µ√
118L
110L
105L
93L
87L
80L
75L
70L
64L
59L
53L
48L
157 °√—¡/¡‘≈≈‘≈‘µ√
147 °√—¡/¡‘≈≈‘≈‘µ√
140 °√—¡/¡‘≈≈‘≈‘µ√
124 °√—¡/¡‘≈≈‘≈‘µ√
116 °√—¡/¡‘≈≈‘≈‘µ√
107 °√—¡/¡‘≈≈‘≈‘µ√
100 °√—¡/¡‘≈≈‘≈‘µ√
93 °√—¡/¡‘≈≈‘≈‘µ√
85 °√—¡/¡‘≈≈‘≈‘µ√
79 °√—¡/¡‘≈≈‘≈‘µ√
71 °√—¡/¡‘≈≈‘≈‘µ√
64 °√—¡/¡‘≈≈‘≈‘µ√
157 g/ml
147 g/ml
140 g/ml
124 g/ml
116 g/ml
107 g/ml
100 g/ml
93 g/ml
85 g/ml
79 g/ml
71 g/ml
64 g/ml
79 °√—¡
73 °√—¡
70 °√—¡
62 °√—¡
58 °√—¡
53 °√—¡
50 °√—¡
47 °√—¡
43 °√—¡
39 °√—¡
35 °√—¡
32 °√—¡
79 g
73 g
70 g
62 g
58 g
53 g
50 g
47 g
43 g
39 g
35 g
32 g
2.0 ™âÕπµ«ß
1.8 ™âÕπµ«ß
1.6 ™âÕπµ«ß
1.4 ™âÕπµ«ß
1.3 ™âÕπµ«ß
1.2 ™âÕπµ«ß
1.1 ™âÕπµ«ß
1.0 ™âÕπµ«ß
0.9 ™âÕπµ«ß
0.8 ™âÕπµ«ß
0.7 ™âÕπµ«ß
0.6 ™âÕπµ«ß
Load size
πÈ”Àπ—°¢Õߺâ“∑’Ë®–´—°Water level
ª√‘¡“≥πÈ”
Compact type (1 cup / 35 g)
™π‘¥‡¢â¡¢âπ (1 ∂⫬ / 35 °√—¡) Conventional type (1 cup / 75 g)
™π‘¥∑—Ë«‰ª (1 ∂⫬ / 75 °√—¡)Detergent qty. (rough measure)
ª√‘¡“≥ºß´—°øÕ° (‚¥¬ª√–¡“≥)Powder / ºß´—°øÕ°
0.5 spoonful quantity1.5 °°.1.5 kg32 ≈‘µ√32L 43 °√—¡/¡‘≈≈‘≈‘µ√43 g/ml21 °√—¡21 g0.5 ™âÕπµ«ß

17
3WPL062081-5
Using the Timer for Washing°“√µ—È߇«≈“´—°≈à«ßÀπâ“
Finishing time can be set to 3-12 hours later. This convenient function is designed to wash clothes when you go out orwash during night time and dry in the morning. (BLANKET, WOOL, TUB DRY, TUB CLEAN course cannot be used withtimer)
• If “SOAK” course is reserved in advance to start operation at the preset time, a quiet washing operation can beperformed even in the midnight.
„π°“√ —Ëß∑”ß“π§ÿ≥ “¡“√∂µ—È߉¥â¿“¬„π 3-12 ™¡. ‚¥¬∂Ÿ°ÕÕ°·∫∫„Àâ¡’§«“¡ –¥«°µàÕ°“√„™âß“π ‡¡◊ËÕ‡«≈“§ÿ≥ÕÕ°πÕ°∫â“π À√◊Õ
„π™à«ß∑’Ëæ—°ºàÕπµÕπ°≈“ߧ◊π ·≈– “¡“√∂𔉪µ“°·Àâ߉¥â„πµÕπ‡™â“ (‚ª√·°√¡´—°ºâ“Àà¡, ºâ“¢π —µ«å, ∑”„Àâ∂—ß´—°·Àâß ·≈–∑”§«“¡
–Õ“¥∂—ß —° ‰¡à “¡“√∂„™â°—∫°“√µ—È߇«≈“‰¥â)
• ∂⓵—Èß‚ª√·°√¡ çSOAKé ‰«â·≈–°¥ªÿÉ¡‡√‘Ë¡°“√∑”ß“π “¡“√∂∑’Ë®–µ—È߇«≈“∑”ß“π„π‡«≈“°≈“ߧ◊π‰¥â
2. Select finishing time.µ—È߇«≈“„Àâ´—°‡ √Á®µ“¡‡«≈“∑’˵âÕß°“√
1. Press power button and load laundry.°¥ªÿÉ¡°“√∑”ß“π·≈–„ àºâ“∑’Ë®–´—°≈߉ª
4. Put the detergent in and close the lid.‡ªî¥Ω“™àÕß„ àºß´—°øÕ°‡æ◊ËÕ∑”°“√„ àºß´—°øÕ°·≈⫪î¥Ω“‡§√◊ËÕ߇¡◊ËÕ‡√‘Ë¡°“√
∑”ß“π
Hold the bulge part at the edge of the detergent dispenser and open it to fillin powder detergent.
• For concentrat powder detergent only.
• Put the dispenser back in position after timed washing finishes.
®—∫ à«π¢Õ∫∑’ËπŸπÕÕ°¡“·≈â«π”ºß —°øÕ°„ à‡¢â“‰ª„À⇵Á¡µ“¡‰ø∑’Ë· ¥ßª√‘¡“≥ºß´—°øÕ°• ”À√—∫ºß —°øÕ°™π‘¥‡¢â¡¢âπ‡∑à“π—Èπ• ªî¥Ω“™àÕß„ àºß´—°øÕ°„Àâ‡À¡◊Õπ‡¥‘¡
À≈—ß®“°∑”°“√ —°‡ √Á®
Caution / ¢âÕ§«√√–«—ß
• Make sure that the detergent dispenser is dry, otherwise, detergent maystick on the surface.
• ‰¡à§«√„Àâ™àÕ߇µ‘¡ºß´—°øÕ°‡ªï¬° ‡æ√“–®–∑”„Àâºß´—°øÕ°µ°§â“߇°“–°—∫º‘«¿“¬„π™àÕß„ à
• Select finishing time by pressing the delay timer button.
• Indicator shows finishing time if timer LED is on.
• Indicator shows other than finishing time if timer LED is blinking.
• ‡≈◊Õ°‡«≈“∑’Ë®–„™â„π°“√∑”ß“π ‚¥¬°¥‡æ’¬ßªÿÉ¡µ—È߇«≈“
• ∂â“™àÕ߉ø¢Õ߇«≈“´—°≈à«ßÀπâ“ «à“ß®–· ¥ß —≠≈—°…≥åµ—«‡≈¢¢Õ߇«≈“∑’Ë∑”ß“π‡ √Á®
• ∂â“™àÕ߉ø¢Õ߇«≈“´—°≈à«ßÀπâ“°–æ√‘∫®–· ¥ß —≠≈—°…≥åµ—«‡≈¢¢Õߧà“Õ◊ËπÊ
3. Select the PROGRAM and press the START/PAUSE button.‡≈◊Õ°‚ª√·°√¡°“√ —° ·≈–°¥ªÿÉ¡°“√∑”ß“π
Detergentdispenser™àÕß„ àºß´—°øÕ°• Pulsator rotates for 15 seconds and the
recommended amount of detergent will beindicated.
• All other indicators are off except timer indicator.
• „∫æ—¥À¡ÿπ 15 «‘π“∑’ ·≈⫉ø®–· ¥ßª√‘¡“≥ºß´—°øÕ°∑’˧«√„™â
• ‰ø· ¥ßÕ◊ËπÊ ®–¥—∫¬°‡«âπ‰ø· ¥ß°“√µ—È߇«≈“®–µ‘¥
12 hours later 12 ™¡. „ÀâÀ≈—ß
3 hours later 3 ™¡. „ÀâÀ≈—ß
No setup ‰¡àµ—È߇«≈“
Precautions / ¢âÕ§«√√–¡—¥√–«—ß
• The timer operation will be cancelled whenelectricity shuts down.
• The actual washing time varies according todifferent types and quantities of laundry andamount of water injected, as a result, it maydiffer from the preset washing time slightly.
• To prevent wrinkles, take out and hang drylaundry as soon as washing finishes.
• °“√µ—È߇«≈“∑”ß“π “¡“√∂∂Ÿ°¬°‡≈‘° ∂â“°√–· ‰øøÑ“¢—¥¢âÕß
• „𧫓¡‡ªìπ®√‘ß·≈â« °“√´—°®–·µ°µà“ß°—π‰ªµ“¡™π‘¥, ª√‘¡“≥¢Õߺ⓷≈–ª√‘¡“≥¢ÕßπÈ”∑’Ë„ à≈߉ª
• °“√ªÑÕß°—πºâ“¬—∫π—Èπ‡¡◊ËÕ´—°‡ √Á®§«√π”ÕÕ°®“°‡§√◊ËÕß¡“·¢«π∑—π∑’
In the following cases
• To verify the time setup : Keep pressing the delay start button to checkprogress and remaining time.
• To cancel the timer washing process : Turn the power off.
• When water injection is slow (approximately below 10s / minute) or detergentremains in dispenser : Wrap powder detergent in a handkerchief and put it inthe middle of the basket. Make sure the detergent is not scattered.
‡¡◊ËÕµâÕß°“√‡ª≈’ˬπ·ª≈ßÀ√◊Õ¡’‡Àµÿ°“√≥套ßπ’È
• °“√µ—È߇«≈“°“√∑”ß“π : „Àâ°¥ªÿÉ¡µ—È߇«≈“°“√∑”ß“π·≈⫇™Á§¥Ÿ‚ª√·°√¡∑’ˉ¥âµ—È߉«â«à“‡À≈◊Õ‡«≈“Õ’°‡∑à“‰√
• °“√∑”°“√¬°‡≈‘°‡«≈“∑’˵—È߉«â„π°“√´—° : ªî¥ªÿÉ¡°“√∑”ß“π
• „π°√≥’∑’ËπÈ”‰À≈™â“ (µË”°«à“ 10S / π“∑’) À√◊պߴ—°øÕ°µ°§â“߇À≈◊ÕÕ¬Ÿà¢â“ß„π : „Àâ∑”°“√Ààպߴ—°øÕ°¥â«¬ºâ“‡™Á¥Àπâ“ ·≈–µâÕß·πà„®«à“ºß´—°øÕ°∂Ÿ°ÀàÕ‰«â¥’·≈â«‚¥¬∑’Ë®–‰¡à°√–®—¥°√–®“¬¢≥–´—° (‡æ√“–°“√ÀàÕ®–∑”„Àâª√– ‘∑∏‘¿“æ°“√≈–≈“¬¥’¢÷Èπ) ·≈–«“߉«âµ√ß°≈“ߢÕß∂—ߪíòπ

18
3WPL062081-5
BLANKET‚ª√·°√¡ —°ºâ“Àà¡
DELICATE‚ª√·°√¡∂πÕ¡ºâ“
SPEEDY‚ª√·°√¡√«¥‡√Á«
(4 Step Wash)(4 √–¥—∫)
WOOL‚ª√·°√¡
°“√ —°ºâ“¢π —µ«å
3 minutes3 π“∑’
(18 min., 15 min., 12 min., 9 min., 3 min.)(18 π“∑’, 15 π“∑’, 12 π“∑’, 9 π“∑’, 3 π“∑’)
9 minutes9 π“∑’
(18 min., 15 min., 12 min., 9 min., 3 min.)(18 π“∑’, 15 π“∑’, 12 π“∑’, 9 π“∑’, 3 π“∑’)
9 minutes9 π“∑’(Fixed)
(§à“§ß∑’Ë)
9 minutes9 π“∑’
(18 min., 15 min., 12 min., 9 min., 3 min.)(18 π“∑’, 15 π“∑’, 12 π“∑’, 9 π“∑’, 3 π“∑’)
Deep 2
≈â“ß·∫∫°—°‡°Á∫πÈ” 2 §√—Èß(Fixed)
(§à“§ß∑’Ë)
Extra rinse 1
≈â“ß·∫∫∂à“¬‡∑πÈ” 1 §√—Èß
Deep 2
≈â“ß·∫∫°—°‡°Á∫πÈ” 2 §√—Èß
Extra rinse 1
≈â“ß·∫∫∂à“¬‡∑πÈ” 1 §√—Èß
3 minute3 π“∑’
(9 min., 6 min., 3 m(9 π“∑’, 6 π“∑’, 3 π
6 minute6 π“∑’
(9 min., 6 min., 3 m(9 π“∑’, 6 π“∑’, 3 π
6 minute6 π“∑’
(9 min., 6 min., 3 m(9 π“∑’, 6 π“∑’, 3 π
3 minute3 π“∑’
(9 min., 6 min., 3 m(9 π“∑’, 6 π“∑’, 3
75S√–¥—∫ 75 ≈‘µ√(118S – 48S)
(√–¥—∫ 118 ≈‘µ√ - 48 ≈‘µ√)(12 Levels)(12 √–¥—∫)
118S√–¥—∫ 118 ≈‘µ√(118S – 48S)
(√–¥—∫ 118 ≈‘µ√ - 48 ≈‘µ√)(12 Levels)(12 √–¥—∫)
75S√–¥—∫ 75 ≈‘µ√(118S – 48S)
(√–¥—∫ 118 ≈‘µ√ - 48 ≈‘µ√)(12 Levels)(12 √–¥—∫)
75S√–¥—∫ 75 ≈‘µ√(118S – 48S)
(√–¥—∫ 118 ≈‘µ√ - 48 ≈‘µ√)(12 Levels)(12 √–¥—∫)
JEANS‚ª√·°√¡´—°ºâ“
°ª√°¡“°
(4 Step Wash)(4 √–¥—∫)
Deep 2
≈â“ß·∫∫°—°‡°Á∫πÈ” 2 §√—Èß(5 Levels)(5 √–¥—∫)
18 min. 18 π“∑’15 min. 15 π“∑’12 min. 12 π“∑’9 min. 9 π“∑’3 min. 3 π“∑’
Automatic setting water level: 118L-48LManual setting water level: 12 levels (118L-48L)
ª√—∫µ—Èß√–¥—∫πȔ՗µ‚π¡—µ‘: 118 ≈‘µ√ - 48 ≈‘µ√ª√—∫µ—Èß√–¥—∫πÈ”‡Õß: 12 √–¥—∫ (118 ≈‘µ√ - 48 ≈‘µ√)
118S118 ≈‘µ√
48S48 ≈‘µ√
9 min. 9 π“∑’
6 min. 6 π“∑’
3 min. 3 π“∑’
1 min. 1 π“∑’
ENERGY SAVE
ª√–À¬—¥‰ø
SMALL LOAD
‡ ◊ÈÕºâ“πâÕ¬
WATER SAVE
ª√–À¬—¥πÈ”(4 Step Wash)
(4 √–¥—∫)
FUZZY‚ª√·°√¡
Õ—µ‚π¡—µ‘
32S√–¥—∫ 32 ≈‘µ√(59S – 32S)
(√–¥—∫ 59 ≈‘µ√ - 32 ≈‘µ√)(4 Levels)(4 √–¥—∫)
9 minutes9 π“∑’(Fixed)
(§à“§ß∑’Ë)
44 min. (Fixed) 44 π“∑’ (§à“§ß∑’Ë)
Deep 1
≈â“ß·∫∫°—°‡°Á∫πÈ” 1 §√—Èß(Fixed)
(§à“§ß∑’Ë)
Spin shower rinse 1 ~Beat eco rinse 1
≈â“ß·∫∫∂—ßÀ¡ÿπ 1 §√—Èß ~≈â“ß·∫∫ª√–À¬—¥ 1 §√—Èß
6 minute6 π“∑’(Fixed)
(§à“§ß∑’Ë
(5 Levels)(5 √–¥—∫)
18 min. 18 π“∑’15 min. 15 π“∑’12 min. 12 π“∑’9 min. 9 π“∑’3 min. 3 π“∑’
9 min. 9 π“∑’
6 min. 6 π“∑’
3 min. 3 π“∑’
1 min. 1 π“∑’
Automatic setting water level: 118L-48LManual setting water level: 12 levels (118L-48L)
ª√—∫µ—Èß√–¥—∫πȔ՗µ‚π¡—µ‘: 118 ≈‘µ√ - 48 ≈‘µ√ª√—∫µ—Èß√–¥—∫πÈ”‡Õß: 12 √–¥—∫ (118 ≈‘µ√ - 48 ≈‘µ√)
118S118 ≈‘µ√
48S48 ≈‘µ√
1 Hr.1 ™—Ë«‚¡ß
3 Hr.3 ™—Ë«‚¡ß
5 Hr.5 ™—Ë«‚¡ß
60 min. (Fixed) 60 π“∑’ (§à“§ß∑’Ë)
180 min. (Fixed) 180 π“∑’ (§à“§ß∑’Ë)
300 min. (Fixed) 300 π“∑’ (§à“§ß∑’Ë)
SOAK‚ª√·°√¡
·™àºâ“
No spinn
‰¡àªíòπ·Àâ(9 min., 6 min., 3 m(9 π“∑’, 6 π“∑’, 3 π
15 min15 π“∑’45 min45 π“∑’90 min90 π“∑’
AIR JETªíòπ·Àâß
摇»…(4 StepWash)
(4 √–¥—∫)
Automatic setting water level: 118L-48LManual setting water level: 12 levels (118L-48L)
ª√—∫µ—Èß√–¥—∫πȔ՗µ‚π¡—µ‘: 118 ≈‘µ√ - 48 ≈‘µ√ª√—∫µ—Èß√–¥—∫πÈ”‡Õß: 12 √–¥—∫ (118 ≈‘µ√ - 48 ≈‘µ√)
118S118 ≈‘µ√
48S48 ≈‘µ√
118S√–¥—∫ 118 ≈‘µ√(118S – 48S)
(√–¥—∫ 118 ≈‘µ√ - 48 ≈‘µ√)(12 Levels)(12 √–¥—∫)
(5 Levels)(5 √–¥—∫)
18 min. 18 π“∑’15 min. 15 π“∑’12 min. 12 π“∑’9 min. 9 π“∑’3 min. 3 π“∑’
Spin shower rinse 1 ~Beat eco rinse 1
≈â“ß·∫∫∂—ßÀ¡ÿπ 1 §√—Èß ~≈â“ß·∫∫ª√–À¬—¥ 1 §√—Èß
Spin shower rinse 1 ~Beat eco rinse 1
≈â“ß·∫∫∂—ßÀ¡ÿπ 1 §√—Èß ~≈â“ß·∫∫ª√–À¬—¥ 1 §√—Èß
15 minutes (15 π“∑’ (§à“
45 minutes (45 π“∑’ (§à“
90 minutes (90 π“∑’ (§à“
Course‚ª√·°√¡
SPINªíòπ·Àâß
RINSEʼnҧ
WASH´—°
Automatically SetWater Level
µ—Èß√–¥—∫πȔ՗µ‚π¡—µ‘
Washing Process¢—ÈπµÕπ„π°“√∑”ß“π
Below explains the washing processes of each course.Process may be complicated due to the need to wash laundry thoroughly.The table below describes washing cycle in detail.µ“√“ߥâ“π≈à“ßÕ∏‘∫“¬°√–∫«π°“√ —°¢Õß·µà≈–‚ª√·°√¡ √«¡∂÷ß√“¬≈–‡Õ’¬¥¢Õß·µà≈–¢—ÈπµÕπ
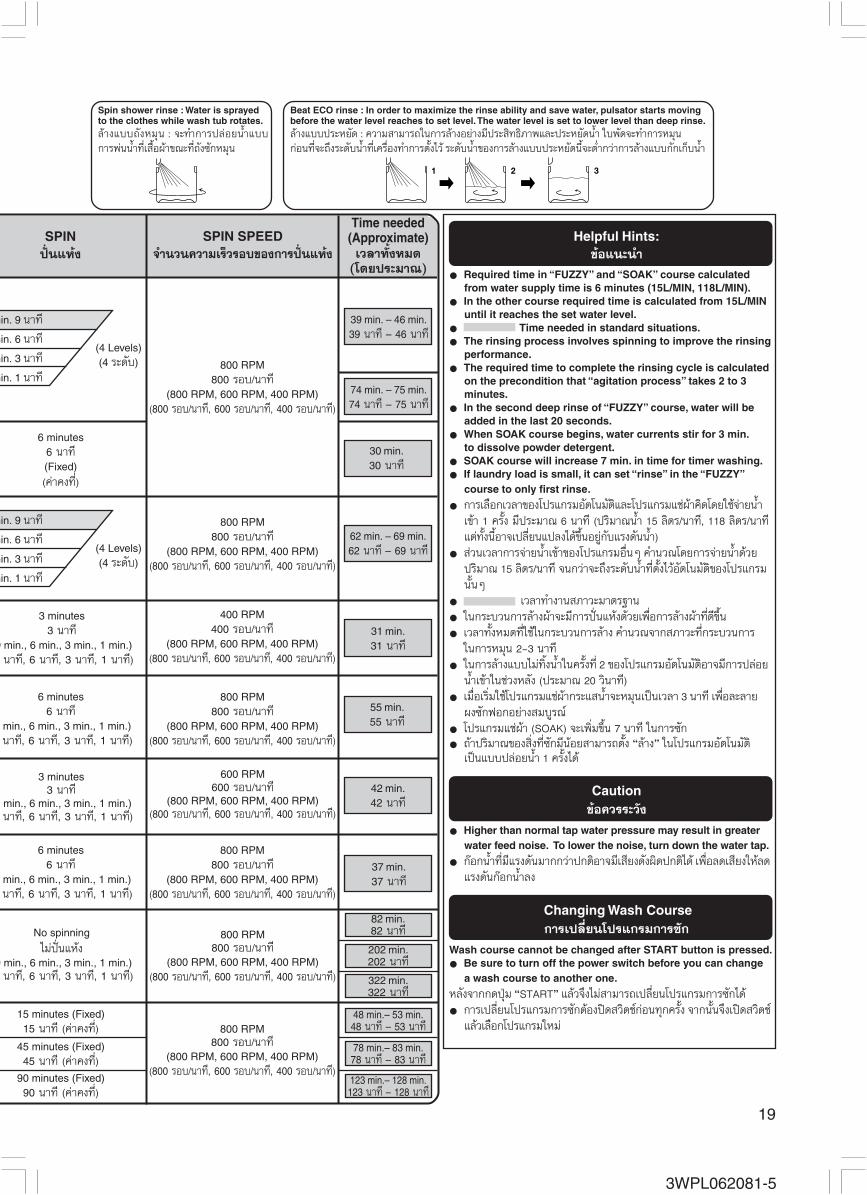
19
3WPL062081-5
3 minutes3 π“∑’
min., 6 min., 3 min., 1 min.)π“∑’, 6 π“∑’, 3 π“∑’, 1 π“∑’)
6 minutes6 π“∑’
min., 6 min., 3 min., 1 min.)π“∑’, 6 π“∑’, 3 π“∑’, 1 π“∑’)
6 minutes6 π“∑’
min., 6 min., 3 min., 1 min.)π“∑’, 6 π“∑’, 3 π“∑’, 1 π“∑’)
3 minutes3 π“∑’
9 min., 6 min., 3 min., 1 min.)π“∑’, 6 π“∑’, 3 π“∑’, 1 π“∑’)
800 RPM800 √Õ∫/π“∑’
(800 RPM, 600 RPM, 400 RPM)(800 √Õ∫/π“∑’, 600 √Õ∫/π“∑’, 400 √Õ∫/π“∑’)
400 RPM400 √Õ∫/π“∑’
(800 RPM, 600 RPM, 400 RPM)(800 √Õ∫/π“∑’, 600 √Õ∫/π“∑’, 400 √Õ∫/π“∑’)
800 RPM800 √Õ∫/π“∑’
(800 RPM, 600 RPM, 400 RPM)(800 √Õ∫/π“∑’, 600 √Õ∫/π“∑’, 400 √Õ∫/π“∑’)
600 RPM600 √Õ∫/π“∑’
(800 RPM, 600 RPM, 400 RPM)(800 √Õ∫/π“∑’, 600 √Õ∫/π“∑’, 400 √Õ∫/π“∑’)
31 min.31 π“∑’
37 min.37 π“∑’
55 min.55 π“∑’
42 min.42 π“∑’
800 RPM800 √Õ∫/π“∑’
(800 RPM, 600 RPM, 400 RPM)(800 √Õ∫/π“∑’, 600 √Õ∫/π“∑’, 400 √Õ∫/π“∑’)
62 min. – 69 min.62 π“∑’ – 69 π“∑’(4 Levels)
(4 √–¥—∫)
min. 9 π“∑’
min. 6 π“∑’
min. 3 π“∑’
min. 1 π“∑’
6 minutes6 π“∑’(Fixed)
(§à“§ß∑’Ë)
800 RPM800 √Õ∫/π“∑’
(800 RPM, 600 RPM, 400 RPM)(800 √Õ∫/π“∑’, 600 √Õ∫/π“∑’, 400 √Õ∫/π“∑’)
(4 Levels)(4 √–¥—∫)
39 min. – 46 min.39 π“∑’ – 46 π“∑’
74 min. – 75 min.74 π“∑’ – 75 π“∑’
30 min.30 π“∑’
min. 9 π“∑’
min. 6 π“∑’
min. 3 π“∑’
min. 1 π“∑’
No spinning
‰¡àªíòπ·Àâß9 min., 6 min., 3 min., 1 min.)
π“∑’, 6 π“∑’, 3 π“∑’, 1 π“∑’)
800 RPM800 √Õ∫/π“∑’
(800 RPM, 600 RPM, 400 RPM)(800 √Õ∫/π“∑’, 600 √Õ∫/π“∑’, 400 √Õ∫/π“∑’)
15 minutes (Fixed)15 π“∑’ (§à“§ß∑’Ë)
45 minutes (Fixed)45 π“∑’ (§à“§ß∑’Ë)
90 minutes (Fixed)90 π“∑’ (§à“§ß∑’Ë)
800 RPM800 √Õ∫/π“∑’
(800 RPM, 600 RPM, 400 RPM)(800 √Õ∫/π“∑’, 600 √Õ∫/π“∑’, 400 √Õ∫/π“∑’)
82 min.82 π“∑’
202 min.202 π“∑’
322 min.322 π“∑’
48 min.– 53 min.48 π“∑’ – 53 π“∑’
78 min.– 83 min.78 π“∑’ – 83 π“∑’
123 min.– 128 min.123 π“∑’ – 128 π“∑’
Time needed(Approximate)‡«≈“∑—ÈßÀ¡¥
(‚¥¬ª√–¡“≥)
SPINªíòπ·Àâß
SPIN SPEED®”π«π§«“¡‡√Á«√Õ∫¢Õß°“√ªíòπ·Àâß
Helpful Hints:¢âÕ·π–π”
• Required time in “FUZZY” and “SOAK” course calculatedfrom water supply time is 6 minutes (15L/MIN, 118L/MIN).
• In the other course required time is calculated from 15L/MINuntil it reaches the set water level.
• Time needed in standard situations.
• The rinsing process involves spinning to improve the rinsingperformance.
• The required time to complete the rinsing cycle is calculatedon the precondition that “agitation process” takes 2 to 3minutes.
• In the second deep rinse of “FUZZY” course, water will beadded in the last 20 seconds.
• When SOAK course begins, water currents stir for 3 min.to dissolve powder detergent.
• SOAK course will increase 7 min. in time for timer washing.
• If laundry load is small, it can set “rinse” in the “FUZZY”course to only first rinse.
• °“√‡≈◊Õ°‡«≈“¢Õß‚ª√·°√¡Õ—µ‚π¡—µ‘·≈–‚ª√·°√¡·™àºâ“§‘¥‚¥¬„™â®à“¬πÈ”‡¢â“ 1 §√—Èß ¡’ª√–¡“≥ 6 π“∑’ (ª√‘¡“≥πÈ” 15 ≈‘µ√/π“∑’, 118 ≈‘µ√/π“∑’·µà∑—Èßπ’ÈÕ“®‡ª≈’ˬπ·ª≈߉¥â¢÷ÈπÕ¬Ÿà°—∫·√ߥ—ππÈ”)
• à«π‡«≈“°“√®à“¬πÈ”‡¢â“¢Õß‚ª√·°√¡Õ◊ËπÊ §”π«≥‚¥¬°“√®à“¬πÈ”¥â«¬ª√‘¡“≥ 15 ≈‘µ√/π“∑’ ®π°«à“®–∂÷ß√–¥—∫πÈ”∑’˵—È߉«âÕ—µ‚π¡—µ‘¢Õß‚ª√·°√¡π—ÈπÊ
• ‡«≈“∑”ß“π ¿“«–¡“µ√∞“π
• „π°√–∫«π°“√≈â“ߺ⓮–¡’°“√ªíòπ·Àâߥ⫬‡æ◊ËÕ°“√≈â“ߺâ“∑’Ë¥’¢÷Èπ
• ‡«≈“∑—ÈßÀ¡¥∑’Ë„™â„π°√–∫«π°“√≈â“ß §”π«≥®“° ¿“«–∑’Ë°√–∫«π°“√„π°“√À¡ÿπ 2-3 π“∑’
• „π°“√≈â“ß·∫∫‰¡à∑‘ÈßπÈ”„π§√—Èß∑’Ë 2 ¢Õß‚ª√·°√¡Õ—µ‚π¡—µ‘Õ“®¡’°“√ª≈àÕ¬πÈ”‡¢â“„π™à«ßÀ≈—ß (ª√–¡“≥ 20 «‘π“∑’)
• ‡¡◊ËÕ‡√‘Ë¡„™â‚ª√·°√¡·™àºâ“°√–· πÈ”®–À¡ÿπ‡ªìπ‡«≈“ 3 π“∑’ ‡æ◊ËÕ≈–≈“¬ºß´—°øÕ°Õ¬à“ß ¡∫Ÿ√≥å
• ‚ª√·°√¡·™àºâ“ (SOAK) ®–‡æ‘Ë¡¢÷Èπ 7 π“∑’ „π°“√´—°• ∂⓪√‘¡“≥¢Õß ‘Ëß∑’Ë´—°¡’πâÕ¬ “¡“√∂µ—Èß ç≈â“ßé „π‚ª√·°√¡Õ—µ‚π¡—µ‘
‡ªìπ·∫∫ª≈àÕ¬πÈ” 1 §√—È߉¥â
Caution¢âÕ§«√√–«—ß
• Higher than normal tap water pressure may result in greaterwater feed noise. To lower the noise, turn down the water tap.
• °äÕ°πÈ”∑’Ë¡’·√ߥ—π¡“°°«à“ª°µ‘Õ“®¡’‡ ’¬ß¥—ߺ‘¥ª°µ‘‰¥â ‡æ◊ËÕ≈¥‡ ’¬ß„Àâ≈¥·√ߥ—π°äÕ°πÈ”≈ß
\Changing Wash Course°“√‡ª≈’ˬπ‚ª√·°√¡°“√´—°
Wash course cannot be changed after START button is pressed.
• Be sure to turn off the power switch before you can changea wash course to another one.
À≈—ß®“°°¥ªÿÉ¡ çSTARTé ·≈â«®÷߉¡à “¡“√∂‡ª≈’ˬπ‚ª√·°√¡°“√ —°‰¥â
• °“√‡ª≈’ˬπ‚ª√·°√¡°“√ —°µâÕßªî¥ «‘µ™å°àÕπ∑ÿ°§√—Èß ®“°π—Èπ®÷߇ªî¥ «‘µ™å·≈⫇≈◊Õ°‚ª√·°√¡„À¡à
Spin shower rinse : Water is sprayedto the clothes while wash tub rotates.≈â“ß·∫∫∂—ßÀ¡ÿπ : ®–∑”°“√ª≈àÕ¬πÈ”·∫∫°“√æàππÈ”∑’ˇ ◊Èպⓢ≥–∑’Ë∂—ß´—°À¡ÿπ
Beat ECO rinse : In order to maximize the rinse ability and save water, pulsator starts movingbefore the water level reaches to set level. The water level is set to lower level than deep rinse.≈â“ß·∫∫ª√–À¬—¥ : §«“¡ “¡“√∂„π°“√≈â“ßÕ¬à“ß¡’ª√– ‘∑∏‘¿“æ·≈–ª√–À¬—¥πÈ” „∫æ—¥®–∑”°“√À¡ÿπ°àÕπ∑’Ë®–∂÷ß√–¥—∫πÈ”∑’ˇ§√◊ËÕß∑”°“√µ—È߉«â √–¥—∫πÈ”¢Õß°“√≈â“ß·∫∫ª√–À¬—¥π’È®–µË”°«à“°“√≈â“ß·∫∫°—°‡°Á∫πÈ”

20
3WPL062081-5
Manual Operation°“√„™âß“π‚¥¬ºŸâ„™âª√—∫µ—È߇Õß
It is possible to set WASH, RINSE and SPIN separately or a combination of two or more of these.ºŸâ„™â “¡“√∂·¬°°“√∑”ß“π¢Õ߇§√◊ËÕ߉¥â ‡™àπ ´—°, ≈â“ß À√◊Õªíòπ·Àâß Õ¬à“ß„¥Õ¬à“ßÀπ÷ËàßÀ√◊Õ∑”ß“π 2 Õ¬à“ß À√◊Õ∑”ß“π∑—Èß 3 Õ¬à“ß°Á‰¥â
In following cases°“√ª√—∫µ—Èßµà“ßÊ
Course‚ª√·°√¡
ButtonªÿÉ¡°¥
1. Turn Poweron.°¥ªÿÉ¡°“√∑”ß“π
2. Select FUZZYcourse.‡≈◊Õ°‚ª√·°√¡Õ—µ‚π¡—µ‘
3. Set water level.µ—Èß√–¥—∫πÈ”
Manual washing°“√∑”ß“π∏√√¡¥“
When reusing cleansing water 23
‡¡◊ËÕµâÕß°“√„™âπÈ”´È”Õ’°§√—ÈߥŸÀπâ“ 23
When not spinning easily-wrinklesclothes
‡¡◊ËÕ‰¡à∑”°“√ªíòπ®–∑”„Àâºâ“¬—∫ßà“¬
When rinsing washed clothes
‡¡◊ËÕ∑”°“√´—°≈â“߇ ◊ÈÕºâ“
When rinsing and spinning washedclothes 23
‡¡◊ËÕ∑”°“√≈â“ß·≈–ªíòπ·Àâ߇ ◊ÈպⓥŸÀπâ“ 23
When draining water in the basket orspinning
‡¡◊ËÕ∑”°“√ª≈àÕ¬πÈ”∑‘ÈßÀ√◊Õ∑”°“√ªíòπ·Àâß
Wash t Rinse t Spin´—° t ≈â“ß t ªíòπ
Wash only´—°Õ¬à“߇¥’¬«
Wash t Rinse´—° t ≈â“ß
Rinse only≈â“ßÕ¬à“߇¥’¬«
Rinse t Spin≈â“ß t ªíòπ
Drain only, spin only
ª≈àÕ¬πÈ”∑‘ÈßÕ¬à“߇¥’¬«,ªíòπÕ¬à“߇¥’¬«
Automatically setto 118S when waterlevel is not preset.‡§√◊ËÕß®–µ—Èß√–¥—∫πȔ՗µ‚π¡—µ‘ √–¥—∫ 118 ≈‘µ√‡¡◊ËÕ§ÿ≥‰¡à‰¥âµ—Èß√–¥—∫πÈ”‰«â
Automatically setto 118S when waterlevel is not preset.‡§√◊ËÕß®–µ—Èß√–¥—∫πȔ՗µ‚π¡—µ‘ √–¥—∫ 118 ≈‘µ√‡¡◊ËÕ§ÿ≥‰¡à‰¥âµ—Èß√–¥—∫πÈ”‰«â
Sensor automatically setwater level when if is notpreset.‡§√◊ËÕß®–∑”ß“πµ—Èß√–¥—∫πȔ՗µ‚π¡—µ‘∑—π∑’ ‡¡◊ËÕ§ÿ≥‰¡à‰¥â∑”°“√µ—Èß√–¥—∫πÈ”‰«â
Using WATER LEVEL, WASH, RINSE and SPIN button.°¥ªÿÉ¡‡ª≈’ˬπ°“√∑”ß“π„Àâµ√ß°—∫°“√∑”ß“π∑’˵âÕß°“√
• Press button repeatedly to change current situation.
• °¥ªÿÉ¡‡æ◊ËÕ∑”°“√‡ª≈’ˬπ°“√∑”ß“ππ—ÈπÊ
Water Level√–¥—∫πÈ”
WASH´—°
RINSEʼnҧ
18 min.18 π“∑’15 min.15 π“∑’12 min.12 π“∑’9 min.9 π“∑’3 min.3 π“∑’
No Setup‰¡àµ—Èߧà“

21
3WPL062081-5
Cycle content√Õ∫°“√´—°
Operation°√–∫«π°“√∑”ß“π
4. Select wash course‡≈◊Õ°‚ª√·°√¡ —°
5. Press STARTbutton°¥ªÿÉ¡‡√‘Ë¡°“√∑”ß“π
ly setn waterpreset.πÈ”118 ≈‘µ√–¥—∫πÈ”‰«â
ly setn waterpreset.πÈ”118 ≈‘µ√–¥—∫πÈ”‰«â
Start from washing to spinning.‡√‘Ë¡°“√´—°®π∂÷ß°“√ªíòπ·Àâß
Stop after washing and water remains (not drain).À¬ÿ¥‡¡◊ËÕ —°‡ √Á®·≈–‰¡à∂à“¬πÈ”∑‘Èß
Stop with rinsing water remaining in the tub.
‡√‘Ë¡®“°´—°®πÀ¬ÿ¥‡¡◊ËÕ∑”°“√≈â“߇ √Á®
Drain (Approx. 2 min.) and Spin (Approx. 2-4 min.)before rinsing starts.Stop with clean water remaining in the tub.ª≈àÕ¬πÈ”∑‘Èß (ª√–¡“≥ 2 π“∑’) ·≈–ªíòπ (ª√–¡“≥ 2-4 π“∑’)°àÕπ‡√‘Ë¡°“√≈â“ߺⓠÀ¬ÿ¥À≈—ß®“°≈â“߇ √Á®
Drain (Approx. 2 min.) and Spin (Approx. 2-4 min.)before rinsing starts.√–∫“¬πÈ”∑‘Èß (ª√–¡“≥ 2 π“∑’) ·≈–ªíòπ (ª√–¡“≥ 2-4 π“∑’)°àÕπ‡√‘Ë¡°“√≈â“ߺâ“
Spin after water draining (Approx. 2 min.)Turn off power when spinning starts in cases ofdraining only.ªíòπ·ÀâßÀ≈—ß®“°√–∫“¬πÈ”ÕÕ° (ª√–¡“≥ 2 π“∑’)ªî¥ «‘µ™å „π°√≥’∑’ˉ¡àµâÕß°“√ªíòπ·Àâß
Precautions / ¢âÕ§«√√–¡—¥√–«—ß
• In case of “Rinse only” or “Rinse-Spin” whenthere is no water in the wash tub, the machinewill spin before filling in water to remove wateror detergent remaining in laundry.(When there is water in the wash tub, themachine will drain first)
• „π°√≥’∑’˵âÕß°“√≈â“ßÕ¬à“߇¥’¬«À√◊Õ≈â“ß › ªíò𠇧√◊ËÕß®–∑”°“√ªíòπ·Àâ߉≈àøÕß°àÕπª≈àÕ¬πÈ”‡¢â“
AIR JETªíòπ·Àâß摇»…
SPINªíòπ·Àâß
RINSEʼnҧ
(Non-spin)(‰¡à∑”ß“π)
Twice≈â“ß 2 §√—Èß
Water circulate twice≈â“ßπÈ”·∫∫∂à“¬‡∑πÈ” 2 §√—Èß
Once≈â“ß 1 §√—Èß
Water circulate once≈â“ßπÈ”·∫∫∂à“¬‡∑πÈ” 1 §√—Èß
No Setup‰¡àµ—Èߧà“
SPIN CONTROL®”π«π√Õ∫
°“√ªíòπ·Àâß

22
3WPL062081-5
When Using Liquid Detergent, Bleach and Fabric Softener¢—ÈπµÕπ„π°“√„™âπÈ”¬“´—°ºâ“, πÈ”¬“øÕ°ºâ“¢“«·≈–πÈ”¬“ª√—∫ºâ“πÿà¡
Using liquid detergent and bleach / «‘∏’„™âπÈ”¬“ —°ºâ“ ·≈–πÈ”¬“øÕ°ºâ“¢“«
Liquid detergent and bleachdispenser™àÕß„ à¢ÕßπÈ”¬“ —°ºâ“ ·≈–πÈ”¬“øÕ°ºâ“¢“«Õ¬Ÿà„π™àÕ߇¥’¬«°—π
Precautions
• Follow the instructions on package of liquid detergent or bleach fordirections and usage amount.
• Do not put bleach directly onto laundry, otherwise, it may lead todamages to the texture or discoloring.
¢âÕ§«√√–¡—¥√–«—ß
• Õà“𧔷π–π”°“√„™âπÈ”¬“´—°ºâ“·≈–πÈ”¬“øÕ°ºâ“¢“«∫πµ—«°≈àÕß°àÕπ°“√„™âß“π
• ‰¡à§«√‡∑πÈ”¬“øÕ°ºâ“¢“«∫π‡ ◊ÈպⓂ¥¬µ√߇æ√“–®–∑”„À⇠◊ÈպⓉ¥â√—∫§«“¡‡ ’¬À“¬À√◊Õ¡’º≈µàÕ ’¢ÕߺⓉ¥â
Liquid detergentDilute liquid detergent and gently pour into the dispenser.
• When using washer timer, dilute liquid detergent twice.
πÈ”¬“´—°ºâ“
º ¡πÈ”¬“´—°ºâ“‡¢â“°—∫πÈ”°àÕπ𔉪‡∑≈ß„π™àÕ߇µ‘¡πÈ”¬“
• ‡¡◊ËÕµ—È߇«≈“°“√∑”ß“π„π°“√´—° „™âπÈ”¬“´—°ºâ“º ¡°—∫πÈ”„ à≈߉ª 2 §√—Èß
BleachDilute bleach with water and gently pour into dispenser before washingstarts.
πÈ”¬“øÕ°ºâ“¢“«
π”πÈ”¬“øÕ°ºâ“¢“«π’È¡“º ¡°—∫πÈ”·≈â«„ à≈߉ª„π™àÕ߇∫“Ê °àÕπ®–‡√‘Ë¡°“√∑”ß“π
Using fabric softener / ¢—ÈπµÕπ„π°“√„™âπÈ”¬“ª√—∫ºâ“πÿà¡
Automatic fabric softener dispenser is for use of concentrated fabric softener only.™àÕß„ àπÈ”¬“ª√—∫ºâ“πÿà¡·∫∫Õ—µ‚π¡—µ‘π’È ®–„™â‡©æ“–πÈ”¬“ª√—∫ºâ“πÿà¡™π‘¥‡¢â¡¢âπ‡∑à“π—Èπ
Open the automatic fabric softenerdispenser lid until it comes to a full stop.
• Make sure the dispenser is workingproperly.
‡ªî¥™àÕß„ àπÈ”¬“ª√—∫ºâ“πÿà¡„Àâ ÿ¥
• „ àπÈ”¬“ª√—∫ºâ“πÿà¡„π™àÕß„ àÕ¬à“ß∂Ÿ°µâÕß
Switch power on, select appropriate washcourse and press the START button.‡ªî¥‡§√◊ËÕß∑”ß“π‡≈◊Õ°‚ª√·°√¡°“√ —°∑’Ë∂Ÿ°µâÕß·≈–°¥ªÿÉ¡‡√‘Ë¡°“√∑”ß“π
1
2
3
4Do not add the softener more thanthe specified level. Doing so maycause damage to the clothes.‰¡à§«√‡µ‘¡πÈ”¬“ª√—∫ºâ“πÿࡇ°‘π¢Õ∫∑’Ë°”À𥉫â‡æ√“–Õ“® √â“ߧ«“¡‡ ’¬À“¬„Àâ°—∫ºâ“‰¥â
Softener dispenser lidΩ“ªî¥¢Õß™àÕß„ àπÈ”¬“ª√—∫ºâ“πÿà¡
<Approximate amount of softener><ª√‘¡“≥πÈ”¬“ª√—∫ºâ“πÿà¡‚¥¬ª√–¡“≥>
Add softener according to water levelindicator.„ àπÈ”¬“ª√—∫ºâ“πÿà¡„Àâ‡À¡“– ¡°—∫√–¥—∫πÈ”∑’Ë„™â
Close dispenser lid.
• Softener will be automaticallyinjected before last rinse.
ªî¥™àÕß„ àπÈ”¬“ª√—∫ºâ“πÿà¡
• πÈ”¬“ª√—∫ºâ“πÿà¡®–∑”ß“πÕ—µ‚π¡—µ‘„π°“√≈â“ߧ√—Èß ÿ¥∑⓬
• Concentrated type : use 6.6 milliliters of softener for 30 liters of water.
• ª√‘¡“≥¢ÕßπÈ”¬“ª√—∫ºâ“πÿࡇ¢â¡¢âπ 6.6 ¡‘≈≈‘≈‘µ√ : πÈ” 30 ≈‘µ√
<Approximate amount of softener><ª√‘¡“≥πÈ”¬“ª√—∫ºâ“πÿà¡‚¥¬ª√–¡“≥>
Amount of water32L 48L 53L 59L 64L 70L 75L
ª√‘¡“≥πÈ”
Amount of softener21ml 32ml 35ml 39ml 43ml 47ml 50ml
ª√‘¡“≥πÈ”¬“ª√—∫ºâ“πÿà¡
• Normal type : use 20 milliliters of softener for 30 liters of water.
• ª√‘¡“≥¢ÕßπÈ”¬“ª√—∫ºâ“πÿࡪ°µ‘ 20 ¡‘≈≈‘≈‘µ√ : πÈ” 30 ≈‘µ√
Precautions
• Do not add too much softener, otherwise, discoloring may occur due to the leakage of softener from dispenser.
• Use appropriate amount of softener, otherwise, rinsing add softening effect may be affected.
• Do not add softener when unit is filled with water, otherwise, liquid may spill out.
• Maintenance of fabric softener dispenser 26
¢âÕ§«√√–¡—¥√–«—ß
• ‰¡à§«√„ àπÈ”¬“ª√—∫ºâ“πÿà¡¡“°‡°‘π‰ª ®–∑”„Àâ ’¢Õ߇ ◊Èպ⓴’¥ ÷ËßÕ“®‡°‘¥®“°πÈ”¬“ª√—∫ºâ“πÿà¡À°„ àºâ“®“°™àÕß„ àπÈ”¬“ª√—∫ºâ“πÿà¡
• „™âπÈ”¬“ª√—∫ºâ“πÿà¡„πª√‘¡“≥∑’Ë∂Ÿ°µâÕß ¡‘©–π—Èπ‡ ◊ÈÕºâ“Õ“®‰¥â√—∫§«“¡‡ ’¬À“¬
• ‰¡à§«√„ àπÈ”¬“ª√—∫ºâ“πÿࡵÕπ∑’ËπÈ”°”≈—ß®à“¬‡¢â“‡§√◊ËÕß ‡æ√“–®–∑”„ÀâπÈ”¬“≈âπÕÕ°¡“
• ¥Ÿ°“√∫”√ÿß√—°…“∑’ËÀπâ“ 26
Amount of water80L 87L 93L 105L 110L 118L
ª√‘¡“≥πÈ”
Amount of softener53ml 58ml 62ml 70ml 73ml 79ml
ª√‘¡“≥πÈ”¬“ª√—∫ºâ“πÿà¡
Amount of water32L 48L 53L 59L 64L 70L 75L
ª√‘¡“≥πÈ”
Amount of softener7ml 11ml 12ml 13ml 14ml 15ml 17ml
ª√‘¡“≥πÈ”¬“ª√—∫ºâ“πÿà¡
Amount of water80L 87L 93L 105L 110L 118L
ª√‘¡“≥πÈ”
Amount of softener18ml 19ml 20ml 23ml 24ml 26ml
ª√‘¡“≥πÈ”¬“ª√—∫ºâ“πÿà¡

23
3WPL062081-5
Using Powder Detergent (Natural oils and fats)°“√„™âºß´—°øÕ°™π‘¥æ‘‡»… (πÈ”¡—π∏√√¡™“µ‘·≈– ∫Ÿà´—°ºâ“)
1. Turn on power switch.‡ªî¥‡§√◊ËÕß°“√∑”ß“π
2. Set the water level at 48S and begin operations.µ—Èß√–¥—∫πÈ”∑’Ë 48 ≈‘µ√ ·≈–‡√‘Ë¡°“√∑”ß“π
3. When the agitation begins, put the powder detergent in andlet it rotate for approximately 3 minutes.‡¡◊ËÕ„∫æ—¥‡√‘Ë¡À¡ÿπ „Àâ∑”°“√„ àºß´—°øÕ°≈߉ª „∫æ—¥®–À¡ÿπª√–¡“≥ 3 π“∑’
4. When the powder detergent is dissolved in the water, turn offthe power switch and load the clothes.‡¡◊Ëպߴ—°øÕ°≈–≈“¬πÈ”¥’·≈â«„Àâªî¥‡§√◊ËÕß´—°ºâ“·≈â«π”ºâ“≈߉ª·™à• Be sure to sufficiently soak the laundry in the washing liquid.
• µâÕß¡—Ëπ„®«à“ºâ“∑’Ë·™àπ—Èπ®¡Õ¬Ÿà„µâπÈ”5. Turn the power switch on and select the mode of washing and
water level to start washing.°¥ªÿÉ¡°“√∑”ß“π‡≈◊Õ°‚ª√·°√¡°“√ —°·≈–µ—Èß√–¥—∫πÈ”∑’˵âÕß°“√·≈â«®÷ß°¥ªÿÉ¡‡√‘Ë¡°“√∑”ß“π• As a small amount of water has already been injected into the
wash tub, the actual quantity of detergent and water may beslightly more than indicated.
• ∂⓪√‘¡“≥¢ÕßπÈ”∑’Ë„™âπâÕ¬ ª√‘¡“≥πÈ”·≈–ºß´—°øÕ°Õ“®πâÕ¬°«à“∑’ˇ§√◊ËÕß°”Àπ¥
When dissolving powder detergent in the washing machine.«‘∏’°“√≈–≈“¬ºß —°øÕ°„π‡§√◊ËÕß —°ºâ“
When the powder detergent is hard to dissolve«‘∏’°“√≈–≈“¬ºß´—°øÕ°∑’ˇªìπ°âÕπ
1. Prepare approximately 5S of tepid water ofabout 30°C in a bucket.‡µ√’¬¡πÈ”Õÿàπ 30°C ª√–¡“≥ 5 ≈‘µ√ „ à„π∂—ß
2. While stirring the water, gradually pour theappropriate amount of powder detergent.§«√„ àºß´—°øÕ°™â“Ê „Àâ‡À¡“– ¡°—∫ª√‘¡“≥¢ÕßπÈ”• To prevent solidification of the powder
detergent, fully dissolve it sufficientlybefore pouring the water into the wash tub.
• ‡æ◊ËÕªÑÕß°—π‰¡à„Àâºß´—°øÕ°·¢Áßµ—« µâÕß∑”°“√≈–≈“¬ºß —°øÕ°°àÕπ °àÕπ∑’Ë®–𔉪‡∑≈ß„π∂—ß —°ºâ“
Powder detergentºß —°øÕ°
Precautions / ¢âÕ§«√√–¡—¥√–«—ß
• The powder detergent is more likely to stay in the laundry than synthetic detergent, therefore thorough rinsing is required. Failureto do so may cause discoloration or bad odors.
• If the amount of powder detergent used is excessive or if the powder detergent is directly poured into water at a low temperature,the residue of the powder detergent which is not properly dissolved may adhere to the drainage hose or the interior of the wash tub.
• Be sure not to use powder detergent when using the timer as it may solidify in the container.
• ºß´—°øÕ°Õ“®µ‘¥Õ¬Ÿà¿“¬„π‡ ◊ÈÕºâ“∑’Ë𔉪´—°‰¥â¥—ßπ—Èπ®÷ߧ«√≈â“ßπȔլà“ß∂’Ë∂â«π°àÕπ‡æ◊ËÕªÑÕß°—𧫓¡º‘¥æ≈“¥∑’ËÕ“®‡°‘¥¢÷Èπ ÷ËßÕ“®∑”„Àâ¡’º≈µàÕ ’¢Õߺⓠ·≈–Õ“®¡’°≈‘Ëπ
• ∂⓪√‘¡“≥ºß —°øÕ°∑’Ë„™â¡“°‡°‘π‰ªÀ√◊Õºß —°øÕ°∑’Ë„ à≈߉ª„ππÈ”¡’Õÿ≥À¿Ÿ¡‘∑’˵˔®–∑”„Àâ¡’‡»…ºß —°øÕ°µ°À≈߇À≈◊ÕÕ¬Ÿàµ“¡∑àÕπÈ”∑‘Èß À√◊Õ¿“¬„π∂—ߪíòπ
• ‰¡à§«√„™âºß´—°øÕ°™π‘¥æ‘‡»…‡¡◊ËÕ„™â‚ª√·°√¡°“√µ—È߇«≈“´—°≈à«ßÀπâ“ ‡æ√“–Õ“®∑”„Àâºß´—°øÕ°·¢Áßµ—«°àÕπ∑’ˇ§√◊ËÕß®–∑”ß“π
Reusing Cleansing Water°“√„™âπÈ”´È”‡æ◊ËÕ´—°Õ’°§√—Èß
3. RINSE and SPIN the first load. 20π”ºâ“™ÿ¥·√°¡“„ à≈߉ª‡æ◊ËÕ≈â“ß·≈–ªíòπ·Àâß®π‡ √Á® ¥Ÿ√“¬≈–‡Õ’¬¥Àπâ“ 20• Set appropriate water level.
• µ—Èß√–¥—∫πÈ”µ“¡§«“¡‡À¡“– ¡
2. Wash second load with appropriatewashing cycle.π”ºâ“™ÿ¥∑’Ë Õß„ à≈߉ª‡æ◊ËÕ´—°®π∂÷ߪíòπ·Àâß• Set appropriate water level.
• µ—Èß√–¥—∫πÈ”µ“¡§«“¡‡À¡“– ¡
1. Wash first load under WASH cycle.
20π”ºâ“™ÿ¥·√°ÕÕ°‚¥¬‰¡àµâÕß√–∫“¬πÈ”¥Ÿ√“¬≈–‡Õ’¬¥Àπâ“ 20
Lightly stainedClothes‡ ◊ÈÕºâ“∑’Ë °ª√°‰¡à¡“°
Wash only´—°Õ¬à“߇¥’¬«
Wash t Rinse t Spin´—° t ≈â“ß t ªíòπ·Àâß
Rinse t Spin≈â“ß t ªíòπ·Àâß
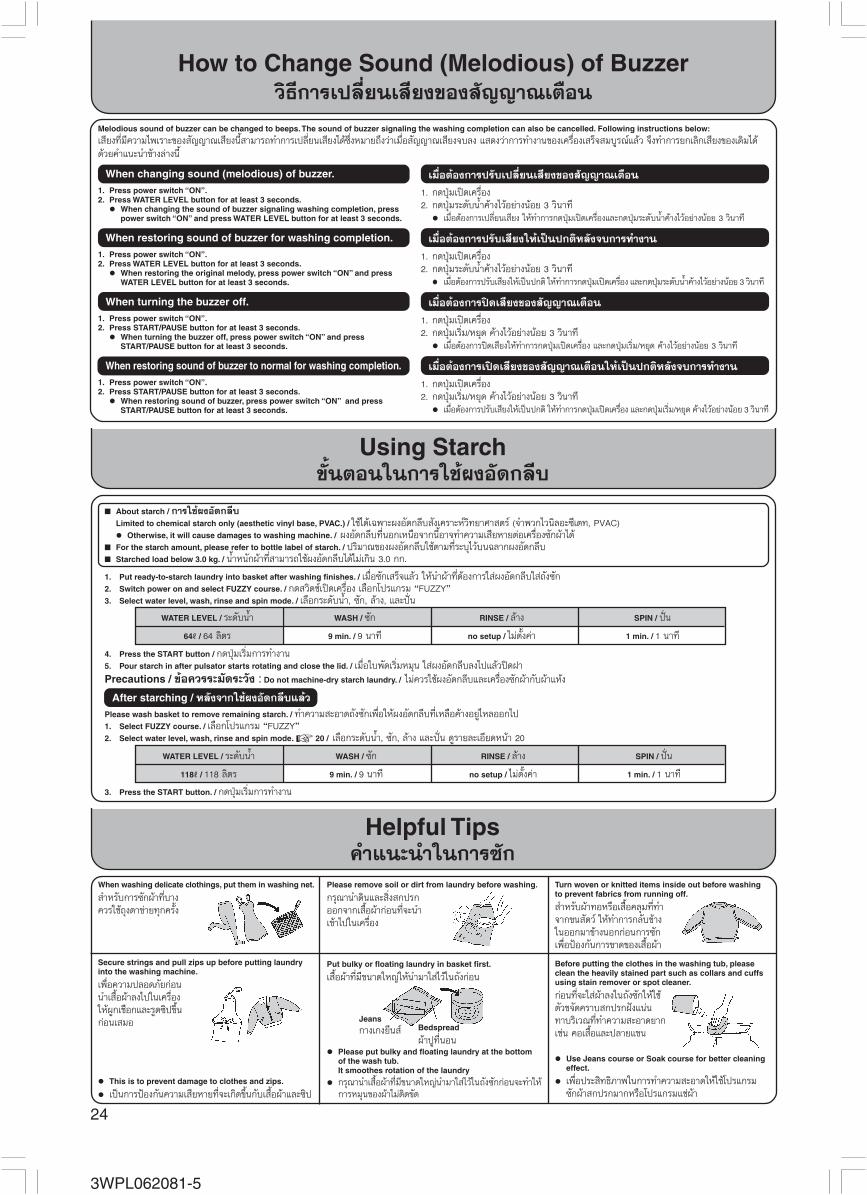
24
3WPL062081-5
When washing delicate clothings, put them in washing net.
”À√—∫°“√´—°ºâ“∑’Ë∫“ߧ«√„™â∂ÿßµ“¢à“¬∑ÿ°§√—Èß
Secure strings and pull zips up before putting laundryinto the washing machine.
‡æ◊ËÕ§«“¡ª≈Õ¥¿—¬°àÕπ𔇠◊ÈÕºâ“≈߉ª„π‡§√◊ËÕß„À⺟°‡™◊Õ°·≈–√Ÿ¥´‘ª¢÷Èπ°àÕπ‡ ¡Õ
• This is to prevent damage to clothes and zips.
• ‡ªìπ°“√ªÑÕß°—𧫓¡‡ ’¬À“¬∑’Ë®–‡°‘¥¢÷Èπ°—∫‡ ◊Èպ⓷≈– ‘ª
Please remove soil or dirt from laundry before washing.
°√ÿ≥“𔥑π·≈– ‘Ëß °ª√°ÕÕ°®“°‡ ◊Èպ⓰àÕπ∑’Ë®–π”‡¢â“‰ª„π‡§√◊ËÕß
Put bulky or floating laundry in basket first.
‡ ◊ÈÕºâ“∑’Ë¡’¢π“¥„À≠à„Àâπ”¡“„ à‰«â„π∂—ß°àÕπ
• Please put bulky and floating laundry at the bottomof the wash tub.It smoothes rotation of the laundry
• °√ÿ≥“𔇠◊ÈÕºâ“∑’Ë¡’¢π“¥„À≠àπ”¡“„ à‰«â„π∂—ß —°°àÕπ®–∑”„Àâ°“√À¡ÿπ¢ÕߺⓉ¡àµ‘¥¢—¥
Turn woven or knitted items inside out before washingto prevent fabrics from running off.
”À√—∫ºâ“∑ÕÀ√◊Õ‡ ◊ÈÕ§≈ÿ¡∑’Ë∑”®“°¢π —µ«å „Àâ∑”°“√°≈—∫¢â“ß„πÕÕ°¡“¢â“ßπÕ°°àÕπ°“√ —°‡æ◊ËÕªÑÕß°—π°“√¢“¥¢Õ߇ ◊ÈÕºâ“
Before putting the clothes in the washing tub, pleaseclean the heavily stained part such as collars and cuffsusing stain remover or spot cleaner.
°àÕπ∑’Ë®–„ àºâ“≈ß„π∂—ß´—°„Àℙⵗ«¢®—¥§√“∫ °ª√°Ωíß·πàπ∑“∫√‘‡«≥∑’Ë∑”§«“¡ –Õ“¥¬“°‡™àπ §Õ‡ ◊ÈÕ·≈–ª≈“¬·¢π
• Use Jeans course or Soak course for better cleaningeffect.
• ‡æ◊ËÕª√– ‘∑∏‘¿“æ„π°“√∑”§«“¡ –Õ“¥„Àℙ₪√·°√¡´—°ºâ“ °ª√°¡“°À√◊Õ‚ª√·°√¡·™àºâ“
1. Put ready-to-starch laundry into basket after washing finishes. / ‡¡◊ËÕ´—°‡ √Á®·≈â« „Àâπ”ºâ“∑’˵âÕß°“√„ àºßÕ—¥°≈’∫„ à∂—ß´—°2. Switch power on and select FUZZY course. / °¥ «‘µ™å‡ªî¥‡§√◊ËÕß ‡≈◊Õ°‚ª√·°√¡ çFUZZYé3. Select water level, wash, rinse and spin mode. / ‡≈◊Õ°√–¥—∫πÈ”, ´—°, ≈â“ß, ·≈–ªíòπ
4. Press the START button / °¥ªÿÉ¡‡√‘Ë¡°“√∑”ß“π5. Pour starch in after pulsator starts rotating and close the lid. / ‡¡◊ËÕ„∫æ—¥‡√‘Ë¡À¡ÿπ „ àºßÕ—¥°≈’∫≈߉ª·≈⫪î¥Ω“Precautions / ¢âÕ§«√√–¡—¥√–«—ß : Do not machine-dry starch laundry. / ‰¡à§«√„™âºßÕ—¥°≈’∫·≈–‡§√◊ËÕß´—°ºâ“°—∫ºâ“·Àâß
After starching / À≈—ß®“°„™âºßÕ—¥°≈’∫·≈â«
Please wash basket to remove remaining starch. / ∑”§«“¡ –Õ“¥∂—ß´—°‡æ◊ËÕ„ÀâºßÕ—¥°≈’∫∑’ˇÀ≈◊Õ§â“ßÕ¬Ÿà‰À≈ÕÕ°‰ª1. Select FUZZY course. / ‡≈◊Õ°‚ª√·°√¡ çFUZZYé2. Select water level, wash, rinse and spin mode. 20 / ‡≈◊Õ°√–¥—∫πÈ”, ´—°, ≈â“ß ·≈–ªíòπ ¥Ÿ√“¬≈–‡Õ’¬¥Àπâ“ 20
3. Press the START button. / °¥ªÿÉ¡‡√‘Ë¡°“√∑”ß“π
How to Change Sound (Melodious) of Buzzer«‘∏’°“√‡ª≈’Ë¬π‡ ’¬ß¢Õß —≠≠“≥‡µ◊Õπ
When changing sound (melodious) of buzzer.1. Press power switch “ON”.2. Press WATER LEVEL button for at least 3 seconds.
• When changing the sound of buzzer signaling washing completion, presspower switch “ON” and press WATER LEVEL button for at least 3 seconds.
When restoring sound of buzzer for washing completion.1. Press power switch “ON”.2. Press WATER LEVEL button for at least 3 seconds.
• When restoring the original melody, press power switch “ON” and pressWATER LEVEL button for at least 3 seconds.
When turning the buzzer off.1. Press power switch “ON”.2. Press START/PAUSE button for at least 3 seconds.
• When turning the buzzer off, press power switch “ON” and pressSTART/PAUSE button for at least 3 seconds.
When restoring sound of buzzer to normal for washing completion.1. Press power switch “ON”.2. Press START/PAUSE button for at least 3 seconds.
• When restoring sound of buzzer, press power switch “ON” and pressSTART/PAUSE button for at least 3 seconds.
Melodious sound of buzzer can be changed to beeps. The sound of buzzer signaling the washing completion can also be cancelled. Following instructions below:
‡ ’¬ß∑’Ë¡’§«“¡‰æ‡√“–¢Õß —≠≠“≥‡ ’¬ßπ’È “¡“√∂∑”°“√‡ª≈’Ë¬π‡ ’¬ß‰¥â´÷ËßÀ¡“¬∂÷ß«à“‡¡◊ËÕ —≠≠“≥‡ ’¬ß®∫≈ß · ¥ß«à“°“√∑”ß“π¢Õ߇§√◊ËÕ߇ √Á® ¡∫Ÿ√≥å·≈â« ®÷ß∑”°“√¬°‡≈‘°‡ ’¬ß¢Õ߇¥‘¡‰¥â¥â«¬§”·π–π”¢â“ß≈à“ßπ’È
Using Starch¢—ÈπµÕπ„π°“√„™âºßÕ—¥°≈’∫
About starch / °“√„™âºßÕ—¥°≈’∫
Limited to chemical starch only (aesthetic vinyl base, PVAC.) / „™â‰¥â‡©æ“–ºßÕ—¥°≈’∫ —߇§√“–Àå«‘∑¬“»“ µ√å (®”æ«°‰«π‘≈Õ–´’‡µ∑, PVAC)• Otherwise, it will cause damages to washing machine. / ºßÕ—¥°≈’∫∑’ËπÕ°‡Àπ◊Õ®“°π’ÈÕ“®∑”§«“¡‡ ’¬À“¬µàÕ‡§√◊ËÕß´—°ºâ“‰¥â
For the starch amount, please refer to bottle label of starch. / ª√‘¡“≥¢ÕߺßÕ—¥°≈’∫„™âµ“¡∑’Ë√–∫ÿ‰«â∫π©≈“°ºßÕ—¥°≈’∫ Starched load below 3.0 kg. / πÈ”Àπ—°ºâ“∑’Ë “¡“√∂„™âºßÕ—¥°≈’∫‰¥â‰¡à‡°‘π 3.0 °°.
Helpful Tips§”·π–π”„π°“√´—°
‡¡◊ËÕµâÕß°“√ª√—∫‡ª≈’Ë¬π‡ ’¬ß¢Õß —≠≠“≥‡µ◊Õπ
1. °¥ªÿÉ¡‡ªî¥‡§√◊ËÕß2. °¥ªÿÉ¡√–¥—∫πÈ”§â“߉«âÕ¬à“ßπâÕ¬ 3 «‘π“∑’
• ‡¡◊ËÕµâÕß°“√‡ª≈’Ë¬π‡ ’¬ß „Àâ∑”°“√°¥ªÿÉ¡‡ªî¥‡§√◊ËÕß·≈–°¥ªÿÉ¡√–¥—∫πÈ”§â“߉«âÕ¬à“ßπâÕ¬ 3 «‘π“∑’
‡¡◊ËÕµâÕß°“√ª√—∫‡ ’¬ß„À⇪ìπª°µ‘À≈—ß®∫°“√∑”ß“π
1. °¥ªÿÉ¡‡ªî¥‡§√◊ËÕß2. °¥ªÿÉ¡√–¥—∫πÈ”§â“߉«âÕ¬à“ßπâÕ¬ 3 «‘π“∑’
• ‡¡◊ËÕµâÕß°“√ª√—∫‡ ’¬ß„À⇪ìπª°µ‘ „Àâ∑”°“√°¥ªÿÉ¡‡ªî¥‡§√◊ËÕß ·≈–°¥ªÿÉ¡√–¥—∫πÈ”§â“߉«âÕ¬à“ßπâÕ¬ 3 «‘π“∑’
‡¡◊ËÕµâÕß°“√ªî¥‡ ’¬ß¢Õß —≠≠“≥‡µ◊Õπ
1. °¥ªÿÉ¡‡ªî¥‡§√◊ËÕß2. °¥ªÿÉ¡‡√‘Ë¡/À¬ÿ¥ §â“߉«âÕ¬à“ßπâÕ¬ 3 «‘π“∑’
• ‡¡◊ËÕµâÕß°“√ªî¥‡ ’¬ß„Àâ∑”°“√°¥ªÿÉ¡‡ªî¥‡§√◊ËÕß ·≈–°¥ªÿÉ¡‡√‘Ë¡/À¬ÿ¥ §â“߉«âÕ¬à“ßπâÕ¬ 3 «‘π“∑’
‡¡◊ËÕµâÕß°“√‡ªî¥‡ ’¬ß¢Õß —≠≠“≥‡µ◊Õπ„À⇪ìπª°µ‘À≈—ß®∫°“√∑”ß“π
1. °¥ªÿÉ¡‡ªî¥‡§√◊ËÕß2. °¥ªÿÉ¡‡√‘Ë¡/À¬ÿ¥ §â“߉«âÕ¬à“ßπâÕ¬ 3 «‘π“∑’
• ‡¡◊ËÕµâÕß°“√ª√—∫‡ ’¬ß„À⇪ìπª°µ‘ „Àâ∑”°“√°¥ªÿÉ¡‡ªî¥‡§√◊ËÕß ·≈–°¥ªÿÉ¡‡√‘Ë¡/À¬ÿ¥ §â“߉«âÕ¬à“ßπâÕ¬ 3 «‘π“∑’
Bedspread
ºâ“ªŸ∑’ËπÕπ
Jeans
°“߇°ß¬’π å
WATER LEVEL / √–¥—∫πÈ” WASH / ´—° RINSE / ≈â“ß SPIN / ªíòπ
64S / 64 ≈‘µ√ 9 min. / 9 π“∑’ no setup / ‰¡àµ—Èß§à“ 1 min. / 1 π“∑’
WATER LEVEL / √–¥—∫πÈ” WASH / ´—° RINSE / ≈â“ß SPIN / ªíòπ
118S / 118 ≈‘µ√ 9 min. / 9 π“∑’ no setup / ‰¡àµ—Èß§à“ 1 min. / 1 π“∑’

25
3WPL062081-5
Troubleshooting Guideªí≠À“·≈–°“√·°â‰¢
Abnormality alarm: When the following cases occur, you will be alerted by flashes of indicators and sound of buzzer. —≠≠“≥¢Õß°“√º‘¥ª°µ‘: ‡¡◊ËÕ‡°‘¥‡Àµÿ°“√≥å°√≥’µàÕ‰ªπ’È¢÷Èπ ®–¡’ —≠≠“≥‰ø°–æ√‘∫∫Õ°·≈–‡ ’¬ß —≠≠“≥‡µ◊Õπ
• If warning signs such as “F0” and “F9” are shown, immediately stop operating the washer and contact an authorized service dealer or a service agent for further inspectionand/or repairing.
• ∂â“¡’ —≠≠“≥‡µ◊Õπ· ¥ß‡ªìπ çF0é ·≈– çF9é „ÀâÀ¬ÿ¥°“√∑”ß“π¢Õ߇§√◊ËÕß ·≈–µ‘¥µàÕ»Ÿπ¬å∫√‘°“√ À√◊Õµ—«·∑π®”Àπà“¬„Àâ¡“∑”°“√·°â‰¢À√◊Õ´àÕ¡·´¡
The following symptoms do not indicate breakdown / Õ“°“√¢Õ߇§√◊ËÕߢâ“ß≈à“ßπ’ȉ¡à„™à§«“¡º‘¥æ≈“¥¢Õ߇§√◊ËÕß
Symptoms / Õ“°“√ Cause / “‡Àµÿ
Water comes out from drainage hose during first use.
πÈ”‰À≈ÕÕ°®“°∑àÕπÈ”∑‘Èß√–À«à“ß°“√„™âß“π§√—Èß·√°Washing remaining time varies.
‡«≈“„π°“√∑”°“√ —°‡À≈◊Õ¡“°Water fills in during wash cycle.
πÈ”‰À≈‡¢â“√–À«à“ß°“√´—°Washing machine keeps running after preset time.
‡§√◊ËÕß∑”ß“π™â“°«à“‡«≈“∑’˵—È߉«âSpinning stops and water fills in during the spin cycle before rinsecycle.
°“√ªíòπÀ¬ÿ¥·≈–¡’πÈ”‰À≈‡¢â“µ≈Õ¥°àÕπ°“√≈â“ߺâ“Spinning stops during last spinning cycle and reverse back to rinsewith water filling in.
‡§√◊ËÕßÀ¬ÿ¥ªíòπ√–À«à“ß°“√∑”ß“π·≈–°≈—∫¡“„π°“√≈â“ßπÈ”Spinning takes place intermittently at the beginning of the spin cycle.
°“√‡√‘Ë¡ªíòπ·Àâß®–∑”ß“πµ—¥Ê µàÕÊ ‡ªìπ®—ßÀ«–Abnormal sound is heard when turning the wash tub by hand.
‡¡◊ËÕ∑”°“√À¡ÿπµ—«∂—ߪíòπ¥â«¬¡◊Õ®–‰¥â¬‘π‡ ’¬ß¥—ߺ‘¥ª°µ‘Water is drained away even if it is handfed.
πÈ”¡—°®–‰À≈ÕÕ°¡“∑“ß∑àÕπÈ”∑‘È߇ ¡Õ∂â“¡◊Õ‰ª‚¥π «‘µ™åµ—¥µàÕ°“√∑”ß“πLid can not open.
‰¡à “¡“√∂‡ªî¥Ω“‰¥â
• Water from test conducted by the manufacturer remains in the drainage hose.
• πÈ”‰À≈ÕÕ°¡“Õ“®µ°§â“ß¡“®“°‚√ßß“πµÕπ∑’Ë∑”°“√∑¥ Õ∫‡§√◊ËÕß
• Remaining time is automatically corrected according to different water supply speeds.
• ‡«≈“®–·ª√º—πµ“¡‡«≈“°“√‰À≈‡¢â“¢ÕßπÈ” (‰À≈™â“„™â‡«≈“π“π)
• When water level falls during wash cycle, water is replenished automatically.
• ‡§√◊ËÕß®–¡’√–∫∫°“√‡µ‘¡πȔ՗µ‚π¡—µ‘‡¡◊ËÕ√–¥—∫πÈ”µË”°«à“ª°µ‘
• It takes place when water is slowly fed in.
• ª√‘¡“≥°“√‰À≈¢ÕßπÈ”™â“°«à“ª°µ‘
• This takes place when the safety switch is activated as a result of an uneven distribution of laundry.The next rinse will automatically switch to rinsing with water injection.
• · ¥ß«à“°“√®—¥«“ߺⓉ¡à ¡¥ÿ≈ ‡§√◊ËÕß®–‡µ‘¡πÈ”‡¢â“·≈–∑”°“√≈â“ߺⓄÀâ ¡¥ÿ≈Õ—µ‚π¡—µ‘
• This takes place when the safety switch is activated as a result of an uneven distribution of laundry. When water fill in and pulsatorrotates, laundry can be balanced by the motion and spin cycle will resume.
• ‡§√◊ËÕß®–µ—¥°“√∑”ß“π‡æ√“–°“√«“ߺⓉ¡à ¡¥ÿ≈ πÈ”®–∂Ÿ°ª≈àÕ¬‡¢â“·≈–∑”°“√≈â“ߺⓄÀ¡à®π∂÷ß°“√ªíòπ·ÀâßÕ’°§√—Èß
• This is to spin effectively.
• ‡æ◊ËÕ‡ªìπ°“√‡æ‘Ë¡ª√– ‘∑∏‘¿“æ„π°“√ªíòπ·Àâß
• This is the liquid balancing device installed to minimize vibration during spinning.
• ¿“¬„π¢Õߥâ“π∫π¢Õß∂—ߪíòπ·Àâß®–∫√√®ÿπÈ”‰«â‡æ◊ËÕª√—∫ ¡¥ÿ≈„π°“√ªíòπ·Àâß
• When power is off during draining or spinning cycle, the drainage valve remains opened. In such case, power on and start filling in wateragain.
• ∂Ⓣø¥—∫„π√–À«à“ß∑’ˇ§√◊ËÕß∑”°“√√–∫“¬πÈ”À√◊Õªíòπ·Àâß«“≈å«√–∫“¬πÈ”∑‘Èß®–‡ªî¥§â“ßÕ¬Ÿà ‡¡◊ËÕ‰øøÑ“°≈—∫‡ªìπª°µ‘‡§√◊ËÕß®–‡√‘Ë¡‡µ‘¡πÈ”‡¢â“„À¡à
• For your safety, the lid is locked while the washing machine is in operation. If you want to open the lid, press START/PAUSE button tounlock the lid. When the washing machine is in spinning process, the lid will be unlocked after the complete stop of the basket rotation.The lid remains locked if electric shut down occurs. In this case, please wait until the recovery of electric and push START/PAUSE buttonto open the lid.
• ‡æ◊ËÕ§«“¡ª≈Õ¥¿—¬„π°“√„™âß“π ¢≥–∑’ˇ§√◊ËÕß´—°ºâ“°”≈—ß∑”ß“πΩ“ªî¥®–∂Ÿ°≈ÁÕ§‰«â ∂ⓧÿ≥µâÕß°“√∑’Ë®–‡ªî¥Ω“„Àâ°¥ªÿÉ¡ START/PAUSE‡æ◊ËÕª≈¥≈ÁÕ§ ‡¡◊ËÕ‡§√◊ËÕßÕ¬Ÿà„π¢—ÈπµÕπ°“√ªíòπ·Àâß Ω“®–∑”°“√ª≈¥≈ÁÕ§À≈—ß®“°∑’ˇ§√◊ËÕß∑”ß“π‡ √Á® ·≈–∂—ßÀ¬ÿ¥À¡ÿπ „π°√≥’∑’ˉøøÑ“¥—∫¢≥–∑’ˇ§√◊ËÕß°”≈—ß∑”ß“π Ω“®–¬—ߧß≈ÁÕ§‰«â „Àâ√Õ®π°«à“‰øøÑ“¡“‡ªìπª°µ‘ ·≈â«®÷ß°¥ªÿÉ¡ START/PAUSE ‡æ◊ËÕ‡ªî¥Ω“
Auto off function1. When the operation finishes, power is automatically turned off.2. Power is automatically cut off if the following situation remains for over an hour.
1 Pause mode. 2 Lid is left opened during spin cycle.3. When START button is not pressed within 5 minutes after machine is being turned
on, power is automatically cut off.
°“√ªî¥‡§√◊ËÕßÕ—µ‚π¡—µ‘
1. ‡¡◊ËÕ®∫°“√∑”ß“π‡§√◊ËÕß®–ªî¥‚¥¬Õ—µ‚π¡—µ‘2. ‡§√◊ËÕß®–µ—¥°“√∑”ß“π∂ⓇÀµÿ°“√≥å‡À≈à“π’ȇ°‘¥‡°‘π°«à“ 1 ™—Ë«‚¡ß
1 °¥À¬ÿ¥°“√∑”ß“π (Pause) 2 ‡ªî¥Ω“∑‘È߉«â„π√Õ∫°“√ªíòπ·Àâß3. ∂Ⓣ¡à°¥ªÿÉ¡ START À≈—ß®“°°¥ªÿÉ¡ POWER ¿“¬„π 5 π“∑’ ‡§√◊ËÕß®–µ—¥«ß®√‚¥¬Õ—µ‚π¡—µ‘
Symptoms Indicator flashes Part to be inspected When resuming operationsÕ“°“√ —≠≠“≥‰ø‡µ◊Õπ ™‘Èπ à«π∑’˵âÕßµ√«®Õ¬à“ß√–¡—¥√–«—ß ‡¡◊ËÕµâÕß°“√„Àâ°“√∑”ß“π¥”‡π‘πµàÕ‰ª„À¡à
Not running
·°π —°‰¡àÀ¡ÿπ
Not filling in water
πÈ”‰À≈‰¡à‡µÁ¡
Not draining
‰¡à√–∫“¬πÈ”∑‘Èß
Not spinning
∂—ߪíòπ‰¡à∑”ß“π
Cannot lock the lid(The lid is unproperly closed.)
‰¡à “¡“√∂ªî¥Ω“(Ω“∂Ÿ°ªî¥‰¡à∂Ÿ°µâÕß)
Cannot unlock the lid
ª≈¥≈ÁÕ§Ω“ªî¥‰¡à‰¥â
• Check if electricity is cut off? ‰øøÑ“¥—∫À√◊Õ‡ª≈à“?• Check if fuse or circuit break is blown? µ√«®¥Ÿ«à“øî« å¢“¥À√◊Õ‡ª≈à“?• Check if power cord is properly plugged? µ√«®¥Ÿ«à“ª≈—Í°∑”°“√‡ ’¬∫
∂Ÿ°µâÕßÀ√◊Õ‰¡à?
• Check if tap is turned on?
• Check if water is frozen or water supply is cut off?
• Check if water supply inlet is dirty?
• µ√«®¥Ÿ«à“∑”°“√‡ªî¥πÈ”·≈â«À√◊Õ¬—ß?• µ√«®¥Ÿ«à“πÈ”°≈“¬‡ªìππÈ”·¢ÁßÀ√◊Õ‰¡à À√◊Õ∑àÕ®à“¬πÈ”¢“¥À√◊Õ‡ª≈à“?• µ√«®¥Ÿ«à“∑àÕ®à“¬πÈ”µ—πÀ√◊Õ¡’‡»…‡¢â“‰ªÕÿ¥À√◊Õ‡ª≈à“?
• Check if drainage hose is completely released?
• Check if drainage hose is damaged?
• Check if drainage opening is immersed in water?
• Check if drainage hose is obstructed?
• Check if the interior of the drainage hose is frozen?
• µ√«®¥Ÿ«à“∑àÕπÈ”∑‘Èß ¡∫Ÿ√≥åÀ√◊Õ‰¡à?• µ√«®¥Ÿ«à“∑àÕπÈ”∑‘È߉¥â√—∫§«“¡‡ ’¬À“¬À√◊Õ‰¡à?• µ√«®¥Ÿ«à“™àÕߢÕß∑àÕπÈ”∑‘Èß®¡Õ¬Ÿà„µâπÈ”À√◊Õ‰¡à?• µ√«®¥Ÿ«à“¡’Õ–‰√°—ÈπÕ¬ŸàÀ√◊Õ‰¡à?• µ√«®¥Ÿ«à“¿“¬„π°≈“¬‡ªìππÈ”·¢ÁßÀ√◊Õ‰¡à?
• Check if lid is opened?
• µ√«®¥Ÿ«à“Ω“∂—ߪíòπ‡ªî¥‰«âÀ√◊Õ‡ª≈à“?
• Check if laundry load is tilted to one side?
• µ√«®¥Ÿ«à“‡ ◊ÈÕºâ“∑’Ë„ à≈߉ªπ—Èπ‡Õ’¬ß¢â“ß„¥¢â“ßÀπ÷ËßÀ√◊Õ‡ª≈à“?
• Does the lock hole of lid match with the pin of interlock switch?
• ™àÕß≈ÁÕ§µ√ß°—∫µ”·Àπàß≈ÁÕ§À√◊Õ‰¡à?
• Is there something that remains inside of the hole? (dust, lint etc.)
• ¡’ΩÿÉπ‡°“–µ“¡™àÕß≈ÁÕ§À√◊Õ‰¡à? (ΩÿÉπ, „¬ºâ“ Õ◊ËπÊ)
• Make sure power is on.
• Make sure the power cord is properly plugged.
• ‡ªî¥‡§√◊ËÕß∑”ß“π·≈â«·πàπÕπ
• ‡ ’¬∫ª≈—Í°∂Ÿ°µâÕß·πàπÕπ
• Press the START/PAUSE button twice to reset program.
• °¥ªÿÉ¡ START/PAUSE 2 §√—Èß ‡æ◊ËÕ‡√‘Ë¡∑”ß“π„À¡à
• Close the lid
• ∑”°“√ªî¥Ω“
• Wait until the tub stop spinning. Press START/PAUSE to unlockand open the lid then balance the clothes. Close the lid andpress START/PAUSE to restart.
• √Õ®π∂—ßÀ¬ÿ¥À¡ÿπ °¥ªÿÉ¡ START/PAUSE ‡æ◊ËÕ∑”°“√ª≈¥≈ÁÕ§·≈–∑”°“√‡ªî¥Ω“®—¥ºâ“„Àâ ¡¥ÿ≈·≈â«∑”°“√ªî¥Ω“·≈–°¥ªÿÉ¡ START/PAUSE ‡√‘Ë¡°“√∑”ß“π„À¡àÕ’°§√—Èß
Close the lid correctly
ªî¥Ω“ ·°â‰¢§«“¡º‘¥ª°µ‘
Restart
‡√‘Ë¡∑”ß“πÕ’°§√—Èß
If “C9” keeps flashing, please request repairing.
∂â“ çC9é ¬—ß· ¥ßÕ¬Ÿà§«√∑”°“√ àß´àÕ¡
Draining not completed after7 minutes.
√–∫“¬πÈ”ÕÕ°‰¡àÀ¡¥¿“¬„π7 π“∑’
Water not being filled tospecified level after 60 minutes.
πÈ”‰À≈‰¡à‡µÁ¡µ“¡∑’Ë°”Àπ¥¿“¬„π60 π“∑’
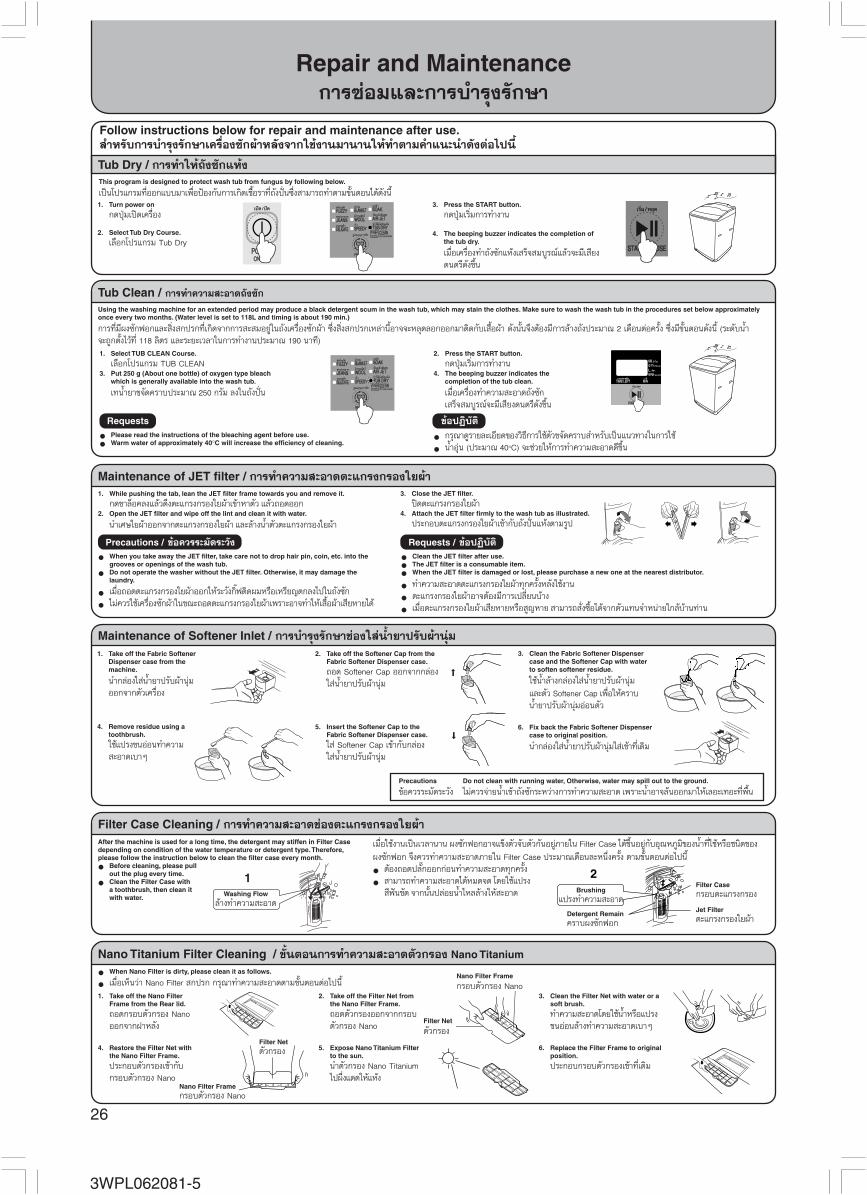
26
3WPL062081-5
Repair and Maintenance°“√ àÕ¡·≈–°“√∫”√ÿß√—°…“
Follow instructions below for repair and maintenance after use. ”À√—∫°“√∫”√ÿß√—°…“‡§√◊ËÕß —°ºâ“À≈—ß®“°„™âß“π¡“π“π„Àâ∑”µ“¡§”·π–π”¥—ßµàÕ‰ªπ’È
Tub Dry / °“√∑”„Àâ∂—ß´—°·Àâß
1. While pushing the tab, lean the JET filter frame towards you and remove it.
°¥¢“≈ÁÕ§≈ß·≈â«¥÷ßµ–·°√ß°√Õß„¬ºâ“‡¢â“À“µ—« ·≈â«∂Õ¥ÕÕ°2. Open the JET filter and wipe off the lint and clean it with water.
𔇻…„¬ºâ“ÕÕ°®“°µ–·°√ß°√Õß„¬ºâ“ ·≈–≈â“ßπÈ”µ—«µ–·°√ß°√Õß„¬ºâ“
Requests / ¢âժؑ∫—µ‘
• Clean the JET filter after use.
• The JET filter is a consumable item.
• When the JET filter is damaged or lost, please purchase a new one at the nearest distributor.
• ∑”§«“¡ –Õ“¥µ–·°√ß°√Õß„¬ºâ“∑ÿ°§√—ÈßÀ≈—ß„™âß“π
• µ–·°√ß°√Õß„¬ºâ“Õ“®µâÕß¡’°“√‡ª≈’ˬπ∫â“ß
• ‡¡◊ËÕµ–·°√ß°√Õß„¬ºâ“‡ ’¬À“¬À√◊Õ Ÿ≠À“¬ “¡“√∂ —Ëß´◊ÈÕ‰¥â®“°µ—«·∑π®”Àπà“¬„°≈â∫â“π∑à“π
Precautions / ¢âÕ§«√√–¡—¥√–«—ß
• When you take away the JET filter, take care not to drop hair pin, coin, etc. into thegrooves or openings of the wash tub.
• Do not operate the washer without the JET filter. Otherwise, it may damage thelaundry.
• ‡¡◊ËÕ∂Õ¥µ–·°√ß°√Õß„¬ºâ“ÕÕ°„Àâ√–«—ß°‘Íøµ‘¥º¡À√◊Õ‡À√’¬≠µ°≈߉ª„π∂—ß´—°
• ‰¡à§«√„™â‡§√◊ËÕß —°ºâ“„π¢≥–∂Õ¥µ–·°√ß°√Õß„¬ºâ“‡æ√“–Õ“®∑”„À⇠◊ÈպⓇ ’¬À“¬‰¥â
Maintenance of JET filter / °“√∑”§«“¡ –Õ“¥µ–·°√ß°√Õß„¬ºâ“
3. Close the JET filter.
ªî¥µ–·°√ß°√Õß„¬ºâ“4. Attach the JET filter firmly to the wash tub as illustrated.
ª√–°Õ∫µ–·°√ß°√Õß„¬ºâ“‡¢â“°—∫∂—ߪíòπ·Àâßµ“¡√Ÿª
Maintenance of Softener Inlet / °“√∫”√ÿß√—°…“™àÕß„ àπÈ”¬“ª√—∫ºâ“πÿà¡
2. Take off the Softener Cap from theFabric Softener Dispenser case.
∂Õ¥ Softener Cap ÕÕ°®“°°≈àÕß„ àπÈ”¬“ª√—∫ºâ“πÿà¡
5. Insert the Softener Cap to theFabric Softener Dispenser case.
„ à Softener Cap ‡¢â“°—∫°≈àÕß„ àπÈ”¬“ª√—∫ºâ“πÿà¡
3. Clean the Fabric Softener Dispensercase and the Softener Cap with waterto soften softener residue.
„™âπÈ”≈â“ß°≈àÕß„ àπÈ”¬“ª√—∫ºâ“πÿà¡·≈–µ—« Softener Cap ‡æ◊ËÕ„Àâ§√“∫πÈ”¬“ª√—∫ºâ“πÿà¡ÕàÕπµ—«
6. Fix back the Fabric Softener Dispensercase to original position.
π”°≈àÕß„ àπÈ”¬“ª√—∫ºâ“πÿà¡„ à‡¢â“∑’ˇ¥‘¡
After the machine is used for a long time, the detergent may stiffen in Filter Casedepending on condition of the water temperature or detergent type. Therefore,please follow the instruction below to clean the filter case every month.
• Before cleaning, please pullout the plug every time.
• Clean the Filter Case witha toothbrush, then clean itwith water. Washing Flow
≈â“ß∑”§«“¡ –Õ“¥
‡¡◊ËÕ„™âß“π‡ªìπ‡«≈“π“π ºß´—°øÕ°Õ“®·¢Áßµ—«®—∫µ—«°—πÕ¬Ÿà¿“¬„π Filter Case ‰¥â¢÷ÈπÕ¬Ÿà°—∫Õÿ≥À¿Ÿ¡‘¢ÕßπÈ”∑’Ë„™âÀ√◊Õ™π‘¥¢Õߺߴ—°øÕ° ®÷ߧ«√∑”§«“¡ –Õ“¥¿“¬„π Filter Case ª√–¡“≥‡¥◊Õπ≈–Àπ÷Ëߧ√—Èß µ“¡¢—ÈπµÕπµàÕ‰ªπ’È
• µâÕß∂Õ¥ª≈—Í°ÕÕ°°àÕπ∑”§«“¡ –Õ“¥∑ÿ°§√—Èß
• “¡“√∂∑”§«“¡ –Õ“¥‰¥âÀ¡¥®¥ ‚¥¬„™â·ª√ß ’øíπ¢—¥ ®“°π—Èπª≈àÕ¬πÈ”‰À≈≈â“ß„Àâ –Õ“¥
Filter Case Cleaning / °“√∑”§«“¡ –Õ“¥™àÕßµ–·°√ß°√Õß„¬ºâ“
1. Take off the Nano FilterFrame from the Rear lid.
∂Õ¥°√Õ∫µ—«°√Õß NanoÕÕ°®“°Ω“À≈—ß
4. Restore the Filter Net withthe Nano Filter Frame.
ª√–°Õ∫µ—«°√Õ߇¢â“°—∫°√Õ∫µ—«°√Õß Nano
• When Nano Filter is dirty, please clean it as follows.
• ‡¡◊ËÕ‡ÀÁπ«à“ Nano Filter °ª√° °√ÿ≥“∑”§«“¡ –Õ“¥µ“¡¢—ÈπµÕπµàÕ‰ªπ’È
Nano Titanium Filter Cleaning / ¢—ÈπµÕπ°“√∑”§«“¡ –Õ“¥µ—«°√Õß Nano Titanium
2. Take off the Filter Net fromthe Nano Filter Frame.
∂Õ¥µ—«°√ÕßÕÕ°®“°°√Õ∫µ—«°√Õß Nano
5. Expose Nano Titanium Filterto the sun.
π”µ—«°√Õß Nano Titanium‰ªº÷Ëß·¥¥„Àâ·Àâß
3. Clean the Filter Net with water or asoft brush.
∑”§«“¡ –Õ“¥‚¥¬„™âπÈ”À√◊Õ·ª√ߢπÕàÕπ≈â“ß∑”§«“¡ –Õ“¥‡∫“Ê
6. Replace the Filter Frame to originalposition.
ª√–°Õ∫°√Õ∫µ—«°√Õ߇¢â“∑’ˇ¥‘¡
Filter Net
µ—«°√Õß
Nano Filter Frame
°√Õ∫µ—«°√Õß Nano
Filter Netµ—«°√Õß
Nano Filter Frame°√Õ∫µ—«°√Õß Nano
Filter Case°√Õ∫µ–·°√ß°√ÕßBrushing
·ª√ß∑”§«“¡ –Õ“¥
Detergent Remain§√“∫ºß´—°øÕ°
Jet Filterµ–·°√ß°√Õß„¬ºâ“
Precautions Do not clean with running water, Otherwise, water may spill out to the ground.
¢âÕ§«√√–¡—¥√–«—ß ‰¡à§«√®à“¬πÈ”‡¢â“∂—ß´—°√–À«à“ß°“√∑”§«“¡ –Õ“¥ ‡æ√“–πȔՓ®≈âπÕÕ°¡“„Àâ‡≈Õ–‡∑Õ–∑’Ëæ◊Èπ
Tub Clean / °“√∑”§«“¡ –Õ“¥∂—ß´—°
1. Turn power on
°¥ªÿÉ¡‡ªî¥‡§√◊ËÕß
2. Select Tub Dry Course.
‡≈◊Õ°‚ª√·°√¡ Tub Dry
3. Press the START button.
°¥ªÿÉ¡‡√‘Ë¡°“√∑”ß“π
4. The beeping buzzer indicates the completion ofthe tub dry.
‡¡◊ËÕ‡§√◊ËÕß∑”∂—ß´—°·Àâ߇ √Á® ¡∫Ÿ√≥å·≈â«®–¡’‡ ’¬ß¥πµ√’¥—ߢ÷Èπ
This program is designed to protect wash tub from fungus by following below.
‡ªìπ‚ª√·°√¡∑’ËÕÕ°·∫∫¡“‡æ◊ËÕªÑÕß°—π°“√‡°‘¥‡™◊ÈÕ√“∑’Ë∂—ߪíòπ ÷Ëß “¡“√∂∑”µ“¡¢—ÈπµÕπ‰¥â¥—ßπ’È
Using the washing machine for an extended period may produce a black detergent scum in the wash tub, which may stain the clothes. Make sure to wash the wash tub in the procedures set below approximatelyonce every two months. (Water level is set to 118L and timing is about 190 min.)
°“√∑’Ë¡’ºß´—°øÕ°·≈– ‘Ëß °ª√°∑’ˇ°‘¥®“°°“√ – ¡Õ¬Ÿà„π∂—߇§√◊ËÕß´—°ºâ“ ÷Ëß ‘Ëß °ª√°‡À≈à“π’ÈÕ“®®–À≈ÿ¥≈Õ°ÕÕ°¡“µ‘¥°—∫‡ ◊Èպⓠ¥—ßπ—Èπ®÷ßµâÕß¡’°“√≈â“ß∂—ߪ√–¡“≥ 2 ‡¥◊ÕπµàÕ§√—Èß ´÷Ëß¡’¢—ÈπµÕπ¥—ßπ’È (√–¥—∫πÈ”®–∂Ÿ°µ—È߉«â∑’Ë 118 ≈‘µ√ ·≈–√–¬–‡«≈“„π°“√∑”ß“πª√–¡“≥ 190 π“∑’)1. Select TUB CLEAN Course.
‡≈◊Õ°‚ª√·°√¡ TUB CLEAN3. Put 250 g (About one bottle) of oxygen type bleach
which is generally available into the wash tub.
‡∑πÈ”¬“¢®—¥§√“∫ª√–¡“≥ 250 °√—¡ ≈ß„π∂—ߪíòπ
Requests
• Please read the instructions of the bleaching agent before use.
• Warm water of approximately 40°C will increase the efficiency of cleaning.
2. Press the START button.
°¥ªÿÉ¡‡√‘Ë¡°“√∑”ß“π4. The beeping buzzer indicates the
completion of the tub clean.
‡¡◊ËÕ‡§√◊ËÕß∑”§«“¡ –Õ“¥∂—ß´—°‡ √Á® ¡∫Ÿ√≥å®–¡’‡ ’¬ß¥πµ√’¥—ߢ÷Èπ
¢âժؑ∫—µ‘
• °√ÿ≥“¥Ÿ√“¬≈–‡Õ’¬¥¢Õß«‘∏’°“√„™âµ—«¢®—¥§√“∫ ”À√—∫‡ªìπ·π«∑“ß„π°“√„™â
• πÈ”Õÿàπ (ª√–¡“≥ 40°C) ®–™à«¬„Àâ°“√∑”§«“¡ –Õ“¥¥’¢÷Èπ
1. Take off the Fabric SoftenerDispenser case from themachine.
π”°≈àÕß„ àπÈ”¬“ª√—∫ºâ“πÿà¡ÕÕ°®“°µ—«‡§√◊ËÕß
4. Remove residue using atoothbrush.
„™â·ª√ߢπÕàÕπ∑”§«“¡ –Õ“¥‡∫“Ê

27
3WPL062081-5
When detergent remains in the dispenser, open the dispenser and wipe the insidewith a piece of soft cloth.
‡¡◊ËÕ¡’ºß —°øÕ°µ°§â“ßÕ¬Ÿà¿“¬„π™àÕß„ à„À⇪î¥Ω“·≈â«„Àâ„™âºâ“πÿà¡∑”§«“¡ –Õ“¥
Precautions / ¢âÕ§«√√–¡—¥√–«—ß
• Be gentle when wiping off touch remains to prevent detachment of the dispenser.
• ‡¡◊ËÕ∑”§«“¡ –Õ“¥ à«πµ°§â“ߢÕß™àÕßºß —°øÕ°§«√∑”‡∫“Ê ‡æ◊ËÕªÑÕß°—𧫓¡‡ ’¬À“¬∑’ËÕ“®‡°‘¥¢÷Èπ°—∫™àÕß„ àºß´—°øÕ°
Maintenance of detergent dispenser°“√¥Ÿ·≈√—°…“™àÕß„ àºß —°øÕ°
When detergent dispenser is detached from the unit.
‡¡◊ËÕ™àÕß„ àºß´—°øÕ°À≈ÿ¥ÕÕ°¡“Follow instruction below for reattachment.
∑”°“√µ‘¥‡¢â“¥â«¬°—π„À¡àµ“¡§”·π–π”¢â“ß≈à“ßπ’È1. Fit the left pin of detergent dispenser
into the pin hole of the inlet.
«¡¢“≈ÁÕ§¥â“π´â“¬¢Õß∑’Ë„ àºß´—°øÕ°°àÕπ
2. Pull right pin outward and fit it intothe right pin hole.
∫’∫∑’Ë„ àºß´—°øÕ°„Àâ‡≈Á°≈߇≈Á°πâÕ¬·≈â«¥—π‡¢â“‰ª„π™àÕߥâ“π¢«“®π¡’‡ ’¬ß¥—ߧ≈‘Í°
Precautions / ¢âÕ§«√√–¡—¥√–«—ß
• Put detergent dispenser back into position when not using it. (Close position)
• «“ß™àÕß„ àºß —°øÕ°‰«â„πµ”·Àπàß∑’Ë∂Ÿ°µâÕ߇¡◊ËÕ‰¡à„™âß“π„Àâ∑”°“√ªî¥ (ªî¥∑’˵”·Àπà߇¥‘¡)
1. Turn the tap off and remove water supply hose.( 28 for dismantling methods)
ªî¥°äÕ°πÈ”·≈â«∂Õ¥∑àÕ®à“¬πÈ”ÕÕ° ( ¥Ÿ«‘∏’°“√∂Õ¥„πÀπâ“ 28)
2. Face water supply hose down. (do not bend thewater supply hose)
∂Õ¥∑àÕ®à“¬πÈ”≈ß (Àâ“¡ßÕ∑àÕ®à“¬πÈ”)3. After running the machine for 30 seconds, stop
the machine.„À⇧√◊ËÕß∑”°“√ªíòπ 30 «‘π“∑’ ·≈â«À¬ÿ¥‡§√◊ËÕß
4. Release drainage hose.∂Õ¥∑àÕπÈ”∑‘ÈßÕÕ°
5. Set spin cycle and run for 30 seconds.µ—È߇«≈“ªíòπ 30 «‘π“∑’
6. Switch power off.ªî¥ªÿÉ¡°“√∑”ß“π
• This serves to drain away water in wash tub and drainage hose, as well as toopen the drainage valve.
• ™àÕß∑“߇¥‘ππ’ȇªìπ¢Õß∑àÕ®à“¬πÈ”„π∂—ߪíòπ·≈–∑àÕπÈ”∑‘Èß®–„À⥒∑”°“√‡ªî¥πÈ”„Àâºà“π∑àÕ®à“¬πÈ”¥â«¬
When freezing occurs / ‡¡◊ËÕÕ“°“»‡¬Áπ®π‡ªìππÈ”·¢Áß
1. Release water supply hose and dip it into tepidwater of about 40°C.
∂Õ¥∑àÕ®à“¬πÈ”ÕÕ°·≈â«®ÿà¡≈ß„ππÈ”Õÿàπª√–¡“≥ 40°C2. Pour tepid water of about 40°C into the wash tub.
π”πÈ”Õÿàπª√–¡“≥ 40°C „ à≈߉ª„π∂—ߪíòπ3. Connect water supply hose and the tap to check
if the feeding and draining of water is workingproperly.
µàÕ “¬∑àÕ®à“¬πÈ”‡¢â“°—∫°äÕ°πÈ”·≈⫵√«®¥Ÿ«à“∑àÕπÈ”∑”ß“πª°µ‘¥’À√◊Õ‰¡à
When it is likely to freeze‡¡◊ËÕÕ“°“»‡¬Áπ®—¥®ππÈ”‡√‘Ë¡®—∫µ—«
Feeding of water may be affected if water supply opening is dirty.
∂â“™àÕß®à“¬πÈ”‡¢â“ °ª√°Õ“®∑”„ÀâπÈ”‰À≈‡¢â“‰¡à –¥«°1. Turn off the tap and release water supply hose.
( 28 for dismantling methods)
ªî¥°äÕ°πÈ”·≈â«∂Õ¥∑àÕ®à“¬πÈ”ÕÕ° ( ¥Ÿ«‘∏’°“√∂Õ¥„πÀπâ“ 28)
2. Remove dirt on filtering net at the water supplyopening.
∑”§«“¡ –Õ“¥¢Õ߇»… ‘Ëß °ª√°µà“ßÊ ∫πµ—«°√Õß∑’ËÕ¬Ÿà∫π™àÕß®à“¬πÈ”• When it is difficult to clean the net, remove
it from the valve for cleaning.
• µ“¢à“¬ “¡“√∂∂Õ¥ÕÕ°¡“∑”§«“¡ –Õ“¥‰¥â∂â“∑”§«“¡ –Õ“¥‰¡à –¥«°
3. When it is necessary to remove the net for cleaning, please fix the net to it’ soriginal position to protect the water inlet valve after cleaning.
‡¡◊ËÕ®”‡ªìπµâÕß∂Õ¥µ—«°√Õ߇æ◊ËÕ∑”§«“¡ –Õ“¥·≈–‡¡◊ËÕ∑”§«“¡ –Õ“¥‡ √Á®·≈â«„Àâª√–°Õ∫µ—«°√Õ߇¢â“∑’ˇ¥‘¡ ‡æ◊ËÕªÑÕß°—𧫓¡‡ ’¬À“¬µàÕµ—««“≈å«®à“¬πÈ”
Precautions / ¢âÕ§«√√–¡—¥√–«—ß
• Restore the filtering net after cleaning it, otherwise, it may cause damages to the water supply valve.
• π”µ—«°√Õßµ“¢à“¬‰«â∑’ˇ¥‘¡À≈—ß®“°°“√∑”§«“¡ –Õ“¥‡ √Á®·≈â« ‡æ√“–Õ“®‰¥â√—∫§«“¡‡ ’¬À“¬µàÕ¢âÕµàÕ¢Õß à«π®à“¬πÈ”
Maintenance of water supply opening°“√¥Ÿ·≈∫”√ÿß√—°…“™àÕß®à“¬πÈ”
Maintenance of the unit°“√¥Ÿ·≈√—°…“‡§√◊ËÕß —°ºâ“
Clean the unit and the control panel with a piece of soft cloth.∑”§«“¡ –Õ“¥‡§√◊ËÕß·≈–·ºßÀπ⓪í∑¡å ¥â«¬ºâ“πÿà¡Ê
Precautions / ¢âÕ§«√√–¡—¥√–«—ß
When conducting repair and maintenance, keep all partsof the unit away from direct contact with water.
„π°“√∫”√ÿß√—°…“µà“ßÊ §«√‰¡à„À♑Èπ à«πµà“ßÊ ∂Ÿ°°—∫πÈ”‚¥¬µ√ß• Short circuit or electric shock may occur.
• Õ“®‡°‘¥°“√™ÁÕµ¢Õ߉øøÑ“‰¥â
Precautions / ¢âÕ§«√√–¡—¥√–«—ß
• Do not use benzene, thinner, cleanser, alkali detergent, wax or scrub-brush toclean the unit.
• When using synthetic cleansing cloth, please follow the instructions on thepackage.
• When detergent adheres to plastic parts of the unit such as the washer lid,remove it instantly to avoid it from damaging the unit.
• ‰¡à§«√„™âπÈ”¡—π‡∫π´‘π, ∑‘π‡πÕ√å ∑”§«“¡ –Õ“¥‡§√◊ËÕß
• ‡¡◊ËÕ„™âºâ“„π°“√∑”§«“¡ –Õ“¥‡§√◊ËÕß °√ÿ≥“Õà“𧔷π–π”∫π∫√√®ÿ¿—≥±å°àÕπ°“√„™âß“π
• ‡¡◊ËÕºß —°øÕ°µ‘¥∑’Ë™‘Èπ à«π∑’ˇªìπæ≈“ µ‘°¢Õ߇§√◊ËÕß ‡™àπ Ω“ªî¥¢Õ߇§√◊ËÕß„Àâ∑”°“√‡™Á¥ÕÕ°∑—π∑’ ‡æ◊ËÕÀ≈’°‡≈’ˬߧ«“¡‡ ’¬À“¬¢Õ߇§√◊ËÕß
Detergent dispenser
à«π„ àºß´—°øÕ°
Pin hole
™àÕß„ à∑’Ë≈ÁÕ§
Pin
∑’Ë≈ÁÕ§
Pin hole
™àÕß„ à∑’Ë≈ÁÕ§
Pin
∑’Ë≈ÁÕ§
Water supply opening
™àÕß®à“¬πÈ”
Cleaning the upper lint filter (Be sure to clean it each time after using the washer.)°“√¥Ÿ·≈√—°…“µ—«°√Õß„¬ºâ“¥â“π∫π (§«√∑”§«“¡ –Õ“¥∑ÿ°§√—ÈßÀ≈—ß®“°∑”°“√„™âß“π)
Overflowing of washing water from the notchesof the upper lint filter is a sign to inform youthat the filter’s net fully clogged with debris.
πÈ”∑’Ë≈âπÕÕ°¡“®“°™àÕߥâ“π∫π¢Õßµ—«°√Õ߇ªìπ —≠≠“≥„Àâ√Ÿâ«à“µ—«°√ÕßÕÿ¥µ—π
1. Remove the filter frame.‡Õ“µ—«°√Õß„¬ºâ“ÕÕ°
3. Firmly insert the filter frame.„ ൗ«°√Õß°≈—∫‡¢â“∑’ˇ¥‘¡
2. Turn the filter net inside out andwipe off the lint in the water.°≈—∫¥â“π„π∂ÿßµ“¢à“¬°√Õß·≈–𔉪≈â“ß„ππÈ”
Caution / ¢âÕ§«√√–«—ß
• Lint filters are consumable items. When the net is damaged, please purchase a new one at a sales outlet.
• µ—«°√Õß„¬ºâ“Õ“®À¡¥Õ“¬ÿ°“√„™âß“π‡¡◊ËÕ¡’√Õ¬√—Ë« °√ÿ≥“ —Ëß´◊ÈÕ„À¡à‰¥â®“°µ—«·∑π®”Àπà“¬„°≈â∫â“π∑à“π
Upper lint filter
µ—«°√Õß„¬ºâ“¥â“π∫π
Notches
™àÕߥâ“π∫π
Filter frame
µ—«°√Õß„¬ºâ“
Tub
∂—ß´—°Tub
∂—ß´—°

28
3WPL062081-5
Install the machine°“√µ‘¥µ—È߇§√◊ËÕß —°ºâ“
• If the power supply plug is damaged, it must only be replaced by the authorized service agent or repairing shops appointed by the manufacturer inorder to avoid a hazard.
∂⓪≈—Í°‰ø‡ ’¬À“¬ ®–µâÕ߉¥â√—∫°“√‡ª≈’Ë¬π®“°√â“π´àÕ¡À√◊Õµ—«·∑π®”Àπà“¬‡∑à“π—Èπ ‡æ◊ËÕªÑÕß°—πÕ—πµ√“¬¢Õ߉øøÑ“
• The opening must not be obstructed by carpeting when the washing machine is installed on a carpet floor.
‡¡◊ËÕµ‘¥µ—È߇§√◊ËÕß´—°ºâ“∫πæ◊Èπ∑’˪Ÿæ√¡ §«√µ√«® Õ∫°àÕπ«à“æ√¡π—Èπ¡’°“√°’¥¢«“ßµ—«‡§√◊ËÕßÀ√◊Õ‰¡à
Please follow instructions in manual and installation guide for installation of the washing machine.
°√ÿ≥“∑”µ“¡§”·π–π”¢â“ß≈à“ßπ’È ”À√—∫·π«∑“ß„π°“√µ‘¥µ—È߇§√◊ËÕß´—°ºâ“
Precautions / ¢âÕ§«√√–¡—¥√–«—ß
Make sure to earth the unit. / µâÕß∑”°“√µàÕ “¬¥‘π‡ ¡Õ·≈–∂Ÿ°µâÕߥ⫬• Failure to earth the unit may cause electric shock when an electric leak takes place. / ∂⓵àÕ “¬¥‘πº‘¥æ≈“¥Õ“®∑”„Àâ‰øøÑ“™ÁÕµ‡¡◊ËÕ‡°‘¥‰ø√—Ë«¢÷ÈπTurn tap on to check if water supply hose is properly connected before starting. / °àÕπ‡√‘Ë¡°“√∑”ß“π„À⇪î¥πÈ”µ√«®¥Ÿ∑’Ë∑àÕ®à“¬πÈ”°àÕπ«à“∂Ÿ°µâÕßÀ√◊Õ‰¡à(¡’°“√√—Ë«‰À≈À√◊Õ‰¡à)• If it is loosely screwed, water leakage may occur, thus causing unpredictable properly damages. / ∂â“ °√Ÿ∑’Ë¢—πÀ≈«¡ Õ“®∑”„Àâ¡’πÈ”‰À≈ÕÕ°¡“·≈–‡ªìπ
“‡Àµÿ„Àâ∑√—æ¬å ‘π‡ ’¬À“¬
Earth Wire Installation / «‘∏’°“√µ‘¥µ—Èß “¬¥‘π
Please install earth wire when necessary• In case of emergency, in order to protect from electric shock accident when there is electric leak, please install the circuit short breaker.
• Before starting install the earth wire, please remove power plug from consent.
• Every time when you change or relocate the installation place, please install the earth wire when necessary.
‚ª√¥¥”‡π‘π°“√µ‘¥µ—Èß “¬¥‘π
• °√≥’∂Ⓡ°‘¥°√–· ‰ø√—Ë«¢÷Èπ¡“·≈â« ‡ªìπ°“√ªÑÕß°—πÕÿ∫—µ‘‡Àµÿ‰ø¥Ÿ¥‰¥â πÕ°®“°π’È ¢Õ·π–π”„Àⵑ¥µ—È߇§√◊ËÕßµ—¥°√–· ‰ø (Breaker) ¥â«¬
• °àÕ𵑥µ—Èß “¬¥‘ππ—È𠂪√¥¥÷ߪ≈—Í°ÕÕ°®“°‡µâ“‡ ’¬∫„Àâ‡√’¬∫√âÕ¬
• „π°√≥’∑’Ë¡’°“√‡ª≈’ˬπ·ª≈ß, ¬â“¬ ∂“π∑’˵‘¥µ—Èßπ—È𠂪√¥¥”‡π‘π°“√µ‘¥µ—Èß “¬¥‘π¥â«¬∑ÿ°§√—Èß
2-Pin Plug system (Without earth wire) / ∫â“π∑’Ë¡’‡µâ“√—∫·∫∫ 2 √Ÿ (‰¡à¡’√–∫∫ “¬¥‘π¿“¬„π)
Attach earth system°“√µ‘¥µ—Èß “¬¥‘π∑’˵‘¥¡“°—∫‡§√◊ËÕß
Earth wire must be properlyconnected (same as the picture).
µâÕß∑”°“√µ‘¥µ—Èß “¬¥‘π∑’˵‘¥¡“°—∫‡§√◊ËÕß°àÕπ∑”°“√„™âß“π (µ“¡√Ÿª¿“æ)
If the place is equipped with powersocket with 2 hole, please use3 hole adaptor with beforeoperating the washing machine.∂â“ ∂“π∑’Ë∑’˵‘¥µ—È߇§√◊ËÕß „™â‡µâ“√—∫·∫∫2 √Ÿ „Àâπ”À—«ª≈—Í°æà«ß·∫∫ 3 √Ÿ (Adaptor)¡“æà«ßµàÕ°—∫ª≈—Í°°àÕπ°“√„™âß“π
Earth wire “¬¥‘π
3 hole3 √Ÿ
AdaptorÀ—«ª≈—Í°æà«ß·∫∫ 3 √Ÿ
2 pin2 ¢“
Adaptor
À—«ª≈—Í°æà«ß·∫∫ 3 √Ÿ
3-Pin Plug system (With earth wire) / ∫â“π∑’Ë¡’‡µâ“√—∫·∫∫ 3 √Ÿ (¡’√–∫∫ “¬¥‘π¿“¬„π)
No need to install attached earth system. / ‰¡àµâÕß∑”°“√µ‘¥µ—Èß “¬¥‘π∑’˵‘¥¡“°—∫‡§√◊ËÕß
Caution / ¢âÕ§«√√–«—ßPlease make sure not to connect the earth wire (prohibited by law) to.
‚ª√¥Õ¬à“µ‘¥µ—Èß “¬¥‘π°—∫∫√‘‡«≥µàÕ‰ªπ’È‚¥¬‡¥Á¥¢“¥ (º‘¥°ÆÀ¡“¬)
• Gas pipe, telephone wire, faucet, lighting rod and please avoid the water supply pipe, cause almost of pipe come to be PVC pipe along the way.
• ∑àÕ·°ä , “¬‚∑√»—æ∑å, “¬≈àÕøÑ“, °äÕ°πÈ” à«π∑àÕª√–ª“π—Èπ¡’∫“ß™à«ß∑’ˇªìπ∑àÕ PVC ¥—ßπ—Èπ®÷ß‚ª√¥À≈’°‡≈’ˬߥ⫬
Setting and dismantling the water supply hose. / °“√µ‘¥µ—Èß·≈–°“√∂Õ¥ª√–°Õ∫∑àÕ®à“¬πÈ”
Water tap / °äÕ°πÈ”
Installation / °“√µ‘¥µ—Èß1. Push the ring down and connect the joint.
°¥·À«π≈ß·≈â«∑”°“√µàÕ¢âÕµàÕ‡¢â“‰ª2. Release the ring and push water supply
hose upward until a click sound is heard.ª≈àÕ¬·À«πÕÕ°·≈–¥—π∑àÕ®à“¬πÈ”®π¡’‡ ’¬ß§≈‘°• Slightly pull the water supply hose to
check if it is tightly and properly connected.≈Õߥ÷ß∑àÕ®à“¬πÈ”‡∫“Ê ‡æ◊ËÕµ√«®¥Ÿ«à“ «¡‰¥â ¡∫Ÿ√≥åÀ√◊Õ‰¡à
Main unit / à«π ”§—≠
Screw the union nut to arrow direction to firmly attach the watersupply opening.∑”°“√¢—π à«π≈ÁÕ§µ“¡∑‘»∑“ߢÕß≈Ÿ°»√„Àâ·πàπ·≈â«®÷ß∑”°“√‡ªî¥πÈ”• Water leakage may occur if union nut is
loosened.πȔՓ®√—Ë«‰¥â∂â“πäÕµ∑’Ë„™âÀ≈«¡
• Unscrew the union nut when dismantling.§≈“¬ °√ŸÕÕ°‡¡◊ËÕµâÕß°“√∂Õ¥∑àÕ
Dismantling / °“√∂Õ¥∑àÕ®à“¬πÈ”1. Turn water tap off.
ªî¥°äÕ°πÈ”2. Press the START button and run for 10 seconds.
°¥ªÿÉ¡‡√‘Ë¡°“√∑”ß“π 10 «‘π“∑’• This is to prevent water from spilling
out during dismantling.‡ªìπ°“√ªÑÕß°—π‰¡à„ÀâπÈ”‰À≈ÕÕ°¡“√–À«à“ß∑”°“√·¬°™‘Èπ à«π
3. Release hook, pull the ring downwardand disconnect water supply hose.∂Õ¥¢Õ‡°’ˬ«ÕÕ°¥÷ß·À«π≈ß·≈–∂Õ¥∑àÕ®à“¬πÈ”
Precautions / ¢âÕ§«√√–¡—¥√–«—ß
Make sure that the union nut between water supply hose andmain unit is tightly screwed.·πà„®«à“¢—ππäÕµ√–À«à“ß∑àÕ®à“¬πÈ”°—∫µ—«‡§√◊ËÕß·πàπ¥’·≈â«• Water leakage may occur if union
nut it loosened.
• πÈ”∑’Ë√—Ë«ÕÕ°¡“Õ“®‡°‘¥®“°µ—«∑’Ë„™â≈ÁÕ§π—ÈπÀ≈«¡
Water supply hose∑àÕπÈ”‡¢â“
Joint¢âÕµàÕ
Hook¢Õ‡°’ˬ«
Ring«ß·À«π
Turn offÀ¡ÿπªî¥
Hook¢Õ‡°’ˬ«
Unionnutµ—«≈ÁÕ§
Water supply opening™àÕß√—∫πÈ”
Earth “¬¥‘π
Ring«ß·À«π
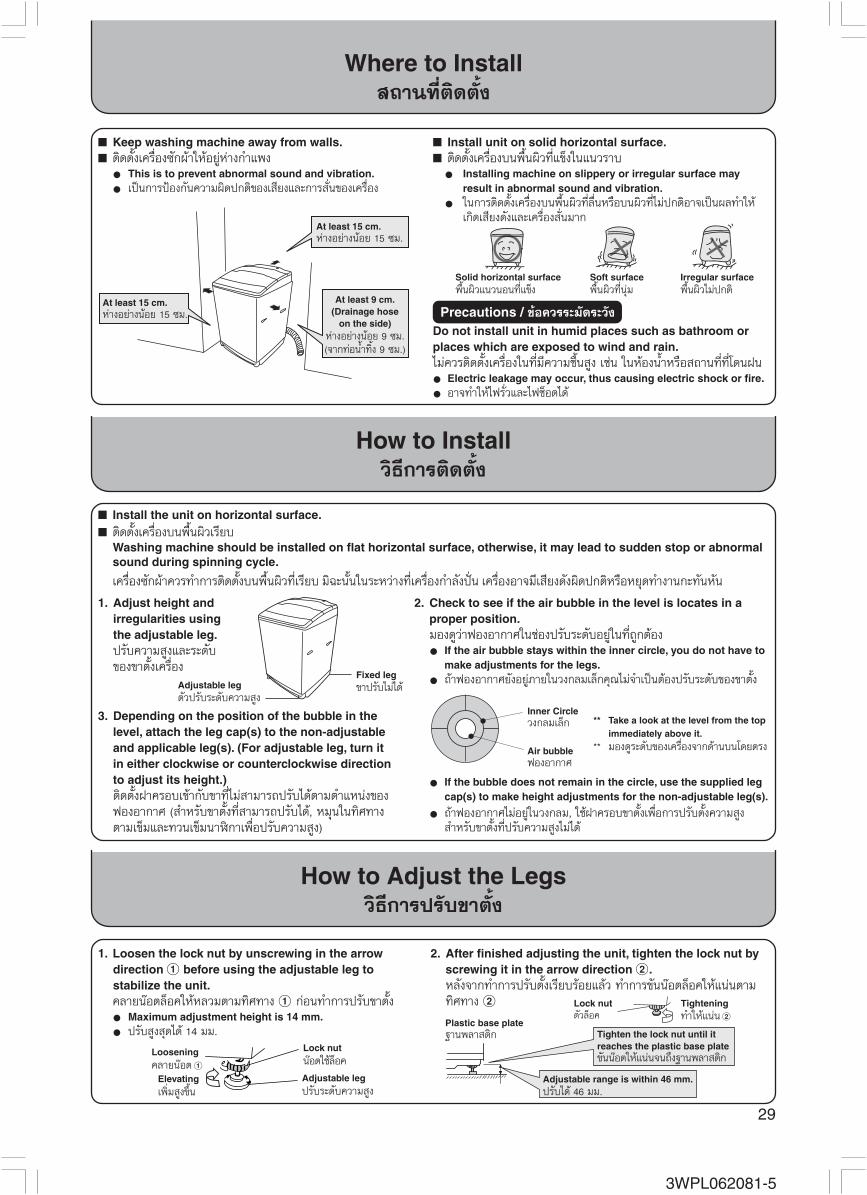
29
3WPL062081-5
Where to Install ∂“π∑’˵‘¥µ—Èß
Keep washing machine away from walls. µ‘¥µ—È߇§√◊ËÕß´—°ºâ“„ÀâÕ¬ŸàÀà“ß°”·æß
• This is to prevent abnormal sound and vibration.
• ‡ªìπ°“√ªÑÕß°—𧫓¡º‘¥ª°µ‘¢Õ߇ ’¬ß·≈–°“√ —Ëπ¢Õ߇§√◊ËÕß
Install unit on solid horizontal surface. µ‘¥µ—È߇§√◊ËÕß∫πæ◊Èπº‘«∑’Ë·¢Áß„π·π«√“∫ • Installing machine on slippery or irregular surface may
result in abnormal sound and vibration. • „π°“√µ‘¥µ—È߇§√◊ËÕß∫πæ◊Èπº‘«∑’Ë≈◊ËπÀ√◊Õ∫πº‘«∑’ˉ¡àª°µ‘Õ“®‡ªìπº≈∑”„Àâ
‡°‘¥‡ ’¬ß¥—ß·≈–‡§√◊ËÕß —Ëπ¡“°
Precautions / ¢âÕ§«√√–¡—¥√–«—ß
Do not install unit in humid places such as bathroom orplaces which are exposed to wind and rain.‰¡à§«√µ‘¥µ—È߇§√◊ËÕß„π∑’Ë¡’§«“¡™◊Èπ Ÿß ‡™àπ „πÀâÕßπÈ”À√◊Õ ∂“π∑’Ë∑’Ë‚¥πΩπ• Electric leakage may occur, thus causing electric shock or fire.
• Õ“®∑”„Àâ‰ø√—Ë«·≈–‰ø™ÁÕµ‰¥â
Solid horizontal surfaceæ◊Èπº‘«·π«πÕπ∑’Ë·¢Áß
Irregular surfaceæ◊Èπº‘«‰¡àª°µ‘
Soft surfaceæ◊Èπº‘«∑’Ëπÿà¡
At least 15 cm.Àà“ßÕ¬à“ßπâÕ¬ 15 ´¡.
How to Install«‘∏’°“√µ‘¥µ—Èß
Install the unit on horizontal surface. µ‘¥µ—È߇§√◊ËÕß∫πæ◊Èπº‘«‡√’¬∫
Washing machine should be installed on flat horizontal surface, otherwise, it may lead to sudden stop or abnormalsound during spinning cycle.
‡§√◊ËÕß´—°ºâ“§«√∑”°“√µ‘¥µ—Èß∫πæ◊Èπº‘«∑’ˇ√’¬∫ ¡‘©–π—Èπ„π√–À«à“ß∑’ˇ§√◊ËÕß°”≈—ߪíò𠇧√◊ËÕßÕ“®¡’‡ ’¬ß¥—ߺ‘¥ª°µ‘À√◊ÕÀ¬ÿ¥∑”ß“π°–∑—πÀ—π
2. Check to see if the air bubble in the level is locates in aproper position.¡ÕߥŸ«à“øÕßÕ“°“»„π™àÕߪ√—∫√–¥—∫Õ¬Ÿà„π∑’Ë∂Ÿ°µâÕß• If the air bubble stays within the inner circle, you do not have to
make adjustments for the legs.
• ∂â“øÕßÕ“°“»¬—ßÕ¬Ÿà¿“¬„π«ß°≈¡‡≈Á°§ÿ≥‰¡à®”‡ªìπµâÕߪ√—∫√–¥—∫¢Õߢ“µ—Èß
• If the bubble does not remain in the circle, use the supplied legcap(s) to make height adjustments for the non-adjustable leg(s).
• ∂â“øÕßÕ“°“»‰¡àÕ¬Ÿà„π«ß°≈¡, „™âΩ“§√Õ∫¢“µ—È߇æ◊ËÕ°“√ª√—∫µ—Èߧ«“¡ Ÿß ”À√—∫¢“µ—Èß∑’˪√—∫§«“¡ Ÿß‰¡à‰¥â
1. Adjust height andirregularities usingthe adjustable leg.ª√—∫§«“¡ Ÿß·≈–√–¥—∫¢Õߢ“µ—È߇§√◊ËÕß
3. Depending on the position of the bubble in thelevel, attach the leg cap(s) to the non-adjustableand applicable leg(s). (For adjustable leg, turn itin either clockwise or counterclockwise directionto adjust its height.)µ‘¥µ—ÈßΩ“§√Õ∫‡¢â“°—∫¢“∑’ˉ¡à “¡“√∂ª√—∫‰¥âµ“¡µ”·ÀπàߢÕßøÕßÕ“°“» ( ”À√—∫¢“µ—Èß∑’Ë “¡“√∂ª√—∫‰¥â, À¡ÿπ„π∑‘»∑“ßµ“¡‡¢Á¡·≈–∑«π‡¢Á¡π“Ãî°“‡æ◊ËÕª√—∫§«“¡ Ÿß)
Inner Circle«ß°≈¡‡≈Á°
Air bubbleøÕßÕ“°“»
** Take a look at the level from the topimmediately above it.
** ¡ÕߥŸ√–¥—∫¢Õ߇§√◊ËÕß®“°¥â“π∫π‚¥¬µ√ß
Adjustable legµ—«ª√—∫√–¥—∫§«“¡ Ÿß
Fixed leg¢“ª√—∫‰¡à‰¥â
How to Adjust the Legs«‘∏’°“√ª√—∫¢“µ—Èß
2. After finished adjusting the unit, tighten the lock nut byscrewing it in the arrow direction 2.À≈—ß®“°∑”°“√ª√—∫µ—È߇√’¬∫√âÕ¬·≈â« ∑”°“√¢—ππäÕµ≈ÁÕ§„Àâ·πàπµ“¡∑‘»∑“ß 2
1. Loosen the lock nut by unscrewing in the arrowdirection 1 before using the adjustable leg tostabilize the unit.§≈“¬πäÕµ≈ÁÕ§„ÀâÀ≈«¡µ“¡∑‘»∑“ß 1 °àÕπ∑”°“√ª√—∫¢“µ—Èß• Maximum adjustment height is 14 mm.
• ª√—∫ Ÿß ÿ¥‰¥â 14 ¡¡.
Loosening§≈“¬πäÕµ 1
Adjustable legª√—∫√–¥—∫§«“¡ Ÿß
Elevating‡æ‘Ë¡ Ÿß¢÷Èπ
Lock nutπäÕµ„™â≈ÁÕ§
Plastic base plate∞“πæ≈“ µ‘°
Lock nutµ—«≈ÁÕ§
Tightening∑”„Àâ·πàπ 2
Tighten the lock nut until itreaches the plastic base plate¢—ππäÕµ„Àâ·πàπ®π∂÷ß∞“πæ≈“ µ‘°
Adjustable range is within 46 mm.ª√—∫‰¥â 46 ¡¡.
At least 9 cm.(Drainage hose
on the side)Àà“ßÕ¬à“ßπâÕ¬ 9 ´¡.(®“°∑àÕπÈ”∑‘Èß 9 ´¡.)
At least 15 cm.Àà“ßÕ¬à“ßπâÕ¬ 15 ´¡.

30
3WPL062081-5
Safety Check¢âժؑ∫—µ‘‡æ◊ËÕ§«“¡ª≈Õ¥¿—¬„π°“√„™âß“π
If any of the following conditions or other abnormalities occurs, immediatelypull out the power plug to prevent an accident and request help from anauthorized dealer or agent.
• Never conduct repairs by yourself as it may be dangerous.
• If you have used the washer for 4-5 years, even in the absence of thefollowing conditions and other abnormalities, request a safety inspectionof the machine.
• If the power supply cord is damaged, it must only be replaced by a repairshop appointed by the manufacturer or its service agents in order toavoid a hazard.
• The washing machine bottom must not be obstructed by carpeting whenthe washing machine is installed on a carpet floor.
• When you turn on the switch, the machine sometimes does not operate.
• The power cord has “cracks” or “flaws”.
• There are abnormal sounds and vibrations during operation.
• The basket does not stop easily. (It takes over 15 seconds for the basket to stop)
• There is a smell of burning.
• If you touch the machine, you may get an electric shock.
• ‡¡◊ËÕ§ÿ≥‡ªî¥‡§√◊ËÕß∑”ß“π„π∫“ߧ√—È߇§√◊ËÕßÕ“®‰¡à∑”ß“π
• µ—«ª≈—Í°Õ“®¡’√Õ¬√â“«À√◊Õ·µ°• ¡’‡ ’¬ß¥—ß·≈– —Ëπ„π√–À«à“ß∑’ˇ§√◊ËÕß∑”ß“π• ∂—ß´—°‰¡àÀ¬ÿ¥À¡ÿπßà“¬ („™â‡«≈“‡°‘π 15 «‘π“∑’ °«à“®–∑”°“√À¬ÿ¥À¡ÿπ)
• ‡°‘¥°≈‘Ëπ‰À¡â• ∂ⓧÿ≥®—∫∂Ÿ°‡§√◊ËÕß·≈â«¡’°√–· ‰øøÑ“¥Ÿ¥
In case when the machine is used in places other than ordinary households.If the washer is in use for extremely long periods of time compared to ordinary householduse, such as in dormitories and hospitals, It may be necessary to change parts (such asthe clutch, belt or seal) more frequently. In this case, consult with the dealer from whomyou purchased the washer and have the machine inspected periodically.
How to Install The Rat Guard«‘∏’°“√ª√–°Õ∫∞“π°—πÀπŸ
Drain Hose Connection Parts°“√µàÕ∑àÕ√–∫“¬πÈ”∑‘Èß
Drain Hose can be moved by the pressure of drain water or the vibration. If the drain port is big or shallow,please fix drain hose so that it does not come off.
∑àÕ√–∫“¬πÈ”∑‘ÈßÕ“®®–‡¢¬◊ÈÕπ‰¥â ‡π◊ËÕß®“°·√ߥ—πÀ√◊Õ°“√ —Ëπ –‡∑◊Õπ¢ÕßπÈ”∑’Ë√–∫“¬ ∂â“™àÕß√–∫“¬πÈ”¡’¢π“¥„À≠à À√◊Õµ◊Èπ°√ÿ≥“¬÷¥µ‘¥∑àÕ‡æ◊ËÕ‰¡à„ÀâÀ≈ÿ¥ÕÕ°
Drain Hose ExtensionPlease use the Extension Hose that is sold separately.For good draining effect, please follow below.
°“√µàÕ§«“¡¬“«¢Õß∑àÕ√–∫“¬πÈ”°√ÿ≥“„™â∑àÕµàÕ§«“¡¬“«∑’Ë®”Àπà“¬·¬°µà“ßÀ“°‡æ◊ËÕ°“√√–∫“¬πÈ”∑’Ë¥’¡’ª√– ‘∑∏‘¿“æ §«√∑”µ“¡À—«¢âÕµàÕ‰ªπ’È
• In case of using the general extension hose, if inner diameter of hose issmall it cannot drain water efficiently and the unit may not work normally.
• °√≥’∑’Ë„™â∑àÕµàÕ§«“¡¬“«∑’Ë¡’¢“¬∑—Ë«‰ªµ“¡∑âÕßµ≈“¥ ∂Ⓡ âπºà“»Ÿπ¬å°≈“ß¿“¬„π∑àÕ‡≈Á°‡°‘π‰ª ®– àߺ≈„Àâª√– ‘∑∏‘¿“æ°“√√–∫“¬πÈ”‰¡à¥’ ∑”„À⇧√◊ËÕß∑”ß“πº‘¥ª°µ‘‰¥â
Max total length ofDrain Hose is 2 m. “¡“√∂µàÕ∑àÕ√–∫“¬πÈ”‰¥â¬“« ÿ¥ 2 ‡¡µ√
When crossing a doorsill, the height should be less than 10 cm.and total length of drain hose should be less than 1 m.°√≥’∑’Ëæ“¥ “¬¢â“¡§“πª√–µŸ §«“¡ ŸßµâÕߵ˔°«à“ 10 ´¡.·≈–§«“¡¬“«∑àÕ√–∫“¬πÈ”∑—ÈßÀ¡¥µâÕߵ˔°«à“ 1 ¡.
Less than 10 cm.µË”°«à“ 10 ´¡.
Less than 1 m.µË”°«à“ 1 ¡.
Extension Hose∑àÕµàÕ¢¬“¬§«“¡¬“«
Less than 2 m. /µË”°«à“ 2 ¡.
1 Lean the machine on the front side.
• To prevent scatch, please place themachine on carton box.
«“߇§√◊ËÕß —°ºâ“≈ߥâ“πÀπⓇ∫“Ê
• ‡æ◊ËÕªÑÕß°—π√Õ¬¢Ÿ¥¢’¥ „Àâ𔇧√◊ËÕß«“ß≈ß∫π°≈àÕß°√–¥“…
2 Insert the rat guard to upper edge ofbase same the picture.„Àâπ”∞“π°—πÀπŸ„ à∑’Ë™àÕߢÕ∫∞“π‡§√◊ËÕß —°ºâ“®“°∑“ߥâ“π∫πµ“¡¿“æ
3 Put each of screw (10 position) to the ratguard and tighten them firmly.
∑”°“√¢—π °√Ÿ∑—Èß 10 ®ÿ¥ ∑’Ë∑”°“√¬÷¥∞“π°—πÀπŸ„Àâ·πàπ
4 Setting the washing machine.
∑”°“√µ‘¥µ—È߇§√◊ËÕß —°ºâ“
REMARK : Screws was packing with the ratguard.
À¡“¬‡Àµÿ : °√Ÿ®–Õ¬Ÿà„π∂ÿßµ‘¥°—∫µ—«∞“π°—πÀπŸ
Put the drain hose into drainport tightly.
• If the drain hose come off,the damage such as waterleak may be occurred.
Õ¥ª≈“¬∑àÕ√–∫“¬πÈ”∑‘È߇¢â“°—∫™àÕß√–∫“¬πÈ”∑‘Èß„Àâ·πàπ
• ∂â“∑àÕ√–∫“¬πÈ”∑‘ÈßÀ≈ÿ¥ÕÕ°®–∑”„À⇰‘¥πÈ”√—Ë«À√◊Õ§«“¡‡ ’¬À“¬Õ◊ËπÊ ‰¥â
Caution / ¢âÕ§«√√–«—ß • Push the drain hose onto the drain outlet and secure itwith the hose clip (enclosed in the package.)
• The drain hose can be extended with an optional hose.
• When purchasing extension drainage hose, make surethat the inner diameter of the hose is wide enough,otherwise, poor drainage may cause malfunction of thewashing machine.
• «¡∑àÕ√–∫“¬πÈ”∑‘È߇¢â“°—∫¢âÕµàÕ¢Õß∑àÕ·≈â«√—¥¥â«¬µ—«√—¥∑àÕ(µ‘¥Õ¬Ÿà°—∫∑àÕ)
• ∑àÕπÈ”∑‘Èß “¡“√∂ ◊ÈÕ¡“µàÕ‡æ‘Ë¡§«“¡¬“«‰¥â
• ‡¡◊ËÕ®– ◊ÈÕ∑àÕπÈ”∑‘Èß¡“µàÕ‡æ‘Ë¡§«√∑√“∫§«“¡‚µ¢Õß∑àÕ„Àâ·πàπÕπ·≈–∂Ⓣ¥â∑àÕ∑’ˉ¡à¡’§ÿ≥¿“æ¡“Õ“®∑”„À⇧√◊ËÕß∑”ß“πº‘¥ª°µ‘
Carton box°≈àÕß°√–¥“…
Screw °√Ÿ
Drain outlet¢âÕµàÕ∑àÕ
Screw °√Ÿ
Drain hose∑àÕ√–∫“¬πÈ”∑‘Èß
Hose clip (set itcorrectly in thedirection indicatedin the figure)µ—«√—¥∑àÕ (®—¥„ÀâÕ¬Ÿà„πµ”·Àπà߇À¡◊Õπ¥—ß√Ÿª)
Base / ∞“π‡§√◊ËÕßInternal hose∑àÕ√–∫“¬πÈ”∑‘Èߥâ“π„π Ring
·À«π√—¥¢âÕµàÕ∑àÕ
Drain hose∑àÕ√–∫“¬πÈ”∑‘Èß
Connection port¢âÕµàÕ∑àÕ√–∫“¬πÈ”∑‘Èß
∂â“¡’‡Àµÿ°“√≥åÀ√◊Õ§«“¡º‘¥ª°µ‘‡°‘¥¢÷Èπ„Àâ¥÷ߪ≈—Í°ÕÕ°∑—π∑’ ‡æ◊ËÕªÑÕß°—πÕÿ∫—µ‘‡Àµÿ∑’ˇ°‘¥¢÷Èπ·≈–„Àâ∑”°“√·®âßµ—«·∑π®”Àπà“¬∑—π∑’
• ‰¡à§«√∑”°“√·°â‰¢‡Õß∫“ß∑’Õ“®‰¥â√—∫Õ—πµ√“¬‰¥â
• ∂ⓧÿ≥„™â‡§√◊ËÕß¡“ª√–¡“≥ 4-5 ªï·≈â« §«√¡’°“√‡√’¬°™à“ß∫√‘°“√ ¡“∑”°“√µ√«®‡™Á§‡§√◊ËÕß ‡æ◊ËÕ§«“¡ª≈Õ¥¿—¬
• ∂⓪≈—Í°‰ø‡°‘¥°“√‡ ’¬À“¬¢÷Èπ„Àâ∑”°“√‡ª≈’ˬπ„À¡à‚¥¬™à“ߢÕß‚√ßß“πÀ√◊Õ»Ÿπ¬å∫√‘°“√„π§Ÿà¡◊Õ ‡æ◊ËÕÀ≈’°‡≈’ˬßÕ—πµ√“¬∑’ËÕ“®‡°‘¥¢÷Èπ‰¥â
• ‡¡◊ËÕ∑”°“√µ‘¥µ—È߇§√◊ËÕß´—°ºâ“∫πæ√¡µâÕ߉¡à¡’ ‘Ëß°’¥¢«“ßÕ¬Ÿà„µâ‡§√◊ËÕß´—°ºâ“
In case of inserting the Drain Hose into Drain Port, if the Drain Port is shallow and the tip of Drain Hose hits, please cut the Drain Hose.
• If it is not cut, when “Rinse” or “Spin”, it cannot drain water efficiently or rinsing is not enough and generate bubbles, so the motor will stop running.
‡¡◊ËÕ®– Õ¥∑àÕ√–∫“¬πÈ”‡¢â“„π™àÕß√–∫“¬πÈ” „π°√≥’∑’Ë™àÕß√–∫“¬πÈ”µ◊Èπ®π∑”„Àâª≈“¬¢Õß∑àÕ√–∫“¬πÈ”™π°—∫ºπ—ß™àÕß „Àâµ—¥∑àÕ√–∫“¬πÈ”ÕÕ°
• ∂Ⓣ¡àµ—¥ÕÕ°®–∑”„Àâ°“√√–∫“¬πÈ”∑‘Èß„π ç°“√≈â“ßé À√◊Õ çªíòπ·Àâßé ‰¡à¥’ ·≈â«®–¡’º≈„Àâ≈â“߉¡à –Õ“¥À√◊Õ‡°‘¥øÕß¡Õ‡µÕ√åÀ¬ÿ¥°“√∑”ß“π‰¥â
Drain Hose∑àÕ√–∫“¬πÈ”∑‘Èß
Drain Port™àÕß√–∫“¬πÈ”
„π°√≥’∑’Ë„™â‡§√◊ËÕß ≥ ∂“π∑’ËÕ◊ËπÊ (‰¡à„™â„π∫â“π)‡™àπ°√≥’∑’Ë„™â„πÀÕæ—°À√◊Õ‚√ß欓∫“≈ ÷Ëß°“√„™âß“πÕ“®¡“°°«à“ª°µ‘∑—Ë«Ê ‰ª ™‘Èπ à«πµà“ßÊ §«√‰¥â√—∫°“√‡ª≈’Ë¬π ‡™àπ (§≈—Í∑, “¬æ“πÀ√◊Õ´’≈µà“ßÊ) §«√ª√÷°…“√â“π§â“∑’Ë∑à“π´◊ÈÕ‡§√◊ËÕß´—°ºâ“¡“
How to Install Drain Hose / «‘∏’°“√µ‘¥µ—Èß∑àÕ√–∫“¬πÈ”∑‘Èß (Drain Hose)
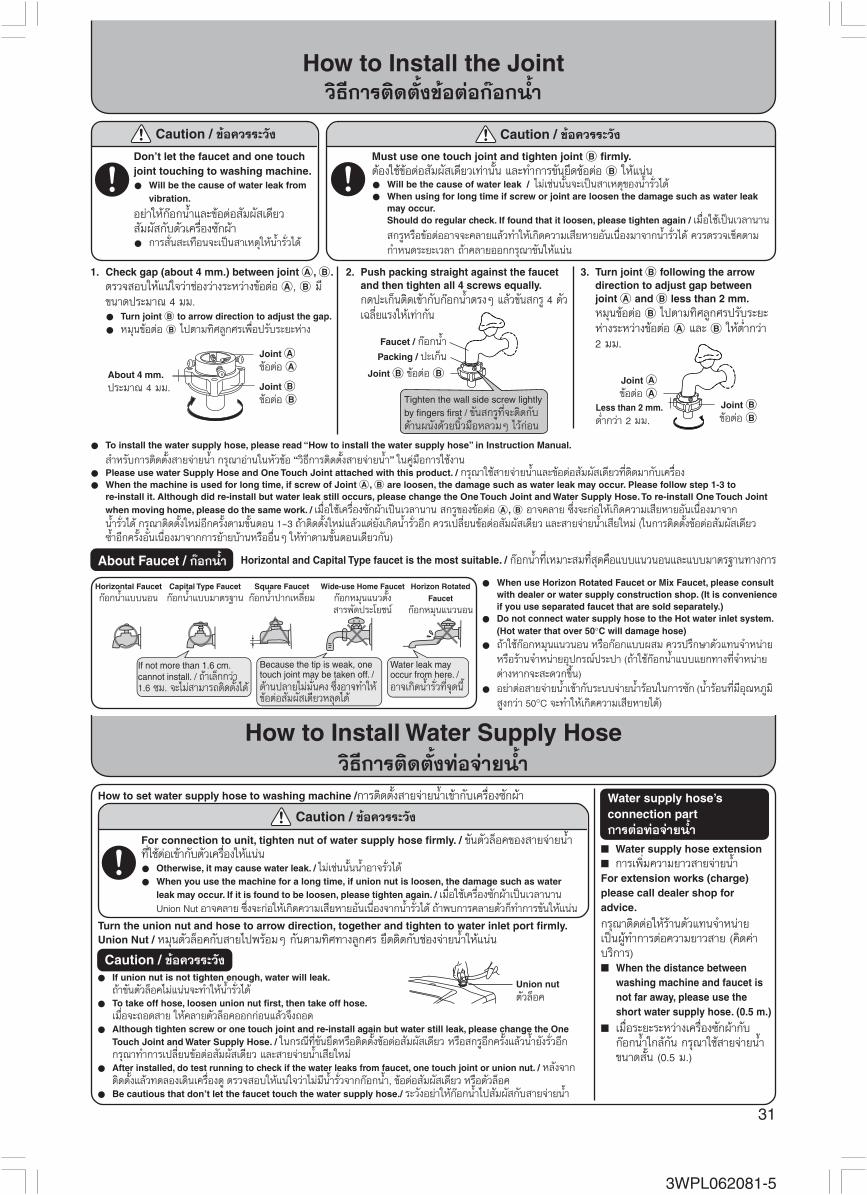
31
3WPL062081-5
How to Install the Joint«‘∏’°“√µ‘¥µ—ÈߢâÕµàÕ°äÕ°πÈ”
Don’t let the faucet and one touchjoint touching to washing machine.
• Will be the cause of water leak fromvibration.
Õ¬à“„Àâ°äÕ°πÈ”·≈–¢âÕµàÕ —¡º— ‡¥’¬« —¡º— °—∫µ—«‡§√◊ËÕß´—°ºâ“• °“√ —Ëπ –‡∑◊Õπ®–‡ªì𠓇Àµÿ„ÀâπÈ”√—Ë«‰¥â
Caution / ¢âÕ§«√√–«—ß
Must use one touch joint and tighten joint B firmly.µâÕß„™â¢âÕµàÕ —¡º— ‡¥’¬«‡∑à“π—Èπ ·≈–∑”°“√¢—π¬÷¥¢âÕµàÕ B „Àâ·πàπ• Will be the cause of water leak / ‰¡à‡™àππ—Èπ®–‡ªì𠓇Àµÿ¢ÕßπÈ”√—Ë«‰¥â• When using for long time if screw or joint are loosen the damage such as water leak
may occur.Should do regular check. If found that it loosen, please tighten again / ‡¡◊ËÕ„™â‡ªìπ‡«≈“π“π °√ŸÀ√◊Õ¢âÕµàÕÕ“®®–§≈“¬·≈â«∑”„À⇰‘¥§«“¡‡ ’¬À“¬Õ—π‡π◊ËÕß¡“®“°πÈ”√—Ë«‰¥â §«√µ√«®‡™Á§µ“¡°”Àπ¥√–¬–‡«≈“ ∂ⓧ≈“¬ÕÕ°°√ÿ≥“¢—π„Àâ·πàπ
Caution / ¢âÕ§«√√–«—ß
• To install the water supply hose, please read “How to install the water supply hose” in Instruction Manual.
”À√—∫°“√µ‘¥µ—Èß “¬®à“¬πÈ” °√ÿ≥“Õà“π„πÀ—«¢âÕ ç«‘∏’°“√µ‘¥µ—Èß “¬®à“¬πÈ”é „π§Ÿà¡◊Õ°“√„™âß“π• Please use water Supply Hose and One Touch Joint attached with this product. / °√ÿ≥“„™â “¬®à“¬πÈ”·≈–¢âÕµàÕ —¡º— ‡¥’¬«∑’˵‘¥¡“°—∫‡§√◊ËÕß• When the machine is used for long time, if screw of Joint A, B are loosen, the damage such as water leak may occur. Please follow step 1-3 to
re-install it. Although did re-install but water leak still occurs, please change the One Touch Joint and Water Supply Hose. To re-install One Touch Jointwhen moving home, please do the same work. / ‡¡◊ËÕ„™â‡§√◊ËÕß —°ºâ“‡ªìπ‡«≈“π“π °√Ÿ¢ÕߢâÕµàÕ A, B Õ“®§≈“¬ ÷Ëß®–°àÕ„À⇰‘¥§«“¡‡ ’¬À“¬Õ—π‡π◊ËÕß¡“®“°πÈ”√—Ë«‰¥â °√ÿ≥“µ‘¥µ—Èß„À¡àÕ’°§√—Èßµ“¡¢—ÈπµÕπ 1-3 ∂⓵‘¥µ—Èß„À¡à·≈â«·µà¬—߇°‘¥πÈ”√—Ë«Õ’° §«√‡ª≈’ˬπ¢âÕµàÕ —¡º— ‡¥’¬« ·≈– “¬®à“¬πÈ”‡ ’¬„À¡à („π°“√µ‘¥µ—ÈߢâÕµàÕ —¡º— ‡¥’¬«´È”Õ’°§√—ÈßÕ—π‡π◊ËÕß¡“®“°°“√¬â“¬∫â“πÀ√◊ÕÕ◊ËπÊ „Àâ∑”µ“¡¢—ÈπµÕπ‡¥’¬«°—π)
About Faucet / °äÕ°πÈ” Horizontal and Capital Type faucet is the most suitable. / °äÕ°πÈ”∑’ˇÀ¡“– ¡∑’Ë ÿ¥§◊Õ·∫∫·π«πÕπ·≈–·∫∫¡“µ√∞“π∑“ß°“√
Horizontal Faucet
°äÕ°πÈ”·∫∫πÕπCapital Type Faucet
°äÕ°πÈ”·∫∫¡“µ√∞“πSquare Faucet
°äÕ°πÈ”ª“°‡À≈’ˬ¡Wide-use Home Faucet
°äÕ°À¡ÿπ·π«µ—Èß “√æ—¥ª√–‚¬™πå
Horizon Rotated
Faucet
°äÕ°À¡ÿπ·π«πÕπ
• When use Horizon Rotated Faucet or Mix Faucet, please consultwith dealer or water supply construction shop. (It is convenienceif you use separated faucet that are sold separately.)
• Do not connect water supply hose to the Hot water inlet system.(Hot water that over 50°C will damage hose)
• ∂â“„™â°äÕ°À¡ÿπ·π«πÕπ À√◊Õ°äÕ°·∫∫º ¡ §«√ª√÷°…“µ—«·∑π®”Àπà“¬À√◊Õ√â“π®”Àπà“¬Õÿª°√≥åª√–ª“ (∂â“„™â°äÕ°πÈ”·∫∫·¬°∑“ß∑’Ë®”Àπà“¬µà“ßÀ“°®– –¥«°¢÷Èπ)
• Õ¬à“µàÕ “¬®à“¬πÈ”‡¢â“°—∫√–∫∫®à“¬πÈ”√âÕπ„π°“√´—° (πÈ”√âÕπ∑’Ë¡’Õÿ≥À¿Ÿ¡‘ Ÿß°«à“ 50°C ®–∑”„À⇰‘¥§«“¡‡ ’¬À“¬‰¥â)
How to Install Water Supply Hose«‘∏’°“√µ‘¥µ—Èß∑àÕ®à“¬πÈ”
How to set water supply hose to washing machine /°“√µ‘¥µ—Èß “¬®à“¬πÈ”‡¢â“°—∫‡§√◊ËÕß´—°ºâ“
For connection to unit, tighten nut of water supply hose firmly. / ¢—πµ—«≈ÁÕ§¢Õß “¬®à“¬πÈ”∑’Ë„™âµàÕ‡¢â“°—∫µ—«‡§√◊ËÕß„Àâ·πàπ• Otherwise, it may cause water leak. / ‰¡à‡™àππ—ÈππȔՓ®√—Ë«‰¥â• When you use the machine for a long time, if union nut is loosen, the damage such as water
leak may occur. If it is found to be loosen, please tighten again. / ‡¡◊ËÕ„™â‡§√◊ËÕß —°ºâ“‡ªìπ‡«≈“π“πUnion Nut Õ“®§≈“¬ ÷Ëß®–°àÕ„À⇰‘¥§«“¡‡ ’¬À“¬Õ—π‡π◊ËÕß®“°πÈ”√—Ë«‰¥â ∂â“æ∫°“√§≈“¬µ—«°Á∑”°“√¢—π„Àâ·πàπ
Caution / ¢âÕ§«√√–«—ß
Caution / ¢âÕ§«√√–«—ß
• If union nut is not tighten enough, water will leak.∂â“¢—πµ—«≈ÁÕ§‰¡à·πàπ®–∑”„ÀâπÈ”√—Ë«‰¥â
• To take off hose, loosen union nut first, then take off hose.‡¡◊ËÕ®–∂Õ¥ “¬ „Àâ§≈“¬µ—«≈ÁÕ§ÕÕ°°àÕπ·≈â«®÷ß∂Õ¥
• Although tighten screw or one touch joint and re-install again but water still leak, please change the OneTouch Joint and Water Supply Hose. / „π°√≥’∑’Ë¢—π¬÷¥À√◊Õµ‘¥µ—ÈߢâÕµàÕ —¡º— ‡¥’¬« À√◊Õ °√ŸÕ’°§√—Èß·≈â«πÈ”¬—ß√—Ë«Õ’°°√ÿ≥“∑”°“√‡ª≈’ˬπ¢âÕµàÕ —¡º— ‡¥’¬« ·≈– “¬®à“¬πÈ”‡ ’¬„À¡à
• After installed, do test running to check if the water leaks from faucet, one touch joint or union nut. / À≈—ß®“°µ‘¥µ—Èß·≈â«∑¥≈Õ߇¥‘π‡§√◊ËÕߥŸ µ√«® Õ∫„Àâ·πà„®«à“‰¡à¡’πÈ”√—Ë«®“°°äÕ°πÈ”, ¢âÕµàÕ —¡º— ‡¥’¬« À√◊Õµ—«≈ÁÕ§
• Be cautious that don’t let the faucet touch the water supply hose./ √–«—ßÕ¬à“„Àâ°äÕ°πÈ”‰ª —¡º— °—∫ “¬®à“¬πÈ”
Water supply hose’sconnection part°“√µàÕ∑àÕ®à“¬πÈ”
Water supply hose extension °“√‡æ‘Ë¡§«“¡¬“« “¬®à“¬πÈ”For extension works (charge)please call dealer shop foradvice.
°√ÿ≥“µ‘¥µàÕ„Àâ√â“πµ—«·∑π®”Àπà“¬‡ªìπºŸâ∑”°“√µàÕ§«“¡¬“« “¬ (§‘¥§à“∫√‘°“√) When the distance between
washing machine and faucet isnot far away, please use theshort water supply hose. (0.5 m.)
‡¡◊ËÕ√–¬–√–À«à“߇§√◊ËÕß —°ºâ“°—∫°äÕ°πÈ”„°≈â°—π °√ÿ≥“„™â “¬®à“¬πÈ”¢π“¥ —Èπ (0.5 ¡.)
If not more than 1.6 cm.cannot install. / ∂Ⓡ≈Á°°«à“1.6 ´¡. ®–‰¡à “¡“√∂µ‘¥µ—È߉¥â
Because the tip is weak, onetouch joint may be taken off. /¥â“πª≈“¬‰¡à¡—Ëπ§ß ÷ËßÕ“®∑”„Àâ¢âÕµàÕ —¡º— ‡¥’¬«À≈ÿ¥‰¥â
Water leak mayoccur from here. /Õ“®‡°‘¥πÈ”√—Ë«∑’Ë®ÿ¥π’È
Turn the union nut and hose to arrow direction, together and tighten to water inlet port firmly.Union Nut / À¡ÿπµ—«≈ÁÕ§°—∫ “¬‰ªæ√âÕ¡Ê °—πµ“¡∑‘»∑“ß≈Ÿ°»√ ¬÷¥µ‘¥°—∫™àÕß®à“¬πÈ”„Àâ·πàπ
Union nutµ—«≈ÁÕ§
3. Turn joint B following the arrowdirection to adjust gap betweenjoint A and B less than 2 mm.À¡ÿπ¢âÕµàÕ B ‰ªµ“¡∑‘»≈Ÿ°»√ª√—∫√–¬–Àà“ß√–À«à“ߢâÕµàÕ A ·≈– B „ÀâµË”°«à“2 ¡¡.
2. Push packing straight against the faucetand then tighten all 4 screws equally.°¥ª–‡°Á𵑥‡¢â“°—∫°äÕ°πÈ”µ√ßÊ ·≈â«¢—π °√Ÿ 4 µ—«‡©≈’ˬ·√ß„Àâ‡∑à“°—π
1. Check gap (about 4 mm.) between joint A, B.µ√«® Õ∫„Àâ·πà„®«à“™àÕß«à“ß√–À«à“ߢâÕµàÕ A, B ¡’¢π“¥ª√–¡“≥ 4 ¡¡.• Turn joint B to arrow direction to adjust the gap.
• À¡ÿπ¢âÕµàÕ B ‰ªµ“¡∑‘»≈Ÿ°»√‡æ◊ËÕª√—∫√–¬–Àà“ß
Joint B ¢âÕµàÕ B
Joint A¢âÕµàÕ A
About 4 mm.ª√–¡“≥ 4 ¡¡.
Faucet / °äÕ°πÈ”Packing / ª–‡°Áπ
Joint B¢âÕµàÕ B
Joint A¢âÕµàÕ A
Joint B¢âÕµàÕ B
Less than 2 mm.µË”°«à“ 2 ¡¡.
Tighten the wall side screw lightlyby fingers first / ¢—π °√Ÿ∑’Ë®–µ‘¥°—∫¥â“πºπ—ߥ⫬π‘È«¡◊ÕÀ≈«¡Ê ‰«â°àÕπ
32
3WPL062081-5
Washing Machine Repair°“√´àÕ¡‡§√◊ËÕß´—°ºâ“
In case of malfunction of the washing machine, read the manual carefully before requesting for repair services.If the manual cannot solve the problem, contact an authorized service dealer or a service agent and provide thefollowing information.1. Model name: SF-160KJS2. Describe abnormal situation and damages in detail.3. Your address and telephone number.„π°√≥’¢Õß°“√∑”ß“π∑’˺‘¥ª°µ‘ °√ÿ≥“Õà“π§Ÿà¡◊Õ∑’ˇ°’ˬ«°—∫√“¬≈–‡Õ’¬¥·≈–·°â‰¢µ“¡§”·π–π” ∂â“∑”°“√Õà“π§Ÿà¡◊Õ·≈â« ‰¡à‡¢â“„®„Àâ∑”°“√µ‘¥µàÕ∑’˵—«·∑π®”Àπà“¬À√◊Õ»Ÿπ¬å∫√‘°“√‡æ◊ËÕ·°â‰¢µàÕ‰ª·≈–§«√·®âß√“¬≈–‡Õ’¬¥¥—ßµàÕ‰ªπ’È1. ™◊ËÕ√ÿàπ SF-160KJS2. ·®âßÕ“°“√‡ ’¬3. ∑’ËÕ¬Ÿà·≈–‡∫Õ√å‚∑√»—æ∑å¢Õß∑à“π
Specifications√“¬≈–‡Õ’¬¥¢Õ߇§√◊ËÕß
Model √ÿàπ SF-160KJS
Type √Ÿª·∫∫ Fully automatic washing machine ‡§√◊ËÕß —°ºâ“Õ—µ‚π¡—µ‘
Power supply °”≈—߉øøÑ“ See the rating plate attached ¥Ÿ©≈“°∑’˵‘¥Õ¬Ÿà∑’Ë·ºàπªî¥¥â“πÀ≈—ߢÕßto the rear of the washer ‡§√◊ËÕß´—°ºâ“
Standard water level √–¥—∫πÈ”∑—Ë«‰ª 118S (Highest water level) 118S (√–¥—∫πÈ” Ÿß ÿ¥)
Standard amount of water used ª√‘¡“≥πÈ”∑’Ë„™â 200S (FUZZY course) 200S (‚ª√·°√¡Õ—µ‚π¡—µ‘)
Type of washing √Ÿª·∫∫°“√∑”ß“π Automatic reverse pulsator type √Ÿª·∫∫·°π —°À¡ÿπ‰ª°≈—∫Õ—µ‚π¡—µ‘
Water pressure ·√ߥ—ππÈ” 0.03-0.8 Mpa (0.3-8 Kgf/cm2) 0.03-0.8 Mpa (0.3-8 Kgf/cm2)
Dimension ¢π“¥ W 715 mm. x L 775.5 mm. x H 1088 mm.715 ¡¡. x 775.5 ¡¡. x 1088 ¡¡. (° x ¬ x )
Weight πÈ”Àπ—° 63 kg. 63 °°.
Sales & Service / ΩÉ“¬¢“¬·≈–»Ÿπ¬å∫√‘°“√
Hitachi Sales (Thailand), Ltd. 994, 996 Soi Thonglor Sukhumvit 55 Rd., Klongtonnua Vadhana Bangkok 10110 Tel : 0-2381-8381-98 Fax : 0-2381-9520
∫√‘…—∑ Œ‘µ“™‘‡´≈ å (ª√–‡∑»‰∑¬) ®”°—¥ 994, 996 ´Õ¬∑ÕßÀ≈àÕ ∂ππ ÿ¢ÿ¡«‘∑ 55 ·¢«ß§≈Õßµ—π‡Àπ◊Õ ‡¢µ«—≤π“ °√ÿ߇∑æœ 10110 ‚∑√»—æ∑å : 0-2381-8381-98 ‚∑√ “√ : 0-2381-9520
Factory / ‚√ßß“πHitachi Consumer Products (Thailand), Ltd. 610/1 Moo 9 Tambol Nongki, Amphur Kabinburi, Prachinburi, THAILAND 25110 Tel : 0-3728-4000 (19 lines) Fax : 0-3728-4161
∫√‘…—∑ Œ‘µ“™‘ §Õπ´Ÿ¡‡¡Õ√å ‚ª√¥—° å (ª√–‡∑»‰∑¬) ®”°—¥ 610/1 À¡Ÿà 9 µ”∫≈ÀπÕß°’Ë Õ”‡¿Õ°∫‘π∑√å∫ÿ√’ ®—ßÀ«—¥ª√“®’π∫ÿ√’ 25110 ‚∑√»—æ∑å : 0-3728-4000 (19 §Ÿà “¬) ‚∑√ “√ : 0-3728-4161
3WPL062081-5