sez online manual (1).pdf · nsdl database management ltd. softex sez online manual page 2 1...
TRANSCRIPT

SEZSEZ Online Manual
Softex
Version 3.0
Version 1.0

NSDL DATABASE MANAGEMENT LTD. Softex
SEZ Online Manual Page 1
Table of Contents
1 Introduction .................................................................................................................................................2
2 Roles and Functionalities in SEZ-ONLINE system .........................................................................................2
3 Preparation of Softex Form in SEZ-Online System .......................................................................................2
4 Workflow of SOFTEX ................................................................................................................................. 15
5 Printing of SOFTEX Through SEZ Online System ....................................................................................... 19
6 Important Notes and Additional Features ................................................................................................ 23

NSDL DATABASE MANAGEMENT LTD. Softex
SEZ Online Manual Page 2
1 INTRODUCTION
This module covers procedure for preparation and submission of Softex form in SEZ Online System.
Following are the stages for processing Softex form in SEZ Online System –
Preparation of Softex Form.
Submission of the Softex Form to Development Commissioner.
Approval of Softex Form by the Development Commissioner.
For filing Softex, Units have to obtain Softex form numbers for single as well as bulk Softex on RBI
website (http://rbi.org.in/scripts/EDF_UserDetails.aspx). The acquired Softex number needs to be
captured in SEZ Online System during creation of Softex transaction. Units will have to declare
information for all the invoices, irrespective of whether the invoice value in greater than or less
than $25,000.
2 ROLES AND FUNCTIONALITIES IN SEZ-ONLINE SYSTEM
Following user are involved in the processing of SOFTEX transaction:
From Unit o Unit Maker o Unit Approver
From DC Office o DC Initiator o DC Verifier o DC Approver
For detailed information and steps regarding user creation and role assignment, kindly refer the manual for ‘User Management’.
3 PREPARATION OF SOFTEX FORM IN SEZ-ONLINE SYSTEM
For Preparation of SOFTEX, a ‘Maker-Checker’ concept has been incorporated at the unit’s end, in the SEZ Online system. The SOFTEX document has to be prepared by the ‘Unit Maker’ user. The Unit Maker prepares a SOFTEX request and submits it to the Unit Approver user, who verifies/checks the correctness of the request before submitting it to Development Commissioner’s office.

NSDL DATABASE MANAGEMENT LTD. Softex
SEZ Online Manual Page 3
To allow the Unit Maker to file for SOFTEX transactions, Unit Admin has to assign the functionality of “SOFTEX” to the user. On assignment of the “SOFTEX” functionality, user will be provided with a link named “SOFTEX”. On clicking on this link, SOFTEX form will be opened.
Fig: Screenshot of menu option for SOFTEX form
Once the Unit Maker will click on the “Softex Form”, the below page will be displayed.

NSDL DATABASE MANAGEMENT LTD. Softex
SEZ Online Manual Page 4
Fig: Screenshots of blank SOFTEX form
Softex general details consist of all the relevant information of the Exporter unit, Period of
Export and Authorized Dealer details. The information in this Tab has been segregated in
following sections.
1. General Details
2. Exporter Details
3. Authorized dealer and Bank details.
Below Table refers all the fields in Softex General Detail’s section and implies the impact of
each of the information in terms of generating a “Softex Form”.
Field Name Functionalities
Letter of Permission (LOP
No)
LOA/LOP number refers to the permission Letter number issued by DC
office to a company for setting up a SEZ unit. In general details Tab,

NSDL DATABASE MANAGEMENT LTD. Softex
SEZ Online Manual Page 5
this information will be populated automatically as the said unit
already got the permission Letter and register in SEZ-Online System.
Date of LOP Issued The LOP/LOA issued date would be mentioned in this field and it
would be auto-populated by default.
Period From Date and To
Date
The period in between the SEZ unit will raise all the export invoices to
the client will fall between this From date and To date. I.e. If the From
Date is 01.01.2014 and To date is 31.03.2014, All the invoices date
should be a date during this particular period.
There are certain criteria’s in order to have an understanding on the
date functionalities in Softex Form.
1. Period To date cannot be a future date.
2. Difference between period date and period from date cannot be
more than 90 days.
3. From date cannot be older than one year from the present date.
Reason for delay in filling When the difference between From date and System date is greater
than 75 days, Reason for delay submission is mandatory. Unit will
require giving a sufficient justification to DC in writing in this particular
field.
Auto-Populated Fields Refer the General details screen-shot above. All the Auto-populated
fields are marked. Further details of all the fields given below.
1. Name of the Exporter. 2. Address of the Exporter 3. SEZ name and
Port code 4. SEZ Address.
Authorized Datacom
service provider
Put the Service Provider Name.
Authorized Dealer Code An Authorized Dealer is a Bank by which all the monetary dealing will
be done in order have a sound software export and getting the
remittance in Foreign Currency.

NSDL DATABASE MANAGEMENT LTD. Softex
SEZ Online Manual Page 6
The Reserve Bank may, on an application made to it in this behalf, authorize any person to deal in foreign exchange. An authorization under this section shall be in writing and -
i. May authorize transactions of all descriptions in foreign currencies or may be restricted to authorizing dealings in specified foreign currencies only;
ii. May authorize dealings in all foreign currencies or may be restricted to authorizing specified transactions only;
iii. May be granted to be effective for a specified period, or within specified amounts;
iv. May be granted subject to such conditions as may be specified therein.
Every Authorized dealer has a Specific and unique Code given by RBI. Unit user requires putting the Code in this particular field.
Authorized Dealer Name Name of Authorize dealer/Bank Name. This field will be populated
automatically once the Authorized dealer code put in the System.
Authorized Dealer
Address
Address of Authorize dealer/Bank. This field will be populated
automatically once the Authorized dealer code put in the System.
In order to enter the details of Authorized Dealer Code in Softex form, user has to click on
the search picker as shown below.
Fig: Screenshot of Authorized Dealer Code section
NSDL DATABASE MANAGEMENT LTD. Softex
SEZ Online Manual Page 7
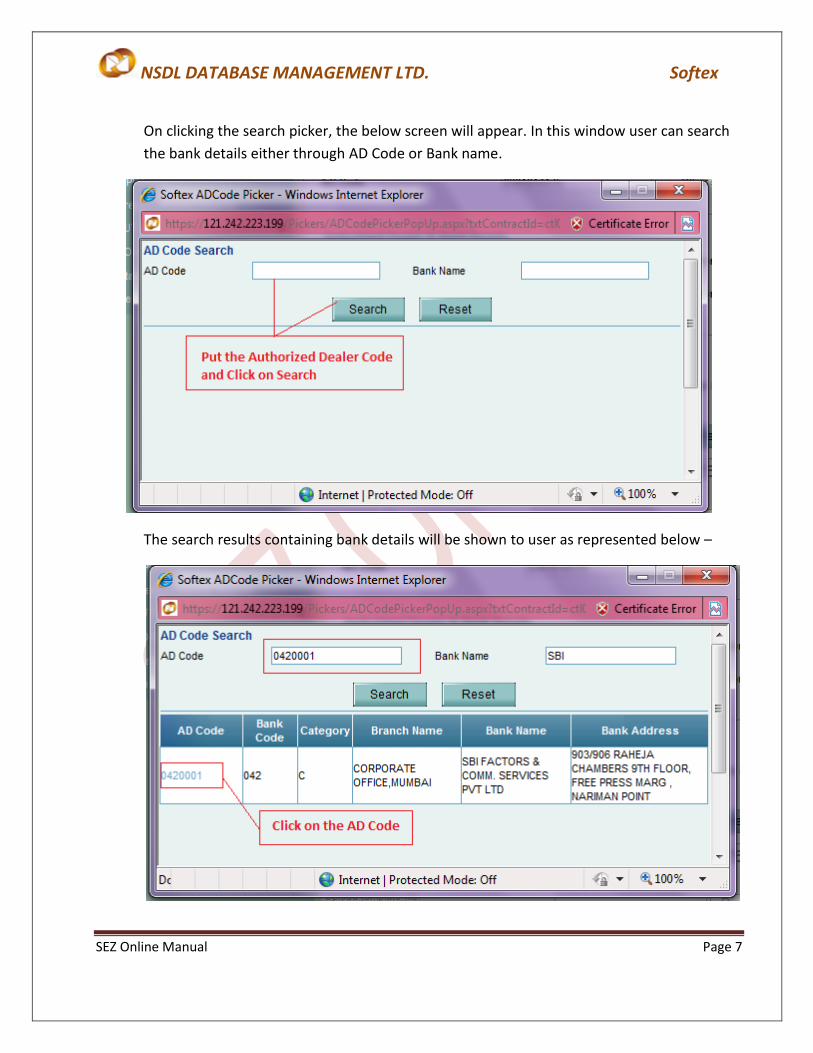
On clicking the search picker, the below screen will appear. In this window user can search
the bank details either through AD Code or Bank name.
The search results containing bank details will be shown to user as represented below –

NSDL DATABASE MANAGEMENT LTD. Softex
SEZ Online Manual Page 8
On clicking the AD Code number, the details of the particular bank will be populated in the
AD details section as represented below –
There are two types of Softex forms available – Single and Bulk Softex.
1. Single Softex - Single Softex is filed when all the records entered in the Softex form are
exported to a single entity.
2. Bulk Softex – Bulk Softex is filed when all the records entered in the Softex form are
exported to more than one entity.
Fig: Selection of type of Softex form
After all the information has been properly entered in the Softex form, user has to click on the
SAVE button
Once all details are saved, system will generate a request ID. Further another tab will be displayed
along with Softex Details Tab, i.e. “Declaration” tab.

NSDL DATABASE MANAGEMENT LTD. Softex
SEZ Online Manual Page 9
Fig: Screenshot of request ID and Declaration tab being generated
Uploading invoice details in Softex form (Softex and Royalty)
Invoice details section consists of two sub-sections
1. Softex Details
2. Royalty Details.
Now, users have been provided with a facility to upload the invoice information into the system.
The macro file can be downloaded from SEZ Online website https://www.sezonline-
ndml.com/downloads.htm in the ‘Manual and File Format’ section across Softex module under the
column ‘File Format for upload item details’.
In this macro, user has to enter Softex as well as Royalty information which need to be uploaded in
the request.
Procedure to upload Invoice details in Softex form –
1. Click on the BROWSE button in the ‘Invoice Details’ section

NSDL DATABASE MANAGEMENT LTD. Softex
SEZ Online Manual Page 10
2. Select the .sx file created by the macro template
3. Click on UPLOAD button

NSDL DATABASE MANAGEMENT LTD. Softex
SEZ Online Manual Page 11
4. System will show a message to the user – “Invoice Upload is Successful”.
5. Softex Invoice details will be uploaded in the Softex Form as shown in the below screenshot.
6. User also has to option to delete the uploaded invoices through the DELETE UPLOADED
button
7. Go to ‘Declaration’ Tab. Declaration Tab will be available to user once the Softex details are
saved.
NSDL DATABASE MANAGEMENT LTD. Softex
SEZ Online Manual Page 12
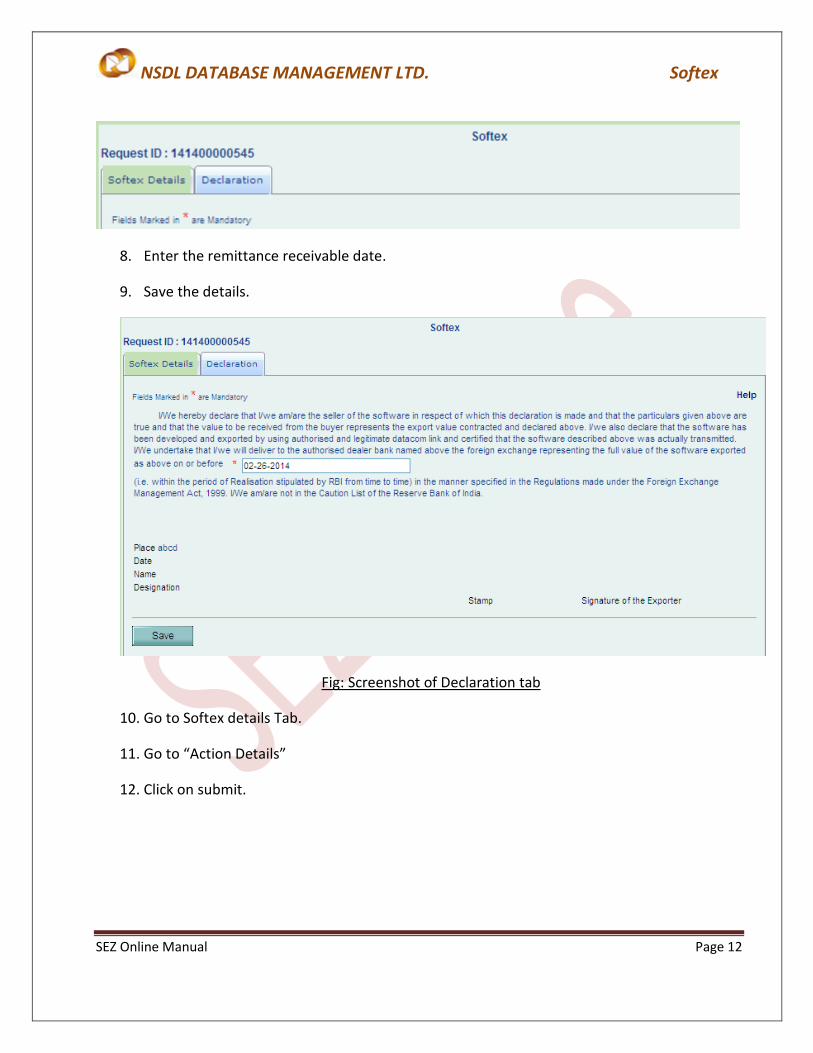
8. Enter the remittance receivable date.
9. Save the details.
Fig: Screenshot of Declaration tab
10. Go to Softex details Tab.
11. Go to “Action Details”
12. Click on submit.

NSDL DATABASE MANAGEMENT LTD. Softex
SEZ Online Manual Page 13
13. A pop-up window will be displayed.
14. Click Ok.
Confirmation Screen:
After preparation of the SOFTEX document as the user clicks on the ‘Submit’ button, a confirmation screen is displayed to the user. In the confirmation page, the contents of the SOFTEX document are displayed. The user may either confirm or cancel the submission of the SOFTEX using the buttons provided in this page. Further, please note that the user may also print a trial copy of the SOFTEX document by clicking on “Print Trial” through this page.

NSDL DATABASE MANAGEMENT LTD. Softex
SEZ Online Manual Page 14
A. General Instructions: i. After entering details of each tab, the save button has to be clicked to save the
information entered. ii. The fields marked with a red asterisk mark “*” are mandatory. The SOFTEX document
cannot be submitted without entering information in the mandatory fields. iii. A unique request id will be generated by the system as the Entity Maker user clicks on
the ‘Save’ button for the first time. The SOFTEX can be tracked in future by using this request ID.
iv. The unit will not be able to make any changes in the SOFTEX once it is submitted to DC. v. At any given point in time only one user can work on a SOFTEX. The user who accepts
the request can only take action on that request. vi. Whenever a request is submitted from Unit to DC and vice versa, user will have to sign
the Confirmation Screen using DSC. All DC users, while submitting a request to an Entity or within DC for any clarifications, will have to sign use DSC
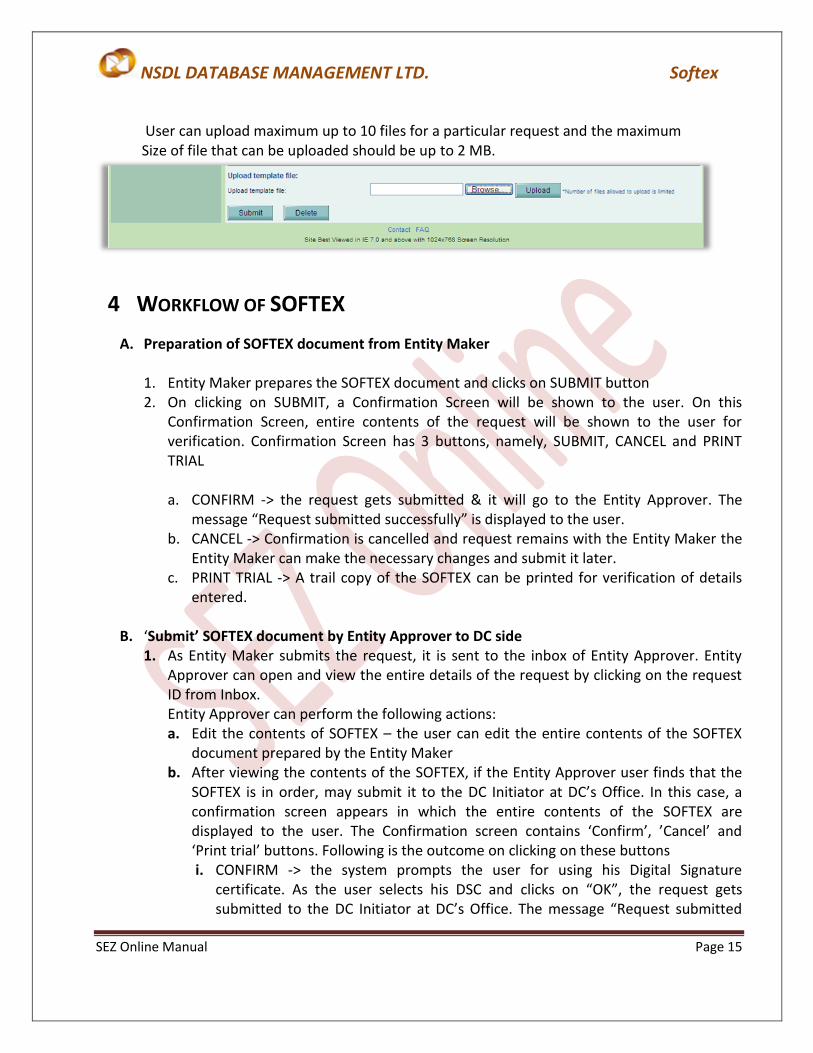
Template Upload: User has an option to upload .xls or .xlsx files through the Upload template file link.
NSDL DATABASE MANAGEMENT LTD. Softex
SEZ Online Manual Page 15
User can upload maximum up to 10 files for a particular request and the maximum Size of file that can be uploaded should be up to 2 MB.
4 WORKFLOW OF SOFTEX
A. Preparation of SOFTEX document from Entity Maker 1. Entity Maker prepares the SOFTEX document and clicks on SUBMIT button 2. On clicking on SUBMIT, a Confirmation Screen will be shown to the user. On this
Confirmation Screen, entire contents of the request will be shown to the user for verification. Confirmation Screen has 3 buttons, namely, SUBMIT, CANCEL and PRINT TRIAL a. CONFIRM -> the request gets submitted & it will go to the Entity Approver. The
message “Request submitted successfully” is displayed to the user. b. CANCEL -> Confirmation is cancelled and request remains with the Entity Maker the
Entity Maker can make the necessary changes and submit it later. c. PRINT TRIAL -> A trail copy of the SOFTEX can be printed for verification of details
entered.
B. ‘Submit’ SOFTEX document by Entity Approver to DC side 1. As Entity Maker submits the request, it is sent to the inbox of Entity Approver. Entity
Approver can open and view the entire details of the request by clicking on the request ID from Inbox. Entity Approver can perform the following actions: a. Edit the contents of SOFTEX – the user can edit the entire contents of the SOFTEX
document prepared by the Entity Maker b. After viewing the contents of the SOFTEX, if the Entity Approver user finds that the
SOFTEX is in order, may submit it to the DC Initiator at DC’s Office. In this case, a confirmation screen appears in which the entire contents of the SOFTEX are displayed to the user. The Confirmation screen contains ‘Confirm’, ’Cancel’ and ‘Print trial’ buttons. Following is the outcome on clicking on these buttons i. CONFIRM -> the system prompts the user for using his Digital Signature
certificate. As the user selects his DSC and clicks on “OK”, the request gets submitted to the DC Initiator at DC’s Office. The message “Request submitted

NSDL DATABASE MANAGEMENT LTD. Softex
SEZ Online Manual Page 16
successfully” is displayed to the user. Once the SOFTEX is submitted to DC, the unit cannot make any changes in the SOFTEX
ii. CANCEL -> Confirmation is cancelled and request remains with the Entity Approver. The Entity Approver can make the necessary changes and submit it later.
iii. PRINT TRIAL -> A trail copy of the SOFTEX can be printed for verification of details entered.
C. ‘Cancel’ request from Entity Approver The Entity Approver can ‘cancel’ the SOFTEX prepared by the Entity Maker by clicking on Delete button. In this case, the SOFTEX will get cancelled permanently and will not be available for edit/submission to DC. However, the users shall be able to view such SOFTEX through the search facility
D. ‘Sentback’ request to Entity Maker
The Entity Approver can send back the SOFTEX to the Entity Maker user who has prepared it. In this case, the SOFTEX shall reach the Inbox of the Entity Maker user who in turn can edit and resubmit the SOFTEX to the Entity Approver again.
E. Assessment of the request from DC The requests which are submitted by Unit are received by the following users DC Users.
a) DC Initiator b) DC Verifier c) DC Authorizer ( If required )
DC Users has the following options
Guidance (DC Initiator -> DC Verifier-> DC Authorizer)
Deficiency (DC Initiator -> DC Verifier, DC Verifier /DC Authorizer-> Unit Approver)
Sent back (DC Verifier -> DC Initiator, DC Authorizer-> DC Verifier)
Verified (DC Initiator -> DC Verifier, DC Verifier -> DC Authorizer)
Rejected ( DC Verifier, DC Authorizer )
Certified ( DC Verifier, DC Authorizer )
i. Guidance If the DC User’s (DC Initiator or DC Verifier) assesses the SOFTEX document and needs any guidance can submit the request with the status “Guidance”, after which the

NSDL DATABASE MANAGEMENT LTD. Softex
SEZ Online Manual Page 17
request will be sent to the DC Verifier (when submitted by DC Initiator) to the DC Authorizer (when submitted by DC Verifier) for query resolution.
ii. Deficiency
If the DC Initiator finds some incorrectness or inconsistency in the details of the submitted SOFTEX request, then DC Initiator can submit the request with the status “Deficiency”, after which the request will be sent to the DC Verifier for further assessment If DC User’s (DC Verifier or DC Authorizer) finds some incorrectness or inconsistency in the details of the submitted SOFTEX request, then DC User’s can send the request to the Unit side for rectifying the errors. For this, DC Verifier or DC Authorizer can submit the request with the status “Deficiency”, after which the request will be sent to the Entity Approver for query resolution.
iii. Sent back If DC Verifier or DC Approver requires clarification regarding some aspect or details of the request, then DC Verifier or DC Approver can submit the request with the status “Sent back” and send it back to DC Initiator by DC Verifier to DC Verifier by DC Approver
iv. Verified
If the DC User’s (DC Initiator or DC Verifier) is satisfied that the details updated by the unit is proper after verifying the necessary documents will select the option as “Verified” then the request to move to the DC Approver for final Approval .
v. Rejected If the DC User’s (DC Verifier or DC Approver) finds the details submitted by the unit is not to be in order may select this option as “Rejected” for rejecting the request.
vi. Certified If the DC User’s (DC Verifier or DC Approver) finds the details submitted by the unit is in order for certifying that the Export/Royalty after verifying the Physical softex form along with the supporting documents may select this option as “Certified” for Approving the request.

NSDL DATABASE MANAGEMENT LTD. Softex
SEZ Online Manual Page 18
For complete set of statuses and workflow scenarios, kindly refer the below embedded excel sheet.
Softexworkflow.xls

NSDL DATABASE MANAGEMENT LTD. Softex
SEZ Online Manual Page 19
5 PRINTING OF SOFTEX THROUGH SEZ ONLINE SYSTEM
After submitting the SOFTEX document to DC, the Unit/DC user can take the print-out of the request even after the workflow of the request has ended. SEZ Online application provides facility to the user to take print-out of Original, Duplicate, and Triplicate copies. On clicking the PRINT button in the User Interface, user is provided with a dialog which contains radio buttons for the above mentioned print copies. Depending upon the radio buttons selected, the user will get the output in pdf file format for taking print out of those copies. A. User can take the print-out of a request either from the Inbox or from the Search
Request screen. To take the print-out from the Inbox, the request has to be present in the Inbox of the user. User has to open the request from his Inbox and then click on the PRINT button shown at the bottom of the screen.
To take the print-out from Search Request screen, the user has to search the request by entering either its request ID of selecting the type of transaction (i.e. “SOFEX”). Then after the request is found, user has to open the request by clicking on the PRINT button shown at the bottom of the screen. On clicking the PRINT button, User is asked to select which copies which are required. Only the copies that that ticked will be printed.

NSDL DATABASE MANAGEMENT LTD. Softex
SEZ Online Manual Page 20
15. The print formats are given below for Softex and Royalty Receipt (Single)

NSDL DATABASE MANAGEMENT LTD. Softex
SEZ Online Manual Page 21
16. The print formats are given below for Softex and Royalty Receipt (Bulk)

NSDL DATABASE MANAGEMENT LTD. Softex
SEZ Online Manual Page 22
Steps to take the print-out:
i. Open the request either from Inbox or Search Request screen ii. Click on the PRINT button
iii. Select the copies as per need and click on OK. The Print Preview screen will be shown
iv. Go to Print Preview and Select Portrait mode v. Go to page settings and select: (a) Page Size as Legal and (b) Zoom as “Shrink to fit”
vi. Keep page header and footer blank vii. Keep page margins as 0.2 inches
viii. Click on PRINT button ix. Only the copies selected will be shown in the print preview screen x. Print the copies

NSDL DATABASE MANAGEMENT LTD. Softex
SEZ Online Manual Page 23
Printing Trial copy before submitting the SOFTEX form to DC In order to enable the user to check if the details entered in the SOFTEX is correct, a facility has been provided in the SEZ Online system to take a Trial copy of the SOFTEX. It can be printed in two ways:
i. Print from the Confirmation screen As the Entity Maker user submits the SOFTEX to the Entity Approver or as the Entity Approver submits the SOFTEX to DC, a confirmation screen is displayed to the user. On the confirmation screen, there is a button called ‘Print Trial’ to enable printing the trial copy of the SOFTEX. The user may take a print of the Trial copy from the Confirmation page of the SOFTEX (before confirming submission of the SOFTEX) and check if the details of the SOFTEX are correct. After checking the same, the user may click on the ‘Confirm’ button for submission of the SOFTEX.
ii. Print from the ‘Search’ facility The users may search for the SOFTEX through ‘Search Request’ facility provided in the system. User can select SOFTEX in “Request Type” or can enter Request ID in respective tab to search SOFTEX. After opening the request, the user may click on the print button provided at the bottom of the page and take a print of the single trial copy
6 IMPORTANT NOTES AND ADDITIONAL FEATURES
1. Follow the below link for Excel Uploader
https://www.sezonline-ndml.com/downloads.htm
2. Softex Invoice can be uploaded single or Bulk basis. A unit user will refer the RBI guidelines
while selecting the methodology.
3. Softex Print copy can be obtained while submitting the request to DC user. In addition the
same print can be taken from search request after submitting the request to DC office.
4. Authorized dealer codes are abstracted in SEZ system from RBI master data. Unit will
require searching the bank details with dealer code.