setting up a hadoop system in cloud a lab activity for …proc.iscap.info/2017/cases/4480.pdfhow to...
TRANSCRIPT

2017 Proceedings of the EDSIG Conference ISSN: 2473-3857 Austin, Texas USA v3 n4480 __________________________________________________________________________________________________________________________
_________________________________________________ ©2017 ISCAP (Information Systems & Computing Academic Professionals) Page 1 http://iscap.info
Teaching Case
Setting Up a Hadoop System in Cloud A Lab Activity for Big Data Analytics
Thuan L Nguyen
[email protected] Advanced Data Analytics – Graduate School
The University of North Texas Denton, Texas, USA
Abstract
Businesses can use big data analytics to get insights into vast volumes of data and extract business intelligence, which can help firms gain and sustain competitive advantages. However, employing the emergent technology successfully is not easy. Besides, several well-known surveys have indicated that there would be a serious shortage of professionals with critical skills in big data analytics, which leads to a great demand for teaching and learning the new technology. This paper aimed to provide a step-by-step guide to setting up a Hadoop system in the public cloud provided by Amazon Web Services (AWS) and making it ready for both teaching and learning big data. The system consists of Hadoop
Distributed File System, MapReduce, Apache Yarn, Apache Hive, and the database PostgreSQL. For instructors, they can follow the steps to set up the system and use it as necessary in their research and teaching. They can also use this lab activity as an assignment. For students, first, they learn how to
create and configure a virtual machine in the cloud. Then, they will gain hands-on experience in installing and setting up a Hadoop system that can be used for big data analysis. Additionally, students get a brief introduction to working with Linux operating system and the cloud technology. The lab activity requires
no experience of programming. The experience of setting up a Hadoop system in the cloud offers an appreciation of a critical part of the process of teaching and learning big data technology. Keywords: BIG DATA, BIG DATA ANALYTICS, HADOOP, APACHE HADOOP FRAMEWORK, HADOOP CLUSTERS, HADOOP SYSTEMS IN CLOUD
1. INTRODUCTION Overview For the last decade, the ubiquitous availability of internet connections using broadband networks along with the advent of sensors, advanced
mobile technologies, and high performance
computing devices leads to a situation in which the digital world has been overwhelmed by staggering amounts of collected data (Arora & Rahman, 2016; George & Lavie, 2016; Stourm & Ebbes, 2017; Wedel & Kannan, 2016). 90% of today’s data has been created in just last two
years (IBM, 2015, 2016).
As a result, big data analytics along with business intelligence has emerged to be more and more essential to academic researchers, industrial practitioners, and business entrepreneurs (Chen, Chiang, & Storey, 2012). Along the path to success, the implementation of big data
technology faces numerous obstacles (George &
Lavie, 2016; Thamir & Poulis, 2015; Stourm & Ebbes, 2017). Many firms have invested or had a plan to invest in big data shortly (Gartner, 2015). However, about half of these organizations were not sure about what would be the results of their investment (Gartner, 2015).
A plausible explanation for the above problem is that big data technologies require skill sets that
2017 Proceedings of the EDSIG Conference ISSN: 2473-3857 Austin, Texas USA v3 n4480 __________________________________________________________________________________________________________________________
_________________________________________________ ©2017 ISCAP (Information Systems & Computing Academic Professionals) Page 2 http://iscap.info
may be new to many information technology (IT)
departments of firms in various business sectors, and professionals with these skills are hard to find (McAfee & Brynjolfsson, 2012). According to
Manyika et al., (2011) in their McKinsey Global Institute (MGI) report, by 2018, the United States will have to tackle a serious shortage of professionals with critical skills of big data analytics as well as face a severe lack of managers with crucial knowledge and skills of making data-driven decisions. As a result,
teaching and learning big data technology have become an urgent need. Hadoop is an open source platform for distributed data storage and processing very big data sets. The framework was created by Google under the
name of Google File System that was published in 2003. Hadoop has been very popular in companies of different sizes in various industries. For students to get hands-on experience with big data systems like Hadoop, they need to have opportunities of working with a real system that they can easily access from anywhere, no matter
whether they are at school or home. This teaching case discusses the steps to set up such a system in the Amazon Web Services (AWS) cloud. Terminology and Definitions Key terms related to the teaching case include AMI, Apache Hive, AWS, AWS Community AMI,
AWS EBS, AWS Instance, Cloud Technology, Hadoop System, HDFS, Linux, MapReduce,
PostgreSQL, public cloud, and PuTTY. Knowing these terms is critical to being able to perform the steps of the lab activity knowledgeably.
AMI (Amazon Machine Image): An Amazon Machine Image (AMI) provides the information needed to launch an instance, a virtual server in the Amazon public cloud (AWS Documentation). Apache Hive: A data warehouse software built on top of Apache Hadoop for providing data
summarization, query, and analysis with a SQL-like interface to query data stored in various databases and file systems that integrate with Hadoop (Wikipedia).
AWS (Amazon Web Service): AWS is a cloud service from Amazon, which provides services
designed to work with each other that can run sophisticated and highly scalable applications (AWS Documentation). AWS EBS (AWS Elastic Block Store): AWS EBS provides persistent storage volumes for use with
Amazon EC2 instances. Each Amazon EBS volume
is automatically replicated within its Availability
Zone offering high availability and durability (AWS Documentation).
AWS EC2 (AWS Elastic Compute Cloud): A web service providing computing capacity that can be changed — literally, servers in Amazon's data centers—that you use to build and host your software systems (AWS Documentation). AWS Instance: A virtual server in the Amazon
public cloud (AWS Documentation). Cloud Regions and Zones: In a public cloud, a region is a specific geographical location where the user can run allocated resources. Each region has one or more zones. For example, the us-
central1 region denotes a region in the Central United States that has zones us-central1-a, us-central1-b, us-central1-c, and us-central1-f (GCP Documentation). Cloud Computing and Cloud Technology: Cloud computing is the delivery of computing
power, storage, databases, networking, applications, and other computing resources over the Internet, i.e. the cloud (GCP Documentation). EXT4 File System: EXT4 is the fourth extended file system used for Linux operating system.
Hadoop System: Hadoop is an open source platform for distributed data storage and
processing very big data sets. The framework was created by Google under the name of Google File System that was published in 2003. Hadoop has been very popular in companies of different sizes
in various industries. (Apache Hadoop Documentation). HDFS (Hadoop Distributed File System): A file system used for the Hadoop system, HDFS is designed to store very large volumes of data, efficiently and reliably, and to stream the data at
high bandwidth to users’ applications (Apache Hadoop Documentation). Linux: An open-source operating system.
MapReduce: A core component of the Apache Hadoop system, MapReduce enables resilient and
distributed processing large volumes of data across networks of computer clusters (Apache Hadoop Documentation). PostgreSQL: An open source relational database management system.
2017 Proceedings of the EDSIG Conference ISSN: 2473-3857 Austin, Texas USA v3 n4480 __________________________________________________________________________________________________________________________
_________________________________________________ ©2017 ISCAP (Information Systems & Computing Academic Professionals) Page 3 http://iscap.info
PuTTY: A free and open source terminal emulator, serial console and network file transfer application (Wikipedia).
Learning Objectives With this teaching case, students will learn about the following: How to set up an Amazon AWS instance
based on an existing AWS community AMI How to create an AWS Elastic Block Store
(EBS) volume How to attach an EBS volume to a running
AWS instance How to connect to an AWS instance using
PuTTY How to set up and configure the Hadoop
system that consists of Hadoop Distributed File System (HDFS), MapReduce, Apache Hadoop Yarn, Apache Hive, and the database PostgreSQL, by running a script
How to create directories and files on an EXT4
(Linux) file system How to create directories and files on HDFS How to test the newly setup Hadoop system How to start and safe-shutdown the Hadoop
system Prerequisites
Although no programming knowledge is required for this lab activity, the following fundamental
computing skills are needed: Read and follow written instructions Capture and save a screenshot of a desktop
or laptop computer
Create, modify, and save files using a text editor
Use, navigate and interact with files and folders using command lines
Preparation Before starting the process of setting the Hadoop
system, each student needs to finish the following items: Create an account of Amazon AWS if
necessary
Apply for education grant offered by Amazon AWS so that the student can use the system free of charges during the semester as
necessary.
2. GETTING STARTED: SET UP AMAZON AWS INSTANCES
The Hadoop system is hosted in an Amazon AWS
instance. Therefore, the first task needs to be
done is to set up an Amazon AWS instance, i.e. a
virtual server, in the Amazon cloud. There are many ways to do it. In this teaching case, the AWS instance host is created based on an
available community-shared Amazon Machine Image (AMI). An AMI is a special type of virtual device used to set up a virtual machine, normally a virtual server, in the Amazon Elastic Compute Cloud (EC2). Using an available AMI, the EC2 user can
quickly create a new EC2 instance with all the features of the image. In this teaching case, the host instance is created based on “ami-be0d5fd4”, a community-shared AMI released by the Information School of The University of California at Berkley. This AMI has been used for
classes offered in the program of Master of Information and Data Science (MIDS) at the school. Log in AWS at this link:
https://aws.amazon.com/
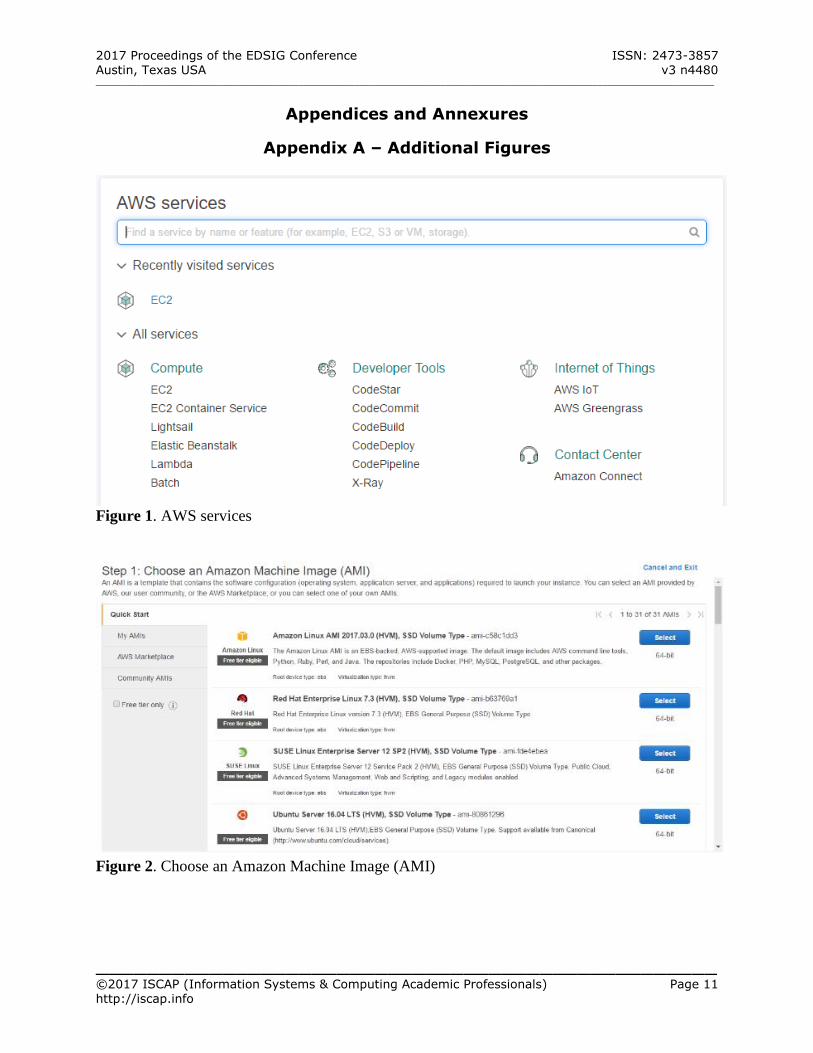
Click on “My Account” and select “AWS Management Console” (See Figure 1 – Appendix A)
Click on the tab to the right of your account
name to open a list of cloud regions o The user can select which region is
the best, i.e. closest, to his/her area o For example, a user in the east coast
can select N. Virginia cloud region, as shown in the above picture.
Step 1: Choose Amazon Machine Image
Click EC2 to open EC2 Dashboard Click “Launch Instance” under Create
Instance (See Figure 2 – Appendix A) Click “Community AMIs” in the panel to the
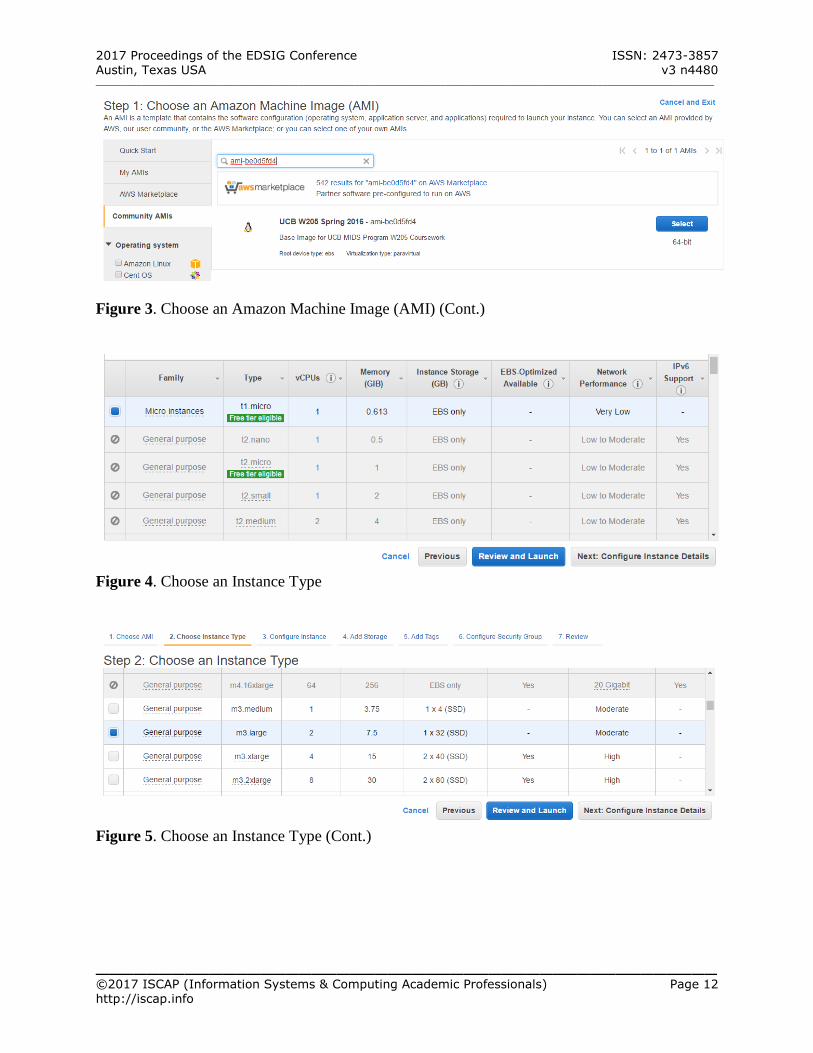
left Enter “ami-be0d5fd4” in Search text field of
“Search community AMIs” Click Search icon to start the search (See
Figure 3 – Appendix A) Click Select to select the AMI as the base for
the new instance. Step 2: Choose Instance Type
In this step, the user should select the virtual hardware configuration for the instance. (See Figure 4 – Appendix A) Scroll down and select an instance type

2017 Proceedings of the EDSIG Conference ISSN: 2473-3857 Austin, Texas USA v3 n4480 __________________________________________________________________________________________________________________________
_________________________________________________ ©2017 ISCAP (Information Systems & Computing Academic Professionals) Page 4 http://iscap.info
o An instance type of “General Purpose
m3 large 2 vCPUs 7.5 GB” should be OK.
o This instance is configured with 2
virtual CPU’s and 7.5 GB of memory (See Figure 5 – Appendix A)
Click Next: Configure Instance Details
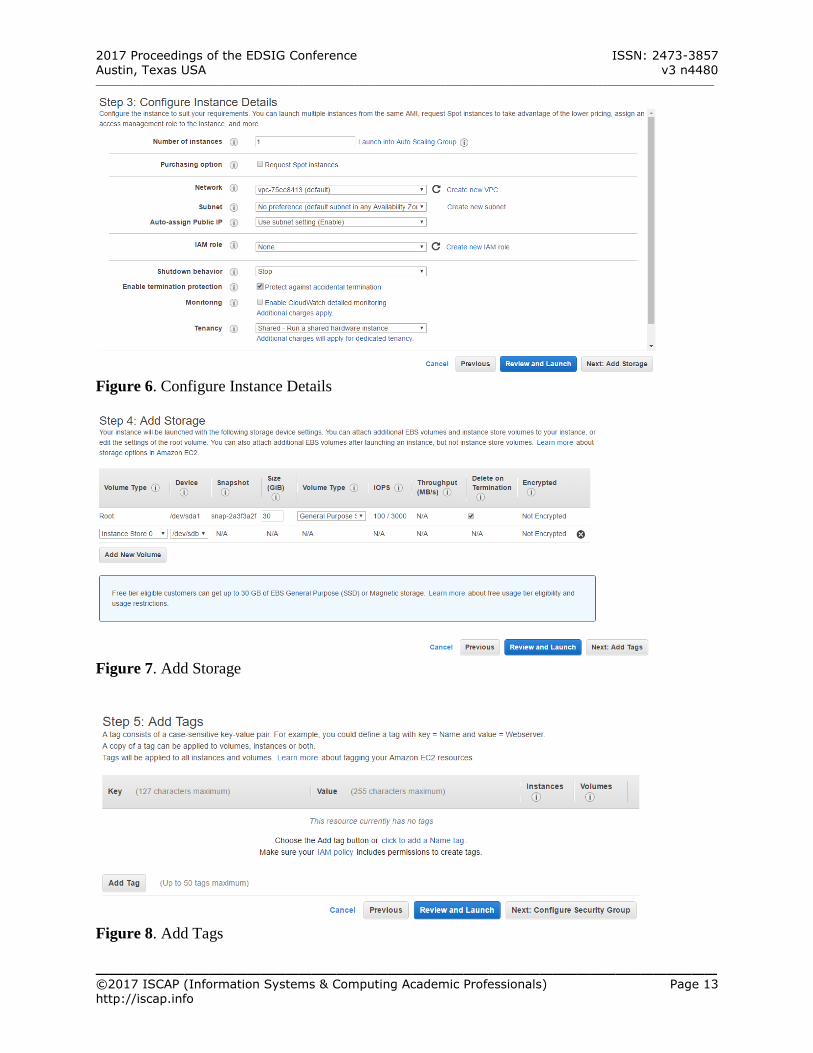
Step 3: Configure Instance Details
Click to check “Protect against accidental termination”
Keep all other configuration details as default (See Figure 6 – Appendix A)
Click Next: Add Storage
Step 4: Add Storage Keep 30 GB of storage as default Keep all other configuration details as default
(See Figure 7 – Appendix A) Click Next: Add Tags
Step 5: Add Tags Initially, there is no tags set for this instance.
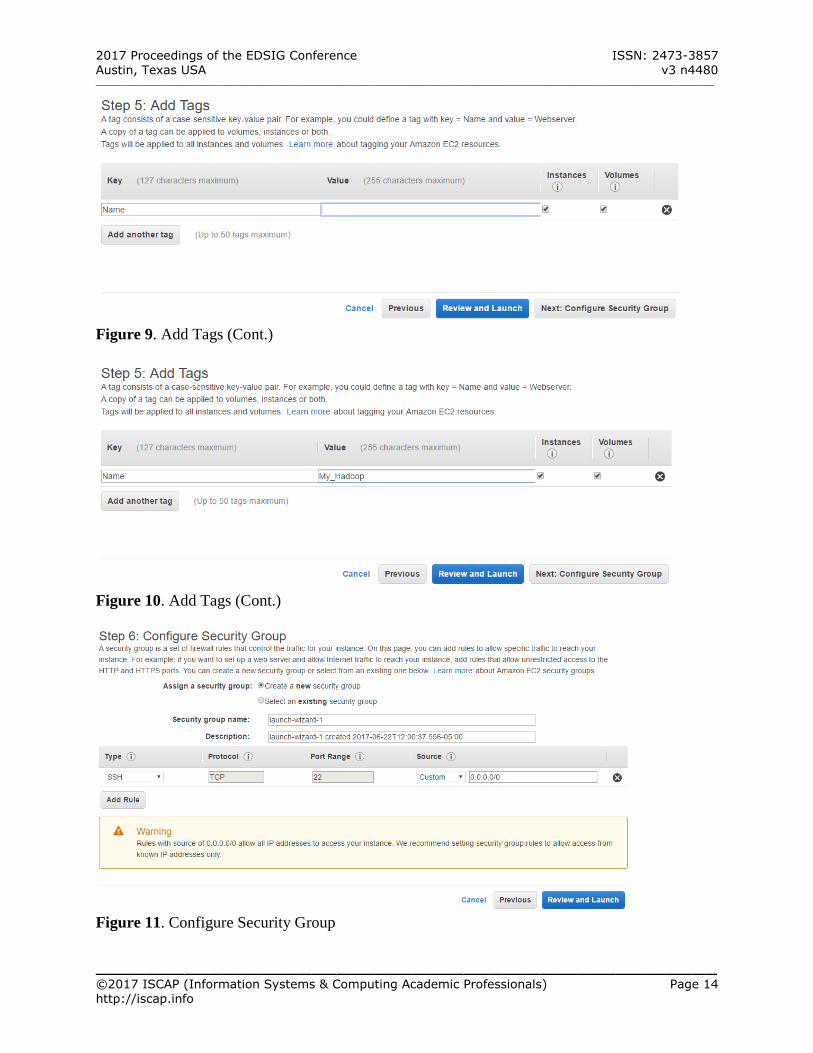
(See Figure 8 – Appendix A) Select “click to add a name tag” (See Figure
9 – Appendix A) Keep “Name” for Key
Enter some text to name this instance, e.g. “My_Hadoop” (See Figure 10 – Appendix A)
Click Next: Configure Security Group Step 6: Configure Security Group
Initially, there exist default configuration details (See Figure 11 – Appendix A)
For Security group name, the user can name it as he/she wants, e.g.AWS_Security_Group_1
Update Description accordingly if a new name is entered for Security group name
Keep the first security rule (Type: SSH: Port 22) as default
Add the following new rules with the correspondent port numbers that we plan to
use with the system: o Type: Custom TCP Rule; Port: 4040
(for Spark-UI)
o Type: Custom TCP Rule; Port: 7180 (for Cloudera Manager)
o Type: Custom TCP Rule; Port: 8080 (for Web Server)
o Type: Custom TCP Rule; Port: 8088 (for Jupyter Notebook)
o Type: Custom TCP Rule; Port: 10000
(for Hive) o Type: Custom TCP Rule; Port: 50070
(for Hadoop)
(See Figure 12 – Appendix A) Step 7: Review and Launch The new instance has been configured, and it is ready to launch (See Figure 13 – Appendix A):
Click Launch o The user is asked to provide a new
pair of RSA keys that can be obtained using
RSA public and private key files can be created with the instructions in this web site:
https://support.rackspace.com/how-to/generating-rsa-keys-with-ssh-puttygen/ (See Figure 14 – Appendix A) Check the acknowledgement statement Finally, click Launch Instances to launch the
newly-created instance.
FOR STUDENTS’ LAB REPORT How many virtual CPU’s (vCPU) have been
configured for your Amazon AWS instance? What is its amount of memory?
What is the amount of the default storage
allocated for the instance? Have you created a pair of RSA keys to be
used for the authentication with the instance?
3. CREATE AND ATTACH A NEW STORAGE
VOLUME
In the process of launching a new instance, a storage of 30GB has been configured to be used. This initial volume of storage is normally used for the installation of system software applications employed to manage the Hadoop system. It is recommended that the user should acquire another volume of storage with the capacity of
between 50 GB and 100 GB. This volume is used to store the data sets for the data analysis.
Create New Volume of Storage Log in AWS at this link:
https://aws.amazon.com/
Click on “My Account”, select “AWS Management Console”, and log in
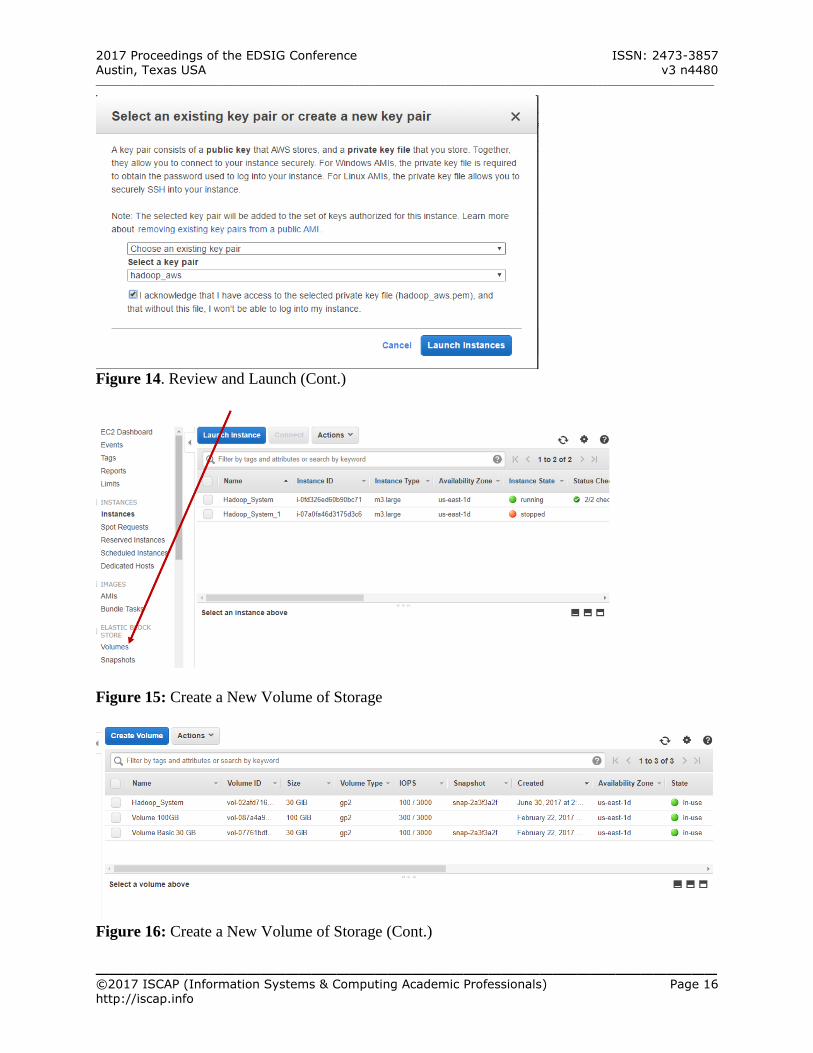
Click Volume under ELASTIC BLOCK STORE in the panel to the left (See Figure 15 & 16 – Appendix A)
Click Create Volume
2017 Proceedings of the EDSIG Conference ISSN: 2473-3857 Austin, Texas USA v3 n4480 __________________________________________________________________________________________________________________________
_________________________________________________ ©2017 ISCAP (Information Systems & Computing Academic Professionals) Page 5 http://iscap.info
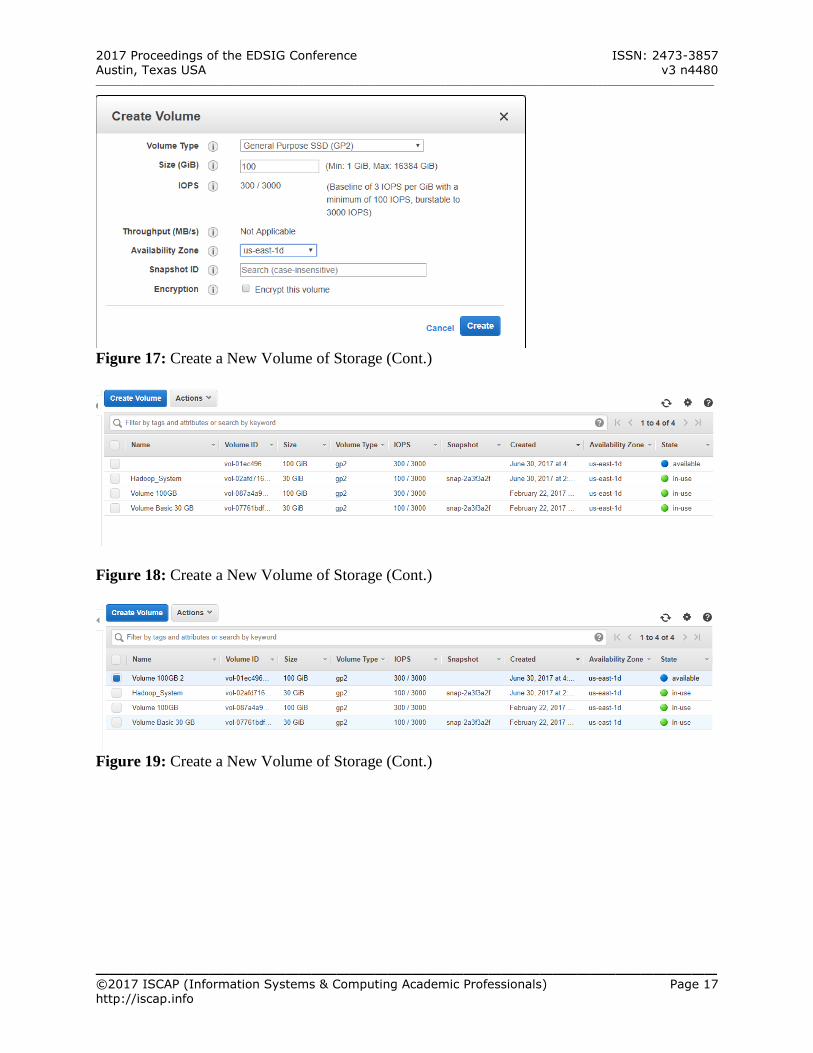
Enter the size of the volume (any capacity
between 50GB and 100 GB should be OK) (See Figure 17 – Appendix A)
NOTES: --) Be sure that the user selects the same cloud zone (Availability Zone) as he/she has done while launching the instance. --) For example, if the host instance is created in us-east-1d cloud zone, the volume that will be attached to the instance later must be configured
with this zone, i.e. us-east-1d Click Create Click Refresh icon on the top right corner to
make the new volume appear (See Figure 18 – Appendix A).
The newly-created volume shows up at the top that has not been assigned with any name. Its color is blue: Available but not In-Use.
Assign a name to the new volume, e.g. Volume 100GB 2 (See Figure 19 – Appendix A)
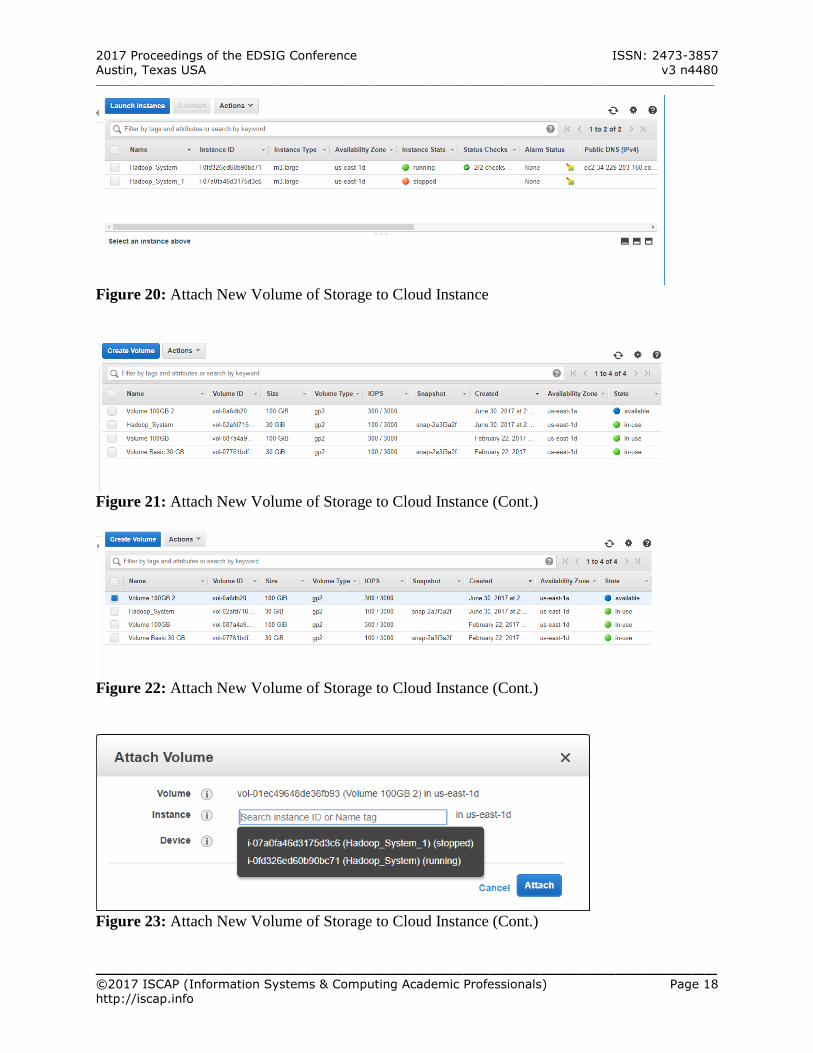
Attach New Volume of Storage to Cloud Instance Check to be sure that the host instance is
running o Click Instance under INSTANCES
section in the panel to the left o Start the host instance (if it is
stopped) (See Figure 20 – Appendix A)
Check Instant State: Green Instance is
running (has been started) Click Volume under ELASTIC BLOCK STORE in
the panel to the left (See Figure 21 – Appendix A)
Select the volume to attach
Click to select Volume 100GB 2 (at the top) (See Figure 22 – Appendix A)
Select Attach Volume Click anywhere in the text field to the right of
Instance to pop up the list of available instances (See Figure 23 – Appendix A)
Select the correct instance to attach the
volume, i.e. Hadoop_System o Device name is automatically set for
the volume
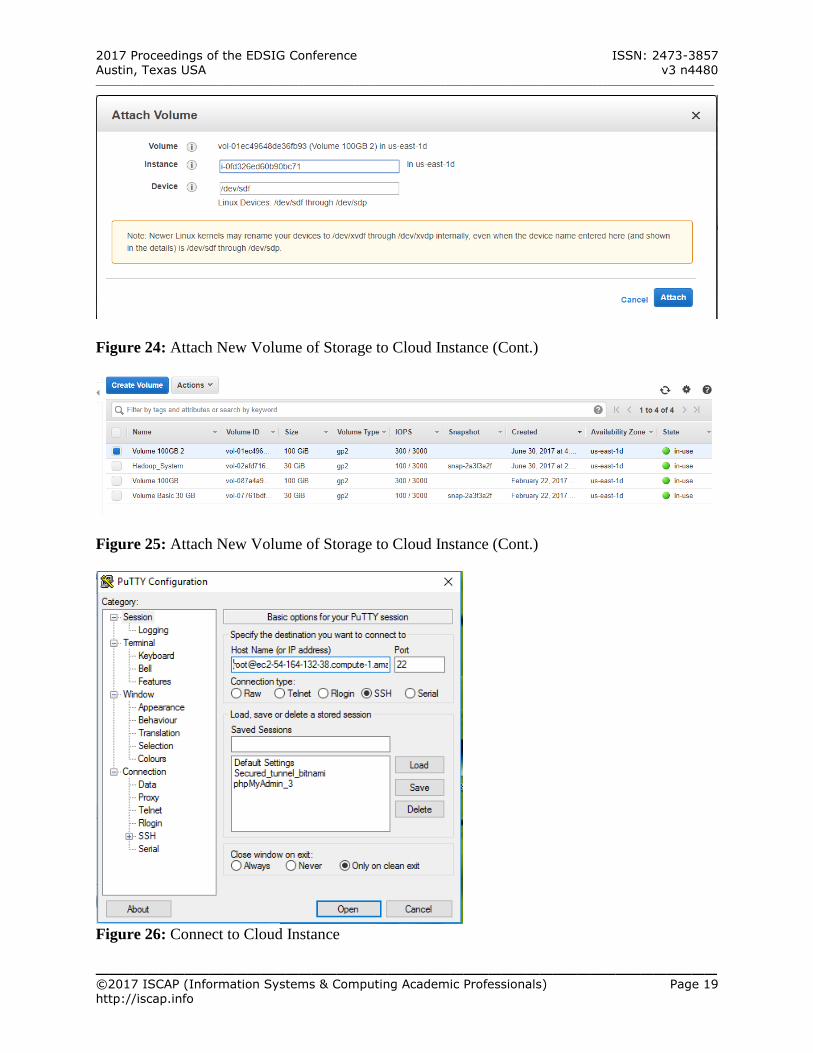
Click Attach to attach the volume to the
instance (The volume has been attached to
the instance and ready for use) (See Figure
24 & 25 – Appendix A)
FOR STUDENTS’ LAB REPORT
What is the amount of storage of the second
EBS volume you have created and attached to your instance?
4. CONNECT TO CLOUD INSTANCE
Before start setting up the Hadoop system in the newly-created AWS instance, the user needs to connect to the instance by following the steps discussed in this website provided by Amazon AWS. http://docs.aws.amazon.com/AWSEC2/latest/Us
erGuide/putty.html
The connection to the AWS instance is done using a software tool named PuTTY that can be downloaded at this link: https://www.chiark.greenend.org.uk/~sgtatham/putty/latest.html
The user needs to install PuTTY and make it ready for use before making the connection to the instance. The connection is done using Secured Socket Shell (SSH) protocol. The user also needs to get the Public DNS of the instance that is displayed in the AWS console window.
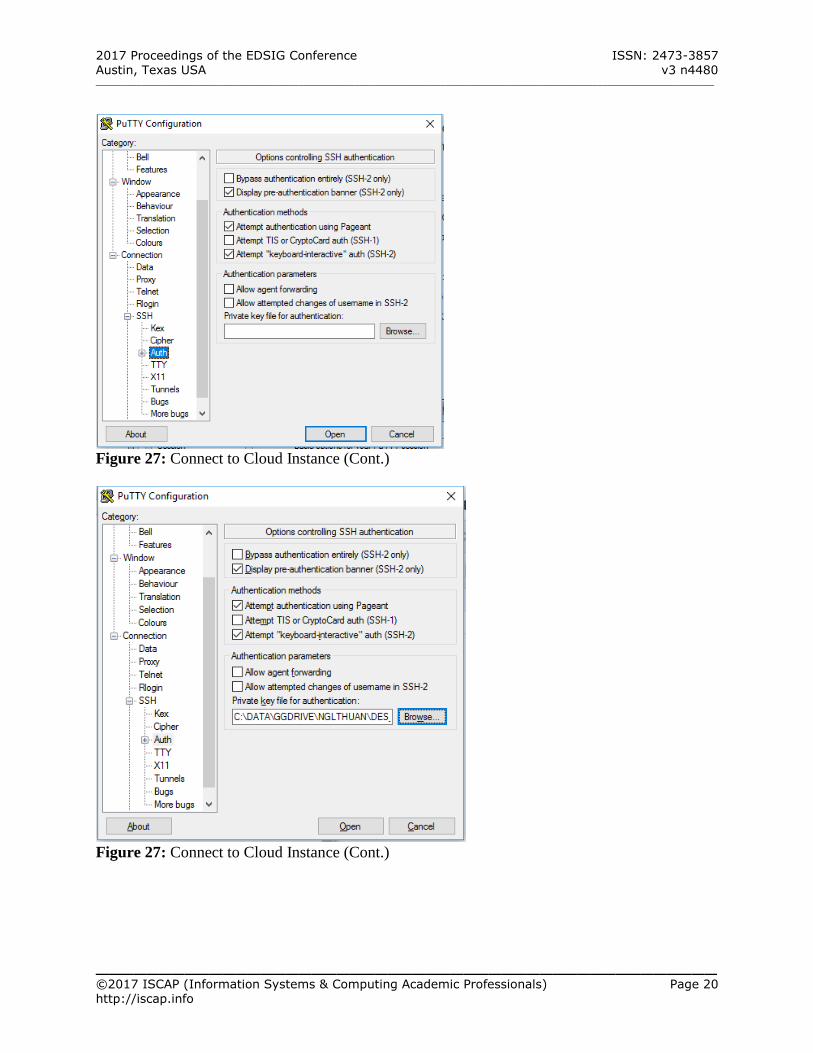
Start PuTTY
For Host Name, enter root@<public DNS of the instance>
In the Category pane, expand Connection, expand SSH, and then select Auth
Click Browse to open the folder where the private RSA key file is stored
Select the private RSA key file and Click Open (See Figure 26 & 27 – Appendix A) Click Open
o If this is the first time you have
connected to this instance, PuTTY displays a security alert dialog box that asks whether you trust the host you are connecting to.
Choose Yes Enter the pass phrase that the user has
entered when he/she creates the RSA key pair
The user has successfully connected to the instance
2017 Proceedings of the EDSIG Conference ISSN: 2473-3857 Austin, Texas USA v3 n4480 __________________________________________________________________________________________________________________________
_________________________________________________ ©2017 ISCAP (Information Systems & Computing Academic Professionals) Page 6 http://iscap.info
FOR STUDENTS’ LAB REPORT
Capture the screen shot of the SSH session
window that is ready for you to work with the
remote virtual machine instance after you have successfully connected to it.
5. SET UP HADOOP SYSTEM
After successfully connecting to the instance as discussed in the above website, the user can start
setting up the instance. The set-up process includes many steps: creating a file system, mounting it, formatting it for HDFS, setting up the database system PostgreSQL and the host. The process can be very time consuming if being done step-by-step. To speed up and facilitate the
process, a script created by the Information School of UCB is used. Verify the existence of the directory /data In the SSH session window, be sure that
current user is “root”
> whoami (NOTES: ‘>’ means “At the prompt, type”) Determine where our AWS Elastic Block
Storage (EBS) volume has been attached.
> fdisk –l
The output shows: Disk /dev/xvdf: 107.4 GB, 107374182400 bytes 255 heads, 63 sectors/track, 13054 cylinders Units = cylinders of 16065 * 512 = 8225280 bytes Sector size (logical/physical): 512 bytes / 512 bytes I/O size (minimum/optimal): 512 bytes / 512 bytes Disk identifier: 0x00000000
List all the contents in the top level directory /
> ls -l Verify that the directory /data exists in the
listed contents
Change Permission Mode of /data
Check the current permission mode > ls –la /data The output shows:
drwxr-xr-x 2 root root 4096 Sep 22 2015 .
dr-xr-xr-x 23 root root 4096 Jul 2 01:29 ..
Change the mode of /data so that the
directory becomes readable, writable, and
executable by all the users > chmod a+rwx /data (NOTES: This sets /data as readable, writable and executable by all users. It is insecure, but it will eliminate permission problems.)
Download and Run Setup Script Download the script > wget <URL of the script>
Where URL of the script is: https://s3.amazonaws.com/ucbdatasciencew205/setup_ucb_complete_plus_postgres.sh List all the contents of the current folder to
check that the script has been downloaded
successfully, i.e. it is available there > ls -l Change permission mode of the script file to
make it executable by everybody
> chmod +x ./setup_ucb_complete_plus_postgres.sh
Run the setup script to set up the Hadoop
system > ./setup_ucb_complete_plus_postgres.sh <*the device path*> Where <*the device path*> is the path of the
AWS Elastic Block Storage (EBS) that has been created (100 GB) and attached with the instance as aforementioned. It should be “/dev/xvdf” The complete command line should be: > ./setup_ucb_complete_plus_postgres.sh
/dev/xvdf
Press ENTER to continue (when prompted to
answer “Press any key to continue or Control - C to quit”)
Then wait until the process of setting up the
Hadoop system finishes.
2017 Proceedings of the EDSIG Conference ISSN: 2473-3857 Austin, Texas USA v3 n4480 __________________________________________________________________________________________________________________________
_________________________________________________ ©2017 ISCAP (Information Systems & Computing Academic Professionals) Page 7 http://iscap.info
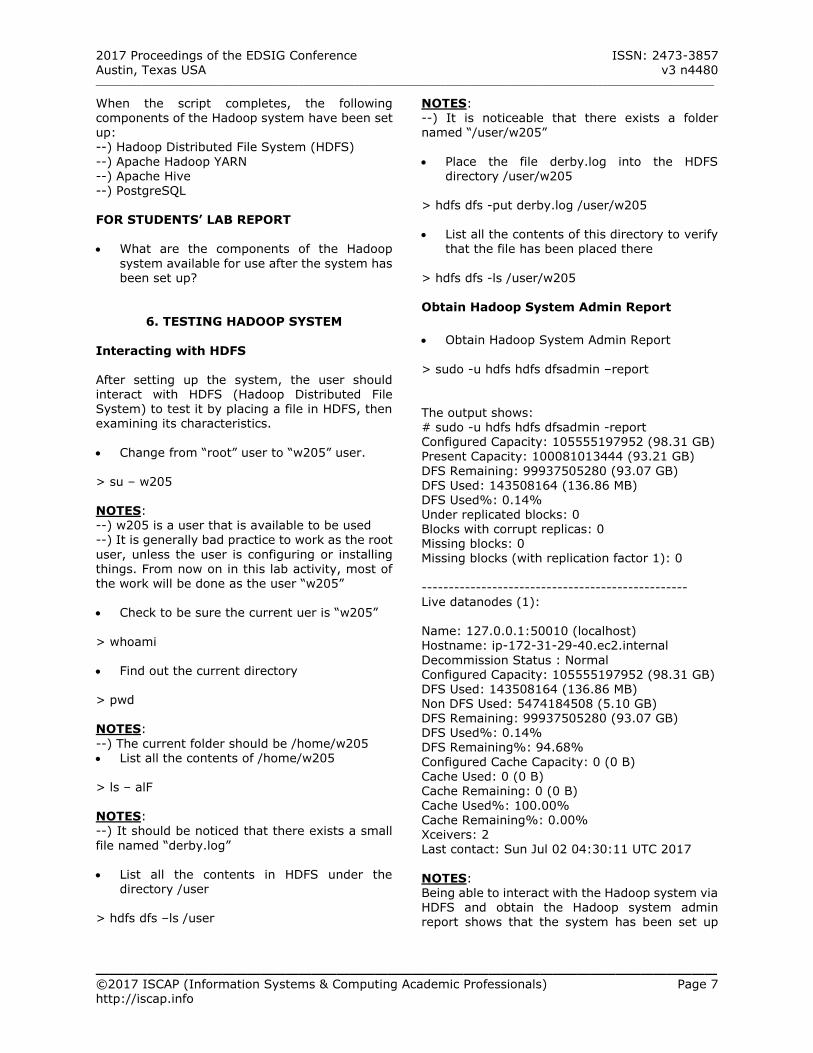
When the script completes, the following
components of the Hadoop system have been set up: --) Hadoop Distributed File System (HDFS)
--) Apache Hadoop YARN --) Apache Hive --) PostgreSQL FOR STUDENTS’ LAB REPORT What are the components of the Hadoop
system available for use after the system has been set up?
6. TESTING HADOOP SYSTEM
Interacting with HDFS After setting up the system, the user should interact with HDFS (Hadoop Distributed File System) to test it by placing a file in HDFS, then examining its characteristics.
Change from “root” user to “w205” user. > su – w205 NOTES: --) w205 is a user that is available to be used --) It is generally bad practice to work as the root
user, unless the user is configuring or installing things. From now on in this lab activity, most of
the work will be done as the user “w205” Check to be sure the current uer is “w205”
> whoami Find out the current directory > pwd NOTES:
--) The current folder should be /home/w205 List all the contents of /home/w205 > ls – alF
NOTES: --) It should be noticed that there exists a small
file named “derby.log” List all the contents in HDFS under the
directory /user > hdfs dfs –ls /user
NOTES:
--) It is noticeable that there exists a folder named “/user/w205”
Place the file derby.log into the HDFS directory /user/w205
> hdfs dfs -put derby.log /user/w205 List all the contents of this directory to verify
that the file has been placed there
> hdfs dfs -ls /user/w205 Obtain Hadoop System Admin Report
Obtain Hadoop System Admin Report
> sudo -u hdfs hdfs dfsadmin –report The output shows: # sudo -u hdfs hdfs dfsadmin -report Configured Capacity: 105555197952 (98.31 GB) Present Capacity: 100081013444 (93.21 GB)
DFS Remaining: 99937505280 (93.07 GB) DFS Used: 143508164 (136.86 MB) DFS Used%: 0.14% Under replicated blocks: 0 Blocks with corrupt replicas: 0 Missing blocks: 0 Missing blocks (with replication factor 1): 0
------------------------------------------------- Live datanodes (1): Name: 127.0.0.1:50010 (localhost) Hostname: ip-172-31-29-40.ec2.internal
Decommission Status : Normal Configured Capacity: 105555197952 (98.31 GB) DFS Used: 143508164 (136.86 MB) Non DFS Used: 5474184508 (5.10 GB) DFS Remaining: 99937505280 (93.07 GB) DFS Used%: 0.14% DFS Remaining%: 94.68%
Configured Cache Capacity: 0 (0 B) Cache Used: 0 (0 B) Cache Remaining: 0 (0 B)
Cache Used%: 100.00% Cache Remaining%: 0.00% Xceivers: 2 Last contact: Sun Jul 02 04:30:11 UTC 2017
NOTES: Being able to interact with the Hadoop system via HDFS and obtain the Hadoop system admin report shows that the system has been set up
2017 Proceedings of the EDSIG Conference ISSN: 2473-3857 Austin, Texas USA v3 n4480 __________________________________________________________________________________________________________________________
_________________________________________________ ©2017 ISCAP (Information Systems & Computing Academic Professionals) Page 8 http://iscap.info
successfully. It is ready for use in analyzing big
data sets. FOR STUDENTS’ LAB REPORT
List all the contents of the HDFS directory
/user Inspect the output of the HDFS admin report
and provide the following pieces of information related to the Hadoop system:
o How many live data notes are there
in the system? o How much non-DFS storage is used? o How much DFS storage is used?
7. START, SAFE SHUTDOWN HADOOP
SYSTEM AND START, STOP CLOUD INSTANCE
The system has been successfully set up and is ready for use. When the user wants to stop working with the Hadoop System, he/she should safe shutdown the whole system. When the user
wants to work with system again, he/she needs to start it again NOTES: --) When the user wants to stop working with the Hadoop System, he/she should safe shutdown the whole Hadoop system (HDFS, PostgreSQL, and
Hive) and stop the cloud instance. --) Stop the cloud instance is not terminating it.
--) When the user needs to work with the system again, first he/she needs to start the cloud instance. Then start the Hadoop system (HDFS, PostgreSQL, and Hive)
Start Cloud Instance Log in AWS at this link:
https://aws.amazon.com/ Click on “My Account” and select “AWS
Management Console” (See Figure 1 –
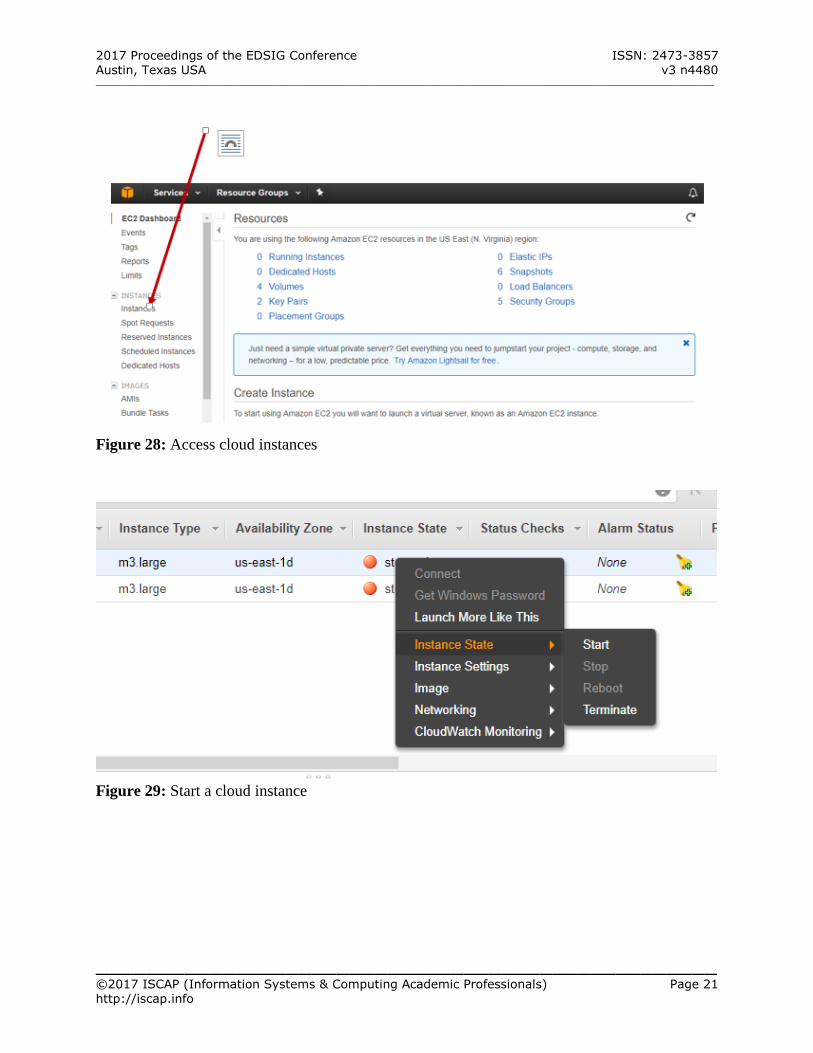
Appendix A) Click EC2 to open EC2 Dashboard Click Instance under INSTANCES in the panel
to the left (See Figure 28 – Appendix A)
Select the cloud instance to start (if its current state is “Stopped”
Right click “Stopped” under “Instance State”
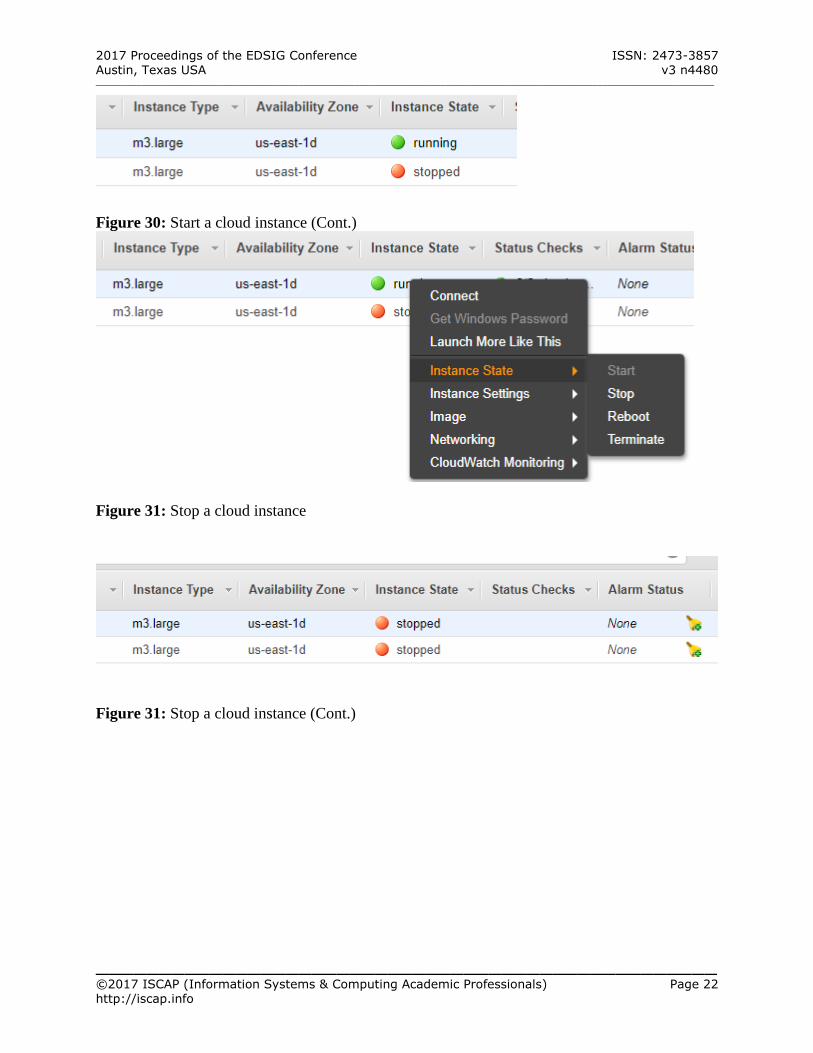
Select Instance State to open another menu Select Start (See Figure 29 – Appendix A) Click “Yes, Start” to start the instance The instance gets into the state of “Pending.” The user should wait until the instance has fully starts
with the green color. The state should show
“running.” (See Figure 30 – Appendix A)
Start Hadoop System (HDFS, PostgreSQL, and Hive) Connect to the cloud instance using PuTTY if
necessary In the SSH session window, be sure that
current user is “root”.
> whoami Start Hadoop > /root/start-hadoop.sh
NOTES: --) The user should wait until the Hadoop system has fully started. Start PostgreSQL
> /data/start_postgres.sh Change from “root” user to “w205” user > su – w205 NOTES:
--) To start Apache Hive, the current system user should be “w205”, not “root”
Start Apache Hive > /data/start_metastore.sh
NOTES: --) The user may need to press ENTER to get back to the command prompt after Apache Hive has fully started.
Safe Shutdown Hadoop System (HDFS, PostgreSQL, and Hive) NOTES:
--) When the user wants to stop working with the Hadoop system, first he/she needs to safe shutdown the whole Hadoop system (HDFS,
PostgreSQL, and Hive). Then, he/she should stop the cloud instance. In the SSH session window, be sure that
current user is “root”.
> whoami
2017 Proceedings of the EDSIG Conference ISSN: 2473-3857 Austin, Texas USA v3 n4480 __________________________________________________________________________________________________________________________
_________________________________________________ ©2017 ISCAP (Information Systems & Computing Academic Professionals) Page 9 http://iscap.info
Stop Apache Hive > /data/stop_metastore.sh
Stop Hadoop > /root/stop-hadoop.sh Stop PostgreSQL
> /data/stop_postgres.sh Stop Cloud Instance After the safe shutdown of Hadoop system (both
Hadoop File System and Postgres database), the user needs to stop AWS instance to avoid unnecessary charges. Access the AWS console Click on “My Account” and select “AWS
Management Console” (See Figure 1 –
Appendix A) Click EC2 to open EC2 Dashboard Click Instance under INSTANCES in the panel
to the left (See Figure 28 – Appendix A) Select the cloud instance to stop (if its current
state is “Running” Right click “Running” under “Instance State”
Select Instance State to open another menu Select Stop (See Figure 31 – Appendix A)
Click “Yes, Stop” to stop the instance The instance gets into the state of “Stopping.” The user should wait until the instance has fully
stopped with the red color. The state should show “Stopped.” (See Figure 32 – Appendix A) FOR STUDENTS’ LAB REPORT Perform the following operations on the system
and the cloud instance in the listed order, and report whether these operations have been successfully run or not:
Safe-shutdown the Hadoop system
(HDFS, PostgreSQL, and Hive) Stop the cloud instance Start the cloud instance
Start the Hadoop system (HDFS, PostgreSQL, and Hive)
Safe-shutdown the Hadoop system (HDFS, PostgreSQL, and Hive) again
Stop the cloud instance again
8. ACKNOWLEDGEMENTS
It is credited to the School of Information of the University of California at Berkeley that has created the AWS AMI “ami-be0d5fd4” and
generously released it for public use as a community AMI. The author also acknowledges the school for all the documents related to setting up an instance based on its AMI.
9. REFERENCES
Apache Hadoop (2017). Welcome to Apache Hadoop. Retrieved from https://hadoop.apache.org/index.html
Apache Hive (2017). Getting started with
Apache Hive software. Retrieved from
https://hive.apache.org/index.html Apache Spark (2017). Lightning-fast cluster
computing. Retrieved from https://spark.apache.org/
Apache YARN (2017). Apache Hadoop YARN.
Retrieved from https://hadoop.apache.org/docs/current/hadoop-yarn/hadoop-yarn-site/YARN.html
Chen, H., Chiang, R., & Storey, V. (2012).
Business intelligence and analytics: From big data to big impact. MIS Quarterly, 36(4), pp.
1165 – 1188.
Ferkoun, M. (2014). Cloud computing and big data: An ideal combination. Retrieved from https://www.ibm.com/blogs/cloud-computing/2014/02/cloud-computing-and-
big-data-an-ideal-combination/ Gartner (2015). Gartner survey shows more
than 75 percent of companies are investing or planning to invest in big data in the next two years. Retrieved from http://www.gartner.com/newsroom/id/3130
817. George, G. and Lavie, D. (2016). Big data and
data science methods for management
research. Academy of Management Journal, 59(5), 1493 – 1507.
IBM (2015). Infographic and Animation: The four V’s of big data. Retrieved from http://www.ibmbigdatahub.com/infographic/four-vs-big-data
iBM (2016). Infographic and Animation:
2017 Proceedings of the EDSIG Conference ISSN: 2473-3857 Austin, Texas USA v3 n4480 __________________________________________________________________________________________________________________________
_________________________________________________ ©2017 ISCAP (Information Systems & Computing Academic Professionals) Page 10 http://iscap.info
Extracting business value from the 4 V’s of
big data. Retrienved from http://www.ibmbigdatahub.com/infographic/extracting-business-value-4-vs-big-data
McAfee, A., & Brynjolfsson, E. (2012). Big
data: The management revolution. Harvard Business Review, 90, pp. 61 – 67.
Manyika, J., Chui, M., Brown, B., Bughin, J.,
Dobbs, R., Roxburgh, C., & Byers, A. H.
(2011). Big data: The next frontier for innovation, competition, and productivity. MGI (McKinsey Global Institute). Retrieved from http://www.mckinsey.com/insights/mgi/research/technology_and_innovation/big_data_t
he_next_frontier_for_innovation
Stourm, L., and Ebbes, P. (2017). Analytics in
the Era of Big Data: Opportunities and Challenges. Retrieved from http://www.hec.edu/Knowledge/Point-of-
View/Analytics-in-the-Era-of-Big-Data-Opportunities-and-Challenges
Thamir, A. & Poulis, E. (2015). Business
intelligence capabilities and implementation strategies. International Journal of Global Business, 8(1), 34 – 45.
Trovati, M., Hill, R., Anjum, A., Zhu, S. Y., &
Liu, L. (2016). Big-Data Analytics and Cloud Computing: Theory, Algorithms and Applications. New York, NY: Springer.
2017 Proceedings of the EDSIG Conference ISSN: 2473-3857 Austin, Texas USA v3 n4480 __________________________________________________________________________________________________________________________
_________________________________________________ ©2017 ISCAP (Information Systems & Computing Academic Professionals) Page 11 http://iscap.info
Appendices and Annexures
Appendix A – Additional Figures
Figure 1. AWS services
Figure 2. Choose an Amazon Machine Image (AMI)
2017 Proceedings of the EDSIG Conference ISSN: 2473-3857 Austin, Texas USA v3 n4480 __________________________________________________________________________________________________________________________
_________________________________________________ ©2017 ISCAP (Information Systems & Computing Academic Professionals) Page 12 http://iscap.info
Figure 3. Choose an Amazon Machine Image (AMI) (Cont.)
Figure 4. Choose an Instance Type
Figure 5. Choose an Instance Type (Cont.)
2017 Proceedings of the EDSIG Conference ISSN: 2473-3857 Austin, Texas USA v3 n4480 __________________________________________________________________________________________________________________________
_________________________________________________ ©2017 ISCAP (Information Systems & Computing Academic Professionals) Page 13 http://iscap.info
Figure 6. Configure Instance Details
Figure 7. Add Storage
Figure 8. Add Tags
2017 Proceedings of the EDSIG Conference ISSN: 2473-3857 Austin, Texas USA v3 n4480 __________________________________________________________________________________________________________________________
_________________________________________________ ©2017 ISCAP (Information Systems & Computing Academic Professionals) Page 14 http://iscap.info
Figure 9. Add Tags (Cont.)
Figure 10. Add Tags (Cont.)
Figure 11. Configure Security Group

2017 Proceedings of the EDSIG Conference ISSN: 2473-3857 Austin, Texas USA v3 n4480 __________________________________________________________________________________________________________________________
_________________________________________________ ©2017 ISCAP (Information Systems & Computing Academic Professionals) Page 15 http://iscap.info
Figure 12. Configure Security Group (Cont.)
Figure 13. Review and Launch
2017 Proceedings of the EDSIG Conference ISSN: 2473-3857 Austin, Texas USA v3 n4480 __________________________________________________________________________________________________________________________
_________________________________________________ ©2017 ISCAP (Information Systems & Computing Academic Professionals) Page 16 http://iscap.info
Figure 14. Review and Launch (Cont.)
Figure 15: Create a New Volume of Storage
Figure 16: Create a New Volume of Storage (Cont.)
2017 Proceedings of the EDSIG Conference ISSN: 2473-3857 Austin, Texas USA v3 n4480 __________________________________________________________________________________________________________________________
_________________________________________________ ©2017 ISCAP (Information Systems & Computing Academic Professionals) Page 17 http://iscap.info
Figure 17: Create a New Volume of Storage (Cont.)
Figure 18: Create a New Volume of Storage (Cont.)
Figure 19: Create a New Volume of Storage (Cont.)
2017 Proceedings of the EDSIG Conference ISSN: 2473-3857 Austin, Texas USA v3 n4480 __________________________________________________________________________________________________________________________
_________________________________________________ ©2017 ISCAP (Information Systems & Computing Academic Professionals) Page 18 http://iscap.info
Figure 20: Attach New Volume of Storage to Cloud Instance
Figure 21: Attach New Volume of Storage to Cloud Instance (Cont.)
Figure 22: Attach New Volume of Storage to Cloud Instance (Cont.)
Figure 23: Attach New Volume of Storage to Cloud Instance (Cont.)
2017 Proceedings of the EDSIG Conference ISSN: 2473-3857 Austin, Texas USA v3 n4480 __________________________________________________________________________________________________________________________
_________________________________________________ ©2017 ISCAP (Information Systems & Computing Academic Professionals) Page 19 http://iscap.info
Figure 24: Attach New Volume of Storage to Cloud Instance (Cont.)
Figure 25: Attach New Volume of Storage to Cloud Instance (Cont.)
Figure 26: Connect to Cloud Instance
2017 Proceedings of the EDSIG Conference ISSN: 2473-3857 Austin, Texas USA v3 n4480 __________________________________________________________________________________________________________________________
_________________________________________________ ©2017 ISCAP (Information Systems & Computing Academic Professionals) Page 20 http://iscap.info
Figure 27: Connect to Cloud Instance (Cont.)
Figure 27: Connect to Cloud Instance (Cont.)
2017 Proceedings of the EDSIG Conference ISSN: 2473-3857 Austin, Texas USA v3 n4480 __________________________________________________________________________________________________________________________
_________________________________________________ ©2017 ISCAP (Information Systems & Computing Academic Professionals) Page 21 http://iscap.info
Figure 28: Access cloud instances
Figure 29: Start a cloud instance
2017 Proceedings of the EDSIG Conference ISSN: 2473-3857 Austin, Texas USA v3 n4480 __________________________________________________________________________________________________________________________
_________________________________________________ ©2017 ISCAP (Information Systems & Computing Academic Professionals) Page 22 http://iscap.info
Figure 30: Start a cloud instance (Cont.)
Figure 31: Stop a cloud instance
Figure 31: Stop a cloud instance (Cont.)