session 3-7 friday, october 13 1:00 p.m. – 2:30 p.m. room 617 · 2018-04-14 · and you do not...
TRANSCRIPT

Session 3-7 Error Correction AP & AR - 1
Session 3-7
Friday, October 13 1:00 p.m. – 2:30 p.m. Room 617
Session 3-7
Sage 300 CRE Error Correction AP & AR
Presented By: Kyle Zeigler
Ledgerwood Associates, Inc.
Credits/Revision History
• Original Author(s): Sharon Hessong, Terri Sobeck, Terry Matuszyk, Kris Logan • Revised Date:2017 • Major Revisions Include:
o None

Session 3-7 Error Correction AP & AR - 2
Topics to Be Covered: Accounts Payable (AP) Error Correction
• Change AP Invoices • Remove Retainage from Partially Paid Invoices • Delete AP Invoices • Record Vendor Refunds • Reprint Checks • Correct Credit Card Charges
Accounts Receivable (AR) Error Correction • Default AR Settings/GL Miscellaneous Accounts/Balance Sheet Accounts • Adjust Receivables
o Adjustment types o Void o Edit
• Deposit Rejection • Deposit Posted to Incorrect CM Bank Account • Miscellaneous GL & JC Cash Receipts • Un-apply/Apply Cash Receipts • Finance Charge Reversals • Invoice Adjustments & Corrections
Bonus Content: Cash Management (CM) Error Correction (time permitting) • Correct a Check Reconciled in Error • Correct a Non-Customer Cash Receipt • Correct a Reconciled Entry

Session 3-7 Error Correction AP & AR - 3
Accounts Payable (AP) Error Correction Changing an AP Invoice
1. Some examples of transactions that can be easily corrected in the Accounts Payable System are: a. Incorrect Vendor b. Incorrect Invoice Number c. Incorrect Invoice Amount d. Incorrect Accounting Date e. Incorrect GL Account f. Change in description g. Incorrect Job Number h. Incorrect Equipment Number i. Incorrect Cost Code or Category
2. AP/Tasks/Change Invoices
a. Enter the vendor ID for the invoice you want to edit. b. Click [List] to select a vendor. c. Enter the invoice number or ID to change.
i. Click [List] to select an invoice. 1. Unposted invoices – New 2. Posted invoices - Posted
d. Make applicable changes or corrections, and choose “Accept Invoice” when finished. e. Some changes/corrections can only be made prior to the payment of the invoice while
others can be made after the invoice has been paid. i. If an invoice has been paid and the check has not been mailed to the vendor
1. AP/Tasks/Void Payments a. “Use Original Date” or “Use Specific Date.” Note: If the GL period
is a closed period and financial statements have been issued for that period, it is recommended to void the check in the current period.
b. Choose “Restore Open Invoice” to restore the invoice to open status.
2. Make any invoice corrections through Change Invoices 3. Re-issue check

Session 3-7 Error Correction AP & AR - 4
Removing retainage from an invoice that was partially paid
1. Follow these steps to remove retainage from a partial paid invoice. a AP/Tasks/Change Invoices.
i. Select the Vendor and Invoice to change. ii. Reduce the invoice amount to reflect the new amount of the invoice (the new
amount should be the original amount less retainage). iii. Move to the distribution grid and create a new line of distribution. iv. For the distribution Amount, enter a negative amount equal to the amount that
you reduced the invoice by (the retainage amount). v. Enter the same negative amount in the Retainage column. vi. If the invoice has several distribution lines with open retainage amounts for
several jobs, add a negative distribution line for each job with retainage that you want to remove.
vii. Accept your distributions and accept your invoice changes. viii. Click Finish and then click Start to print your journal.
b AP/Tasks/Select Invoices for Payment i. When selecting for payment, make sure to select the Retainage invoices only box
because if there are no payments on the distribution, it will hold retainage instead of netting to zero. If you pay the invoice by itself, the check amount is zero, but paying the invoice is necessary for Accounts Payable to change the open status of the invoice to fully paid.
ii. If you use Record Manual Checks to pay this invoice, type 0.00 in Retainage Held for each distribution that is retainage only.
c Notes: i. When you reduce a partially paid invoice by the amount of open retainage, you
must create negative lines of distribution to reverse the retainage. If you reduce the existing retainage amounts directly instead of creating negative lines of distribution, the retainage does not get removed correctly.
ii. Invoice changes post to the accounting date of the invoice. If that period is closed and you do not want to post any entries to the original accounting date of the invoice, change the accounting date of the invoice to your current period. After you accept your invoice changes in Change Invoices, you can select the accounting date of the reversing entries. Select the Revised accounting date.

Session 3-7 Error Correction AP & AR - 5
Deleting an AP Invoice
1. Deleting an invoice is done via the same process as changing an AP Invoice. The method used to delete (void) an invoice depends on the status of the invoice. You can delete the invoice if the invoice is:
a. Posted, but no payments are applied. i. AP/Tasks/Change Invoices - The accounting date on the invoice is the date used
for the reversing entry when the invoice is deleted. NOTE: To post the reversing entry to a different accounting date, you must change the accounting date on the invoice.
1. Enter the vendor ID and invoice number. Or you can click [List] to select a vendor ID and invoice number. Click [Delete] and then click [Yes] when the message asks if you are sure you want to delete this invoice.
2. Select applicable accounting date to use for reversing entries
3. Select “OK’ & “Finish” b. Posted and fully paid.
i. AP/Tasks/Void Payments ii. “Use Original Date” or “Use Specific Date.” Note: If the GL period is a closed
period and financial statements have been issued for that period, it is recommended to void the check in the current period.

Session 3-7 Error Correction AP & AR - 6
iii. Choose “Restore Open Invoice” to restore the invoice to open status. iv. Follow steps 1.a to delete the AP Invoice
c. Posted and partially paid. i. To delete a partially paid invoice, you must first void each payment that made up
the partial payment via the method described in 1.b and follow steps 1.a to delete the AP Invoice
Refund from an AP Vendor
1. Enter the refund as a deposit in Cash Management/Edit Register and post to the general ledger suspense account.
2. Enter a negative invoice in AP. If you are using a Paperless system (like Sage Paperless or Timberscan), you can scan the deposit check in as the invoice backup. In the Invoice Distribution, code the invoice using the original invoice coding.
3. Enter a positive invoice in AP. If the vendor receives a 1099 notice, make sure the distribution is 1099 Exempt. Code the invoice to your suspense account.
4. Use AP-Tasks-Record Manual/Print Quick Checks and create a manual check for a zero amount. Select the positive and negative invoices. Noe: Both invoices can be cleared the next time that vendor is paid.
Reprinting Checks
1. There are various reasons why you might need to reprint one, or a few checks, or an entire check run. Note: Checks marked as “Cleared” or “Void” may not be reprinted.
2. Use Reprint Checks when the original check run: a. Prints the incorrect check date. b. Prints check numbers that do not match the stock check numbers. c. Prints the checks out of alignment. d. Encounters a printer jam, but the Print Checks journal indicates the process completed
successfully. 3. AP/Tasks/Reprint Checks.
a. Enter the bank information. b. Enter the first check number you want to reprint. c. Enter the last check number you want to reprint. d. Accept the prefilled check number or enter the number of the first check you are
reprinting. e. Accept the prefilled check date, or enter a new date.
Session 3-7 Error Correction AP & AR - 7
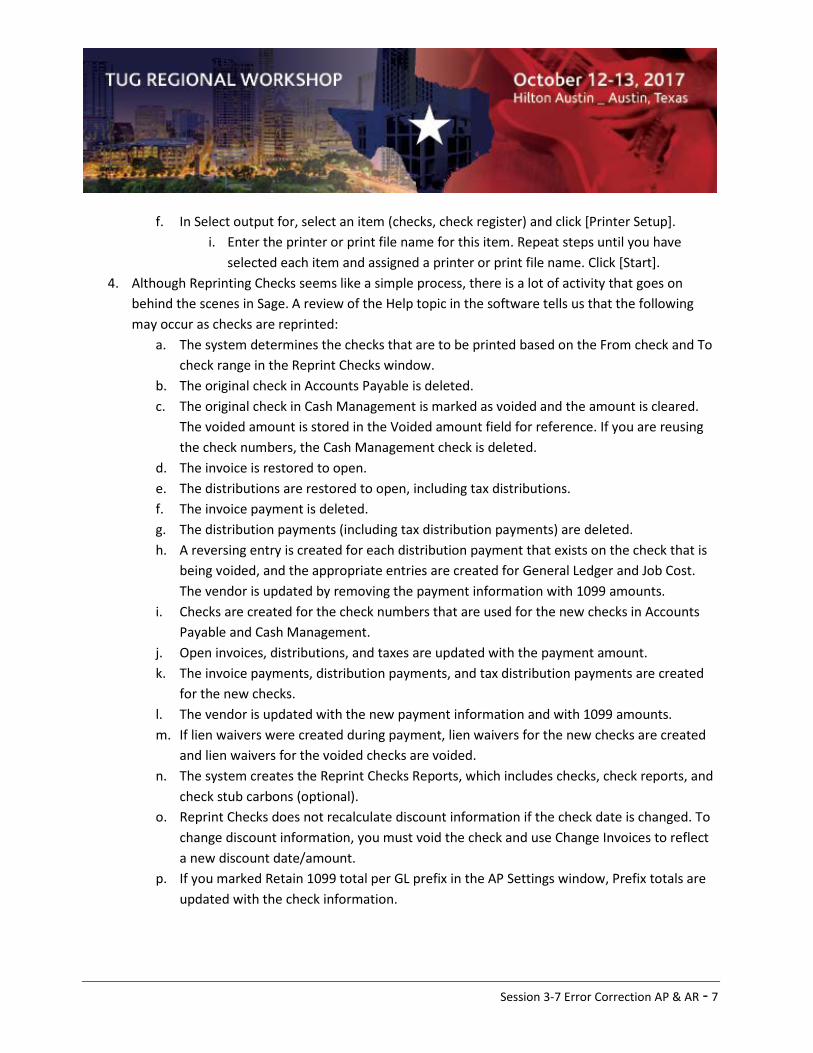
f. In Select output for, select an item (checks, check register) and click [Printer Setup].
i. Enter the printer or print file name for this item. Repeat steps until you have selected each item and assigned a printer or print file name. Click [Start].
4. Although Reprinting Checks seems like a simple process, there is a lot of activity that goes on behind the scenes in Sage. A review of the Help topic in the software tells us that the following may occur as checks are reprinted:
a. The system determines the checks that are to be printed based on the From check and To check range in the Reprint Checks window.
b. The original check in Accounts Payable is deleted. c. The original check in Cash Management is marked as voided and the amount is cleared.
The voided amount is stored in the Voided amount field for reference. If you are reusing the check numbers, the Cash Management check is deleted.
d. The invoice is restored to open. e. The distributions are restored to open, including tax distributions. f. The invoice payment is deleted. g. The distribution payments (including tax distribution payments) are deleted. h. A reversing entry is created for each distribution payment that exists on the check that is
being voided, and the appropriate entries are created for General Ledger and Job Cost. The vendor is updated by removing the payment information with 1099 amounts.
i. Checks are created for the check numbers that are used for the new checks in Accounts Payable and Cash Management.
j. Open invoices, distributions, and taxes are updated with the payment amount. k. The invoice payments, distribution payments, and tax distribution payments are created
for the new checks. l. The vendor is updated with the new payment information and with 1099 amounts. m. If lien waivers were created during payment, lien waivers for the new checks are created
and lien waivers for the voided checks are voided. n. The system creates the Reprint Checks Reports, which includes checks, check reports, and
check stub carbons (optional). o. Reprint Checks does not recalculate discount information if the check date is changed. To
change discount information, you must void the check and use Change Invoices to reflect a new discount date/amount.
p. If you marked Retain 1099 total per GL prefix in the AP Settings window, Prefix totals are updated with the check information.

Session 3-7 Error Correction AP & AR - 8
Correcting Credit Card Charges
1. Invoice Entered for the Wrong Amount a. AP/Task/Void Payments
i. Payment type – Credit Card ii. Select applicable credit card & reference
iii. Select applicable accounting date for reversing entry iv. Restore open invoices & correct applicable invoice information via Change
Invoices v. Re-record credit card payment for corrected invoice via Tasks/Record Credit Card
Payments
2. Credit Card Statement Invoice is created with Errors a. AP/Tasks/Change Invoices - If there is an error on a credit card statement invoice, the only
option to correct the invoice is to delete the invoice via Change Invoices. b. Once the invoice has been deleted, you can go back into AP/Tasks/Verify Statement
Balance to fix any errors. 3. Invoice is paid with the Wrong Credit Card Account
a. Void the credit card payment and re-enter to the correct credit card via AP/Tasks/Record Payments by Credit Card.

Session 3-7 Error Correction AP & AR - 9
Accounts Receivable (AR) Error Correction AR Settings
1. Default AR Settings/GL Miscellaneous Accounts/Balance Sheet Accounts a. File/Company Settings/AR Settings/GL Settings/Misc. Accounts
i. Misc. Receipts – Default account utilized for Miscellaneous GL Cash Receipt Type ii. Write-off – Default account utilized with Write-off Adjustment Type
iii. Bad Debt – Default account utilized with Bad Debt Adjustment Type iv. Customer Credit – Default account utilized with Customer Credit Adjustment Type v. Customer Charges – Default account utilized with Customer Debit Adjustment
Type vi. Refund – Default account utilized with Refund Adjustment Type
vii. NSF Bank Charges – Default account utilized with NSF Check Adjustment Type when recording related bank charge for NSF checks
viii. Finance Charge Write-Off – Default account utilized with Write-Off Adjustment Type on Finance Charge invoices

Session 3-7 Error Correction AP & AR - 10
b. File/Company Settings/AR Settings/GL Settings/Balance Sheet Accounts
i. Customer Cash Receipts – Default account utilized with customer cash receipt type
Adjust Receivables
1. Adjustment types a. Billed credit: Applies a billed credit adjustment to the invoice and decreases the billed
amounts on the customer, contract, and contract item or job. This also reduces the revenue amount in General Ledger. Use this adjustment type when you want the credit memo to reduce the amount billed for the invoice.
b. Billed debit: Applies a billed debit adjustment to the invoice and increases the billed amounts on the customer, contract, and contract item or job. This also increases the revenue amount in General Ledger. Use this adjustment type when you want the debit memo to increase the amount billed for the invoice.
c. AR credit: Applies a credit adjustment to the invoice but does not decrease the billed amount on the customer, contract, and contract item or job. If this is a non-finance charge distribution, it also affects the write-off account (from AR Settings) in General Ledger. If this is a finance charge distribution, it also affects the finance charge write-off account (from AR Settings) in General Ledger. Use this type when you want to reduce the receivable amount for the invoice without affecting the billed amounts.
d. AR debit: Applies a debit adjustment to the invoice but does not increase the billed amount on the customer, contract, and contract item or job. It also affects the revenue accounts in General Ledger. Use this type when you want to increase the receivable amount for the invoice without affecting the billed amounts.

Session 3-7 Error Correction AP & AR - 11
e. Bad debt: Applies a credit adjustment to the invoice but does not decrease the billed
amount on the customer, contract, and contract item or job. This also affects the bad debt account (from AR Settings) in General Ledger. Use this type when you want to reduce the receivable amount for the invoice without affecting the billed amounts and you want this adjustment to be reflected as a bad debt write-off in General Ledger.
f. Customer credit: Applies a credit to the customer account, not to any specific invoice. Customer credit does not create entries to other applications. Use this type when you want to enter a customer credit that can be applied to an invoice later.
g. Customer debit: Applies a debit to the customer account, not to any specific invoice. Customer debit does not create entries to other applications. Use this type when you want to enter a customer debit that can be applied to an invoice later.
h. Refund: Use to reflect a refund for a cash receipt. This reduces the customer receipt balance on the customer and makes entries to General Ledger. No entries are made to Cash Management. If you are using Accounts Payable, you must enter the refund check in the Record Manual Checks task. For more information, see “Entering checks written manually” and “About Refunds” in Accounts Payable Help.
i. NSF check: Reverses a cash receipt that was returned as non-sufficient funds. This makes reversing entries to the customer, contract, job, and General Ledger. An adjusting entry is created for Cash Management for the NSF check and its bank charge (if one is entered).
j. Write off: Applies a credit adjustment to the invoice but does not decrease the billed amount on the customer, contract, and contract item or job. If this is a non-finance charge distribution, it also affects the write-off account (from AR Settings) in General Ledger. If this is a finance charge distribution, it also affects the finance charge write-off account (from AR Settings) in General Ledger. Use this type when you want to reduce the receivable amount for the invoice without affecting the billed amounts.
2. Void a. Utilized when revised invoice required for customer or to correct Sales Tax
3. Edit a. Not recommended – while system tracks edits, not best accounting practice for audit
purposes.

Session 3-7 Error Correction AP & AR - 12
Deposit Rejection Correction
1. Tasks/Enter Cash Receipts/Standard view a. Deposit Information
i. Bank Account = First ii. Deposit Date = 5/30/15
iii. Deposit ID = 1 iv. Deposit Type = Checking v. Number of Deposit Items = 2
vi. Total Deposit Amount = $200.00 vii. Select OK
b. Deposit Items
i. Dep Item Type = Check ii. Customer = ALLST – ALLState University
iii. Cash Receipt ID = 1234 iv. Amount = 200.00

Session 3-7 Error Correction AP & AR - 13
c. Cash Receipt Selection
i. Select Invoice SM4513 & Select OK
d. Deposit Items i. Notice Remaining items = 1 & Remaining amount = 0
ii. Select Finish
iii. When both remaining items & remaining amount fields do not equal zero, the deposit is considered out of balance and will not post. The below message will allow correction of the out of balance deposit if the user selects “No” to the “OK to continue?” question. If the user selects “Yes”, the deposit is still correctable by following the subsequent steps.

Session 3-7 Error Correction AP & AR - 14
iv. Select “Yes” to continue
v. Select “Start” & print or save the data entry print journal
e. Review the data entry print journal. i. Rejecting deposits do not specifically state the deposit rejected on the print
journal ii. The user will know the deposit rejected by the absence of any posted/rejected
summaries on the print journal
2. Tasks/Enter Cash Receipts/Standard view a. Bank Account = First b. Deposit Date – Select the “List” button to view any rejecting deposits

Session 3-7 Error Correction AP & AR - 15
c. Select the applicable rejected deposit to correct & Select “OK”
d. Change the “Number of deposit items” to 1 & Select “OK”
e. Deposit Items i. Select “Finish”

Session 3-7 Error Correction AP & AR - 16
ii. Select “Start” to print or save print journal
iii. Select “Yes” to post entries – Note: This message is only applicable to users whose “Post & Interface Settings” are set to manual post. Automatic Post will bypass this additional window.
iv. The print journal now shows the posting summary information

Session 3-7 Error Correction AP & AR - 17
Deposits Posted to Incorrect CM Bank Account
1. Option 1 – Create CM Bank Transfer in cash management to transfer deposit amount from incorrect CM Bank Account to correct CM Bank Account. It is imperative to use the bank transfer feature, versus recording adjustment via individual bank registers. Bank Transfer utilizes the CM clearing account, in CM Settings, as the offsetting GL entries for both the individual registers to reflect accurately as well as the general ledger account balances.
a. Cash Management/Tasks/Bank Transfers i. Date = 5/31/15
ii. Accounting date = 5/31/15 iii. Select list in “Transfer From” & select incorrect bank account to transfer deposit
amount from iv. Select list in “Transfer To” & select correct bank account to transfer deposit
amount to v. Amount = 200.00
vi. The appropriate general ledger accounts related to the CM bank accounts prefill in the Credit Account & Debit Account fields.
vii. It is highly recommended to update the description with the specific batch number reference from the original batch posted to the incorrect bank account. This will leave an easy accounting audit trail to trace the origination history of the transaction.

Session 3-7 Error Correction AP & AR - 18
viii. Select “OK”
ix. Select “Finish”
x. If the CM Post & Interface settings are set to “Automatic”, the “Post Entries”
selection box will be selected & disabled. If the CM Post & Interface settings are set to “Manual”, the “Post Entries” selection box will be cleared & will need manually selected to post the entries.
xi. Select “Start” to save print journal or print to a printer

Session 3-7 Error Correction AP & AR - 19
2. Option 2 – Void the deposit entered to the incorrect bank account in Adjust Receivables & re-enter. This option will require the user to unapply each cash receipt applied to individual customer invoices prior to voiding the cash receipt. Additionally, any Miscellaneous GL and/or JC Cash Receipts entered as part of the deposit will require reversal via Cash Management/Job Cost to fully void/reverse the total deposit amount from the incorrect bank account, job cost & general ledger.
a. AR/Tasks/Adjust Receivables i. Select “List” & choose ALLState University
ii. Change “View” to “All activity” iii. Locate & select the appropriate cash receipt under the invoice it was applied
against.
Session 3-7 Error Correction AP & AR - 20
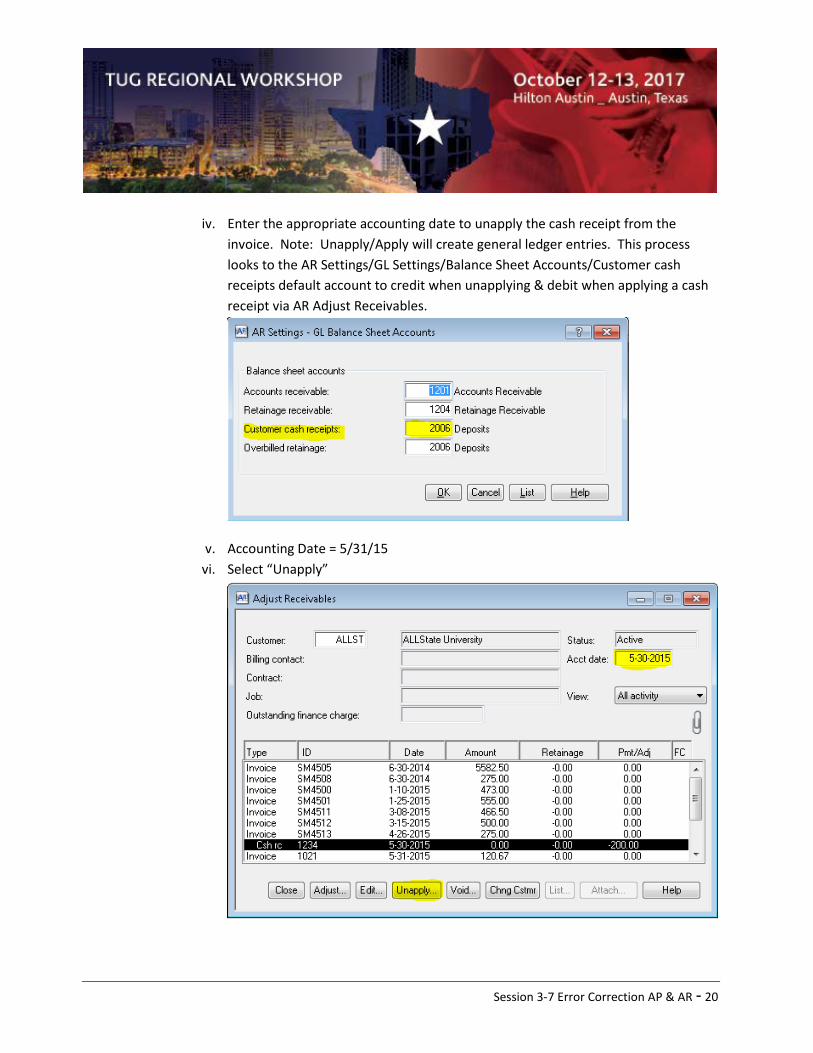
iv. Enter the appropriate accounting date to unapply the cash receipt from the
invoice. Note: Unapply/Apply will create general ledger entries. This process looks to the AR Settings/GL Settings/Balance Sheet Accounts/Customer cash receipts default account to credit when unapplying & debit when applying a cash receipt via AR Adjust Receivables.
v. Accounting Date = 5/31/15 vi. Select “Unapply”
Session 3-7 Error Correction AP & AR - 21
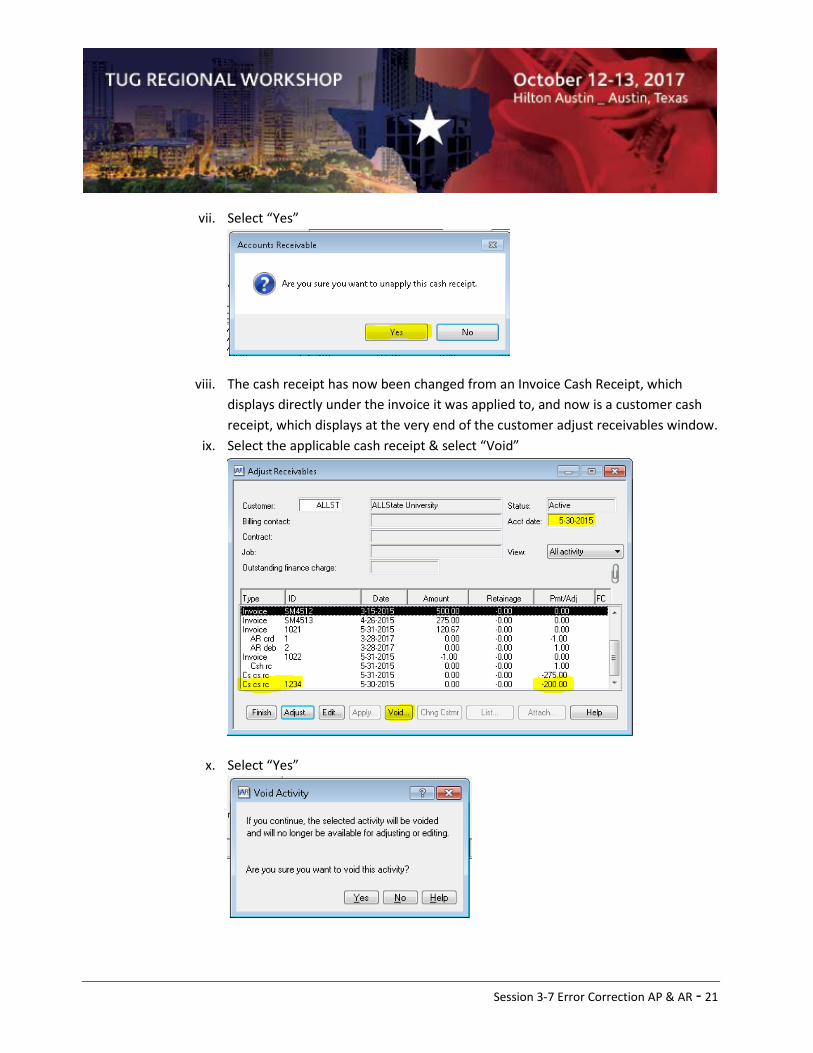
vii. Select “Yes”
viii. The cash receipt has now been changed from an Invoice Cash Receipt, which displays directly under the invoice it was applied to, and now is a customer cash receipt, which displays at the very end of the customer adjust receivables window.
ix. Select the applicable cash receipt & select “Void”
x. Select “Yes”

Session 3-7 Error Correction AP & AR - 22
xi. Repeat the above steps to void any additional cash receipts for this customer, or
additional customers, where the original cash receipts, for the deposit posted to the wrong bank account, were applied.
xii. Once all cash receipts are voided, select “Finish” & “Start” to save/print journal
xiii. If no Miscellaneous Cash Receipts were part of the incorrect deposit, re-enter the deposit to the correct bank account via AR/Tasks/Enter Cash Receipts. The next activity will review how to correct Miscellaneous Cash Receipts and should be performed prior to re-entering the deposit to the correct bank account.

Session 3-7 Error Correction AP & AR - 23
Miscellaneous GL & JC Cash Receipt Correction
1. Miscellaneous GL Cash Receipts a. GL Miscellaneous Cash Receipts, entered through AR, cannot be edited or deleted in AR.
Corrections originate in Cash Management/Edit Register. If a deposit was recorded in error (for example, wrong bank account was used), reverse the incorrect entry in CM Edit Register by adding an adjustment line entry as a subtraction posted to the original general ledger account. Note: While Sage does provide an optional feature to “Delete Row” there have been occasion where this does not delete the header record and can view incorrectly in batch related CM inquiries. It is accounting best practice to record reversing entry detail and preserve the original AR entry for future reference.
b. Cash Management/Tasks/Edit Register i. Select bank account where deposit was originally entered – “First”
ii. Select “OK”
iii. Select the next available line in the register iv. Date = 5/31/15 v. Type = ADJ
xiv. Description – It is highly recommended to update the description with the specific batch number reference, from the original batch, posted to the incorrect bank account. This will leave an easy accounting audit trail to trace the origination history of the transaction.

Session 3-7 Error Correction AP & AR - 24
xv. Subtraction Amount = $100.00
xvi. Select the appropriate general ledger debit account – This would be the general ledger account the original transaction credited.
1. Debit account = 10-4003 xvii. Type – This selection list can be customized in custom descriptions. Adding a
description type for error or deposit correction can be useful to condition reports & inquires and focus on specific correction entries.
1. Type = Does not apply xviii. Select “OK”

Session 3-7 Error Correction AP & AR - 25
xix. Select “Finish”
xx. If the CM Post & Interface settings are set to “Automatic”, the “Post Entries” selection box will be selected & disabled. If the CM Post & Interface settings are set to “Manual”, the “Post Entries” selection box will be cleared & will need manually selected to post the entries.
xxi. Select “Start” to save print journal or print to a printer
2. Miscellaneous JC Cash Receipts - Enter a reversing entry through Job Cost/Enter Direct cost. The reversing entry is a positive amount, since the Miscellaneous JC cash receipt is a negative cost transaction. Use the cost account which was previously credited as the debit account, and the cash account which was previously debited as the credit account. An adjusting entry is created for the cash receipt in Cash Management. Enter the reversing entry as a positive amount in the subtraction column. Use the same GL cash account for the debit and credit. Note: Since the Job Cost correction entry created above used the GL cash account for the reversal reduction, the Cash Management adjustment must debit and credit the same GL account so no balances are affected in General Ledger. Select the link below for steps to enter a Cash Management transaction that does not affect General Ledger. The changes made in Job Cost send entries only to General Ledger (GL). You must adjust the cash receipt in Cash Management.
a. JC/Tasks/Enter Direct Costs i. Job = 03-001 ii. Cost Code = 7-610 iii. Category = M iv. Amount = $100.00

Session 3-7 Error Correction AP & AR - 26
v. Description - It is highly recommended to update the description with the specific batch number reference, from the original batch, posted to the incorrect bank account. This will leave an easy accounting audit trail to trace the origination history of the transaction.
vi. Debit Account = 21-5003 vii. Credit Account = 21-1001 viii. Select “Finish” & save/print journal
b. Cash Management/Tasks/Edit Register i. Select bank account where deposit was originally entered – “First”
ii. Select “OK”
iii. Select the next available line in the register iv. Date = 5/31/15 v. Type = ADJ
xxii. Description – It is highly recommended to update the description with the specific batch number reference, from the original batch, posted to the incorrect bank account. This will leave an easy accounting audit trail to trace the origination history of the transaction.

Session 3-7 Error Correction AP & AR - 27
xxiii. Subtraction Amount = $100.00
xxiv. Select the appropriate general ledger debit account – This would be the general ledger account the original transaction credited.
1. Debit account = 21-1001 xxv. Type – This selection list can be customized in custom descriptions. Adding a
description type for error or deposit correction can be useful to condition reports & inquires and focus on specific correction entries.
1. Type = Does not apply xxvi. Select “OK”
Session 3-7 Error Correction AP & AR - 28
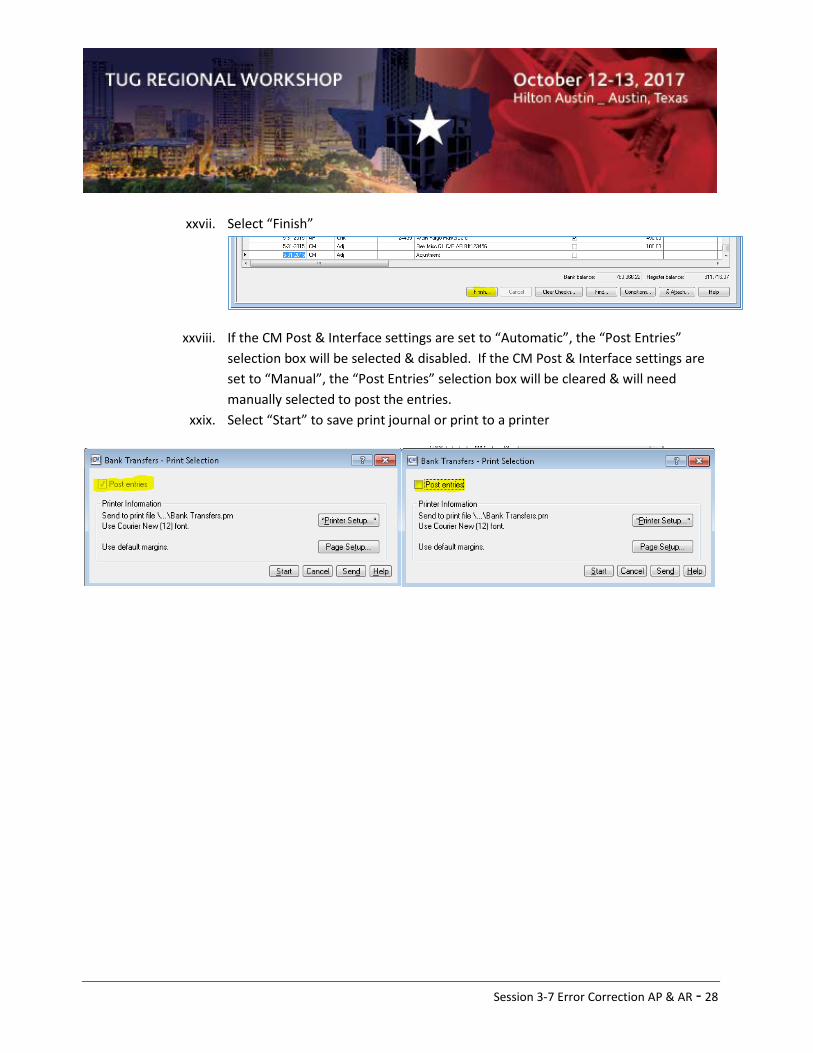
xxvii. Select “Finish”
xxviii. If the CM Post & Interface settings are set to “Automatic”, the “Post Entries” selection box will be selected & disabled. If the CM Post & Interface settings are set to “Manual”, the “Post Entries” selection box will be cleared & will need manually selected to post the entries.
xxix. Select “Start” to save print journal or print to a printer

Session 3-7 Error Correction AP & AR - 29
Finance Charge Reversals
1. AR/File/Company Settings/AR Settings/Finance Charge Settings/Generation Level will determine the reversal process.
a. Invoice level - finance charges are added to existing past due invoices; one finance charge distribution is created for each General Ledger prefix on the invoice. A “Billed Credit” adjustment is applied to each invoice for the amount of the finance charge distribution.
b. Customer level - A single finance charge is created for each customer. The invoice contains one finance charge distribution for each General Ledger prefix. Finance charge invoices are voided to reverse.
c. Invoice Level i. AR/Tasks/Adjust Receivables
1. Select “List” & choose ALLState University
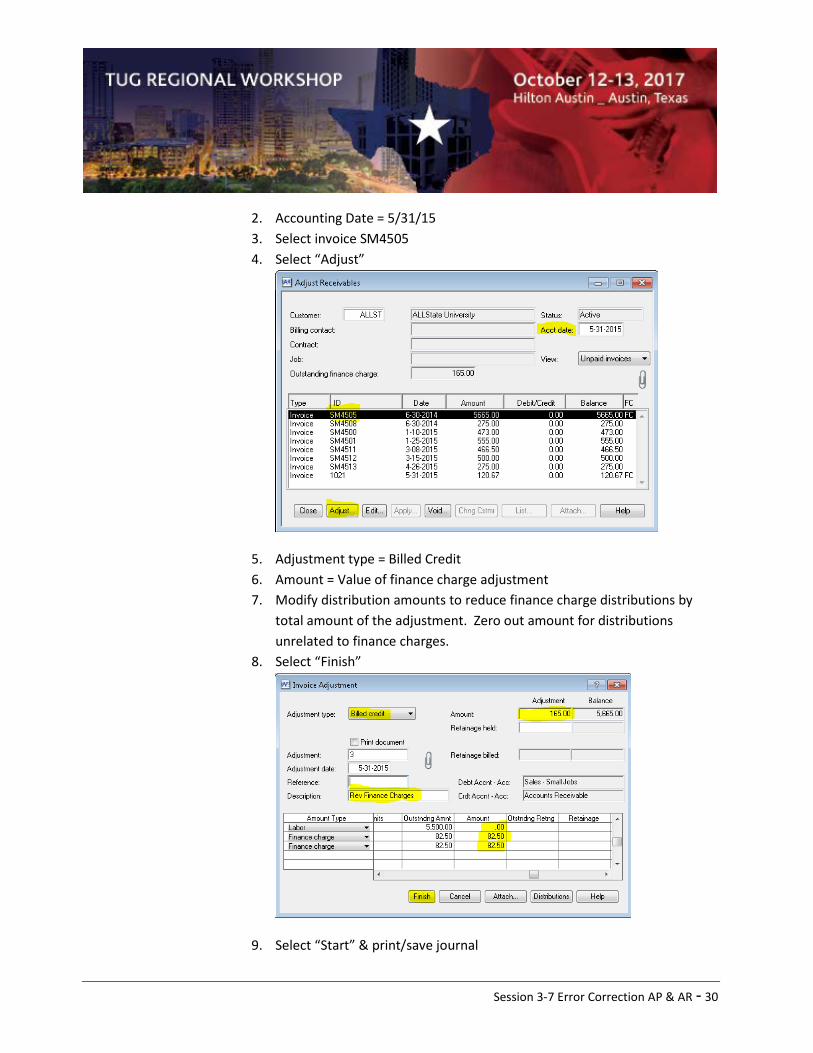
Session 3-7 Error Correction AP & AR - 30
2. Accounting Date = 5/31/15 3. Select invoice SM4505 4. Select “Adjust”
5. Adjustment type = Billed Credit 6. Amount = Value of finance charge adjustment 7. Modify distribution amounts to reduce finance charge distributions by
total amount of the adjustment. Zero out amount for distributions unrelated to finance charges.
8. Select “Finish”
9. Select “Start” & print/save journal

Session 3-7 Error Correction AP & AR - 31
d. Customer level
i. AR/Tasks/Adjust Receivables 1. Select “List” & choose ALLState University
2. Accounting Date = 5/31/15 3. Select invoice SM4505 4. Select “Void”

Session 3-7 Error Correction AP & AR - 32
5. Select “Yes” to approve void activity
6. Select “Finish”
7. Select “Start” & print/save journal

Session 3-7 Error Correction AP & AR - 33
Invoice Adjustments & Corrections
1. Void Invoices – Most commonly used to: a. Reverse previously billed invoice with no reissued invoice b. Reverse previously billed invoice & reissue new invoice to customer c. Reverse previously billed invoice with sales tax & reissue as non-taxable d. AR/Tasks/Adjust Receivables
i. Select “List” & choose Grocer’s Association
ii. Accounting Date = 5/31/15 iii. Select invoice 1023 iv. Select “Void”

Session 3-7 Error Correction AP & AR - 34
v. Contract Billing or Quick Bill Invoices will allow reinstatement in Billing to correct
& rebill. Service Management Invoices will allow reinstatement in Service Management to correct & rebill. Select “Reinstate in Billing/Service Management” check box. If no corrected & reissued invoice required, de-select reinstatement check box.
2. Invoice Adjustments
a. Billed credit: Applies a billed credit adjustment to the invoice and decreases the billed amounts on the customer, contract, and contract item or job. This also reduces the revenue amount in General Ledger. Use this adjustment type when you want the credit memo to reduce the amount billed for the invoice.
b. Billed debit: Applies a billed debit adjustment to the invoice and increases the billed amounts on the customer, contract, and contract item or job. This also increases the revenue amount in General Ledger. Use this adjustment type when you want the debit memo to increase the amount billed for the invoice.
c. AR credit: Applies a credit adjustment to the invoice but does not decrease the billed amount on the customer, contract, and contract item or job. If this is a non-finance charge distribution, it also affects the write-off account (from AR Settings) in General Ledger. If this is a finance charge distribution, it also affects the finance charge write-off account (from AR Settings) in General Ledger. Use this type when you want to reduce the receivable amount for the invoice without affecting the billed amounts.
d. AR debit: Applies a debit adjustment to the invoice but does not increase the billed amount on the customer, contract, and contract item or job. It also affects the revenue accounts in General Ledger. Use this type when you want to increase the receivable amount for the invoice without affecting the billed amounts.

Session 3-7 Error Correction AP & AR - 35
e. Bad debt: Applies a credit adjustment to the invoice but does not decrease the billed
amount on the customer, contract, and contract item or job. This also affects the bad debt account (from AR Settings) in General Ledger. Use this type when you want to reduce the receivable amount for the invoice without affecting the billed amounts and you want this adjustment to be reflected as a bad debt write-off in General Ledger.
b. Write off: Applies a credit adjustment to the invoice but does not decrease the billed amount on the customer, contract, and contract item or job. If this is a non-finance charge distribution, it also affects the write-off account (from AR Settings) in General Ledger. If this is a finance charge distribution, it also affects the finance charge write-off account (from AR Settings) in General Ledger. Use this type when you want to reduce the receivable amount for the invoice without affecting the billed amounts.

Session 3-7 Error Correction AP & AR - 36
Cash Management (CM) Error Correction
Correcting a Check Reconciled in Error
1. Open File-Company Settings-CM Settings and make sure you have checked the boxes for “Override opening balance in Reconcile” and “Allow reconciliation status change in Register”. You may need to ask your company Sage 300 CRE security administrator to make these changes for you.
2. Open Tasks/Edit Register and select the applicable bank account. The warning message lets you know that you need to be careful when changing the reconciliation status of a transaction. In this case, we will be un-reconciling one check and then reconciling the correct check where both checks are for the same amount which will keep the balances the same. Select OK.

Session 3-7 Error Correction AP & AR - 37
3. Locate the check that was reconciled in error and click on …► in the column past the Addition
column to open the edit window.
4. Click on the Reconciled Status drop down box and change the status to [Open]. Click [OK]. Click [Finish].

Session 3-7 Error Correction AP & AR - 38
5. Open Tasks/Reconcile – Select applicable bank account and enter the Statement opening balance
amount in the Statement ending balance space. Enter the statement ending date for the previous month. Click [OK] Note: You can do this for any month prior to the previous month. You only need to find the Ending balance for that month and enter it in both the opening balance and ending balance spaces and enter the correct statement date.
6. Reconcile the correct check. The bank reconciliation is not in balance. Click on [Statement…] on the right to change the Statement opening balance. Add the amount of the check to the opening balance. Click [OK].

Session 3-7 Error Correction AP & AR - 39
7. The bank reconciliation is in balance. Click [Finish].
8. Re-print the “Reconciliation Report” (found at Reports-Reconcilation)
Correcting a Non-Customer Cash Receipt
1. Non-customer cash receipts are recorded through Accounts Receivable or Cash Management. a. Non-customer cash receipts entered through AR cannot be edited or deleted in AR.
Corrections originate in Cash Management/Edit Register. If a deposit was recorded in error (for example, wrong bank account was used), Reverse the incorrect entry in CM Edit Register by adding an adjustment line entry as a subtraction posted to the original general ledger account. Note: While Sage does provide an optional feature to “Delete Row” there have been occasion where this does not delete the header record and can view incorrectly in batch related CM inquiries. It is accounting best practice to record reversing entry detail and preserve the original AR entry for future reference.
Session 3-7 Error Correction AP & AR - 40
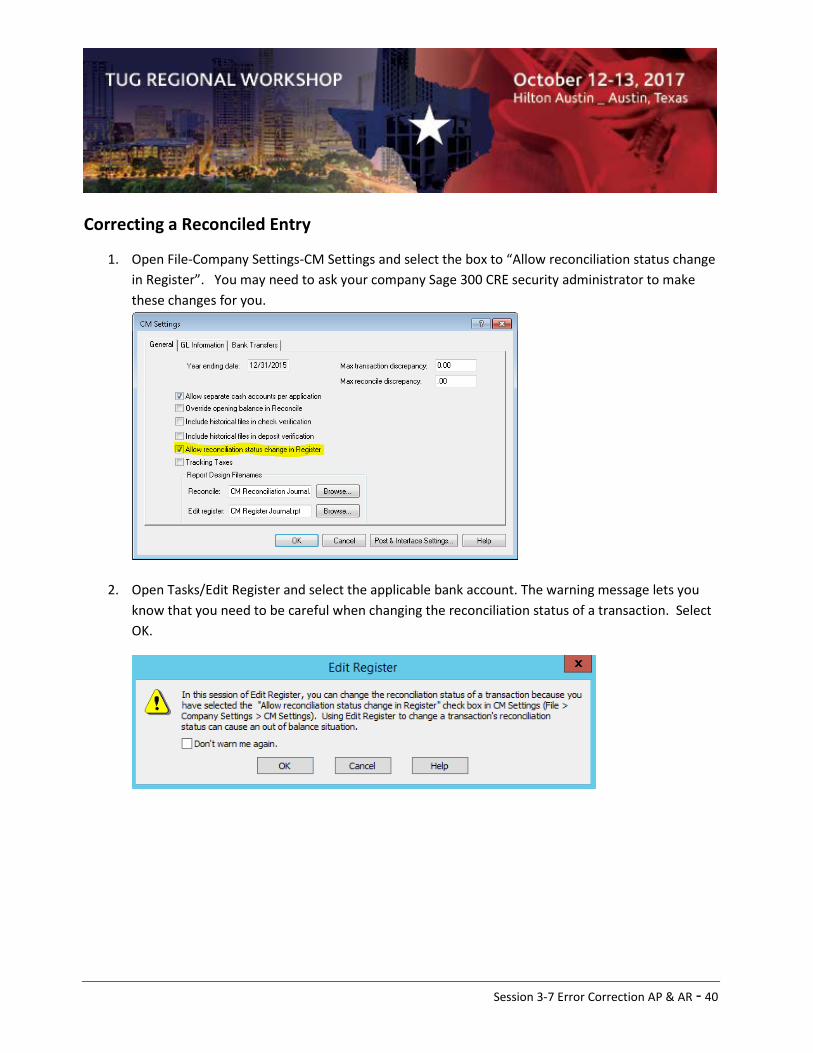
Correcting a Reconciled Entry
1. Open File-Company Settings-CM Settings and select the box to “Allow reconciliation status change in Register”. You may need to ask your company Sage 300 CRE security administrator to make these changes for you.
2. Open Tasks/Edit Register and select the applicable bank account. The warning message lets you know that you need to be careful when changing the reconciliation status of a transaction. Select OK.

Session 3-7 Error Correction AP & AR - 41
3. Select the drop-down arrow next to Reconciled Status: at the bottom left and change the R to an
O (for Open). Please note the “Cleared date:” before changing the status. You will need to use the same date to re-reconcile the entry.
4. Make the changes needed to the GL credit account. Then re-reconcile the entry by changing the Reconciled Status back to R and enter the correct date (noted before making changes) in the “Cleared date:” box. Select “OK”