servswitch wizard usb kvm extender with audio manual · the quickest way to extend vga video plus...
TRANSCRIPT
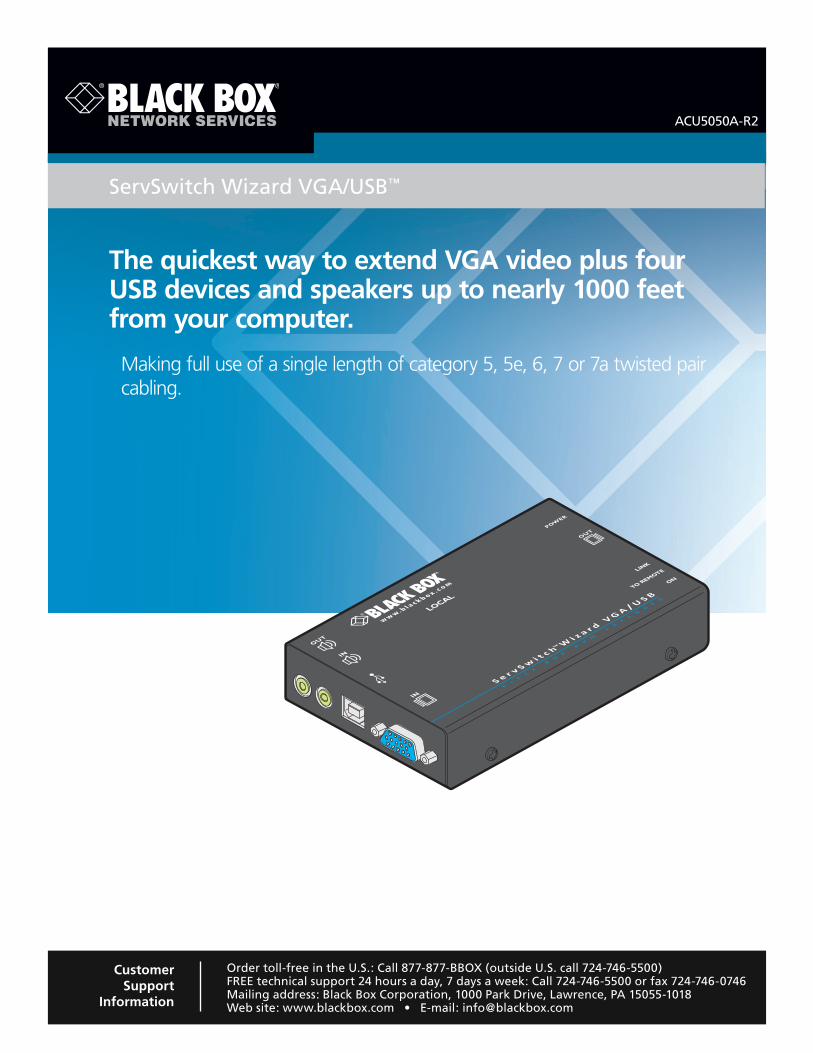
The quickest way to extend VGA video plus four USB devices and speakers up to nearly 1000 feet from your computer.
Making full use of a single length of category 5, 5e, 6, 7 or 7a twisted pair cabling.
ServSwitch Wizard VGA/USB™
ACU5050A-R2
Order toll-free in the U.S.: Call 877-877-BBOX (outside U.S. call 724-746-5500)FREE technical support 24 hours a day, 7 days a week: Call 724-746-5500 or fax 724-746-0746Mailing address: Black Box Corporation, 1000 Park Drive, Lawrence, PA 15055-1018Web site: www.blackbox.com • E-mail: [email protected]
Customer Support
Information
®
NETWORK SERVICES
®
LINK
LOCAL
POWER
OUT
OUT
IN
IN
TOREMOTE
ON
S e r v S wi t c h
Wi z a r d
VG
A/ U
S B
™
BL
AC
K
BO
X
KV
M
EX
TE
ND
ER

ServSwitch Wizard VGA/USB
724-746-5500 | blackbox.com Page 2
Trademarks Used in this ManualBlack Box and the Double Diamond logo are registered trademarks, and ServSwitch is a trademark, of BB Technologies, Inc.
Mac is a registered trademark of Apple Computer, Inc.
Linux is registered trademark of Linus Torvalds.
Windows is a registered trademark of Microsoft Corporation.
NetWare is a registered trademark of Novell, Inc.
Sun is a trademark of Sun Microsystems, Inc.
Unix is a registered trademark of UNIX System Laboratories, Inc.
BSD is a registered trademark of UUNet Technologies, Inc.
Any other trademarks mentioned in this manual are acknowledged to be the property of the trademark owners.
We‘re here to help! If you have any questions about your application or our products, contact Black Box Tech Support at 724-746-5500
or go to blackbox.com and click on “Talk to Black Box.”You’ll be live with one of our technical experts in less than 30 seconds.

FCC and IC RFI Statements
724-746-5500 | blackbox.com Page 3
Federal Communications Commission and Industry Canada Radio Frequency Interference Statements
This equipment generates, uses, and can radiate radio-frequency energy, and if not installed and used properly, that is, in strict accordance with the manufacturer’s instructions, may cause inter ference to radio communication. It has been tested and found to comply with the limits for a Class A computing device in accordance with the specifications in Subpart B of Part 15 of FCC rules, which are designed to provide reasonable protection against such interference when the equipment is operated in a commercial environment. Operation of this equipment in a residential area is likely to cause interference, in which case the user at his own expense will be required to take whatever measures may be necessary to correct the interference.
Changes or modifications not expressly approved by the party responsible for compliance could void the user’s authority to oper-ate the equipment.
This digital apparatus does not exceed the Class A limits for radio noise emis sion from digital apparatus set out in the Radio Interference Regulation of Industry Canada.
Le présent appareil numérique n’émet pas de bruits radioélectriques dépassant les limites applicables aux appareils numériques de la classe A prescrites dans le Règlement sur le brouillage radioélectrique publié par Industrie Canada.

ServSwitch Wizard VGA/USB
724-746-5500 | blackbox.com Page 4
Instrucciones de Seguridad
(Normas Oficiales Mexicanas Electrical Safety Statement)
1. Todas las instrucciones de seguridad y operación deberán ser leídas antes de que el aparato eléctrico sea operado.
2. Las instrucciones de seguridad y operación deberán ser guardadas para referencia futura.
3. Todas las advertencias en el aparato eléctrico y en sus instrucciones de operación deben ser respetadas.
4. Todas las instrucciones de operación y uso deben ser seguidas.
5. El aparato eléctrico no deberá ser usado cerca del agua—por ejemplo, cerca de la tina de baño, lavabo, sótano mojado o cerca de una alberca, etc..
6. El aparato eléctrico debe ser usado únicamente con carritos o pedestales que sean recomendados por el fabricante.
7. El aparato eléctrico debe ser montado a la pared o al techo sólo como sea recomendado por el fabricante.
8. Servicio—El usuario no debe intentar dar servicio al equipo eléctrico más allá a lo descrito en las instrucciones de operación. Todo otro servicio deberá ser referido a personal de servicio calificado.
9. El aparato eléctrico debe ser situado de tal manera que su posición no interfiera su uso. La colocación del aparato eléctrico sobre una cama, sofá, alfombra o superficie similar puede bloquea la ventilación, no se debe colocar en libreros o gabinetes que impidan el flujo de aire por los orificios de ventilación.
10. El equipo eléctrico deber ser situado fuera del alcance de fuentes de calor como radiadores, registros de calor, estufas u otros aparatos (incluyendo amplificadores) que producen calor.
11. El aparato eléctrico deberá ser connectado a una fuente de poder sólo del tipo descrito en el instructivo de operación, o como se indique en el aparato.
12. Precaución debe ser tomada de tal manera que la tierra fisica y la polarización del equipo no sea eliminada.
13. Los cables de la fuente de poder deben ser guiados de tal manera que no sean pisados ni pellizcados por objetos colocados sobre o contra ellos, poniendo particular atención a los contactos y receptáculos donde salen del aparato.
14. El equipo eléctrico debe ser limpiado únicamente de acuerdo a las recomendaciones del fabricante.
15. En caso de existir, una antena externa deberá ser localizada lejos de las lineas de energia.
16. El cable de corriente deberá ser desconectado del cuando el equipo no sea usado por un largo periodo de tiempo.
17. Cuidado debe ser tomado de tal manera que objectos liquidos no sean derramados sobre la cubierta u orificios de ventilación.
18. Servicio por personal calificado deberá ser provisto cuando: A: El cable de poder o el contacto ha sido dañado; u B: Objectos han caído o líquido ha sido derramado dentro del aparato; o C: El aparato ha sido expuesto a la lluvia; o D: El aparato parece no operar normalmente o muestra un cambio en su desempeño; o E: El aparato ha sido tirado o su cubierta ha sido dañada.
Table of Contents
724-746-5500 | blackbox.com Page 5
Contents
1. Specifications .............................................................................................................................................................................. 6
2. Overview .................................................................................................................................................................................... 7
3. Installation .................................................................................................................................................................................. 8
3.1 Mounting the modules – desk or rack............................................................................................................................... 8
3.1.1 Desk mount .......................................................................................................................................................... 8
3.1.2 Rack mount .......................................................................................................................................................... 9
3.2 Connections ................................................................................................................................................................... 10
3.2.1 Connections at the local module ........................................................................................................................ 10
3.2.2 Connections at the remote module ....................................................................................................................12
3.2.3 Dual user configuration ...................................................................................................................................... 16
3.3 Video display (DDC) information ..................................................................................................................................... 18
3.3.1 DDC indications ................................................................................................................................................. 19
3.4 Video compensation ....................................................................................................................................................... 20
3.4.1 To enter video compensation mode ................................................................................................................... 21
3.4 Video compensation (continued) .................................................................................................................................... 22
3.4.3 To set the cable type .......................................................................................................................................... 22
3.4.4 To set the cable length ....................................................................................................................................... 22
3.4.5 To adjust video gain ........................................................................................................................................... 22
3.4.6 To adjust color skew ........................................................................................................................................... 23
3.4.7 To exit video compensation mode (return to normal operation) ........................................................................ 23
4. Operation ................................................................................................................................................................................. 24
4.1 General use ..................................................................................................................................................................... 24
4.2 Dual user arbitration ....................................................................................................................................................... 24
4.3 Peripheral operation ....................................................................................................................................................... 24
4.3.1 USB .................................................................................................................................................................... 24
Appendix A. Troubleshooting ....................................................................................................................................................... 26
A.1 Status indicators ............................................................................................................................................................. 26
Appendix B. Safety Information .................................................................................................................................................... 27
ServSwitch Wizard VGA/USB
724-746-5500 | blackbox.com Page 6
1. Specifications
Approvals: CE, FCC
Hardware Compatibility: All computers with VGA analog video and USB interfaces
Software Compatibility: Operates with all known software and operating systems including Windows®, Linux®, Unix®, BSD, all Sun® OS, all Mac® OS, NetWare®, etc.
Connectors: Video: VGA female (local transmitter) USB: USB Type B female Other: RJ-45 CATx link socket Power jack
Connectors: Video: VGA female (remote receiver) USB: (4) USB Type A female Other: RJ-45 CATx link socket Power jack
Operating Temperature: 32 to 104°F (0 to 40°C)
Power: DC jack (power adapter included) Input: 100–240 VAC, 50/60 Hz Output: 5VDC, 12.5W
Local unit
Dimensions (w x h x d): 118.4mm (4.66”) x 26mm (1.02”) x 74.8mm (2.94”)
Weights: 0.33kg (0.72lbs)
Remote unit
Dimensions (w x h x d): 118.4mm (4.66”) x 26mm (1.02”) x 74.8mm (2.94”)
Weights: 0.33kg (0.72lbs)
Chapter 2: Overview
724-746-5500 | blackbox.com Page 7
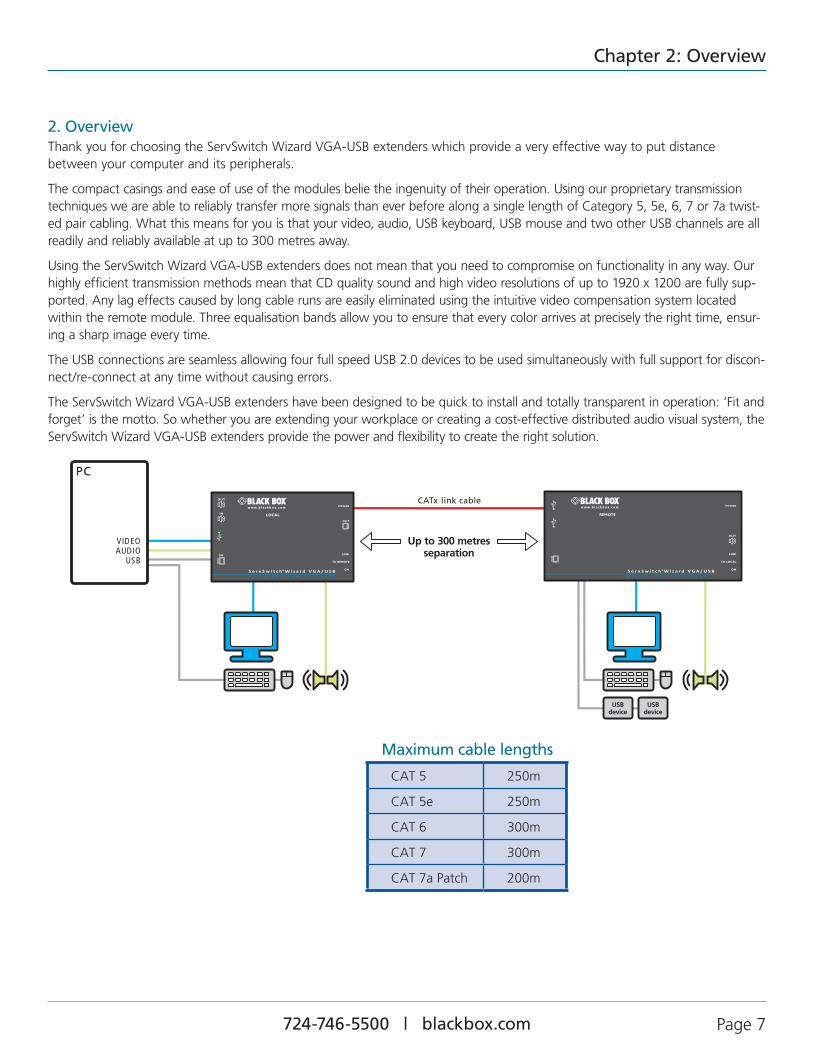
2. OverviewThank you for choosing the ServSwitch Wizard VGA-USB extenders which provide a very effective way to put distance between your computer and its peripherals.
The compact casings and ease of use of the modules belie the ingenuity of their operation. Using our proprietary transmission techniques we are able to reliably transfer more signals than ever before along a single length of Category 5, 5e, 6, 7 or 7a twist-ed pair cabling. What this means for you is that your video, audio, USB keyboard, USB mouse and two other USB channels are all readily and reliably available at up to 300 metres away.
Using the ServSwitch Wizard VGA-USB extenders does not mean that you need to compromise on functionality in any way. Our highly efficient transmission methods mean that CD quality sound and high video resolutions of up to 1920 x 1200 are fully sup-ported. Any lag effects caused by long cable runs are easily eliminated using the intuitive video compensation system located within the remote module. Three equalisation bands allow you to ensure that every color arrives at precisely the right time, ensur-ing a sharp image every time.
The USB connections are seamless allowing four full speed USB 2.0 devices to be used simultaneously with full support for discon-nect/re-connect at any time without causing errors.
The ServSwitch Wizard VGA-USB extenders have been designed to be quick to install and totally transparent in operation: ‘Fit and forget’ is the motto. So whether you are extending your workplace or creating a cost-effective distributed audio visual system, the ServSwitch Wizard VGA-USB extenders provide the power and flexibility to create the right solution.
USBdevice
USBdevice
PC
AUDIOVIDEO
USB
Up to 300 metresseparation
CATx link cable
LINK
REMOTE
POWER
OUT
TO LOCAL
ONS e r v S w i t c h W i z a r d V G A / U S B™
B L A C K B O X K V M E X T E N D E R
LINK
LOCAL
POWER
OUT
OUT
IN
IN
TO REMOTE
ONS e r v S w i t c h W i z a r d V G A / U S B™
B L A C K B O X K V M E X T E N D E R
CAT 5 250m
CAT 5e 250m
CAT 6 300m
CAT 7 300m
CAT 7a Patch 200m
Maximum cable lengths

ServSwitch Wizard VGA/USB
724-746-5500 | blackbox.com Page 8
3. Installation
3.1 Mounting the modules – desk or rackThe modules can be situated on a desk or alternatively, for larger installations, mounted within an optional rack mount chassis.
3.1.1 Desk mountApply the supplied self-adhesive rubber feet to the underside of the module as shown in Figure 3-1:
Figure 3-1. Applying the supplied self-adhesive rubber feet to the underside of the module

Chapter 3: Installation
724-746-5500 | blackbox.com Page 9
3.1.2 Rack mountNote: The module switches are not accessible once it is inserted into the rack, therefore, check all settings before insertion.
1 Place the rack securing plate (available as a separate kit) onto the front of the module and secure it with the two countersunk screws.
2 Orient the module on its side so that its labeled face is the correct way up.
3 Slide the module into the required rack position. The rectangular cut-out in the front upper lip of the rack allows the two screws on the module’s upper edge to slide through.
4 The rack mount chassis has a series of holes in its floor that are spaced to accommodate the two screws on the module’s lower edge. Ensure that the screws correctly locate into the two holes of the chosen slot. The rack securing plate on the module should now be flush with the front of the rack mount chassis.
5 Use the third (pan-head) screw, in the top hole of the rack securing plate to fasten the module to the rack as shown in Figure 3-2:
Figure 3-2. Fixing the module into the rack
1ON
42 3
LINK
LOCAL
POWER
OUT
IN
IN
TO REMOTE
ON
S e r v S wi t c h
Wi z a r d
VG
A/ U
S B
™
BL
AC
K
BO
X
KV
M
EX
TE
ND
ER
ServSwitch Wizard VGA/USB
724-746-5500 | blackbox.com Page 10
3.2 ConnectionsInstallation of the modules is straightforward and requires minimal configuration in most cases.
• Connectionsatthelocalmodule
• Connectionsattheremotemodule
IMPORTANT: The ServSwitch Wizard VGA-USB can be used with other hubs in the system, but please note that the local unit should not be connected to the downstream port of a bus-powered hub due to power constraints.
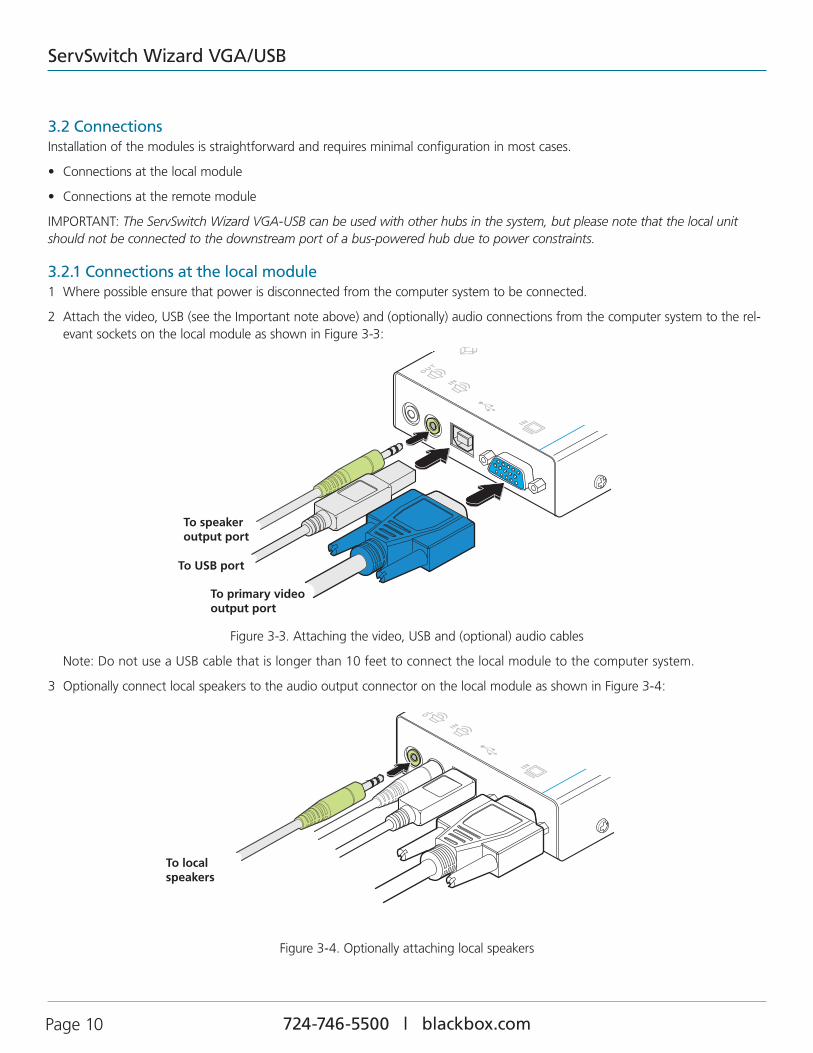
3.2.1 Connections at the local module1 Where possible ensure that power is disconnected from the computer system to be connected.
2 Attach the video, USB (see the Important note above) and (optionally) audio connections from the computer system to the rel-evant sockets on the local module as shown in Figure 3-3:
Figure 3-3. Attaching the video, USB and (optional) audio cables
Note: Do not use a USB cable that is longer than 10 feet to connect the local module to the computer system.
3 Optionally connect local speakers to the audio output connector on the local module as shown in Figure 3-4:
Figure 3-4. Optionally attaching local speakers
LOCAL
OUT
IN
IN
S e r
B
To speaker output port
To USB port
To primary video output port
LOCAL
OUT
IN
IN
S e r
B
To local speakers

Chapter 3: Installation
724-746-5500 | blackbox.com Page 11
4 Optionally connect a local video monitor to the video out feed- through connector on the local module as shown in Figure 3-5:
Figure 3-5. Optionally attaching a local video monitor
5 Attach the connector of the category 5, 5e, 6, 7 or 7a link cable (up to 1000 feet in length) to the ‘TO REMOTE’ socket on the local module as shown in Figure 3-6:
Figure 3-6. Attaching the CATx link cable
LINK
POWER
OUT
TOREMOTE
ON
hW
izardV
GA
/USB
™KV
M
EX
TE
ND
ER
Link to remote module
LINK
POWER
OUT
TOREMOTE
ON
hW
izardV
GA
/USB
™KV
M
EX
TE
ND
ER
To local monitor
3.2.1.1 Local module powerIn the majority of installations, the local module will derive all of its power successfully from the USB link with the computer system. However, if insufficient voltage is available from the computer system, the module will fail to operate. If this occurs (or if you do not intend to use the USB con-nection with the computer) you will need to purchase and use a power adapter identical to the one used for the remote module from your Black Box stockist.
1 If external power input is necessary, attach the output connector of the optional power adapter to the ‘POWER’ socket of the local module.
2 Attach the IEC power cord to the power adapter body and insert the mains plug of the cord to a nearby power outlet.
Note: If a power adapter is plugged into the module but not switched on, it will prevent the unit from deriving power from the USB connection.
LINK
POWER
OUT
TOREMOTE
ON
hW
izardV
GA
/USB
™KV
M
EX
TE
ND
ER
To optional power adapter
ServSwitch Wizard VGA/USB
724-746-5500 | blackbox.com Page 12
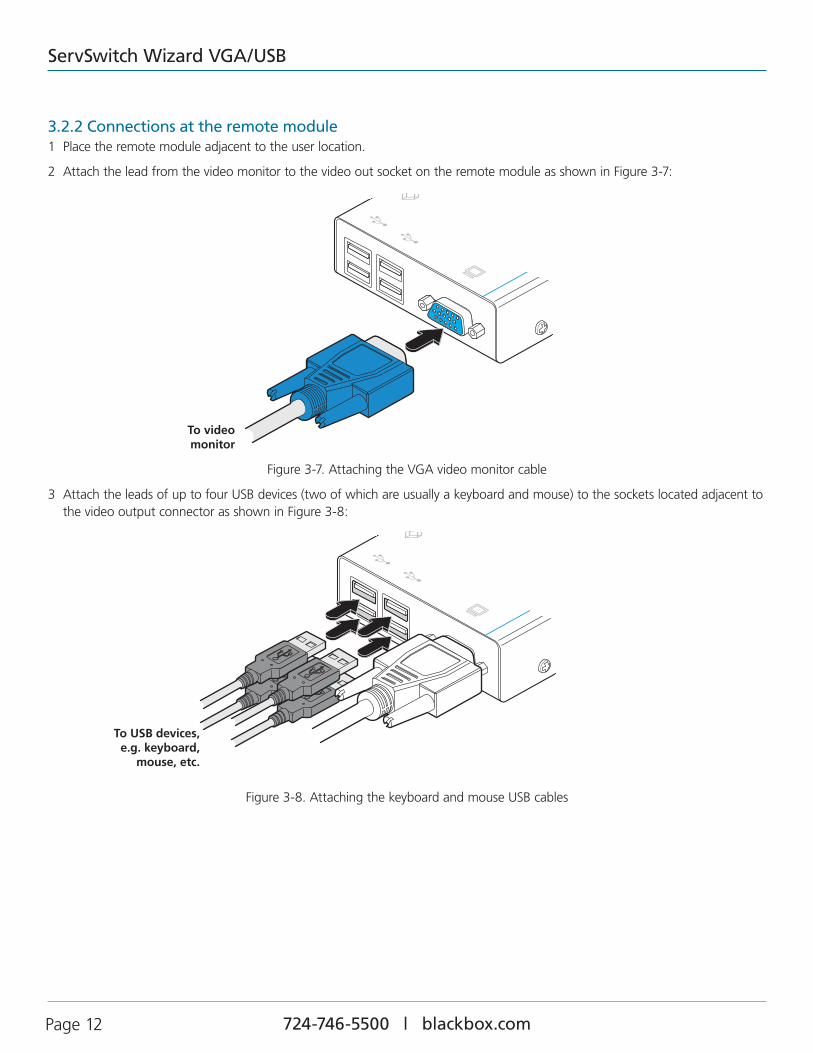
3.2.2 Connections at the remote module1 Place the remote module adjacent to the user location.
2 Attach the lead from the video monitor to the video out socket on the remote module as shown in Figure 3-7:
Figure 3-7. Attaching the VGA video monitor cable
3 Attach the leads of up to four USB devices (two of which are usually a keyboard and mouse) to the sockets located adjacent to the video output connector as shown in Figure 3-8:
Figure 3-8. Attaching the keyboard and mouse USB cables
To video monitor
REMOTE
REMOTE
To USB devices, e.g. keyboard,
mouse, etc.
Chapter 3: Installation
724-746-5500 | blackbox.com Page 13
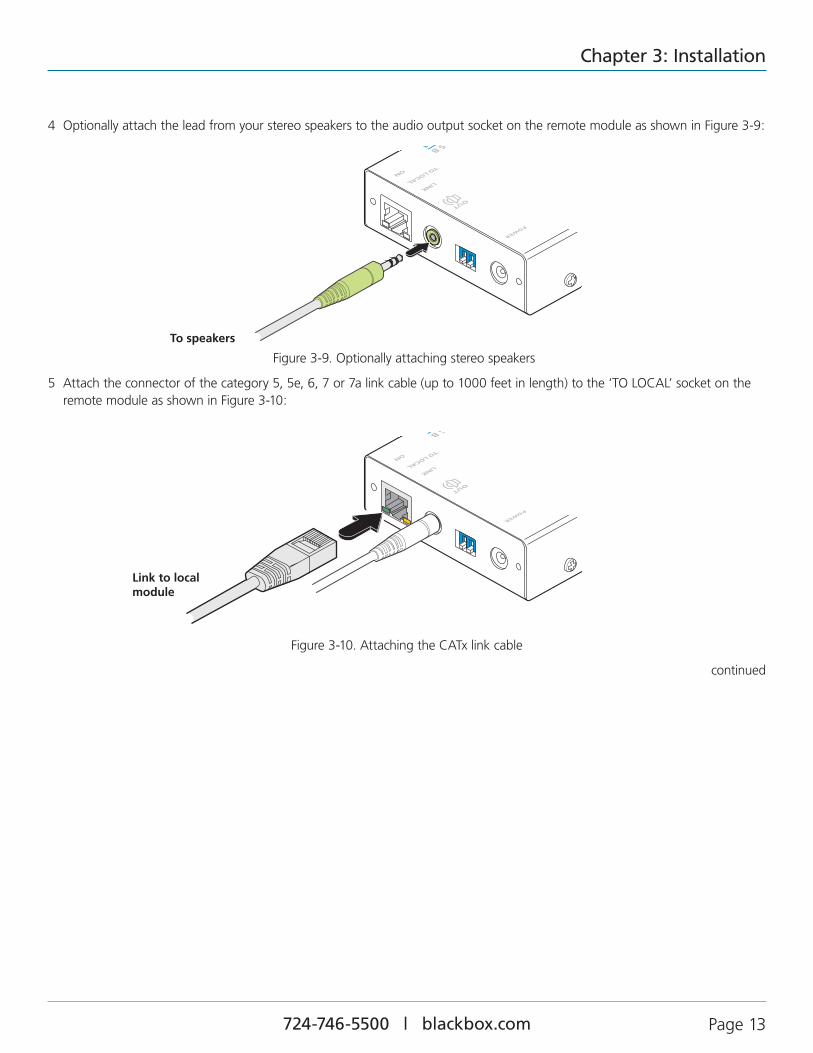
4 Optionally attach the lead from your stereo speakers to the audio output socket on the remote module as shown in Figure 3-9:
Figure 3-9. Optionally attaching stereo speakers
5 Attach the connector of the category 5, 5e, 6, 7 or 7a link cable (up to 1000 feet in length) to the ‘TO LOCAL’ socket on the remote module as shown in Figure 3-10:
Figure 3-10. Attaching the CATx link cable
continued
LINK
POWER
OUT
TOLOCAL
ON
Wizard
VG
A/U
SB
VM
EX
TE
ND
ER
LINK
POWER
OUT
TOLOCAL
ON
Wizard
VG
A/U
SB
VM
EX
TE
ND
ER
To speakers
Link to local module
ServSwitch Wizard VGA/USB
724-746-5500 | blackbox.com Page 14
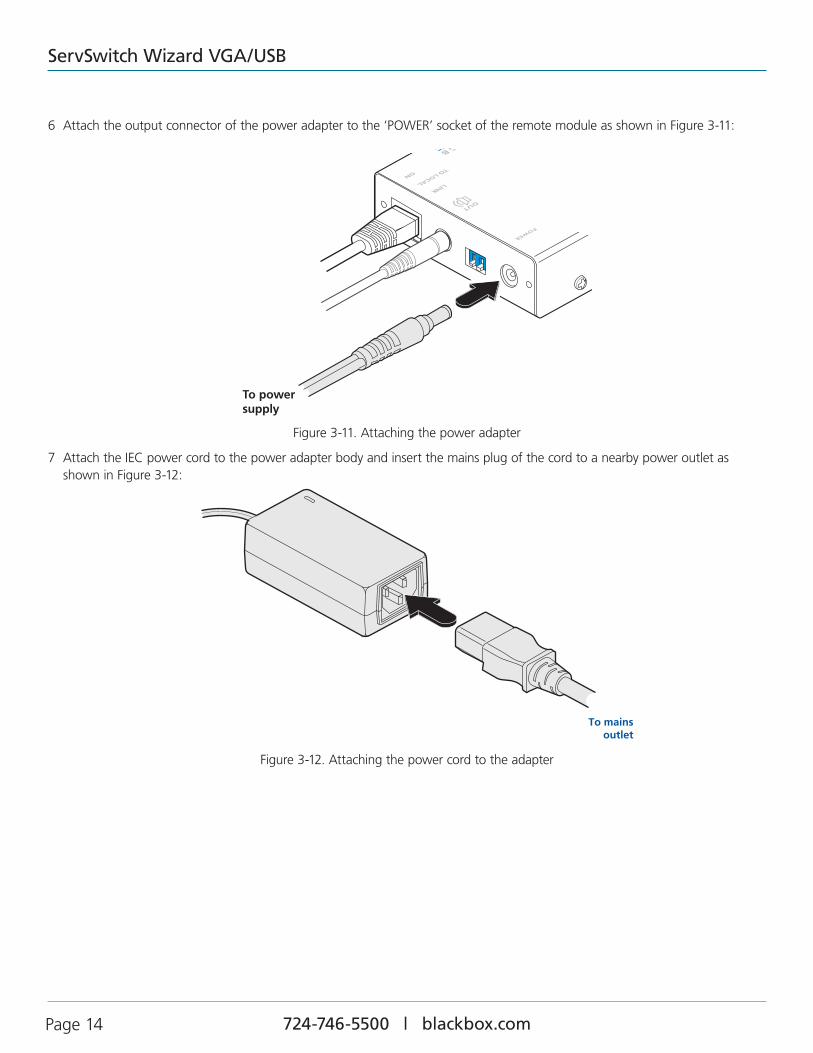
6 Attach the output connector of the power adapter to the ‘POWER’ socket of the remote module as shown in Figure 3-11:
LINK
POWER
OUT
TOLOCAL
ON
Wizard
VG
A/U
SB
VM
EX
TE
ND
ER
To power supply
Figure 3-11. Attaching the power adapter
7 Attach the IEC power cord to the power adapter body and insert the mains plug of the cord to a nearby power outlet as shown in Figure 3-12:
To mains outlet
Figure 3-12. Attaching the power cord to the adapter
Chapter 3: Installation
724-746-5500 | blackbox.com Page 15

ServSwitch Wizard VGA/USB
724-746-5500 | blackbox.com Page 16
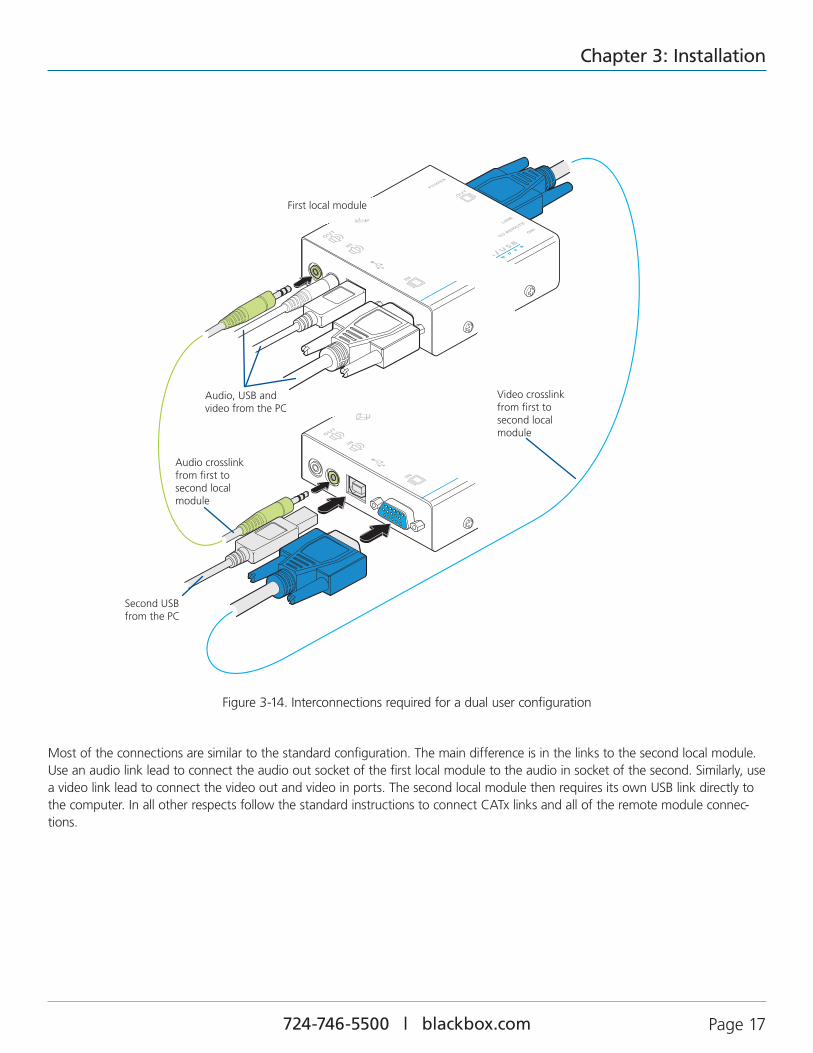
3.2.3 Dual user configurationYou can combine two ServSwitch Wizard VGA-USB extender sets to create a dual user configuration. Such an installation would allow a single computer to be controlled from two different positions, with each position receiving the same audio visual output and having equal and concurrent control over the computer. Arbitration between the two positions is handled by the computer’s USB system and so this arrangement is better suited to situations where two users would not often require simultaneous access.
PC
AUDIOVIDEO
USB
USER1
USER2
LINK
REMOTE
POWER
OUT
TO LOCAL
ONS e r v S w i t c h W i z a r d V G A / U S B™
B L A C K B O X K V M E X T E N D E R
LINK
REMOTE
POWER
OUT
TO LOCAL
ONS e r v S w i t c h W i z a r d V G A / U S B™
B L A C K B O X K V M E X T E N D E R
LINK
LOCAL
POWER
OUT
OUT
IN
IN
TO REMOTE
ONS e r v S w i t c h W i z a r d V G A / U S B™
B L A C K B O X K V M E X T E N D E R
LINK
LOCAL
POWER
OUT
OUT
IN
IN
TO REMOTE
ONS e r v S w i t c h W i z a r d V G A / U S B™
B L A C K B O X K V M E X T E N D E R
Both local modules require their own USB links to the PC
Video and audio crosslinks are made from first local module to the second local module
CATx link (up to 1000 feet)
Figure 3-13. The logical layout of a dual user configuration
CATx link (up to 1000 feet)
Chapter 3: Installation
724-746-5500 | blackbox.com Page 17
LOCAL
OUT
IN
IN
S eB
LOCAL
OUT
IN
IN
S eB
LINK
AL
POWER
OUT
TOREMOTE
ON
S e r v S wi t c h
Wi z a r d
VG
A/ U
S B
™
LA
CK
BO
X
KV
M
EX
TE
ND
ER
Audio, USB and video from the PC
Audio crosslink from first to second local module
Video crosslink from first to second local module
Second USB from the PC
First local module
Most of the connections are similar to the standard configuration. The main difference is in the links to the second local module. Use an audio link lead to connect the audio out socket of the first local module to the audio in socket of the second. Similarly, use a video link lead to connect the video out and video in ports. The second local module then requires its own USB link directly to the computer. In all other respects follow the standard instructions to connect CATx links and all of the remote module connec-tions.
Figure 3-14. Interconnections required for a dual user configuration
ServSwitch Wizard VGA/USB
724-746-5500 | blackbox.com Page 18
3.3 Video display (DDC) informationThe Display Data Channel (or DDC) is an industry standard scheme which allows video monitors to declare their capabilities to the computer’s video adapter circuitry, allowing the latter to optimise their outputs accordingly. Since the widespread adoption of the scheme, video adapters have become increasingly dependent on receiving relevant DDC information during startup, before they will output anything more than a rudimentary video signal.
It is not possible to transmit DDC data back from the video monitor that is attached to the remote module to the computer’s video adapter. Therefore, during startup of the local module, it will search for a video monitor connected to its local feed-through connector:
• Ifalocalvideomonitorisfound,itsDDCinformationwillbecomparedtotheinformationalreadystoredand,ifdifferent,willbe copied, stored and presented to the video adapter upon request.
• Ifnolocalvideomonitorisfound,thelocalmodulewillmakeavailableitspreviouslystoredsetofDDCparameterstothevideoadapter upon request; or, if none were stored, a default set.
In either case, the DDC information taken by the video adapter will be used to determine the video output that is sent via the ServSwitch Wizard VGA-USB modules to the remote monitor.
If you find that the default DDC information is not completely suitable for your remote monitor, try temporarily connecting your remote monitor to the video out port of the local module. When the local module is powered up, it will read and store the DDC information from your monitor. You can then return the monitor to its remote position and the new DDC information will be used at every power on.
Chapter 3: Installation
724-746-5500 | blackbox.com Page 19
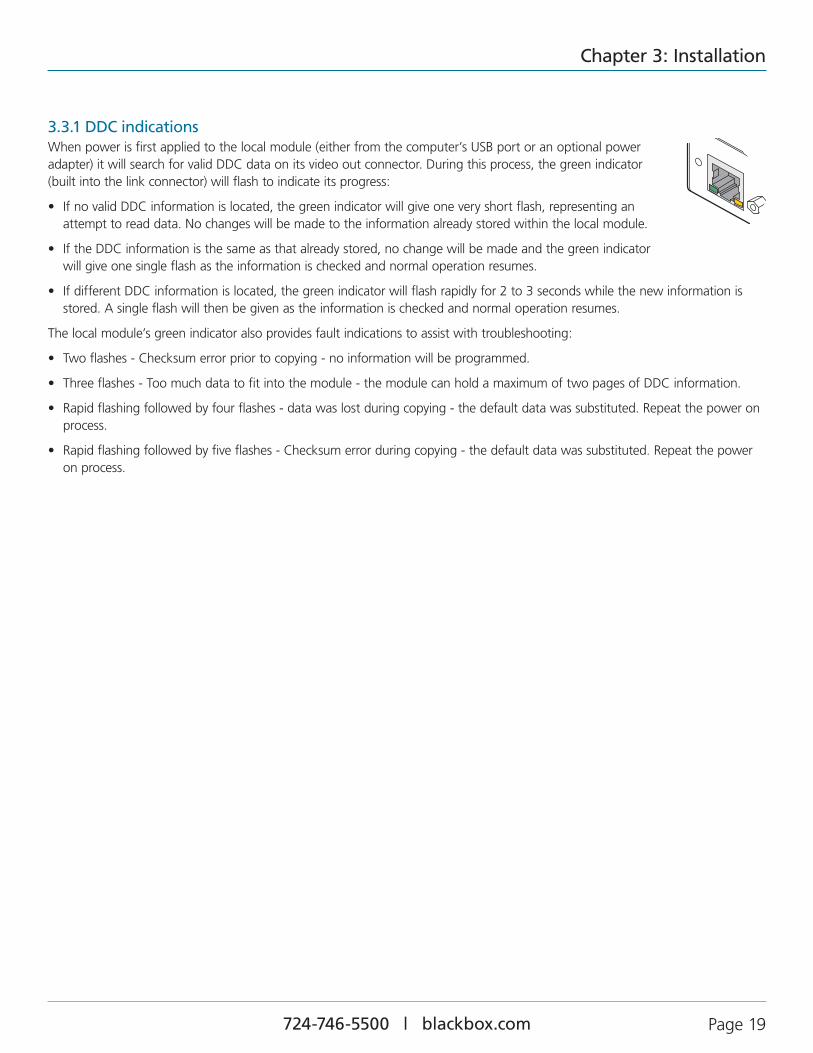
3.3.1 DDC indicationsWhen power is first applied to the local module (either from the computer’s USB port or an optional power adapter) it will search for valid DDC data on its video out connector. During this process, the green indicator (built into the link connector) will flash to indicate its progress:
• IfnovalidDDCinformationislocated,thegreenindicatorwillgiveoneveryshortflash,representinganattempt to read data. No changes will be made to the information already stored within the local module.
• IftheDDCinformationisthesameasthatalreadystored,nochangewillbemadeandthegreenindicatorwill give one single flash as the information is checked and normal operation resumes.
• IfdifferentDDCinformationislocated,thegreenindicatorwillflashrapidlyfor2to3secondswhilethenewinformationisstored. A single flash will then be given as the information is checked and normal operation resumes.
The local module’s green indicator also provides fault indications to assist with troubleshooting:
• Twoflashes-Checksumerrorpriortocopying-noinformationwillbeprogrammed.
• Threeflashes-Toomuchdatatofitintothemodule-themodulecanholdamaximumoftwopagesofDDCinformation.
• Rapidflashingfollowedbyfourflashes-datawaslostduringcopying-thedefaultdatawassubstituted.Repeatthepoweronprocess.
• Rapidflashingfollowedbyfiveflashes-Checksumerrorduringcopying-thedefaultdatawassubstituted.Repeatthepoweron process.
LINK
OREMOTE
ON
ServSwitch Wizard VGA/USB
724-746-5500 | blackbox.com Page 20
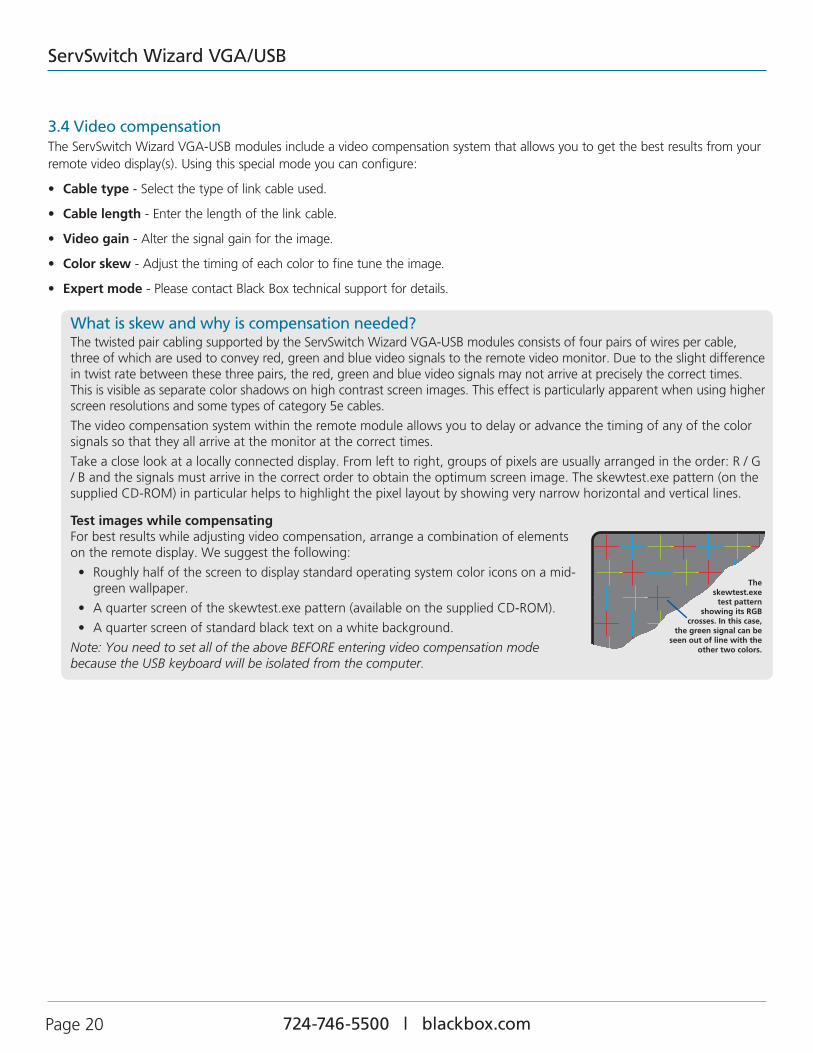
What is skew and why is compensation needed?The twisted pair cabling supported by the ServSwitch Wizard VGA-USB modules consists of four pairs of wires per cable, three of which are used to convey red, green and blue video signals to the remote video monitor. Due to the slight difference in twist rate between these three pairs, the red, green and blue video signals may not arrive at precisely the correct times. This is visible as separate color shadows on high contrast screen images. This effect is particularly apparent when using higher screen resolutions and some types of category 5e cables.
The video compensation system within the remote module allows you to delay or advance the timing of any of the color signals so that they all arrive at the monitor at the correct times.
Take a close look at a locally connected display. From left to right, groups of pixels are usually arranged in the order: R / G / B and the signals must arrive in the correct order to obtain the optimum screen image. The skewtest.exe pattern (on the supplied CD-ROM) in particular helps to highlight the pixel layout by showing very narrow horizontal and vertical lines.
Test images while compensatingFor best results while adjusting video compensation, arrange a combination of elements on the remote display. We suggest the following:
• Roughlyhalfofthescreentodisplaystandardoperatingsystemcoloriconsonamid-green wallpaper.
• Aquarterscreenoftheskewtest.exepattern(availableonthesuppliedCD-ROM).
• Aquarterscreenofstandardblacktextonawhitebackground.
Note: You need to set all of the above BEFORE entering video compensation mode because the USB keyboard will be isolated from the computer.
3.4 Video compensationThe ServSwitch Wizard VGA-USB modules include a video compensation system that allows you to get the best results from your remote video display(s). Using this special mode you can configure:
• Cable type - Select the type of link cable used.
• Cable length - Enter the length of the link cable.
• Video gain - Alter the signal gain for the image.
• Color skew - Adjust the timing of each color to fine tune the image.
• Expert mode - Please contact Black Box technical support for details.
The skewtest.exe
test pattern showing its RGB
crosses. In this case, the green signal can be
seen out of line with the other two colors.
Chapter 3: Installation
724-746-5500 | blackbox.com Page 21
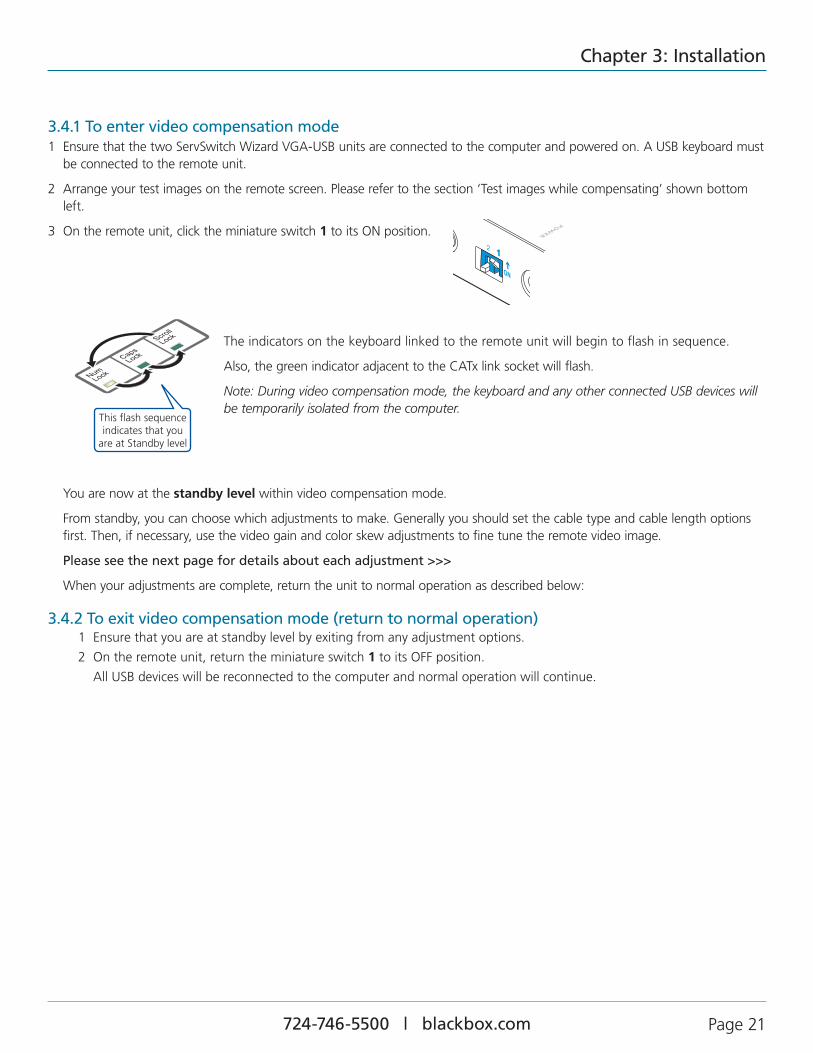
This flash sequence indicates that you
are at Standby level
NumLock
CapsLock
Scroll
Lock The indicators on the keyboard linked to the remote unit will begin to flash in sequence.
Also, the green indicator adjacent to the CATx link socket will flash.
Note: During video compensation mode, the keyboard and any other connected USB devices will be temporarily isolated from the computer.
1
ON
2
You are now at the standby level within video compensation mode.
From standby, you can choose which adjustments to make. Generally you should set the cable type and cable length options first. Then, if necessary, use the video gain and color skew adjustments to fine tune the remote video image.
Please see the next page for details about each adjustment >>>
When your adjustments are complete, return the unit to normal operation as described below:
3.4.2 To exit video compensation mode (return to normal operation)1 Ensure that you are at standby level by exiting from any adjustment options.
2 On the remote unit, return the miniature switch 1 to its OFF position.
All USB devices will be reconnected to the computer and normal operation will continue.
3.4.1 To enter video compensation mode1 Ensure that the two ServSwitch Wizard VGA-USB units are connected to the computer and powered on. A USB keyboard must
be connected to the remote unit.
2 Arrange your test images on the remote screen. Please refer to the section ‘Test images while compensating’ shown bottom left.
3 On the remote unit, click the miniature switch 1 to its ON position.

ServSwitch Wizard VGA/USB
724-746-5500 | blackbox.com Page 22
3.4 Video compensation (continued)Once you have entered video compensation standby level, you can choose which adjustments to make. Generally you should set the cable type and cable length options first. Then, if necessary, use the video gain and color skew adjustments to fine tune the remote video image.
3.4.3 To set the cable typea From standby, press . The Num Lock and Caps Lock indicators will flash.
b Type the number that corresponds to the category of link cable used:
• Press for Cat 5
• Press for Cat 5e
• Press for Cat 6
• Press for Cat 7
• Press for Cat 7a
c Press to save the value and return to standby.
Alternatively, press to discard any change and return to standby.
3.4.4 To set the cable lengtha From standby, press . The Caps Lock and Scroll Lock indicators will flash.
b Use the keypad to enter the cable length in metres.
c Press to save the value and return to standby.
Alternatively, press to discard any change and return to standby.
Note: You can also increase or decrease the cable length setting from the standby level (and view the resulting change in screen image quality) using and respectively. If necessary, press to return to a neutral setting. Such adjustments to the cable length setting are saved automatically.
3.4.5 To adjust video gaina From standby, use and to decrease or increase the gain level. If necessary, press to return to a neutral setting.
Gain adjustments are saved automatically.
NumLock
CapsLock
Scroll
Lock
NumLock
CapsLock
Scroll
Lock

Chapter 3: Installation
724-746-5500 | blackbox.com Page 23
3.4.6 To adjust color skewYou will only need to use these adjustments if the video image is not sharp after adjusting the cable type and length. Before entering video compensation mode, display the suggested screen content (see Test images while compensating on the previous page). Look for color fringes adjacent to the displayed icons and text. Also check the skewtest.exe image to confirm whether the red, green and blue crosses are all vertically aligned.
a From standby, press either , or depending on which color needs to be adjusted. The Num Lock, Caps Lock or Scroll Lock indicators will flash for the Red, Green and Blue channels respectively.
NumLock
CapsLock
Scroll
Lock
NumLock
CapsLock
Scroll
Lock
NumLock
CapsLock
Scroll
Lock
b Use and to adjust the delay for the chosen color while watching the results on the remote video display.
Note: If the screen goes blank during adjustment, either press the opposite arrow key to the one you last pressed or press to reset all delays.
c Press to save the setting and return to standby.
Alternatively, press to discard any change and return to standby.
3.4.7 To exit video compensation mode (return to normal operation)1 Ensure that you are at standby level by exiting from any adjustment options.
2 On the remote unit, return the miniature switch 1 to its OFF position.
All USB devices will be reconnected to the computer and normal operation will continue.

ServSwitch Wizard VGA/USB
724-746-5500 | blackbox.com Page 24
4. Operation
4.1 General useIn use, the ServSwitch Wizard VGA-USB modules should be transparent - the system and its peripherals should operate exactly as normal, the only difference being that they are now up to 300 metres apart.
In some installations, you may see some ‘shadows’ to the right of high contrast screen characters. This can be caused by an incor-rect video compensation setting and it may be necessary to make adjustments to correct this. Please see Video compensation in the ‘Installation’ section.
4.2 Dual user arbitrationWhen using two sets of ServSwitch Wizard VGA-USB modules to allow two users to access a single computer, be aware that arbi-tration between the users is handled by the USB sub-system of the computer. Unlike with other Black Box products, this means that both users can control the computer at exactly the same time and the resulting keyboard and mouse influences will be an amalgam of the two inputs - i.e. a mouse move to the right by one user will cancel out a simultaneous left mouse move by the other. The same is also true when the local module has feed-through peripherals attached to it, adjacent to the computer.
For this reason, the ServSwitch Wizard VGA-USB dual user arrangement is better suited to situations where two users would not often require simultaneous access.
4.3 Peripheral operation
4.3.1 USBEach ServSwitch Wizard VGA-USB remote module provides four USB outlets, each of which can support USB 2.0 peripherals at speeds up to 12Mbps. The ServSwitch Wizard VGA-USB appears to the computer as a four port USB hub.
If the link between the modules is interrupted, any connected USB peripherals will be automatically disabled and re-enabled once the connection is restored.

Chapter 4: Operation
724-746-5500 | blackbox.com Page 25
ServSwitch Wizard VGA/USB
724-746-5500 | blackbox.com Page 26
Appendix A. Troubleshooting
A.1 Status indicatorsThe green indicators built into the link connectors on each module provide useful feedback regarding the connection and power status:
During startup (of the local module)• Oneveryshortgreenflash:novalidDDCinformationavailablefromalocallyconnectedvideomonitor,nochangesmadeto
stored DDC information.
• Singlegreenflash:DDCinformationbeingreadfromalocallyconnectedvideomonitor,butnochangesmadetostoredDDCinformation.
• Rapidgreenflashfor2to3seconds,followedbysingleflash:NewDDCinformationbeingreadandstoredfromalocallycon-nected video monitor.
• Twogreenflashes-Checksumerrorpriortocopying-noinformationwillbeprogrammed.
• Threegreenflashes-Toomuchdatatofitintothemodule-themodulecanholdamaximumoftwopagesofDDCinforma-tion.
• Rapidgreenflashingfollowedbyfourflashes-datawaslostduringcopying-thedefaultdatawassubstituted.Repeatthepower on process.
• Rapidgreenflashingfollowedbyfiveflashes-Checksumerrorduringcopying-thedefaultdatawassubstituted.Repeatthepower on process.
During operation (either module)• Continualyellow:ValidCATxlinktoothermodulesensed.
• Continualgreen:Correctpowerinputsensed.
Important: The ServSwitch Wizard VGA-USB can be used with other hubs in the system, but please note that the local unit should not be connected to the downstream port of a bus-powered hub due to power constraints.

Appendices
724-746-5500 | blackbox.com Page 27
Appendix B. Safety Information• Foruseindry,oilfreeindoorenvironmentsonly.
• Donotusetolinkbetweenbuildings.
• Ensurethatalltwistedpairinterconnectcablesareinstalledincompliancewithallapplicablewiringregulations.
• DonotconnectCATxlinkinterfaces(RJ45styleconnectors)toanyotherequipment,particularlynetworkortelecommunica-tions equipment.
• Warning–thepoweradaptercontainsliveparts.
• Nouserserviceablepartsarecontainedwithinthepoweradapter-donotdismantle.
• Plugthepoweradapterintoagroundedsocketoutletclosetothemodulethatitispowering.
• Replacethepoweradapterwithamanufacturerapprovedtypeonly.
• Donotusethepoweradapterifthepoweradaptercasebecomesdamaged,crackedorbrokenorifyoususpectthatitisnotoperating properly.
• Ifyouuseapowerextensioncordwiththeremotemodule,makesurethetotalampereratingofthedevicespluggedintotheextension cord do not exceed the cord’s ampere rating. Also, make sure that the total ampere rating of all the devices plugged into the wall outlet does not exceed the wall outlet’s ampere rating.
• Donotattempttoservicethemodulesyourself.
• Thepowersupplycangetwarminoperation–donotsituateitinanenclosedspacewithoutanyventilation.

724-746-5500 | blackbox.com
About Black BoxBlack Box Network Services is your source for more than 118,000 networking and infrastructure products. You’ll find everything from cabinets and racks and power and surge protection products to media converters and Ethernet switches all supported by free, live 24/7 Tech support available in 30 seconds or less.
© Copyright 2011. Black Box Corporation. All rights reserved.
ACU5050A-R2, rev. 1
Black Box Tech Support: FREE! Live. 24/7.
Great tech support is just 30 seconds away at 724-746-5500 or blackbox.com.
®
NETWORK SERVICES
®
Tech support theway it should be.