service support administrator supervisor...
TRANSCRIPT

imagineIS Implementation and
Change Management Project
Service Support Director / Supervisor
Guide
Work Request Numbers: DMR01-0000018510
Version 2.0 – Final September 27, 2016
Department of Developmental Disabilities Division of Information Technology Services 30 East Broad St, 12th floor Columbus, Ohio 43215

imagineIS: Implementation and Change Management Project
imagineIS_SSA_Director_Guide - Final
V 2.0 09/27/2016
Division of Information
Technology Services
ii
Table of Contents
SETTING DIRECT REPORTS ................................................................................................................................... 1 ASSIGNING AND REASSIGNING AN INDIVIDUAL TO AN SSA ........................................................................................ 3 SETTING SUPERVISOR NOTIFICATIONS AND REVIEW ................................................................................................. 6 REVIEWING DISCOVERY RESULTS .......................................................................................................................... 8 ADD DISCOVERY RESULTS FEEDBACK ..................................................................................................................... 9 REVIEW DISCOVERY RESULTS FEEDBACK .............................................................................................................. 11 REVIEWING QUICK SUMMARY MODULES FOR AN INDIVIDUAL.................................................................................. 12 REVIEWING OR ADVANCING (ACTIVATING) AN OUTCOME (WITH SUPERVISOR REVIEW ON) ......................................... 15 REVIEWING ISP FOR AN INDIVIDUAL (WITH SUPERVISOR REVIEW ON) ...................................................................... 18 VALIDATE USER SECURITY ROLES ........................................................................................................................ 21 CONFIRM SECURITY ROLE TITLES ........................................................................................................................ 22 ENTER A SOCIAL SECURITY NUMBER, MEDICAID NUMBER OR UPDATE DOB FOR AN INDIVIDUAL................................... 25 CHANGE THE NAME OF AN SSA .......................................................................................................................... 27 REMOVE AN SSA FROM THE TEAM...................................................................................................................... 28 IMAGINE CRM PORTAL – OPTION TO ADD SSA PICTURE ........................................................................................ 29 SSA SUPERVISOR HAS ACCESS TO CASE NOTES ..................................................................................................... 31 TILES METHOD FOR ASSIGNING A QA TO AN SSA – (NOT A DIRECT REPORT) ............................................................. 34 DETERMINE, ENTER, OR EDIT THE COUNTY SAMPLING RATE.................................................................................... 38 RUNNING THE YEARLY SSA PRODUCTIVITY REPORT ............................................................................................... 43

imagineIS: Implementation and Change Management Project
imagineIS_SSA_Director_Guide – Final
V2.0 09/27/2016
Division of Information
Technology Services
Page 1 of 54
Setting Direct Reports The SSA supervisor has the ability to assign or re-assign to themselves, direct reports.
1. Sign on to imagineIS as SSA Supervisor.
2. Click on the Microsoft Dynamics icon in the navigation bar.
3. Click on the Settings tile.
Figure 1 – Initial Menu Settings
4. Select the SETTINGS drop down in the blue ribbon.
5. Click on the ADMINISTRATION tile.
6. Click on the Users link.
Figure 2 – Select User

imagineIS: Implementation and Change Management Project
imagineIS_SSA_Director_Guide – Final
V2.0 09/27/2016
Division of Information
Technology Services
Page 2 of 54
7. Enter the User Name of the SSA in the search field unless already displayed in the list.
8. Click the name of the SSA to open the record.
Figure 3 – Select SSA
9. Click the CHANGE MANAGER link.
Figure 4 – User Information Page

imagineIS: Implementation and Change Management Project
imagineIS_SSA_Director_Guide – Final
V2.0 09/27/2016
Division of Information
Technology Services
Page 3 of 54
10. Type an SSA Supervisor name or search for it.
11. After the SSA Supervisor Name is found, Click “OK”.
12. Click “Save and Close”.
Figure 5 – Change Manage Approval Screen
Assigning and Reassigning an Individual to an SSA Walks though how to assign or reassign an SSA to an Individual.
1. Sign on to imagineIS as an SSA Supervisor.
2. Change the Dashboard to ‘SSA Supervisor/Director Caseload’ (If not already set).

imagineIS: Implementation and Change Management Project
imagineIS_SSA_Director_Guide – Final
V2.0 09/27/2016
Division of Information
Technology Services
Page 4 of 54
3. Scroll down and select from any of the Individual Sub-Tables.
Figure 6 – Assigning an individual to an SSA - Part 1
4. Search for the Individual and click to open the record.
5. Scroll Down to the County Information.

imagineIS: Implementation and Change Management Project
imagineIS_SSA_Director_Guide – Final
V2.0 09/27/2016
Division of Information
Technology Services
Page 5 of 54
6. Click the ‘Search’ for the Assigned SSA.
Figure 7 – Assigning an Individual to an SSA - Part 2
7. Scroll through the list to find the SSAs or use the Search functionality.
8. When the SSA is located, highlight and click the SSA.
9. The name will appear as the assigned SSA.
Figure 8 – Assigning an Individual to an SSA - Part 3
10. Click “Save and Close”.

imagineIS: Implementation and Change Management Project
imagineIS_SSA_Director_Guide – Final
V2.0 09/27/2016
Division of Information
Technology Services
Page 6 of 54
Setting Supervisor Notifications and Review An SSA can have their profile set to send a notification or request reviewed by the SSA Supervisor each time Discovery Management, Outcome or an ISP is phased. This allows the SSA supervisor to review the work of their direct reports.
1. Sign on to imagineIS as an SSA Supervisor.
2. Change the Dashboard to SSA Supervisor/Director Caseload (If not already set).
3. Search for the SSAs list in My Direct Reports.
a. If there are no SSAs listed in ‘My Direct Reports’, go to ‘Setting Direct Report’ step above.
Figure 9 – Opening a Direct Report Record
4. Click on the direct reports Name to open the record.
5. Click the down arrow on the blue ribbon next to the SSA’s name to display the tiles.
6. Scroll right to “SUPERVISOR REVIEW SETTINGS” tile and select.
Figure 10 – Supervisory Settings

imagineIS: Implementation and Change Management Project
imagineIS_SSA_Director_Guide – Final
V2.0 09/27/2016
Division of Information
Technology Services
Page 7 of 54
7. Select “ADD NEW SUPERVISOR REVIEW SETTING’.
Figure 11 – Adding New Supervisor Settings - Part 1
8. Select the review setting for the supervisor.
Figure 12 – Adding New Supervisor Settings - Part 2
9. Click “Save and Close”.

imagineIS: Implementation and Change Management Project
imagineIS_SSA_Director_Guide – Final
V2.0 09/27/2016
Division of Information
Technology Services
Page 8 of 54
Reviewing Discovery Results 1. Sign on to imagineIS as an SSA Supervisor.
2. Change the Dashboard to SSA Supervisor/Director Caseload (If not already). 3. Click on an individual to open to their Front Page. 4. From the Individual’s Front Page, select the dropdown next to the Individual’s name and select the
Discovery Module to review.
5. Click on the Link in the List View to open the module.
Figure 13 - Discovery Module List View
6. After reviewing the module, select “Save & Close” to Exit.
Figure 14 - Opened Discovery

imagineIS: Implementation and Change Management Project
imagineIS_SSA_Director_Guide – Final
V2.0 09/27/2016
Division of Information
Technology Services
Page 9 of 54
Add Discovery Results Feedback
1. From Discovery Module Front page, click the More Commands (…). 2. Select “Other Activities”. 3. Select “Notebook Activities”, a New Notebook Activities’ pop up will display.
Figure 15 – Notebook Activities
4. Enter feedback information.
Figure 16 – New Discovery Feedback
5. Click “Save & Close”. Feedback is saved back to the “Feedback” link on the Discovery Module Front Page. *Note: User will need to reselect the Individual and Provider fields

imagineIS: Implementation and Change Management Project
imagineIS_SSA_Director_Guide – Final
V2.0 09/27/2016
Division of Information
Technology Services
Page 10 of 54
Figure 17 –Feedback List

imagineIS: Implementation and Change Management Project
imagineIS_SSA_Director_Guide – Final
V2.0 09/27/2016
Division of Information
Technology Services
Page 11 of 54
Review Discovery Results Feedback
1. From the SSA Dashboard, change the List View to ‘My Feedback Notes Dashboard’.
Figure 18- Caseload View
2. Click the ‘Subject’ link to review Feedback.
Figure 19- My Feedback Notes Dashboard
3. Click “Close Notebook Activity” or “Mark Complete”. Once the activity is marked complete it is no longer
editable.

imagineIS: Implementation and Change Management Project
imagineIS_SSA_Director_Guide – Final
V2.0 09/27/2016
Division of Information
Technology Services
Page 12 of 54
Figure 20- Feedback Complete
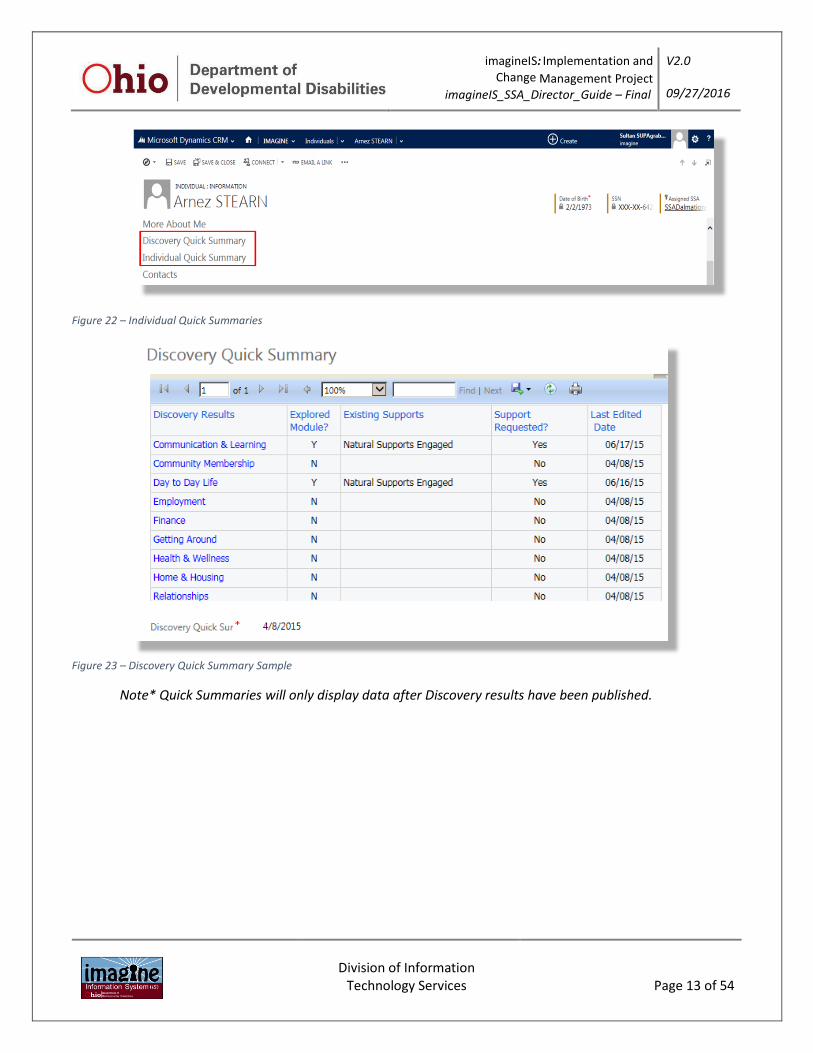
Reviewing Quick Summary Modules for an individual The Quick Summary Modules provide a convenient way to review the status of the Individual’s Discovery Management process once Discovery Management has been published.
1. Sign on to imagineIS as an SSA Supervisor.
2. Click on the IMAGINE drop down.
3. Click on the ‘INDIVIDUALS’ Tile to open.
4. Double click on the individual to open up the record.
Figure 21 – Individual Listing
5. Scroll down and click on one of the Quick Summary listings:
a. Discovery Quick Summary.
b. Individual Quick Summary.
imagineIS: Implementation and Change Management Project
imagineIS_SSA_Director_Guide – Final
V2.0 09/27/2016
Division of Information
Technology Services
Page 13 of 54
Figure 22 – Individual Quick Summaries
Figure 23 – Discovery Quick Summary Sample
Note* Quick Summaries will only display data after Discovery results have been published.

imagineIS: Implementation and Change Management Project
imagineIS_SSA_Director_Guide – Final
V2.0 09/27/2016
Division of Information
Technology Services
Page 14 of 54
Figure 24 – Individual Quick Summary Sample

imagineIS: Implementation and Change Management Project
imagineIS_SSA_Director_Guide – Final
V2.0 09/27/2016
Division of Information
Technology Services
Page 15 of 54
Reviewing or Advancing (Activating) an Outcome (With Supervisor Review On) Prior to executing a plan for an Outcome, the Outcome must be reviewed by all parties and phased through the required step to be activated. This section walks through how to advance the Outcome to an active status.
1. Sign on to imagineIS as an SSA Supervisor.
2. Change the Dashboard to SSA Supervisor/Director Caseload (If not already set).
3. Scroll down the page to ‘My Alerts’.
4. Click the ‘Outcome Review Required’ entry.
Figure 25 – Outcome Review
5. Click the ‘Regarding’ link to open the Outcome to review.
Figure 26 – Alert Information: Regarding

imagineIS: Implementation and Change Management Project
imagineIS_SSA_Director_Guide – Final
V2.0 09/27/2016
Division of Information
Technology Services
Page 16 of 54
a. Once the Outcome displays, the Supervisor can scroll through the Outcome as desired.
b. Click the title lines to expand and review.
Figure 27 – Outcome Information
NOTE: Once the review is complete the SSA Supervisor has two choices; move the Outcome to the next
Phase allowing the process to continue or returning the Outcome to the SSA for further refinement.
6. To move the Outcome to the next phase click the ‘More Commands’ ellipsis (…) then click ‘Next Phase’.
Two confirmation alters will be displayed. Accept the notices by clicking ‘OK’. The Outcome is moved to
‘Draft Distributed’. The Outcome is now visible to all members of the Team.
7. To return the Outcome to the SSA for further refinement reset the Outcome to ‘Working Draft –
Internal’ by clicking the ‘More Commands’ ellipsis (…) then clicking ‘Reset to Internal’.
Figure 28 – Outcome Page: Phasing

imagineIS: Implementation and Change Management Project
imagineIS_SSA_Director_Guide – Final
V2.0 09/27/2016
Division of Information
Technology Services
Page 17 of 54
8. Once the review process is complete the Alert will need to be marked completed. Click the ‘Mark
Complete’ option on the Alert screen to close and remove the alert from the ‘Alerts’ list on the ‘SSA
Supervisor/Direct Caseload’ dashboard.
Figure 29 – Alert Information: Mark Complete

imagineIS: Implementation and Change Management Project
imagineIS_SSA_Director_Guide – Final
V2.0 09/27/2016
Division of Information
Technology Services
Page 18 of 54
Reviewing ISP for an individual (With Supervisor Review On) If the SSA Supervisor requests to review the ISP, (See the section on Setting Supervisor Review), the section below steps through where to find the ISP on the Supervisor Dashboard and how to mark the alert as complete.
1. Sign on to imagineIS as an SSA Supervisor.
2. Change the Dashboard to SSA Supervisor/Director Caseload (If not already set).
3. Scroll down the page to ‘My Alerts’.
Figure 30 – ISP Review Required
4. Double click the ‘ISP Review Required’ alert item to open the ISP
5. In the Alert, click the ‘Regarding’ item to open the ISP to review
Figure 31 – Alert Information: ISP Review Required
6. When ISP opens, the supervisor can:
a. Review or update.
b. Respond or provide feedback.
c. Advance to the next phase.
7. To Advance to the next phase, click more commands (…) and select Next Phase.

imagineIS: Implementation and Change Management Project
imagineIS_SSA_Director_Guide – Final
V2.0 09/27/2016
Division of Information
Technology Services
Page 19 of 54
Figure 32 – Advancing the Phase
8. Click OK to each of the confirmation widows that display.
Figure 33 – ISP Confirmation
9. Select ‘Mark Complete’ to close the Alert.

imagineIS: Implementation and Change Management Project
imagineIS_SSA_Director_Guide – Final
V2.0 09/27/2016
Division of Information
Technology Services
Page 20 of 54
Figure 34 – Marking an Alert Complete
Note: The SSA Supervisor will be notified if the ISP has been set to ‘Review’ status. The ‘Review‘ setting
requires the SSA Supervisor to move (action) the ISP to the next phase. If the setting were set to ‘Notify’
or ‘None’, then the SSA actions the ISP to the next phase.

imagineIS: Implementation and Change Management Project
imagineIS_SSA_Director_Guide – Final
V2.0 09/27/2016
Division of Information
Technology Services
Page 21 of 54
Validate User Security Roles The below is for reviewing user security roles with in the imagineIS system.
1. Sign on to imagineIS as an SSA Supervisor.
2. Click the CRM drop down.
3. Click the ‘SETTING’ Tile.
Figure 35 – Initial Menu Settings
4. Select the ‘SETTINGS’ drop down.
5. Click on the ‘ADMINISTRATION’ Tile.
6. Click Users.
Figure 36 – Validate User Security Roles – Part 1
7. Type the user name in the search window and select Enter.
8. Double Click the user to open.
9. Click the drop down next to the “users” name.
10. Click the ‘SECURITY ROLES’ Tile.
Figure 37 - Security Roles Tile

imagineIS: Implementation and Change Management Project
imagineIS_SSA_Director_Guide – Final
V2.0 09/27/2016
Division of Information
Technology Services
Page 22 of 54
11. Click on the security role to display the assigned security.
12. Click the tabs to reveal the security roles underneath
Figure 38 – Validate User Security Roles – Part 2
Confirm Security Role Titles Once the county approver has requested and had the necessary security added to a user’s role, confirmation to the user’s titles is completed here.
1. Sign on to imagineIS as an SSA Supervisor.
2. Click on the CRM drop down.
3. Click the ‘SETTINGS’ drop down.
4. Click the ‘SETTINGS’ Tile.

imagineIS: Implementation and Change Management Project
imagineIS_SSA_Director_Guide – Final
V2.0 09/27/2016
Division of Information
Technology Services
Page 23 of 54
Figure 39 – Settings for User Groups
5. Click the Users link.
Figure 40 – Select User Link
6. Search/Select the users.
Figure 41 – Search and Select User
7. Scroll down to ‘User Titles’.
8. Click the roles that apply.
9. Click Save.

imagineIS: Implementation and Change Management Project
imagineIS_SSA_Director_Guide – Final
V2.0 09/27/2016
Division of Information
Technology Services
Page 24 of 54
10. Click Save and Close.
Figure 42 – Select to confirm user’s title

imagineIS: Implementation and Change Management Project
imagineIS_SSA_Director_Guide – Final
V2.0 09/27/2016
Division of Information
Technology Services
Page 25 of 54
Enter a Social Security Number, Medicaid Number or update DOB for an Individual This section explains how to update Date of Birth, Medicaid Number, and Social Security Number for an
Individual.
1. Sign on to imagineIS as an SSA Supervisor.
2. Change the Dashboard to SSA Supervisor/Director Caseload (If not already set).
3. Scroll down and click on a user from any of the Individual Sub-Tables.
Figure 43 – Sub-tables of Individuals
4. DOB is at the top of the screen. Click to make a change.
Figure 44 – Individual Information: Date of Birth

imagineIS: Implementation and Change Management Project
imagineIS_SSA_Director_Guide – Final
V2.0 09/27/2016
Division of Information
Technology Services
Page 26 of 54
5. Scroll down the page to the Additional Demographics (Click to open and see the details)
6. Click on the SSN or Medicaid Number field to make a change
Figure 45 – Update/Review DOB, Medicaid, & SSN for an Individual
7. Click Save and Close
Note: A Supervisor can only add a new SSN or Medicaid number. To update/change these fields
requires a DODD Systems Administrator.

imagineIS: Implementation and Change Management Project
imagineIS_SSA_Director_Guide – Final
V2.0 09/27/2016
Division of Information
Technology Services
Page 27 of 54
Change the Name of an SSA 1. Sign on to imagineIS as an SSA Supervisor
2. Change the Dashboard to SSA Supervisor/Director Caseload (If not already set)
3. Under ‘My Direct Report’ sub-menu, Search for or Click on the Direct Report’s name
Figure 46 – Find Direct Report
4. Click on the first or last name and then change it.
5. Select Save and Close.
Figure 47 – Change Name of Direct Report

imagineIS: Implementation and Change Management Project
imagineIS_SSA_Director_Guide – Final
V2.0 09/27/2016
Division of Information
Technology Services
Page 28 of 54
Remove an SSA from the Team
1. Sign on to imagineIS as an SSA Supervisor.
2. Change the Dashboard to SSA Supervisor/Director Caseload (If not already set).
3. Under ‘My Direct Report’ sub-menu, Search for or Click on the Direct Report’s name.
Figure 48 - Supervisor Direct Reports
4. Select the drop down next to the Name in the blue ribbon.
5. Select the Team Tile.
Figure 49 - Selecting TEAMS Tile
6. Change the view to Team Associated View to display all teams the user is on.
Figure 50 - Team Associated View
7. Click on the team name to display the remove link. 8. Select the Remove link. 9. Repeat until user is removed from all teams.

imagineIS: Implementation and Change Management Project
imagineIS_SSA_Director_Guide – Final
V2.0 09/27/2016
Division of Information
Technology Services
Page 29 of 54
Imagine CRM portal – Option to add SSA Picture
1. Log on as the SSA Supervisor. 2. Open the SSA user document where you want to add a picture. 3. Click on the greyed out picture template. 4. Choose file, browse and select a picture. 5. Click OK.

imagineIS: Implementation and Change Management Project
imagineIS_SSA_Director_Guide – Final
V2.0 09/27/2016
Division of Information
Technology Services
Page 30 of 54
imagineIS: Implementation and Change Management Project
imagineIS_SSA_Director_Guide – Final
V2.0 09/27/2016
Division of Information
Technology Services
Page 31 of 54
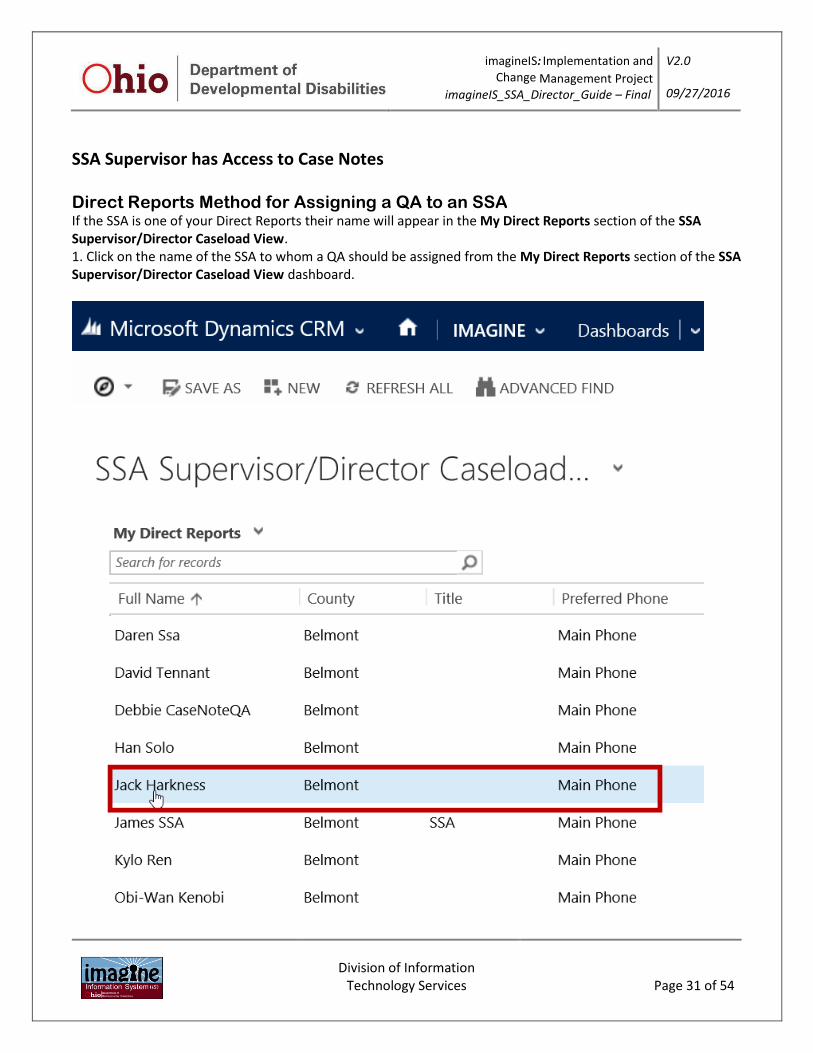
SSA Supervisor has Access to Case Notes
Direct Reports Method for Assigning a QA to an SSA If the SSA is one of your Direct Reports their name will appear in the My Direct Reports section of the SSA Supervisor/Director Caseload View. 1. Click on the name of the SSA to whom a QA should be assigned from the My Direct Reports section of the SSA Supervisor/Director Caseload View dashboard.

imagineIS: Implementation and Change Management Project
imagineIS_SSA_Director_Guide – Final
V2.0 09/27/2016
Division of Information
Technology Services
Page 32 of 54
When the User Information screen for the chosen SSA opens, scroll down to the Case Note QA Assignments (SSA User) section.
3. Click on the plus sign (+) to enter a QA for this SSA.
4. The New Case Note QA Assignment window will open.
5. Choose the County in which the Case Note QA serves. Click in the field beside the County For QA (Case Note) field. If the County is in an Alliance or COG then multiple county names will be displayed.

imagineIS: Implementation and Change Management Project
imagineIS_SSA_Director_Guide – Final
V2.0 09/27/2016
Division of Information
Technology Services
Page 33 of 54
6. Click on the Magnifying Glass in the Assigned QA field. A list of Users with the QA role in the selected county will display. (If the desired QA’s Name is not displayed, see page 1 of this document in the “Case Notes Quality Analyst/s (QA) & Requesting QA Role” for instructions on setting up QA’s.
7. Click in the blue area next to the QA’s name to select them.
8. Click on the Save & Close command at the top of the screen.
Figure 6: Select Assigned QA's Name from Displayed List and Save
9. When the SSA User Information opens, click on the Save & Close command at the top of the screen.

imagineIS: Implementation and Change Management Project
imagineIS_SSA_Director_Guide – Final
V2.0 09/27/2016
Division of Information
Technology Services
Page 34 of 54
Tiles Method for Assigning a QA to an SSA – (Not a Direct Report) 1. Click on the Microsoft Dynamics CRM drop-down arrow and click on the Settings tile.
Figure 8: Navigate to the Settings Tile
2. Click on the Settings drop-down arrow and click on the Administration tile.
Figure 9: Navigate to the Administration Tile
3. Click on the Users link.

imagineIS: Implementation and Change Management Project
imagineIS_SSA_Director_Guide – Final
V2.0 09/27/2016
Division of Information
Technology Services
Page 35 of 54
Figure 10: Navigate to Users feature to find the SSA’s Name
4. The list of Enabled Users for your county will display. Search for the SSA’s name using the Search for records box or the letters at the bottom of the screen.
5. Double-click on the record of the SSA to which a QA will be assigned.

imagineIS: Implementation and Change Management Project
imagineIS_SSA_Director_Guide – Final
V2.0 09/27/2016
Division of Information
Technology Services
Page 36 of 54
Figure 11: Select the Name of the SSA from the Enabled Users
6. When the User Information screen for the chosen SSA opens, scroll down to the Case Note QA Assignments (SSA User) section.
7. Click on the plus sign (+) to enter a QA for this SSA.
Figure 12: User Information Screen - Assign QA
8. The New Case Note QA Assignment window will open.
9. Choose the County in which the Case Note QA serves. Click in the field beside the County For QA (Case Note) field. If the County is in an Alliance or COG then multiple county names will be displayed.

imagineIS: Implementation and Change Management Project
imagineIS_SSA_Director_Guide – Final
V2.0 09/27/2016
Division of Information
Technology Services
Page 37 of 54
Figure 13: Select Case Note QA's County
10. Click on the Magnifying Glass in the Assigned QA field. A list of Users with the QA role in the selected county will display. (If the desired QA’s Name is not displayed, see page 1 of this document in the “Case Notes Quality Analyst/s (QA) & Requesting QA Role” for instructions on setting up QA’s.
11. Click in the blue area next to the QA’s name to select them.
12. Click on the Save & Close command at the top of the screen.
Figure 14: Select Assigned QA's Name from Displayed List and Save
13. When the SSA User Information opens, click on the Save & Close command at the top of the screen.

imagineIS: Implementation and Change Management Project
imagineIS_SSA_Director_Guide – Final
V2.0 09/27/2016
Division of Information
Technology Services
Page 38 of 54
Figure 15: Save SSA User Information with new QA
14. The SSA is now setup to enter Case Notes. The Case Note QA is now associated with the SSA, can review Case Notes, and generate the Case Note Billing File.
Determine, Enter, or Edit the County Sampling Rate 1. Navigate to the SSA Supervisor/Director Caseload View dashboard. (Note: To change click on the down arrow beside the Dashboard View. Find and click on the title of the dashboard desired.)
2. Click on the Advanced Find command.

imagineIS: Implementation and Change Management Project
imagineIS_SSA_Director_Guide – Final
V2.0 09/27/2016
Division of Information
Technology Services
Page 39 of 54
Figure 16 -- Begin Sampling Process-Click on Advanced Find command
3. Click on the Look For drop down arrow
Figure 17 – Search in Look For drop down list

imagineIS: Implementation and Change Management Project
imagineIS_SSA_Director_Guide – Final
V2.0 09/27/2016
Division of Information
Technology Services
Page 40 of 54
4. Select Counties Profile from the list displayed.
5. Click on the Results exclamation point icon.
Figure 18: Select County Profile from drop down list
6. Find and double-click in the blue section of the desired county name from the list displayed.

imagineIS: Implementation and Change Management Project
imagineIS_SSA_Director_Guide – Final
V2.0 09/27/2016
Division of Information
Technology Services
Page 41 of 54
7. Enter the desired percentage of case notes to be sampled in the Case Note Sampling % box.
8. Click Save & Close to record change in Case Note Sampling.

imagineIS: Implementation and Change Management Project
imagineIS_SSA_Director_Guide – Final
V2.0 09/27/2016
Division of Information
Technology Services
Page 42 of 54
Figure 20: Enter desired percentage for Case Note Sampling % and Save
9. Click on the ‘X’ of the Advanced Find window to close. 10. The county’s Case Note Sampling % percentage can be changed as desired or needed using the same process as described above.
imagineIS: Implementation and Change Management Project
imagineIS_SSA_Director_Guide – Final
V2.0 09/27/2016
Division of Information
Technology Services
Page 43 of 54
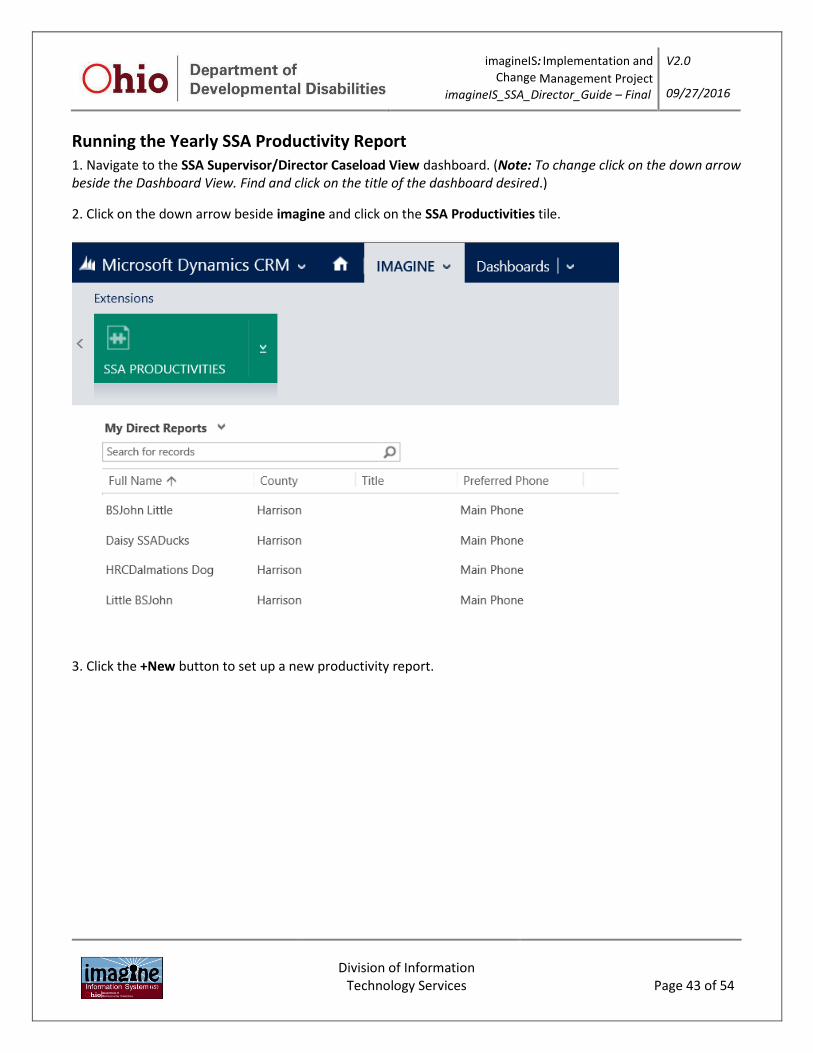
Running the Yearly SSA Productivity Report 1. Navigate to the SSA Supervisor/Director Caseload View dashboard. (Note: To change click on the down arrow beside the Dashboard View. Find and click on the title of the dashboard desired.)
2. Click on the down arrow beside imagine and click on the SSA Productivities tile.
3. Click the +New button to set up a new productivity report.

imagineIS: Implementation and Change Management Project
imagineIS_SSA_Director_Guide – Final
V2.0 09/27/2016
Division of Information
Technology Services
Page 44 of 54
Figure 22: Click the +NEW Button
4. Click on the magnifying glass icon beside the SSA search box to find and select the SSA’s name for which the SSA Productivities report will be run. Click Look Up More Records if the name is not displayed in the drop down list.
Figure 23: Search for the SSA's Name from New SSA Productivity Screen

imagineIS: Implementation and Change Management Project
imagineIS_SSA_Director_Guide – Final
V2.0 09/27/2016
Division of Information
Technology Services
Page 45 of 54
5. Click in the blue area beside the name of the SSA for which the report will be run.
6. Click the Add button.
Figure 24: Choose the SSA's Name from the List and Click Add
7. Check that the SSA’s name for which the report will be run is listed on the New SSA Productivities screen.

imagineIS: Implementation and Change Management Project
imagineIS_SSA_Director_Guide – Final
V2.0 09/27/2016
Division of Information
Technology Services
Page 46 of 54
Figure 25: Check that the SSA's Name is Listed
8. Select the current or previous year in the Productivity Year drop down box
Figure 26: Select the Productivity Year.

imagineIS: Implementation and Change Management Project
imagineIS_SSA_Director_Guide – Final
V2.0 09/27/2016
Division of Information
Technology Services
Page 47 of 54
9. Enter the Available Hours for the month or months wanted in the report. One month or multiple months may be entered.
Figure 27: Enter Available Hours
10. Enter the Leave/Calamity numeric value for each month included in the report.

imagineIS: Implementation and Change Management Project
imagineIS_SSA_Director_Guide – Final
V2.0 09/27/2016
Division of Information
Technology Services
Page 48 of 54
Figure 28: Enter Leave/Calamity
11. Enter the title for the report in the Name field. The name will be listed on the SSA Productivities screen after the report is run, so that it will be easily identified at any time.
Figure 29: Enter the Title for the SSA Productivity Report.
12. Click Save at the top of the page to save the parameters set for the report, i.e., SSA Name, Available Hours, and Leave/Calamity (Note: This report may be edited at any time.)
imagineIS: Implementation and Change Management Project
imagineIS_SSA_Director_Guide – Final
V2.0 09/27/2016
Division of Information
Technology Services
Page 49 of 54
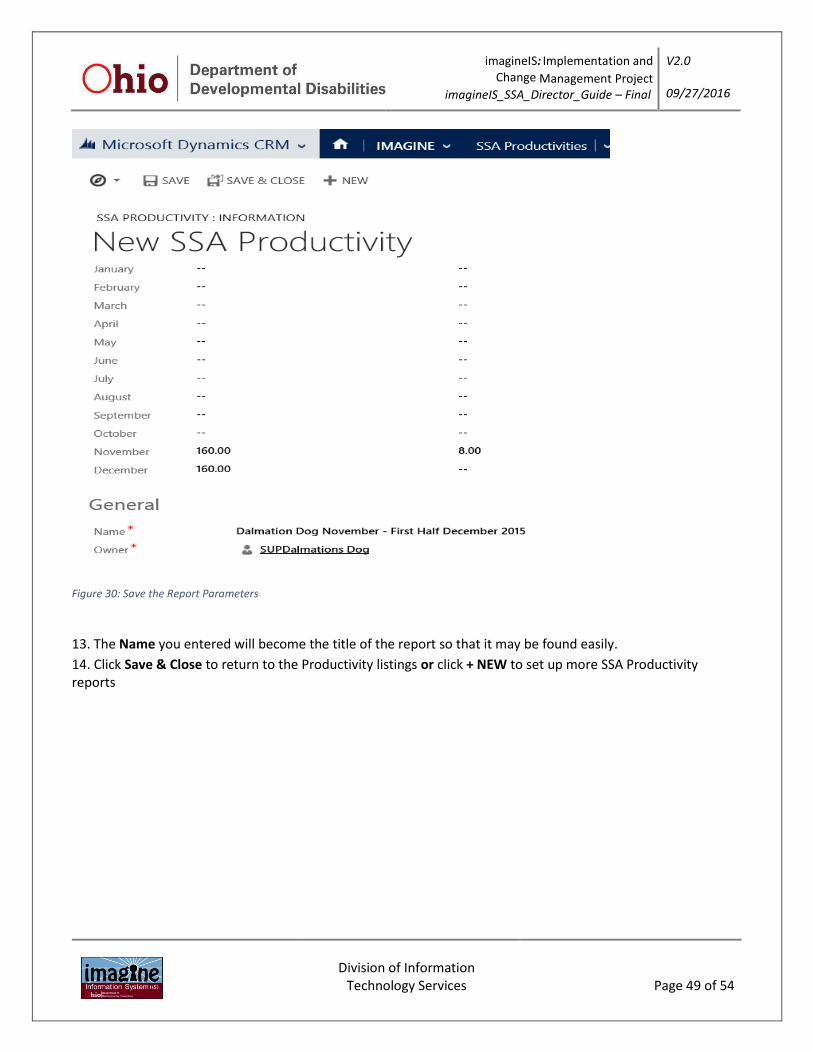
Figure 30: Save the Report Parameters
13. The Name you entered will become the title of the report so that it may be found easily.
14. Click Save & Close to return to the Productivity listings or click + NEW to set up more SSA Productivity reports

imagineIS: Implementation and Change Management Project
imagineIS_SSA_Director_Guide – Final
V2.0 09/27/2016
Division of Information
Technology Services
Page 50 of 54
Figure 31: Save & Close the New SSA Productivity Window
15. Double-click on the listing of the report desired to open and run it.
Figure 32: Select the SSA Report to Run
16. Click on the title of the report that will be run.

imagineIS: Implementation and Change Management Project
imagineIS_SSA_Director_Guide – Final
V2.0 09/27/2016
Division of Information
Technology Services
Page 51 of 54
Figure 33: Click on the Title of the Report to View Parameters & Data
17. Verify that the record displayed is the for the correct SSA and contains the desired data.

imagineIS: Implementation and Change Management Project
imagineIS_SSA_Director_Guide – Final
V2.0 09/27/2016
Division of Information
Technology Services
Page 52 of 54
18. Click on the link of the name of the SSA to open their record.

imagineIS: Implementation and Change Management Project
imagineIS_SSA_Director_Guide – Final
V2.0 09/27/2016
Division of Information
Technology Services
Page 53 of 54
19. Click on the Ellipsis (3 dots).
20. Click on Run Report from the dropdown menu.
21. Click on the SSA Productivity.
Figure 36: Chose the SSA Productivity Report

imagineIS: Implementation and Change Management Project
imagineIS_SSA_Director_Guide – Final
V2.0 09/27/2016
Division of Information
Technology Services
Page 54 of 54
22. The report will generate and open in a new window showing the Available Hours, Leave/Calamity, Actual Hours Worked, Minutes Worked, Case Notes Minutes Documented, Case Notes Documented Productivity, Units Worked, TCM Units, and TCM Units Productivity by Month and Year To Date totals.
Figure 37: Sample SSA Productivities Report