service 7 w-94 - jaguar parts, jaguar accessories all … body service.pdf · showroom preparation...
TRANSCRIPT

Service Bulletin 7 -- . . . . - - - . - w-94 aimler
DATE: MARCH 1991
PAGE: 1 of 8
REF: JD 02/91
It has been decided to re-issue sheets 1 of 5 and 2 of 5 of Service Bulletin JD 15/89. The first issue instructs -fitters to lubricate the crankshaft rear oil seal. The seal supplier, however, recommends that the seal is fitted dry to avoid contamination.
These amended sheets are included a t the end of this Bulletin and are clearly identi- fied as "lssue2". Would Service Personnel concerned please remove and destroy the original copies and replace them with the amended sheets.
ERRATUM
With reference to Service Bulletin JD 01/91, Item 06:-
1. Please note that the restrictor valve detailed in k i t JLM 2295 reads CCC 3587; this should read CCC 3537.
2 An error has also been noted whereby the installation details for valve CCC 3587 have been omitted.
Please refer as follows:- A With the right hand side centre console panel removed, locate the centre vent re- strictor valve {blue ident) = (A). See illustration on following page.
Note which
I
A ,:- d J 3
direction the blue ident is positioned.
Jaguar Cars Limited
Jaguar Cars Limited 2005

JD 02 / 91 JAGUAR %
Remove the blue restrictor and replacewith the yellow restrictorICCC3537), install the restrictor in the same orientation.
ALL V12 ENGINES ITEM: 10
12 ADDITIONAL USE OF RTV SEALANT
RemovinglReplacing Sump Sandwich Plate Gasket
When removing or replacing the sump sandwich plate gasket, would Dealers please note that to help preventthe possibility of oil leaks, additional RTV sealant should be applied as follows:-
A bead of RTV sealant approximately 3 mm wide and 10 mm long should be applied in the middle of the joint line between the cylinder block and the rear main bearing cap in two positions (Fig 1) before the sump sandwich gasket is fitted.
FIG 1
A small spot of RTV approximately 3 mm diameter, should be applied in the middle of the split line between the timing cover and the sump face (Fig 21, after the paper timing cover gasket has been shaved and just before fitling the sump sandwich gasket.
FIG 2
Jaguar Cars Limited 2005

- JAGUAR
XJR-S AND XJR-SALOON ITEM: 11
76 SATIN BLACK EXTERIOR FINISHERS (WHERE FITTED)
When polishing vehicles equipped with satin black exterior finishers during POI, showroom preparation a r service valeting, care shou Id be exercised to avoid excess- ive rubbing, particularly with power tools otherwise the satin finish may become glossy in appearance, detracting from the original specification.
In order that owners are discouraged from similar practices in service, reference in the form of a caution notewil l be contained within future editions of the vehicle hand- book under Section 9 - Vehicle Care.
XJS COUPE ITEM: 12
76 DOOR GLASS - INCORRECT OPERATION
Service reports have identified some incidence of door glass sticking and juddering whilst it is being powered up and down. The reports also point out that the adjust- ments incorporated within the window lift assembly do not, in all cases, provide an effective means of eliminating the problem.
To redress this situation and prevent further occurrences of the fault, a modified lower door glass guide channel and improvements to the door assembly have been intro- duced on all XJS coupes manufactured from VIN 176860. Coupes built prior to VIN 176860, which are affected by this problem, can be corrected by carrying-out the fol- lowing procedure.
Rectification Procedure:
1. Remove the door tr im (refer to S.R.U. 76 34 01) to gain access to the door glass window lift regulator assembly. mm
2. Disengage the regulator assembly from the door glass and allow it to rest in the lower door panel.
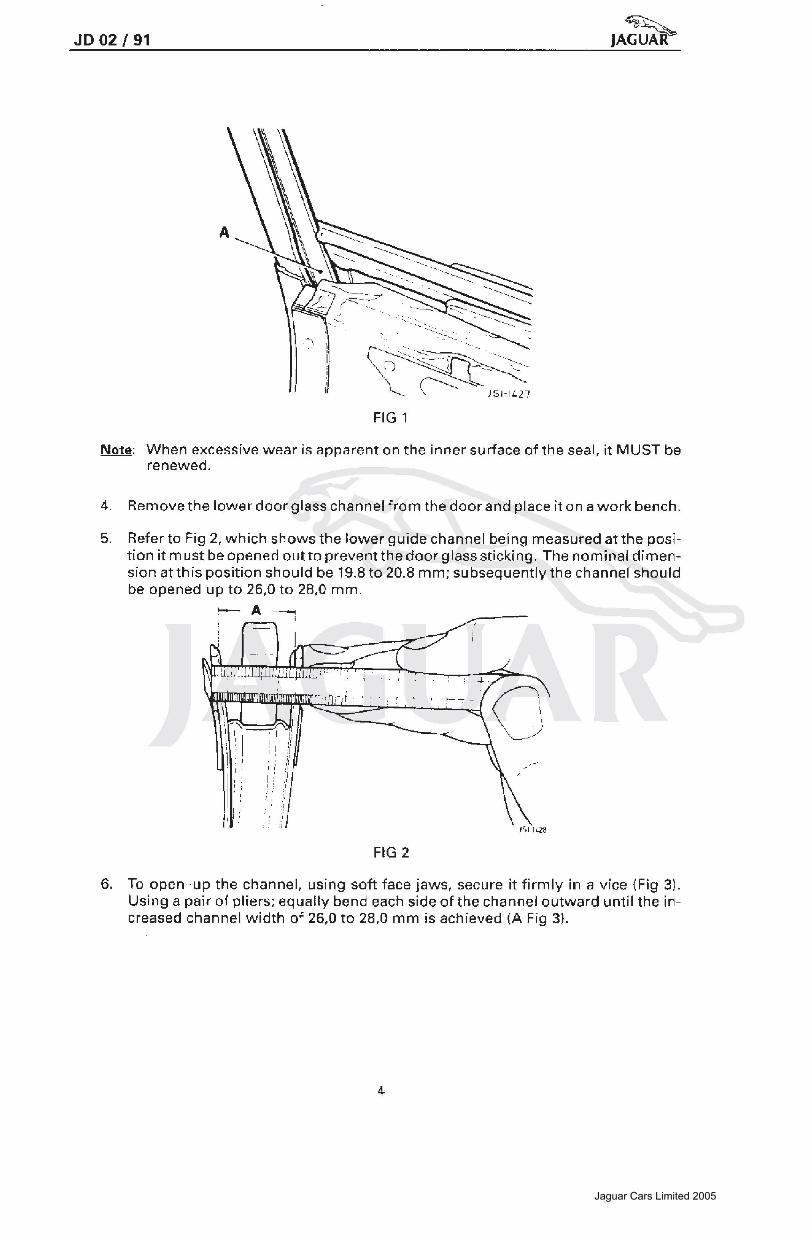
3. Place hands on either side (surface) of the door glass, then move the glass up and down. Refer to Fig 1, Point 'A'. The glass movement becomes restricted at this point as full contact is made between the glass and upper to lower guide channels. Close observation of the glass channel seal at the foul point 'A' wil l in- variably show signs of pressure marking and wear.
Jaguar Cars Limited 2005
JD 02 1 91 % IAGUAR
FIG 1
Nate: When excessive wear is apparent on the inner surface of the seal, it MUST be renewed.
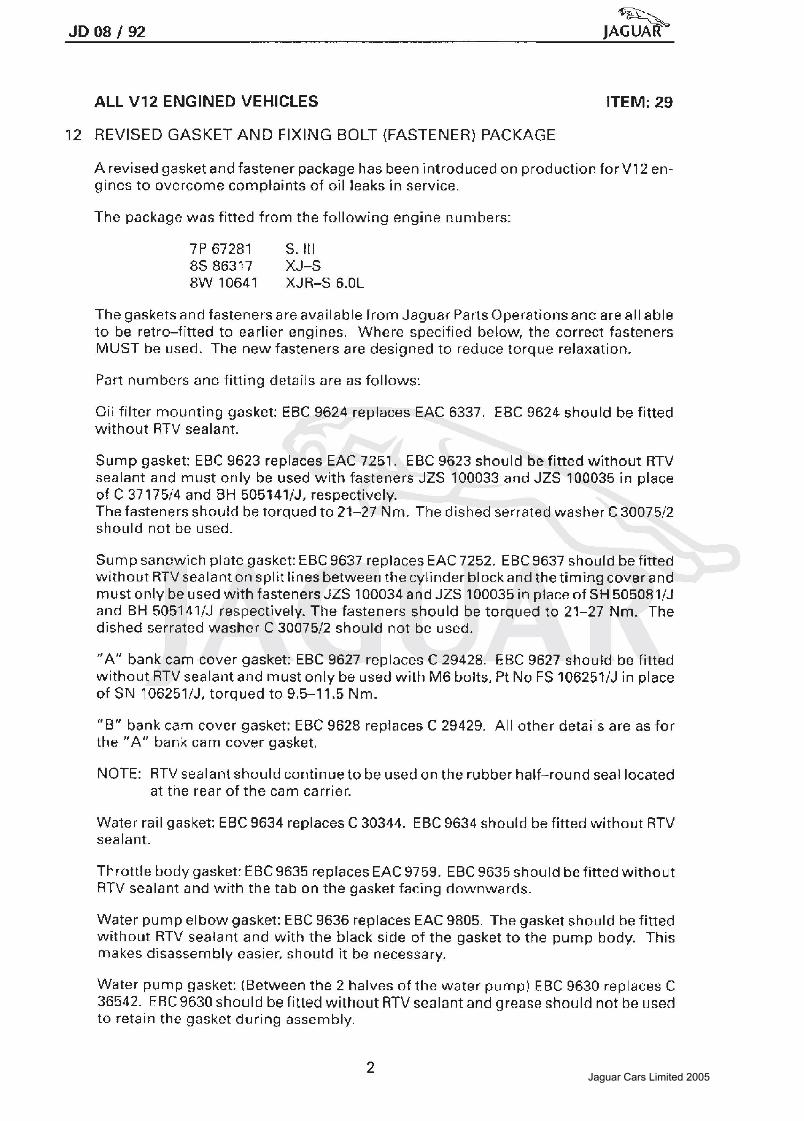
4. Remove the lower door glass channel from the door and place i t on a work bench.
5. Refer to Fig 2, which shows the lower guide channel being measured at the posi- tion it rn ust be opened out to prevent the door glass sticking. The nominal dimen- sion a t this posit ion should be 19.8 to 20.8 mm; subsequently the channel should be opened up to 26,O to 28,U mm.
FIG 2
6. To open-up the channel, using soft face jaws, secure it firmly in a vice (Fig 3). Using a pair of pliers; equally bend each side of the channel outward unti l the in- creased channel width of 26,O to 28,O mm is achieved (A Fig 3).
Jaguar Cars Limited 2005

JD 02 1 91 JAGUAR %
FIG 3
7 . Refer to Fig 4; using an engineer's steel rule, measure the external width of the frame as shown. The correct dimension should be 19.5 to 20.5 mm.
8. If this dimension is less than 19.5 mm, the door glass movement wil l still be re- stricted at this point. Should this dimension be correct, items 9 to 11 can be disre- garded. When this width is less than 19.5 mm, the doorlwindow frame channel wi l l have to be opened out.
9. To open outthis channel, insert a 15 rnm thick steel drift approximately 12cm long x 25 mm wide into the channel as shown in Fig 5.
Jaguar Cars Limited 2005

=+% JAGUAR
FIG 5
10. Using a pair of pipe grips secured to the drift. twist the drift i n t h e direction shown in Fig 6. This action should be repeated until a dimension of approximately 21 mm is achieved at the position shown in Fig 4. This 0.5 rnm increase above the upper limit of 20.5 mm, wil l compensate for any "spring back" of the channel due to integral latent stresses.
FIG 6
11. On completion of the previous action, the steel drift should be removed and the inner surface of the channel inspected for damage (paint removal). Any area of the inner channel where 'bare metal' is found should be repaired in line with Jag- uar's current full paint specification. This wil l require the application of:-
I i ) A brush applied air dry anti-corrosive primer (etch primer).
(ii) A brush applied air dry black top coat, e.g. BASF (synthetic) Code No. L2 1 KO1 3.
12. When the paint is fully dried. refit the door glass lower guide channel and the glass channel seal. Reset the channel so that the door glass moves freely up and down. Ensure there is no excess sideways movement which may allow the glass to ti l t and subsequently jam.
Jaguar Cars Limited 2005

JD 02 / 91 % JAGUAR
13. Refit the regulator and motor assembly and check for correct functioning of the door glass during powered operation.
14. Refit all door trim, then carry-out a final test for correct functioning of the door glass.
Warranty repairs should be claimed quoting the following details:-
Single Door - 76 92 04 Window tower Guide Channel Repair. Time Allowance: 0.90 hrs.
Both Doors: 76 92 05 Window Lower Guide Channel Repair. Time allowance: 1.80 hrs.
XJS AND S.III V12 ITEM: 13
801 AIR CONDlTlONING/HEATER MICROPROCESSORS 82
Some confusion has recently occurred over the interchangeability of Mk.3 Air Condi- tioni ng/Heater Microprocessors, due to the incorrect issue of supersession inform a- t ion concerning Part Nos: CAC 8032 and DAC 7601. This information has subsequent- ly been corrected, with Part No. CAC 8032 being re-instated.
To clarify the situation, CAC 8032 and DAC 7601 are NOT interchangeable.
CAC 8032 was the original microprocessor and was fitted in conjunction with a red water temperature switch, Part No. JLM 763.
DAC 7601 replaced CAC 8032 as a running change around November 1989 and was fitted in conjunction with a black water temperature switch, Par? No. JLM 2121.
If the identification or compatibility of the microprocessor/harness and water tem- perature switch is suspect, identification can be determined as follows:-
a) DAC 7601 may be identified by a blue edge connector colouring and a OAC 7601 label.
b) CAC 8032 was only identified using the supplier part number on the rear of the microprocessor, Part No. 36900200.
C) With the Air Conditioning/Heater unit switched on, disconnect the water tempera- tureswitch and measure the harnessvoltages. These should be nominally Ovolts or 5 volts. If they are the same voltage, the ECU and harness are incompatible (a switch between them wil l have no effect).
Measure Pin 21 of the microprocessor; if this isovolts, a red watertemperature switch should be fitted.
If this is + 5 volts, a black water temperature switch should be fitted.
Jaguar Cars Limited 2005

-- -.
rl Service Bulletin
DATE: JULY 1992
PAGE: 1 of 10
REF: JD 08/92
ERRATA
WITH REFERENCE TO SERVICE BULLETlN JD 02/92, ITEM 16, THE FOLLOWING IS A CORRECTION TO THE FAULT DIAGNOSIS PROCEDURE ITEM:
"FUEL GAUGE ALWAYS READS EMPTY"
PLEASE NOTE,DURING THE CHECKPROCEDURE DETAILE0,THE LOW FUELWARN- ING LIGHT WILL ALSO REMAIN ILLUMlNATEO WHEN THE UPPER WIRE IS CON- NECTEDTO GROUNDTO CHECKTHE GAUGE NEEDLE MOVEMENT. THE CURRENT BULLETIN ONLY STATES THAT THIS WILL OCCUR WHEN DISCONNECTING THE UPPER WIRE TO CHECK IF THE GAUGE READS EMPTY.
XJ6 & XJ-S ITEM: 27
00 WARRANTY CODE BOOK
To enable dealers to diagnose customer concerns of "brake pull" accurately, a new 4th digit code of "R" has been introduced into sections 6E and 6J of the XJ6 Warranty Code Book and section 6J of the XJ-S Warranty Code Book.
Dealers should amend their code books immediately to reflect this addition.
ITEM: 28
03 REPAIR OPERATION TIME AMENDMENT
An error has been discovered within the XJ6 Repair Time Schedule Section 30-15, Ex- haust Manifolds. The incorrect times have been issued and affect 3.2 a n d 4.0 catalyst non-EGR vehicles only. The correct times are as follows: 30-15-09 Exhaust Manifold Heatshield - Renew 0.20 Hrs 30-15-12 Exhaust Manifold Gasket -Engine Set - Renew 1.15 Hrs 30-1 5-20 Front Exhaust Manifold Gasket - Renew 0.95 Hrs 30-15-21 Rear Exhaust Manifold Gasket - Renew 1.00 Hrs 30-15-36 Front Exhaust Manifold - Renew 0.95 Hrs 30-15-37 Rear Exhaust Manifold - Renew 1.00 Hrs 30-15-38 Exhaust Manifold - Engine Set - Renew 1.15 Hrs
Please amend your Repair Time Schedules accordingly.
No other times are affected.
Jaguar Cars Limited Jaguar Cars Limited 2005
JD 08 / 92 % JAGUAR
ALL V12 ENGINED VEHICLES
REVISED GASKET AND FIXING BOLT {FASTENER) PACKAGE
ITEM: 29
A revised gasket and fastener package has been introduced on production forV12 en- gines to overcome complaints of oil leaks in service.
The package was fitted from the following engine numbers:
S. It1 XJ-S XJR-S 6.OL
The gaskets and fasteners are available from Jaguar Parts Operations and are all able t o be retro-fitted to earlier engines. Where specified below, the correct fasteners MUST be used. The new fasteners are designed to reduce torque relaxation.
Part numbers and fitting details are as follows:
Oil filter mounting gasket: EBC 9624 replaces EAC 6337. EBC 9624 should be fitted without RSV sealant.
Sump gasket: EBC 9623 replaces EAC 7251. EBC 9623 should be fitted without RTV sealant and must only be used with fasteners JZS 100033 and JZS 100035 in place of C 37175/4 and BH 505141/J, respectively. The fasteners should be torqued to 21-27 Nm. The dished serrated washer C 3007512 should not be used.
Sump sandwich plate gasket: EBC 9637 replaces EAC 7252. EBC9637 should be fitted without RTV sealant on split lines between the cylinder blockand the timing cover and must only be used with fasteners JZS 100034 and JZS 100035 in place of SH 5050811J and BH 5051411J respectively. The fasteners should be torqued to 21-27 Nm. The dished serrated washer C 3007512 should not be used.
"A" bank cam cover gasket: EBC 9627 replaces C 29428. EBC 9627 should be fitted without RTV sealant and must only be used with M6 bolts, Pt No FS 1062511J in place of SN 106251/J, torqued to 9.5-11.5 Nm.
"6" bank cam cover gasket: EBC 9628 replaces C 29429. All other details are as for the "A" bank cam cover gasket.
NOTE: RTV sealant should continue to be used on the rubber half-round seal located at the rear of the cam carrier.
Water rail gasket: EBC 9634 replaces C 30344. EBC 9634 should be fitted without RTV sealant.
Throttle body gasket: EBC9635 replaces EAC 9759. EBC 9635 should be fitted without RTV sealant and with the tab on the gasket facing downwards.
Water pump elbow gasket: EBC 9636 replaces EAC 9805. The gasket should be fitted wi thout RTV sealant and with the black side of the gasket to the pump body. This makes disassembly easier, shauld it be necessary.
Water pump gasket: (Between the 2 halves of the water pump) EBC 9630 replaces C 36542. EBC 9630 should be fitted without RTV sealant and grease should not be used to retain the gasket during assembly.
Jaguar Cars Limited 2005

JD 08 / 92 %
JAGUAR
Water pump gasket - pump assembly to timing cover; EBC 9629 replaces C 29626. EBC 9629should befitted without RTVsealantand grease should not be used t o retain the gasket during assembly.
Top cover gasket: [Also known as "Valley" gasket). EBC 9631 replaces C 29485. EBC 9631 should be fitted without RTV sealant or grease, with the black side of the gasket to the cylinder block. This makes disassembly easier, should it be necessary.
"A" bank timing cover gasket: EBC 9632 replaces EBC 3280.
"B" bank timing cover gasket: EBC 9633 replaces EBC 3281.
Timing cover top gasket: EBC 9625 replaces EBC 3282.
The three timing cover gaskets above must be fitted without RTV sealant or grease. After fitting the timing cover, the ends of the gaskets should be trimmed flush with the block, using a sharp knife.
All fixing bolts/screws and their torques, not mentioned above, remain as before.
OIL PUMPS
ITEM: 30
To improve quality, Jaguar is now using an alternative supplier for the V12 oil pump.
In most cases, the new pump can be used as a direct replacement with no rnodifica- tion to the block; however, in some cases, a foul condition may exist between the pump and certain areas of the old sand-cast block. To check for any fout condition, the pump should be offered in the correct position to the mounting bosses. If it lies flat against the bosses, the condition is correct. If the pump lies proud of the bosses, material should be removed from the foul area of the block (refer to shaded areas in Fig. 1 for possible foul areas) by careful use of a rotary file or similar implement.
WARNING: PROTECTIVE EYE WEAR MUST BE WORN WHEN USING ROTARY FILES.
FIG 1
Care should be taken when removing material to ensure that swarf produced by the operation is completely cleared from the area and that no other part of the engine, i.e, crank, main bearing, is damaged during the operation.
Jaguar Cars Limited 2005

JD 08 / 92 -
JAGUAR
In some cases, the new pump may appear to be seized or difficult to turn. This can be explained by "stiction", arising due to storage, and does not mean that the pump is damaged in any way.
If the pump does appear to be seized, 10 ccs of engine oi l should be poured into the suction port and the inner rotor of the pump turned, using a suitable implement.
The repair method Is as outlined in the relevant Service Manual. Note: the torque for the fixing bolts remains the same at: 21.5 - 28.5 Nm.
Service Tools are as outlined in the relevant Service Manual.
The new part number is EBC 3163 for the pump and EBC 4240 for the adaptor collar, which must be used in conjunction with the pump.
In addition, shorter fixing bolts must be used: 4-off Part No SH 505071 J. The washers for the bolts remain the same, Part No C30075 2.
WARRANTY CODE: 1 EA REPAIR OPERATION CODE: SRO 12-60-26
ALL AJ6 ENGINES ITEM: 31
12 CYLINDER HEAD EROSION
On removal of AJ6 cylinder heads for service work, it has been reported that in some cases a certain amount of erosion exists on the gasket face around the inlet side water jacket holes.
As a guide to whether the cylinder head should be changed, dealers should proceed as follows:
Clean the gasket mating face using fine emery cloth or a soft wire brush.
NOTE: CARE SHOULD BE TAKEN NOT TO SCORE OR DAMAGE THE SURFACE.
Make a paper template of the cored holes in the cylinder block that correspond with the affected water holes in the head. To orientate the template to the head water holes, include the cylinder head bolt holes on the template. (See Fig. 1 )
FIG. 1
Position the template on the cylinder head by aligning the cylinder head bolt holes on the template to those on the head.
Jaguar Cars Limited 2005

%\% JD 08 192 JAGUAR
ONLY IF THE EROSION ON THE HEAD OVERLAPS THE CORED HOLE CUT-OUTS SHOULD THE HEAD BE CHANGED,
If the erosion is within the cut-out the cylinder head shouId be refitted in the normal manner.
FIG. 2
Dealers should ensure that Jaguar coolant / anti-freeze / corrosion inhibitor is used in the cooling system at the correct concentration, or, where this is not available, phosphate-free anti-freeze to BS 6580 should be used.
NOTE: CYLINDER HEADS SHOULD NOT BE RE MOVED TO LOOK FOR THIS CONDI- TION. THE ABOVE SHOULD ONLY BE NECESSARY WHEN THE CONDITION IS NOTICED ON REMOVALOFACYLINDER HEADFOROTHERREPAIR WORK.
A36 ENGINES ITEM: 32
12 DISTRIBUTOR / ROTOR ARM - SETTING GAUGE
Initial setting of the distributor body and rotor arm may be carried out with Service Tool JD 189 as follows:
Unclip and remove the distributor cap (H.T. leads remain connected).
Set the engine to T.D.C., firing on No.1 cylinder (rotor arm a t apprax. 5 o' clock).
Slacken the distributor clamp bolt.
Fit Service Tool JD 189 ((setting gauge) Fig. 1) to the distributor body.
Adjust the distributor body to enable the tool t o engage the distributor body and rotor arm (Fig. 2).
Tighten the distributor clamp bolt.
Jaguar Cars Limited 2005

JD 08 / 92 -%
JAGUAR
Remove tool JD 189, setting gauge.
Fit the distributor cap and clamp with the securing clips.
FIG. 2
ITEM: 33
76 DASH LINERS R/H & L/H
Problems associated with the cosmetic appearance, fit and removal of t h e dash liners have prompted the following corrective actions.
To assist removal and prevent damage to the dash liner pads, a removal tool JD 788 and Service Bulletin JD 02192 Item 13 have been issued to all Jaguar Dealers / Im- porters.
The visual appearance of the facia glovebox l id hinges has been improved on all ve- hicles built f rom VIN 658676. Hinges fitted to cars from this VIN are now finished in black.
FIG 1
When renewing / refitting a dash liner, the only fixings that should currently be used are the stud fastener push-in fixings (Part NoAGU 1425). These should be used in conjunction with the stud anchor plastic retainers (Part No AJU 1136).
NB: The fixings identified above are the only ones that should be used to secure dash liners. Any other fixing currently being used for this purpose should be discarded IM- MEDIATELY.
Jaguar Cars Limited 2005
JD 08 192 % IACUAR
WARRANTY CODES
8RG Dash Liner Driver's side 8RH Dash Liner Passengers' side
REPAIR OPERATION CODES
SRO 76-41-1 1 SRO 76-46-15
XJ-S ITEM: 34
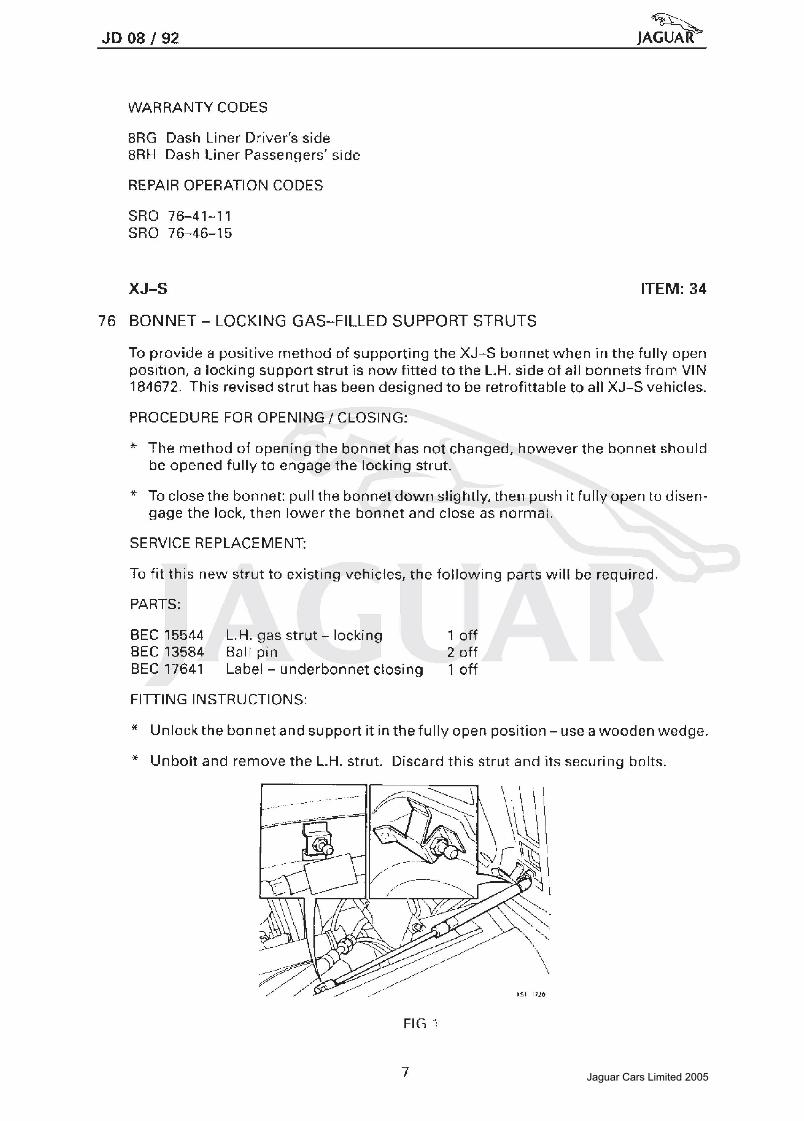
76 BONNET - LOCKING GAS-FILLED SUPPORT STRUTS
To provide a positive method of supporting the XJ-S bonnet when in the fully open position, a locking support strut is now fitted to the L.H. side of all bonnets from VIN 184672. This revised strut has been designed to be retrofittable to all XJ-S vehicles.
PROCEDURE FOR OPENING / CLOSING:
* The method of opening the bonnet has not changed, however the bonnet should be opened fully t o engage the locking strut.
* To close the bonnet: pull the bonnet down slightly, then push it fully open to disen- gage the lock, then lower the bonnet and close as normal.
SERVICE REPLACEMENT
To fit this new strut to existing vehicles, the following parts wi l l be required.
PARTS:
BEC 15544 L.H. gas strut - locking 1 off BEC13584 Ballpin 2 off BEC 17641 Label - underbonnet closing 1 off
Fl lTlNG INSTRUCTIONS:
* Unlock the bonnet and support it in the fully open position - use a wooden wedge.
* Unbolt and remove the L.H. strut. Discard this strut and its securing bolts.
FIG 1
Jaguar Cars Limited 2005

4
I 111 Service Bulletin
ISSUE NO: JD 18192
NOVEMBER 1992
SHEET: 1 OF 2
MODEL
SUBJECT
: XJS ALL MODELS
: WINDOW LIFT MOTOR I REGULATOR ASSEMBLIES
CUSTOMER CONCERN : Poor operation I sticking / noisy.
ADVICE TO CUSTOMER : Installation of a revised motor or a motor regulator assem- bly (which incorporates a new motor) wi l l overcome stick- ing or noisy operation.
New window lift motors have been introduced in produc- tion from VIN 1841 17.
DEALER ACTION : Yes.
REPAIR METHOD : Window life assemblies incorporating the new motor are fully interchangeable with previous assemblies. Al l mo- tors will be supplied with the necessaryadditional parts for fitrnent to vehicles prior to VIN 184117. If the new motor is required to be fitted to vehicles after VIN 184117, the additional parts supplied wi th the kit should be discarded.' For details of part numbers and components relative to VIN, please refer to "Parts Information" below.
Replacement of window lift motors and / or regulators should be carried out in accordance with the Service Man- ual instructions. This Bulletin contains relevant informa- tion on thefi tmentof the additional parts supplied with the kit, when fitting to vehicles prior to VIN 184117.
Prior to the replacement of parts, Dealers must ensure that on vehicles built priorto VIN 176860, the customer concern is not the result of poor channel guide setting, and action as detailed in Service Bulletin JD 02/91, Item 76, must be carried out before parts are removed from the vehicle. A Service Bulletin wi l l be issued shortly, detailing the set- ting procedure for Facelift vehicles to ensure that the align- ment of the door glass is suitable to allow correct sealing. Jaguar Cars Limited 2005

When the motor is confirmed as being the cause of con- cern, it should, where possible, be removed from the regu- lator and be replaced as a single part. Refer to "Parts Infor- mation" below.
SERVICE TOOLS : N / A
PARTS INFORMATION : As a result of changes during production to the connector, the channel guide regulator arm and the quadrant, i t is im- portant that VlNs are accurately recorded before parts are obtained.
Coupe
1. UD to and including VIN 174361
Parts required for motor and / or regulator fault JLM 1100213 (LHJRH motor) JLM 1101819 (LH/RH regulator) DBC 11 503 (adaptor link lead)
2. VIN 174362 to 179736 inclusive
Parts required for motor fault JLM 11 00213 (LH/RH motor) DBC 11503 (adaptor link lead) Parts required for regulator fault JLM 1101819 (LH/RH regulator)
3. VIN 179737 to '1841 16 inciusive
Parts required for motor fault JLM 1 100213 (LHIRH motor) Parts required for regulator fault BEC 22008/9 (LH/RH regulator)
4. From VIN 184117
Parts required for motor fault JLM 11002/3 (LH/RW motor) Parts required for regulator fault BEC 22008/9 (LH/RH regulator)
Convertible
5. Up to and includinq VIN 179736
Parts required for motor and I or regulator fault J LM 30578/9 (LH/RH regulator assembly) DBC 11 503 (adaptor link lead) BD 48949/3 (bolts)
6. VIN 179737 to 1841 16 inclusive
As Coupe 3.
7 . VIN 1841 17 onwards
As Coupe 4.
Jaguar Cars Limited 2005