series 8 side panel - merlyn showering · 2019-11-21 · installation guide 1 755-775 715-735...
TRANSCRIPT

INSTALLATION GUIDE
Series 8 Side Panel

Thank you for choosing Merlyn.Please familiarise yourself
with the fitting instructions before commencing fitting.
1. Check that you have the tools required.
2 that the installation site is compatible . Check with size of door supplied3. Check all the enclosure components.
4 that the installation kit is complete. Check
DO NOT attempt to install the product unless you can
tick ALL 4 boxes as satisfactory.
The wall plugs supplied with the installation kit are for
use in solid walls. Hollow or 'stud-partition’ walls will
require alternative fixings. Please consult a hard ware
supplier for the correct type.
It may also be necessary to consult your tiling supplier
about the correct method for drilling your tiles.
IMPORTANT
Any parts missing or damaged must be reported to your supplier within 5 days of purchase.
Inspect shower enclosure before fitting as no claims will be acceptable after product has been installed.
USE SAFETY EYEWEAR WHEN DRILLING
INSTALLATION GUIDE 1
755-775
715-735
855-875
Adjustment ‘X’
800
760
900
Size
Adjustment when used as side panel
955-9751000
755-775
715-735
855-875
Adjustment ‘Y’
XY

Φ6x30 wall plug Upright profile cover cap
Wall profile cover cap L/R
Glass Panel A
Top support bar with glass clamp
Screw cap
Magnet seal
Wall bracket
Bottom strip corner clip(L&R)
Screw ST4x12
2
1
1
1
1
1
5
1
2
1
1
3
INSTALLATION GUIDE 2
Part No. Part No.
B08070
A2401201
A
123456
10
11
789
12
13
14
Flat head screw ST4x30
5
2SY51
Cover strip clip 5 M7009
Cover strip M7104
Wall profile
B08060 L/R
B08062
M7128
M7130
M7127
M7126
M7129
M7012
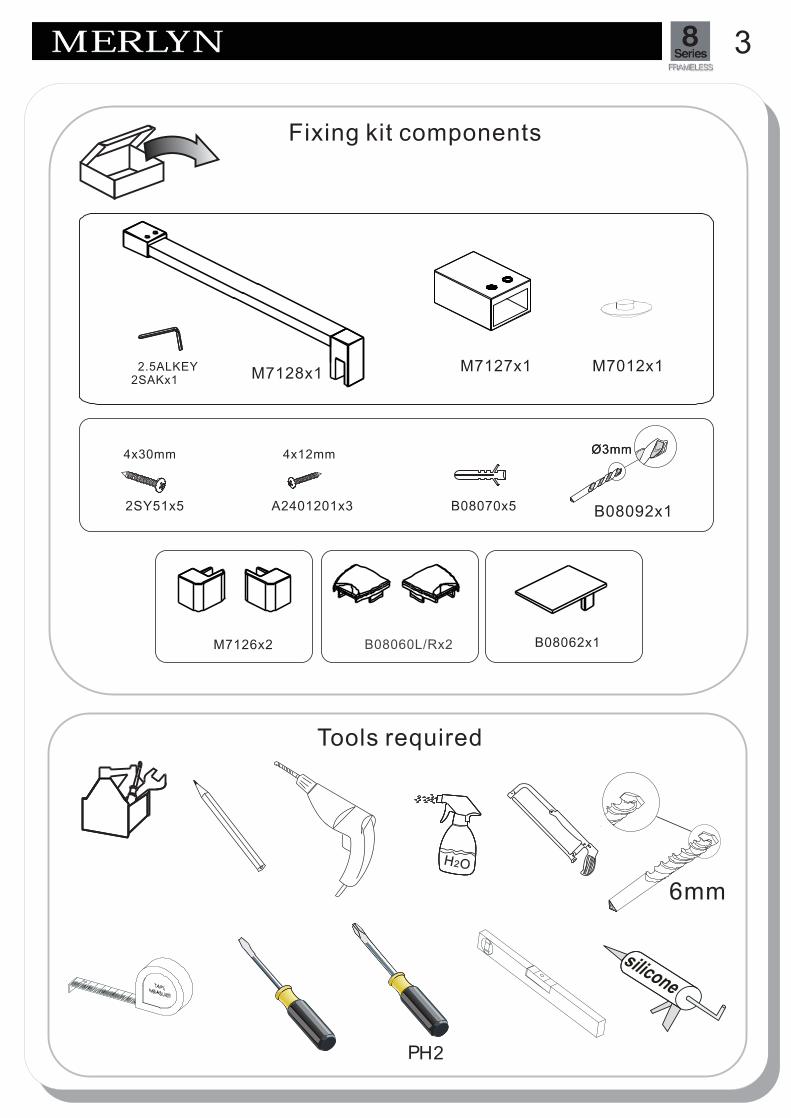
A2401201x3 B08070x5
4x30mm 4x12mm
P 1
H2
H2O
6mm
Ø3mm
B08092x1
Ø3mm
2SY51x5
INSTALLATION GUIDE 3
Fixing kit components
Tools required
2.5ALKEY2SAKx1
B08060L/Rx2 B08062x1M7126x2
M7012x1M7127x1M7128x1

100%
Level !
TRAY MUST BE LEVEL IN ALL DIRECTIONS!
Ensure the shower tray is level in all directions and is
properly sealed to the wall. The wall must be tiled down to
the top edge of the tray. Do not angle out bottom tile.
TRAY MUST BE SEALED FULLY AROUND WHERE
THE TRAY MEETS THE WALL.
PROCEDURE
100% level
1
2
1
B
C
D
E
INSTALLATION GUIDE 4
LH RH
Note:Determine the handing, note that the wall profile is only fitted to the side panel.
A
Determine distance from edge of tray to front of profile.
Min
5m
m

INSTALLATION GUIDE 5
3
4
15mm
M7104
A2401201
M7129
M7130

5
INSTALLATION GUIDE 6
6
M7127
M7128
L L
6
6*30WSER
M7127
M7012

INSTALLATION GUIDE 7
71
2
M7118
24 h.
SEALING INSIDE
INSIDE
Note:
SEALING OUTSIDE
OUTSIDE
Seal top to bottom on thebetween the wall
profile and the wall.Do not apply sealant on
the inside of the tray.
Seal only along bottom on thebetween
glass/rail/profile and the trayand approx 50mm upbetween the wall profile andthe wall. Seal joint betweenbottom profile and uprightprofile.
50
50
8
WARNIING - The bottom profile must be used to ensure water tightness under the moving panel. We cannot guarantee water tightness if this is not used.
M7126