sensory magic operating instructions v 2.0.0 - rompa · sensory magic operating instructions v...
TRANSCRIPT

Operating Instructions
Version 2.0.0.22

Sensory Magic Operating Instructions v 2.0.0.22 2017
2
Welcome! …
…to a world of Sensory Magic™.
Bringing sound, light, colour and motion together in harmony, like never before.
Through Sensory Magic™ you can create your own comforting, relaxing or energizing sensory environments, personalised to suit changing moods, needs and preferences.
Sensory Magic™ is suitable for use in most health, education and social care settings, and can be accessed by all, regardless of age or ability. It can provide opportunities for visual and/or auditory sensory stimulation in a structured, targeted way. It can provide opportunities to support education, whatever the subject: mainstream curriculum work, special education topics, life story work, cognitive rehabilitation, reminiscence therapy – the possibilities are endless…
Getting Started
Sensory Magic™ has been carefully designed to be simplicity itself to use. With this in mind, your Sensory Magic™ system will start up automatically after you have plugged the system in and turned the mains power on. That’s it! No other switches to turn on, no leads to plug in – just sit and wait a short while.
You will then be greeted with this log in screen:

Sensory Magic Operating Instructions v 2.0.0.22 2017
3
There are three levels at which Sensory MagicTM can be accessed: Manager, Carer or Client (user).
Sample Usernames and Passwords have been set as follows:
Access level Username Password Manager Manager password Carer Carer password Client Client password
Manager Log In
Managers have access to the whole system and all data collected. Managers can also add Carers and Clients onto the system.
To log in as a Manager, enter Username = Manager and password = password, then click Log in.
You will then be greeted with an opening screen. If you have purchased the Sensory MagicTM system, you will see the Sensory MagicTM and ProfileTM logos. If you have also purchased the Care reminiscence experienceTM system, you will see all three logos:
Setting the Manager’s Username and Password
Click on the ProfileTM logo to set the Manager’s username and password and to remove the sample demo log in details. Click the staff icon:
Under “Select Staff Member”, choose Manager Demo. All text boxes are now editable. Enter Manager’s name, new Username and new Password, then click Save.

Sensory Magic Operating Instructions v 2.0.0.22 2017
4
Usernames and Passwords must be single words (no spaces).
Remember to make a note of your Username and Password, as demo login details will no longer work after they have been edited.
Further information about setting usernames and passwords can be found in this instruction manual in the ProfileTM section.
Exit ProfileTM by clicking on the Cancel button:
Enter Sensory MagicTM by clicking on the logo on the left-hand side of the screen.
You will then see the Sensory MagicTM opening screen:
Sensory Magic Opening Screen
WiFi ON indicator – Sensory Magic™ will control all ROMPA® WiFi products.
WiFi OFF indicator – WiFi dongle is not connected.
Please ensure that the WiFi dongle supplied is fully connected to the USB port at the back of the touchscreen. Sensory Magic™ will not operate without this dongle fitted.
Sensory Magic Operating Instructions v 2.0.0.22 2017
5
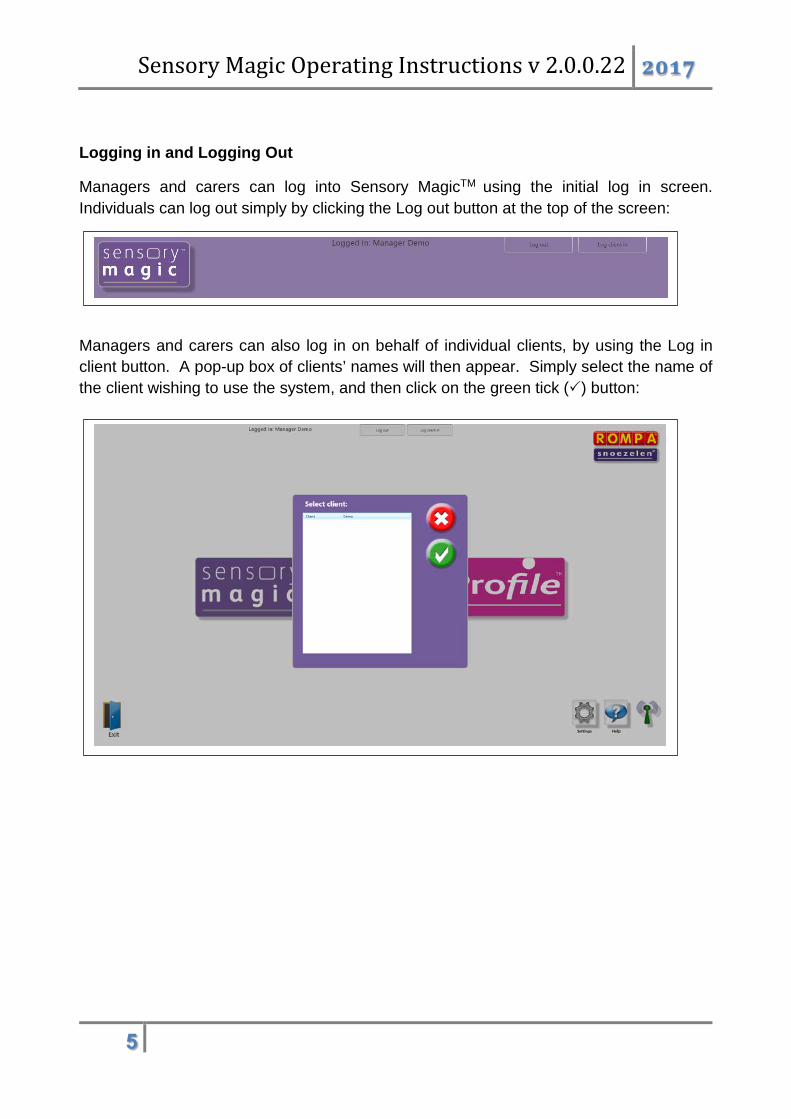
Logging in and Logging Out
Managers and carers can log into Sensory MagicTM using the initial log in screen. Individuals can log out simply by clicking the Log out button at the top of the screen:
Managers and carers can also log in on behalf of individual clients, by using the Log in client button. A pop-up box of clients’ names will then appear. Simply select the name of the client wishing to use the system, and then click on the green tick () button:

Sensory Magic Operating Instructions v 2.0.0.22 2017
6
Colours Press this button to control the colour of all ROMPA® WiFi products in the room. You will then see this screen:
There are 12 Pre-set colour selection buttons. To change the colour of all ROMPA® WiFi products in the room to one of these colours, simply click on the colour of your choice.
There are also 4 Editable colour selection buttons. To mix your own choice of colour, simply click on one of the edit buttons:
You will then see 3 colour sliders: red, green and blue. Click and drag the sliders up or down to add more or less of each of the 3 colours.
When you are happy with your selection, click on the green tick button to save it. Alternatively, click on the red cancel button to exit without saving changes made.
Automatic Mode
Cancel
Pre-set colour
selection buttons
Editable colour selection buttons

Sensory Magic Operating Instructions v 2.0.0.22 2017
7
Example: Adding more blue light.
Original Blue added
Click the green tick button to save changes made.
Click the red cancel button to exit without saving changes.
Automatic Mode
Click to set to automatic mode (default).
System will automatically cycle through a rainbow of over 16 million colours.
Click on the Cancel button to quit Colours and return to the Sensory MagicTM
opening screen.

Sensory Magic Operating Instructions v 2.0.0.22 2017
8
Sound Press this button to choose and play sound files stored on the computer / USB memory stick / CD.
The system supports many popular audio formats, including 3GP, AAC, WAV, WMA and MP3.
Playlists
Playing tracks in a playlist
Saved playlists are shown in the left-hand column. Click on the playlist title to show all tracks in the chosen playlist. Click on any track to play the track automatically. You can also pause tracks, stop tracks, skip backwards or skip forwards to other tracks in the playlist.
Play all – press this button to play all tracks in a playlist automatically.
Volume control – click to reveal the volume slider. Click and drag the volume button left or right to increase or decrease sound volume. Sensory MagicTM will automatically save the desired volume level.
Slide to adjust volume
1

Sensory Magic Operating Instructions v 2.0.0.22 2017
9
Creating new playlists
1. To create a new playlist, click on the green plus button under “My playlists”.
A pop up box will then invite you to name your new playlist. Enter a playlist name, e.g. “Edith Piaf – top tracks”, then click the green tick button ():
2. To select your new playlist, click on the playlist name. The playlist will then be highlighted in blue:
2
3

Sensory Magic Operating Instructions v 2.0.0.22 2017
10
3. To add a music track, click on the green plus button in the right-hand column, under the playlist name. This will call up the music libraries. Select a music track and click on the green tick button () to add the track to your playlist:
Continue to add music tracks as desired.
4. Tracks can be moved up or down in the playlist simply by selecting the music track and clicking on the up or down arrow buttons.
Example: Moving a music track to the top of the playlist
Original After up arrow pressed 5 times
Click to move a music track up in the playlist.
Click to move a music track down in the playlist.
3
4

Sensory Magic Operating Instructions v 2.0.0.22 2017
11
To remove a music track from a playlist, simply click on the track and then click the red minus button. At the prompt, click on the green tick button () to delete the track.
To delete an entire playlist, simply click on the playlist name and then click the red minus button in the left-hand column. At the prompt, click on the green tick button () to delete the playlist.
The system is supplied with a basic music/sound library. You can add your own music/sounds to the library. See the Library section for more details.
Press this button to play CDs. Simply insert your CD into the disc drive. The CD will play automatically.
To play music tracks from a memory stick, simply insert the memory stick into a USB port and click on the name of the memory stick once this is displayed. The music tracks on the memory stick will then be listed in the right-hand column. Simply click on the track name to play a track.
Click on the Cancel button to quit Sound and return to the Sensory MagicTM opening screen.

Sensory Magic Operating Instructions v 2.0.0.22 2017
12
Video Press this button to choose and play video files stored on the computer / USB memory stick.
The system supports many popular video formats, including 3GP, AVCHD, MPEG-4, WMV, AVI, DivX, MOV and Xvid.
Playlists
Playing videos in a playlist
Saved playlists are shown in the left-hand column. Click on the playlist title to show all videos in the chosen playlist. Click on any track to play the track automatically. You can also pause tracks, stop tracks, skip backwards or skip forwards to other tracks in the playlist.
Play all – press this button to play all tracks in a playlist automatically.
Volume control – click to reveal the volume slider. Click and drag the volume button left or right to increase or decrease sound volume. Sensory MagicTM will automatically save the desired volume level.
Slide to adjust volume
1

Sensory Magic Operating Instructions v 2.0.0.22 2017
13
Creating new video playlists
1. To create a new video playlist, click on the green plus button under “My playlists”.
A pop up box will then invite you to name your new playlist. Enter a playlist name, e.g. “Nature”, then click the green tick button ():
2. To select your new video playlist, click on the playlist name. The playlist will then be highlighted in blue:
2
3

Sensory Magic Operating Instructions v 2.0.0.22 2017
14
3. To add a video track, click on the green plus button in the middle column, under the playlist name. This will call up the video libraries. Select a video track and click on the green tick button () to add the track to your playlist:
Continue to add video tracks as desired.
4. Tracks can be moved up or down in the playlist simply by selecting the video track and clicking on the up or down arrow buttons.
Example: Moving a video track to the bottom of the playlist
Original After down arrow pressed 4 times
Click to move a video track up in the playlist.
Click to move a video track down in the playlist.
3
4

Sensory Magic Operating Instructions v 2.0.0.22 2017
15
To remove a video track from a playlist, simply click on the track and then click the red minus button. At the prompt, click on the green tick button () to delete the track.
To delete an entire playlist, simply click on the playlist name and then click the red minus button in the left-hand column. At the prompt, click on the green tick button () to delete the playlist.
The system is supplied with a basic video library. You can add your own videos to the library. See the Library section for more details.
To play video tracks from a memory stick, simply insert the memory stick into a USB port and click on the name of the memory stick once this is displayed. The video tracks on the memory stick will then be listed in the right-hand column. Simply click on the track name to play a track.
Click on the Cancel button to quit Video and return to the Sensory MagicTM opening screen.

Sensory Magic Operating Instructions v 2.0.0.22 2017
16
Themes
Press this button to create and play audio-visual themes. You will then see this screen:
Themes are presented in three categories:
Education Relaxation Stimulation
1. Select a category by clicking on the corresponding coloured button. 2. Select a theme by clicking on the theme name in the left-hand column. The theme
will then be highlighted in blue and all eight theme items will be displayed in the middle column.
3. Choose an item to play. The theme will play automatically.
Create new playlist
Open playlist
Play all
1
2
3
4

Sensory Magic Operating Instructions v 2.0.0.22 2017
17
4. You can also pause themes, stop themes, skip backwards or skip forwards to other theme items in the playlist using the green and white buttons.
Play all – press this button to play all theme items in a playlist automatically.
Select this button to play themes using a ROMPA® Deluxe 8 Colour Wirefree Controller: Button 1 will play theme item 1, button 2 will play theme item 2, etc. Alternatively, select this button to play themes using a ROMPA® Talking Cube: The first six of the eight theme items can be played by simply turning the cube, with each cube face activating a different, specific, theme item.
Select this button to play themes using a ROMPA® Deluxe 8 Colour Wirefree Controller: Press any button to step through all eight theme items. Alternatively, select this button to play themes using a ROMPA® Talking Cube: The first six of the eight theme items can be played by simply turning the cube to any cube face. The theme item will change with every turn of the cube, irrespective of which cube face is uppermost.
Volume control – click to reveal the volume slider. Click and drag the volume button left or right to increase or decrease sound volume. Sensory MagicTM will automatically save the desired volume level.
Click on the Cancel button to quit The Experience and return to the Sensory MagicTM opening screen.
Slide to adjust volume
8
1

Sensory Magic Operating Instructions v 2.0.0.22 2017
18
Creating and Editing Themes
Press this button to edit or create audio-visual themes. You will then see this screen:
1. Click on the green plus button in the left-hand column to create a new theme. A pop-up box will then appear, inviting you to enter a new theme name:
2. Enter your new theme name. 3. Decide whether or not the theme is to be shared with others. 4. Click on the green tick () button to save the theme name.
Create new playlist
Open playlist
Play all
1
2
3 4

Sensory Magic Operating Instructions v 2.0.0.22 2017
19
5. Select your new theme name from the list in the left-hand column.
6. Click on the green plus button in the middle column to add theme items. A pop-up box will then appear, inviting you to enter a theme item name:
7. Enter your new theme item name. 8. Click on the green tick () button to save the theme item.
5
6
7 8

Sensory Magic Operating Instructions v 2.0.0.22 2017
20
9. Select your new theme item in the middle column. It will then be highlighted in blue.
10. To add a still picture, click on the picture folder icon: 11. Choose a library picture. 12. Click on the green tick () button to save the selected image:
13. Alternatively, to add a video file, click on the video folder icon: 14. Choose a video file. 15. Click on the green tick () button to save the selected video. 16. To add a sound file, click on the music folder icon: 17. Choose a sound file. 18. Click on the green tick () button to save the selected sound:
11
12
17
18

Sensory Magic Operating Instructions v 2.0.0.22 2017
21
19. You can choose whether or not to loop the video and / or audio:
Loop Do not loop
NB: If you select Do not loop Audio, the theme will automatically end when the sound file ends.
20. You can choose whether or not to play the soundtrack which accompanies the video file (if there is one):
Play Sound No Sound
Remember to Save your settings!
21. To select the room colour(s) to accompany the theme, click on the colour select button:
You will then see 3 colour sliders: red, green and blue. Click and drag the sliders up or down to add more or less of each of the 3 colours.
When you are happy with your selection, click on the green tick () button to save it. Alternatively, click on the red cancel button to exit without saving changes made.
19
20
21

Sensory Magic Operating Instructions v 2.0.0.22 2017
22
You can select up to 3 colours per theme.
22. Select the time in seconds (s) that the colour will display for. If no time is selected, Sensory MagicTM will automatically default to 5 seconds.
23. Choose whether to step or gently fade through the colours chosen:
Step through colours Fade through colours
Remember to Save your settings!
22 23
24
25

Sensory Magic Operating Instructions v 2.0.0.22 2017
23
24. Special Effects control.
Introducing the sense of smell to Sensory MagicTM. You can now control the Interactive Aroma Panel from within the system. Simply click on the nose icon to select one of the four Aroma Panel cartridges: Click once to select cartridge one, twice to select cartridge two, etc.
Aroma cartridge 3 selected. In the green box, choose the time in seconds (s) that the aroma will stay on for. In the red box, choose the time in seconds (s) that the aroma will stay off for. In the example above, Aroma Panel cartridge 3 will turn on for 2 seconds and then turn off for 5 seconds, before turning on again. The other special effects icons are for specialist applications and allow for control of fans, vibration equipment and other mains powered equipment (e.g. heaters, lights, etc). Please contact ROMPA® for further details.
25. Theme items can be moved up or down in the list simply by selecting the item and clicking on the up or down arrow buttons in the middle column.
Click to move a theme item up in the list.
Click to move a theme item down in the list.

Sensory Magic Operating Instructions v 2.0.0.22 2017
24
To remove a theme item, simply click on the item and then click the red minus button in the middle column. At the prompt, click on the green tick button () to delete the item.
To delete an entire theme, simply click on the theme name and then click the red minus button in the left-hand column. At the prompt, click on the green tick button () to delete the theme.
Click on the Cancel button to quit The Experience and return to the Sensory MagicTM opening screen.

Sensory Magic Operating Instructions v 2.0.0.22 2017
25
Library
Click this button to add files to the libraries. You will then see this screen:
Click this button to add sound/music files.
Click this button to add video files.
Click this button to add still picture / photo files.
Example: Adding a music file:
1. Transfer your chosen music file onto a memory stick. 2. Insert the memory stick into a USB drive. 3. Click on the music file icon: 4. The relevant library screen will then appear:

Sensory Magic Operating Instructions v 2.0.0.22 2017
26
5. To categorise the music, select a category from the left-hand column, or to create a new category, click on the green plus (+) button in the left-hand column, enter the new category name and then click on the green tick () button.
6. To add the music file to the library, click on the green plus (+) button in the middle column. Locate the file on your computer. Select the file and click Open.
7. A pop-up box will then prompt you to rename the file (if required). Choose a file name and then click on the green tick () button to save the file:
5 6
7

Sensory Magic Operating Instructions v 2.0.0.22 2017
27
8. The file will then appear in the sound / music library:
9. You can adjust the sound volume of the file by using the slider at the bottom of the right-hand column. The volume will be saved automatically. This feature is useful for adjusting the volume of especially quiet or loud sound files.
10. You can change the way in which the file is categorised by choosing between Public Library or Private Library from the drop-down list. You can also change the file category using the drop-down list on the right.
11. You can rename the file (if desired) using the edit button in the top-right hand corner. There are two additional edit buttons displayed in the picture library. These buttons are features used in the ROMPA® Care reminiscence experienceTM system.
The same process is used to add video files and / or still pictures / photographs.
Click this button to add video files.
Click this button to add still picture / photo files.
9
10
11

Sensory Magic Operating Instructions v 2.0.0.22 2017
28
To remove a file from the library, simply click on the file name and then click the red minus button in the middle column. At the prompt, click on the green tick button () to delete the file.
To delete an entire library category, simply click on the category name and then click the red minus button in the left-hand column. The system will not allow you to delete categories which are not empty.
Click on the Cancel button to quit Library and return to the Sensory MagicTM
opening screen.

Settings
Click this button to customise the settings. You can personalise the background colours and font colours.
Example: Changing the Sensory MagicTM background colour to green and font colour to red:
1. Click on the coloured background of the Abc button to the right of the Sensory MagicTM logo.
2. A pop up box will then appear:
1
3 4

Sensory Magic Operating Instructions v 2.0.0.22 2017
30
3. Change the background colour from default purple to green by adjusting the colour sliders on the left-hand side nearest the colour swatch.
4. Change the font colour from default dark grey to red by adjusting the colour sliders above “Abc” on the right-hand side:
5. Click on the green tick () button to save your settings. 6. The new settings will then be shown on the Settings screen:
3 4 5
6

Sensory Magic Operating Instructions v 2.0.0.22 2017
31
7. The new settings will appear when the program is restarted (close Sensory MagicTM down and then open it up again):
8. Settings can be returned to default factory settings by selecting the refresh button within Settings:
Click on the Help button to open a copy of these Operating Instructions.
The Group function is an advanced setting used to pair together specific items of equipment. Please contact ROMPA® for assistance with this.

Sensory Magic Operating Instructions v 2.0.0.22 2017
32
Closing Down
Please make sure that you close down the system properly after use. Once you return to the initial opening screen, select the blue door to Exit Sensory MagicTM
You will be given a warning that the system is about to close down and so can change your mind if this was not intended. To go ahead and close down, select the green tick () button:
Troubleshooting
If the Sensory Magic unit will not continue past the initial screen, please check the WiFi dongle symbol in the right-hand corner. If this is red, this means that the WiFi dongle has been disconnected.
WiFi OFF indicator – WiFi dongle is not connected.
Please ensure that the WiFi dongle supplied is fully connected to the USB port at the back of the touchscreen. Sensory Magic™ will not operate without this dongle fitted.
The WiFi dongle can be located:
• On the portable unit: Adhered to the back of the PC and inserted into one of the USB ports on the side of the unit.
• On the wall mounted unit: Inside the main casing and inserted into one of the USB ports on the computer.
When correctly connected, the WiFi indicator will be green:

Sensory Magic Operating Instructions v 2.0.0.22 2017
33
Goyt Side Road Chesterfield Derbyshire S40 2PH United Kingdom
www.rompa.com
Technology by:
Stephen James Technologies LTD
Upper Lumsdale Matlock Derbyshire DE4 5LB United Kingdom
www.stephenjames.biz
Stephen James Technologies LTD