self immage instruction manual - alaska department...
TRANSCRIPT

1
Instruction Manual (Revised 5/2014)

2
TABLE OF CONTENTS
l. How to Use this Manual 4 Step-by-step guide 4 lI. What is Self ImmAGE 4 Introduction and Purpose 4 Features of This Program 4 llI. Accessing Web Based Self ImmAGE 5 Creating a ‘myAlaska’ Account 5 Link to Self ImmAGE ‘Login’ web page 5
Creating a new facility 6 ‘myAlaska’ Profile 7
lV. Running Self ImmAGE 8 Students 8 New Student 8
Entering Data in Student Information Screen 8 Name, Date of Birth, Grade, and Student ID 8 Additional Information 9 No Immunization Record 9 Inactive 9 Excluded Due to Noncompliance 9 Religious Exemption 9 Vaccine Information 9 Medical Exemption – Disease History Information 9 Exemptions 9 Disease History 9 Notes 9
Compliance Icon 10 Noncompliance Response for Individual Vaccines 10
Facilities 10 Selecting a Facility 10
Editing/Adding/Deleting Facilities 10 Administrator 10 User 10
Invitations 11 Promote Students 11
Inactivate Students 13 Delete Students 14 Vaccines 15

3
V. Reports 15 Exclusion Letter(s) 15 Exemptions 16 Immunization History 16 Noncompliant Child 17 Parent Letter(s) 17 Self Assessment Survey 18 VI. Trouble Shooting 18 My Employees Do Not Have Work E-mail Accounts 18 Reports Won’t Run 18
Unable to Login to ‘myAlaska’ 18 Facility Name Not Listed in Self ImmAGE ‘Facility’ Fields 20
Children’s Names Not Appearing 21 I Promoted My Students More than One Grade 22
VII. Who to Contact for Support 22

4
l. How to Use this Manual Section III of this manual contains the links (and web site addresses) necessary to set up accounts and provide access to Self ImmAGE. Once you have gained access to the program you can add the link to your ‘Favorites’ folder for future use.
This manual is intended to be a step-by-step guide to assist in the use of the web based version of the Self ImmAGE program. It is recommended that you read through this manual prior to starting and hi-light those areas that pertain to you. Closely following this manual should help you save time, data, and facilitate your understanding of this tool. Should you need further assistance, contact information is provided at the end of this manual. To Table of Contents
lI. What is Self ImmAGE? As vaccine scheduling has become more complex, school and child care personnel have found it increasingly difficult to determine a child’s level of compliance with Alaska immunization requirements. Self ImmAGE (Self Immunization Assessment and Goal Evaluation) is a web based tool that may be used to help with this process.
The Self ImmAGE Program allows you to:
Enter vaccine history for each child in the school/child care facility
Modify/correct previously entered information for an individual child
Calculate and display a child’s immunization status
Forecast future immunization needs for each child
Promote and inactivate or delete students
Produce helpful reports:
o Exclusion Letter(s) – Letter(s) to notify parents of noncompliant children that their child will be denied attendance at your facility due to insufficient immunizations.
o Exemption List – A list of children with medical or religious exemptions, and children with documentation of disease history (internal report for facility).
o Immunization History – A list of the immunization histories of all children in the facility (internal report for the facility).
o Noncompliant Child List– A list of children who are not in compliance with Alaska immunization requirements (internal report for facility).
o Parent Letter(s) – Letter(s) to notify parents that their child is out of compliance and is in need of additional immunizations.
o State of Alaska Annual Self-Assessment Survey (submitted annually to the Alaska Immunization Program).
To Table of Contents

5
llI. Accessing Web Based Self ImmAGE
Creating a ‘myAlaska’ account: In order to access Self ImmAGE, you must have a ‘myAlaska’ account. Although you may currently have a ‘myAlaska’ account you use for personal business you conduct with the State of Alaska, you may create a ‘myAlaska’ profile specifically for Self ImmAGE use. Do not share your ‘myAlaska’ username or password with anyone. To begin this process follow the steps below:
Click here
or the following link: https://SelfImmAGE.dhss.alaska.gov/Welcome.aspx This will take you to the ‘myAlaska’ login page:
If you are using an established ‘myAlaska’ account, simply login with your username and password on the left side. Click ‘Login’. Skip down to, “Bookmark”, in this instruction manual.
If you do not have a ‘myAlaska’ account, or have decided to create one specifically for your facility, click on the link, “New User: Register for a myAlaska Account” to sign up for a new account. After filling in the required information, an e-mail confirmation will be sent to the address you provided.
Close the browser and watch your e-mail for this confirmation. Follow the instructions in the e-mail. Once you accept the terms and click ‘Continue’, you will be taken to the myAlaska Home Page. Click on the link that states, “Return to The Alaska Immunization Programs’, Self ImmAGE”. (see next image).

6
The next screen will ask you to accept the privacy agreement, click in the box and then click the, ‘Continue’ button.
Bookmark the Self ImmAGE welcome page in your internet browser’s “Favorites” folder. Welcome Page:
Creating a new facility:
o Click on the “Facilities” bar on the left side of the screen. (You may need to scroll down the screen to see the bar.)
o Click the ‘New Facility’ button. A blank “Facility Information” screen will appear.
o Enter your facility information and click the ‘Save’ button at the bottom of the screen. All required fields are marked with a small red asterisk.
o Proceed to “Updating ‘myAlaska’ Profile” on page 7 to complete your profile. To learn about additional features on the “Facility Information” screen (i.e., ‘Users – Invitations’), and about how to add children to your facility see the “Running Self ImmAGE” section of this manual.

7
Facility Information Screen:
Updating ‘myAlaska’ Profile: After you have established a ‘myAlaska’ login, you will need to update your profile. To do so, follow these steps:
On the Self ImmAGE welcome page click on the tab at the top of the screen labeled ‘myAlaska’ (all State of Alaska web pages have this button).
Click on the ‘MYPROFILE’ tab at the top of the page. (You may have to sign-in with your ‘myAlaska’ login to see this ‘Profile’ button.)
Enter your profile information.
Click on the ‘Save’ button at the bottom of the form to save your changes.
Use the bookmark you added to your “Favorites” folder earlier to access the Self ImmAGE welcome page. To Table of Contents

8
lV. Running Self ImmAGE
Students: (The navigation bar on the left side of the screen) There are several options you may use to search for children already in your data base:
You can look for students with the following search options: “Active Students”, “Inactive Students”, “All Students”, “With Religious Exemption”, “With Medical Exemption”, “With Disease History”, or “Noncompliant Students”.
A search by “Active Students” will find students you have entered in your data base that are currently active. To narrow the search, provide information in the “Name contains” field (first letter, first name, last name, etc.), and/or “Grade” field and select a facility.
Selecting “Facility” will provide a drop down list of facilities to which you have access. If you are the administrator/user for only one facility, only one facility will be listed. You must select a facility to conduct a search for active or inactive students.
Once you have selected a facility and/or other sorting features mentioned above, click on the ‘Search’ button to view a list of students meeting your search criteria.
New Student: Click on the ‘New Student’ button for a blank student information screen. To avoid having duplicate children’s records in your facility data base, it is suggested you search for similar names prior to entering children’s information. For children with the same name, use additional identifiers such as middle initials or nicknames.
Entering data in the “Student Information” screen:
Click on the field in which you would like to enter information (i.e. name, date of birth, etc.) Required fields are marked with a red asterisk. Dates entered in date fields (i.e., date of birth) should be mmddyy. Slash marks will be inserted automatically. It is important to enter a correct grade so that the child’s immunization history can be evaluated accurately. For example, a child in kindergarten who attends an after school program at a child care facility should be classified with a grade of “kindergarten” in his/her child care facility.

9
Additional Information: In the upper right hand corner, additional information may be added by clicking on the box next to the following: “No Immunization Record” should be selected anytime a child attending school/child care does not have the required immunization record. “Inactive” should be selected when a child has withdrawn from school or child care, but may be returning to your facility in the near future. “Exclusion Due to Noncompliance” should be selected when a child is excluded from school or child care due to noncompliance. “Religious Exemption” should be selected when a child’s parent(s) submits a valid religious exemption.
Vaccine Information: Each child’s immunization history is entered in these fields. Immunization dates should be entered mmddyy. Slash marks will be inserted automatically. After entering the date for the first vaccine, move to the next cell by hitting the ‘tab’ key or clicking the mouse in the next desired cell. NOTE: The “Recombivax” vaccine date fields are to be used only for the two dose series of Hep B which may be given between the ages of 11 and 15 years.
Medical Exemption – Disease History: Directly below “Vaccine Information” is the “Medical Exemption-Disease History Information” section. If this section is closed, click on the blue bar to access the medical exemption and disease history check boxes. The Medical Exemption section is used to document a child’s valid medical exemption for a vaccine. For multiple antigens (DTP and MMR), mark only the appropriate box(es). For example, if a child has a medical exemption for measles, check only the measles box. Mumps and rubella immunizations may still be required. The Disease History section is used to document a child has had a disease and has obtained natural immunity to that disease. For multiple antigens (DTP and MMR), mark only the appropriate box(es). For example, if there is valid documentation of a history of measles, check only the measles box. Mumps and rubella immunizations may still be required.
Notes: This section is directly below “Medical Exemption – Disease History” and may be used to enter additional information for individual children. This section is for your use and may be used to document when letters were sent to parents, or for TB or physical exam information for example.
Save the information you’ve entered by clicking the ‘Save’ button at the bottom of this screen or
hitting the ‘Enter’ key. At that time the program will automatically check your data for compliance.

10
Compliance Icon: A smiling face will appear after you’ve saved your data if the child is compliant. A frowning face will appear if the child is noncompliant. This may occur because a child is overdue for an immunization or if a minimum spacing requirement has not been met. Below the frowning face are options to print noncompliance charts, parent letters and exclusion letters. (More on the letters can be found in section V. Reports.) Additionally, a red exclamation mark (!) will appear next to a noncompliant vaccine on the right side of the screen. If you hover over the exclamation mark with your mouse, a noncompliance response will state the noncompliance issue. At times a black arrow will appear below the exclamation mark(s); this is to indicate that the row next to the arrow goes with the row above. Click on the compliant or noncompliant face icon or the words ‘Compliance Status’ to produce a screen displaying a printer friendly “Compliance Chart” for that particular child. Click on your printer icon to print this screen. To Table of Contents
Facilities: (The navigation bar on the left side of the screen) In this section you will see a list of the facilities for which you have “Administrator” rights. To access the “Facility Information” screen (which contains the demographic information for a facility), click on the facility’s name. This screen allows you to edit the facility information. After making changes, click on the ‘Save’ button at the bottom of the screen. Schools will have additional fields for grade cohorts. It is important the grades listed are accurate as they directly affect the system’s ability to promote and delete students. You may also delete a facility by clicking on the ‘Delete’ button at the bottom of the screen. A pop up window will ask you to verify you want to permanently delete the facility and the children’s information from the system. Once you click ‘OK’, the facility, students and student information will be permanently deleted. You may add a new facility by clicking on the ‘New Facility’ button. A blank “Facility Information” screen will appear. After entering your facility information, click on the ‘Save’ button at the bottom of the screen. All required fields are marked by a red asterisk.
Administrator Rights: Staff with “Administrator” rights have access to all functions of the program for their facilities. While in the “Facility Information” screen, a person with “Administrator” rights is able to edit, add and/or delete facilities and may invite others to be users and/or administrators for a facility. Staff with “Administrator” rights are also able to promote, inactivate and delete groups of students from the facility.
User Rights: Inviting “Users” allows more than one person at the facility to add, or edit student data. (“Users” do not have access to features found in “Facilities” and cannot delete students.)

11
Invitations: To invite a “User” or “Administrator” for a facility:
In the ‘Facilities’ menu, click on the facility name. Your “Facility Information” screen will appear. Directly below the facility information is the “Users – Invitations” section.
Select the invitation type from the drop down menu and type in the email address of the person you would like to invite to be a “User” or “Administrator”.
Click ‘Add Invite’ and then the ‘Save’ button. An invitation with instructions and a link to your Self ImmAGE facility will be sent automatically. (The user will have access to the students in this facility after they’ve accepted the invitation. Instructions for this process are in the email. An expiration date is automatically applied to invitations. If the invitation expires before the user accepts it, simply invite the user again.)
To change the user type: After the user has accepted their invitation you can change their “Role” from “User” to “Administrator” and vice versa by changing the label in the drop down menu next to their name under the “Role” column. (If you see a comma instead of their name, the person needs to update their profile. Instructions for updating profile information are on page 7 of this manual.) To delete an invitation, click on the word ‘Delete’ next to the invited person’s email address. To delete a “User” or “Administrator”, click on the word ‘Delete’ next to the user’s name.
Promoting students advances students to the next higher grade level. This can be done in two
ways:
1. To promote a single student (active or inactive):
o Go to the individual student’s information screen.
o Change the student’s grade.
o Click ‘Save’ at the bottom of the screen.

12
2. To promote a group of students at one time, the students must be marked as active in their individual student information screens.
o Click on the ‘Facilities’ bar on the left side of the screen.
o Click on the ‘Promote Students’ button. A screen displaying “Step One: Select Facilities” with a list of facilities will appear.
o Select one or more of the facilities that have the student(s) you want to promote.
o Click on the ‘Next’ button. The system will display “Step Two: Select Students” which includes a list of students eligible for being promoted (students that are active).
o Select the student(s) you want to promote by clicking on the student name(s), or pressing the ‘Shift’ key and moving the cursor to highlight a group of students you want to promote. Click on the ‘>>’ button to move the selected student(s) to the “Students to promote:” field.

13
o Click on the ‘Next’ button. The system will display “Step Three: Promote Students” which shows the list of student(s) you selected to promote.
o Review the list for accuracy, (you may print the list to aid in this process). If the list is inaccurate, click on the ‘Previous’ button and change the list selection(s), or click on the ‘Cancel’ button, in the top right corner of the screen, to end the promotion process.
o Once the list is correct, click on the ‘Promote’ button to promote the student(s). The screen will display a list of students you have successfully promoted.
NOTE: Click the ‘Promote’ button one time only. Clicking more than once will promote the student(s) multiple times. If you do promote your students more than one grade you will have to manually correct it by going into each student’s record and choose the appropriate grade, see step 1, “To promote a single student”, in the section, Promoting Students.
NOTE: Students who are promoted outside of the established range of grades for a school and students who are promoted from the 12th grade are automatically inactivated by the system.
Inactivating Students is used when a child temporarily leaves your facility, for deleting a group
of children from your records, or for transferring children to another facility. This can be done in two ways.
1. To inactivate a single student:
o Go to the individual student’s information screen.
o Place a check mark in the box labeled ‘Inactive’.
o Click ‘Save’ at the bottom of the screen.

14
2. To inactivate a group of students at one time:
o Click on the ‘Facilities’ bar on the left side of the screen.
o Click on the ‘Inactivate Students’ button. A screen displaying “Step One: Select Facilities” with a list of facilities will appear. (The screens look very similar to the “Promote Student” screens.)
o Select one or more of the facilities that have student(s) you want to inactivate.
o Click on the ‘Next’ button. The system will display “Step Two: Select Students” which includes a list of active students who are eligible for inactivation.
o Select the student(s) you want to inactivate by clicking on the student name(s), or pressing the ‘Shift’ key and moving the cursor to highlight a group of students you want to inactivate. Click on the ‘>>’ button to move the selected student(s) to the “Students to inactivate:” field.
o Click on the ‘Next’ button. The system will display “Step Three: Inactivate Students” which shows the list of student(s) you selected to inactivate.
o Review the list for accuracy (you may print the list to aid in this process). If the list is inaccurate, click on the ‘Previous’ button and change the list selection(s), or click on the ‘Cancel’ button located in the top right corner of the screen to end the inactivation process.
o Once the list is correct, click the ‘Inactivate’ button to inactivate the student(s). The screen will display a list of students you have successfully inactivated.
Deleting Students is a permanent removal of children from your facility. This can be done in two
ways.
1. To delete a single student:
o Go to the individual student’s information screen.
o Click on the ‘Delete’ button at the bottom of the screen. A pop up window will ask if you are sure you want to delete this student.
o Once you click the ‘OK’ button, the student will be permanently deleted from your facility.
2. To delete a group of students at one time, the students must be marked as inactive. (To inactivate a group of students, see the section above on inactivating students).
o Click on the ‘Facilities’ bar on the left side of the screen.
o Select the ‘Delete Students’ button. A screen displaying “Step One: Select Facilities” with a list of facilities will appear. (The screens look very similar to the “Promote Student” screens.)
o Select one or more of the facilities that have the student(s) you want to delete.
o Click on the ‘Next’ button. The system will display “Step Two: Select Students” which includes a list of inactive students who are eligible for deletion.

15
o Select the student(s) you want to delete by clicking on the student name(s), or pressing the ‘Shift’ key and moving the cursor to highlight a group of students you want to delete. Click on the ‘>>’ button to move the selected student(s) to the “Students to delete:” field.
o Click on the ‘Next’ button. The system will display “Step Three: Delete Students” which shows the list of student(s) you selected to delete.
o Review the list for accuracy (you may print the list to aid in this process). If the list is inaccurate, click on the ‘Previous’ button and change the list selection(s), or click on the ‘Cancel’ button, in the top right corner of the screen, to end the deleting process.
o Once the list is correct, click on the ‘Delete’ button to permanently delete the selected students. The screen will display a list of students you have successfully deleted.
Vaccines: (The navigation bar on the left side of the screen) This is a list of common vaccines/vaccine combination names for immunizations and the diseases they protect against. To Table of Contents
V. Reports Self ImmAGE has several reports available to assist you in your efforts to ensure that Alaska’s children are safe from vaccine preventable diseases and help you in maintaining compliance with State requirements. Pop-ups from this website must be allowed in order to see the report windows. This is an internet browser option and is usually displayed in a bar near the top of the page just under the tool bars. You may also access this feature under the tab titled ‘Tools’. The Exclusion Letter informs parents/guardians that their noncompliant child will be excluded from your facility if appropriate follow up on noncompliance issues is not completed. You may produce exclusion letters by individual noncompliant students or for all noncompliant children in a facility. To produce an individual child’s Exclusion Letter:
Go to the “Student Information” screen for that individual child.
If the child is noncompliant, click on the words ‘Exclusion letter’ under the frowning face icon.
A filter will appear with the option to enter an exclusion date, and a contact name and phone number for staff at your facility. Information entered into these fields will be printed on the letter. You may also leave them blank and write the information on the letter after printing it.
Click on your printer icon to print the letter. To produce multiple children’s Exclusion Letters at one time:
Click on the “Reports” bar on the left side of the screen.
Click on ‘Exclusion Letter(s)’ and a filter will appear. “Facility” name and “Student Status” are required fields (use the drop down lists and highlight your choices). Additionally, you have the

16
option to enter an exclusion date (date should be entered mmddyy; slashes will be automatically placed), and facility contact phone number and name.
When the information has been entered, click ‘View Report’. The “Exclusion Letters” for the facility you chose will appear.
Click on your printer icon to print the letters. The letters will be sorted first by grade and then by attendees’ first names.
The Exemption/Disease History List is a list of medically and religiously exempted children, as well as those who have documentation of disease history.
Click on the “Reports” bar on the left side of the screen.
Click on ‘Exemption/Disease History List’ and a filter will appear. “Facility” name and “Student Status” are required fields (use the drop down lists and highlight your choices). Additionally, you have the option to include notes you’ve written in the “Student Information” screen.
When the information has been entered, click ‘View Report’. The list for the facility you chose will appear.
Click on your printer icon to print this report. This report will be sorted first by grade and then by attendees’ last, then first names.
The Immunization History List provides a detailed list of each of your attendees’ immunization histories.
Click on the “Reports” bar on the left side of the screen.
Click on ‘Immunization History List’ and a filter will appear. “Facility” name and “Student Status” are required fields (use the drop down lists and highlight your choice). Additionally, you have the option to include notes you’ve written in the “Student Information” screen.
When the information has been selected, click ‘View Report’. The list for the facility you chose will appear.

17
Click on your printer icon to print this report. This report will be sorted first by grade and then by the attendees’ last, then first names.
The Noncompliant Child List provides a detailed list of children who are not in compliance with State of Alaska immunization requirements and offers a brief explanation of why the child is noncompliant. This report allows you to enter a future date to forecast upcoming immunization needs so that action can be taken before a child becomes noncompliant.
Click on the “Reports” bar on the left side of the screen.
Click on ‘Noncompliant Child List’ and a filter will appear. “Facility” name and “Student Status” are required fields (use the drop down lists and highlight your choice). An option to change the default date and enter a future date for which you’d like to calculate compliance (date should be entered mmddyy; slashes will be automatically placed) is available, as well as, the option to include notes you’ve written in the “Student Information” screen.
When information has been entered, click ‘View Report’. The list for the facility you chose will appear.
Click on your printer icon to print this report. This report will be sorted first by grade and then by attendees’ last, then first names.
The Parent Letter informs parents/guardians of noncompliant children of compliance issues (i.e., the need for additional immunizations). This letter can (and should) be taken to the child’s immunization provider, as it describes specific immunization needs for the child. You may produce parent letters for children individually or collectively as a group. To access an individual child’s “Parent Letter”:
Go to the “Student Information” screen for that individual student.
If the child is noncompliant, click on the words ‘Exclusion letter’ exclusion letter under the frowning face icon.
A filter will appear. A date is required in the ‘Compliance Date’ field. The option to enter a contact name and phone number for staff at your facility is available. You may enter the contact information so that it prints automatically on the letter, or you may leave these fields blank and write the contact information on the letter after printing it. You will also have the option to print notes you have entered in the student’s information screen.
Click on your printer icon to print this letter. To produce multiple children’s Parent Letters at one time: (This feature allows you to enter a future date to forecast upcoming immunization needs before a child becomes noncompliant.)
Click on the “Reports” bar on the left side of the screen.
Click on ‘Parent Letter(s)’ and a filter will appear. “Facility” name and “Student Status” are required fields (use the drop down lists and highlight your choices). The compliance date defaults to today’s date, however, you have the option to change the date by entering a future date (date should be entered mmddyy; slashes will be automatically placed). Additionally, you have the option to enter an exclusion date (date should be entered mmddyy, slashes will be
18
automatically placed), and facility contact phone number and name. You may also include notes you’ve written in the “Student Information” screen.
When the information has been entered, click ‘View Report’. The “Parent Letters” for the facility you chose will appear.
Click on your printer icon to print these letters. This report will be sorted first by grade and then by attendees’ first names.
The Self Assessment Survey is the Annual Immunization Self-Assessment Survey. The system will calculate the information requested from the data you have entered. To produce this report:
Click on the “Reports” bar on the left side of the screen.
Click on ‘Self Assessment Survey’.
Choose your facility from the drop down list by highlighting the facility name.
Click ‘View Report. The “Self-Assessment Survey” for the facility you chose will appear.
Click on your printer icon to print this survey. Each year this report should be printed and sent to the Alaska Immunization Program at the address specified on the first page of the survey. To Table of Contents
VI. Troubleshooting My employees do not have work e-mail accounts:
Hotmail, Gmail, or any other free e-mail service will work.
If the above is not an option, contact our office and request “Self ImmAGE support”. Reports won’t run:
Ensure pop-ups are allowed for this site in your internet browser options.
If you are using Firefox you may have to look for tabs on the browser toolbar. Clicking on these report tabs should reveal these reports to you.
Try signing out, closing the browser you’re currently working in, and open a new browser.
If these efforts fail to correct the problem, contact our office and request “Self ImmAGE support”.
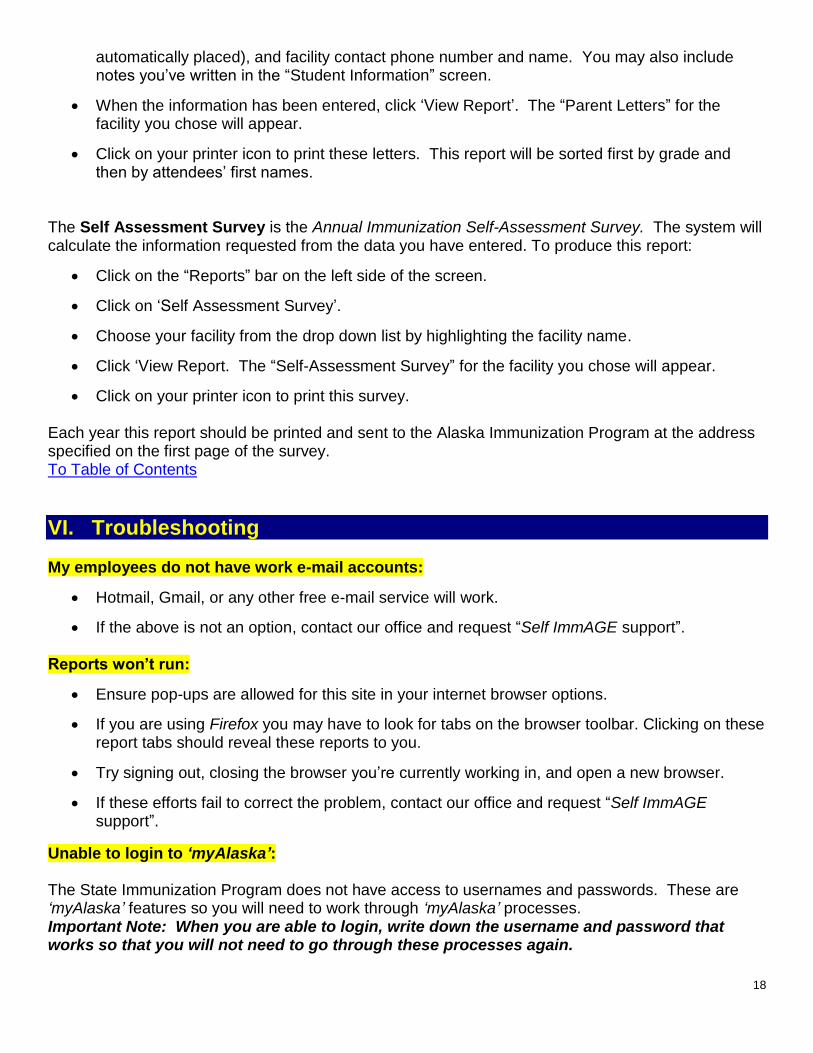
Unable to login to ‘myAlaska’: The State Immunization Program does not have access to usernames and passwords. These are ‘myAlaska’ features so you will need to work through ‘myAlaska’ processes. Important Note: When you are able to login, write down the username and password that works so that you will not need to go through these processes again.
19
First see if the username and password is being entered correctly and is the one you are using
for your Self ImmAGE account. (People sometimes have more than one ‘myAlaska’ username
and/or password. For example, you may have one you use for applying for the PFD.)
If you are still unable to login, then follow the directions below:
For Username information:
Click on the ‘Forgot my Username’ link below the login fields.
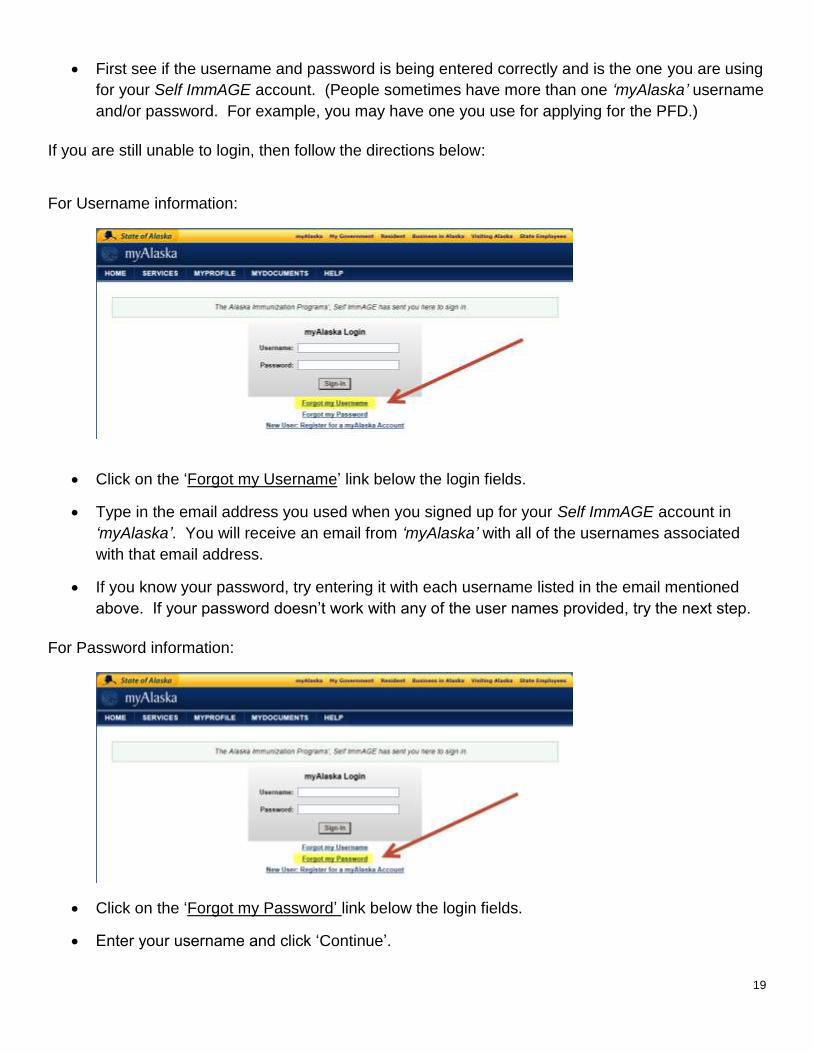
Type in the email address you used when you signed up for your Self ImmAGE account in
‘myAlaska’. You will receive an email from ‘myAlaska’ with all of the usernames associated
with that email address.
If you know your password, try entering it with each username listed in the email mentioned
above. If your password doesn’t work with any of the user names provided, try the next step.
For Password information:
Click on the ‘Forgot my Password’ link below the login fields.
Enter your username and click ‘Continue’.

20
Fill in each of the requested fields and click on ‘change password’.
Helpful Hint: Write down the answer to your secret question, and your new password for future reference.
If you are still unable to access your Self ImmAGE account, contact our office and request Self
ImmAGE support.
Facility name not listed in Self ImmAGE “Facility” fields: Our experience has been that when a person is unable to see their facility name in a “Facility” name field, it is most often because the user is not using the correct login and/password.
OR
Follow the instructions above in “Unable to login into ‘myAlaska’” to ensure you’re using the
correct login information or to obtain a listing of your usernames or change your password.
Login after going through the steps above. If you are now able to see your facility name(s),
write down the username and password that worked for future reference.

21
If you’re still unable to see your facility name(s) after going through the steps above, contact
our office and request Self ImmAGE support.
Children’s names not appearing:
First ensure you are using the correct username and password in ‘myAlaska’. If you are still
having difficulty, try searching for the child using the filter fields under the “Students” heading.
Self ImmAGE allows you to search for “Inactive”, “Active” and “All” students. Additionally, you
can search for students using the “name contains” and “grade” filters.
Simply fill in the information in the search filter fields you’d like to use.
Choose the facility in which you wish to search. (If you have more than one facility, you may need to conduct a search in each one.)
Click the “Search” button.
Helpful Hints:
o Look for similar names or possible alternative names (for example, “Jonathan” may have
been entered into Self ImmAGE as “John”).
o Be aware that a child’s name may have been misspelled during data entry or that a child
may have been mistakenly assigned to an incorrect grade or facility during data entry.

22
o Close your browser and start Self ImmAGE again. We have found that sometimes newly
entered children will appear in name and report listings after the browser has been closed
and re-opened.
If you are still unable to locate the child’s name, it may be that the child had not been entered into Self ImmAGE as thought, or that the child was deleted from Self ImmAGE. (Children who are “inactive” remain in the system; children who are deleted do not remain in Self ImmAGE.) I promoted my students more than one grade:
Manually correct each students grade on the student information screen.
Review the section on, “Promoting Students”, and “Entering Data in Student Information Screen”, above. To Table of Contents
VII. Who to contact for support
Alaska Division of Public Health Section of Epidemiology Immunization Program
Request “Self ImmAGE support” using the
Alaska Immunization Helpline: (907) 269-8088 (in Anchorage)
(888) 430-4321 (toll free statewide) Or
E-Mail us at: [email protected]