self adjustment of the spine
DESCRIPTION
kriyaTRANSCRIPT
HEALTHY BACK Breath ofTen: Meditation toBecome Disease FreeThis pranayam is a magnetic energy therapy.The energy connection between the hands mustnot be broken. It can give you a disease-freebody and a clear meditative mind, andit can develop your intuition but it requirespractice.
Sit in Easy Pose with a straight spine. Yourelbows are bent and your forearms and handsare relaxed in a clapping position at the level ofthe solar plexus. Your hands move in and out asif you are clapping but they do not touch. Stopthe inward motion when the hands are about sixto eight inches apart. Move them slowly andrhythmically. Concentrate on the energy youfeel between the palm.s of your hands.
The breath is timed with the movement of thehands. Each stroke of the breath is one com-plete clapping motion (hands move in, handsmove out). Inhale in five strokes through thenose as you complete five complete clappingmotions. Then exhale in five strokes throughthe mouth as you complete the next fiveclapping motions. Continue for 11 minutes anddo not break the rhythm of the movement andthe breath.
To end, inhale and hold the breath for 20seconds as you press your hands against yourface as hard as you can. Exhale. Inhale again,and hold the breath 20 seconds as you pressyour crossed hands strongly against your heartcenter. Exhale. Inhale one last time and hold thebreath 20 seconds as you press your handsagainst your navel point. Exhale and relax.
To also put all the chakras in rhythm, do thismeditation every day for 11 minutes. You can grad-ually increase the time to 16 '/2 minutes.
Sada Sat Singh Khalsa teaches Kundalini Yoga at
Golden Bridge in Los Angeles and is on the advi-
sory board of the International Kundalini Yoga
Teachers' Association. He is a co-founder of the
Yogi Tea Company and is a yogic herbalist.
Kundalini Yoga Kriya:Self-Adjustment of the SpineIn this set, when we adjust the pelvis as we do inTree Pose, we set a strong and balanced founda-tion. This foundation stabilizes the hips so thatwe can carry the weight of our body with ease.
Squatting in Crow Pose, we again balance thehips and also strengthen the thighs so that webuild our pelVic foundation. Also, we adjust thevertebrae of the lower spine to take pressure offthe discs and nerves of the lower back.
The third posture works powerfully to stretch,correct, and adjust the sciatic nerve. When weadjust the sciatic, we relieve pressure throughthe back of the thighs and lower back. In the lastexercise, as we stretch laterally, we adjust theentire length of the spine from the hips throughthe neck to relieve stress and compression.
When practiced regularly, this set of exerciseswill help keep your back comfortable, strong,and healthy. If you are experiencing back pain orsoreness, approach the exercises slowly andcarefully. If need be, modify the exercises so thatyou are not creating any pain in the body. Theexercises in this set are designed to adjust thepelvis, lower vertebrae, sciatic nerve, and neck.This adjustment allows for the proper balance,support, and stability of the hips and the spine.

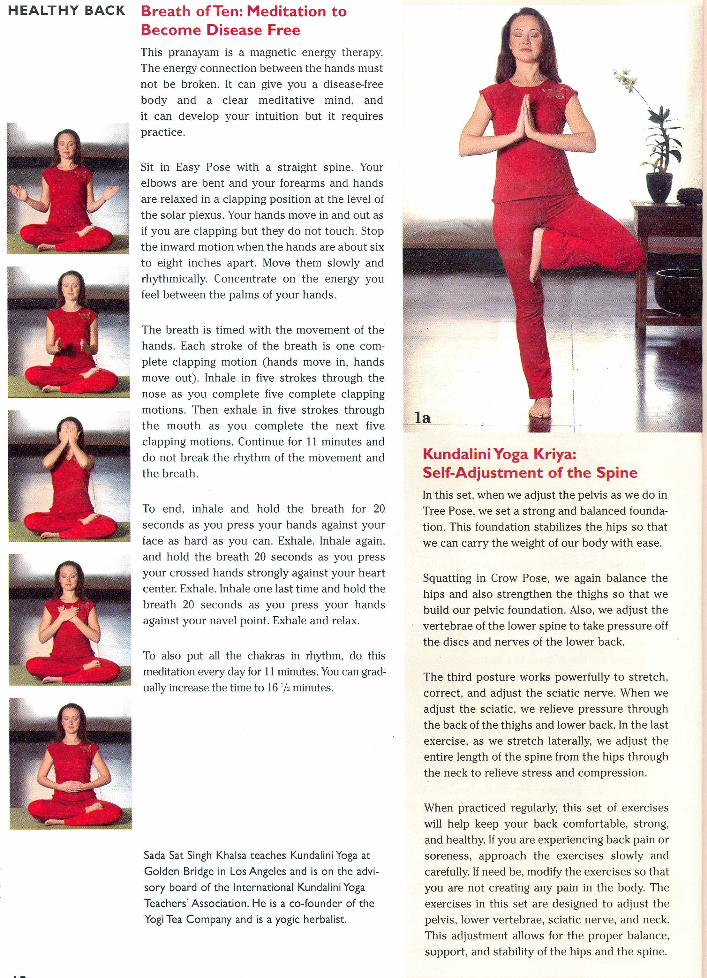
1. Come into a standing position withthe palms together at the heart center(prayer Pose). Raise the left leg andplace the sole of the foot on the insideof the right thigh so the heel touchesthe groin (la). This is called Tree Pose.Hold for 2 minutes with normal breath-ing. Then bring the palms together overthe head. Stretch the arms up keepingthe elbows straight (lb). Hold for 2 min-utes then change legs and repeat (la)and (lb) for 2 minutes each.
A more advanced version is to rest theheel of the raised foot on the pelvicbone (Ic), (Id). The body should be bal-anced with the spine held firmly. Therewill be pressure at the base of the spineand, when done properly, all the verte-brae will automatically be adjusted.
2. Stand straight with the heels togeth-er and toes pointing out at a 60° angleto the mid-line of the body. Interlacethe fingers and place the palms on topof the head (2a).ln this posture, bendthe knees and lower the torso all theway down keeping the heels on theground (2b). The buttocks will beabout two to three inches above theground (ideally). The spine should bekept straight, although the lower backwill bend forward slightly to balancethe body. The eyes look straight aheadto help keep the body balanced. In\1alebending down for a count of 5 se~and exhale standing up for a count of 5seconds. Continue for up to 21 com-plete cycles. The angle of the back inthis exercise will allow the discs of thelower spine to adjust and balance.
3. In a standing position, spread the legswide apart. Bend forward from the waistand grab the toes with the hands. Let theknees bend outside of the arms andbring the back parallel to the ground,keeping the head up. Bounce the lowerback and buttocks area up and down 11times, inhaling up and exhaling down.The position of the head does notchange. Next, stand up and breathe nor-mally for 5 seconds, and then resumebouncing for another 11 times. Each 11bounces should take 7-8 seconds.Continue for 3 minutes. This exercisecorrects the sciatic nerve in the thighs.
4. Stand up and spread the legs wideapart. Stretch sideways to the rightbringing the left arm up and over thehead without letting it bend and stretch-ing the right arm down towards the right .foot. Change sides and stretch the leftarm down to the left foot and the rightarm over the head. Hold the stretch for10 seconds on each side, switching sidesslowly without stopping in between.Continue for 2-3 minutes.
This exercise is helpful in correcting thebalance in the musculoskeletal systemsof the neck.