security for microsoft exchange 8.0.0 product guide · pdf file2 mcafee security for microsoft...
TRANSCRIPT

Product Guide
McAfee Security for Microsoft Exchange8.0.0

COPYRIGHTCopyright © 2013 McAfee, Inc. Do not copy without permission.
TRADEMARK ATTRIBUTIONSMcAfee, the McAfee logo, McAfee Active Protection, McAfee AppPrism, McAfee Artemis, McAfee CleanBoot, McAfee DeepSAFE, ePolicy Orchestrator,McAfee ePO, McAfee EMM, McAfee Enterprise Mobility Management, Foundscore, Foundstone, McAfee NetPrism, McAfee Policy Enforcer, Policy Lab,McAfee QuickClean, Safe Eyes, McAfee SECURE, SecureOS, McAfee Shredder, SiteAdvisor, SmartFilter, McAfee Stinger, McAfee Total Protection,TrustedSource, VirusScan, WaveSecure, WormTraq are trademarks or registered trademarks of McAfee, Inc. or its subsidiaries in the United States andother countries. Other names and brands may be claimed as the property of others.
LICENSE INFORMATION
License AgreementNOTICE TO ALL USERS: CAREFULLY READ THE APPROPRIATE LEGAL AGREEMENT CORRESPONDING TO THE LICENSE YOU PURCHASED, WHICH SETSFORTH THE GENERAL TERMS AND CONDITIONS FOR THE USE OF THE LICENSED SOFTWARE. IF YOU DO NOT KNOW WHICH TYPE OF LICENSE YOUHAVE ACQUIRED, PLEASE CONSULT THE SALES AND OTHER RELATED LICENSE GRANT OR PURCHASE ORDER DOCUMENTS THAT ACCOMPANY YOURSOFTWARE PACKAGING OR THAT YOU HAVE RECEIVED SEPARATELY AS PART OF THE PURCHASE (AS A BOOKLET, A FILE ON THE PRODUCT CD, OR AFILE AVAILABLE ON THE WEBSITE FROM WHICH YOU DOWNLOADED THE SOFTWARE PACKAGE). IF YOU DO NOT AGREE TO ALL OF THE TERMS SETFORTH IN THE AGREEMENT, DO NOT INSTALL THE SOFTWARE. IF APPLICABLE, YOU MAY RETURN THE PRODUCT TO MCAFEE OR THE PLACE OFPURCHASE FOR A FULL REFUND.
2 McAfee Security for Microsoft Exchange 8.0.0 Product Guide

Contents
Preface 7About this guide . . . . . . . . . . . . . . . . . . . . . . . . . . . . . . . . . . 7
Audience . . . . . . . . . . . . . . . . . . . . . . . . . . . . . . . . . . 7Conventions . . . . . . . . . . . . . . . . . . . . . . . . . . . . . . . . . 7Using this guide . . . . . . . . . . . . . . . . . . . . . . . . . . . . . . . 8
Find product documentation . . . . . . . . . . . . . . . . . . . . . . . . . . . . . . 8
1 Introduction 11What's new in this release . . . . . . . . . . . . . . . . . . . . . . . . . . . . . . 11Product features . . . . . . . . . . . . . . . . . . . . . . . . . . . . . . . . . . 13Why do you need MSME . . . . . . . . . . . . . . . . . . . . . . . . . . . . . . . 14
Threats to your organization . . . . . . . . . . . . . . . . . . . . . . . . . . 14How MSME protects your Exchange Server . . . . . . . . . . . . . . . . . . . . . . . 15How emails are scanned . . . . . . . . . . . . . . . . . . . . . . . . . . . . . . . 16
Scanning inbound emails . . . . . . . . . . . . . . . . . . . . . . . . . . . 17Scanning outbound emails . . . . . . . . . . . . . . . . . . . . . . . . . . . 18Scanning internal emails . . . . . . . . . . . . . . . . . . . . . . . . . . . . 19
2 Installation and configuration 21Pre-installation . . . . . . . . . . . . . . . . . . . . . . . . . . . . . . . . . . . 21
System requirements . . . . . . . . . . . . . . . . . . . . . . . . . . . . . 22Supported Microsoft Exchange Server roles . . . . . . . . . . . . . . . . . . . . 23Package contents . . . . . . . . . . . . . . . . . . . . . . . . . . . . . . . 23
Installation . . . . . . . . . . . . . . . . . . . . . . . . . . . . . . . . . . . . 24Install the software using setup wizard . . . . . . . . . . . . . . . . . . . . . . 24Install the McAfee Anti-spam add-on manually . . . . . . . . . . . . . . . . . . . 26Perform a silent installation . . . . . . . . . . . . . . . . . . . . . . . . . . 27Upgrade a standalone deployment . . . . . . . . . . . . . . . . . . . . . . . . 27
Post-installation . . . . . . . . . . . . . . . . . . . . . . . . . . . . . . . . . . 28Quick setup . . . . . . . . . . . . . . . . . . . . . . . . . . . . . . . . . 28Cluster deployment . . . . . . . . . . . . . . . . . . . . . . . . . . . . . . 29Test your installation . . . . . . . . . . . . . . . . . . . . . . . . . . . . . 32
3 Dashboard 35Statistical information of detected items . . . . . . . . . . . . . . . . . . . . . . . . 35
Detections . . . . . . . . . . . . . . . . . . . . . . . . . . . . . . . . . 36Scanning . . . . . . . . . . . . . . . . . . . . . . . . . . . . . . . . . . 40Graph . . . . . . . . . . . . . . . . . . . . . . . . . . . . . . . . . . . 40
Product versions and updates . . . . . . . . . . . . . . . . . . . . . . . . . . . . . 41Update information . . . . . . . . . . . . . . . . . . . . . . . . . . . . . . 41Schedule a software update . . . . . . . . . . . . . . . . . . . . . . . . . . 42Product information . . . . . . . . . . . . . . . . . . . . . . . . . . . . . . 42Licenses . . . . . . . . . . . . . . . . . . . . . . . . . . . . . . . . . . 43
View recently scanned items . . . . . . . . . . . . . . . . . . . . . . . . . . . . . 43On-Demand scan and its views . . . . . . . . . . . . . . . . . . . . . . . . . . . . 44
McAfee Security for Microsoft Exchange 8.0.0 Product Guide 3

View on-demand scan tasks . . . . . . . . . . . . . . . . . . . . . . . . . . 45Create an on-demand scan task . . . . . . . . . . . . . . . . . . . . . . . . . 46
Status reports . . . . . . . . . . . . . . . . . . . . . . . . . . . . . . . . . . . 48View status report tasks . . . . . . . . . . . . . . . . . . . . . . . . . . . . 48Schedule a new status report . . . . . . . . . . . . . . . . . . . . . . . . . . 49Status report email notifications . . . . . . . . . . . . . . . . . . . . . . . . . 50
Configuration reports . . . . . . . . . . . . . . . . . . . . . . . . . . . . . . . . 51View configuration report tasks . . . . . . . . . . . . . . . . . . . . . . . . . 51Schedule a new configuration report . . . . . . . . . . . . . . . . . . . . . . . 52Configuration report email notifications . . . . . . . . . . . . . . . . . . . . . . 53
Graphical reports . . . . . . . . . . . . . . . . . . . . . . . . . . . . . . . . . . 54View graphical report using simple search filters . . . . . . . . . . . . . . . . . . 54Using advanced search filters . . . . . . . . . . . . . . . . . . . . . . . . . . 55
4 Detected Items 59Manage quarantined data . . . . . . . . . . . . . . . . . . . . . . . . . . . . . . 59Detection types . . . . . . . . . . . . . . . . . . . . . . . . . . . . . . . . . . 60Available primary search filters . . . . . . . . . . . . . . . . . . . . . . . . . . . . 62Search filter comparison chart . . . . . . . . . . . . . . . . . . . . . . . . . . . . 64Additional search options . . . . . . . . . . . . . . . . . . . . . . . . . . . . . . 65Search detected items . . . . . . . . . . . . . . . . . . . . . . . . . . . . . . . . 66Actions that you can take on quarantined items . . . . . . . . . . . . . . . . . . . . . 67
5 Policy Manager 71Policy manager menu options . . . . . . . . . . . . . . . . . . . . . . . . . . . . . 72Policy categories to handle threats . . . . . . . . . . . . . . . . . . . . . . . . . . . 72Policy manager views . . . . . . . . . . . . . . . . . . . . . . . . . . . . . . . . 73Master policy and subpolicy . . . . . . . . . . . . . . . . . . . . . . . . . . . . . 74
Create subpolicies . . . . . . . . . . . . . . . . . . . . . . . . . . . . . . 74Core scanners and filters . . . . . . . . . . . . . . . . . . . . . . . . . . . . . . . 76Scanners and filters comparison chart . . . . . . . . . . . . . . . . . . . . . . . . . 77List all scanners and filters for a selected policy . . . . . . . . . . . . . . . . . . . . . 79Adding a scanner or filter . . . . . . . . . . . . . . . . . . . . . . . . . . . . . . 80Create new rule for specific users . . . . . . . . . . . . . . . . . . . . . . . . . . . 80Actions you can take on detections . . . . . . . . . . . . . . . . . . . . . . . . . . 81Shared Resource . . . . . . . . . . . . . . . . . . . . . . . . . . . . . . . . . . 82
Configure scanner settings . . . . . . . . . . . . . . . . . . . . . . . . . . . 83Configure alert settings . . . . . . . . . . . . . . . . . . . . . . . . . . . . 83Create a new alert . . . . . . . . . . . . . . . . . . . . . . . . . . . . . . 84Configure DLP and compliance rules . . . . . . . . . . . . . . . . . . . . . . . 86Configure file filtering rules . . . . . . . . . . . . . . . . . . . . . . . . . . . 88Configure time slots . . . . . . . . . . . . . . . . . . . . . . . . . . . . . 90
Manage core scanner settings for a policy . . . . . . . . . . . . . . . . . . . . . . . . 90Configure anti-virus scanner settings . . . . . . . . . . . . . . . . . . . . . . . 91Configure DLP and compliance scanner settings . . . . . . . . . . . . . . . . . . 94Configure file filtering settings . . . . . . . . . . . . . . . . . . . . . . . . . 95Configure anti-spam settings . . . . . . . . . . . . . . . . . . . . . . . . . . 96Configure anti-phishing settings . . . . . . . . . . . . . . . . . . . . . . . . . 99
Manage filter settings for a policy . . . . . . . . . . . . . . . . . . . . . . . . . . . 100Configure corrupt content settings . . . . . . . . . . . . . . . . . . . . . . . 101Configure protected content settings . . . . . . . . . . . . . . . . . . . . . . 102Configure encrypted content settings . . . . . . . . . . . . . . . . . . . . . . 102Configure signed content settings . . . . . . . . . . . . . . . . . . . . . . . 102Configure password-protected file settings . . . . . . . . . . . . . . . . . . . . 103Configure mail size filtering settings . . . . . . . . . . . . . . . . . . . . . . 104Configure scanner control settings . . . . . . . . . . . . . . . . . . . . . . . 104
Contents
4 McAfee Security for Microsoft Exchange 8.0.0 Product Guide

Configure MIME mail settings . . . . . . . . . . . . . . . . . . . . . . . . . 105Configure HTML file settings . . . . . . . . . . . . . . . . . . . . . . . . . . 107
Manage miscellaneous settings for a policy . . . . . . . . . . . . . . . . . . . . . . . 108Configuring alert message settings . . . . . . . . . . . . . . . . . . . . . . . 109Configuring disclaimer text settings . . . . . . . . . . . . . . . . . . . . . . . 110
6 Settings and Diagnostics 111On-Access settings . . . . . . . . . . . . . . . . . . . . . . . . . . . . . . . . 113
Microsoft Virus Scanning API (VSAPI) settings . . . . . . . . . . . . . . . . . . 114Background scan settings . . . . . . . . . . . . . . . . . . . . . . . . . . . 115Transport scan settings . . . . . . . . . . . . . . . . . . . . . . . . . . . . 115
Configure mailbox exclusion settings . . . . . . . . . . . . . . . . . . . . . . . . . 116Notification settings . . . . . . . . . . . . . . . . . . . . . . . . . . . . . . . . 116
Configure notification settings . . . . . . . . . . . . . . . . . . . . . . . . . 117Edit notification template . . . . . . . . . . . . . . . . . . . . . . . . . . . 117Notification fields that you can use . . . . . . . . . . . . . . . . . . . . . . . 118Enable product health alerts . . . . . . . . . . . . . . . . . . . . . . . . . 119
Anti-spam settings . . . . . . . . . . . . . . . . . . . . . . . . . . . . . . . . 120Detected items settings . . . . . . . . . . . . . . . . . . . . . . . . . . . . . . 121
Quarantine using McAfee Quarantine Manager . . . . . . . . . . . . . . . . . . 121Quarantine using the local database . . . . . . . . . . . . . . . . . . . . . . 122
User interface preferences settings . . . . . . . . . . . . . . . . . . . . . . . . . . 123Configure dashboard settings . . . . . . . . . . . . . . . . . . . . . . . . . 123Configure graph and chart settings . . . . . . . . . . . . . . . . . . . . . . . 124
Diagnostics settings . . . . . . . . . . . . . . . . . . . . . . . . . . . . . . . . 125Configure debug log settings . . . . . . . . . . . . . . . . . . . . . . . . . 125Configure event logging settings . . . . . . . . . . . . . . . . . . . . . . . . 126Configure product log settings . . . . . . . . . . . . . . . . . . . . . . . . . 127Configure error reporting service settings . . . . . . . . . . . . . . . . . . . . 128
View product logs . . . . . . . . . . . . . . . . . . . . . . . . . . . . . . . . . 129Configure DAT settings . . . . . . . . . . . . . . . . . . . . . . . . . . . . . . . 130Import and export configuration settings . . . . . . . . . . . . . . . . . . . . . . . . 130
Export your existing MSME configuration . . . . . . . . . . . . . . . . . . . . . 131Import configuration from another MSME server . . . . . . . . . . . . . . . . . . 131Import a sitelist . . . . . . . . . . . . . . . . . . . . . . . . . . . . . . . 131
Configure anti-spam proxy settings . . . . . . . . . . . . . . . . . . . . . . . . . . 132
7 Program maintenance 133Modify the installation . . . . . . . . . . . . . . . . . . . . . . . . . . . . . . . 133Repair the installation . . . . . . . . . . . . . . . . . . . . . . . . . . . . . . . 133Restore default settings . . . . . . . . . . . . . . . . . . . . . . . . . . . . . . 134Purge and optimize . . . . . . . . . . . . . . . . . . . . . . . . . . . . . . . . 134Uninstall the software . . . . . . . . . . . . . . . . . . . . . . . . . . . . . . . 135
8 Integrating MSME with ePolicy Orchestrator 137Prerequisites . . . . . . . . . . . . . . . . . . . . . . . . . . . . . . . . . . . 137Check in the MSME package . . . . . . . . . . . . . . . . . . . . . . . . . . . . . 138Install the MSME extension . . . . . . . . . . . . . . . . . . . . . . . . . . . . . 138Migrate policies from older versions . . . . . . . . . . . . . . . . . . . . . . . . . . 138Deploy the MSME software to clients . . . . . . . . . . . . . . . . . . . . . . . . . 139Set up the McAfee Anti-spam software . . . . . . . . . . . . . . . . . . . . . . . . 140
Check in the McAfee Anti-spam package . . . . . . . . . . . . . . . . . . . . . 140Deploy the McAfee Anti-spam add-on . . . . . . . . . . . . . . . . . . . . . . 140
Manage policies . . . . . . . . . . . . . . . . . . . . . . . . . . . . . . . . . . 141Create or modify MSME policies . . . . . . . . . . . . . . . . . . . . . . . . 142Assign policies . . . . . . . . . . . . . . . . . . . . . . . . . . . . . . . 142
Contents
McAfee Security for Microsoft Exchange 8.0.0 Product Guide 5

Create and schedule tasks . . . . . . . . . . . . . . . . . . . . . . . . . . . . . 143Schedule automatic updates . . . . . . . . . . . . . . . . . . . . . . . . . . 143Schedule on-demand scan . . . . . . . . . . . . . . . . . . . . . . . . . . 144Schedule to send status report . . . . . . . . . . . . . . . . . . . . . . . . . 145Schedule to send configuration report . . . . . . . . . . . . . . . . . . . . . . 145
Queries and reports . . . . . . . . . . . . . . . . . . . . . . . . . . . . . . . . 146Predefined queries . . . . . . . . . . . . . . . . . . . . . . . . . . . . . . 146Custom query filters . . . . . . . . . . . . . . . . . . . . . . . . . . . . . 147Run a default query . . . . . . . . . . . . . . . . . . . . . . . . . . . . . 148
Filter events . . . . . . . . . . . . . . . . . . . . . . . . . . . . . . . . . . . 148Configure automatic responses . . . . . . . . . . . . . . . . . . . . . . . . . . . . 149Remove the software . . . . . . . . . . . . . . . . . . . . . . . . . . . . . . . . 150
Remove the McAfee Anti-spam software from clients . . . . . . . . . . . . . . . . 150Remove the client software . . . . . . . . . . . . . . . . . . . . . . . . . . 151Remove the software extension . . . . . . . . . . . . . . . . . . . . . . . . 152
9 Troubleshooting 153Default Vs. Enhanced configuration settings . . . . . . . . . . . . . . . . . . . . . . 153Important registry keys . . . . . . . . . . . . . . . . . . . . . . . . . . . . . . 154
10 Frequently asked questions 155General . . . . . . . . . . . . . . . . . . . . . . . . . . . . . . . . . . . . . 155Installation . . . . . . . . . . . . . . . . . . . . . . . . . . . . . . . . . . . . 156Policy Manager . . . . . . . . . . . . . . . . . . . . . . . . . . . . . . . . . . 156Settings and Diagnostics . . . . . . . . . . . . . . . . . . . . . . . . . . . . . . 157McAfee Anti-Spam add-on component . . . . . . . . . . . . . . . . . . . . . . . . . 157Regular Expressions (regex) . . . . . . . . . . . . . . . . . . . . . . . . . . . . . 158
A Using McAfee Security for Microsoft Exchange Access Control 161
B SiteList Editor 163Configure sitelist repository settings . . . . . . . . . . . . . . . . . . . . . . . . . 164Configure sitelist proxy settings . . . . . . . . . . . . . . . . . . . . . . . . . . . 166
Index 169
Contents
6 McAfee Security for Microsoft Exchange 8.0.0 Product Guide

Preface
This guide provides the information you need for all phases of product use, from installation toconfiguration to troubleshooting.
Contents About this guide Find product documentation
About this guideThis information describes the guide's target audience, the typographical conventions and icons usedin this guide, and how the guide is organized.
AudienceMcAfee documentation is carefully researched and written for the target audience.
The information in this guide is intended primarily for:
• Administrators — People who implement and enforce the company's security program.
ConventionsThis guide uses these typographical conventions and icons.
Book title, term,emphasis
Title of a book, chapter, or topic; a new term; emphasis.
Bold Text that is strongly emphasized.
User input, code,message
Commands and other text that the user types; a code sample; a displayedmessage.
Interface text Words from the product interface like options, menus, buttons, and dialogboxes.
Hypertext blue A link to a topic or to an external website.
Note: Additional information, like an alternate method of accessing anoption.
Tip: Suggestions and recommendations.
Important/Caution: Valuable advice to protect your computer system,software installation, network, business, or data.
Warning: Critical advice to prevent bodily harm when using a hardwareproduct.
McAfee Security for Microsoft Exchange 8.0.0 Product Guide 7

Using this guide This guide will take you through the installation process and help you understand the various featuresof McAfee® Security for Microsoft Exchange (MSME) 8.0.
To do this... Look here...
Learn how MSME works, product features and how emails arescanned.
Chapter 1, Introduction
Plan and perform your desired type of installation such asstandalone, silent, cluster or upgrading from an older version.
Chapter 2, Installation andconfiguration
Get information about the system health through dashboards andgraphical reports. Schedule on‑demand scans, status reports, andconfiguration reports.
Chapter 3, Dashboard
View information about all email messages containing potentialthreats that are detected and quarantined by MSME.
Chapter 4, Detected Items
Configure or manage different policies and actions to determinehow different types of threats are treated when detected.
Chapter 5, Policy Manager
Plan and configure MSME settings to best suit the security foryour Microsoft Exchange server.
Chapter 6, Settings andDiagnostics
Perform maintenance tasks such as repair, modify, remove orrestore the software. Also perform purge and optimization tasksto improve the database utilization.
Chapter 7, Program maintenance
Manage your MSME server using an ePolicy Orchestrator server tomanage MSME policies and product specific tasks.
Chapter 8, Integrating MSME withePolicy Orchestrator
Determine and troubleshoot issues while using MSME. Chapter 9, Troubleshooting
Get answers to common situations that you might encounterwhen installing or using the product.
Chapter 10, Frequently askedquestions
Allow or deny access to the MSME user interface for specific usersor groups.
Appendix A, Using the McAfeeSecurity for Microsoft ExchangeAccess Control
Configure sitelists that specify the location from where automaticupdates are downloaded.
Appendix B, SiteList Editor
Find product documentationMcAfee provides the information you need during each phase of product implementation, frominstallation to daily use and troubleshooting. After a product is released, information about the productis entered into the McAfee online KnowledgeBase.
Task1 Go to the McAfee Technical Support ServicePortal at http://mysupport.mcafee.com.
2 Under Self Service, access the type of information you need:
PrefaceFind product documentation
8 McAfee Security for Microsoft Exchange 8.0.0 Product Guide

To access... Do this...
User documentation 1 Click Product Documentation.
2 Select a product, then select a version.
3 Select a product document.
KnowledgeBase • Click Search the KnowledgeBase for answers to your product questions.
• Click Browse the KnowledgeBase for articles listed by product and version.
PrefaceFind product documentation
McAfee Security for Microsoft Exchange 8.0.0 Product Guide 9

PrefaceFind product documentation
10 McAfee Security for Microsoft Exchange 8.0.0 Product Guide

1 Introduction
McAfee® Security for Microsoft Exchange (MSME) protects your Microsoft Exchange server from variousthreats that could adversely affect the computers, network, or employees.
MSME uses advanced heuristics against viruses, unwanted content, potentially unwanted programs,and banned file types or messages. It also scans:
• Subject line and body of the email messages
• Email attachments (based on file type, file name, and file size)
• Text within the email attachments
The software also includes the McAfee Anti‑Spam add‑on component that protects your Exchangeserver from spam and phishing emails.
Contents What's new in this release Product features Why do you need MSME How MSME protects your Exchange Server How emails are scanned
What's new in this releaseMcAfee Security for Microsoft Exchange (MSME) has increased its protection profile to provide the bestprotection for your Microsoft Exchange servers.
Here is a list of features included with this release of the product:
Feature Description
New Exchangeserver support
• Support for Microsoft Exchange Server 2013
• Support for Microsoft Exchange Server 2010 with Service Pack 2
IP reputation A method of detecting threat from email messages based on the sendingserver's IP address. IP Reputation Score reflects the likelihood that a networkconnection poses a threat.
IP reputation leverages on McAfee Global Threat Intelligence (GTI) to preventdamage and data theft by blocking the email messages at the gateway basedon the source IP address of the last email server.
MSME processes the message before it enters the organization by rejecting ordropping the connection based on the IP reputation score.
1
McAfee Security for Microsoft Exchange 8.0.0 Product Guide 11

Feature Description
DLP andCompliance
Ability to ensure that email content is in accordance with your organization’sconfidentiality and compliance policies.Pre‑defined compliance dictionaries include:
• Addition of 60 new DLP and Compliance dictionaries.
• Support for industry specific compliance dictionaries — HIPAA, PCI, SourceCode (Java, C++ etc.)
• Improvements to existing phrase based detections.
• Reduced false positives, due to enhanced capabilities in detectingnon‑compliant content, based on the Threshold score and in combinationwith the maximum term count (occurrence).
Customize policies for content security and Data Loss Prevention (DLP).
AdvancedOn‑Demand scan
Ability to perform granular‑level on‑demand scan on Exchange Server 2010 &2013, resulting in faster on‑demand scans. You can schedule on‑demand scansbased on these filters:• Subject • Attachments
• Sender/Recipient/CC • Mail Size
• Message ID • Unread items
• Time duration
Advancednotifications
Forward the quarantined emails for compliance audit to multiple users, basedon the detection category.
Browserenhancements
• Support for new browsers:
• Microsoft Internet Explorer 8.0 and 9.0
• Mozilla Firefox 14.x and 15.x
• Identifies unsupported browsers, however allows access to the product’sweb‑user interface.
Virtualization • Support for VMware Workstation 7.0 or later
• Support for VMware ESX 5.0
McAfee StackUpgrade
Bundled with newer versions of these components:• McAfee Agent
• McAfee Content Scanning Engine
• McAfee Anti‑Spam Engine
• PostgreSQL database
1 IntroductionWhat's new in this release
12 McAfee Security for Microsoft Exchange 8.0.0 Product Guide

Product featuresThe main features of MSME are described in this section.
• Protection from viruses — Scans all email messages for viruses and protects your Exchangeserver by intercepting, cleaning, and deleting the viruses that it detects. MSME uses advancedheuristic methods and identifies unknown viruses or suspected virus‑like items and blocks them.
• Protection from spam — Helps you save bandwidth and the storage space required by yourExchange servers by assigning a spam score to each email message as it is scanned and by takingpre‑configured actions on those messages.
• Protection from phishing — Detects phishing emails that fraudulently try to obtain your personalinformation.
• Capability to detect packers and potentially unwanted programs — Detects packers thatcompress and encrypt the original code of an executable file. It also detects potentially unwantedprograms (PUPs), that are software programs written by legitimate companies to alter the securitystate or privacy state of a computer.
• Content filtering — Scans content and text in the subject line or body of an email message andan email attachment. MSME supports content filtering based on regular expressions (regex).
• File filtering — Scans an email attachment depending on its file name, type, and size of theattachment. MSME can also filter files containing encrypted, corrupted, password‑protected, anddigitally signed content.
• Background scanning — Facilitates scanning of all files in the information store. You can schedulebackground scanning to periodically scan a selected set of messages with the latest engine updatesand scanning configurations. In MSME, you can exclude mailboxes that you don't want to bescanned.
• Product Health Alerts — These are notifications on the current status of the product's health. Youcan configure and schedule these alerts.
• Integrate with McAfee ePolicy Orchestrator 4.5 or 4.6 — Integrates with ePolicy Orchestrator4.5 or 4.6 to provide a centralized method for administering and updating MSME across yourExchange servers. This reduces the complexity of, and the time required to, administer and updatevarious systems.
• Web‑based user interface — Provides a user‑friendly web‑based interface based on DHTML.
• Policy Management — The Policy Manager menu option in the product user interface lists differentpolicies you can set up and manage in MSME.
• Centralized scanner, filter rules, and enhanced alert settings — Using scanners, you canconfigure settings that a policy can apply when scanning items. Using File Filtering rules, you canset up rules that apply to a file name, file type, and file size.
• On‑demand/time‑based scanning and actions — Scans email messages at convenient times orat regular intervals.
• Multipurpose Internet Mail Extensions (MIME) scanning — A communications standard thatenables you to transfer non‑ASCII formats over protocols (such as SMTP) that support only 7‑bitASCII characters.
• Quarantine management — You can specify the local database to be used as a repository forquarantining infected email messages. You can choose to store quarantined messages on your ownserver running McAfee® Quarantine Manager (MQM), which is called the Off‑box quarantine.
• Auto‑update of virus definitions, extra DATs, anti‑virus and anti‑spam engine — regularlyprovides updated DAT files, anti‑virus scanning engine, and anti‑spam engine to detect and cleanthe latest threats.
IntroductionProduct features 1
McAfee Security for Microsoft Exchange 8.0.0 Product Guide 13

• Retention and purging of old DATs — Retain old DAT files for periods you define or purge themas needed.
• Support for Site List editor — Specify a location from which to download automatic updates forMSME.
• Support for Small Business Server — MSME is compatible with Small Business Servers.
• Detection reports — Generates status reports and graphical reports that enable you to viewinformation about detected items.
• Configuration reports — Summarizes product configuration such as information about the server,version, license status and type, product, debug logging, on‑access settings, on‑access policies, andgateway policies. You can specify when your server needs to send the configuration report to theadministrator.
• Denial‑of‑service attacks detection — Detects additional requests or attacks flooding andinterrupting the regular traffic on a network. A denial‑of‑service attack overwhelms its target withfalse connection requests, so that the target ignores legitimate requests.
Why do you need MSMEYour organization is vulnerable to many threats that can affect its reputation, employees, computers,and networks.
• The reputation of an organization can be affected by the loss of confidential information or throughan abuse that can lead to legal action.
• Electronic distractions and unrestricted use of email and the internet can affect the productivity ofemployees.
• Viruses and other potentially unwanted software can damage computers, making them unusable.
• Uncontrolled use of various types of files on your networks can cause performance problems foryour entire organization.
Threats to your organizationLearn about various threats that could affect an organization.
Type of threat Description
Reputation of a company An unguarded or ill‑informed remark by an employee might causelegal problems, unless it is covered by a disclaimer.
Spam (unsolicited email) Unsolicited commercial email messages are the electronicequivalent of spam or junk mail. Often they contain advertisementsthat are not expected by the recipients. Although it is more of anuisance than a threat, spam can degrade the performance of yournetwork.
Large email messages Large email messages or messages that contain numerousattachments can slow down the performance of email servers.
Mass‑mailer viruses Although they can be cleaned like any other virus, they can spreadrapidly and quickly degrade the performance of your network.
Email messages from unwantedsources
Disgruntled ex‑employees and unscrupulous individuals who knowthe email addresses of your employees can cause distress anddistraction by sending unwanted emails.
Non‑business use of email If most employees use recipient email addresses not within theirorganization, such emails are likely to be for personal ornon‑business use.
1 IntroductionWhy do you need MSME
14 McAfee Security for Microsoft Exchange 8.0.0 Product Guide

Type of threat Description
Loss of company‑confidentialinformation
Employees might disclose confidential information related tounreleased products, customers or partners.
Offensive language Offensive words or phrases can appear in email messages andattachments. Besides causing offense, they can provoke legalaction too.
Transfer of entertainment files Large video or audio files intended for entertainment might reduceyour network performance.
Inefficient file types Some files use large amounts of memory and can be slow totransfer, but alternatives are often available. For example, GIF andJPEG files are much smaller than their equivalent BMP files.
Transfer of large files Transferring large files can reduce your network performance.
Denial‑of‑service attack A deliberate surge of large files can seriously affect theperformance of your network, making it unusable to its legitimateusers.
Pornographic text Vulgar language or terms must not be used in emails.
Viruses and other potentiallyunwanted software
Viruses and other potentially unwanted software can quickly makecomputers and data unusable.
Corrupt or encrypted content This type of content cannot be scanned. Appropriate policies mustbe specified to handle it.
How MSME protects your Exchange ServerLearn how MSME protects your exchange server by accessing all email messages that reach theexchange server, and emails that are read from and written to the mailbox.
Protecting your Microsoft Exchange server
MSME uses the virus scanning interface of your Exchange server to gain full access to all emailmessages that are being read from, and written to the mailbox of the Exchange server.
• The anti‑virus scanning engine compares the email message with all the known virus signaturesstored in the DATs.
• The content management engine scans the email message for banned content as specified in thecontent management policies in MSME.
If these checks find any viruses or banned content within the email message, MSME takes thespecified action. If no items are detected, MSME passes the information back to the virus‑scanninginterface to complete the original message request within Microsoft Exchange.
Real‑time detection
MSME integrates with your Exchange server and works in real‑time to detect and delete viruses orother harmful or unwanted code. It also helps you maintain a virus‑free environment by scanning thedatabases on your Exchange server. Each time an email message is sent to or received from a source,MSME scans the email message to compare it with a list of known viruses and suspected virus‑likebehavior and intercepts and cleans the infected file before it spreads. It can also scan content withinthe email message (and its attachments), using rules and policies defined in the software.
IntroductionHow MSME protects your Exchange Server 1
McAfee Security for Microsoft Exchange 8.0.0 Product Guide 15

Scanning of email messages
• The anti‑spam, anti‑virus, and the content management engines scan the email messages andprovide the result to MSME before the content is written to the file system or read by the MicrosoftExchange users.
• The anti‑virus and the anti‑spam scanning engines compare the email message with all the knownsignatures stored in the currently installed virus definition files (DATs) and anti‑spam rules. Theanti‑virus engine also scans the message using selected heuristic detection methods.
• The content management engine scans the email message for banned content as specified in thecontent management policies running within the software. If there are no viruses, banned/unwanted content in the email message, MSME passes the information back to Microsoft Exchange.In case of a detection, MSME takes actions as defined within its configuration settings.
How scanning works
• Central to your MSME are the scanning engine and DAT files. The engine is a complex dataanalyzer. The DAT files contain a great deal of information including thousands of different drivers,each of which contains detailed instructions on how to identify a virus or a type of virus.
• The scanning engine works with the DAT files. It identifies the type of the item being scanned anddecodes the content of that object to understand what the item is. It then uses the information inthe DAT files to search and locate known viruses. Each virus has a distinctive signature. There is asequence of characters unique to a virus and the engine searches for that signature. The engineuses a technique called heuristic analysis to search for unknown viruses. This involves analyzingthe object's program code and searching for distinctive features typically found in viruses.
• Once the engine has confirmed the identity of a virus, it cleans the object to the extent possible.For example, it removes an infected macro from an attachment or deletes the virus code in anexecutable file.
What and when to scan?
• The threat from viruses can come from many directions such as infected macros, shared programfiles, files shared across a network, email messages and attachments, floppy disks, filesdownloaded from the internet, and so on. Individual McAfee Security anti‑virus software productstarget specific areas of vulnerability. We recommend a multi‑tiered approach to provide the fullrange of virus detection, security, and cleaning capabilities that you require.
• MSME provides a range of options that you can further configure according to the demands of yoursystem. These demands will vary depending on when and how the component parts of your systemoperate and how they interact with each other and with the outside world, particularly throughemails and internet access.
• You can configure or enable various actions that allow you to determine how your MSME servershould deal with different items and what actions it should take on detected or suspicious items.
How emails are scannedMSME scans an email differently based‑on whether it is an inbound, outbound or internal email.
Each time an email message is sent to or received from a source, MSME scans it comparing it with alist of known viruses and suspected virus‑like behavior. MSME can also scan for content within theemail message using rules and policies defined within the software.
1 IntroductionHow emails are scanned
16 McAfee Security for Microsoft Exchange 8.0.0 Product Guide

When MSME receives an email, it scans in this order:
1 IP address, spam or phish 4 Content scanning (DLP and Compliance)
2 Corrupt or encrypted content 5 Anti‑virus
3 File filter
Even though emails are scanned in this order, if an item is detected first by the file filtering scanner, itwill still be scanned for anti‑virus before being quarantined.
Detecting an email based on the source IP address is possible when you enable the IP reputationfeature in MSME. This feature is available when you install the McAfee Anti‑Spam Add‑On component.
Scanning inbound emailsStep‑by‑step information on what happens to an email that reaches your organization and how MSMEscans it to determine if the email is clean or infected.The task described below is narrated assuming a situation in your organization, where you haveinstalled MSME on all these roles:
• Edge Transport
• Hub Transport
• Mailbox
If you don't have an Exchange server on the Edge or Hub Transport role, MSME will ignore the stepsrelated that role.
Task1 The SMTP stack hosted by EdgeTransport.exe on Edge role receives the email.
2 MSME Transport Agent (McAfeeTxAgent) scans the email for spam, phish or mail size.
If you have installed the McAfee Anti‑Spam add‑on component and enabled the IP reputationfeature, emails will be scanned based on the source IP address by the Transport IP Agent(McTxIPAgent).
3 If there is detection, it is dropped, else it is returned to the SMTP stack.
4 If the email is clean, McAfeeTxRoutingAgent processes it.
5 MSME receives the same stream and scans for File filtering, Content scanning and Anti‑virus (AV)scanning.
6 If there is a detection, action is taken as per product configuration.
7 MSME stamps the email with AV stamp as per Microsoft specifications.
8 The email is now sent to Exchange Hub server role.
9 SMTP stack hosted by EdgeTransport.exe on Hub server role, receives the email.
10 MSME Transport Agent (McAfeeTxAgent) scans the email for spam, phish or mail size. Only in caseof EdgeSync (Edge and Hub server), the session is authenticated where anti‑spam scanning isskipped. In this case, Originator check is used for session authentication.
11 If there is detection, the email is dropped, else it is returned back to the SMTP stack.
12 If the email is clean, McAfeeTxRoutingAgent processes it and checks for AV stamp (if any).
IntroductionHow emails are scanned 1
McAfee Security for Microsoft Exchange 8.0.0 Product Guide 17

13 If AV stamp is present, it checks and compares with the stamp MSME forms with engine/DAT onHub server role.
14 If the stamp is different, MSME receives the same stream and scans for File filtering, Contentscanning and Anti‑virus scanning.
15 On Transport, MSME looks for AV stamp whereas on VSAPI, Exchange Store does this work andMSME will not receive a scan call if AV stamp matches.
16 If there is a detection, an action is taken as per product configuration.
17 MSME stamps the email with AV stamp as per Microsoft specifications.
18 The email is routed to Exchange Mailbox server role.
19 Exchange store receives the mail and before saving it to its database, checks for the AV stamp.
20 If AV stamp matches, it saves the item without scanning.
21 If AV stamp does not match, Exchange store calls VSAPI (Virus Scanning API) and scans the email.
22 If there is detection, the email is replaced or deleted as per product configuration.
Scanning outbound emailsStep‑by‑step information on what happens to an email that goes out of the organization and howMSME scans it, to determine if the email is clean or infected.
Task1 The end‑user sends an email to an external user, using the email client.
2 Exchange store receives the email and scans it in the Outbox folder.
3 If there is detection, it is replaced or deleted as per the product configuration and if replaced it issubmitted to Transport queue.
4 SMTP stack hosted by EdgeTransport.exe on Hub server role, receives the email.
5 MSME Transport Agent (McAfeeTxRoutingAgent) scans the email for File filtering, Content scanning,then Anti‑Virus scanning and also disclaimer addition.
6 If there is detection, it is dropped or replaced and appropriately returned to the SMTP stack.
7 If the email is clean, it is returned to SMTP stack for further routing.
8 If the email is routed to Edge server role from this Hub server, then:
a SMTP stack hosted by EdgeTransport.exe on Edge server role, receives the email.
b MSME Transport Agent (McAfeeTxRoutingAgent) checks for AV stamp (if any).
c If AV stamp is present, it checks and compares with the stamp MSME forms with engine/DAT onEdge server role.
d If the stamp is different then, MSME receives the same stream and scans for File filtering,Content scanning, then Anti‑virus scanning.
1 IntroductionHow emails are scanned
18 McAfee Security for Microsoft Exchange 8.0.0 Product Guide

e If there is a detection, action is taken as per product configuration.
f MSME stamps the email with AV stamp, as per Microsoft specifications on Edge server role.
9 Now the email is returned to SMTP stack, hosted by EdgeTransport.exe on Edge server role forfurther routing.
Scanning internal emailsStep‑by‑step information on what happens to an email that is sent within the organization and howMSME scans it, to determine if the email is clean or infected.
Task1 The end‑user sends an email to an internal user, using the email client.
2 Exchange store receives the email and scans it in the Outbox folder.
3 If there is detection, it's replaced or deleted as per the product configuration and if replaced it issubmitted to Transport queue.
4 SMTP stack hosted by EdgeTransport.exe on Hub server role, receives the email.
5 MSME Transport Agent (McAfeeTxRoutingAgent) scans the email for File filtering, Content scanning,then Anti‑virus scanning.
6 If there is detection, it is dropped or replaced and appropriately returned to the SMTP stack.
7 MSME stamps the email with AV stamp, as per Microsoft specifications on Hub server role.
8 If the email is clean, it is returned to SMTP stack for further routing.
9 The Exchange Mailbox server receives the email.
10 Exchange store checks for AV stamp and if it matches, the email will not be sent to MSME scanningfor VSAPI, else the email is scanned for Anti‑Virus, File filtering and Content Scanning by VSAPI.
IntroductionHow emails are scanned 1
McAfee Security for Microsoft Exchange 8.0.0 Product Guide 19

1 IntroductionHow emails are scanned
20 McAfee Security for Microsoft Exchange 8.0.0 Product Guide

2 Installation and configuration
Select the option to install and use your MSME software, which best suits your requirements.
Installation type Description
Standalone Wizard‑based When using the wizard‑based setup file, select one of theseoptions per your requirements:• Typical — Configured for all standard features except the McAfee
Anti‑Spam add‑on. You can install the McAfee Anti‑spam add‑onseparately at a later stage.
• Complete — Configured for all standard features with the McAfeeAnti‑Spam add‑on that provides protection against Spam orPhish attacks.
• Custom — Configure using the advanced options to customizeyour setup.
Silent Install the software without any user interaction or prompts.Modify and run the Silent.bat file that allows you to recordselections for the installation process.
ePolicy Orchestrator‑managed Deploy MSME in ePolicy Orchestrator environment to allowcentralized policy management and enforcement on yourMicrosoft Exchange Servers.
You can also deploy MSME to a Microsoft Exchange Server cluster. This deployment requires certainpost‑installation configuration tasks.
See also Cluster deployment on page 29
Contents Pre-installation Installation Post-installation
Pre-installationUse this information to prepare for the MSME installation.
Contents System requirements Supported Microsoft Exchange Server roles Package contents
2
McAfee Security for Microsoft Exchange 8.0.0 Product Guide 21

System requirementsMake sure that your server meets these requirements.
Component Requirement
Operating system • Microsoft Windows 2003 Standard/Enterprise Server (64‑bit)
• Microsoft Windows 2003 Standard/Enterprise Server R2 (64‑bit)
• Microsoft Windows 2008 Standard/Enterprise Server SP2 (64‑bit)
• Microsoft Windows 2008 Standard/Enterprise Server R2 (64‑bit)
• Microsoft Windows 2012 Standard/Enterprise Server (64‑bit)
Microsoft ExchangeServer
• Microsoft Exchange Server 2007 SP3
• Microsoft Exchange Server 2010 SP2
• Microsoft Exchange Server 2013
Browser • Microsoft Internet Explorer version 7.0, 8.0, 9.0, and 10.0
• Mozilla Firefox 16.x and 17.x
Processor • Intel x64 architecture‑based processor that supports Intel Extended Memory64 technology (Intel EM64T)
• AMD x64 architecture‑based processor with AMD 64‑bit technology
MemoryThe memory requirement to install MSME is the same as Microsoft ExchangeServer requirement. For more information, see the Microsoft Exchangewebsite.
Microsoft Exchange Server 2007• Minimum — 2 GB RAM
• Recommended — 4 GB RAM
Microsoft Exchange Server 2010• Minimum — 4 GB RAM
• Recommended — 4 GB RAM for a single role and 8 GB for multiple roles
Microsoft Exchange Server 2013• Minimum — 8 GB RAM
• Recommended — 8 GB RAM
Disk space Minimum: 740 MB
Network 10/100/1000‑Mbps Ethernet card
Screen resolution 1024 x 768
McAfee managementsoftware
• McAfee ePolicy Orchestrator 4.5
• McAfee ePolicy Orchestrator 4.6
2 Installation and configurationPre-installation
22 McAfee Security for Microsoft Exchange 8.0.0 Product Guide

Component Requirement
McAfee Agent(required for ePolicyOrchestratordeployment)
• McAfee Agent 4.5 Patch3
• McAfee Agent 4.6 Patch 2
Upgrade path • GroupShield for Exchange 7.0.1 hotfix release HF725138
• GroupShield for Exchange 7.0.2 hotfix release HF722718
• MSME 7.6 Patch 1
To view updated system requirements, see KB76903.
Supported Microsoft Exchange Server rolesThe MSME installation depends upon the role selected for the Microsoft Exchange Server installation.
These roles are supported for the various versions of Microsoft Exchange Servers:
• Microsoft Exchange Server 2007 and 2010:
• Edge Transport Server — Runs in the perimeter outside a domain and provides message hygieneand security. It is installed on a standalone server that is not a member of an Active Directorydomain.
• Hub Server — Handles all mail flow inside the organization, applies transport rules, and deliversmessages to a recipient's mailbox in an Active Directory domain.
• Mailbox Server — Holds the Exchange databases containing the user mailboxes.
• An installation with a dual role of Mailbox with Hub.
• Microsoft Exchange Server 2013
• MBX Server — Holds the dual role of Mailbox with Hub.
Package contentsThe MSME 8.0 software package contains the files necessary to install and set up the software asrequired.
Unzip the MSMEv80_x64.ZIP archive, to find these directories.
Installation and configurationPre-installation 2
McAfee Security for Microsoft Exchange 8.0.0 Product Guide 23

Folder Content
Standalone Contains the files required to perform a standalone installation of the product:• Setup_x64.exe — Setup file to install the software using a wizard.
• Silent.bat — Record file to install the software without any prompts or wizard.
ePO Contains installation and configuration files required for managing the product usingePolicy Orchestrator.• ePO_Extension_XX: Contains the product extensions for all locales in their respective
locale folders. For example, ePO_Extension_EN.
• MSME_Deployment_x64_xxxx.zip: Deployment package to deploy MSME on to themanaged clients.
• MSME_AS_Deployment_xxxx.zip: Deployment package to deploy the McAfeeAnti‑spam component on to the managed clients.
• MSMEePOUpgrade.zip: Contains the executable file required to migrates policies fromGroupShield for Exchange 7.0.X to MSME 8.0 in an upgrade.
• MSME80REPORTS.zip: Extension to add MSME reporting interface such as dashboards,queries.
Manual Contains the product guide in PDF format for all locales.
Readme Contains the product release notes in HTML format for all locales.
AntiSpam Contains ASAddon_x64.exe to install the McAfee Anti‑Spam add‑on component.
MSME installer includes McAfee Agent 4.6.x. The agent collects and sends information between theePolicy Orchestrator server and repositories, and manages installations across the network.
InstallationMSME is installed in a compatible environment with features depending on your requirement.
MSME can be installed on a standalone server or integrated with ePolicy Orchestrator.
Make sure that you have the Windows administrator credentials to install the product. This accountmust be a Domain administrator and these credentials are required to launch the product installer.
See also Integrating MSME with ePolicy Orchestrator on page 5
Contents Install the software using setup wizard Install the McAfee Anti-spam add-on manually Perform a silent installation Upgrade a standalone deployment
Install the software using setup wizardInstall MSME on a system where Microsoft Exchange Server 2007, 2010, or 2013, is installed.In Microsoft Exchange Server 2007 and 2010, MSME executes Transport Scanning for the Edgetransport and Hub transport roles, and VirusScan API for the Mailbox role (based on the rolesconfigured).
2 Installation and configurationInstallation
24 McAfee Security for Microsoft Exchange 8.0.0 Product Guide

Task1 As an administrator, log on to the system where Microsoft Exchange Server is installed.
2 Create a temporary directory on your local drive.
3 Download the archived software package and extract it to the temporary directory you created.
4 From the setup folder, double‑click setup_x64.exe (this is the setup application for a 64‑bit operatingsystem).
5 Select a language from the drop‑down list, then click OK.
6 In the Preparing to Install screen, the installation wizard is prepared and all required installation filesare extracted. When the process is complete, the Welcome screen appears. Click Next.
7 The Exchange Server Role Detection screen lists the roles selected during the Microsoft Exchange Serverinstallation. Click Next.
8 Select an installation type, then click Next.• Typical — Commonly used features are installed with Web‑based Product Configuration. The
McAfee Anti‑Spam add‑on component is not installed.
• Complete — (Recommended) Web based product configuration and McAfee Anti‑Spam add‑on areinstalled. If the node is cluster aware, the required cluster setup components and services arealso installed.
• Custom — (Recommended only for advanced users) Select which application features you want toinstall and where to install . If you select this type of installation, a dialog box displays thefeatures you can install. To change the destination folder for the installation files, click Change.
9 Accept the terms in the license agreement, then click Next.
10 In the Additional Configuration Settings screen, complete these options, then click Next.
a Select Import existing configuration to import the MSME configuration from an existing installation inthe same or a different system. This configuration setting is saved as a .cfg file. To import thisconfiguration, click Import, browse to the .cfg file, then click Open.
You must have already exported a configuration file from the product interface.
b Under Select Quarantine mechanism, select a location to store all quarantined items, then completethe options for the location you selected.
c If you select Local Database, click Browse to change the default location (optional). If you selectMcAfee Quarantine Manager, type the IP address of the McAfee Quarantine Manager server, the portnumber, and the callback port number. Make sure that the McAfee Quarantine Manager server isup and is available for quarantining.
d Under Administrator Email address, type the email address to which all notifications, configurationreports, and status reports must be sent.
11 Select a protection profile, then click Next.• Default —This profile provides maximum performance with optimum protection.
• Enhanced — This profile enables default file filter rules and provides maximum protection. It alsoprovides real‑time protection using McAfee Global Threat Intelligence file and messagingreputation.
• Use existing — (Upgrade only) This option uses the existing protection profile.
Installation and configurationInstallation 2
McAfee Security for Microsoft Exchange 8.0.0 Product Guide 25

12 Select Create Desktop shortcuts if you want the installation wizard to create shortcuts for the applicationon the desktop, then click Next.
13 In the Ready to Install the Program screen, verify the selected configuration, then click Install. The InstallingMcAfee Security for Microsoft Exchange screen appears that displays the features being copied, initialized,and installed.
MSME creates a user named MSMEODuser in the active directory. This user is required to performon‑demand scans.
14 When the installation is complete, the Installation Wizard Completed screen appears. Select the options asrequired, then click Finish.
• Launch Product User Interface — To launch the MSME standalone user interface after you exit theinstallation wizard.
• Show the readme file — To view the Release Notes of the product (Readme.html) for information on anylast‑minute additions or changes to the product, known issues, or resolved issues.
• Update Now — (Recommended) To update MSME with the latest DAT files, engine, and anti‑spamupdates.
• Register at McAfee Business Community to stay up to date — To receive information regarding the product,new releases, updates, and other relevant information.
• Show Windows Installer logs — To view the log file of the installation process.
We recommend that you restart your computer after the installation process is complete.
The MSME software is successfully installed on your system.
Install the McAfee Anti-spam add-on manuallyIf you've not installed McAfee Anti‑spam as part of the complete or custom installation of MSME, installthe add‑on manually.
The MSME package includes an evaluation version of the McAfee Anti‑Spam add‑on. To upgrade it tolicensed, contact McAfee Support.
Task1 As an administrator, log on to the system where Microsoft Exchange Server is installed.
2 Browse to the \AntiSpam folder in the software package, double‑click ASAddOn_x64_Eval.exe.
3 Select a language from the drop‑down list, then click OK.
4 In the Welcome screen, click Next to display the End User License Agreement screen.
5 Accept the terms in the license agreement, then click Next.
6 In the Ready to Install the Program screen, verify the selected configuration, then click Install. The InstallingMcAfee Anti‑Spam add‑on for Microsoft Exchange screen appears that displays the features being copied,initialized, and installed.
7 When the installation is complete, the installation wizard Completed screen appears. Select ShowWindows Installer logs to view the log file of the installation process, if necessary, then click Finish.
The McAfee Anti‑spam add‑on is successfully installed on your system.
2 Installation and configurationInstallation
26 McAfee Security for Microsoft Exchange 8.0.0 Product Guide

Perform a silent installationAutomate installation using the Silent.bat file that allows you to record the selections for theinstallation process.
To install the product with default settings, double‑click the Silent.bat available in the downloadpackage.
Silent.bat internally calls off the MSME setup file. Make sure that the setup_x64.exe is made available in thesame directory because the installation can't succeed with Silent.bat alone.
To customize the installation, modify these parameters in the batch file before running it:
Parameter Value Description
ADMIN_EMAIL_ID <admin>@<msme>.com Specify the administrator's email address fornotifications. For example, [email protected]
AUTO_UPDATE 1 or 0 Enable or disable automatic updates:• 1 = enabled
• 0 = disabled
INSTALL_DIR %SystemDrive%\MSME Specify the installation path.
NEED_DESKTOP_SHORTCUT 1 or 0 Specify whether to create a desktop shortcutafter successful installation:• 1 = yes
• 0 = no
DB_PATH_CHANGED 1 or 0 Specify whether to change the Postgresdatabase path:• 1 = yes
• 0 = no
DATABASEDIR <New Postgres DBLocation>
Specify the new Postgres database location. Forexample, C:\TestDB.
AGREE_TO_LICENSE Yes or No Agree to the license terms to install thesoftware. For example, SETAGREE_TO_LICENSE = Yes.
Upgrade a standalone deploymentMSME version 8.0 supports upgrading your configuration settings from the previous version of thesoftware.
Before you beginPlace your Microsoft Exchange server in maintenance mode because the ExchangeDatabase and Exchange Transport services restart during the installation process.
When upgrading to a new version of MSME, you need not uninstall the existing version. Theinstallation program updates your installation to the new version.
Task
1 As an administrator, log on to the system where Microsoft Exchange Server is installed.
2 From the setup folder, double‑click setup_x64.exe (this is the setup application for a 64‑bit operatingsystem).
Installation and configurationInstallation 2
McAfee Security for Microsoft Exchange 8.0.0 Product Guide 27

3 In the Preparing to Install screen, the installation wizard is prepared and all required installation filesare extracted. When the process is complete, the Welcome screen appears. Click Next.
4 The Exchange Server Role Detection screen lists the roles selected during the Microsoft Exchange Serverinstallation. Click Next.
5 In the Setup Type screen, the Custom option is selected by default. Click Next.
6 The Custom Setup screen lists the features installed in the existing installation. Select the featuresyou want to be updated with MSME, then click Next
7 Accept the terms in the license agreement, then click Next.
8 The Additional Configuration Settings screen displays the settings for quarantine mechanism andquarantine database applied in the existing installation. Change the settings, if necessary, thenclick Next. To migrate policies from an earlier version, select the option Import existing configuration, thenbrowse and select the configuration file.
9 In the Setup Protection Profile screen, select Default, Enhanced ,or Use Existing, as necessary, then click Next.
If you've selected the Import existing configuration, all options on this screen are grayed‑out. The UseExisting option is selected by default.
10 Select Create Desktop shortcuts if you want the installation wizard to create shortcuts for the applicationon the desktop, then click Next.
11 In the Ready to Install the Program screen, verify the selected configuration, then click Install. The InstallingMcAfee Security for Microsoft Exchange screen appears that displays the features being copied, initialized,and installed.
12 When the installation is complete, the Installation Wizard Completed screen appears with the MigrateQuarantine Data option selected by default. Click Finish.
We recommend that you restart your computer after the installation process is complete.
The MSME software is successfully upgraded.
Post-installationOnce you've installed MSME, perform certain additional configuration to set it up for your environment.
Quick setupSteps to quickly set up MSME and protect your Exchange server environment.
As an administrator, perform these tasks once you install MSME on your Exchange server.
Task1 Update the software by performing a Engine/DAT update. For details, see the Schedule a software
update section.
2 If you have installed MSME on an Edge Transport or Hub Transport server, make sure that MSMEagents are loaded in the Exchange Power Shell (Exchange Management Shell), using thiscommand:
Get‑TransportAgentThe status for "Enabled" must be true to agents starting with "McAfee".
2 Installation and configurationPost-installation
28 McAfee Security for Microsoft Exchange 8.0.0 Product Guide

3 Make sure that you install the McAfee anti‑spam add‑on component to quarantine spam or phishemail messages.
4 Update the administrator email address from Settings & Diagnostics | Notifications | Settings tab.
5 Schedule a status report task. For details, see the Schedule a new status report section.
6 Schedule a configuration report task. For details, see the Schedule a new configuration reportsection.
7 Schedule on‑demand scans based on your requirement. For details, see the On‑Demand scan andits views section.
8 Configure the on‑access scan settings as per your requirement from Settings & Diagnostics | On‑AccessSettings page. For details, see the On‑Access settings section.
9 Configure DLP and Compliance scanner settings and rules based on your company policy. For details,see the Policy Manager section for instructions on configuring policies, scanners, and filters.
10 For exceptions in a policy, create subpolicies based on your organization's requirement.
11 Send test email messages to verify the configuration.
Cluster deploymentYou need additional configurations to install MSME in cluster deployments of Microsoft ExchangeServer 2007, 2010 and 2013.
Cluster replication methods for Microsoft Exchange Server 2007Cluster replication can be carried out using two methods: Cluster Continuous Replication (CCR) orSingle Copy Cluster (SCC).
Cluster Continuous Replication (CCR)Install MSME on all nodes of the cluster as standalone instances.
MSME is not a cluster aware application on Microsoft Exchange Server 2007 CCR cluster. However, boththe nodes can be managed independently and work as standalone instances.
Single Copy Cluster (SCC)Install MSME on all nodes of the cluster. In a Microsoft Exchange Server 2007 SCC cluster, MSME canbe added only as a Cluster Resource.
Make sure that you:
• Install MSME on the Active node first, then on the Passive node.
• Create MSME Cluster in the same cluster group, where you have Microsoft Exchange resourcesconfigured.
Add the software to a cluster group on Windows 2003Add MSME as a resource to a cluster group to make MSME a cluster application.
Task1 In Cluster Administrator, select the Exchange cluster group where you want to add the MSME resource.
Make sure that the MSME cluster resource is created in the same cluster group where you haveMicrosoft Exchange resources configured.
Installation and configurationPost-installation 2
McAfee Security for Microsoft Exchange 8.0.0 Product Guide 29

2 From the File menu, select New | Resource.
3 Type a suitable name for the MSME resource.
4 From the Resource Type drop‑down list, select McAfee Cluster Framework.
5 From the Group drop‑down list, select the cluster group where the MSME resource needs to beadded, then click Next.
6 In the Possible Owners screen, check whether the nodes of the cluster on which MSME is installed, arelisted, then click Next.
7 In the Dependencies screen, make the current resource McAfee Cluster Framework dependent on aresource of type Physical Disk, then Next.
8 In the Parameters screen under the Shared Data Drive section, verify if the disk that was selected fromthe Dependencies screen is displayed, then click Finish.
9 Click OK to confirm.
The cluster resource is successfully created.
10 In Cluster Administrator, right‑click on the newly created resource and from the context menu, selectBring Online.
This step starts the MSME service on the active node and the quarantine database is created in thedesignated drive. Multiple instances of the Postgress.exe*32 process appears under the Processestab of the Task Manager with RPCServ.exe*32, and SAFeService.exe*32.
Add the software to a cluster group on Windows 2008Add MSME as a resource to a cluster group in a Windows 2008 (64‑bit) environment.
Task1 Click Start | Run, type cmd, then click OK.
Make sure that you have logged in as the administrator.
2 Type these commands to navigate to the cluster folder and run the cluster command. Press enterafter each command.
cd <windows folder>\clustercluster /UNREGADMINEXT:McPPClusResEx.dll
3 Close the command prompt.
Make sure that the MSME cluster resource is created in the same cluster group where you haveMicrosoft Exchange resources configured.
4 Click Start | Administrative Tools | Failover Cluster Management.
5 In the Failover Cluster Management console, select the cluster group in which you would like to create thecluster resource. In the right pane (Actions window), click Add resource.
6 Select More resources from the drop‑down, then select Add McAfee Cluster Framework.
7 In the main console, right‑click in the New McAfee Cluster Framework window, then select Properties.
8 In the New McAfee Cluster Framework Properties window, click the Properties tab.
2 Installation and configurationPost-installation
30 McAfee Security for Microsoft Exchange 8.0.0 Product Guide

9 Under Grid, click the Value field and enter the drive that was selected to store the MSMEconfiguration and the database, for example F:\, then click OK.
10 In Cluster Administrator, right‑click on the newly created resource and select Bring Online.
This step starts the MSME service on the active node and the quarantine database is created in thedesignated drive. Multiple instances of the Postgress.exe*32 process appears under the Processestab of the Task Manager with RPCServ.exe*32, and SAFeService.exe*32.
Cluster replication utility for Microsoft Exchange 2010 and 2013The Cluster Replication Setup Utility helps in the replication of the quarantine database, Policy configurations,engine, and DATs.
This utility is available only for an MSME installation that is recognized by a Data Availability Group(DAG), in which case the MSME Replication Service is also available. Depending on the configurationsettings, this utility replicates quarantined items from one server to the other, and makes them highlyaccessible.
The primary component in a Data Availability Group is called Active Manager. Microsoft ExchangeServer 2010 relies on the Active Manager to manage switchovers and failovers between mailboxservers that are a part of a Data Availability Group. Active Manager runs on all Mailbox servers in agiven Data Availability Group and can be installed in two roles:
• Primary Active Manager (PAM)
• Standby Active Manager (SAM)
For details regarding these roles, refer to the relevant Exchange 2010 documentation.
Configure the replication settingsConfigure the replication settings for Quarantine database, Policy configurations, Engine, and DATs.
Task1 From the Start menu, click All Programs | McAfee | Security for Microsoft Exchange | Cluster Replication Setup. A
dialog box appears with various options to define for this service.
If the Mailbox role is installed in Microsoft Exchange Server 2010 and 2013, the service ClusterReplication Setup is automatically installed in all three types of setup: Typical, Complete, and Custom.
2 From Server name, retrieve the available servers for replication which are part of Data AvailabilityGroup and have MSME installed with Exchange Server in the mailbox role.
• Available server(s) displays a list of servers that can be added for replicating the quarantinedatabase, Policy configurations, Engine, and DATs.
• Replication server(s) displays a list of servers that have been configured as replication servers forthe quarantine database, Policy configurations, Engine, and DATs.
3 Select the server from Available server(s) and click >> to add it to the Replication servers list.
4 Select Stop Replication service to stop the MSME Cluster Replication service.
5 Select Start Replication service for to manage the MSME Cluster Replication service. Select appropriateoptions:
• Policy Configuration
• Engine/DATs
• Quarantine Database
Installation and configurationPost-installation 2
McAfee Security for Microsoft Exchange 8.0.0 Product Guide 31

6 Click Apply to save and apply the cluster replication settings.
7 When prompted, select the option to restart the MSME service, which is required for the replicationto work.
Test your installationWhen you have completed the installation of MSME, we recommend that you test it.
It makes sure that the software is installed properly and can detect viruses and spam within emailmessages.
Tasks• Test the anti-virus component on page 33
Attach an EICAR anti‑virus test file to an email message, then send the message throughthe Microsoft Exchange server where you’ve installed MSME.
• Test the anti-spam component on page 33Run GTUBE (General Test mail for Unsolicited Bulk Email) to test the McAfee anti‑spamsoftware.
• Test the installation using McAfee Virtual Technician on page 33McAfee Virtual Technician automatically checks for common deviations that might haveoccurred since you installed the product.
Installed components and servicesMSME installs various components on your Microsoft Exchange server.
To access an MSME component, click Start | Programs | McAfee | Security for Microsoft Exchange, then click thecomponent:
• McAfee Anti‑Spam for McAfee Security for Microsoft Exchange — Detects spam and phishing content.
• Access Control — Allows or denies access to the MSME user interface for specific users or groups.
• Product Configuration — Launches MSME standalone version or through a web interface.
• Sitelist Editor — Specifies the location where automatic updates (including DATs and scanningengines) are downloaded from.
• Cluster Replication Setup — Replicates the quarantine database, policy configurations, and productupdates (Microsoft Exchange Server 2010 or 2013 only). This is dependent upon the replicationsetting across a Data Availability Group (DAG), recognized by an MSME installation.
Services available
• McAfee Framework Service — Prerequisite for installing and using ePolicy Orchestrator. For more detailson this service, refer the ePolicy Orchestrator product documentation.
• McAfee Security for Microsoft Exchange — Protects your Microsoft Exchange Server (versions 2007, 2010,2013) from viruses, unwanted content, potentially unwanted programs, and banned file types/messages.
• McAfee Anti‑Spam rules updater — Required to update the anti‑spam rules.
2 Installation and configurationPost-installation
32 McAfee Security for Microsoft Exchange 8.0.0 Product Guide

Test the anti-virus componentAttach an EICAR anti‑virus test file to an email message, then send the message through the MicrosoftExchange server where you’ve installed MSME.Several anti‑virus vendors throughout the world jointly created the EICAR standard anti‑virus test file.It is a standard to verify anti‑virus installations.
This file is not a virus. Make sure that you delete the file when you have finished testing yourinstallation to avoid alarming users.
Task1 Open a text editor, copy this code to notepad, then save the file with the name EICAR.COM:
X5O!P%@AP[4\PZX54(P^)7CC)7}$EICAR‑STANDARD‑ANTIVIRUS‑TEST‑FILE!$H+H*
The file size is 68 bytes or 70 bytes.
2 Send an email message through the Microsoft Exchange server with the EICAR test file as anattachment.
When MSME examines the email message, it reports finding the EICAR test file. However, it cannotclean or repair the EICAR file because it is a test file.
3 MSME replaces the EICAR test file with an alert message.
Test the anti-spam componentRun GTUBE (General Test mail for Unsolicited Bulk Email) to test the McAfee anti‑spam software.
The test email message must be sent from an external email account (a different domain).
Task1 Create an email message.
2 Copy this code in the body text:
XJS*C4JDBQADN1.NSBN3*2IDNEN*GTUBE‑STANDARD‑ANTI‑UBE‑TEST‑EMAIL*C.34X
Make sure that you copy this text with no extra spaces or line breaks.
3 From an external email address, send this email message to a mailbox address on the serverwhere you have installed MSME with McAfee Anti‑Spam add‑on component. McAfee Anti‑Spamscans the message, recognizes it as a junk email message, and takes necessary actions.
The GTUBE test overrides blacklists and whitelists. For more information on the GTUBE test file, visithttp://spamassassin.apache.org/.
Test the installation using McAfee Virtual TechnicianMcAfee Virtual Technician automatically checks for common deviations that might have occurred sinceyou installed the product.Run McAfee Virtual Technician to test whether MSME is installed correctly.
To download McAfee Virtual Technician, visit: http://mvt.mcafee.com/mvt/index.asp.
Installation and configurationPost-installation 2
McAfee Security for Microsoft Exchange 8.0.0 Product Guide 33

2 Installation and configurationPost-installation
34 McAfee Security for Microsoft Exchange 8.0.0 Product Guide
3 Dashboard
Dashboard organizes and presents information in a way that is easy to read and interpret.
The MSME dashboard provides critical information on how well your server is being protected fromspam, phish, viruses, potentially unwanted programs, and unwanted content. It also providesinformation about the detection statistics; additional components installed in the product; versioninformation of components such as engine and DAT files; product license information and recentlyscanned items.
Contents Statistical information of detected items Product versions and updates View recently scanned items On-Demand scan and its views Status reports Configuration reports Graphical reports
Statistical information of detected itemsProvides detailed information on the total emails scanned by MSME, how many emails triggered thedetection and are quarantined based on the detection category. The dashboard also provides thisstatistical information in the form of a graph, for easy interpretation, and monitor the detection rates.
The Statistics tab is categorized into these sections:
• Detections
• Scanning
• Graph
Clicking Reset will clear the statistical information of all counters in the Detections section and reset thevalue to zero. Resetting the statistics will not delete any quarantined items from the Detected Items. Thesecounters are dependent on the database path, so if you change the database path under Settings &Diagnostics | Detected Items | Local Database, the counters will reset to zero.
To modify the dashboard settings such as the refresh rate; maximum items to appear in the RecentlyScanned Items; graph scale units; graph and chart settings such as the 3D pie‑chart, exploded pie‑chart,transparency, go to Settings & Diagnostics | User Interface Preferences.
3
McAfee Security for Microsoft Exchange 8.0.0 Product Guide 35

DetectionsDisplays all statistical information on how many emails scanned by MSME are clean and how manyitems triggered a detection. Based on the detection category, the respective counter is incremented.
The reported numbers indicate the number of emails and documents that trigger any of the detectionmethods. For example, if an email contains two virus attachments, the statistics for Viruses would beincremented by one and not two. Reporting statistics are based on email messages rather thanindividual files or detections and is more intuitive in a mail server environment.
If your MSME server is managed by ePO and if you restart the service or click the Reset button, thesestatistics will vary in ePO reports due to the historical data stored in ePO. For more information on ePOreports, see Integrating MSME with ePolicy Orchestrator chapter.
Table 3-1 Icons used — Detections section
Icon Description
Provides additional information on the detection category when you place the mouse pointeron the icon.
Indicates that the statistics of the respective detection category is available in the graph.
Indicates that the statistics of the respective detection category is unavailable in the graph.
The graphical icons and appear only when the <Select Detections> option is selected from the Graphdrop‑down list.
The following table provides you more information on each detection category.
Table 3-2 Detection Definitions
Category Additionalinformation
Description
CleanIf the email flowhas more cleanemails than thedetections,enabling this icon for cleanemails maysuppress thegraph of othercategories. Insuch scenarios,disable the icon next to Cleancategory.
Legitimate email messages that do not pose a threat to theuser and does not trigger any of the MSME scanners.
Spam This counter is availableonly if you haveinstalled the McAfeeAnti‑Spam add‑oncomponent.
An unsolicited email message often sent in bulk to numerousrecipients who have not requested or registered for it.
Scanned for spam All emails scanned by MSME for spam.
Detected as spam Emails that are identified as spam, but not quarantined dueto policy settings.
Blocked as spam Emails that are identified as spam and quarantined due topolicy settings.
3 DashboardStatistical information of detected items
36 McAfee Security for Microsoft Exchange 8.0.0 Product Guide

Table 3-2 Detection Definitions (continued)
Category Additionalinformation
Description
Phish This counter is availableonly if you haveinstalled the McAfeeAnti‑Spam add‑oncomponent.
Phish or Phishing is a method used by individuals to obtainpersonal information by unfair or fraudulent means. Thispersonal information can include your credit card details,passwords, bank account login details, and so on. Theseemails mimic trusted sources like banks and legitimatecompanies. Usually these emails would request you to clickon a link to verify or update certain personal details. Likespam, phishing emails are also sent out in bulk.
Phish detected Emails that are identified as phish, but not quarantined dueto policy settings.
Phish blocked Emails that are identified as phish and quarantined due topolicy settings.
IP Reputation This counter is availableonly if you haveinstalled the McAfeeAnti‑Spam add‑oncomponent.
A method of detecting threat from email messages based onthe sending server's IP address. IP reputation score reflectsthe likelihood that a network connection poses a threat.
IP reputation leverages on McAfee Global Threat Intelligence(GTI) to prevent damage and data theft by blocking theemail messages at the gateway based on the source IPaddress of the last email server.
MSME processes the message before it enters theorganization by rejecting or dropping the connection basedon the IP reputation score.
IP Encountered All emails that reach the MSME server.
IP Dropped Emails that were quarantined by MSME due to IP reputationfeature. In this case, the sender will not be notified aboutthe email delivery status.
IP Rejected Emails that were quarantined by MSME due to IP reputationfeature. In this case, the sender will be notified about theemail delivery status.
Viruses A computer program file capable of attaching to disks orother files and replicating itself repeatedly, typically withoutuser knowledge or permission. Some viruses attach to files,so when the infected file executes, the virus also executes.Other viruses sit in a computer’s memory and infect files asthe computer opens, modifies, or creates files. Some virusesdisplay symptoms, others damage files and computersystems, but neither is essential in the definition of a virus;a non‑damaging virus is still a virus.
Viruses detected Virus which is detected in an incoming email and anappropriate action is taken based on the policy settings.
Viruses cleaned Virus which is removed from an incoming email and anappropriate action is taken based on the policy settings.
PotentiallyUnwantedPrograms
Potentially Unwanted Programs (PUP) are software programswritten by legitimate companies that could alter the securityor privacy policies of a computer on which they have beeninadvertently installed. These programs could be downloadedalong with a legitimate application that you might require.
PUP detected PUP which is detected in an incoming email and anappropriate action is taken based on the policy settings.
PUP blocked PUP which is removed from an incoming email and anappropriate action is taken based on the policy settings.
DashboardStatistical information of detected items 3
McAfee Security for Microsoft Exchange 8.0.0 Product Guide 37

Table 3-2 Detection Definitions (continued)
Category Additionalinformation
Description
Banned Filetypes/Messages
Certain types of file attachments are prone to viruses. Theability to block attachments by file extension is another layerof security for your mail system. Both internal and externalemail messages are checked for banned file types ormessages.
Banned file types Certain types of file attachments are prone to viruses. Theability to block attachments by file extension is another layerof security for your mail system.
Banned messages Certain email messages that you wish to ban from goingthrough your mail system. Both internal and external mailare checked for banned content.
DLP andCompliance To view available
dictionaries, clickthe Categorydrop‑down listfrom Policy Manager| Shared Resource |DLP and ComplianceDictionaries.
Stop the loss of sensitive information via email. MSMEprovides industry‑leading email content analysis to providethe tightest control of sensitive content in any form to aidcompliance with many state, national, and internationalregulations.
Prevent data leakage with the most extensive email DataLoss Prevention (DLP) in the industry that does patternmatching to detect data; policy‑based message handling thatprevents outbound data loss.
UnwantedContent
Unwanted Content is any content that the user would notlike to receive through emails. The rules can be defined bycertain words or phrases which would trigger acorresponding policy and block the email.
Packers A packed executable that decompresses and/or decryptsitself in memory while it is running, so that the file on disk isnever similar to the memory image of the file. Packers arespecially designed to bypass security software and preventreverse engineering.
Encrypted/Corrupted content Email messages that cannot be categorized as havingencrypted or corrupted content.
Encrypted content Some email messages can be encrypted, which means thatthe content of those email messages cannot be scanned.Encrypted content policies specify how encrypted emailmessages are handled when detected.
3 DashboardStatistical information of detected items
38 McAfee Security for Microsoft Exchange 8.0.0 Product Guide

Table 3-2 Detection Definitions (continued)
Category Additionalinformation
Description
Signed content Whenever information is sent electronically, it can beaccidentally or willfully altered. To overcome this, someemail software uses a digital signature ‑ the electronic formof a handwritten signature.A digital signature is extra information added to a sender'smessage, that identifies and authenticates the sender andthe information in the message. It is encrypted and acts likea unique summary of the data. Typically, a long string ofletters and numbers appear at the end of a received emailmessage. The email software then re‑examines theinformation in the sender's message, and creates a digitalsignature. If that signature is identical to the original, thedata has not been altered.
If the email message contains a virus, bad content, or is toolarge, the software might clean or remove some part of themessage. The email message is still valid, and can be read,but the original digital signature is 'broken'. The recipientcannot rely on the contents of the email message becausethe contents might also have been altered in other ways.
Corrupted content The content of some email messages can become corrupt,which means that the content of the email message cannotbe scanned.Corrupt content policies specify how email messages withcorrupt content are handled when detected.
Denial of service A means of attack against a computer, server or network.The attack is either an intentional or an accidentalby‑product of instruction code that is either launched from aseparate network or Internet‑connected system, or directlyfrom the host. The attack is designed to disable or shutdown the target, and disrupts the system's ability to respondto legitimate connection requests. A denial‑of‑service attackoverwhelms its target with false connection requests, so thatthe target ignores legitimate requests.
Protected content The content of some email messages is protected, whichmeans that the content of the email message cannot bescanned.Protected content policies specify how email messages withprotected content are handled when detected.
DashboardStatistical information of detected items 3
McAfee Security for Microsoft Exchange 8.0.0 Product Guide 39
Table 3-2 Detection Definitions (continued)
Category Additionalinformation
Description
Password protected files It is possible to password protect a file that is sent by email.Password‑protected files cannot be scanned.Password‑protected file policies specify how email messagesthat contain a password‑protected file are handled.
Incomplete MIME messages Multipurpose Internet Mail Extensions (MIME) is acommunications standard that enables the transfer ofnon‑ASCII formats over protocols, like SMTP, that onlysupport 7‑bit ASCII characters.MIME defines different ways of encoding the non‑ASCIIformats so that they can be represented using characters inthe 7‑bit ASCII character set.
If the content in the body of a MIME message is too large topass through the mail transfer system, the body can bepassed as a number of smaller MIME messages. These MIMEmessages are known as partial or incomplete MIMEmessages, because each MIME message contains only afragment of the total message that needs to be transmitted.
ScanningDisplays information on the total items scanned by MSME and the average time taken to scan allitems, since the last reset.
Table 3-3 Option definitions
Option Definition
Average Scan Time(milliseconds)
Specifies the average time taken by MSME to scan all the email messages thatreach the Exchange server.To understand how this is calculated, let's consider this example where:• T = Total time taken to scan all emails after the last MSME Service restart.
• N = Total number of emails scanned after the last MSME Service restart.
then, Average scan time = T/N (in milliseconds)
Total Scanned Total number of email messages scanned, since the last time the statisticcounters were reset.
GraphDisplays the statistics of the email messages scanned by MSME in a graphical format.
Table 3-4 Icons used — Graph section
Icon Description
View statistical information of the selected counters as a bar graph. This is useful when youwant the statistics of total number of emails scanned and the items that triggered a detectionduring the selected duration.
View statistical information of the selected counters as a pie chart. This is useful when youwant the percentage of emails scanned and the items that triggered a detection during theselected duration.
3 DashboardStatistical information of detected items
40 McAfee Security for Microsoft Exchange 8.0.0 Product Guide

Table 3-5 Option definitions
Option Definition
Graph • Spam Summary — Provides additional information on how many spam email messageswere detected and blocked by MSME for the selected time range.
• Phish Summary — Provides additional information on how many phishing email messageswere detected and blocked by MSME for the selected time range.
Magnify Graph Specify the magnification percentage of the Detections graph. This helps you view anenlarged graph, which is useful when the default graph in the dashboard is clutteredwith more information and becomes unreadable in the current browser window.
Time range Specify for which time period you would like to review the statistics. The availableoptions are:• Last 24 Hours
• Last 7 Days
• Last 30 Days
Product versions and updatesProvides important information on whether the software is up‑to‑date with all the latest DATs anddrivers. It also provides information about the product license type and if any additional componentsare installed.
Versions and Updates
The Versions & Updates section in the Dashboard has these tabs:
• Update Information
• Product Information
• Licenses
Update informationProvides information about anti‑virus DAT, anti‑virus engine, extra drivers, anti‑spam engine version,their status and when they were last updated. MSME uses the McAfee update website to automaticallyupdate its anti‑virus DAT, engine and rules on a daily‑basis.
If MSME is managed by an ePolicy Orchestrator server, create an AutoUpdate task using ePolicyOrchestrator.
Table 3-6 Option definitions — Update Information
Option Definition
Last Successful Update Displays the time when the software was updated successfully.
Update Now Click to immediately update the product with latest engine and drivers. This ishelpful in a situation when there is a virus out‑break and you cannot wait untilthe scheduled software update occurs.
Update Frequency Displays the schedule frequency of how often the software is updated.
Edit Schedule Click to schedule or edit the product's software update. For more informationon how to update the software, see Schedule a software update section.
Show Status Click to view the status of the update task such as the start time, runningtime, current status and how much the task has progressed.
DashboardProduct versions and updates 3
McAfee Security for Microsoft Exchange 8.0.0 Product Guide 41

Table 3-6 Option definitions — Update Information (continued)
Option Definition
Anti‑Virus Engine | DATVersion | Extra Drivers
Displays the latest anti‑virus engine, DAT version and extra drivers informationand when it was updated.
Viruses that Extra DriversDetect
Displays items that were detected by ExtraDAT to remove particular viruses.EXTRA.DAT files contain information that is used by MSME to detect a newvirus. When a major virus is discovered and extra detection is required, anEXTRA.DAT file is made available until the normal DAT update is released.
Anti‑Spam Engine | RulesVersion
Displays the anti‑spam engine and rules version number and when it wasupdated.
This appears only if the McAfee Anti‑Spam add‑on component is installed.
Schedule a software updateKeep your software up‑to‑date with the latest anti‑virus DAT, anti‑virus engine, extra drivers andanti‑spam engine by scheduling an automatic update.
By default the product update occurs based on the repository settings specified in SiteList Editor. Tochange the repository settings, use SiteList Editor from Start | All Programs | McAfee | Security for Microsoft Exchangeoption. However, if your computer is managed by an ePolicy Orchestrator server, the product update willoccur based on the settings provided in ePO.
Task1 Click Dashboard | Statistics & Information.
2 From the Versions & Updates section, click Update Information tab.
3 From Update Frequency, click Edit Schedule.
The Edit Schedule page appears.
4 From Choose a time, select an option depending on the required software update frequency.
As a best practice, schedule a daily update, by selecting Days and specifying 1 under Every day(s) textbox. Perform software updates during non‑business hours or when the network traffic is low.
5 Click Save, then Apply.
You have now successfully scheduled a software update.
Product informationProvides information on the product name, version, service packs, hotfixes and any additionalcomponent installed.
Table 3-7 Option definitions
Option Definition
Product Name Specifies McAfee Security for Microsoft Exchange as the product name.
Product Version Specifies the product version in the format: 8.0.<build number>.<package number>
Service Pack Lists the Service Pack or Patch details (if any)
Hotfixes Lists the hotfixes installed
3 DashboardProduct versions and updates
42 McAfee Security for Microsoft Exchange 8.0.0 Product Guide

LicensesProvides information on the type of license, expiration date, and days to expire of the installed productand components.
License information of McAfee Anti‑Spam add‑on component appears if you have it installed oractivated.
Table 3-8 Option definitions
Option Definition
Description Specifies the installed product name.
McAfee Anti‑Spam for McAfee Security for Microsoft Exchange appears, if you have the McAfeeAnti‑Spam add‑on component installed.
Type Specifies if the installed product is a Licensed or Evaluation version.
Expires Appears when you have an Evaluation version of the software installed. Specifies the dateand time on when the license expires.
Days to Expiry Appears when you have an Evaluation version of the software installed. Specifies thenumber of days remaining for product expiry.
View recently scanned itemsProvides a quick view of the recently scanned items from the dashboard.
The Recently Scanned Items section provides you run‑time information on all items scanned by MSME. Bydefault, only 10 items appear in the Recently Scanned Items section. However, you can view up to 100items by modifying the Maximum recently scanned items option under Settings & Diagnostics | User InterfacePreferences | Dashboard Settings | Report Settings.
The items in the Recently Scanned Items section will be cleared, if you restart McAfee Security for Microsoft Exchangeservice from the Services console.
Table 3-9 Option definitions
Option Definition
Date/Time Date and time when the most recent scan was executed.
IP Reputation Score Score which reflects the likelihood that a network connection poses a threat.
Sender Email addresses of the senders of the items that were scanned.
Recipients Email addresses of recipients of scanned items.
Subject Subject line of scanned emails.
Action Taken What action was taken on scanned items.
Filename The name of a quarantined file.
Detection Name The name of a detection. For example, the name of a virus.
Task The task associated with a particular detection.
Reasons A rule or rules that were triggered by a particular email.
Scanned By The policy setting used to scan items.
Policy Name The name of the policy that triggered a detection.
DashboardView recently scanned items 3
McAfee Security for Microsoft Exchange 8.0.0 Product Guide 43

Table 3-9 Option definitions (continued)
Option Definition
Reputation Score The authenticity level of the source of the email based on up to date informationavailable pertaining to a particular source.
Reason The reason why the email was quarantined (quarantine queue type).
For detailed information on these fields, see Available primary search filters section.
— Indicates that the item is clean.
— Indicates that the item triggered one of the scanners or filters.
Hover the cursor on to see which scanner or filter was triggered. If the item triggered multiplescanners or filters, only the highest priority detection is shown.
On-Demand scan and its viewsAn on‑demand scanner is a security scanner that you start manually at convenient times or regularintervals. It allows you to set various configurations and scan specific mails or mailboxes.MSME enables you to create scheduled on‑demand scans. You can create multiple schedules, eachrunning automatically at predetermined intervals or times.
You can schedule regular scan operations when the server activities are comparatively low and whenthey do not interfere with your work.
This feature is available only on an Exchange server that has Mailbox role. You cannot schedule anon‑demand scan on an Exchange server that has only Edge Transport or Hub Transport role.
When should you perform an on‑demand scanAn on‑demand scan is highly recommended if there is an outage in your organization due to maliciousactivity. This will make sure that the Microsoft Exchange databases are clean and are not infectedduring the outage.
McAfee recommends that you perform an on‑demand scan task during non‑business hours. When anon‑demand scan task is scheduled during a non‑business hour and it continues during peak workhours, you must reconsider the databases being scanned and create with alternate schedules byaltering the data being scanned.
You can schedule an on‑demand scan during the weekends to make sure that the Exchange Databasesare clean and older emails are also scanned by the latest Anti‑Virus signatures. Administrators mustschedule an on‑demand scan keeping in mind the number of Exchange servers, databases, and mailflow. Your goal must be to complete this task before business hours.
Why should you perform an on‑demand scanYou might want to perform an on‑demand scan for a number of reasons. For example:
• To check a specific file or files that has been uploaded or published.
• To check that the messages within your Microsoft Exchange server are virus‑free, possibly followingDAT update, so that new viruses can be detected.
• If you have detected and cleaned a virus and want to check that your computer is completelyclean.
3 DashboardOn-Demand scan and its views
44 McAfee Security for Microsoft Exchange 8.0.0 Product Guide

View on-demand scan tasksView a list of on‑demand scan tasks configured for MSME.
Task• Click Dashboard | On‑Demand Scans. The On‑Demand Scans page appears listing the configured on‑demand
scan tasks.
By default, a scheduled on‑demand scan task named Default Scan is created when MSME is installed.
From the On‑Demand Scans page, you can use these options:
Table 3-10 Option definitions
Option Definition
Name Indicates the name of the on‑demand scan task.
Status Indicates the current status of the on‑demand scan task on whether the task is Idle,Running, Stopped or Completed.
Last Run Indicates the date and time, when the on‑demand scan was last executed.
Next Run Indicates the date and time, when the next on‑demand scan is scheduled to run.
Action Lists these options for all the available on‑demand scan tasks:• Modify
• Delete
• Run Now
• Show Status
The Stop option appears only if any on‑demand scan task is running.
Modify Edit the settings of an on‑demand scan task.
Delete Deletes the selected on‑demand scan task.
Run Now Starts the selected on‑demand scan task immediately.
Show Status Displays the current status of an on‑demand scan task. The Task Status page appearswith these tabs:• General — Provides more information on the on‑demand scan task such as the total
running time of the task, progress of the task, DAT and Engine version used forscanning, scan results, total items scanned, rules broken and folders scanned.
• Settings — Provides more information on the database scanned and the policy used.
The Show Status option is available only after an on‑demand scan task is started.
Stop Stops an on‑demand scan task that is running.
Refresh Refresh the page with latest on‑demand scan information.
New Scan Schedule a new on‑demand scan task.
You have now successfully viewed all available on‑demand scan tasks configured for MSME.
DashboardOn-Demand scan and its views 3
McAfee Security for Microsoft Exchange 8.0.0 Product Guide 45

Create an on-demand scan taskSchedule an on‑demand scan task to find or remove viruses and banned content in mailboxes, atconvenient time intervals.
Before you beginMake sure that you do not remove the MSMEODuser from active directory, that was createdduring the product installation. This user is required for performing on‑demand scans onmailboxes.
Task1 Click Dashboard | On‑Demand Scans. The On‑Demand Scans page appears.
2 Click New Scan. The Choose when to scan page appears.
3 From Choose a time tab, specify when you want the scan to run. The available options are:
• Not scheduled — Select this if you have not decided on when to perform the on‑demand scan ordisable the schedule for an existing on‑demand scan.
• Once — Specify the date and time to schedule an on‑demand scan once.
• Hours — Select this to schedule the task based on hours, if you have to execute the on‑demandscan task for more than once in a day. For example, let's consider that the current time is 14:00hours and you have to create a on‑demand scan task that satisfies these conditions:
• The on‑demand scan must start exactly at 14:30 hours
• The on‑demand scan must occur twice a day
To achieve this, specify 12 for hours and 30 for minutes.
• Days — Select this to schedule the task based on how often the scan must occur in a week. Forexample, if you want the on‑demand scan to occur once in three days, specify 3 under day(s) andselect the time when the task should start.
• Weeks — Select this to schedule the task based on how often the scan must occur in a month.For example, if you want the on‑demand scan to occur bi‑weekly, specify 2 under week(s), selectthe days and time when the task should start.
• Months — Select this to schedule the task based on how often the scan must occur in a year. Forexample, if you want the on‑demand scan to occur on every second Saturday of each month,select second from On the drop‑down list, Saturday from of drop‑down list, then select all the monthsand time when the task should start.
Enable Stop task after it has run for <n> hour(s) <n> minute(s), to stop an on‑demand scan task if it exceedsthe specified hours.
4 Click Next. The Choose what to scan page appears. The available options are:
• Scan all folders — Select this to scan all the mailboxes in the Exchange server.
• Scan selected folders — Select this to scan only specific mailboxes in the Exchange server.
• Scan all except selected folders — Select this to scan all except specific mailboxes that are added tothe Folders to scan list.
5 Click Next. The Configure scan settings page appears.
6 From the Policy to use drop‑down list, select any of the policy option based on your scan requirement.
3 DashboardOn-Demand scan and its views
46 McAfee Security for Microsoft Exchange 8.0.0 Product Guide

Policy Description
Default The default settings for all scanners and filters except these scanners:• DLP and Compliance Scanner
• File Filtering
Find Viruses Anti‑virus settings and filters. These policies provide an easy means tocheck the viral content in databases.
Remove Viruses Anti‑virus settings and filters. These policies provide an easy means toremove the viral content in databases.
Find Non‑CompliantContent
Content scan settings. These policies are particularly useful if you want tosee the effect of newly created/assigned content scan rules.
Remove Non‑CompliantContent
Content scan settings. These policies are particularly useful if you want tosee the effect of newly created/assigned content scan rules and removenon‑compliant content.
Full Scan Settings for all scanners and filters. These policies will be the typically usedfor scanning at regular intervals.
The settings and actions to take are specified in on‑demand policies found under Policy Manager.
7 Select Resumable Scanning to enable the option to resume on‑demand scan from where it stopped,then select Restart from last item to restart a scan from where it stopped. For example, if theon‑demand scan stops after a specific time, resuming the scan will start the on‑demand scan taskfrom the Store where it scanned the last item.
8 On Exchange Server 2010/2013, you now have the option to perform a granular on‑demand scantask. You can narrow down the scan using these fields:
• Subject
• From
• To
• Message ID
• Recipients
• Date range
• Mail size
• Attachments
• Unread items
Performing a granular on‑demand scan saves you time and fetches specific scan results.
9 Click Next. The Enter a name for the scan page appears.
10 Specify a meaningful on‑demand scan task name, based on the policy you selected in the previouspage. For example, if you are creating an on‑demand scan task to do a full scan over the weekend,specify the task name as Weekend Full Scan.
11 Click Finish, then Apply.
By performing these steps, you have successfully created an on‑demand scan task.
DashboardOn-Demand scan and its views 3
McAfee Security for Microsoft Exchange 8.0.0 Product Guide 47

Status reportsA status report is a scheduled report sent to an administrator at a specific time. The report containsdetection statistics within that specified time frame.
Using Status Reports, you can automate the task of querying for statistics periodically. You can schedulea periodic task for collecting the simple statistics like the number of detections on a particular dateand send an email to the Exchange administrator or a distribution list.
These reports can help you to find out which Exchange servers are receiving more threats, usingwhich you can come up with mechanisms to reduce the threat landscape.
You can choose a time, recipient email address or distribution list to send the report to, and a subjectfor the email. Status reports are sent to the recipient in HTML or CSV format.
Based on your configuration, the status report email contains statistical information on the detecteditems such as viruses, spam, phish, IP reputation, PUP, banned file types, unwanted content, DLP andcompliance, clean emails and total number of emails scanned. For more information on how toschedule a status report, see Schedule a new status report.
After installing MSME, status reports require at least 24‑hour interval to populate the statistics in thenotification email.
View status report tasksView a list of status report tasks configured for MSME.
Task• Click Dashboard | Status Reports . The Status Reports page appears listing the configured status report
tasks.
From the Status Reports page, you can use these options:
Table 3-11 Option definitions
Option Definition
Name Indicates the name of the report task.
Status Indicates the current status of the report task on whether the task is Idle, Running,Stopped or Completed.
Last Run Indicates the date and time, when the report task was last executed.
Next Run Indicates the date and time, when the next report task is scheduled to run.
Action Lists these options for all the available report tasks:• Modify
• Delete
• Run Now
• Show Status
The Stop option appears only if any report task is running.
Modify Click Modify to edit the settings of an on‑demand scan task.
Delete Deletes the selected report task.
Run Now Starts the selected report task immediately.
3 DashboardStatus reports
48 McAfee Security for Microsoft Exchange 8.0.0 Product Guide

Table 3-11 Option definitions (continued)
Option Definition
Show Status Displays the current status of a report task. The Task Status page has this tab:• General — Provides more information on the report task such as the start and end
time, task runtime, current action, and task progress.
The Show Status option is available only after a report task is started.
Refresh Refresh the page with latest report information.
New Report Schedule a new status report task.
You have now successfully viewed all available status report tasks configured for MSME.
Schedule a new status reportSchedule a new status report task to send the detection statistics to a specific email address ordistribution list, at convenient time intervals.
Task1 Click Dashboard | Status Reports. The Status Reports page appears.
2 Click New Report. The Report page appears.
3 From When to report tab, specify when you want the status report task to run. The available optionsare:
• Not scheduled — Select this if you have not decided on when to perform the status report task ordisable the schedule for an existing status report task.
• Once — Specify the date and time to schedule a status report task once.
• Hours — Select this to schedule the task based on hours, if you have to execute the status reporttask for more than once in a day. For example, let's consider that the current time is 14:00hours and you have to create a report task that satisfies these conditions:
• The status report task must start exactly at 14:30 hours
• The status report task must occur twice a day
To achieve this, specify 12 for hours and 30 for minutes.
• Days — Select this to schedule the task based on how often the status report task must occur ina week. For example, if you want the status report task to occur once in three days, specify 3under day(s) and select the time when the task should start.
• Weeks — Select this to schedule the task based on how often the status report task must occur ina month. For example, if you want the status report task to occur bi‑weekly, specify 2 underweek(s), select the days and time when the task should start.
• Months — Select this to schedule the task based on how often the status report task must occurin a year. For example, if you want the status report task to occur on every second Saturday ofeach month, select second from On the drop‑down list, Saturday from of drop‑down list, then selectall the months and time when the task should start.
Enable Stop task after it has run for <n> hour(s) <n> minute(s), to stop a status report task if it exceeds thespecified hours.
4 Click Next. The Report Settings page appears. The available options are:
DashboardStatus reports 3
McAfee Security for Microsoft Exchange 8.0.0 Product Guide 49
Table 3-12 Option definitions
Option Definition
Recipient Email Specify the recipient email address or SMTP address of the distribution list. In mostcases, this should be the Exchange administrator's email address.
By default, the email address from Settings & Diagnostics | Notifications | Settings | General |Administrator E‑mail is used as the recipient email address.
Subject line forreport
Specify a meaningful subject line for the email. For example, if you want a dailystatus report in HTML format, specify MSME Daily Status Report (HTML).
Number of Rows Specify the number of rows (n) to be displayed in the status report email. Each rowin the status report displays the total number of detections for a particular day. Thereport contains the detection count for the last (n) days, excluding the day whenthe status report is triggered. For example: If you specify 1, the status report willcontain one row displaying detections for yesterday.
You can specify a maximum value of 365.
Type of Report Specify the format of the status report, which is sent to the recipient. The availableoptions are:• CSV — Select this if you want the status report sent to the recipient in Comma
Separated Value format as a .csv file attachment.
• HTML— Select this if you want the status report sent to the recipient in HTMLformat as a .html file attachment or appear in the email message body.
5 Click Next. The Please enter a task name page appears.
6 Specify a meaningful status report task name, based on the schedule and format you selected inthe previous pages. For example, if you are creating a weekly status report task that providesdetection statistics for weekdays in HTML format, specify the task name as Weekly Status Report(HTML).
7 Click Finish, then Apply.
By performing these steps, you have successfully created a new status report task.
Status report email notificationsBased on your scheduled status report, the recipient receives an email with the statistics on all emailsscanned and detected by MSME for the specified duration.
Based on your status report configuration, the status report email contains statistical information ofthe detected items, total clean emails and total number of emails scanned on that day.
Table 3-13 Option definitions
Option Definition
From Displays the email address that you have specified under Settings & Diagnostics |Notifications | Settings | General | Sender E‑mail.
To Displays the intended recipient email address that you have specified underSettings & Diagnostics | Notifications | Settings | General | Administrator E‑mail.
Subject Displays the subject of the status report email notification that you have specifiedunder Dashboard | Status Reports | Report Settings | Subject line for report .
Scanning Statistics forServer
Displays the Computer name where MSME is installed.
Date Displays the date in MM/DD/YYYY format.
3 DashboardStatus reports
50 McAfee Security for Microsoft Exchange 8.0.0 Product Guide

Table 3-13 Option definitions (continued)
Option Definition
Detections Displays detection statistics of Viruses, Spam, Phish, IP Reputation, Potentially UnwantedProgram, Banned File Types, Unwanted Content, and DLP and Compliance in the message body.
The Spam, Phish and, IP Reputation statistics are available only if you have installedthe McAfee Anti‑Spam add‑on component.
Clean Displays the total number of clean emails that were detected by MSME as cleanand did not pose a threat. For example, even a status report email sent to theadministrator will be counted as a clean email in the statistics.
Total Scanned Displays the total number of emails scanned by MSME for the day.
Status report emails will be blocked if you set the IP reputation threshold value to Trusted IP (below 0) or Neutral IP(equal to or above 0) from Settings & Diagnostics | Anti‑Spam | McAfee GTI IP reputation.
Configuration reportsA configuration report is a scheduled report sent to an administrator at a specific time. The reportcontains the MSME product information, policy settings, and system information.
Using Configuration Reports, you can automate the task of viewing the summary of product configurationsperiodically.
This feature is helpful when there are multiple administrators in your organization and you want tokeep a track of the MSME configuration settings. Its also useful when there multiple MSME installationsmanaged by ePO and you want to track the product configuration.
You can choose a time, recipient email address or distribution list to send the report to and a subjectfor the email.
Based on your configuration, the configuration report has product and system information such as:server information, product version information, product license status and type, hotfix information,debug logging information, on‑access scanner settings, on‑access policy settings, and gateway policysettings. For more information on how to schedule a configuration report, see Schedule a newconfiguration report.
View configuration report tasksView a list of configuration report tasks configured for MSME.
Task• Click Dashboard | Configuration Reports . The Configuration Reports page appears listing the configured
configuration report tasks.
From the Configuration Reports page, you can use these options:
Table 3-14 Option definitions
Option Definition
Name Indicates the name of the report task.
Status Indicates the current status of the report task on whether the task is Idle, Running,Stopped or Completed.
Last Run Indicates the date and time, when the report task was last executed.
DashboardConfiguration reports 3
McAfee Security for Microsoft Exchange 8.0.0 Product Guide 51

Table 3-14 Option definitions (continued)
Option Definition
Next Run Indicates the date and time, when the next report task is scheduled to run.
Action Lists these options for all the available report tasks:• Modify
• Delete
• Run Now
• Show Status
The Stop option appears only if any report task is running.
Modify Click Modify to edit the settings of an on‑demand scan task.
Delete Deletes the selected report task.
Run Now Starts the selected report task immediately.
Show Status Displays the current status of a report task. The Task Status page has this tab:• General — Provides more information on the report task such as the start and end
time, task runtime, current action, and task progress.
The Show Status option is available only after a report task is started.
Refresh Refresh the page with latest report information.
New Report Schedule a new configuration report task.
You have now successfully viewed all available configuration report tasks configured for MSME.
Schedule a new configuration reportSchedule a new configuration report task to send the product configuration and system information toa specific email address or distribution list, at convenient time intervals.
Task1 Click Dashboard | Configuration Reports. The Configuration Reports page appears.
2 Click New Report. The Report page appears.
3 From When to report tab, specify when you want the configuration report task to run. The availableoptions are:
• Not scheduled — Select this if you have not decided on when to perform the configuration reporttask or disable the schedule for an existing configuration report task.
• Once — Specify the date and time to schedule a configuration report task once.
• Hours — Select this to schedule the task based on hours, if you have to execute the configurationreport task for more than once in a day. For example, let's consider that the current time is14:00 hours and you have to create a report task that satisfies these conditions:
• The configuration report task must start exactly at 14:30 hours
• The configuration report task must occur twice a day
To achieve this, specify 12 for hours and 30 for minutes.
3 DashboardConfiguration reports
52 McAfee Security for Microsoft Exchange 8.0.0 Product Guide

• Days — Select this to schedule the task based on how often the configuration report task mustoccur in a week. For example, if you want the configuration report task to occur once in threedays, specify 3 under day(s) and select the time when the task should start.
• Weeks — Select this to schedule the task based on how often the configuration report task mustoccur in a month. For example, if you want the configuration report task to occur bi‑weekly,specify 2 under week(s), select the days and time when the task should start.
• Months — Select this to schedule the task based on how often the configuration report task mustoccur in a year. For example, if you want the configuration report task to occur on every secondSaturday of each month, select second from On the drop‑down list, Saturday from of drop‑down list,then select all the months and time when the task should start.
Enable Stop task after it has run for <n> hour(s) <n> minute(s), to stop a configuration report task if itexceeds the specified hours.
4 Click Next. The Report Settings page appears. The available options are:
Table 3-15 Option definitions
Option Definition
Recipient Email Specify the recipient email address or SMTP address of the distribution list. Inmost cases, this should be the Exchange administrator's email address.
By default, the email address from Settings & Diagnostics | Notifications | Settings |General | Administrator E‑mail is used as the recipient email address.
Subject line for report Specify a meaningful subject line for the email. For example, if you want aweekly configuration report, specify MSME Weekly Configuration Report.
5 Click Next. The Please enter a task name page appears.
6 Specify a meaningful configuration report task name, based on the schedule and format youselected in the previous pages. For example, if you are creating a monthly configuration report taskthat provides product and system information on the first Monday of each month, specify the taskname as Monthly Configuration Report (First Monday).
7 Click Finish, then Apply.
By performing these steps, you have successfully created a new configuration report task.
Configuration report email notificationsBased on your scheduled configuration report, the recipient receives an email containing MSMEproduct information, policy settings and system information for the specified duration.
Table 3-16 Option definitions
Option Definition
Server Info Displays server information such as the computer name, IP address and Exchangeversion.
Version Info Displays MSME information such as the product version, DAT version and date,Engine version, Anti‑Spam Rules and Engine information (if any).
License Status Displays product license information such as the MSME and Anti‑Spam add‑oncomponent license type.
Product Information Displays additional product information on whether any service pack or hotfix isinstalled.
Debug Logging Displays Debug Logging information such as the level, maximum size of the log file andlocation of the file.
DashboardConfiguration reports 3
McAfee Security for Microsoft Exchange 8.0.0 Product Guide 53

Table 3-16 Option definitions (continued)
Option Definition
On‑Access Settings Displays the current On‑Access Settings configuration specifying which setting isenabled or disabled.
On‑Access Policies Displays the core scanners and filters enabled for the On‑Access Master policy.
Gateway Policies Displays the current status of the Anti‑Spam and Anti‑Phishing scanner for theGateway | Master policy.
This is applicable only if you installed the McAfee Anti‑Spam add‑on component.
Graphical reportsGenerate graphical reports to understand the threat‑level during a specific time‑frame. Provides anexplicit view of detected items in the form of a Bar Graph or Pie Chart.
These reports along with the status report will help you and your organization to identify serversfacing higher threats and help you in coming up with mitigation plans.
Use graphical reports when you want to only view the current threat‑level and doesn't have to takeany action on the detected items. Graphical Reports allow you to query based on certain filters, where youcan view Top 10 reports for various detections.
Graphical Reports are classified into:
• Simple — Limited search filters to view Top 10 report of the day or week.
• Advanced — More search options to query on different filters, time‑range, and chart options.
View graphical report using simple search filtersGenerate graphical report on detections using simple search filters for the day or week.
Task1 Click Dashboard | Graphical Reports. The Graphical Reports page appears.
2 Click the Simple tab.
3 From Time Span drop‑down list, select Today or This week to view detections quarantined for the day orfor the week.
4 From Filter drop‑down list, select the report that you want to view. The options available are:
• Top 10 Viruses — Lists the top 10 virus names ranked by their detection count.
• Top 10 Spam Detections — Lists the top 10 detected spam emails ranked by the spam messagecount.
• Top 10 Spam Recipients — Lists the top 10 spam recipients ranked by their total received spammessage count.
• Top 10 Phish Detections — Lists the top 10 detected phishing emails ranked by their phishingmessage count.
• Top 10 Blocked IP addresses — Lists the top 10 IP addresses ranked by the blocked count for bouncedemails.
3 DashboardGraphical reports
54 McAfee Security for Microsoft Exchange 8.0.0 Product Guide
• Top 10 Unwanted Programs — Lists the top 10 potentially unwanted programs detected that might bethreats.
• Top 10 DLP and Compliance Detections — Lists the top 10 data loss prevention and complianceregulatory violations ranked by the number of detections that triggered the rule.
• Top 10 Infected Files — Lists the top 10 filenames ranked by their detection count.
• Top 10 Detections — Lists the top 10 detections ranked by their detection count. This graph containsall the categories such as viruses, spam detections, spam recipients, phish detections, blockedIP addresses, Unwanted programs, DLP and compliance, and infected files listed above.
5 Click Search. The search results are shown in the View Results pane.
In Magnify Graph, select the zoom percentage to let you enlarge or reduce the view of the graph inthe View Results pane
Using advanced search filtersGenerate graphical report on detections using advanced search filters.
Task1 Click Dashboard | Graphical Reports. The Graphical Reports page appears.
2 Click Advanced tab.
DashboardGraphical reports 3
McAfee Security for Microsoft Exchange 8.0.0 Product Guide 55

3 Select at least one filter or up to three filters from the list:
Table 3-17 Primary Filters
Filter Description
Subject Search using the "subject" of an email.
Recipients Search using an email address of the recipient.
Reason Search using the detection trigger or using the reason why the item wasquarantined. When you select the Reason filter, secondary filters are enabled forfurther refining your search.For example, you might want to search for all items that was quarantined due tothe Mail Size rule being triggered as the reason.
Ticket Number To search using the ticket number. A ticket number is a 16‑digit alpha‑numericentry which is auto‑generated by the software for every detection.
Detection Name To search by the name of a detected item.
Spam Score To search based on the spam score.For example, you might want to search for all items that was quarantined with aSpam Score equal to 3.
Spam Score is a number that indicates the amount of potential spam contained within an emailmessage. The engine applies anti‑spam rules to each email messages it scans. Each rule isassociated with a score. To assess the risk that an email message contains spam, these scores areadded together to give an overall spam score for that email message. The higher the overall spamscore, the higher the risk that the email messages contains spam. The spam score can rangebetween 0 and 100. Incoming messages start with a spam score of zero. Each time a messageviolates a filter, its spam score increases.
A secondary filter are only available for the Reasonfilter. If you do not want specify the secondaryfilter, ensure that the field is blank so that all detections are queried upon.
Table 3-18 Secondary Filters
Filter Description
Anti‑Virus Search for items that was quarantined when a potential virus was found inthe message.
Banned Content Search for items that was quarantined when a banned content was found inthe message. For example: inappropriate words.
File Filter Search for items that was quarantined when a banned file was found in themessage.
Anti‑Spam Search for items that was quarantined when spam was found. For example:chain email messages
Encrypted orCorrupted
Search for items that was quarantined when encrypted or corrupt contentwas found in the email.
PotentiallyUnwanted Program
Search for items that was quarantined when potentially unwanted programwas found in the email.
Phish Search for items that was quarantined when phishing content was found inthe email
Packer Search for items that was quarantined when packers (small programs,compressed executables files, encrypted code) was found in the email.
Mail Size Search for items that was quarantined when mail size exceed the maximumlimit set.
Encrypted Search for items that was quarantined when encrypted content was found inthe email.
3 DashboardGraphical reports
56 McAfee Security for Microsoft Exchange 8.0.0 Product Guide

Table 3-18 Secondary Filters (continued)
Filter Description
Signed Search for items that was quarantined when signed content was found in theemail.
Corrupted Search for items that was quarantined when corrupt content was found inthe email.
Denial of Service Search for items that was quarantined when denial‑of‑service threatoccurred. For example: if you want to retrieve all email messages that wasquarantined during the event.
Protected Content Search for items that was quarantine when protected content was found andthe content might not be accessed for scrutiny.
Password Protected Search for items that was quarantined when password protected content wasfound and the content might not be accessed for scrutiny.
Blocked MIME Search for items that was quarantined when blocked MIME (multipurposeInternet Mail Extension) were found in the email.
For more information about the search filters, see the Search filters section.
4 Select All Dates or a Date Range from the drop‑down lists.
If you select All Dates, the query returns search results from quarantine database from day it startedquarantining any detected items. If you select Date Range, select the Date, Month, Year, Hour, andMinutes from the From and To fields to enable your query to search within a date range.
5 Select Bar Graph or Pie Chart as required.
6 If you select Pie Chart, select a filter from the drop‑down list to further refine your search:
Table 3-19 Query on
Filter Description
Recipients Search using the recipient email address
Sender Search using the senders email address
Filename Search using a quarantined filename.
Detection Name Search using the name of a detected item.
Subject Search using the "subject" of an email.
Reason Search using the detection trigger or using the reason why the item wasquarantined.
Rule Name Search using the name of the rule that triggered the detection.
Policy Name Search using the policy name that made the detection.
a In Maximum Results, specify the number of search results you want to view. You can view amaximum of 99 search results and this field is available only if you select pie chart.
7 Click Search. The search results are shown in the View Results pane. In Magnify Graph, select the zoompercentage to let you enlarge or reduce the view of the graph in the View Results pane The searchresults are shown in the View Results pane.
DashboardGraphical reports 3
McAfee Security for Microsoft Exchange 8.0.0 Product Guide 57
3 DashboardGraphical reports
58 McAfee Security for Microsoft Exchange 8.0.0 Product Guide

4 Detected Items
View information about all email messages containing potential threats that are detected andquarantined by MSME. You can use various search filters to refine the search and find quarantineditems that are of interest to you, view the results and take necessary action on the quarantined items.
From the product's user interface, click Detected Items to view quarantined items based on the detectioncategory. The detection categories are:
• Spam • Unwanted Content
• IP Reputation • Banned File types/Messages
• Phish • DLP and Compliance
• Viruses • All Items
• Potentially Unwanted Programs
The Spam, Phish and, IP Reputation option is available only if you have installed the McAfee Anti‑Spamadd‑on component.
Contents Manage quarantined data Detection types Available primary search filters Search filter comparison chart Additional search options Search detected items Actions that you can take on quarantined items
Manage quarantined dataBased on your requirement, decide whether to use the local database or a dedicated quarantinemanagement server known as McAfee Quarantine Manager (MQM), to quarantine detected items.
By default, detected items are quarantined locally to a PostgreSQL database installed by MSME.
Configure quarantine location
Based on the Detected Items configuration settings, you can choose to quarantine detected items in thelocal database or use McAfee's quarantine management software, widely known as McAfee QuarantineManager (MQM) to quarantine detected items on a separate server.
4
McAfee Security for Microsoft Exchange 8.0.0 Product Guide 59

From the product's user interface, click Settings & Diagnostics | Detected Items and select:
• McAfee Quarantine Manager — To quarantine detected items in the MQM server.
• Local Database — To quarantine detected items in the local MSME server, at the specified path.
Local Database Vs. McAfee Quarantine Manager — When to use
This table helps you understand when to use the local database or McAfee Quarantine Manager forquarantine management:
Use Local Database... Use McAfee Quarantine Manager...
To manage quarantineditems of one MSMEinstallation.
To manage quarantined items from multiple MSME installations or anyof these McAfee products configured in your organization:• McAfee Security for Microsoft Exchange
• McAfee Email and WebSecurity Appliance
• McAfee Security for Lotus Domino (Windows)
• McAfee Security for Lotus Domino (Linux)
You can download and install McAfee Quarantine Manager for free, ifyou have purchased any of the products mentioned above.
If you want to usePostgreSQL database toquarantine items.
If you want to use MySQL or Microsoft SQL Server database toquarantine items.
For more information on McAfee Quarantine Manager software and its features, refer to its productdocumentation.
Detection typesDetected items are email messages identified by MSME as a potential threat, that could be a virus,spam, phish, non‑compliant content or banned file types.
The detection types in MSME are:
Detectiontypes
Description
Spam An unwanted electronic message, most commonly unsolicited bulk email. Typically,spam is sent to multiple recipients who did not ask to receive it. Types include emailspam, instant messaging spam, Usenet newsgroup spam, web search‑engine spam,spam in blogs, and mobile phone‑messaging spam. Spam includes legitimateadvertisements, misleading advertisements, and phishing messages designed to trickrecipients into giving up personal and financial information. Email messages are notconsidered spam if a user has signed up to receive them.
IP Reputation A method of detecting messages based on the sending server's IP address. McAfeecollects data from billions of IP addresses and network ports, providing hundreds oftrillions of unique views, and calculates a reputation score based on network traffic,including port, destination, protocol, and inbound and outbound connection requests.This score is known as IP Reputation Score and reflects the likelihood that a networkconnection poses a threat. MSME uses this score to determine action based on a localpolicy.
4 Detected ItemsDetection types
60 McAfee Security for Microsoft Exchange 8.0.0 Product Guide

Detectiontypes
Description
Phish A method of fraudulently obtaining personal information, such as passwords, SocialSecurity numbers, and credit card details by sending spoofed emails that look likethey are sent from trusted sources, such as banks or legitimate companies. Typically,phishing emails request that recipients click on the link in the email to verify orupdate contact details or credit card information. Like spam, phishing emails are sentto a large number of email addresses, with the expectation that someone will act onthe information in the email and disclose their personal information.
Viruses A computer program file capable of attaching to disks or other files and replicatingitself repeatedly, typically without user knowledge or permission. Some viruses attachto files, so when the infected file executes, the virus also executes. Other viruses sit ina computer’s memory and infect files as the computer opens, modifies, or createsfiles. Some viruses display symptoms, others damage files and computer systems, butneither is essential in the definition of a virus; a non‑damaging virus is still a virus.
You cannot Download, Release, Forward or View quarantined items from the Viruses detectioncategory.
PotentiallyUnwantedPrograms
Often legitimate software (non‑malware) that may alter the security state or theprivacy posture of the system on which they are installed. This software can, but notnecessarily, include spyware, adware, keyloggers, password crackers, hacker tools,and dialer applications and could be downloaded in conjunction with a program thatthe user wants. Security‑minded users may want to know about such programs and,in some cases, have them removed.
UnwantedContent
This is any content that triggers a content scanning rule. It might include offensive,abusive, unpleasing words or even company's confidential information. Unwanted Contentcan be categorized into:• Packers • Denial of service
• Encrypted Content • Protected Content
• Signed Content • Password protected files
• Corrupted Content • Incomplete MIME messages
Banned Filetypes/Messages
Certain types of file attachments are prone to viruses. The ability to blockattachments by file extension is another layer of security for your mail system. Bothinternal and external email messages are checked for banned file types or messages.
DLP andCompliance
Stop the loss of sensitive information via email. MSME provides industry‑leading emailcontent analysis to provide the tightest control of sensitive content in any form to aidcompliance with many state, national, and international regulations.
Prevent data leakage with the most extensive email Data Loss Prevention (DLP) in theindustry that does pattern matching to detect data; policy‑based message handlingthat prevents outbound data loss.
The Spam, Phish and, IP Reputation option is available only if you have installed the McAfee Anti‑Spamadd‑on component.
See also Search filter comparison chart on page 64Additional search options on page 65
Detected ItemsDetection types 4
McAfee Security for Microsoft Exchange 8.0.0 Product Guide 61

Available primary search filtersSearch filters enable you to define the search criteria and provide more efficient and effective searchesfrom the quarantine database.
The available primary search filter option varies based on the detected item category you haveselected. These search filters appear in the View Results section of the detected item category.
Use Columns to display in the View Results section, to select the search filters that you want to view.
Table 4-1 Detected Items — Primary search filters
Searchfilter
Definition
Action taken Search for an item based on the action that was taken on it. The actions taken byMSME are:• Clean • Denied Access
• Cleaned • Logged
• Deleted • Replaced
• Deleted Message • Rejected
Anti‑SpamEngine
Search for an item based on the anti‑spam engine that scans email messages forspam and phishing attacks.To view the current Anti‑Spam Engine used, go to Dashboard | Versions & Updates | UpdateInformation | Anti‑Spam Engine | Rules Version . For example, the Anti‑Spam Engine versionappears in this format: 9286
Anti‑Spam Rule Search for an item based on the anti‑spam rules that are updated every few minutesto catch the latest spam campaigns sent by spammers.To view the current Anti‑Spam Rule used, go to Dashboard | Versions & Updates | UpdateInformation | Anti‑Spam Engine | Rules Version . For example, the rule version appears in thisformat: core:4373:streams:840082:uri:1245250
Anti‑Virus DAT Search for an item based on the anti‑virus DAT version with a distinctive signature.To view the current Anti‑Virus DAT used, go to Dashboard | Versions & Updates | UpdateInformation | Anti‑Virus Engine | DAT Version | Extra Drivers. For example, the DAT version appearsin this format: 6860.0000
Anti‑VirusEngine
Search for an item based on the anti‑virus engine that had a sequence of charactersunique to a virus/unwanted content.To view the current Anti‑Virus Engine used, go to Dashboard | Versions & Updates | UpdateInformation | Anti‑Virus Engine | DAT Version | Extra Drivers. For example, the Anti‑Virus Engineversion appears in this format: 5400.1158
Banned Phrases Search by the content of banned phrases that are defined in the DLP and Compliance Rulesunder Policy Manager | Shared Resource | DLP and Compliance Dictionaries.
Detection Name Search for a detected item based on its name.
File Name Search by the name of the detected file in the quarantined item.To view the File Name used, go to Policy Manager | Shared Resource | DLP and ComplianceDictionaries | File Filtering Rules.
Folder Search by the folder where quarantined items are stored such as a user's mailbox.
The folder will not be available if the email is quarantined at the On‑Access (Transport)level.
4 Detected ItemsAvailable primary search filters
62 McAfee Security for Microsoft Exchange 8.0.0 Product Guide

Table 4-1 Detected Items — Primary search filters (continued)
Searchfilter
Definition
IP ReputationScore
Search for an item based on the sender's IP Reputation Score. The items quarantined arebased on the IP reputation threshold specified under Settings & Diagnostics | Anti‑Spam | McAfeeGTI IP reputation.
This filter is available only if you have installed the McAfee Anti‑Spam add‑oncomponent.
Policy Name Search for an item by a policy name such as a Master policy or sub‑policy that detectedthe item.
Reason Search for an item based on the reason why it was detected. This could be based onthe scanners and filters such as Anti‑Virus, Anti‑Spam, Anti‑Phish, DLP and Compliance, and soon.
Reasons Search by a rule or rules that were triggered by a particular email. Use this if an itemhas triggered multiple scanners or filters. For example, if an spam email contains avirus, then the Reasons are Anti‑Spam and Anti‑Virus.
Recipients Search for an item through the recipient's email address.
ReputationScore
Search by the authenticity level of the source of the email based on up to dateinformation available. The items quarantined are based on the Message reputation thresholdspecified under Settings & Diagnostics | Anti‑Spam | McAfee GTI message reputation.
This filter is available only if you have installed the McAfee Anti‑Spam add‑oncomponent.
Rule Name Search for an item based on the rule that triggered one or more scanners/filters. Therule that triggered the scanner or filter is based on the Actions set for each policy.
Scanned by Search for an item by the scanner name that detected the item.
Sender Search for an item by the sender's email address.
Sender IP Search for an item by the IP address of the sender's system. The items quarantinedare based on the IP reputation threshold specified under Settings & Diagnostics | Anti‑Spam |McAfee GTI IP reputation.
This filter is available only if you have installed the McAfee Anti‑Spam add‑oncomponent.
Server Search for an item based on the computer name.
Spam Score Search for an item based on the spam score, which is a number that indicates theamount of potential spam contained within an email message. The engine appliesanti‑spam rules to each email messages it scans. Each rule is associated with a score.To assess the risk that an email message contains spam, these scores are addedtogether to give an overall spam score for that email message. The higher the overallspam score, the higher the risk that the email messages contains spam.
This filter is available only if you have installed the McAfee Anti‑Spam add‑oncomponent.
Detected ItemsAvailable primary search filters 4
McAfee Security for Microsoft Exchange 8.0.0 Product Guide 63

Table 4-1 Detected Items — Primary search filters (continued)
Searchfilter
Definition
State Search for an item based on its current status. The available items states are:• Untrained — Items that are not acted upon such as purged, released, forwarded or
deleted. The initial state of all items will be Untrained.
• Released — Items that are released from the quarantine database.
• In Quarantine Manager Queue — Items that are currently in the queued in the McAfeeQuarantine Manager database.
• Forwarded — Items that are forwarded to the intended recipients.
Subject Search for an item based on the subject line of the email message.
Task Search for an item based on the scan task name which can be an On‑Access (VSAPI),On‑Access (Transport) scan task or On‑Demand scan task. The on‑access scan taskthat appears in the View Results section is based on the settings you have enabled underSettings & Diagnostics | On‑Access Settings. To know whether the item was detected due to anon‑demand scan task, go to Dashboard | On‑Demand Scans.
Ticket Number Search for an item based on the ticket number, which is a unique alphanumericidentifier assigned to a specific detection and delivered as a notification through email.It helps identify the associated detection.
The primary search filters applicable to Spam, Phish and, IP Reputation detection category are available onlyif you have installed the McAfee Anti‑Spam add‑on component.
See also Additional search options on page 65
Search filter comparison chartProvides information on which search filter is available for a selected detected item category.
The available search filters in MSME varies based on the detected item category you have selected.Use this as a reference material, when you are not sure about which search filter is available for aspecific detected item category.
A quick look into this comparison chart helps you know the available search filters for a specificdetection type.
Table 4-2 Comparison chart — Search filters for detection types
Filter Spam IPReputation
Phish Viruses PotentiallyUnwantedPrograms
UnwantedContent
BannedFiletypes/Messages
DLP andCompliance
ActionTaken
Anti‑SpamEngine
Anti‑SpamRule
Anti‑VirusDAT
4 Detected ItemsSearch filter comparison chart
64 McAfee Security for Microsoft Exchange 8.0.0 Product Guide

Table 4-2 Comparison chart — Search filters for detection types (continued)
Filter Spam IPReputation
Phish Viruses PotentiallyUnwantedPrograms
UnwantedContent
BannedFiletypes/Messages
DLP andCompliance
Anti‑VirusEngine
BannedPhrases
DetectionName
Filename
Folder
IPReputationScore
PolicyName
Recipients
ReputationScore
Rule Name
ScannedBy
Sender
Sender IP
Server
SpamScore
Subject
TicketNumber
The search filters Reason, Reasons, State and Task are not available in this comparison chart, as it isavailable only for Detected Items | All Items category.
See also Detection types on page 60
Additional search optionsProvides information on additional search options to narrow‑down the detected items search results.
Table 4-3 Option definitions
Option Definition
AND Search items based on the conditions set in the previous and next filter option, wherethe search results satisfy both the conditions.
OR Search items based on the conditions set in the previous and next filter option, wherethe search results satisfy either of the conditions.
Detected ItemsAdditional search options 4
McAfee Security for Microsoft Exchange 8.0.0 Product Guide 65

Table 4-3 Option definitions (continued)
Option Definition
Contains Search for an item that contains the specified text in the primary search filter. Forexample, if you want to search for quarantined items that were detected in the Outboxfolder, select Folder as the primary search filter, select Contains from the drop‑down list,then type out in the text box and click Search to view the search results in the View Resultssection.
Not Contains Search for an item that excludes the specified text in the search results. For example, ifyou do not want logged items to appear in your search results, select Action Taken as theprimary search filter, select Not Contains from the drop‑down list, then type log and clickSearch to view the search results in the View Results section.
Exact Match Search for an item that is an exact match of the specified text. For example, if you wantto search for quarantined items that were detected by a specific Anti‑Virus Engine versionnumber 5400.1158, select Anti‑Virus Engine as the primary search filter, select Exact Matchfrom the drop‑down list, then type 5400.1158 in the text box and click Search to view thesearch results in the View Results section.
Match RegExp Search for an item matching a particular pattern, using regular expressions. Forexample, if you want to search based on a valid email address anywhere in thedetection, select Detection Name as the primary search filter, select Match RegExp from thedrop‑down list, then type \b[A‑Z0‑9._%+‑]+@(?:[A‑Z0‑9‑]+\.)+[A‑Z]{2,4}\b in the textbox and click Search to view the search results in the View Results section.
Equal to Search for an item containing the Spam Score, Reputation Score or IP Reputation Score thatequals the specified value.
Less than Search for an item containing the Spam Score, Reputation Score or IP Reputation Score that is lessthan the specified value.
Greater than Search for an item containing the Spam Score, Reputation Score or IP Reputation Score that ismore than the specified value.
Case Sensitive Select if your search criteria is case‑sensitive.
All Dates Select if you want to search for items on all dates.
The search results appear based on the date stored in the quarantined items database.
Date Range Search for an item within a defined date range according to your requirements. Hereyou can specify the date, month, year and time against the parameters From and To. Youcan also use the calendar icon to specify a date range.
The date range is based on the local system time.
Search Click to view a list of quarantined items matching your search criteria that appear in theView Results section.
Clear Filter Click to return to default search settings.
See also Available primary search filters on page 62
Search detected itemsUse search filters to find specific quarantined items that are of interest to you and take correspondingaction.You can use a combination of search filters such as boolean logic operators, regular expressions,case‑sensitive text or date range.
4 Detected ItemsSearch detected items
66 McAfee Security for Microsoft Exchange 8.0.0 Product Guide

Task1 From the product's user interface, click Detected Items.
2 From the left‑pane, click the desired detection category such as Spam, Phish or All Items.
3 From the Search pane, select the desired search filters from the drop‑down lists (if required). Theavailable search options are:
Table 4-4 Search options
Search feature Description
Primary searchfilter
Select if you want to refine your search criteria based on a specific filtersuch as Policy Name, Action Taken, Sender and so on.
For more information on all primary search filters, see Available primarysearch options section.
Boolean logicoperator
Select if you want to refine your search by using these logical operators:• AND
• OR
For more information on these filter options, see Additional search optionssection.
Secondary searchfilter
Select if you want to refine your search by using these secondary filters:• Contains • Equal to
• Not Contains • Less than
• Exact Match • Greater than
• Match RegExp
For more information on these filter options, see Additional search optionssection.
Case Sensitive Select if your search criteria is case‑sensitive.
Date Range Select if you want to refine your search to all dates or to a specific timeframe.• All Dates
• Date Range
4 Click Search.
By performing this task, you have successfully searched for detected items matching your searchcriteria, that now appear in the View Results section.
Actions that you can take on quarantined itemsView results of the search based on the parameters you defined and take necessary action onquarantined items.
You can then execute various actions on these quarantined items.
Detected ItemsActions that you can take on quarantined items 4
McAfee Security for Microsoft Exchange 8.0.0 Product Guide 67

Table 4-5 Types of action
Action Definition
Release To release a quarantined item. Select an applicable record from the View Results paneand click Release. The original email message is released from the database for deliveryto the intended recipient.
• When an item is downloaded, released or forwarded, it will be scanned forviruses and will appear in the Dashboard | Recently Scanned Items section.
• After a successful release, the item will appear with status as Released underDetected Items | All Items category.
Download To download a quarantined item for research or analysis. Select one applicable recordfrom the View Results pane and click Download.
You cannot Download, Forward, View or Release multiple records at a time from Detected Items |All Items category. However, you can Release multiple records from a specific category.
Export to CSVFile
To export and save information about all quarantined items returned by the search in a .CSV format. If there are thousands of quarantined items in the database, instead ofnavigating through multiple pages, you can use this option to download these recordsto a file in CSV format and later generate custom reports in Microsoft Excel.From the View Results pane, click Export to CSV File to Open or Save the search results to thedesired folder or location.
To specify a limit on how many quarantined items need to appear in the View Results,modify the Maximum query size (records) value from Settings & Diagnostics | Detected Items | LocalDatabase.
• If you do not find a specific field in the search result of the CSV file, makesure to enable the required field in the Columns to Display option.
• Use the Import Data option in Microsoft Excel, to open the CSV file in adifferent locale.
Forward To forward the quarantined item to the desired recipient. Use semi‑colon as a delimiterto forward the quarantined item to multiple recipients. Performing this action will sendthe quarantined item in a new email as an attachment (.eml format.)
To forward the quarantined item to a Distribution List (DL) within your organization,specify the SMTP address of the DL.
View To view the quarantined item in a separate window.
Add to BlockSenders
To add a sender's email address to the list of addresses from which emails should beblocked, which is also known as blacklisting.
Add to AllowSenders
To add a sender's email address to the list of addresses from which emails should beallowed, which is also known as whitelisting.
Columns todisplay
To select additional column headers to be listed in the View Results pane. This option hasa list of all the filters available in the Search pane and some more options.
Select All To select all quarantined items that appear in that page of the View Results section. Forexample, if you have 100 quarantined items and set the items to view per page as 10,then only 10 items that appear in the View Results section is selected.
Select None To deselect all quarantined items that appear in the View Results section.
4 Detected ItemsActions that you can take on quarantined items
68 McAfee Security for Microsoft Exchange 8.0.0 Product Guide

Table 4-5 Types of action (continued)
Action Definition
Delete To delete the quarantined items that you selected in that page of the View Results sectionfor the selected category.
Press and hold down the Ctrl key to select multiple items.
Delete All To delete all quarantined items from the database for the selected category.
Views perpage
To specify the maximum number of quarantined items that you want to view per page.The options are:• 10
• 20
• 50
• 100
Each item in the View Results pane has an image, which indicates:
Icon Description
An item that is quarantined and can be downloaded, forwarded, released or viewed.
An item that is only logged and cannot be downloaded, forwarded, released or viewed.
Detected ItemsActions that you can take on quarantined items 4
McAfee Security for Microsoft Exchange 8.0.0 Product Guide 69

4 Detected ItemsActions that you can take on quarantined items
70 McAfee Security for Microsoft Exchange 8.0.0 Product Guide

5 Policy Manager
Allows you to configure or manage different policies and corresponding actions in the product.Determine how different types of threats are treated when detected.
A policy is typically described as a principle or rule to guide decisions and achieve rational outcomes.Policies are adopted within an organization to help objective decision making.
In MSME, a policy specifies the settings that are used and the actions taken when a detection istriggered in the Exchange environment. You can create multiple policies and define specific settingsand actions to particular policies. For example, you can create multiple subpolicies for the On‑Accessmenu option and have a different setting and action set for each policy.
To simplify, an MSME policy = Scanner settings + Actions to take.
Use the Shared Resource menu option under Policy Manager, to modify or create rules for scanner, filter, andalert settings from one common location. Use Shared Resource to save time in creating and applying MSMEpolicies.
Steps to create a policy
As an administrator, to create a policy, you must:
1 Enable the scanner or filter.
2 Edit scanner or filter settings from the policy or Shared Resource.
3 Specify an action to take when a detection is triggered.
4 Specify users for whom this policy applies.
5 Apply the settings for the required policy category.
Contents Policy manager menu options Policy categories to handle threats Policy manager views Master policy and subpolicy Core scanners and filters Scanners and filters comparison chart List all scanners and filters for a selected policy Adding a scanner or filter Create new rule for specific users Actions you can take on detections Shared Resource Manage core scanner settings for a policy Manage filter settings for a policy Manage miscellaneous settings for a policy
5
McAfee Security for Microsoft Exchange 8.0.0 Product Guide 71

Policy manager menu optionsView the menu options available under Policy Manager.
From the product's user interface, click Policy Manager. These menu options appear on the left‑pane.
Option Description
On‑Access Contains policies for email messages every time they are accessed, to determine ifthe email message contains a virus or other potentially unwanted code.
On‑Demand (Default) Contains policies that are activated at set intervals or on demand, to find a virusor other potentially unwanted code.
On‑Demand (FindViruses)
Contains policies that are activated at set intervals or on demand, to find a virusor other Potentially Unwanted Programs (PUPs) and other possible threats.
On‑Demand (RemoveViruses)
Contains policies that are activated at set intervals or on demand, and whichremove viruses, Potentially Unwanted Programs (PUPs) and other possible threats.
On‑Demand (FindBanned Content)
Contains policies that are activated at set intervals or on demand, to find abanned content that you do not want to appear in email messages.
On‑Demand (RemoveBanned Content)
Contains policies that are activated at set intervals or on demand, and whichremove content that you do not want to appear in email messages. For example,if an email message contains a particular word or phrase, you can set up a policyto automatically replace the content of that email message with an alert message.You can use this type of policy to prevent unwanted information entering orleaving your organization.
On‑Demand (FullScan)
Contains policies that are activated at set intervals to scan for viruses, spam,phishing email messages, banned/unwanted content, and other harmful codes.
Gateway Contains policies for email messages every time they are accessed, to determinespam, phish, MIME files or HTML files.
Shared Resource One common location to edit settings for scanners, filters, alerts, DLP andCompliance dictionaries, and time slots.
Policy categories to handle threatsView available policy categories and apply an existing default policy (known as a Master Policy) to yourentire organization.
MSME helps you mitigate electronic threats with special set of rules and settings called policies, thatyou can create to suit your Exchange organization needs.
When you install MSME for the first time on your Exchange server, a default Master policy is available forthese menu options:
• On‑Access • On‑Demand (Find Banned Content)
• On‑Demand (Default) • On‑Demand (Remove Banned Content)
• On‑Demand (Find Viruses) • On‑Demand (Full Scan)
• On‑Demand (Remove Viruses) • Gateway
You can customize policies under each of these categories to precisely handle specific threats thatcould affect your Exchange organization.
5 Policy ManagerPolicy manager menu options
72 McAfee Security for Microsoft Exchange 8.0.0 Product Guide

Policy manager viewsView and sort subpolicies based on inheritance or priority.
The types of Policy Manager views are:
• Inheritance View
• Advanced View
Inheritance view
Displays the priority and status of the Master policy and all subpolicies. MSME acts on an email, basedon the settings configured for the subpolicy with highest priority. When the rules of a subpolicy are notsatisfied, MSME moves on to the subpolicy with the next priority. Settings configured in the Masterpolicy are applied, when rules in none of the subpolicies are satisfied.
When you select Inheritance View, the subpolicies appear based on the inheritance of the policy.
In this view, you can:
• View the policy and its priority
• View the inherited subpolicy and its parent policy
• Enable or disable subpolicies
• Delete subpolicies
Advanced view
Display all policies in ascending order, based on the priority and provides an option to change thepriority of a subpolicy.
In this view, you can:
• View the policies sorted on priority
• Modify the priority of a policy
Use these icons to modify the priority of a policy:
• — Increase the priority of a policy.
• — Decrease the priority of a policy.
• Enable or disable subpolicies
• Delete subpolicies
• Edit the policy name, description, and parent policy by clicking Details
Policy ManagerPolicy manager views 5
McAfee Security for Microsoft Exchange 8.0.0 Product Guide 73

Master policy and subpolicyA policy setting inside a hierarchical structure is ordinarily passed from parent to children, and fromchildren to grandchildren, and so forth. This concept is termed as inheritance. In MSME, the defaultparent policy is referred as Master policy and child policy is referred as Subpolicy.
Master policy
Default parent policy available for all policy categories that define how items are scanned for viruses,how files are filtered, and various other settings. These policies apply to all users within anorganization.
You cannot delete the Master policy, as it acts as a baseline to create subpolicies.
Subpolicy
Policies which inherit their settings and actions from another policy is known as a subpolicy. You cancreate more subpolicies with different settings and actions as needed, to apply to specific users.
Subpolicies are required in situations where you need exceptions to the Master policy to suit anygeographical areas, functions, mailboxes, domains, or departments within your organization. In MSME,the general term for such more policies is known as a policy group.
Action taken on an email is based on the settings configured for the subpolicy with highest priority.When the rules of a subpolicy with highest priority are not satisfied, MSME moves on to the subpolicywith the next priority. Settings configured in the Master policy are applied only when rules in none ofthe subpolicies are satisfied.
If you select Inherit settings from parent policy in the scanner or filter settings page, an inherited policy(subpolicy) uses the same setting as the parent policy. However, if there is a detection, you can take adifferent action. Any changes to the settings in the parent or Master policy is reflected in thesesubpolicies.
Example: Creating a subpolicy to act on all email messages identified by MSME as a threat to be:
• Quarantined — For all users
• Logged, quarantined, and notify the administrator — For administrators
This simple example provides you more insight on when you might need a subpolicy.
Table 5-1 Example — When do you need a subpolicy
Policy type Scanner Protection level Users Actions to take
Master policy Anti‑virus Medium Protection All users Quarantine
Subpolicy Anti‑virus High Protection Administrators Log, Quarantine, and Notify administrator
Restoring MSME to default setting removes the existing subpolicies. Make sure to back up the policiesand settings using Export from Settings & Diagnostics | Import and Export Configuration | Configuration tab, beforerestoring MSME to factory settings.
Create subpoliciesCreate other policies based on the Master policy or a parent policy to suit specific needs of any part ofyour organization. Create subpolicies for any exceptional situations that are not covered by the Masterpolicy.
This is useful when you do not want to apply rules from the Master policy for certain users or groups inyour organization. You can create exceptions and allow MSME to perform specific scan.
5 Policy ManagerMaster policy and subpolicy
74 McAfee Security for Microsoft Exchange 8.0.0 Product Guide

Some example's on when to create a subpolicy:
• Allow through inbound emails to Executive level users in your organization after scanning, butquarantine for other users.
• Allow certain file formats for specific user groups. For example, if you want to block .wav files forall users, except a specific department in your organization.
Task1 From Policy Manager, select a menu item for which you want to create a subpolicy.
2 Click Create Subpolicy.
The Create a Subpolicy page appears.
3 Under Initial configuration | Identification | Subpolicy name, specify a name that identifies the policy andwhat it does.
4 Type a Description for the policy (optional).
5 Select the Parent policy for the subpolicy from where to inherit the settings.
6 Click Next.
7 Under Trigger Rules | Rules, click New Rule.
8 From Specify a policy rule, you can select:
• <select a rule template> — To specify a policy rule based on the sender or recipient. You can createnew rules, based on these options:
• The SMTP address of the sender is email address
• The SMTP address of the sender is not email address
• The SMTP address of any recipients is email address
• The SMTP address of any recipients is not email address
• The sender is in Active Directory Group
• The sender is not in Active Directory Group
• Any of the recipients is in Active Directory Group
• Any of the recipients is not in Active Directory Group
Make sure that you do not create rules with conflicting email addresses or user names. Regularexpression (regex) is not supported for specifying users, only wildcard is supported.
• Copy rules from another policy — To copy the rules from another policy.
9 Click Add.
10 Specify the conditions when the policy should trigger for the user. You can select:
• Any of the rules apply
• All rules apply
• None of the rules apply
11 Click Next.
Policy ManagerMaster policy and subpolicy 5
McAfee Security for Microsoft Exchange 8.0.0 Product Guide 75

12 From Scanner and Filters, you can select:
• Inherit all settings from the parent policy — To inherit all properties of the parent policy.
• Initialize selected settings with values copied from another policy — To select specific scanners and filters fromthe available policies.
13 Click Finish.
Core scanners and filtersDetermine the types of scanners and filters that can be applied when creating policies.
Core scanners
View and configure settings for these scanners from Policy Manager | Shared Resource.
Scanner Definition
Anti‑Virus Scanner Configure settings to detect threats such as viruses, trojans, worms, packers,spyware, adware, and more.
DLP and ComplianceScanner
Create or configure DLP and Compliance Rules to meet your Exchange organization'sconfidential and compliance policies with the addition of 60 new DLP andCompliance Dictionaries.
File Filtering Create new file filtering rules to meet the Exchange organization needs.Configure these settings based on file name, file category, or file size.
Anti‑Spam Configure settings to detect email messages that are categorized as spam,based on spam score, size, rules, and mailing lists.
Anti‑Phishing Configure report settings for email messages that are categorized as phish.
Filters
Enable or disable these filters and specify actions to take when there is a detection, based on yourExchange organization needs.
You can enable or disable some filters, but cannot configure the customized settings. Those filters donot appear under Shared Resource | Scanners & Alerts | Scanners | Category drop‑down list.
Filter Definition
Corrupt Content Configure settings to act on email messages that are detected as corruptcontent.
Protected Content Configure settings to act on email messages that are detected as protectedcontent.
Encrypted Content Configure settings to act on email messages that are detected as encryptedcontent.
Signed Content Configure settings to act on email messages that are detected as signedcontent.
Password‑Protected Files Configure settings to act on email messages that contain password protectedfiles.
Mail Size Filtering Create or configure settings to act on email messages that exceed the mail sizefiltering options. Configure settings to quarantine email messages based on theoverall mail size, attachment size, and number of attachments.
Scanner Control Create or configure core scanner settings to act on email messages based onthe nesting level, expanded file size, and scanning time.
5 Policy ManagerCore scanners and filters
76 McAfee Security for Microsoft Exchange 8.0.0 Product Guide

Filter Definition
MIME Mail Settings Create or configure settings to detect threats that are categorized as MIMEmessage.
HTML Files Create or configure settings to act on email messages containing HTMLelements such as comments, URLs, metadata, and scripts.
Miscellaneous
Configure miscellaneous settings such as alerts and disclaimers that are sent to end users, if there is adetection.
Miscellaneous Definition
Alert Settings Create or configure settings for an email alert if there is a detection. Configuresettings such as the alert email format (HTML or text), encoding, file name, header,and footer.
Disclaimer Text Create or configure the disclaimer text that has to appear in the email sent to enduser, if there is a detection.
Scanners and filters comparison chartProvides information on which search scanner or filter is available for each policy category by default.
The available scanner or filter in MSME varies based on the policy category you have selected.
Use this as a reference material, when you are not sure about which scanner or filter is available for aspecific policy category. A quick look into this comparison chart helps you know the available scannersand filters for each policy category, where the acronyms are:
• OA — On‑Access
• OD (D) — On‑Demand (Default)
• OD (FV) — On‑Demand (Find Viruses)
• OD (RV) — On‑Demand (Remove Viruses)
• OD (FC) — On‑Demand (Find Non‑Compliant Content)
• OD (RC) — On‑Demand (Remove Non‑Compliant Content)
• OD (FS) — On‑Demand (Full Scan)
• GW — Gateway
Core scanners
Core Scanners OA OD (D) OD (FV) OD (RV) OD (FC) OD (RC) OD (FS) GW
Anti‑Virus Scanner
DLP and Compliance Scanner
File Filtering
Policy ManagerScanners and filters comparison chart 5
McAfee Security for Microsoft Exchange 8.0.0 Product Guide 77

Core Scanners OA OD (D) OD (FV) OD (RV) OD (FC) OD (RC) OD (FS) GW
Anti‑Spam
Anti‑Phishing
Even though DLP and Compliance Scanner is available for the On‑Access and On‑Demand (Default) policy category, itis not active or enabled by default. You must create the required rules, then specify an action to takewhen a rule is triggered and enable the scanner.
Filters
Filters OA OD (D) OD (FV) OD (RV) OD (FC) OD (RC) OD (FS) GW
Corrupt Content
Protected Content
Encrypted Content
Signed Content
Password‑Protected Files
Mail Size Filtering
Scanner Control
MIME Mail Settings
HTML Files
Alert and disclaimer settings
Miscellaneous settings OA OD (D) OD (FV) OD (RV) OD (FC) OD (RC) OD (FS) GW
Alert Settings
Disclaimer Text
5 Policy ManagerScanners and filters comparison chart
78 McAfee Security for Microsoft Exchange 8.0.0 Product Guide

List all scanners and filters for a selected policyView status of the available scanners and filters for the selected policy category.The type of settings that is available depends on which policy is selected.
Task1 From the product's user interface, click Policy Manager and policy category menu item.
The policy page for the selected menu item appears.
2 Click Master policy or the wanted subpolicy.
The corresponding policies page appears.
3 In the policies page, you can use these tabs:
• List All Scanners — To view which scanner or filter is enabled for the policy.
• View Settings — To view settings of the scanner or filter and the actions specified.
• Specify Users — To specify policy rules that apply to specific users.
You can specify users only to subpolicies.
4 From the List All Scanners tab, you can use:
Table 5-2 Policy configuration
Option Definition
Policy To select the policy, you want to configure.
Add Scanner/Filter To configure the policy so that it applies only at specific times. For example,you can create new anti‑virus setting with different rules, which is applicableonly on weekends.
Core Scanners To configure the policy for each of these scanners:• Anti‑Virus Scanner • Anti‑Spam
• DLP and Compliance Scanner • Anti‑Phishing
• File Filtering
Filters To configure the policy for each of these filters:• Corrupt Content • Mail Size Filtering
• Protected Content • Scanner Control
• Encrypted Content • MIME Mail Settings
• Signed Content • HTML Files
• Password Protected Files
Miscellaneous settings To configure the alert settings and disclaimer messages for polices. Miscellaneousoptions include:• Alert Settings
• Disclaimer Text
Policy ManagerList all scanners and filters for a selected policy 5
McAfee Security for Microsoft Exchange 8.0.0 Product Guide 79
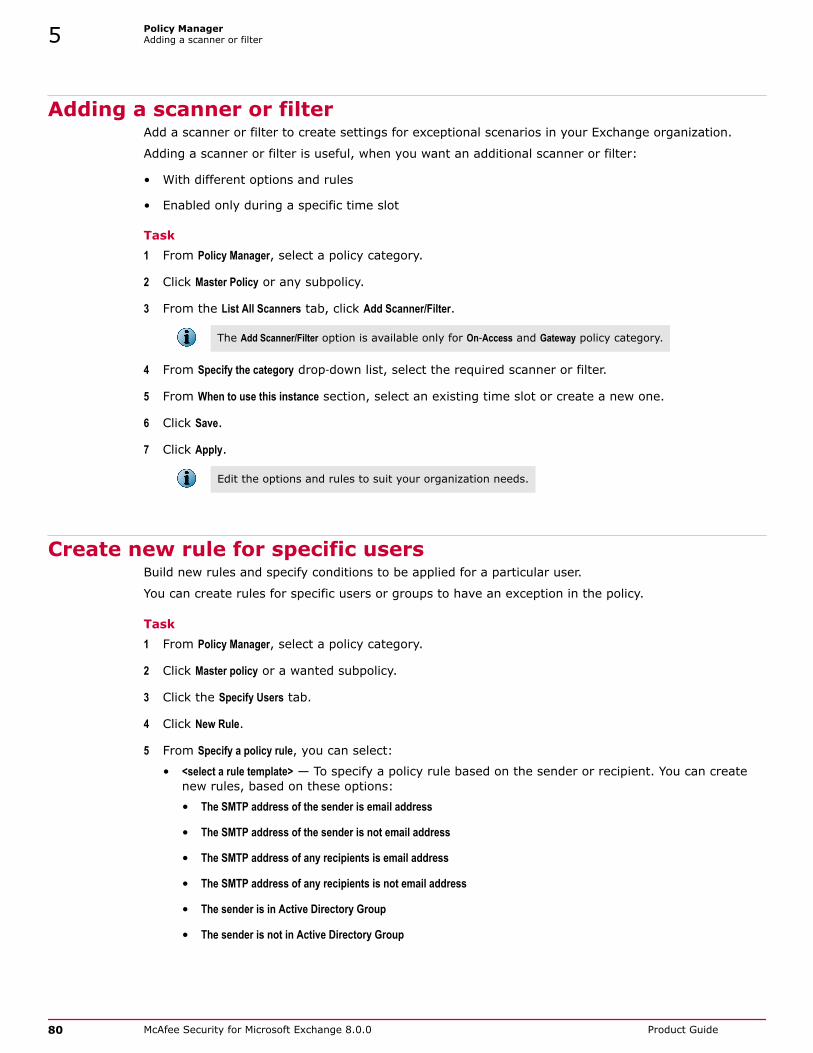
Adding a scanner or filterAdd a scanner or filter to create settings for exceptional scenarios in your Exchange organization.
Adding a scanner or filter is useful, when you want an additional scanner or filter:
• With different options and rules
• Enabled only during a specific time slot
Task1 From Policy Manager, select a policy category.
2 Click Master Policy or any subpolicy.
3 From the List All Scanners tab, click Add Scanner/Filter.
The Add Scanner/Filter option is available only for On‑Access and Gateway policy category.
4 From Specify the category drop‑down list, select the required scanner or filter.
5 From When to use this instance section, select an existing time slot or create a new one.
6 Click Save.
7 Click Apply.
Edit the options and rules to suit your organization needs.
Create new rule for specific usersBuild new rules and specify conditions to be applied for a particular user.
You can create rules for specific users or groups to have an exception in the policy.
Task1 From Policy Manager, select a policy category.
2 Click Master policy or a wanted subpolicy.
3 Click the Specify Users tab.
4 Click New Rule.
5 From Specify a policy rule, you can select:
• <select a rule template> — To specify a policy rule based on the sender or recipient. You can createnew rules, based on these options:
• The SMTP address of the sender is email address
• The SMTP address of the sender is not email address
• The SMTP address of any recipients is email address
• The SMTP address of any recipients is not email address
• The sender is in Active Directory Group
• The sender is not in Active Directory Group
5 Policy ManagerAdding a scanner or filter
80 McAfee Security for Microsoft Exchange 8.0.0 Product Guide

• Any of the recipients is in Active Directory Group
• Any of the recipients is not in Active Directory Group
Make sure that you do not create rules with conflicting email addresses or user names. Regularexpression (regex) is not supported for specifying users, only wildcard is supported.
• Copy rules from another policy — To copy the rules from another policy.
6 Click Add.
7 Specify the conditions when the policy should trigger for the user. You can select:
• Any of the rules apply
• All rules apply
• None of the rules apply
8 Click Apply to save the rule to the specific user.
Actions you can take on detectionsFor each scanner and filter settings in a policy, you can specify a primary and secondary action to takeon a detection. You can specify what happens to an email message or its attachment, when it triggersa detection.
When a policy rule is triggered based on the scanner or filter settings, MSME acts on the detectionbased on the primary and secondary action configured.
When configuring actions, at least one primary action must be selected. You can also select a numberof secondary actions. For example, if the primary action is deleting the email that triggers a detection,the secondary action might be logging the detection and notifying the administrator.
The available primary actions depend on the type of policy category and scanner or filter settings youconfigure.
Click Reset, to restore the actions to default settings for the policy category and scanner.
Table 5-3 Primary actions
Action Definition
Attempt to clean any detected virusor trojan
To clean the email containing a virus or trojan detected by the Anti‑VirusScanner.
Replace item with an alert To replace the email that triggered the detection with an alert.
Delete embedded item To delete the attachment that triggered the detection in an email.
Delete message To delete the email that triggered the detection.
Allow through To allow the email to continue to the next scanning phase or reach theend user.
Score‑based action To take an action based on the spam score. This is available only forthe Anti‑Spam scanner, where you must select If the spam score is High,Medium or Low.
Route to System Junk Folder To route the email detected by the Anti‑Spam scanner to the emailaddress specified under Settings & Diagnostics | Anti‑Spam | Gateway Spam Filter| System Junk Folder Address.
Route to User Junk Folder To route the email detected by the Anti‑Spam scanner to the recipient'sJunk E‑mail folder.
Policy ManagerActions you can take on detections 5
McAfee Security for Microsoft Exchange 8.0.0 Product Guide 81

Table 5-3 Primary actions (continued)
Action Definition
Reject the Message To reject the email and send a notification to the user.
Replace the attachment with an alert To replace the attachment in an email message with an alert, if the MailSize Filtering scanner is triggered when the attachment size exceeds.
Replace all attachments with a singlealert
To replace the email message containing multiple attachments with asingle alert, if the Mail Size Filtering scanner is triggered when theattachment count exceeds.
Do not allow changes to break thesignature
To stop MSME from breaking the signature, when an email messagecontaining Signed Content is detected.
Allow changes to break the signature To allow MSME to break the signature, when an email messagecontaining Signed Content is detected.
Table 5-4 Secondary actions
Action Definition
Log To record the detection in a log.
Quarantine To store a copy of the email that triggered the detection, in the quarantinedatabase. To view all quarantined items, go to Detected Items | All Items or thespecific detection category.Select Forward Quarantined email to send the email to a specific reviewer ordistribution list, based on the detection category. To configure notifications basedon the detection category, go to Settings & Diagnostics | Notifications | Settings |Advanced.
The Forward Quarantined email option is not applicable for Anti‑Virus Scanner or Gatewaypolicies.
Notify administrator To send a copy of the email to the administrator specified under Administrator E‑mailfrom Settings & Diagnostics | Notifications | Settings | General.
Notify internal sender To send an alert message to the internal sender, if the original email originateswithin the Exchange server's Authoritative Domain.
Notify external sender To send an alert message to the sender, if the original email message does notoriginate within the Exchange server's Authoritative Domain.
Notify internal recipient To send an alert message to the recipient, if the recipient is within the Exchangeserver's Authoritative Domain.
Notify external recipient To send an alert message to the recipient, if the recipient is not within theExchange server's Authoritative Domain.
Shared ResourceOne common location to edit settings for scanners, filters, alerts, DLP and Compliance dictionaries,and time slots. When setting up policies, you might want the same resource (scanner and filtersettings) applied to more than one policy. In such scenarios, use Shared Resource.
For example, if you want to use a different disclaimer for internal and external recipients, createdifferent disclaimers for recipients and apply in the required subpolicy.
5 Policy ManagerShared Resource
82 McAfee Security for Microsoft Exchange 8.0.0 Product Guide

From the product 's user interface, click Policy Manager | Shared Resource. You can use these tabs:
• Scanners & Alerts — To edit or create new scanner and filter settings.
• DLP and Compliance Dictionaries — To edit or create new DLP and Compliance Rules and File Filtering Rules.
• Time Slots — To edit or create new time slots such as weekdays or weekends.
Any changes made to these settings are applied automatically to all policies using these configurations.
Configure scanner settingsCreate or modify scanner settings to suit your Exchange organization's requirement.
Task1 From the product's user interface, click Policy Manager | Shared Resource.
The Shared Resources page appears.
2 Click Scanners & Alerts tab.
3 From the Category drop‑down list under Scanners section, select the scanner you want to configure.The scanner type appears with the settings name, policies used by, and action to configure. Youcan use:
Table 5-5 Option definitions
Option Definition
Category To select the required scanner that you want to configure.
Create New To create new settings for a scanner based on your requirement. Required in a situationwhere you need exceptions for certain scanner settings and apply it in a policy.
Edit To edit settings for the selected scanner.
Delete To delete the scanner settings.
You cannot delete a scanner, if
• It is a default scanner.
• If it is used by any policy. To know, how many policies use this scannersetting, see the Used By column.
4 Once you configure the scanner settings, click Save, then Apply.
You have now successfully configured the settings for a scanner, based on your Exchangeorganization's requirement.
Configure alert settingsCreate or modify alert settings for the selected scanner to suit your Exchange organization'srequirement.
Task1 From the product's user interface, click Policy Manager | Shared Resource.
The Shared Resources page appears.
2 Click Scanners & Alerts tab.
Policy ManagerShared Resource 5
McAfee Security for Microsoft Exchange 8.0.0 Product Guide 83

3 From the Category drop‑down list under Alerts section, select the alert you want to configure for ascanner. The scanner type appears with the settings name, policies used by, and action toconfigure. You can use:
Table 5-6 Option definitions
Option Definition
Category To select the required scanner that you want to configure.
Create New To create new settings for a scanner based on your requirement. Required in a situationwhere you need exceptions for certain scanner settings and apply it in a policy.
View To view the default alert settings for a scanner.
Edit To edit settings for the selected scanner. For more information on the variables you canuse in the alerts, refer to the Notification fields that you can use section.
Delete To delete the scanner settings.
You cannot delete an alert, if
• It is a default scanner alert.
• If it is used by any policy. To know, how many policies use this alert setting,see the Used By column.
4 Once you configure the scanner settings, click Save, then Apply.
You have now successfully configured the settings for an alert, based on your Exchange organization'srequirement.
Create a new alertCreate a new alert message for actions taken by a scanner or filter.
Task1 From the product's user interface, click Policy Manager | Shared Resource.
The Shared Resources page appears.
2 Click Scanners & Alerts tab.
3 From the Category drop‑down list under Alerts section, select the alert you want to configure for ascanner.
4 Click Create New.
The Alert Editor page appears.
5 Type a meaningful Alert name.
6 Select the required Style, Font, Size, and Tokens from the respective drop‑down lists.
These options are available only if you select HTML content (WYSIWYG) from the Show drop‑down menu.
5 Policy ManagerShared Resource
84 McAfee Security for Microsoft Exchange 8.0.0 Product Guide

7 Use any of these tools to customize your alert:
Table 5-7 Toolbar options
Options Description
Bold To make the selected text bold.
Italic To make the selected text italic.
Underline To underline the selected text.
Align Left To left align the selected paragraph.
Center To center the selected paragraph.
Align Right To right align the selected paragraph.
Justify To adjust the selected paragraph so that the lines within the paragraph fill agiven width, with straight left and right edges.
Ordered List To make the selected text into a numbered list.
Unordered List To make the selected text into a bulleted list.
Outdent To move the selected text a set distance to the right.
Indent To move the selected text a set distance to the left.
Text Color To change the color of the selected text.
Background Color To change the background color of the selected text.
Horizontal Rule To insert a horizontal line.
Insert Link To insert a hyperlink where the cursor is currently positioned. In URL, type theURL. In Text, type the name of the hyperlink as you want it to appear in thealert message. If you want the link to open a new window, select Open link innew window, then click Insert Link.
Insert Image To insert an image where the cursor is currently positioned. In Image URL, typethe location of the image. In Alternative text, type the text you want to use inplace of the image when images are suppressed or the alert message isdisplayed in a text‑only browser. If you want to give the image a title, type thetitle name in Use this text as the image title. Click Insert Image.
Insert Table To insert a table at the current cursor position. Type the values in Rows, Columns,Table width, Border thickness, Cell padding, and Cell spacing to configure the table, thenclick Insert Table.
Policy ManagerShared Resource 5
McAfee Security for Microsoft Exchange 8.0.0 Product Guide 85
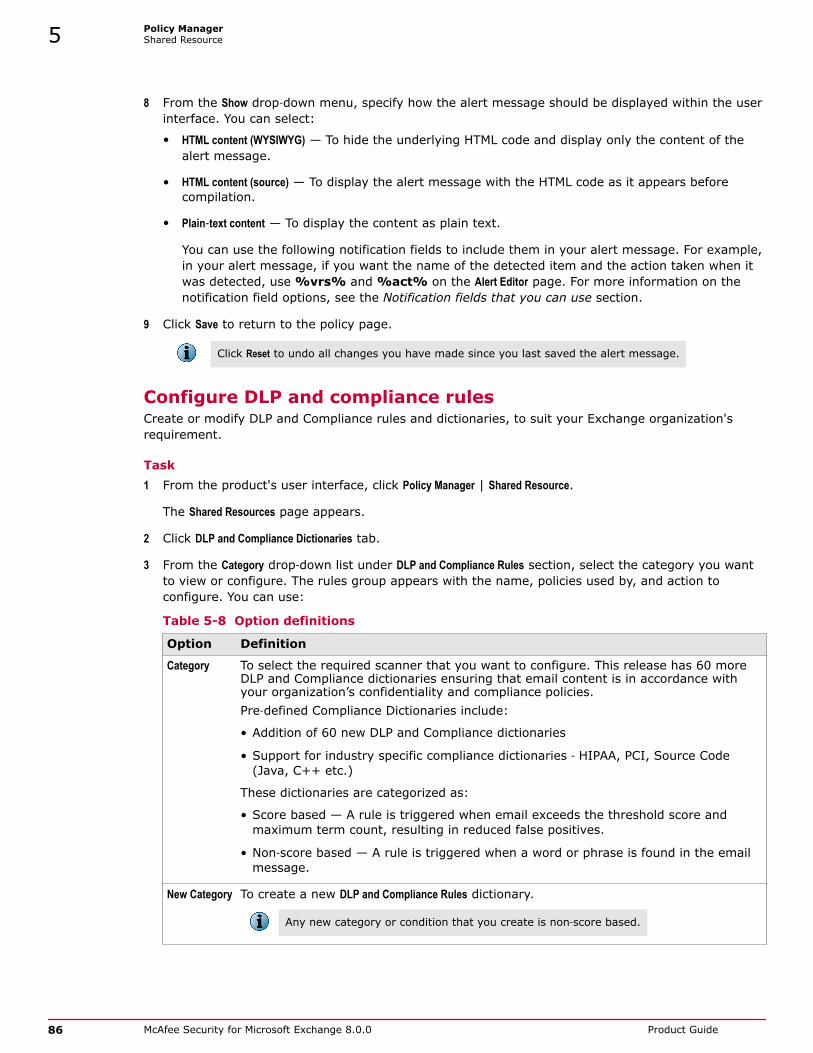
8 From the Show drop‑down menu, specify how the alert message should be displayed within the userinterface. You can select:
• HTML content (WYSIWYG) — To hide the underlying HTML code and display only the content of thealert message.
• HTML content (source) — To display the alert message with the HTML code as it appears beforecompilation.
• Plain‑text content — To display the content as plain text.
You can use the following notification fields to include them in your alert message. For example,in your alert message, if you want the name of the detected item and the action taken when itwas detected, use %vrs% and %act% on the Alert Editor page. For more information on thenotification field options, see the Notification fields that you can use section.
9 Click Save to return to the policy page.
Click Reset to undo all changes you have made since you last saved the alert message.
Configure DLP and compliance rulesCreate or modify DLP and Compliance rules and dictionaries, to suit your Exchange organization'srequirement.
Task1 From the product's user interface, click Policy Manager | Shared Resource.
The Shared Resources page appears.
2 Click DLP and Compliance Dictionaries tab.
3 From the Category drop‑down list under DLP and Compliance Rules section, select the category you wantto view or configure. The rules group appears with the name, policies used by, and action toconfigure. You can use:
Table 5-8 Option definitions
Option Definition
Category To select the required scanner that you want to configure. This release has 60 moreDLP and Compliance dictionaries ensuring that email content is in accordance withyour organization’s confidentiality and compliance policies.Pre‑defined Compliance Dictionaries include:
• Addition of 60 new DLP and Compliance dictionaries
• Support for industry specific compliance dictionaries ‑ HIPAA, PCI, Source Code(Java, C++ etc.)
These dictionaries are categorized as:
• Score based — A rule is triggered when email exceeds the threshold score andmaximum term count, resulting in reduced false positives.
• Non‑score based — A rule is triggered when a word or phrase is found in the emailmessage.
New Category To create a new DLP and Compliance Rules dictionary.
Any new category or condition that you create is non‑score based.
5 Policy ManagerShared Resource
86 McAfee Security for Microsoft Exchange 8.0.0 Product Guide

Table 5-8 Option definitions (continued)
Option Definition
Create New To create new rules group for the selected category, based on your requirement.Required in a situation where you need specific rules to trigger a detection and applyit in a policy.
Edit To edit settings for the selected DLP and Compliance rule.
Delete To delete the DLP and Compliance rule.
You cannot delete a DLP and Compliance rule, if
• It is enabled. Deselect the rule, Apply the settings, then click Delete.
• If it is used by any policy. To know, how many policies use this scannersetting, see the Used By column.
For example, select Credit Card Number or any dictionary that suits your needs, from the Categorydrop‑down list and see the enhanced Rules Group option available.
4 To create a new rules group, click Create New for DLP and Compliance Rules for a selected category.
The New DLP and Compliance Scanner Rule page appears for the selected category.
5 Type the Rule Name and Description for the rule.
6 Select Add this rule to this category's rules group to add the new rule to the rules group for the selectedcategory.
7 Under Word or Phrase, specify the words or phrases to look for, in The rule will trigger when the following word orphrase is found. Then select one of the following options:
• Regular Expression — If enabled, the rule is triggered for specified text that is a regular expression(regex). Regex is a precise and concise method for matching strings of text, such as words,characters, or patterns of characters.
For example, the sequence of characters "tree" appearing consecutively in any context, such astrees, street, or backstreet.
• Regex is disabled for some phrases.
• Refer http://www.regular‑expressions.info/reference.html or http://www.zytrax.com/tech/web/regex.htm for more details.
• Use Wildcard — If enabled, the rule is triggered for the specified word or phrase that containwildcard characters. (Wildcard characters are often used in place of one or more characterswhen you do not know what the real character is or you do not want to type the entire name).
• Starts with — If enabled, the rule is triggered for specified text that forms the beginning of theword or phrase.
• Ends with — If enabled, the rule is triggered for specified text that forms the last part of the wordor phrase.
• Case Sensitive — If enabled, the rule is triggered if the case of the specified text matches the wordor phrase.
To detect a word or phrase with exact match, select both Starts with and Ends with option.
Policy ManagerShared Resource 5
McAfee Security for Microsoft Exchange 8.0.0 Product Guide 87

8 Select Specify additional contextual words or phrases, which is a secondary action when the primary word orphrase is detected. Specify any additional word or phrase that can accompany the primary word orphrase that triggers a detection.
9 Select from Trigger if ALL of the phrases are present, Trigger if ANY of the phrases are present or Trigger if NONE of thephrases are present from the drop‑down menu.
10 Select within a block of to specify the number of Characters from a block to be scanned.
11 Click Add Contextual word to type additional words or phrases.
12 Specify the word or phrase in Specify words or phrases, select one of the conditions (same options as inStep 7), then click Add.
13 Under File Format, select Everything to enable all file categories and its subcategories. You can selectmultiple categories and file types within the selected categories to be matched. Selecting All in thesubcategory selector overrides any other selections that may have already been made.
14 If you have not selected Everything, then click Clear selections to deselect any of the selected file typeoptions.
15 Click Save to return to Shared Resources page.
16 Click Apply to save the settings.
You have now successfully configured the DLP and Compliance rules and dictionaries, to suit yourExchange organization's requirement.
Configure file filtering rulesCreate new rules to detect files based on their name, type, or size.
Before you beginThe file filtering rule triggers only when you select one condition. Make sure that you createan individual rule for each of these categories:
• File name
• File category
• File size
This task provides you information on configuring all three categories. Based on yourExchange organization's requirement, select only one category for a file filtering rule andcreate separate rules for each category.
Task1 From the product's user interface, click Policy Manager | Shared Resource.
The Shared Resources page appears.
2 Click DLP and Compliance Dictionaries tab.
3 From File Filtering Rules, click Create New.
The File Filtering Rule page appears.
4 Type a unique Rule name. Give the rule a meaningful name, so that you can easily identify it andwhat it does. For example, FilesOver5MB or Block MPP files.
5 Policy ManagerShared Resource
88 McAfee Security for Microsoft Exchange 8.0.0 Product Guide

5 In the File Filtering Rule page, you can use:
Table 5-9 Option definitions — Filename filtering
Option Definition
Enable file name filtering To enable file filtering according to the file names.
Take action when the filename matches
Specify the name of the files that triggers this rule. You can use wildcardcharacters (* or ?) to match multiple file names. For example, if you want tofilter any Microsoft PowerPoint files, type *.ppt.
Add To add the file name specified under Take action when the file name matches, to thefile name filtering list.
Edit To edit or modify an existing file filtering rule.
Delete To remove the file name from the filtering list.
You cannot delete a file filtering rule, if it is used by any policy. The Used Bycolumn must display 0 policies for the rule that you want to delete. You mustfirst remove the file filtering rule from the policy, then click Delete.
Table 5-10 Option definitions — File category filtering
Option Definition
Enable file category filtering To enable file filtering according to their file type.
Take action when the filecategory is
Specify the type of files that affects this rule.
File types are divided into categories and subcategories.
File categories Select a file type category. An asterisk symbol (*) appears next to thefile type, to indicate that the selected file type will be filtered.
Subcategories Select the subcategory you want to filter.To select more than one subcategory, use Ctrl+Click or Shift+Click.
To select all of the subcategories, click All.
Click Clear selections to undo the last selection.
Extend this rule to unrecognizedfile categories
To apply this rule to any other file categories and subcategories thatare not specifically mentioned in the categories and subcategories list.
Table 5-11 Option definitions — File size filtering
Option Definition
Enable file size filtering To filter files according to their file size.
Take action when the file size is Specify a value in the adjacent text box and drop‑down list, then select:• Greater than — To specify that the action should only be applied if the file
is larger than the size specified.
• Less than — To specify that the action should only be applied if the fileis smaller than the size specified.
6 Click Save to return to the Shared Resources page.
7 Click Apply to create the file filtering rule.
You have now successfully created a file filtering rule, to suit your Exchange organization'srequirement.
Policy ManagerShared Resource 5
McAfee Security for Microsoft Exchange 8.0.0 Product Guide 89

Configure time slotsSet up different time slots or configure existing time slots that can be applied to policies, based onyour Exchange organization's requirement.
Time Slots enable you to specify the time during which certain rules must be triggered. For example, youmight want to restrict large file upload or download during office hours.
There might be situations where you require more time slots, based on different users, theirgeographical locations, or working hours. You can create more time slots based on business hours,non‑business hours, weekly maintenance, and so on.
By default, MSME has these time slots:
• All the time
• Weekdays
• Weekends
You cannot delete or edit the default time slot All the time, as the Master policy uses it.
Task1 From the product's user interface, click Policy Manager | Shared Resource.
The Shared Resources page appears.
2 Click Time Slots tab.
3 Click Create New.
The Time Slot page appears.
4 Type a unique Time slot name such as Business hours or System Maintenance (Weekly).
5 Under Select day and time, select the required days.
6 Select All day or Selected hours.
7 Specify the Start and End time from the drop‑down list, if you choose Selected hours.
8 Click Save to return to the Shared Resources page.
9 Click Apply to save the settings.
You have now successfully configured or created a time slot, to suit your Exchange organization'srequirement.
Manage core scanner settings for a policyCreate or edit scanner options, then specify an appropriate action to take on the detected item when apolicy is triggered.The available core scanners are:
• Anti‑Virus Scanner • Anti‑Spam
• DLP and Compliance Scanner • Anti‑Phishing
• File Filtering
5 Policy ManagerManage core scanner settings for a policy
90 McAfee Security for Microsoft Exchange 8.0.0 Product Guide

Tasks• Configure anti-virus scanner settings on page 91
Configure Anti‑Virus Scanner settings in a policy to identify, thwart, eliminate computer virusesand other malware.
• Configure DLP and compliance scanner settings on page 94Configure DLP and Compliance Scanner settings in a policy to identify noncompliant textual datain an email or attachment and take necessary actions.
• Configure file filtering settings on page 95Configure settings in a policy to detect files based on their name, type, or size and takenecessary actions.
• Configure anti-spam settings on page 96Configure settings in a policy to detect spam email messages and take necessary actions.
• Configure anti-phishing settings on page 99Configure settings in a policy to block phishing messages using the anti‑spam rules andengine, and take necessary actions.
Configure anti-virus scanner settingsConfigure Anti‑Virus Scanner settings in a policy to identify, thwart, eliminate computer viruses and othermalware.
Task1 From Policy Manager, select a submenu item that has the anti‑virus scanner.
The policy page for the submenu item appears.
2 Click Master policy or any subpolicy you want to configure, then click List All Scanners tab.
3 Click Anti‑Virus Scanner.
4 In Activation, select Enable to activate the anti‑virus scanner settings for the selected submenu item.
• If you are configuring settings for a subpolicy, select Use configuration from parent policy toinherit settings from the parent policy.
• If you add a new scanner to the policy, you can specify a time slot when to enable thescanner, using What time would you like this to apply drop‑down list.
5 From the Options section, you can use:
Table 5-12 Option definitions
Option Definition
High Protection To scan all files, archive files, unknown viruses, unknown macro viruses,mass mailers, potentially unwanted programs, and scan all files for macros.
Medium Protection To scan all files, archive files, unknown viruses, unknown macro viruses,mass mailers, and potentially unwanted programs.
Low Protection To scan only default file types, archive files, mass mailers, and potentiallyunwanted programs.
<create new set of options> To create your customized anti‑virus scanner settings.
Edit To edit the existing level of protection.
6 If you select to edit or modify the scanner settings, in Instance name, type a unique name for theanti‑virus scanner setting instance. This field is mandatory.
Policy ManagerManage core scanner settings for a policy 5
McAfee Security for Microsoft Exchange 8.0.0 Product Guide 91

7 In Basic Options tab under Specify which files to scan, select one of these options:
• Scan all files — To specify that all files to scan regardless of their type.
• Default file types — To specify that only the default file types to scan.
• Defined file types — To specify which file types to scan.
8 Select more scanner options available in Scanner options. You can select:
• Scan archive files (ZIP, ARJ, RAR...)
• Find unknown file viruses
• Find unknown macro viruses
• Enable McAfee Global Threat Intelligence file reputation — This enables the threat intelligence gathered byMcAfee Labs that would prevent damage and data theft before a signature update is available.Select the Sensitivity level from the options available.
• Scan all files for macros
• Find all macros and treat as infected
• Remove all macros from document files
9 On the Advanced tab under Custom malware categories, specify the items to be treated as malware. Thereare two ways to select malware types:
• Select the malware types from the list of checkboxes.
• Select Specific detection names, type a malware category, then click Add.
When typing a malware category name, you can use wildcards for pattern matching.
10 Select the Do not perform custom malware check if the object has already been cleaned option, if the cleaned itemsmust not be subjected to the custom malware check.
11 In Clean options, specify what happens to files that are reduced to zero bytes after being cleaned.Select any one of these options:
• Keep zero byte file — To keep files that have been cleaned and is of zero bytes.
• Remove zero byte file — To remove any file that has zero bytes after being cleaned.
• Treat as a failure to clean — To treat zero‑byte files as if they cannot be cleaned, and apply the failureto clean action.
12 In Packers tab, select:
• Enable detection — To enable or disable the detection of packers.
• Exclude specified names — To specify which packers can be excluded from being scanned.
• Include only specified names — To specify which packers you want the software to detect.
• Add — To add packer names to a list. You can use wildcards to match names.
• Delete — To remove packer names you have added. This link is activated if you click Add.
5 Policy ManagerManage core scanner settings for a policy
92 McAfee Security for Microsoft Exchange 8.0.0 Product Guide

13 In PUPs tab, select:
• Enable detection — To enable or disable the detection of potentially unwanted programs. Click thedisclaimer link and read the disclaimer before configuring potentially unwanted programsdetection.
• Select the program types to detect — To specify whether each type of potentially unwanted programs inthe list to be detected or ignored.
• Exclude specified names — To specify which potentially unwanted programs can be excluded frombeing scanned. For example, if you have enabled spyware detection, you can create a list ofspyware programs that you want the software to ignore.
• Include only specified names — To specify which potentially unwanted programs you want thesoftware to detect. For example, if you enable spyware detection and specify that only namedspyware programs should be detected, all other spyware programs are ignored.
• Add — To add potentially unwanted programs names to a list. You can use wildcards to matchnames.
• Delete — To delete potentially unwanted programs names that you have added. This link isactivated if you click Add.
The McAfee Threat Intelligence website contains a list of recent malware names. Use Search theThreat Library to view information about specific malware.
14 Click Save to return to the policy page.
15 In Actions to take, click Edit. In these following tabs, specify the anti‑virus scanner actions that mustbe taken if a virus (or virus‑like behavior) is detected:
• Cleaning — Select Attempt to clean any detected virus or trojan to activate various actions. Select theactions to be taken from:
• Log • Notify external sender
• Quarantine • Notify internal recipient
• Notify administrator • Notify external recipient
• Notify internal sender
• Default Actions — From Take the following action drop‑down list, select an action.
• Replace item with an alert
• Delete embedded item
• Delete message
• Allow through
For more information on the primary and secondary actions, see the Actions you can take ondetections section.
16 Select the corresponding alert document or click Create to make a new alert document. From Andalso, select more actions to be taken for these tabs:
• Custom Malware
• Packers
• PUPs
Policy ManagerManage core scanner settings for a policy 5
McAfee Security for Microsoft Exchange 8.0.0 Product Guide 93

17 Click Save to apply the settings and return to the policy settings page.
18 Click Apply to configure these settings to a policy.
Configure DLP and compliance scanner settingsConfigure DLP and Compliance Scanner settings in a policy to identify noncompliant textual data in an emailor attachment and take necessary actions.
Task1 From Policy Manager, select a submenu item that has the DLP and Compliance scanner.
The policy page for the submenu item appears.
2 Click Master policy or any subpolicy you want to configure, then click List All Scanners tab.
3 Click DLP and Compliance Scanner.
4 In Activation, select Enable to activate the DLP and compliance scanner settings for the selectedsubmenu item.
• By default, all scanner setting options are disabled for DLP and Compliance Scanner.
• If you are configuring settings for a subpolicy, select Use configuration from parent policy toinherit settings from the parent policy.
• If you add a new scanner to the policy, you can specify a time slot when to enable thescanner, using What time would you like this to apply drop‑down list.
5 In Options, you can use:
• Include document and database formats — To scan documents and database formats, for noncompliantcontent.
• Scan the text of all attachments — To scan the text of all attachments.
• Create — To create a new alert message when the content of an email message is replaced dueto a rule being triggered. See the Create a new alert section for more instructions.
• View/Hide — To display or hide the preview of the alert message. If the preview is hidden, clickingthis link displays it. If the preview is displayed, clicking this link hides it.
6 In DLP and Compliance rules and associated actions, click Add rule.
The DLP and Compliance Rules page appears.
7 In Specify actions for rule, select a rule group from the Select rule group drop‑down menu that triggers anaction, if one or more of its rules are broken. Each phrase can have a Score set for a category,under DLP and Compliance Scanner Phrase.
For some rule groups, you might need to specify these options:
• Threshold score — To specify the maximum threshold score upon which the scanner triggers.
• Max Term Count — To specify the maximum number of times this rule group can be triggered.Exceeding this count triggers the scanner to take the specified action.
The equation for current Threshold score = Score x Term Count (instance). A rule is triggered when thevalue equals or exceeds the Threshold score.
5 Policy ManagerManage core scanner settings for a policy
94 McAfee Security for Microsoft Exchange 8.0.0 Product Guide

To understand how Threshold score and Max Term Count helps in triggering a rule, let us consider anexample on Pascal Language dictionary. Consider that you have set the Score for the DLP andCompliance Scanner Phrase "PAnsiChar" to 5.
Under Select rule group, if you have selected Pascal Language dictionary, and set the value for:
• Threshold score = 15
• Max Term Count = 4
If "PAnsiChar" is found twice in the code, the current threshold score becomes 10. Hence the rulewill NOT be triggered.
If "PAnsiChar" is found five times in the code, the current threshold score will still be calculated asScore x Max Term Count which is 5 * 4 = 20. This value is greater than the defined threshold score.Hence the rule will be triggered.
Consider that you have modified the Score for "PAnsiChar" to 8. If the phrase "PAnsiChar" is foundthrice in the code, the current threshold score becomes 24. Now the rule will be triggered as itexceeded the specified Threshold score.
If there are multiple rules, the Threshold score is the combined value of all the rules for a dictionary.
A rule will be triggered only when the value equals or exceeds the Threshold score and is not triggeredeven if the instance of phrase exceeds the Max Term Count value in an email.
8 From If detected, take the following action:, select the DLP and compliance scanner actions that must betaken if some content in an email message is detected as noncompliant.
9 From And also, select one or more actions.
10 Click Save to apply the settings and return to the policy settings page.
11 Click Apply to configure these settings to a policy.
Configure file filtering settingsConfigure settings in a policy to detect files based on their name, type, or size and take necessaryactions.
Task1 From Policy Manager, select a submenu item that has the File Filtering scanner.
The policy page for the submenu item appears.
2 Click Master policy or any subpolicy you want to configure, then click List All Scanners tab.
3 Click File Filtering.
4 In Activation, select Enable to activate the file filtering scanner settings for the selected submenu item.
• If you are configuring settings for a subpolicy, select Use configuration from parent policy toinherit settings from the parent policy.
• If you add a new scanner to the policy, you can specify a time slot when to enable thescanner, using What time would you like this to apply drop‑down list.
Policy ManagerManage core scanner settings for a policy 5
McAfee Security for Microsoft Exchange 8.0.0 Product Guide 95

5 In Alert Selection, click:
• Create — To create a new alert message when the attachment of an email message is replaceddue to a rule being triggered. See the Create a new alert section for more instructions.
• View/Hide — To display or hide the preview of the alert message. If the preview is hidden, clickingthis link displays it. If the preview is displayed, clicking this link hides it.
6 In File filtering rules and associated actions, from the Available rules drop‑down menu, select an available rule.If you want to create new file filtering rules, select <Create new rule...>. See the Configure file filteringrules section for more instructions on how to create new file filtering rules.
Make sure that you create separate file filtering rules for each category such as file name, type, andsize.
7 Click Change to specify actions that must be taken when a file/attachment in an email messagetriggers the scanner.
8 Click Delete, to remove an existing rule from the policy.
9 Click Apply to configure these settings to a policy.
Configure anti-spam settingsConfigure settings in a policy to detect spam email messages and take necessary actions.
Task1 From Policy Manager, select the submenu item Gateway that has the Anti‑Spam scanner.
The policy page for the submenu item appears.
2 Click Master policy or any subpolicy you want to configure, then click List All Scanners tab.
3 Click Anti‑Spam.
4 In Activation, select Enable to activate the anti‑spam scanner settings for the selected submenu item.
• If you are configuring settings for a subpolicy, select Use configuration from parent policy toinherit settings from the parent policy.
• If you add a new scanner to the policy, you can specify a time slot when to enable thescanner, using What time would you like this to apply drop‑down list.
5 In the Options drop‑down list, select an existing scanner setting or <create new set of options>.
The Anti‑Spam Settings page appears.
6 In Instance name, type a unique name for the anti‑spam scanner setting instance. This field ismandatory.
5 Policy ManagerManage core scanner settings for a policy
96 McAfee Security for Microsoft Exchange 8.0.0 Product Guide

7 In Options tab, under Scoring, type the values for:
• High score threshold — If the overall spam score is 15 or more.
• Medium score threshold — If the overall spam score is from 10 to 15.
• Low score threshold — If the overall spam score is from 5 to 10.
To use the default values of spam scores, select the Use default option. These default settings havebeen carefully optimized to maintain the balance between a high spam detection rate and a lowfalse positive rate. In the unlikely event that you need to change these settings, a technical notice isavailable from Technical Support.
8 In Reporting, under the Spam reporting threshold is drop‑down list, select High, Medium, Low, or Custom tospecify the point at which an email message should be marked as spam.
9 In Custom score, type a specific spam score at which email messages should be marked as spam.This field is enabled only if you select Custom from Spam reporting threshold is drop‑down list.
10 Select or deselect Add prefix to subject of spam messages as required.
11 From the Add a spam score indicator drop‑down list, select:
• Never ‑ To have the Internet header of an email message without the spam score indicator.
• To spam messages only — To add a spam score indicator to the Internet header of spam emailmessages only.
• To non‑spam messages only — To add a spam score indicator to the Internet header of non‑spamemail messages only.
• To all messages — To add a spam score indicator to the Internet header of all email messages.
Spam score indicator is a symbol used in the spam report that is added to the email message'sInternet headers to indicate the amount of potential spam contained in an email.
12 From the Attach a spam report drop‑down list, select:
• Never ‑ To display an email message without the spam score indicator.
• To spam messages only — To add a spam report to spam email messages only.
• To non‑spam messages only — To add a spam report to non‑spam email messages only.
• To all messages — To add a spam report to all email messages.
13 Select or deselect Verbose reporting to specify whether verbose reporting is required or not. Verbosereporting includes the names and descriptions of the anti‑spam rules that have been triggered.
Selecting Never for Attach a spam report disables Verbose reporting.
14 On the Advanced tab, use:
• Maximum message size to scan (KB) — To specify the maximum size of an email message (in kilobytes)that can be scanned. You can type a size up to 999,999,999 kilobytes, although typical spamemail messages are small. Default value is 250 KB.
• Maximum width of spam headers (Bytes) — To specify the maximum size (in bytes) that the spam emailmessage header can be. The minimum header width that you can specify is 40 characters andthe maximum is 999 characters. Default value is 76.
Spammers often add extra information to headers for their own purposes.
Policy ManagerManage core scanner settings for a policy 5
McAfee Security for Microsoft Exchange 8.0.0 Product Guide 97

• Maximum number of reported rules — To specify the maximum number of anti‑spam rules that can beincluded in a spam report. The minimum number of rules you can specify is 1 and the maximumis 999. Default value is 180.
• Header name — To specify a different name for the email header. You can use this email headerand its header value (below) when tracking email messages and applying rules to thosemessages. These fields are optional, and accept up to 40 characters.
• Header value — To specify a different value for the email header.
• Add header — To specify that the header should be added to none of the email messages, all emailmessages, only spam email messages or only to non‑spam email messages.
• Select or deselect the Use alternative header names when a mail is not spam option as required.
15 In Mail Lists tab, under Blacklisted senders, Whitelisted senders, Blacklisted recipients and Whitelisted recipients, typethe email addresses of the blacklisted and whitelisted senders and recipients.
Email messages sent to or from an email address on a blacklist are treated as spam, even if they donot contain spam‑like characteristics. Email messages sent to or from email addresses on a whitelistare not treated as spam, even if they contain spam‑like characteristics.
Click Add to add email addresses to a list and the checkbox beside each address tospecify whether it is enabled or not. Click Delete All to remove an email address from thelist. You cannot add the same email address more than once. You can use wildcardcharacters to match multiple addresses.
16 In Rules tab, enter the rule name and select Enable rule to activate it. Click Add to display a list ofavailable rules.
Click Reset to return to the default anti‑spam settings.
17 In the list, against each rule, click Edit to modify the rule.
18 Click Delete to remove the rule.
19 Click Save to return to the policy page.
20 In Actions to take if spam is detected, click Edit. In the following tabs, specify the anti‑spam scanner actionsthat must be taken if a spam is detected:
• High Score
• Medium Score
• Low Score
21 Click Save to apply the settings and return to the policy settings page.
22 Click Apply to configure these settings to a policy.
Tasks• Import or export blacklists and whitelists on page 99
Import or export blacklists and whitelists for backup or use on any other Exchange server.
5 Policy ManagerManage core scanner settings for a policy
98 McAfee Security for Microsoft Exchange 8.0.0 Product Guide

Import or export blacklists and whitelistsImport or export blacklists and whitelists for backup or use on any other Exchange server.
Task1 From Policy Manager, select the submenu item Gateway that has the anti‑spam scanner.
The policy page for the submenu item appears.
2 Click Master policy or any subpolicy you want to configure, then click List All Scanners tab.
3 Click Anti‑Spam.
4 From Options, click the link Block list and allow list.
The Anti‑Spam Settings page appears.
5 Click the Mail Lists tab.
6 Select the required list from:
• Blacklisted senders
• Whitelisted senders
• Blacklisted recipients
• Whitelisted recipients
7 To import a list, click Import. In the pop‑up window, click Browse to navigate to the required .cfg file,then click OK.
8 To export a list, click the link Export.
Click Delete to remove a list from the database.
9 Click Save to apply the settings and return to the policy settings page.
Configure anti-phishing settingsConfigure settings in a policy to block phishing messages using the anti‑spam rules and engine, andtake necessary actions.
Task1 From Policy Manager, select the submenu item Gateway that has the Anti‑Phishing scanner.
The policy page for the submenu item appears.
2 Click Master policy or any subpolicy you want to configure, then click List All Scanners tab.
3 Click Anti‑Phishing.
4 In Activation, select Enable to activate the anti‑phishing scanner settings for the selected submenuitem.
• If you are configuring settings for a subpolicy, select Use configuration from parent policy toinherit settings from the parent policy.
• If you add a new scanner to the policy, you can specify a time slot when to enable thescanner, using What time would you like this to apply drop‑down list.
Policy ManagerManage core scanner settings for a policy 5
McAfee Security for Microsoft Exchange 8.0.0 Product Guide 99

5 In the Options drop‑down list, select an existing scanner setting or <create new set of options>.
The Anti‑Phishing Settings page appears.
6 In Instance name, type a unique name for the anti‑phishing scanner setting instance. This field ismandatory.
7 In Reporting Options, select or deselect these options as required:
• Add prefix to subject of phishing messages — To specify that you want to add text to the start of thesubject line of any email message that probably contains phishing information.
• Add a phish indicator header to messages — To specify whether a phish indicator is added to the Internetheader of any email message that probably contains phishing information.
• Attach a phish report — To specify whether a phish report should be generated and added to theemail message detected as phish.
• Verbose reporting — To specify whether the names and a detailed description of the anti‑phish rulesthat triggered, is included in the email message. This option is available only if you select theAttach a phish report option.
8 Click Save to return to the policy page.
9 In Actions to take, click Edit and specify the antiphish scanner actions that must be taken if a phish isdetected.
10 Click Save to apply the settings and return to the policy settings page.
11 Click Apply to configure these settings to a policy.
Manage filter settings for a policyEnable or disable filter options, then specify an appropriate action to take on the detected item when apolicy is triggered.The available filters are:
• Corrupt Content • Mail Size Filtering
• Protected Content • Scanner Control
• Encrypted Content • MIME Mail Settings
• Signed Content • HTML Files
• Password‑Protected Files
5 Policy ManagerManage filter settings for a policy
100 McAfee Security for Microsoft Exchange 8.0.0 Product Guide

Tasks
• Configure corrupt content settings on page 101Configure settings in a policy to identify emails with corrupt content and take necessaryactions.
• Configure protected content settings on page 102Configure settings in a policy to identify emails with protected content and take necessaryactions.
• Configure encrypted content settings on page 102Configure settings in a policy to identify emails with encrypted content and take necessaryactions.
• Configure signed content settings on page 102Configure settings in a policy to identify emails with signed content and take necessaryactions.
• Configure password-protected file settings on page 103Configure settings in a policy to identify emails with password‑protected archives and takenecessary actions.
• Configure mail size filtering settings on page 104Configure mail size filtering settings in a policy detect email messages based on their size,number of attachments and attachment size.
• Configure scanner control settings on page 104Configure settings in a policy that defines the nesting level, expanded file size, andmaximum scan time that is allowed, when an email is scanned.
• Configure MIME mail settings on page 105Configure settings in a policy to identify encoded MIME messages and take necessaryactions.
• Configure HTML file settings on page 107Configure settings in a policy to scan for elements or remove executables such as ActiveX,Java applets, VBScripts in HTML components in an email.
Configure corrupt content settingsConfigure settings in a policy to identify emails with corrupt content and take necessary actions.
The content of some email messages can become corrupt and cannot be scanned. Corrupt contentpolicies specify how email messages with corrupt content are handled when detected.
Task
1 From Policy Manager, select a submenu item that has the filter.
The policy page for the submenu item appears.
2 Click Master policy or any subpolicy you want to configure, then click List All Scanners tab.
3 Click Corrupt Content.
If you add a new filter to the policy, you can specify a time slot when to enable the filter, using Whattime would you like this to apply drop‑down list.
4 In Actions, click Edit to specify the filter actions that must be taken when corrupt content is detected.
5 Click Save to return to the policy page.
6 Click Apply to configure these settings to a policy.
Policy ManagerManage filter settings for a policy 5
McAfee Security for Microsoft Exchange 8.0.0 Product Guide 101

Configure protected content settingsConfigure settings in a policy to identify emails with protected content and take necessary actions.Protected content policies specify how email messages with protected content are handled whendetected.
Task1 From Policy Manager, select a submenu item that has the filter.
The policy page for the submenu item appears.
2 Click Master policy or any subpolicy you want to configure, then click List All Scanners tab.
3 Click Protected Content.
If you add a new filter to the policy, you can specify a time slot when to enable the filter, using Whattime would you like this to apply drop‑down list.
4 In Actions, click Edit to specify the filter actions that must be taken when protected content isdetected.
5 Click Save to return to the policy page.
6 Click Apply to configure these settings to a policy.
Configure encrypted content settingsConfigure settings in a policy to identify emails with encrypted content and take necessary actions.Email messages can be encrypted to prevent access by unauthorized parties. Encrypted content usesa key and encryption mathematical algorithms to decrypt it. Encrypted content policies specify howencrypted email messages are handled when detected.
Task1 From Policy Manager, select a submenu item that has the filter.
The policy page for the submenu item appears.
2 Click Master policy or any subpolicy you want to configure, then click List All Scanners tab.
3 Click Encrypted Content.
If you add a new filter to the policy, you can specify a time slot when to enable the filter, using Whattime would you like this to apply drop‑down list.
4 In Actions, click Edit to specify the filter actions that must be taken when encrypted content isdetected.
5 Click Save to return to the policy page.
Encrypted content settings are applicable to encrypted attachments in internal emails and toencrypted internet email messages.
6 Click Apply to configure these settings to a policy.
Configure signed content settingsConfigure settings in a policy to identify emails with signed content and take necessary actions.Whenever information is sent electronically, it can be accidentally or willfully altered. To overcome thisissue, some email software use a digital signature — the electronic form of a handwritten signature.
5 Policy ManagerManage filter settings for a policy
102 McAfee Security for Microsoft Exchange 8.0.0 Product Guide

A digital signature is extra information added to a sender’s message that identifies and authenticatesthe sender and the information in the message. It is encrypted and acts like a unique summary of thedata. Typically, a long string of letters and numbers appears at the end of a received email message.The email software then re‑examines the information in the sender’s message, and creates a digitalsignature. If that signature is identical to the original, the data has not been altered.
If the email message contains a virus, bad content, or is too large, the software might clean orremove some part of the message. The email message is still valid and can be read, but the originaldigital signature is 'broken'. The recipient cannot rely on the contents of the email message becausethe contents might also have been altered in other ways. Signed content policies specify how emailmessages with digital signatures are handled.
Task1 From Policy Manager, select a submenu item that has the filter.
The policy page for the submenu item appears.
2 Click Master policy or any subpolicy you want to configure, then click List All Scanners tab.
3 Click Signed Content.
If you add a new filter to the policy, you can specify a time slot when to enable the filter, using Whattime would you like this to apply drop‑down list.
4 In Actions, click Edit to specify the filter actions that must be taken when signed content is detected.
5 Click Save to return to the policy page.
Signed content settings are applicable to signed emails and attachments.
6 Click Apply to configure these settings to a policy.
Configure password-protected file settingsConfigure settings in a policy to identify emails with password‑protected archives and take necessaryactions.
Password‑protected files cannot be accessed without a password and cannot be scanned.Password‑protected files policies specify how email messages that contain a password‑protected filesare handled.
Task1 From Policy Manager, select a submenu item that has the filter.
The policy page for the submenu item appears.
2 Click Master policy or any subpolicy you want to configure, then click List All Scanners tab.
3 Click Password‑Protected Files.
If you add a new filter to the policy, you can specify a time slot when to enable the filter, using Whattime would you like this to apply drop‑down list.
4 In Actions, click Edit to specify the filter actions that must be taken when an email messagecontaining password‑protected file is detected.
5 Click Save to return to the policy page.
6 Click Apply to configure these settings to a policy.
Policy ManagerManage filter settings for a policy 5
McAfee Security for Microsoft Exchange 8.0.0 Product Guide 103

Configure mail size filtering settingsConfigure mail size filtering settings in a policy detect email messages based on their size, number ofattachments and attachment size.
Task
1 From Policy Manager, select a submenu item that has the anti‑virus scanner.
The policy page for the submenu item appears.
2 Click Master policy or any subpolicy you want to configure, then click List All Scanners tab.
3 Click Mail Size Filtering.
4 In Activation, select Enable to activate the email size filter settings for the selected submenu item.
If you add a new filter to the policy, you can specify a time slot when to enable the filter, using Whattime would you like this to apply drop‑down list.
5 In Options, you can use:
• Default Settings — To view a summary of the mail size option set that is used by default.
• <create new set of options> — To configure mail size filtering options. The options are:
• Instance name — Type a unique name for the mail size filter setting instance. This field ismandatory.
• Maximum overall mail size (KB) — Specify the maximum size (in kilobytes) that an email messagecan be. You can specify a value from 2 KB to 2 GB, where the default value is 20,000 KB.
• Maximum attachment size (KB) — Specify the maximum size (in kilobytes) that the attachments ofan email message can be. You can specify a value from 1 KB to 2 GB, where the defaultvalue is 4096 KB.
• Maximum number of attachments — Specify the maximum number of attachments an emailmessage can have. You can specify up to 999, where the default value is 25.
• Edit — To edit the selected option set.
6 In Actions, click Edit. Specify the mail size filter actions to take, if the value exceeds the specifiedsettings for these options:
• Message Size
• Attachment Size
• Attachment Count
7 Click Save to return to the policy page.
Mail size filtering settings are applicable only for inbound email messages.
Configure scanner control settingsConfigure settings in a policy that defines the nesting level, expanded file size, and maximum scantime that is allowed, when an email is scanned.
Task
1 From Policy Manager, select a submenu item that has the scanner.
The policy page for the submenu item appears.
5 Policy ManagerManage filter settings for a policy
104 McAfee Security for Microsoft Exchange 8.0.0 Product Guide

2 Click Master policy or any subpolicy you want to configure, then click List All Scanners tab.
3 Click Scanner Control.
If you add a new filter to the policy, you can specify a time slot when to enable the filter, using Whattime would you like this to apply drop‑down list.
4 In Options, click <create new set of options>.
5 In Instance name, type a unique name for the scanner control filter setting instance. This field ismandatory.
6 In Maximum nesting level, specify the level to which the scanner should scan, when an attachmentcontains compressed files, and other compressed files within. You can specify a value from 2–100,where the default value is 10.
7 In Maximum expanded file size (MB), specify the maximum size allowed for a file when it is expanded forscanning. You can specify a value from 1–2047, where the default value is 10.
8 In Maximum scan time (minutes), specify the maximum time allowed to scan any file. You can specify avalue from 1–999, where the default value is 1.
9 Click Save to return to the policy page.
10 In Alert selection, you can select which alert to use when a scanner control option is triggered. Youcan use:
• Create — To create a new alert message for this policy.
• View/Hide — To display or hide the alert text. If the text is hidden, clicking this link displays it. Ifthe text is displayed, clicking this link hides it.
11 In Actions, click Edit to specify the actions to take, if the value exceeds the specified settings forthese options:
• Maximum nesting level
• Maximum expanded file size (MB)
• Maximum scanning time (minutes)
12 Click Save to return to the policy page.
13 Click Apply to configure these settings to a policy.
Configure MIME mail settingsConfigure settings in a policy to identify encoded MIME messages and take necessary actions.
Multipurpose Internet Mail Extensions (MIME) is a communications standard that enables the transferof non‑ASCII formats over protocols (such as SMTP) that supports only 7‑bit ASCII characters.
MIME defines different ways of encoding the non‑ASCII formats so that they can be represented usingcharacters in the 7‑bit ASCII character set.
Task1 From Policy Manager, select a submenu item that has the filter.
The policy page for the submenu item appears.
2 Click Master policy or any subpolicy you want to configure, then click List All Scanners tab.
Policy ManagerManage filter settings for a policy 5
McAfee Security for Microsoft Exchange 8.0.0 Product Guide 105

3 Click MIME Mail Settings.
If you add a new filter to the policy, you can specify a time slot when to enable the filter, using Whattime would you like this to apply drop‑down list.
4 In Options, select <create new set of options>.
The Mail Settings page appears.
5 In Instance name, type a unique name for the MIME email filter setting instance. This field ismandatory.
6 In Options tab, type a Prefix to message subject.
a In Preferred re‑encoding of attachments in a MIME message, select a re‑encoding method that is used whenre‑encoding attachments in MIME messages from the options available.
b In Preferred re‑encoding of modified subject headers, select a re‑encoding method that is used whenre‑encoding the subject headers in the MIME messages from the options available.
c In If re‑encoding a subject header fails, select one of these options :
• Treat as an error — If the MIME message is bounced.
• Fallback to UTF‑8 — If the MIME message is encoded into UTF‑8.
7 In Advanced tab, select one of these encoding methods to use while encoding the text part of anemail message:
• Quoted‑Printable, which is best suited for messages that mainly contain ASCII characters, but alsocontains some byte values outside that range.
• Base64, which has a fixed overhead and is best suited for non‑text data, and for messages thatdo not have a lot of ASCII text.
• 8‑Bit, which is best suited for use with SMTP servers that support the 8BIT MIME transport SMTPextension.
You can perform step 6b only if you select Re‑encode using the original encoding scheme or Re‑encode using thefollowing character set from Preferred re‑encoding of modified subject headers.
a Select or deselect Do not encode if text is 7‑bit as required.
b In Default decode character set, select a character set that should be used for decoding when one isnot specified by the MIME headers.
c In Maximum number of MIME parts, specify the maximum number of MIME parts that can be containedin a MIME message. Default value is 10000 MIME parts.
d In Header corruption in a MIME message, select the required option.
e In NULL characters in the headers of a MIME message, select the required option.
f In Quoted‑printable characters encoding in a MIME message, select the required option.
8 In MIME Types tab, specify which MIME types should be treated as text attachments and which, asbinary attachments.
Click Add to add the MIME types to the list or Delete to delete a MIME type from a list. Duplicateentries are not allowed.
5 Policy ManagerManage filter settings for a policy
106 McAfee Security for Microsoft Exchange 8.0.0 Product Guide

9 In Character Sets tab, select Character set and Alternatives, deselect the Fixed checkbox, and click Add tospecify an alternative character set mapping to the one specified in the MIME message.
Click Edit to edit character mappings, Delete to delete character mappings and click Save to apply anychanges you have made to the character mappings.
The Save option is available only when you click Edit.
10 Click Save.
11 In Alert selection, you can select which alert to use when a MIME type is blocked. You can use:
• Create — To create a new alert message for this policy.
• View/Hide — To display or hide the alert text. If the text is hidden, clicking this link displays it. Ifthe text is displayed, clicking this link hides it.
12 In Incomplete message actions, click Edit to specify the filter actions that must be taken when a partialMIME or external MIME type is encountered.
13 Click Save to return to the policy page.
14 Click Apply to configure these settings to a policy.
Configure HTML file settingsConfigure settings in a policy to scan for elements or remove executables such as ActiveX, Javaapplets, VBScripts in HTML components in an email.If any of this content is found in HTML, it is removed. This filter works only if Content Scanner isenabled.
Task1 From Policy Manager, select a submenu item that has the filter.
The policy page for the submenu item appears.
2 Click Master policy or any subpolicy you want to configure, then click List All Scanners tab.
3 Click HTML Files.
4 In Options, click <create new set of options>.
The HTML Files page appears.
5 In Instance name, type a unique name for the filter setting instance. This field is mandatory.
6 In Scan the following elements, select any of these option(s):
• Comments — To scan for comment elements in the HTML message. For example:
<!‑‑ comment text ‑‑!>
• Metadata — To scan for metadata elements in the HTML message. For example:
< META EQUI="Expires" Content="Tue, 04 January 2013 21:29:02">
• Links URLs ("<ahref=...") — To scan for URL elements in the HTML message. For example:
<a HREF="McAfee.htm">
Policy ManagerManage filter settings for a policy 5
McAfee Security for Microsoft Exchange 8.0.0 Product Guide 107

• Source URLS ("<img src=...") — To scan for source URL elements in the HTML message. For example:
<IMG SRC="..\..\images\icons\mcafee_logo_rotating75.gif">
• JavaScript / VBScript — To scan for JavaScript or Visual Basic script in the HTML message. Forexample:
<script language="javascript" scr="mfe/mfe.js">
7 In Remove the following executable elements, select any of these option(s):
• JavaScript / VBScript — To remove JavaScript or Visual Basic script elements from the HTMLmessage. For example:
<script language="javascript" scr="mfe/mfe.js">
• Java applets — To remove Java applet elements from the HTML message. For example:
<APPLET code="XYZApp.class" codebase="HTML ....."></APPLET>
• ActiveX controls — To remove ActiveX control elements from the HTML message. For example:
<OBJECT ID="clock" data="http://www.mcafee.com/vscan.png" type="image/png"> VirusScan Image </OBJECT>
• Macromedia Flash — To remove Macromedia Flash elements from the HTML message. This optiongets enabled if you have selected ActiveX controls. For example:
<EMBED SCR="somefilename.swf" width="500" height="200">
8 Click Save to return to the policy page.
9 Click Apply to configure these settings to a policy.
Manage miscellaneous settings for a policyCreate or edit miscellaneous settings such as alerts and disclaimers, that are applied when a policy istriggered.The available options are:
• Alert Settings
• Disclaimer Text
Tasks• Configuring alert message settings on page 109
Configure settings in a policy to notify the end user with an alert message, when adetection occurs.
• Configuring disclaimer text settings on page 110Configure disclaimer text settings in a policy which is a piece of text, typically a legalstatement that is added to all outbound email messages.
5 Policy ManagerManage miscellaneous settings for a policy
108 McAfee Security for Microsoft Exchange 8.0.0 Product Guide

Configuring alert message settingsConfigure settings in a policy to notify the end user with an alert message, when a detection occurs.
Task1 From Policy Manager, select a submenu item that has the scanner.
The policy page for the submenu item appears.
2 Click Master policy or any subpolicy you want to configure, then click List All Scanners tab.
3 Click Alert Settings.
4 Select Enable to activate the alert message settings for the selected submenu item.
• If you are configuring settings for a subpolicy, select Use configuration from parent policy toinherit settings from the parent policy.
• If you add a new alert message setting to the policy, you can specify a time slot whento enable, using What time would you like this to apply drop‑down list.
5 In Options, select the default alert settings available or select <create new set of options> to define youralert settings.
For step‑by‑step instructions on how to create a new alert, see the Create a new alert section.
6 Click Edit to modify an existing alert.
The Alert Settings page appears.
7 Select HTML or Plain text as the Alert format.
8 From the Character encoding drop‑down menu, select a required character set.
9 In Alert filename, specify the file name for this alert, including the appropriate HTML (.htm) or plaintext (.txt) file extension.
10 Select or deselect Enable alert headers to enable the use of an alert header.
11 In the Alert header text entry box, type the header for the alert.
12 From Show, select HTML content (WYSIWYG) or HTML content (source) depending on whether the HTML textshould be shown as compiled code or source code in the Alert header.
The Show option is only available if you have selected HTML as the alert message format.
13 Select Enable alert footers to enable the use of an alert footer as needed.
14 In the Alert footer text entry box, type the footer for the alert.
15 From Show, select HTML content (WYSIWYG) or HTML content (source) depending on whether the HTML textshould be shown as compiled code or source code in the Alert footer.
The Show option is only available if you have selected HTML as the alert message format.
16 Click Save to return to the policy page.
17 Click Apply to configure these settings to a policy.
Policy ManagerManage miscellaneous settings for a policy 5
McAfee Security for Microsoft Exchange 8.0.0 Product Guide 109

Configuring disclaimer text settingsConfigure disclaimer text settings in a policy which is a piece of text, typically a legal statement that isadded to all outbound email messages.
When assigned to a policy, all emails leaving the exchange organization through the MSME server willhave the disclaimer text applied, based on the settings configured.
Disclaimer text settings is applicable only on Microsoft Exchange Transport servers.
Task1 From Policy Manager, select a submenu item that has the scanner.
The policy page for the submenu item appears.
2 Click Master policy or any subpolicy you want to configure, then click List All Scanners tab.
3 Click Disclaimer Text.
4 Select Enable to activate the disclaimer text settings for the selected submenu item.
• If you are configuring settings for a subpolicy, select Use configuration from parent policy toinherit settings from the parent policy.
• If you add a new disclaimer text setting to the policy, you can specify a time slotwhen to enable, using What time would you like this to apply drop‑down list.
5 In Options, select <create new set of options>. The Disclaimer Text page appears.
6 In Instance name, type a unique name for the disclaimer text setting instance. This field is mandatory.
7 From Disclaimer format, you can select:
• HTML — To specify whether you want the disclaimer to appear in HTML format in the notificationemail.
• Plain text — To specify whether you want the disclaimer to appear in plain text format in thenotification email.
8 In Edit Disclaimer content, type the disclaimer text message.
9 From Show, select HTML content (WYSIWYG) or HTML content (source) depending on whether the HTML textshould be shown as compiled code or source code in the Alert footer.
The Show option is only available if you have selected HTML as the disclaimer text format.
10 From the Insert disclaimer drop‑down list, select Before any message text, After any message text or As anattachment depending on where and how the disclaimer text should be inserted in the email message.
11 Click Save to return to the policy page.
Disclaimers are applicable only to outbound email messages.
12 Click Apply to configure these settings to a policy.
5 Policy ManagerManage miscellaneous settings for a policy
110 McAfee Security for Microsoft Exchange 8.0.0 Product Guide

6 Settings and Diagnostics
Settings & Diagnostics has menus for MSME feature enablement and disablement, feature configuration,feature administration and logs. Configure these settings based on your organization's securitypolicies.
To modify or view MSME product settings, from the product's user interface, click Settings & Diagnostics.This table briefly explains when to configure these settings:
Table 6-1 Settings & Diagnostics
Use... To...
On‑Access Settings
The On‑Access Settingsare available only onMicrosoft Exchange2007/2010 server. AsMicrosoft VSAPIsupport is removedfrom MicrosoftExchange 2013, theOn‑Access VSAPI andBackground scansettings feature isdisabled on Exchange2013 server.
Define what to do with an email should a scan fail. The options are:• Allow Through
• Remove
It also has sub‑menus for enabling or disabling settings for:
• Microsoft Virus Scanning API (VSAPI)
• Background Scan Settings
• Transport Scan Settings
Mailbox Exclusion Settings Define which mailboxes to exclude from On‑Access VSAPI scanning.
Notifications • Define an administrator email account to receive notifications orsend notification emails to specific reviewers or DL's, when an emailis detected.
• Create customized notification emails that goes out to users when anemail is quarantined.
• Define product health alerts that are emailed to the administrator ona daily‑basis or immediately when specific events occur, such asissues with the Postgres database or loading a service fails.
Anti‑Spam • Define settings for junk email folder in which to forward a spam on aEdge Transport (Gateway) server.
• Enable or disable McAfee GTI message reputation feature.
• Enable or disable McAfee GTI IP reputation feature.
6
McAfee Security for Microsoft Exchange 8.0.0 Product Guide 111

Table 6-1 Settings & Diagnostics (continued)
Use... To...
Detected Items Configure and manage quarantine repositories, using either:• McAfee Quarantine Manager — To configure communication settings
between MSME and MQM server (if any).
• Local Database — To manage and administer the local quarantinedatabase activities such as purge and optimization.
User Interface Preferences Define settings in the Dashboard such as the refresh rate, reportsettings, unit scale of graphics, reporting interval, graph and chartsettings.
Diagnostics Define settings for debug event and product logs, including informationon how big the logs are and where they are stored. Diagnosticssettings include:• Debug Logging
• Event Logging
• Product Log
• Error Reporting Service
Product Log View the Product Log and filter the output by date, type or description.
DAT Settings Keep older DATs instead of over‑writing with each update and definehow many detection definition files to maintain.
Import and Export Configuration Set up your current MSME server with the same configurations as onealready built, restore default or enhanced settings, or create SiteListsto point to DAT download sites.
Proxy Settings Configure or modify proxy settings for the McAfee Anti‑Spam Rules UpdaterService.
If you modify any of these settings, make sure you click Apply to save the changes. The backgroundcolor behind Apply, changes to:
• Yellow — If you have changed the existing setting or the change is still not applied.
• Green — If you have not changed the existing setting or the change is applied.
Contents On-Access settings Configure mailbox exclusion settings Notification settings Anti-spam settings Detected items settings User interface preferences settings Diagnostics settings View product logs Configure DAT settings Import and export configuration settings Configure anti-spam proxy settings
6 Settings and Diagnostics
112 McAfee Security for Microsoft Exchange 8.0.0 Product Guide

On-Access settingsOn‑access scanning is triggered at the Gateway or every time email messages are accessed, todetermine if an item is detected by the on‑access policy. On‑access scanning is also known as real‑timescanning.
Each scan has its own benefit based on the Exchange server role where MSME is installed. This tablehelps you understand the types of scan, its function, and when each scan is applicable:
ExchangeServer role
Applicablepolicies
Scan type Description
Edge Transportor HubTransport
• On‑Access
• Gateway
On‑AccessTransport scan
Scans for threats before it reaches theMailbox server. By enabling this, MSME candetect threats at the perimeter of yourorganization and thus reduce the load on theMailbox server.
Mailbox • On‑Access On‑Access VSAPIscan
Scans for threats when an email is accessedby the end‑user using an email client such asOutlook.
Proactive scan Scans for threats before an email is writtento the Microsoft Exchange Information Store.
Outbox scan Scans for threats in an email that is currentlyin the Outbox folder.
Background scan A low‑priority scan which scans for threats onall Exchange databases in the background.
From the General section, define an action to take when a scan failure occurs. A scan failure can occurdue to several reasons. Some of the reasons could be due to technical issues such as:
• Scan timeout
• Scan Engine failed to load
• DAT issues
• Incorrectly formatted emails
For example, if there is a DAT mismatch in the registry and actual location (\bin\DATs), a scan failurewill occur.
In case of a scan failure, an action will be triggered based on the settings specified under Settings &Diagnostics | On‑Access Settings | General | On Scan Failure.
Table 6-2 Option definitions
Option Definition
On Scan Failure • Allow Through — Allows through the email message to theintended recipient, when a scan failure occurs.
• Remove — Removes the email message, when a scan failureoccurs.
McAfee recommends that you always set this option to Allow Through to avoid legitimate emails beingquarantined should a scan failure occur. By default, this option is set to Allow Through, so that emails arenot lost during a scan failure.
Settings and DiagnosticsOn-Access settings 6
McAfee Security for Microsoft Exchange 8.0.0 Product Guide 113

The other categories in the On‑Access Settings page are:
• Microsoft Virus Scanning API (VSAPI)
• Background Scan Settings
• Transport Scan Settings
For more information on the types of scan, refer McAfee KnowledgeBase article KB51129.
Microsoft Virus Scanning API (VSAPI) settingsMicrosoft VSAPI allows MSME to scan emails when they are accessed by the end‑user using any emailclient.
In Microsoft Exchange, emails are stored in a database called Exchange Information Store. When anew mail is received, the Exchange server notifies the outlook client about a change. This is whenOn‑access scan is triggered.
This feature is available only on Microsoft Exchange 2007/2010 Server with Mailbox role.
Table 6-3 Option definitions
Option Definition
Enable Select to scan email messages only when they are accessed by the end‑user using anemail client such as Outlook. This feature scans emails that are already available inthe Microsoft Exchange Information Store or if there is a mismatch in the AV stamp.
Proactivescanning
Select to scan email messages before it is being written to the Microsoft ExchangeInformation Store.Enable this feature in these situations:
• Where MSME is not configured on the HUB Transport server and if an infected emailreaches the Mailbox server, it will be detected before it is being written to theExchange Information Store.
• Usually content posted to a public folder database is usually not routed through aHUB Transport server. In order to ensure that the content is scanned before it getsto the store, it is recommended that you enable proactive scanning for public folderdatabases.
OutboxScanning
Select to scan email messages in the Outbox folder.MSME scans the email in the Outbox itself, even before the email reaches the HUBTransport server, thus reducing the load on the HUB server.
Lower Age Limit(seconds)
Specify a value, where emails received within the specified duration are only scanned.Emails received before the specified time will not be scanned.By default, the value is set to 86400 seconds, which is equal to one day.
Scan Timeout(seconds)
Maximum time allowed to scan an email. If scanning an email exceeds the specifiedvalue, the action specified under Settings & Diagnostics | On‑Access Settings | General | On ScanFailure will occur. By default, the value is set to 180 seconds.
Number of ScanThreads
Specify the number of pool threads used to process items in the On‑access andProactive scan queue. The default value is 2 * <# of processors> + 1. McAfeerecommends that you select the Default checkbox for better performance.
6 Settings and DiagnosticsOn-Access settings
114 McAfee Security for Microsoft Exchange 8.0.0 Product Guide

Background scan settingsMethodically scan the desired messages stored in a database. For each database, a thread running atbelow normal priority enumerates all the folders in the database and then requests MSME to scan thecontent as appropriate.
Table 6-4 Option definitions
Option Definition
Enable Select to scan the entire database in the background, after a virus outbreak. Bydefault this option is disabled.
Schedule Schedule when to enable or disable background scanning.• Click Enable At to specify when to start background scanning.
• Click Disable At to specify when to stop background scanning.
• Schedule this during non‑peak hours of the day or during weekends.
• If you have not created a schedule, background scan starts whenever aDAT update occurs.
Only Messages WithAttachment
Select to scan only email messages with attachments. This feature is useful if youare concerned about a specific virus that spreads through attachments. As theemail messages having attachments are more vulnerable and have maliciouscontent, any viruses or executables will be replaced in this task.Enabling this feature saves time, as MSME scans only emails with attachments.
Only Un‑ScannedItems
Select to scan email messages that are unscanned. Enable this in scenarios whereyou had Microsoft VSAPI disabled on the Mailbox server for sometime and want toscan the unscanned items.
Force Scan All Select to scan items irrespective of whether the item has a AV scan stamp or not.
Update Scan Stamp Select to update email messages with the latest AV stamp.
From Date To perform background scanning only on emails received from the date specified.
To Date To perform background scanning only on emails received until the date specified.Select Till Date to scan emails until the current system date.
Transport scan settingsTransport scanning allows you to scan SMTP traffic before it enters the Exchange information store.SMTP Transport scanning can perform scanning of routed email messages that are not destined for thelocal server and can stop delivery of messages.
Table 6-5 Option definitions
Option Definition
Enable Select to enable scanning at the Exchange Transport level. By default, this option isenabled.
This option will work only on Microsoft Exchange servers with Edge Transport, HubTransport or Mailbox + Hub role.
Transport ScanStamp
Select to apply DAT signatures to the email header, so that the emails are notscanned again at the Mailbox role.Recommended settings: If you have enabled Transport scan, make sure toenable this option as well.
Direction BasedScanning
Configure on‑access scan settings based on the email flow.
Settings and DiagnosticsOn-Access settings 6
McAfee Security for Microsoft Exchange 8.0.0 Product Guide 115

Table 6-5 Option definitions (continued)
Option Definition
Scan Inbound Mails Select to scan any email message that comes into the Exchange server orExchange organization.
Scan Outbound Mails Select to scan any email message that leaves your Exchange server or Exchangeorganization. Email messages are designated as outbound, if at least one recipienthas an external email address.
Scan Internal Mails Select to scan email messages that are being routed from one location inside yourdomain to another location inside your domain. Anything within the Exchangeserver's Authoritative Domain is considered as an internal domain. Email messagesare designated as internal if they originate from inside your domain and all therecipients are located inside your domain.
Configure mailbox exclusion settingsConfigure mailboxes that are to be excluded from a VSAPI scan.
Configure mailbox exclusion settings during specific scenarios where:
• Company officials who do not want their emails scanned.
• Company policy that identifies non‑scan folders.
McAfee does not recommend excluding mailboxes and cannot be held liable, if you have any mailboxesthat are infected due to the exclusion settings.
Task1 Click Settings & Diagnostics | Mailbox Exclusion Settings. The Mailbox Exclusion Settings page appears.
2 From the Available mailboxes pane, select a mailbox and click >>.
The selected mailbox is moved to the Mailboxes to exclude pane. Repeat this step for all mailboxes thatare to be excluded from a VSAPI scan.
To remove a mailbox from the exclusion list, select a mailbox in the Mailboxes to exclude pane and click<< to move the mailbox to the list of Available mailboxes.
3 Click Apply to save the settings.
Notification settingsAllows you to configure the content and SMTP address for the administrator to send emailnotifications, when an email is quarantined.
From the product's user interface, click Settings & Diagnostics | Notifications to configure notificationsettings.
6 Settings and DiagnosticsConfigure mailbox exclusion settings
116 McAfee Security for Microsoft Exchange 8.0.0 Product Guide

In the Notifications page, you can use:
• Settings — To define an email account to receive notifications, when an email is quarantined.Additionally, you can send notification emails to specific reviewers or DL's, when an email isquarantined due to a specific scanner or filter.
• Template — To create customized notification email that goes out to specific users, when an email isquarantined.
• Product Health Alerts — To define product health alerts that are emailed to the administrator on adaily‑basis or immediately when specific events occur, such as issues with the Postgres database orloading a service fails.
Configure notification settingsConfigure an email account to receive notifications, when an email is quarantined. Also sendnotification emails to specific reviewers or DL's, when an email is detected.
Task1 From the product's user interface, click Settings & Diagnostics | Notifications.
2 In the Notifications | Settings tab, you can use:
Table 6-6 Option definitions
Option Definition
General To define simple email notification settings.
Administrator E‑mail To notify the Microsoft Exchange administrator in case of an event such asquarantine action or alert.
• To send email notifications to multiple users, use semi‑colon (;) asthe delimiter.
• To send email notifications to a distribution list (DL), specify theSMTP address of the DL.
Sender E‑mail To specify the sender's email address in the From field of the notificationemail.
Enable Task resultsnotification
To send emails with on‑demand scan and update tasks results. The email is inHTML format and has the same data and format as Task Result window in theuser interface. This feature can be enabled/disabled through this option. Bydefault, this feature is disabled.
Advanced To define advanced notification settings such as specifying individual emailaddresses and subject line for each scanner or filter.
Mail Body To define a generic email message body for all notifications.
3 Click Apply to save the settings.
Edit notification templateView or edit the message body of the notification email sent to end‑user.
Task1 From the product's user interface, click Settings & Diagnostics | Notifications.
2 In the Notifications | Template tab, you can use:
Settings and DiagnosticsNotification settings 6
McAfee Security for Microsoft Exchange 8.0.0 Product Guide 117

Table 6-7 Option definitions
Option Definition
Template To view the notification template for a specific end‑user. The available options are:• Internal Sender
• Internal Recipient
• External Sender
• External Recipient
You can define specific notification text for each of these user types.
Subject To specify the subject line for the notification email. By default the notificationsubject is McAfee Security for Microsoft Exchange Alert.
Notification Text To preview of the notification email's message body, based on the selected Template.The notification text contains information about the quarantined item, such as thedate and time, subject, action taken and so on.
Edit To modify the notification text using HTML in plain text format. After editing thenotification based on your company's requirement, click Save to apply the changes.
3 Click Apply to save the settings.
You have now successfully viewed or modified the notification template. For more information on theavailable notification fields, refer to the Notification fields that you can use section.
Notification fields that you can useUse these fields to include them in your notifications. For example, if you want the name of thedetected item and the action taken when it was detected, use %vrs% and %act% in the Settings &Diagnostics | Notifications | Template page.
Table 6-8 Notification fields you can use
Notification field options Description
%dts% Date and time
%sdr% Sender
%ftr% Filter
%fln% File name
%rul% Rule name
%act% Action taken
%fdr% Folder
%vrs% Detection name
%trs% State (Train state)
%tik% Ticket number
%idy% Scanned by
%psn% Policy name
%svr% Server
%avd% Anti‑virus DAT
%ave% Anti‑virus engine
%rpt% Recipient
%rsn% Reason
6 Settings and DiagnosticsNotification settings
118 McAfee Security for Microsoft Exchange 8.0.0 Product Guide

Table 6-8 Notification fields you can use (continued)
Notification field options Description
%sbj% Subject
%ssc% Spam score
%ase% Anti‑spam engine
%asr% Anti‑spam rules
Enable product health alerts Send notifications immediately or on a daily‑basis to the Microsoft Exchange administrator, when aproduct specific task fails.
Task1 From the product's user interface, click Settings & Diagnostics | Notifications.
2 In the Notifications | Product Health Alerts tab, you can use:
Table 6-9 Option definitions
Option Definition
Enable To enable sending product health alert notifications to the administrator, when aproduct specific task fails.
Alert ePolicyOrchestrator
To alert the McAfee ePolicy Orchestrator server that manages this MSME server,when a product specific task fails.
Alert Administrator To send the product health alerts to the email address specified under Settings &Diagnostics | Notifications | Settings | Administrator E‑mail.
Notify when To notify the administrator when any of the selected product specific task fails.You can select these options to send product health alerts to the administrator:
These options may vary based on your Exchange server role.
• Downloading DATs/Anti‑Virus Engine fails
• Downloading Anti‑Spam Rules fails
• Loading Anti‑Virus Engine fails
• Loading TransportScan module fails
• Loading VSAPI module fails
• RPCServ process quits unexpectedly
• DLLHost process quits unexpectedly
• Postgres process fails
• Postgres failed to quarantine or log detections
• Postgres database initialization fails
• Postgres failed to store a record
• On‑Demand scan fails
• Database diskspace goes below the threshold
• Product service fails to start
• McAfee Global Threat Intelligence file reputation scanning fails
Settings and DiagnosticsNotification settings 6
McAfee Security for Microsoft Exchange 8.0.0 Product Guide 119

Table 6-9 Option definitions (continued)
Option Definition
Immediate To send a notification to the administrator immediately after the task fails.
Daily To send a notification to the administrator on a daily‑basis at a specific timewhen the task fails.
3 Click Apply to save the settings.
You have now successfully enabled the Product Health Alerts feature.
Anti-spam settingsDefine settings for junk email folder in which to forward a spam detected on a Edge Transport or HubTransport server. Also enable or disable settings for the McAfee GTI message reputation and McAfeeGTI IP reputation feature.
Table 6-10 Option definitions
Option Definition
System JunkFolder Address
Specify the email address to which all emails categorized as spam are sent.
McAfee GTImessagereputation
McAfee Global Threat Intelligence message reputation is McAfee’s comprehensive,real‑time, cloud‑based message and sender reputation service that enables MSME toprotect your Exchange server against both known and emerging message‑basedthreats such as spam.
McAfee receives millions of email queries daily, takes a fingerprint of the messagecontent (versus the content itself, for privacy reasons) and analyzes it along manydimensions. Message reputation combines with factors such as spam‑sendingpatterns and IP behavior to determine the likelihood that the message in question ismalicious.
The score is based not only on the collective intelligence from sensors querying theMcAfee cloud and the analysis performed by McAfee Labs researchers and automatedtools, but also on the correlation of cross‑vector intelligence from file, web, andnetwork threat data. MSME uses this score to determine an action based on the PolicyManager | Gateway policy.
Enable To block email messages at the gateway, based on the email's message reputationscore.
Perform messagereputation afterAnti‑Spam
To perform McAfee GTI message reputation after performing a scan based on thelocal MSME policy.
Messagereputationthreshold
Specify a threshold value to block email messages based on the message reputationscore. By default, the value is set to 80.
Action to take Select:• Drop and Quarantine — To drop the email and quarantine it in the database. When an
email is dropped due to this setting, the sender will not be notified on the emaildelivery status.
• Pass score to Anti‑Spam Engine — To send the message reputation score detected byMcAfee GTI to the Anti‑Spam engine. This option is available only when you enablethe Perform message reputation after Anti‑Spam option.
6 Settings and DiagnosticsAnti-spam settings
120 McAfee Security for Microsoft Exchange 8.0.0 Product Guide

Table 6-10 Option definitions (continued)
Option Definition
McAfee GTI IPreputation
IP reputation acts as the first level of protection for your Exchange environment, bysafeguarding your Exchange server from unsafe email sources. It enables you toleverage the threat intelligence gathered by McAfee Global Threat Intelligence toprevent damage and data theft by blocking the email messages at the gateway,based on the source IP address.
Enable To block email messages at the gateway, based on the source IP address.
IP reputationthreshold
Specify a threshold value to block email messages based on the IP reputation score.
The action will be applied to all IP addresses having a reputation score greater thanthe selected threshold. All other email messages will be allowed through.
Action to take Select either of these options to take an action on an email message, based on thereputation score of the source IP address:• Drop connection and Log — To drop the email from the detected source IP address and
log the action taken on the item.
• Reject connection and Log — To reject the email from the source IP, by notifying thesender and log the action taken on the item.
Detected items settingsSpecify repository settings to store the quarantined items detected by MSME.
Configure and manage quarantine repositories using:
• McAfee Quarantine Manager — To quarantine detected items on the MQM server.
• Local Database — To quarantine detected items in the local MSME server.
Quarantine using McAfee Quarantine ManagerSpecify repository settings to quarantine items detected by MSME on a McAfee Quarantine Manager(MQM) server.
McAfee products such as McAfee Security for Microsoft Exchange and McAfee Email Gateway use apre‑assigned port number to send the detection information to McAfee Quarantine Manager. McAfeeQuarantine Manager in turn uses the same port number by default, to release or send configurationinformation of the detected email messages to the McAfee product.
The communication port mentioned in the McAfee Security for Microsoft Exchange and McAfeeQuarantine Manager user interface should be the same.
You can use McAfee Quarantine Manager to consolidate the quarantine and anti‑spam managementfunctionality. It gives you a central point from which you can analyze and act upon emails and filesthat have been quarantined.
This guide does not provide detailed information about installing or using the McAfee QuarantineManager software. See the McAfee Quarantine Manager product documentation for more information.
Task1 Install McAfee Security for Microsoft Exchange software on <server 1>.
2 Install the supported McAfee Quarantine Manager software on <server 2>.
Settings and DiagnosticsDetected items settings 6
McAfee Security for Microsoft Exchange 8.0.0 Product Guide 121

3 Launch the MSME user interface from <server 1>.
4 From the product's user interface, click Settings & Diagnostics | Detected Items.
The Detected Items page appears.
5 From the McAfee Quarantine Manager section, select Enable.
6 In IP address, specify the IP address of the MQM server.
7 Use the default values 49500 for Port and Callback port.
Modify this value only if you have configured a different port value on the McAfee QuarantineManager server.
8 Click Apply to save the settings.
You have now successfully configured your MSME server to start quarantining detected items on theMQM server.
Quarantine using the local databaseSpecify repository settings to quarantine items detected by MSME to a PostgreSQL database on thelocal MSME server.
Task1 From the product's user interface, click Settings & Diagnostics | Detected Items.
The Detected Items page appears.
2 From the Local Database section, you can use:
Table 6-11 Option definitions
Option Definition
Specify location ofdatabase
To enable the Database location for storing the quarantined items detected byMSME.
Database location To specify the database location path where items detected by MSME can bestored. You can select:• <Install Folder> — To create the database sub‑folders under the MSME installation
directory.
• <System Drive> — To create the database sub‑folders under the C:\Windows\system32 directory.
• <Program Files> — To create the database sub‑folders under the Windows C:\Program Files (x86) directory.
• <Windows Folder> — To create the database sub‑folders under the C:\Windowsdirectory.
• <Data Folder> — To create the database sub‑folders under the C:\ProgramData\directory.
• <Full Path> — To store the MSME database in the complete path specified.
Specify the sub‑folder path in the field next to the drop‑down list. The defaultsub‑folder path specified is: McAfee\MSME\Data\
Maximum item size(MB)
To specify the maximum size of a quarantined item that can be stored in thedatabase. You can specify a value from 1 to 999, where the default value is 100.
6 Settings and DiagnosticsDetected items settings
122 McAfee Security for Microsoft Exchange 8.0.0 Product Guide

Table 6-11 Option definitions (continued)
Option Definition
Maximum query size(records)
To specify the maximum number of records or quarantined items you can queryfrom the Detected Items page. You can specify a value from 1 to 20000, where thedefault value is 1000.
Maximum item age(days)
To specify the maximum number of days an item will be stored in the localquarantine database, before being marked for deletion. You can specify a valuefrom 1 to 365, where the default value is 30.
Disk size checkinterval (Minute)
To specify how often MSME should check for the available disk space. You canspecify a value from 6 to 2880, where the default value is 6.
Disk spacethreshold (MB)
To specify the threshold value at which a low disk space warning notificationshould be sent to the administrator. You can specify a value from 1 to 512000,where the default value is 2048.
Make sure that Database diskspace goes below the threshold under Settings & Diagnostics |Notifications | Product Health Alerts | Notify when is enabled.
Purge of old itemsfrequency
To specify how frequently old items that are marked for deletion are deletedfrom the MSME database. The default value is set to Monthly.
Optimizationfrequency
To recover the disk space taken up by deleted database records. Based on thevalue set under Maximum item age (days), old records will be deleted if you havescheduled a purge task. After deleting these old records, MSME will still use thedisk space specified under Disk space threshold (MB) field, even if the quarantinedatabase has not reached the size limit. To optimize and shrink the database,schedule an optimization task. The default value is set to Monthly.
Always schedule an optimization task a few hours after you perform the purgetask.
Edit Schedule To modify the schedule of the purge or optimization task. Click Save aftermodifying the schedule.
3 Click Apply to save the settings.
You have now successfully configured your MSME server to start quarantining detected items on to thelocal database.
User interface preferences settingsDefine settings in the Dashboard such as the refresh rate, report settings, unit scale of graphics,reporting interval, graph and chart settings.
Configure dashboard settingsConfigure settings in the Dashboard such as the statistics, unit scale of graph, items to view in theRecently Scanned Items, and status reporting interval.
Task1 From the product's user interface, click Settings & Diagnostics | User Interface Preferences.
The User Interface Preferences page appears.
Settings and DiagnosticsUser interface preferences settings 6
McAfee Security for Microsoft Exchange 8.0.0 Product Guide 123

2 Click Dashboard Settings tab. You can use:
Table 6-12 Option definitions
Option Definition
Automatic refresh To specify whether the information shown on the Dashboard | Statistics countershould be refreshed automatically.
Refresh rate (seconds) To specify the duration (in seconds) at which the information on thedashboard should be refreshed. You can specify a value from 30 to 3600,where the default value is 60.
Maximum recentlyscanned items
To specify the maximum number of items to appear in the Dashboard | Reports |Recently Scanned Items section. You can specify a value from 10 to 100, wherethe default value is 10.
Graph scale (units) To specify the measurement units for the scale of the bar graph that isgenerated on the Dashboard | Graph section. You can specify a value from 100to 500, where the default value is 100.
Number of hours toreport for
To specify the report generation interval (in hours) to generate reports suchas status and configuration reports. You can specify a value from 1 to 24,where the default value is 7.
3 Click Apply to save the settings.
Configure graph and chart settingsConfigure settings in the Dashboard | Graph section to enhance the graph and chart settings.
Task1 Click Settings & Diagnostics | User Interface Preferences.
2 Click Graph and Chart Settings tab. You can use:
Table 6-13 Option definitions
Option Definition
3D To specify whether you want the dashboard graph to be displayed as athree‑dimensional (3D) graph.
Draw transparent To specify whether the bars in a three‑dimensional bar graph should appear solidor transparent. A solid bar hides part of any bar behind it. A transparent barallows you to look through it and see other transparent bars behind it.
Anti‑alias To specify whether you want to use anti‑aliasing techniques when displaying piecharts. When anti‑aliasing is used, pie charts have smoother curves. Ifanti‑aliasing is not used, pie chart curves appear jagged.
Explode pie To specify whether the segments should remain within the circle of the pie chartor be shown with exploded segments.
Pie angle (degrees) To specify the angle to use when displaying pie charts. You can specify a valuefrom 1 to 360, where the default value is 45.
3 Click Apply to save the settings.
6 Settings and DiagnosticsUser interface preferences settings
124 McAfee Security for Microsoft Exchange 8.0.0 Product Guide

Diagnostics settingsDetermine the causes of symptoms, mitigation for problems and solutions to issues faced while usingMSME.
In the Settings & Diagnostics | Diagnostics page, you can use:
• Debug Logging — To configure debug logging settings such as specifying the debug log level,maximum file size limit of the log file, and the file location.
• Event Logging — To configure settings to capture product or event related logs based on information,warnings or errors.
• Product Log — To configure settings for the MSME product log file (productlog.bin). Changes madeto this setting will be reflected on the Settings & Diagnostics | Product Log page.
• Error Reporting Service — To configure settings to determine whether to catch exceptions such assystem crashes and report to the user.
Configure debug log settingsConfigure settings to specify the debug log level, maximum file size limit of the log file, and the log filelocation. Use these settings when you want to troubleshoot an issue with the product and provide thelogs to McAfee Technical Support for further analysis.
Configure Debug Log settings for troubleshooting purposes and only for a limited duration. Once youcapture sufficient logs for troubleshooting, set the value for Level to None. Using debug loggingindiscriminately could fill up the hard disk space and affect the overall performance of the server. Enableit for a limited duration as advised by an authorized personnel (McAfee Technical Support Engineer).
Task1 From the product's user interface, click Settings & Diagnostics | Diagnostics.
The Diagnostics page appears.
2 In the Debug Logging tab, you can use:
Table 6-14 Option definitions
Option Definition
Level To enable or disable debug logging and specify the level of information that shouldbe captured in the debug log file. You can select:• None — To disable debug logging.
• Low — To log critical events such as errors, exceptions, and return values offunctions in the debug log file. Select this if you want to keep a low size for thedebug log file.
• Medium — To log events mentioned in the Low state and additional information thatcould be of help to the technical support team.
• High — To log all critical errors, warnings and debug messages in the debug log file.It contains information about all activities performed by the product. This is themost detailed level of logging supported by the product.
Enable sizelimit
If you want to specify a maximum file size limit for each debug log file.
Settings and DiagnosticsDiagnostics settings 6
McAfee Security for Microsoft Exchange 8.0.0 Product Guide 125
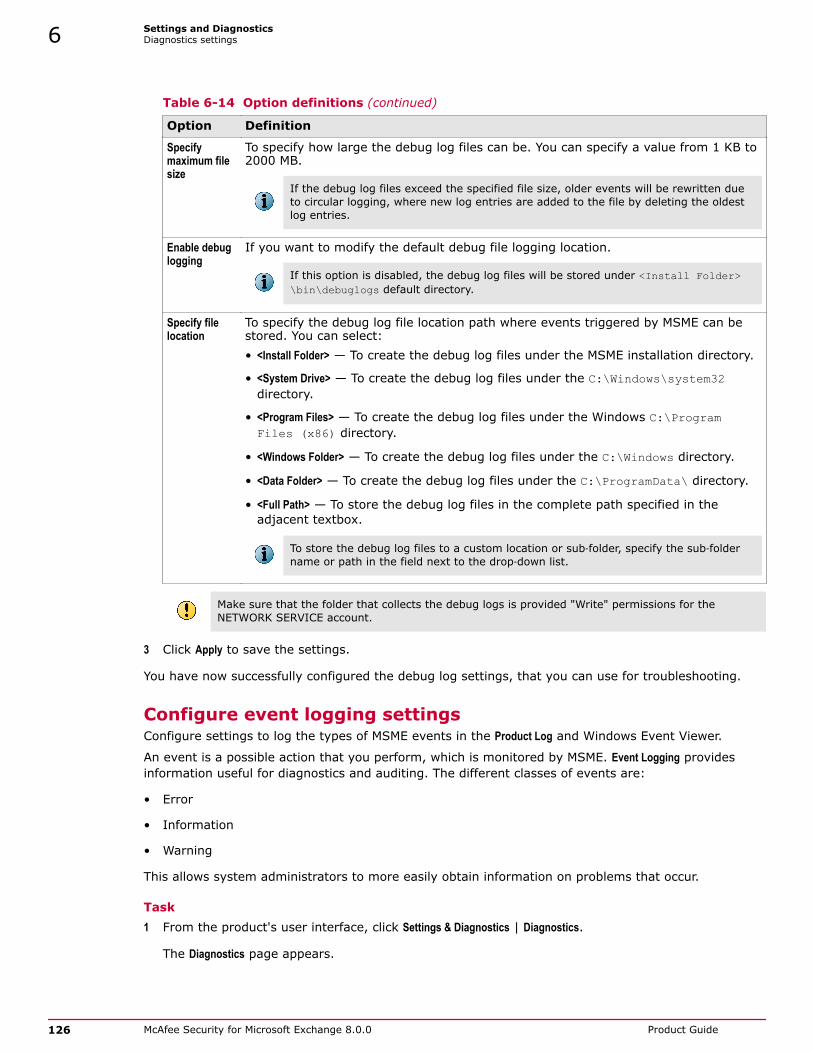
Table 6-14 Option definitions (continued)
Option Definition
Specifymaximum filesize
To specify how large the debug log files can be. You can specify a value from 1 KB to2000 MB.
If the debug log files exceed the specified file size, older events will be rewritten dueto circular logging, where new log entries are added to the file by deleting the oldestlog entries.
Enable debuglogging
If you want to modify the default debug file logging location.
If this option is disabled, the debug log files will be stored under <Install Folder>\bin\debuglogs default directory.
Specify filelocation
To specify the debug log file location path where events triggered by MSME can bestored. You can select:• <Install Folder> — To create the debug log files under the MSME installation directory.
• <System Drive> — To create the debug log files under the C:\Windows\system32directory.
• <Program Files> — To create the debug log files under the Windows C:\ProgramFiles (x86) directory.
• <Windows Folder> — To create the debug log files under the C:\Windows directory.
• <Data Folder> — To create the debug log files under the C:\ProgramData\ directory.
• <Full Path> — To store the debug log files in the complete path specified in theadjacent textbox.
To store the debug log files to a custom location or sub‑folder, specify the sub‑foldername or path in the field next to the drop‑down list.
Make sure that the folder that collects the debug logs is provided "Write" permissions for theNETWORK SERVICE account.
3 Click Apply to save the settings.
You have now successfully configured the debug log settings, that you can use for troubleshooting.
Configure event logging settingsConfigure settings to log the types of MSME events in the Product Log and Windows Event Viewer.
An event is a possible action that you perform, which is monitored by MSME. Event Logging providesinformation useful for diagnostics and auditing. The different classes of events are:
• Error
• Information
• Warning
This allows system administrators to more easily obtain information on problems that occur.
Task1 From the product's user interface, click Settings & Diagnostics | Diagnostics.
The Diagnostics page appears.
6 Settings and DiagnosticsDiagnostics settings
126 McAfee Security for Microsoft Exchange 8.0.0 Product Guide

2 Click Event Logging tab. You can use:
Table 6-15 Option definitions
Option Definition
Product Log To log MSME events in the Product Log. These events can be viewed fromSettings & Diagnostics | Product Log | View Results section.
Event Log To log MSME events under Windows Event Viewer.To find MSME related events in the Windows Event Viewer:
1 Go to Event Viewer (Local) | Windows Logs | Application.
2 In the Application pane, product related events appear as MSME under theSource column.
Write information events To log events that are categorized as Information.
Write warning events To log events that are categorized as Warning.
Write error events To log events that are categorized as Error.
3 Click Apply to save the settings.
Configure product log settingsConfigure settings for the Settings & Diagnostics | Product Log page, by specifying the required parametersto generate product logs.
Task1 From the product's user interface, click Settings & Diagnostics | Diagnostics.
The Diagnostics page appears.
2 Click the Product Log tab. You can use:
Table 6-16 Option definitions
Option Definition
Location If you want to configure a location to store the product log. Select Enable to specifya custom location.
Specify databaselocation
To specify the product log file location path where product log events can bestored. You can select:• <Install Folder> — To create the product log file under the MSME installation
directory.
• <System Drive> — To create the product log file under the C:\Windows\system32directory.
• <Program Files> — To create the product log file under the Windows C:\ProgramFiles (x86) directory.
• <Windows Folder> — To create the product log file under the C:\Windows directory.
• <Data Folder> — To create the product log file under the C:\ProgramData\directory.
• <Full Path> — To store the product log file in the complete path specified in theadjacent textbox.
To store the product log file to a custom location or sub‑folder, specify thesub‑folder name or path in the field next to the drop‑down list.
Settings and DiagnosticsDiagnostics settings 6
McAfee Security for Microsoft Exchange 8.0.0 Product Guide 127

Table 6-16 Option definitions (continued)
Option Definition
Filename If you want to specify a different file name to store the product log. Select Enableto specify a custom file name.
Specify databasefilename
To specify a custom file name for the product log. The default file name isproductlog.bin under <Install Folder>\Data\ directory.
If you modify the default product log file name or path, the log entries in theSettings & Diagnostics | Product Log page will be reset and older log entries will notappear.
Size Limit If you want to specify a different size limit for the product log file. Select Enabledatabase size limit to specify a custom file size.
Specify maximumdatabase size
To specify how large the product log file can be. You can specify a value from 1 KBto 2000 MB.
If the product log file exceeds the specified file size, older log events will berewritten due to circular logging, where new log entries are added to the file bydeleting the oldest log entries.
Limit age ofentries
If you want the product log entries to be deleted after a set period of time.
Specify maximumage of entry
To specify how many days an entry should remain in the product log file before itis deleted. You can specify a value from 1 to 365.
Query Timeout If you want to limit the amount of time allowed for answering a product log query.Select Enable to specify the duration.
Specify querytimeout (seconds)
To specify the maximum number of seconds allowed, when answering a productlog query. You can specify a value from 1 to 3600.
3 Click Apply to save the settings.
You have now successfully configured settings for the Product Log page.
Configure error reporting service settingsConfigure settings to report product related errors or exceptions to McAfee.
Task1 From the product's user interface, click Settings & Diagnostics | Diagnostics.
The Diagnostics page appears.
2 Click the Error Reporting Service tab. You can use:
Table 6-17 Option definitions
Option Definition
Enable To enable or disable the error reporting service.
Catch exceptions To capture information about exceptional events, such as system crashes.
Report exceptions to user To specify whether exceptions should be reported to the administrator.
3 Click Apply to save the settings.
6 Settings and DiagnosticsDiagnostics settings
128 McAfee Security for Microsoft Exchange 8.0.0 Product Guide

View product logsView the product's health using log entries about events, information, warnings, and errors. Forexample, you can view information on when a task initiated or ended, product service errors and soon.You can use the available search filters to find log entries that are of interest to you.
To modify settings related to the product log query page, go to Settings & Diagnostics | Diagnostics | ProductLog.
Task1 From the product's user interface, click Settings & Diagnostics | Product Log. The Product Log page appears.
2 From the Product Log section, you can use:
Table 6-18 Option definitions
Option Definition
ID To specify the number which identifies a specific product log entry. For example, ifyou want to view product logs only with ID's greater than 2000, specify: 200*
Level To select Information, Warning or Error from the drop‑down list, depending on the typeof log you want to view.
Description To specify a relevant description. For example, if you want to view logs based onservice start or stop, type: *service*
All Dates To include events from all dates which is based on the entry in the product log file.
Date Range To search for an event within a defined date range according to yourrequirements. Here you can specify the date, month, year and time against theparameters From and To. You can also use the calendar icon to specify a daterange.
Clear Filter To return to the default search settings.
Export to CSV File To export and save information about all events returned by the search in a .CSVformat. If there are thousands of events in the log, instead of navigating throughmultiple pages, you can use this option to download these events to a file in CSVformat and later generate custom reports in Microsoft Excel.
• If you do not find a specific field in the search result of the CSV file,make sure to enable the required field in the Columns to Display option.
• Use the Import Data option in Microsoft Excel, to open the CSV file in adifferent locale.
3 Click Search.
The maximum number of records that can be stored in the product log is based on the log file size.
A list of events matching your search criteria are displayed in the View Results section.
Settings and DiagnosticsView product logs 6
McAfee Security for Microsoft Exchange 8.0.0 Product Guide 129

Configure DAT settingsSpecify the number of old DATs that can be maintained in your system.
DAT files are the detection definition files, also referred to as signature files, that identify the codeanti‑virus and/or anti‑spyware software detects to repair viruses, trojan horses and PotentiallyUnwanted Programs (PUPs). For glossary information on .DAT files, go to: http://www.mcafee.com/us/mcafee‑labs/resources/threat‑glossary.aspx#dat
Task1 From the product's user interface, click Settings & Diagnostics | DAT Settings.
The DAT Settings page appears.
2 Use Maximum number of old DATs to specify the maximum number of DAT generations that shall bepreserved in the system during regular updates. MSME retains the latest DATs with old DATs under<Install Folder>\bin\DATs directory. Whenever a new DAT update occurs, MSME verifies thenumber of available DATs. If the available DATs count exceeds the DAT retention value, the oldestDAT will be deleted. You can specify a value from 3 to 10, where the default value is 10.
3 Click Apply to save the settings.
Import and export configuration settingsConfigure settings to export existing MSME configuration (settings and policies) for import and use onanother MSME server. Also import sitelists to specify the location from where automatic updates aredownloaded.
From the product's user interface, click Settings & Diagnostics | Import and Export Configuration. In the Import andExport Configurations page, you can use these tabs:
• Configuration — To export, import or restore product settings.
Table 6-19 Configuration tab — Option definitions
Option Definition
Export To copy the MSME configuration (settings and policies) of this server and save it toa location from where it can be imported by other MSME servers. The defaultMSME configuration file is McAfeeConfigXML.cfg.
Restore Default To reset the MSME settings for your product to maximum performance.
Restore Enhanced To reset the MSME settings for your product to maximum protection.
Browse To locate the configuration file (McAfeeConfigXML.cfg)that you want to import.
Import To apply the settings of another MSME server to this server.
You must import settings across the same product version. For example, you mustnot import settings from a MSME 7.6 server to MSME 8.0 server.
• SiteList — To import sitelists that specify the location from where automatic updates aredownloaded.
Table 6-20 SiteList tab — Option definitions
Option Definition
Browse To locate the sitelist file (SiteList.xml) that you want to use.
Import To apply the sitelist configuration settings specified in the file, to download DAT updates.
6 Settings and DiagnosticsConfigure DAT settings
130 McAfee Security for Microsoft Exchange 8.0.0 Product Guide

Export your existing MSME configurationExport the configuration of a MSME server and save it to a location, where it can be imported by otherMSME servers.
Task1 From the product's user interface, click Settings & Diagnostics | Import and Export Configuration.
The Import and Export Configurations page appears.
2 Click the Configuration tab.
3 Click Export.
4 Specify a location where to save the configuration file. The default name of the configuration file isMcAfeeConfigXML.cfg.
5 Click Save.
You have now successfully exported your existing MSME settings and policies to a configuration file,that can be imported by other MSME servers.
Import configuration from another MSME serverApply MSME configuration settings from another server to this MSME server.
• You must import settings across the same product version. For example, you must notimport MSME server settings from an MSME 7.6 server to MSME 8.0 server.
• It is advisable that you import settings from MSME server's having the same Exchangeroles.
Task1 From the product's user interface, click Settings & Diagnostics | Import and Export Configuration.
The Import and Export Configurations page appears.
2 Click the Configuration tab.
3 From the Import Configuration section, click Browse to locate the configuration file. The default name ofthe configuration file is McAfeeConfigXML.cfg.
4 Click Import.
A dialog box appears with the message The operation completed successfully.
5 Click OK.
You have now successfully imported configuration settings from another MSME server to this server.
Import a sitelistImport sitelists that specify the location from where automatic updates are downloaded.
A sitelist specifies from where automatic updates are downloaded. By default, MSME uses SiteList Editorthat points to a McAfee URL for automatic updates.
If your MSME server is managed by McAfee ePO, the sitelist from ePO is used to perform automaticupdates. If you are not using ePO to manage your MSME server, create a sitelist that points yourMSME server to a local repository.
Settings and DiagnosticsImport and export configuration settings 6
McAfee Security for Microsoft Exchange 8.0.0 Product Guide 131

Alternative sitelists can be created using the McAfee AutoUpdate Architect software or McAfee ePolicyOrchestrator.
Task1 Click Settings & Diagnostics | Import and Export Configuration. The Import and Export Configurations page appears.
2 Click the SiteList tab.
3 From the Import SiteList section, click Browse to locate the sitelist file SiteList.xml. This file containsinformation about the repository settings such as repository name, server URL, and so on.
You can find the SiteList.xml file under C:\ProgramData\McAfee\Common FrameWork\ directory.The SiteList Editor application under Start | All Programs | McAfee | Security for Microsoft Exchange uses this fileto display the repository settings in the application.
4 Click Import.
A dialog box appears with the message The operation completed successfully.
5 Click OK.
You have now successfully imported the sitelist that points to a new repository location, to downloadproduct updates.
Configure anti-spam proxy settingsConfigure these settings if your organization uses a proxy server to connect to the internet, so thatMSME can download the Anti‑Spam Rules.
This feature is applicable only if you have installed the McAfee Anti‑Spam add‑on component.
Task1 From the product's user interface, click Settings & Diagnostics | Proxy Settings.
The Proxy Settings page appears.
2 Select Use Proxy. In the Proxy Server Details section, you can use:
Table 6-21 Option definitions
Option Definition
IP Address To specify the IP address of the proxy server.
Port To specify the port used for communications to access the internet.
Authentication Details To specify the authentication type. You can use:• Anonymous — To access the proxy computer without specifying any
authentication details.
• NTLM — To access the proxy computer using NT LAN Manager credentials.
• Basic authentication — To provide a system User Name and Password to access theproxy computer. Retype the password in Confirm Password.
3 Click Apply to save the settings.
6 Settings and DiagnosticsConfigure anti-spam proxy settings
132 McAfee Security for Microsoft Exchange 8.0.0 Product Guide
7 Program maintenance
Perform product maintenance tasks such as modify installation, repair, uninstall, restore defaultsettings, purge and optimize the database.
Contents Modify the installation Repair the installation Restore default settings Purge and optimize Uninstall the software
Modify the installationChange MSME program features as required and change the way program features are installed onyour computer or if you have modified the Exchange server role.
You can also modify the MSME installation from Control Panel | Programs and Features | Uninstall a programconsole by clicking Uninstall/Change.
Task1 In the folder containing the installation files, double‑click setup_x64.exe.
2 Click Next in the Welcome screen.
The Program Maintenance screen appears.
3 Select Modify, then click Next.
4 Select the program features you want to modify and click Next.
5 Select I accept the terms in the license agreement, then click Next.
6 Click Install to complete the installation with the modified program features.
7 Click Finish when the installation completes.
Repair the installationResolve installation errors in the program by fixing corrupt or missing files, shortcuts and registryentries.
You can also repair the MSME installation from Control Panel | Programs and Features | Uninstall a program consoleby clicking Uninstall/Change. Repairing an installation will revert to the default configuration settings.
7
McAfee Security for Microsoft Exchange 8.0.0 Product Guide 133

Task1 In the folder containing the installation files, double‑click setup_x64.exe.
2 Click Next. The Program Maintenance screen appears.
3 From the Program Maintenance screen, select Repair, then click Next. The Ready to Repair the program screenappears.
4 Click Install to complete the repair. The InstallShield Wizard Completed dialog box appears.
5 Click Finish to exit.
Restore default settingsRestore the product to its default configuration and achieve maximum performance.
Task1 From the product's user interface, click Settings & Diagnostics | Import and Export Configuration. The Import and
Export Configurations page appears.
2 From the Configuration tab, click Restore Default.
Restoring the default settings removes all policy settings and subpolicies configured. It isrecommended that you take a backup of existing settings, to restore the settings later.
A dialog box appears asking you to confirm the settings.
3 Click OK.
A dialog box appears confirming that the default configuration settings are applied.
4 Click OK.
You have now successfully restored your MSME server to default configuration settings for maximumperformance.
Purge and optimizeRemove old items marked for deletion from the database and use optimization task to recover diskspace being taken up by deleted database records.
Task1 From the product's user interface, click Settings & Diagnostics | Detected Items.
The Detected Items page appears.
7 Program maintenanceRestore default settings
134 McAfee Security for Microsoft Exchange 8.0.0 Product Guide
2 From the Local Database section, you can use:
• Purge of old items frequency — To specify how frequently old items that are marked for deletion aredeleted from the MSME database. The default value is set to Monthly.
• Optimization frequency — To recover the disk space taken up by deleted database records. Based onthe value set under Maximum item age (days), old records will be deleted if you have scheduled apurge task. After deleting these old records, MSME will still use the disk space specified underDisk space threshold (MB) field, even if the quarantine database has not reached the size limit. Tooptimize and shrink the database, schedule an optimization task. The default value is set toMonthly.
Always schedule an optimization task a few hours after you perform the purge task.
3 Click Edit Schedule to modify the schedule.
These tasks should be performed on a regular basis to maintain adequate free space in thedatabase.
Uninstall the softwareRemove or uninstall MSME from the Exchange server.
You can also remove MSME from the Control Panel | Programs and Features | Uninstall a program console. In thismethod, the quarantine database is retained by default.
Task1 In the folder containing the installation files, double‑click setup_x64.exe.
The Welcome screen appears.
2 Click Next.
The Program Maintenance screen appears.
3 Select Remove, then click Next.
The Preserve Settings screen appears.
4 Select Preserve quarantine database to retain the quarantine database, then click Next.
The Remove the program screen appears.
5 Click Remove to uninstall MSME from your Exchange server.
The InstallShield Wizard Completed screen appears.
6 Click Finish to exit.
Program maintenanceUninstall the software 7
McAfee Security for Microsoft Exchange 8.0.0 Product Guide 135

7 Program maintenanceUninstall the software
136 McAfee Security for Microsoft Exchange 8.0.0 Product Guide

8 Integrating MSME with ePolicyOrchestrator
Integrate and manage MSME using ePolicy Orchestrator management software.
ePolicy Orchestrator 4.5 or 4.6 provides a scalable platform for centralized policy management andenforcement on your McAfee security products and systems on which they reside. It also providescomprehensive reporting and product deployment capabilities, all through a single point of control.
For instructions about setting up and using ePolicy Orchestrator, see the product guide for yourversion of the product.
Contents Prerequisites Check in the MSME package Install the MSME extension Migrate policies from older versions Deploy the MSME software to clients Set up the McAfee Anti-spam software Manage policies Create and schedule tasks Queries and reports Filter events Configure automatic responses Remove the software
PrerequisitesSet up your environment before you integrate MSME with ePolicy Orchestrator.
• Make sure that the system requirements are met.
• If a supported McAfee Agent is not installed on the client systems, install or upgrade your McAfeeAgent to the version 4.5.x. McAfee Agent is a component of ePolicy Orchestrator that must beinstalled on each computer on the network and client computer. The agent collects and sendsinformation between the ePolicy Orchestrator server, repositories, and manages MSME installationsacross the network. See the McAfee Agent documentation for installation and deploymentinstructions.
8
McAfee Security for Microsoft Exchange 8.0.0 Product Guide 137

Check in the MSME packageCheck in the MSME deployment package to the ePolicy Orchestrator server.
Task1 Log on to ePolicy Orchestrator server as administrator.
2 Click Menu | Software | Master Repository, then click Action | Check In Package.
3 In the Package step, select Product or Update (.zip), click Browse and browse to the .zip file containing theMSME package (MSME_Deployment_x64_xxxx.zip), then click Next.
4 In the Package Options step, select Current as the branch, then click Save.
Install the MSME extensionInstall the MSME extension on the ePolicy Orchestrator server.
When you already have a previous version of the software extension, this task adds the MSME 8.0extension to the list. You can retain the previous extensions or remove them, as required.
Task1 Log on to the ePolicy Orchestrator server as an administrator.
2 Click Menu | Software | Extensions, then click Install Extension.
3 Click Browse and browse to the .zip file containing the MSME extension (\MSMEv80_x64\ePO\ePO_Extension_EN\MSME____8000_0409.zip for English), then click OK.
When you upgrade the software, the older versions of MSME or GroupShield for Exchange 7.0.xpolicies are not upgraded.
Migrate policies from older versionsWhen you upgrade the software, migrate existing policies from older versions to MSME version 8.0.
Ignore this task when you're performing a fresh installation.
Task1 Browse to the folder containing the MSME_ePOUpgrade.zip (\MSMEv80_x64\ePO), then extract it.
Make sure that all files in the .zip are extracted to the same folder.
2 Go to the command prompt, navigate to the folder where the .zip file is extracted, and run theMSMEePOUpgrade.exe command.
3 Type the ePolicy Orchestrator database password, then press Enter.
4 Type the ePolicy Orchestrator SQL named instance if created during the server installation,otherwise leave it blank. Then press Enter.
The policy upgrade process starts. Wait for it to complete.
8 Integrating MSME with ePolicy OrchestratorCheck in the MSME package
138 McAfee Security for Microsoft Exchange 8.0.0 Product Guide

On successful completion, a confirmation message appears. See EPODebugTrace.txt in the currentdirectory for log details. Press Enter to exit.
For more information on the policy upgrade tool, refer McAfee KnowledgeBase article KB76921 — Usingthe MSME ePO Upgrade tool.
• Verify that the policies are upgraded: In the ePolicy Orchestrator console, navigate to Policy Catalog,select the product as McAfee Security for Microsoft Exchange 8.0.0, then look for upgraded policies suffixedwith (Upgraded). For example, My Default (Upgraded).
• Assign the custom policies to the required systems, otherwise the McAfee default policies areenforced.
See also Manage policies on page 141
Deploy the MSME software to clientsDeploy MSME to Microsoft Exchange systems.
Before you beginMigrate existing policies from older versions to MSME 8.0.
When you already have a previous version of the software, this task upgrades the software on allmanaged Microsoft Exchange systems that you select.
Task1 Log on to the ePolicy Orchestrator server as an administrator.
2 Click Menu | Systems | System Tree, then select the required group or systems.
When upgrading the software, make sure that you select all required systems.
3 Complete these steps according to your version of ePolicy Orchestrator:
Version 4.5 Version 4.6
1 Click the Client Tasks tab, then click NewTask. The Client Task Builder screenappears.
2 Type a name for the task, and anynotes.
3 Select Product Deployment as the tasktype, then click Next.
4 Select Windows as a target platform.
5 In Products and components, select McAfeeSecurity for Microsoft Exchange (x64) ‑ xxxxxxxx8.0.0.xxxx, select Install as action, selectthe language, then click Next.
1 Click the Assigned Client Tasks tab, then click Actions |New Client Task Assignment. The Client Task Assignment Builderscreen appears.
2 In Product, select McAfee Agent.
3 In Task Type, select Product Deployment.
4 Click Create New Task. The Client Task Catalog screenappears.
5 Type a name for the task, and any notes.
6 Select Windows as a target platform.
7 In Products and components, select McAfee Security forMicrosoft Exchange (x64) ‑ xxxxxxxx 8.0.0.xxxx, select Install asaction, select the language, then click Save. The taskis listed in the Task Name.
8 Select the task and click Next.
Integrating MSME with ePolicy OrchestratorDeploy the MSME software to clients 8
McAfee Security for Microsoft Exchange 8.0.0 Product Guide 139

4 Schedule the task to run immediately, then click Next to view a summary of the task.
5 Review the summary of the task, then click Save.
6 In the System Tree page, select the systems or groups where you assigned the task, then click Wake UpAgents.
7 In the Wake Up McAfee Agent screen, select Force complete policy and task update, then click OK.
On successful execution of this task, the MSME client software is deployed to the selected systems.
Set up the McAfee Anti-spam softwareTo use the anti‑spam feature with your ePolicy Orchestrator managed MSME software, check in theMcAfee Anti‑spam deployment package to ePolicy Orchestrator, then deploy it to the client systems.
The MSME package includes an evaluation version of the McAfee Anti‑Spam add‑on. To upgrade it tolicensed, contact McAfee Support.
Tasks• Check in the McAfee Anti-spam package on page 140
Check in the McAfee Anti‑spam add‑on deployment package to the ePolicy Orchestratorserver.
• Deploy the McAfee Anti-spam add-on on page 140Deploy the McAfee Anti‑spam add‑on to Microsoft Exchange systems.
Check in the McAfee Anti-spam packageCheck in the McAfee Anti‑spam add‑on deployment package to the ePolicy Orchestrator server.
Task1 Log on to ePolicy Orchestrator server as administrator.
2 Click Menu | Software | Master Repository, then click Action | Check In Package.
3 In the Package step, select Product or Update (.zip), click Browse and browse to the .zip file containing theMSME package (MSME_AS_Deployment_x64_Eval.zip), then click Next.
4 In the Package Options step, select Current as the branch, then click Save.
Deploy the McAfee Anti-spam add-onDeploy the McAfee Anti‑spam add‑on to Microsoft Exchange systems.
Task1 Log on to the ePolicy Orchestrator server as an administrator.
2 Click Menu | Systems | System Tree, then select the required group or systems.
3 Complete these steps according to your version of ePolicy Orchestrator:
8 Integrating MSME with ePolicy OrchestratorSet up the McAfee Anti-spam software
140 McAfee Security for Microsoft Exchange 8.0.0 Product Guide

Version 4.5 Version 4.6
1 Click the Client Tasks tab, then click NewTask. The Client Task Builder screenappears.
2 Type a name for the task, and anynotes.
3 Select Product Deployment as the tasktype, then click Next.
4 Select Windows as a target platform.
5 In Products and components, select McAfeeAnti‑Spam for McAfee Security for MicrosoftExchange (x64) ‑ xxxxxxxx 8.0.0.xxxx, selectInstall as action, select the language,then click Next.
1 Click the Assigned Client Tasks tab, then click Actions |New Client Task Assignment. The Client Task Assignment Builderscreen appears.
2 In Product, select McAfee Agent.
3 In Task Type, select Product Deployment.
4 Click Create New Task. The Client Task Catalog screenappears.
5 Type a name for the task, and any notes.
6 Select Windows as a target platform.
7 In Products and components, select McAfee Anti‑Spam forMcAfee Security for Microsoft Exchange (x64) ‑ xxxxxxxx 8.0.0.xxxx,select Install as action, select the language, then clickSave. The task is listed in the Task Name.
8 Select the task and click Next.
4 Schedule the task to run immediately, then click Next to view a summary of the task.
5 Review the summary of the task, then click Save.
6 In the System Tree page, select the systems or groups where you assigned the task, then click Wake UpAgents.
7 In the Wake Up McAfee Agent screen, select Force complete policy and task update, then click OK.
Manage policiesMSME policies provide options to configure MSME feature enablement and disablement, featureconfiguration, feature administration, and logs.
These policy settings are nearly identical to those you can access from the Settings and Diagnostic tab inthe MSME interface.
You can find these policies on the Policy Catalog page under the McAfee Security for Microsoft Exchange 8.0.0product.
• Anti‑Spam Settings • Mail Notifications
• DAT Settings • On Access Settings
• Detected Items • Proxy Settings
• Diagnostics • Scanner Settings
Modify these policies with your preferences, then assign them to groups of managed MicrosoftExchange systems or to a single system (requires McAfee Agent on the systems). For genericinformation about policies, see the product guide for your version of the ePolicy Orchestrator software.
Integrating MSME with ePolicy OrchestratorManage policies 8
McAfee Security for Microsoft Exchange 8.0.0 Product Guide 141

Tasks• Create or modify MSME policies on page 142
Create or modify MSME policies from the Policy Catalog.
• Assign policies on page 142When you've created or modified MSME policies with the required settings, assign each ofthem to the required Microsoft Exchange systems that are managed by ePolicyOrchestrator.
See also Settings and Diagnostics on page 5
Create or modify MSME policiesCreate or modify MSME policies from the Policy Catalog.Alternatively, you can create or modify these policies from the System Tree, while assigning policies toselected systems. See the product guide for your version of the ePolicy Orchestrator software for moreinformation.
Task1 Log on to the ePolicy Orchestrator server as an administrator.
2 From the Policy Catalog, select McAfee Security for Microsoft Exchange 8.0.0 as the product, then select therequired MSME policy as the category.
3 Perform this step as required:
To create a policy To modify a policy
Click New Policy, type a name for the policy, then click OK. Click the policy that you want to modify.
4 Modify the policy settings as required, then click Save.
The policy settings are updated and the new policy (when created) appears in the Policy Catalog.
Assign policiesWhen you've created or modified MSME policies with the required settings, assign each of them to therequired Microsoft Exchange systems that are managed by ePolicy Orchestrator.
TaskFor option definitions, click ? in the interface.
1 Log on to the ePolicy Orchestrator server as an administrator.
2 Navigate to the System Tree, select a required group or systems, then click the Assigned Policies tab.
3 Select McAfee Security for Microsoft Exchange 8.0.0 from the products list, locate the required policy, thenclick Edit Assignment next to the policy.
4 (Optional) Select a policy, then click Edit Policy to modify the policy settings. Click New Policy to createa new policy based on the selected category.
Alternatively, you can also modify or create a policy from the Policy Catalog.
5 Select the policy to assign, select appropriate inheritance options, then click Save.
The policy enforcement occurs in the next agent‑server communication. Click Wake Up Agents to enforcepolicies immediately.
8 Integrating MSME with ePolicy OrchestratorManage policies
142 McAfee Security for Microsoft Exchange 8.0.0 Product Guide

Create and schedule tasksCreate MSME client tasks on your Microsoft Exchange systems to schedule automated actions.
Tasks• Schedule automatic updates on page 143
Schedule automatic updates to keep your software up‑to‑date with the latest anti‑virusdefinitions (DATs), anti‑virus scanning engine, and spam engine.
• Schedule on-demand scan on page 144Schedule an on‑demand scan to scan your Microsoft Exchange servers to find a threat,vulnerability, or other potentially unwanted code.
• Schedule to send status report on page 145Schedule to send the status report to an administrator at a specific time.
• Schedule to send configuration report on page 145Schedule to send the configuration report to an administrator at a specific time.
Schedule automatic updatesSchedule automatic updates to keep your software up‑to‑date with the latest anti‑virus definitions(DATs), anti‑virus scanning engine, and spam engine.
McAfee recommends that you run the MSME automatic update task explicitly.
Task1 Log on to the ePolicy Orchestrator server as an administrator.
2 Click Menu | Systems | System Tree, then select the required group or systems.
3 Complete these steps according to your version of ePolicy Orchestrator:
Version 4.5 Version 4.6
1 Click the Client Tasks tab, then click NewTask. The Client Task Builder screen appears.
2 Type a name for the task, and any notes.
3 Select AutoUpdate Task (McAfee Security forMicrosoft Exchange 8.0.0) as the task type,then click Next.
4 No configuration is required in step 2,click Next again.
1 Click the Assigned Client Tasks tab, then click Actions |New Client Task Assignment. The Client Task AssignmentBuilder screen appears.
2 In Product, select McAfee Security for Microsoft Exchange8.0.0.
3 In Task Type, select AutoUpdate Task.
4 Click Create New Task. The Client Task Catalog screenappears.
5 Type a name for the task, and any notes, thenclick Save. The task is listed in the Task Name.
6 Select the task and click Next.
4 Schedule the task as required, then click Next to view a summary of the task.
5 Review the summary of the task, then click Save.
6 In the System Tree page, select the systems or groups where you assigned the task, then click Wake UpAgents.
7 In the Wake Up McAfee Agent screen, select Force complete policy and task update, then click OK.
See also Product versions and updates on page 41
Integrating MSME with ePolicy OrchestratorCreate and schedule tasks 8
McAfee Security for Microsoft Exchange 8.0.0 Product Guide 143
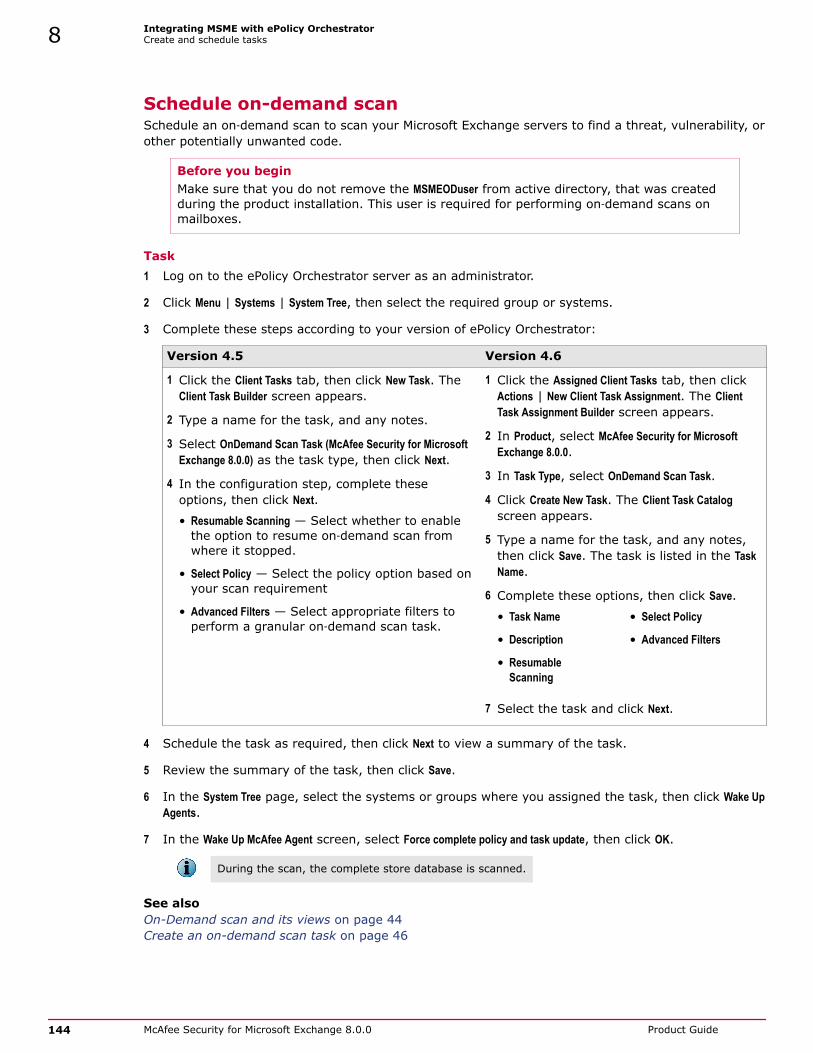
Schedule on-demand scanSchedule an on‑demand scan to scan your Microsoft Exchange servers to find a threat, vulnerability, orother potentially unwanted code.
Before you beginMake sure that you do not remove the MSMEODuser from active directory, that was createdduring the product installation. This user is required for performing on‑demand scans onmailboxes.
Task1 Log on to the ePolicy Orchestrator server as an administrator.
2 Click Menu | Systems | System Tree, then select the required group or systems.
3 Complete these steps according to your version of ePolicy Orchestrator:
Version 4.5 Version 4.6
1 Click the Client Tasks tab, then click New Task. TheClient Task Builder screen appears.
2 Type a name for the task, and any notes.
3 Select OnDemand Scan Task (McAfee Security for MicrosoftExchange 8.0.0) as the task type, then click Next.
4 In the configuration step, complete theseoptions, then click Next.• Resumable Scanning — Select whether to enable
the option to resume on‑demand scan fromwhere it stopped.
• Select Policy — Select the policy option based onyour scan requirement
• Advanced Filters — Select appropriate filters toperform a granular on‑demand scan task.
1 Click the Assigned Client Tasks tab, then clickActions | New Client Task Assignment. The ClientTask Assignment Builder screen appears.
2 In Product, select McAfee Security for MicrosoftExchange 8.0.0.
3 In Task Type, select OnDemand Scan Task.
4 Click Create New Task. The Client Task Catalogscreen appears.
5 Type a name for the task, and any notes,then click Save. The task is listed in the TaskName.
6 Complete these options, then click Save.• Task Name • Select Policy
• Description • Advanced Filters
• ResumableScanning
7 Select the task and click Next.
4 Schedule the task as required, then click Next to view a summary of the task.
5 Review the summary of the task, then click Save.
6 In the System Tree page, select the systems or groups where you assigned the task, then click Wake UpAgents.
7 In the Wake Up McAfee Agent screen, select Force complete policy and task update, then click OK.
During the scan, the complete store database is scanned.
See also On-Demand scan and its views on page 44Create an on-demand scan task on page 46
8 Integrating MSME with ePolicy OrchestratorCreate and schedule tasks
144 McAfee Security for Microsoft Exchange 8.0.0 Product Guide

Schedule to send status reportSchedule to send the status report to an administrator at a specific time.You can configure these settings in the status report task wizard.
• When to send the status report
• A time limit for the reporting task
• Recipients of the status report
• A name for the report task to help identify it
Task1 Log on to the ePolicy Orchestrator server as an administrator.
2 Click Menu | Systems | System Tree, then select the required group or systems.
3 Complete these steps according to your version of ePolicy Orchestrator:
Version 4.5 Version 4.6
1 Click the Client Tasks tab, then click New Task.The Client Task Builder screen appears.
2 Type a name for the task, and any notes.
3 Select Status Report Task (McAfee Security forMicrosoft Exchange 8.0.0) as the task type, thenclick Next.
4 Complete these options, then click Next.• Recipient E‑mail
• Subject line for report
• Number of Rows
• Type of Report: CSV or HTML format.
1 Click the Assigned Client Tasks tab, then click Actions| New Client Task Assignment. The Client Task AssignmentBuilder screen appears.
2 In Product, select McAfee Security for Microsoft Exchange8.0.0.
3 In Task Type, select Status Report Task.
4 Click Create New Task. The Client Task Catalog screenappears.
5 Complete these options, then click Save.• Task Name • Subject line for report
• Description • Number of Rows
• Recipient E‑mail • Type of Report
6 Select the task and click Next.
4 Schedule the task as required, then click Next to view a summary of the task.
5 Review the summary of the task, then click Save.
6 In the System Tree page, select the systems or groups where you assigned the task, then click Wake UpAgents.
7 In the Wake Up McAfee Agent screen, select Force complete policy and task update, then click OK.
See also Status reports on page 48
Schedule to send configuration reportSchedule to send the configuration report to an administrator at a specific time.
Task1 Log on to the ePolicy Orchestrator server as an administrator.
2 Click Menu | Systems | System Tree, then select the required group or systems.
Integrating MSME with ePolicy OrchestratorCreate and schedule tasks 8
McAfee Security for Microsoft Exchange 8.0.0 Product Guide 145

3 Complete these steps according to your version of ePolicy Orchestrator:
Version 4.5 Version 4.6
1 Click the Client Tasks tab, then click NewTask. The Client Task Builder screen appears.
2 Type a name for the task, and any notes.
3 Select Configuration Report Task (McAfee Securityfor Microsoft Exchange 8.0.0) as the task type,then click Next.
4 Complete these options, then click Next.• Recipient E‑mail
• Subject line for report
1 Click the Assigned Client Tasks tab, then click Actions |New Client Task Assignment. The Client Task AssignmentBuilder screen appears.
2 In Product, select McAfee Security for Microsoft Exchange8.0.0.
3 In Task Type, select Configuration Report Task.
4 Click Create New Task. The Client Task Catalog screenappears.
5 Complete these options, then click Save.• Task Name
• Description
• Recipient E‑mail
• Subject line for report
6 Select the task and click Next.
4 Schedule the task as required, then click Next to view a summary of the task.
5 Review the summary of the task, then click Save.
6 In the System Tree page, select the systems or groups where you assigned the task, then click Wake UpAgents.
7 In the Wake Up McAfee Agent screen, select Force complete policy and task update, then click OK.
See also Configuration reports on page 51
Queries and reportsRun the predefined MSME queries to generate your reports, or modify them to generate customreports.
Predefined queriesThese predefined queries are added to the McAfee Security for Microsoft Exchange Reports group in ePolicyOrchestrator 4.6 and to the MSME80REPORTS group in ePolicy Orchestrator 4.5.
Query Retrieves information on...
MSME 80 : DLP and Compliance History Historical data for the DLP and Compliance threat category of allmanaged MSME servers.
MSME 80 : File Attachments Blocked History Historical data of managed MSME servers with file attachmentsblocked in email messages.
MSME 80 : File Attachments Blocked Today The file attachments blocked in email messages as on currentdate.
MSME 80 : Number of Messages andAverage Processing Time Today
The number of email messages scanned on each managed MSMEserver as on current date and their average scan time.
8 Integrating MSME with ePolicy OrchestratorQueries and reports
146 McAfee Security for Microsoft Exchange 8.0.0 Product Guide

Query Retrieves information on...
MSME 80 : Percentage of PUPs DetectedToday
The percentage of potentially unwanted programs infected emailmessages detected on each server as on current date.
MSME 80 : Percentage of Spam DetectedToday
The percentage of spam infected email messages detected oneach server as on current date.
MSME 80 : Percentage of Virus DetectedToday
The percentage of virus infected email messages detected oneach server as on current date.
MSME 80 : PUPs Deleted Today The potentially unwanted programs infected email messagesdeleted as on current date.
MSME 80 : PUPs Detection History All potentially unwanted programs infected email messagesdetected.
MSME 80 : PUPs Detection Today The potentially unwanted programs infected email messagesdetected as on current date.
MSME 80 : Spam detected in the last oneweek
The number of spam infected email messages detected on eachday during the last one week.
MSME 80 : Spam detection history All spam infected email messages detected. It displays apie‑chart representing the number of email messages by the typeof spam detected.
MSME 80 : Spam detection today The spam infected email messages detected as on date. Itdisplays a pie‑chart representing the number of email messagesby the type of spam detected.
MSME 80 : Top 10 Attachment Types The top 10 attachment types by their number of detections,which have triggered any rules.
MSME 80 : Top 10 Detected Viruses The top 10 viruses by their number of detections.
MSME 80 : Top 10 Infected ExchangeServers
The top 10 Microsoft Exchange servers by number of infectedemail messages detected.
MSME 80 : Top 10 Unwanted Programs The top 10 potentially unwanted programs by their number ofdetections.
MSME 80 : Top 10 Virus Recipients The top 10 email addresses that received the maximum numberof virus infected email messages.
MSME 80 : Top 10 Virus Senders The top 10 email addresses that sent the maximum number ofvirus infected email messages.
MSME 80 : Unwanted Content DetectedHistory
The potentially unwanted content detected in email messages.
MSME 80 : Virus Cleaned Today The number of virus infected email messages cleaned as oncurrent date.
MSME 80 : Virus Detection history The number of virus infected email messages detected.
MSME 80 : Virus Detection Today The number of virus infected email messages detected as oncurrent date.
MSME 80 : Viruses detected in the last oneweek
The number of virus infected email messages detected on eachday during the last one week.
Custom query filtersYou can create custom queries with MSME specific filters to retrieve information on MSME data.
Filter Filters the results based on...
DAT Version (McAfee Security for MicrosoftExchange)
The version of the virus signature files installed on the clientsystems.
Engine Version (McAfee Security for MicrosoftExchange)
The version of the scanning engine software installed on theclient systems.
Integrating MSME with ePolicy OrchestratorQueries and reports 8
McAfee Security for Microsoft Exchange 8.0.0 Product Guide 147

Filter Filters the results based on...
Hotfix/Patch Version (McAfee Security forMicrosoft Exchange)
The patch version of the MSME software installed on theclient systems.
Language (McAfee Security for MicrosoftExchange)
The language of the MSME software installed on the clientsystems.
Product Version (McAfee Security for MicrosoftExchange)
The version of the MSME software installed on the clientsystems.
Service Pack (McAfee Security for MicrosoftExchange)
The version of the Service Pack installed on the clientsystems.
Run a default queryRun the predefined MSME queries to generate reports based on MSME data.
Task1 Log on to ePolicy Orchestrator as administrator.
2 Complete these steps according to your version of ePolicy Orchestrator
Version 4.5 Version 4.6
1 Click Menu | Reporting | Queries.
2 From Shared Groups in the Groups pane, selectMSME80REPORTS.
1 Click Menu | Reporting | Queries & Reports.
2 From Shared Groups in the Groups pane, selectMcAfee Security for Microsoft Exchange Reports.
3 Select a query from the Queries list, then click Run. In the query result page, click any item in theresults to drill down further.
To generate custom reports, duplicate a predefined query, then modify it per your requirements. Fordetailed instructions on working with queries, see the product guide for your version of ePolicyOrchestrator software.
4 Click Close when finished.
Filter eventsSpecify which MSME events generated from the client systems are to be forwarded to the server.
By default, all MSME events are enabled. Filter events based on the bandwidth used in yourenvironment, and event‑based queries required.
For more details on event filtering, see the product guide for your version of the ePolicy Orchestratorsoftware.
Task1 Log on to the ePolicy Orchestrator server as an administrator.
2 Click Menu | Configuration | Server Settings, select Event filtering, then click Edit at the bottom of the page.
3 Select All events to the server to forward all events to the ePolicy Orchestrator server, or select Onlyselected events to the server and select the MSME specific client events that you want to forward.
8 Integrating MSME with ePolicy OrchestratorFilter events
148 McAfee Security for Microsoft Exchange 8.0.0 Product Guide

MSME events are prefixed with McAfee Security for Microsoft Exchange such as these:
• 34150: McAfee Security for Microsoft Exchange Packer detected (High)
• 34151: McAfee Security for Microsoft Exchange Phish detected (High)
• 34152: McAfee Security for Microsoft Exchange Mail size filter rule triggered (Medium)
• 34153: McAfee Security for Microsoft Exchange Signed content detected (Medium)
• 34154: McAfee Security for Microsoft Exchange Encrypted content detected (Medium)
• 34155: McAfee Security for Microsoft Exchange Corrupted content detected (Medium)
• 34156: McAfee Security for Microsoft Exchange Denial of service triggered (High)
• 34157: McAfee Security for Microsoft Exchange Protected content triggered (Medium)
• 34158: McAfee Security for Microsoft Exchange Password protected content detected (Medium)
• 34159: McAfee Security for Microsoft Exchange Blocked mime type detected (Medium)
• 34160: McAfee Security for Microsoft Exchange statistics and average scan time (Info)
4 Click Save.
The selected events are forwarded at the next agent‑server communication.
See also Run a default query on page 148
Configure automatic responsesConfigure and schedule the MSME product health alerts to notify you on the product status.
Before you beginConfigure the Mail Notifications policy with the Alert ePolicy Orchestrator option as enabled.
For more details on automatic responses, see the product guide for your version of the ePolicyOrchestrator software.
Task1 Log on to the ePolicy Orchestrator server as an administrator.
2 Click Menu | Automation | Automatic Responses, then click Edit against MSME 80 : Product Health Alert Notification.Alternatively, duplicate MSME 80 : Product Health Alert Notification and edit its copy to retain the defaultvalues in the predefined notification.
3 In the Description step, select Enable, then click Next.
4 In the Filter step, select Threat Action Taken from available properties, select an appropriate comparisoncriteria, select the value as MSME80PHA, then click Next.
You can also select other appropriate filters, as required.
5 In the Aggregation step, select the appropriate aggregation, grouping, and throttling options, asrequired, then click Next.
Integrating MSME with ePolicy OrchestratorConfigure automatic responses 8
McAfee Security for Microsoft Exchange 8.0.0 Product Guide 149

6 In the Actions step, select Send Email, complete these options, then click Next.• Recipients — Email address of the health alert recipients.
• Importance — Importance of the email notification: High, Medium, or Low.
• Subject — Subject line for the email notification. Insert variables to include dynamic content. Forexample, event description.
• Body — Body text of the email notification. Update the existing body text template, as required.The template uses variables to include dynamic content.
7 Review the summary, then click Save.
The selected recipients are notified, as configured.
See also Manage policies on page 141Enable product health alerts on page 119
Remove the softwareRemove the MSME client software and extensions to remove the software and its features.To completely remove the MSME software and its features from your environment, remove them inthis order:
1 (If installed) Remove the McAfee Anti‑spam software from the clients.
2 Remove the MSME client software from the clients.
3 (If installed) Remove the MSME reporting extension.
4 Remove the MSME software extension from ePolicy Orchestrator.
Tasks
• Remove the McAfee Anti-spam software from clients on page 150Create a client task to remove McAfee Anti‑spam software from the managed MicrosoftExchange servers.
• Remove the client software on page 151Create a client task to remove MSME client software from the managed Microsoft Exchangeservers.
• Remove the software extension on page 152Remove the MSME extensions from the ePolicy Orchestrator server.
Remove the McAfee Anti-spam software from clientsCreate a client task to remove McAfee Anti‑spam software from the managed Microsoft Exchangeservers.
TaskFor option definitions, click ? in the interface.
1 Log on to the ePolicy Orchestrator server as an administrator.
2 Click Menu | Systems | System Tree, then select the required group or systems.
3 Complete these steps according to your version of ePolicy Orchestrator
8 Integrating MSME with ePolicy OrchestratorRemove the software
150 McAfee Security for Microsoft Exchange 8.0.0 Product Guide

Version 4.5 Version 4.6
1 Click the Client Tasks tab, then click NewTask. The Client Task Builder screenappears.
2 Type a name for the task, and anynotes.
3 Select Product Deployment as the task type,then click Next.
4 Select Windows as a target platform.
5 In Products and components, select McAfeeAnti‑Spam for McAfee Security for MicrosoftExchange (x64) ‑ xxxxxxxx 8.0.0.xxxx, selectRemove as action, select the language,then click Next.
1 Click the Assigned Client Tasks tab, then click Actions |New Client Task Assignment. The Client Task Assignment Builderscreen appears.
2 In Product, select McAfee Agent.
3 In Task Type, select Product Deployment.
4 Click Create New Task. The Client Task Catalog screenappears.
5 Type a name for the task, and any notes.
6 Select Windows as a target platform.
7 In Products and components, select McAfee Security forMicrosoft Exchange (x64) ‑ xxxxxxxx 8.0.0.xxxx, select Removeas action, select the language, then click Save. Thetask is listed in the Task Name.
8 Select the task and click Next.
4 Schedule the task to run immediately, then click Next to view a summary of the task.
5 Review the summary of the task, then click Save.
6 In the System Tree page, select the systems or groups where you assigned the task, then click Wake UpAgents.
7 In the Wake Up McAfee Agent screen, select Force complete policy and task update, then click OK.
Remove the client softwareCreate a client task to remove MSME client software from the managed Microsoft Exchange servers.
Before you beginWhen McAfee Anti‑spam add‑on has been deployed to the clients, remove it beforeremoving the MSME client software.
TaskFor option definitions, click ? in the interface.
1 Log on to the ePolicy Orchestrator server as an administrator.
2 Click Menu | Systems | System Tree, then select the required group or systems.
3 Complete these steps according to your version of ePolicy Orchestrator
Integrating MSME with ePolicy OrchestratorRemove the software 8
McAfee Security for Microsoft Exchange 8.0.0 Product Guide 151
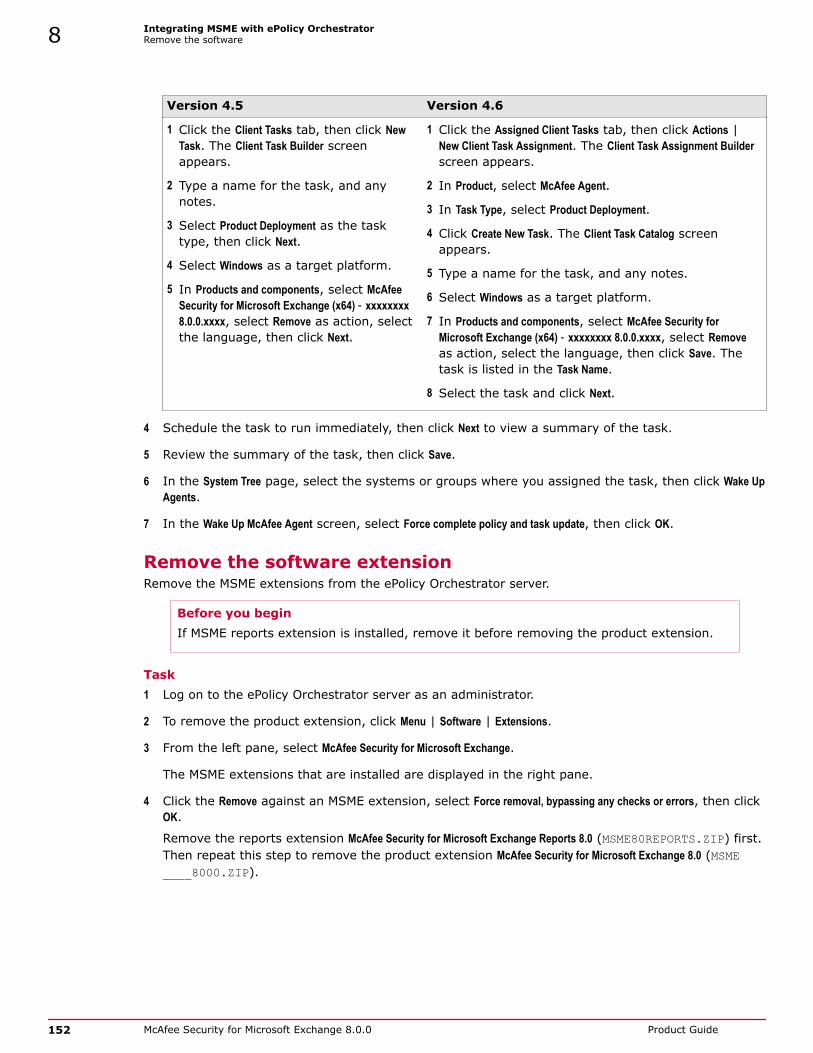
Version 4.5 Version 4.6
1 Click the Client Tasks tab, then click NewTask. The Client Task Builder screenappears.
2 Type a name for the task, and anynotes.
3 Select Product Deployment as the tasktype, then click Next.
4 Select Windows as a target platform.
5 In Products and components, select McAfeeSecurity for Microsoft Exchange (x64) ‑ xxxxxxxx8.0.0.xxxx, select Remove as action, selectthe language, then click Next.
1 Click the Assigned Client Tasks tab, then click Actions |New Client Task Assignment. The Client Task Assignment Builderscreen appears.
2 In Product, select McAfee Agent.
3 In Task Type, select Product Deployment.
4 Click Create New Task. The Client Task Catalog screenappears.
5 Type a name for the task, and any notes.
6 Select Windows as a target platform.
7 In Products and components, select McAfee Security forMicrosoft Exchange (x64) ‑ xxxxxxxx 8.0.0.xxxx, select Removeas action, select the language, then click Save. Thetask is listed in the Task Name.
8 Select the task and click Next.
4 Schedule the task to run immediately, then click Next to view a summary of the task.
5 Review the summary of the task, then click Save.
6 In the System Tree page, select the systems or groups where you assigned the task, then click Wake UpAgents.
7 In the Wake Up McAfee Agent screen, select Force complete policy and task update, then click OK.
Remove the software extensionRemove the MSME extensions from the ePolicy Orchestrator server.
Before you beginIf MSME reports extension is installed, remove it before removing the product extension.
Task1 Log on to the ePolicy Orchestrator server as an administrator.
2 To remove the product extension, click Menu | Software | Extensions.
3 From the left pane, select McAfee Security for Microsoft Exchange.
The MSME extensions that are installed are displayed in the right pane.
4 Click the Remove against an MSME extension, select Force removal, bypassing any checks or errors, then clickOK.
Remove the reports extension McAfee Security for Microsoft Exchange Reports 8.0 (MSME80REPORTS.ZIP) first.Then repeat this step to remove the product extension McAfee Security for Microsoft Exchange 8.0 (MSME____8000.ZIP).
8 Integrating MSME with ePolicy OrchestratorRemove the software
152 McAfee Security for Microsoft Exchange 8.0.0 Product Guide

9 Troubleshooting
Determine and troubleshoot issues while using MSME. Learn about the available performance countersand important registry keys associated with this product.
Contents Default Vs. Enhanced configuration settings Important registry keys
Default Vs. Enhanced configuration settingsBased on your requirement you can configure MSME to perform for maximum performance ormaximum protection.
To modify your MSME configuration settings, go to Settings & Diagnostics | Import and Export Configuration. Youcan use:
• Restore Default — To configure MSME for maximum performance.
• Restore Enhanced — To configure MSME for maximum protection.
Table 9-1 Differences between Default and Enhanced configuration
Feature Default Enhanced
Message reputation Disabled Enabled
IP reputation Disabled Enabled
Maximum nesting level 10 50
Password Protected file Allow through Replace and quarantine
Protected file Allow through Replace and quarantine
File filter Disabled Enabled with default rule (*.exe, *.com, *.bat, *.scr)
Encrypted file Allow through Replace and quarantine
Corrupted file Allow through Replace and quarantine
9
McAfee Security for Microsoft Exchange 8.0.0 Product Guide 153
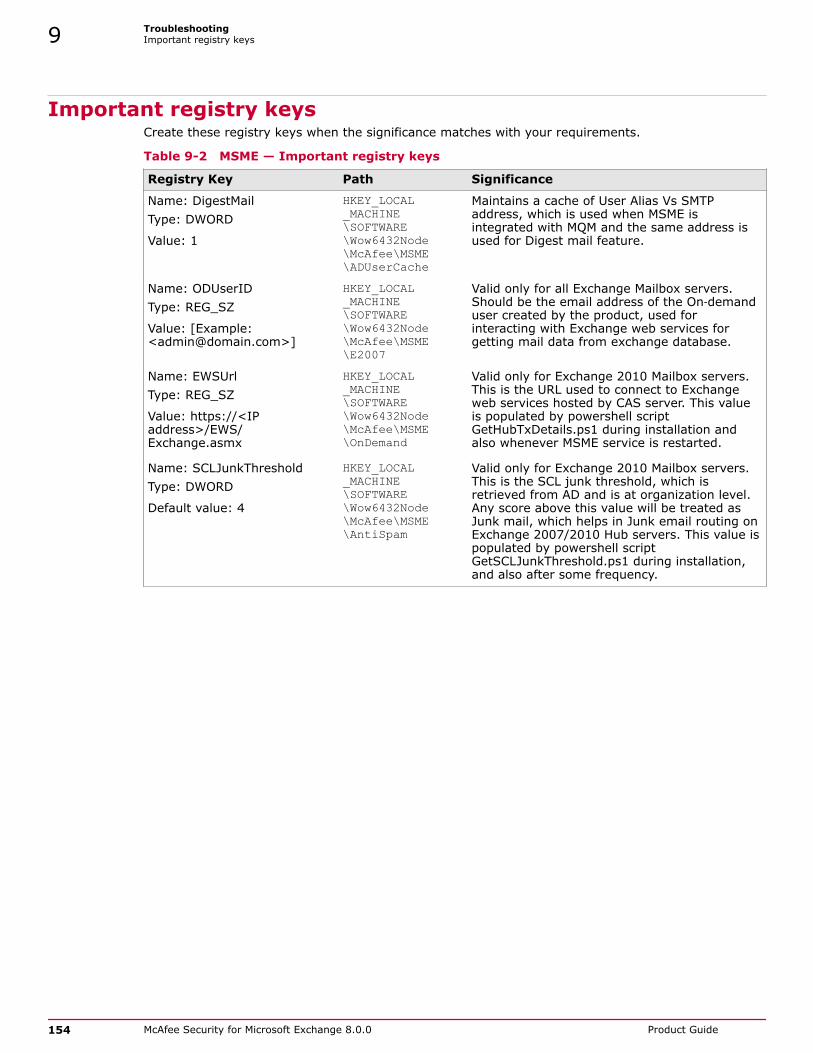
Important registry keysCreate these registry keys when the significance matches with your requirements.
Table 9-2 MSME — Important registry keys
Registry Key Path Significance
Name: DigestMailType: DWORD
Value: 1
HKEY_LOCAL_MACHINE\SOFTWARE\Wow6432Node\McAfee\MSME\ADUserCache
Maintains a cache of User Alias Vs SMTPaddress, which is used when MSME isintegrated with MQM and the same address isused for Digest mail feature.
Name: ODUserIDType: REG_SZ
Value: [Example:<[email protected]>]
HKEY_LOCAL_MACHINE\SOFTWARE\Wow6432Node\McAfee\MSME\E2007
Valid only for all Exchange Mailbox servers.Should be the email address of the On‑demanduser created by the product, used forinteracting with Exchange web services forgetting mail data from exchange database.
Name: EWSUrlType: REG_SZ
Value: https://<IPaddress>/EWS/Exchange.asmx
HKEY_LOCAL_MACHINE\SOFTWARE\Wow6432Node\McAfee\MSME\OnDemand
Valid only for Exchange 2010 Mailbox servers.This is the URL used to connect to Exchangeweb services hosted by CAS server. This valueis populated by powershell scriptGetHubTxDetails.ps1 during installation andalso whenever MSME service is restarted.
Name: SCLJunkThresholdType: DWORD
Default value: 4
HKEY_LOCAL_MACHINE\SOFTWARE\Wow6432Node\McAfee\MSME\AntiSpam
Valid only for Exchange 2010 Mailbox servers.This is the SCL junk threshold, which isretrieved from AD and is at organization level.Any score above this value will be treated asJunk mail, which helps in Junk email routing onExchange 2007/2010 Hub servers. This value ispopulated by powershell scriptGetSCLJunkThreshold.ps1 during installation,and also after some frequency.
9 TroubleshootingImportant registry keys
154 McAfee Security for Microsoft Exchange 8.0.0 Product Guide

10 Frequently asked questions
Provides answers to common situations that you might encounter when installing or using the productand contains troubleshooting information in the form of frequently asked questions.
To view an updated list of questions associated with this release, see the McAfee KnowledgeBase articleKB76886.
Contents General Installation Policy Manager Settings and Diagnostics McAfee Anti-Spam add-on component Regular Expressions (regex)
GeneralHere are answers to general frequently asked questions.
Can email delivery be prioritized?
No. It cannot be prioritized, as this is an Exchange server task.
If an email is scanned in the Hub Transport server, will it be scanned in the Mailbox server?
It depends. If the email is scanned on the Hub server and has the same Anti‑Virus (AV) stamp,then it will not be scanned on the Mailbox server. If the AV stamp differs either in terms of AVvendor or in terms of Engine/DAT version, it will be scanned on the Mailbox server.
Why should I use "Run as administrator" option in Windows 2008, to open the MSME userinterface?
Due to security reasons, MSME will not be able to communicate with the RPC servers. This is dueto the SID having no permission to do Inter‑process communication (IPC) with the RPC process.
Under which executable does the scanning modules of MSME gets loaded across allExchange versions?
The RPCServ.exe process loads all the scanning binaries. To find the process id of the scannerprocess, check the command line in Task Manager and see which RPCServ.exe process has thecommand line parameter: /EVENTNAME:Global\MSME_scanner_RPCEvent.
What is the optimum MSME configuration?
The configurations are for Enhanced protection and Maximum performance. The default configuration is tohave maximum performance.
What should I exclude if MSME and a file level anti‑virus is installed on the same server?
Exclude all the MSME binary folders and sub‑folders, Postgres database, Replication folders,Exchange folders, ePO event folder, and product log.
Where can I find more information about Email Security?
10
McAfee Security for Microsoft Exchange 8.0.0 Product Guide 155

For product solutions on email security, see http://www.mcafee.com/us/products/email‑and‑web‑security/email‑security.aspx.
InstallationHere are answers to frequently asked questions on MSME installation.
How do I perform a silent installation?
Execute the Silent.bat file in the download package. For information on customization, see thePerform a silent installation section.
What is the supported ePolicy Orchestrator version?
McAfee ePolicy Orchestrator 4.5 or 4.6.
What is the supported McAfee Agent version?
McAfee Agent 4.5 or later.
On which port does the MSME configuration replication works?
This service doesn't work on ports, but it keeps monitoring the folders that are set byadministrator using replication user interface.
Do I have to consider anything special while upgrading to MSME 8.0 from MSME 7.6 in aCCR or DAG environment?
No considerations. Follow the standalone installation steps.
Policy ManagerHere are answers to frequently asked questions on the Policy Manager feature.
How do I create and use email policies?
Always create policies on gateway servers using the SMTP addresses and on mailbox serversusing Active Directory (AD) groups. On Mailbox server, designing policies based on SMTPaddresses will be very costly, as the product does not get SMTP addresses and in order toresolve the same, AD queries are made. Doing this will slow down the performance on theMailbox servers.
Do domain names in policies affect performance?
Yes. For detailed explanation, refer the previous question How do I create and use email policies.
How does policy priority work?
Whenever a child policy gets satisfied first based on the priority of resolution, the next policy isnever evaluated.
Is it beneficial to have multiple policies and will it affect the server performance?
Yes, this will affect performance. During policy evaluation, when the first child policy is notsatisfied and next policy is evaluated, there may be AD queries which might have to be made,thus resulting in slow performance.
How do I configure MSME to block executable files at a granular level?
You can do this using the File Filtering Rules option. For example, let us see how to filter specificexecutable files such as the Windows executables.1 From the product's user interface, click Policy Manager | On‑Access (Master Policy).
2 Under Core‑Scanners, click File Filtering and enable this option.
10 Frequently asked questionsInstallation
156 McAfee Security for Microsoft Exchange 8.0.0 Product Guide

3 Under Options (Core Anti‑Spam Settings), click Edit.
4 Under Available rules drop‑down list, select <Create a new rule…>.
5 Specify a rule name and under File category filtering, select Enable file category filtering.
6 From File categories list, select Other specific formats.
7 From Subcategories list, select Windows Executables.
8 Click Save.
What type of file is detected as Packers or PUPs, and from where I can control this setting?
Packers and PUPs belong to the malicious content category that is detected based on thecategory. Packers generally are files that is compressed or packed using some algorithm andthen get de‑compressed on execution.Control this setting from Anti‑Virus settings in the MSME user interface.
Settings and DiagnosticsHere are answers to frequently asked questions on the Settings & Diagnostics feature.
Does enabling McAfee GTI cause email latency?
Yes, there will be latency due to the email validation by McAfee GTI.
How do I verify if Transport scanner is scanning for spam emails?
You can verify this from the product's user interface in either of these ways:• From the Recently Scanned items page, see the mails scanned and check the policy used to scan
the email. It should show Gateway under Scanned by field.
• From the Detected Items database, check if there are any spam emails detected. Finally verify ifthe emails are not through authenticated sessions, which is logged under MSME Debug Logging.
Can I export the Blacklists and Whitelists from one MSME server to another?
Yes, you can export the blacklists and whitelists from one MSME server to another. To do this:1 From the product's user interface, click Policy Manager | Gateway (Master Policy).
2 Under Core‑Scanners, click Anti‑Spam.
3 Under Options (Core Anti‑Spam Settings), click Edit.
4 Click the Mail Lists tab, and then click Export to save all Blacklisted and Whitelisted senders/recipients to a CSV file.
McAfee Anti-Spam add-on componentHere are answers to frequently asked questions on the Anti‑Spam add‑on component.
How do I update the Anti‑spam engine manually?
Frequently asked questionsSettings and Diagnostics 10
McAfee Security for Microsoft Exchange 8.0.0 Product Guide 157

Update registry key and place the new engine on the specified directory which is entered inregistry under SpamEngineVersion registry key under MSME\SystemState registry. These twovalues should be in‑sync. For example, if the engine version is 9039, create a directory with thename 9039 under MSME\Bin\AntiSpam\Engine and copy the engine file masecore.dll to thisdirectory.
Can I edit the Anti‑spam rules manually?
No.
What should I consider before adding an email address to the Blacklist?
• Make sure that McAfee Anti‑Spam add‑on component is installed.
• The Microsoft Exchange server must be a Transport server. For example, have an Exchangeserver with Edge Transport or Hub Transport role.
• Have an un‑authenticated connection, where emails reach the server directly from internet.
How do I blacklist or whitelist an email address?
1 From the product's user interface, click Policy Manager | Gateway (Master Policy).
2 Under Core Scanners, click Anti‑Spam.
3 Under Options (Core Anti‑Spam Settings), click Edit.
4 Click the Mail Lists tab and then click Add for the required options such as Blacklisted orWhitelisted senders/recipients.
What should I do when few emails are not being detected as spam?
From Settings & Diagnostics | Anti‑Spam, select Enable message reputation and apply the settings. Also,adjust the spam score to a value between 51 and 79, which will help with the detection rate.
The emails with a lower spam score (51–59) could still be legitimate, so tweaking the score isrequired.
Where can I get the Anti‑spam add‑on license?
You can download the MSMEASA.ZIP file from the McAfee download site, if you have valid McAfeeAnti‑spam grant number. If you do not have a valid Anti‑spam grant number, call the McAfeeCustomer Service team.
Regular Expressions (regex)Here are answers to frequently asked questions on the regular expressions (regex).
Does enabling regex cause email latency?
Yes, enabling regular expression causes email latency, as content scanning is a process intensiveconfiguration.
Where do I find more information on regex?
Several websites on the internet provide information on regular expressions.To name a few, see:• http://www.regular‑expressions.info/reference.html
• http://www.regexbuddy.com/regex.html
How do I block certain Credit Card numbers and Social Security numbers using regex?
10 Frequently asked questionsRegular Expressions (regex)
158 McAfee Security for Microsoft Exchange 8.0.0 Product Guide

1 From the product's user interface, click Policy Manager | Shared Resource. The Shared Resources pageappears.
2 In the DLP and Compliance Dictionaries tab, click New Category and specify a category name.
3 Click OK.
4 Under DLP and Compliance Rules, click Create New.
5 Specify the Rule Name, Description and under Word or Phrase specify the regular expression.
Table 10-1 Example: How to validate Credit Card Numbers
Card type Regular Expression Description
Visa ^4[0‑9]{12}(?:[0‑9]{3})?$
All Visa card numbers start with number 4.New cards have 16 digits. Old cards have 13.
MasterCard ^5[1‑5][0‑9]{14}$ All MasterCard numbers start with thenumbers 51 through 55. All have 16 digits.
American Express ^3[47][0‑9]{13}$ American Express card numbers start with 34or 37 and have 15 digits.
Diners Club ^3(?:0[0‑5]|[68][0‑9])[0‑9]{11}$
Diners Club card numbers begin with 300through 305, 36 or 38. All have 14 digits.There are Diners Club cards that begin with 5and have 16 digits. These are a joint venturebetween Diners Club and MasterCard, andshould be processed like a MasterCard.
Discover ^6(?:011|5[0‑9]{2})[0‑9]{12}$
Discover card numbers begin with 6011 or 65.All have 16 digits.
JCB ^(?:2131|1800|35\d{3})\d{11}$
JCB cards beginning with 2131 or 1800 have15 digits. JCB cards beginning with 35 have16 digits.
Based on the example mentioned above, you can also create a similar regular expression forSocial Security numbers. For more examples on regular expressions, refer http://www.regular‑expressions.info/examples.html.
6 Select the Regular Expression option and click Save.
7 Add this to the DLP and Compliance policy in Policy Manager by clicking Policy Manager | On‑Access(Master Policy) | DLP and Compliance.
8 Under Activation, select Enable.
9 Under DLP and Compliance rules and associated actions, click Add rule.
10 Under Select rules group, select the regex rule that you created earlier from the drop‑down list.
11 Specify the action to take, when the rule is triggered.
12 Click Save.
Frequently asked questionsRegular Expressions (regex) 10
McAfee Security for Microsoft Exchange 8.0.0 Product Guide 159
10 Frequently asked questionsRegular Expressions (regex)
160 McAfee Security for Microsoft Exchange 8.0.0 Product Guide

A Using McAfee Security for MicrosoftExchange Access Control
Allow or deny access to the MSME user interface for specific users or groups.
Task1 From the Start menu, click Programs | McAfee | Security for Microsoft Exchange | Access Control. The Permissions
for Access dialog box appears.
Figure A-1 Permissions for Access
2 From Group or user names, select the user you want to allow or deny access to the MSME userinterface.
3 Click OK.
McAfee Security for Microsoft Exchange 8.0.0 Product Guide 161

A Using McAfee Security for Microsoft Exchange Access Control
162 McAfee Security for Microsoft Exchange 8.0.0 Product Guide

B SiteList Editor
SiteList specifies the location from where automatic updates (including DAT file and scanning engines)are downloaded.
Access SiteList Editor
• From the Start menu, click Programs | McAfee | Security for Microsoft Exchange | SiteList Editor.
Figure B-1 Edit AutoUpdate Repository List
McAfee Security for Microsoft Exchange 8.0.0 Product Guide 163

You can use these tabs:
• Repositories — To configure repository settings from where MSME can download automatic updates.
By default, MSME uses a sitelist that points to a McAfee site for automatic updates, but you canalso create alternative sitelists that point to a different location. For example, you might havecopied the automatic updates to a local repository and created a sitelist that points your MSMEsystems to that local repository.
• Proxy settings — To configure the proxy server settings, so that MSME can connect to the Internetusing this server, to download automatic updates.
Settings applied in the SiteList Editor are saved in the SiteList.xml file under C:\ProgramData\McAfee\Common FrameWork\ directory.
Contents Configure sitelist repository settings Configure sitelist proxy settings
Configure sitelist repository settingsThe SiteList specifies from where automatic updates are downloaded.
By default, McAfee Security for Microsoft Exchange uses a sitelist that points to a McAfee site forautomatic updates, but you can use a sitelist that points to a different location. For example, youmight have copied the automatic updates to a local repository and created a sitelist that points yourMcAfee Security for Microsoft Exchange systems to that local repository.
B SiteList EditorConfigure sitelist repository settings
164 McAfee Security for Microsoft Exchange 8.0.0 Product Guide

Task1 Click Start | Programs | McAfee | Security for Microsoft Exchange | SiteList Editor. The Edit AutoUpdate Repository List
dialog box appears.
2 From the Repositories tab, click Add. The Repository Settings dialog box appears.
Figure B-2 Repository Settings
3 Select from the following options:
• Repository Description — To give a brief description of the repository.
• Retrieve files from — To specify from which type of repository to retrieve the files. The availableoptions are HTTP repository, FTP repository, UNC Path, and Local Path.
• URL — To specify the URL of the repository.
• Port — To specify the port number of the repository.
• Use Authentication — To enable user authentication to access the repository.
4 Specify a user name and password for authentication of the repository and confirm the passwordby typing it again.
5 Click OK to add the new repository to the Repository Description list.
6 Click OK to close the Edit AutoUpdate Repository List dialog box.
SiteList EditorConfigure sitelist repository settings B
McAfee Security for Microsoft Exchange 8.0.0 Product Guide 165

Configure sitelist proxy settingsConfigure these settings if your organization uses a proxy server to connect to the Internet, for MSMEto download the product updates.
If your organization uses proxy servers for connecting to the Internet, you can select the Proxy settingsoption.
Task1 Click Start | Programs | McAfee | Security for Microsoft Exchange | SiteList Editor.
The Edit AutoUpdate Repository List dialog box appears.
2 Click the Proxy settings tab.
Figure B-3 Proxy settings
3 Select the Use Internet Explorer proxy settings or Manually configure the proxy settings option as required.
4 Type the IP address and port number of the HTTP or FTP server.
5 You can use the following options:
• Use Authentication — To enable user authentication to access the proxy server.
• Username — To specify a user name for authentication to access the proxy server.
• Password — To specify a password.
B SiteList EditorConfigure sitelist proxy settings
166 McAfee Security for Microsoft Exchange 8.0.0 Product Guide

• Confirm Password — To reconfirm the specified password.
• Exceptions — To bypass a proxy server for specific domains. Click Exceptions, then select SpecifyExceptions and type the domains that need to be bypassed.
6 Click OK.
SiteList EditorConfigure sitelist proxy settings B
McAfee Security for Microsoft Exchange 8.0.0 Product Guide 167

B SiteList EditorConfigure sitelist proxy settings
168 McAfee Security for Microsoft Exchange 8.0.0 Product Guide

Index
Aabout this guide 7access
SiteList Editor 163
access controlconfiguring 161
action to takedetected items 67
actionsprimary 81
secondary 81
to take 81
addfilter 80
scanner 80
add resource to cluster group 29, 30
additional components 32
advancedpolicy view 73
advanced search filters 55
alertcreating new 84
alert messageconfiguring settings 109
alertsconfiguring 83
enabling product health 119
anti-phishing scannerconfiguring settings 99
anti-spamconfigure settings 120
anti-spam add-onfaqs 157
anti-spam component 33
anti-spam scannerconfiguring settings 96
anti-virus component 33
anti-virus scannerconfiguring settings 91
automatic updateschedule 42
availablescanners and filters 77
Bbackground scan
configuring on-access settings 115
banned file messages 60
banned file types 60
blacklistexporting 99
importing 99
Cchart
configure settings 124
Cluster Continuous Replication 29
Cluster group 29
cluster group resource 29, 30
comparison chartscanners and filters 77
configuration files 32
configuration report task 145
configuration reports 51
email notification 53
scheduling 52
viewing 51
configureaccess control 161
alerts 83
anti-spam proxy settings 132
DLP and Compliance Rules 86
File Filtering Rules 88
notification settings 117
quarantine location 59
scanners 83
sitelist proxy settings 166
sitelist repository settings 164
configure on-access settingsbackground scan 115
transport scan 115
configure settingsalert message 109
anti-phishing scanner 99
anti-spam scanner 96
anti-virus scanner 91
corrupt content 101
McAfee Security for Microsoft Exchange 8.0.0 Product Guide 169

configure settings (continued)DAT 130
disclaimer text 110
DLP and compliance scanner 94
encrypted content 102
export 130
file filtering 95
from another server 131
HTML files 107
import 130
local database 122
mail size filter 104
McAfee Quarantine Manager 121
MIME mail 105
password-protected files 103
protected content 102
scanner control 104
signed content 102
contents, package 23
conventions and icons used in this guide 7core
filters 76
scanners 76
core scannermanaging settings 90
corrupt contentconfiguring settings 101
createnew alert 84
new rule for new users 80
on-demand scan task 46
subpolicy 74
Ddashboard
configure settings 123
Dashboard 35
DAT settingsconfiguring 130
databaseoptimizing 134
PostgreSQL 122
purging 134
debug logconfigure settings 125
default settingsrestoring 134
default vs. enhancedsettings 153
denial of service 55
detected itemsaction to take 67
additional search options 65
comparison chart 64
detected items (continued)configuring settings 121
primary search filters 62
search results 67
searching 66
viewing 59
detectionreal-time 15
detection name 55
detection types 60
diagnosticsconfigure settings 125
disclaimer textconfiguring settings 110
DLP and Compliance 60
DLP and Compliance Rulesconfiguring 86
DLP and compliance scannerconfiguring settings 94
documentationaudience for this guide 7product-specific, finding 8typographical conventions and icons 7
Eedit
notification template 117
EICAR test file 33
emailshow are they scanned 16
encrypted contentconfiguring settings 102
error reporting serviceconfigure settings 128
event logconfigure settings 126
exchange serverprotecting your 15
supported roles 23
exclude mailboxes 116
existing configurationexporting 131
exportblacklists 99
configuring settings 130
existing configuration 131
whitelists 99
extension check-in 138
Ffaqs
anti-spam add-on 157
general 155
install 156
Index
170 McAfee Security for Microsoft Exchange 8.0.0 Product Guide

faqs (continued)policy manager 156
regex 158
regular expressions 158
settings and diagnostics 157
featuresnew 11
product 13
fields you can use, notification 118
file filterconfiguring settings 95
File Filtering Rulesconfiguring 88
filteradding 80
managing settings 100
filters 76
available 77
frequently asked questions 155
Ggeneral
faqs 155
graphconfigure settings 124
graphical reports 54
GTUBE test file 33
HHTML files
configuring settings 107
Iimport
blacklists 99
configuring settings 130
settings from another server 131
sitelists 130, 131
whitelists 99
inbound emailsscanning 17
informationproduct 42
inheritancepolicy view 73
installfaqs 156
modifying 133
repairing 133
installed components 32
internal emailsscanning 19
introduction 11
Kkeys
registry 154
Llicense
product 41
licensesproduct 43
listfilters 79
scanners 79
local databasequarantine using 122
local database vs. MQM 59
Mmail size filter
configuring settings 104
mailbox exclusionconfiguring settings 116
managefilter settings 100
miscellaneous settings 108
quarantined data 59
scanner settings 90
manage using ePolicy Orchestrator 137
prerequisites 137
Master policy 74
master repository 138
McAfee Quarantine Managerquarantine using 121
McAfee ServicePortal, accessing 8McAfee Virtual Technician 33
migrate policiesfrom epolicy Orchestrator 138
MIME 55
MIME mailconfiguring settings 105
miscellaneousmanaging settings 108
modifyinstallation 133
MQM vs. local database 59
Nnew features 11
notificationsettings 116
notification fieldsusing 118
notification templateediting 117
Index
McAfee Security for Microsoft Exchange 8.0.0 Product Guide 171

notificationsconfiguration report 53
configuring 117
status report 50
Oon-access settings 113
configure VSAPI 114
on-demandscanning 44
on-demand scan 44
creating 46
scheduling 46
viewing 45
on-demand scan task 144
optimizedatabase 134
organizational threats 14
outbound emailsscanning 18
Ppackage contents 23
packer 55
password-protected filesconfiguring settings 103
phish 55, 60
policiesmigrating 138
prioritizing 73
sorting 73
policy managerfaqs 156
policy settingsmanage core scanners 90
manage filters 100
manage miscellaneous 108
policy viewadvanced 73
inheritance 73
PostgreSQL database 122
potentially unwanted program 55
potentially unwanted programs 60
pre-installation 21
primaryactions 81
prioritizepolicies 73
productlicense 41
update 41
product features 13
product health alertsenabling 119
product information 42
product logconfigure settings 127
product logsviewing 129
programmaintaining the 133
protectexchange server 15
protected contentconfiguring settings 102
proxy settingsconfiguring anti-spam 132
configuring sitelist 166
purgedatabase 134
Qquarantine location
configuring 59
quarantined datamanaging 59
quarantined itemsaction to take 67
queriespredefined ePO 146
quick setup 28
Rreal-time
detecting 15
recently scanned items 43
regexfaqs 158
registry keysMSME 154
regular expressionsfaqs 158
remove 135
remove extension 152
repairinstallation 133
reportsgraphical 54
repository settingsconfiguring sitelist 164
requirementssystem 22
restoredefault settings 134
roles supportedexchange server 23
rulecreating new for specific users 80
Index
172 McAfee Security for Microsoft Exchange 8.0.0 Product Guide

rulesDLP and Compliance 86
file filtering 88
Sscan types
on-demand 44
scanned itemsrecently 43
scanneradding 80
scanner controlconfiguring settings 104
scanners 76
available 77
configuring 83
scanners and filterscomparison chart 77
listing 79
scheduleautomatic update 42
configuration reports 52
on-demand scan task 46
status reports 49
scheduling tasks in ePolicy Orchestrator 143
searchdetected items 66
search filterscomparison chart 64
primary 62
search optionsdetected items 65
secondaryactions 81
ServicePortal, finding product documentation 8services 32
setting policies in ePolicy Orchestrator 141
settingsconfigure detected items 121
configure on-access 113
configuring anti-spam 120
configuring chart 124
configuring dashboard 123
configuring debug log 125
configuring diagnostics 125
configuring error reporting service 128
configuring event log 126
configuring graph 124
configuring local database 122
configuring McAfee Quarantine Manager 121
configuring product log 127
configuring user interface preferences 123
default vs. enhanced 153
notification 116
settings and diagnosticsfaqs 157
overview 111
setupquickly 28
shared resource 82
configuring alerts 83
configuring DLP and Compliance Rules 86
configuring File Filtering Rules 88
configuring scanners 83
signed contentconfiguring settings 102
simple search filters 54
Single Copy Cluster 29
sitelistimporting 130
SiteListimporting 131
SiteList Editoraccessing 163
proxy settings 163
repository 163
softwareremoving the 135
uninstalling the 135
software updateschedule 42
sortpolicies 73
spam 60
spam score 55
specifyuser 80
statistical information 35
statistics 35
status reports 48
email notification 50
scheduling 49
viewing 48
subject 55
subpoliciescreating 74
subpolicy 74
systemrequirements 22
TTechnical Support, finding product information 8test the installation 33
threatsto your organization 14
ticket number 55
time slots 90
Index
McAfee Security for Microsoft Exchange 8.0.0 Product Guide 173

transport scanconfiguring on-access settings 115
type of scanon-demand scan 44
types ofpolicy 74
types of detection 60
types of on-access scanbackground 113, 115
outbox 113
proactive 113
transport 113, 115
VSAPI 113
Uuninstall 135
unwanted content 60
updateproduct 41
software 42
updatesproduct version 41
userspecifying 80
user interface preferencesconfigure settings 123
using this guide 8
Vversion
product 41
viewconfiguration reports 51
detected items 59
on-demand scan 45
product logs 129
status reports 48
viruses 60
VSAPI settingsconfiguring 114
Wwhat's new 11
whitelistexporting 99
importing 99
Index
174 McAfee Security for Microsoft Exchange 8.0.0 Product Guide

00