secure production programming solution (spps) user guide
TRANSCRIPT

Secure Production Programming Solution(SPPS)
User Guide
For Libero SoC v11.7 SP2

Revision 1 2
Table of Contents
Introduction . . . . . . . . . . . . . . . . . . . . . . . . . . . . . . . . . . . . . . . . . . . . . . . . . . . . . . . . . . . . . . . . . . . . . . . . . 3What is SPPS . . . . . . . . . . . . . . . . . . . . . . . . . . . . . . . . . . . . . . . . . . . . . . . . . . . . . . . . . . . . . . . . . . . . . . . . . . . . . 3
Secure Initial Key Loading . . . . . . . . . . . . . . . . . . . . . . . . . . . . . . . . . . . . . . . . . . . . . . . . . . . . . . . . . . . . . . . . . . . . 3
Preventing Overbuilding . . . . . . . . . . . . . . . . . . . . . . . . . . . . . . . . . . . . . . . . . . . . . . . . . . . . . . . . . . . . . . . . . . . . . . 3
Use of Hardware Security Modules (HSM) . . . . . . . . . . . . . . . . . . . . . . . . . . . . . . . . . . . . . . . . . . . . . . . . . . . . . . . 4
SPPS Functions and Services . . . . . . . . . . . . . . . . . . . . . . . . . . . . . . . . . . . . . . . . . . . . . . . . . . . . . . . . . . . . . . . . . 4
SPPS Ecosystem . . . . . . . . . . . . . . . . . . . . . . . . . . . . . . . . . . . . . . . . . . . . . . . . . . . . . . . . . . . . . . . . . . . . . . . . . . . 5
Terms and Definitions . . . . . . . . . . . . . . . . . . . . . . . . . . . . . . . . . . . . . . . . . . . . . . . . . . . . . . . . . . . . . . . . . . . . . . . 5
Referenced Documents . . . . . . . . . . . . . . . . . . . . . . . . . . . . . . . . . . . . . . . . . . . . . . . . . . . . . . . . . . . . . . . . . . . . . . 5
1 Programming Production . . . . . . . . . . . . . . . . . . . . . . . . . . . . . . . . . . . . . . . . . . . . . . . . . . . . . . . . . . . . 6Main SPPS Flow . . . . . . . . . . . . . . . . . . . . . . . . . . . . . . . . . . . . . . . . . . . . . . . . . . . . . . . . . . . . . . . . . . . . . . . . . . . 6
Non-HSM Flow . . . . . . . . . . . . . . . . . . . . . . . . . . . . . . . . . . . . . . . . . . . . . . . . . . . . . . . . . . . . . . . . . . . . . . . . . . . . 13
Creation of SPI Directory . . . . . . . . . . . . . . . . . . . . . . . . . . . . . . . . . . . . . . . . . . . . . . . . . . . . . . . . . . . . . . . . . . . . 15
2 SPPS Protocols . . . . . . . . . . . . . . . . . . . . . . . . . . . . . . . . . . . . . . . . . . . . . . . . . . . . . . . . . . . . . . . . . . 16Authorization Code Protocol . . . . . . . . . . . . . . . . . . . . . . . . . . . . . . . . . . . . . . . . . . . . . . . . . . . . . . . . . . . . . . . . . 16
Per-Device Protocol . . . . . . . . . . . . . . . . . . . . . . . . . . . . . . . . . . . . . . . . . . . . . . . . . . . . . . . . . . . . . . . . . . . . . . . . 18
One Time Pass Key (OTPK) Protocol . . . . . . . . . . . . . . . . . . . . . . . . . . . . . . . . . . . . . . . . . . . . . . . . . . . . . . . . . . 18
Device Certificate of Conformance (CoC) . . . . . . . . . . . . . . . . . . . . . . . . . . . . . . . . . . . . . . . . . . . . . . . . . . . . . . . 19
Job End Certifier Protocol . . . . . . . . . . . . . . . . . . . . . . . . . . . . . . . . . . . . . . . . . . . . . . . . . . . . . . . . . . . . . . . . . . . 19
Device Authenticity Check Protocol . . . . . . . . . . . . . . . . . . . . . . . . . . . . . . . . . . . . . . . . . . . . . . . . . . . . . . . . . . . . 19
3 HSM Servers . . . . . . . . . . . . . . . . . . . . . . . . . . . . . . . . . . . . . . . . . . . . . . . . . . . . . . . . . . . . . . . . . . . . 20HSM Hardware Modules used by SPPS . . . . . . . . . . . . . . . . . . . . . . . . . . . . . . . . . . . . . . . . . . . . . . . . . . . . . . . . 20
HSM Server Architecture . . . . . . . . . . . . . . . . . . . . . . . . . . . . . . . . . . . . . . . . . . . . . . . . . . . . . . . . . . . . . . . . . . . . 21
HSM Server Functionality . . . . . . . . . . . . . . . . . . . . . . . . . . . . . . . . . . . . . . . . . . . . . . . . . . . . . . . . . . . . . . . . . . . 22
Deployment Scenarios . . . . . . . . . . . . . . . . . . . . . . . . . . . . . . . . . . . . . . . . . . . . . . . . . . . . . . . . . . . . . . . . . . . . . . 23
HSM Server Installation and Provisioning . . . . . . . . . . . . . . . . . . . . . . . . . . . . . . . . . . . . . . . . . . . . . . . . . . . . . . . 24
HSM Security Environment . . . . . . . . . . . . . . . . . . . . . . . . . . . . . . . . . . . . . . . . . . . . . . . . . . . . . . . . . . . . . . . . . . 24
A Product Support . . . . . . . . . . . . . . . . . . . . . . . . . . . . . . . . . . . . . . . . . . . . . . . . . . . . . . . . . . . . . . . . . . 29Customer Service . . . . . . . . . . . . . . . . . . . . . . . . . . . . . . . . . . . . . . . . . . . . . . . . . . . . . . . . . . . . . . . . . . . . . . . . . 29
Customer Technical Support Center . . . . . . . . . . . . . . . . . . . . . . . . . . . . . . . . . . . . . . . . . . . . . . . . . . . . . . . . . . . 29
Technical Support . . . . . . . . . . . . . . . . . . . . . . . . . . . . . . . . . . . . . . . . . . . . . . . . . . . . . . . . . . . . . . . . . . . . . . . . . 29
Website . . . . . . . . . . . . . . . . . . . . . . . . . . . . . . . . . . . . . . . . . . . . . . . . . . . . . . . . . . . . . . . . . . . . . . . . . . . . . . . . . 29
Contacting the Customer Technical Support Center . . . . . . . . . . . . . . . . . . . . . . . . . . . . . . . . . . . . . . . . . . . . . . . 29
ITAR Technical Support . . . . . . . . . . . . . . . . . . . . . . . . . . . . . . . . . . . . . . . . . . . . . . . . . . . . . . . . . . . . . . . . . . . . . 30

Introduction
This user guide describes the Microsemi Secure Production Programming Solution (SPPS), and includes the following information:
• High level SPPS overview
• Use models
• Software/hardware components of SPPS
• Tools flow
What is SPPSSPPS is a solution provided by Microsemi to its customers for secure programming of Microsemi SmartFusion2/IGLOO2 devices in untrusted environments.
The operation engineer (OE) uses SPPS to prepare secure programming jobs based on design information received from design and firmware engineers. The created secure programing job is executed by manufacturing as part of the SPPS on the site of the contract manufacturer (CM).
SPPS provides the following during manufacturing in an untrusted environment or where insiders may be present:
• Ensures confidentiality of user design and security keys used via a secure initial key loading mechanism
• Prevents unauthorized programming of the user design via an overbuild protection mechanism, thus preventing overbuilding of electronic systems
Secure Initial Key LoadingSecure initial key loading allows the programming security settings, such as encryption keys, pass keys, and security locks, into a blank device under protection of the unique per-device factory key programmed into every SmarFusion2/IGLOO2 device. This is achieved using the Authorization Code Protocol (see "Authorization Code Protocol" on page 16) built into Microsemi SmarFusion2/IGLOO2 devices. For execution during device programming, the Authorization Code Protocol requires the support of a Hardware Security Module (HSM). See "HSM Hardware Modules used by SPPS" on page 20 for more information about HSMs.
Secure Initial Key Loading provides strong cryptographic protection of the user design and security settings programmed into a blank device. Programming of user defined security settings disables the factory default key modes, giving the user exclusive access to the programmed device. No one can gain access to the device without the proper security credentials, even Microsemi personnel, if the factory test mode is protected by user security settings.
Note: The user must select the “Protect factory test mode access using FlashLock/UPK1" or "Permanently protect factory test mode access" in the Security Policy Manager (SPM).
Preventing OverbuildingThe overbuild protection mechanism allows the user to restrict the number of devices programmed using a specific design. The maximum number of allowed devices and the count of already programmed devices are stored in the physical HSM module, and cannot be physically cloned. The HSM module enforces overbuild protection during programming as a part of security protocols execution.
Revision 1 3

Use of Hardware Security Modules (HSM)An HSM is a physical computing device that safeguards and manages user key information. It allows execution of algorithms making use of those keys inside the security boundaries provided by the module. HSM modules protect the information they process. They consist of specially sealed packaging and various tamper-resistant and tamper-evident protection mechanisms.
The HSM module is attached to the PC (HSM Server) via hardware interfaces such as USB or PCIe. Storage space in the module is limited; therefore, most of the data used by the HSM is stored on the PC side in encrypted form. In-module memory contains an encryption key for protecting external data and data that must be physically uncloneable, such as overbuild protection counters.
For more information about HSM modules used in SPPS, see "HSM Hardware Modules used by SPPS" on page 20.
SPPS uses two types of HSM: User HSM (U-HSM) and Manufacturer HSM (M-HSM). See "HSM Servers" on page 20 for more information.
SPPS Functions and ServicesThe primary purpose of SPPS is to enable secure programming of SmartFusion2/IGLOO2 devices in an untrusted environment. This flow is based on the use of an HSM, and in this document is referred to as HSM flow. However, the primary tool created for SPPS (Job Manager) can also be used for non-secured programming (non-HSM flow), which is the same as the programming supported by Libero. In the case of non-HSM flow, initial key loading is done using the Key Loading Key (KLK) key mode supported for SmartFusion2/IGLOO2 devices. KLK key mode is suitable for programming in a trusted environment or if security is not a concern.
The following SPPS-supported common functions are available in HSM flow and non-HSM flow:
• Generation of programming bitstreams and programming jobs outside the Libero tool
• Generation of Master programming bitstreams (for initial key loading)
• Generation of Update bitstreams for updating Fabric and/or eNVM of an already programmed device
• Overwrite of eNVM Client(s) data
• Selection of eNVM Clients in generated bitstreams
• Security settings overwrite
• Generation of SPI flash file directory
The main SPPS flow (HSM flow) assumes the presence of HSM servers on the customer side and in most cases on the manufacturer side as well.
Features available in HSM flow only:
• HSM-protected user key generation
– The user does not have access to the encryption and pass key values; nor do insiders
– HSM generated keys are never present on the host workstation except in encrypted form
• Secured Initial Key Loading via the Authorization Code Protocol (see "Authorization Code Protocol" on page 16)
– Initial programming of the project key (same for all devices)
– Initial programming of per-device keys
• Overbuild protection
• Generation and validation of Certificates of Conformance (CoC) of the programmed design
• Verifying Microsemi device authenticity
Revision 1 4
SPPS EcosystemSPPS includes the following tools and servers (see Figure 1-1 on page 6):
• Libero Design Tool – the design engineer creates and exports a Libero design in a Job Data Container (JDC) file.
• Job Manager Tool – used by the operation engineer (OE) to generate an HSM or non-HSM programming job using a JDC file received from Libero. The Job Manager also allows the OE to modify certain design features, such as eNVM content and security settings.
• FlashPro Express – used during production to program the device from programming jobs created by the Job Manager tool.
• U-HSM Server – used by the Job Manager to create secured jobs for HSM flow. It also allows the OE to test-execute programming job created with FlashPro Express. The Job Manager uses the U-HSM to validate results of the programming job execution.
• M-HSM Server – used by FlashPro Express to generate protocol data and generate per-device key values (which are derived from the device serial number and the base values of the user key) during programming. The M-HSM enforces overbuild protection.
• Firmware Design Tools – firmware developers can generate new firmware images that can be sent to the OE and updated inside the Job Manager via the eNVM update feature.
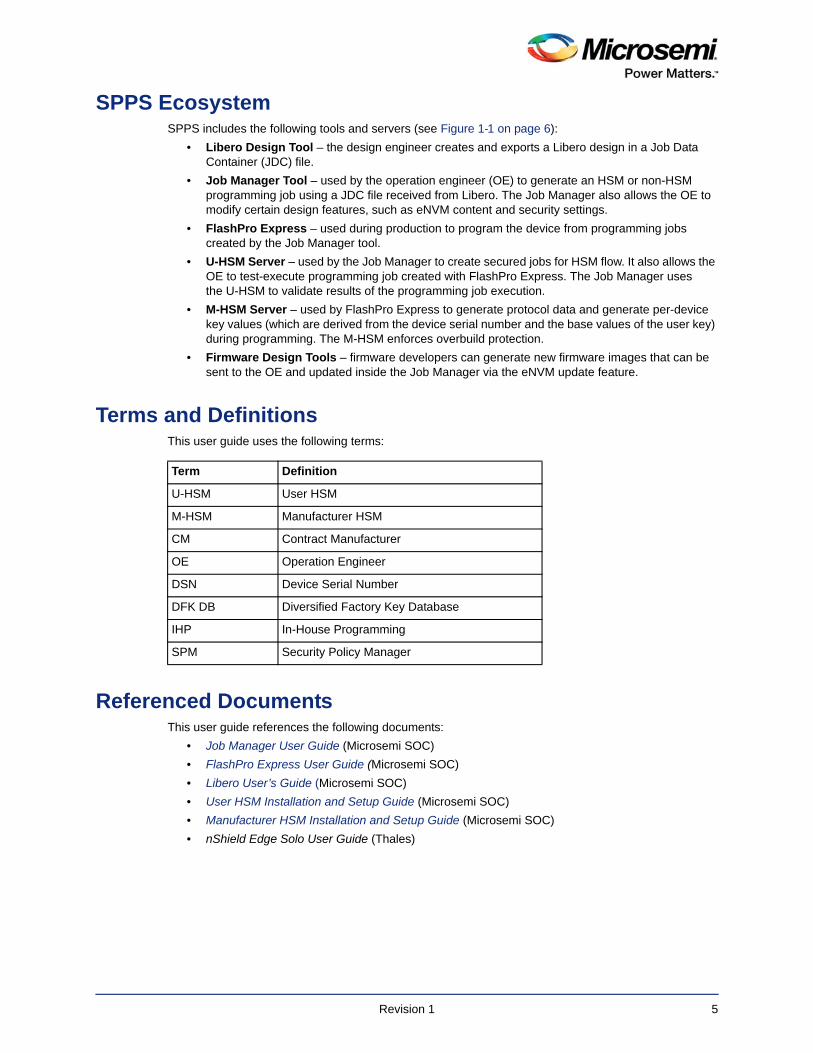
Terms and DefinitionsThis user guide uses the following terms:
Referenced DocumentsThis user guide references the following documents:
• Job Manager User Guide (Microsemi SOC)
• FlashPro Express User Guide (Microsemi SOC)
• Libero User’s Guide (Microsemi SOC)
• User HSM Installation and Setup Guide (Microsemi SOC)
• Manufacturer HSM Installation and Setup Guide (Microsemi SOC)
• nShield Edge Solo User Guide (Thales)
Term Definition
U-HSM User HSM
M-HSM Manufacturer HSM
CM Contract Manufacturer
OE Operation Engineer
DSN Device Serial Number
DFK DB Diversified Factory Key Database
IHP In-House Programming
SPM Security Policy Manager
Revision 1 5

1 – Programming Production
The Microsemi programming production flow is shown in Figure 1-1. The flow supports simple programming jobs and bitstream file exports directly from the Libero tool, represented with the blue components in Figure 1-1. Libero-based production flow only supports non-secured programming, based on KLK key mode. For more information, refer to the Libero User’s Guide.
The Job Manager extends that capability, allowing bitstream file and programming job generation outside of the Libero tool, and the support of SPPS flow, represented with green components in Figure 1-1.
Bitstream files (STAPL, DAT and SPI) can be programmed using FlashPro, DirectC, or Silicon Sculptor. STAPL file can be used by third party JTAG production programming tools to program Microsemi devices. Programming jobs are supported by FlashPro Express only.
The main SPPS flow is based on the use of HSM in the Operation and Production site. It supports the advanced production the programming models described in the following sections.
Main SPPS FlowThe main objectives of this flow are to support secured programming of a blank device (initial programming), enforce overbuild protection, and allow an upgrade flow for already-programmed devices.
In this flow, all user-selected design information such as Fabric, eNVM, and Security is exported from Libero via a JDC file and handed off to the OE, who uses the Job Manager to create and submit an HSM Programming Job for production. eNVM client data can be updated in the Job Manager during this step. eNVM data is typically provided by (but not limited to) the firmware development team. All operations related to generation and use of encryption keys, pass keys, and other protected data is handled by the User HSM (U-HSM). Production executes received HSM Programming Jobs using FlashPro Express. The Manufacturer HSM (M-HSM) serves FlashPro Express security protocol requests and enforces the overbuild protection policy. Proof of programming results such as Certificates of Conformance generated by programmed devices and job end certifiers are sent back to the OE and can be validated using the U-HSM.
From a design security standpoint, Design and Operation areas are always considered to be trusted environments. The OE can modify security settings from Libero via the JDC file. Production in the main
Figure 1-1 • Microsemi Programming Flow
Revision 1 6
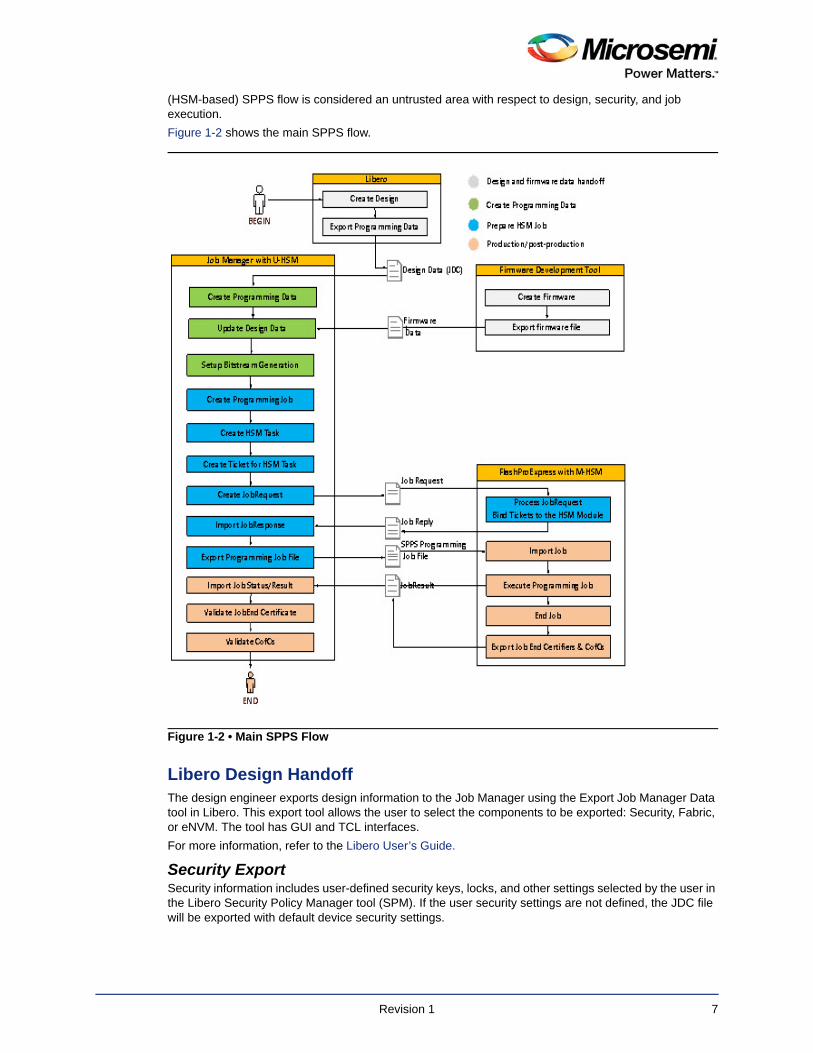
(HSM-based) SPPS flow is considered an untrusted area with respect to design, security, and job execution.
Figure 1-2 shows the main SPPS flow.
Libero Design HandoffThe design engineer exports design information to the Job Manager using the Export Job Manager Data tool in Libero. This export tool allows the user to select the components to be exported: Security, Fabric, or eNVM. The tool has GUI and TCL interfaces.
For more information, refer to the Libero User’s Guide.
Security ExportSecurity information includes user-defined security keys, locks, and other settings selected by the user in the Libero Security Policy Manager tool (SPM). If the user security settings are not defined, the JDC file will be exported with default device security settings.
Figure 1-2 • Main SPPS Flow
Revision 1 7

Exported security settings can be changed by the OE in the Job Manager, depending on specific use cases explained in "Main SPPS Flow" on page 6 and "Non-HSM Flow" on page 13.
Fabric ExportThe Fabric component is exported and used in the Job Manager as is.
eNVM ExporteNVM data exported via a JDC file includes all eNVM clients available in the Libero project. The OE can modify eNVM client data within the Job Manager project. This mechanism is intended to support cases such as firmware development/upgrade flow, which is described in the following section. The Job Manager can only modify client data; it cannot modify the eNVM client configuration. eNVM configuration is managed by the design engineer in the Libero project.
Firmware HandoffWhile the initial version of the firmware for Microsemi SmartFusion2 devices is typically included in newly created Libero designs, and can be exported from Libero via a JDC file, it is possible to issue pre- or post-production firmware updates directly to Operation. Files with firmware update can be exported by firmware development tools such as IAR or Soft Console in one of formats supported by Libero (see the Libero User’s Guide). New firmware data is accepted and applied by the Job Manager via eNVM update, which is explained in "eNVM Update".
Programming Data and Bitstream InitializationProgramming data is created by the OE within a Job Manager project from design data received from Libero via a JDC file. Its primary objective is to provide a programming job with programming bitstreams according to a selected programming scenario (initial programming, upgrade, etc.)
Programming Data Creation via JDC ImportProgramming data creation requires the user to point to the specific JDC file. Also, in the HSM flow, all key material is handled by the U-HSM on the operation side. Therefore, the Programming Data needs a special KeySet file pre-generated by the U-HSM. KeySet files are stored in a repository shared by different Job Manager projects, which enables key sharing. For more information about handling KeySet files, refer to the Programming Job Manager User Guide.
Design Data ModificationThe Job Manager allows the OE to modify imported design data and supports the following use cases:
• eNVM update
• Security settings overwrite
eNVM UpdateThere are two main uses for an eNVM update:
1. The OE receives an update from the firmware development team and updates the firmware in a Job Manager project.
2. The OE performs a custom update of the existing eNVM clients. Examples of this case could be programming of custom per-device information or information that becomes available or changed after the device was initially programmed.
eNVM update is applied to the existing clients in the loaded design. The updated content size cannot exceed the client size in the design, but may be smaller. This allows the Libero design engineer to reserve more client space to accommodate a potential increase in firmware size.
Security OverwriteThis use case is designed to give the OE full control over security programmed into the device. The user can import a Security Policy Manager (SPM) file created by Libero into the Programming Data entry of a Job Manager project. This new SPM file, called Security Overwrite, substitutes all security settings imported into the Programming Data via the JDC file. The key values are still used from the KeySet file associated with the Programming Data, as all keys are protected by the HSM.
Revision 1 8

Initialization of Master Programming BitstreamThe Master programming bitstream is similar to the Master bitstream used in Libero, but is based on secured key loading using the Authorization Code Protocol (see "Authorization Code Protocol" on page 16 for protocol description), which makes initial key loading secure and provides overbuilding protection.
The OE uses the Master bitstream to program security and any other optional bitstream components (Fabric, eNVM) into a blank device that does not have user security programmed. Initialization of the Master bitstream automatically includes all protocol data generated by the U-HSM on the Job Manager side. This data is then passed and used by the M-HSM on the FlashPro Express (Manufacturing) side.
The Master bitstream programs security settings based on SPM information in the Programming Data. If Programming Data has a Security Overwrite (explained in "Security Overwrite" on page 8), the overwrite supersedes the SPM from the original design. Key values are always used from the KeySet file associated with the Programming Data.
When using the Master Bitstream in the SPPS HSM flow, note the following:
1. After initial key loading, the Master bitstream disables all Factory Default Key modes and Factory pass keys. This gives the user exclusive control over device access via programming interfaces with the user pass and encryption keys. Note that the user-defined pass key and encryption keys are only accessible via the U-HSM. The M-HSM can only access the user-defined pass keys and encryption keys with the authorization of the U-HSM through the Job Ticket embedded in the Programming Job.
Note: The user has to select the “Protect factory test mode access using FlashLock/UPK1” or “Permanently protect factory test mode access” in the Security Policy Manager (SPM).
2. An ERASE or VERIFY operation using the Master bitstream requires an M-HSM. This is because after initial programming, device security is always locked by UPK1. The UPK1 value is always protected by the HSM, and security unlock can only be done by the HSM via the One Time Pass Key protocol (OTPK) that securely transmits the UPK1 value to the device (see "One Time Pass Key (OTPK) Protocol" on page 18 for details).
3. A program action from the Master bitstream cannot be invoked on a programmed device. Security reprogramming can only be achieved by erasing the device first using the Master bitstream that was used to program the device.
4. The ERASE programming action does not erase content of eNVM areas programmed by the Master bitstream. With this action, security settings will be erased, but eNVM content remains available for access.
The OE can choose to make any of the user-defined keys (UEK1/UPK1/UEK2/UPK2/DPK) to be Project Wide keys or Per-device keys.
Project KeysAll devices programmed from the same job have the same key value programmed. These keys are used from the KeySet file without modification.
Per-device KeysIf the OE specifies any of the SPM keys to have a per-device value, every device receives a unique value derived from the respective base key in the KeySet file and Device Serial Number (DSN) of the device being programmed. This type of key derivation is referred to as a Per-Device Key Protocol (see "Per-Device Protocol" on page 18).
Because actual device programming is done on the Production side, the programming software reads the DSN from the device and passes it to the M-HSM. The HSM uses the Per-Device protocol to derive per-device key value. This also applies to Erase and Verify operations if UPK1 is selected to be per-device.
For more information about how to use the Master bitstream, refer to the Programming Job Manager User Guide.
Initialization of UEK1/UEK2 Update BitstreamUpdate bitstreams is designed to update devices already programmed using the Master bitstream (see "Initialization of Master Programming Bitstream" on page 9).
An update bitstream can only update eNVM and Fabric device features. Reprogramming security is explained in a special use case in "Initialization of Master Programming Bitstream" on page 9.
Revision 1 9

Depending on whether or not the device has security locks on areas targeted for update, and whether project or per-device keys are used, the OE will follow one of the use cases listed below:
UEK1/UEK2 project keys, no security lockIn this case, all devices in the project have the same UEK1 or UEK2 values and target device feature programming is allowed without FlashLock/UPK1 match. The Job Manager can generate a standalone bitstream file or non-HSM programming job that does not require the M-HSM during programming. However, this case assumes the Job Manager uses the U-HSM to encrypt the resulting bitstream using UEK1/UEK2 token values in the KeySet file.
UEK1/UEK2 project keys, security lockedIf the target device feature programming is locked, the M-HSM must perform a secured unlock of the device, because plain text value of the lock key cannot be used in an untrusted environment. This type of bitstream must be handled via an HSM Programming Job using the OTPK protocol (see "One Time Pass Key (OTPK) Protocol" on page 18). The OTPK protocol is engaged automatically by FlashPro Express.
UEK1/UEK2 per-device keys, no security locks, DSN is available to OEIf UEK1 or UEK2 are per-device keys, target feature programming is not locked, and DSN for the target device is known, the user has an option to generate a device-specific programming bitstream that does not require the M-HSM during production. This bitstream can be exported as a standalone bitstream file or non-HSM Programming Job. In either case, DSN must be provided upon bitstream export or during the addition of the device to the job.
UEK1/UEK2 per-device, all other casesFor all other cases related to per-device UEK1/UEK2, the M-HSM and HSM Programming Job must be used. If the target device features are locked by per-device UPK1, UPK1 unlock is performed securely via the OTPK protocol (see "One Time Pass Key (OTPK) Protocol" on page 18).
For more information about Initializing the bitstream in the Job Manager, refer to the Programming Job Manager User Guide.
Job PreparationHSM Job Preparation consists of two phases:
1. Job Creation: JTAG chain setup and device association with programming bitstream
2. Add HSM data to the job (adding HSM Task to the job)
Job CreationUpon creation of a job, the user specifies production type, which can be either FlashPro Express or In-House Programming (IHP). For more information, refer to the Programming Job Manager User Guide.
FlashPro Express JobThis job type uses FlashPro Express and the M-HSM in the HSM flow, and is based on the JTAG chain. The JTAG chain may have following types of devices:
• Microsemi device targeted for programing with Master or Update bitstream
• Microsemi bypass device not targeted for programming
• Non-Microsemi bypass device
Secured IHP JobGeneral handling of the Secured IHP job type is similar to FlashPro Express Job type. The primary difference is that the Secured IHP job requires only one Microsemi device targeted for programming. This is because actual hardware setup is managed by the IHP system.
Adding HSM Data to the Job via HSM TasksThe OE can execute a programming job using multiple Contract Manufacturers or by handing off production volume to the Contract Manufacturer in chunks. The OE can manage this by using the HSM Tasks. For example, the OE creates a Programming Job and then creates and exports an HSM Task for each manufacturer.
Revision 1 10

The main purposes of HSM Tasks are to:
• Grant permission to execute a job to a specific physical M-HSM in the contract manufacturer's security world.
– This is a part of the overbuild protection mechanism that excludes the possibility of replicating the job on any other M-HSM in the same security world.
– A special handshake mechanism between the U-HSM and the M-HSM is designed to accomplish this, as explained later in this section.
• Enable the OE to limit the number of devices served by a particular programming action (i.e., PROGRAM, ERASE, and VERIFY)
– This is another component of the overbuild protection mechanism.
• Securely deliver keys and protocol data to the M-HSM for programming execution.
All HSM-related information listed above is handled by Job Tickets associated to the HSM Task. The OE adds the Job Ticket to every authorized programming action (PROGRAM, ERASE, VERIFY) for the target device. This allows the user to separately manage those actions. The Job Ticket allows control of the overbuild protection mechanism: The OE turns Job Ticket overbuild protection on or off and specifies how many devices the ticket is allowed to handle (for more information, refer to the Programming Job Manager User Guide.
HSM Task Flow The following HSM task flow steps must be done by the OE (refer to Figure 1-2 for details):
1. Create an HSM Task for the Programming Job.
2. Create a Job Ticket for the programming bitstream action for the target Microsemi programming device:
a.Programming actions that require HSM support need a valid Job Ticket to execute.
b.The maximum number of devices to be allowed for the ticket can be specified in a ticket. The user can select not to turn on overbuild protection for a specific ticket.
3. The OE executes the Job Request-Reply handshake protocol between the U-HSM and the M-HSM to bind Job Tickets of the HSM Task to the specific physical M-HSM:
a.The OE exports the file with the Job Request from the Job Manager.
b.The OE passes this Job Request to the CM.
– The OE and CM agree on the transport type for delivering the Job Request, depending on their specific case and security policies.
c.The CM loads the received Job Request with FlashPro Express and M_HSM, and exports a Job Reply.
d.The CM sends the Job Reply file back to the OE.
e.The OE imports the received Job Reply into the HSM Task on the Job Manager side.
4. The OE generates and exports the HSM Job from the HSM Task and creates the SPPS Programming Job file.
a.The HSM job can only be executed on the physical M-HSM that was used to generate the Job Reply.
b.The generated job is sent to CM for execution.
Refer to the Programming Job Manager User Guide for more information about the content of the HSM job file and HSM Task Flow steps listed above.
ProductionThe CM receives the SPPS Programming Job file from the OE and creates a FlashPro Express project with the HSM Job in the SPPS Programming Job file. For the HSM job, some ticket information, such as ticket IDs and overbuild protection data, gets loaded into the specific M-HSM module that participated in the Job Request-Reply handshake protocol. The rest of the ticket-protected information, such as JTAG chain configuration and programming bitstreams, is loaded into the FlashPro Express project. For more information, refer to the FlashPro Express User’s Guide.
After creating the FlashPro Express project, the job is ready for execution.
Revision 1 11

Overbuild ProtectionFor each execution of a programming action (PROGRAM, ERASE, and VERIFY) that has an associated job ticket with overbuild protection turned on, the M-HSM decreases the counter of the remaining devices for the ticket. The overbuild protection counters reside inside the HSM module and are physically uncloneable. When the allowed number of devices have been programmed, the M-HSM stops processing any further protocol request associated with the ticket.
Job StatusJob status can be requested in FlashPro Express during job execution. Job status can be printed out in the FlashPro Express log windows or exported into the Job Status file and sent back to the OE. Job status contains a list of job tickets loaded into the FlashPro Express project and the M-HSM. For tickets with active overbuild protection, status will show max allowed device numbers and current state of remaining device counters.
Job Status also includes device CoC. The CoC is generated and cryptographically signed by the device with a (symmetric) message authentication code. This information can be verified by the U-HSM on the Job Manager side. See "Device Certificate of Conformance (CoC)" on page 19 for more information.
Device AuthenticationFlashPro Express performs a Microsemi device authenticity check at the beginning of each programming action. This check is embedded into the check chain procedure. A failed device authentication check will abort programming action. The device authentication protocol is explained in "Device Authenticity Check Protocol" on page 19.
Job CompletionJob execution can be stopped in two ways:
• Normal job ending upon finishing programming of the target number of devices
– For example, all job ticket overbuild protection counters are exhausted
• Job termination
– If some job ticket overbuild protection counters still have devices to program
Both types of job termination will do the following:
• Remove job tickets from the M-HSM and archive them in a dedicated folder on the M-HSM.
• Generate Job Status with the following data:
– Device Certificates of Conformance generated by devices (see "Device Certificate of Conformance (CoC)" on page 19).
– Ticket End certifiers. This is a cryptographically validated proof of removing ticket data from the M-HSM module. Validation of this data can be done by the Job Manager using the U-HSM. This check confirms that the job ticket can no longer be used by the M-HSM. See "Job End Certifier Protocol" on page 19.
Post ProductionThe post production step on the Job Manager side is optional. It is used to analyze and cryptographically verify validators of Job Status received from the Production side. This is done by importing the Job Status file into the HSM Task. The Job Manager uses the U-HSM to check all status validators.
Special Cases
Test Execution of the HSM Job on Operation SideAs a part of HSM job preparation, the OE may want to test-execute jobs on his side. This test execution can be done using FlashPro Express connected to the same U-HSM that was used for job creation.
The U-HSM has the complete functionality of the M-HSM. This feature is called the M-HSM function of the U-HSM. Configuring the M-HSM function of the U-HSM is explained in the User HSM Installation and Setup User Guide. All other aspects related to HSM job execution by FlashPro Express using the M-HSM function is similar to job execution in a real Production environment.
Revision 1 12

Using Internal (Automatic) Job Request-Reply for HSM Job Test ExecutionIf the OE uses the same physical U-HSM to create the HSM job and test-execute it, it is possible to eliminate the user-initiated Job Request-Reply flow steps (see "Adding HSM Data to the Job via HSM Tasks" on page 10). In this case, an HSM Task is created in a special “INTERNAL” mode (explained in the Programming Job Manager User Guide). This mode tells the Job Manager to automatically execute Job Request-Reply protocol for the user, without involving regular request processing steps on the FlashPro Express side (see Figure 1-2).
Non-HSM FlowThe SPPS tool Job Manager supports a non-HSM flow that can be used without the U-HSM and the M-HSM. In this flow, all key material is handled in plain text form and initial key loading is done using KLK-key mode.
The main objective for non-HSM flow is to give the OE a way to prepare non-HSM jobs outside the Libero design tool. This eliminates the need for the user to be familiar with design process and general use of Libero, having to install Libero and eliminates Libero licensing requirements. It allows eNVM update to be handled within the Job Manager. Security can also be overridden at the Operation level similarly to the main HSM-based flow.
This flow is capable of producing a standalone bitstream file (as shown Figure 1-3) or non-HSM jobs (as shown in Figure 1-4).
Figure 1-3 • Non-HSM SPPS Flow for Bitstream Generation
Revision 1 13

In both cases, Design and Firmware data handoff is done similarly to the Main SPPS Flow (see "Libero Design Handoff" on page 7 and "Firmware Handoff" on page 8).
Programming Data entry is created as in the main flow step (see "Programming Data and Bitstream Initialization" on page 8), with some differences in security management, as explained below.
Security Management in Non-HSM FlowBy default, all security settings and key values are used from the design data loaded from the JDC file.
The user can overwrite security settings from an external SPM file received from Libero. This feature is similar to the one in the main flow (see "Security Overwrite" on page 8).
In addition to Security Overwrite, the non-HSM flow supports Key Overwrite.
Key OverwriteKey Overwrite is available in non-HSM flow only. Key Overwrite allows the OE to replace one or more key values (pass keys, encryption, or debug key) received from Libero in the original JDC file or from applied security overwrite from the SPM file. Overwritten key values always supersede any key values in Programming Data.
Bitstream InitializationNon-HSM flow supports the following programming bitstream options:
• Trusted Facility Bitstream
• Master Bitstream
Figure 1-4 • SPPS Flow for non-HSM Job Export
Revision 1 14

• UEK1/UEK2 Update Bitstream
Trusted Facility BitstreamThis bitstream type can program Fabric and/or eNVM. It does not program device security. The entire bitstream is encrypted with the KLK encryption key.
Master BitstreamSupports initial programming of Security and other optional components such as Fabric and eNVM. The entire bitstream is encrypted with the KLK encryption key.
After initial programming with user keys, all Microsemi factory default key modes, including KLK and DFK key mode, become disabled. After this step, the device becomes secured, and further updates can be applied in an untrusted environment (see "UEK1/2 Update Bitstream" on page 15).
Note: Per security policy, programming of UEK1 or UEK2 will program the UPK1 or UPK2 passkeys, respectively, and lock security segment. As a result, ERASE and VERIFY actions in generated bitstream files or programming jobs will contain plain text UPK1/UPK2 values. This is required to unlock security segments for the programming actions when using the non-HSM flow (the HSM-based flow uses encrypted one-time passcodes).
UEK1/2 Update BitstreamA device programmed with a Master bitstream can later be updated using an Update bitstream. This bitstream can reprogram Fabric and/or eNVM device features only. Device security cannot be updated in this flow.
Note: If Fabric or eNVM device components targeted by this bitstream are protected by FlashLock or UPK1, the plain text value of UPK1 will be included in the exported bitstream file/programming job when using the non-HSM flow.
Creation of Programming Bitstream FilesThe bitstream file can be exported after the bitstream initialization step is complete. The Job Manager supports different file formats (STAPL, SPI, DAT, etc.) For more information, refer to the Programming Job Manager User Guide.
The generated bitstream file can be sent for production to program the devices using FlashPro, DirectC, Silicon Sculptor, IAP/ISP services, or other third party programming tools that support STAPL format.
Creation and Execution of non-HSM JobsThe creation of a non-HSM job is similar to an HSM Job with the exception that there is no IHP job type option, and the job is exported directly without HSM Tasks (see "Adding HSM Data to the Job via HSM Tasks" on page 10).
The user adds target and bypass devices. Target Microsemi devices are associated with the bitstreams in Programing Data.
Job generation is done at the job level (explained in the Programming Job Manager User Guide). The created job is sent to Production and can only be executed by FlashPro Express programming software.
Creation of SPI DirectorySPPS provides a way to create an SPI directory similar to that of the Libero tool. For more information, refer to the Libero User’s Guide.
The SPI directory allows the user to set up addresses for device self-programming images (golden and update).
This operation does not require HSM support and is not bound to a particular Job Manager project. See the Programming Job Manager User Guide for details.
Revision 1 15

2 – SPPS Protocols
This section describes the protocols used by SPPS. It includes device-supported protocols, such as Authorization Protocols and OTPK, and protocols created above the device level, such as the Per-device key protocol.
Authorization Code ProtocolThis is the main protocol used by SPPS. Authorization Code protocol support is built into SmartFusion2/IGLOO2 devices. It allows SPPS to securely program initial security settings into the blank device, in an untrusted environment where simple monitoring or man-in-the-middle attacks would otherwise be possible.
This protocol is used by the Master bitstream in the HSM flow (see "Initialization of Master Programming Bitstream" on page 9). It is also used by the UEK1/2 Update bitstream to program devices that have per-device UEK1/2 keys programmed into them (see "Initialization of UEK1/UEK2 Update Bitstream" on page 9).
The Authorization Code protocol enables secure delivery of a randomly-generated encryption key (IP key, KIP) to the device. The device can use the delivered KIP to decrypt an incoming programming bitstream. KIP remains in the device only until the end of the programming cycle, at which point it is erased—it is not stored in the device’s non-volatile memory.
A KIP-encrypted user bitstream can only be programmed into those devices which are “authorized” to be programmed by this protocol.
KIP can only be delivered to the device if encrypted with one of the keys known to the device. In the case of a blank device, there is only one such key supported by SPPS, which is a per-device Factory Key (FK) that is pre-placed in the device by Microsemi during its manufacture.
If user security settings have already been programmed into the device, the Factory Key mode becomes disabled. For such a device, the user can only program FPGA and/or eNVM components with the Update bitstream using one of the user keys that was loaded with the Master bitstream. If the encryption key that must be used during this update is a per-device key, the Update bitstream is encrypted with KIP, and KIP is sent to the device via the Authorization Code protocol.
The following sections provide more information about using the Authorization Code protocol during initial key loading and update flows.
Authorization Code Protocol in Initial Key LoadingSPPS initial key loading via the Master bitstream is based on the Authorization Code protocol. This protocol makes use of Diversified Factory Key (DFK), which is described in the next section.
Diversified Factory Key (DFK) and DFK DatabaseEvery SmartFusion2/IGLOO2 device has a unique Factory Key programmed into it. Microsemi customers who use the SPPS HSM-based solution are given a database (DB) of the Diversified Factory Keys (DFKs) upon registering their U-HSM via the Microsemi Portal. Upon registration, a UUID is assigned to the user HSM. The UUID is a 32-hex symbol string identifier (40-for M-HSM). The Customer UUID is used to diversify device Factory Key values to build a Diversified Factory Key Database (DFK DB) for the customer. Diversification is a non-reversible cryptographic operation that takes the device-unique Factory Key and Customer UUID as inputs. The resulting key is called the Diversified Factory Key or DFK. The DFK value is irreversible, unique per-device and per-customer, and is stored in the DFK database in encrypted form. Encryption is done using U-HSM and M-HSM Public Keys, thus allowing only HSM modules to directly access plain text DFK values.
Blank devices do not have knowledge of the Customer UUID, so it is passed to the device via the authorization code. The UUID is authenticated but not encrypted. The device then uses the value of the Factory Key and received UUID to derive the DFK value.
Revision 1 16

The process of obtaining a DFK DB by the OE, using it for test runs, and preparing for the M-HSM in production is described in the setup section of the User HSM Installation and Setup User Guide.
Initial Key Loading of Project KeysBitstream InitializationBy selecting Master bitstream in the HSM-based flow, the user instructs the bitstream generation software to use the Authorization Code protocol in DFK key mode. The generated bitstream will have a special programing algorithm for requesting the Authorization Code component from the M-HSM. The Authorization Code bitstream is generated dynamically by the M-HSM during production. The Authorization Code component is cryptographically linked to the programming bitstream, so it cannot be used with any other bitstreams, if intercepted during programming. Additional protocol-specific information is created for use by the M-HSM during generation of Authorization Code component.
HSM Job ExportExported programming job includes the following protocol-specific information:
• Instruction to use Authorization Key Protocol in DFK mode
• Header for the Authorization Code component generation and its binding with the associated bitstream
• KIP value encrypted with the Ticket Key (see "Adding HSM Data to the Job via HSM Tasks" on page 10)
Job ExecutionIn the beginning of device programming, a programming algorithm reads the Device Serial Number (DSN) and makes a request to FlashPro Express software to provide the Authorization Code.
FlashPro Express, based on the context of the current programming action (device, programming action), retrieves ticket information, encrypted KIP value, and other controlling data and passes them to the M-HSM as a part of the request for the Authorization Code.
The M-HSM finds the encrypted DFK value in its DFK DB and passes a request to the secure execution engine (SEE machine) inside its HSM module. The firmware running in the SEE machine in the HSM decrypts KIP, the bitstream binding information, Authorization Code Header, and assembles the Authorization Code component. As the last step, it decrypts DFK and uses it to encrypt the resulting Authorization Code bitstream component.
Programming software shifts the Authorization Code component into the device and then shifts in the main programming bitstream components. In the case of programming a new device with a master bitstream, the device uses its pre-placed factory key (FK) and the UUID from the Authorization Code header to compute DFK. It uses DFK to authenticate and unwrap (decrypt) KIP from the encrypted payload of the Authorization Code. Finally, it uses KIP to authenticate and decrypt the main master bitstream components (e.g., the security component and the optional FPGA fabric and eNVM components).
In the case of updating a device using a unique-per-device user key, the device retrieves the selected user key from its NVM security segment and uses it to authenticate the Authorization Code and unwrap KIP from its payload. KIP is used to authenticate and decrypt the main update bitstream components containing one or both of the FPGA fabric and eNVM components.
Initial Key Loading of Per-device KeysThis flow is almost the same as Initial Key Loading with Project keys, but with a few additional steps listed below.
In this scenario, the Job Manager-generated Master bitstream does not include a complete security component. This is because per-device key values can only be derived during programming, once DSN is known. Therefore, the, security component is passed to the M-HSM as a pre-filled template via data structures protected by the Job Ticket. In addition to the standard Authorization Code protocol data, HSM module attached to the M-HSM receives the security component template along with the base key(s) (originally from the KeySet file) and derives actual per-device key(s) upon programming (see protocol details in "Per-Device Protocol" on page 18). Derived keys are inserted into the template of the security component. Then the HSM module firmware links all the bitstream components cryptographically and proceeds to the same steps of project keys listed in "Initial Key Loading of Project Keys" on page 17).
Revision 1 17

Update Flow with Per-device Encryption KeysThis flow is also similar to SPPS Main flow that does the initial key loading of project keys. The difference is that the Authorization Code is encrypted with the same per-device UEK1 or UEK2 derived by the M-HSM upon initial programming.
In this case, Ticket information passed to the M-HSM includes the base key value for the per-device key to be derived. This value is originally taken from the KeySet file on the U-HSM side. Firmware in the HSM module attached to the M-HSM will use the received DSN and the base key in the Per-device protocol (see "Per-Device Protocol" on page 18) to derive the actual per-device key value. That value then encrypts the Authorization Code component that is sent to the device in a way similar to "Initial Key Loading of Project Keys" on page 17. The Authorization Code is followed by the bitstream components (FPGA or eNVM) that are being updated.
Note that this flow does not require DFK DB on the M-HSM side.
Overbuild Protection The Authorization Code protocol allows the user to limit any programming action to a specific maximum number of devices.
This is possible due to following:
• The target devices do not have KIP and KIP needs to be sent to every target device
• KIP is not stored in the device even after being used during programming cycle
• KIP is delivered encrypted using a per-device encryption key (DFK or per-device UEK1/2), thus the same authorization code cannot be used on other devices.
The HSM hardware module owns overbuild protection counters as a part of the Ticket information and will stop generating new Authorization Codes when the maximum allowed number of Authorization Codes has been generated.
Per-Device ProtocolThe Per-device protocol is used to calculate per-device values of UPK1/UPK2/UEK1/UEK2/DPK keys. Per-device keys are built on top of standard SmartFusion2/IGLOO2 key types. They are programmed into the device as standard UPK1/UPK2/UEK1/UEK2/DPK keys. If any encryption keys are designated as per-device unique keys, the passcode that protects that key from overwriting is a per-device unique passcode.
The Per-device protocol derives device-specific keys from the base key and DSN. This enables programming user models in which programming operations can be authorized per certain devices based on their DSN.
Derivation of per-device key values is done using a one-way cryptographic operation that takes the base key and DSN as inputs by firmware running inside the HSM module. The U-HSM generated KeySet file contains base key values for UPK1/UPK2/UEK1/UEK2/DPK key types, as needed. Those values are passed to the M-HSM via Tickets under protection of the Ticket key.
The per-device protocol is used by SPPS in following cases:
• Initial key loading via Master bitstream—to program per-device keys
• Update bitstream, if device has per-device encryption keys programmed—to generate the required Authorization Codes
• By the OTPK protocol—to unlock the device if per-device pass keys are used (see "One Time Pass Key (OTPK) Protocol" on page 18)
One Time Pass Key (OTPK) ProtocolThis protocol is supported by SmartFusion2/IGLOO2 devices and is used to unlock overwrite-protection or no-verify security policy settings (if used) in:
• Erase/Verify actions in Master bitstream flow
• Program/Erase/Verify actions in Update bitstream, if Fabric and/or eNVM have security locks.
Revision 1 18

This protocol is designed for temporary security unlock during programming actions. Use of the HSM allows hiding of the plain text values of the pass keys.
SPPS automatically uses the OTPK protocol with no user interaction required.
Device Certificate of Conformance (CoC)Upon being programming, a device can generate cryptographically signed digests for each freshly programmed bitstream component. Component digests with HSM-generated validators (message authentication codes) are together called the Certificate of Conformance (CoC). The CoC can be used as proof of device programming with a specific design.
The validators in the CoC can be verified by the Job Manager using the U-HSM.
The device will generate and return CoC if the customer requests it upon initializing the programming bitstream (see "Initialization of Master Programming Bitstream" on page 9 and "Initialization of UEK1/UEK2 Update Bitstream" on page 9).
Job End Certifier ProtocolUpon job completion (see "Job Completion" on page 12), Job Tickets are removed from the HSM module. For every removed ticket, the HSM module returns proof of ticket deletion. This information can be validated by the Job Manager using the U-HSM. This information is cryptographically protected and cannot be modified without detection.
Job end certifier is a guarantee that the programming job cannot continue and is a part of the overall overbuild protection mechanism.
Device Authenticity Check ProtocolSmartFusion2/IGLOO2 devices have built-in device certificates that allow Microsemi programing software to verify device origin. This check is enforced by FlashPro Express upon each programing operation, as a part of a check (certificate) chain operation (see the FlashPro Express User’s Guide for details).
For any device failing Authenticity Check, programming action is aborted.
Revision 1 19

3 – HSM Servers
This section provides information about User and Manufacturer HSM servers: purpose, deployment scenarios, and the key management scheme.
HSM servers provide a protected security environment that allows SPPS to:
• Generate and protect user encryption and pass keys, base keys, random nonces, etc.
– Application keys and their associated metadata are stored as encrypted key tokens on theHSM-server mass storage device (e.g., hard drive)
• Execute cryptographic algorithms and protocols making use of the protected keys:
– Generate protocol data (e.g., Authorization Code bitstream components (see "AuthorizationCode Protocol" on page 16), etc.)
– Verify validators generated by other HSMs or devices (e.g. CoC (see "Device Certificate ofConformance (CoC)" on page 19, Job End certifier (see "Job End Certifier Protocol" on page19), etc.)
– Securely transmit information between HSM servers (see "HSM Security Environment" onpage 24)
Secured key handling and protocol execution is done by the SEE firmware running inside the HSM hardware module (see "Use of Hardware Security Modules (HSM)" on page 4).
HSM Hardware Modules used by SPPSSPPS uses nShield Edge (Figure 3-1) and nShield Solo (Figure 3-2) hardware security modules (HSMs) manufactured by Thales. Both modules carry a FIPS140-2 Level 3 security certificate.
nShield Edge is a USB-attached module.
nShield Solo is PCIe-based, and can be installed on regular and compact size PC boxes with a PCIe port.
Figure 3-1 • nShield Edge HSM Module
Revision 1 20

nShield Edge HSMs have an integrated smart card reader. The included card reader for nShield Solo HSMs is external.
In performance, nShield Solo surpasses nShield Edge. nShield Solo is optimal for use in the U-HSM for performance-intensive programming Authentication Code and one-time passcode generation. nShield Edge is optimal for use in the M-HSM for handling lightweight bitstream generation operations. From the software and setup perspective, both modules are interchangeable, and module type selection is typically based on specific use conditions and the size of the SmartFustion2/IGLOO2 devices they serve.
The HSM module has standard Thales-provided cryptographic algorithms and can execute custom algorithms within the security boundaries provided by the HSM module.
The HSM module has limited internal non-volatile memory size for storing the module master key and Job Ticket information such as Ticket binding data, overbuild protection data, etc. All other information that requires protection by HSM is stored on the hard disk of the host PC.
For more information about nShield Edge and nShield modules, refer to the nShield Edge Solo User Guide from Thales.
HSM Server ArchitectureThe HSM module must be attached to the host PC running standard Thales nShield software. This software provides access to the HSM module. U-HSM and M-HSM servers have an architecture that is similar to the U-HSM architecture shown in Figure 3-3, but the client software is FlashPro Express instead of the Job Manager.
Figure 3-2 • nShield Solo HSM Module
Revision 1 21

The client application (Job Manager in this diagram) makes a request to the server. The HSM server Software running on the host PC receives the client request. Depending on request, it reads all required information from the database on the host PC and passes it via nShield software to the firmware running inside the HSM module. The HSM module decrypts received keys and processes the request. It encrypts output data and sends the response back to the HSM server. Some information is stored in the local database (e.g. CoC). Client call-requested information is returned to the caller.
SEE firmware is stored on disc of the host PC in encrypted form (see "HSM Security Environment" on page 24 for details).
HSM Server FunctionalitySPPS uses the User and Manufacturer HSM server types.
The User HSM allows the OE to generate keys and use them to generate programming bitstreams.
User HSM The U-HSM provides the following functionality:
• Generated user keys
– User encryption keys
– User passcodes
– Base Keys (for derivation of per-device encryption keys and passcodes, see "Per-DeviceProtocol" on page 18)
• Encrypt programming bitstreams
• Generate data for security protocols (see the Libero User’s Guide)
• Creation of Job Tickets
• Creation of Programming Jobs
• Validation of programming results (see "Device Certificate of Conformance (CoC)" on page 19)
• Validation of programming job completion (see "Job End Certifier Protocol" on page 19)
Figure 3-3 • HSM Server Diagram
Revision 1 22

• Preparation of device manufacturing data for the M-HSM, such as DFK DB and manufacturing keys (see the User HSM Installation and Setup User Guide)
• Test Job Execution (M-HSM function of U-HSM)
– Complete functionality of the M-HSM
• Support for all underlying cryptographic algorithms and generation of cryptographic-quality true random numbers needed above
Manufacturer HSMThe M-HSM has software and firmware that is limited to job execution.
The M-HSM is designed to be used by Production for the following:
• Creation of Job Tickets with binding to the physical HSM module (serving Job Requests)
• Generation of protocol data (see the Libero User’s Guide)
• Device authenticity check (see "Device Authenticity Check Protocol" on page 19)
• Overbuild protection
• Secured initial key loading
• Providing job status
• Providing proof of job completion
• Collection of CoCs (see "Device Certificate of Conformance (CoC)" on page 19)
• Support for all underlying cryptographic algorithms and generation of cryptographic-quality true random numbers needed above
Deployment ScenariosU-HSM and M-HSM servers are Windows based machines. HSM client applications, the Job Manager, and FlashPro Express can be installed and run on either Linux or Windows systems.
On Windows platforms, client applications can be installed on the same or different physical operating systems. On Linux platforms, client applications are always installed on different systems.
There are two main HSM deployment scenarios: Server and Workstation.
For more information, refer to the User HSM Installation and Setup User Guide and the Manufacturer HSM Installation and Setup User Guide.
ServerIn the server deployment scenario, the HSM server runs on a dedicated PC. All client applications access HSM over the network.
One or more Job Manager applications can access the same U-HSM server at the same time, and one or more FlashPro Express applications can simultaneously use the same M-HSM.
Accessing HSM across the network requires certain ports to be open. For more information, refer to the User HSM Installation and Setup User Guide and the Manufacturer HSM Installation and Setup User Guide.
WorkstationThe workstation deployment scenario assumes client applications and HSM are sharing the same physical Windows system. Workstations in Operation or Production can be completely isolated from the network.
Note: U-HSM and M-HSM servers cannot be installed on the same physical Windows machine.
Revision 1 23

Notes about Using Virtual MachinesIt is possible to run HSM (or client applications) inside virtual machines such as VMWare player. This provides the flexibility to create additional hybrid deployment scenarios. For example, Linux machine can run the Job Manager and VM with Windows system are installed for the U-HSM. This scenario enables the use of the same physical machine for both, client and server purposes. Such hybrid Workstation can be isolated from the external network.
Note: There are known issues related to using VMWare virtual systems. For information about workarounds proposed by Thales, refer to the nShield Edge Solo User Guide.
HSM Server Installation and ProvisioningU-HSM and M-HSM server installation and provisioning can be done manually or by using the setup utility provided by Microsemi.
For information about obtaining components of the HSM servers and installation and provisioning instructions, refer to the User HSM Installation and Setup User Guide for the U-HSM and the Manufacturer HSM Installation and Setup User Guide for the M-HSM.
Use of the Microsemi Web PortalThe Microsemi Web Portal (https://ops.microsemi.com/dfk) is designed to provide SPPS customers with a convenient way to interact with Microsemi Manufacturing HSM during the provisioning of the U-HSM and the M-HSM. It also allows Microsemi IHP customers to initiate and control their programming jobs executed by IHP.
HSM Security EnvironmentThis section provides an overview of the security environment used by the U-HSM and the M-HSM. It shows the key management scheme and interaction between the U-HSM, M-HSM, and Microsemi Manufacturing.
The main components of the HSM security environment are:
• Security environment data (Security World)
• HSM Module connected to Security World
• Administrator Card Set (ACS)—used for administration of Security World
Security WorldSecurity World is a key part of the HSM server. It is a security data domain physically residing on the disk of the host PC and used by the HSM module connected to it. Security World contains configuration data and security keys used by the HSM server.
Security World is introduced and supported by Thales. For complete documentation and descriptions of utilities for managing Security World, refer to the nShield Edge Solo User Guide. This document provides an overview about security keys utilized by the SPPS solution.
SPPS has installation and provisioning processes defined for the U-HSM (see the User HSM Installation and Setup User Guide) and the M-HSM (see the Manufacturer HSM Installation and Setup User Guide). The process includes instructions for creating a new Security World and keys used by the HSM. It also shows how to perform key exchange with other servers and how to handle DFK DB (explained in "Diversified Factory Key (DFK) and DFK Database" on page 16).
Security World DirectoryAll data related to Security World is stored in the Security World directory on the disk of the host PC. The actual path is determined during installation and defaults to:
C:\ProgramData\nCipher\Key Management Data\local
Note: "ProgramData" is a Windows system folder that is hidden by default.
Revision 1 24

Security World DataThe Security World directory contains all Security World data and can be backed up, restored, copied, or moved to another HSM as a whole. It contains HSM identity information and should be backed up periodically.
Security World data includes the following:
• Security World identity and configuration settings
• Data of HSM module(s) connected to Security World (the SPPS U-HSM and M-HSM support single module setup only)
• Data for the ACS cards associated with Security World
• Keys used by HSM internally
• Private component of the private/public key infrastructure for communication
• Public keys of the other HSMs for secure data exchange
• Microsemi Manufacturing Keys (used during bitstream generation by the U-HSM and used during protocol execution by the M-HSM)
An example of U-HSM Security World directory content is shown in Figure 3-4. Note that the M-HSM has very similar Security World data structure. The main difference between the two is the length of the UUID used by both HSM types (32 for the U-HSM UUID, 40 for the M-HSM UUID) and key name prefixes: "cu" for the U-HSM and "cm" for the M-HSM, respectively.
Figure 3-4 • U-HSM Security World Directory Example
Revision 1 25
Security World CreationNew Security World creation instructions are provided in the User HSM Installation and Setup User Guide for the U-HSM and the Manufacturer HSM Installation and Setup User Guide for the M-HSM. This process also includes initialization of the Administrator Card Set (ACS). ACS cards are used for administrative actions performed on Security World, such as connecting new HSM modules, etc.
Note: ACS can be set up to require a user-defined quorum of ACS cards for performing administration actions on Security World (see the nShield Edge Solo User Guide for details).
Information about Security World is placed into the file named "world", as shown in Figure 3-4.
Information about each card in ACS is stored in the file with prefix "card_", e.g. card_7fb2caf3494e585d4664febf7d624ab1b99e7d50_1
Connecting HSM Module to Security WorldThe process of Security World creation makes use of the HSM module connected to the host PC. The HSM module is connected to Security World, and as a result, the Thales nCipher software creates a file that contains information about the module in the Security World directory. The file follows the pattern "module_<module serial number>", as shown in the example in Figure 3-4.
This HSM module can be replaced with another module at any time after Security World creation.
Key Management SchemeThis section explains the key management scheme used by both HSM server types in their interactions with each other, as well as the Microsemi Manufacturing HSM Server.
All security keys used by Security World are stored in the Security World directory as key token files, as shown in Figure 3-4. All private data in key token files is encrypted, watermarked, and signed. These files are part of the FIPS140-2 Level 2 and 3 certified nShield key management system. For more information, refer to the nShield Edge Solo User Guide.
Security World Key access control lists (ACL) control which operations a key can be used for, if the key can be stored persistently as a key token after generation, if a key is recoverable by the Security World Security Officer, and other attributes of the key.
One feature of SW Key ACLs that is used in the SPPS is the SEE application key scheme. This scheme allows all crypto operations available to a key type to only be executed within a properly signed SEE application (HSM module firmware).
SEE Integrity Key The HSM hardware module executes two types of the firmware:
• Standard nShield firmware provided by Thales
• Custom firmware that implements Microsemi security protocols and makes use of various keys created for the SPPS. This custom firmware is referred to as the SEE machine.
Standard firmware controls execution of the SEE machine. This control includes load, decryption, and security integration between SEE machine firmware, security keys used by SPPS, and data stored inside HSM module non-volatile memory (NVRAM).
1. The Microsemi SEE machine is signed by the private component of the SEE Integrity Key.
2. The public component of the SEE Integrity Key is installed in the Security World directory upon HSM setup in the file key_seeinteg_userdata_signer (shown in Figure 3-4).
3. All keys created and used by SPPS are cryptographically signed by the public component of the SEE Integrity Key. This signature carries the hash of the private component of the key, thus allowing standard nShield firmware to enforce ACL policy by matching signatures on the SEE machine and keys used by it.
Private/Public HSM KeysFor each HSM server, the user creates two private/public key pairs. One private/public key pair is used for encryption and decryption. These keys appear with the prefix "key_simple_g4cu_seepk" and "key_simple_g4cu_seesk" as shown in Figure 3-4. The public key is sent to the other HSM servers for encryption of the data sent back to this HSM. The HSM then uses the private key component to decrypt
Revision 1 26

received data. The private component is a persistent key created in the Security World directory stored in the encrypted form.
The other private/public key pair is used for signing and verifying signature. These keys appear with prefix "key_simple_g4cu_seessk" and "key_simple_g4cu_seespk" as shown in Figure 3-4. The HSM uses the private key component to sign the data that is sent to other HSM servers. The public key is sent to other HSM servers for verifying the signature of data sent by this HSM, which allows checking the authenticity (i.e., assurance of signatory's identity) and integrity (i.e., tamper and corruption detection) of the data being imported. The private component is a persistent key created in the Security World directory stored in the encrypted form.
The public key of the HSM server carries cryptographic proof that it was created by an nShield HSM module. This binding is done via the HSM Warrant file and is checked by the other HSMs when importing this public key component. This mechanism makes it nearly impossible for the intruder to gain access to any HSM server used by SPPS by sending them a falsely generated public key.
nShield HSM Warrant The HSM warrant is a file created by Thales. It is unique and included with every nShield Solo or Edge HSM module provided by Microsemi as part of the module acquisition process.
Data inside the warrant file ensures that an nShield module with a specific module serial number (ESN) and KLF value has been certified by Thales.
Internal Security Key (ISK)The ISK is a persistent Security World key generated by the customer. The ISK is stored in the Security World directory in a file with the default name key_simple_g4see_isk, as shown in the example in Figure 3-4. The actual name of the file is user-configurable per instructions provided in the User HSM Installation and Setup User Guide and the Manufacturer HSM Installation and Setup User Guide.
The ISK value is randomly generated by the HSM module and is unique within Security World. This key can only be used by the SEE application.
Import of Public Keys from Other HSMsBefore an HSM can communicate with other HSMs, the public keys need to be manually exchanged in a trusted manner. As a part of key exchange, every HSM server used by SPPS should import two public keys from each of the other HSMs. This mechanism mirrors the process explained in "Private/Public HSM Keys" on page 26. Refer to the User HSM Installation and Setup User Guide and the Manufacturer HSM Installation and Setup User Guide. which explain how to import these public keys.
Public key import includes a strict check of the key generation certificate of the key being imported. This check validates that the key was generated by a valid HSM of the official SPPS application.
After the check has been done, the ISK is used to sign imported public key as proof of warrant check done upon the key import. This signature is required for the key to be used by the SEE application.
An example of the imported public keys is shown in Figure 3-4. This sample Security World has following imported public keys:
• key_simple_g4cm-seepk-0000000000000000000000000000000000000002
– This is the encryption public key of the M-HSM with UUID "0000000000000000000000000000000000000002"
– Note that the M-HSM has UUID length of 40
• key_simple_g4cu-seepk-00000000000000000000000000000001
– This is the encryption public key of this U-HSM
– Note that the UUID length is only 32 hex symbols
– This is to enable the M-HSM function of this U-HSM server
• key_simple_g4cm-seespk-0000000000000000000000000000000000000002
– This is the verify public key of the M-HSM with UUID "0000000000000000000000000000000000000002"
– Note that the M-HSM has UUID length of 40
• key_simple_g4cu-seespk-00000000000000000000000000000001
– This is the verify public key of this U-HSM
Revision 1 27

– Note that the UUID length is only 32 hex symbols
– This is to enable the M-HSM function of this U-HSM server
Microsemi Manufacturing KeysThese special Microsemi keys are imported per device type as a part of obtaining the DFK DB. For more information, refer to the User HSM Installation and Setup User Guide for the U-HSM and the Manufacturer HSM Installation and Setup User Guide for the M-HSM.
Every imported key is created in a file starting with the prefix "key_simple_f4mf-" key. These keys are used by both the U-HSM and the M-HSM. They are sent to either HSM from the Microsemi Manufacturing HSM. The key values are encrypted with the public key of the receiving HSM.
U-HSM Master KeyThe U-HSM Master Key is created by the user. This is a symmetric key that allows the U-HSM to protect KeySet files and Job Ticket master keys.
The U-HSM Master Key encrypts the Job Ticket Master Key, which in turn protects all private Job Ticket data. To send ticket data to the M-HSM, the U-HSM only needs to rewrap the Job Ticket Master Key with the M-HSM public key.
DFK DB HandlingDFK DB is used by the M-HSM during initial key loading (see "Diversified Factory Key (DFK) and DFK Database" on page 16). It can also be used during a test run by the U-HSM.
DFK DB is generated by Microsemi for the specific U-HSM UUID. All DFK values in the generated database are encrypted by per-device type DFK DB ticket keys. DFK DB ticket keys are protected by the U-HSM public key imported into the Microsemi Manufacturing HSM during the previous steps. This scheme allows the U-HSM access to the DFK values in the received database.
To use DFK DB on the M-HSM side, the user exports the DFK DB ticket keys and sends them to the Microsemi Manufacturing server for rewrap with the M-HSM public key. Rewrapped ticket keys are imported by the user back to the DFK DB. When the DFK DB has ticket keys encrypted with the M-HSM public key, it can be used by the M-HSM.
Job HandlingAll private data and key material used by the Job Manager during bitstream generation and job preparation is protected by the Ticket Master Key. This is a symmetric encryption key encrypted by the U-HSM Master Key (see "U-HSM Master Key" on page 28).
During HSM job export ("Job Creation" on page 10), all Job Tickets are rewrapped with the target the M-HSM public key. This grants the M-HSM access to all job data protected by the Job Ticket Master keys.
Other types of communication between the U-HSM and the M-HSM, such as Job Request/Reply protocol execution ("Job Preparation" on page 10) and returning job end sending job end certifiers from the M-HSM for validation to U-HSM, also make use of the counterpart HSM public key to protect private information.
Revision 1 28

A – Product Support
Microsemi SoC Products Group backs its products with various support services, including Customer Service, Customer Technical Support Center, a website, electronic mail, and worldwide sales offices. This appendix contains information about contacting Microsemi SoC Products Group and using these support services.
Customer ServiceContact Customer Service for non-technical product support, such as product pricing, product upgrades, update information, order status, and authorization.
From North America, call 800.262.1060From the rest of the world, call 650.318.4460Fax, from anywhere in the world, 650.318.8044
Customer Technical Support CenterMicrosemi SoC Products Group staffs its Customer Technical Support Center with highly skilled engineers who can help answer your hardware, software, and design questions about Microsemi SoC Products. The Customer Technical Support Center spends a great deal of time creating application notes, answers to common design cycle questions, documentation of known issues, and various FAQs. So, before you contact us, please visit our online resources. It is very likely we have already answered your questions.
Technical SupportFor Microsemi SoC Products Support, visit http://www.microsemi.com/products/fpga-soc/design-support/fpga-soc-support.
WebsiteYou can browse a variety of technical and non-technical information on the Microsemi SoC Products Group home page, at www.microsemi.com/soc.
Contacting the Customer Technical Support CenterHighly skilled engineers staff the Technical Support Center. The Technical Support Center can be contacted by email or through the Microsemi SoC Products Group website.
EmailYou can communicate your technical questions to our email address and receive answers back by email, fax, or phone. Also, if you have design problems, you can email your design files to receive assistance. We constantly monitor the email account throughout the day. When sending your request to us, please be sure to include your full name, company name, and your contact information for efficient processing of your request.
The technical support email address is [email protected].
Revision 1 29

MOCA
WOSaFa
E-
©2reloCosere
Microsemi makes no warranty, representation, or guarantee regarding the information contained herein orthe suitability of its products and services for any particular purpose, nor does Microsemi assume anyliability whatsoever arising out of the application or use of any product or circuit. The products soldhereunder and any other products sold by Microsemi have been subject to limited testing and should notbe used in conjunction with mission-critical equipment or applications. Any performance specifications arebelieved to be reliable but are not verified, and Buyer must conduct and complete all performance andother testing of the products, alone and together with, or installed in, any end-products. Buyer shall not relyon any data and performance specifications or parameters provided by Microsemi. It is the Buyer'sresponsibility to independently determine suitability of any products and to test and verify the same. Theinformation provided by Microsemi hereunder is provided "as is, where is" and with all faults, and the entirerisk associated with such information is entirely with the Buyer. Microsemi does not grant, explicitly orimplicitly, to any party any patent rights, licenses, or any other IP rights, whether with regard to such
About Microsemi
Microsemi Corporation (Nasdaq: MSCC) offers a comprehensive portfolio of semiconductorand system solutions for communications, defense & security, aerospace and industrialmarkets. Products include high-performance and radiation-hardened analog mixed-signalintegrated circuits, FPGAs, SoCs and ASICs; power management products; timing andsynchronization devices and precise time solutions, setting the world's standard for time; voiceprocessing devices; RF solutions; discrete components; Enterprise Storage andCommunication solutions, security technologies and scalable anti-tamper products; Ethernetsolutions; Power-over-Ethernet ICs and midspans; as well as custom design capabilities andservices. Microsemi is headquartered in Aliso Viejo, Calif. and has approximately 4,800employees globally. Learn more at www.microsemi.com.icrosemi Corporate Headquarters
ne Enterprise, Aliso Viejo, 92656 USA
ithin the USA: +1 (800) 713-4113 utside the USA: +1 (949) 380-6100les: +1 (949) 380-6136 x: +1 (949) 215-4996
mail: [email protected]
016 Microsemi Corporation. All rights served. Microsemi and the Microsemi go are trademarks of Microsemi rporation. All other trademarks and
My CasesMicrosemi SoC Products Group customers may submit and track technical cases online by going to My Cases.
Outside the U.S.Customers needing assistance outside the US time zones can either contact technical support via email ([email protected]) or contact a local sales office.
Visit About Us for sales office listings and corporate contacts.
Sales office listings can be found at www.microsemi.com/soc/company/contact/default.aspx.
ITAR Technical SupportFor technical support on RH and RT FPGAs that are regulated by International Traffic in Arms Regulations (ITAR), contact us via [email protected]. Alternatively, within My Cases, select Yes in the ITAR drop-down list. For a complete list of ITAR-regulated Microsemi FPGAs, visit the ITAR web page.
5-02-00705-1/10.16
information itself or anything described by such information. Information provided in this document isproprietary to Microsemi, and Microsemi reserves the right to make any changes to the information in thisdocument or to any products and services at any time without notice.
rvice marks are the property of their spective owners.