secure messaging extension user’s guide (java) · secure messaging extension user’s guide...
TRANSCRIPT

Secure Messaging Extension User’s Guide
Release 4.5.2
Java Version
SeeBeyond Proprietary and Confidential

The information contained in this document is subject to change and is updated periodically to reflect changes to the applicable software. Although every effort has been made to ensure the accuracy of this document, SeeBeyond Technology Corporation (SeeBeyond) assumes no responsibility for any errors that may appear herein. The software described in this document is furnished under a License Agreement and may be used or copied only in accordance with the terms of such License Agreement. Printing, copying, or reproducing this document in any fashion is prohibited except in accordance with the License Agreement. The contents of this document are designated as being confidential and proprietary; are considered to be trade secrets of SeeBeyond; and may be used only in accordance with the License Agreement, as protected and enforceable by law. SeeBeyond assumes no responsibility for the use or reliability of its software on platforms that are not supported by SeeBeyond.
e*Gate, e*Insight, e*Way, e*Xchange, e*Xpressway, eBI, iBridge, Intelligent Bridge, IQ, SeeBeyond, and the SeeBeyond logo are trademarks and service marks of SeeBeyond Technology Corporation. All other brands or product names are trademarks of their respective companies.
© 1999–2002 by SeeBeyond Technology Corporation. All Rights Reserved. This work is protected as an unpublished work under the copyright laws.
This work is confidential and proprietary information of SeeBeyond and must be maintained in strict confidence.
Version 20020308114806.
Secure Messaging Extension User’s Guide 2 SeeBeyond Proprietary and Confidential

Contents
Contents
Chapter 1
Introduction 6Overview 6
Intended Reader 6Components 6
Introducing S/MIME 7
Introducing Secure Messaging Extension 8
Supported Operating Systems 11
System Requirements 11Host System Requirements 11
GUI Host Requirements 11
Chapter 2
Installation 12Windows NT or 2000 12
Pre-installation 12Installation Procedure 12
UNIX 13Pre-installation 13Installation Procedure 13
Files/Directories Created by the Installation 14
Chapter 3
Multi-Mode e*Way Configuration 15Multi-Mode e*Way 15
JVM Settings 15JNI DLL Absolute Pathname 15CLASSPATH Prepend 16CLASSPATH Override 16Initial Heap Size 17Maximum Heap Size 17Maximum Stack Size for Native Threads 17Maximum Stack Size for JVM Threads 17
Secure Messaging Extension User’s Guide 3 SeeBeyond Proprietary and Confidential

Contents
Class Garbage Collection 18Garbage Collection Activity Reporting 18Asynchronous Garbage Collection 18Report JVM Info and all Class Loads 18Disable JIT 18Allow Remote Debugging of JVM 19
Chapter 4
e*Way Connection Configuration 20Configuring e*Way Connections 20
Connector 21Type 21Class 21Property.Tag 21
Encrypt 21Certificate 22Format 22Algorithm 22MessageFormat 22EncodingFormat 22
Decrypt 23MessageFormat 23EncodingFormat 23PKCS12 23PassPhrase 23
Sign 23Algorithm 24Detached 24MessageFormat 24EncodingFormat 24PKCS12 25PassPhrase 25
Verify 25This section contains a set of top level parameters: 25MessageFormat 25EncodingFormat 25Certificate 26Format 26The appropriate certificate format. One of three provided: DER, PEM, or PK7. The default is DER. 26
Certificate 26Checking 26TrustedCA 27Format 27
CRL 27Filename 27CACRLCertificate 27CACRLformat 28CACertificate 28Format 28
Secure Messaging Extension User’s Guide 4 SeeBeyond Proprietary and Confidential

Contents
Chapter 5
Implementation 29SME Sample Implementation Overview 29
Creating the New Schema 30Event Types 30
Creating an Event Type from an Existing DTD 30Creating an Event Type Without an Existing DTD 31Creating an Event Type From an Existing .xsc 33
Creating and Configuring the e*Ways 33Create the e*Way Connection 36Intelligent Queues 37Collaboration Rules 37
Creating Collaboration Rules files 38Java (cor_java) 39Creating the Collaboration Rules Class 40
Collaborations 42
Sample Schema 45Execute the Schema 46
Certificate Formats 46
Chapter 6
Secure Messaging Extension Functions 50SMEMessage Functions 50
base64Decode 50base64Encode 51encrypt 51encrypt 52decrypt 52decrypt 53getMD5Hash 53getSHA1Hash 54sign 54sign 55verify 55verify 56
Index 57
Secure Messaging Extension User’s Guide 5 SeeBeyond Proprietary and Confidential

Chapter 1
Introduction
This document describes how to install and configure the Secure Messaging Extension.
1.1 OverviewThe Secure Messaging Extension enables e*Gate to process Events utilizing the S/MIME (Secure Multipurpose Internet Mail Extensions) message format. The Secure Messaging Extension supports encryption, decryption and authentication of messages and is interoperable with any other client applications that support the S/MIME standard.
This adds the following features to a transaction:
! privacy
! message (Event) authentication
! sender authentication
! nonrepudiation
1.1.1 Intended ReaderThe reader of this guide is presumed to be a developer or system administrator with responsibility for maintaining the e*Gate system; to have expert-level knowledge of Windows NT and/or UNIX operations and administration; and to be thoroughly familiar with Windows-style GUI operations.
1.1.2 ComponentsThe following components comprise Secure Messaging Extension:
! stcsme.jar
! smime.jar
! Java collaborations that load and run the Java class functions.
A complete list of the installed files appears in Table 1 on page 14.
Secure Messaging Extension User’s Guide 6 SeeBeyond Proprietary and Confidential

Chapter 1 Section 1.2Introduction Introducing S/MIME
1.2 Introducing S/MIMESecure Multipurpose Internet Mail Extension (S/MIME) is a type of MIME message format that supports digital signatures and encryption of messages. S/MIME uses Public Key Cryptography Standards (PKCS) developed by Baltimore Technology, based on the RSA algorithm which determined that there is no efficient way to factor very large numbers, making it nearly impossible to derive the private (decryption) key based solely on the public (encryption) key.
The public-key encryption system uses two keys: a public key available to everyone, and a private key known only to the recipient of the message. A public key can be published openly allowing the user to send secure messages that can only be decrypted by owner of the private key.
Only the public key can be used to encrypt messages, and only the corresponding private key can be used to decrypt them. In addition, a message encrypted with the private key can only be properly decrypted by the public key. This process known as digital signing guarantees to the receiver that the response genuinely came from the stated source.
MIME offers a standardized way to represent and encode a wide variety of media types for transmission via the internet. Many e-Mail clients now support MIME, which enables sending and receiving of graphics, audio, and video files via the Internet. MIME also supports messages in character sets other than ASCII.
When using MIME, messages can contain the following data types:
! Text messages in US-ASCII
! Messages of unlimited length
Due to limitations associated with the Baltimore SMIME library, to support the following files Base64 format must be specified:
! Binary files.
! Character sets other than US-ASCII
! Multi-media: Image, Audio, and Video messages
! Multiple objects in a single message
With the implementation of S/MIME, the protocol is available that adds digital signatures and encryption to these messages. These messages consist of two parts: the header and the body. The header forms a collection of field/value pairs structured to provide information necessary for the transmission of the message. MIME defines how the body of a message is structured. This format permits the inclusion of the above mentioned data types in a standardized manner. S/MIME defines the security services, adding digital signatures and encryption, thus preventing forgery and interception.
For more information regarding S/MIME, please see Baltimore Technology, Developers Zone, S/MIME Protocols and Standards, available online at: http://www.baltimore.com/devzone/standards/smime.html. Also available is Internet Engineering Task Force S/MIME Message Specification (proposed standard) at: http://www.ietf.org/rfc/rfc2633.txt.
Secure Messaging Extension User’s Guide 7 SeeBeyond Proprietary and Confidential

Chapter 1 Section 1.3Introduction Introducing Secure Messaging Extension
1.3 Introducing Secure Messaging ExtensionThe Secure Messaging Extension provides security features, allowing the protected transmission of exchanges over public domains such as the Internet. Secure Messaging Extension adds the ability to use Public Key Infrastructure (PKI) technology to ensure the confidentiality of exchanges by digitally signing and encrypting messages as they are sent, and decrypting and authenticating messages when they are received.
The Secure Messaging Extension performs the encryption and decryption of messages using the S/MIME standard. The standard one-way hash algorithms ensure data integrity by verifying that no modifications are made to the message while in transit. The message sender’s identity is verified through the use of digital signatures, proving that the message actually originated from the entity who claims to have sent it.
The following flowcharts show the processing of the data from receipt to destination.
Secure Messaging Extension User’s Guide 8 SeeBeyond Proprietary and Confidential

Chapter 1 Section 1.3Introduction Introducing Secure Messaging Extension
Figure 1 Inbound Signed/Encrypted Message
Receives and InboundMessage
Retrieve Receiver's Private
Signed Event?
Forw ard Event body todestination
Hash Event body
Decrypt digital signature using Public Key
Separate the digital signature andoriginator's Public Key
f rom the body of the Event
Decrypteddigital signature = hashed
Event body.
Retrieve Public Key f rom thecertif icate provided by user
Raiseexception
Encrypted Event?
Encryptionrequired for this
Event?
Raiseexception
Yes
No
No
Yes
Separate Block encrypted Eventf rom PKI encrypted Session Key
Decrypt Session Keyusing Private Key
Decrypt Event using Session Key
Yes
No
Raiseexception
Yes
No
Yes
No
Key from PKCS12 f ileProvided by the user
PKCS12f ile
Encryptionrequired for this
Event?
or attached to signed message
Secure Messaging Extension User’s Guide 9 SeeBeyond Proprietary and Confidential

Chapter 1 Section 1.3Introduction Introducing Secure Messaging Extension
Figure 2 Outbound Signed/Encrypted Message
Receives Outbound Event/Message
Hash Event
Retrieve Private Key f romPKCS12 f ile provided
Sign Event?
Encrypt Event?
Retrieve recipient's PublicKey f rom user
Encrypt Session Key w ithPartner's Public Key Certif icate
Encrypt hashed Event using originator's Private Key
to create a digital s ignature
Add digital s ignature & originator'sPublic Key
to Outbound Event
Forw ard OutboundEvent to destination
Randomly generate Session Key
Use Session Key toblock encrypt the Event
Add PKI encrypted SessionKey to Block encrypted Event
No
No
Yes
Yes
PKCS12f ile
by the user
provided certif icates
Secure Messaging Extension User’s Guide 10 SeeBeyond Proprietary and Confidential

Chapter 1 Section 1.4Introduction Supported Operating Systems
1.4 Supported Operating SystemsThe Secure Messaging Extension (Java) is supported on the following operating systems:
! Windows 2000, Windows 2000 SP1, and Windows 2000 SP2
! Windows NT 4.0 SP6a
! Solaris 2.6, 7, and 8
! AIX 4.3.3
! HP-UX 11.0 and HP-UX 11i
1.5 System RequirementsTo use the Secure Messaging Extension, you will need the following:
1 An e*Gate Participating Host, version 4.5.1 or higher.
2 250 KB free disk space
Note: Additional disk space will be required to process and queue the data that the Secure Messaging Extension processes; the amount necessary will vary based on the type and size of the data being processed, and any external applications performing the processing.
3 A TCP/IP network or other network connection.
4 A fast CPU, if secure message volume is expected to be high. (The public-key operations associated with encryption and signing are computationally expensive.)
1.5.1 Host System RequirementsThe external system requirements are different for a GUI host machine—specifically a machine running the ETD Editor and the Java Collaboration Editor GUIs—versus a participating host which is used solely to run the e*Gate schema.
GUI Host Requirements
To enable the GUI editors to communicate with the external system, the following items must be installed on any host machines running the GUI editors:
! Java JDK 1.3. The JDK can be installed during the e*Gate GUI installation process if it hasn’t been installed already.
! Microsoft Data Access Components (MDAC) RTM version 2.6 or greater. This component is included in the Windows 2000 installation routine. Windows NT users can obtain MDAC 2.6 RTM from the following location:
http://www.microsoft.com/data/download.htm
Secure Messaging Extension User’s Guide 11 SeeBeyond Proprietary and Confidential

Chapter 2
Installation
This chapter describes how to install the Secure Messaging Extension.
2.1 Windows NT or 2000
2.1.1 Pre-installation1 Exit all Windows programs before running the setup program, including any anti-
virus applications.
2 You must have Administrator privileges to install this extension.
2.1.2 Installation ProcedureTo install the Secure Messaging Extension on a Windows NT or 2000 system
1 Log in as an Administrator on the workstation on which you want to install the extension.
2 Insert the installation CD-ROM into the CD-ROM drive.
3 If the CD-ROM drive’s “Autorun” feature is enabled, the setup application should launch automatically; skip ahead to step 4. Otherwise, use the Windows NT Explorer or the Control Panel’s Add/Remove Applications feature to launch the file setup.exe on the CD-ROM drive.
4 The InstallShield setup application will launch. Follow the on-screen instructions to install the extension.
Note: Be sure to install the extension files in the suggested “client” installation directory. The installation utility detects and suggests the appropriate installation directory. Unless you are directed to do so by SeeBeyond support personnel, do not change the suggested “installation directory” setting.
Secure Messaging Extension User’s Guide 12 SeeBeyond Proprietary and Confidential

Chapter 2 Section 2.2Installation UNIX
2.2 UNIX
2.2.1 Pre-installation1 Root privileges are not required to install this e*Way. Log in under the user name
that will own the e*Way files. Be sure that this user has sufficient privilege to create files in the e*Gate directory tree.
2.2.2 Installation ProcedureTo install the Secure Messaging Extension on a UNIX system
1 Log in on the workstation containing the CD-ROM drive, and insert the CD-ROM into the drive.
2 If necessary, mount the CD-ROM drive.
3 At the shell prompt, type
cd /cdrom
4 Start the installation script by typing:
./setup.sh
5 A menu of options will appear. Select the “install Agents” option. Then, follow any additional on-screen directions.
Note: Be sure to install the extension files in the suggested “client” installation directory. The installation utility detects and suggests the appropriate installation directory. Unless you are directed to do so by SeeBeyond support personnel, do not change the suggested “installation directory” setting.
Secure Messaging Extension User’s Guide 13 SeeBeyond Proprietary and Confidential
Chapter 2 Section 2.3Installation Files/Directories Created by the Installation
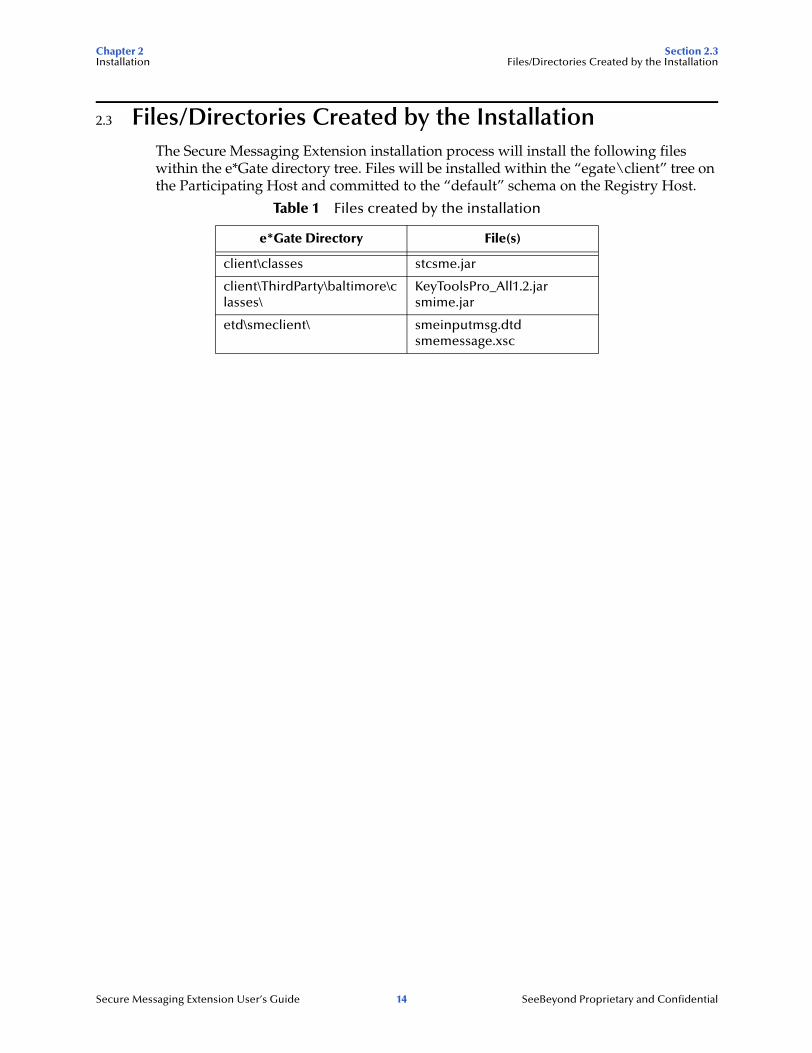
2.3 Files/Directories Created by the InstallationThe Secure Messaging Extension installation process will install the following files within the e*Gate directory tree. Files will be installed within the “egate\client” tree on the Participating Host and committed to the “default” schema on the Registry Host.
Table 1 Files created by the installation
e*Gate Directory File(s)
client\classes stcsme.jar
client\ThirdParty\baltimore\classes\
KeyToolsPro_All1.2.jarsmime.jar
etd\smeclient\ smeinputmsg.dtdsmemessage.xsc
Secure Messaging Extension User’s Guide 14 SeeBeyond Proprietary and Confidential

Chapter 3
Multi-Mode e*Way Configuration
This chapter describes how to configure the Multi-Mode e*Way.
3.1 Multi-Mode e*WayMulti-Mode e*Way properties are set using the Enterprise Manager.
To create and configure a New Multi-Mode e*Way:
1 Select the Navigator’s Components tab.
2 Open the host on which you want to create the e*Way.
3 On the Palette, click on the icon to create a new e*Way.
4 Enter the name of the new e*Way, then click OK.
5 Select the new component, then click to edit its properties.
6 When the e*Way Properties window opens, click on the Find button beneath the Executable File field, and select an executable file. (stceway.exe is located in the “bin\” directory.)
7 Under the Configuration File field, click on the New button. When the Settings page opens, set the configuration parameters for this configuration file.
8 After selecting the desired parameters, save the configuration file. Close the .cfg file and select OK to close the e*Way Properties Window.
The Multi-Mode e*Way configuration parameters are organized into the following section:
! JVM Settings
3.1.1 JVM SettingsThe JVM Settings control basic Java Virtual Machine settings.
JNI DLL Absolute Pathname
Description
Specifies the absolute pathname to where the JNI DLL installed by the Java 2 SDK 1.2.2 or higher is located on the Participating Host. This parameter is mandatory.
Secure Messaging Extension User’s Guide 15 SeeBeyond Proprietary and Confidential

Chapter 3 Section 3.1Multi-Mode e*Way Configuration Multi-Mode e*Way
Required Values
A valid pathname.
Additional Information
The JNI dll name varies on different O/S platforms:
The value assigned can contain a reference to an environment variable, by enclosing the variable name within a pair of % symbols. For example:
%MY_JNIDLL%
Such variables can be used when multiple Participating Hosts are used on different platforms.
To ensure that the JNI DLL loads successfully, the Dynamic Load Library search path environment variable must be set appropriately to include all the directories under the Java 2 SDK (or JDK) installation directory that contain shared libraries (UNIX) or DLLs (NT).
CLASSPATH Prepend
Description
Specifies the paths to be prepended to the CLASSPATH environment variable for the Java VM.
Required Values
An absolute path or an environmental variable. This parameter is optional.
Additional Information
If left unset, no paths will be prepended to the CLASSPATH environment variable.
Existing environment variables may be referenced in this parameter by enclosing the variable name in a pair of % signs. For example:
%MY_PRECLASSPATH%
CLASSPATH Override
Description
Specifies the complete CLASSPATH variable to be used by the Java VM. This parameter is optional. If left unset, an appropriate CLASSPATH environment variable (consisting of required e*Gate components concatenated with the system version of CLASSPATH) will be set.
OS Java 2 JNI DLL Name
NT 4.0/ Windows 2000 jvm.dll
Solaris 2.6, 2.7, 2.8 libjvm.so
Linux 6 libjvm.so
HP-UX libjvm.sl
AIX 4.3 libjvm.a
Secure Messaging Extension User’s Guide 16 SeeBeyond Proprietary and Confidential

Chapter 3 Section 3.1Multi-Mode e*Way Configuration Multi-Mode e*Way
Note: All necessary JAR and ZIP files needed by both e*Gate and the Java VM must be included. It is advised that the CLASSPATH Prepend parameter should be used.
Required Values
An absolute path or an environmental variable. This parameter is optional.
Additional Information
Existing environment variables may be referenced in this parameter by enclosing the variable name in a pair of % signs. For example:
%MY_CLASSPATH%
Initial Heap Size
Description
Specifies the value for the initial heap size in bytes. If set to 0 (zero), the preferred value for the initial heap size of the Java VM will be used.
Required Values
An integer between 0 and 2147483647. This parameter is optional.
Maximum Heap Size
Description
Specifies the value of the maximum heap size in bytes. If set to 0 (zero), the preferred value for the maximum heap size of the Java VM will be used.
Required Values
An integer between 0 and 2147483647. This parameter is optional.
Maximum Stack Size for Native Threads
Description
Specifies the value of the maximum stack size in bytes for native threads. If set to 0 (zero), the default value will be used.
Required Values
An integer between 0 and 2147483647. This parameter is optional.
Maximum Stack Size for JVM Threads
Description
Specifies the value of the maximum stack size in bytes for JVM threads. If set to 0 (zero), the preferred value for the maximum heap size of the Java VM will be used.
Required Values
An integer between 0 and 2147483647. This parameter is optional.
Secure Messaging Extension User’s Guide 17 SeeBeyond Proprietary and Confidential

Chapter 3 Section 3.1Multi-Mode e*Way Configuration Multi-Mode e*Way
Class Garbage Collection
Description
Specifies whether the Class Garbage Collection will be done automatically by the Java VM. The selection affects performance issues.
Required Values
YES or NO.
Garbage Collection Activity Reporting
Description
Specifies whether garbage collection activity will be reported for debugging purposes.
Required Values
YES or NO.
Asynchronous Garbage Collection
Description
Specifies whether asynchronous garbage collection activity will be reported for debugging purposes.
Required Values
YES or NO.
Report JVM Info and all Class Loads
Description
Specifies whether the JVM information and all class loads will be reported for debugging purposes.
Required Values
YES or NO.
Disable JIT
Description
Specifies whether the Just-In-Time (JIT) compiler will be disabled.
Required Values
YES or NO.
Note: This parameter is not supported for Java Release 1.
Secure Messaging Extension User’s Guide 18 SeeBeyond Proprietary and Confidential

Chapter 3 Section 3.1Multi-Mode e*Way Configuration Multi-Mode e*Way
Allow Remote Debugging of JVM
Description
Specifies whether to allow remote debugging of the JVM.
Required Values
YES or NO.
Secure Messaging Extension User’s Guide 19 SeeBeyond Proprietary and Confidential
Chapter 4
e*Way Connection Configuration
This chapter describes how to configure the SME e*Way Connection Configuration.
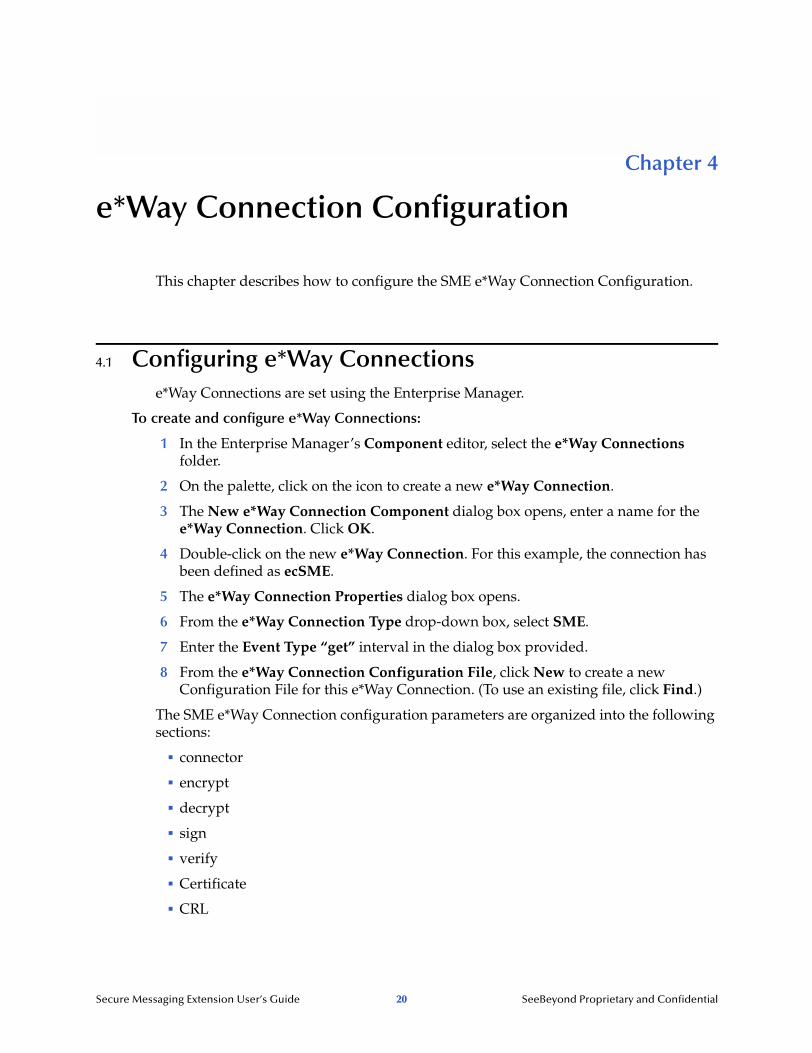
4.1 Configuring e*Way Connectionse*Way Connections are set using the Enterprise Manager.
To create and configure e*Way Connections:
1 In the Enterprise Manager’s Component editor, select the e*Way Connections folder.
2 On the palette, click on the icon to create a new e*Way Connection.
3 The New e*Way Connection Component dialog box opens, enter a name for the e*Way Connection. Click OK.
4 Double-click on the new e*Way Connection. For this example, the connection has been defined as ecSME.
5 The e*Way Connection Properties dialog box opens.
6 From the e*Way Connection Type drop-down box, select SME.
7 Enter the Event Type “get” interval in the dialog box provided.
8 From the e*Way Connection Configuration File, click New to create a new Configuration File for this e*Way Connection. (To use an existing file, click Find.)
The SME e*Way Connection configuration parameters are organized into the following sections:
! connector
! encrypt
! decrypt
! sign
! verify
! Certificate
! CRL
Secure Messaging Extension User’s Guide 20 SeeBeyond Proprietary and Confidential

Chapter 4 Section 4.1e*Way Connection Configuration Configuring e*Way Connections
4.1.1 ConnectorThis section contains a set of top level parameters:
! type
! class
! Property.Tag
Type
Description
Specifies the type of connection.
Required Values
SME. The value defaults to SME.
Class
Description
Specifies the class name of the SME Client connector object.
Required Values
A valid package name. The default is com.stc.sme.eway.SMEClientConnector.
Property.Tag
Description
Specifies the data source identity. This parameter is required by the current EBobConnectorFactory.
Required Values
A valid data source package name.
4.1.2 EncryptThis section contains a set of top level parameters:
! Certificate
! format
! algorithm
! MessageFormat
! EncodingFormat
Secure Messaging Extension User’s Guide 21 SeeBeyond Proprietary and Confidential
Chapter 4 Section 4.1e*Way Connection Configuration Configuring e*Way Connections
Certificate
Description
Specifies the certificate of the partner to which encrypted messages will be sent.
Required Values
A valid certificate.
Format
Description
Specifies the certificate format.
Required Values
The appropriate certificate format. One of three provided: DER, PEM, or PK7. The default is DER.
Algorithm
Description
Specifies the algorithm used for encryption.
Required Values
A string. The appropriate encryption algorithm. One of four provided: DES_EDE3_CBC, RC2_CBC_40, RC2_CBC_64, RC2_CBC_128. The default is DES_EDE3_CBC.
MessageFormat
Description
Specifies the format used for the encrypted message.
Required Values
The appropriate message format. One of two provided: PKCS7, or SMIME2. The default is SMIME2.
EncodingFormat
Description
Specifies the format used to encode the output message. This setting is only applied if MessageFormat is set to SMIME2.
Required Values
The appropriate encoding format. One of two provided: BASE64, or BINARY. The default is BASE64.
Secure Messaging Extension User’s Guide 22 SeeBeyond Proprietary and Confidential

Chapter 4 Section 4.1e*Way Connection Configuration Configuring e*Way Connections
4.1.3 DecryptThis section contains a set of top level parameters:
! Message Format
! Encoding Format
! PKCS12
! PassPhrase
MessageFormat
Description
Specifies the format used for encrypting the message.
Required Values
The appropriate encryption format. One of two provided: PKCS7, or SMIME2. The default is SMIME2.
EncodingFormat
Description
Specifies the encoding format for the output message. This setting is only applied if MessageFormat is set to SMIME2.
Required Values
The appropriate encoding format. One of two provided: BASE64, or BINARY. The default is BASE64.
PKCS12
Description
Specifies the PKCS12 file. The PKCS12 file is where the private key is stored.
Required Values
The valid path and PKCS12 file.
PassPhrase
Description
Specifies the PassPhrase (password) used to protect/access the PKCS12 file.
Required Values
A valid PassPhrase.
4.1.4 SignThis section contains a set of top level parameters:
Secure Messaging Extension User’s Guide 23 SeeBeyond Proprietary and Confidential

Chapter 4 Section 4.1e*Way Connection Configuration Configuring e*Way Connections
! algorithm
! detached
! MessageFormat
! EncodingFormat
! PKCS12
! PassPhrase
Algorithm
Description
Specifies the signing algorithm, the algorithm used to sign the message.
Required Values
The appropriate algorithm type. One of two provided: RSA_MD5, or RSA_SHA1. The default is RSA_SHA1.
Detached
Description
Specifies whether the signature will be separated from the original message.
Required Values
Yes or No. Yes detaches the signature.
MessageFormat
Description
Specifies the format used for encrypting the message.
Required Values
The appropriate encryption format. One of two provided: PKCS7, or SMIME2. The default is SMIME2.
EncodingFormat
Description
Specifies the encoding format for the output message. This setting is only applied if MessageFormat is set to SMIME2.
Required Values
The appropriate encoding format. One of two provided: BASE64, or BINARY. The default is BASE64.
Secure Messaging Extension User’s Guide 24 SeeBeyond Proprietary and Confidential

Chapter 4 Section 4.1e*Way Connection Configuration Configuring e*Way Connections
PKCS12
Description
Specifies the PKCS12 file. The PKCS12 file is where the private key is stored.
Required Values
The valid path and PKCS12 file.
PassPhrase
Description
Specifies the PassPhrase (password) used to protect/access the PKCS12 file.
Required Values
A valid PassPhrase.
4.1.5 Verify
This section contains a set of top level parameters:
! MessageFormat
! EncdoingFormat
! Certificate
! format
MessageFormat
Description
Specifies the format used for encrypting the message.
Required Values
The appropriate encryption format. One of two provided: PKCS7, or SMIME2. The default is SMIME2.
EncodingFormat
Description
Specifies the encoding format for the output message. This setting is only applied if MessageFormat is set to SMIME2.
Required Values
The appropriate encoding format. One of two provided: BASE64, or BINARY. The default is BASE64.
Secure Messaging Extension User’s Guide 25 SeeBeyond Proprietary and Confidential

Chapter 4 Section 4.1e*Way Connection Configuration Configuring e*Way Connections
Certificate
Description
Specifies the certificate used to verify the signed message. If not set, the certificate attached to the signed message will be used to verify the signed message.
Required Values
A valid certificate.
Format
Description
Specifies the certificate format.
Required Values
The appropriate certificate format. One of three provided: DER, PEM, or PK7. The default is DER.
4.1.6 CertificateThis section contains a set of top level parameters:
! Checking
! TrustedCA
! format
Checking
Description
Specifies the method used to check the certificate. Three options are available for checking:
! Direct: The certificate used in the program has been checked and should be trusted.
! CA: Only those certificates issued by the trusted CAs can be used in the program.
! CA_CRL: Certificates issued from the trusted CAs will be checked with CRLs. If this one is selected, a CRL catalog, needs to be configured for the purpose of locating the CRL.
Required Values
The appropriate checking method. One of three options provided: CA, CA_CRL, or DIRECT. The default is CA
Secure Messaging Extension User’s Guide 26 SeeBeyond Proprietary and Confidential

Chapter 4 Section 4.1e*Way Connection Configuration Configuring e*Way Connections
TrustedCA
Description
Specifies the trusted CAs. Certificates of the designated CA are used to check the certificates use within the program. Multiple CAs may be selected.
Required Values
One or more trusted CAs.
Format
Description
Specifies the format of the CA’s certificate. If PK7 is selected, the end entity will be regarded as the CA’s Certificate.
Required Values
The appropriate certificate format. One of three provided: DER, PEM, or PK7. The default is DER.
4.1.7 CRLThis section contains a set of top level parameters:
! filename
! CACRLCertifciate
! CACRLformat
! CACertifciate
! format
Filename
Description
Specifies the file name of the stored CRL, DER is the required format.
Required Values
The path and file name of the stored CRL.
CACRLCertificate
Description
Specifies the certificate of the CA that was used to sign the CRL.
Required Values
A valid certificate name.
Secure Messaging Extension User’s Guide 27 SeeBeyond Proprietary and Confidential
Chapter 4 Section 4.1e*Way Connection Configuration Configuring e*Way Connections
CACRLformat
Specifies the format of the CA’s certificate. If PK7 is selected, the end entity will be regarded as the CA’s Certificate.
Required Values
The appropriate certificate format. One of three provided: DER, PEM, or PK7. The default is DER.
CACertificate
Description
Specifies the certificate of the CA that was used to sign user's certificate. This certificate will be regarded as the trusted CA certificate. If it is the same as the one used to sign the CRL, leave this parameter blank.
Required Values
A valid certificate name.
Format
Description
Specifies the format of the CA’s certificate. If PK7 is selected, the end entity will be regarded as the CA’s Certificate.
Required Values
The appropriate certificate format. One of three provided: DER, PEM, or PK7. The default is DER.
Secure Messaging Extension User’s Guide 28 SeeBeyond Proprietary and Confidential

Chapter 5
Implementation
This chapter includes information pertinent to implementing the Java-enabled SME e*Way in a production environment. Also included is a sample schema. The sample schema can be located in the root directory of the Installation CD under:
samples/ewsme
The following assumptions are applicable to this implementation: 1) The SME e*Way has been successfully installed. 2) The executable and the configuration files have been appropriately assigned. 3) All necessary .jar files are accessible.
5.1 SME Sample Implementation OverviewDuring installation, the host and Control Broker are automatically created and configured. The default name of each is the name of the host on which you are installing the e*Gate Enterprise Manager GUI. To complete the implementation of the Java-enabled SME e*Way, do the following:
! Make sure that the Control Broker is activated.
! In the e*Gate Enterprise Manager, define and configure the following as necessary:
" Inbound e*Way using stcewfile.exe
" Outbound e*Way using stcewfile.exe
" The Multi-Mode e*Way component.
" Event Type Definitions used to package the data to be exchanged with the external system.
" Collaboration Rules to process Events.
" The e*Way Connection to be created as described in Chapter 4.
" Collaborations, to be associated with each e*Way component, to apply the required Collaboration Rules.
" The destination to which data will be published prior to being sent to the external system.
The following sections describe how to define and associate each of the above components. However, the section “Sample Schema” on page 45 provides the details necessary to create the components of a specific schema consisting of three e*Ways,
Secure Messaging Extension User’s Guide 29 SeeBeyond Proprietary and Confidential

Chapter 5 Section 5.1Implementation SME Sample Implementation Overview
three Event Types, one Collaboration Rule, two Intelligent Queues and three Collaborations.
5.1.1 Creating the New SchemaThe first task in deploying the sample implementation is to create a new schema name. While it is possible to use the default schema for the sample implementation, it is recommended that you create a separate schema for testing purposes. After you install the SME e*Way, do the following:
1 Start the e*Gate Enterprise Manager GUI.
2 When the Enterprise Manager prompts you to log in, select the host that you specified during installation, and enter your password.
3 When prompted to select a schema, click New.
4 Enter a name for the new schema; In this case, enter SMESample, or any name as desired.
The e*Gate Enterprise Manager opens under your new schema. You are now ready to begin creating the necessary components for this sample schema.
5.1.2 Event TypesThe SME e*Way installation includes the file “smemessage.xsc” which represents a standard SME Event Type template.
Creating an Event Type from an Existing DTD
For the purpose of this example, the following procedure shows how to create an Event Type Definition (ETD) from an existing Document Type Definition (DTD) using (smeinputmsg.dtd located in the <eGate root directory>/client/etd/smeclient) as the input file.
1 Highlight the Event Types folder on the Components tab of the e*Gate Navigator.
2 On the palette, click the Create a New Event Type button to create a new Event Type.
3 Enter the name of the Event, then click OK. (For the purpose of this sample, the first Event Type is defined as “input”.)
4 Double-click the new Event Type to edit its properties.
5 When the Properties window opens, click the New button. The ETD Editor opens.
6 Select New from the File menu on Task Manager.
Secure Messaging Extension User’s Guide 30 SeeBeyond Proprietary and Confidential

Chapter 5 Section 5.1Implementation SME Sample Implementation Overview
7 The Event Type Definition Wizard opens.
Figure 3 Event Type Definition Wizard
8 Select the proper wizard. (For this Event Type, select DTDWizard.)
9 Enter a package name where the DTD builder can place all the generated Java classes associated with the created ETD. (For this sample use SME.)
10 Select a DTD file to be used by the DTD builder to generate an ETD file. (Using the browse button, navigate to an existing DTD. For this sample, the file smeinputmsg.dtd was used.)
11 Click Next. and review the summary information.
12 Click Back to edit, otherwise, click Finish.
13 The ETD Editor opens displaying the newly converted .xsc file. An ETD is a graphical representation of the layout of data in an Event.
14 Save the file as inputmsg.xsc, and Promote to Run Time.
Note: For more information on the creation and modification of Java-enabled ETDs, please see the “Java-based ETD Editor” guide.
Creating an Event Type Without an Existing DTD
For the purpose of this example, the following procedure shows how to create an ETD without using an existing DTD file as the input file.
1 Highlight the Event Types folder on the Components tab of the e*Gate Navigator.
2 On the palette, click the Create a New Event Type button to create a new Event Type.
3 Enter the name of the Event, then click OK. (For the purpose of this sample, the first Event Type is defined as “outevent”)
4 Double-click the new Event Type to edit its properties.
5 When the Properties window opens, click the New button. The ETD Editor opens.
Secure Messaging Extension User’s Guide 31 SeeBeyond Proprietary and Confidential

Chapter 5 Section 5.1Implementation SME Sample Implementation Overview
6 Select New from the File menu on Task Manager.
7 The Event Type Definition Wizard opens.
Figure 4 Event Type Definition Wizard
8 Select the desired wizard. (For this Event Type, select StandardETD.)
9 Enter a package name where the DTD builder can place all the generated Java classes associated with the created ETD. (For this sample, use SMESample as the package name.)
10 The ETD Editor opens, select New from the File menu.
11 Select EventTypeDefintion1.
12 Right click, and select Add Field, as Child Node.
13 Select Field1 and change the structure type to fixed in the Properties window.
Figure 5
14 Triple-click on EventTypeDefinition1 in the Event Type Definition window, and rename it outevent.
15 Triple-click on Field1, and rename it Data.
Secure Messaging Extension User’s Guide 32 SeeBeyond Proprietary and Confidential

Chapter 5 Section 5.1Implementation SME Sample Implementation Overview
Figure 6 SMEMessage.xsc
16 Save the file as smemessage.xsc, and Promote to Run Time.
Creating an Event Type From an Existing .xsc
For the purpose of this example, the following procedure shows how to create an Event Type Definition (ETD) from an existing .xsc file using (smemessage.xsc) as the input file.
1 Highlight the Event Types folder on the Components tab of the e*Gate Navigator.
2 On the palette, click the Create a New Event Type button to create a new Event Type.
3 Enter the name of the Event, then click OK. (For the purpose of this sample, the first Event Type is defined as “smemessage”).
4 Double-click the new Event Type to edit its properties.
5 When the Properties window opens, click the Find button.
6 Select smemessage.xsc (provided as the default destination .xsc file).
7 Click OK to continue.
5.1.3 Creating and Configuring the e*WaysThe first components to be created are the following e*Ways:
Secure Messaging Extension User’s Guide 33 SeeBeyond Proprietary and Confidential
Chapter 5 Section 5.1Implementation SME Sample Implementation Overview
! Inbound_eWay
! Outbound_eWay
! Multi-Mode_eWay
The following sections provide instructions for creating each e*Way.
Inbound e*Way
1 Select the Navigator's Components tab.
2 Open the host on which you want to create the e*Ways.
3 Select the Control Broker that will manage the new e*Ways.
4 On the palette, click the Create a New e*Way button.
5 Enter the name of the new e*Way, (in this case, inbound), then click OK.
6 Right-click inbound, and select Properties to edit its properties.
7 When the e*Way Properties window opens, click on the Find button beneath the Executable File field, and select stcewfile.exe as the executable file.
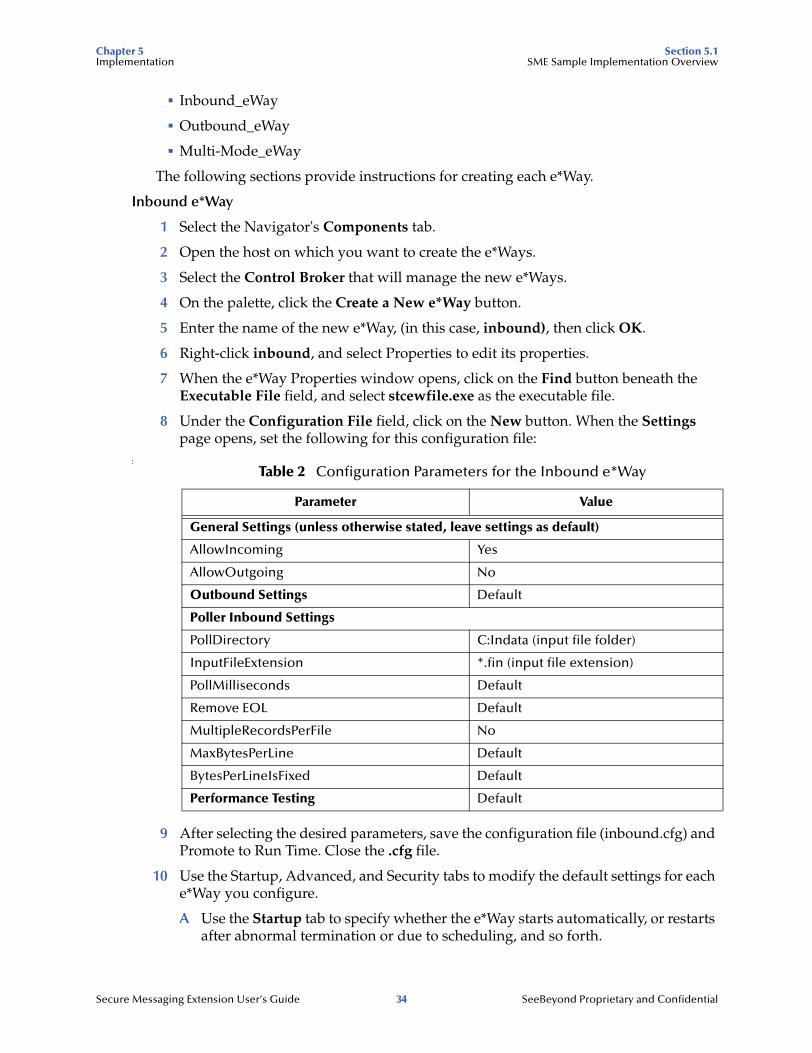
8 Under the Configuration File field, click on the New button. When the Settings page opens, set the following for this configuration file:
:
9 After selecting the desired parameters, save the configuration file (inbound.cfg) and Promote to Run Time. Close the .cfg file.
10 Use the Startup, Advanced, and Security tabs to modify the default settings for each e*Way you configure.
A Use the Startup tab to specify whether the e*Way starts automatically, or restarts after abnormal termination or due to scheduling, and so forth.
Table 2 Configuration Parameters for the Inbound e*Way
Parameter Value
General Settings (unless otherwise stated, leave settings as default)
AllowIncoming Yes
AllowOutgoing No
Outbound Settings Default
Poller Inbound Settings
PollDirectory C:Indata (input file folder)
InputFileExtension *.fin (input file extension)
PollMilliseconds Default
Remove EOL Default
MultipleRecordsPerFile No
MaxBytesPerLine Default
BytesPerLineIsFixed Default
Performance Testing Default
Secure Messaging Extension User’s Guide 34 SeeBeyond Proprietary and Confidential

Chapter 5 Section 5.1Implementation SME Sample Implementation Overview
B Use the Advanced tab to specify or view the activity and error logging levels, as well as the Event threshold information.
C Use Security to view or set privilege assignments.
11 Select OK to close the e*Way Properties window.
Outbound e*Way
1 Select the Navigator's Components tab.
2 Open the host on which you want to create the e*Ways.
3 Select the Control Broker that will manage the new e*Ways.
4 On the palette, click the Create a New e*Way button.
5 Enter the name of the new e*Way, (in this case, outbound), then click OK.
6 Select outbound, then right-click and select Properties to edit its properties.
7 When the e*Way Properties window opens, click the Find button beneath the Executable File field, and select stcewfile.exe as the executable file.
8 Under the Configuration File field, click the New button. When the Settings page opens, set the following for this configuration file:
:
9 Save the .cfg file (outbound.cfg), Promote to Run Time, close Settings. Click OK to close e*Way Properties window.
Multi-Mode e*Way
1 Select the Navigator's Components tab.
2 Open the host on which you want to create the e*Way.
3 Select the Control Broker that will manage the new e*Way.
4 On the palette, click the Create a New e*Way button.
Table 3 Configuration Parameters for the Outbound e*Way
Parameter Value
General Settings (unless otherwise stated, leave settings as default)
AllowIncoming No
AllowOutgoing Yes
Outbound Settings
OutputDirectory C:\DATA
OutputFileName output%d.dat
MultipleRecordsPerFile No
MaxRecordsPerFile 10000
AddEOL Yes
Poller Inbound Settings Default
Performance Testing Default
Secure Messaging Extension User’s Guide 35 SeeBeyond Proprietary and Confidential

Chapter 5 Section 5.1Implementation SME Sample Implementation Overview
5 Enter the name of the new e*Way (in this case, ew_java), then click OK.
6 Right-click the new e*Way and select Properties to edit its properties.
7 When the e*Way Properties window opens, click the Find button beneath the Executable File field, and select stceway.exe as the executable file.
8 To edit the JVM Settings, select New under Configuration file.
See “Multi-Mode e*Way Configuration” on page 15 for details on the parameters associated with the Multi-Mode e*Way.:
9 Save the .cfg file, Promote to Run Time.
10 In the e*Way Properties window, use the Startup, Advanced, and Security tabs to modify the default settings for each.
D Use the Startup tab to specify whether the e*Way starts automatically, restarts after abnormal termination or due to scheduling, etc.
E Use the Advanced tab to specify or view the activity and error logging levels, as well as the Event threshold information.
F Use Security to view or set privilege assignments.
11 Click OK to close e*Way Properties window.
5.1.4 Create the e*Way ConnectionThe e*Way Connection configuration file contains the connection information along with the information needed to communicate using SME.
To create and configure a New e*Way Connection
1 Highlight the e*Way Connection folder on the Components tab of the e*Gate Navigator.
2 On the palette, click the Create a New e*Way Connection button.
3 Enter the name of the e*Way Connection, then click OK. (For the purpose of this sample, the e*Way Connection is defined as “con_sme”.)
4 Double-click the new e*Way Connection to edit its properties.
5 When the e*Way Connection Properties window opens, select SME from the e*Way Connection Type drop-down menu.
Table 4 Configuration Parameters for the MultiMode e*Way
Parameter Value
JVM Settings (unless otherwise stated, leave settings as default)
JNI DLL absolute pathname
C:\eGate\client\bin\Jre\jvm.dll (or absolute path to proper JNI DLL)
CLASSPATH Prepend
C:\eGate\client\classes\stcsme.jarC:\eGate\client\classes\ThirdParty\baltimore\classes\smime.jarC:\eGate\client\classesThirdParty\baltimore\classes\KeyToolsPro_All_1.2.jar(or absolute path to stcsme.jar, smime.jar, and KeyToolsPro_All1.2.jar)
Secure Messaging Extension User’s Guide 36 SeeBeyond Proprietary and Confidential

Chapter 5 Section 5.1Implementation SME Sample Implementation Overview
6 Under e*Way Connection Configuration File, click the New button.
7 The e*Way Connection editor opens, select the necessary parameters.
For more information on the SME e*Way Connection Type parameters, see “e*Way Connection Configuration” on page 20.
8 Save the .cfg file and Promote to Run Time.
5.1.5 Intelligent QueuesThe next step is to create and associate Intelligent Queues (IQs). IQs manage the exchange of information between components within the e*Gate system, providing non-volatile storage for data as it passes from one component to another. IQs use IQ Services to transport data. IQ Services provide the mechanism for moving Events between IQs, handling the low-level implementation of data exchange (such as system calls to initialize or reorganize a database).
To create and modify an Intelligent Queue for the SME e*Way:
1 Select the Navigator's Components tab.
2 Open the host on which you want to create the IQ.
3 Open a Control Broker.
4 Select an IQ Manager.
5 On the palette, click the Create a New IQ button.
6 Enter the name of the new IQ (in this case, iq1), then click OK.
7 Double-click the new IQ to edit its properties.
8 On the General tab, specify the Service and the Event Type Get Interval.
The STC_Standard IQ Service provides sufficient functionality for most applications. If specialized services are required, custom IQ Service DLLs may be created.
The default Event Type Get Interval of 100 Milliseconds is satisfactory for the purposes of this initial implementation.
9 On the Advanced tab, make sure that Simple publish/subscribe is checked under the IQ behavior section.
10 Click OK to close the IQ Properties window
11 For this schema, repeat steps 1 through 10 to create an additional IQ (iq2).
5.1.6 Collaboration RulesThe next step is to create the Collaboration Rules that will extract and process selected information from the source Event Type defined above, according to its associated Collaboration Service. The Default Editor can be set to either Monk or Java.
From the Enterprise Manager Task Bar, select Options and click Default Editor. The default should be set to Java.
Secure Messaging Extension User’s Guide 37 SeeBeyond Proprietary and Confidential

Chapter 5 Section 5.1Implementation SME Sample Implementation Overview
The sample schema call for the creation of three collaboration Rules files
! Pass_in (Pass Through)
! Pass_out (Pass Through)
! cor_java (Java)
Creating Collaboration Rules files
Pass Through (inbound)
1 Select the Navigator's Components tab in the e*Gate Enterprise Manager.
2 In the Navigator, select the Collaboration Rules folder.
3 On the palette, click the Create New Collaboration Rules button.
4 Enter the name of the new Collaboration Rule Component, then click OK (for this case, use Pass_in).
5 Double-click the new Collaboration Rules Component. The Collaboration Rules Properties window opens.
Figure 7 Collaboration Properties
6 The Service field defaults to Pass Through.
7 Go to the Subscriptions tab. Select input under Available Input Event Types, and click the right arrow to move it to Selected Input Event Types. The box under Triggering Event should be checked.
8 Go to the Publications tab. Select input under Available Output Event Types, and click the right arrow to move it to Selected Output Event Types. The Radio button under Default will be enabled.
9 Click OK to close the Collaboration Rules - passin Properties window.
Secure Messaging Extension User’s Guide 38 SeeBeyond Proprietary and Confidential

Chapter 5 Section 5.1Implementation SME Sample Implementation Overview
Pass Through (outbound)
1 Select the Navigator's Components tab in the e*Gate Enterprise Manager.
2 In the Navigator, select the Collaboration Rules folder.
3 On the palette, click the Create New Collaboration Rules button.
4 Enter the name of the new Collaboration Rule Component, then click OK (for this case, use Pass_out).
5 Double-click the new Collaboration Rules Component. The Collaboration Rules Properties window opens.
6 The Service field defaults to Pass Through.
7 Go to the Subscriptions tab. Select outevent under Available Input Event Types, and click the right arrow to move it to Selected Input Event Types. The box under Triggering Event should be checked.
8 Go to the Publications tab. Select outevent under Available Output Event Types, and click the right arrow to move it to Selected Output Event Types. The Radio button under Default will be enabled.
9 Click OK to close the Collaboration Rules - passin Properties window.
10 Click OK to close the Collaboration Properties window.
Java (cor_java)
1 Select the Navigator's Components tab in the e*Gate Enterprise Manager.
2 In the Navigator, select the Collaboration Rules folder.
3 On the palette, click the Create New Collaboration Rules button.
4 Enter the name of the new Collaboration Rule, then click OK (for this case, use cor_java).
5 Double-click the new Collaboration Rules Component to edit its properties. The Collaboration Rules Properties window opens.
6 From the Service field drop-down box, select Java. The Collaboration Mapping tab is now enabled, and the Subscriptions and Publications tabs are disabled.
7 In the Initialization string box, enter any required initialization string that the Collaboration Service may require. This field can be left blank.
8 Select the Collaboration Mapping tab.
9 Using the Add Instance button, create instances to coincide with the Event Types.
For this sample, do the following:
10 In the Instance Name column, enter in1 for the instance name.
11 Click Find, navigate to etd\inputmsg.xsc, double-click to select.
inputmsg.xsc is added to the ETD column of the instance row.
12 In the Mode column, select In from the drop–down menu available.
Secure Messaging Extension User’s Guide 39 SeeBeyond Proprietary and Confidential

Chapter 5 Section 5.1Implementation SME Sample Implementation Overview
13 In the Trigger column, click the box to enable trigger mechanism.
14 Repeat steps 9–13 using the following values:
" Instance Name — out1
" ETD — outputmsg.xsc
" Mode — Out
" Trigger — do not select
15 Repeat steps 9–13 again using the following values:
" Instance Name — out
" ETD — smemessage.xsc
" Mode — Out
16 Trigger — do not select
Figure 8 Collaboration Rules - Collaboration Mapping Properties
Select the General tab, under the Collaboration Rule box, select New. The Collaboration Rules Editor opens.
17 Expand to full size for optimum viewing, expanding the Source and Destination Events as well.
Creating the Collaboration Rules Class
1 Highlight retBoolean in the Business Rules pane.
All of the user–defined business rules are added as part of this method.
Secure Messaging Extension User’s Guide 40 SeeBeyond Proprietary and Confidential

Chapter 5 Section 5.1Implementation SME Sample Implementation Overview
2 Select InputFile from the Source Events pane. Drag–and–drop onto Input in the Destination Events pane. A connecting line appears between the properties objects.
3 In the Business Rules pane, a rule expression appears, with the properties of that rule displayed in the Rule Properties pane.
4 Select OutputFile from the Source Events pane. Drag–and–drop onto Output in the Destination Events pane.
5 Select Signature from the Source Events pane. Drag–and–drop onto Signature in the Destination Events pane.
Figure 9 Collaboration Rules — Collaboration Mapping Properties
6 Choose the appropriate function (encrypt/sign/verify/decrypt) from the method SMEMessageAp by dragging it to the Rule panel.
For example, to add an encryption rule, from the Destination Event:
getout1().setData(new String(getout().encrypt()))
Secure Messaging Extension User’s Guide 41 SeeBeyond Proprietary and Confidential
Chapter 5 Section 5.1Implementation SME Sample Implementation Overview
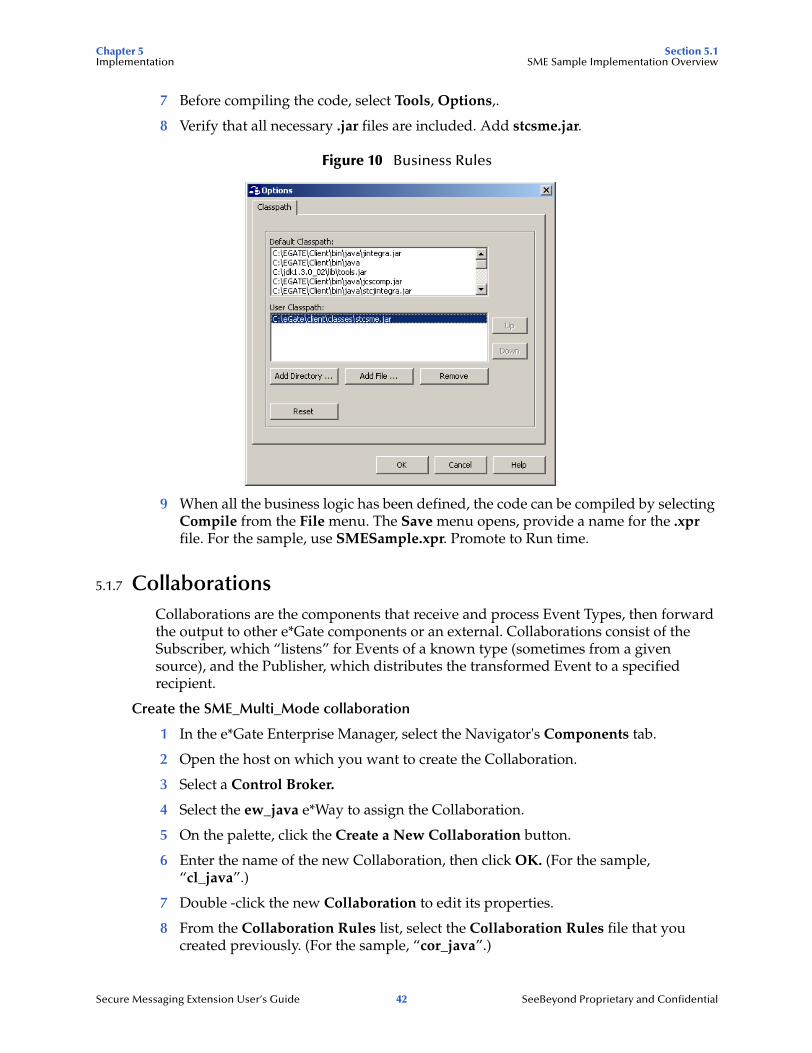
7 Before compiling the code, select Tools, Options,.
8 Verify that all necessary .jar files are included. Add stcsme.jar.
Figure 10 Business Rules
9 When all the business logic has been defined, the code can be compiled by selecting Compile from the File menu. The Save menu opens, provide a name for the .xpr file. For the sample, use SMESample.xpr. Promote to Run time.
5.1.7 CollaborationsCollaborations are the components that receive and process Event Types, then forward the output to other e*Gate components or an external. Collaborations consist of the Subscriber, which “listens” for Events of a known type (sometimes from a given source), and the Publisher, which distributes the transformed Event to a specified recipient.
Create the SME_Multi_Mode collaboration
1 In the e*Gate Enterprise Manager, select the Navigator's Components tab.
2 Open the host on which you want to create the Collaboration.
3 Select a Control Broker.
4 Select the ew_java e*Way to assign the Collaboration.
5 On the palette, click the Create a New Collaboration button.
6 Enter the name of the new Collaboration, then click OK. (For the sample, “cl_java”.)
7 Double -click the new Collaboration to edit its properties.
8 From the Collaboration Rules list, select the Collaboration Rules file that you created previously. (For the sample, “cor_java”.)
Secure Messaging Extension User’s Guide 42 SeeBeyond Proprietary and Confidential

Chapter 5 Section 5.1Implementation SME Sample Implementation Overview
9 In the Subscriptions area, click Add to define the input Event Types to which this Collaboration will subscribe.
A From the Instance Name list, select the Instance Name that you previously defined in1.
B From the Event Type list, select the Event Type that you previously defined (input).
C Select the Source from the Source list. In this case, it should be cr_inbound.
10 In the Publications area, click Add to define the output Event Types that this Collaboration will publish.
A From the Instance Name list, select the Instance Name that you previously defined out1.
B From the Event Types list, select the Event Type that you previously defined (outevent).
C Select the publication destination from the Destination list. In this case, it should be iq2.
11 In the Publications area, click Add again to define the output Event Types that this Collaboration will publish.
A From the Instance Name list, select the Instance Name that you previously defined out.
B From the Event Types list, select the Event Type that you previously defined (smemessage).
C Select the publication destination from the Destination list. In this case, it should be con_sme.
Figure 11 Collaboration Properties
Secure Messaging Extension User’s Guide 43 SeeBeyond Proprietary and Confidential

Chapter 5 Section 5.1Implementation SME Sample Implementation Overview
12 Click OK to exit.
Create the Inbound_eWay collaboration
1 In the e*Gate Enterprise Manager, select the Navigator's Components tab.
2 Open the host on which you want to create the Collaboration.
3 Select a Control Broker.
4 Select the inbound e*Way to assign the Collaboration.
5 On the palette, click the Create a New Collaboration button.
6 Enter the name of the new Collaboration, then click OK. (For the sample, “PassIn”.)
7 Double-click the new Collaboration to edit its properties.
8 From the Collaboration Rules list, select the Collaboration Rules file that you created previously. (For the sample, “PassIn”.)
9 In the Subscriptions area, click Add to define the input Event Types to which this Collaboration will subscribe.
A From the Event Type list, select the Event Type that you previously defined (input).
B Select the Source from the Source list. In this case, it should be <External>.
10 In the Publications area, click Add to define the output Event Types that this Collaboration will publish.
A From the Event Types list, select the Event Type that you previously defined (input).
B Select the publication destination from the Destination list. In this case, it should be iq1.
Create the Outbound_eWay collaboration
1 In the e*Gate Enterprise Manager, select the Navigator's Components tab.
2 Open the host on which you want to create the Collaboration.
3 Select a Control Broker.
4 Select the Outbound_eWay to assign the Collaboration.
5 On the palette, click the Create a New Collaboration button.
6 Enter the name of the new Collaboration, then click OK. (For the sample, “PassOut”.)
7 Double-click the new Collaboration to edit its properties.
8 From the Collaboration Rules list, select the Collaboration Rules file that you created previously. (For the sample, “PassOut”.)
9 In the Subscriptions area, click Add to define the input Event Types to which this Collaboration will subscribe.
A From the Event Type list, select the Event Type that you previously defined (outevent).
Secure Messaging Extension User’s Guide 44 SeeBeyond Proprietary and Confidential
Chapter 5 Section 5.2Implementation Sample Schema
B Select the Source from the Source list. In this case, it should be cl_java.
10 In the Publications area, click Add to define the output Event Types that this Collaboration will publish.
A From the Event Types list, select the Event Type that you previously defined (outevent).
B Select the publication destination from the Destination list. In this case, it should be <External>.
5.2 Sample SchemaThe previous sections provided the basics for implementing the SME e*Way. This section describes how to use the SME e*Way within a sample Schema. It is assumed that the SME e*Way has been installed properly, and that all of the necessary files and scripts are located in the default location.
This implementation will consist of two file-based e*Ways, one Multi-Mode e*Way, three Event Types, three Collaboration Rules, two Intelligent Queues and three Collaboration, as follows:
! inbound - This e*Way will receive input from an external source, apply pass through Collaboration Rules, and publish the information to an Intelligent Queue.
! ew_java - This Multi-Mode e*Way applies extended Java Collaboration Rules to an inbound Event to perform the desired business logic, in this case encryption and decryption.
! outbound - This e*Way will receive information from the Multi-Mode e*Way and publish to the external system.
! smemessage - This Event Type contains the methods to be used to perform the necessary transformation.
! input - This Event Type describes an Event that is input to the extended Java Collaboration Service.
! outevent - This Event Type describes an Event that contains the transformed data.
! PassIn - This Collaboration Rule is associated with the inbound e*Way, and is used for receiving the input Event.
! cor_java - The Collaboration Rule is associated with the ew_java Multi-Mode e*Way, and is used to perform the transformation process.
! PassOut - This Collaboration Rule is associated with the outbound e*Way, and is used for sending the Event to the External.
! iq1 - This Intelligent Queue is a STC_Standard IQ, and forwards data to the ew_java Multi-Mode e*Way.
! iq2 - This Intelligent Queue is a STC_Standard IQ, and forwards data to the outbound e*Way.
Secure Messaging Extension User’s Guide 45 SeeBeyond Proprietary and Confidential

Chapter 5 Section 5.3Implementation Certificate Formats
5.2.1 Execute the SchemaTo execute the SMESample schema, do the following:
1 Go to the command line prompt, and enter the following:
stccb -rh hostname -rs SMESample -un username -up user password -ln hostname_cb
Substitute hostname, username and user password as appropriate.
2 Exit from the command line prompt, and start the e*Gate Monitor GUI.
3 When prompted, specify the hostname which contains the Control Broker you started in Step 1 above.
4 Select the SMESample schema.
5 After you verify that the Control Broker is connected (the message in the Control tab of the console will indicate command succeeded and status as up), highlight the IQ Manager, hostname_igmgr, then click on the right button of the mouse, and select Start.
6 Highlight each of the e*Ways, right-click the mouse, and select Start.
7 To view the output, copy the output file (specified in the Outbound_eWay configuration file). Save to a convenient location, open.
Note: While the schema is running, opening the destination file, will cause errors.
5.3 Certificate FormatsThe SMIME/C library accepts certificates in PKCS#7 format. DER encoded binary X.509 and Base64 encoded X.509 format certificates are also popular.
Windows 2000 and Internet Explorer provide a tool to transfer between formats. To change formats, perform the following:
1 On Windows 2000, double click the certificate file.
Secure Messaging Extension User’s Guide 46 SeeBeyond Proprietary and Confidential

Chapter 5 Section 5.3Implementation Certificate Formats
Figure 12 Windows 2000 Certificate Files
2 Select the Detail tab.
Figure 13 Windows 2000 Detail Tab
3 Click on “copy to file” button.
Secure Messaging Extension User’s Guide 47 SeeBeyond Proprietary and Confidential

Chapter 5 Section 5.3Implementation Certificate Formats
Figure 14 Windows 2000 Copy to File
4 Click Next. Choose the format.
Figure 15 Windows 2000 Copy to File
For Internet Explorer:
1 Select Tools-->Internet option.
2 Choose Content Tab, click on Certificates.
Secure Messaging Extension User’s Guide 48 SeeBeyond Proprietary and Confidential

Chapter 5 Section 5.3Implementation Certificate Formats
Figure 16 Windows 2000 Copy to File
3 Click on Import, to import your certificate.
4 Click on “Intermediate Certification Authorities” Tab to choose the certificate to import, and click on the “export” button.
Figure 17 Windows 2000 Copy to File
5 Select the format, and save the file.
Secure Messaging Extension User’s Guide 49 SeeBeyond Proprietary and Confidential

Chapter 6
Secure Messaging Extension Functions
This chapter details the Secure Messaging Extension Functions. The
6.1 SMEMessage FunctionsThe following static methods of the SMEMessage class are available to all Java e*Ways. The SMEMessage class is found in the com.stc.sme package:
! encrypt on page 51
! encrypt on page 52
! decrypt on page 52
! sign on page 54
! verify on page 55
! verify on page 56
base64Decode
Syntax
public byte[] base64Decode(byte[] input)
Description
base64Decode is used obtain the base64 decoded result of the input message.
Parameters
Return Values
byte arrayReturns the signed message if successful.
Parameter name Type Description
input byte array byte array of the message.
Secure Messaging Extension User’s Guide 50 SeeBeyond Proprietary and Confidential

Chapter 6 Section 6.1Secure Messaging Extension Functions SMEMessage Functions
Throws
com.stc.sme.exception.SMEException, indicating an error occurred during the signing process.
Location
stcsme.jar
base64Encode
Syntax
public byte[] base64Encode(byte[] input)
Description
base64Encode is used obtain the base64 encoded result of the input message.
Parameters
Return Values
byte arrayReturns the signed message if successful.
Throws
com.stc.sme.exception.SMEException, indicating an error occurred during the signing process.
Location
stcsme.jar
encrypt
Syntax
public byte[] encrypt()
Description
encrypt is used to encrypt the message for the specified recipients. The input field of SMEMessageAPP ETD needs to be set to the filename which contains the message.
Parameters
None.
Return Values
byte arrayReturns an encrypted message, if successful.
Parameter name Type Description
input byte array byte array of the message.
Secure Messaging Extension User’s Guide 51 SeeBeyond Proprietary and Confidential

Chapter 6 Section 6.1Secure Messaging Extension Functions SMEMessage Functions
Throws
com.stc.sme.exception.SMEException, indicating an error occurred during the encryption process.
Location
stcsme.jar
encrypt
Syntax
public byte[] encrypt(byte[] input)
Description
encrypt is used to encrypt the message for the specified recipients.
Parameters
Return Values
byte arrayReturns an encrypted message, if successful.
Throws
com.stc.sme.exception.SMEException, indicating an error occurred during the encryption process.
Location
stcsme.jar
decrypt
Syntax
public byte[] decrypt()
Description
decrypt is used to decrypt the encrypted input message. The input field of SMEMessageAPP ETD needs to be set to the filename which contains the message.
Parameters
None.
Return Values
byte arrayReturns the original message if successful.
Parameter name Type Description
input byte array The original message for encryption.
Secure Messaging Extension User’s Guide 52 SeeBeyond Proprietary and Confidential

Chapter 6 Section 6.1Secure Messaging Extension Functions SMEMessage Functions
Throws
com.stc.sme.exception.SMEException, indicating an error occurred during the decryption process.
Location
stcsme.jar
decrypt
Syntax
public byte[] decrypt(byte[] input)
Description
decrypt is used to decrypt the encrypted input message.
Parameters
Return Values
byte arrayReturns the original message if successful.
Throws
com.stc.sme.exception.SMEException, indicating an error occurred during the decryption process.
Location
stcsme.jar
getMD5Hash
Syntax
public byte[] getMD5Hash(byte[] input)
Description
getMD5Hash is used obtain the hash code of the input message using MD5.
Parameters
Parameter name Type Description
input byte array The encrypted message.
Parameter name Type Description
input byte array byte array of the message.
Secure Messaging Extension User’s Guide 53 SeeBeyond Proprietary and Confidential

Chapter 6 Section 6.1Secure Messaging Extension Functions SMEMessage Functions
Return Values
byte arrayReturns the signed message if successful.
Throws
com.stc.sme.exception.SMEException, indicating an error occurred during the signing process.
Location
stcsme.jar
getSHA1Hash
Syntax
public byte[] getSHA1Hash(byte[] input)
Description
getMD5Hash is used obtain the hash code of the input message using SH1.
Parameters
Return Values
byte arrayReturns the signed message if successful.
Throws
com.stc.sme.exception.SMEException, indicating an error occurred during the signing process.
Location
stcsme.jar
sign
Syntax
public byte[] sign()
Description
sign is used to sign a message with a detached or inline signature. The input field of SMEMessageAPP ETD needs to be set to the filename which contains the message.
Parameters
None.
Parameter name Type Description
input byte array byte array of the message.
Secure Messaging Extension User’s Guide 54 SeeBeyond Proprietary and Confidential

Chapter 6 Section 6.1Secure Messaging Extension Functions SMEMessage Functions
Return Values
byte arrayReturns the signed message if successful.
Throws
com.stc.sme.exception.SMEException, indicating an error occurred during the signing process.
Location
stcsme.jar
sign
Syntax
public byte[] sign(byte[] input)
Description
sign is used to sign a message with a detached or inline signature.
Parameters
Return Values
byte arrayReturns the signed message if successful.
Throws
com.stc.sme.exception.SMEException, indicating an error occurred during the signing process.
Location
stcsme.jar
verify
Syntax
public byte[] verify()
Description
verify is used to verify the signed message and return the original message , provided the signed message is verified. The content of the specified input field is used as the
Parameter name Type Description
input byte array The message used for signing.
clearSign boolean If true, signature is a detached signature.If false, signature is an inline signature.
Secure Messaging Extension User’s Guide 55 SeeBeyond Proprietary and Confidential

Chapter 6 Section 6.1Secure Messaging Extension Functions SMEMessage Functions
byte array message that needs to be authenticated, if the message is in SMIME2 format or in PKCS7 format with inline signature. If the message to be verified is in PKCS7 format, and has a detached signature, the input field is used to indicate the file that contains the original message, and the Signature field is used to indicate that the file contains the detached signature.
Parameters
None.
Return Values
byte arrayReturns the original message if successful.
Throws
com.stc.sme.exception.SMEException, indicating an error occurred during the verification process.
Location
stcsme.jar
verify
Syntax
public byte[] verify(byte[]input1 byte[] input2)
Description
verify is used for verification of the detached PKCS7 signature, in which case, the signature portion and the original content is separated.
Parameters
Return Values
byte arrayReturns the original message if successful.
Throws
com.stc.sme.exception.SMEException, indicating an error occurred during the verification process.
Location
stcsme.jar
Parameter name Type Description
input1 byte[] Byte array for the original message.
input2 byte[] byte array of the detached signature.
Secure Messaging Extension User’s Guide 56 SeeBeyond Proprietary and Confidential

Index
Index
BBaltimore Technologies
Web sight 7Base64 46base64Encode 51
CCertificate Formats 46Classpath Override 16Classpath Prepend 16collaboration rules 37
creating collaboration rules files 38collaborations 42
for the Multi-Mode e*Way 42components 6creating a new schema 30CRL 27
Ddecrypt 52, 53DER 46Disable JIT 18
Ee*Way Connection 36
parametersSME 20
e*Wayscreating and configuring 33Inbound e*Way 34Multi-Mode e*Way 35Outbound e*Way 35
encrypt 51, 52event type
creatingfrom an existing DTD 30without an existing DTD 31
creating from an existing .xsc 33event types 30
Ffiles/directories created by installation 14
GgetMD5Hash 53getSHA1Hash 54
Hhost system requirements 11
Iimplementation 29
overview 29Initial Heap Size 17installation
UNIXpre-installation 13procedure 13
Windows NT or 2000 12pre-installation 12procedure 12
intelligent queues 37intended reader 6
JJava JDK 1.3 11Java requirements 11JNI DLL Absolute Pathname 15JVM settings 15
MMaximum Heap Size 17MDAC 2.6 RTM 11Microsoft Data Access Components (MDAC) 11Microsoft ODBC driver for Oracle 11Multi-Mode e*Way 15
configuration 15parameters 15
OODBC drivers 11overview 6
Pparameters
Secure Messaging Extension User’s Guide 57 SeeBeyond Proprietary and Confidential

Index
Certificate 26Checking 26Format 27TrustedCA 27
Connector 21Class 21Type 21
CRL 27CACertificate 28CACRLCertificate 27CACRLformat 28Filename 27Format 28
Decrypt 23EncodingFormat 23MessageFormat 23PassPhrase 23PKCS12 23
Encrypt 21Algorithm 22Certificate 22EncodingFormat 22Format 22MessageFormat 22
Multi-Mode e*WayCLASSPATH Override 16CLASSPATH prepend 16Disable JIT 18Initial Heap Size 17JNI DLL absolute pathname 15JVM settings 15Maximum Heap Size 17
Sign 23Algorithm 24Detached 24EncodingFormat 24MessageFormat 24PKCS12 25
Verify 25Certificate 26EncodingFormat 25Format 26MessageFormat 25
public-key encryption 7
Rrequirements
host system 11Java version 11
SS/MIME 7
introduction 7sample schema 45
executing the schema 46Secure Messaging Extension
introduction 8sign 54, 55SME
introduction 8system requirements 11
UUNIX 13
installation procedure 13pre-installation 13
Vverify 55, 56
XX.509 46
Secure Messaging Extension User’s Guide 58 SeeBeyond Proprietary and Confidential