secure client portal
TRANSCRIPT
Secure Client
Portal
Instructional Guide
Introduction The Secure Client Portal is a secure website developed to allow Vendors across Centene health plans to perform a variety of functions from their office. By having an account created and registering the account, a Vendor employee can easily check patient eligibility. Vendors can view authorizations, care plans, health record information--Visits, Medications, Immunizations, Labs, and Allergies through the website. Vendors can view and submit Assessments and have the ability to upload and view uploaded documents for the member. A secure messaging feature allows a Vendor employee to communicate with the health plan without having to pick up the telephone. How to Use the Manual This manual is intended to be a quick reference for using a tool or function offered on the website when a Vendor employee needs assistance. The manual also explains many ways to use the site in order to get the most out of the resource.
System Requirements Access the Secure Vendor website using Internet Explorer 10.0 or higher, Firefox and/or Google Chrome. Each browser should be updated to the most recent version available optimal performance. Google Chrome is the preferred browser to be used for the Client Portal.

Operational Training 3 December 2017
Contents Login ............................................................................................................................................................4 Create an account/Registration..............................................................................................................5 - 13 Coordination of Benefits View..............................................................................................................14 - 18 Case Management View......................................................................................................................19 - 20 Check for Member/Eligibility Check......................................................................................................21 - 22 Member Overview Page..............................................................................................................................23 Authorizations..............................................................................................................................................24 Care Plan.............................................................................................................................................25 - 26 Assessments…………………...............................................................................................................27 - 32 Health Record.............................................................................................................................................33 Visits............................................................................................................................................................33 Medications…..............................................................................................................................................34 Immunizations..............................................................................................................................................35 Labs……………………..........................................................................................................................36 - 37 Allergies……………………….......................................................................................................................38 Documents Upload……………………………………………………………….........................................39 - 49 Notes………………………………………………………………………………………………………….…50 – 52 Coordination of Benefits………………………………………………………………………………………..……53 Referrals…………………………………………………………………………………………………….…...54 – 56 Task Manager…………………………………………………………………………………………….……..57 – 58 Special Needs………………………………………………………………………………………….…..…….59 - 60 Secure Message.....................................................................................................................................61 - 64 Reports…………………………………………………………………………………………..……………….65

Operational Training 4 December 2017
Create an account/Register new user: The screen below appears: Enter your User Name and Password

Operational Training 5 December 2017
Landing page allows administrators to: • Invite and manage users’ accounts • View Recent Activity

Operational Training 6 December 2017
To create a new account, click on Invite User. o Complete the invitation
o Ensure that you do not enter any spaces before or after the end of your text, additional spaces can prevent the user from accessing the website
Click on “Invite User”

Operational Training 7 December 2017
When the invitation is submitted, the Registration Invitation Confirmation will open—this will generate an email from [email protected]. The Association ID number will be required to complete the user’s access.
The user should click on the hyperlink inside of the email.

Operational Training 8 December 2017
The hyperlink will open the “Register Provider” form. • All information enter must match exactly what was entered on the invitation.
Please complete the secret questions and answers. The telephone number is required. The fax number is not required.
o Click “Submit”

Operational Training 9 December 2017
To verify and complete registration, the client portal administrator will log into the website using their user name and password.

Operational Training 10 December 2017
On the manage accounts page, once the invited user has completed their registration form, an orange button will instruct the administrator to verify account and update user. Click on “Verify Account/Update User.”

Operational Training 11 December 2017
To verify the account, review the user information and what the user will be able to access. In comments, enter the date the account was verified and any additional information required per health plan protocol Click “Update User.”

Operational Training 12 December 2017
When the account is successfully updated, a green banner will appear stating the account is activated. An email will automatically be generated to the new user.

Operational Training 13 December 2017
The user will receive an email from [email protected] that their account has been activated. The enclosed hyperlink in the email should be saved to enter the website.

Operational Training 14 December 2017
Depending on the users’ access in the Client Portal you will have different views of items in the Client Portal.
Admin View Admin view—the Admin view gives you the ability to invite users to the Client Portal
Medical Management view

Operational Training 15 December 2017
Coordination of Benefits view

Operational Training 16 December 2017
To check for a member: You MUST have two identifying pieces of member information to find the member.
• Enter the member’s last name or Member ID • Enter the member’s Date of Birth • Click Check Eligibility or Enter
You will see on the Eligibility Check Page
• A Green Thumbs Up means the member is eligible. Risk Categories can provide information about risk for disease management or missing preventative care components.
• Click on the member’s name to open the health record

Operational Training 17 December 2017
• An Orange Thumbs Down means the member is Not Eligible
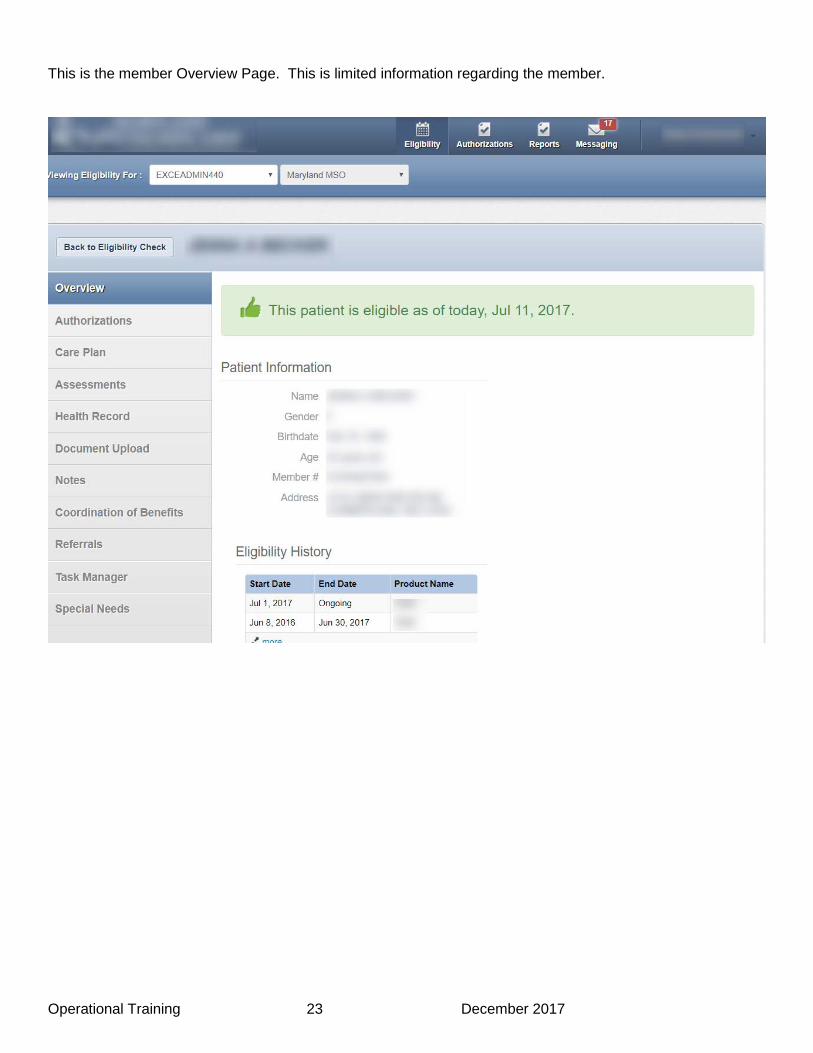
This is the member Overview Page. This is limited information regarding the member.
Click on the Coordination of Benefits tab.

Operational Training 18 December 2017
• Coordination of Benefits will display on the member

Operational Training 19 December 2017
Client Portal for Case Management: Log into the Client Portal using your email and password

Operational Training 20 December 2017
Depending on your account you will see of the screens below when you login. Case Management view
Admin view—the Admin view gives you the ability to invite users to the Client Portal with Medical Management access.

Operational Training 21 December 2017
To check for a member: You MUST have two identifying pieces of member information to find the member.
• Enter the member’s last name or Member ID • Enter the member’s Date of Birth • Click Check Eligibility or Enter

Operational Training 22 December 2017
You will see on the Eligibility Check Page • A Green Thumbs Up means the member is eligible. Risk Categories can provide information about
risk for disease management or missing preventative care components. • The Orange Emergency Room Visit tab will send a notification to TruCare that the member has been
seen in the Emergency Room. • Click on the member’s name to open the health record
• An Orange Thumbs Down means the member is Not Eligible
Operational Training 23 December 2017
This is the member Overview Page. This is limited information regarding the member.
Operational Training 24 December 2017
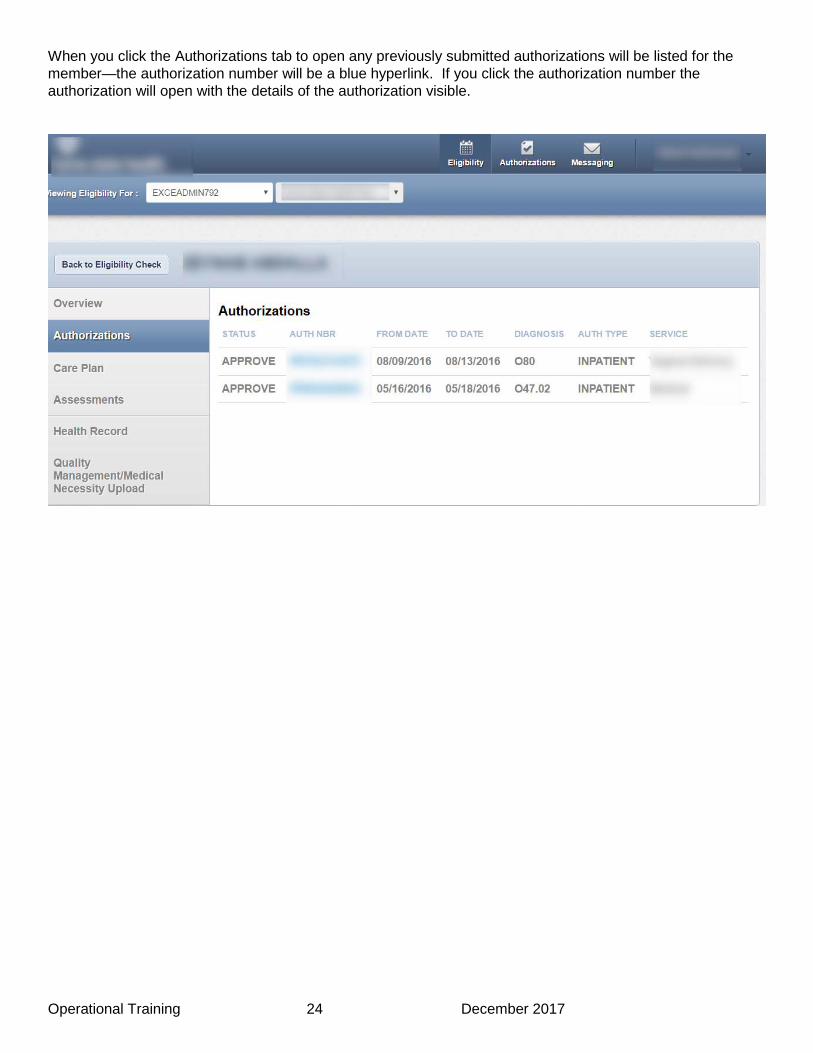
When you click the Authorizations tab to open any previously submitted authorizations will be listed for the member—the authorization number will be a blue hyperlink. If you click the authorization number the authorization will open with the details of the authorization visible.

Operational Training 25 December 2017
When Care Plan tab is clicked any Care Plans that is currently open on the member will display.

Operational Training 26 December 2017
• Member facing Care Plans will always have “Self Management” in the title • Members cannot view barriers. Members can only view “Goals” and “What we’re doing”.

Operational Training 27 December 2017
To complete the assessment click Fill Out Now!—the assessment will open. Any previously completed assessments will display with a blue hyperlink—you can click on the name of the assessment—which will be a blue hyperlink.
Complete the assessment questions.
Operational Training 28 December 2017
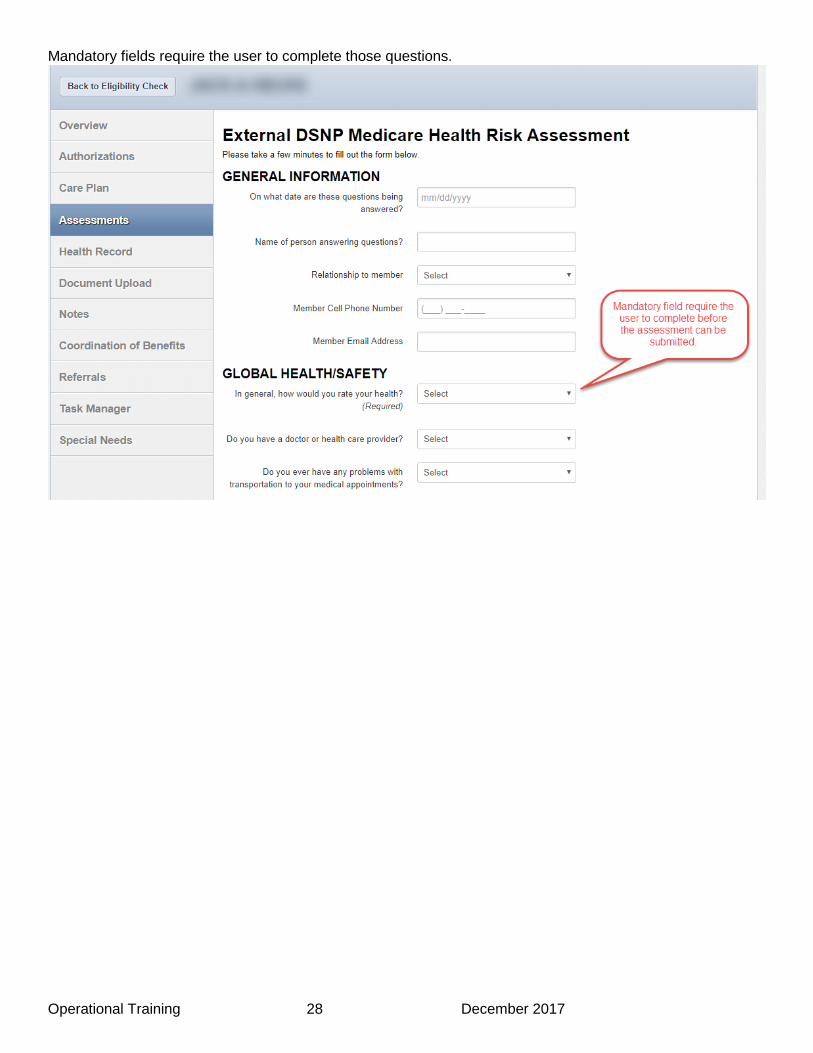
Mandatory fields require the user to complete those questions.
Operational Training 29 December 2017
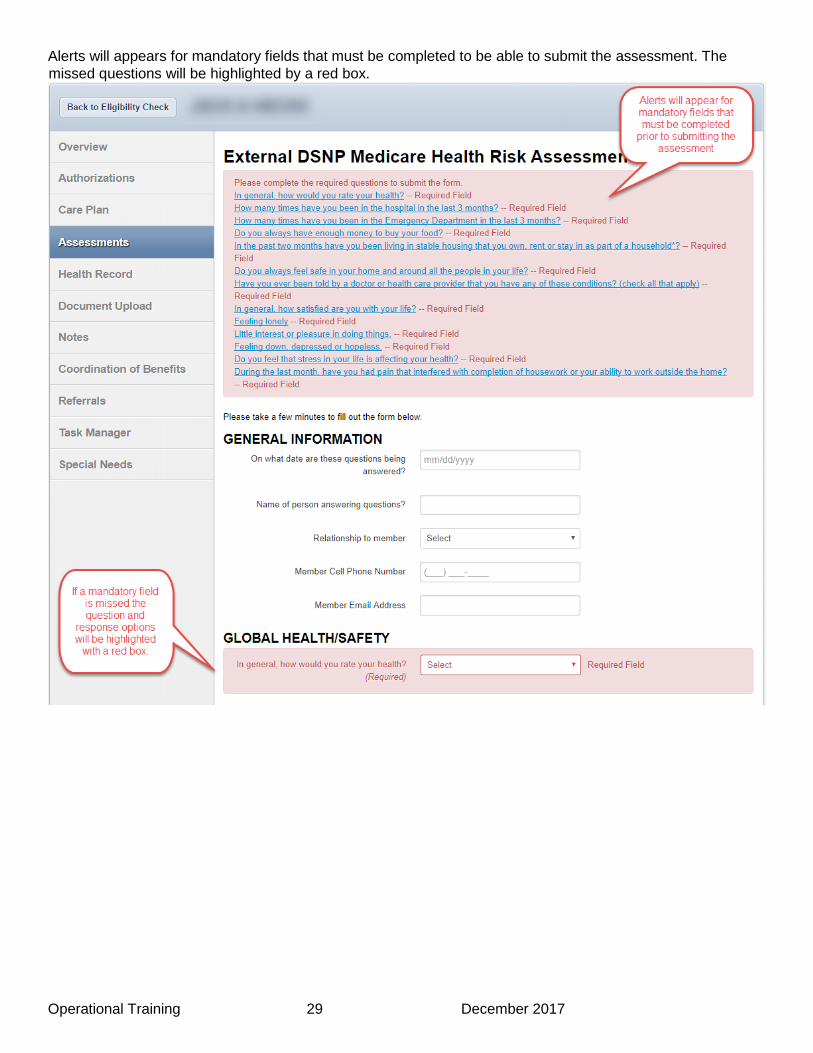
Alerts will appears for mandatory fields that must be completed to be able to submit the assessment. The missed questions will be highlighted by a red box.

Operational Training 30 December 2017
The previously completed assessment will open with the answers—you will now be able to edit or update the assessment.

Operational Training 31 December 2017
Green banner appears with the message stating the assessment was successfully submitted.

Operational Training 32 December 2017
In approximately 24 hours, the previous assessment will be available to view on the Client Portal. The member’s responses will be visible by clicking on the blue hyperlink assessment name under Previous Assessments.
Operational Training 33 December 2017
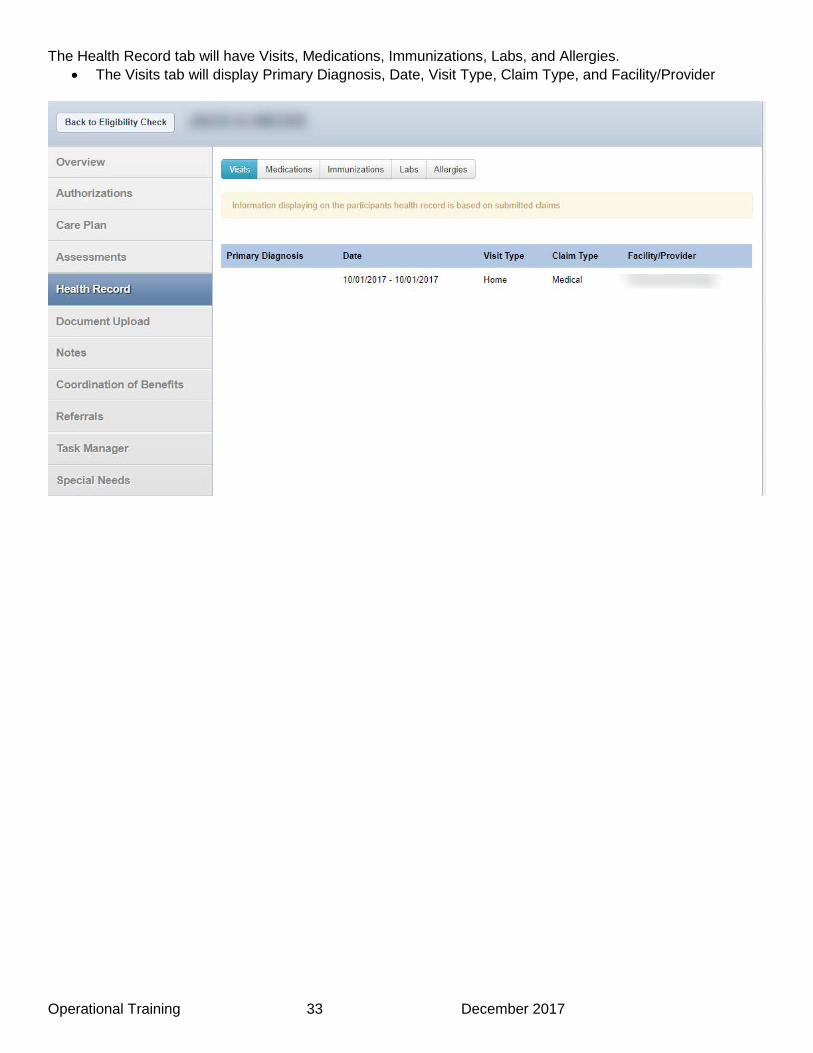
The Health Record tab will have Visits, Medications, Immunizations, Labs, and Allergies. • The Visits tab will display Primary Diagnosis, Date, Visit Type, Claim Type, and Facility/Provider
Operational Training 34 December 2017
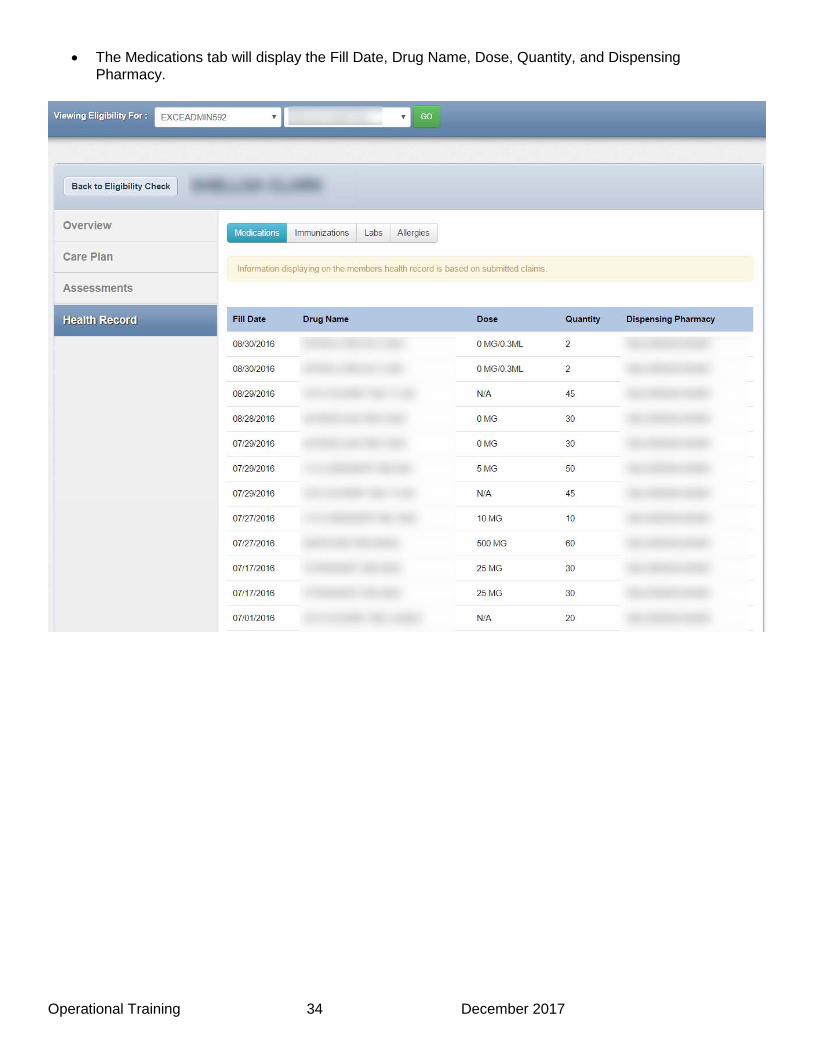
• The Medications tab will display the Fill Date, Drug Name, Dose, Quantity, and Dispensing Pharmacy.

Operational Training 35 December 2017
When the Immunizations tab is clicked Code, Description, Facility/Provider and Date will display.
Operational Training 36 December 2017
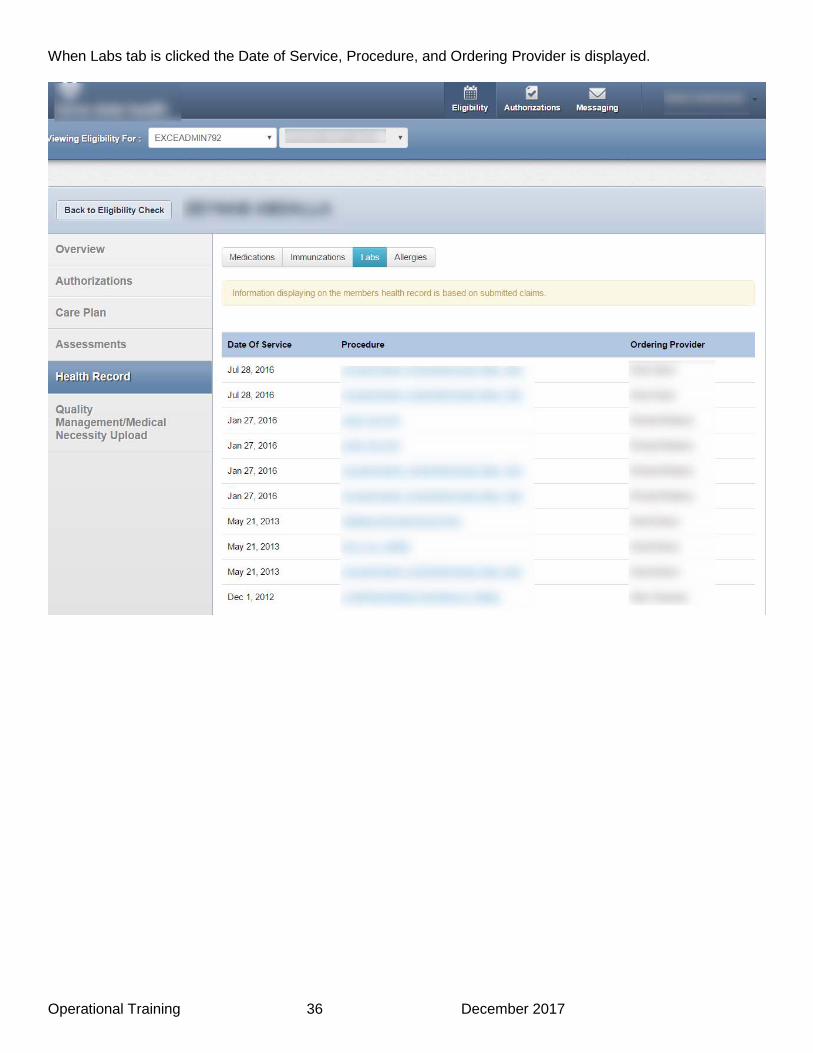
When Labs tab is clicked the Date of Service, Procedure, and Ordering Provider is displayed.

Operational Training 37 December 2017
If you click on the Procedure the Procedure, Ordering Provider, and Date of Service will display. Component, You Value, Standard Range, and Units values will display.

Operational Training 38 December 2017
When Allergies tab is Clicked, Substance, Reaction, Severity, Source, Allergy Details, Active, and Date Identified will display

Operational Training 39 December 2017
Document Upload gives the user the ability to upload additional Medical Necessity, Long Term Services and Support, Quality Management, or Behavioral Health information on the member.
Document formats accepted for uploading from the web portal are as follows: · BMP · DOC · DOCX · GIF · JPG · LIC · PDF · PNG · PPT · PPTX · RTF · TIF · TXT · XLS · XLSX

Operational Training 40 December 2017
In Document Category select Medical Necessity then select the Document Type selections are Emergency Notes, Inpatient Notes, InterQual Smart Sheets, and Other are displayed.

Operational Training 41 December 2017
Choose the Document Type and click Choose File—make the selection of the file you wish to upload. You MUST click Submit to Upload the document.

Operational Training 42 December 2017
Accepted will display once the upload is successful.

Operational Training 43 December 2017
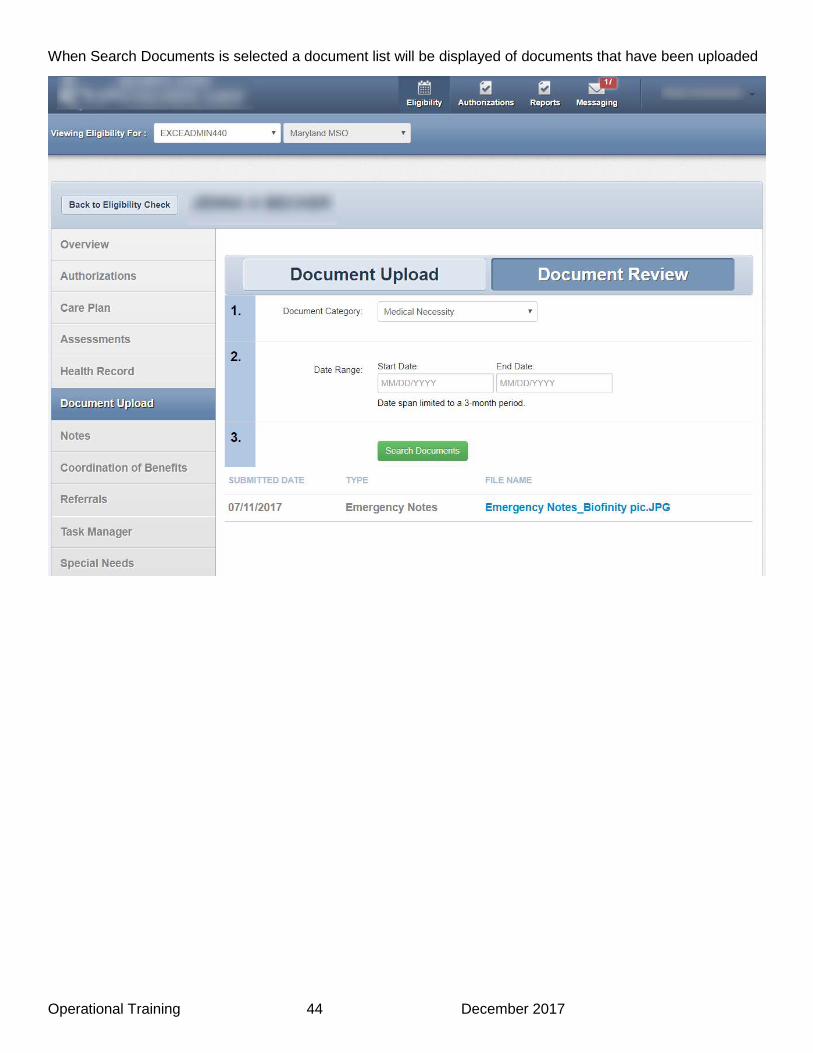
You have the ability to view documents that have been uploaded from the Client Portal. Select Document Review then make a selection in Document Category of Medical Necessity and enter a Date Range into the Start Date and End Date—please note Date span is limited to a 3 month period.
Operational Training 44 December 2017
When Search Documents is selected a document list will be displayed of documents that have been uploaded
Operational Training 45 December 2017
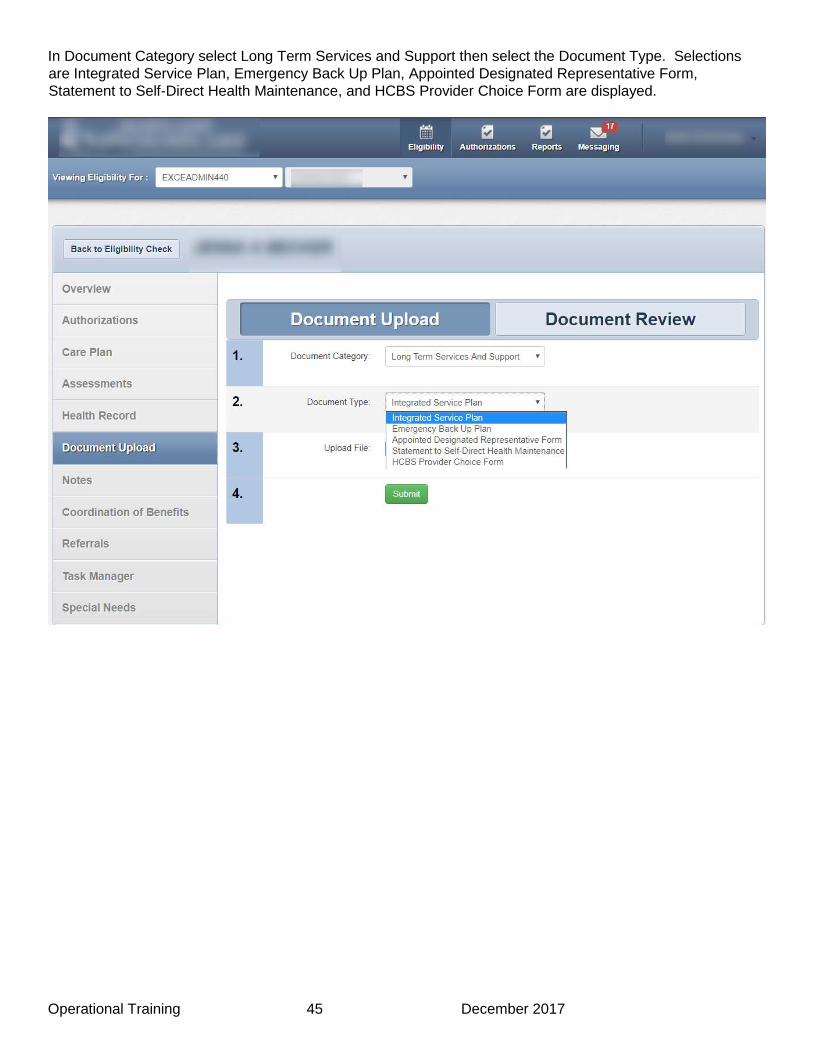
In Document Category select Long Term Services and Support then select the Document Type. Selections are Integrated Service Plan, Emergency Back Up Plan, Appointed Designated Representative Form, Statement to Self-Direct Health Maintenance, and HCBS Provider Choice Form are displayed.

Operational Training 46 December 2017
Choose the Document Type and click Choose File—make the selection of the file you wish to upload. You MUST click Submit to Upload the document.

Operational Training 47 December 2017
Accepted will display once the upload is successful.

Operational Training 48 December 2017
You have the ability to view documents that have been uploaded from the Client Portal. Select Document Review then make a selection in Document Category of Long Term Services and Support and enter a Date Range into the Start Date and End Date—please note Date span is limited to a 3 month period.

Operational Training 49 December 2017
When Search Documents is selected a document list will be displayed of documents that have been uploaded

Operational Training 50 December 2017
When the Notes tab is selected—Write Note must be clicked.
General Notes will open and you must select an Option from the drop down box.

Operational Training 51 December 2017
Admin Notes selection will display the following: Encounter Date and Note. You must complete Encounter Date and Note area—there is a 9,500 character limit inside the Note area.
Inbound Call Note will display the following: Encounter Date, Contact Name, Contact Reason, and Note area. You must complete Encounter Date, Contact Name, Contact Reason and Note area—there is a 9,500 character limit inside the Note area.

Operational Training 52 December 2017
Outbound Call Note will display the following: Encounter Date, Outcome, Contact Name, Contact Reason, and Note area. You must complete Encounter Date, Outcome, Contact Name, Contact Reason and Note area—there is a 9,500 character limit inside the Note area.

Operational Training 53 December 2017
Click on the Coordination of Benefits tab. • Coordination of Benefits will display on the member

Operational Training 54 December 2017
Select the Referrals tab—you will have the ability to create a Case Management Referral. When a referral is submit to TruCare, it will generate a task that can be found on the member's health record and in the specific queues

Operational Training 55 December 2017
Complete applicable fields

Operational Training 56 December 2017
When a referral is submit to TruCare, it will generate a task that can be found on the member's health record and in the specific queue.

Operational Training 57 December 2017
When Task Manager is selected you will have the ability to create a task. This task will be visible on the member’s record.

Operational Training 58 December 2017
When Submit Task submission is successful you will receive the following:

Operational Training 59 December 2017
When you select Special Needs complete applicable fields.

Operational Training 60 December 2017
When Special Needs submission is successful you will receive the following:

Operational Training 61 December 2017
To send a Secure Message • Click Messaging from the Dashboard • The Secure Messaging Inbox appears displaying any messages for that user.

Operational Training 62 December 2017
To create a Secure Message • Click Create Message • In the New Message screen the To field is populated • You are able to select a Subject from the drop down menu • If this message is regarding a Member complete the Member ID and Date of Birth fields • In the Your Message field you can type the message to the Health Plan staff. • Click Send when complete.

Operational Training 63 December 2017
• A confirmation message appears that your message successfully sent.
The Inbox will allow you to view received messages
• Click Inbox—your message will appear • To send to Trash—click the Send to Trash button

Operational Training 64 December 2017
To view Sent messages • Click Sent—your message will appear • To send to Trash—click the Send to Trash button
To view message sent to Trash
• Click Trash—the messages sent to Trash appear • Note: The message sent to Trash will be deleted after 30 days. • If a message is not trash but is found under the Trash tab, you can reverse it by clicking the Not
Trash button
Operational Training 65 December 2017
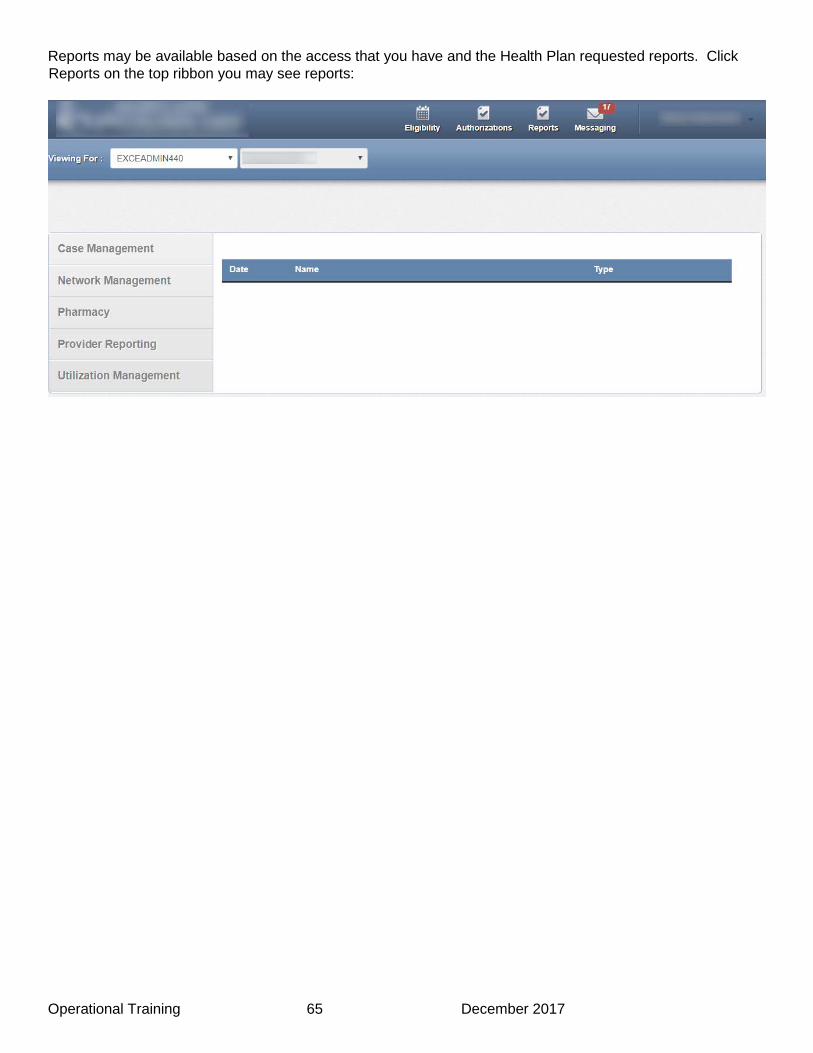
Reports may be available based on the access that you have and the Health Plan requested reports. Click Reports on the top ribbon you may see reports: