section 6: suspension - infrastructure.gov.au · 6.9 four-bar suspension locaters . 6.10 steering...
TRANSCRIPT

National Guidelines for the Construction and Modification of Street Rods in Australia Second Edition November 2013
SECTION 6: SUSPENSION
6.1 Suspension Mounting
6.2 Beam Axles
6.3 Springs
6.4 Ground Clearance
6.5 Suspension Shackles
6.6 Locking of Suspension Nuts
6.7 Lowering Blocks
6.8 Radius Rods
6.9 Four-Bar Suspension Locaters
6.10 Steering Considerations with Beam Axles and Transverse Spring Suspension
6.11 Panhard Bars and Watts Linkages
6.12 Track Rods and Traction Bars
6.13 Custom Made Suspensions
6.14 Wheel Alignment
6.15 Jaguar Independent Rear Suspension
6.16 Shock Absorbers
6.17 Chrome Plating

National Guidelines for the Construction and Modification of Street Rods in Australia 33 Second Edition November 2013
6.1 SUSPENSION MOUNTING 6.1.1 Suspension removed from a donor vehicle must be mounted so that the original
strength of the mounting is not reduced. The best practice is to install the suspension by the same method that was used in the donor vehicle, using with the same size and number of fasteners.
6.1.2 Bolted-in suspension units that originally have brake reaction tongues forward of the cross member to prevent rotation, must be mounted with suitable side rail mounts and with bolts sized so that no loss of strength occurs. If required by the Examiner, gusset plates must also be fitted. An example of this type of suspension mounting is shown in Appendix 1.
6.1.3 Welded-in suspension members must be installed by a competent welder. Welded suspension cross members should first be tacked into place then examined prior to finish welding to ensure that all components are correctly located.
6.1.4 Radius arm mounts should be in line with the pivot line of the control arms. Original type compliance bushes should be used in this case. Where ties – ie forward-facing members originally installed in tension – are reversed to form struts – ie rear-facing members in compression – an increase in the member’s diameter may be required to prevent buckling under load. An example of an L300 Front Suspension Unit is shown in Appendix 1.
6.1.5 Heat treated suspension components should not be polished, sand, or bead blasted except by a skilled and experienced supplier. Stainless steel suspension components may be supplied in a coarse matt or polished finish, and should only be polished by the manufacturer or a competent person. Evidence may be sought to confirm the material, and the supplied finish of any suspension component; for example, original invoices or receipts and manufacturer’s specifications.
6.2 BEAM AXLES 6.2.1 The axle selected must be suitable for the load and application. Note the minimum king pin diameter is 19mm (¾”). Five types of beam axles are normally used in Street Rod construction and they are: Type 1 OEM unmodified. Type 2 OEM modified or dropped. Type 3 Aftermarket manufacturer or specialist supplier one piece I-beam. Type 4 Tube axle commercially manufactured by inserting and welding cast steel ends into
a mild steel tube. Type 5 Tube axle manufactured from formed mild steel with end bosses and locater
welded in position. Homemade axles must not be used. 6.2.2 The following minimum standards of inspection should be used for all Types of
axles: New Axles New axles require a visual check for obvious faults or damage. Second-hand Axles A visual check for obvious faults or damage, of the roundness
of the kingpin holes and spring perch bosses; and a check to ensure the axle is not bent out of alignment.

National Guidelines for the Construction and Modification of Street Rods in Australia 34 Second Edition November 2013
In addition, any fabrication or modifications which involve the strength or integrity of a new or second-hand axle must be supported by the appropriate certification or engineer’s report. 6.2.3 Type-5 axles must comply with the following:
Construction Welded professionally, including appropriate heat treatment in accordance with engineer’s instructions and in a jig designed for the purpose.
Certifying Certified by an engineer’s report. Certification must include a non-destructive inspection in accordance with the Australian Standard AS/NZS 1554.1 Structural steel welding Part 1 Welding of steel structures by a recognised non-destructive testing organisation.
Note: Care should be taken when purchasing second hand Type-5 axles privately or at markets such as swap meets as the axles may not meet the requirements specified above.
6.2.4 Beam axles may be welded or dropped provided that this operation is carried out by a welder certified to carry out the process. This process requires certification.
6.2.5 Axles that have been drilled by the axle manufacturer during the manufacturing process may be used. Beam axles must not be drilled for non-essential purposes such as reducing weight or for aesthetic purposes.
6.2.6 The lowest point of a beam axle must not be less than 100mm from the ground - refer to Section 6.4 for further details concerning ground clearance.
Note: No axle is exempt from the requirements specified above. Safety is a paramount consideration and must not be bypassed under any circumstance.
6.2.7 Evidence must be available to show that beam or tube axles fitted to a Street Rod have been inspected and certified.
6.3 SPRINGS 6.3.1 Where fitted, coil springs should be shortened by resetting, rather than by cutting. 6.3.2 Coil springs must not be heated to lower a Street Rod. 6.3.3 If a transverse spring is mounted behind a beam front axle, a positive limiting device
must be fitted above the axle to prevent any part of the Street Rod, other than a wheel, making contact with the ground in the event of a spring failure.
6.4 GROUND CLEARANCE 6.4.1 Ground clearance must be at least 100mm at any point within 1 metre of an axle, and at
any other point must be at least one thirtieth of the distance between the centres of the axles (wheel base), in accordance with Rule 73 of the AVSR. Where the wheelbase is less than 3000mm, the Street Rod should have 100mm minimum ground clearance under its full length; refer to Figure 6.1.
6.4.2 In addition to the requirements of 6.4.1, in the event of a tyre failure no part of the Street Rod other than the wheel rim must be able to come in contact with the road surface.
6.5 SUSPENSION SHACKLES Spring shackles must be designed for automotive usage and not exceed 125mm
measured from pin entre to pin centre. 6.6 LOCKING OF SUSPENSION NUTS
6.6.1 Castellated nuts used for suspension components must be locked with split pins.

National Guidelines for the Construction and Modification of Street Rods in Australia 35 Second Edition November 2013
6.6.2 If nyloc or deformed thread nuts are used, the thread must protrude at least one clear turn beyond the end of the nut.
6.6.3 Other means of locking may be used provided that the application is appropriate. Note: Refer to Appendix A to Section LZ of VSB 14 for guidance on the use of fasteners.
6.7 LOWERING BLOCKS 6.7.1 The thickness of a lowering block must not exceed 50mm. 6.7.2 Lowering blocks must be made of steel or solid alloy. Note: Refer to Section 4.11 to Section S of VSB 14 for more information on lowering blocks.
Figure 6.1 Ground Clearance Requirements
6.8 RADIUS RODS
National Guidelines for the Construction and Modification of Street Rods in Australia 36 Second Edition November 2013
6.8.1 Examiners may seek an engineer’s report where there is any concern about any
aspect of the design, strength, integrity or torsional characteristics of any aspect of the Street Rod suspension. Adjustments such as bending any suspension component to align for fitting must only be done by a competent person and appropriate heat treatment must be reinstated in accordance with the original manufactured specification, or the engineer’s instructions. If in doubt consult the Examiner or component supplier before proceeding. All chassis welding and appropriate strengthening must have been completed and any necessary examination and assessment of the chassis completed according to Section 3 of this Guide before mounting suspension components
6.8.2 Early Ford-type rear radius rods may be split to obtain clearance provided that the distance between the locating ends of the split rods is no more than 300mm. If a transverse rear spring is used the spring end of the radius rods may need to be bent to realign the spring shackle hole. This procedure must be carried out by a competent person and certified by a Signatory.
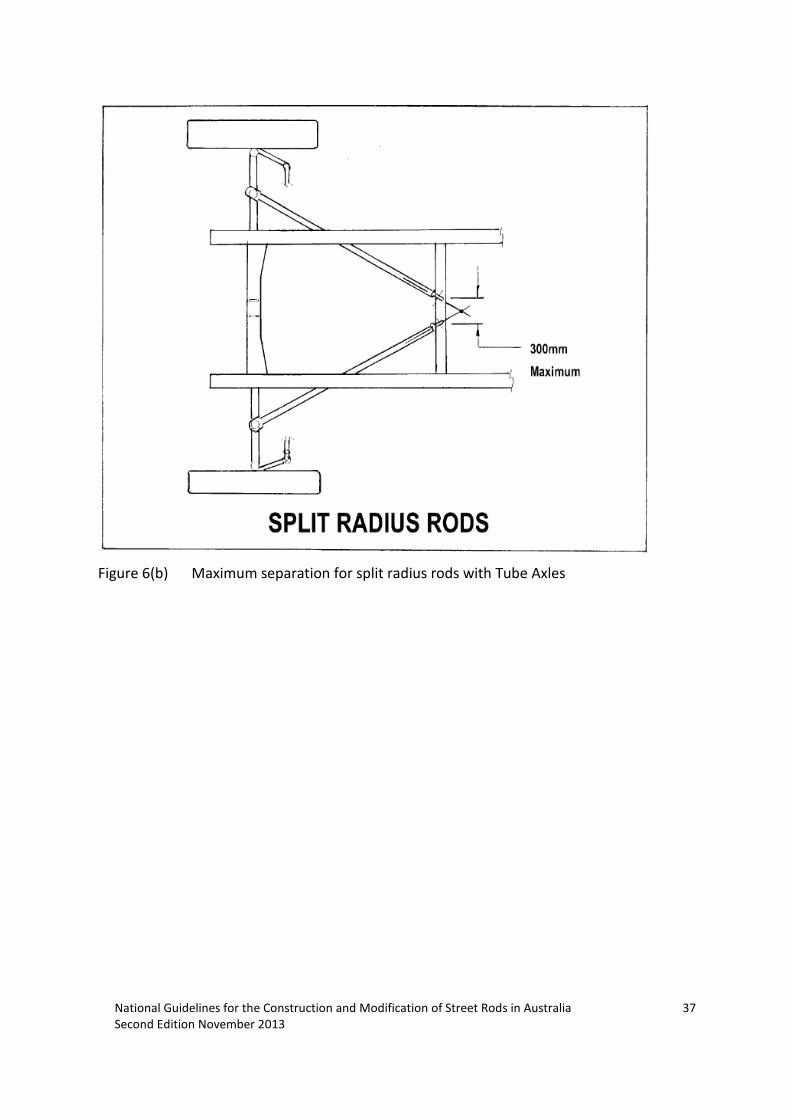
6.8.3 Early Ford-type front radius rods or front wishbone type control arms may be split to obtain clearance and to position the ends on the chassis rails for I-beam axles only. The distance between the ends of split radius rods for tube axles must not exceed 300mm (see diagram 6(b)). The spring end of the radius rods may need to be bent to realign the spring shackle hole. This procedure must be carried out by a competent person and certified by a Signatory.
6.8.4 Ladder bar rear suspension locators must not be used, except where used as radius rods with the distance between the locating ends being less than 300mm. Ladder bar style radius rods must be of sufficient length to ensure full suspension travel without binding of any suspension components.
6.8.5 Locators for independent type rear axles should resemble the OEM installation wherever possible; refer to Appendix 3. Note: There is a wide range of aftermarket and specialist manufactured fittings appropriate for the securely locating an IRS. Examiners may seek evidence to confirm the fittings used are appropriate for the IRS, the location, and the likely loading. Consult an Examiner or an experienced or specialist supplier for further information.
6.8.6 Original style radius rods used on the rear may require reinforcement at the rear of the mounting frame. Further advice may be obtained from an engineer or specialist supplier
6.8.7 Hairpin radius rods must only be used on front beam axles and must have engineering certification.
National Guidelines for the Construction and Modification of Street Rods in Australia 37 Second Edition November 2013
Figure 6(b) Maximum separation for split radius rods with Tube Axles

National Guidelines for the Construction and Modification of Street Rods in Australia 38 Second Edition November 2013
6.9 FOUR-BAR SUSPENSION LOCATERS 6.9.1 Table 6.1set out the minimum requirements for fabricated four-bars.
Note: The diagrams at the end of this section provide examples of parallel and triangulated four-bar suspensions.
Front Four-Bars
Maximum Length – 900mm
Outside diameter of Tube – 22mm
Wall Thickness – 3mm
Thread – 5/8 UNF or 16mm fine metric
Table 6.1.1 Minimum requirements for Front Four-Bars
Rear Four-Bars: Normal duty application
Maximum Length – 900mm
Outside diameter of Tube – 22mm
Wall Thickness – 3mm
Thread – 5/8 UNF or 16mm fine metric
Table 6.1.2 Minimum requirements for Rear Four-Bars for normal duty application
Rear Four-Bars: Heavy duty application
Maximum Length – 900mm
Outside diameter of Tube – 25mm
Wall Thickness – 3mm
Thread – 3/4 UNF or 19mm fine metric
Table 6.1.3 Minimum requirements for Rear Four-Bars for heavy duty application
The wall thickness of 3mm tube must not be reduced by threading directly into the end of it. If threaded ends are used with 3mm wall thickness tubing, a bush must be welded into the end of the tube to accommodate the thread.
6.9.2 Rod end bushes fitted in a cantilever style application, ie mounted on the outside of the mounting bracket, must be fitted with a washer or retainer of a diameter at least as large as the diameter of the outer tube sleeve section as shown in Figure 6(c), must not be more than 10 degrees out of alignment.

National Guidelines for the Construction and Modification of Street Rods in Australia 39 Second Edition November 2013
Figure 6(c) Rod End Bushes Fitted in a Cantilever Style Application
6.9.3 Spherical rod ends, sometimes known as’ Heim joints’, and ‘Rose joints’, are rod end bearings that may be used on the end of control rods, steering links, tie rods, or anywhere a precision articulating joint is required. They comprise a ball swivel with an opening through which a bolt or other attaching hardware may pass that is pressed into a circular casing with a threaded shaft attached. The threaded portion may be either male or female. Spherical rod ends are made to a variety of standards in terms of strength and durability, and can be prone to poor durability or failure if used inappropriately. Early versions were prone to failure and had a poor durability history. As a result spherical rod ends must only be used in critical applications such as steering and suspension if they meet all of the following criteria: (a) The movement of the rod/component to which the joint is attached does
not exceed the allowable articulation angle of the spherical rod ends as specified by the spherical rod ends’ manufacturer;
(b) The spherical rod ends do not hang-up on existing components; and (c) A Signatory confirms that the spherical rod ends used have sufficient
durability and strength in all directions for their intended purpose. (d) Spherical rod ends must be protected by suitably designed dust covers to
reduce the risk of premature wear. 6.9.4 Where possible, the top and bottom arms of parallel rear four-bars, should be of
equal length. If this cannot be achieved, one parallel arm should be at least 50 percent of the length of its counterpart. (eg: Bottom arm - 800mm minimum, Top arm - 400mm minimum).
6.9.5 Four-bars fitted to the front axle should be at least 116mm (4 ½ inches) between centres, equal at both front and rear to ensure that the axle does not rock as a result of normal suspension and steering operation. See diagram 6(d) below.

National Guidelines for the Construction and Modification of Street Rods in Australia 40 Second Edition November 2013
Figure 6(d) Installation of Four-bars to Front Axle
6.9.6 Four-bars fitted to the rear axle should be at least 127mm (5 inches) between centres to prevent excessive loads on the four-bar assembly.
6.9.7 Mounting points for rear four-bars should be of the double shear type (two side plates with the bush/bar end in between) and located on the chassis rail. Where lateral loads are likely to be encountered mounting points must be boxed or gusseted.
6.9.8 Parallel four-bars must be straight. If the front and rear locations are offset; then either: the axle batwing and chassis mount must be aligned, or either or both bush ends must be equally offset.
6.9.9 If batwings are used for front four-bar location do not compensate for perch bolt angle, suitable flexible rod ends must be used. See Figures 6(e) to 6(h) for examples of “four-bar” front and rear suspensions.

National Guidelines for the Construction and Modification of Street Rods in Australia 41 Second Edition November 2013
Figure 6(e) Example of four-bar front suspension with side steering. Note that the steering drag link runs parallel to, and is close to the same length as the suspension four-bars.
Figure 6(f) Example of four-bar front suspension with cross steering.
Note the panhard bar, which is fixed to the chassis on the steering box side. It is as long as possible, and parallel to the drag link and tie rod.
Figure 6(g) Example of parallel four-bar rear suspension.

National Guidelines for the Construction and Modification of Street Rods in Australia 42 Second Edition November 2013
Figure 6(h) Example of triangulated four-bar rear suspension.
i. 6.10 STEERING CONSIDERATIONS WITH BEAM AXLES AND TRANSVERSE SPRING SUSPENSION
Significant steering problems can result with incorrect steering geometry on transverse spring beam axles, whether they are located by parallel four-bars or radius rods. Figures, 6(i) to 6(l) illustrate the potential problems, and also the principles for the correct setting up of beam axle steering to minimise the effect of axle movement on steering. Bump steer is where the wheel alignment alters as the axle moves through its normal range of suspension travel, taking steering control away from the driver. It will occur, for instance, if the drag link is not set up correctly for side steer, or in the case of cross steer, if a dead perch or panhard bar is not used. A dead perch, shown in Figure 6(m) is a fixed spring mount rather than a shackle mount, and is used on the passenger side of the spring.

National Guidelines for the Construction and Modification of Street Rods in Australia 43 Second Edition November 2013
Figure 6(i) Arcs for Side Steering Installations
When side steering is used with a four-bar front suspension, the steering box must be mounted such that the drag link is as close as possible to the same length as the four-bars, and parallel to them, as shown in Figure 6(i). This will ensure that the arc travelled by the drag link is very close to the arc travelled by the axle during normal suspension travel.
Figure 6(j) Arcs for Split Radius Rods or Ford Wishbone Installations
Where split radius rods, or original Ford wishbone style radius rods are used, the Pitman arm and steering arm pivots must lie on a line that passes through the radius rod pivot to ensure similar arcs are travelled, as shown in diagram 6(j).

National Guidelines for the Construction and Modification of Street Rods in Australia 44 Second Edition November 2013
Figure 6(k) Arcs resulting from incorrect installation
If drag links are not set up correctly, the drag link and axle as shown in diagram 6(k) will travel different arcs. This will result in movement at the steering wheel, and the Street Rod wandering as the suspension moves through its normal travel. This is known as bump steer.
Figure 6(l) Beam axle bump steer
A chassis using a transverse mounted front spring such as an early Ford may be able to swing side to side on the shackles. If the axle can move side to side, and the steering box and drag link are secure, the movement will be transmitted to the spindle via the steering arm, so without moving the steering wheel the Street Rod will sway from side to side. Use a panhard bar fixed to the chassis on the steering box side of the axle or a dead perch on the passenger side of the axle to prevent axle sway. If a modifier or builder is unsure of the nature or meaning of any part of this section, they should seek expert advice and input should before fitting a beam axle or finalising the location of any steering components.

National Guidelines for the Construction and Modification of Street Rods in Australia 45 Second Edition November 2013
Figure 6(m) Example of dead perch
ii. 6.11 PANHARD BARS AND WATTS LINKAGES 6.11.1 A rear parallel four-bar system must have either a watts linkage or panhard bar to control
side movement. Panhard bars should be mounted as near to horizontal as possible, and be as long as possible. Refer to diagrams 6(n) and 6(o) for examples of panhard bars and watts linkage, and Table 6.2 sets out the minimum requirements for these
6.11.2 Triangulated “four-bar” systems do not require a “watts linkage” or panhard bar. 6.11.3 A dead perch on the passenger side of a front transverse spring may be used, however a
panhard bar fitted to the chassis on the steering box side and connected to the axle on the passenger should be used.
Figure 6(n) Example of Rear Panhard Bar
Note that the bar is as long as possible, and level with the rear axle housing. It is also adjustable at one end to ensure accurate location of the differential.

National Guidelines for the Construction and Modification of Street Rods in Australia 46 Second Edition November 2013
Figure 6(o) Example of Watts linkage.
Note: This particular linkage is from a Ford Falcon.
Front Panhard Bars/Watts Linkage
Outside diameter of Tube – 22mm
Wall Thickness – 3mm
Thread – 5/8 UNF or 16mm fine metric
Table 6.2.1 Minimum requirements for Front Four-Bars
Rear Panhard Bars/Watts Linkage: Normal duty application
Outside diameter of Tube – 22mm
Wall Thickness – 3mm
Thread – 5/8 UNF or 16mm fine metric
Table 6.2.2 Minimum requirements for Rear Four-Bars for normal duty application
Rear Four-Bars: Heavy duty application
Outside diameter of Tube – 25mm
Wall Thickness – 3mm
Thread – 3/4 UNF or 19mm fine metric
Table 6.2.3 Minimum requirements for Rear Four-Bars for heavy duty application

National Guidelines for the Construction and Modification of Street Rods in Australia 47 Second Edition November 2013
iii. 6.12 TRACK RODS AND TRACTION BARS 6.12.1 If track rods are fitted to limit axle movement on acceleration, they must not impede the
function of the suspension system and must not reduce the ground clearance below the specified limits.
6.12.2 Traction or slapper bars must not be used as the front portion of the bar will tilt downwards under deceleration and braking thereby reducing ground clearance and compromising safety. These devices are also known to limit suspension movement under cornering resulting in poor handling.
iv. 6.13 CUSTOM MADE SUSPENSIONS 6.13.1 If custom made suspensions are used, an engineer’s certification for the suspension
components as fabricated must be obtained. Notes: 1. Scratch building a front or rear suspension requires experience in suspension
geometry as well as above average fabrication skills. Do not embark on such a task unless you can qualify your methods. There are already several custom installations available which pass the requirements. Ensure that the custom suspension you wish to install will meet the criteria for your particular application.
2. The manufacturer should record and retain details of the manufactured front end and components. You should ensure that a traceable identification mark and number is permanently etched or attached to the component or components. Examiners may seek evidence to confirm that components used are appropriate for the Street Rod, the location, and the likely loading (e.g. original invoices or receipts and manufacturers’ specifications).
6.13.2 All welding must be in accordance with Australian Standard AS/NZS 1554.1 Structural steel welding Part 1 Welding of steel structures.
6.13.3 Owner built suspensions must be certified in accordance with the above requirements. v. 6.14 WHEEL ALIGNMENT 6.14.1 The wheel alignment specification for the donor vehicle should be maintained when fitting
a production car suspension assembly, whenever possible. 6.14.2 Extremes of caster whether positive or negative should be avoided. Zero or slightly
negative camber should be used. Steering Axis Inclination may be affected when swapping spindles and a trial of the swap should be carried out to ensure that the correct scrub radius is maintained whenever possible. Refer to Drawing 6(p).
6.14.3 Fitting of wheels with large offset (either positive or negative) can adversely increase the bearing loads and affect scrub radius. Such changes will require significant alterations to wheel alignment specifications. Advice should be obtained from an Examiner or a reputable wheel alignment specialist.
6.14.4 Toe-in normally amounts to 3mm total when narrow front tyres are used. 6.14.5 When using a beam front axle, the nominal caster is 7 degrees positive at nominal ride
height with sufficient adjustment available to allow variations of three degrees in either direction. Advice should be obtained from an Examiner or a reputable alignment specialist for further information.
vi. 6.15 JAGUAR INDEPENDENT REAR SUSPENSION 6.15.1 Drawing 6(r) depicts the problem with fitting wheels of different offset and diameter to
Jaguar independent rear suspensions, and Table 6.3 lists the standard Jaguar track dimensions. Dimension “A” is critical and must be carefully checked when selecting wheels for this suspension.

National Guidelines for the Construction and Modification of Street Rods in Australia 48 Second Edition November 2013
6.15.2 The XK-E type, S type, XJ series 1 to 3 and Mark 10 Jaguar feature nearly identical independent rear suspension assemblies, with the only difference being track width variation between the various models. Drawing 6(r) depicts a lug type wheel flange rather than a splined hub as used on the E Type. Mark 10 and XJ series Jaguar accept Chevrolet and HQ - WB Holden bolt pattern wheels.
6.15.3 Welding of half shafts and lower control arms should be performed in accordance with Appendix C to Section LZ of VSB 14. Welding must be done to the satisfaction of the Examiner.
6.15.3.1 Each component used must have been stamped with an identifying serial number, or a certificate of authenticity provided by the firm carrying out the alterations.
6.15.3.2 A non-destructive inspection across the welded or heated areas, and certification must be obtained for the component. Note: The modifier should obtain information on the process used to modify the component, including heat treatment and preparation, and made available to the Examiner if requested.
6.15.4 Jaguar Track Measurements
Track widths are a problem with Jaguar Independent Rear Suspensions when using 14” wheels. A maximum rim width of 7” with no greater distance than 25mm between rim lip and bottom of hub carrier are the established dimensions (dimension “A” on Drawing TAC-3). With 15” rims, track should be able to comply with normal track requirements, being standard plus 50mm. Note: These are standard track measurements.

National Guidelines for the Construction and Modification of Street Rods in Australia 49 Second Edition November 2013
Model Series Front track Rear track Comments
MARK II: 1959-1968, 240 Series, S-type: 1963-1968, 340 Series
1397mm (4’7”)
1381mm (4’63/8”)
MARK 10 1962-1967, 420 and 4200 Series
1473mm (4’10”)
1473mm (4’10”)
E TYPE 1962-1965 (Series 1) 1965-1970 (Series 2)
1276mm (4’2¼”)
1276mm (4’2¼”)
E TYPE 1970-1975 (Series 3) 1346mm (4’5”)
1346mm (4’5”)
Same track for steel and wire wheels
XJ6 1968-1976 (Series 1 and 2)
1489mm (4’105/8”)
1489mm (4’105/8”)
Same track for steel and wire wheels
XJI2 Series 2 (including Daimler all models)
1489mm (4’105/8”)
1489mm (4’105/8”)
Same track for steel and wire wheels
Table 6.3 Jaguar track dimensions
vii. 6.16 SHOCK ABSORBERS 6.16.1 Shock absorbers dampen spring oscillations and are essential for good driving
characteristics and to retain control of the Street Rod. With the exception of coil over shock absorbers, they are not a supporting device and must not be used as such. The Street Rod spring may be supplemented by the addition of air adjustable shock absorbers to maintain ride height when loaded, but they must not be used to attain unladen ride height. The suspension must contact and compress the relevant bump stop before the shock absorber reaches maximum extension or compression. Such bump stops may be inside the shock absorber. If the springs are not sufficient to maintain a stable platform and ride height, the spring rates should be upgraded.
6.16.2 There must be at least one shock absorber per wheel. 6.16.3 The shock absorber used must be suitable for the weight and application intended. 6.16.4 Shock absorbers should be no more than one third compressed when the Street
Rod is stationary and in a fully trimmed state and with all fluid reservoirs (including fuel) filled to nominal capacity.
6.16.5 Shock absorbers are at their most efficient when mounted vertically, but may offer some improvement to lateral stability when fitted angled in at the top. Fitting shock absorbers at an angle reduces their effectiveness, expected life and compliance bush life. See Drawing 6(r) for indications of shock absorber efficiency versus angle of installation.
6.16.6 The lower shock mount should be positioned as close to the wheel as possible. On independent suspensions, the shock absorber may be mounted midway between the inner pivot and the wheel, and as such will move less and require more dampening strength.
6.16.7 Shock absorber mounts must be of suitable strength.

National Guidelines for the Construction and Modification of Street Rods in Australia 50 Second Edition November 2013
Figure 6(p) Castor Angles (TAC-6)
Figure 6(q) Shock Absorber Efficiency Verses Installation Angles (TAC-4)
A positive castor helps return the front wheels back to the straight-ahead position after cornering. In practice, only a small amount of castor is required to be effective. For example, as little as half a degree of castor angle can produce positive self-centring in steering.

National Guidelines for the Construction and Modification of Street Rods in Australia 51 Second Edition November 2013
Figure 6(r) Jaguar Rear End (TAC-3)
viii. 6.17 CHROME PLATING Due to the risk of hydrogen embrittlement, suspension components must not be chrome plated. Refer to Clause 5.2 for more information. Heat treated components should not be polished, sand, or bead blasted except by a skilled and experienced supplier. Stainless steel components may be supplied in a coarse matt or polished finish, and should only be polished by the manufacturer or a skilled and experienced supplier. Evidence may be sought to confirm the material properties, and the supplied finish, of any component