secrets of embroidery -...
TRANSCRIPT
5352
Secrets of embroidery
Supplies
The fabricIf you’re a beginner, it’s best to use a fairly tightly woven cotton fabric in a pastel color. If you sew, you can have fun mixing and matching fabrics. You can also begin with fabric objects such as pillows, aprons, and tea towels.
Mechanical pencil and eraserA regular pencil works perfectly for drawing designs on light-colored fabrics.
Embroidery hoopIt’s not essential, but tightly stretched fabric helps you keep your stitches more regular.
Embroidery needlesThey have an elongated eye and nice sharp points. Number 9 needles are ideal.
Embroidery scissors Their short blades cut threads very close to the surface of the fabric, so there’s no risk of losing control!
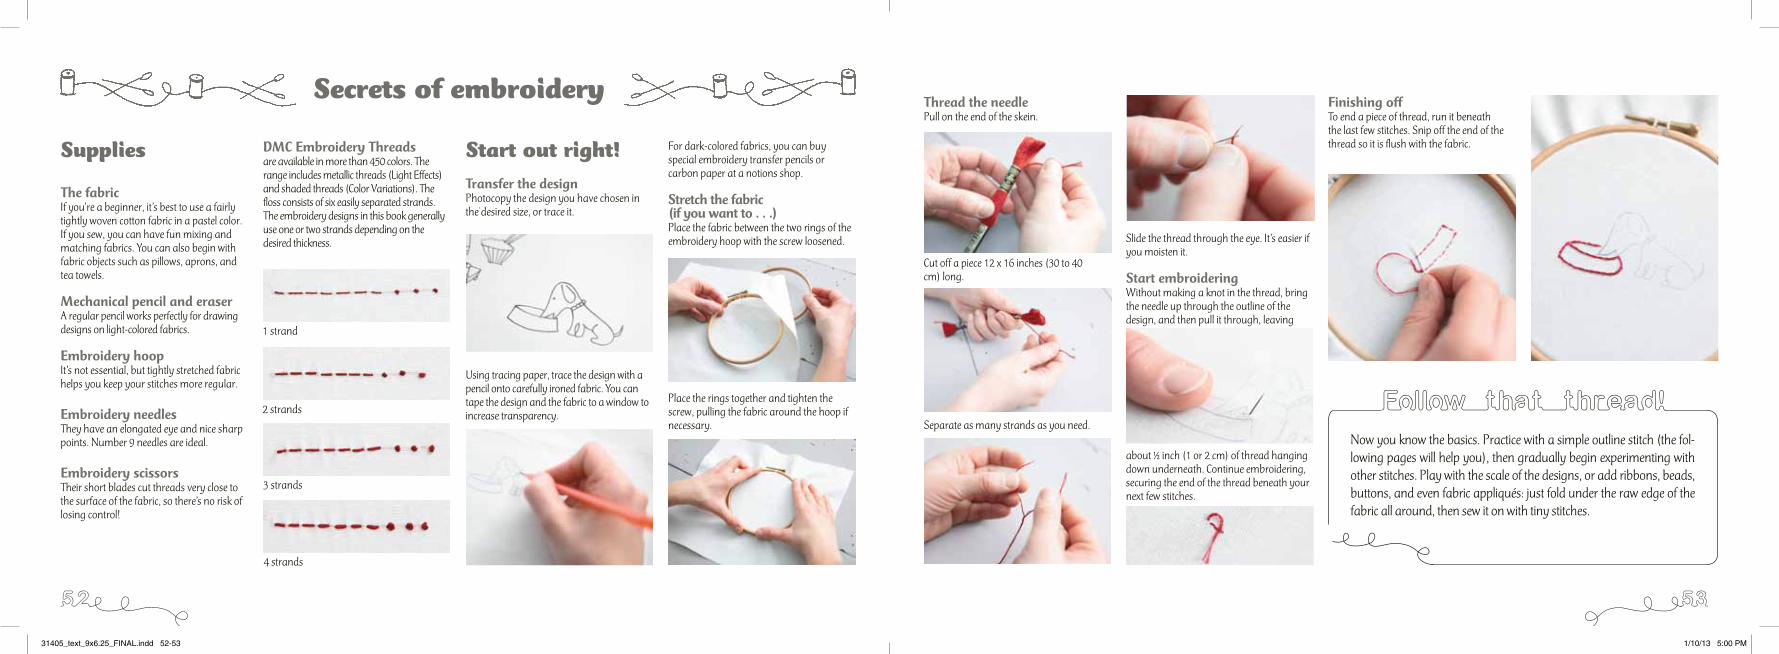
DMC Embroidery Threadsare available in more than 450 colors. The range includes metallic threads (Light Effects) and shaded threads (Color Variations). The floss consists of six easily separated strands. The embroidery designs in this book generally use one or two strands depending on the desired thickness.
Start out right!Transfer the designPhotocopy the design you have chosen in the desired size, or trace it.
Using tracing paper, trace the design with a pencil onto carefully ironed fabric. You can tape the design and the fabric to a window to increase transparency.
For dark-colored fabrics, you can buy special embroidery transfer pencils or carbon paper at a notions shop.
Stretch the fabric (if you want to . . .)Place the fabric between the two rings of the embroidery hoop with the screw loosened.
Place the rings together and tighten the screw, pulling the fabric around the hoop if necessary.
1 strand
2 strands
3 strands
4 strands
Thread the needlePull on the end of the skein.
Slide the thread through the eye. It’s easier if you moisten it.
Start embroideringWithout making a knot in the thread, bring the needle up through the outline of the design, and then pull it through, leaving
about ½ inch (1 or 2 cm) of thread hanging down underneath. Continue embroidering, securing the end of the thread beneath your next few stitches.
Finishing off To end a piece of thread, run it beneath the last few stitches. Snip off the end of the thread so it is flush with the fabric.
Now you know the basics. Practice with a simple outline stitch (the fol-lowing pages will help you), then gradually begin experimenting with other stitches. Play with the scale of the designs, or add ribbons, beads, buttons, and even fabric appliqués: just fold under the raw edge of the fabric all around, then sew it on with tiny stitches.
Separate as many strands as you need.
Cut off a piece 12 x 16 inches (30 to 40 cm) long.
Follow that thread!
31405_text_9x6.25_FINAL.indd 52-53 1/10/13 5:00 PM

5554
Stem stitch (St)Work from left to right, and bring the needle up halfway back behind each stitch while keeping the loop of thread below the needle. Arranged in side-by-side lines, this stitch can be used to fill in forms (a).To follow curved lines perfectly, combine the “backward” variation of the stem stitch with the traditional version of the stem stitch. Proceed in the same fashion, but keeping the thread above the needle (b).
Chain stitch (C)This stitch can be used to outline or fill in. Work from top to bottom. Make regular loops by passing the thread under the needle with each stitch. Finish the last loop with a small straight stitch.
Blanket stitch (Bl)This stitch can be used for straight lines, curves, or circles (wheels), working from leftto right. Insert the needle into the fabric above the line and bring it through on the line, keeping the thread to the right. Space the stitches regularly.
Buttonhole stitch (Bu)This stitch is done like the blanket stitch but with the stitches more closely spaced.
a
b
A collection of stitches
Outline stitchesRunning stitch (R)Working from right to left, pass the needle through the fabric in an up-and-down motion at regular intervals. For an almost continuous line, leave only one or two threads in the fabric weave between each stitch. For a looser look, space the stitches farther apart.
Backstitch (Ba)Worked from right to left, as its name suggests, this stitch embroiders from front to back. Make short, regular stitches, as close together as possible.
Laced running stitch (LR) or Laced backstitch (LB)Embroider a line in running stitch (a) or backstitch (b). Lace another thread from top to bottom over each stitch you’ve already made.
The direction given for these stitches is for a right-handed person. If you’re left-handed, look at the diagrams in a mirror.
a
b
Use the simplest outline stitches in pretty colors, and you’ll start making beautiful things right away! The selection below will help you try out new effects and have even more fun. The stitches used in the models are indicated by abbreviations next to them. The alphabetical list of these abbreviations printed on the flap at the back of the book will be a useful reference.
Helpful hint
31405_text_9x6.25_FINAL.indd 54-55 1/10/13 5:00 PM
5756
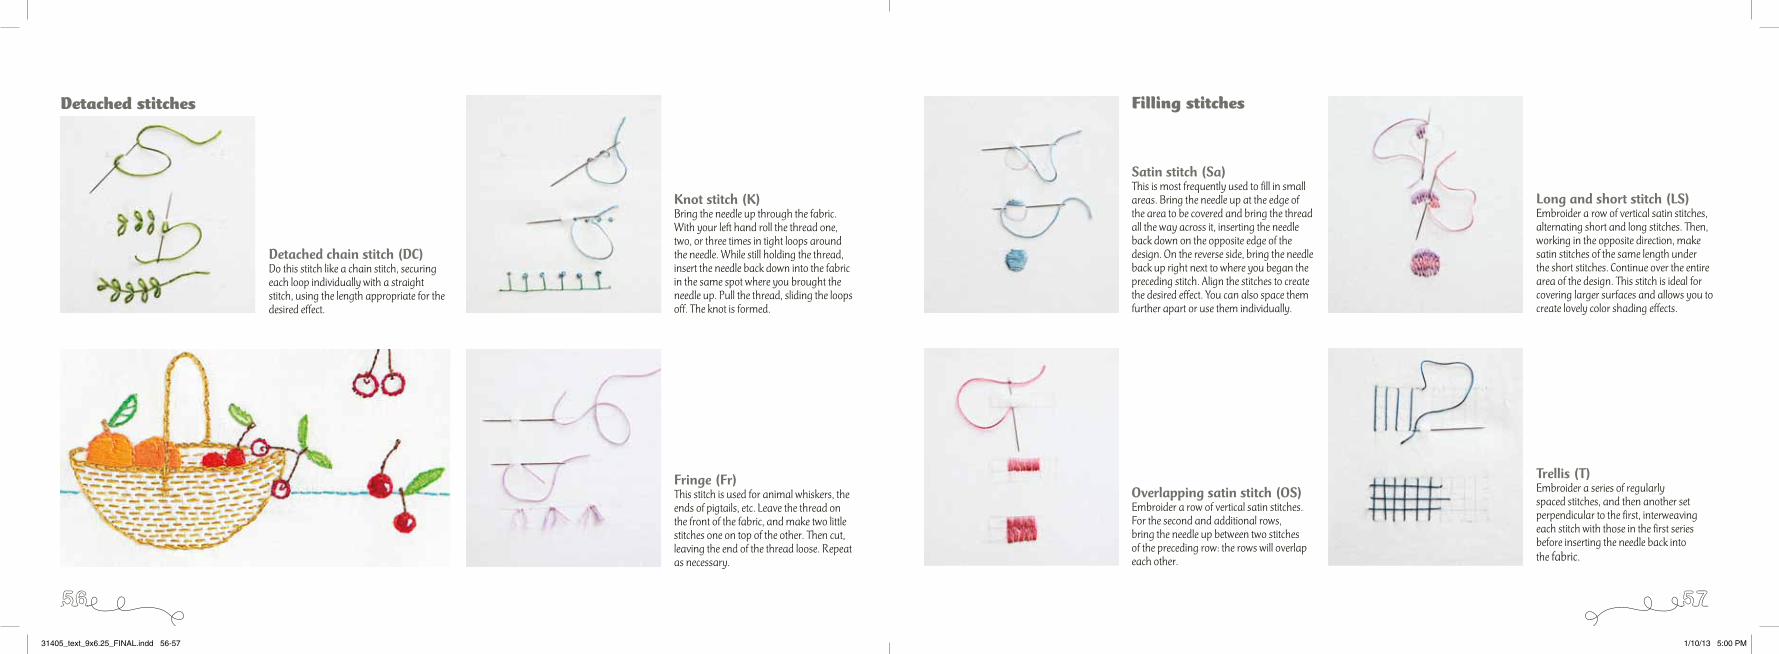
Detached stitches
Detached chain stitch (DC)Do this stitch like a chain stitch, securing each loop individually with a straight stitch, using the length appropriate for the desired effect.
Knot stitch (K)Bring the needle up through the fabric. With your left hand roll the thread one, two, or three times in tight loops around the needle. While still holding the thread, insert the needle back down into the fabric in the same spot where you brought the needle up. Pull the thread, sliding the loops off. The knot is formed.
Fringe (Fr)This stitch is used for animal whiskers, the ends of pigtails, etc. Leave the thread on the front of the fabric, and make two little stitches one on top of the other. Then cut, leaving the end of the thread loose. Repeat as necessary.
Filling stitches
Satin stitch (Sa)This is most frequently used to fill in small areas. Bring the needle up at the edge of the area to be covered and bring the thread all the way across it, inserting the needle back down on the opposite edge of the design. On the reverse side, bring the needle back up right next to where you began the preceding stitch. Align the stitches to create the desired effect. You can also space them further apart or use them individually.
Overlapping satin stitch (OS)Embroider a row of vertical satin stitches. For the second and additional rows, bring the needle up between two stitches of the preceding row: the rows will overlap each other.
Long and short stitch (LS)Embroider a row of vertical satin stitches, alternating short and long stitches. Then, working in the opposite direction, make satin stitches of the same length under the short stitches. Continue over the entire area of the design. This stitch is ideal for covering larger surfaces and allows you to create lovely color shading effects.
Trellis (T)Embroider a series of regularly spaced stitches, and then another set perpendicular to the first, interweaving each stitch with those in the first series before inserting the needle back into the fabric.
31405_text_9x6.25_FINAL.indd 56-57 1/10/13 5:00 PM

5958
Fern stitch (Fn)Begin at the top of the line. Make three running stitches of the same length, forming an angle between them and inserting the needle through the same hole at the base of each of the three stitches. To continue the design, make the next stitch just below the first and continue in the same way.
Feather stitch (Fe)Bring the needle up at the top of the line, then alternate to the left and right, always keeping the needle above the length of thread.
a
a
b
b
c
Borders and edgings
Herringbone stitch (H)This stitch is executed in two parallel lines. Bring the needle up on the upper line. Take a small straight stitch from right to left, inserting the needle back down at the lower line. Take another small straight stitch on the lower line. Then make another small straight stitch on the on the upper line. Space the stitches evenly.
Fly stitch (Fl)This stitch is done from left to right, in lines, overlapping lines, or individually. Bring the needle up to the left of the line and insert it into the fabric as if making a straight stitch, forming a V-shaped loop without pulling too hard on the thread. Bring the needle up again farther down, in the middle of the stitch, and make a vertical straight stitch to secure the previous stitch.
Whipped running stitch (WR)Embroider a line of running stitches (a) or backstitches (b). Lace a second thread up and down through the stitches already made, creating the effect of a wave.
Beading (Be)Depending on your design, there are a number of ways to attach the beads:- running stitch (a)- backstitch (b)- combination of running stitch and backstitch (c)
31405_text_9x6.25_FINAL.indd 58-59 1/10/13 5:00 PM