sda810dd parts list shiplap workshop - forest … it is flush with the inside of the framing as...
TRANSCRIPT

8’ x 10’ Shiplap Workshop
Issue 0216
FELT
B
60360200A1TRUSS SUPPORT QTY 2
SDA8PEPLAIN END
SDA810WSWINDOW PANEL
QTY 2
SDA810PSPLAIN PANEL
QTY 2
WS10X8BRDFLFLOOR QTY 2
85008 QTY 3
C D E G IF
28120675PARDTR675mmm STRIP QTY 2
OPA8TRUSSTRUSS
A
SDA810DD PARTS LIST
43
154013408ROOF SHEET
QTY 4
DDRDTDOOR QTY 2 SDA8DE
DOOR END
90121375PAII74DT1375mm BARGE BOARD QTY 4
59121710PDT1710mm CORNER STRIP QTY 6
452814621462mm BATTEN QTY 8
H
O
L
N
H
J
2
45451630DT1630mm BATTEN QTY 1
M
P
Floor
Top View
5
K
452815401540mmm BATTEN QTY 4
Important : Assembly of this shed requires a
minimum of two adults. Must Pre-drill for each screw used.
PCWIN1WINDOW QTY 4
The windows are packed together tightly, separate
before assembly.
Q
1
84996675mmm PLASTIC STRIP QTY 8
RFIN20010512DTR
FINIAL QTY 2
Place the hinge against the inside of the door frame and position the large section of the hinge so that it is flush with the inside of the framing as shown and fix with 25mm screws.
Open the hinge and fix the smaller section to the door framing. Again make sure that the hinge is flush and that the holes are positioned so that the 25mm screws locate correctly into the batten.
Place the two floor sections together and position the panels on top of the completed floor. Make sure that all the panels are tight and flush before fixing them to each other using 3x50mm screws.
When the panels are secured to each other, make sure they are flush and fix to the floor using 3x50mm screws for each panel. Make sure that the screws locate into the bearers underneath.
Place the window from the outside so that the lip sits on the bottom board as shown.
Place the plastic strips at the bottom of the window so that one side butts up against the cladding. Fix each strip in place using 2 x security screws. Secure the top of each window in place with 1 x security screw.
Position the remaining strip vertically against the outer edge of the window so that one side of the strip butts up against the cladding.
Place one 675mm wooden strip in the middle so that it overlaps the window equally on both sides and the remaining strip on the door side of the window. Again fix each wooden strip in place using 2 x security screws.
Fix the 1630mm batten against the end of the door using 3x70mm screws. Make sure it is flush with the door end framework.
Fix a turn button to the top and bottom of the batten using 1x30mm (zinc) screw for each.
Attention:Take care when
placing the screws. These
can not be backed out.
You may need to cut the plastic
strips to size using a pair of scissors
Place and secure each angled block using 2 x 70mm screws. Make sure these are 1470mm from the floor level and are tight against the framework.
Place the truss so that is sits on the angled blocks. Secure this in place by screwing down through the truss into the blocks using 2 x 90mm screws for each end.
D
A
B
Q
REQUIRED TOOLS : (NOT SUPPLIED)
HAMMER
SHARP KNIFE SCISSORS
FLAT HEAD SCREWDRIVER
POZI DRIVE SCREWDRIVER
TAPE MEASURE
LADDER
C
F
JP
O
Board
H
Lip
I
M
IMPORTANT, RETAIN FOR FUTURE REFERENCE; READ CAREFULLY
This building is pre-treated with a factory base coat for protection during storage and transit. We recommend that you treat your new building as soon as possible after assembly using a wood preservative treatment. Apply in accordance with the manufacturers instructions.
- This product must be built on a solid level base.- The roof of this building is not a load bearing structure.- Timber is a natural material. It will shrink and swell as a result of varying moisture content.- Due to the nature of the material the doors may need some trimming for a neater fit.- Please keep all plastic bags and small parts away from children
Technical Helpline: 0333 7777 089 8.30 am and 5.00 pm Monday to Friday.
Please check all parts prior to assembly
Assembly of damaged parts may be deemed to be acceptance and this may affect the remedies you are entitled to. If the product is not constructed in accordance with the instructions, or is altered in any way (e.g. painted), the manufacturer cannot be held liable for any resulting damage.
Fixing Pack (OPA812DDFP)This fixing pack is used for several products. There may be additional fixings.
Not to Scale
Turn Button Qty 2
Z’ bracket Qty 16
70m
m S
crew
Qty
7
50m
m S
crew
Qty
36
10mm Felt tacks Qty 110
25m
m S
crew
Qty
61
30m
m S
crew
Qty
18
30m
m N
ail
Qty
90
Flush Hinge Qty 4
25m
m C
ounte
rsunk
Secu
rity
Scr
ew
s Q
ty 4
0
Hasp & Staple
40m
m S
crew
Qty
18
80m
m S
crew
Qty
3
90m
m S
crew
Qty
4
S
32mm
Place the 1695mm strip against the inside of the door end so that the batten is covering the gap between the door end and the door. Fix this in place using 3x30mm nails.
Repeat for the opposite side of the door way.
32161695DTR1695mm STRIP QTY 2
S
Q
Forest Garden Ltd, Unit 288 Hartlebury Trading Estate, Hartlebury, Worcestershire, DY10 4JB
Biocidal Product Regulation (EU 528/2012) Article 58 Information
This article contains timber treated with Celcure AC-500, incorporating biocidal products to give protection against wood destroying insects & wood rotting fungi.
Contains: Basic copper carbonate (Copper (II) carbonate – Copper (II) hydroxide (1:1)), Boric acid, Benzalkonium chloride.
Wear gloves when handling freshly treated wood. Avoid breathing dust when cutting treated or untreated wood. Dispose of off-cuts responsibly – do not burn.
8
E
K
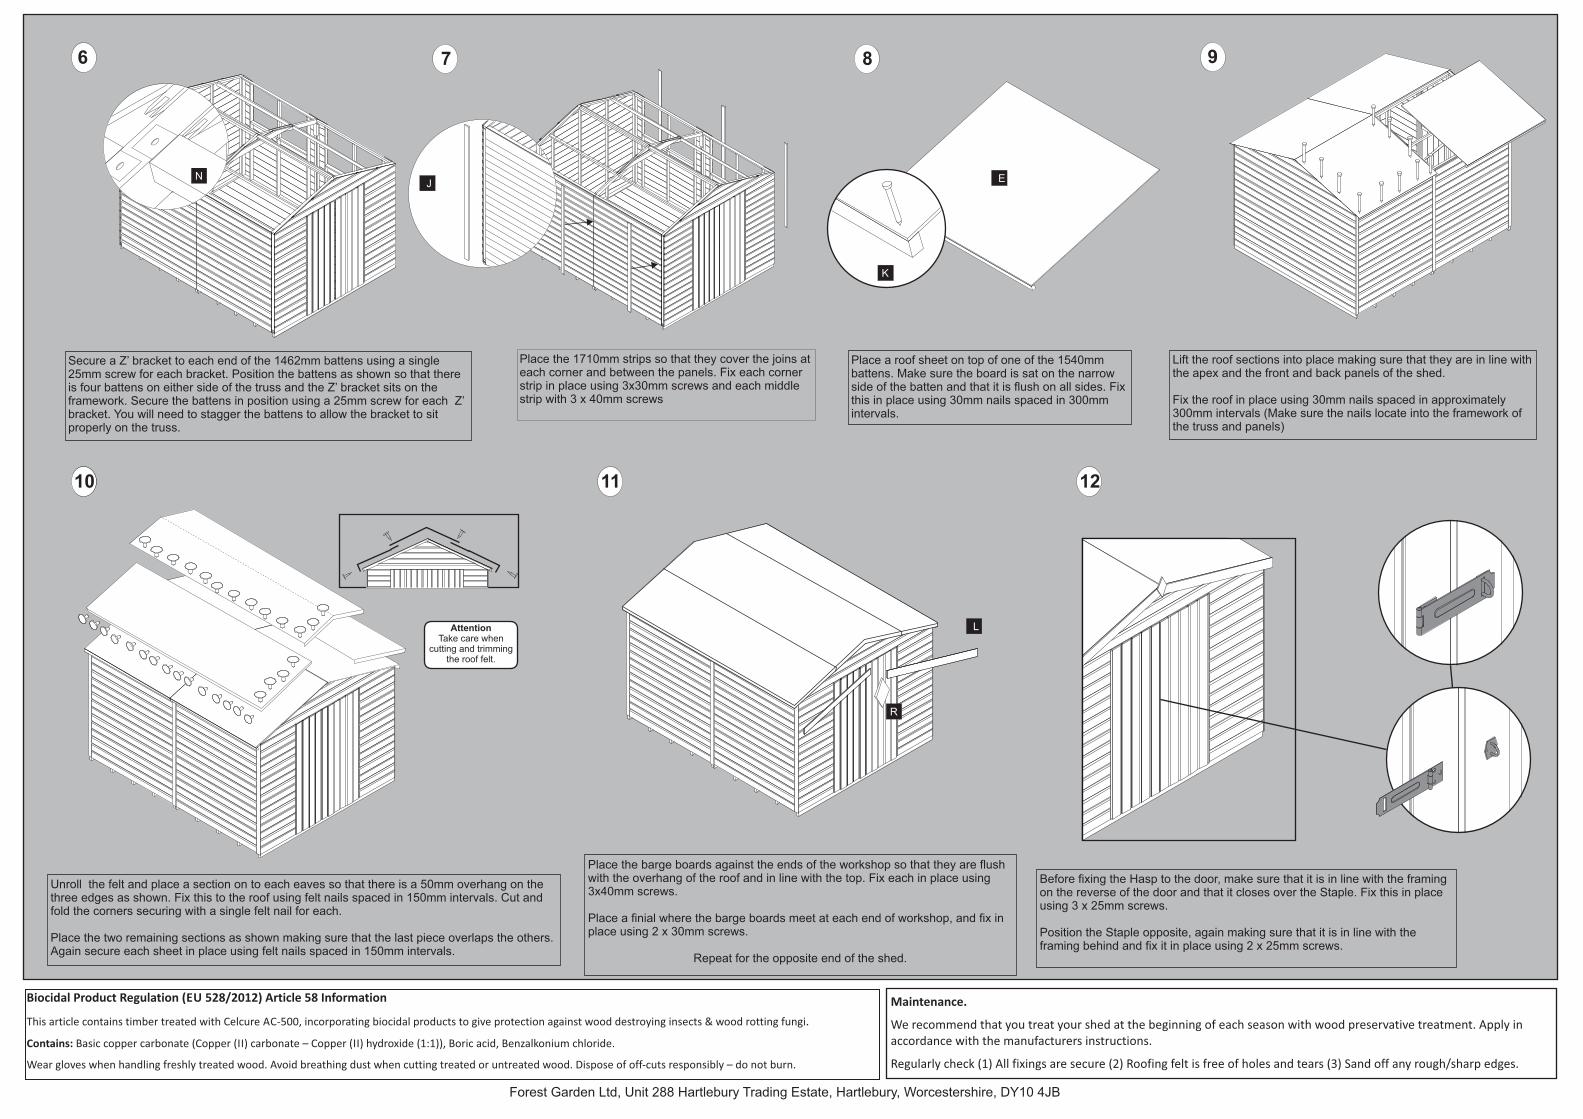
Unroll the felt and place a section on to each eaves so that there is a 50mm overhang on the three edges as shown. Fix this to the roof using felt nails spaced in 150mm intervals. Cut and fold the corners securing with a single felt nail for each.
Place the two remaining sections as shown making sure that the last piece overlaps the others. Again secure each sheet in place using felt nails spaced in 150mm intervals.
11 12
96
Secure a Z’ bracket to each end of the 1462mm battens using a single 25mm screw for each bracket. Position the battens as shown so that there is four battens on either side of the truss and the Z’ bracket sits on the framework. Secure the battens in position using a 25mm screw for each Z’ bracket. You will need to stagger the battens to allow the bracket to sit properly on the truss.
Before fixing the Hasp to the door, make sure that it is in line with the framing on the reverse of the door and that it closes over the Staple. Fix this in place using 3 x 25mm screws.
Position the Staple opposite, again making sure that it is in line with the framing behind and fix it in place using 2 x 25mm screws.
7
Place the barge boards against the ends of the workshop so that they are flush with the overhang of the roof and in line with the top. Fix each in place using 3x40mm screws.
Place a finial where the barge boards meet at each end of workshop, and fix in place using 2 x 30mm screws.
Repeat for the opposite end of the shed.
Lift the roof sections into place making sure that they are in line with the apex and the front and back panels of the shed.
Fix the roof in place using 30mm nails spaced in approximately 300mm intervals (Make sure the nails locate into the framework of the truss and panels)
Place a roof sheet on top of one of the 1540mm battens. Make sure the board is sat on the narrow side of the batten and that it is flush on all sides. Fix this in place using 30mm nails spaced in 300mm intervals.
Place the 1710mm strips so that they cover the joins at each corner and between the panels. Fix each corner strip in place using 3x30mm screws and each middle strip with 3 x 40mm screws
N J
AttentionTake care when
cutting and trimming the roof felt.
L
R
Maintenance.
We recommend that you treat your shed at the beginning of each season with wood preservative treatment. Apply in accordance with the manufacturers instructions.
Regularly check (1) All fixings are secure (2) Roofing felt is free of holes and tears (3) Sand off any rough/sharp edges.
10