scsi card 2930cu - adaptec - technical...
TRANSCRIPT

R
SCSI Card 2930CU
User’s Guide

Copyright© 2002 Adaptec, Inc. All rights reserved. No part of this publication may be reproduced, stored in a retrieval system, or transmitted in any form or by any means, electronic, mechanical, photocopying, recording or otherwise, without the prior written consent of Adaptec, Inc., 691 South Milpitas Blvd., Milpitas, CA 95035.
Trademarks
Adaptec, the Adaptec logo, and SCSISelect are trademarks of Adaptec, Inc., which may be registered in some jurisdictions.
Windows 95, Windows 98, Windows NT, Windows 2000, and Windows Me, are trademarks of Microsoft Corporation in the US and other countries, used under license.
All other trademarks are the property of their respective owners.
ChangesThe material in this document is for information only and is subject to change without notice. While reasonable efforts have been made in the preparation of this document to assure its accuracy, Adaptec, Inc. assumes no liability resulting from errors or omissions in this document, or from the use of the information contained herein.
Adaptec reserves the right to make changes in the product design without reservation and without notification to its users.
DisclaimerIF THIS PRODUCT DIRECTS YOU TO COPY MATERIALS, YOU MUST HAVE PERMISSION FROM THE COPYRIGHT OWNER OF THE MATERIALS TO AVOID VIOLATING THE LAW WHICH COULD RESULT IN DAMAGES OR OTHER REMEDIES.
ii

Adaptec Customer SupportIf you have questions about installing or using your Adaptec product, check this document first—you will find answers to most of your questions here. If you need further assistance, use the support options listed below.
Technical Support Identification (TSID) Number
� Before contacting Technical Support, you need your unique 12-digit TSID number. The TSID number identifies your product and support status.
� The TSID number is included on two white, bar-coded labels, like the example below.
� If you register by mail, affix one copy of the TSID label to the registration card, which may be contained on the CD. Also affix a copy of the TSID label to the CD jacket so that you don’t lose it.
Support Options
� Search the Adaptec Support Knowledgebase (ASK) at http://ask.adaptec.com for articles, troubleshooting tips, and frequently asked questions for your product.
� For support via Email, submit your question to Adaptec’s Technical Support Specialists at http://ask.adaptec.com.
North America
� Visit our Web site at http://www.adaptec.com.
� For information about Adaptec’s support options, call +1 408-957-2550, 24 hours per day, 7 days per week. To speak with a Technical Support Specialist,
� For Hardware products call +1 408-934-7274, Monday to Friday, 3:00 A.M. to 5:00 P.M., Pacific Time.
� For RAID and Fibre Channel products call +1 321-207-2000Monday to Friday, 3:00 A.M. to 5:00 P.M., Pacific Time.
To expedite your service, have your computer in front of you.
� To order Adaptec products, including accessories and cables, call +1 408-957-7274.
iii

Europe
� Visit our Web site at http://www.adaptec-europe.com.
� English and French: To speak with a Technical Support Specialist, call one of the following numbers, Monday to Thursday, 10:00 to 12:30 and 13:30 to 17:30; Friday, 10:00 to 12:30 and 13:30 to 16:30, Central European Time:
� English: +32 2 352 3470
� French: +32 2 352 3460
To expedite your service, have your computer in front of you.
� German: To speak with a Technical Support Specialist, call +49 89 456 40660, Monday to Thursday, 9:30 to 12:30 and 13:30 to 16:30; Friday, 9:30 to 12:30 and 13:30 to 15:00, Central European Time. To expedite your service, have your computer in front of you.
� To order Adaptec products, including accessories and cables, call +32 11 300 379.
Australia and New Zealand
� Visit our Web site at http://www.adaptec.com.au.
� To speak with a Technical Support Specialist, call +612 9416 0698, Monday to Friday, 10:00 A.M. to 4:30 P.M., Eastern Australia Time. To expedite your service, have your computer in front of you.
Hong Kong and China
� Visit our Web site at http://www.adaptec.com.
� To speak with a Technical Support Specialist, call +852 2869 7200, Monday to Friday, 10:00 A.M. to 5:00 P.M. To expedite your service, have your computer in front of you.
� Fax Technical Support at +852 2869 7100.
Singapore
� Visit our Web site at http://www.adaptec.com.
� To speak with a Technical Support Specialist, call +65 245 7470, Monday to Friday, 10:00 A.M. to 5:00 P.M. To expedite your service, have your computer in front of you.
Japan
� Visit our Web site at http://www.adaptec.co.jp.
� To speak with a Technical Support Specialist, call +81 3 5308 6120 Monday–Friday, 9:00 A.M. to 12:00 P.M and 1:00 P.M. to 6:00 P.M.
iv

Limited 5-Year Hardware Warranty1. Adaptec, Inc. (“Adaptec”) warrants to the purchaser of this product that it will be free from
defects in material and workmanship for a period of five (5) years from the date of purchase. If the product should become defective within the warranty period, Adaptec, at its option, will repair or replace the product, or refund the purchaser’s purchase price for the product, provided it is delivered at the purchaser’s expense to an authorized Adaptec service facility or to Adaptec.
2. Repair or replacement parts or products will be furnished on an exchange basis and will either be new or reconditioned. All replaced parts or products shall become the property of Adaptec. This warranty shall not apply if the product has been damaged by accident, misuse, abuse or as a result of unauthorized service or parts.
3. Warranty service is available to the purchaser by delivering the product during the warranty period to an authorized Adaptec service facility or to Adaptec and providing proof of purchase price and date. The purchaser shall bear all shipping, packing and insurance costs and all other costs, excluding labor and parts, necessary to effectuate repair, replacement or refund under this warranty.
4. For more information on how to obtain warranty service, write or telephone Adaptec at 691 South Milpitas Boulevard, Milpitas, CA 95035, (800) 959-7274.
5. THIS LIMITED WARRANTY DOES NOT EXTEND TO ANY PRODUCT WHICH HAS BEEN DAMAGED AS A RESULT OF ACCIDENT, MISUSE, ABUSE, OR AS A RESULT OF UNAUTHORIZED SERVICE OR PARTS.
6. THIS WARRANTY IS IN LIEU OF ALL OTHER EXPRESS WARRANTIES WHICH NOW OR HEREAFTER MIGHT OTHERWISE ARISE RESPECT TO THIS PRODUCT. IMPLIED WARRANTIES, INCLUDING THOSE OF MERCHANTABILITY, FITNESS FOR A PARTICULAR PURPOSE AND NON-INFRINGEMENT SHALL (A) HAVE NO GREATER DURATION THAN 5 YEARS FROM THE DATE OF PURCHASE, (B) TERMINATE AUTOMATICALLY AT THE EXPIRATION OF SUCH PERIOD AND (C) TO THE EXTENT PERMITTED BY LAW BE EXCLUDED. IN THE EVENT THIS PRODUCT BECOMES DEFECTIVE DURING THE WARRANTY PERIOD, THE PURCHASER’S EXCLUSIVE REMEDY SHALL BE REPAIR, REPLACEMENT OR REFUND AS PROVIDED ABOVE. INCIDENTAL OR CONSEQUENTIAL DAMAGES, INCLUDING WITHOUT LIMITATION LOSS OF DATA, ARISING FROM BREACH OF ANY EXPRESS OR IMPLIED WARRANTY ARE NOT THE RESPONSIBILITY OF ADAPTEC AND, TO THE EXTENT PERMITTED BY LAW, ARE HEREBY EXCLUDED BOTH FOR PROPERTY DAMAGE, AND TO THE EXTENT NOT UNCONSCIONABLE, FOR PERSONAL INJURY DAMAGE.
7. SOME STATES DO NOT ALLOW THE EXCLUSION OR LIMITATION OF INCIDENTAL OR CONSEQUENTIAL DAMAGES FOR CONSUMER PRODUCTS, AND SOME STATES DO NOT ALLOW LIMITATIONS ON HOW LONG AN IMPLIED WARRANTY LASTS, SO THE ABOVE LIMITATION OR EXCLUSIONS MAY NOT APPLY TO YOU.
8. This warranty gives you specific legal rights, and you may also have other rights which vary from state to state.
v

Adaptec Software License AgreementPLEASE READ CAREFULLY: THE USE OF THIS SOFTWARE IS SUBJECT TO THE SOFTWARE LICENSE TERMS OF ADAPTEC, INC. AND OTHER LICENSORS WHOSE SOFTWARE MAY BE BUNDLED WITH THIS PRODUCT.
BY YOUR USE OF THE SOFTWARE INCLUDED WITH THIS PRODUCT YOU AGREE TO THE LICENSE TERMS REQUIRED BY THE LICENSOR OF THAT SOFTWARE, AS SET FORTH DURING THE INSTALLATION PROCESS. IF YOU DO NOT AGREE TO THE LICENSE TERMS APPLICABLE TO THE SOFTWARE, YOU MAY RETURN THE ENTIRE UNUSED PRODUCT FOR A FULL REFUND.
In return for acquiring a license to use the Adaptec software, which may include software from third party licensors and patches made available by Adaptec (“Software”), and the related documentation, you agree to the following terms and conditions:
1. License. This Agreement grants you, the Licensee, a license to:
a. Use the Software on a single computer system, which is not intended for use by more than five (5) users; and:
b. Make one copy of the Software in machine readable form solely for back-up purposes, provided you reproduce Adaptec's copyright proprietary legends. Notwithstanding the foregoing, the Software may be used on the home, laptop or other secondary computer of the principal user of the Software, and an additional copy of the Software may be made to support such use. As used in this license, the Software is “in use” when it is either loaded into RAM or installed on a hard disk or other permanent memory device. The Software may be “in use” on only one computer at any given time. (Different license terms and fees are applicable for networked or multiple user applications.) As a specific condition of this license, you agree to use the Software in compliance with all applicable laws, including copyright laws, and that you will not copy, transmit, perform or distribute any audio or other content using the Software without obtaining all necessary licenses or permissions from the owner of the content.
2. Restrictions. You may not distribute copies of the Software to others or electronically transfer the Software from one computer to another over a network. You may not post or otherwise make available the Software, or any portion thereof, in any form, on the Internet. You may not use the Software in a computer service business, including in time sharing applications. The Software contains trade secrets and, in order to protect them, you may not decompile, reverse engineer, disassemble, or otherwise reduce the Software to a human-perceivable form. YOU MAY NOT MODIFY, ADAPT, TRANSLATE, RENT, LEASE, LOAN, RESELL FOR PROFIT, DISTRIBUTE, NETWORK OR CREATE DERIVATIVE WORKS BASED UPON THE SOFTWARE OR ANY PART THEREOF.
3. Ownership of Software. As Licensee, you own the media upon which the software is recorded or fixed, but Adaptec and its licensors retain title and ownership of the Software recorded on the original media and all subsequent copies of the Software, regardless of the form or media in which or on which the original and other copies may exist. This license is not a sale of the Software or any copy.
4. Confidentiality. You agree to maintain the Software in confidence and that you will not disclose the Software to any third party without the express written consent of Adaptec. You further agree to take all reasonable precautions to preclude access of unauthorized persons to the Software.
5. Term. This license is effective until January 1, 2045, unless terminated earlier. You may terminate the license at any time by destroying the Software (including the related documentation) together with all copies or modifications in any form. Adaptec will have the right to terminate our license immediately if you fail to comply with any term or condition of this Agreement. Upon any termination, including termination by you, you must destroy the Software (including the related documentation), together with all copies or modifications in any form.
6. Special Terms Applicable to Databases. Where a database is included with the Software, you acknowledge that it is licensed only in connection with the use of the Software to perform disc creation, and that the database and all data derived therefrom must be maintained in confidence in accordance with the provisions of Section 4. This license does not grant you any rights to distribute or disclose such database or data.
vi

7. Limited Warranty. Adaptec and its Licensor warrant only that the media upon which the Software is furnished will be free from defects in material or workmanship under normal use and service for a period of thirty (30) days from the date of delivery to you. ADAPTEC AND ITS LICENSORS DO NOT AND CANNOT WARRANT THE PERFORMANCE OR RESULTS YOU MAY OBTAIN BY USING THE SOFTWARE OR DOCUMENTATION. THE FOREGOING STATES THE SOLE AND EXCLUSIVE REMEDIES ADAPTEC AND ITS LICENSORS WILL PROVIDE FOR BREACH OF WARRANTY. EXCEPT FOR THE FOREGOING LIMITED WARRANTY, ADAPTEC AND ITS LICENSORS MAKE NO WARRANTIES, EXPRESSED OR IMPLIED, INCLUDING, BUT NOT LIMITED, AS TO NON-INFRINGEMENT OF THIRD PARTY RIGHTS, MERCHANTABILITY OR FITNESS FOR A PARTICULAR PURPOSE. Some states do not allow the exclusion of implied warranties or limitations on how long an implied warranty may last, so the above limitations may not apply to you. This warranty gives you specific legal rights and you may also have other rights which vary from state to state.
8. The entire liability of Adaptec and its licensors, and your exclusive remedy for a breach of this warranty, shall be: a. The replacement of any media not meeting the above limited warranty which is
returned to Adaptec; or: b. if Adaptec or its distributor is unable to deliver replacement media which is free from
defects in materials or workmanship, you may terminate this Agreement by returning the Software and your money will be refunded.
9. Limitation of Liability. IN NO EVENT WILL ADAPTEC OR ITS LICENSORS BE LIABLE TO YOU FOR ANY INCIDENTAL, CONSEQUENTIAL OR INDIRECT DAMAGES, INCLUDING ANY LOST PROFITS, LOST SAVINGS, OR LOSS OF DATA, EVEN IF ADAPTEC OR A LICENSOR HAS BEEN ADVISED OF THE POSSIBILITY OF SUCH DAMAGES, OR FOR ANY CLAIM BY ANY OTHER PARTY. Some states do not allow the exclusion or limitation of special, incidental, or consequential damages, so the above limitation or exclusion may not apply to you.
10. Export. You acknowledge that the laws and regulations of the United States and other countries may restrict the export and re-export of the Software. You agree that you will not export or re-export the Software or documentation in any form in violation of applicable United States and foreign law.
11. Government Restricted Rights. The Software is subject to restricted rights as follows. If the Software is acquired under the terms of a GSA contract: use, reproduction or disclosure is subject to the restrictions set forth in the applicable ADP Schedule contract. If the Software is acquired under the terms of a DoD or civilian agency contract, use, duplication or disclosure by the Government is subject to the restrictions of this Agreement in accordance with 48 C.F.R. 12.212 of the Federal Acquisition Regulations and its successors and 49 C.F.R. 227.7202-1 of the DoD FAR Supplement and its successors.
12. General. You acknowledge that you have read this Agreement, understand it, and that by using the Software you agree to be bound by its terms and conditions. You further agree that it is the complete and exclusive statement of the agreement between Adaptec and you, and supersedes any proposal or prior agreement, oral or written, and any other communication between Adaptec and you relating to the subject matter of this Agreement. No additional or any different terms will be enforceable against Adaptec unless Adaptec gives its express consent, including an express waiver of the terms of this Agreement, in writing signed by an officer of Adaptec. You assume full responsibility for the use of the Software and agree to use the Software legally and responsibly. This Agreement shall be governed by California law, except as to copyright matters, which are covered by Federal law. This Agreement is deemed entered into at Milpitas, California by both parties. Should any provision of this Agreement be declared unenforceable in any jurisdiction, then such provision shall be deemed severable from this Agreement and shall not affect the remainder hereof. All rights in the Software not specifically granted in this Agreement are reserved by Adaptec.
Should you have any questions concerning this Agreement, you may contact Adaptec by writing to: Adaptec, Inc.Legal Department691 South Milpitas BoulevardMilpitas, California 95035
vii

Regulatory Compliance Statements
Federal Communications Commission Radio Frequency Interference StatementWARNING: Changes or modifications to this unit not expressly approved by the party responsible for compliance could void the user’s authority to operate the equipment.
This equipment has been tested and found to comply with the limits for a Class B digital device, pursuant to Part 15 of the FCC rules. These limits are designed to provide reasonable protection against harmful interference in a residential installation. This equipment generates, uses, and can radiate radio frequency energy, and if not installed and used in accordance with the instruction manual, may cause harmful interference to radio communications. However, there is no guarantee that interference will not occur in a particular installation. However, if this equipment does cause interference to radio or television equipment reception, which can be determined by turning the equipment off and on, the user is encouraged to try to correct the interference by one or more of the following measures:
� Reorient or relocate the receiving antenna.
� Increase the separation between equipment and receiver.
� Connect the equipment to an outlet on a circuit different from that to which the receiver is connected.
� Consult the dealer or an experienced radio/television technician for help.
� Use a shielded and properly grounded I/O cable and power cable to ensure compliance of this unit to the specified limits of the rules.
This device complies with part 15 of the FCC rules. Operation is subject to the following two conditions: (1) this device may not cause harmful interference and (2) this device must accept any interference received, including interference that may cause undesired operation.
European Union Compliance StatementThis Information Technology Equipment has been tested and found to comply with the following European directives:
EMC Directive 89/336/EEC, as amended by 92/31/EEC and 93/68/EEC
EN50081-1 (1992)EN55022 (1994) Class BEN50082-1 (1992)EN61000-4-2 (1998)EN61000-4-3 (1998)EN61000-4-4 (1995)EN61000-4-5 (1995) SurgesEN61000-4-6 (1996) Conducted immunityEN61000-4-11 (1994) Supply dips of variation
Australian/New Zealand Compliance StatementThis device has been tested and found to comply with the limits for a Class B digital device, pursuant to the Australian/New Zealand standard AS/NZS 3548 set out by the Spectrum Management Agency.
Adaptec, Inc.
Tested to ComplyWith FCC Standards
FOR HOME OR OFFICE USE
SCSI Card 2930CU
viii

Canadian Compliance StatementThis Class B digital apparatus meets all requirements of the Canadian Interference-Causing Equipment Regulations.
Cet appareil numérique de la classe B respecte toutes les exigences du Règlement sur le matériel brouilleur du Canada.
Japanese Compliance (Voluntary Control Council Initiative)
This equipment complies to class B Information Technology equipment based on VCCI (Voluntary Control Council for Interface). This equipment is designed for home use but it may causes radio frequency interference problem if used too near to a television or radio. Please handle it correctly per this documentation.
ix

Contents
1 Getting Started Kit Contents 1-1Installation Process 1-1
2 Installing the SCSI Card 2930U Installing the SCSI Card 2930CU 2-1Registering Your SCSI Card 2-3
3 Installing SCSI Devices Installing Internal SCSI Devices 3-1Connecting External SCSI Devices 3-5
4 Installing Drivers Windows 2000 and Windows XP 4-1
Verifying Driver Installation–Windows XP 4-1Verifying Driver Installation–Windows 2000 4-2
Windows Me 4-3Windows 95 and Windows 98 4-3
Installing the Driver When Installing Windows 95/98 4-4Installing the Driver When Windows 95 is Already Installed 4-4Installing the Driver When Windows 98 is Already Installed 4-7Verifying Driver Installation–Windows 95/98/Me 4-11
Windows NT 4.0 4-11Installing the Driver When Installing Windows NT 4-12Installing the Driver When Windows NT is Already Installed 4-12Installing the Driver When Installing Windows NT to a SCSI Hard Disk Drive Attached to the SCSI Card 2930CU 4-12Removing the SCSI Card 2930CU 4-14
x

Contents
5 Troubleshooting First Steps 5-1Troubleshooting Q & A – General 5-3
Common Error Messages 5-4Troubleshooting Q & A – Windows 95/98 Only 5-5Troubleshooting Q & A – Windows NT 4.0 5-9
Error Codes 5-10
A Understanding SCSI SCSI IDs A-2
SCAM Protocol A-2Terminating the SCSI Bus A-3Preparing SCSI Devices for Installation A-4Using SCSI Devices A-4
Hard Disk Drives A-4Installing Multiple SCSI Cards A-5
B Configuring the SCSI Card 2930CU with SCSISelect SCSISelect Settings B-2Starting SCSISelect B-3Using SCSISelect Settings B-3
SCSI Bus Interface Options B-3Boot Device Options B-4SCSI Device Configuration Options B-4Advanced Configuration Options B-5
Using SCSI Disk Utilities B-7Exiting SCSISelect B-8
C Using Advanced Configurable Parameters in Windows NT 4.0 Using Windows NT SCSI Parameters C-1
Value Keys for SCSI Parameters C-2Using Driver-specific Parameters C-4
Value Keys for Driver-specific Parameters C-4
xi

Contents
D Obtaining SCSI Cables External Cables D-1Internal Cable D-2Maximum Cable Lengths D-2
xii

1
Getting StartedWith the Adaptec SCSI Card 2930CU, you can connect up to seven SCSI devices to any PC computer.Kit ContentsYour SCSI Card 2930 package includes:
� SCSI Card 2930CU adapter.
� Standard 50-pin internal SCSI cable.
� SCSI Card 2930 CD, containing drivers, online documentation, and other useful tools and information.
� Adaptec SCSI Card 2930CU Installation Guide.
If you plan to connect more than two internal SCSI devices, or one or more external SCSI devices, to your computer, you will need additional cables not included in this package. See Chapter D, Obtaining SCSI Cables for more information.
Installation ProcessThe installation process for the SCSI Card 2930CU has three main steps:
� Installing the SCSI Card 2930CU (see Chapter 2, Installing the SCSI Card 2930U).
� Installing and connecting SCSI devices (see Chapter 3, Installing SCSI Devices).
� Installing drivers (see Chapter 4, Installing Drivers).
Additional information about SCSI and SCSISelect®, and more detailed information for advanced users, can be found in the Appendices.
1-1

2
Installing the SCSI Card 2930UIn this ChapterInstalling the SCSI Card 2930CUTo install the SCSI Card 2930CU
1 Ground yourself by touching the chassis.
2 Turn off the computer and disconnect the power cord.
3 Open the computer cabinet, following the manufacturer’s instructions.
Installing the SCSI Card 2930CU 2-1
Registering Your SCSI Card 2-3
2-1

Installing the SCSI Card 2930U
4 Find an unused PCI expansion slot (typically white or ivory) in the computer. Unscrew the expansion slot cover screw and remove the slot cover to provide an opening, as shown. Save the slot cover screw for use in Step 7.
5 Remove the SCSI Card 2930CU from its antistatic packaging.
Note: Always handle the SCSI card by its edges or metal bracket. Do not touch the gold connector or any components on the card.
6 Place the SCSI Card 2930CU in the slot and press it down firmly until the connector fingers are fully seated.
PCI expansion slot
Expansion slotcover
2-2

Installing the SCSI Card 2930U
7 Secure the card bracket with the screw you removed in Step 4.
Do not close the computer cabinet or reconnect the power cord yet. Continue with Chapter 3, Installing SCSI Devices.
Registering Your SCSI CardTo register your SCSI Card 2930CU, go to www.register.adaptec.com. If you don’t have Internet access, complete and return the registration card located on the SCSI Card 2930 CD.
Card bracket
2-3

3
Installing SCSI DevicesIn this ChapterYou can connect a total of seven SCSI devices to the SCSI Card 2930CU. If you are installing more than two internal SCSI devices, you will need an internal SCSI cable with enough connectors for all devices.
The SCSI card, and each SCSI device (whether internal or external), must have a unique SCSI ID. See SCSI IDs on page A-2 and refer to each device’s documentation for more information.
Note: The card’s SCSI ID is preset to 7 and should not be changed.
Installing Internal SCSI DevicesYou must prepare each internal SCSI device for installation. See Preparing SCSI Devices for Installation on page A-4 for detailed instructions.
If you are connecting only external devices, skip to Connecting External SCSI Devices on page 3-5.
Installing Internal SCSI Devices 3-1
Connecting External SCSI Devices 3-5
3-1

Installing SCSI Devices
To install internal SCSI devices
1 Ensure that each internal SCSI device has a unique SCSI ID number between 0 and 6. Refer to the SCSI device’s documentation for instructions on setting the SCSI ID.
Note: Avoid touching the device connector pins.
2 If your computer is not already open, ground yourself on the chassis, then turn off the computer and disconnect the power cord. Open the computer cabinet, following the manufacturer’s instructions.
3 Mount each SCSI device in an available drive bay inside your computer. Refer to the documentation for your computer and SCSI devices for installation instructions.
Note: If space is limited inside your computer, you may have difficulty connecting SCSI and power supply cables to your SCSI devices once they’re installed. Consider completing these connections (starting with Step 4 on page 3-3) before installing the devices.
Internal SCSI device mountedin the drive bay
3-2
Installing SCSI Devices
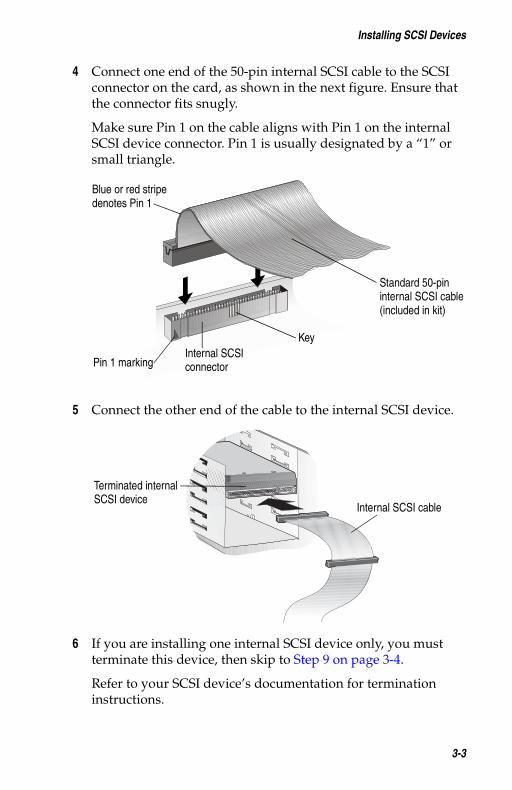
4 Connect one end of the 50-pin internal SCSI cable to the SCSI connector on the card, as shown in the next figure. Ensure that the connector fits snugly.
Make sure Pin 1 on the cable aligns with Pin 1 on the internal SCSI device connector. Pin 1 is usually designated by a “1” or small triangle.
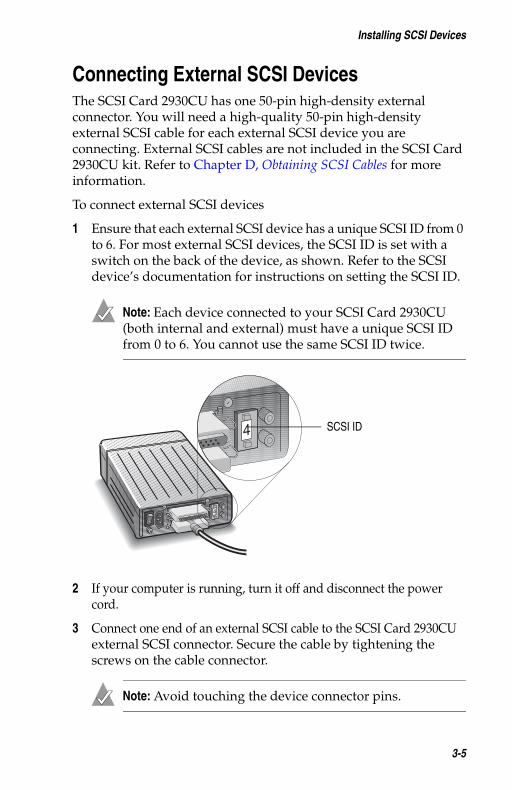
5 Connect the other end of the cable to the internal SCSI device.
6 If you are installing one internal SCSI device only, you must terminate this device, then skip to Step 9 on page 3-4.
Refer to your SCSI device’s documentation for termination instructions.
Blue or red stripedenotes Pin 1
Standard 50-pininternal SCSI cable(included in kit)
Pin 1 marking
KeyInternal SCSI connector
Terminated internalSCSI device
Internal SCSI cable
3-3

Installing SCSI Devices
7 Connect any other internal SCSI devices, as shown.
8 Terminate the device that is connected to the end of the cable. Refer to the SCSI device’s documentation for instructions.
9 Connect a power cable from your computer’s power supply to the power input connector on the SCSI device, as shown. Repeat this step for each SCSI device.
10 Close the computer cabinet. Do not reconnect the power cord yet.
If you are also connecting external SCSI devices, skip to the next section, Connecting External SCSI Devices.
If you are not connecting external SCSI devices, complete the installation by continuing with Step 11.
11 Reconnect the power cord, then turn on the computer.
12 Install the software driver for your operating system. See Chapter 4, Installing Drivers for more information.
Terminated internal SCSI device
Unterminated internal SCSI deviceInternal SCSI cable
Power input connector
Power supply
Power cable
3-4
Installing SCSI Devices
Connecting External SCSI DevicesThe SCSI Card 2930CU has one 50-pin high-density external connector. You will need a high-quality 50-pin high-density external SCSI cable for each external SCSI device you are connecting. External SCSI cables are not included in the SCSI Card 2930CU kit. Refer to Chapter D, Obtaining SCSI Cables for more information.
To connect external SCSI devices
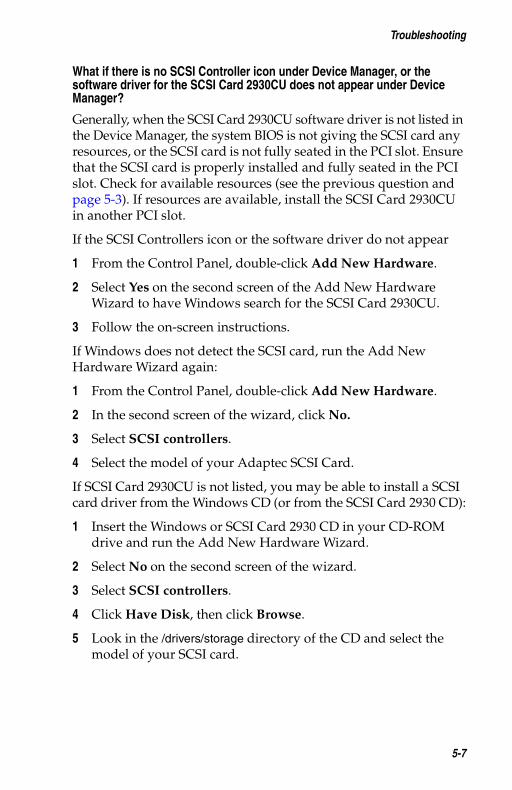
1 Ensure that each external SCSI device has a unique SCSI ID from 0 to 6. For most external SCSI devices, the SCSI ID is set with a switch on the back of the device, as shown. Refer to the SCSI device’s documentation for instructions on setting the SCSI ID.
Note: Each device connected to your SCSI Card 2930CU (both internal and external) must have a unique SCSI ID from 0 to 6. You cannot use the same SCSI ID twice.
2 If your computer is running, turn it off and disconnect the power cord.
3 Connect one end of an external SCSI cable to the SCSI Card 2930CU external SCSI connector. Secure the cable by tightening the screws on the cable connector.
Note: Avoid touching the device connector pins.
SCSI ID
3-5

Installing SCSI Devices
4 Connect the other end of the cable to a SCSI connector on the back of the SCSI device.
5 If you are installing only one external SCSI device, terminate the device.
Refer to your SCSI device’s documentation for termination instructions.
6 Connect other external SCSI devices by cabling each device to the previous one, as shown. Only terminate the SCSI device at the end of the chain.
7 Reconnect the power cord to the computer and connect power cables to the external SCSI devices.
8 Turn on the SCSI devices and allow them to power up. Then turn on the computer.
9 Install the driver. See Chapter 4, Installing Drivers for more information.
Terminated device
Unterminated devices
3-6

4
Installing DriversIn this ChapterAfter installing the SCSI Card 2930CU and your SCSI devices, install the driver by following the instructions appropriate for your computer.
Windows 2000 and Windows XPIn Windows 2000 and Windows XP, driver installation is fully automatic, including the identification of compatible drivers.
Verifying Driver Installation – Windows XPTo verify driver installation
1 Click Start, point to Settings, then click Control Panel. Double-click Performance and Maintenance, then double-click System.
2 Click on the Hardware tab, then click Device Manager.
3 Double-click SCSI and RAID Controllers. Check that the SCSI Card 2930CU is listed. (See the screen shot on page 4-2.)
Windows 2000 and Windows XP 4-1
Windows Me 4-3
Windows 95 and Windows 98 4-3
Windows NT 4.0 4-11
4-1

Installing Drivers
Verifying Driver Installation – Windows 2000To verify driver installation
1 Right click the My Computer icon on your desktop.
2 Select Manage.
3 Click Device Manager.
4 Double-click SCSI and RAID Controllers. Check that the SCSI Card 2930CU is listed, as shown.
SCSI Card 2930CU driver installed
4-2

Installing Drivers
Windows MeWindows Me has embedded driver support for a SCSI card as part of the installation software. When the SCSI Card 2930CU is installed and you have restarted your computer, the Add New Hardware Wizard window appears to guide you through the final steps.
1 When the Add New Hardware Wizard window appears, select the top radio button to launch an automatic search for the most suitable driver, and click Next.
Windows locates the appropriate driver for the newly-detected SCSI card and automatically processes the installation.
The SCSI Card 2930CU is detected as PCI SCSI AHA-2930CU.
Note: If Windows is unable to find the driver, insert the SCSI Card 2930 CD into the CD-ROM drive and direct Windows to search the CD for the driver.
2 Click Finish to complete the installation. To verify driver installation, see Verifying Driver Installation – Windows 95/98/Me on page 4-11.
Windows 95 and Windows 98This section explains how to install the driver for Windows 95/98. The driver is detected as PCI SCSI AHA-2930CU. The driver file on the SCSI Card 2930 CD is aic78xx.mpd.
If you are performing a first-time Windows 95/98 installation, see the next section, Installing the Driver When Installing Windows 95/98.
If Windows 95/98 is already installed on your system, see Installing the Driver When Windows 95 is Already Installed on page 4-4 or Installing the Driver When Windows 98 is Already Installed on page 4-7.
Note: When Windows 95/98 starts, if a New Hardware Found dialog box displays after your SCSI Card 2930CU has been installed, select Driver from Disk Provided by Hardware Manufacturer. Insert the SCSI Card 2930 CD into the CD-ROM drive and type the drive letter for your CD-ROM drive. Then, follow the on-screen instructions.
4-3

Installing Drivers
Installing the Driver When Installing Windows 95/98The Ultra SCSI driver is embedded in the Windows 95/98 CD. During a normal Windows 95/98 installation, the SCSI Card 2930CU is detected in your system and the embedded driver is automatically installed.
Note: If Windows cannot detect the SCSI Card 2930CU installed in your computer, you must install the driver manually after the Windows installation is complete. Follow the procedures in either Installing the Driver When Windows 95 is Already Installed on page 4-4 or Installing the Driver When Windows 98 is Already Installed on page 4-7.
Installing the Driver When Windows 95 is Already InstalledTo update or install the driver
1 Start Windows 95.
2 Click Start, point to Settings, then click Control Panel. Double-click System, then click on the Device Manager tab.
4-4

Installing Drivers
3 Click the plus sign (+) next to Other Devices, then double-click PCI SCSI Bus Controller to open the PCI SCSI Bus Controller Properties window. Click the Driver tab, then click Update Driver.
4 Insert the SCSI Card 2930 CD into your CD-ROM drive. Ensure that Yes is selected, then click Next.
5 Click Other Locations.
4-5

Installing Drivers
6 Browse to the location of the driver on the CD. (The driver file is aic78xx.mpd.) Then click OK.
7 Click Finish.
This message appears:
Please insert the disk labeled ‘7800 Family Manager Set Installation Disk’, and then click OK.
8 Click OK to clear the message.
4-6

Installing Drivers
9 Browse to the location of the driver on the SCSI Card 2930 CD. Then click OK.
10 Click Yes to restart your computer. (You must restart your computer for the changes to take effect.)
Installing the Driver When Windows 98 is Already InstalledTo update or install the driver
1 Start Windows 98.
2 Click Start, point to Settings, then click Control Panel. Double-click System, then click on the Device Manager tab.
4-7

Installing Drivers
3 Click the plus sign (+) next to Other Devices, then double-click PCI SCSI Bus Controller to open the PCI SCSI Bus Controller Properties window. Click the Driver tab, then click Update Driver.
4-8

Installing Drivers
4 Click Next. Click Next again. Insert the SCSI Card 2930 CD into your CD-ROM drive.
5 Select CD-ROM drive and deselect Floppy disk drive by clicking in the check boxes. Select Specify a location, then browse to the location of the driver on the CD. Then click Next.
4-9

Installing Drivers
6 Click Next.
Note: Your CD-ROM drive letter may differ from that shown in the example above.
7 Click Finish to complete the installation. Click Yes to restart your computer. (You must restart your computer for the changes to take effect.)
4-10

Installing Drivers
Verifying Driver Installation – Windows 95/98/MeTo verify driver installation
1 Click Start, point to Settings, then click Control Panel. Double-click System, then click on the Device Manager tab.
2 Click the plus sign (+) next to SCSI Controllers. SCSI Card 2930CU should be listed as shown.
Windows NT 4.0This section explains how to install the driver for Windows NT 4.0. The driver is aic78xx.sys.
If you are performing a first-time Windows NT 4.0 installation, see Installing the Driver When Installing Windows NT on page 4-12.
If Windows NT 4.0 is already installed on your system, see Installing the Driver When Windows NT is Already Installed on page 4-12.
For information on removing your SCSI Card 2930CU, see Removing the SCSI Card 2930CU on page 4-14.
SCSI Card 2930CUdriver installed
4-11

Installing Drivers
Installing the Driver When Installing Windows NTThe driver is embedded on the Windows NT 4.0 CD. During a normal Windows NT installation, the SCSI Card 2930CU is detected in your system and the embedded driver is automatically installed.
Installing the Driver When Windows NT is Already InstalledTo update or install the drivers if Windows NT is already installed
1 Start Windows NT.
2 Click Start, point to Settings, then click Control Panel.
3 Double-click SCSI Adapters, then click the Drivers tab.
4 Click Add.
5 In the Install Driver window, click Have Disk.
6 Insert the SCSI Card 2930 CD into the CD-ROM drive.
7 In the Copy Manufacturer’s File From text box, type the drive letter for your CD-ROM drive, and click OK.
8 In the Install Driver window, Click OK.
The system asks if you want to use the currently installed driver or install a new one.
9 Click New.
10 Type the drive letter for your CD-ROM drive, then click Continue.
The driver is now installed.
11 Restart your computer for the changes to take effect.
Installing the Driver When Installing Windows NT to a SCSI Hard Disk Drive Attached to the SCSI Card 2930CUFollow the appropriate set of instructions for a fresh Windows NT installation from either CD or floppy disk.
Completing an Installation from CD
1 Insert your Windows NT 4.0 CD into your CD-ROM drive, then turn on your computer.
2 Press and release F6 immediately when this message appears:
Setup is inspecting your computer’s hardware configuration...
4-12

Installing Drivers
Note: If this message does not appear, your system may not be set up to boot from a CD. You need to install Windows NT from floppy disks. See Completing an Installation from Floppy Disk on page 4-13.
3 Press S when this message appears:
Windows NT was unable to determine one or more mass storage controllers. Press S to specify an additional device.
4 Press Enter to select Others.
5 Insert the driver disk created from the Adaptec SCSI CD for Windows NT into your floppy disk drive.
6 Use the arrow keys to highlight and select Adaptec PCI SCSI AIC-78xx.sys SCSI Host Adapter Driver for NT 4.0, then press Enter.
7 Enter the driver path if you are prompted to do so.
8 Press Enter to continue the Windows NT operating system set-up. Follow the instructions on-screen and in the Windows NT documentation to complete the installation.
Completing an Installation from Floppy Disk
1 Insert your Windows NT boot disk #1 in your floppy disk drive, then turn on your computer.
2 Insert boot disk #2 when prompted.
3 When a blue screen appears, press Enter.
4 Press S. (This skips Windows NT Setup’s auto-detection of your PCI SCSI adapter.)
5 Press S again to specify an additional device.
6 Press Enter to select Others.
7 Insert the driver disk created from the Adaptec SCSI CD for Windows NT into your floppy disk drive.
8 Use the arrow keys to highlight and select Adaptec PCI SCSI AIC-78xx.sys SCSI Host Adapter Driver for NT 4.0, then press Enter.
9 Enter the driver path if you are prompted to do so.
4-13

Installing Drivers
10 Press Enter to continue the Windows NT operating system set-up. Follow the instructions on-screen and in the Windows NT documentation to complete the installation.
Removing the SCSI Card 2930CUIf you physically remove your SCSI Card 2930CU, a warning message is generated every time you boot Windows NT. To eliminate the warning message, remove the driver from your system.
Caution: If you have removed a SCSI card but still have other SCSI cards of the same type installed in your computer, do not use Windows NT Setup to remove the device driver.
To remove a driver from Windows NT
1 From the Control Panel, double-click SCSI Adapters.
2 Click the Drivers tab.
3 Select the driver (aic78xx.sys).
4 Click Remove.
5 Ensure that you are removing the correct driver, then click Yes.
6 Click Yes to restart the computer and initialize changes. Click No to return to the SCSI Adapters window.
Note: Windows NT Setup does not delete the device driver from your system disk; it only updates Windows NT software configuration information so that the device driver is no longer loaded during system bootup.
!
4-14

5
TroubleshootingIn this ChapterFirst StepsMost problems with the SCSI Card 2930CU result from errors in preparing and connecting devices on the SCSI bus. If you have problems, check these possibilities first:
� Are all SCSI devices turned on?
� Are all SCSI bus cables and power cables properly connected?
� Is the SCSI Card 2930CU firmly seated and secured in the PCI expansion slot? (Turn off the power to the computer and disconnect the power cord before checking the card.)
� Is pin 1 orientation maintained throughout the SCSI bus?
� Does each device on the SCSI bus have a unique SCSI ID?
� Are all SCSI devices terminated properly?
First Steps 5-1
Troubleshooting Q & A – General 5-3
Troubleshooting Q & A – Windows 95/98 Only 5-5
Troubleshooting Q & A – Windows NT 4.0 5-9
5-1

Troubleshooting
� On some computers, you can set up configuration options when the computer first boots up (through CMOS setup). If your computer has this feature, check that these options are set up as specified:
� Interrupt Type or Interrupt Line option is set to Int-A or Interrupt Type = A. (Also check the motherboard jumper setting).
� Triggering Interrupt option is set to Level.
� Bus mastering for the PCI slots is set to Enabled. Refer to your computer documentation for more information on bus mastering.
� PCI slot in which the SCSI Card 2930CU is installed is set to Enabled.
� If your computer has a combination of ISA (or EISA) and PCI boards, you may need to mark the IRQs used by ISA/EISA boards as Used so the computer BIOS will not try to assign these IRQs to other PCI boards.
� In some computers the BIOS reserves a set of available IRQs for PCI boards, and you have to assign these IRQs manually.
Some configuration options apply to a specific PCI bus slot, so if you change any option be sure you are applying the change to the correct slot. Check your computer documentation to determine the correct PCI bus slot.
If you still experience problems, try installing the SCSI Card 2930CU in another PCI slot, starting with the first PCI slot.
If, after working through this checklist, you are still unable to resolve a problem, check the questions and answers in the next section or refer to the Adaptec Web site at www.adaptec.com for additional troubleshooting information.
5-2

Troubleshooting
Troubleshooting Q & A – GeneralHow can I tell if the SCSI Card 2930CU software driver is loading properly?
Follow the instructions for your operating system as provided in Chapter 4, Installing Drivers.
Why does an X inside a red circle appear by the SCSI Card 2930CU software driver in Device Manager?
The SCSI Card 2930CU software driver is disabled and isn’t loading. To enable the driver
1 Double-click the SCSI card software driver in Device Manager.
2 Click the General tab, and check Original Configuration (current).
Note: In most cases, this is the result of an IRQ conflict. See the information on page 5-6.
How can I check the status of a resource (for example, IRQ, Memory, I/O)?
1 Click Start, point to Settings, then click Control Panel.
2 Double-click System, then click on the Device Manager tab.
3 Click Computer, then click Properties.
4 Go to the View Resources tab and click the option button for the type of resource you want to check.
The setting and the hardware using the setting displays.
� If a specific resource is not listed, the resource is not used by a device.
� If a resource is listed more than once, the resource is used by more than one device.
� If a resource is used by an unknown device, the resource is used but the device using the resource cannot be detected.
5-3

Troubleshooting
Common Error Messages
“Device connected, but not ready”
The SCSI card received no answer when it requested data from an installed SCSI device.
Make sure the drive is set to spin up when the power is turned on. (Refer to the device’s documentation.) If you still have problems, you may have a bad drive. If you can still access your computer
1 Click Start, point to Programs>Accessories>System Tools, then click ScanDisk.
2 Click Start, then wait a few moments for results.
“Start unit request failed”
The SCSI card BIOS was unable to send a Start Unit Command to the peripheral.
Run SCSISelect and disable the Send Start Unit Command for the peripheral.
“Time-out failure during...”
An unexpected time-out occurred.
� Verify that the SCSI bus is properly terminated.
� Verify that all cables are properly connected.
� Disconnect the SCSI cables from the SCSI card and then start the computer. If the computer successfully restarts, one of the SCSI devices, cables, or terminators may be defective.
“BIOS Not Installed”
A non-bootable hard disk is attached and the BIOS is enabled. This is an informative message, not an error. This message will appear also if no boot device is attached.
5-4

Troubleshooting
Troubleshooting Q & A – Windows 95/98 OnlyWhen I start Windows 95/98, the system locks up when the Windows logo displays. How can I get the system to start so that I can verify that the SCSI card is functioning normally?
1 Start or restart your computer. View the messages that appear.
2 When this message appears:
Starting Windows 95/98
press and release F8 while the text is on your screen
3 From the menu that displays, select Safe Mode. (It may take extra time for Windows to load.)
4 Verify that the SCSI Card 2930CU software driver is loading properly (see the information in the next question).
Why is there a yellow “!” beside my driver(s) in Device Manager?
The yellow “!” may appear for many reasons. Use the table to troubleshoot this problem. The easiest problem to solve is listed first.
How do I check for faulty cables, termination, or damaged device?
1 Turn off your computer and disconnect the cables from the SCSI card.
2 Turn on your computer, restart Windows, and verify that the yellow “!” disappeared from Device Manager.
If the yellow “!” disappeared, the cabling, termination, or device is faulty, or there may be an IRQ conflict in your system.
Where do I check to see if the Master Boot Record was modified?
1 Click Start, point to Settings, then click Control Panel.
2 Double-click System, then click on the Performance tab.
3 Click Details for more information. If needed, contact the computer manufacturer for additional help.
Reason See Page
Faulty cables, termination, or device 5
Master Boot Record was modified 5
Conflicting or unavailable resources 6
5-5

Troubleshooting
Where do I check for conflicting or unavailable resources?
1 Click Start, point to Settings, then click Control Panel.
2 Double-click System, then click on the Device Manager tab.
3 Double-click Computer.
4 Click Interrupt request (IRQ), as shown.
The Setting column lists the IRQs in use. IRQ settings range from 0 through 15. If an IRQ setting is not listed, it is available. In the above example, setting 10 is not listed and therefore is an available IRQ.
5-6
Troubleshooting
What if there is no SCSI Controller icon under Device Manager, or the software driver for the SCSI Card 2930CU does not appear under Device Manager?
Generally, when the SCSI Card 2930CU software driver is not listed in the Device Manager, the system BIOS is not giving the SCSI card any resources, or the SCSI card is not fully seated in the PCI slot. Ensure that the SCSI card is properly installed and fully seated in the PCI slot. Check for available resources (see the previous question and page 5-3). If resources are available, install the SCSI Card 2930CU in another PCI slot.
If the SCSI Controllers icon or the software driver do not appear
1 From the Control Panel, double-click Add New Hardware.
2 Select Yes on the second screen of the Add New Hardware Wizard to have Windows search for the SCSI Card 2930CU.
3 Follow the on-screen instructions.
If Windows does not detect the SCSI card, run the Add New Hardware Wizard again:
1 From the Control Panel, double-click Add New Hardware.
2 In the second screen of the wizard, click No.
3 Select SCSI controllers.
4 Select the model of your Adaptec SCSI Card.
If SCSI Card 2930CU is not listed, you may be able to install a SCSI card driver from the Windows CD (or from the SCSI Card 2930 CD):
1 Insert the Windows or SCSI Card 2930 CD in your CD-ROM drive and run the Add New Hardware Wizard.
2 Select No on the second screen of the wizard.
3 Select SCSI controllers.
4 Click Have Disk, then click Browse.
5 Look in the /drivers/storage directory of the CD and select the model of your SCSI card.
5-7
Troubleshooting
How do I use the Windows Hardware Conflict Troubleshooter?
1 Click Start, then click Help.
2 Go to the Contents tab, then double-click Troubleshooting.
3 Double-click If you have a hardware conflict.
4 Follow the step-by-step instructions in Windows Help.
What is a miniport driver, and how do I make sure that the miniport driver for my SCSI card is installed correctly?
Miniport drivers are 32-bit protected mode device drivers used by Windows 95/98 to control SCSI cards and devices. Windows 95/98 includes a set of miniport drivers for various SCSI cards.
If your SCSI card is already installed, the card’s miniport driver is automatically installed and configured during Windows 95/98 installation. Follow the instructions listed in Installing the Driver When Windows 98 is Already Installed on page 4-7 to ensure that the miniport driver is updated.
To make sure the driver is installed correctly in systems running Windows 95/98
1 From the Control Panel, double chick System.
2 Click the Device Manager tab.
3 Double-click SCSI Controllers.
The SCSI Card 2930CU should appear.
What if a yellow exclamation mark or a red X appears in Device Manager in front of my SCSI card.
This means there is some kind of resource problem. First, see if the names of any SCSI cards appear that are not actually installed in your computer. If so, select the name and click Remove.
If a red X appears in front of your SCSI card name, remove all the SCSI card references under SCSI Controllers and run Add New Hardware, as described in the previous question/answer.
If a yellow exclamation point appears in front of your SCSI card name, the resources that the driver uses probably do not match the resources used by the hardware.
1 Double-click the SCSI card name, then click on the Resource tab.
5-8

Troubleshooting
2 Deselect the Use Automatic Settings box and edit the resources (Interrupt Request, Direct Memory Access, etc.) so they match those used by the SCSI card.
If the problem still remains, there is probably a hardware resource conflict between the SCSI card and other hardware in your computer. You can fix this by changing the hardware resource settings. (See your hardware documentation.)
What do I need to do if I change or upgrade my SCSI card?
1 Click Start, point to Settings, then click Control Panel.
2 Double-click System, then click the Device Manager tab.
3 Double-click SCSI Controllers, then select the name of the old SCSI card. Click Remove.
4 Turn off the computer and physically remove the currently installed SCSI card.
5 Install the new SCSI card according to the instructions in the hardware documentation.
6 Turn the computer on. If the new SCSI card supports Plug and Play, Windows will install and configure it automatically. Otherwise, run Add New Hardware to make sure the new driver is loaded.
Troubleshooting Q & A – Windows NT 4.0How can I check which resources are available on my computer?
Note: You must log in as an administrator to complete the following steps.
1 Click Start, point to Programs>Administrative Tools, select Windows NT Diagnostics, then click Resources Tab.
2 Select the resource from the Used Resources list (for example IRQ, DMA, and so on).
3 In the SCSI Adapters window, click Properties to see which resources are in use.
5-9

Troubleshooting
I made changes to the SCSI card configuration and Windows NT no longer boots.
The boot manager for Windows NT contains recovery logic to allow you to return to the last known good configuration. If you have changed your SCSI card configuration and Windows NT no longer boots
1 Undo any hardware changes you have made to the computer since it was last operational.
2 Restart the computer. Watch the display carefully during bootup. If this message appears:
Press spacebar NOW to invoke the Last Known Good menu
press the Spacebar and follow the instructions on the screen to continue booting with the last known good configuration.
3 Once your computer is operational again, check all of the hardware and software configuration changes you want to make. Look specifically for conflicts with parts of the existing system configuration that are not being changed.
Error CodesError codes generated by the driver can be viewed by opening the Windows NT Event Viewer error logs.
To view events generated by the driver
1 Double-click the Event Viewer icon in the Administrative Tools program group.
� Error codes generated by the driver show up as Event ID 11.
� Error codes generated by the SCSI Port show up as Event ID 9.
2 To view event details, select System from the Log menu. Double-click the driver event that has an Event ID of 11. (There may be multiple driver events or none at all.)
The top section of the Event Detail dialog box displays information such as the time that the event was generated, the computer on which the event occurred (in case of remote monitoring), and the description of the event. The Data section of the Event Details dialog box displays the error codes generated.
5-10

Troubleshooting
3 Click the Words radio button.
In the Data section of the dialog box, the entry in the second row and second column (to the right of the 0010: entry) lists the error code generated by the driver. The common error codes for the driver are described in the Table on page 5-11.
Note: The entry in the third row of the last column identifies the SCSI ID of the device originating the error.
Note: When reporting problems to Adaptec Customer Support, include the complete error code in your problem description.
Error Code Description
[xxxxx004][xxxxx005][xxxxx006]
Command completed with error. A request issued to a target device completed with indication that there is an error. In most cases, the error is recovered and normal operations continues.
[xxxxx010] Error issuing command. An error has occurred while the driver was setting up its internal data structures.
[xxxxx011] Error issuing command. The requested command is not supported by this driver.
[xxxxx012][xxxxxx99]
Error issuing command. The driver does not recognize the target device.
[xxxxx021] Device protocol error. An unexpected event occurred during data transfer between the adapter and target device. Normally, this indicates a faulty or noncompliant target device.
5-11

Troubleshooting
[xxxxx022] Adapter or target device protocol error. The adapter or target device has broken the communication protocol. A faulty device could cause this message to appear. Normally this is not a serious problem. If you get this message frequently over a short period of time, it could indicate that the device or system is malfunctioning. Unplug or power down unused devices to see if the problem persists.
[xxxxx023] Target device parity error. The driver has detected a parity error by the target device.
[xxxxx024] Data overrun or underrun. The adapter was given more or less data than the expected amount of data.
[xxxxx031] Target device queue full. The target device internal buffer is full.
[xxxxx032] Target device busy. The target device reports a Busy status. Another program may already be using this device.
[xxxxx050][xxxxxx9A]
Host adapter failure. Your host adapter may not be properly installed or is defective. Try reseating the adapter in the PCI slot, or try installing it a different PCI slot.
[xxxxx081][xxxxxx8A][xxxxxx83]
Adapter initialization failure. An error has occurred while the driver was setting up its internal data structures. Verify that your adapter is supported by this version of the driver.
[xxxxx089] Unable to allocate memory. This indicates that there may be a problem with the amount of memory installed in your system. Verify that your system has at least the minimum amount of memory required by your operating system.
Error Code Description
5-12

Troubleshooting
[xxxxx096] Adapter hardware initialization failure—possible resource conflict. The driver has attempted to initialize the adapter hardware but failed. This might suggest that the adapter resources (e.g., IRQ) conflict with another board installed in your system.
[xxxxx097] Unable to allocate memory. This indicates that there may be a problem with the amount of memory installed in your system. Verify that your system has at least the minimum amount of memory required by your operating system.
[xxxxx0af] Unable to deallocate memory that was allocated for a target device. Normally, this is not a serious problem, unless you get this message frequently over a short period of time. The memory can be reclaimed by restarting the system.
[xxxxx0ce] Scatter/Gather Limit exceeded. An I/O request packet from the system contained a Scatter/Gather element list that contained more elements than are supported by the miniport. Scatter/Gather is a list of data segments that define the entire data transfer. Scatter/Gather is a means to improve total data throughput. This error might be caused by a component external to the miniport driver, such as the operating system or an ASPI application.
[xxxxxd4] Adapter hardware failure - adapter reset. The host adapter hardware failed and the miniport has to reset the hardware.
[xxxxx0d6] Internal driver error. An error has occurred while the driver was setting up its internal data structures. Try installing the most up-to-date version of the driver available from the Adaptec Web site or BBS.
Error Code Description
5-13

A
In this AppendixUnderstanding SCSISCSI (pronounced “scuzzy”) stands for Small Computer System Interface. SCSI is an industry standard computer interface for connecting SCSI devices (such as a hard disk drive, CD-ROM drive, or scanner) to a common SCSI bus.
A SCSI bus is an electrical pathway that consists of a SCSI card (such as the SCSI Card 2930CU) installed in a computer and one or more SCSI devices. SCSI cables are used to connect the devices to the SCSI card.
For the SCSI bus to function properly, each SCSI device must have a unique SCSI ID and must be correctly terminated. For more information, see the next section (SCSI IDs) and Terminating the SCSI Bus on page A-3.
SCSI IDs A-2
Terminating the SCSI Bus A-3
Preparing SCSI Devices for Installation A-4
Using SCSI Devices A-4
Installing Multiple SCSI Cards A-5
A-1

Understanding SCSI
SCSI IDsSCSI IDs identify each device on the SCSI bus and determine priority when two or more devices are trying to use the SCSI bus at the same time. The SCSI card is also identified by a SCSI ID. For the SCSI Card 2930CU, SCSI IDs are numbers between 0 and 7.
Adaptec presets the SCSI Card 2930CU to SCSI ID 7. You should not change this setting. SCSI ID 7 has the highest priority on the SCSI bus; the remaining SCSI IDs descend in priority from 6 to 0.
Use SCSI ID 0 for the first SCSI hard disk drive. Most internal SCSI hard disk drives come from the factory set to SCSI ID 0.
Note: If you are booting your computer from a SCSI hard disk connected to the SCSI Card 2930CU, the Boot SCSI ID setting in the SCSISelect utility must correspond to the SCSI ID of the peripheral you are booting from. By default, the Boot SCSI ID is set to 0. See Boot Device Options on page B-4 to change the Boot SCSI ID.
Here is some general information about SCSI IDs:
� For internal SCSI devices, you generally set the SCSI ID by configuring a jumper on the SCSI device.
� For external SCSI devices, you generally set the SCSI ID with a switch on the back of the device.
� For specific instructions on setting the SCSI ID, refer to the SCSI device’s documentation.
� In Windows 95/98, you can use the Device Manager to view the SCSI ID assigned to the SCSI card and each SCSI device.
SCAM ProtocolThe SCSI Card 2930CU supports the SCSI Configured AutoMatically (SCAM) protocol. This protocol assigns SCSI IDs dynamically and resolves SCSI ID conflicts automatically when you start the computer. If your computer includes SCSI disk drives or other SCSI devices that support SCAM, you do not need to assign SCSI IDs manually to these devices.
A-2

Understanding SCSI
To determine if your SCSI device supports the SCAM protocol, check the SCSI device’s documentation.
To enable SCAM support, see Chapter B, Configuring the SCSI Card 2930CU with SCSISelect.
Terminating the SCSI BusTo ensure reliable communication on the SCSI bus, both ends must be terminated. Termination prevents the signal from bouncing off the end of the cable and interfering with itself.
If the SCSI Card 2930CU is connected at one end of the SCSI bus, you must terminate the device at the other end.
If the SCSI Card 2930CU is connected in the middle of the SCSI bus, it will not terminate itself and you must terminate the SCSI devices connected to both ends of the SCSI bus.
The method for terminating a SCSI device varies. Refer to the SCSI device’s documentation for instructions on how to enable or disable termination.
Here is some general information about termination:
� You control termination on internal SCSI devices by manually setting a jumper on the device or by changing the position on the cable. The internal SCSI device at the end of the cable must be terminated.
� Usually, you control termination on external SCSI devices by installing or removing a SCSI terminator module, or by setting a switch on the back of the device. The external SCSI device at the end of the cable must be terminated.
� By default, termination on the SCSI Card 2930CU is set to Automatic. Adaptec recommends that you keep this setting. To manually set termination on the SCSI Card 2930CU, see Chapter B, Configuring the SCSI Card 2930CU with SCSISelect.
� Most SCSI devices come from the factory with termination enabled. Some SCSI devices include a terminator block or pass-through terminator. See your SCSI device’s documentation for information on enabling and disabling termination.
A-3

Understanding SCSI
Preparing SCSI Devices for InstallationWhen preparing to install SCSI devices, make sure to
� Check the SCSI IDs. Ensure that the SCSI Card 2930CU and each SCSI device you want to connect to it has a unique SCSI ID. See SCSI IDs on page A-2 for more information.
� Use only high-quality SCSI-2 cables to ensure reliable data transfer. See Chapter D, Obtaining SCSI Cables for more information.
� Terminate the ends of the SCSI bus. The SCSI device at the end of each cable, or the end of the cable itself, must have a terminator installed or enabled. Terminators must be disabled or removed from SCSI devices that will be connected between the ends of the SCSI cable. See Terminating the SCSI Bus on page A-3 for more information.
� You may need to install the manufacturer’s proprietary device drivers if you use SCSI devices other than hard disk drives and CD-ROM drives. (Refer to your device’s documentation.)
Using SCSI Devices
Hard Disk DrivesEvery SCSI hard disk drive connected to you SCSI card must be physically low-level formatted, partitioned, and logically formatted before it can be used to store data. Refer to your computer and operating system documentation for instructions.
Caution: A low-level format destroys all data on the drive. Be sure to back up your data before performing a low-level format.
If you are booting from a SCSI hard disk drive, make sure the Hard Disk (or Drives) setting in your computer’s CMOS setup program is set to None or No Drives Installed. Refer to your computer and operating system documentation for instructions.
If both SCSI and non-SCSI (for example, IDE) hard disk drives are installed, the non-SCSI hard disk drive is usually the boot drive.
!
A-4

Understanding SCSI
Installing Multiple SCSI CardsYou can install multiple SCSI cards in your computer. You are limited only by the available system resources (for example, IRQ settings, I/O port addresses, and so on).
Each SCSI card you install forms a separate SCSI bus with a different set of SCSI devices. Each SCSI ID can be used once on each SCSI card. (For example, each SCSI card can have a device with SCSI ID 2 but SCSI ID 2 appears only once on each card.)
If you have two or more SCSI cards, enable the BIOS on the boot SCSI card only; disable the BIOS on the remaining SCSI cards.
A-5

B
Configuring the SCSI Card 2930CU with SCSISelectIn this AppendixYou can use Adaptec SCSISelect to change SCSI settings without opening the computer or handling the card, and you can low-level format or verify the disk media of your SCSI hard disk drives. The table in the next section (SCSISelect Settings) lists the available and default settings for each SCSISelect option.
Note: The default settings are appropriate for most systems. Run SCSISelect if you need to change or view current settings, or if you would like to run the SCSI disk utilities. Detailed descriptions of each option begin on page B-3.
SCSISelect Settings B-2
Starting SCSISelect B-3
Using SCSISelect Settings B-3
Using SCSI Disk Utilities B-7
Exiting SCSISelect B-8
B-1

Configuring the SCSI Card 2930CU with SCSISelect
SCSISelect Settings
SCSISelect Options Available Settings Default Setting
SCSI Bus Interface Options
Host Adapter SCSI ID 0-7 7
SCSI Parity Checking Enabled, Disabled
Enabled
Host Adapter SCSI Termination Automatic, Enabled, Disabled
Automatic
Boot Device Options
Boot SCSI ID 0-7 0
Boot LUN Number1 0-7 0
SCSI Device Configuration Options
Initiate Sync Negotiation Yes, No Yes (Enabled)
Maximum Burst Rate 20.0, 10.0, 8.0, 6.7, 5.0
20.0
Enable Disconnection Yes, No Yes (Enabled)
Send Start Unit Command Yes, No No (Disabled)
BIOS Multiple LUN Support Yes, No No (Disabled)
Advanced Configuration Options
Plug-and-Play SCAM Support Enabled, Disabled
Disabled
Reset SCSI Bus at Initialization Enabled, Disabled
Enabled
Host Adapter BIOS Enabled, Disabled
Enabled
Support Removable Disks Under BIOS as Fixed Disks2
Boot Only,All Disks, Disabled
Boot Only
Extended BIOS Translation for DOS Drives > 1 GB2
Enabled, Disabled
Enabled
Display <Ctrl> <A> Messages during BIOS Initialization2
Enabled, Disabled
Enabled
B-2

Configuring the SCSI Card 2930CU with SCSISelect
Starting SCSISelectTo start SCSISelect:
1 Turn on or restart your computer.
2 When this message appears on your screen, immediately press Ctrl+A. (This message appears for only a few seconds.)
Press Ctrl+A for SCSISelect (TM) Utility!
3 From the menu that appears, use the ↑ and ↓ keys to move the cursor to the option you want to select, then press Enter.
Note: If you have difficulty viewing the display, press F5 to toggle between color and monochrome modes. (This feature may not work on all monitors.)
Using SCSISelect SettingsTo select an option, use the ↑ and ↓ keys to move the cursor to the option, then press Enter.
In some cases, selecting an option displays another menu. You can return to the previous menu at any time by pressing Esc.
To restore the original SCSISelect default values, press F6 from the main SCSISelect screen.
SCSI Bus Interface Options� Host Adapter SCSI ID—Sets the SCSI ID for the SCSI card. The
SCSI Card 2930CU is set at 7, which gives it the highest priority on the SCSI bus. You should not change this setting.
BIOS Support for Bootable CD-ROMs2
Enabled, Disabled
Disabled
BIOS Support for Int 13 Extensions2
Enabled, Disabled
Enabled
1 Setting is valid only if Multiple LUN Support is enabled.2 Settings are valid only if host adapter BIOS is enabled.
SCSISelect Options Available Settings Default Setting
B-3

Configuring the SCSI Card 2930CU with SCSISelect
� SCSI Parity Checking—When set to Enabled, verifies the accuracy of data transfer on the SCSI bus. Leave this setting enabled unless any SCSI device connected to the SCSI card does not support SCSI parity. If one SCSI device does not support SCSI parity, change this setting to Disabled.
� Host Adapter SCSI Termination—Determines the termination setting for the SCSI card. The default setting is Automatic, which determines termination this way:
� If a cable is connected to the SCSI card’s internal or external SCSI connector, the terminators are enabled. (The SCSI card is at the end of the SCSI bus.)
� If a cable is connected to the SCSI card’s internal and external SCSI connector, the terminators are disabled. (The SCSI card lies between the ends of the SCSI bus.)
You can also disable the terminators by setting Host Adapter Termination to Disable. Adaptec recommends that you leave this setting at its default (Automatic).
Boot Device Options� Boot SCSI ID—Specifies the SCSI ID of your boot drive.
� Boot LUN Number—Specifies which LUN to boot from on your boot drive. BIOS Multiple LUN Support must be enabled (see page B-5).
SCSI Device Configuration Options
Note: To configure settings for a SCSI device, you must know its SCSI ID (see Using SCSI Disk Utilities on page B-7).
� Initiate Sync Negotiation—When set to Enabled, initiates synchronous data transfer negotiation (Sync Negotiation) between the device and SCSI card. Leave this setting enabled unless any SCSI device connected to the SCSI card does not support synchronous negotiation.
� Maximum Burst Rate—Determines the maximum synchronous data transfer rate the SCSI card supports. If you have an Ultra
B-4

Configuring the SCSI Card 2930CU with SCSISelect
SCSI device, use the maximum value of 20.0. If your device is not Ultra SCSI, select a transfer rate of 10.0.
� Enable Disconnection—When set to Yes, allows the SCSI device to disconnect from the SCSI bus. Leave the setting at yes if two or more SCSI devices are connected to the SCSI card. If only one SCSI device is connected, change the setting to No for slightly better performance.
� Send Start Unit Command—When set to Yes, sends the Start Unit Command to the SCSI device at bootup.
� BIOS Multiple LUN Support—Determines whether booting from a SCSI drive that has multiple LUNs is supported. Enable this option if your boot drive has multiple LUNs.
Advanced Configuration Options
Note: Do not change the Advanced Configuration Settings unless absolutely necessary.
� Plug-and-Play SCAM Support—When set to Enabled, the SCSI card automatically assigns SCSI IDs to SCSI devices that support the SCAM protocol (see page A-2). The default is Disabled, but you can set it to Enabled even if you have a non-SCAM device.
� Reset SCSI Bus at IC Initialization—When set to Enabled, the SCSI card generates a SCSI bus reset during its power-on initialization and after a hard reset.
� Host Adapter BIOS—Enables or disables the SCSI card BIOS.
� Set to Enabled if you boot from a SCSI hard disk drive or a CD-ROM drive connected to the SCSI card.
� Set to Disabled if the devices on the SCSI bus (for example, CD-ROM drives) are controlled by software drivers and do not need the BIOS.
� Support Removable Disks Under BIOS as Fixed Disks—Determines which removable-media drives are supported by the SCSI card BIOS.
� Boot Only—Only the removable-media drive designated as the boot drive is treated as a hard disk drive.
B-5

Configuring the SCSI Card 2930CU with SCSISelect
� All Disks—All removable-media drives supported by the BIOS are treated as hard disk drives.
� Disabled— No removable-media drives are treated as hard disk drives. Software drivers are required because the drives are not controlled by the BIOS.
Caution: Do not remove media from a removable-media SCSI drive controlled by the SCSI card BIOS while the drive is on. You may lose data. To be able to remove media while the drive is on, install the removable-media software driver and set Support Removable Disks Under BIOS as Fixed Disks to Disabled.
� Extended BIOS Translation for DOS Drives > 1 GB—When set to Enabled, provides an extended translation scheme for SCSI hard disk drives with capacities greater than 1 GB. This setting is necessary only for MS-DOS 5.0 or above. The extended translation scheme supports 2-GB partitions on hard disk drives as large as 8 GB.
To partition a hard disk drive larger than 1 GB that is controlled by the SCSI card BIOS, use the MS-DOS Fdisk command and specify a partition size that is a multiple of 8. (Fdisk rounds up to the nearest whole multiple of 8.)
Caution: Back up your disks before changing the translation scheme.
� Display Ctrl+A Messages during BIOS Initialization—When set to Enabled, the SCSI card BIOS displays this message during system bootup:
Press Ctrl+A for SCSISelect (TM) Utility!
If this setting is disabled, you can still invoke the SCSISelect utility by pressing Ctrl+A after the SCSI card BIOS banner appears.
� BIOS Support for Bootable CD-ROMs—When set to Enabled, the SCSI card BIOS allows booting from a CD-ROM drive. Set to Disabled to boot from a hard disk drive or other device.
!
!
B-6

Configuring the SCSI Card 2930CU with SCSISelect
� BIOS Support for Int 13 Extensions—When set to Enabled, the SCSI card BIOS supports Int 13h extensions as required by Plug-and-Play. The setting can be either enabled or disabled if your system is not Plug-and-Play.
Using SCSI Disk UtilitiesTo access the SCSI disk utilities
1 From the main SCSISelect menu, select SCSI Disk Utilities.
SCSISelect scans the SCSI bus and displays a list of all SCSI IDs and the devices.
2 Use the ↑ and ↓ keys to move the cursor to a specific ID and device, then press Enter.
3 A small menu appears, displaying two options:
� Format Disk—Allows you to perform a low-level format on a hard disk drive. (Most SCSI disks are preformatted at the factory and do not need to be formatted again.) Each hard disk drive must be low-level formatted before you can use your operating system’s partitioning and file preparation utilities, such as MS-DOS Fdisk and Format.
Caution: A low-level format destroys all data on the hard disk drive. Be sure to back up your data before performing this operation. You cannot stop a low-level format once it is started; therefore, do not turn the power off to stop this operation.
� Verify Disk Media—Allows you to scan the media of a hard disk drive for defects. If the utility finds bad blocks on the media, it prompts you to reassign them; if you select Yes, those blocks are no longer used. You can press Esc at any time to stop the utility.
!
B-7

Configuring the SCSI Card 2930CU with SCSISelect
Exiting SCSISelectTo exit SCSISelect
1 Press Esc until a message prompts you to exit.
If you changed settings, you are prompted to save the changes before you exit.
2 Select Yes to exit, then press any key to restart the computer.
Any changes you made in SCSISelect take effect after the computer boots.
B-8

C
Using Advanced Configurable Parameters in Windows NT 4.0In this AppendixAdvanced users may use software parameters to alter the configuration of the Windows NT device drivers supplied by Adaptec. All Windows NT configuration information is stored in a data structure called the Registry. You can edit this information through a tool called the Registry Editor.
Caution: Do not edit your registry unless it is absolutely necessary. If there is an error in your registry, your computer may become nonfunctional.
Using Windows NT SCSI ParametersYou can enter registry values that affect how the Windows NT SCSI manager interprets the generic configuration information of SCSI device drivers. All SCSI cards installed in your system are affected by the values you enter here. See Value Keys for SCSI Parameters on page C-2 for a list of valid values.
Using Windows NT SCSI Parameters C-1
Using Driver-specific Parameters C-4
!
C-1

Using Advanced Configurable Parameters in Windows NT 4.0
Note: The following value keys are case-sensitive and must be entered exactly as shown.
Value Keys for SCSI Parameters� DisableTaggedQueuing—A nonzero value indicates that the
SCSI card disables tagged queueing for SCSI devices. The data type for this value is REG_SZ.
� DisableSynchronousTransfers—A nonzero value indicates that the SCSI card is not to initiate synchronous negotiations (but it may still accept negotiations initiated by a SCSI target). The data type for this value is REG_SZ.
� DisableDisconnects—A nonzero value indicates that targets are not permitted to disconnect during the execution of a SCSI command. The data type for this value is REG_DWORD.
� MaximumLogicalUnit—This can limit the scan for connected devices on the SCSI bus. Valid values are 1 to 8. If 1 is specified, the Windows NT SCSI Manager assumes that no SCSI targets support LUNs other than 0. Otherwise, LUNs from 0 to 8 are scanned during system initialization. The data type for this value is REG_DWORD.
� Maximum SGList— Specifies the maximum number of Scatter/Gather elements. Valid values are 17 to 255. The data type for this value is REG_DWORD.
To enter Windows NT parameters
1 Click Start, then click Run.
2 Type regedt32, then press Enter.
3 Open the registry list to
\HKEY_LOCAL_MACHINE\System\CurrentControlSet\Services\aic78xx\Parameters\Device.
If the \Parameters\Device keys already exist, skip to Step 9 to begin entering values. If the keys do not exist, create them by continuing with Step 4.
4 Click aic78xx.
C-2

Using Advanced Configurable Parameters in Windows NT 4.0
5 From the Edit menu, select Add Key.
6 In the Key Name edit box, type Parameters. Leave the Class edit box blank.
7 Click Parameters.
8 From the Edit menu, select Add Key.
9 In the Key Name edit box, type Device. To specify a SCSI card, type the number of the SCSI card after Device.
For example, type Device0 for the first SCSI card, type Device1 for the second, and so on. If you omit the SCSI card number, the configuration information may be applied to other SCSI cards installed in your computer.
Leave the Class edit box blank.
10 Click Device.
11 From the Edit menu, select Add Value.
12 In the Value Name edit box, enter one of the valid parameter values. Make sure to enter the appropriate data type for the value. To enter additional values, repeat Steps 10–12.
Note: Changes made with the Registry Editor do not take effect until you shut down and then restart your computer.
C-3

Using Advanced Configurable Parameters in Windows NT 4.0
Using Driver-specific ParametersYou can use the Registry Editor to enter driver-specific parameters that affect the configuration information for Adaptec SCSI PCI device drivers. See Value Keys for Driver-specific Parameters on page C-4 for a list of valid values.
Value Keys for Driver-specific Parameters
Note: The following parameters are case-sensitive and must be entered exactly as shown. When entering multiple parameters, each parameter must be separated by a space.
� /INSTRUMENTATION—Enables recording of I/O statistics and errors. If this option is not specified, instrumentation defaults to Disabled. The data type for this value is REG_SZ.
� /INSTR_ERRLOG_Z=nnn—Sets the maximum number of error log entries if /INSTRUMENTATION is enabled. If a number is not specified, the maximum number of error log entries defaults to 32. Valid values are 0-128. The data type for this value is REG_SZ.
� /MAXTAGS=nnn—Specifies the tagged command queue depth. If a number is not specified, the tagged queue depth defaults to 128. Valid values are 1-255. The data type for this value is REG_SZ.
To enter driver-specific parameters
1 Click Start, then click Run.
2 Type regedt32, then press Enter.
3 Open the registry list to
\HKEY_LOCAL_MACHINE\System\CurrentControlSet\Services\aic78xx\Parameters\Device\DriverParameters.
If the \Parameters\Device\DriverParameters keys already exist, skip to Step 13 to begin entering parameters. If the keys do not exist, create them by continuing with Step 4.
4 Click aic78xx.
5 From the Edit menu, select Add Key.
C-4

Using Advanced Configurable Parameters in Windows NT 4.0
6 In the Key Name edit box, type Parameters. Leave the Class edit box blank.
7 Click Parameters.
8 From the Edit menu, select Add Key.
9 In the Key Name edit box, type Device.To specify a SCSI card, type the number of the SCSI card after Device.
For example, type Device0 for the first SCSI card, type Device1 for the second, and so on. If you omit the SCSI card number, the configuration information may be applied to other SCSI cards installed in your computer.
Leave the Class edit box blank.
10 Click Device.
11 From the Edit menu, select Add Value.
12 In the Key Name edit box, type DriverParameters, then type REG_SZ as the data type and press Enter.
13 A String Editor text box appears. Enter valid parameters in the text box. When entering multiple parameters, each parameter must be separated by a space.
Note: Changes made with the Registry Editor do not take effect until you shut down and then restart your system.
C-5

D
Obtaining SCSI CablesIn this AppendixHigh-quality cables are required in high-performance SCSI systems to ensure data integrity. Adaptec provides the highest quality SCSI cables designed specifically for use with Adaptec SCSI cards. For purchasing information, visit the Adaptec Web site at www.adaptec.com.
External Cables
This is a DB25-pin connector.
External Cables D-1
Internal Cable D-2
Maximum Cable Lengths D-2
DescriptionRetail Cable
Number
DB25-pin to high-density 50-pin cable (3 ft) 200
High-density 50-pin to high-density 50-pin cable (3 ft) 300
High-density 50-pin to Centronics 50-pin cable (3 ft) 500
D-1

Obtaining SCSI Cables
This is a high-density 50-pin connector.
This is a Centronics 50-pin connector.
Internal Cable
This is a standard 50-pin internal connector.
Maximum Cable LengthsThe total length of cabling (internal and external) on the SCSI bus may not exceed the maximum lengths listed in the next table.
Description Retail Cable Number
5 position (4 devices and a SCSI card) standard 50-pin connectors (1.5 m)
1100
Maximum Cable Length Data Transfer Rate
Maximum Devices Supported1
1 Including the SCSI card.
3 m (9.8 ft) Fast SCSI(10 MB/sec)
8
3 m (9.8 ft) Ultra SCSI(20 MB/sec for 8 bit, 40 MB/sec for 16-bit)
4
1.5 m (4.9 ft) Ultra SCSI2
2 Ultra SCSI data transfer rates do not currently support more than eight peripherals per channel.
6 m (19.7 ft) 5 MB/sec(asynchronous or synchronous)
8
D-2

R
Adaptec, Inc.691 South Milpitas BoulevardMilpitas, CA 95035 USA
© 2002 Adaptec, Inc.All rights reserved. Adaptec and the Adaptec logo are trademarks of Adaptec, Inc. which may beregistered in some jurisdictions.
Part Number: 513154-06, Ver. AA, LB 02/02