scs zynq fpga-box · scs zynq fpga-box quick start guide table of contents. table of contents 1 box...
TRANSCRIPT
Date Wed Apr 02 08:31:26 CEST 2014 Version 82 1 / 42
Supercomputing Systems AG Technoparkstrasse I CH-8005 Zürich Tel: +41 43 456 16 00 Fax: +41 43 456 16 10 www.scs.ch [email protected]• • • • • •
SCS ZynqFPGA-BoxQuick Start Guide
Table of Contents

Table of Contents
1 Box & Module Specification 6
1.1 Module Features 8
1.2 Box Features 9
2 Connecting to the Box (Windows) 9
2.1 Prepare your PC and the Zynq Box 10
2.1.1 Configure Network card for PL Ethernet 11
2.1.2 Activate Jumbo Frames 11
2.1.3 Increase RX Buffer Size 12
2.2 Exchange Files with the Box 13
2.3 Open a console 14
2.4 Update and Load a PL bitstream 15
2.5 Change IP Address 15
2.6 Serial Boot terminal (COM5 over USB) 16
3 Connecting to the Box (Linux) 16
3.1 Prepare your PC and the Zynq Box 17
3.1.1 Network Configuration 17
3.1.2 Start the FPGA Daemon 17
3.1.3 Activate Jumbo Frames 17
3.1.4 Increase RX Buffer Size 17
4 Stereo Camera Hardware Setup 17
5 Stereo Camera Example Software 18
5.1 Demo GUI 20
5.2 Stereo Camera Calibration 21
5.3 Acceleration sensor 22
6 Programmers Guide 22
6.1 PS-PL 23
6.1.1 Bitstreams not using PS-PL communication 23
6.1.2 Using the PS-PL interface (FPGA side) 23
6.1.3 Software side 23
6.1.4 Accessing Registers in PL 23
6.1.5 DMA operations (PL-masters) 23
6.2 Clocking 24
6.2.1 FCLK 24
6.2.2 External PL Clock sources 24
6.3 EMIO GPIO 24
6.4 PS I2C 25
7 Appendix 25
7.1 Starting recovery Linux 26
7.2 Updating SD-card in recovery Linux from USB-Stick 26
7.3 Updating SD-card in recovery Linux from SD-Card 27
7.4 Create SD-Card 27
8 Recommended Network cards for FPGA connection 28
8.1 Recommended cards (PCI-Express) 29
8.2 Recommended cards (ExpressPort) - Not as stable as PCI-Express 29
8.3 Blacklist (not recommended cards) 29
8.4 Watchdog and Linux boot recovery 29
9 Box Testing 30
9.1 PS Memory 31
10 Linux Hints 31
10.1 How to adjust RTC time and date 32
10.2 Where to store user data 32
10.3 Mounting a USB stick 32
10.4 Check temperature/voltages of the Zynq Module 32
10.5 How to load bitstreams with xilinx driver only 32
10.6 Connector Pinout 32
10.6.1 CAM1/CAM2 Rosenberger Connector 32
10.6.2 Power Connector 34
10.6.3 CAN Connector 34
10.6.4 PS-ETH/USB 35
10.6.5 PL-ETH1/2 36
10.6.6 LaserWire 36
10.7 What is inside the FPGA Box? 37
10.8 Stereo Camera Mechanical Drawing 38
10.9 Aptina Camera Serializer Board 39
10.10 Additional Resources 40
10.10.1 Xilinx Resources 40
10.10.2 Further Resources 40
10.10.3 References 41
11 Warranty 41

Date Wed Apr 02 08:31:26 CEST 2014 Version 82 4 / 42
Supercomputing Systems AG Technoparkstrasse I CH-8005 Zürich Tel: +41 43 456 16 00 Fax: +41 43 456 16 10 www.scs.ch [email protected]• • • • • •
Copyright reminder
Copyright © 2014 by Supercomputing Systems AG, Switzerland.All rights reserved. No part of this publication may be reproduced, stored in a retrievalsystem, or transmitted, in any form by any means, electronic, mechanical, photocopying,recording, or otherwise, without the prior written permission of the publisher. Printed andpublished in Switzerland.While Supercomputing Systems AG believes the information included in this publication iscorrect as of the date of publication, it is subject to change without notice.All cited trademarks and registered trademarks are the property of their respective owner.
Non-disclosure reminder
All information in this document is strictly confidential and may only be published bySupercomputing Systems AG, Switzerland. The permissions of the reader are defined in thenon-disclosure agreement. Any violation of the non-disclosure agreement terms will behandled as described in the agreement.
Thank you for your interest and for purchasing our product!
Please send your sales requests to: [email protected] technical support or bug reports: [email protected]
To download the newest drivers and documentation please check: www.scs.ch/FpgaBOX
This document was generated automatically by PDF export from our Confluence WIKI.Please excuse some minor layout problems.

Date Wed Apr 02 08:31:26 CEST 2014 Version 82 5 / 42
Supercomputing Systems AG Technoparkstrasse I CH-8005 Zürich Tel: +41 43 456 16 00 Fax: +41 43 456 16 10 www.scs.ch [email protected]• • • • • •
This operating manual belongs to this product. It contains important information on thecommissioning and handling of the product. Please bear this in mind, also when passing it onto other people. Please keep this operating manual for future reference!
NOTICE OF DISCLAIMER
The information disclosed to you hereunder (the “Materials”) is provided solely for theselection and use of SCS products. To the maximum extent permitted by applicable law: (1)Materials are made available "AS IS" and with all faults, SCS hereby DISCLAIMS ALLWARRANTIES AND CONDITIONS, EXPRESS, IMPLIED, OR STATUTORY, INCLUDINGBUT NOT LIMITED TO WARRANTIES OF MERCHANTABILITY, NON-INFRINGEMENT,OR FITNESS FOR ANY PARTICULAR PURPOSE; and (2) SCS shall not be liable (whetherin contract or tort, including negligence, or under any other theory of liability) for any loss ordamage of any kind or nature related to, arising under, or in connection with, the Materials(including your use of the Materials), including for any direct, indirect, special, incidental, orconsequential loss or damage (including loss of data, profits, goodwill, or any type of loss ordamage suffered as a result of any action brought by a third party) even if such damage orloss was reasonably foreseeable or SCS had been advised of the possibility of the same.SCS assumes no obligation to correct any errors contained in the Materials or to notify you ofupdates to the Materials or to product specifications.
PROPER USE
The product is intended to prototype algorithms with the FPGA BOX/MODULE in anR&D environment.
LIMITED USE
The box/module is based on a Xilinx device and is not designed to be fail safe andmust not be used in applications where fail safe performance is required. You assumesole risk and liability for use of SCS products in Critical Applications.
SCS PRODUCTS ARE NOT DESIGNED OR INTENDED TO BE FAIL-SAFE, OR FOR USEIN ANY APPLICATION REQUIRING FAIL-SAFE PERFORMANCE, SUCH ASAPPLICATIONS RELATED TO: (I) THE DEPLOYMENT OF AIRBAGS, (II) CONTROL OF AVEHICLE, UNLESS THERE IS A FAIL-SAFE OR REDUNDANCY FEATURE (WHICH DOESNOT INCLUDE USE OF SOFTWARE IN THE XILINX DEVICE TO IMPLEMENT THEREDUNDANCY) AND A WARNING SIGNAL UPON FAILURE TO THE OPERATOR, OR (III)USES THAT COULD LEAD TO DEATH OR PERSONAL INJURY. CUSTOMER ASSUMESTHE SOLE RISK AND LIABILITY OF ANY USE OF THE SCS BOX/MODULE IN SUCHAPPLICATIONS.
The Zynq FPGA Box and its cables must not be not be installed near safety systems such asairbag, belt system, ABS, etc.
ESD
This box/module is an ESD sensitive device. Handle it with normal ESD precautions. (SeeJESD625 and/or IEC 61340-5)

Date Wed Apr 02 08:31:26 CEST 2014 Version 82 6 / 42
Supercomputing Systems AG Technoparkstrasse I CH-8005 Zürich Tel: +41 43 456 16 00 Fax: +41 43 456 16 10 www.scs.ch [email protected]• • • • • •
Scope of the delivery
Quick Start Guide (This document)
Zynq 7045 Box [SCS-Z7045-BOX] (preinstalled micro SD card with Debian Linux)
Power Supply 100-240V -> 12V/3A
CAT6 Ethernet Cable
OPTIONAL: Stereo Camera KIT with Aptina Headboards and Maxim 9260Adapterboards
:Recomended SW for Windows Users
PuTTY
WinSCP
Recommended SW for Linux users:
cutecom
1 Box & Module Specification

Date Wed Apr 02 08:31:26 CEST 2014 Version 82 7 / 42
Supercomputing Systems AG Technoparkstrasse I CH-8005 Zürich Tel: +41 43 456 16 00 Fax: +41 43 456 16 10 www.scs.ch [email protected]• • • • • •
1 Box & Module Specification
The SCS Zynq Box is based on the SCS Zynq 7045 module.The Zynq™-7000 family is based on the Xilinx® All Programmable SoC architecture. Theseproducts integrate a dual-core ARM® Cortex™-A9 processing system (PS) and Xilinxprogrammable logic (PL) in a single device.The ZYNQ 7045 Module is a multipurpose system hosted on an application specificbaseboard.

Date Wed Apr 02 08:31:26 CEST 2014 Version 82 8 / 42
Supercomputing Systems AG Technoparkstrasse I CH-8005 Zürich Tel: +41 43 456 16 00 Fax: +41 43 456 16 10 www.scs.ch [email protected]• • • • • •
1.1 Module Features
See „ug585-Zynq-7000-TRM" and relatedXilinx ZYNQ-7045 SoC (XC7Z045-3E-FBG676)documents for detailed SoC description
Size: 12cm x 6cm x ~1.2cmWeight: 46g
1GHz Dual ARM Cortex-A9with NEON media processing engine equipped with:
1GByte DDR3 SDRAM 533MHz (32bit configuration)
32MB Quad-SPI flash memory
Gigabit Ethernet PHY (Marvell 88E1518)
SD Card Interface (over connector – SD card on baseboard)
USB 2.0 OTG PHY
CAN 2.0B
UART / I2C
RTC with battery-backup
33.333MHz Clock
2 GPIOs accessible via I2C port expander
EEPROM 2k, EUI-48 Node Identity
LM75 onboard temperature sensor
Kintex-7 FPGA, 350k Logic Cells, 218k LUTs, 2MB Block RAM, 900 DSP Slices,PCIe Gen2 x8equipped with:
two separate DDR3 SDRAM (400MHz): 512MByte (16bit configuration)256MByte (16bit configuration)
146 GPIOs accessible on ComExpress connector (1.8V level)grouped as 24differential pairs (high performance) 46differential pairs (high range) 6 singleended signals (high range)
8 x 6.6Gb/s Low-Power Serial Transceivers (with integrated PCI Express block)accessible on ComExpress connector
XADC 12bit, 1MSPS, 16 Channel
Additional 25MHz Clock
Date Wed Apr 02 08:31:26 CEST 2014 Version 82 9 / 42
Supercomputing Systems AG Technoparkstrasse I CH-8005 Zürich Tel: +41 43 456 16 00 Fax: +41 43 456 16 10 www.scs.ch [email protected]• • • • • •
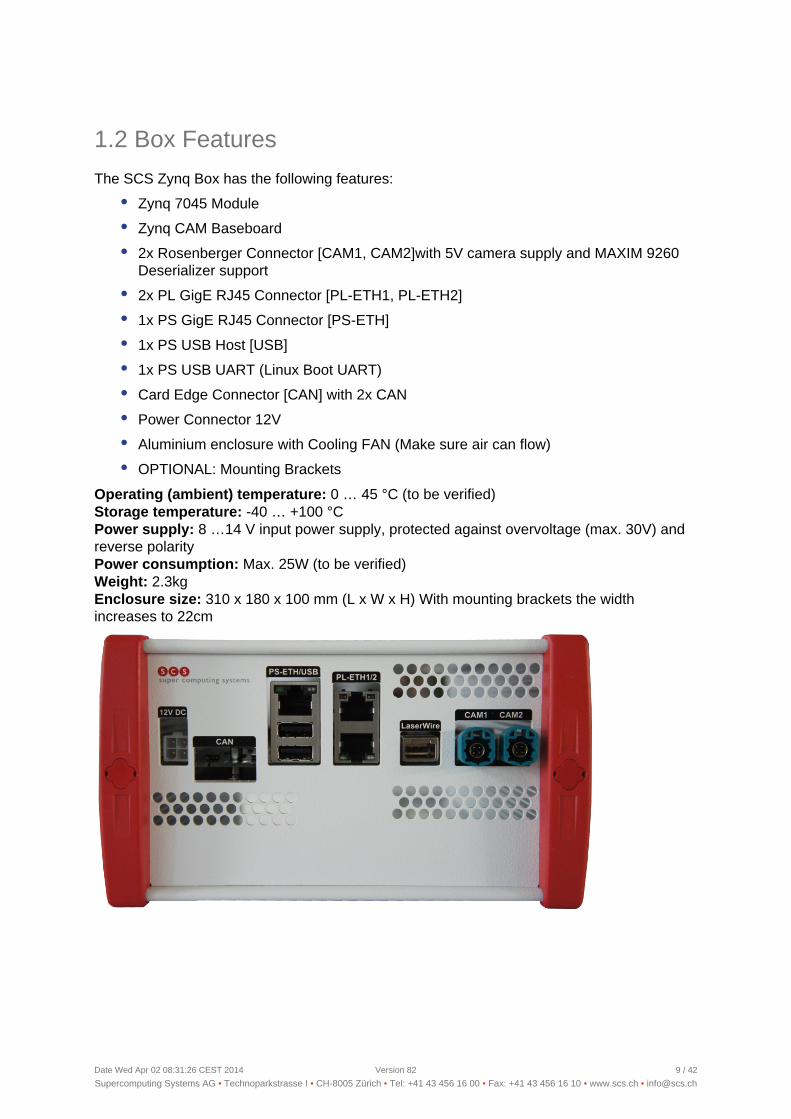
1.2 Box Features
The SCS Zynq Box has the following features:
Zynq 7045 Module
Zynq CAM Baseboard
2x Rosenberger Connector [CAM1, CAM2]with 5V camera supply and MAXIM 9260Deserializer support
2x PL GigE RJ45 Connector [PL-ETH1, PL-ETH2]
1x PS GigE RJ45 Connector [PS-ETH]
1x PS USB Host [USB]
1x PS USB UART (Linux Boot UART)
Card Edge Connector [CAN] with 2x CAN
Power Connector 12V
Aluminium enclosure with Cooling FAN (Make sure air can flow)
OPTIONAL: Mounting Brackets
0 … 45 °C (to be verified)Operating (ambient) temperature: -40 … +100 °CStorage temperature:
8 …14 V input power supply, protected against overvoltage (max. 30V) andPower supply:reverse polarity
Max. 25W (to be verified)Power consumption: 2.3kgWeight:
310 x 180 x 100 mm (L x W x H) With mounting brackets the widthEnclosure size:increases to 22cm
2 Connecting to the Box (Windows)

Date Wed Apr 02 08:31:26 CEST 2014 Version 82 10 / 42
Supercomputing Systems AG Technoparkstrasse I CH-8005 Zürich Tel: +41 43 456 16 00 Fax: +41 43 456 16 10 www.scs.ch [email protected]• • • • • •
1.
2.
3.
4.
5.
2 Connecting to the Box (Windows)
This chapter describes how to connect your Zynq Box to your Windows computer and workwith the embedded Debian Linux on the Zynq Box.
The Box is shipped with fixed IP: 192.168.0.100Default User: rootDefault Password: root
2.1 Prepare your PC and the Zynq Box
Plug in the CAT6 Ethernet cable to connect your PC with the PS-ETH port of the ZynqBox.
Plug in the two CAT6 Ethernet cables to connect the PL-ETH ports with your computer.
Plug in the included 12V/3A Power Supply
Open Control Panel\All Control Panel Items\Network and Sharing Center
Set your PC's IP to 192.168.0.80
Date Wed Apr 02 08:31:26 CEST 2014 Version 82 11 / 42
Supercomputing Systems AG Technoparkstrasse I CH-8005 Zürich Tel: +41 43 456 16 00 Fax: +41 43 456 16 10 www.scs.ch [email protected]• • • • • •
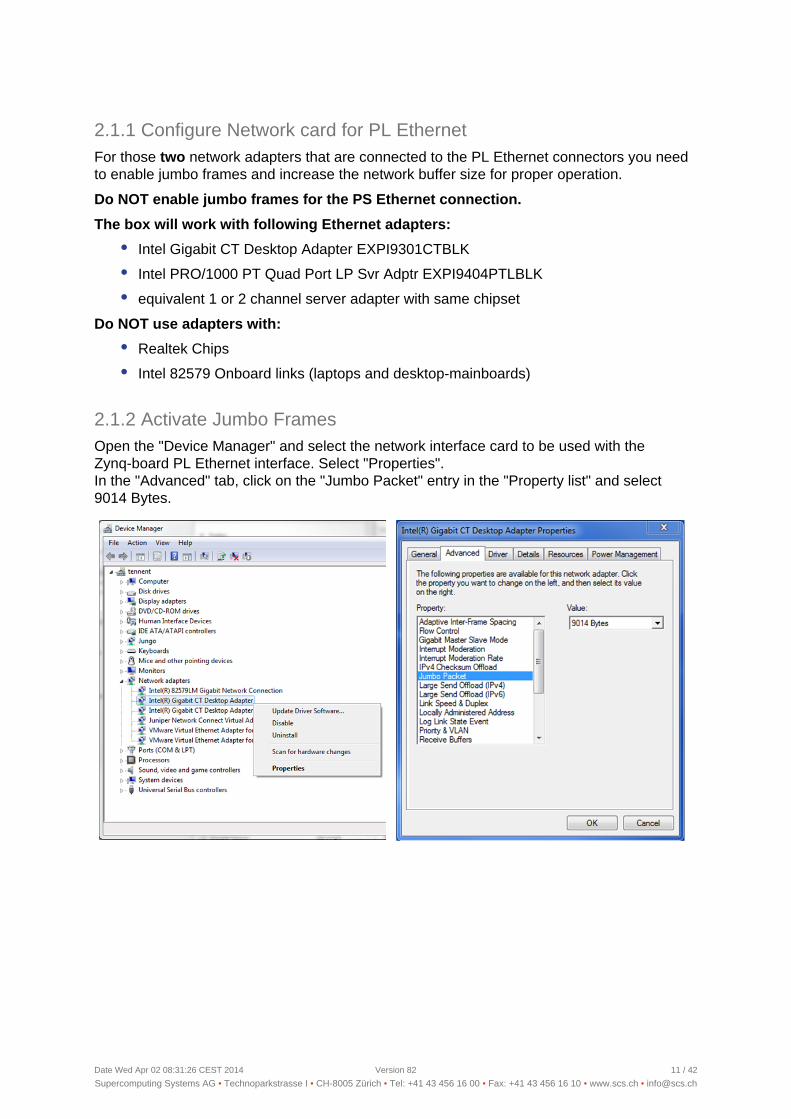
2.1.1 Configure Network card for PL EthernetFor those network adapters that are connected to the PL Ethernet connectors you needtwoto enable jumbo frames and increase the network buffer size for proper operation.
Do NOT enable jumbo frames for the PS Ethernet connection.
The box will work with following Ethernet adapters:
Intel Gigabit CT Desktop Adapter EXPI9301CTBLK
Intel PRO/1000 PT Quad Port LP Svr Adptr EXPI9404PTLBLK
equivalent 1 or 2 channel server adapter with same chipset
Do NOT use adapters with:
Realtek Chips
Intel 82579 Onboard links (laptops and desktop-mainboards)
2.1.2 Activate Jumbo FramesOpen the "Device Manager" and select the network interface card to be used with theZynq-board PL Ethernet interface. Select "Properties".In the "Advanced" tab, click on the "Jumbo Packet" entry in the "Property list" and select9014 Bytes.

Date Wed Apr 02 08:31:26 CEST 2014 Version 82 12 / 42
Supercomputing Systems AG Technoparkstrasse I CH-8005 Zürich Tel: +41 43 456 16 00 Fax: +41 43 456 16 10 www.scs.ch [email protected]• • • • • •
2.1.3 Increase RX Buffer SizeOpen the "Device Manager" and select the network interface card to be used with theZynq-board PL Ethernet interface. Select "Properties" (see image on last page).In the "Advanced" tab, click on the "Receive buffers" entry in the "Property list" and select themaximum value (2048 in this case).
Date Wed Apr 02 08:31:26 CEST 2014 Version 82 13 / 42
Supercomputing Systems AG Technoparkstrasse I CH-8005 Zürich Tel: +41 43 456 16 00 Fax: +41 43 456 16 10 www.scs.ch [email protected]• • • • • •
1.
2.
3.
2.2 Exchange Files with the Box
WARNING: By modifying or deleting the wrong files you may not be able to boot theBox anymore without restoring the SD card.
Install and Start WinSCP
Setup a connection
ConnectYou have now acces to the filesystem stored on the SD card in the Zynq Box

Date Wed Apr 02 08:31:26 CEST 2014 Version 82 14 / 42
Supercomputing Systems AG Technoparkstrasse I CH-8005 Zürich Tel: +41 43 456 16 00 Fax: +41 43 456 16 10 www.scs.ch [email protected]• • • • • •
1.
2.
3.
2.3 Open a console
The Zynq Box is shipped with Debian Linux. To connect follow these steps:
Start WinSCP
Press Ctrl-P to start PuTTY
Login as root / Default Password: root

Date Wed Apr 02 08:31:26 CEST 2014 Version 82 15 / 42
Supercomputing Systems AG Technoparkstrasse I CH-8005 Zürich Tel: +41 43 456 16 00 Fax: +41 43 456 16 10 www.scs.ch [email protected]• • • • • •
1.
2.
3.
4.
2.4 Update and Load a PL bitstream
Use WinSCP to copy the new PL bitstream to /root/SCS/Bitstream_Loader
In PuTTY console change directory to /root/SCS/Bitstream_Loader
Use command ./loadbit MYBITSTREAM.bit to load the new bitstream
Update the link default.bit to define which bitstream is automatically loaded at startup
2.5 Change IP Address
In the standard configuration, the module boots into Linux and uses a static IP.Factory default: static IP 192.168.0.100If you wish another static IP or if you want to get the IP from a DHCP-Server in your network,you need to change the settings in "/etc/network/interfaces":auto loallow-hotplug eth0iface lo inet loopback#uncomment if you have a DHCP server running#iface eth0 inet dhcp#uncomment if you assign static ipiface eth0 inet staticaddress 192.168.0.100netmask 255.255.255.0The changes are applied after a "ifdown eth0" and a subsequent "ifup eth0" is done inthe terminal or after reboot.
Date Wed Apr 02 08:31:26 CEST 2014 Version 82 16 / 42
Supercomputing Systems AG Technoparkstrasse I CH-8005 Zürich Tel: +41 43 456 16 00 Fax: +41 43 456 16 10 www.scs.ch [email protected]• • • • • •
2.6 Serial Boot terminal (COM5 over USB)
By connecting the provided USB cable to the Terminal USB connector (upper USBconnector) and your PC, it is possible to get a Serial Console and check the Linux boot log.This is only needed for maintenance purposes.
. Set Baudrate: 115200, Data Bits: 8, Stop bits: 1, Parity: None,Use PuTTY in Serial modeHandshake: None
3 Connecting to the Box (Linux)

Date Wed Apr 02 08:31:26 CEST 2014 Version 82 17 / 42
Supercomputing Systems AG Technoparkstrasse I CH-8005 Zürich Tel: +41 43 456 16 00 Fax: +41 43 456 16 10 www.scs.ch [email protected]• • • • • •
1.
2.
3.
3 Connecting to the Box (Linux)
This chapter describes how to connect your Zynq Box to your Linux computer and work withthe embedded Debian Linux on the Zynq Box.
The Box is shipped with fixed IP: 192.168.0.100Default User: rootDefault Password: root
3.1 Prepare your PC and the Zynq Box
Plug in the CAT6 Ethernet cable to connect your PC with the PS-ETH port of the ZynqBox.
Plug in the two CAT6 Ethernet cables to connect the PL-ETH ports with your computer.
Plug in the included 12V/3A Power Supply
3.1.1 Network ConfigurationNormally, the IP address of the Zynq-board should be set to .192.168.0.100However, there are cases where the configuration is set via DHCP. If no DHCP server isavailable, the network settings need to be changed by logging in to the Linux on theZynq-board using the USB console cable as described above.Once logged in to the Zynq-board, the network settings can be found inetc/network/interfacesThe changes are applied after a and a subsequent ."ifdown eth0" "ifup eth0"
3.1.2 Start the FPGA DaemonTODOWhere to find the sourcesHow to configure so that executed on start-up
3.1.3 Activate Jumbo FramesTODOHow to enable on LinuxHow to configure on start-up
3.1.4 Increase RX Buffer SizeThe rx buffer size can be increased by using the command line tool.ethtoolUse followed by the Ethernet interface name (in the example below "eth2") toethtool -gshow the current rx and tx buffer settings.Increase the rx buffer size by using as shown below. In the example, thesudo ethtool -Ginterface name is "eth2" and the receive buffer size is increased from 256 to 4096 packets.
4 Stereo Camera Hardware Setup
Date Wed Apr 02 08:31:26 CEST 2014 Version 82 18 / 42
Supercomputing Systems AG Technoparkstrasse I CH-8005 Zürich Tel: +41 43 456 16 00 Fax: +41 43 456 16 10 www.scs.ch [email protected]• • • • • •
4 Stereo Camera Hardware Setup
The below stereo head is an example how the cameras can be fixed.
Connect the stereo head with two Rosenberger cables to the Zynq FPGA Box according thenames below.
5 Stereo Camera Example Software

Date Wed Apr 02 08:31:26 CEST 2014 Version 82 19 / 42
Supercomputing Systems AG Technoparkstrasse I CH-8005 Zürich Tel: +41 43 456 16 00 Fax: +41 43 456 16 10 www.scs.ch [email protected]• • • • • •
5 Stereo Camera Example Software
To demonstrate the capabilities of the Aptina cameras, SCS provides the following examplesoftware. The software is provided "AS-IS" without any further warranty.
Before using the SW you have to load the bitstream and start some SW on the ARM. This isdone by executing a script that is called in rc.local during boot process.
Below is an overview of the demo firmware, that has to be licensed from SCS.

Date Wed Apr 02 08:31:26 CEST 2014 Version 82 20 / 42
Supercomputing Systems AG Technoparkstrasse I CH-8005 Zürich Tel: +41 43 456 16 00 Fax: +41 43 456 16 10 www.scs.ch [email protected]• • • • • •
5.1 Demo GUI
This program starts a GUI that shows a live image of the two cameras. The cameraconfiguration is read from an ini file.
After executing the SW on the host you can control it by pressing the following keys:
Q : Quit
"Space Bar" : Capture a stereo image pair in either 8-bit or 12-bit PGM format (12-biton start-up, can be toggled with "M")
G : „Burst capture mode“ (captures the next 100 frames)
M : Switch between 8-bit and 12-bit PGM’s, default is 12-bit (PGM’s are written inbinary format)
O : Increase Analog Gain
P : Decrease Analog Gain
K : Increase Exposure
L : Decrease Exposure
Example Output (Stereo overlay over 3MP Aptina grey image)

Date Wed Apr 02 08:31:26 CEST 2014 Version 82 21 / 42
Supercomputing Systems AG Technoparkstrasse I CH-8005 Zürich Tel: +41 43 456 16 00 Fax: +41 43 456 16 10 www.scs.ch [email protected]• • • • • •
1.
2.
3.
4.
5.
6.
7.
8.
5.2 Stereo Camera Calibration
The following section explains how to obtain configuration files for image rectification.
Run demo_gui with "RAW" output on both left and right camera channel. The outputresolution must be the same resolution with which the images should be rectified.Example for AR0331 camera: ./demo_gui -t ar0331 -c <path to config file> -d -s -lo raw-ro raw
Set the depth of the captures PGM images to 8-bit. Use the "M" key to toggle between8-bit and 12-bit (current mode is displayed on console).
Adjust gain and exposure time if necessary to have a good contrast.
Take image sequence of the calibration board. An image pair can be captured usingthe "SPACE" key. Make sure that all entire squares on the board are always visible inboth left and right images. The image sequence should contains the calibration boardat different distances/positions from the cameras and in different orientations
Generate BOG files according to the image sequence. This is done with the tool. It can be found under demo_gui/bin. Call the tool with thecamera_calibration
following parameterscamera_calibration --ip_rad 5 --nx 15 --ny 9 --dx 60 --dy 60 -c 0 -c 1 --enable int_k0_0--enable int_k1_0 --enable int_k2_0 --enable int_k3_0 --no int_k4_0 --enable int_k0_1--enable int_k1_1 --enable int_k2_1 --enable int_k3_1 --no int_k4_1 --enable int_fs_0--enable int_fs_1 <path to image sequence>/img_*.pgm
The two BOG files for the left (k0) and right (k1) camera are now used to generate alookup table for each camera. This is done with the tool. It can be foundsaveLUTsunder demo_gui/bin. Call the tool with the following parameterssaveLUTs -a <width of images in calibration sequence> <height of images incalibration sequence> <path to left BOG file (k0)> <path to right BOG file (k1)> left.txtright.txt
Finally, the two ASCII lookup tables are used to generate a rectification configurationfile. This is done with the tool. Call the tool for each lookup table with thewpgen following parameterswpgen --saveLUT left.txt -e 0.0625 -o left.binwpgen --saveLUT right.txt -e 0.0625 -o right.binNote that the resulting BIN files must not be larger than 1MB. If they are larger than1MB, try slightly increasing the -e parameter, e.g. -e 0.064 instead of 0.0625.
The BIN files can now be used to call the demo_gui with SGM output, e.g.Example for AR0331 camera: ./demo_gui -t ar0331 -c <path to config file> -d -s -looverlay -lwp left.bin -rwp right.bin

Date Wed Apr 02 08:31:26 CEST 2014 Version 82 22 / 42
Supercomputing Systems AG Technoparkstrasse I CH-8005 Zürich Tel: +41 43 456 16 00 Fax: +41 43 456 16 10 www.scs.ch [email protected]• • • • • •
5.3 Acceleration sensor
There is an acceleration sensor on the Aptina camera module. Please note the coordinatesystem of the sensor.
There is no SW at the moment that demonstrates the functionality.
6 Programmers Guide
Date Wed Apr 02 08:31:26 CEST 2014 Version 82 23 / 42
Supercomputing Systems AG Technoparkstrasse I CH-8005 Zürich Tel: +41 43 456 16 00 Fax: +41 43 456 16 10 www.scs.ch [email protected]• • • • • •
6 Programmers Guide
This programmers guide shall help users to programm the ARM and the FPGA logic
6.1 PS-PL
6.1.1 Bitstreams not using PS-PL communicationWhen building a bitstream that does not use any ARM communication, it is advisable toinstantiate the cpu7_empty entity (vhdl-lib/zynq/cpu7_empty.vhd). When not doing so loadingthe bitstream from SW in Linux will block the ARM CPUs.
6.1.2 Using the PS-PL interface (FPGA side)Instantiate cpu7_wrapper entity (vhdl-lib/zynq/cpu7_wrapper.vhd) and connect whatever youneed from PS (AXI, EMIO etc.). That's it!
Remember: a bitstream that communicates only with PS is perfectly allowed to not have anyports in its top-entity!
For clocking please have a look under the topic .Clocking
6.1.3 Software sideThe software side for communicating with PL can be a bit more complicated than the FPGAside.
Using EMIO interfaces (eg. GPIO) is easy and only requires access to PS side registers ormaybe only using Linux drivers (eg. I2C).
6.1.4 Accessing Registers in PLRegister access must be over the master GP AXI interfaces. To access them under Linux,map /dev/mem at the appropriate address.
There is a wrapper block around the axi-master that provides a simple register bus ready touse (vhdl-lib/axi/axi2regif.vhd) that has 32 bit address and 32 bit data ports with no burstsand an "easy" interface (compared to AXI3). Regmapper instances can be connected overthis entity.
The entity axi2regif is only allowed to be used with simple 32 bit accesses from software!Other accesses cause undefined behaviour!
6.1.5 DMA operations (PL-masters)SCS Zynq Linux is configured in a way that it doesn't use 128 MB of the PS memory. This isthe area between 0x38000000 and 0x3FFFFFFF. So this area may be used without sideeffects by AXI-masters in PL. (Write-)access to other parts of the memory will corrupt Linux!
The simplest way of accessing DMA buffers from software is by mapping /dev/mem on theDMA area. /dev/mem mappings will always have the cache disabled for the mapped area,therefore there will be no issues with cache coherency.
Date Wed Apr 02 08:31:26 CEST 2014 Version 82 24 / 42
Supercomputing Systems AG Technoparkstrasse I CH-8005 Zürich Tel: +41 43 456 16 00 Fax: +41 43 456 16 10 www.scs.ch [email protected]• • • • • •
The drawback is obviously the access speed of the CPU. This can be mitigated partly byusing memcpy between the DMA area and "normal" memory. memcpy has the advantage ofusing NEON 256 Bit accesses, this was tested and memcpy is approx. 6 times faster thandirect 32 bit accesses (not far from the theoretical factor of 8). In absolute numbers: approx.200-250 MB/s for one CPU.
Up to now, cached DMA memory wasn't used. To do so, a separate driver with similarfunctionality to /dev/mem is needed that maps memory with cache enabled.
Now there are two ways to deal with cache coherency problems: either by only using theACP-AXI port which is cache coherent, or by using cache invalidate / flush operations.Unfortunately these cache operations are not available to user-mode Linux processes andare also poorly documented for Linux kernel mode. So some implementation effort will beneeded when the ACP port cannot be used or is too slow alone.
6.2 Clocking
A bitstream may be clocked as usual from a PL-external clock pin. Another approach is usingthe PS provided clocks.
6.2.1 FCLKThe PS system provides PL with four different clock outputs. To use them in PL it isadvisable to put them through a BUFG first!
Current SCS assignment of the FCLKs:
FCLK_CLK0: 200 MHz
FCLK_CLK1: 100 MHz
FCLK_CLK2: 125 MHz
FCLK_CLK3: 133 MHz
Don't forget to constrain the clocks accordingly in UCF!
6.2.2 External PL Clock sources25 MHz OSC???
Ethernet OSC
6.3 EMIO GPIO
There are 64 bits of EMIO GPIO from PS to PL. Signals in cpu7_wrapper:
GPIO_I : in std_logic_vector(63 downto 0) := (others =>'0');
GPIO_O : out std_logic_vector(63 downto 0);
GPIO_T : out std_logic_vector(63 downto 0);
That means we effectively have 128 bit of GPIO data bits from PS to PL (_O and _Tcombined) and 64 bits of input to PS.
Date Wed Apr 02 08:31:26 CEST 2014 Version 82 25 / 42
Supercomputing Systems AG Technoparkstrasse I CH-8005 Zürich Tel: +41 43 456 16 00 Fax: +41 43 456 16 10 www.scs.ch [email protected]• • • • • •
Usually the GPIO block of register in PS is not enabled by default (clock gated in registerAPER_CLK_CTRL). This results in all registers having no effect / reading as 0. Also theoutputs bits are not activated by default.
The following C-function enables the clock:
void enable_gpio_clk()
{
int fmem;
uint32_t x;
volatile uint8_t *p_mapped_reg;
volatile uint32_t *p32;
fmem = open("/dev/mem", O_RDWR);
p_mapped_reg = mmap(NULL, 1024*1024*16, PROT_READ | PROT_WRITE, MAP_SHARED, fmem,REG_ADDR);
//Clk control GPIO
p32=(uint32_t *)(p_mapped_reg+0x12C);
//printf("APER_CLK_CTRL=%08X\n",p32[0]);
x=p32[0];
x|=0x400000;
p32[0]=x;
//printf("APER_CLK_CTRL=%08X\n",p32[0]);
close(fmem);
}
6.4 PS I2C
In the SCS Zynq configuration, one I2C bus (bus 0) is connected to MIO pins and is notavailable in PL/EMIO.
Each of the two lines SCL and SDA are connected by 3 pins: a _O _T and _I pin. The _Opins are driven 0 all the time by PS (at least when using the Linux I2C driver), only the _Tpins is driven to 0 when the line should be driven (applies for _T pins coming out ofprocessing_system7 entity or SCS cpu7_wrapper entity, _T pins seem to be inverted in theXilinx verlilog sources for processing_system7).
An example of top-level pin driving for the EMIO I2C-1 could look like this in VHDL (althoughthe _O lines are basically useless, they could be replaced by constant '0'):
cam0_scl <= I2C1_SCL_O when I2C1_SCL_T='0' else 'Z';
I2C1_SCL_I <= cam0_scl;
cam0_sda <= I2C1_SDA_O when I2C1_SDA_T='0' else 'Z';
I2C1_SDA_I <= cam0_sda;
The Linux I2C driver is using a fixed I2C clock of 400 kHz. This is taken from the devicetreeand used globally.
7 Appendix
Date Wed Apr 02 08:31:26 CEST 2014 Version 82 26 / 42
Supercomputing Systems AG Technoparkstrasse I CH-8005 Zürich Tel: +41 43 456 16 00 Fax: +41 43 456 16 10 www.scs.ch [email protected]• • • • • •
1.
2.
3.
1.
2.
3.
4.
5.
7 Appendix
7.1 Starting recovery Linux
Connect Zynq box with USB / serial console cable to a PC (Putty, cu, minicom, screenetc.). Baudrate is 115200
Restart your Zynq Box, you should see a countdown now. Please press any key toabort this, you are now in the U-Boot console
type "run recovery", this should start a Linux based on a RAM-Disk root-filesystem(independent on the SD-card) (on older Images the command was "run Peta")
Manual tasks may be done from the recovery Linux like fixing files on the mainroot-filesystem /dev/mmcblk0p2 that prevent a normal bootup or executing update scripts asdescribed below.
The login of the recovery image is also root/root.
On older boot-images the initial countdown to abort is very short so starting the recoveryLinux may be tricky. To avoid that, start the normal Linux first, then login and type "reboot".This way the full boot process is visible on the terminal.
If your box is bricked, use the following script on your Linux PC to be fast enough to press akey:
#!/bin/bash
while true
do
cu -s 115200 -l /dev/ttyUSB0
done
7.2 Updating SD-card in recovery Linux from USB-Stick
Copy the folder "SDcardCreator" 20140310 or newer to a memory stick
Reboot box and start recovery Linux (instructions above)
Execute the following commands:
mount /dev/sda1 /mnt
cd /mnt/SDcardCreator
./update_vfat.sh
Reboot box and start recovery Linux (instructions above) (This step is only needed thefirst time to have a stable box for the update)
Execute the following commands:
mount /dev/sda1 /mnt
cd /mnt/SDcardCreator
./update_rootfs.sh
Date Wed Apr 02 08:31:26 CEST 2014 Version 82 27 / 42
Supercomputing Systems AG Technoparkstrasse I CH-8005 Zürich Tel: +41 43 456 16 00 Fax: +41 43 456 16 10 www.scs.ch [email protected]• • • • • •
1.
2.
3.
4.
1.
2.
3.
4.
5.
6.
Please note that files that exist in the update of the root-filesystem are overwritten. Other filesare left as they are, the filesystem is not formatted. This procedure may also be used torestore a working system without having to open the box and remove the SD-card manually.
7.3 Updating SD-card in recovery Linux from SD-Card
Mount the first partition of the SDcard to /mnt: "mount /dev/mmcblk0p1 /mnt"
Copy the folder "SDcardCreator" 20140310 or newer to this partition using SFTP/SCP(e.g. Winscp)
Reboot box and start recovery Linux (instructions above)
Execute the following commands:mount /dev/mmcblk0p1 /mntcd /mnt/SDcardCreator./update_all.sh
Please note that files that exist in the update of the root-filesystem are overwritten. Other filesare left as they are, the filesystem is not formatted. This procedure may also be used torestore a working system without having to open the box and remove the SD-card manually.
7.4 Create SD-Card
In case you have to setup a new SD card or you have broken your system (includingrecovery Linux) follow these steps:
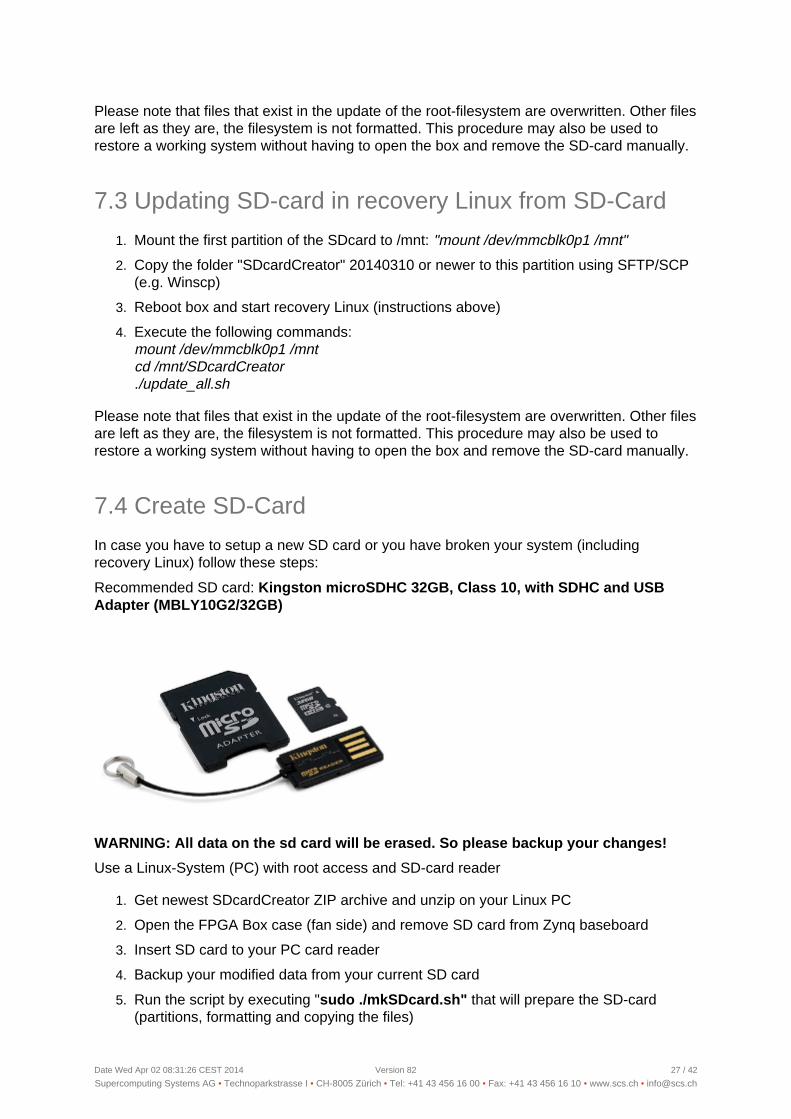
Recommended SD card: Kingston microSDHC 32GB, Class 10, with SDHC and USBAdapter (MBLY10G2/32GB)
WARNING: All data on the sd card will be erased. So please backup your changes!
Use a Linux-System (PC) with root access and SD-card reader
Get newest SDcardCreator ZIP archive and unzip on your Linux PC
Open the FPGA Box case (fan side) and remove SD card from Zynq baseboard
Insert SD card to your PC card reader
Backup your modified data from your current SD card
Run the script by executing " that will prepare the SD-cardsudo ./mkSDcard.sh"(partitions, formatting and copying the files)

Date Wed Apr 02 08:31:26 CEST 2014 Version 82 28 / 42
Supercomputing Systems AG Technoparkstrasse I CH-8005 Zürich Tel: +41 43 456 16 00 Fax: +41 43 456 16 10 www.scs.ch [email protected]• • • • • •
6.
7.
8.
Follow the instructions in the script. Do NOT format accidentally your PC's harddisk by choosing the wrong device!
Insert SD card to Zynq baseboard and close case
Test your system by verifying the boot process over USB boot console
8 Recommended Network cards for
Date Wed Apr 02 08:31:26 CEST 2014 Version 82 29 / 42
Supercomputing Systems AG Technoparkstrasse I CH-8005 Zürich Tel: +41 43 456 16 00 Fax: +41 43 456 16 10 www.scs.ch [email protected]• • • • • •
1.
8 Recommended Network cards forFPGA connection
The following list tries to separate reliable and unreliable network cards. Unreliability may becaused by the network chip used or the driver for this particular chip.
8.1 Recommended cards (PCI-Express)
Intel EXPI9301CT (1 port, 1x PCI-Express)
Intel I350T2 / I350T2BLK (2 ports, 4x PCIe 2.0)
Intel I350T4 / I350T4BLK (4 ports, 4x PCIe 2.0)
Older Intel server gigabit Ethernet cards with PCI-Express (I350T is recommendedover those, as the newer I350 uses less power and has PCIe 2.0)
8.2 Recommended cards (ExpressPort) - Not as stableas PCI-Express
Belkin F5U250 with a new Marvell driver (do not use the driver on the CD from Belkin!)This card is not manufactured anymore.
8.3 Blacklist (not recommended cards)
Intel 82579 on-board ports (used in sandy/ivy bridge and haswell mainboards, laptopsand desktops), hardware is bad
Realtek chip based ports (used in PCI-express as well as in ExpressPort add-oncards), drivers are not very good, neither Windows nor Linux
8.4 Watchdog and Linux boot recovery
Beginning with the Zynq SD-card image from 10/3/2014 the kernel contains a watchdogdriver.
A simple watchdog daemon was implemented that is started first in the script /etc/rc.local. Ifthis daemon is stopped or the ARM-CPUs hang, the Zynq system will reboot after amaximum of 20 seconds.
In rc.local, a new critical section was introduced. All startup code that potentially could hangthe system should be inserted there, synchronously, not in a background process! If thesystem hangs inside this section, the watchdog timer will reboot and the script will see thisduring the next boot.
At this point, the critical section is not executed, it only will be executed again during the nextbootup. So the order of bootups is as follows:
Boot hangs

Date Wed Apr 02 08:31:26 CEST 2014 Version 82 30 / 42
Supercomputing Systems AG Technoparkstrasse I CH-8005 Zürich Tel: +41 43 456 16 00 Fax: +41 43 456 16 10 www.scs.ch [email protected]• • • • • •
2.
3.
Boot script does not execute critical section
Boot script again executes the critical section
9 Box Testing
Date Wed Apr 02 08:31:26 CEST 2014 Version 82 31 / 42
Supercomputing Systems AG Technoparkstrasse I CH-8005 Zürich Tel: +41 43 456 16 00 Fax: +41 43 456 16 10 www.scs.ch [email protected]• • • • • •
9 Box Testing
9.1 PS Memory
UBOOT:
mtest
Linux:
memtester 256M 10
memtester [size] [iterations]
(As we configured Linux in a way that the upper 128MB memory is reserved for PL, don't testbigger than 384MB)
In case it is not available: sudo apt-get install memtester
10 Linux Hints
Date Wed Apr 02 08:31:26 CEST 2014 Version 82 32 / 42
Supercomputing Systems AG Technoparkstrasse I CH-8005 Zürich Tel: +41 43 456 16 00 Fax: +41 43 456 16 10 www.scs.ch [email protected]• • • • • •
10 Linux Hints
Here you find hints on things you can do with this Box.
10.1 How to adjust RTC time and date
There is a realtime clock on the module (rtc0) that sets the Linux time automatically.
date --set 2014-03-13date --set 21:08:00
hwclock -w
10.2 Where to store user data
\root\SCS
10.3 Mounting a USB stick
1) mit dem Befehl „cat /proc/partitions"siehst du alle erkannten Filesystems. Da erscheint dann zB. ein sda, sda1, etc, wenn derStick eingesteckt ist.2) das Verzeichnis /media sollte eigentlich noch leer sein. Somit kannst Du den Stickmounten:„mount /dev/sda /media"
10.4 Check temperature/voltages of the Zynq Module
…
10.5 How to load bitstreams with xilinx driver only
zum Laden des Bit-stream via Linux wie folgt vorgehen:1) Den angehängten Bit-stream (apcam_v00.08_convertedByBootgen.bit) auf die SD-Kartekopieren(z.B. via scp/WinSCP „scp apcam_v00.08_convertedByBootgen.bit [email protected]:~/.)2) Auf den Zynq einloggen (via ssh/PuTTy „ssh )[email protected]) Den folgenden Befehl ausführen um den Bit-stream zu laden „catapcam_v00.08_convertedByBootgen.bit > /dev/xdevcfg"
10.6 Connector Pinout
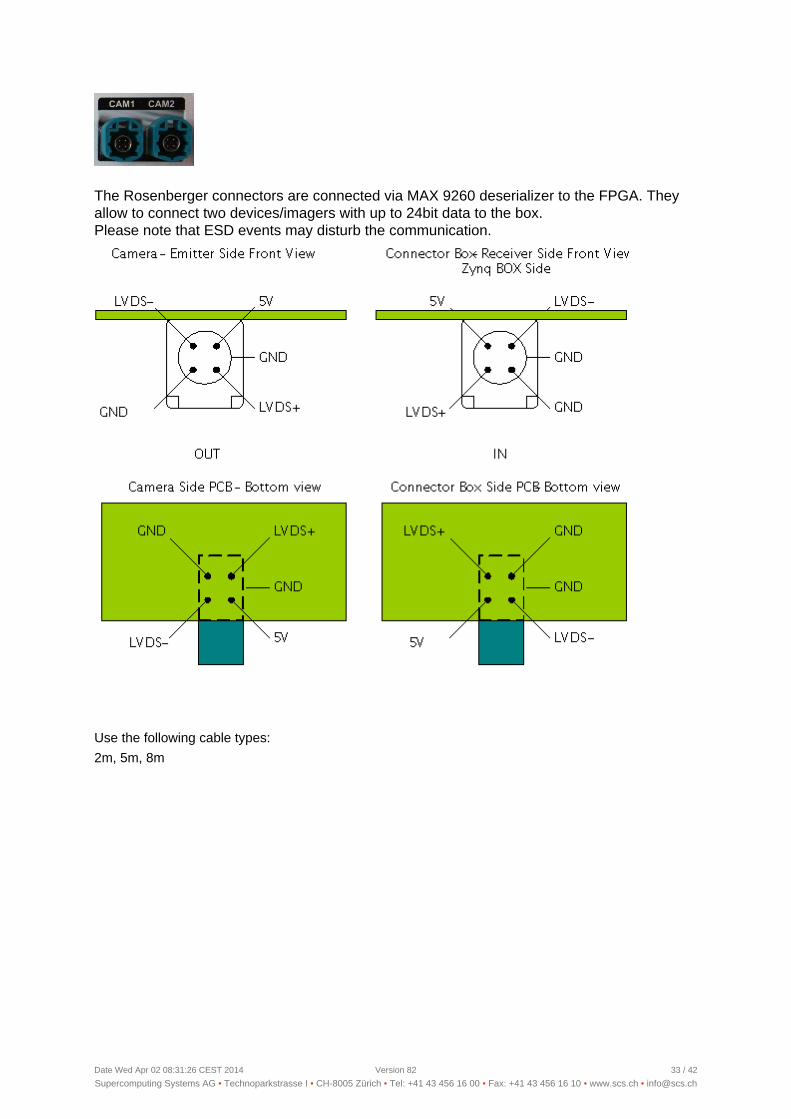
10.6.1 CAM1/CAM2 Rosenberger Connector
Date Wed Apr 02 08:31:26 CEST 2014 Version 82 33 / 42
Supercomputing Systems AG Technoparkstrasse I CH-8005 Zürich Tel: +41 43 456 16 00 Fax: +41 43 456 16 10 www.scs.ch [email protected]• • • • • •
The Rosenberger connectors are connected via MAX 9260 deserializer to the FPGA. Theyallow to connect two devices/imagers with up to 24bit data to the box.Please note that ESD events may disturb the communication.
Use the following cable types:
2m, 5m, 8m
Date Wed Apr 02 08:31:26 CEST 2014 Version 82 34 / 42
Supercomputing Systems AG Technoparkstrasse I CH-8005 Zürich Tel: +41 43 456 16 00 Fax: +41 43 456 16 10 www.scs.ch [email protected]• • • • • •
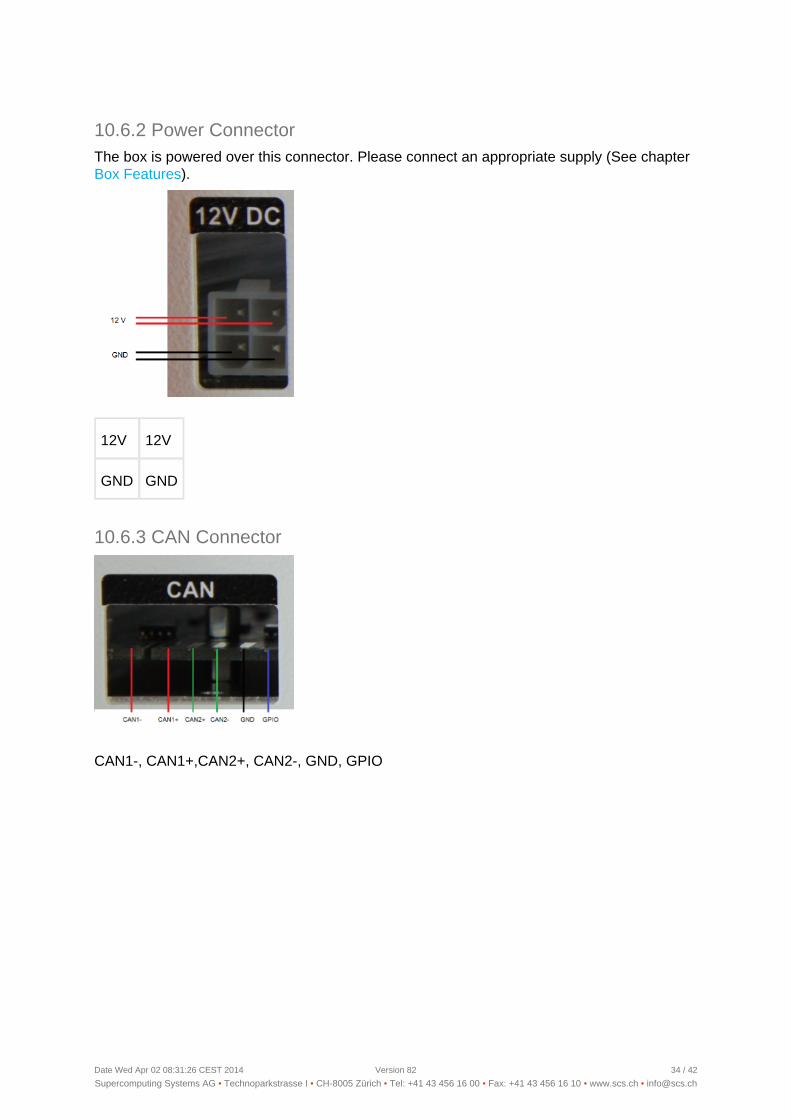
10.6.2 Power ConnectorThe box is powered over this connector. Please connect an appropriate supply (See chapter
).Box Features
12V 12V
GND GND
10.6.3 CAN Connector
CAN1-, CAN1+,CAN2+, CAN2-, GND, GPIO
Date Wed Apr 02 08:31:26 CEST 2014 Version 82 35 / 42
Supercomputing Systems AG Technoparkstrasse I CH-8005 Zürich Tel: +41 43 456 16 00 Fax: +41 43 456 16 10 www.scs.ch [email protected]• • • • • •
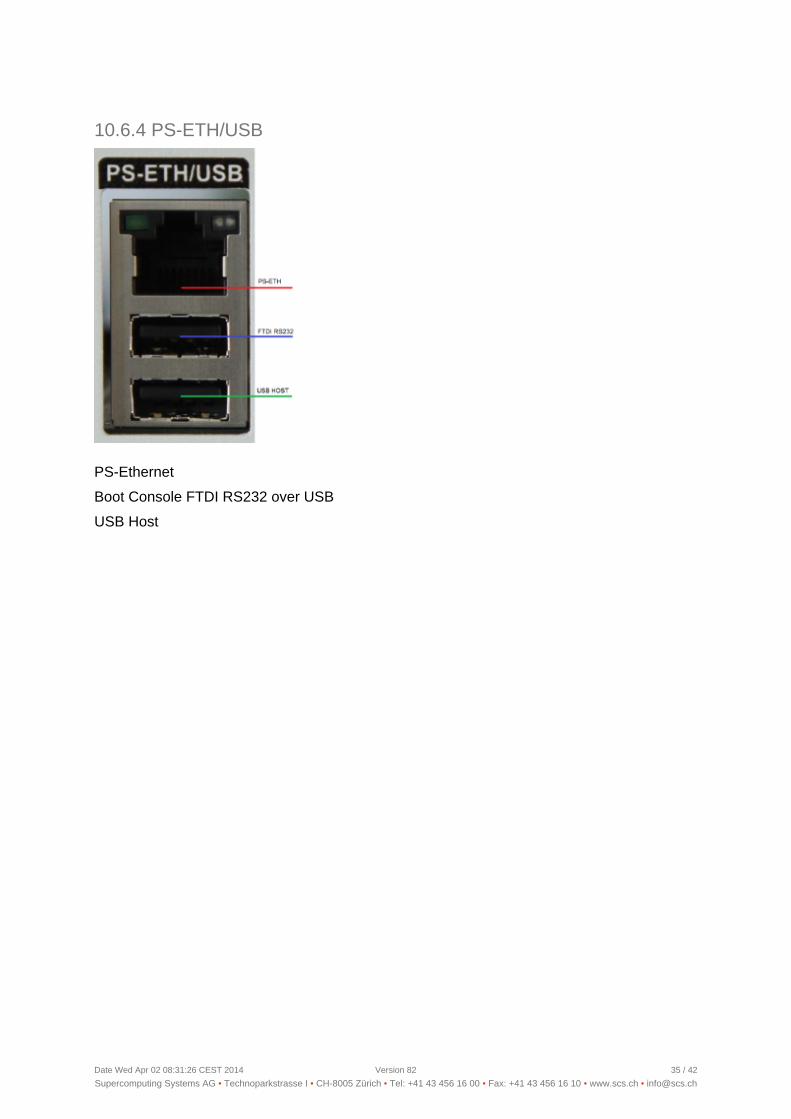
10.6.4 PS-ETH/USB
PS-Ethernet
Boot Console FTDI RS232 over USB
USB Host

Date Wed Apr 02 08:31:26 CEST 2014 Version 82 36 / 42
Supercomputing Systems AG Technoparkstrasse I CH-8005 Zürich Tel: +41 43 456 16 00 Fax: +41 43 456 16 10 www.scs.ch [email protected]• • • • • •
10.6.5 PL-ETH1/2
PL-ETH1 and PL-ETH2 are connected over a Marvel PHY directly to the PL.
10.6.6 LaserWire
Laser wire not yet implemented/tested. Looking for sponsor.

Date Wed Apr 02 08:31:26 CEST 2014 Version 82 37 / 42
Supercomputing Systems AG Technoparkstrasse I CH-8005 Zürich Tel: +41 43 456 16 00 Fax: +41 43 456 16 10 www.scs.ch [email protected]• • • • • •
10.7 What is inside the FPGA Box?
Do NOT open the box unless you are authorized by SCS to do so.
Inside the box, there is a baseboard and a module. They are both ESD sensitive.

Date Wed Apr 02 08:31:26 CEST 2014 Version 82 38 / 42
Supercomputing Systems AG Technoparkstrasse I CH-8005 Zürich Tel: +41 43 456 16 00 Fax: +41 43 456 16 10 www.scs.ch [email protected]• • • • • •
10.8 Stereo Camera Mechanical Drawing
Please find as a reference attached the mechanical drawing of the aluminum camera holder.

Date Wed Apr 02 08:31:26 CEST 2014 Version 82 39 / 42
Supercomputing Systems AG Technoparkstrasse I CH-8005 Zürich Tel: +41 43 456 16 00 Fax: +41 43 456 16 10 www.scs.ch [email protected]• • • • • •
10.9 Aptina Camera Serializer Board
The pictures below shows the Aptina headboard and the SCS serializer board.

Date Wed Apr 02 08:31:26 CEST 2014 Version 82 40 / 42
Supercomputing Systems AG Technoparkstrasse I CH-8005 Zürich Tel: +41 43 456 16 00 Fax: +41 43 456 16 10 www.scs.ch [email protected]• • • • • •
10.10 Additional Resources
10.10.1 Xilinx ResourcesFor support resources such as Answers, Documentation, Downloads, and Forums, see theXilinx Support website at: http://www.xilinx.com/supportFor continual updates, add the Answer Record to your myAlerts:http://www.xilinx.com/support/myalertsFor a glossary of technical terms used in Xilinx documentation, see:www.xilinx.com/company/terms.htmSee the Xilinx Solution Centers for support on devices, software tools, and intellectualproperty at all stages of the design cycle. Topics include design assistance, advisories, andtroubleshooting tips.
10.10.2 Further ResourcesThese Xilinx documents and sites provide supplemental material useful with this guide:DS190, Zynq-7000 Extensible Processing Platform Overview DS4067 Series FPGAs Integrated Block for PCI Express User Guide UG585Zynq-7000 AP SoC Technical Reference Manual UG673Quick Front-to-Back Overview Tutorial: PlanAhead Design Tool UG798Installation and Licensing Guide, Vivado Design Suite and ISE Design Suite (v2012.2, v14.2)UG804,Zynq-7000 AP SoC Summary User Guide UG821Zynq-7000 All Programmable SoC Software Developers Guide UG873Zynq-7000 Concepts, Tools, and Techniques UG882Kintex-7 FPGA Base Targeted Reference Design User Guide UG883Kintex-7 FPGA KC705 Evaluation Kit Getting Started Guide UG925Zynq-7000 All Programmable SoC: ZC702 Base Targeted Reference Design User Guide(ISE Design Suite 14.3) UG926Zynq-7000 All Programmable SoC: ZC702 Evaluation Kit and Video and ImagingKit Getting Started Guide (ISE Design Suite 14.3) UG954ZC706 Evaluation Board for the Zynq-7000 XC7Z045 All Programmable SoC User GuideUG961Zynq-7000 All Programmable SoC ZC706 Evaluation Kit Getting Started Guide UG963Xilinx Zynq-7000 All Programmable SoC website: www.xilinx.com/products/silicon-devices/soc/zynq-7000/index.htmZynq-7000 All Programmable SoC Product Table:www.xilinx.com/publications/prod_mktg/zynq7000/Zynq-7000-combined-product-table.pdf
Xilinx Open Source ARM git Repository: http://git.xilinx.com/Using Git: http://wiki.xilinx.com/using-gitXilinx ARM GNU Tools: http://wiki.xilinx.com/zynq-toolsZynq Linux—Downloading the Kernel Tree: http://xilinx.wikidot.com/zynq-linux#toc7Zynq Linux—Configuring and Building the Linux Kernel: http://xilinx.wikidot.com/zynq-linux#toc8Xilinx Open Source Linux: http://wiki.xilinx.com/open-source-linuxXilinx Device Tree Generator: http://xilinx.wikidot.com/device-tree-generatorXilinx PlanAhead Design and Analysis Tool website: http://www.xilinx.com/tools/planahead.htm

Date Wed Apr 02 08:31:26 CEST 2014 Version 82 41 / 42
Supercomputing Systems AG Technoparkstrasse I CH-8005 Zürich Tel: +41 43 456 16 00 Fax: +41 43 456 16 10 www.scs.ch [email protected]• • • • • •
10.10.3 ReferencesThe following websites provide supplemental material useful with this guide:1. git: the fast version control system home page: http://git-scm.com2. Device Tree general information: http://devicetree.org/Main_Page3. AMBA AXI4-Stream Protocol Specification: http://infocenter.arm.com/help/index.jsp?topic=/com.arm.doc.ihi0051a/index.html
11 Warranty

Date Wed Apr 02 08:31:26 CEST 2014 Version 82 42 / 42
Supercomputing Systems AG Technoparkstrasse I CH-8005 Zürich Tel: +41 43 456 16 00 Fax: +41 43 456 16 10 www.scs.ch [email protected]• • • • • •
11 Warranty
THIS LIMITED WARRANTY applies solely to standard development boards/modulesmanufactured by or on behalf of SCS ("Development Systems"). Subject to the limitationsherein, SCS warrants that Development Systems, when delivered by SCS or its authorizeddistributor, for ninety (90) days following the delivery date, will be free from defects inmaterial and workmanship and will substantially conform to SCS publicly availablespecifications for such products in effect at the time of delivery. This limited warrantyexcludes: engineering samples or beta versions of Development Systems (which areprovided "AS IS" without warranty); (ii) design defects or errors known as "errata"; (iii)Development Systems procured through unauthorized third parties; and (iv) DevelopmentSystems that have been subject to misuse, mishandling, accident, alteration, neglect,unauthorized repair or installation. Furthermore, this limited warranty shall not apply to theuse of covered products in an application or environment that is not within SCS specificationsor in the event of any act, error, neglect or default of Customer. For any breach by SCS ofthis limited warranty, the exclusive remedy of Customer and the sole liability of SCS shall be,at the option of SCS, to replace or repair the affected products, or to refund to Customer theprice of the affected products. The availability of replacement products is subject to productdiscontinuation policies at SCS. Customer may not return product without first obtaining acustomer return material authorization (RMA) number from SCS.THE WARRANTIES SET FORTH HEREIN ARE EXCLUSIVE. SCS DISCLAIMS ALLOTHER WARRANTIES, WHETHER EXPRESS, IMPLIED OR STATUTORY, INCLUDING,WITHOUT LIMITATION, ANY WARRANTY OF MERCHANTABILITY, FITNESS FOR APARTICULAR PURPOSE, OR NON-INFRINGEMENT, AND ANY WARRANTY THAT MAYARISE FROM COURSE OF DEALING, COURSE OF PERFORMANCE, OR USAGE OFTRADE.
Do not throw SCS products marked with the "crossed out wheeled bin" in the trash. Directive2002/96/EC on waste electrical and electronic equipment (WEEE) requires the separatecollection of WEEE. Your cooperation is essential in ensuring the proper management ofWEEE and the protection of the environment and human health from potential effects arisingfrom the presence of hazardous substances in WEEE. Return the marked products to SCSfor proper disposal.