screening online user guide · screening online ... please note that any data sources displayed are...
TRANSCRIPT

Screening Online
User Guide

-2-
Contents Screening Online ................................................................................................................. 1 User Guide .......................................................................................................................... 1
1. Introduction ..................................................................................................................... 5
2. Log in .............................................................................................................................. 6
3. Initial Screening – Sanctions and Enforcements ............................................................ 7
4. Match Overview – Standard Interface ............................................................................ 9
5. Match Details ................................................................................................................ 15
6. Media Results ................................................................................................................ 17
7. View Name Report ....................................................................................................... 20
8. Stored Names ................................................................................................................ 23
8.1 Save name for ongoing screening ........................................................................... 23
8.2 Find a name ............................................................................................................. 23
9. New matches ................................................................................................................. 28
10. Batch ........................................................................................................................... 30
10.0 File Format: ....................................................................................................... 30
Batch Upload ................................................................................................................ 30
10.1 Access to Batch Upload .................................................................................... 30
10.1.1 Uploading a List for Batch Upload ................................................................ 31
10.1.2 File Verification: ............................................................................................ 32
10.1.3 Approval Report (Batch Upload) ................................................................... 33
10.1.4 Summary Report (Batch Upload) .................................................................. 34
Batch Archive ............................................................................................................... 36
10.2 Uploading a list for Batch Archive ................................................................... 36
10.2.1 Approval Report (Batch Archive) .................................................................. 38
10.2.2 Summary Report (Batch Archive) ................................................................. 39
Batch Deletion .............................................................................................................. 41
10.3 Uploading a list for Batch Deletion .................................................................. 41
10.3.1 Approval Report (Batch Deletion) ................................................................. 41
10.3.2 Summary Report (Batch Deletion) ................................................................ 43
11. Reports ........................................................................................................................ 44
11.1. Matches Report .................................................................................................... 46
Permissions: .............................................................................................................. 46
11.2. Assignments Report ............................................................................................. 54
Permissions: .............................................................................................................. 54
11.3. Users Report ......................................................................................................... 58
Permissions: .............................................................................................................. 58
Vessels User Guide ........................................................................................................... 61
1.0 Initial Screening – Vessels .......................................................................................... 62
2. Match Overview ............................................................................................................ 64
3. Match Details ................................................................................................................ 66
3.1 Additional screening – Match Overview ............................................................ 68

-3-
4.0 Batch List .................................................................................................................... 71 4.1 Batch Results ...................................................................................................... 72
5.0 Electronic ID Search (EID) ........................................................................................ 75
6.0 FATCA User Guide .................................................................................................... 79
Background ....................................................................................................................... 80
Objective ........................................................................................................................... 80
Overview ........................................................................................................................... 80
US Indicia Check – Individual .......................................................................................... 80
Step 1 – Initial Screening .............................................................................................. 80
Step 2 – The Individual Form ....................................................................................... 82
Step 3 – Match Overview.............................................................................................. 85
Step 4 – Match Details .................................................................................................. 85
Step 5 – Confirming the US Indicia Result ................................................................... 88
Step 6 – Match Overview after US Indicia Confirmation............................................. 88
Step 7 – Name Report ................................................................................................... 89
Step 8 – W8/W9 Form Requests ................................................................................... 89
US Indicia Check – Organisation ..................................................................................... 90
Step 1 – Initial Screening .............................................................................................. 90
Step 2 – Organisation Form .......................................................................................... 90
Step 3 – Match Overview.............................................................................................. 94
Step 4 – Match Details .................................................................................................. 94
Step 5 – Confirming the US Indicia Result ................................................................... 99
Step 6 – Match Overview after US Indicia Confirmation........................................... 100
Step 7 – Name Report ................................................................................................. 100
Step 8 – W8/W9 Form requests .................................................................................. 103
US Indicia Re-Run .......................................................................................................... 104
Overview ..................................................................................................................... 104
Step 1 – Name Report after an Identity Change ......................................................... 104
Step 2 – Match Details Page after an Identity Change ................................................ 105
Step 3 – Match Details Page after US Indicia Re-Run ............................................... 105
Glossary .......................................................................................................................... 107
Version Number Version Date Changes
1.0 23 April 2008 New Matches & Media Category Term highlighting Enhancements
1.1 31 July 2008 Addition of Batch Archive / Deletion 1.2 11 Sept 2008 New Reports functionality 1.3 May 2010 New Vessels Data

-4-
1.4 June 2012 Match Overview – Secondary Filters & EIDV 1.5 May 2013 FATCA User Guide added

-5-
1. Introduction
This user guide is for using the Thomson Reuters Accelus Screening Online solution.
The system allows users to screen names, typically new or prospective customers, against watch lists and media data. Users then must review each returned match and decide on:
The match status: whether the matching information actually refers to the customer in
question.
The match risk (when it is a positive or possible match): the level of business risk that is implied by the information, e.g. a particular match might indeed refer to the customer but have no regulatory implications and therefore be low risk.
Either of these decisions can be deferred and the match will be left unresolved.
Once any matches are resolved, system provides the option to save a name for ongoing daily screening against future updates to the watch lists and media data.
Below is a page map for the initial screening process. It shows the different pages that the user will pass through once they‟ve screened a name.

-6-
2. Log in
Visit: https://screening.complinet.com
1. Enter your email address. 2. Enter your password. For initial
login, this will be set to „complinet‟ the system may be forced to change this after logging into the system.
3. Click on the Login button.
Forgotten your password?
If a user has forgotten his/her password, click the link underneath the Login button to obtain a new one. User will be prompted for their email address and a new temporary password will be to that email address. This must be changed by the user upon login.
After successfully logging in, user will see a home page and the navigation buttons, which will be based on their access level/permission for the tool. Users with initial screening permission will be taken to the Initial Screening page and users with Ongoing screening permission will see New matches page upon login.

-7-
3. Initial Screening – Sanctions and Enforcements
1. Enter the name to be screened on the Initial screening page.
2. If the user is an initial screener for more than one group, he/she will be asked to select the group from the drop down menu for which they would like to run the search. The group profile settings (appropriate transaction identifiers, if any) will load up based on user‟s selection.
If the user is only an initial screener for one group, they will not see the group drop down menu. Instead, their group profiling setting will be automatically displayed.
3. Select whether the name is an organization or an individual. This may be required by user‟s
group in order to screen against the correct data.
4. Assign the screened name to either to yourself, or a member of the group. By default, the initial screeners name will be selected.
If the user is only an initial screener for one group, they will only be able to assign names to themselves.
5. There are up to 2 custom identifiers that can be entered per name based on client configuration. Enter identifiers:
a) Enter the first custom identifier, for example Customer name/ID. This may be a reference
or project name. If screening an individual, user may enter the name of the organization they are related to. (Required or Optional – based on group settings)

-8-
Note that this field is not searchable. If users need to run a search on the individual and the organization with which they are associated, these searches must be undertaken separately.
b) Enter the second custom identifier, dependant upon clients preference another example
would be Deal name/ID. (Required or Optional – based on group settings)
6. Click the Search button to run the search.

-9-
4. Match Overview – Standard Interface
On running a search, the Match overview page is displayed. This shows the search summary and lists all the sanctions, enforcements, PEP results and link to media results on one page.
1 The summary includes the name of the individual or organization searched, the date and time
of the search, who undertook the search and the number of matches obtained.
2 Below the summary, any matches found are listed by data source, grouped together under the following data categories:
Sanctions Law Enforcement Regulatory Enforcement Other Bodies PEP
Please note that any Data sources displayed are based on client configuration.
3 Each match can be further investigated by selecting the match. To investigate a match, click
on the match either in the left hand menu or on the main page to see further details and to resolve the match – see section 5.
The system also provides an alternative way of resolving matches. If matches don‟t need to be investigated before being resolved, user can select the multiple matches by checking the tick box and selecting an action from the drop down menu below.

-10-
4 The selected action will be taken against all the checked names and it allows matches to be resolved quickly and efficiently.

-11-
4. Match Overview – Secondary Matching Filters
On running a search, the Match overview page is displayed. This shows the search summary and lists all the sanctions, enforcements, PEP results and link to media results on one page.
1. The summary includes the:
Name – The individual or organization searched
Category – The type of match (Sanctions, PEP, Law Enforcement, Regulatory Enforcement, Other Bodies)
Date of Birth, if available,
Identification, if available (Passport No, SSN etc)
Country of Residence
Country of Origin
PEP Sub Cats - Sub-category of PEP to help assess the potential risk associated
Please note that any Data sources displayed are based on client configuration.
2. On the left of the screen, there are 6 filters that help refine the matches providing multiple selection criteria.
1. Date of Birth 2. Identification 3. Residence 4. Origin 5. PEP Sub Cats
-12-
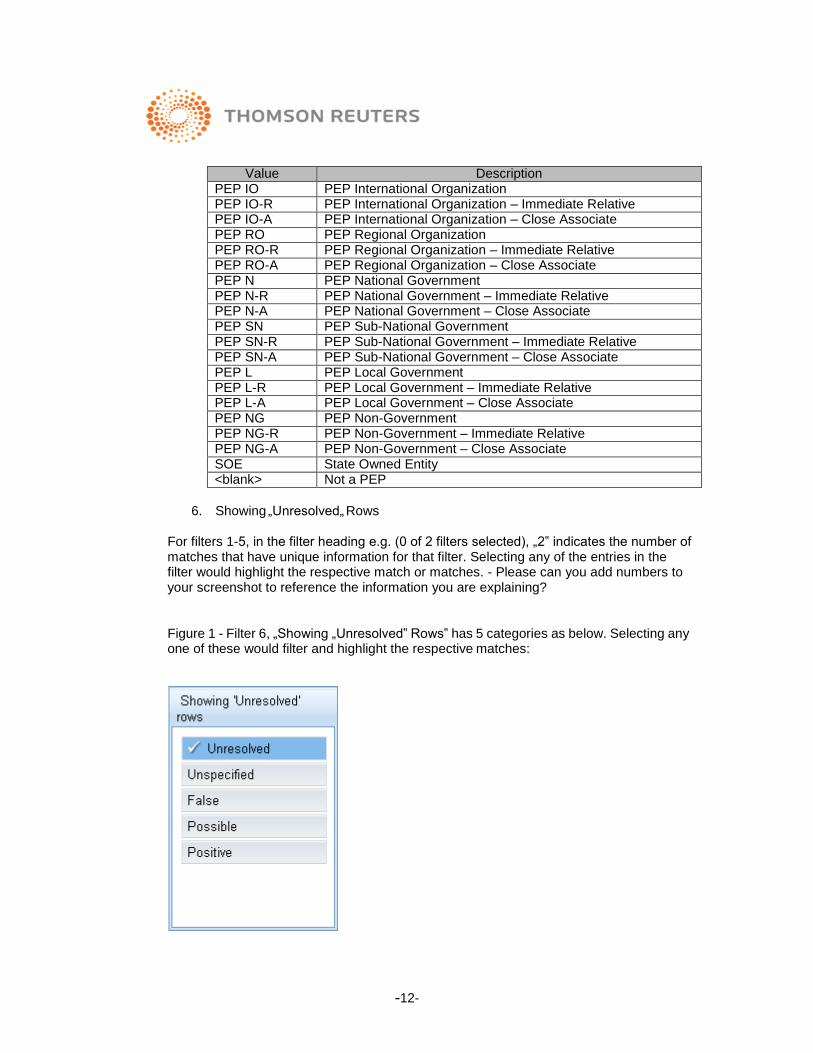
Value Description PEP IO PEP International Organization PEP IO-R PEP International Organization – Immediate Relative PEP IO-A PEP International Organization – Close Associate PEP RO PEP Regional Organization PEP RO-R PEP Regional Organization – Immediate Relative PEP RO-A PEP Regional Organization – Close Associate PEP N PEP National Government PEP N-R PEP National Government – Immediate Relative PEP N-A PEP National Government – Close Associate PEP SN PEP Sub-National Government PEP SN-R PEP Sub-National Government – Immediate Relative PEP SN-A PEP Sub-National Government – Close Associate PEP L PEP Local Government PEP L-R PEP Local Government – Immediate Relative PEP L-A PEP Local Government – Close Associate PEP NG PEP Non-Government PEP NG-R PEP Non-Government – Immediate Relative PEP NG-A PEP Non-Government – Close Associate SOE State Owned Entity <blank> Not a PEP
6. Showing „Unresolved„ Rows
For filters 1-5, in the filter heading e.g. (0 of 2 filters selected), „2‟ indicates the number of matches that have unique information for that filter. Selecting any of the entries in the filter would highlight the respective match or matches. - Please can you add numbers to your screenshot to reference the information you are explaining?
Figure 1 - Filter 6, „Showing „Unresolved‟ Rows‟ has 5 categories as below. Selecting any one of these would filter and highlight the respective matches:

-13-
1. Unresolved – Matches that have not been resolved yet 2. Unspecified – Matches that have been resolved and marked as Unspecified,
usually preferred in instances where more information/research is required to remediate the match, assess the match validity and risk associated
3. False – Matches that have been marked as false positives 4. Possible – Matches that have been marked as potential matches 5. Positive – matches that have been identified as positive
Figure 2- Removes all filters and reverts the screen to the original display with all matches generated.
Figure 3 - Allows the user to shift between watchlist and media matches by clicking on either of the buttons. By default, screen „1 Watchlist Matches‟ is displayed.
Figure 4 - Allows the user to create a PDF of the Match Overview screen (all results).
Figure 5 - Allows the user to request Thomson Reuters‟ Enhanced Due Diligence Report on the entity searched. The user has to complete the form to submit a request.
Figure 6 - Entity names can be selected either by using the filters are by selecting the relevant names under the „Name‟ tab. Based on the information provided on the entity, the user can select the below tool to create notes for future reference and mark the entities as Unspecified, False, possible or Positive, and click „Resolve‟. The match will disappear from the overall matches, however can be retrieved using the filters.

-14-
In Instances where the entity is marked as Possible or Positive, the risk levels below appears. An appropriate selection has to be made before clicking the „Resolve‟ button. This is helpful for audit purposes.
3. The system also provides an alternative way of resolving matches. If matches don‟t need to be investigated before being resolved, user can select the multiple matches by checking the tick box above the „Name‟ and selecting an action from the drop down menu below.
4. The selected action will be taken against all the checked names and it allows matches to be resolved quickly and efficiently.
Figure 7 – By clicking on the Name of the searched entity, the user is taken directly to the Name Report (For Viewing Name Report - Please refer to Section 7 of the User Guide).

-15-
5. Match Details
1 Run a search and select the first match – see section 4. The Match details page is shown. This includes any identifying information and details of the information source where the match has come from.
2 Review the match and change the match status to:
False match
Possible match
Positive match
These match status options are based on client configuration. A match can only be resolved when the match status is changed from “New” to one of these three options.
3 If match status is set to Possible or Positive, the system will prompt:
“The remaining results may be batch resolved with the status “Unspecified” without reviewing the matches individually.”
This feature is useful if the user has a name which has returned lots of matches. If one or more possible/positive match has been identified then it might not be necessary to go through the remaining matches. However this option should be used with extreme care and only if the client has processed enough information to make a business decision about the name screened.

-16-
If the user decides to batch resolve all remaining matches as “Unspecified” without reviewing the matches individually, they have the option to have the name for ongoing screening by selecting “Yes” to the second question below.
Would you like to save the name for ongoing screening?
Selecting „No‟ for automatically resolving matches, will take the user back to individually resolving each of the matches by setting the match status and match risk.
4 The following business risk values are based on client configurations and must be set if the
match was possible or positive:
Low
Medium
High
The match risk defaults to “Unspecified” and must be set for possible or positive matches.
5 Add a comment in the box at the bottom of the page. This, while not required, is essential to explain why the match is possible or positive and if there is some risk.
6 If the match status has been applied to all matches, select the Resolve button to save the details and to remove this name from users list of outstanding work.
All matches from initial screening must be resolved to save the name for ongoing screening. To resolve a match, the match status must be set as false, possible or positive and the name must be saved by clicking on the Resolve button.
7 If Adverse Media is included in the client subscription, on dealing with the last match in the list, the media results page opens. If there are no media results, the Name report page opens, which includes a summary of all matches and a list of actions to take next.
-17-
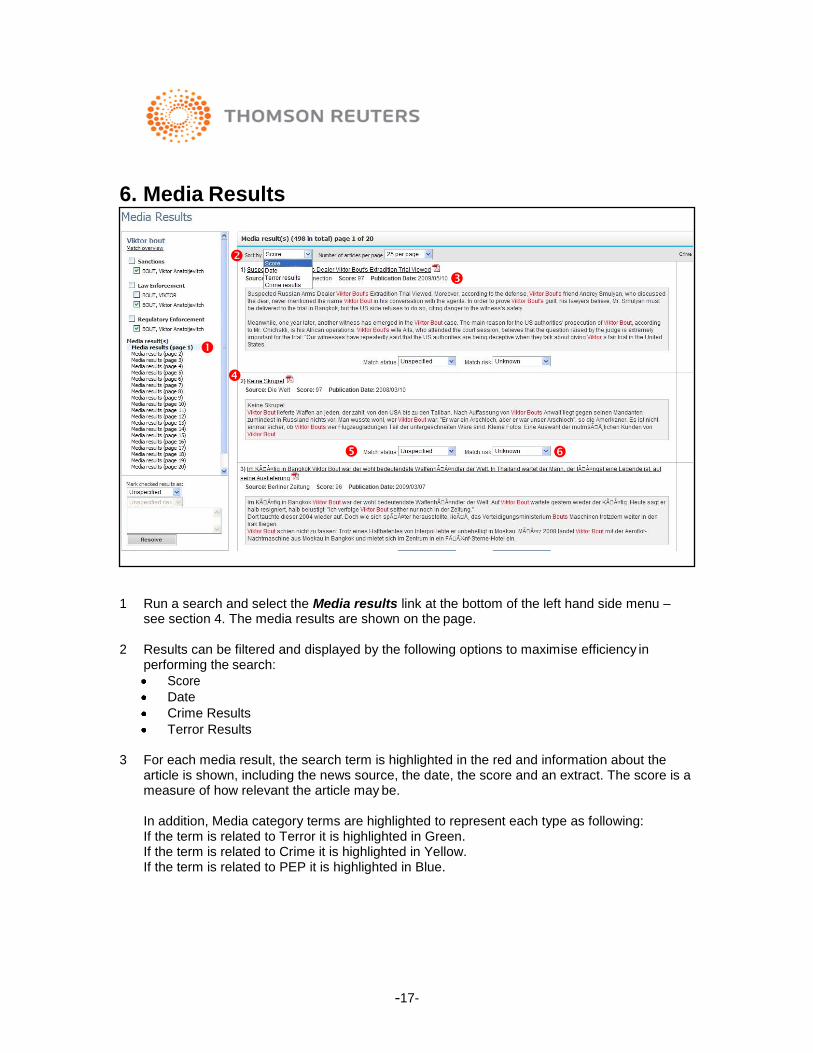
6. Media Results
1 Run a search and select the Media results link at the bottom of the left hand side menu – see section 4. The media results are shown on the page.
2 Results can be filtered and displayed by the following options to maximise efficiency in
performing the search:
Score
Date
Crime Results
Terror Results
3 For each media result, the search term is highlighted in the red and information about the article is shown, including the news source, the date, the score and an extract. The score is a measure of how relevant the article may be.
In addition, Media category terms are highlighted to represent each type as following: If the term is related to Terror it is highlighted in Green. If the term is related to Crime it is highlighted in Yellow. If the term is related to PEP it is highlighted in Blue.
-18-
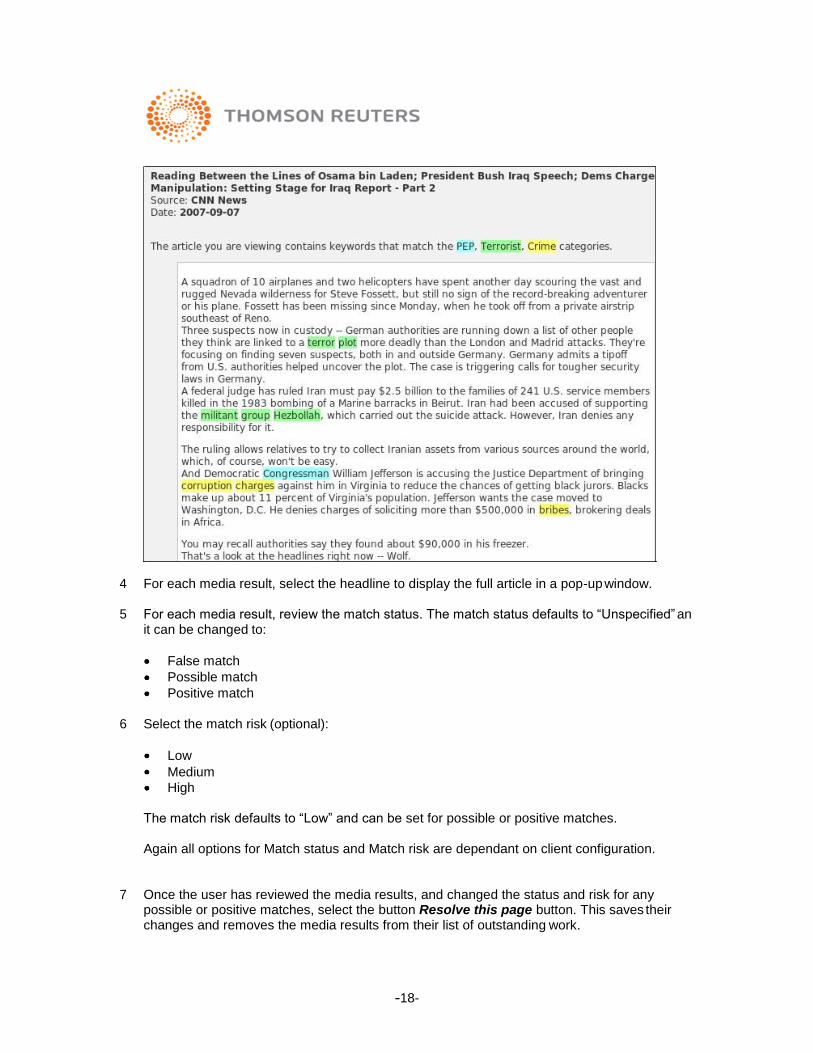
4 For each media result, select the headline to display the full article in a pop-up window.
5 For each media result, review the match status. The match status defaults to “Unspecified” an it can be changed to:
False match
Possible match
Positive match
6 Select the match risk (optional):
Low
Medium
High
The match risk defaults to “Low” and can be set for possible or positive matches.
Again all options for Match status and Match risk are dependant on client configuration.
7 Once the user has reviewed the media results, and changed the status and risk for any possible or positive matches, select the button Resolve this page button. This saves their changes and removes the media results from their list of outstanding work.

-19-
When resolving media matches, all results can be resolved together in batch and their statuses can be left as unspecified if desired.

-20-
7. View Name Report

-21-
Users can view all details and previous matches for a name and they can perform additional actions from the Name report page. This page is accessed after resolving all matches for a name, from selecting an assignment in the “My assignments” list or from the Stored names page.
1 View the name details:
Name
Customer name/ID (custom fields based on client configuration)
Deal name/ID (custom fields based on client configuration)
Group
Date added
Added by
“Added by” refers to the initial screener. The Owner is by default the initial screener. Once a name has been saved for ongoing screening, the Owner can be changed. The user can view all names for which they are the Owner in the Stored Names page.
Owner
Number of unresolved matches
Assigned to
2 View the match history:
All unresolved and resolved matches are listed in the Matches box. Using the checkboxes at the top of the box, user can set the box to show matches with different statuses.
High risk matches are highlighted in red, medium risk matches are highlighted in amber and low risk matches are not highlighted.
3 Any unresolved matches can be resolved by checking the tick box and stating the match
status/risk. If further investigation is required before resolving matches, select the specific match to view the Match Details page and to change the status and risk for that match.
4 View the change log:
The Change log box shows a history of all actions that relate to the name. This includes all match status changes and notes, and who made the changes. The entries are ordered by log date in ascending/descending order.
5 Possible actions taken from this page are:
Assign name - This is useful if the user need to escalate a match to someone else for review.
Change Owner –
Add a note. The user can add a note directly onto this page. Select this action, enter the note/message and click Save. Notes are shown in the Change log box.

-22-
Save name for ongoing screening - This is to automatically screen the name
against updates to watch lists and media data on an ongoing basis. Note: This option will allow appear only once all the matches have been resolved.
Discard this search. If a name is saved for ongoing screening it can be discarded from the search at any point by leaving the page. If the name however, is in their assignment list, they can select this action to remove the name from „Your assignments‟.
Add to my assignments - If the user would like to save a name in their assignments and resolve the matches later, they can assign it to themselves.
6 Download a PDF file of the summary details using the link on the left of the page.

-23-
8. Stored Names
Once the user has resolved all the matches for a name, they may save it for ongoing screening. When this is done, there are also several further actions that can be taken.
8.1 Save name for ongoing screening
Once all matches are resolved, user can save a name for ongoing screening. It will be automatically screened daily against new updates to watch lists and media data.
If there are outstanding unresolved matches, user will not be able to save the name for ongoing screening.
1 Select the Save name for ongoing
screening action at the top left of the Name report page.
2 Check that the Custom Client fields are
correct. User may edit them. The Customer name/ID may be required or optional depending on the group settings.
3 Add a note. This is optional.
8.2 Find a name
Users can find any name which they own. Typically, user would have initially screened this name and saved it for ongoing screening.
Upon loading this page, the following default settings will be applied:
Screening status = Ongoing Active
With unresolved matches = Yes
Owner = User who‟s logged in
Group = 1st
group that user has permission to

-24-
1 Click the Stored names button at the top of the page. In the Filter names box, enter search terms or use one or more of the filters. Search options include:
Name
Custom Client fields eg. Customer Name/ID or Deal Name/ID
2 Search results can be filtered by:
Screening status. The possible statuses are:
o Ongoing Active: Displays all the names that have been saved for ongoing
screening. o Initial Only: Displays all the names that are only initially screened. o All Active: Displays both initially and ongoing screened names which are not
archived. o Archived: Displays all archived names.
o Any: Displays all the names; initially and ongoing screened, active or archived.
Name status
Names with unresolved matches
Owner*
Group*
Assigned to

-25-
Date added - This refers to when the name was added to the database, either via initial screening or as part of a bulk import.
* The owner and group filters will only display user‟s group member.
3 User can change these default filters and select Show names. All names that match the filters are listed in the Stored names box. Clear Filters button clears and resets all the filters to default.
4 Clicking on the column-heading will re-order the list. Select a particular name to view all details held about that name or take actions against multiple name from this page by selecting the check box next to each name.
5 Possible actions performed include:
Change name status
There is an option to change the overall status of any customer name that is being ongoing screened. Note that this status is purely a record kept within the Thomson Reuters Accelus solution and is not affected by the status of any individual matches. Names can be set one of the three statuses:
Clear

-26-
Selected names from the stored names page will only get updated if their current name status is different from the selected action.
Add to my assignments
Assignments are names that need further work. Users can choose to complete their work at another time by saving a screened name to „Your assignment‟ list. For example, a user may have resolved some of the matches but want to come back at a later time to complete them. Typically they will have unresolved matches or matches that require further investigation. Adding a name to my assignments also allows the user to quickly access their own names.
User may have self assigned a name to work on at a future time or someone else may have assigned them a name.
It will only be possible to add names to „Your assignments‟ if user has the correct assignments permissions for the relevant group(s) that the names fall under. If the user doesn‟t have the correct permission, the system will not allow them to perform this action and they will need to contact their administrator.
User can access their assignment from the bottom of the Initial screening page (for initial screening permission) and new matches page (for ongoing screening permission) by going through „Your assignments‟ box. On selecting an assignment by clicking the name, the Name report page opens. The note added by the assigner will be in the Change log.
Assign selected names
User has the option to assign a name to another user. Depending on the users permissions, they will receive an email alerting him or her about the assignment. Typically this will be when there is a possible match for the name and it needs further investigation.
Selected names will only be assigned to the specified individual if the individual has the correct assignments permissions for the relevant group(s) that the names fall under. If the individual does not have the correct permission, the system will not allow him/her to perform this action and they will need to contact their administrator.
Under Investigation
Suspended

-27-
Discard selected names
At any point during initial screening user can discard the name by leaving the page, unless the name is in „Your assignment‟ list, in which case they can select this action to remove the name from assignment.
This action can only be performed if the name has not been saved for ongoing screening. If selected names are not saved for ongoing screening, system will prompt to take a new/different action for these names or return to the stored names page.
Add a note
A note can be added directly onto this page. Select this action, enter the note and click Go. Notes for each of the selected names are shown in the Change log box.
Archive selected name
Select the Archive name action to stop ongoing screening of the name. The name‟s screening status will be set to “Archived” rather than “Active”. All the records will still be displayed and the name will still be accessible from the Stored Names Page.
Once a name is archived, it can not be made active again. To start screening the name again, user will need to enter it as a new name via initial screening.
Delete selected name
This action will permanently remove the name from the database. It will not be possible to trace change log or have retrieve any match information about this names once this action is performed. Therefore, it is not required to add a note when deleting a name.
This is a permissions based action so „Delete‟ option will only appear if the user has been set with „Store name Deleter‟ permission by their administrator.

-28-
9. New matches
New matches arise from ongoing screening. When a name matches against new updates to watch lists and media data as part of daily ongoing screening, the name will appear in the New matches box for ongoing screeners to resolve. The “New Matches” page is available to all users with Ongoing Screening permission.
Users have the following options sorting and filtering:
1 Search for a name Only those names that contain the text entered in the search text box are displayed.
2 Browse for a name alphabetically
Hyperlinks listed with the letters A to Z above the list of names. Clicking on a letter will list only those names that begin with that letter. There is an „All‟ option to display all the results and remove the filter.
3 Select how many results are displayed per page
Users have the option to display 10, 25, 50 or 100 names per page.
4 Jump to a specific page number
User can jump to a specific page by entering the page number in this box and clicking „Go‟.

-29-
Once a user has clicked on a name which has received new matches, they will be directed to the Name Report. This will enabled to view in detail each individual match made against the name and resolve it accordingly.
To view all New Matches with short summaries, users can select the Match Overview button. (1) The user can return to the Name Report at any time from the Match Overview page.

10. Batch This form provides an interface to upload a list of names into the system to perform 3 batch actions; Batch Upload, Batch Archive and Batch Delete.
Please Note: Uploading a batch list will store the names for screening during the overnight process and return any matches the following day.
10.0 File Format:
All batch lists MUST be in Comma Delimited (.csv) or Tab Delimited Text (.txt) format and
have the following columns. Excel spreadsheets can be easily saved as .csv files if required.
Column Name Column Type Name Required Text string to be screened
Organization/Individual/Vessel Required Text with values “Organization”, “Individual” or **“Vessel”. No other values will be accepted
Custom field 1 Optional Text string. Example, Deal ID Custom field 2 Optional Text string. Example Customer ID
Batch list should be limited to no more than 10,000 names. This is the recommended amount of names to include for optimal performance.
**Please note, for Vessel searches via batch you can enter either a Vessel name or IMO number.
Batch Upload
10.1 Access to Batch Upload
1. To access the batch upload service, the permission setting for “Batch Upload” will need to be provided by the system administrators.
2. Users that have the „Batch Upload‟ permission set for one or more specific group(s) can upload names into those groups for on-going screening.
3. Once logged in, users with the “Batch Upload” permission will see a button along the menu bar entitled “Batch”.
4. When clicking on this button, users will be brought to a simple upload form.

-31-
10.1.1 Uploading a List for Batch Upload
The Batch Upload page consists of a form that allows users to enter the following details in order to complete the upload.
1. Select Group. This is available for users with access to one or more groups with ongoing screening permissions. Users must select a group value where these names will be stored.
2. File to upload. Users can use the Browse button to easily retrieve a file from their local computer or network drive.
3. Check the correct File Format (see 10.0).

-32-
4. Select Owner name. Users must select a value for owner using the drop-down menu. The list will only consist of users in the group selected. The individual selected will be the owner of all the names uploaded.
5. Select Assigned to name. Users must select an individual using the drop-down menu. The list will only consist of users in the group selected and users with the „Assignment target‟ permission from the chosen group. If the user however, has the „Global Assigner‟ permission, the list will consist of all Assignment Targets, Initial Screeners and Ongoing Screeners.
10.1.2 File Verification:
1. Click „Verify‟.
2. If the file format is correct, the names will successfully be submitted to the Enterprise
platform to be approved for upload. (see 10.1.4)
3. If a file is not uploaded in an acceptable format, errors will be returned on the confirmation screen. The confirmation screen will also display the total number of names being uploaded.

-33-
4. Possible errors could occur whilst trying to upload the files prohibiting them from being successfully stored. It is therefore important to check that the files:
Do not contain more than 10,000 names
Are in the correct format. The list must be in Comma Delimited (.csv) or Tab Delimited Text (.txt) in order to be uploaded.
Contain the correct columns in the right order.
Have the correct spelling for the ‟Type‟ column (Individual or Organisation)
Do not contain any incorrect spellings or unrecognised characters.
5. Check file and make necessary amendments. 6. Return to step 1 of 10.1.1.
10.1.3 Approval Report (Batch Upload)
The Approval Report shows all names that have been successfully submitted for approval before being uploaded into Enterprise for on-going screening.
Once the file has been verified and successfully submitted for upload the user will receive an email which will direct them to the approval report to confirm names for upload. After reviewing these names the user can continue and complete the batch action by selecting the „Perform Batch Upload‟ button. (1)

-34-
(2) If „Cancel batch operation‟ button is selected the user will be asked to confirm that they wish to cancel the current Batch Upload procedure. By selecting Ok it will disallow the action and the user will be directed back to the Batch page.
10.1.4 Summary Report (Batch Upload)
The Summary Report, similar to the Approval report displays information on what batch action was carried out, by which user and in what group. It will also provide the file details and date the action was completed.
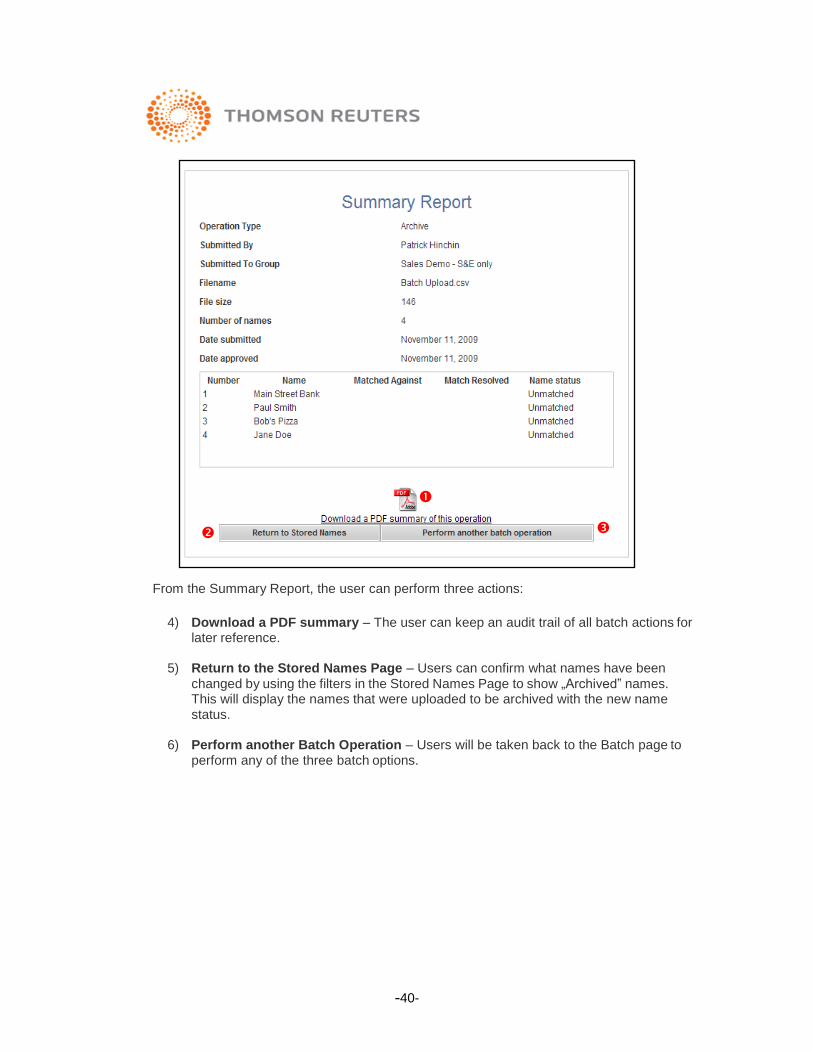
From the Summary Report, the user can perform three actions:
1) Download a PDF summary – The user can keep an audit trail of all batch actions for
later reference.
2) Return to the Stored Names Page – Users can confirm what names have been
changed by using the filters in the Stored Names Page to show „Archived‟ names. This will display the names that were uploaded to be archived with the new name

-35-
status.
3) Perform another Batch Operation – Users will be taken back to the Batch page to perform any of the three batch options.

-36-
Batch Archive
10.2 Uploading a list for Batch Archive
The Batch Archive page can be accessed if a user has the „Stored Names Deleter‟ permission, and allows users to import a list of up to 10,000 names to be archived from the Enterprise Stored Names.
Please Note: Archived names will no longer be screened on a daily basis but will remain accessible in order to view previously found matches and the full audit trail detailing match statuses, match risks and who performed each action. Archived names can not be reactivated once they have been archived. If a name needs to be screened again after it has been archived, it will need to be reinserted into the Enterprise system and then re-screened.
The following details must be entered in to perform the action.
1. Select Group. This is available for users with access to one or more groups with ongoing screening permissions. Users must select a group value where these names will be stored.
2. File to upload. Users can use the Browse button to easily retrieve a file from their local computer or network drive.

-37-
3. Choose Owner & Assignee. These are optional fields that can help authenticate the search and reduce the case of duplicate matches.
- Users can select the name of the person the batch names to be archived are owned by.
- Users can select the name of the person the batch names to be archived are assigned to.
4. The Custom identifiers check boxes are optional search criteria. Users can validate their batch list against the Custom Identifiers to reduce the number of duplicate matches that will need to be cleared before performing the batch action.
5. Once all information has been entered into the form the user must select Verify to approve the file format and file structure are correct. While the names are being verified and matched to those already in the system, the user can continue using the Enterprise platform. Once the file has been verified, an email including a link to the Approval Report is sent to the user to notify them of when the names are ready to be approved before undertaking the batch action.

-38-
6. The Approval screen shows what matches have been made from the criteria inputted for the search which need to be cleared before performing the batch action.
10.2.1 Approval Report (Batch Archive)
Users can review the list of names they are about to action on the Approval Report.
If there any duplicate matches found from the file that has been uploaded, the user will need to resolve these before the action can be completed for those names. These duplicates can be investigated by selecting each duplicate match and viewing the details on the Name Report to verify if it is the correct name that is to be archived.
(1) The Approval report can show a number of results for the names uploaded for the Batch Archive action:
- Matched. The name has been matched against the criteria entered on the form to the
names that are existing in the Stored Names Page.
- Unmatched. No matches have been made for the names that are uploaded for batch
archival.
- Mismatched. Names may exist on the system however have mismatched either the
Owner or Assignee entered in the drop down menu.
- Duplicate. Multiple instances of the same name have been found in the system and
must be resolved before being archived.

-39-
(2) If the report contains a list all matching names then the user can continue and carry out the batch action by selecting the „Perform Batch Archive‟ button.
A pop up box then will appear to ask the user to confirm that they are about to archive the names shown on the approval report that have been matched.
The following message will alert the user of their pending action and how they wish to proceed.
An OK button will allow the user to successfully complete the task at hand and an email will be generated to inform the user when the Archive process is complete and details can be viewed on the Summary Report which is provided by a link.
A Cancel button will cease the action and direct the user back to the Approval Report.
(3) If „Cancel batch operation‟ button is selected the user will be asked to confirm that they
wish to cancel the current Batch Archive procedure. By selecting Ok it will disallow the action and the user will be directed back to the Batch page.
10.2.2 Summary Report (Batch Archive)
The Summary Report, similar to the Approval report displays information on what batch action was carried out, by which user and in what group. It will also provide the file details and date the action was completed.
-40-
From the Summary Report, the user can perform three actions:
4) Download a PDF summary – The user can keep an audit trail of all batch actions for
later reference.
5) Return to the Stored Names Page – Users can confirm what names have been
changed by using the filters in the Stored Names Page to show „Archived‟ names. This will display the names that were uploaded to be archived with the new name status.
6) Perform another Batch Operation – Users will be taken back to the Batch page to perform any of the three batch options.

-41-
Batch Deletion
10.3 Uploading a list for Batch Deletion
The Batch Deletion page can be accessed if a user has the „Stored Names Deleter‟ permission, and allows users to import a list of up to 10,000 names to be deleted from the Enterprise Stored Names.
The interface is similar to that of the Batch Archive and follows the same steps.
Please Note: Once a list of names has been approved, all names and associated matches are deleted from the Enterprise platform and can no longer be retrieved.
10.3.1 Approval Report (Batch Deletion)
On submitting a file for verification an email is sent to the user to notify them that any matches or duplicates found for deletion, are awaiting approval before being processed.
If there any duplicate matches found from the file that has been uploaded, the user will need to resolve these before the action can be completed. This can be investigated by selecting each duplicate match and viewing the details on the Name Report to verify if it is the correct name that is to be deleted.

-42-
(1) Once the user has clicked on the „Perform Batch Delete‟ a pop up box then appears to ask the user to confirm that they are about to delete the names shown
on the approval report that have been matched.
The following message will alert the user of their pending action and how they wish to proceed.
An OK button will allow the user to successfully complete the task at hand and an email will be generated to inform the user when the Deletion process is complete and details can be viewed on the Summary Report which is provided by a link.
A Cancel button will cease the action and direct the user back to the Approval Report.
(2) If „Cancel batch operation‟ button is selected the user will be asked to confirm that they wish to cancel the current Batch Deletion procedure. By selecting Ok it will disallow the action and the user will be directed back to the Batch page.

-43-
10.3.2 Summary Report (Batch Deletion)
The Summary Report, similar to the Approval report displays information on what batch action was carried out, by which user and in what group. It will also provide the file details and date the action was completed.
From the Summary Report, the user can perform three actions:
1) Download a PDF summary – The user can keep an audit trail of all batch actions for
later reference.
2) Return to the Stored Names Page – Users can confirm that the names not longer
exist in the Enterprise system by searching for them on the Stored Names Page. Individual names that have been deleted can be entered into the „Name‟ field and by selecting „Show Names‟ there should be no results generated if the names have been successfully deleted.
3) Perform another Batch Operation – Users will be taken back to the Batch page to
perform any of the three batch options.

-44-
11. Reports
The Reports tab enables users to produce management reports based on three broad criteria; matches, assignments and users.
Users who have either the Initial Screener, Ongoing Screener or User Administrator permissions will see the „Reports‟ tab when logged in. The new tab sits between the „Batch‟ and „Groups‟ tabs across their top header.
When logged in to the Reports page, the default will be directed to the Reports Download page
where they can view all their previous and current reports.
To begin creating a report, user must click on the link “Create New Report”. This will take them
to the Reports wizard which will take user through the steps required to generate their required report.
This form will provide an interface for users to create detailed reports for their groups. The three reports that are available on the Enterprise platform are:

-45-
Matches Report
Assignments Report
User Report
Please Note: All reports are saved on the user‟s platform for 48 hours and can be downloaded or saved in a .csv format.

11.1. Matches Report
The Matches report allows users with the relevant permissions to generate a list of the total number of matches found against the data sources they have subscribed to for their own screened names. If however users have the Group permission, they will be able to see matches against names for other users in their group.
The Matches report gives a user the option to customise the report according to watchlist type, active or inactive clients, users and groups.
Permissions:
The permissions that are required to have access to the Matches Report are:
Initial Screener Permission
Ongoing Screener Permission
Group Permission
Step 1 – Report Selection
1 - Select “Matches Report”
2 - Click „Next‟ to be taken to step 2 where user can begin creating the matches report.
3 - To go back to the home page, click on „Previous‟.

-47-
Step 2 – Date Range Selection Step 2 allows users to enter the date range in which they would like to run their report against.
By entering a valid date range, users will be able to retrieve the total number of matches found against the names in a particular period.
Please note: The start date can not be later than the end date.
1) - Select Start date
2) - Select End date
3) – Click on “Next” go to step 3 of 7.
4) – To go back to the Report Selection Page click on the “Previous” button.
Step 3 – Group Selection
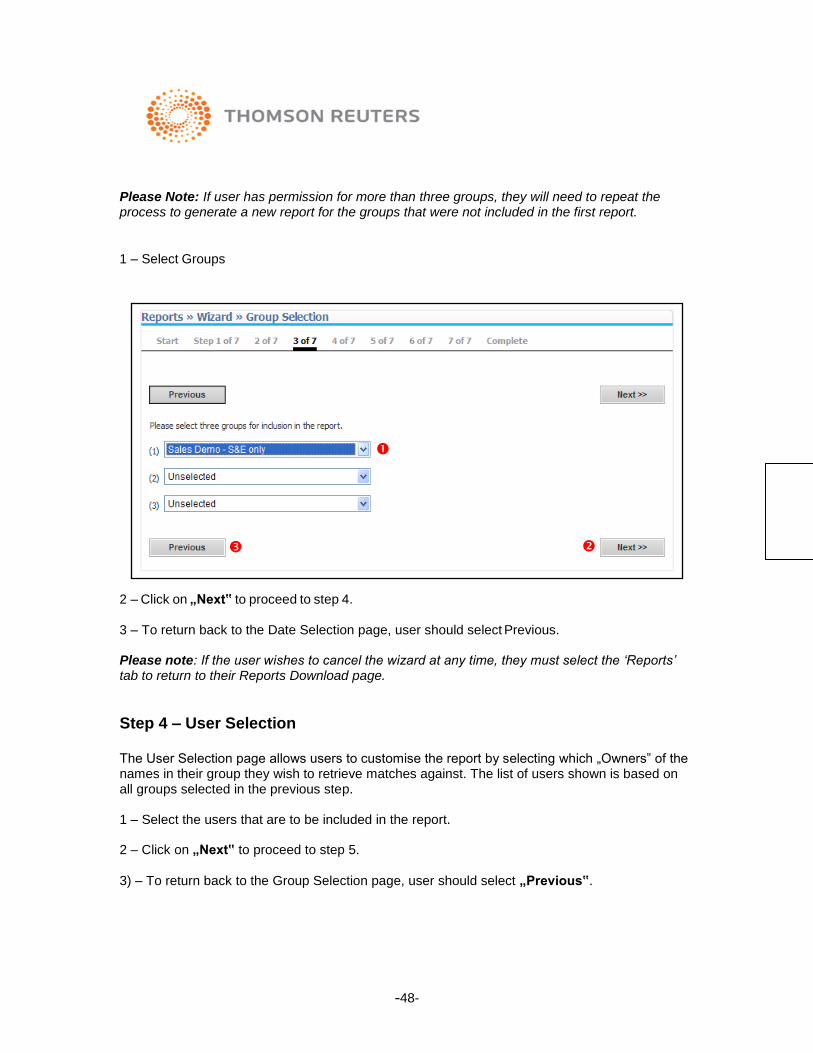
Users can select up to 3 groups to include in the report at one time.
-48-
Please Note: If user has permission for more than three groups, they will need to repeat the process to generate a new report for the groups that were not included in the first report.
1 – Select Groups
2 – Click on „Next‟ to proceed to step 4.
3 – To return back to the Date Selection page, user should select Previous.
Please note: If the user wishes to cancel the wizard at any time, they must select the ‘Reports’ tab to return to their Reports Download page.
Step 4 – User Selection
The User Selection page allows users to customise the report by selecting which „Owners‟ of the names in their group they wish to retrieve matches against. The list of users shown is based on all groups selected in the previous step.
1 – Select the users that are to be included in the report.
2 – Click on „Next‟ to proceed to step 5.
3) – To return back to the Group Selection page, user should select „Previous‟.

-49-
4 - User can select each user individually or all of the names by clicking on “Select All” link and if necessary can deselect all the names by clicking on “Deselect All”.
Step 5 – Data Category Selection
From this screen the user will be able to select the categories they want to include in the report for matches. Names which have matches against the chosen data categories will be displayed in the report

-50-
1 – Select Data Categories that are to be included in the report. These can include one or many of the following: Sanctions, Regulatory Enforcements, Criminal Enforcements, PEP and Media.
2 – To proceed to the next step, click „Next‟.
3 - To return back to the Group Selection page, user should select „Previous‟
4 – Users can include all data categories by clicking „Select All‟ and unselect all data categories by clicking „Deselect All‟.
Step 6 – Match Status Report
The user can customise the report by specifying which type of match status they are looking to include in their report.
1 – Select the Match Status that should be included in the report. This can include: Positive, Possible, False and Unresolved.
2 – To proceed to the step 7, click „Next‟.
3 - To return back to the Data Category Selection page, user should click on „Previous‟
4 – Users can include all Match Status‟s by clicking „Select All‟ and unselect all Match Status‟s
by clicking „Deselect All‟.

-51-
Step 7 – Customer Status Selection
In step 7 users can specify which customer status they wish to include in the report. These will be either; Active, Inactive (archived) or both.
1 – Select the Customer Status that‟s should be included in the report. (Active, Inactive or Both)
2 – To proceed to the finish screen, click „Next‟.
3 - To return back to the Matches Status Selection page, user should click on „Previous‟
4 – Users can include all Customer Status‟s by clicking „Select All‟ and unselect all Customer Status‟s by clicking „Deselect All‟.
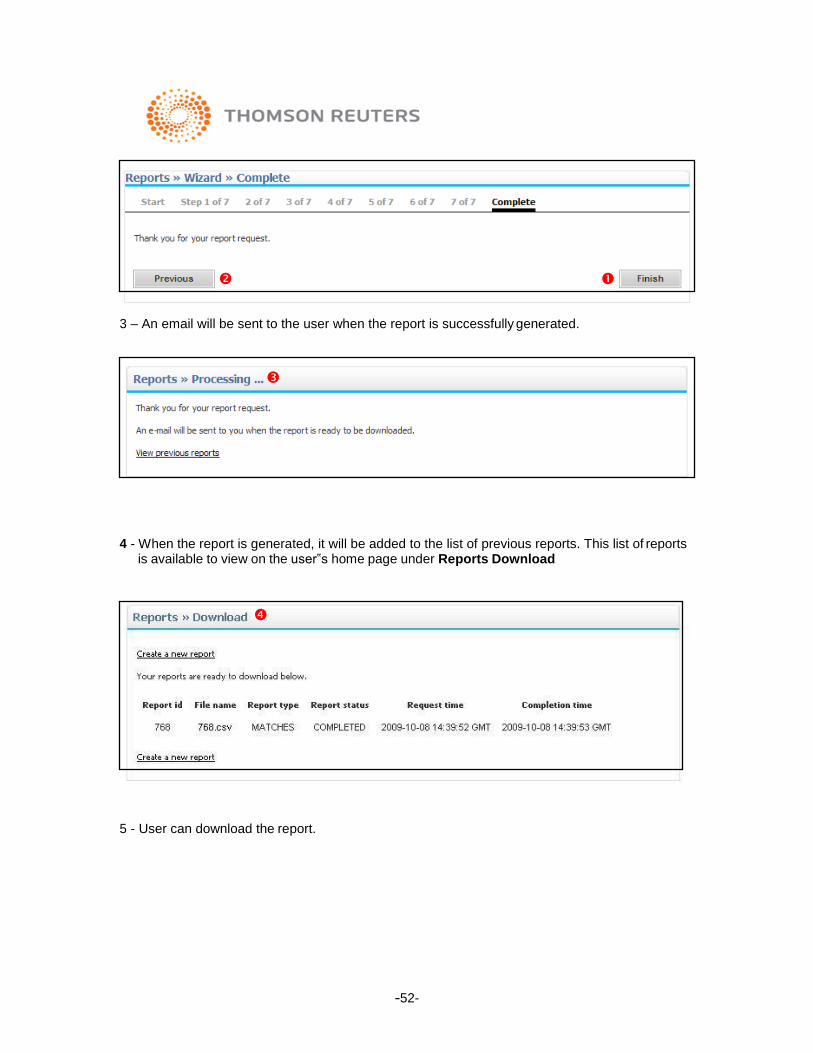
Complete
The User is taken to the final step in creating their customized report.
1 – The user must click on the “Finish” button to complete the wizard and generate the report.
2 - To go back to the Match Status Selection page user should click on “Previous”
-52-
3 – An email will be sent to the user when the report is successfully generated.
4 - When the report is generated, it will be added to the list of previous reports. This list of reports is available to view on the user‟s home page under Reports Download
5 - User can download the report.

-53-
Matches Report
The report generated will consist of the following fields:
Name (the searched name)
Custom field 1 (custom field 1)
Custom field 2 (custom field 2)
Group (the group of the name is stored/searched under)
Owner (The user who is the owner of the name)
Assignee (The name of the user the name is assigned to)
Name stored for ongoing screening (Yes or No. Is the name stored for ongoing screening)
Date added (The date the name was added to Enterprise or was screened)
Date last checked (the date the name was last screened)
Name Status (The status of the name i.e. under investigation, clear etc)
Sanctions matches # (the number of sanction matches)
Regulatory Enforcement matches # (the number of regulatory enforcement matches against that name)
Criminal Enforcement matches # (the number of criminal enforcements matches in that name)
Other matches # (the number of other category matches against name)
PEP matches (The number of PEP matches)
Media Matches (The number of media results)

11.2. Assignments Report
The Assignments report allows users with the relevant permissions to generate a list of the names assigned to them and the last date an action was performed on those names. If users have the Group permission, they will be able to generate a list of names that are assigned to all users in their group.
The Assignments report gives a user the option to customise the report according active or inactive clients, users and groups.
Permissions:
The permissions that are required to have access to the Assignments Report are:
Initial Screener Permission
Ongoing Screener Permission
Group Permission
Step 1 – Report Selection
1 - Select “Assignments Report”
2 - Click „Next‟ to be taken to step 2 where user can begin creating the Assignments report.
3 - To go back to the home page, click on „Previous‟.
Step 2 – Date Range Selection
Step 2 allows users to enter the date range in which they would like to run their report against.
By entering a valid date range, users will be able to retrieve the total number of matches found against the names in a particular period.
Please note: The start date can not be later than the end date.
1) - Select Start date
2) - Select End date
3) – Click on “Next” go to step 3 of 7.
4) – To go back to the Report Selection Page click on the “Previous” button

-55-
Step 3 – Group Selection
Users can select up to 3 groups to include in the report at one time.
Please Note: If user has permission for more than three groups, they will need to repeat the process to generate a new report for the groups that were not included in the first report.
1 – Select Groups
2 – Click on „Next‟ to proceed to step 4.
3 – To return back to the Date Selection page, user should select Previous.
Please note: If the user wishes to cancel the wizard at any time, they must select the ‘Reports’ tab to return to their Reports Download page.
Step 4 – User Selection
The User Selection page allows users to customise the report by selecting which users in their group they wish to search against. The list of users shown is based on all groups selected in the previous step.
1 – Select the users that are to be included in the report.
2 – Click on „Next‟ to proceed to step 7.
3 – To return back to the Group Selection page, user should select „Previous‟.
4 - User can select each user individually or all of the names by clicking on “Select All” link and if necessary can deselect all the names by clicking on “Deselect All”.
Step 7 – Customer Status Selection
In step 7 users can specify which customer status they wish to include in the report. These will be either; Active, Inactive (archived) or both.
1 – Select the Customer Status that‟s should be included in the report.
2 – To proceed to the finish screen, click „Next‟.
3 - To return back to the User Selection page, user should click on „Previous‟

-56-
4 – Users can include all Customer Status‟s by clicking „Select All‟ and unselect all Customer Status‟s by clicking „Deselect All‟.
Complete
The User is taken to the final step in creating their customized report.
1 – The user must click on the “Finish” button to complete the wizard and generate the report.
2 - To go back to the Customer Selection page user should click on “Previous”
3 – An email will be sent to the user when the report is successfully generated.
4 - When the report is generated, it will be added to the list of previous reports. This list of reports is available to view on the user‟s home page under Reports Download
6 - User can download the report.

-57-
Assignments Report
The Assignments report generated will consist of the following fields:
Name (the searched name)
Custom field 1(custom field 1)
Custom field 2 (custom field 2)
Group (the group of the name is stored/searched under)
Owner (The user who is the owner of the name)
Assignee (The name of the user the name is assigned to)
Date assigned (if possible, if not date added) The date the name was assigned to the assignee
Date of Last User Action
Name Status (Clear, Under Investigation or Suspended)
System Status (Live or Archived)
Unresolved matches # (The number of unresolved matches against the name)

11.3. Users Report
The Users report allows administrators to monitor what rights users in their groups have by generating a list of all users against their permissions.
Permissions:
The permissions that are required to have access to the Users Report are:
User Administrator Permission
Step 1 – Report Selection
1 - Select “Users Report”
2 - Click „Next‟ to be taken to step 3 where user can begin creating the Users report.
3 - To go back to the home page, click on „Previous‟.
Step 2 – Date Range Selection
Users will not need to select a date range for this report.
Step 3 – Group Selection
Users can select up to 3 groups to include in the report at one time.

-59-
Please Note: If user has permission for more than three groups, they will need to repeat the process to generate a new report for the groups that were not included in the first report.
1 – Select Groups
2 – Click on „Next‟ to proceed to step 4.
3 – To return back to the Report Selection page, user should select Previous.
Please note: If the user wishes to cancel the wizard at any time, they must select the ‘Reports’ tab to return to their Reports Download page.
Step 4 – User Selection
The User Selection page allows users to customise the report by selecting which users in their group they wish to search against. The list of users shown is based on all groups selected in the previous step.
1 – Select the users that are to be included in the report.
2 – Click on „Next‟ to complete the wizard.
3 – To return back to the Group Selection page, user should select „Previous‟.
4 - User can select each user individually or all of the names by clicking on “Select All” link and if necessary can deselect all the names by clicking on “Deselect All”.
Complete
The User is taken to the final step in creating their customized report.
1 – The user must click on the “Finish” button to complete the wizard and generate the report.
2 - To go back to the Match Status Selection page user should click on “Previous”
3 – An email will be sent to the user when the report is successfully generated.
4 - When the report is generated, it will be added to the list of previous reports. This list of reports is available to view on the user‟s home page under Reports Download

-60-
5 - User can download the report.
Users Report
The Users report generated will consist of the following fields:
User name (The name of the user (multiple entries if user belongs to more than one
group)
Group (the name of the group(s) the user belongs to)
Date user created (The date the user was created)
List of all Enterprise permissions the user has.

-61-
Vessels User Guide

-62-
1.0 Initial Screening – Vessels
1. Enter the name to be screened on the Initial screening page.
2. If the user is an initial screener for more than one group, he/she will be asked to select the group from the drop down menu for which they would like to run the search. The group profile settings (appropriate transaction identifiers, if any) will load up based on user‟s selection.
3. If the user is only an initial screener for one group, they will not see the group drop down
menu. Instead, their group profiling setting will be automatically displayed.
4. Select whether the name is an organisation, individual or vessel. This may be required by user‟s group in order to screen against the correct data.
5. Please note if you are screening against a Vessel name of the International Maritime
Organisation number (IMO) please select „Vessel‟.
6. Assign the screened name to either to yourself, or a member of the group. By default, the initial screeners name will be selected.
7. If the user is only an initial screener for one group, they will only be able to assign names
to themselves.

-63-
8. There are up to 2 custom identifiers that can be entered per name based on client configuration. Enter identifiers:
i. Enter the first custom identifier, for example Customer name/ID. This may be
a reference or project name. If screening an individual, user may enter the name of the organization they are related to. (Required or Optional – based on group settings)
Note that this field is not searchable. If users need to run a search on the individual and the organization with which they are associated, these searches must be undertaken separately.
ii. Enter the second custom identifier, dependant upon clients preference
another example would be Deal name/ID. (Required or Optional – based on group settings)
Click the Search button to run the search.

-64-
2. Match Overview
On running a search, the Match overview page is displayed. This shows the search summary and lists all the sanctions, enforcements, vessel results and link to media results on one page.
1 The summary includes the name of the individual or organization searched, the date and time of the search, who undertook the search and the number of matches obtained.
2 Below the summary, any matches found are listed by data source, grouped together under
the following data categories:
5. Sanctions 6. Law Enforcement 7. Regulatory Enforcement 8. Other Bodies – (Including Vessels) 9.
Please note that any Data sources displayed are based on client configuration.
3 Each match can be further investigated by selecting the match. To investigate a match, click on the match either in the left hand menu or on the main page to see further details and to resolve the match – see section 5.
The system also provides an alternative way of resolving matches. If matches don‟t need to be investigated before being resolved, user can select the multiple matches by checking the tick box and selecting an action from the drop down menu below.

-65-
4 The selected action will be taken against all the checked names and it allows matches to be resolved quickly and efficiently.
5 There is additional information given in the „Match Overview‟ page to assist in selecting the
correct Vessel. The three data fields which are given are:
a. The current flag of the Vessel b. The IMO number c. The Vessels „Dead Weight‟

-66-
3. Match Details
1 Run a search and select the first match – see section 4 (main document). The Match details page is shown. This includes any identifying information and details of the information source where the match has come from.
2 Review the match and change the match status to:
False match
Possible match
Positive match
These match status options are based on client configuration. A match can only be resolved when the match status is changed from “New” to one of these three options.
3 If match status is set to Possible or Positive, the system will prompt:
“The remaining results may be batch resolved with the status “Unspecified” without reviewing the matches individually.”
This feature is useful if the user has a name which has returned lots of matches. If one or more possible/positive match has been identified then it might not be necessary to go through the remaining matches. However this option should be used with extreme care and only if the client has processed enough information to make a business decision about the name screened.
If the user decides to batch resolve all remaining matches as “Unspecified” without reviewing the matches individually, they have the option to have the name for ongoing screening by selecting “Yes” to the second question below.

-67-
Would you like to save the name for ongoing screening?
Selecting „No‟ for automatically resolving matches, will take the user back to individually resolving each of the matches by setting the match status and match risk.
4 The following business risk values are based on client configurations and must be set if the match was possible or positive:
Low
Medium
High
The match risk defaults to “Unspecified” and must be set for possible or positive matches.
5 Add a comment in the box at the bottom of the page. This, while not required, is essential to explain why the match is possible or positive and if there is some risk.
6 If the match status has been applied to all matches, select the Resolve button to save the details and to remove this name from users list of outstanding work.
All matches from initial screening must be resolved to save the name for ongoing screening. To resolve a match, the match status must be set as false, possible or positive and the name must be saved by clicking on the Resolve button.
7 If Adverse Media is included in the client subscription, on dealing with the last match in the
list, the media results page opens. If there are no media results, the Name report page opens, which includes a summary of all matches and a list of actions to take next.
-68-
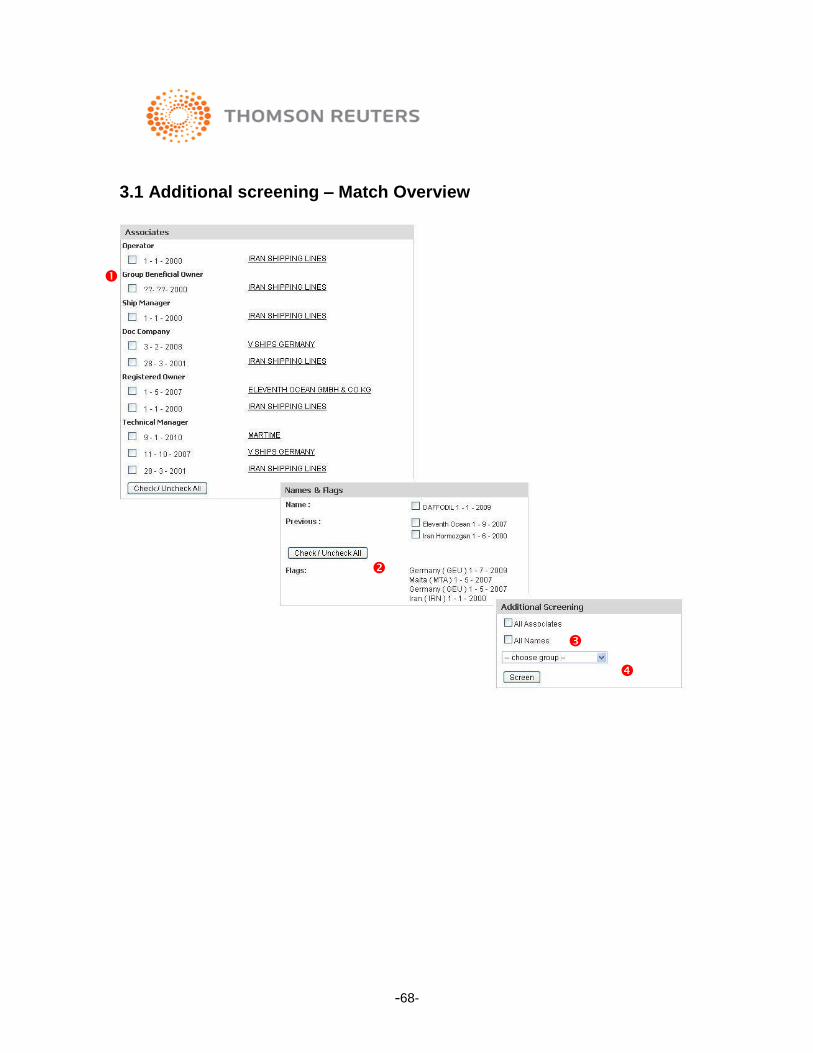
3.1 Additional screening – Match Overview

-69-
Within the Vessel‟s result there is the ability for the end user to select the names of the current and previous Associates and Vessel names. These can be selected individually (1) or via the „Check/Uncheck All‟ (2) button at the bottom of each section. Alternatively, they can select „All Associates‟ or „All Names‟ (3) from the Additional Screening section.
Once the user has selected the names which they would like to screen, they should choose the group (4) which the names will be screened against. The list of groups available will be dependent on permissions. When a group is selected press the „Screen‟ button:
The names selected are sent to the system for screening. There will be a progress bar displayed of the upload:
Once the names have been uploaded the user will be taken to the „Batch List‟ page.

-70-
The batch name will always be the current name of the Vessel followed by the date (Year, Month and Day) and a unique time stamp given by Thomson Reuters Accelus.

-71-
4.0 Batch List
1. Once a file has been submitted, it is placed in the Batch List along with all previous batch files. Clicking on the Batch Name – the screening results are displayed. (see section 10.3)
2. The total number of names in each file is displayed.
3. The screening status of the batch will display „Initial Batch Only‟.
4. The date the file is uploaded
5. Last screening date will specify when the batch was last screened.
6. The screen status will confirm the progress of each batch.
These are:
Waiting: Batch file waiting to load into the system
In queue: Names in batch file in queue for screening
Screening: Names in batch file are being screened
Completed: Screening completed
Failed: Batch file errors found
7. A batch can be searched by entering the file name into the search field or date range.

-72-
4.1 Batch Results
1. Once user has clicked through to the screening results at the top of the page they are
given information on the batch file you have selected. Displayed will be the name of the file and the number of names screened. In addition, there is the ability to filter your results to display all names or only those which have matches.
2. The name screened and the number of matches.
3. The number of unresolved matches in the results.
4. The user can click the name e.g. Paul Smith and they will be taken to specific results for that search (Name Report). Within the results will be the matches of that name/organisation and a Change Log of assignments and audit trail.
5. The end user has the ability to download the results to a PDF.
6. Possible actions performed include:
Change name status
There is an option to change the overall status of any customer name that is being ongoing screened. Note that this status is purely a record kept within the Thomson Reuters Accelus

-73-
solution and is not affected by the status of any individual matches. Names can be set one of the three statuses:
Clear
Under Investigation
Suspended
Selected names from the stored names page will only get updated if their current name status is different from the selected action.
Add to my assignments
Assignments are names that need further work. Users can choose to complete their work at another time by saving a screened name to „Your assignment‟ list. For example, a user may have resolved some of the matches but may want to come back at a later time to complete them. Typically they will have unresolved matches or matches that require further investigation. Adding a name to my assignments also allows the user to quickly access their own names.
User may have self assigned a name to work on at a future time or someone else may have assigned them a name.
It will only be possible to add names to „Your assignments‟ if user has the correct assignment permissions for the relevant group(s). If the user doesn‟t have the correct permission, the system will not allow them to perform this action and they will need to contact their administrator.
User can access their assignment from the bottom of the Initial screening page (for initial screening permission) by going through „Your assignments‟ box. On selecting an assignment by clicking the name, the Name report page opens. The note added by the assigner will be in the Change log.
Assign selected names
User has the option to assign a name to another user. Typically this will be when there is a possible match for the name and it needs further investigation.
Selected names will only be assigned to the specified individual if the individual has the correct assignment permissions for the relevant group(s). If the individual does not have the correct permission, the system will not allow him/her to perform this action and they will need to contact their administrator.
Archive selected name

-74-
Select the Archive name action to archive the name. The name‟s screening status will be set to “Archived” rather than “Active”. All the records will still be displayed and the name will still be accessible from the Stored Names Page.
Once a name is archived, it can not be made active again. To start screening the name again, user will need to enter it as a new name via initial screening.
To review their batches the end user should use the „Batch‟ tag within the Navigation:
Depending user permissions the view received will alter. If permissions for both „Additional Screener‟ (please refer to section 3.1) and „Batch‟ (please refer to section 10 in Enterprise User Guide) are applied the view received is as follows:
To review the „Vessel‟ batches the user should click on the „Batch List‟ tag. The screen returned is described in section 4 (Vessels User Guide).
If the permission for „Batch‟ is not present and the user clicks on the navigation they will be directed to the „Batch List‟ page (as described in section 4 - Vessels User Guide).

-75-
Shipping Data Copyright © Lloyds Register Fairplay
Whilst every effort has been made to ensure the accuracy of the shipping data contained in this product, with Lloyds Register Fairplay accepts no liability for screening results and/or decisions made in conjunction with the use of its data.

-76-
5.0 Electronic ID Search (EID)
As part of Know Your Customer (KYC) screening, users also have the option to verify customer details.
To start the EID search process, go to the Initial Screening tab.
Select the group from the dropdown list in Figure 1.
Select the „EID search‟ in Figure 2.
Select the country against which the customer details are to be verified.
Read the Terms & Conditions in Figure 4. If the Terms & Conditions are acceptable, select the „I
Agree to the Identity Check Terms & Conditions‟ option.
Please note: The input fields in Section 4 „Person details‟ are country specific and would change
based on the country selected in Figure 3. Input for fields marked * is mandatory. For Australia,
the input fields would also change based on the options selected in Figure 5.

-77-
Select the Assignee from the dropdown list in Figure 6.
Information required in Figure 7 is for reference purposes and might be optional or mandatory
based on your organisation‟s requirements.
Once the information has been filled in, click on „Search‟.
Below is an example that highlights the change in Section 4 „Person details‟ regarding country-
specific fields once the country in Figure 3 is changed to United Kingdom from Australia.

-78-
Click on EIDV in figure 8 to go to the EIDV Match Details screen.
The Match Details screen provides the results of the screening conducted against Section 4 „Person details‟. The results are displayed in order of the lists/databases the name is screened against and could be one of the below: Match – The details entered have matched against a list(s) or database(s) No-Match – The details entered have not matched against list(s) or database(s) Missing – This indicates either the field was not sent, or the field was not held by the source for the record in question

-79-
After the results have been analysed, the user can update the „Match status‟ and „Match risk‟ in Figure 9 and add reference notes in the adjoining comments box. On clicking „Resolve >>‟, the Name Report screen appears. Click on „Identity Check Result(s)‟ in Figure 10 to view matches by status.

-80-
6.0 FATCA User Guide
Background
The Foreign Account Tax Compliance Act (FATCA) has been enacted as part of the Hiring Incentives to Restore Employment (HIRE) Act of 2010 (to reduce tax evasion by US account holders)
Through FACA provisions the United States Internal Revenue Service (IRS), requires financial institutions to use enhanced due diligence procedures to identify US persons who have invested in either non-US financial accounts or non-US entities
The IRS intent behind FATCA is to keep US persons from hiding income and assets overseas avoiding disclosure and wants the global financial industry to report to the IRS on entities with US indicia who hold financial accounts which are offshore to the USA. The IRS, thus, hopes to discover entities with US indicia who are not meeting their obligation to pay tax on their worldwide income.
FATCA has several main parts:
o It requires foreign financial institutions (FFI) to find any American account holders and disclose their balances, receipts, and withdrawals to the US Internal Revenue Service (IRS), or eventually be subject to a 30% withholding tax on income from US financial assets held by the FFI.
o It closes a tax loophole that investors had used to avoid paying any taxes on dividends by converting them into dividend equivalents.
FATCA comes into legal force on 1 January 2013, although not all the provisions come into effect on that date. The implementation of the regulation has been staggered by legislation.
Objective
Screening Online has been enhanced for FATCA. This user guide provides a step by step guide to perform a US indicia check for both individual and organisation entity types. It will explain the process and the results as well as how to initiate an IRS W8/W9 form request within Screening Online for completion via the Identity application.
Overview
Screening Online has been enhanced to allow clients to check for US indicia against both individual and organisation entity types. It also allows clients to initiate an IRS W8/W9 form collection against their customers via the Identity application. Only the name of an individual or organisation is a mandatory field, all other fields are optional.
US Indicia Check – Individual
Step 1 – Initial Screening
From the Screening Online Initial Screening page select your group from section 2 Group – see Figure 1. Groups dictate what actions can be performed next such as a FATCA search, EIDV check or Watch list and also what options are available such as individual, organisation and vessel searches.

-81-
Figure 1

-82-
Step 2 – The Individual Form
Once the group has been selected, choose FATCA Search from section 3 Screening Type and then select Individual from section 4 Type of name. Refer to Figure 2. This will load section 5 Person Details. Only the First Name and Last Name are mandatory fields, all others are optional. In this section you are able to enter an individual‟s identity (name, date of birth), nationality (including any passport or driving licence details), a US tax identification number (TIN) and enter details for the US substantial presence test (if the data is available). You can also add your customer‟s primary address as well as a variety of other addresses such as correspondence, power of attorney, in-care of, PO Box and hold mail.
Figure 2

-83-
You can also add a Client Reference Number, this will act as the entities unique ID in the system. The field accepts alphanumeric characters. If you don‟t enter a reference number an auto generated ID will be created. In addition you can enter Client Account Numbers. Multiple numbers can be entered separated with a semicolon. To add additional ID types and ID numbers in the Nationality section simply click the + button, to delete click the X button. To add additional nationalities click the + Additional Nationalities button and to delete click the X Delete Nationalities button. Refer to Figure 3.
Figure 3
If you want to add additional addresses select them from the drop down „Additional Addresses/select additional address‟, refer to Figure 2 and add relevant address information available. If you then decide you want to delete an address click the X Delete Address button. A pop up dialogue box will appear asking you for confirmation. Refer to Figure 4. Adding additional telephone numbers works in the same way as adding ID types under the Nationality section.

-84-
Figure 4
When you have entered all the information you have available for your customer into the form click Search in section 8 Search.
The Individual information entered on the page will then be submitted to the FATCA US Indicia Search and results displayed next.

-85-
Step 3 – Match Overview After you have clicked Search from Step 2 – The Individual Form the Match Overview page will load, see Figure 5. You will notice that there is a button called FATCA. When the button has a red exclamation mark next to it, as it does in Figure 5, it means that there is some action needed (to review the US indicia check results). If there is no red exclamation mark then it means that there is no action to take. Click the FATCA button.
Figure 5
Step 4 – Match Details
After you have clicked the FATCA button with the red exclamation mark you will be taken to the Match Details page which will detail the results of any US indicia found against the information you entered in the individual form – see Figure 6.

-86-
Figure 6
The Match Details page displays the information entered on the FATCA Search individual form and has 2 additional columns, Indicia Found and Rule.
Indicia Found
The Indicia Found column will display yes or no depending on whether it has found signs of US indicia. In the example in Figure 6 under Personal Details the Place of Birth, Autaugaville, has been identified as US indicia (since it is a town in Autauga, Alabama, USA).
The address blocks go one step further and not only identify whether or not a value has US indicia but also state if they are linked to the other address values that have been entered. The more linking that exists the stronger the sign of US indicia. Note that linking only exists for city, county, state and post code. In the example above for the Primary Address;
City: Autaugaville Yes (County, Postcode, State)
“Yes” is displayed because it is a valid US city and in addition it is a city in the county of Autauga, which is in the state of Alabama and the post code of 36003 is valid for Autaugaville. Therefore the result shows “Yes (County, Postcode, State)” to reflect this. This is a strong sign of US indicia since all of the address values link to each other.

-87-
County: Autauga Yes (Postcode, City, State)
“Yes” is displayed because it is a valid US county and in addition it is a county in the state of Alabama, the post code of 36003 is valid for the county Autauga and the city Autaugaville is in the county of Autauga. Therefore the result shows “Yes (Postcode, City, State)” to reflect this.
State: Alabama Yes (Postcode, City, County)
“Yes” is displayed because it is a valid US state and in addition the postcode of 36003 is valid for that state and both the city of Autaugaville and the county of Autauga are valid for Alabama. Therefore the result shows “Yes (Postcode, City, County)” to reflect this.
Post Code: 36003 Yes (State, County, City)
”Yes” is displayed because it is a valid US postcode and in addition it is valid for the city of Autaugaville, the county of Autauga and the state of Alabama.
In contrast the Correspondence Address in Figure 6 you will notice that no linking of the address block has been found;
City: Manhattan Yes County: Orange Yes State: Washington Yes Post Code: 36005 Yes
This is because although all of the values above are valid places in the US they are not linked to each other i.e. The City of Manhattan is not in the county of Orange and not in the State of Washington and is not associated with the post code of 36005. This should raise some doubt as to the accuracy of this particular address.
Rule
The rule column displays the name of the rule used to match a value and clicking on the tool tip next to the column heading Rule will provide an explanation of each of the rules. For example, under the Person Details section you will see the rule named Substantial Presence. The explanation for this rule is;
You will be considered a U.S. resident for tax purposes if you meet the substantial presence test for the calendar year. To meet this test, you must be physically present in the United States on at least:
1. 31 days during the current year, and 2. 183 days during the 3-year period that includes the current year and the 2 years
immediately before that, counting:
All the days you were present in the current year, and
1/3 of the days you were present in the first year before the current year, and
1/6 of the days you were present in the second year before the current year.
All rules are described in the on-line help that can be accessed by clicking on „?‟ next to the column label Rule.

-88-
Step 5 – Confirming the US Indicia Result
After analysing the result of your US indicia check, Match Details Figure 6, you will be presented with some questions at the bottom of that page - see Figure 7.
Figure 7
The first question, „Confirm Indicia Found?‟, is asking you to decide whether or not you think there is enough evidence from the US indicia check result to state that, „Yes, US indicia has been found‟ (therefore selecting yes to this question) or, „No, US indicia has not been found‟ (therefore selecting no to this question).
When you select „Yes‟ or „No‟ to this question it will be stored in the Screening Online application (in a non editable format) and be available from the Match Details page.
The second question „Create Entity for Form Collection?‟ is asking you if you wish to send your customers details to the Identity application in order to send out an IRS W8/W9 form (or equivalent) for self-certification.
Selecting „Yes‟ to this question sends the data to Identity and creates an entity within that application so that you can send a request to the customer to fill out the appropriate form. It will also store the result in the Screening Online application and be available from the Match Details page. Please note: selecting „Yes‟ will not take you directly into the Identity application. Selecting „No‟ will not send any data to Identity and simply store the result within Screening Online.
Note: You must select the answer to both questions in order to submit the information. However, you do not have to make the decision to these questions immediately. You can return to this page at a later time if you are unsure about the answer. To return to the Match Details page you need to navigate to the Name Report page, choose the Indicia Check Result tab at the bottom of the screen and click on the name of the individual (or organisation).
There is also a PDF link which you can click to get a PDF version of the Match Details results page.
To navigate to the Name Report page click the link at the top left hand side of the screen View Name Report.
Step 6 – Match Overview after US Indicia Confirmation
After you have made your selection in Figure 7 you will be taken to the Match Overview page (assuming you have selected either „Yes‟ or „No‟ to both of the questions and submitted the form). Once this has been done, you will notice that the FATCA button on the Match Overview page will no longer have a red exclamation mark since there is no action required anymore - See Figure 8.
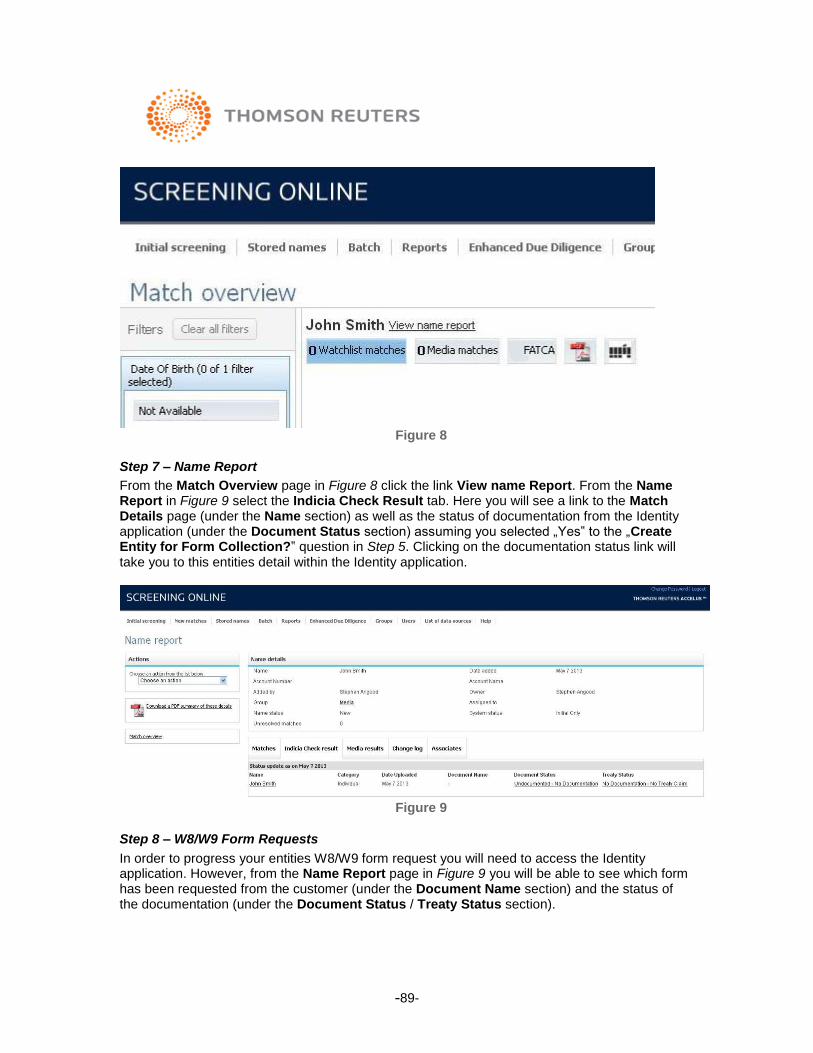
-89-
Figure 8
Step 7 – Name Report
From the Match Overview page in Figure 8 click the link View name Report. From the Name Report in Figure 9 select the Indicia Check Result tab. Here you will see a link to the Match Details page (under the Name section) as well as the status of documentation from the Identity application (under the Document Status section) assuming you selected „Yes‟ to the „Create Entity for Form Collection?‟ question in Step 5. Clicking on the documentation status link will take you to this entities detail within the Identity application.
Figure 9
Step 8 – W8/W9 Form Requests
In order to progress your entities W8/W9 form request you will need to access the Identity application. However, from the Name Report page in Figure 9 you will be able to see which form has been requested from the customer (under the Document Name section) and the status of the documentation (under the Document Status / Treaty Status section).

-90-
US Indicia Check – Organisation
Step 1 – Initial Screening
From the Screening Online Initial Screening page select your group from section 2 Group – see Figure 10.
Figure 10
Step 2 – Organisation Form
Once the group has been selected, choose FATCA Search from section 3 Screening Type and then select Organisation from section 4 Type of name. Refer to Figure 11. This will load section 5 Organisation Details. In this section you are able to enter an organisations general detail (name, EIN number and country of incorporation). You can also add multiple addresses such as the primary address, correspondence, power of attorney etc. You are also able to add additional relationships. Additional relationships are either individuals (for example directors or partners) or organisations (for example parent company or holding company) that have controlling interests in the organisation being checked for US indicia.

-91-
Figure 11

-92-
You can also add a Client Reference Number, this will act as the entities unique ID in the system. The field accepts alphanumeric characters. If you don‟t enter a reference number an auto generated ID will be created. In addition you can enter Client Account Numbers. Multiple numbers can be entered separated with a semicolon. Refer to Figure 12.
If you want to add additional addresses select them from the drop down „Additional Addresses/select additional address‟ and add relevant address information available, refer to Figure 11. If you then decide you want to delete an address click the X Delete Address button. A pop up dialogue box will appear asking you for confirmation. Refer to Figure 12. Adding additional telephone numbers works in the same way as adding ID types under the Nationality section.
Figure 12
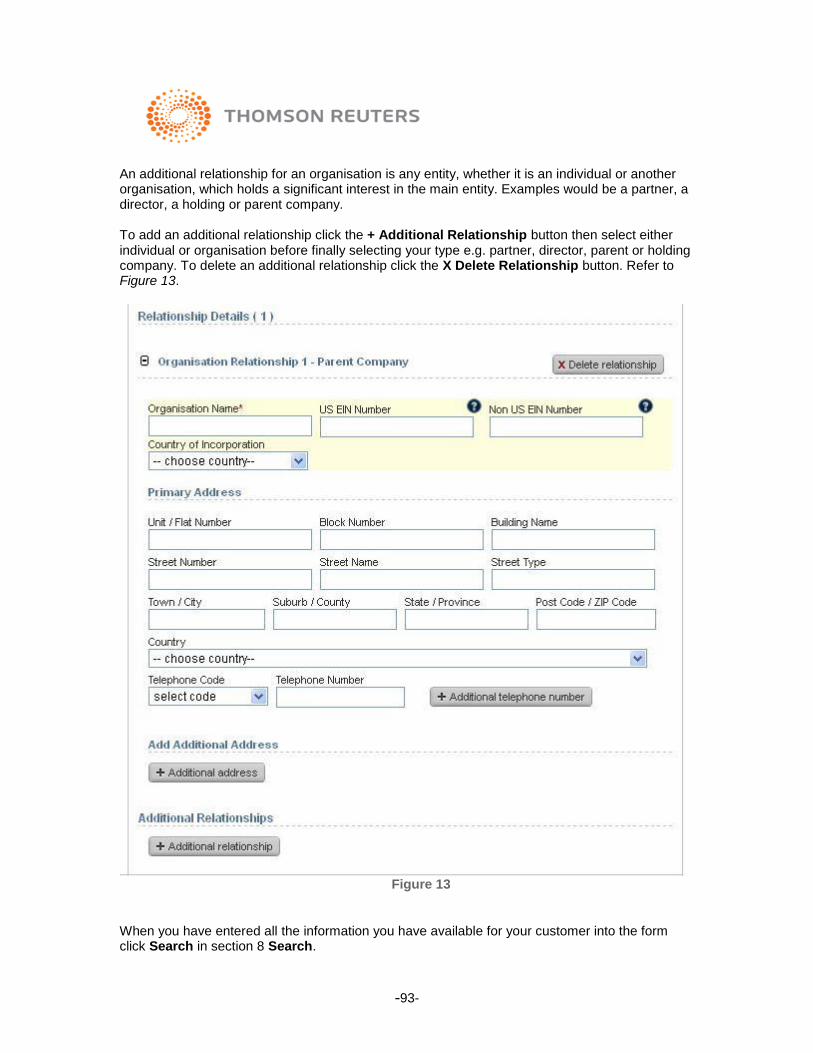
-93-
An additional relationship for an organisation is any entity, whether it is an individual or another organisation, which holds a significant interest in the main entity. Examples would be a partner, a director, a holding or parent company.
To add an additional relationship click the + Additional Relationship button then select either individual or organisation before finally selecting your type e.g. partner, director, parent or holding company. To delete an additional relationship click the X Delete Relationship button. Refer to Figure 13.
Figure 13
When you have entered all the information you have available for your customer into the form click Search in section 8 Search.

-94-
The Organisation information entered on the page will then be submitted to the FATCA US Indicia Search and results displayed next.
Step 3 – Match Overview
After you have clicked Search from Step 2 – Organisation Form the Match Overview page will load, see Figure 14. You will notice that there is a button called FATCA. When the button has a red exclamation mark next to it, as it does in Figure 14, it means that there is some action needed to be taken. If there is no red exclamation mark then it means that there is no action needed. Click the FATCA button.
Figure 14
Step 4 – Match Details
After you have clicked the FATCA button with the red exclamation mark you will be taken to the Match Details page which will detail the results of any US indicia found against the information you entered in the organisation form – see Figure 15.

-95-
Figure 15
The Match Details page displays the information entered on the FATCA Search organisation form and has 2 additional columns, Indicia Found and Rule.
Indicia Found
The Indicia Found column will display yes or no depending on whether it has found signs of US indicia. In the example in Figure 15 under Criteria the Country of Incorporation, United States, has been identified as US indicia.
The address blocks go one step further and not only identifies whether or not a value has US indicia but also states if they are linked to the other address values that have been entered. The more linking that exists the stronger the sign of US indicia. Note that linking only exists for city, county, state and post code. In the example above for the Primary Address;
City: Autaugaville Yes (County, Postcode, State)
Yes is displayed because it is a valid US city and in addition it is a city in the county of Autauga, which is in the state of Alabama and the post code of 36003 is valid for Autaugaville. Therefore the result shows “Yes (County, Postcode, State)” to reflect this. This is a strong sign of US indicia.

-96-
Rule
The rule column displays the name of the rule used to match a value and clicking on the tool tip next to the column heading Rule will provide an explanation of each of the rules. For example, under the Person Details section you will see the rule named Substantial Presence. The explanation for this rule is;
You will be considered a U.S. resident for tax purposes if you meet the substantial presence test for the calendar year. To meet this test, you must be physically present in the United States on at least:
3. 31 days during the current year, and 4. 183 days during the 3-year period that includes the current year and the 2 years
immediately before that, counting:
All the days you were present in the current year, and
1/3 of the days you were present in the first year before the current year, and
1/6 of the days you were present in the second year before the current year.
All rules are described in the on-line help that can be accessed by clicking on „?‟ next to the column label Rule.
Additional Relationships
In addition to checking for US indicia for the main entity – in our example ABC Limited – an organisation check can check for signs of US indicia against additional relationships such as directors, partners, parent and holding companies.
The Match Detail report delivers the result of these additional relationships at the bottom of the page if they have been entered in the original search criteria.

-97-
Figure 16
Figure 16 shows 2 additional relationships to ABC Limited, a director and a parent company. A message will display to inform you if any US indicia have been found i.e. „US indicia has been found‟ or „No US indicia has been found‟. Clicking on the Details hyperlink will show a pop-up window displaying the respective results.
Clicking on the director hyperlink will display Figure 17. The format and layout is almost identical to Figure 15 however there are no questions to answer – it is for information only. If the main entity, in our example ABC Limited has no US indicia but one or both of the additional relationships (Director John Mackin and parent company DFG Limited) have clear signs of US indicia then you may still need to state that ABC Limited has US indicia and initiate a W8/W9 form request. This is because the onus is on the main entity (ABC Limited) not on the additional relationships. This is why there are no submit buttons on the additional relationship Match Details page.
You will notice in the example in Figure 17 that the majority of values have not been matched except Place of Birth and City. This is because the address is quite clearly a UK address but
Reading and Newark do happen to be valid places in the US.

-98-
Figure 17
Clicking on the parent company hyperlink will display Figure 18. The format and layout is almost identical to Figure 15 however there are no questions to answer – it is for information only.
Figure 18

-99-
Step 5 – Confirming the US Indicia Result
After analysing the result of your US indicia check, Match Details Figure 15, you will be presented with some questions at the bottom of that page. See Figure 19.
Figure 19
Note: In making your decision on whether the results show US indicia you should take into consideration the results from the additional relationships. If they indicated strong US indicia, even if the main entity has none, then you may decide that the overall result was yes.
The first question, „Confirm Indicia Found?‟ is asking you to decide whether or not you think
there is enough evidence from the US indicia check result to state that, „Yes, US indicia has been found‟ (therefore selecting yes to this question) or, „No, US indicia has not been found‟ (therefore selecting no to this question).
When you select „Yes‟ or „No‟ to this question it will be stored in the Screening Online application (in a non editable format) and be available from the Match Details page.
The second question „Create Entity for Form Collection?‟ is asking you if you wish to send your customers details to the Identity application in order to send out an IRS W8/W9 form (or equivalent) for self-certification.
Selecting „Yes‟ to this question sends the data to Identity and creates an entity within that application so that you can send a request to the customer to fill out the appropriate form. It will also store the result in the Screening Online application and be available from the Match Details page. Please note: selecting „Yes‟ will not take you directly into the Identity application. Selecting „No‟ will not send any data to the Identity application and simply store the result within Screening Online.
Note: You must select the answer to both questions in order to submit the information. However, you do not have to make the decision to these questions immediately. You can return to this page at a later time if you are unsure about the answer. To return to the Match Details page you need to navigate to the Name Report page, choose the Indicia Check Result tab at the bottom of the screen and click on the name of the individual or organisation.
There is also a PDF link which you can click to get a PDF version of the Match Details results
page.
To navigate to the Name Report page click the link at the top left hand side of the screen View Name Report.

-100-
Step 6 – Match Overview after US Indicia Confirmation
After you have made your selection in Figure 19 you will be taken to the Match Overview page (assuming you have selected either „Yes‟ or „No‟ to both of the questions). Once this has been done, you will notice that the FATCA button on the Match Overview page will no longer have a red exclamation mark since there is no action required anymore. See Figure 20.
Figure 20
Step 7 – Name Report
From the Match Overview page in Figure 20 click the link View name Report. From the Name Report in Figure 21 select the Indicia Check Result tab. Here you will see a link to the Match Details page (under the Name section) as well as the status of documentation from the Identity application (under the Document Status section) assuming you selected „Yes‟ to the „Create Entity for Form Collection?‟ question in

-101-
Step 5 – Confirming the US Indicia Result. Clicking on the documentation status link will take you to this entities detail within the Identity application.
Figure 21

-102-
Clicking on the Change Log tab will display a list of changes made to this customer – see Figure 22.
Figure 22
Clicking on the Associates tab will show you a list of the Additional Relationships associated with this client and you will be able to view the results of their US indicia check by clicking on their name. See Figure 23.
Figure 23

-103-
Step 8 – W8/W9 Form requests
In order to progress your entities W8/W9 form request you will need to access the Identity application. However, from the Name Report page in Figure 21 you will be able to see which form has been requested from the customer (under the Document Name section) and the status of the documentation (under the Document Status section).

-104-
US Indicia Re-Run
Overview
Screening Online currently does not offer the ability to edit information once entered. However, if data is sent to Identity then some of this data can be edited there and updated back in Screening Online. As a result, you can then re-run a US indicia check for a client without having to re-enter all of their information. The following data items can be changed within Identity and updated back in Screening Online; Account Number US TIN Non US TIN Primary Address Correspondence Address (also known as Mailing Address)
Step 1 – Name Report after an Identity Change
Once a change is made to one of the fields listed in the Overview a red exclamation mark will appear next to the individual or organisation name under the Name section of the Indicia Check Result tab. See Figure 24. In addition a W8 form has been sent to the customer (from within the Identity application) and this is indicated by the fact that the form name has now been populated under the Document Name section of the Indicia Check Result tab. The documentation status has also been updated.
Figure 24

-105-
Step 2 – Match Details Page after an Identity Change
Click on the organisation name hyperlink with the red exclamation mark next to it in Figure 24. This will take you to the Match Details page where you will be able to see what changes have been made. See Figure 25.
Figure 25
Here you can see that changes have been made to both the primary and correspondence address. The original value is displayed in the Current Value column. It is called current value since this is still the value that Screening Online holds. The updated value is shown in red in the Updated Value column.
There is a single question at the bottom of the page, „Would you like to re-run the indicia check?‟, If you select „Yes‟ then the updated values will be stored in Screening Online and the US indicia check will re-run. If you select „No‟ Screening Online will not update the values and will continue to store the original values entered. It will also continue to show a red exclamation mark on the Name Report page. Note: If you elect to choose „No‟ then the Identity application and Screening Online data will not be synchronised / aligned.
Step 3 – Match Details Page after US Indicia Re-Run
After selecting „Yes‟ in Figure 25 the US Indicia check will re-run and display the results as normal. However, since this client‟s data has already been sent to Identity you will not see the question „Create Entity for Form Collection?‟ you will only be asked to confirm the indicia found which will store the result in Screening Online. See Figure 26.
Once this is done the red exclamation mark on the Name Report page will disappear and only
reappear if a further change is made in the Identity application.

-106-
Figure 26

-107-
Glossary
Term Description
Account Number This is the client‟s customer account number. Multiple account numbers can be entered separated by a semi colon (;). If entered it can be used as an easier way of searching for customers in the Identity application and for reporting purposes. The account number is entered on either the organisation or individual input forms when performing a FATCA search.
Additional Relationship This refers to a party that has a significant interest in the main entity, for example, it could be a director or a partner in an organisation or a holding or parent company. These „additional relationships‟ need to have a FATCA search carried out because if they have US indicia then the main entity could be liable and may have to self certify with the IRS.
Associates The associates tab on the name report page is where any „additional relationships‟ to the main entity will be shown. Refer to „Additional Relationships‟.
Change Log The change log tab on the name report page records all of the actions taken in a FATCA search journey.
Client Reference Number This is the reference number a client uses for a customer, not the account number. If entered it will be used as the unique ID within the Identity application. It can aid searching within Identity as well as being useful for reporting purposes. The client reference number is entered on either the organisation or individual input forms when performing a FATCA search.
Document Name The document name on the indicia check result tab on the name report page states which document type has been issued to the client‟s customer in the Identity application e.g. W8 or W9 form.
Document Status The document status on the indicia check result tab on the name report page displays the status of the documentation for W8 / W9 form collection from the client‟s customer.
EIN This is the Employer Identification Number (EIN) is also known as a Federal Tax Identification Number, and is used to identify a business entity by IRS.
FATCA Refers to the Foreign Account Tax Compliance Act.
Foreign TIN This is a non US tax identification number.
Group Groups dictate what actions can be performed such as a FATCA search, EIDV check or Watch list and also what options are available such as individual, organisation and vessel searches.

-108-
Term Description
Identity An installed .Net application with web-client compliance tool from the Tax and Accounting division of Thomson Reuters that automates the end-to-end process of collecting and maintaining electronic documentation. The tool facilitates organisations that make payments relating to U.S. source income by maintaining accurate documentation (forms W-8 and W-9) on account holders to ensure the correct tax withholding rate can be applied.
Indicia As per Mariam Webster‟s dictionary, Indicia means distinctive marks or indications.
Indicia Check Result This tab on the name report page displays the document name & status, the individual name or organisation name and allows you to see the indicia result on the match details page.
Indicia Found This column identifies whether or not US indicia has been found indicated by a „Yes‟ or a „No‟. If a value has a blank in this column it means that no rule has been run against it. The address blocks also check to see whether the values entered for city, county, state and postcode are valid for each other and indicates this by placing the matching value in brackets after the result (it does not match against street names) e.g. City: Red Bay – Yes (County / State / Postcode) County: Franklin – Yes (City / State / Postcode) State: Alabama – Yes (City / County / Postcode) Postcode: 35582 – Yes (City / County / State) This result is stating that the city „Red Bay‟ is in the county of „Franklin‟ both of which are in the state of „Alabama‟ and that the postcode „35582‟ is valid for all 3. This suggests very strong indicia as opposed to; City: Manhattan – Yes County: Boulder – Yes State: Nevada – Yes Postcode: 35756 – Yes This is simply stating that the entered values are valid for the US but they are not linked or valid for each other. This suggests that the address entered is incorrect.
Rule This column on the match details page displays the name of the rule used to check the value entered. A description of the rule can be found by hovering over the help icon (?) next to the column heading.
Screening Type Prior to screening you must select the type of screening you need. There are 3 options, Watchlist, EIDV and FATCA. EIDV and FATCA can be done at the same time but will be limited to the countries that EIDV supports. A FATCA only search has no restrictions in terms of countries.

-109-
Term Description
Type of Name After selecting the type of screening e.g. FATCA search you must select the type of name to screen. For a FATCA search there are only 2 options, individual or organisation.
US TIN This is a US taxpayer identification number. The TIN is an identification number used by the Internal Revenue Service (IRS) in the administration of tax laws