scratched.gse.harvard.eduscratched.gse.harvard.edu/sites/default/files/...0.docx · web viewunit...
TRANSCRIPT

Carrie Beth Rykowski – Let’s Play Unit
Introduction
Let’s play! Dynamic Therapy Games Unit Overview
Summary:
This STEAM project is a multifaceted, real world simulation of engineering research. Students will program a Scratch game that could help a physical therapy patient with rehabilitation. The game will be dynamic so that it adapts based on player performance to help with the rehabilitation. Students will use the Makey Makey Invention Kit to create a game controller and use design thinking principles to make the controller and game aesthetically pleasing and practical. Then, students will create a mobile art sculpture to visually represent the dynamic game code in a novel way.
This unit was taught to a 7th grade Science Enrichment elective course; however, it can easily be adapted to a variety of subjects and grade levels. Since there are not currently computer science standards for middle grades, the high school Introduction to Digital Technology standards were used. Additional standards include 7th Grade Life Science, 7th grade Visual Arts, and 7th grade CTAE Engineering and Technology.
Unit Objectives:
● Invent a Scratch computer game that is adaptive/dynamic for use by physical therapy patients● Explain and use conditional statements (if/then/else) in computer programming● Use a flowchart to plan out a computer program (pseudocode)● Use the engineering design process and design thinking to create an interactive computer game, and
program a circuit board controller for use in the game● Understand the nervous system and its role in movement● Learn about physical therapy and examples of techniques used in therapy for rehabilitation of nervous
system conditions, such as strokes or spinal cord injuries● Apply knowledge of nervous system injuries to create a digital game for therapy● Create a balanced mobile sculpture and explain how the mobile represents a pseudocode flowchart used
in programming
Teacher introduction and motivation:
The inspiration for this project comes from the HumAnS (Human-Automation Systems) Lab at Georgia Tech. Under the guidance of Dr. Ayanna Howard, PhD researcher Brittney English is developing a way to help stroke patients complete physical therapy exercises using video games. Brittney’s motivation for the research stems from the desire to use robotics to help people. She realized that stroke patients often need physical therapy to help them regain bodily functions. Often these patients need to rehabilitate the movement of their wrists and hands. Having proper wrist/hand motion is important in maintaining quality of life and independence. Think about all of the functions you use your hands and wrists for each day! People who have lost functionality of those parts cannot easily provide personal care for themselves and might need assistance with daily events like bathing or going to the restroom. As a result, the patients lose privacy when they need assistance with personal care.

Brittney’s research is aimed at helping stroke patients increase their engagement with physical therapy exercises so they can regain independence.
Brittney points out that often times, patients do not enjoy participating in physical therapy and it can result in low morale and slower recovery time. She wants to find out if using video games can help patients get better faster by improving morale and motivation to complete the therapy. One key aspect of her research is to make the video games adaptive, or dynamic, which means the games adapt the challenge level based on the player performance. For example, the game will get more challenging for players who are excelling and the game will get easier for players who are struggling. This helps customize the game to maintain motivation. A game that is too easy might become boring while a game that is too hard might become frustrating. In either situation, the player might give up, which does not help the patient make progress in recovery. Brittney hypothesizes that using dynamic game play will improve many aspects of therapy and improve patient outcome. Additionally, the adaptability allows the game to have a longer life since it can grow with the player and be used multiple times.
In this unit, students will emulate Brittney’s collegiate level research on a middle school scale. They will experience what it is like to be a computer scientist, game designer, industrial engineer, graphic designer, among other careers. The students will research a nervous system impairment that would require physical therapy exercise. They will then use Scratch to code and design an interactive dynamic game that would aid in the exercise while also incorporating the Makey Makey as a game controller. Once a prototype controller is developed, the students will refine the design to make it aesthetically pleasing. They will then demonstrate the effectiveness of their game and device and how it aids in physical therapy.
Additionally, the students will create a mobile sculpture that is inspired by the coding they created for the game. Making the game dynamic requires the use of conditional statements (If/Then/Else) and planning the code for the game requires planning the steps out using a decision tree or map. The steps used in the code can then be represented visually in an artistic mobile design that represents in code in a new way.
Materials/Resources needed:
1. Access to Scratch programming (www.scratch.mit.edu)2. Makey Makey Classic Invention Kits (quantity needed depends on class size, each group needs a kit. Kits
are available in many online stores, or on the Makey Makey website. They are about $50 each: http://shop.makeymakey.com/)
3. Basic craft supplies for Makey Makey creations (cardboard, popsicle sticks, glue, art supplies, Play Doh, aluminum foil, etc.)
4. Art supplies (Twisteez wires, jump rings, sequins. Optional: acetate/cardboard/paper, wire cutters, pliers. Supplies can be found at craft stores. More details are provided on the art lesson plan.)
2
Prerequisites:
1. A basic understanding of how to make simple projects with Scratch. Here’s a link for more details about Scratch: https://www.youtube.com/watch?v=ywG6lv9mFLI
2. A basic understanding of Game Design might be helpful, but isn’t required (consider using the website, Gamestar Mechanic, to provide lessons: http://gamestarmechanic.com/. If you don’t have time for Gamestar Mechanic, this site provides a very brief overview https://www.makeschool.com/gamernews/298/5-basic-elements-of-game-design )
3. Basic experience with programming the arrow keys on a Makey Makey Invention Kit using Scratch. Here’s a link for more details about Makey Makey: https://www.youtube.com/watch?v=-X3hb__YynM
Key words/standards:
Engineering, game design, adaptive/dynamic games, physical therapy, research, human centered design, life science, programming, conditional statements, flowcharts, mobile sculpture, kinetic art
Georgia Performance Standards:
7th grade Life Science
S7L2. Students will describe the structure and function of cells, tissues, and organ systems.
b. Relate cell structures (cell membrane, nucleus, cytoplasm, chloroplasts, mitochondria) to basic cell functions. e. Explain the purpose of the major organ systems in the human body
S7CS6. Students will communicate scientific ideas and activities clearly.
a. Write clear, step-by-step instructions for conducting particular scientific investigations, operating a piece of equipment, or following a procedure
S7CS9. Students will investigate the features of the process of scientific inquiry. f. Scientists use technology and mathematics to enhance the process of scientific inquiry.
High School Introduction to Digital Technology
IT-IDT-1 1.1 Communicate effectively through writing, speaking, listening, reading, and interpersonal abilities.
3
(Giving/receiving feedback).
IT-IDT-7 Use computational thinking procedures to analyze and solve problems.
7.5 Explore commonly used documentation tools for design specifications. a. Flowcharts, visual and textual storyboards.
IT-IDT-9 Design, develop, test and implement programs using visual programming.
9.1 Utilize drag and drop software to develop programs.
9.7 Incorporate music and art to enhance creativity in projects.
Middle School Visual Arts
VA6C.1 Applies information from other disciplines to enhance the understanding and production of artworks.
VA7PR.3 Uses the elements and principles of design along with a variety of media, techniques and skills to produce two-dimensional and three-dimensional works of art.
VA7CU.1 Discovers how the creative process relates to art history.
7th grade Engineering and Technology
ENGR-STEM 4 – Students will apply principles of science, technology, engineering, mathematics, interpersonal communication, and teamwork to the solution of technological problems.
ENGR-STEM 2 – Students will identify the impact of engineering and technology within global, economic, environmental, and societal contexts
MSENGR-II-3: Students will demonstrate engineering design and problem solving skills. e) Troubleshoot a product or system
4

MSENGR-II-4: Students will invent or innovate a technological product. a) Apply a design process in the invention or innovation of a product or system b) Design a simple invention or innovation c) Construct a simple invention or innovation f) Demonstrate the use and/or operation of the invention or innovation g) Evaluate the invention or innovation
MSENGR-II-6: Students will develop leadership skills and work ethics. a) Demonstrate work ethics within the classroom and lab environment
ITEEA Standards for Technology Literacy: Standard 8 – Students will develop an understanding of the attributes of design. E: Design is a creative planning process that leads to useful products and systems.
Standard 9 – Students will develop an understanding of engineering design. F: Design involves a set of steps, which can be performed in different sequences as needed. G: Brainstorming is a group problem-solving design process in which each person in the group presents his or her ideas in an open forum.
Standard 10 – Students will develop an understanding of the role of troubleshooting, research and development, invention and innovation, and experimentation in problem solving. F: Troubleshooting is a problem-solving method used to identify the cause of a malfunction in a technological system. H: Some technological problems are best solved through experimentation.
Standard 11 – Students will develop the abilities to apply the design process. H: Apply a design process to solve problems in and beyond the laboratory-classroom.
5
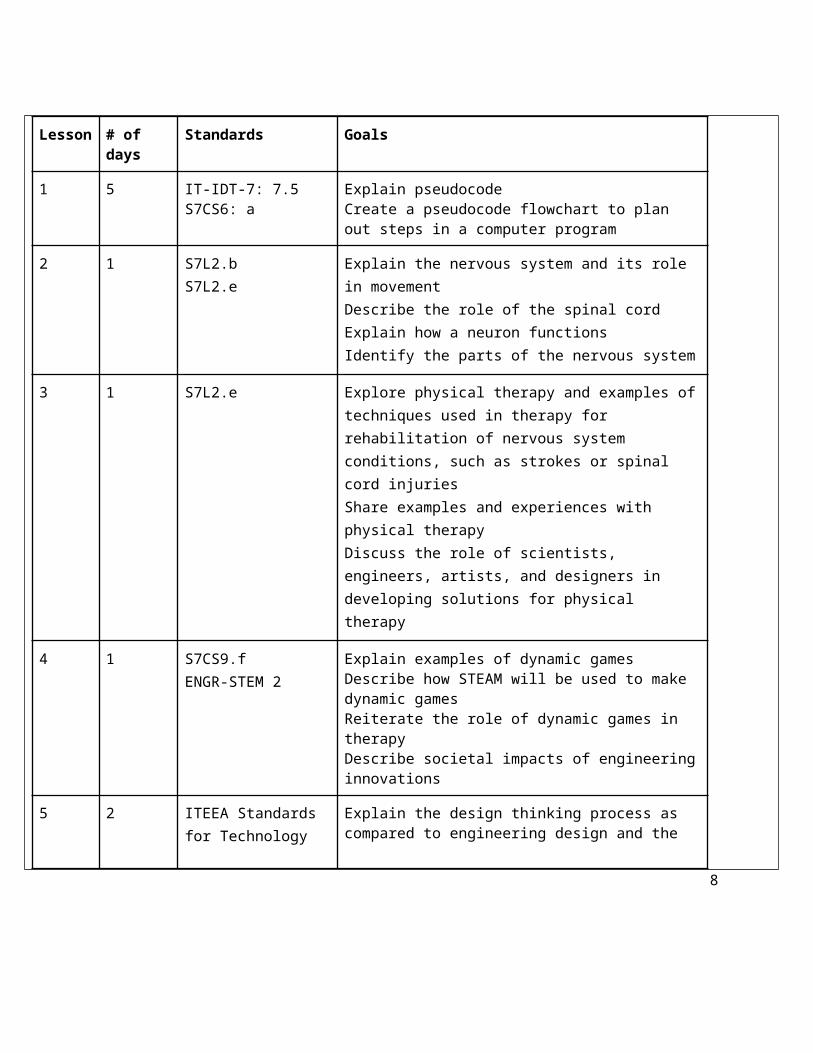
Unit Outline:
Lesson # of days Standards Goals
1 5 IT-IDT-7: 7.5S7CS6: a
Explain pseudocodeCreate a pseudocode flowchart to plan out steps in a computer program
2 1 S7L2.b S7L2.e
Explain the nervous system and its role in movementDescribe the role of the spinal cordExplain how a neuron functionsIdentify the parts of the nervous system
3 1 S7L2.e Explore physical therapy and examples of techniques used in therapy for rehabilitation of nervous system conditions, such as strokes or spinal cord injuriesShare examples and experiences with physical therapyDiscuss the role of scientists, engineers, artists, and designers in developing solutions for physical therapy
4 1 S7CS9.f ENGR-STEM 2
Explain examples of dynamic gamesDescribe how STEAM will be used to make dynamic gamesReiterate the role of dynamic games in therapyDescribe societal impacts of engineering innovations
5 2 ITEEA Standards for Technology Literacy: Standard 8-E: Standard 9-F
Explain the design thinking process as compared to engineering design and the scientific methodUse the Discovery phase of design thinking to begin planning solutions for a therapy gameGive examples of using empathy and human centered design
6 3 ENGR-STEM 4 Apply interpersonal communication and teamwork to the solution of a technological problem. Use design thinking to interpret discovery information
6

ITEEA Standard 8 –E Standard 9–G
Use design thinking to prototype solutions Brainstorm game ideas and use group problem solving to select game concepts Apply a persona to a broader context
7 1 IT-IDT-7.5IT-IDT-1.1
Identify and interpret conditional statementsCreate a pseudocode flowchart for a dynamic game
8 10 ITEEA Standard 11-H MSENGR-II-4: a, b, c MSENGR-II-6: a IT-IDT-9.1, 9.7 VA7PR.3
Invent a Scratch computer game that is adaptive/dynamic for use by physical therapy patientsUse conditional statements (if/then/else) in computer programmingUse the engineering design process and design thinking to create an interactive computer game, and program a circuit board controller for use in the gameUse principles of art and design to create an aesthetically pleasing game and controller
9 2 VA7CU.1VA7PR.3VA6C.1IT-IDT-9.7
Create a mobile sculpture inspired by pseudocodeDifferentiate between implied and actual motion,Define kinetic artUnderstand the artistic contributions of Alexander Calder
10 1 MSENGR-II-4: f IT-IDT-1 1.1
Summarize the project by demonstrating the games and explaining the art pieceCommunicate lessons learned in the project
11 1 MSENGR-II-4:f Reflect on the unitWrite about suggestions for project improvementsDescribe the role of art in engineering and computer science
7
Lesson Day One
Standards
Addressed
IT-IDT-7: 7.5
S7CS6: a
Key ConceptsExplain pseudocode
Create a pseudocode flowchart to plan out steps in a computer program
Daily Assessment Handout related to the video tutorial
Lesson 1 (5 days): Practicing making a dynamic game in Scratch
All needed materials (handouts, PowerPoints, rubrics) are provided: Lesson 1 Scratch Game Planner, Lesson 1 Arcade Day, Lesson 1 A Game of Cat and Mouse Rubric, and Lesson 1 PowerPoint. You will need a computer, projector, and speakers. Students will need computers.
To kick off, students will be introduced to the unit (part A) and then follow a tutorial lesson to make a simple Scratch game called A Game of Cat and Mouse (part B). They will then change the game on their own to make it dynamic. Last, the students will practice making their own dynamic game (part C). The activities in this first lesson will scaffold the students for how to make a therapy based game later on. (Powerpoint provided to match the script).
Part A
Script:
We are starting an exciting new unit involving computer games, engineering, art, design, and science! In this unit, we will learn how to make video games in Scratch, how to design games that are dynamic or adjustable, and how to customize those games so people could use them to help rehabilitate an injury or condition related to the nervous system, such as a spinal cord injury. There is also a unique Computer Science art project!
8

The inspiration for this unit comes from the HumAnS (Human-Automation Systems) Lab at Georgia Tech. Under the guidance of Dr. Ayanna Howard, PhD researcher Brittney English is developing a way to help stroke patients complete physical therapy exercises using video games. In this unit, you will emulate Brittney’s university level research on a middle school scale. You will experience what it is like to be a computer scientist, game designer, industrial engineer, and a graphic designer, among other careers. You will research an impairment that would require physical therapy exercise and use Scratch to design an interactive dynamic game that would aid in the exercise while also incorporating the Makey Makey as a game controller.
Part B
Script and video:
Make sure that students have computers available for the activity, as well as the handouts (Lesson 1 Scratch Game Planner, Lesson 1 Arcade Day, Lesson 1 A Game of Cat and Mouse Rubric.
To start out, you are going to make a simple Scratch project called A Game of Cat and Mouse Part 1. The purpose of today’s activity is to keep the game simple in order to focus on the basic concepts; you can jazz it up later! We are going to start small and then make a bigger project as we improve our skills.
First, let me show you the game. (Use a projector to demonstrate the game on the board for the students. Simply hit the green flag and hover the computer mouse over the cat. A point is earned each time the mouse “catches” the cat. https://scratch.mit.edu/projects/115651118/ )
How does this game work? On the handout provided (Lesson 1 Scratch Game Planner), record what you think needs to be in the code to make the program work. You do not need to use Scratch specific language, but try to describe all the components of the game and what makes it work. Bullet points are appropriate.
(Ask for students to share their ideas.) What you have done by describing how the game works is called writing pseudocode. Pseudocode is simply when you plan out your steps for your program by outlining it on paper before jumping to the actual coding. Just like you wouldn’t want to start an essay without an outline, you don’t want to start writing a program without an idea of what components you need to include. It helps you stay organized! All professional programmers use pseudocode to help their work progress smoothly. The word pseudo means fake. Like a pseudonym is another word for pen name, as in what an author might use. It is a fake name. Pseudocode is like fake code because it’s not written in the actual programming
9

language. It’s a casual outline written in your own words.
Let’s watch a video to learn exactly how A Game of Cat and Mouse works. Make the project in Scratch alongside the Screencast video so you can later adapt this version of the game. Fill in the pseudocode information on the handout as well. Log into Scratch by going to www.scratch.mit.edu.
https://vimeo.com/173561009 (password: ryko)
Have students submit their handouts at the end of class. If they have not finished, they can complete it the next day.
Lesson Day Two
Standards
Addressed
IT-IDT-7: 7.5
IT-IDT-9: 9.1
S7CS6: a
Key Concepts
Create a pseudocode flowchart to plan out steps in a computer program
Define dynamic game
Develop a dynamic computer game in Scratch
Daily Assessment Handout related to pseudocode, Product in the form of the game being created
Lesson 1 continued: Practicing making a dynamic game in Scratch
Have students complete the Game of Cat and Mouse tutorial from the previous day, if needed. As a warm up, review the definition of pseudocode (an informal outline of the steps in a computer program).
10

Part C
Script and video:
After you’ve created A Game of Cat and Mouse Part 1, let’s take this project a step further! Creating a video game is like the fairy tale “Goldilocks and the Three Bears”. You don’t want your game to be too hard or too easy, just like Goldilocks didn’t want a bowl of porridge too hot or too cold. You need your game to be just right so that the player doesn’t give up from boredom or frustration. This is called game balance.
One way game designers keep a game balanced is to the design the game so that it is dynamic or adaptive. A great example of a dynamic video game is Mario Kart from Nintendo. In the game, players are go-kart drivers and they compete to be the first to cross the finish line of a race course. During a race, players can collect surprise bonus items by driving through specially marked boxes on the course. The items can give a speed boost, can be used to hit and slow down other players, lay traps for other players, etc. While the surprise items seem randomly assigned, toward the end of the game, certain patterns emerge. Often times, players who are losing the race (in 7th-8th places) receive speed boosts and especially helpful items more frequently. These items can help the losing players catch up to opponents. Meanwhile, the players who are leading the pack (1st-2nd places) often receive less valued items. A leader might receive an item like a banana peels that other drivers could slip on, but these items do not always impact others because players can easily swerve to avoid the object. In Mario Kart, dynamic game design helps keep players engaged, especially when competing against the non-human computer opponents (artificial intelligence characters). (Source: https://en.wikipedia.org/wiki/Dynamic_game_difficulty_balancing)
Show this video: https://vimeo.com/173572280
A Game of Cat and Mouse game is too simple and could get boring for the player. This game is not balanced. Let’s update the game so that it is dynamic, or adaptive. What are ways we could change this game so that it adjusts based on how the player is doing? (Example responses: change the wait time so you have to move faster or slower to catch the cat, make the cat change size so it is harder or easier to catch, etc.) Now that you have some ideas, try updating your game to make it adaptive. Use your planning handout to record your pseudocode before you start changing the code (Lesson 1 Scratch Game Planner). Remember, we are taking baby steps right now. Later in the unit, you will use the idea of dynamic games to create a project that will serve a specific purpose. This time, when you make your pseudocode, make it a flowchart, instead of a list of bullet points. The flowchart should show what happens in each step and what steps subsequent parts of the program will follow. It’s like a procedures list. (Example image provided in the
11

Lesson 1 PowerPoint). The example provided shows an example of how of A Game of Cat and Mouse could be turned into a dynamic game. We will share the games in an Arcade Day in a few days.
Circulate and monitor student progress. Ensure that students are writing pseudocode in a flowchart format before programming anything in Scratch. Have students submit their handouts at the end of class. If they have not finished, they can complete it the next day.
Note: When students have completed the game update, get creative with sharing! Host an Arcade Day during class so students can take turns playing each other's games. Have the students set up their games and allow the class to take turn playing each other’s games. This is a great time for students to practice giving feedback as well. Space to provide feedback is provided on the handout (Lesson 1 Arcade Day).
Additional Teacher resource: This website has information pertaining to how to use the “I Like, I Wish, What if” technique for peer feedback.
https://dschool.stanford.edu/wp-content/themes/dschool/method-cards/i-like-i-wish-what-if.pdf
Lesson Day Three
Standards
Addressed
IT-IDT-7: 7.5
IT-IDT-9: 9.1
S7CS6: a
Key Concepts
Create a pseudocode flowchart to plan out steps in a computer program
Define dynamic game and apply the concept in order to adapt a game
Develop a dynamic computer game in Scratch
Daily Assessment Handout related to pseudocode, Product in the form of the game being created
Lesson 1 continued: Practicing making a dynamic game in Scratch
12

Have students continue to develop their dynamic version of A Game of Cat and Mouse, as presented in Day 2. Explain that the games will be shared during Arcade Day and they should be prepared to play other students games, give feedback on other students’ games, and have their game played as well.
During class, circulate and monitor student progress. Ensure that students are writing pseudocode in a flowchart format before programming anything in Scratch. Have students submit their handouts at the end of class. If they have not finished, they can complete it the next day. Remind them that tomorrow is the last day to make their games.
Lesson Day Four
Standards
Addressed
IT-IDT-9: 9.1, 9.7
S7CS6: a
Key Concepts
Create a pseudocode flowchart to plan out steps in a computer program
Define dynamic game and apply the concept in order to adapt a game
Develop a dynamic computer game in Scratch
Daily Assessment Handout related to pseudocode, Product in the form of the game being created
Lesson 1 continued: Practicing making a dynamic game in Scratch
Have students continue to develop their dynamic version of A Game of Cat and Mouse, as presented in Day 2. Remind students that they need to finish their games today and encourage them to incorporate engaging sounds and images. Also remind students that games will be shared during Arcade Day and they should be prepared to play other students games, give feedback on other students’ games, and have their game played as well. Circulate and monitor student progress. Have students submit their handouts at the end of class.
13

Lesson Day Five
Standards
AddressedIT-IDT-1: 1.1
Key ConceptsDevelop and share a dynamic computer game in Scratch
Evaluate games and provide feedback for peers
Daily Assessment Rubric provided for culminating task related to completing and sharing the games created in Scratch
Lesson 1 continued: Practicing making a dynamic game in Scratch
Students will share their games today. Instructions for the students are below:
Today is Arcade Day! We will share our games after listening to instructions. Please set up your games and leave a feedback handout (Lesson 1 Arcade Day) next to your game. When it is time, you will circulate the classroom and play multiple games, time dependent. Every time you play a game, leave feedback for the respective game creator. You can play the game more than once. Remember, do not take the feedback handout around the room. Leave it next to the game you were evaluating so the person after you can add on. When giving feedback, please be constructive and specific. Tell the game creator what you liked, what you wish would be different, and suggestions for further development of the game.
At the end of class, allow students time to read their feedback forms. Debrief by having a class discussion. Have student define pseudocode and dynamic games. Pose questions such as: “What made some games more engaging than others? What is a tip you can share about coding with Scratch? How is pseudocode helpful? What did you learn from your feedback form? What did you learn from having to provide feedback?”
14
Tell students that the next lesson is related to the nervous system, which will provide needed background information to develop dynamic physical therapy games.
If time does not allow for an Arcade Day, have students share out in a class discussion and show 1-2 examples on the projector.
A rubric for this culminating activity is provided (Lesson 1 A Game of Cat and Mouse Rubric).
Lesson Day Six
Standards
Addressed
S7L2.b S7L2.e
Key Concepts
Explain the nervous system and its role in movement
Describe the role of the spinal cord
Explain how a neuron functions
Identify the parts of the nervous system
Daily Assessment Webquest handout
Lesson 2 (1 day): Nervous system webquest
Today students are completing a webquest to learn about the nervous system. They will need access to computers and headphones. The students need a copy of the handout, Lesson 2
15
Nervous System Webquest.
Script:
So far, you have used Scratch to create a basic project that uses dynamic difficulty game balancing. As mentioned previously, we are actually working towards creating a game that serves a bigger purpose. In a few days, you will create a video game that can be used by someone who is participating in physical therapy to help rehabilitate a spinal cord injury or condition. Before you can design a game to help a therapy patient, you need background knowledge on the spinal cord and the nervous system overall. The goal of today is to complete a webquest to learn about the nervous system so you can use that knowledge to develop an impactful video game and understand why physical therapy works. Please complete the webquest by using the links provided and filling in the handout.
Teacher note: If you do not have a subscription to the BrainPop website, you can remove that activity from the webquest.
Collect all handouts at the end of class.
Lesson Day Seven
Standards
AddressedS7L2.e
Key Concepts Explore physical therapy and examples of techniques used in therapy for rehabilitation of nervous system conditions, such as strokes or spinal cord
16

injuries
Share examples and experiences with physical therapy
Discuss the role of scientists, engineers, artists, and designers in developing solutions for physical therapy
Daily Assessment Class discussions
Lesson 3 (1 day): Introduction to Physical Therapy
Students will learn about physical therapy by viewing examples in pictures and videos. Students will share their experience with therapy in order to provide empathy for the upcoming project related to making physical therapy games. You will need a computer, projector, and speakers. Students will need a sheet of paper.
The script below corresponds with the Lesson 3 PowerPoint.
Put the PowerPoint on the board and have students record their thoughts to the warm up question on their own paper. Discuss as a class. Continue to read through the script and change the PowerPoint slides as needed.
Script:
Warm Up question: In the last webquest, you learned about the how the nervous system works. But what happens if there is an injury or damage to a part of the nervous system? Think about the role of the nervous system and how life can be impacted by damage to the nervous system, such as through a spinal cord injury or stroke.
Injury to the nervous system can have a wide variety of impacts and can affect people of any age. However, each injury is unique. What the injuries have in common is that they impair the ability of the nervous system to relay messages around the body in some way. Injuries to the spinal cord can impair movement and affect the ability to walk or move limbs. Injuries to the brain can impact speech and
17
memory as well as movement. Injuries to nerves can impact senses. Other common examples of nervous system injuries are traumatic brain injuries (like from a collision accident), concussions, etc. Again, each injury is different, but knowing how the nervous system works and what it is responsible for, it is easy to see how many ways a malfunction can interrupt daily life.
Pose a follow up question and call on volunteers. Follow up question: Do you think it possible to recover from an injury to part of the nervous system? Can anything be done for someone who has damage to the nervous system? Explain.
After students share their thoughts, read the script below: Recovering from injury to part of the nervous system, especially the brain, can be very difficult. In many cases, a person does not recover to the same ability level as prior to the injury. However, there is hope and there are many strategies to help people recover. It once was believed that neurons were formed only in early human development and that adult brains could not create new neurons, which makes recovering from brain injuries difficult. However, scientists have recently discovered that there are certain areas of the adult brain that can still create neurons; this process is called neurogenesis. One area of neuroscience that scientists are researching involves injecting proteins in certain parts of the brain to stimulate the growth of new neurons to help repair damaged areas. It is still a very new area of exploration. Check out this clip to learn more: http://ed.ted.com/lessons/could-your-brain-repair-itself-ralitsa-petrova
Physical therapy is another way to help people recover. The purpose of physical therapy is to help regain strength, improve flexibility, coordination, etc. Physical therapy could involve a wide variety of treatments, such as cardio exercise, games, massage, stretching, weight lifting, etc. The idea is to help neurons fire and to grow neural pathways to help regain movement.
Pose another follow up question and have students record their thoughts on paper. Then, have students share their responses with the class. Follow up question: Have you or someone you know ever had to do physical therapy? Describe the experience. (Was it fun? Hard? Frustrating? Did it work?) If you are not sure what PT is, write what you think it means.
After students share their thoughts, read the script below if desired. Note: This is an example I shared about my experience with therapy when my dog had surgery, so you could explain that this is an
18
example shared by another teacher.
Did you know that animals can have physical therapy too? The next example is from another teacher, who had experience with therapy from when her dog had surgery!
Ladybird is a basset hound and even though she is still a puppy, she already has problems with her joints and walking. (Think about form and function in this case. She’s a big bodied dog with very short legs that have to support too much weight.) She had a limp that was caused by a small part of her elbow breaking off. The veterinarian compared it to walking around with a pebble in your shoe. It was uncomfortable for her, which caused the limp. Ladybird had surgery to correct the issue. After surgery, Ladybird needed to complete physical therapy to help her regain strength in her leg so she could use it again comfortably. She completed therapy sessions with a physical therapist at the vet’s office, and the therapist also assigned us homework to complete certain exercises at home each day.
During the therapy, Ladybird would practice motions like laying down, pushing up to get off the ground, and transferring her weight back and forth on wobbly surfaces. She also had water therapy where she walked on a treadmill that was inside a tank of water. The purpose of the water was to reduce the weight of Ladybird’s body so the therapist could help train her to walk correctly without having to bear much weight on her leg.
At home, Ladybird was supposed to practice 4-5 excises a few times per day. Keeping Ladybird motivated during therapy time was challenging. The exercises were sometimes tiring for her and sometimes painful. If it weren’t for dog treats, it would have been very difficult to keep Ladybird focused on her exercises. Honestly, we did not complete the therapy exercises as often as we should have.
Physical therapy is challenging for patients (as it should be to help the patients’ progress). Many of the issues with Ladybird are common for people as well. Maintaining motivation is a huge challenge for physical therapists and patients alike. Sometimes the exercises are painful or uncomfortable, and they can even get repetitive and boring. Patients can also get frustrated if they do not think they are making progress. Finding ways to keep patients engaged in therapy exercises is key to helping them recover and continue with the program. This is where engineering comes in!
19
What is physical therapy like for people of different ages? Physical therapy can be very different based on the age of the patients and injury type. Let’s watch some video clips that show examples of therapy facilities.
The first videos are from the website, MoveForwardPT.com, which is sponsored by the American Physical Therapy Association. Thanks to MoveForwardPT.com for allowing the posting of their videos and use their website for researching.
This clip is about pediatric physical therapy, which is for children. https://www.youtube.com/watch?v=bn9Ibg7zCHw
This clip is about using video games during therapy.
https://www.youtube.com/watch?v=cBb4XIb5PCk
The next video was made at Project Walk, which is located in nearby Alpharetta. (Note: To personalize this project, you could also reach out to local organizations that might be interested in partnering with your class and create a similar informational video.) They specialized in helping people with spinal cord injuries. Since making the video, Project Walk changed its name to Next Step Spinal Atlanta Paralysis Recovery.
Show the Project Walk video.
https://vimeo.com/174958783 (password: Ryko)
Afterward, briefly discuss examples of how engineering is involved in therapy in general and at Project Walk. For example, there are people who design the equipment, and some equipment has to be further adapted to help people with spinal cord injuries. There were many examples of equipment types in the videos.
20
Script:
So far, you have learned about the nervous system and techniques used to help people who have injuries to parts of the nervous system. This knowledge base was formed by scientists, researchers, and engineers who have worked to create solutions to help people overcome injuries. As mentioned, one of the biggest hurdles in physical therapy is keeping a patient motivated to complete the therapy or participate fully.
Today, you’ve seen many examples of therapy solutions. What is the role of scientists and engineers as it relates to creating those solutions? What is the role of an artist or designer in creating therapy solutions? (Example answers: Scientists might research and measure how the nervous system responds to movement, engineers could develop modified exercise equipment and solve problems related to motivation, etc. Artists and designers can apply design and art principles to influence the way equipment looks and operates so that it is appealing and functional for patients, etc.)
To explore this problem, you are going to be an engineer who designs a solution to aid with physical therapy and maintaining client motivation. You will create a therapy based game and controller that could be used by a person who has an injury to the nervous system to help them recover from the injury. You will also apply your knowledge of dynamic video games when creating a therapy game. You’ll find out more about this tomorrow.
Lesson Day Eight
Standards S7CS9.f
21

Addressed ENGR-STEM 2
Key Concepts
Explain examples of dynamic games
Describe how STEAM will be used to make dynamic games
Reiterate the role of dynamic games in therapy
Describe societal impacts of engineering innovations
Daily Assessment Class discussion
Lesson 4 (1 day): Project motivation and examples
Today students will learn about the motivation and real world research behind the therapy game project. They will see two examples to help provide project inspiration. The script below corresponds with the Lesson 4 PowerPoint. You will need a computer, projector, and speakers.
Put the PowerPoint on the board and have students record their thoughts to the warm up question on their own paper. Discuss as a class. Continue to read through the script and change the PowerPoint slides as needed.
Script:
As mentioned, one of the biggest hurdles in physical therapy is keeping a patient motivated to complete the therapy or participate fully. To explore this problem, you are going to be an engineer who designs a solution to aid with physical therapy and maintaining client motivation. You will create a therapy based game and controller that could be used by a person who has an injury to the nervous system to help them recover from the injury. Your game will also be dynamic in the way that it is balanced to help the player maintain a satisfactory level of challenge. Before you get started, let’s explore some background information about the project.
The inspiration for this project comes from the HumAnS (Human-Automation Systems) Lab at Georgia Tech. Under the guidance of Dr. Ayanna Howard, PHD researcher Brittney English is developing a way to encourage stroke patients complete physical therapy exercises using video games. A stroke happens
22

when blood flow to a part of the brain is blocked. This causes the brain to lose oxygen and cells in that area can die. Strokes can have many, but varied, devastating side effects. The effects of a stroke depend on the location of the blockage and the severity, but some examples of impacts include memory loss, paralysis, etc.
Brittney’s motivation for the research stems from her desire to use robotics to help people. She realized that stroke patients often need physical therapy to help them regain bodily functions. Often these patients need to rehabilitate the movement of their wrists and hands. Having proper wrist/hand motion is important in maintaining quality of life and independence. Think about all of the functions you use your hands and wrists for each day! People who have lost functionality of those parts cannot easily provide personal care for themselves and might need assistance with daily events like bathing or going to the restroom. As a result, the patients lose privacy when they need assistance with personal care. Brittney’s research is aimed at helping stroke patients increase their engagement with physical therapy exercises so they can regain independence.
Show the video about Brittney’s research: https://vimeo.com/194162353 (Password: Ryko)
Brittney points out that often times, patients do not enjoy participating in physical therapy and it can result in low morale and slower recovery time. She wants to find out if using video games can help patients get better faster by improving morale and motivation to complete the therapy. One key aspect of her research is to make the video games adaptive, or dynamic, which if you recall, means the games adapt the challenge level based on the player performance. For example, the game will get more challenging for players who are excelling and the game will get easier for players who are struggling. The dynamic game play helps customize the game to maintain motivation. A game that is too easy might become boring while a game that is too hard might become frustrating. In either situation, the player might give up, which does not help the patient make progress in recovery. Brittney hypothesizes that using dynamic game play will improve many aspects of therapy and improve patient outcome. Additionally, the adaptability allows the game to have a longer life since it can grow with the player and be used multiple times.
Strokes affect over 795,000 Americans per year. While most strokes occur in people over age 65, up to 15% of strokes occur in people under 45, which can include young people. Brittney’s research is important because it has the potential to help a wide range of people who are affected by stroke and
23
even their caregivers. It could even be used by patients with similar other conditions or injuries.
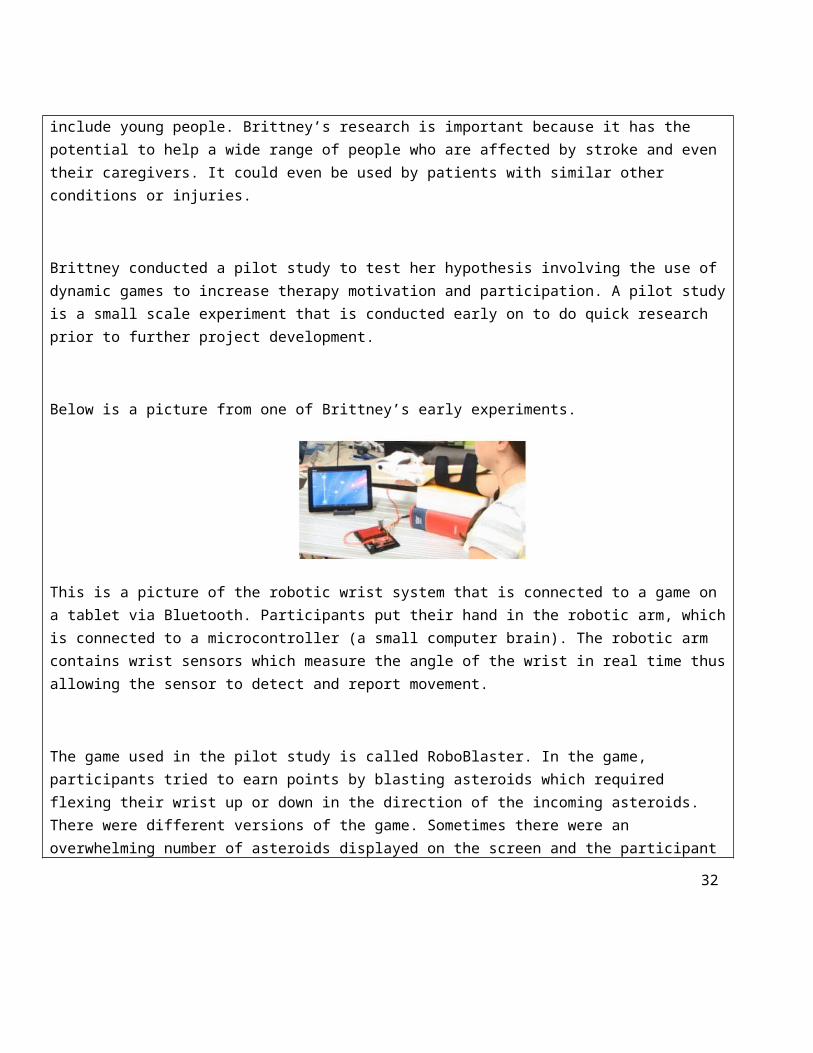
Brittney conducted a pilot study to test her hypothesis involving the use of dynamic games to increase therapy motivation and participation. A pilot study is a small scale experiment that is conducted early on to do quick research prior to further project development.
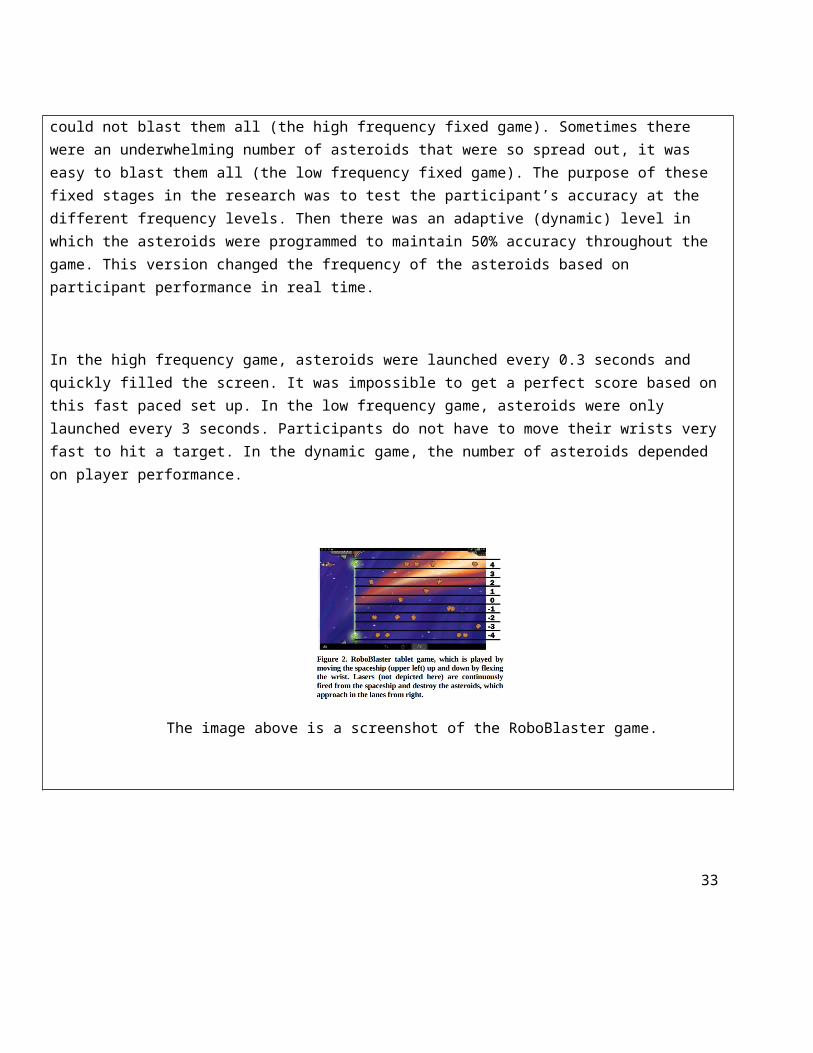
Below is a picture from one of Brittney’s early experiments.
This is a picture of the robotic wrist system that is connected to a game on a tablet via Bluetooth. Participants put their hand in the robotic arm, which is connected to a microcontroller (a small computer brain). The robotic arm contains wrist sensors which measure the angle of the wrist in real time thus allowing the sensor to detect and report movement.
The game used in the pilot study is called RoboBlaster. In the game, participants tried to earn points by blasting asteroids which required flexing their wrist up or down in the direction of the incoming asteroids. There were different versions of the game. Sometimes there were an overwhelming number of asteroids displayed on the screen and the participant could not blast them all (the high frequency fixed game). Sometimes there were an underwhelming number of asteroids that were so spread out, it was easy to blast them all (the low frequency fixed game). The purpose of these fixed stages in the research was to test the participant’s accuracy at the different frequency levels. Then there was an adaptive (dynamic) level in which the asteroids were programmed to maintain 50% accuracy throughout the game. This version changed the frequency of the asteroids based on participant performance in real time.
In the high frequency game, asteroids were launched every 0.3 seconds and quickly filled the screen. It was impossible to get a perfect score based on this fast paced set up. In the low frequency game, asteroids were only launched every 3 seconds. Participants do not have to move their wrists very fast to
24
hit a target. In the dynamic game, the number of asteroids depended on player performance.
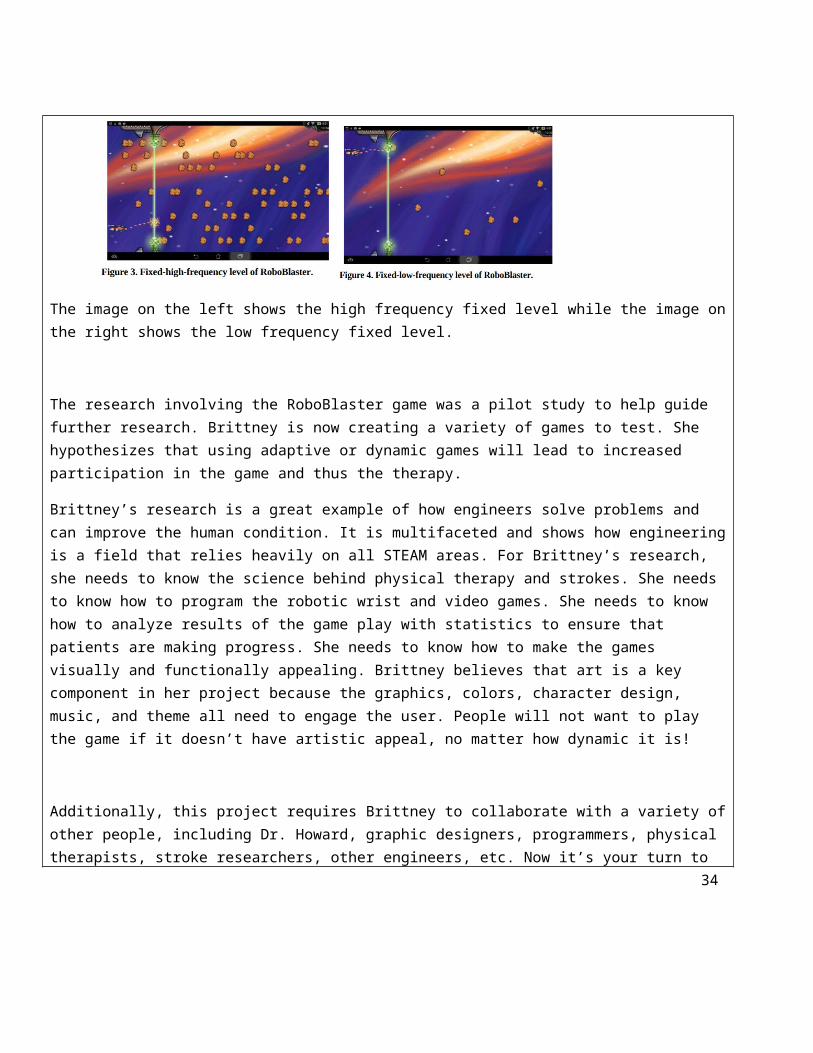
The image above is a screenshot of the RoboBlaster game.
The image on the left shows the high frequency fixed level while the image on the right shows the low frequency fixed level.
The research involving the RoboBlaster game was a pilot study to help guide further research. Brittney is now creating a variety of games to test. She hypothesizes that using adaptive or dynamic games will lead to increased participation in the game and thus the therapy.
Brittney’s research is a great example of how engineers solve problems and can improve the human condition. It is multifaceted and shows how engineering is a field that relies heavily on all STEAM areas. For Brittney’s research, she needs to know the science behind physical therapy and strokes. She needs to know how to program the robotic wrist and video games. She needs to know how to analyze results of the game play with statistics to ensure that patients are making progress. She needs to know how to
25

make the games visually and functionally appealing. Brittney believes that art is a key component in her project because the graphics, colors, character design, music, and theme all need to engage the user. People will not want to play the game if it doesn’t have artistic appeal, no matter how dynamic it is!
Additionally, this project requires Brittney to collaborate with a variety of other people, including Dr. Howard, graphic designers, programmers, physical therapists, stroke researchers, other engineers, etc. Now it’s your turn to do the same using Scratch and Makey Makey.
Here is an example of a project to give you an idea of what it all entails. The game is called “Adaptive PT.”
Here is a link to the game on Scratch: https://scratch.mit.edu/projects/113651960/
Here is a video clip to show a demonstration of the game: https://vimeo.com/194165914
Password: Ryko
The object of the game is to pet Ladybird when she asks for it. Each time she gets pet, she moves farther away on the screen. The game is designed for someone with a spinal cord injury who is practicing the motion of leaning forward. Leaning forward is the first step in the process of getting up from a seated position, such as from a wheelchair. In the game, the player must practice leaning forward a little farther each time. The game is adaptive because Ladybird only moves farther back on the screen once she has been pet up close.
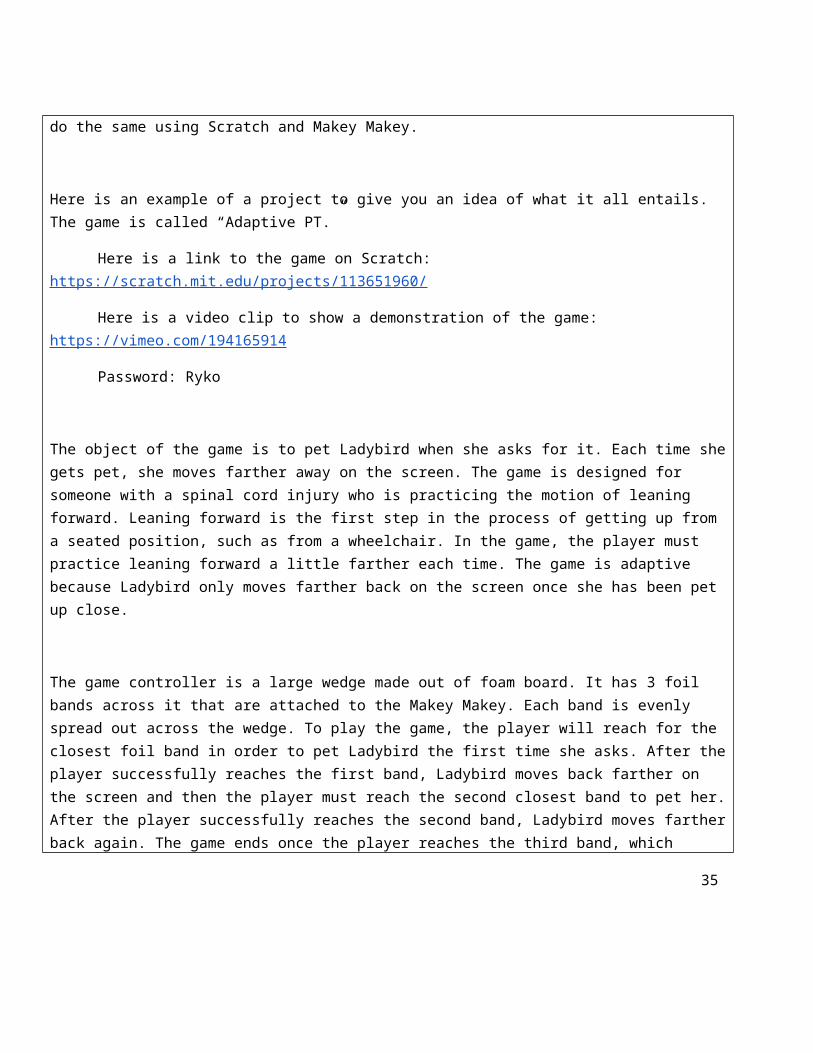
The game controller is a large wedge made out of foam board. It has 3 foil bands across it that are attached to the Makey Makey. Each band is evenly spread out across the wedge. To play the game, the player will reach for the closest foil band in order to pet Ladybird the first time she asks. After the player successfully reaches the first band, Ladybird moves back farther on the screen and then the player must reach the second closest band to pet her. After the player successfully reaches the second band, Ladybird moves farther back again. The game ends once the player reaches the third band, which corresponds to Ladybird’s farthest position on the screen.
26
This game is adaptive or dynamic because the game play adjusts based on player performance. If the player doesn’t reach the band, Ladybird continues to request to be pet until she is reached. Ladybird will then move back farther on the screen once she has been reached. The game changes once the player is successful, which results in Ladybird to changing positions on the screen. In theory, the game increases the level of challenge each round by requiring the player to lean farther each round in order to reach the next band. The challenge level only increases based on player input. If the player does not reach a band, Ladybird requests that they keep trying. Once the player reaches that band, the difficulty increases.
Important side note. Notice that the controllers in these examples are not traditional handheld, rectangular boxes with buttons. In Brittney’s game, the controller was a computer chip attached to a device that connected to the wrist. Moving the wrist up and down then controlled movement on the screen. In the dog game, the controller was a wedge with strips of foil on it that were spaced out at equal intervals. Touching different foil strips changed what happened the in game. When you create your therapy game, the game controller you will design with the Makey Makey in actuality will be more like a touchpad, like in the last example. Maybe your controller is a pad that you step on. Maybe it’s a basketball hoop with a switch that gets activated when a ball goes through. Maybe it’s a set of tweezers that activate the circuit when the ends touch. When it comes time to brainstorm ideas, don’t be limited by the word controller; think more along the lines of it being a touch pad or switch.
Now you see why we practiced making dynamic/adaptive games at the start of the unit! Let’s recap. How are the example games you’ve seen today dynamic? (They adjust based on player performance. For example, in RoboBlaster, if the player is doing well, more asteroids start to appear on screen which requires more and faster wrist movement to catch the asteroids. In the dog game, if the player is doing well, the dog moves back farther on the screen and the player then has to lean farther to hit the target.) How can you incorporate art in your project and why should you? (Answers will vary, but students can talk about having a coordinating color pallet, quality illustration or graphics, engaging sounds or music,
27
having a cohesive theme or storytelling, etc.) An engineer is a problem solver. What problem are you solving by making a therapy game? (The goal is to help patients maintain motivation during therapy.) What are the potential societal impacts of this engineering project? (The games and devices can help people recover from injuries. The games can be used in a variety of situations.) Are there any questions about expectations?
Start thinking about who you want to work with for the project and what materials you might need. Tomorrow we will select groups and start planning the project.
28
Lesson Day Nine
Standards
Addressed
ITEEA STANDARDS FOR TECHNOLOGY LITERACY:
Standard 8-E:
Standard 9-F
Key Concepts
Explain the design thinking process as compared to engineering design and the scientific method
Use the Discovery phase of design thinking to begin planning solutions for a therapy game
Give examples of using empathy and human centered design
Daily Assessment Lesson 5 Project Planner Handout, Class discussions
Lesson 5 (2 days): Introducing Design Thinking
You will need a computer and projector. Students will need copies of the Lesson 5 Dynamic Therapy Game Planner and Lesson 5 Persona Scenarios handouts. Note: If your students are accustomed to digital copies and collaborating on Google Docs, you can use the Game Planner as an online document that the group shares in lieu of printing copies. If you chose digital copies, students will need access to technology. The number of students in a group depends on the number of Makey Makey Invention kits available for the class; 3-5 is an ideal number of students per group.
The script below corresponds with the Lesson 5 PowerPoint.
Put the PowerPoint on the board and have students record their thoughts to the warm up question on their own paper. Discuss as a class. Continue to read through the script and change the PowerPoint slides as needed.
29

Script:
Today, you are going to prepare to start planning your therapy game by engaging in a process called design thinking. Remember, you are solving a problem that will help another person, so it is important to consider the user when creating your game and controller. It is also important to test your ideas frequently and make changes to your project based on any observations or feedback by following the engineering design process. Your project will not work perfectly the first time and the goal is to go through multiple iterations to make improvements.
First, find a group to work with. After you have a group (3-5 students), gather then planning handout for group member and wait for explanation before answering the questions (Lesson 5 Dynamic Therapy Game Planner).
To help guide your project, you have 4 scenarios to choose from. The scenarios will tell you the age and injury of the person that you will use as inspiration for your game design. The scenarios were written to help guide your human-centered design process (which you will learn about shortly). The scenarios represent fictional people, but you will use these personas to guide your decisions related to the game design and function.
Provide each group a copy of the Scenarios handout, which provides more details about each persona. Allow students to read the scenarios and select the one that they want to focus on (Lesson 5 Persona Scenarios).
Scenario 1: Mia is a 6 year old who had an accident that resulted in a spinal cord injury. She is completing physical therapy to regain the use of her legs.
Scenario 2: Mary is an older adult who had a stroke. She is completing physical therapy to regain the use of her right hand.
Scenario 3: Bennett is preteen who had an accident that resulted in a spinal cord injury. He is completing physical therapy to regain the use of his arms.
Scenario 4: Brian is a young adult who had a stroke. He is completing physical therapy to regain the use of his fingers.
30

After students have selected a scenario, each group member should complete the Lesson 5 Game Planner handout. Have the students complete only Part 1. Do not move on to Part 2. Students may need to briefly access technology to assist with research for question 2.
Now that you have finished Part 1, let’s get ready to move on to Part 2. Wait for further information before filling out the questions.
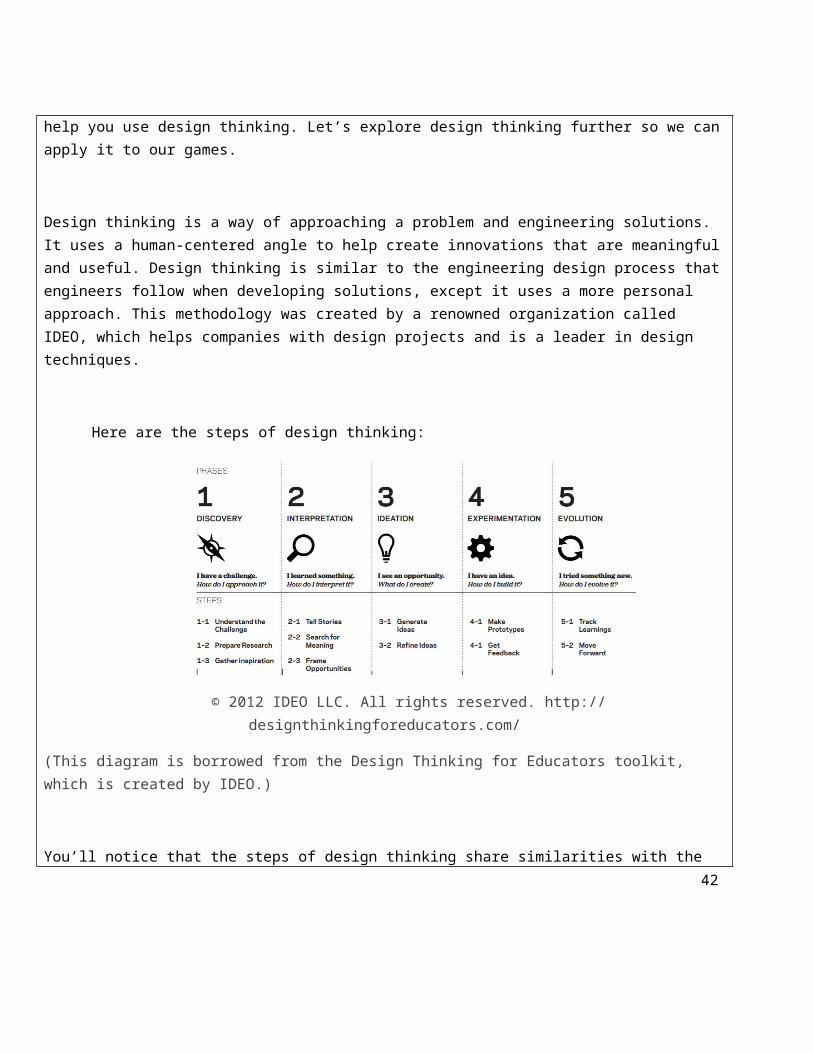
Before you start designing your game and device, it’s really important to consider the users of your game. Who will use the game and for what purpose? How will you know that the game/controller will appeal to the user? How will you make it engaging and motivating? What should it look like and how should it work? Where will it be used? These types of considerations are part of a process called design thinking. The reason you were given scenarios was to help you use design thinking. Let’s explore design thinking further so we can apply it to our games.
Design thinking is a way of approaching a problem and engineering solutions. It uses a human-centered angle to help create innovations that are meaningful and useful. Design thinking is similar to the engineering design process that engineers follow when developing solutions, except it uses a more personal approach. This methodology was created by a renowned organization called IDEO, which helps companies with design projects and is a leader in design techniques.
Here are the steps of design thinking:
31
© 2012 IDEO LLC. All rights reserved. http:// designthinkingforeducators.com/
(This diagram is borrowed from the Design Thinking for Educators toolkit, which is created by IDEO.)
You’ll notice that the steps of design thinking share similarities with the engineering design process and the scientific method! Ultimately, most scientists, engineers, programmers, and designers use an organized method of working. What these processes have in common is that they all begin with questions or problems to solve, then move into a testing phase, followed by creating a solution, and finally end with sharing results. The process can then start all over again if the results require more testing or if the project leads to further questions.
The key with design thinking is to really delve into the people who will eventually use the product and to carefully consider where and how it will be used when making a design. This is called human-centered design. For example, say you are an engineer and your job is to create a new type door knob. Your task is to make a mechanical device that can open and close a door. It will probably have a latch, a lock, a handle, etc. The design will be done when it’s been tested to show that it works, right? Maybe not. Just because you have created a product that is functional, doesn’t necessarily make it the best design. While the new door knob you created might have filled the requirements of opening and closing a door, what are other considerations that could further improve the design?
With design thinking, the first phase is Discovery. During Discovery, you gather as much background information as possible. A few examples of how to gather the information are by conducting interviews
32
with potential users, reading relevant articles, and visiting the places where the product could be used.
Class discussion: Think about the doorknob example. What are some questions you could explore when designing the door knob? How about: Where will the doorknob be used? Who will use it? What other options are available in place of a door knob? What materials should be used? All of these questions are part of design thinking, which takes a deeper look at the scope of a project and from a different point of view.
Let’s consider the doorknob further. This time, what if you are an architect or interior designer who is working on a project related to the construction of an assisted living facility. During the construction process, eventually you will need to decide the type of door knobs that should be installed in the facility. While it seems like a simple question, it doesn’t necessarily have an obvious outcome. What kind information would be useful to explore during the discovery phase of this project? For example, did you consider if the door knobs should be round knobs or flat handles? Think about the life of someone who needs assisted living. What is their age normally? What is their health like? What are some design considerations needed when creating a comfortable place for senior citizens? Getting the answers to those questions will help make the design optimal.
One way to find the answers to those questions would be to go to other assisted living places and observe. While there, you could explore how people use the building (including staff, not just residents). Then you could interview users and see what they like and dislike about the building. You could also talk with other stakeholders, such as the construction team, building manager, etc. Getting as many perspectives as possible is key in design thinking so that the solution is optimized. This is all part of the Discovery phase of design thinking. It is important because it helps you have empathy. Empathy is when you put yourself in someone else's shoes to see things from their perspective.
Let’s say that after interviewing residents at an assisted living facility, you found that many residents suffer from arthritis in their hands. Arthritis causes joint pain, stiffness, and reduces range of motion. Class discussion: How could this knowledge influence the type of door knob you install at your facility? (A round door knob might be difficult for arthritic hands to grasp. A flat door handle would be more comfortable to use because it only requires a pressing down motion instead of a grasping motion.) Even though selecting/designing door knob seems simple, it is a little detail that could make a huge difference
33
for stakeholders.
Besides interviewing and observing, another way that some designers practice empathy is to immerse themselves in the user experience. Here is an example of a designer practicing empathy by using a tool called simulation gloves: https://www.youtube.com/embed/gMFhF6XFP-E
The gloves simulate what it would be like to have a limited range of motion in your hands, such as with arthritis. Trying on these gloves and using them gives a better perspective of what someone experiences when they do not have full functionality in their hands. You can then apply that knowledge to make better decisions, such as in the door knob example. When wearing the gloves, it is easy to understand how a round door knob is much more difficult to use than a flat handle in the case of someone with arthritis.
As mentioned in the video, people tend to design products so they can use it themselves. However, by doing that, you might be excluding others who can’t access the product, especially if they have a particular physical limitation. When you design your therapy game, you aren’t creating it for yourself. The scenarios/personas were provided to help you remember that you are designing for other people, who may not be similar to you.
Can you and should you use design thinking and empathy in the creation of your game and controller? Yes! In the case of this project, the Discovery phase has been mostly completed for you since your problem is already defined. (How might you create a game that helps a patient stay motivated in therapy by using dynamic difficulty balancing?) After problem definition, the next component of the Discovery phase is to gather background information, as explained earlier.
Remember that one way to gather information is to interview the stakeholders that you are designing for. I have already done this for you by creating the scenarios/personas. Additionally, you have knowledge of physical therapy and nervous system injuries from previous lessons. You can also use the video clips you’ve seen as observations, since you aren’t actually going to a therapy facility to observe in person. Remember, reviewing the scenarios and making observations will help you have empathy. This is important because you might not know of someone with a nervous system injury and you might not have ever done therapy before.
34
To continue in the Discovery phase, begin filling out questions 3-11 on Step 2 on your planner handout. Use the scenarios and other resources provided to help make observations.
Next, we will move into Phase 2 and 3 of design thinking: Interpretation and Ideation. You will see an example of how a scenario and persona were used to inspire a therapy game and controller design. Then, you will brainstorm ideas for your game.
Note 1: The information below is optional, but was chosen to make a local connection for the students.
The new development Halcyon that is under construction in nearby Alpharetta has an informational document available to prospective retailers. In that document, it outlines personas for the types of demographic expected at patron the shopping center. This helps retailers decide if their business is a fit for the project. This is another example of how personas are used. They do not represent actual people, but are a concept to help envision the possibilities.
http://www.jllproperty.us/assets/doc/halcyon%20fact%20sheet_8271197.pdf
Note 2: I have taught this unit twice, once employing design thinking and once without. What I observed is that students who learned about design thinking created very unique, thoughtful, and practical solutions. Without design thinking, the students all made very similar games. Without design thinking, I had 4 out of 9 groups make the same product, which was a Dance Dance Revolution style game. This game is something that the students play and you can see how they were designing for themselves and not necessarily for someone else. While the design thinking, personas, and human centered design concepts take time to explain and practice, I found it to be a worthwhile endeavor. Additionally, the students enjoyed learning about design. For more information about design thinking, visit: http://www.designthinkingforeducators.com/
Lesson Day Ten
Standards
Addressed
ITEEA STANDARDS FOR TECHNOLOGY LITERACY:
Standard 8-E
35
Standard 9-F
Key Concepts
Explain the design thinking process as compared to engineering design and the scientific method
Use the Discovery phase of design thinking to begin planning solutions for a therapy game
Give examples of using empathy and human centered design
Daily Assessment Lesson 5 Project Planner Handout, Class discussions
Lesson 5 (2 days): Introducing Design Thinking continued
Students should continue to work on the Lesson 5 Dynamic Therapy Game Planner Handout. If the Lesson 5 PowerPoint was not finished on the previous day, that information can be presented during this time.
Circulate and assist students with the Game Planner. Review their responses and guide conversations if needed. Collect the handout upon completion and return it to the students later on so they can refer to it when creating their therapy game projects.
Lesson Day Eleven
Standards
Addressed
ENGR-STEM 4
ITEEA STANDARDS FOR TECHNOLOGY LITERACY:
Standard 8 –E
Standard 9–G
Key Concepts Apply interpersonal communication and teamwork to the solution of a
36

technological problem.
Use design thinking to interpret discovery information
Use design thinking to prototype solutions
Brainstorm game ideas and use group problem solving to select game concepts
Apply a persona to a broader context
Daily Assessment Class discussions, Lesson 6 Project Planner handout
Lesson 6 (3 days): Interpretation, Ideation, and Experimentation with Design Thinking
Over the next two days, students will learn how to use design thinking to brainstorm ideas for their therapy games. They will need the Lesson 6 Dynamic Therapy Game Planner handout. Students will need at least 6 notecards each. A projector and computer are needed for the PowerPoint. Students should be seated with the groups they have chosen.
The script below corresponds with the Lesson 6 PowerPoint.
Put the PowerPoint on the board and have students record their thoughts to the warm up question on their own paper. Discuss as a class. Continue to read through the script and change the PowerPoint slides as needed.
To start class, have students volunteer answers to the warm up questions: What is design thinking? (A method of approaching a problem and engineer solutions. It uses a human-centered angle to help create innovations that are meaningful and useful.) What happens in the Discovery phase? (Background research on a problem, digging deeper into the issue, gaining empathy for the end user.) What is a persona? (It’s a fictional character that represents potential users of a product.)
Script:
37

Let’s think back to the example of the dynamic therapy game that involved reaching the dog on the screen. The idea for the game and controller did not come out of thin air. Design thinking was used to guide the creation process. A scenario was used to help drive the decision making process, just as it will for your game. The scenario helped make purposeful decisions about the theme, look, and purpose of the game. Using the scenario to make decisions is part of the next phase of design thinking, called Interpretation.
During Interpretation, you synthesize all the information you gathered during Discovery, and use it to create meaning. Think about the scenario that your group picked. What do you know about the persona portrayed? What connections can you make between information in the scenario and the real world?
Here is an example of how the scenario was interpreted and what impact that made on game design. (Allow students time to read the scenario on the board.)
Susan is a 26 year old who is recovering from an accident. She is in a wheelchair and is learning to walk again. Susan needs to practice leaning forward to help her stand.
What do you like about therapy? It’s like working out at a gym and there is a variety of exercise equipment.
What do you dislike about therapy? Sometimes the equipment is intimidating looking and it is not always intuitive. Some exercises can get old if it is repetitive each session.
What motivates you to do your therapy? There is a lot of encouragement. The key for me to is to focus on the long term goals. I feel like I am getting stronger and I am actually getting a real work out, just as if I were in a regular gym.
Describe the setting where you do your therapy: I go to a therapist’s office, and again, it is like a gym. Some of the equipment is modified so it can be used by people in wheelchairs. Some of the equipment is not very modern looking, but it actually is highly engineered.
How has your injury affected your life? I cannot stand up by myself and I cannot stand for long once I get up. I am learning to walk again on my own, but I am very early in my therapy.
What are your interests? I enjoy pop culture. I am a tv buff! I am passionate about helping animals.
38
What kind of games do you like? I like playing golf at Top Golf and I am re-learning how to bowl from a wheelchair.
What are your favorite activities? I like being out and about with my friends and family. I like shopping at outdoor malls and going to restaurants.
What do you think about technology? I am all about it as long as it is intuitive. I am not afraid to try new things.
With that information, what do you know about Susan? What kind of games do you think she would like and why? What would motivate her in a therapy game? What would be a game that Susan could relate to?
Information from Susan’s scenario was compiled into a mind map. Key ideas were centered around her name, and then more words branched off of those ideas, whatever came to mind when those words were mentioned. The mind map helped provide direction for the design.
Take a few minutes to review your scenario. You are going to make a mind map of your persona to pull out key findings that might influence your game design. Pull out key words from the scenario and then keep branching off from those words; jot down whatever the first ideas are that pop in your head. Start by putting the persona’s name in the center of the page. Write down 4-5 main key words that remind you of that persona. Then continue to connect other ideas off of those main words. Connect any words that are
39
related. Take 10 minutes to make the mind map of your persona. (Use the Lesson 6 Dynamic Therapy Game Planner handout).
Your mind map is a useful tool that you can use to help create a meaningful therapy game. Later, you can use the mind map to translate those thoughts into your design in a purposeful way. Here is an example of how the mind map of Susan was used as a guide for design decision making. Remember, when designing, it is important to also consider additional users who might benefit from the game, and not only the persona.
“Susan mentioned that the therapy equipment can be intimidating and strange looking. As such, I made the controller clean and simple. The triangular shape is similar to a foam wedge that is found in many gyms. The idea was to make the controller seem like a piece of sports equipment. To make the controller look modern, it has a clean design. The color orange could be used to evoke a feeling of energy. It is fun looking, but not kiddie. Susan likes Top Golf and that is a good example of a place that is fun for any age, but without having to be kiddie. Top Golf is also a modern and high tech place, so the idea is for the wedge to be the same.
The controller also can be easily stored by folding the two sides down. Then it can be laid flat and easily put away. It is lightweight and portable so it could be moved or used in a variety of locations. This is important because Susan said she likes to be out and about, so it would be useful to have something she could take with her if she goes on a trip. Other users would also benefit from easy storage and portability. Susan said she likes exercises that have variety, and the wedge can be used in many ways, with the wedge lying down or standing upright.
The theme of the game involves petting a dog. This was chosen since Susan likes animals. It works for other users as well, since dogs are very popular, and also some people in wheelchairs might have service dogs that they need to have access to. The idea of petting a dog could be motivating to many users. The setting of the game is in an outdoor, public space, which could evoke a feeling of freedom and normalcy. Going to a movie, as shown in the setting, is a fun way to be out and about with friends and family, for many people, not just Susan.
To maintain motivation in the game, the dog is programmed to show motivational phrases at certain points during the activity. It also challenges the user by having the dog change positions on the screen.”
40

As you can see from the example, your game does not need to be an exact translation of information in the scenario. For example, if the persona likes baseball, you do not need to create a baseball game, however, a sports theme for your game might be appropriate. The information in the scenario is provided simply to help paint a picture of the user so you can have a more empathetic perspective when designing.
Keep your mind map out for the next activity. Now that you have spent time digging deeper into the persona, let’s move into the next phase of design thinking, Ideation. Shortly, you will be asked to think of ideas for concepts for your therapy game. The key to ideation during design thinking is that this classroom is a judgement free zone! Let your imagination run wild! You never know where your ideas can take you, so don’t hold back in fear of what others will think. It is much easier to create with multiple ideas versus no ideas. In the end, your group will share ideas. Maybe your group will vote to use one idea, but more than likely, your final product will be a bouquet of everyone’s ideas! Your contribution will be important, even if it isn’t selected. Use your mind map to help you get ideas, but don’t let it limit you. Simply use it as inspiration to get your mind going.
Place a stack of notecards or sticky notes on each table. (Each student will need at least 6.)
Grab your thinking caps and 3 notecards. When the timer begins, list at least 3 ideas you have for the concept/main idea/theme of the therapy game you will code in Scratch. For example, you could list something like this: A game that involves shooting asteroids by moving your wrist. You have 2 minutes. Use one notecard per idea. No need for complete sentences or specific details. Work silently and independently.
Time the students for 2 minutes. After 2 minutes expire, announce the following:
Surprise! Let’s do this again! You have 2 minutes to come up with at least 3 additional ideas. Use new notecards for each idea.
41
After time expires, announce the following: In just 4 minutes, you have come up with 6 ideas! Combine those ideas with your group, and that is a lot of great ideas! Now comes the fun part! Take turns sharing your ideas with your group. Briefly read your notecards to the group and then allow the next person to share. Keep going until everyone has shared. Remember, all ideas are good ideas! This is a judgement free zone. You have 15 minutes to share. Explain your thoughts in more detail if needed.
After everyone has shared, it’s time to pare down the options. Now, sort the cards. As a group, pick the top 3 cards from each team member. Sort all of the top 3 cards into any of the following categories: the most likely to delight, the rational choice, and the most unexpected. You have 8 minutes. (Move on when time expires). Next, from the cards that were categorized, decide on the top card from each category. You may combine ideas from other cards if desired. You have 5 minutes.
Next, we are going to blur the design thinking lines slightly between Ideation and the next phase, Experimentation. You are going to test your ideas by getting feedback from another group. This is a way to prototype, but you are using ideas instead of physical models. A prototype is like an early draft or concept. Pick another group to trade ideas with. Pick one group to be Group A and the other to be Group B. Have one representative Group A explain the game ideas for each category. After presenting the ideas, have Group B give their thoughts about the pros and cons of each concept. Decide the best route to take for Group A. You have 10 minutes for Group A to present ideas and make a decision based on feedback from Group B. After 10 minutes, have the groups reverse roles so Group B can also make a decision for the best option to pursue.
Congratulations! You have made it through 3 phases of design thinking! Now, continue to further develop your ideas by filling in the Lesson 6 Project Planner handout with your group. Refer back to any previous work you’ve done (Lesson 5 Project Planner, Scenarios, etc.) to help you make decisions. The next phase will be to plan out the pseudocode for the game. We will start that in a few days!
To assist your group with finding examples of therapy exercises, links are provided that show images of real exercises. (You can either provide this electronically so students can easily click on the links, or give them a hard copy. The document is titled Lesson 6 Example Exercises Resources).
Lesson Day Twelve
42

Standards
Addressed
ENGR-STEM 4
ITEEA STANDARDS FOR TECHNOLOGY LITERACY:
Standard 8 –E
Standard 9–G
Key Concepts
Apply interpersonal communication and teamwork to the solution of a technological problem.
Use design thinking to prototype solutions
Brainstorm game ideas and use group problem solving to select game concepts
Daily Assessment Class discussions, Lesson 6 Project Planner handout
Lesson 6 (3 days): Interpretation, Ideation, and Experimentation with Design Thinking continued
Continue working on any part of Lesson 6 that was not completed. Circulate and guide students through conversations about how to implement design thinking and plan their games. This process is tedious, but it will result in better quality projects that can solve real problems. Have students submit any complete handouts for your review and feedback. Check to see that students are providing quality, thoughtful answers with an appropriate level of detail. There are not necessarily right or wrong answers, however, the responses should align with what has been explored in class.
Lesson Day Thirteen
Standards
Addressed
ENGR-STEM 4
ITEEA STANDARDS FOR TECHNOLOGY LITERACY:
Standard 8 –E
43
Standard 9–G
Key Concepts
Apply interpersonal communication and teamwork to the solution of a technological problem.
Use design thinking to prototype solutions
Brainstorm game ideas and use group problem solving to select game concepts
Daily Assessment Class discussions, Lesson 6 Project Planner handout
Lesson 6 (3 days): Interpretation, Ideation, and Experimentation with Design Thinking continued
Continue working on any part of Lesson 6 that was not completed. Circulate and guide students through conversations about how to implement design thinking and plan their games. This process is tedious, but it will result in better quality projects that can solve real problems. Have students submit any complete handouts for your review and feedback. Check to see that students are providing quality, thoughtful answers with an appropriate level of detail. There are not necessarily right or wrong answers, however, the responses should align with what has been explored in class.
Lesson Day Fourteen
Standards
Addressed
IT-IDT-7.5
IT-IDT-1.1
Key ConceptsIdentify and interpret conditional statements
Create a pseudocode flowchart for a dynamic game
Daily Assessment Conditional statement practice handout, Pseudocode handout
Lesson 7 (1 day): Conditional Statements and Pseudocode
Students will review pseudocode and learn more detail about how to use conditional statements. You will need a computer, speakers, and projector. The handouts needed are Lesson 7 Conditionals Practice and Lesson 7 Dynamic Therapy Game Pseudocode.
44

The script below corresponds with the Lesson 7 PowerPoint .
Put the PowerPoint on the board and have students record their thoughts to the warm up question on their own paper. Discuss as a class. Continue to read through the script and change the PowerPoint slides as needed.
Script:
In this unit, you have learned about dynamic games, the nervous system, and design thinking. You are armed with a plethora of knowledge for how to create a well-designed physical therapy game! Today we will focus on coding strategies and planning out the code for your game. After today you will have 10 days to manage your project with your group.
When coding or programming, it is very important to have a plan. What is it called when you informally write out code in preparation for writing a program? (Pseudocode). Remember, pseudocode is important because it helps you stay organized, especially when code gets complicated. It also helps you think about the order of events so the sequencing will work correctly.
Here is an example of pseudocode that you’ve seen before. Before you start coding your game, your group will need to write pseudocode. We will use the pseudocode not only for the game, but for an art project later. Your pseudocode should be visible at all times while you are coding. It is a helpful resource, not just something to complete and forget about.
45

Before you start your pseudocode, let’s talk about the key to making your game dynamic. Remember, a dynamic game is one in which it adapts to the player’s performance. When you make your game dynamic, you will need to use conditional statements. Most programming languages have conditional statements. In Scratch, the conditionals are found in the orange Control block section. Conditional statements are lines of code such as: if-then, if-then-else, etc. The purpose of conditional statements is to provide options for the computer to follow. In a conditional, the command will only be executed if the statement is true, otherwise it doesn’t do the command, or it will move on to the next line of code. Conditional statements require the computer to evaluate if a statement is true or false, and depending on if it is true or false, it will execute a command or move on. Conditional statements can be nested, meaning there could be multiple conditions in a row that the computer needs to evaluate before moving on.
Conditional statements are not just Computer Science concepts! They appear in Geometry and Language Arts as well! Ultimately, conditionals are simply about deciding if something is true and then determining the next step as a result. For example, the phrase “If you do your homework, you will get a good grade, else you won’t” is a conditional statement.
As mentioned, your dynamic game will need conditional statements. The conditionals will allow your game to set thresholds so the game can get easier or harder. For example, in Brittney’s RoboBlaster game, if the player’s accuracy was 50% or higher, then more asteroids appeared, else less asteroids appeared. The use of conditionals allowed the game to make adjustment decisions automatically without Brittney having to adjust the game herself or press any additional buttons.
Here is another example of conditionals. Look at the Conditionals Practice handout, which shows a portion of the code from a game of Rock-Paper-Scissors in Scratch. While this game is not dynamic, it is a good example of how to nest conditionals. In the game, the player competes versus the computer and it works with a Makey Makey. The player picks either rock, paper, or scissors by selecting an arrow key. Then, the computer makes a pick. Look at the code on your handout. Next to each line, explain what is happening. Fill in the first 3 boxes.
Give students 10 minutes to work on the handout. Have a brief class discussion about how the code works. Then have students try to write the last lines of code for a situation in which the player picks
46

paper. Last, show the video to reveal answers and explain the program.
https://vimeo.com/194241575 (Password: Ryko)
Now that you have reviewed pseudocode and conditional statements, it’s time for your group to plan you game! Think about how your game will be dynamic and start creating a pseudocode flowchart by using the Dynamic Therapy Game Pseudocode handout. When your pseudocode has been approved, you may start coding your game!
Circulate and ensure that students are writing pseudocode that is logical and useful. They do not need too many details. The overall operation of the program should be clear and concisely written. Make sure students keep track of the pseudocode handout. They will need it for the rest of the unit.
Have a wrap up the last few minutes of class.
Wrap up: Remember to bring any supplies you need for making your game/controller! You can start building tomorrow if your pseudocode is complete.
Why is the code on the left more efficient than the one on the right?
Why do you think it is important for code to be efficient? (When you have very large programs, the more code there is, the longer it takes a computer to run the program. Practicing eliminating unnecessary code is an important skill for creating efficiency.)
47

Tip: I required all groups to bring in a container with a lid or a box with a lid in which to store their projects. This kept the classroom more organized and prevented projects from getting damaged. The containers should be labeled. I also allowed the students to keep the Makey Makeys in their boxes so they wouldn’t have to disassemble the wiring each day.
Lesson Day Fifteen
Standards
Addressed
ITEEA Standard 11-H MSENGR-II-4: a, b, c MSENGR-II-6: a IT-IDT-9.1, 9.7 VA7PR.3
Key Concepts
Invent a Scratch computer game that is adaptive/dynamic for use by physical therapy patients
Use conditional statements (if/then/else) in computer programming
Use the engineering design process and design thinking to create an interactive computer game, and program a circuit board controller for use in the game
Use principles of art and design to create an aesthetically pleasing game and controller
Daily Assessment Daily work log, Summative project progress
Lesson 8 (10 days): Therapy Game Project Time!
The script below corresponds with the Lesson 8 PowerPoint Put the PowerPoint on the board. Continue to read through the script and change the PowerPoint slides as needed. Students will now have 10 days to work on their physical therapy game projects with their groups. During this time, the groups will program a dynamic game using the Scratch website (scratch.mit.edu) and build a game controller that will connect with the Makey Makey Invention kit. They will get
48

feedback on their projects on days 3, 6, and 9 by giving others an opportunity to test their games and give suggestions for improvement. Please provide students a copy of the Lesson 8 Daily Work Log (which also contains project directions) and the Lesson 8 Dynamic Therapy Games Project Rubric.
A computer and project are needed for the Power Point. Each group will also need computer access and craft supplies for the project.
Script:
The day has finally arrived! It’s project time! You have learned a plethora of information over the past few lessons. The work you have already done should be a great resource to help you with your project. Please refer back to any handouts, PowerPoints, or other materials you need during the project. Be sure to use your pseudocode as you create your Scratch program. During the project, you will apply your knowledge of dynamic games, the nervous system, and conditional statements to create a dynamic game that can be used in physical therapy by someone who has an injury to the nervous system. You will also use the Makey Makey Invention Kit to design the controller or touchpad. The type of game you are designing depends on the scenario you chose. The engineering problem you are solving is how to keep a patient motivated during therapy. Not only should your game keep a player engaged by having it be dynamic, but also by incorporating the arts. The music, graphics, colors, sounds, and theme of your game and controller can also contribute to the success of your solution.
Your project will be shared in an exciting event called a Maker Faire! During the event, our class will invite other students, staff, and community members to learn about the projects and play the games. Your upcoming art projects will also be on display.
A Maker Faire is an event that is described as “part show n’ tell, part Science fair, and part county fair.” They are nationwide events that occur throughout the year. The purpose of a Maker Faire is to celebrate makers (anyone who makes something, which is you) and allow them a space to share their creations. The spirit of the event is meant to inspire others to create, build, invent, etc.
49

You will learn more details about the Maker Faire later, but just be aware that others will have the opportunity to see your projects.
During class, you should be creating your game code and controller. You should also test your project frequently to find areas for improvement. On days 3, 6, and 9, we will take a few minutes to get feedback from other groups, which is a critical component of design thinking. More details about feedback days will be provided on day 3.
When you start your project today, review the group expectations that you set on the Lesson 6 Project Planner. Every member should contribute equally. While this is a team effort, individual contributions will impact grades on an individual basis.
From this point on, when you come to class, you can immediately start working on your project. If there are any announcements, they will be written on the board, so be sure to check the board when you arrive. We will stop the last 5 minutes of class in order to clean up and complete the Lesson 8 Daily Work Log.
On the Lesson 8 Daily Work Log, use bullet points to fill in the boxes. The purpose of the log is to help you with time management and to stay focused. It requires you to record your progress and set goals for the next day so you know what needs to be accomplished. The Daily Work Log also contains the project directions for your convenience.
Last, a copy of the project rubric is provided so you can see how to earn full credit for your work. The project is a summative assessment. (Lesson 8 Dynamic Therapy Game Project Rubric). Are there any questions? Please have fun and work hard! Be safe with materials and ask for help when you have questions.
50
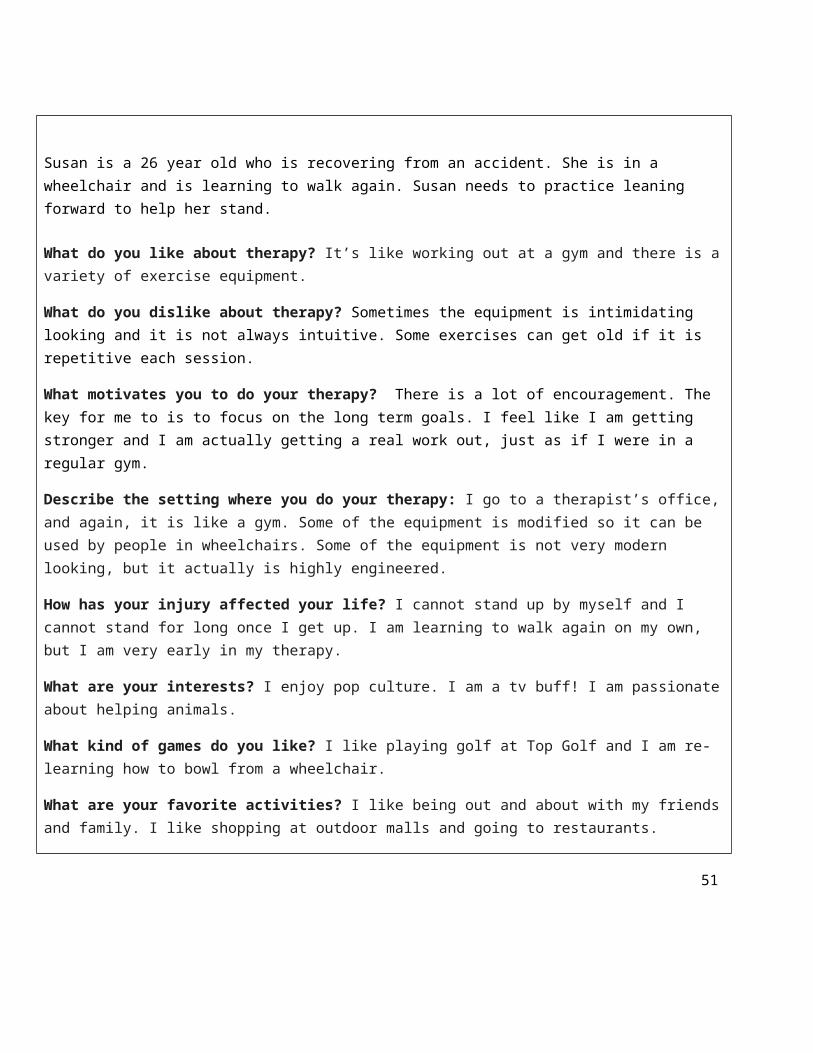
Project tips and details:
● Groups will need to test their games and controllers frequently and make modifications or improvements based on any discoveries made during testing or any feedback received.
● Students will need access to computers during the project.
● Your role is to serve as a facilitator and help students with troubleshooting, encouragement, and focus as needed.
● At the end of each class, allow time for cleaning up and have the students update their daily work log. On the work log, there is a section for a workstation check off, which is a space for you to use to approve the cleanliness of the work area. The purpose of the work log is to document progress and to help the students with time management.
● Students will need a range of craft supplies for the project, such as tape, scissors, coloring supplies, glue, cardboard, paper, hot glue, foil, playdoh, etc. Your school cafeteria may have a supply of cardboard and if possible, you can request that students bring the supplies they need. Otherwise, each group may need 1-2 rolls of tape, 1-2 pairs of scissors, cardboard, paper, and conductive material that interacts with Makey Makey, such as foil or Playdoh. You will also need 1 Makey Makey Invention kit per group. Makey Makeys are typically about $50 and can be bought at many stores online. Sometimes you can get a discount at Barnes and Noble.
● Since class time goes by quickly, I recommend allowing students to begin working immediately upon entering the room. If I have any announcements, I write them on the board. This saves time and prevents anyone from getting off track.
Future Planning Notes:
Upon completion of the unit, the projects should be shared with the school and community. (This will include the therapy games and also the art projects that will be created in Lesson 9). Arrange a time and space for the games and art projects to be on display and invite other classes, school staff, parents, partners in education, etc. to come to a show and tell day, called a Maker Faire. For example, I had my students set up their projects on tables in the Media Center.
51

Maker Faires occur all over the country and are great events for students to attend, if they don’t already do so. Here is more information about Maker Faires: http://makerfaire.com/
The students will certainly have so much to share with their therapy games and art projects. Visitors to your Maker Faire will be blown away by how much your students have learned, what they were able to create, and how their projects can solve real problems. The event is also a great platform to promote STEAM so others can see the impact of combining the arts with STEM. During the Maker Faire, have students set up their games and demonstrate them to the visitors. The visitors should be greeted by a teacher or student and then given a handout with conversation starters to use when viewing the games. During the Maker Faire, students can take turns playing another group’s games, so long as someone from their group is demonstrating their game. The students will need tables to display their games on and computers to plug in their Makey Makeys. They will also need space to display their corresponding art project. Be sure to invite visitors in advance; consider contacting them at this point with the details.
Examples of projects at the Maker Faire.
Lesson Day Sixteen
Standards ITEEA Standard 11-H MSENGR-II-4: a, b, c
52

AddressedMSENGR-II-6: a IT-IDT-9.1, 9.7 VA7PR.3
Key Concepts
Invent a Scratch computer game that is adaptive/dynamic for use by physical therapy patients
Use conditional statements (if/then/else) in computer programming
Use the engineering design process and design thinking to create an interactive computer game, and program a circuit board controller for use in the game
Daily Assessment Daily work log, Summative project progress
Lesson 8 (10 days): Therapy Game Project Time!
Students will now have 9 days to work on their physical therapy game projects with their groups. Circulate and assist as needed.
Confirm arrangements for the Maker Faire event. Send out invitations if you haven’t already done so.
At the end of class, have students fill in their daily work logs.
Lesson Day Seventeen
Standards
Addressed
MSENGR-II-3: e
ITEEA Standard 10: F, H
Key Concepts Students will analyze feedback to make improvements to their games
53
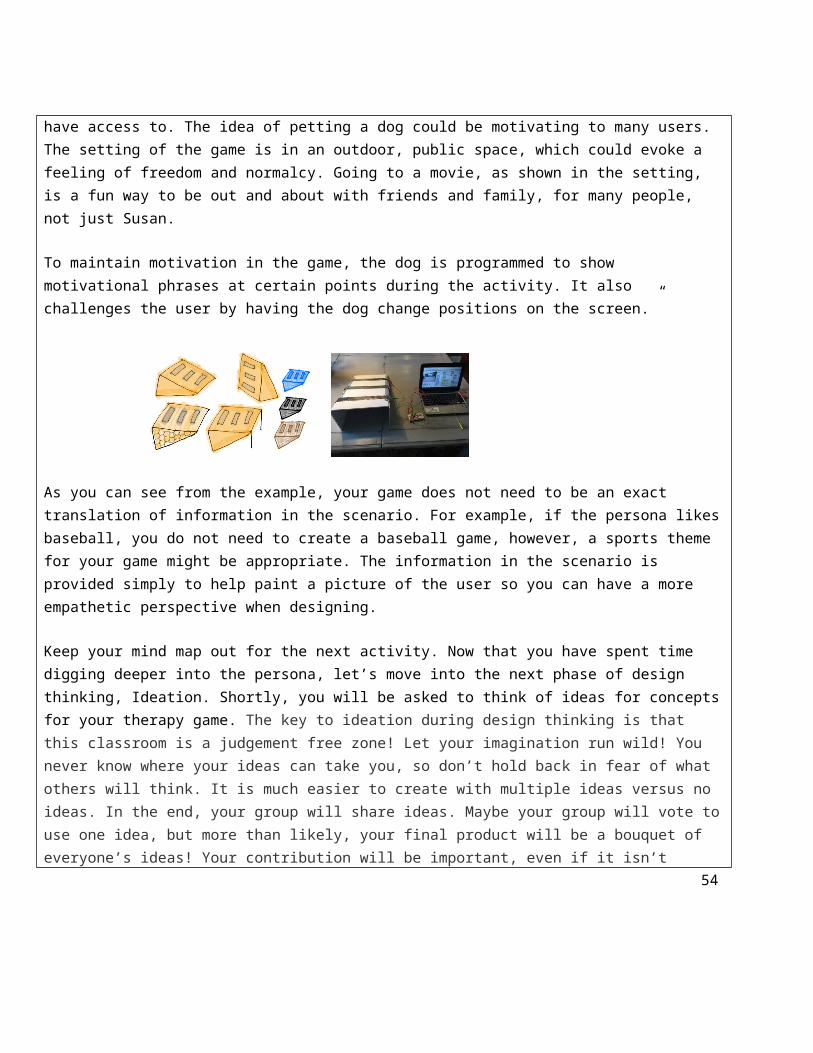
Daily Assessment Daily work log, feedback handout
Lesson 8 (10 days): Therapy Game Project Time!
Students have been working on their therapy projects for 2 days. At some point during class, have each group find 2 volunteers to test their games so far. While many groups will be hesitant to share their games this early, this is a great time to get suggestions about the concept before the project goes too far down the wrong path. Students will use the “I Like, I Wish, I Wonder” feedback format as they did in Lesson 1. Then, the group will analyze the feedback results. The needed handout is the Lesson 8 Feedback Handout. Use the Lesson 8 PowerPoint to help provide instructions (starting on slide 6. During class, circulate and provide assistance as needed. Have students fill out the daily work log at the end of class.
Script:
It’s Day 3 and it’s time to get an early round of feedback! At some point during class, find 2 volunteers to test your game/controller so far. Don’t worry if your project is still very early in the prototyping stage. This is the perfect time to get suggestions before going down the wrong path. Have 2 students try your project and fill in the Lesson 8 Feedback Handout. Then, as a group, analyze the feedback results.
Wrap Up: We have already completed many phases of design thinking. You have already progressed into the next phase by starting your projects. This phase is called Experimentation. During Experimentation, you will use trial and error to get your game functioning. You will also seek feedback and make improvements to your game during this phase. A common rule of engineering is “Fail early and fail often.” The idea is to make mistakes so they can be corrected and improved upon. During Experimentation, don’t worry if your project is not working perfectly. You will have time to fix it or adapt your project. Remember, there is no one correct solution to the engineering problem you are solving. Embrace the process! You can go back to any of the phases of design thinking as needed.
Lesson Day Eighteen
54
Standards
Addressed
ITEEA Standard 11-H MSENGR-II-4: a, b, c MSENGR-II-6: a IT-IDT-9.1, 9.7 VA7PR.3
Key ConceptsUse the engineering design process and design thinking to create an interactive computer game, and program a circuit board controller for use in the game
Daily Assessment Daily work log, Summative project progress
Lesson 8 (10 days): Therapy Game Project Time!
Students will now have 7 days to work on their physical therapy game projects with their groups. Circulate and assist as needed.
At the end of class, have students fill in their daily work logs.
Lesson Day Nineteen
Standards
Addressed
ITEEA Standard 11-H MSENGR-II-4: a, b, c MSENGR-II-6: a IT-IDT-9.1, 9.7 VA7PR.3
Key ConceptsUse the engineering design process and design thinking to create an interactive computer game, and program a circuit board controller for use in the game
Daily Assessment Daily work log, Summative project progress
55

Lesson 8 (10 days): Therapy Game Project Time!
Students will now have 6 days to work on their physical therapy game projects with their groups. Circulate and assist as needed.
At the end of class, have students fill in their daily work logs.
Lesson Day Twenty
Standards
Addressed
MSENGR-II-3: e
ITEEA Standard 10: F, H
Key Concepts Students will analyze feedback to make improvements to their games
Daily Assessment Daily work log, feedback handout
Lesson 8 (10 days): Therapy Game Project Time!
Students have been working on their therapy projects for 6 days. At some point during class, have each group find 2 volunteers to test their games so far. Students will use the “I Like, I Wish, I Wonder” feedback format as they did in Lesson 1. Then, the group will analyze the feedback results. Use the Lesson 8 Feedback Handout. During class, circulate and provide assistance as needed. Have students fill out the daily work log at the end of class.
Lesson Day Twenty-one
Standards
Addressed
ITEEA Standard 11-H
MSENGR-II-4: a, b, c
Key Concepts Use the engineering design process and design thinking to create an interactive computer game, and program a circuit board controller for use in
56
the game
Daily Assessment Daily work log, Summative project progress
Lesson 8 (10 days): Therapy Game Project Time!
Students will now have 4 days to work on their physical therapy game projects with their groups. Circulate and assist as needed.
At the end of class, have students fill in their daily work logs.
Lesson Day Twenty-two
Standards
Addressed
ITEEA Standard 11-H
MSENGR-II-4: a, b, c
Key ConceptsUse the engineering design process and design thinking to create an interactive computer game, and program a circuit board controller for use in the game
Daily Assessment Daily work log, Summative project progress
Lesson 8 (10 days): Therapy Game Project Time!
Students will now have 3 days to work on their physical therapy game projects with their groups. Circulate and assist as needed.
57
At the end of class, have students fill in their daily work logs.
Lesson Day Twenty-three
Standards
Addressed
MSENGR-II-3: e
ITEEA Standard 10: F, H
Key Concepts Students will analyze feedback to make improvements to their games
Daily Assessment Daily work log, feedback handout
Lesson 8 (10 days): Therapy Game Project Time!
Students have been working on their therapy projects for 9 days. Remind them that only 2 days remain to work on the project. At some point during class, have each group find 2 volunteers to test their games. Students will use the “I Like, I Wish, I Wonder” feedback format. Then, the group will analyze the feedback results. Use the Lesson 8 Feedback Handout. During class, circulate and provide assistance as needed. Have students fill out the daily work log at the end of class.
Lesson Day Twenty-four
Standards
Addressed
ITEEA Standard 11-H
MSENGR-II-4: a, b, c
Key ConceptsUse the engineering design process and design thinking to create an interactive computer game, and program a circuit board controller for use in the game
58

Daily Assessment Daily work log, Summative project progress
Lesson 8 (10 days): Therapy Game Project Time!
This is the final day for students to work on their projects. Circulate and assist as needed.
Script:
This is your final day to work on your game! Make any last minute changes.
Tomorrow, we will start a 2 day art project. You will display your art project with your game at the Maker Faire. Remind your families about the event!
During the Maker Faire, you will put your game and controller on a table. You will set it up and as visitors walk by, encourage them to play. As a heads up, visitors will be given a list of questions to help guide you in conversations about your game. Be prepared to tell them about your pseudocode,
how your game works, why it was developed, what specific problem it solves, how it all connects to your art project, etc.
Please check the rubric to ensure that you have fulfilled all of the project requirements at the point (except the art project); you already have a copy of the rubric.
At the end of class, have students fill in their daily work logs.
Lesson Day Twenty-five
Standards
Addressed
VA7CU.1
VA7PR.3
59

VA6C.1
IT-IDT-9.7
Key Concepts
Create a mobile sculpture inspired by pseudocode
Differentiate between implied and actual motion,
Define kinetic art
Understand the artistic contributions of Alexander Calder
Daily Assessment Art project, art questions handout
Lesson 9 (2 days): Making Mobiles!
The students will have 2 days to make a mobile sculpture that is inspired by their pseudocode flowchart. There are many ways to build a mobile, but a sample supply list is below. Use the Lesson 9 PowerPoint to provide the art lesson. You will need a computer and projector. Students will also briefly need computer access to try the online mobile building simulator. The students will need a copy of the Lesson 9 Making Mobiles Review handout.
During class, assist students as needed. Collect the handouts when they are finished! Remind the students about the Maker Faire!
Suggested Materials:
Twisteez wire (2-4 per student)
http://www.dickblick.com/products/twisteez/?clickTracking=true&wmcp=pla&wmcid=items&wmckw=33407-1050&gclid=CMyGqo674NACFVEkgQodiEULOQ
Sequins/poster board/acetate paper
20mm sequins work well
60
http://www.ccartwright.com/sunshop/index.php?l=product_list&c=19
Acetate paper is also an option
http://www.dickblick.com/products/grafix-clear-lay-assorted-colors/
Jump Rings (approximately 15 per student)
http://www.hobbylobby.com/Beads-Jewelry/Jewelry-Findings/Jump-Split-Rings/6mm-Sterling-Plated-Round-Jump-Rings/p/15220
Script:
When you were programming your dynamic therapy game in Scratch, you wrote pseudocode to help you plan out the needed steps. You also created a flowchart to show the sequence of the steps as a visual diagram. That flowchart is similar to the process used when planning out the creation of a mobile sculpture. After learning more about mobiles, you will use your flowchart to create your own mobile sculpture.
Here is an example. The therapy game required the use of conditional statements (If/Then/Else) to make it dynamic. The pseudocode is a decision tree flowchart. That flowchart is reminiscent of the framework of a mobile. The steps used in the Scratch program can then be represented visually in an artistic mobile design that represents in code in a new, creative way.
61

The word mobile in general means to move freely. A mobile sculpture then is a 3-dimensional art form that is able to freely move. Most mobiles are suspended and are moved by air or a push. Mobiles are a type of kinetic art. Kinetic art is a type of art that uses movement to create an effect.
One artist who is famous for redefining sculpture is Alexander Calder. A sculpture is a form of art that is represented in 3-dimensional space. Prior to Calder, most sculptures were static figures made of bronze, marble etc. They were solid pieces with no open space, like statues. Calder truly created a new art form with his mobiles because they moved and also because they were crafted out of industrial materials. Calder’s mobiles were made of a combination of metal, wire, and brightly colored abstract shapes. Many of his mobiles were very large and occupied entire ceilings. (These are called installations because they weren’t designed to move around from location to location as with some art pieces.) Calder also created large installation sculptures that were built from the ground up. The mobile balanced on the top point of the structure instead of being suspended from the ceiling; these are called standing mobiles. Many are so large that they are located outdoors.
Van Vechten, Carl, photographer. "Alexander Calder." July 10, 1947. Creative Americans: Portraits by Carl Van Vechten, 1932-1964, Library of Congress.(Found on Wikipedia on the Alexander Calder page.)
Red Mobile, di en:Alexander Calder. 1956. Lamiera verniciata e bacchette di metallo. Montreal Museum of Fine Arts. Foto di Montrealais. Attribution: Montrealais at the English language Wikipedia
Calder was born in Pennsylvania 1898 and died in 1976. Calder enjoyed making sculptures even as a child and created jewelry and toys regularly. He pursued a degree in Mechanical Engineering. To celebrate what would have been Calder’s 113th birthday, the Google Doodle of the day was an interactive mobile that users could manipulate: http://www.google.com/doodles/alexander-calders-113th-birthday More of his art can be viewed on this site: http://calder.org/
62

Calder’s mobile sculptures are intriguing because they evoke a sense of volume (meaning they physically take up a large space), but they also give a sense of low mass despite the large size (they seem light and airy which allows them to move easily). The mobiles also exhibit balance and movement. In terms of design vocabulary, balance means that the art elements are stable and arranged in a pleasing way. A level mobile is balanced. The movement of the mobile allows for a dynamic viewing experience; the appearance or composition changes as the mobile is pushed. In terms of design vocabulary, movement refers to how something changes place or position.
In art, movement can be either implied or actual motion. If it is implied, the art piece might suggest movement but not actually move. For example, imagine a piece of art showing a boat rowing on the water. The painter can create lines on the water that make it appear to have a ripple effect. While the boat is not actually moving since it is a painting, the ripples suggest implied motion. In the case of a mobile, it has actual motion.
Watch these clip of Calder’s mobiles to see the movement:
https://www.youtube.com/watch?v=fI5PRaTSMUI
https://www.youtube.com/watch?v=uyIgGb8SgrE
A mobile uses a principle of science called equilibrium. In the sculptures, each component must balance the other so that the structure doesn’t collapse or lean too heavily toward one side. (Additionally, the pieces do not touch each other as they all spin freely and independently.) Imagine a seesaw. If two children are on opposite sides of the seesaw and they have equal weight, the seesaw stays perfectly horizontal. If both children sit on the same side of the seesaw, it will hit the ground on that side. This describes balance and the scenario applies to a mobile as well. Like a seesaw, a mobile has a fulcrum. A fulcrum is the center point on which something balances. The fulcrum is the triangle in the image below.
63
First Class Lever, 1 December 2005, ChongDae CC-BY-SA-3.0-migrated
Use a pencil to create a model. Place a pencil on the tip of your finger and adjust the position of it until it balances. The part of the pencil where it balances on the fulcrum (your finger tip) is called the center of balance. When you make your mobile, finding the center of balance with your fingertip is an easy way to check your work as you go.
Before you start making a sculpture, first try building one using this interactive. What variables can you manipulate to create equilibrium? http://www.nga.gov/kids/interactive/mobile.htm
When Calder created large scale mobiles, he started by making smaller versions first, called maquettes. Typically, he started his mobiles by sketching them on paper and then using a grid to help accurately enlarge the designs. He would make the small scale version and after trial and error to get the equilibrium correct, he would then fabricate the full size sculpture. You will create your mobile using a similar process.
64
To make your mobile, your sketch is partially completed for you. Use the pseudocode flowchart to inspire the arrangement of the mobile and the path that each wire will take. Next, sketch a draft. Then, gather the materials. You might want to build your mobile starting from the bottom, working your way to the top. Be sure to test the equilibrium frequently.
For materials, you will use Twisteez wires, jump rings, and sequins. Select the quantity and color of wires needed. Look at your diagram to decide how many jump rings you need. Each jump ring will attach top and bottom to the sequin element surrounding it. Next, select the sequins you want to use. The sequins already have one set of holes punched in them, which will easily fit the jump rings. If you need additional holes, use a push pin to make a small hole. Be careful not to rip the material. If you do not want to use sequins, you can cut out shapes using paper/cardboard/acetate and attach them instead. You could also consider building 3-D objects to hang from your mobile, perhaps by using cardboard, paper, toothpicks, straws, etc. Start by bending the wire and adding sequins for one part of the mobile. Then add another section and try to make it balance. Continue until you have all of your components.
Remember, a mobile is an example of kinetic art. Similarly, your therapy game was kinetic in nature. It was designed to help someone who is working to regain mobility by getting the player to move actively. The mobile creates motion as does your game. Mobiles are also very dynamic, just like the games. To tie it all together, your mobile is inspired by the code you used to create the game.
Making the mobile balance and spin is the fun part! See how creative you can get! When you are finished, fill out the review handout (Lesson 9 Making Mobiles handout). You have 2 days to make your mobile. You will display your sculpture at the Maker Faire, so be sure to have your pseudocode handy to be able to explain the inspiration for the design.
Lesson Day Twenty-six
Standards
Addressed
VA7CU.1
VA7PR.3
VA6C.1
65
IT-IDT-9.7
Key Concepts
Create a mobile sculpture inspired by pseudocode
Differentiate between implied and actual motion,
Define kinetic art
Understand the artistic contributions of Alexander Calder
Daily Assessment Art project, art questions handout
Lesson 9 (2 days): Making Mobiles!
The students should complete the lesson from yesterday by filling in the handout and making the mobiles (Lesson 9 Making Mobiles).
During class, assist students as needed. Collect the handouts when they are finished! Remind the students about the Maker Faire!
Lesson Day Twenty-seven
Standards
Addressed
MSENGR-II-4: f
IT-IDT-1 1.1
Key Concepts Summarize the project by demonstrating the games and explaining the art
66
piece
Communicate lessons learned in the project
Daily Assessment Daily work log, feedback handout
Lesson 10 (1 day): Maker Faire
Today is show and tell at the Maker Faire! Have a great time watching the students display their projects! Make sure that students have computers/laptops so they can plug in their projects. You might need access to outlets or power strips. You will need copies of the Lesson 10 Maker Faire Questionnaire handout for guests.
When students arrive, have them set up their projects (games, controllers, art sculptures). Remind them that they should be available to demonstrate their projects and allow others to play their games. Students can take turns taking a lap around the Maker Faire, however, someone should be demonstrating their project at all times. Their pseudocode should be easily accessible.
When guests arrive, greet them at the door and provide them the Maker Faire Questionnaire handout. The handout contains a list of suggested questions/talking points to use as projects are visited. At the end, ask guests to leave feedback for the students and the event overall. Consider taking pictures or videos to send out to families who can’t attend the event.
At the end of the event, have students store their projects. They will be disassembled the next day. Enjoy!
67
Lesson Day Twenty-eight
Standards
AddressedMSENGR-II-4:f
Key Concepts
Reflect on the unit
Write about suggestions for project improvements
Describe the role of art in engineering and computer science
Daily Assessment Reflection
Lesson 11 (1 day): Wrap up and Reflection
Today is a day to celebrate the conclusion of the project, clean up, and reflect. Please read the script below and follow the Lesson 11 PowerPoint. Students will need a piece of paper and you will need a computer and projector.
Script:
Wow! What an adventure! Congratulations on an incredible unit with creative and innovative projects.
68
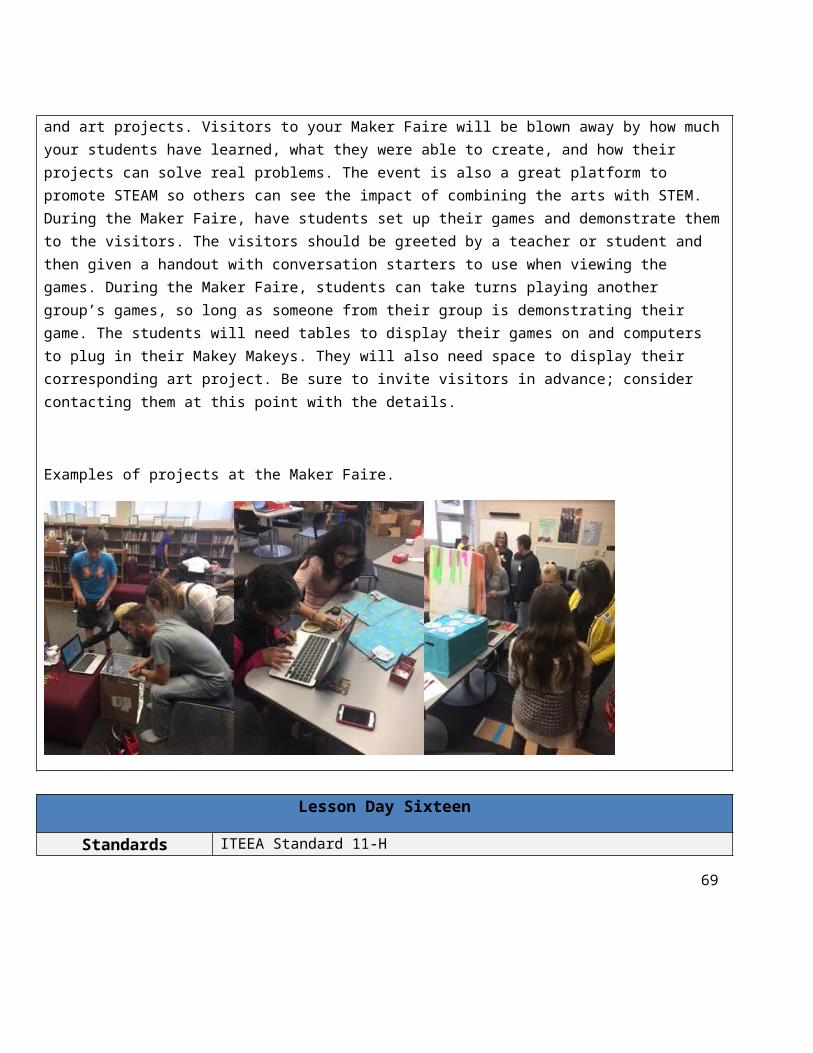
Today we are going to wrap up, reflect and clean up.
(Share any feedback received from the Maker Faire Questionnaires and provide your own observations and insights).
During the process of creating your game, you followed the design thinking model. You Discovered, Interpreted, Ideated, and Experimented. Now, let’s learn about the last phased, Evolution. During Evolution, you take what you’ve learned during Experimentation and apply it to make something new. If you made any changes to your project based on feedback (which you all should have), then you were in the Evolution stage. Another part of this phase is reflecting. On a piece of paper, let’s do some reflecting.
Please, consider the following:
What did you think about the therapy game project? What did you like and dislike?
What have you learned during this unit? (Think back even to the beginning when we had lessons on dynamic games, the nervous system, etc.)
How would you continue to change your game? If you had more time, what would you add or take away?
How could this unit be improved for future classes?
What is the role of art in engineering?
How is computer science creative?
After your reflection is complete, please disassemble your project. Thanks for a great experience!
69