scratch live single scs.3d preset - stanton dj
TRANSCRIPT
Scratch LIVE™ Single SCS.3d Preset
Legal Fun StuffWindows XP is a registered trademark of Microsoft Corporation in the United States and other countriesMac OSX is a registered trademark of Apple Inc.Scratch LIVE™ is a registered trademark of Serato Audio ResearchSerato™ is a registered trademark of Serato Audio Research
Important note about compatibility: SCS.3d lives and breathes through DaRouter™ and presets. With the opportunity of presets beingedited and possibly broken, Serato™ makes no warranties regarding the implementation or use of DaRouter with Scratch LIVE™. The ScratchLIVE preset is maintained by Stanton and all customer support questions related to DaRouter and or Stanton preset for Scratch LIVE shouldbe addressed to Stanton, not Serato via [email protected].
VitalsPhysical Units Used: 1 SCS.3dVirtual Decks: 2 Scratch LIVE DecksFirmware: V1.00DaRouter Version: V1.00 and upSoftware Required: Serato Scratch Live™ 1.8.2 (earlier versions do not properly support MIDI input) http://www.scratchlive.net/downloads/Other Files Required: SCS.3d V1.00.XML - This is the MIDI map that Serato will use to communicate with DaRouter
Change Log:Version 1.0.0 - Initial release
GlossaryDaRouter - Stanton middleware application which runs presets for specific DJ programs with MIDI implementation.Middleware - The function of serving as a translating / processing layer between the application and hardware. The middleware connects toSCS.3d via standard MIDI, then intercepts and processes its signal and sends it back out to either the hardware or application via a virtualMIDI driver.MIDI - MIDI is the low level communication protocol that most control surfaces utilize to send messages regarding note presses, controlchanges and other actions.Preset - A preset is what runs inside of DaRouter to determine how messages get processed in the middleware. A preset will contain differenttranslators which are essentially like formulas. A message will come into DaRouter and be translated / modified and sent back out of DaRouterbased on the rules of the preset.LED - Light emitting diode. Essentially this is a technical term for a small light source. SCS.3d uses multiple colors of LED’s such as red, blueand on some buttons a combination of red and blue (purple).Virtual MIDI - Virtual MIDI, or a Virtual MIDI port is essentially a part of DaRouter that emulates (creates a simulated) MIDI device thatcommunicates directly with the application. This port acts as a buffer between the SCS.3d(s) and the application controlling the flow ofmessages through the middleware.Relative Mode - Relative mode is a function of how Scratch LIVE will track record movements. When using Scratch LIVE with the SCS.3dthe decks inside of Scratch LIVE must always be set to relative for cue points, looping, and instant doubles to work.Strobing / Phasing - This is a DJ technique of taking two of the same songs and playing one slightly in beat behind the other, almost likean echo effect.
Introduction

Scratch LIVE is a very robust and focused DJ application, designed for integration with existing turntable and mixer setups. Scratch LIVE hassince added functionality for cue points, looping, browsing and some transport control since the first versions. The SCS.3d was designed as anall purpose MIDI controller trying to encompass different actions found in DJing such as triggers, scrolling, or adjusting levels. In developmentof SCS.3d, Serato released MIDI input to allow any controller to have access to some of the internal Scratch LIVE functions, thus the ScratchLIVE DaRouter preset was born.
SCS.3d works with ScratchLIVE by utilizing DaRouter, Stanton’s free middleware application running the Scratch Live preset. This means thatDaRouter uses Scratch LIVE’s standard MIDI input and sets the proper MIDI messages through Scratch LIVE’s XML midi maps. NOTE:Serato does not manage support for DaRouter or SCS.3d, only MIDI input support.
The dual deck Scratch LIVE preset was designed to allow advance control over Scratch LIVE when using timecode vinyl. The main goals ofthe preset were to create unique and easy to use interfaces towards basic transport control, looping, triggering and most importantly browsing.Scratch LIVE is a very powerful and reliable program to begin with, the philosophy of this preset is not to replace the vinyl but rather add towhat can be done with two turntables and a regular mixer.
Installation InstructionsTo install the SCS.3d with Serato Scratch LIVE, you will need to copy an .XML file with all the MIDI commands tailored towards the SSLDaRouter preset into the ScratchLIVE directory. Once that is done, Scratch LIVE will display the option for you to use these commands in thesetup dialog. After this is complete all that needs to be done is plug in the SCS.3d, start DaRouter, load the SSL preset and start ScratchLIVE.
1) Check to see if Scratch LIVE currently has a MIDI folder created. Browse for your Scratch LIVE folder using Windows Explorer (onWindows, of course) or Finder (on Mac OSX). The Scratch LIVE folder will be in the following locations by default: Windows Location: \My Documents\My Music\ScratchLIVE\MIDI\ Mac Location: \Music\ScratchLIVE\MIDI\
2) If the folder does not exist simply create a new folder at the \ScratchLIVE directory location specified above called “MIDI”. In Windows, rightclick in the ScratchLIVE folder and select “New” then “Folder” and name the folder “MIDI”. In Mac OSX, while in the \ScratchLIVE directory,click “File” then “New Folder” and name the folder “MIDI”
Creating new folder in Windows XP Creating new folder in Mac OSX
3) Next, copy and paste the “SSL SCS.3d V1.00.xml” file into your Scratch LIVE MIDI directory. The XML file is found in the preset directorythat install with DaRouter, on Windows this is located in “\Documents and Settings\All Users\Application Data\Stanton DaRouter\ScratchLIVEPresets\SSL SCS.3d V1.00.xml”. To make things easier, we've also put a shortcut to this directory in your program folder on the Start menu.Go to Start>Programs>Stanton>DaRouter>Presets.
On the Mac it is located in “\home\Stanton DaRouter\ScratchLIVE Presets\SSL SCS.3d V1.00.xml”. After finding the XML file, select it and copy(Windows: CTRL+C, Mac: Command+C) it. Then browse back to your \ScratchLIVE folder (location defined in step 1) and paste the XML there(Windows: CTRL+V, Mac: Command+V).

Proper directory placement of XML file in Windows XP
Proper directory placement of XML file in Mac OSX
4) Connect DaScratch®, observe that it powers up and performs the power on light test by flashing every LED on the unit. If the unit only lightsthe bottom 4 buttons as purple, than the unit has detected there is not adequate power to perform reliably. If this is the case, please check theStanton website for troubleshooting tips. The easiest fix for this is to try another USB port (not all ports give equal power) or plug the unit into apowered USB hub. If neither of these solutions resolve the issue, contact Stanton support.
5) Start DaRouter and select “SSL Single SCS.3d V1.00” preset from the drop down preset list. Confirm that the unit is connected and displaysa light show and that Deck 1 in DaRouter is illuminated in blue. A light show on the unit will flash LEDs around the center circular section toindicate that DaRouter has made a connection to the SCS.3d successfully and is now waiting to confirm the MIDI messages from the unit areproperly making it DaRouter. To confirm MIDI messages are making it to DaRouter simply press any button on the SCS.3d and the light showshould stop and default preset settings should load. If the unit does not light up in DaRouter or a light show on the unit is not seen, pleasecheck the Stanton website for troubleshooting information.

Proper DaRouter configuration, preset selected andunits are lit blue to indicate connection Preset selected, but no units detected
6) Start the Scratch Live applicationIMPORTANT: Scratch LIVE does not allow for discreet opening and closing of MIDI ports (it simply opens ALL midi ports), you mustALWAYS start DaRouter before starting Scratch LIVE in Windows… otherwise Scratch LIVE opens SCS.3d’s physical MIDI port and does notallow DaRouter to connect to it, thus notranslating can happen. On the Mac, DaRouter can be started before or after Scratch LIVE is launched.
7) Once Scratch LIVE is open, click SETUP then select the MIDI tab. Select “SSL SCS.3d V1.00” (this is the .XML file that we placed in theMIDI folder) and activate it by using the “load” button. Well, that’s it folks, your done!
8) Optional: Most users prefer this setup for vinyl control, although all these settings are optional. The below text describes functionality withthis setup (mainly manual loop mode).

9) Optional: Have a glass of wine, perhaps a beer*! That’s it, you’re done! Let’s get into the preset functionality while you sip your favorite drinkof choice.
*Stanton assumes no liability for drinking while DJing.
Using DaRouter after installationAfter following the above steps you will be able to start ScratchLIVE with SCS.3d every time by simply:
1) Plugging in the SCS.3d
2) Starting DaRouter application
3) Confirming the correct preset is loaded by default and a light show is observed on the SCS.3d
4) Touching any button on SCS.3d to confirm feedback from the unit
5) Starting ScratchLIVE
Preset FunctionalityThe single deck preset emulates 2 physical SCS.3d's by use of the deck button. While some users will prefer having 2 discreet controllers, onefor each deck, we at Stanton felt it important to allow the option for both. The goal of DVS systems is to eliminate carrying stuff around afterall! However if you find that you like having access to both decks and are comfortable with the SCS.3d, you can always buy a second unit andget discreet control.
On top of being able to switch decks to control 2 virtual decks within Scratch LIVE, there is also mode switching which allows differentfunctions within Scratch LIVE to be controlled. This allows a wide array of controls to be accessed, without having to discreetly map eachcontrol to a button thus reducing the size of the unit. The center section of DaScratch switches its function based on which mode is selected.Certain buttons never change their function and are referred to "Global Controls". StanTouch® technology allows the center section to changefrom sliders, to buttons to even a scrub wheel.
Slider Mode - Slider mode gives the user 3 variable controls (like faders) that can be used by sliding your finger up anddown the areas next to the 3 LED meter bars. This mode can be used for controlling many parameters at once, like an EQ.A slider may be changed by dragging a finger across the surface, or you can place your finger in an absolute position on theslider and its position will jump immediately to that point. Two fingers may be used to trigger from one position to the next.For instance, holding one finger on the bottom of the slider and tapping the top with a second finger will make the slidergenerate the higher value for as long as that finger remains on the surface. Once the second (upper) finger is removed, theslider will generate the value indicated by the first finger position. We refer to this as a “finger jump”. This type of parametermanipulation is almost impossible to achieve with a conventional fader, one of the many advantages of StanTouchtechnology.

Circle Mode - In Circle mode, there is one slider at the center of the circle, and circular slider going around the perimeterof the touch surface. Just like in Slider mode, finger jumps are possible can be performed to quickly change the parameter inreal time. This is the mode most likely to be used to emulate the platter of a deck. Circle mode is also the default mode ofDaScratch. That is to say that if you plug DaScratch into your computer without using the DaRouter software, it will operate inCircle mode. But keep in mind that without DaRouter, the Mode Selector buttons (VINYL, LOOP, etc) will only send note dataand will not change the operation of DaScratch.
Button Mode - In Button mode, the zones highlighted in the diagram will act as triggers to control buttons in the targetapplication. For example, these functions could be assigned to alter loop lengths, jump to cue points, or start clips playing.Multiple buttons may be pressed at the same time in Button mode. Also, you will find some presets use a modified version ofButton mode that makes the trigger areas bigger by combining 2 or more button zones.
StanTouch® - In every mode of operation, you’ll find that the touch sensitive areas on DaScratch will respond to multiplesimultaneous touches. This is part of its core functionality, and indeed many cool behaviors and gestures can be developedaround this capability. StanTouch was exclusively developed by an engineer named Stan.
Mode SwitcherAll of these modes are assessable via the mode switcher which is on the top of the unit. When each mode is activated the center section and4 buttons around the center change their function based upon the mode. Here are all the modes used in this preset:
FX - Controls deck gain and master volume
EQ - Controls deck transport when in internal mode
LOOP - Controls looping (duh). The loop mode actually contains two sub modes, one for auto loopand one for manual loop controls
TRIG - Controls cue points
VINYL - Browsing
DECK - Switches decks and also allows for quick deck loads when held
The top two sliders and bottom 4 buttons do not switch their functionality no matter which mode is selected, they are “global”, and we will coverthat next.
Global ControlsGlobal controls are controls whose function doesn’t change when the mode is changed. So, for instance, no matter what mode you’re in(VINYL, FX, EQ, etc) the GAIN slider (S1) will always control the deck vinyl controls. Below is a list of the global controls.
How to use it:
S1 - Slider 1 is split into two half’s (upper and lower). The upper half switches the vinyl control intorelative mode. The lower half switches the deck into internal mode. The lower half is useful forquickly placing the deck into internal mode to for instance lift the needle once it reaches the end ofthe track and bring it back to the beginning without interrupting playback. Other useful cases includeplacing the deck into internal mode and stopping playback (either through pressing the cue button orusing EQ mode) and playing triggers like a traditional sampler
S2 - Slider 2 turns on key lock for active deck.
DECK - Switches deck focus by tapping. This will switch between deck Aand B and is confirmed bythe A and B indicators on the top of the unit and bya quick light show. Holding DECK will activatethe deck mode which ishighlighted below.

PLAY button - Sets a temporary cue point. This cue point is not savedwith the track but is veryuseful for mixing much like on a CD player. It isgood practice to learn to always place a temp cuepoint at the position thatyou are going to mix from.
CUE button- The CUE button will instantly start playback from thetemporary cue point. This is veryuseful when mixing to eliminate the need fora backspin when dropping into a mix. This can even beused for beat jugglingtype effects. When the deck is placed into internal mode, pressing thecuepoint will only play forward from the temp cue point for as long as the cuebutton is pressed. Thiscan be used as an effect however is important to watchthe internal/relative switcher on screen as ifyou reach the end of thetimecode on the record, pressing the cue point will stop playback. Ifthishappens on accident the easiest way to resolve the issue is to continue to holdthe cue button, liftthe needle to the beginning of the timecode vinyl andswitching back into relative mode by using S1.Another alternative is to enterEQ mode and manually start playback in internal mode.
SYNC button- This is mapped to censor feature which will reverse thesong momentarily whileletting the music play forward in memory. In this wayyou can reverse through certain curse words ina song. Of course this buttoncan also be used as an effect as well.
TAP button- The tap button is mapped to instant doubles. By pressingthis button the active playingsong will be instantly loaded to the oppositedeck. By using the instant double feature multipleeffects can be achieved suchas preparing for beat juggling or phasing / strobing. One of the mostusefulfeatures of instant doubles is for hiphop DJ’s who are not ambidextrous, yeswe all cant be DjCraze. By using instant doubles you can cue and drop into amix on one deck and then use theinstant double feature to throw the song tothe opposite deck. In this way your “record hand” canalways be placed on onedeck. If you are ambidextrous… I’m jealous.
How to freak it:
- Use the CUE button to do quick drops, by grabbing the vinyl you can simulate more of the “warbly”sound of beat juggling.
- Do a motor off on the turntable allowing the song to wind down. Hit CUE as the same time as start/ stop on the turntable and resume playback.
- Tap between PLAY and CUE as a track plays for a strobing effect.
- Use SYNC and CUE for quick rephrases, hit CUE, let one beat play, hit SYNC and hold for onebeat then hit CUE again.
- Use TAP to setup strobing by grabbing one side of the record and delaying it from the other.
- Do one turntable beat juggling, hit CUE on Deck 1, hit SYNC to throw it to Deck 2, crossfade toDeck 2, hit CUE to bring deck 1 back to the down beat then scratch in the drop and crossfade backto deck 1. Rinse and repeat.
- Use the deck not being played and bang all 4 buttons looking like you are drumming the beat,even though you are doing nothing… no seriously, don’t do this!
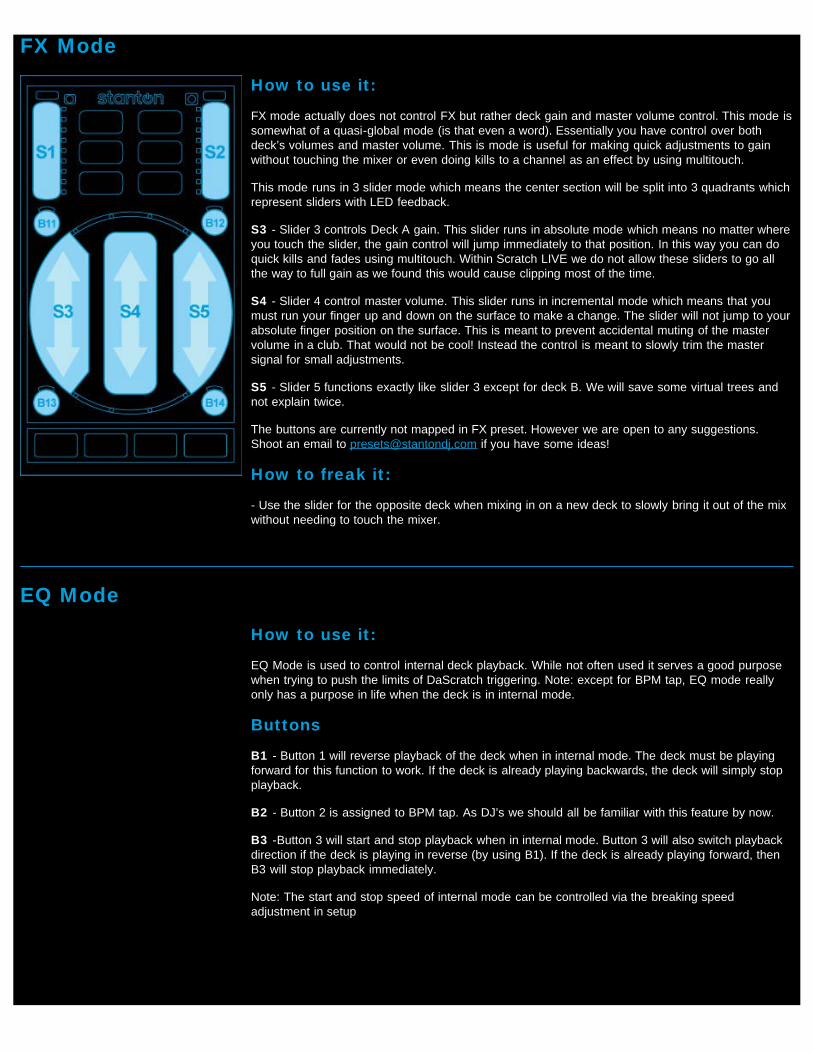
FX Mode
How to use it:
FX mode actually does not control FX but rather deck gain and master volume control. This mode issomewhat of a quasi-global mode (is that even a word). Essentially you have control over bothdeck’s volumes and master volume. This is mode is useful for making quick adjustments to gainwithout touching the mixer or even doing kills to a channel as an effect by using multitouch.
This mode runs in 3 slider mode which means the center section will be split into 3 quadrants whichrepresent sliders with LED feedback.
S3 - Slider 3 controls Deck A gain. This slider runs in absolute mode which means no matter whereyou touch the slider, the gain control will jump immediately to that position. In this way you can doquick kills and fades using multitouch. Within Scratch LIVE we do not allow these sliders to go allthe way to full gain as we found this would cause clipping most of the time.
S4 - Slider 4 control master volume. This slider runs in incremental mode which means that youmust run your finger up and down on the surface to make a change. The slider will not jump to yourabsolute finger position on the surface. This is meant to prevent accidental muting of the mastervolume in a club. That would not be cool! Instead the control is meant to slowly trim the mastersignal for small adjustments.
S5 - Slider 5 functions exactly like slider 3 except for deck B. We will save some virtual trees andnot explain twice.
The buttons are currently not mapped in FX preset. However we are open to any suggestions.Shoot an email to [email protected] if you have some ideas!
How to freak it:
- Use the slider for the opposite deck when mixing in on a new deck to slowly bring it out of the mixwithout needing to touch the mixer.
EQ Mode
How to use it:
EQ Mode is used to control internal deck playback. While not often used it serves a good purposewhen trying to push the limits of DaScratch triggering. Note: except for BPM tap, EQ mode reallyonly has a purpose in life when the deck is in internal mode.
Buttons
B1 - Button 1 will reverse playback of the deck when in internal mode. The deck must be playingforward for this function to work. If the deck is already playing backwards, the deck will simply stopplayback.
B2 - Button 2 is assigned to BPM tap. As DJ’s we should all be familiar with this feature by now.
B3 -Button 3 will start and stop playback when in internal mode. Button 3 will also switch playbackdirection if the deck is playing in reverse (by using B1). If the deck is already playing forward, thenB3 will stop playback immediately.
Note: The start and stop speed of internal mode can be controlled via the breaking speedadjustment in setup

How to freak it:
- EQ mode is really useful for instance when performing drum patterns in TRIG mode. For instance,try switching the deck into internal mode (by using S1) then stopping playback by using B3 (in EQmode), switching to trigger mode and tapping out a pattern on the pads. On the last part of thepattern, continue to hold the pad so the music continues. While holding the pad switch to EQ modeand press B3. The music will then continue to play and relative mode playback can be resumed bypressing the top part of S1.
- Toggle back and forth between forwards and backwards for quick reverse effects (kind of anotherversion of censor). Hrmm, maybe we should just make that happen in the preset anyways. Meh, V2.
LOOP MODE - Auto Loop (Red)Auto loop and manual loop mode are selected by pressing the loop button. However you may also toggle between the modes by pressing theLOOP button. For instance when you first press the LOOP button on preset load, AUTO LOOP will be selected and the LOOP button willindicate as RED. Pressing the LOOP button again will switch into MANUAL LOOP mode and the LOOP button will be illuminated in purple. Ifyou switch to another mode and then back into LOOP, DaRouter will remember which was your last loaded mode (this works across decks aswell) Pretty tricky, eh?
Also it is very important to remember that you MUST have your song analyzed before AUTO loop will work. If you do not have your songsanalyzed then you are setting yourself up for a world of disappointment.
How to use it:
Auto LOOP mode is by far one of the coolest modes in SCS.3d / Scratch LIVE. It was designed toallow easy access to looping on the fly. Scratch LIVE really nailed this implementation.
The looping mode is setup to cater towards both shorter loops (for more hiphop orientated mixing)and longer loops for (for electronic music). The two length modes can be switched in two differentways and the loop length setting is remembered through mode switching in DaRouter (damn thatDaRouter is snazzy).

B12 - Button 12 switches between short (1/4, ½, 1, 2 and 4 beats) and long (1, 4, 8, 16, 32)lengths. Pressing the button will toggle which length mode you are in. The length modes affectbuttons 1-5 and which length they set, although button 5 ALWAYS sets a 4 beat loop (it’s kind of thehappy medium between short and long loop). When in short loop mode B12’s indicator willilluminate as blue, when in long loop mode B12’s indicator will illuminate as red.
B13 - B14 - Button 13 and Button 14 will temporarily change from either short to long loop lengthsor long to short loop lengths. This is good in situations where you might want to jump from a reallylong loop setting (say 8 beats) to a really short length for a stutter mix out. The idea with thesebuttons is that they can be accessed from either the left or right (here we go with that ambidextrousstuff again). And second to that, typically we think that a DJ will rather work in one mode primarilyand only want to quickly toggle into the other mode for a quick change.
B11 - Button 11 will save a loop so it can be recalled later, it will show up as a numbered loop oncebeing saved.
B4 - Button 4 is always assigned to 4 beats (1 bar typically). Pressing once will create a loop,pressing again will exit the loop.
B1 - Will set a ½ beat loop in short mode and a 8 beat loop in long mode.
B2 - Will set a 2 beat loop in short mode and a 32 beat loop in long mode.
B3 - Will set ¼ beat loop in short mode and a 1 beat loop in long mode.
B4 - Will set a 1 beat loop in short mode and a 16 beat loop in long mode.
How to freak it:
- Use small lengths and tap in and out loops for quick stutters.
- Use long lengths and the temp change buttons to drop down to a small length
- Take a long loop and trim it down one step at a time.
LOOP MODE - Manual Loop (Purple)Manual loop mode is a sub preset of LOOP mode, which accessed by pressing the LOOP button once the loop preset has been activated.
How to use it:
Manual loop is used to set a loop by using an in and out point. This is useful for if you do not haveyour songs analyzed or simply would rather have more control over your loops.
Buttons
B11 - Button 11 allows you to save and lock a loop to the loop memory in Scratch LIVE for lateruse. On first press the loop will be saved on second press the loop will be locked. If the loop isalready locked pressing B11 will unlock it.
B12 - Button 12 will delete a loop from the loop memory in Scratch LIVE as long as it is unlocked.
B13 - Button 13 will select the previous loop in memory

B14 - Button 14 will select the next loop in memory (if one is saved).
B1 & B2 - Will set the IN point for a loop, or the point in which a loop will start.
B3 & B4 - Will set the OUT point for a loop.
B5 - Will engage and disengage (if active) a loop. Use this to exit a loop if it is already created orre-enter a loop.
How to freak it:
- Use the adjust loop with vinyl setting (found in the beginning of this document and in the setupmenu of Scratch LIVE). To do quick loop trim effects. Set an IN and OUT point then press OUTagain and move the point closer to the IN point to trim the sound.
TRIGGER Mode
How to use it:
TRIGGER mode allows the 5 cue points in Scratch LIVE to be created and used in real time. Cuepoints can be set in 3 different ways: one cue point capture, momentary capture and arm capture.Each mode is useful for different situations when DJing. For instance B12 is useful when you wantto capture a bunch of cue points at one, B11 is good for just grabbing one (like the start of a break)and B13 / B14 are good for on the fly corrections and captures.
Buttons
B1 thru B5 - Give you direct access to cues 1-5.
B11 - Button 11 allows a single cue point to be set by arming the cue point capture mode. Whenpressing B11 the LED above the button will blink red to indicate that a cue point can be captured bypressing any of the pads (B1, B2, B3, B4, or B5) once pressing one of the pads the cue point willbe stored and can be instantly used. This function is useful for instance when a break is coming upand you want to capture the down beat and immediately use it.
B12 - Pressing B12 will place the unit in arm mode. When armed any of the pads may be pressedto create a cue point and the pads may be continuously pressed to create cue points until B12 ispressed again. This is good when wanting to capture multiple cue points at once or before a setwhen trying meticulously capture a sequence of points. When B12 is pressed the LED above it willturn red, when pressed again it return to blue and the newly created cue points can be triggered.
B13 & B14 - These two buttons can be used to quickly capture cue points by pressing and holdingB13 and B14. When pressing the buttons the LED’s above the buttons will turn red and any of thepads (B1, B2, B3, B4, B5) can be pressed to create a cue point. Cue points will only be createdwhile the button is being held and the associated LED is red.
How to freak it:
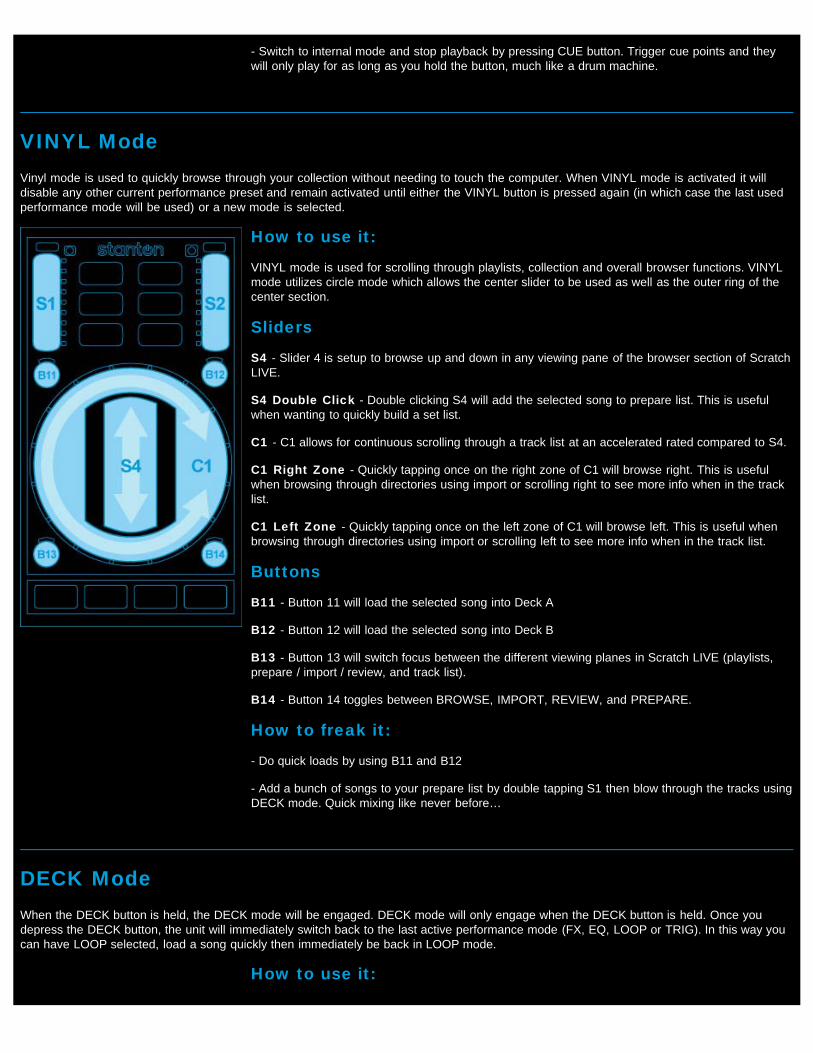
- Switch to internal mode and stop playback by pressing CUE button. Trigger cue points and theywill only play for as long as you hold the button, much like a drum machine.
VINYL ModeVinyl mode is used to quickly browse through your collection without needing to touch the computer. When VINYL mode is activated it willdisable any other current performance preset and remain activated until either the VINYL button is pressed again (in which case the last usedperformance mode will be used) or a new mode is selected.
How to use it:
VINYL mode is used for scrolling through playlists, collection and overall browser functions. VINYLmode utilizes circle mode which allows the center slider to be used as well as the outer ring of thecenter section.
Sliders
S4 - Slider 4 is setup to browse up and down in any viewing pane of the browser section of ScratchLIVE.
S4 Double Click - Double clicking S4 will add the selected song to prepare list. This is usefulwhen wanting to quickly build a set list.
C1 - C1 allows for continuous scrolling through a track list at an accelerated rated compared to S4.
C1 Right Zone - Quickly tapping once on the right zone of C1 will browse right. This is usefulwhen browsing through directories using import or scrolling right to see more info when in the tracklist.
C1 Left Zone - Quickly tapping once on the left zone of C1 will browse left. This is useful whenbrowsing through directories using import or scrolling left to see more info when in the track list.
Buttons
B11 - Button 11 will load the selected song into Deck A
B12 - Button 12 will load the selected song into Deck B
B13 - Button 13 will switch focus between the different viewing planes in Scratch LIVE (playlists,prepare / import / review, and track list).
B14 - Button 14 toggles between BROWSE, IMPORT, REVIEW, and PREPARE.
How to freak it:
- Do quick loads by using B11 and B12
- Add a bunch of songs to your prepare list by double tapping S1 then blow through the tracks usingDECK mode. Quick mixing like never before…
DECK ModeWhen the DECK button is held, the DECK mode will be engaged. DECK mode will only engage when the DECK button is held. Once youdepress the DECK button, the unit will immediately switch back to the last active performance mode (FX, EQ, LOOP or TRIG). In this way youcan have LOOP selected, load a song quickly then immediately be back in LOOP mode.
How to use it:

The DECK mode is used to quickly load a song out of the active play list and turn auto play on andoff. This preset is extremely powerful when used with a playlist as you can drop songs extremelyfast.
Note: Scratch LIVE loads songs in order of the last loaded song out of a play list. So to use theprepare list as the list to load from, simply load a song from the prepare list before using the nextand previous song load buttons.
Buttons
B1 - Button 1 will load the previous song in the current playlist.
B2 - Button 2 is assigned to AUTO which automatically play songs after they have ended in a deck.
B3 -Button 3 will load the next song in the current playlist.
How to freak it:
- Use B3 for quick mixes!