scouts who completed the gold cord in cubs and the link
TRANSCRIPT

1. With your Patrol, complete the following: Learn and be able to demonstrate the following knots: a) Reef Knot b) Clove Hitch c) Sheet Bend d) Rolling Hitch
2. Flag a) Describe the Australian Flag and how to use it. b) Hoist the flag. c) Break the flag
3. First Aid a) Know how to report an emergency b) Know the first steps to control bleeding
4. Safety with Camping tools a) Know the laws that govern the carrying and use of knives in your state or territory. b) Know and understand the safety rules for the use and storage of knives, bush saws and axes. c) Demonstrate an understanding of the rules that apply to the supply and use of firewood in camping
areas in your state or territory. d) Demonstrate the use of a pocketknife or multi-tool.
5. Patrol System a) Discuss with your Patrol Leader the requirements of the Pioneer Badge or other appropriate level of
the Award Scheme. b) Discuss with your Patrol Leader how the Patrol System operates in your Troop. e.g. selection of
Patrol leader, appointment of APL, responsibilities and operation of Troop Council. c) Show an understanding of the structure and duties of the Patrol. This test can all be done together with a Patrol Leader from your Troop. Be ready to ask plenty of questions.
Scouts who completed the Gold Cord in Cubs and the Link Badge do not have to do this again. They automatically receive this badge.
If you are using the CD, to find out more about these tests click on the links.

OR On my honour I promise that I will do my best
To do my duty to My God and to the Queen of Australia To help other people, and To live by the Scout Law
On my honour I promise that I will do my best
To do my duty to my God and to Australia To help other people, and To live by the Scout Law
Scout Law
Scout Promise
1. A Scout is trustworthy. 2. A Scout is Loyal. 3. A Scout is helpful. 4. A Scout is friendly. 5. A Scout is cheerful. 6. A Scout is considerate. 7. A Scout is thrifty. 8. A Scout is courageous. 9. A Scout is respectful. 10. A Scout cares for the environment.

Reef Knot
A flat knot used to tie two ends of a rope or twine.
Uses: Bandages, parcels
Take one end in each hand. Put the left over the right and tuck it under. Then put the
right over the left and under.

Uses: Start lashings, tie do
hs
c
Clove Hit hA clove hitch is really just two half hitches together used to tie a rope to a pole or bar
(where the pull is at right angles).
wn a trailer.
Take one end of the rope. Tie the first alf hitch as shown. Continue on in the
ame direction around the pole to tie the second half hitch.

Use a sheet bend to tieespeciall
each is of differ
Take one end of the roloop. Smaller rope cloop like a snake, the
the tree and then
Sheet Bend
one rope to another, y where ent thickness.pe and make it into a
omes up through the n around the back of under its own tail.

Rolling Hitch
To tie a rope to a peg or pole so thatyou can tighten or
loosen it easily.
Take thethe rope
round thhalf hitthe stan
Tie a sehitch ov
Tie a thirabove t
Firm Slide up
down t
This kntied aro
insteastandingrope. It won smoo
m
1. free end of and run it e peg. Tie a ch around ding part. 2. cond half
er the first. 3. d half hitchhe others. 4.
the knot. to tighten, o loosen.
ot can be und a pole d of the part of the ill not slide
th wood or etal

Describe the Australian Flag and how to use it. Hoist the flag. Break the flag
If you are using the CD, click on the badge to go back.
Flag
• The Union Jack in the corner reminds us of our British origins. • The Large seven-pointed Federal star reminds us of the six states
and the territories. • The five smaller stars of the Southern Cross remind us of where
in the world our continent belongs.
Treat the flag with respect. Fold it each day after using it.
• Fold in half lengthwise • Fold the same again • Fold in half the other way • Fold the same again • Concertina (or roll) • Use the longer rope to hook
under itself • The toggle and loop are for
attaching the flag to a rope.
Breaking the Flag The flag is folded at the top of the flagpole. Scouts are on Parade. • Leader calls Scouts to alert. • Scout breaks the flag by
tugging on the rope hanging from below the flag. Make sure the other end is held firm so that the flag does not fall down.
• All Scouts salute for about 2 seconds.
Lowering the Flag Flag is flying. Scouts are on Parade. • Leader calls the Scouts to alert. • Two Scouts approach the flag. • The two Scouts salute and then one lowers
the flag. The other Scout gathers the flag so that it never touches the ground.
• The other Scouts salute as the flag is lowered.
• The flag is immediately folded and stored safely.

When you report an emergency make yourself stay calm. When you call the emergency number the operator will ask you some questions. Answer clearly and don’t hang up Remember the four Ws: • Why are you calling?
Tell exactly the sort of emergency it is and if people are hurt.
• Where you are? Be ready to give the nearest address, street corner or landmark.
• Who you are? Clearly give you name and any details they ask.
• What can you do now? Wait for instructions about what you can do next – wait for an emergency vehicle or help with the emergency.
Know how to report an emergency
If you are using the CD, click on the badge to go back.
Reporting an emergency

2. First Aid
vi) Learn the correct procedure for management of wounds.
If the wound is serious then seek help immediately.
If there is strong bleeding, immediately apply pressure to stop the bleeding If it is a simple cut or graze (which is most common on Scout activities) then:
Make sure your hands are clean
Prepare an antiseptic solution.
Clean the wound.
Put on a light dressing if the wound is likely to get dirty. Leaving a minor wound without a dressing helps it to dry out quickly and heal.
If there is continued bleeding place a clean pad on the wound and bandage it firmly. Then seek medical help.

Pocket Knife or Multi-Tool
The laws about carrying pocket knives vary from state to state. In some places you are not allowed to carry them at all. Scouts
are not allowed to wear a sheath knife. They must not be carried on planes.
Safety rules for multi tools are the same as for pocket knives.
The best sort of knife for a Scout is one with one or two blades and a
marlin spike. The marlin spike is useful for loosening tight knots in rope.
A sharp knife is safest. Regularly sharpen you knife on a proper stone. Keep the angle of the blade to the stone as
shown.
• When whittling always use the knife away from yourself.
• Never throw your knife.
• Don’t play with the knife, especially when others are nearby.

Firewood Demonstrate an understanding of the rules that apply to the
supply and use of firewood in camping areas in your state or territory.
These rules vary from state to state. There will be places where you are not allowed to collect wood
for fires. In other places there will be no restrictions.
Your PL should be the person to help you with this. If you are camping somewhere new, always check first about
the rules for firewood and fires.
All fires should be only what is needed. Burning adds to air pollution.
Remember that even dead trees are important for some animals and other plants.

scouts.org.uk/sac ■ [email protected] ■ 0845 300 2549
ESSENTIALSAxes and saws are essential tools for preparing firewood
around camp. It is vital to know how to take care of these
tools and how to use them safely and correctly.
Item Code FS315070 January 2013
using Axe
and sawS
A hand axe or hatchet is a one-handed tool for cutting
and trimming small branches and twigs for firewood.
It should not be used to chop live wood. All hand axes
should have a mask to cover the blade, which fits securely
around the head.
A felling axe is a two-handed tool for felling timber. It is
larger than the hand axe, and has a very sharp single or
double bit to cut across the grain of wood.
WedgeHead
Shoulder
Haft
Heel
Fellin g axe
ToeMask
Bit

facebook.com/ScoutActivityCentres ■ twitter.com/ScoutCentres ■ youtube.com/ScoutActivityCentres2
A bow saw is used to cut timber that is too large for a
hand axe, and is often safer and easier to use than a felling
axe. One variation of the bow saw is the bucksaw. Folding
bucksaws are popular camp tools.
A folding saw is a portable saw with a folding, locking
blade. Like the hand axe, it is ideal for cutting and
trimming small branches and twigs for firewood. Folding
saws are a popular camping and bushcraft tool.
Bow saw
Foldin g saw
Types of tool
Felling axe
Bow saw
Folding saw
Types of tool
Felling axe
Bow saw
Folding saw
GOOD PRACTICE � Fit masks or sheaths to axe heads and saw blades,
which should fit securely. Do not plant the head in
the ground. An axe can be masked temporarily in the
chopping block but make sure that the blade is securely
wedged in the grain of the wood and that the haft does
not pose a trip hazard. Saws are usually supplied with
plastic clip-on masks that fit over the blade. Alternatively,
make a mask from a split length of hosepipe.
� Keep axes and saws dry, and never leave them out
overnight. Keep them in a stores tent in a locked box.
�Maintain axes by sharpening them regularly, ideally after
use and before putting them in storage. Saw blades are
relatively cheap and can generally be replaced rather
than sharpened. Treat axe heads and saw blades with
gun oil or camellia oil to prevent rusting. Protect wooden
handles by rubbing them with boiled linseed oil.
SAFETY GUIDELINES � Axes and large saws can be difficult and dangerous
to handle if they are too big for you to control
effectively. Use a tool of a size and weight tha
is suited to the job and your level of ability.
�Wear appropriate clothing and footwear, avoiding scarves,
lanyards or any loose items that could be snared. Boots
should be worn rather than trainers. Tie long hair back.
� Inspect tools before use. Check for damage
and ensure that the parts are aligned and held
together securely. Never use a blunt axe or saw,
which is likely to slip or bounce on impact.
� Do not use axes or saws after dark or when tired.
� Crouch or kneel on one knee when using small
axes and saws to avoid risk of injury.
� Always use a chopping block when splitting
firewood. Chop directly over the block, positioning
the wood on the far side of the block.
� Carry axes cradled upside down in your hand with
your arm by your side. Make sure the axe bit is
facing forward, keeping fingers out of the way.
� Pass tools to others carefully and safely; axes should be
passed head first. Support the head with your free hand.

3 scouts.org.uk/sac ■ [email protected] ■ 0845 300 2549
USING A HAND AXE1. Mark out a clear chopping area, situated close to the
fire area but separated from it by a graded woodpile.
The chopping area must be free of obstructions and
trip hazards, and at least three axe lengths in
radius (ie an outstretched arm and the length of three
axes). Place the chopping block in the centre.
Axes should only be used in this area, which should
be clearly marked and enforced as a ‘no go’ zone
for anyone who is not properly trained or clothed.
2. Crouch or kneel on one knee behind the
chopping block.
3. Hold the wood to be chopped in one hand, and firmly
grip the haft of the axe with the other.
4. Aim carefully and always try to hit the wood in the
same place. When practising, it may help to make a
chalk mark on the log.
5. Swing the axe in a chopping motion by bending your
arm at the elbow, aiming to create a small ‘V’ with
alternate angled cuts at 45 degrees. Do not chop straight
down onto the wood, as this will cause the axe head
to bounce.
6. As the ‘V’ widens, you will create chippings, and the
wood will soon split. Clear the chippings away regularly
and use them for kindling.
Chopping block
Chopping area1st cut 2nd cut
Dangerous
SHARPENING AN AXEUse a round carborundum stone for sharpening. Make sure
the axe head is free of dirt or resin, and move the stone
in small circles towards or away from the bit, applying
light pressure and keeping fingers clear. Change sides and
sharpening angles often until the edge has a smooth and
even surface. If the edge becomes too thin and fragile you
can work against the bit, to give a wider cutting angle and a
stronger edge.
facebook.com/ScoutActivityCentres ■ twitter.com/ScoutCentres ■ youtube.com/ScoutActivityCentres4
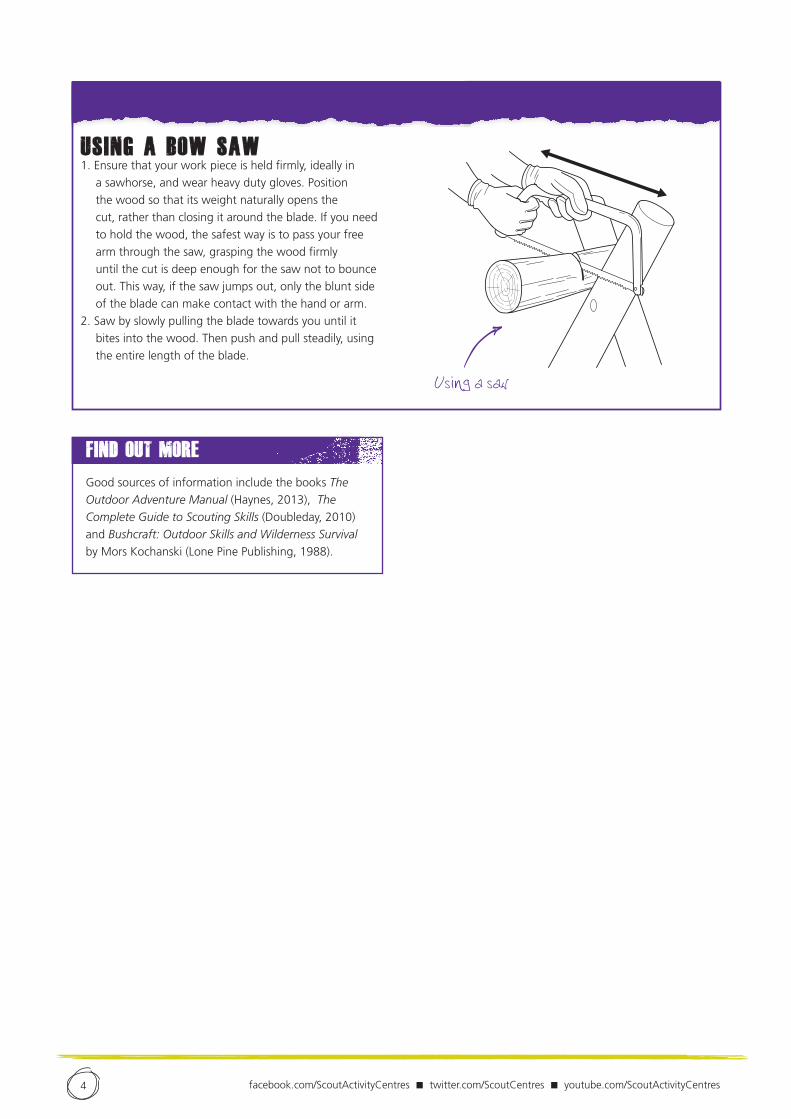
USING A BOW SAW1. Ensure that your work piece is held firmly, ideally in
a sawhorse, and wear heavy duty gloves. Position
the wood so that its weight naturally opens the
cut, rather than closing it around the blade. If you need
to hold the wood, the safest way is to pass your free
arm through the saw, grasping the wood firmly
until the cut is deep enough for the saw not to bounce
out. This way, if the saw jumps out, only the blunt side
of the blade can make contact with the hand or arm.
2. Saw by slowly pulling the blade towards you until it
bites into the wood. Then push and pull steadily, using
the entire length of the blade.
Using a saw
Using a saw
FIND OUT MORE
Good sources of information include the books The
Outdoor Adventure Manual (Haynes, 2013), The
Complete Guide to Scouting Skills (Doubleday, 2010)
and Bushcraft: Outdoor Skills and Wilderness Survival
by Mors Kochanski (Lone Pine Publishing, 1988).

Pioneer Badge
Citzenship + Campcraft + One elective
Pioneer Cord
Pioneer + One P.A. + Two Proficiency Badges
+ +
+
+