schematics for breakout examples
TRANSCRIPT

Schematics for Breakout Examples
This document contains wiring diagrams and component lists for the examples. A diagram may be used for more than one example file. The corresponding files are listed for each diagram.

• Button• Led• 10k resistor• 330 ohm resistor
Component List
Getting Started: Hello World/examples/getting_started/hello_world.html/examples/getting_started/hello_world_node.html/examples/processing_js/basic_example.html

• Potentiometer• Button• Led• 10k resistor• 330 ohm resistor
Component List
Getting Started: All ExamplesUse this schematic for all of the examples in /examples/getting_started/

• Servo motor• Potentiometer
Component List
Actuators: Servo/examples/actuators/servo.html

• DC motor• 0.1 uF capacitor• H-bridge SN754410 or equivalent
Component List
Actuators: DC Motor/examples/actuators/DCmotor.html
Note that in this schematic the motor is powered by the Arduino. If you connect anything to the motor you should use an external power supply for the motor. See the schematic on the next page.
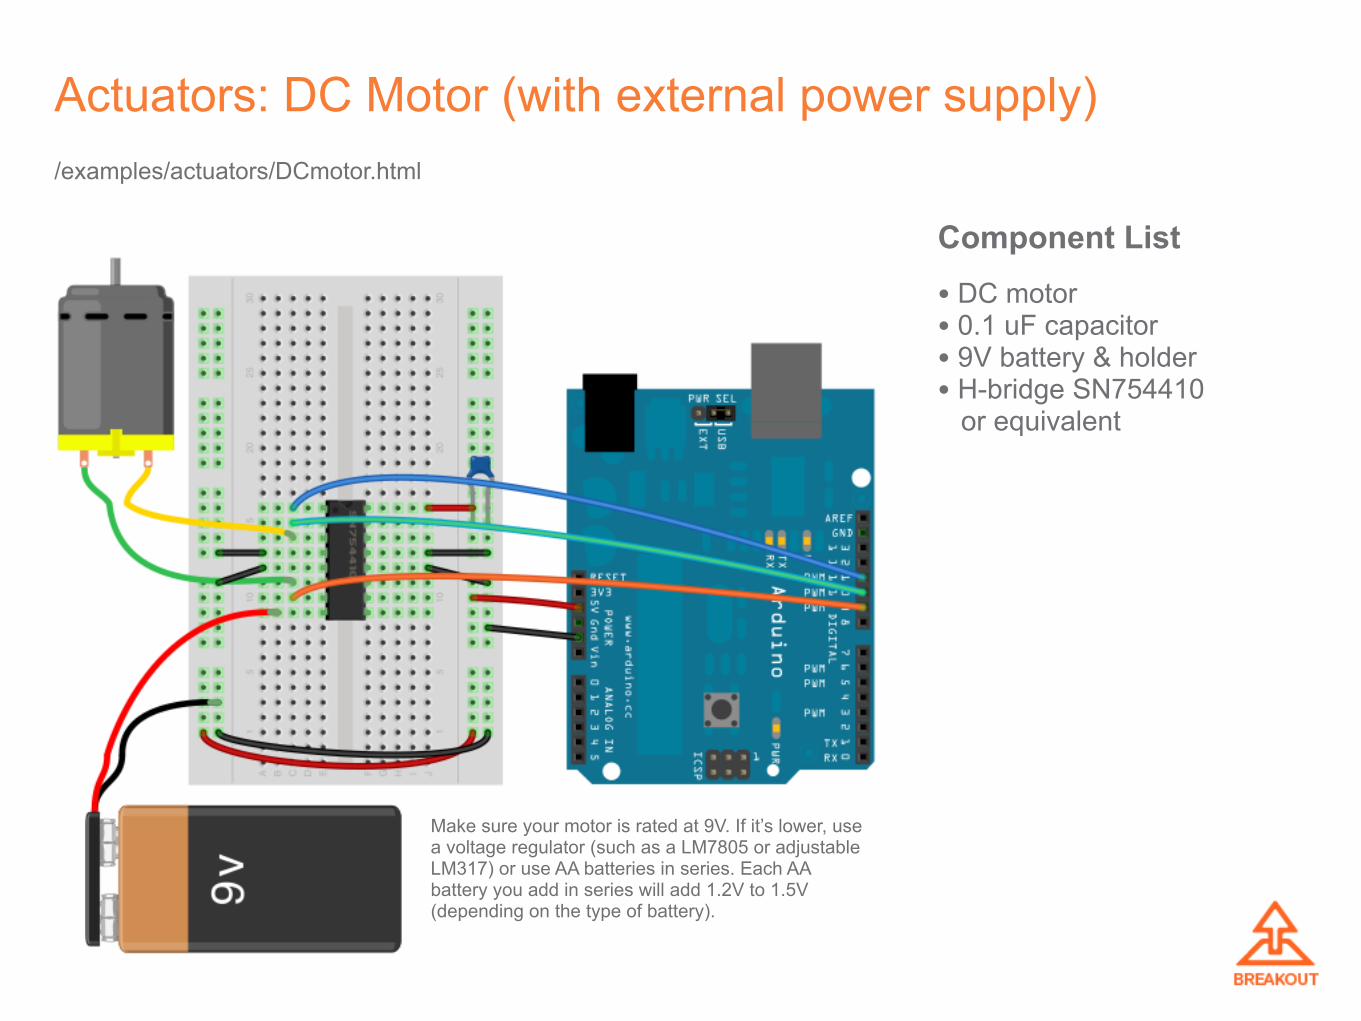
• DC motor• 0.1 uF capacitor• 9V battery & holder• H-bridge SN754410 or equivalent
Component List
Actuators: DC Motor (with external power supply)/examples/actuators/DCmotor.html
Make sure your motor is rated at 9V. If it’s lower, use a voltage regulator (such as a LM7805 or adjustable LM317) or use AA batteries in series. Each AA battery you add in series will add 1.2V to 1.5V (depending on the type of battery).
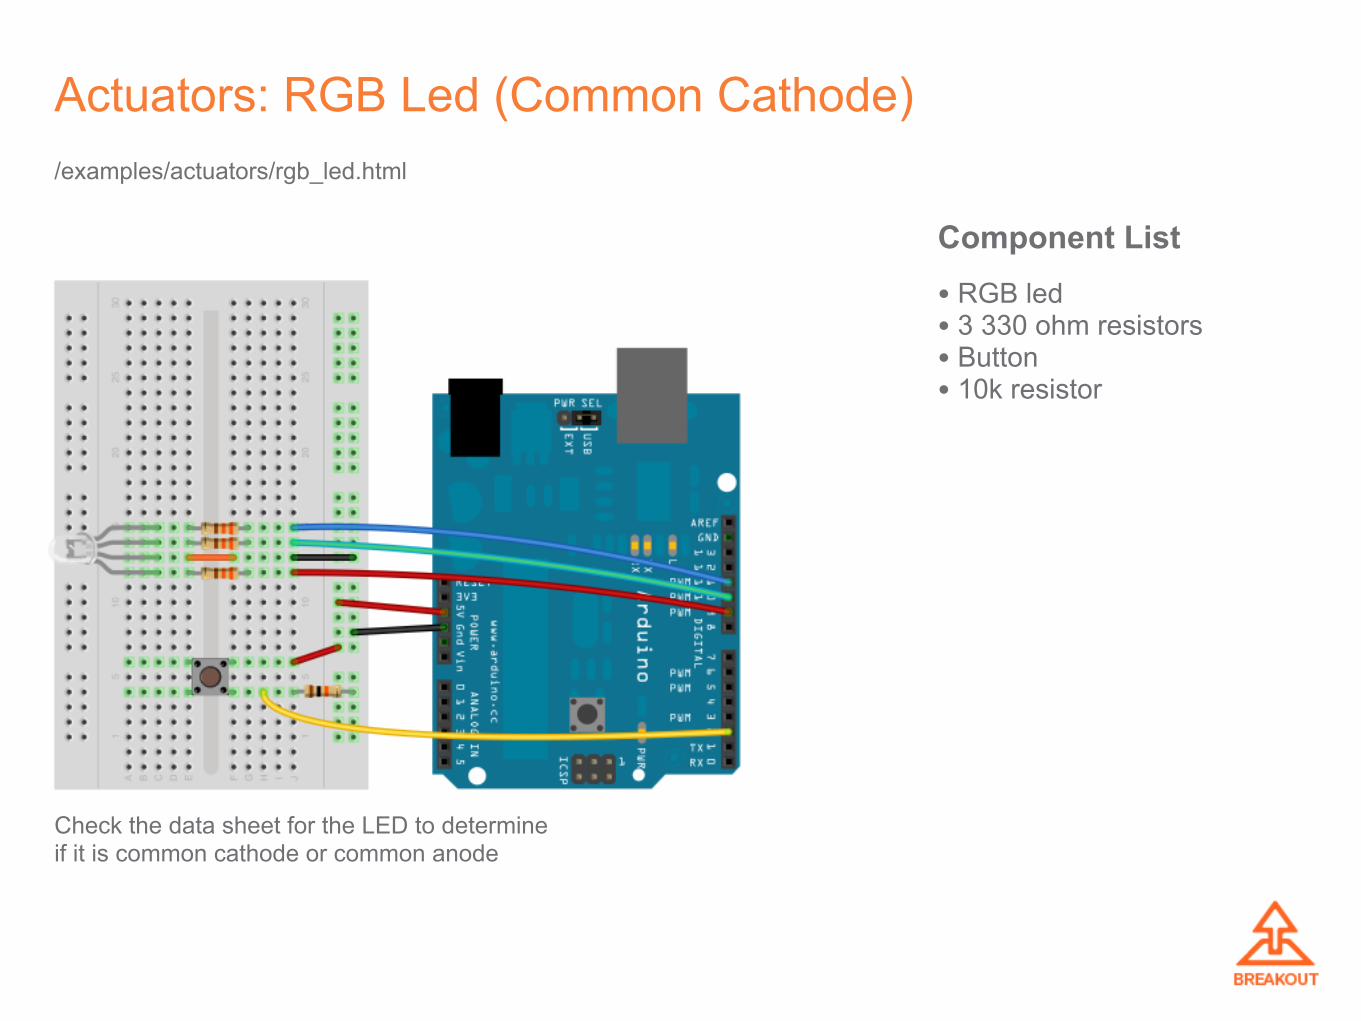
• RGB led• 3 330 ohm resistors• Button• 10k resistor
Component List
Actuators: RGB Led (Common Cathode)
Check the data sheet for the LED to determine if it is common cathode or common anode
/examples/actuators/rgb_led.html

• RGB led• 3 330 ohm resistors• Button• 10k resistor
Component List
Actuators: RGB Led (Common Anode)
Check the data sheet for the LED to determine if it is common cathode or common anode.
Note: In the rgb_led.html example change COMMON_CATHODE to COMMON_ANODE on line 104.
/examples/actuators/rgb_led.html

• Bi-Color led• 2 330 ohm resistors
Component List
Actuators: Bi-Color Led (Common Cathode)
Check the data sheet for the LED to determine if it is common cathode or common anode.
/examples/actuators/bi_color_led.html

• BlinkM led module• Button• 10k resistor
Component List
Actuators: BlinkM RGB Led Module/examples/actuators/blinkM.html
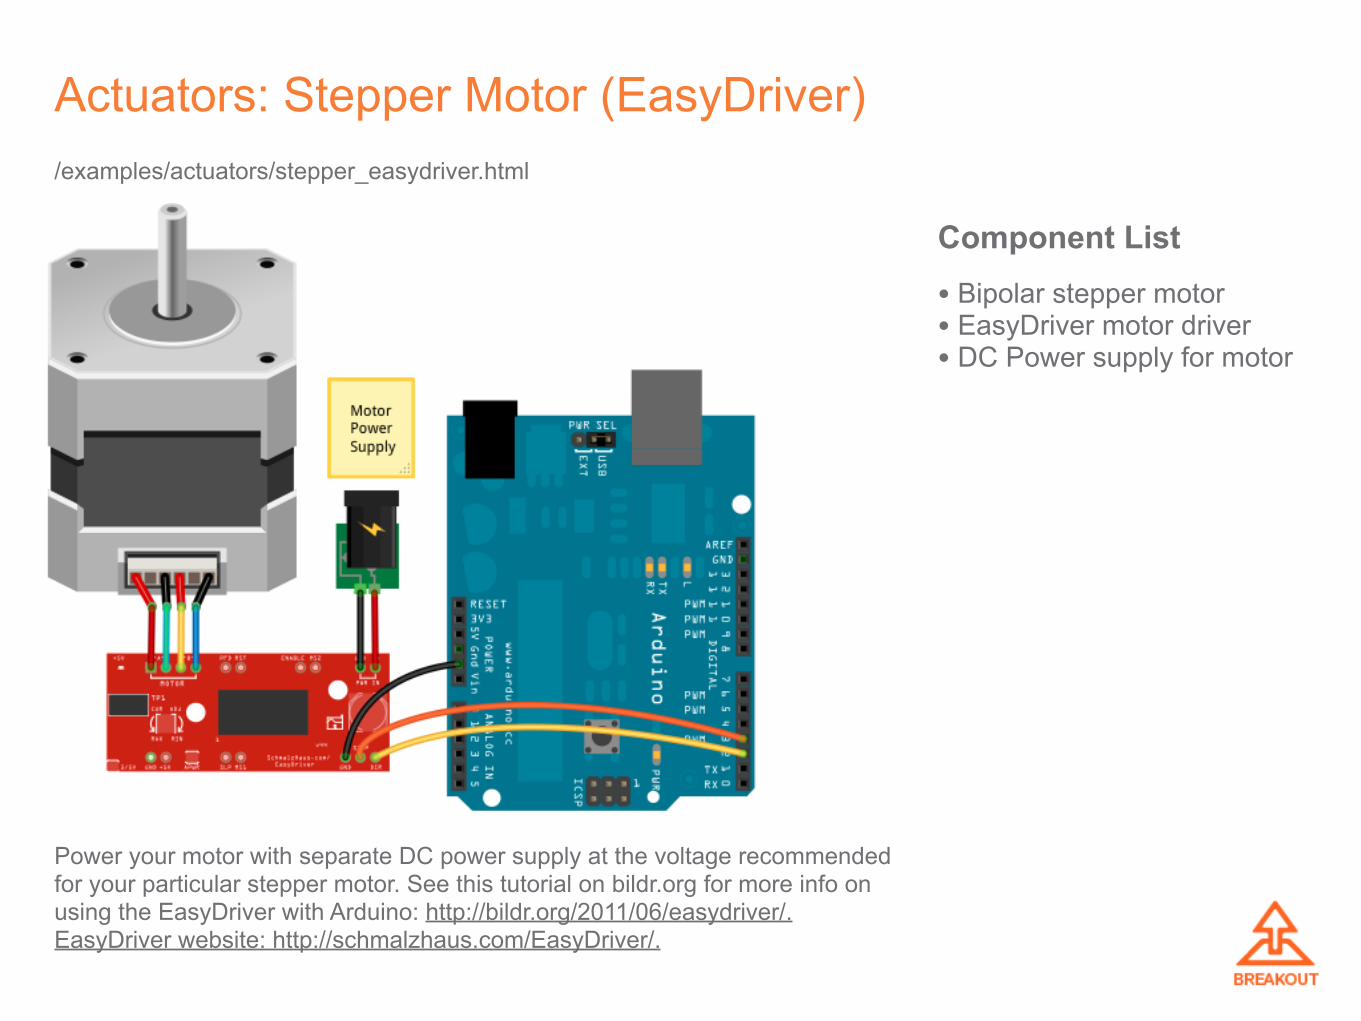
• Bipolar stepper motor• EasyDriver motor driver• DC Power supply for motor
Component List
Actuators: Stepper Motor (EasyDriver)/examples/actuators/stepper_easydriver.html
Power your motor with separate DC power supply at the voltage recommended for your particular stepper motor. See this tutorial on bildr.org for more info on using the EasyDriver with Arduino: http://bildr.org/2011/06/easydriver/. EasyDriver website: http://schmalzhaus.com/EasyDriver/.

• Bipolar stepper motor• SN754410NE H-bridge• DC Power supply for motor
Component List
Actuators: Stepper Motor (4-wire driver)/examples/actuators/stepper_4wire.html
Power your motor with separate DC power supply at the voltage recommended for your particular stepper motor. See this tutorial by Tom Igoe for more info on 2 and 4 wire stepper motor circuits for bipolar and unipolar stepper motors: http://www.tigoe.com/pcomp/code/circuits/motors/stepper-motors/.
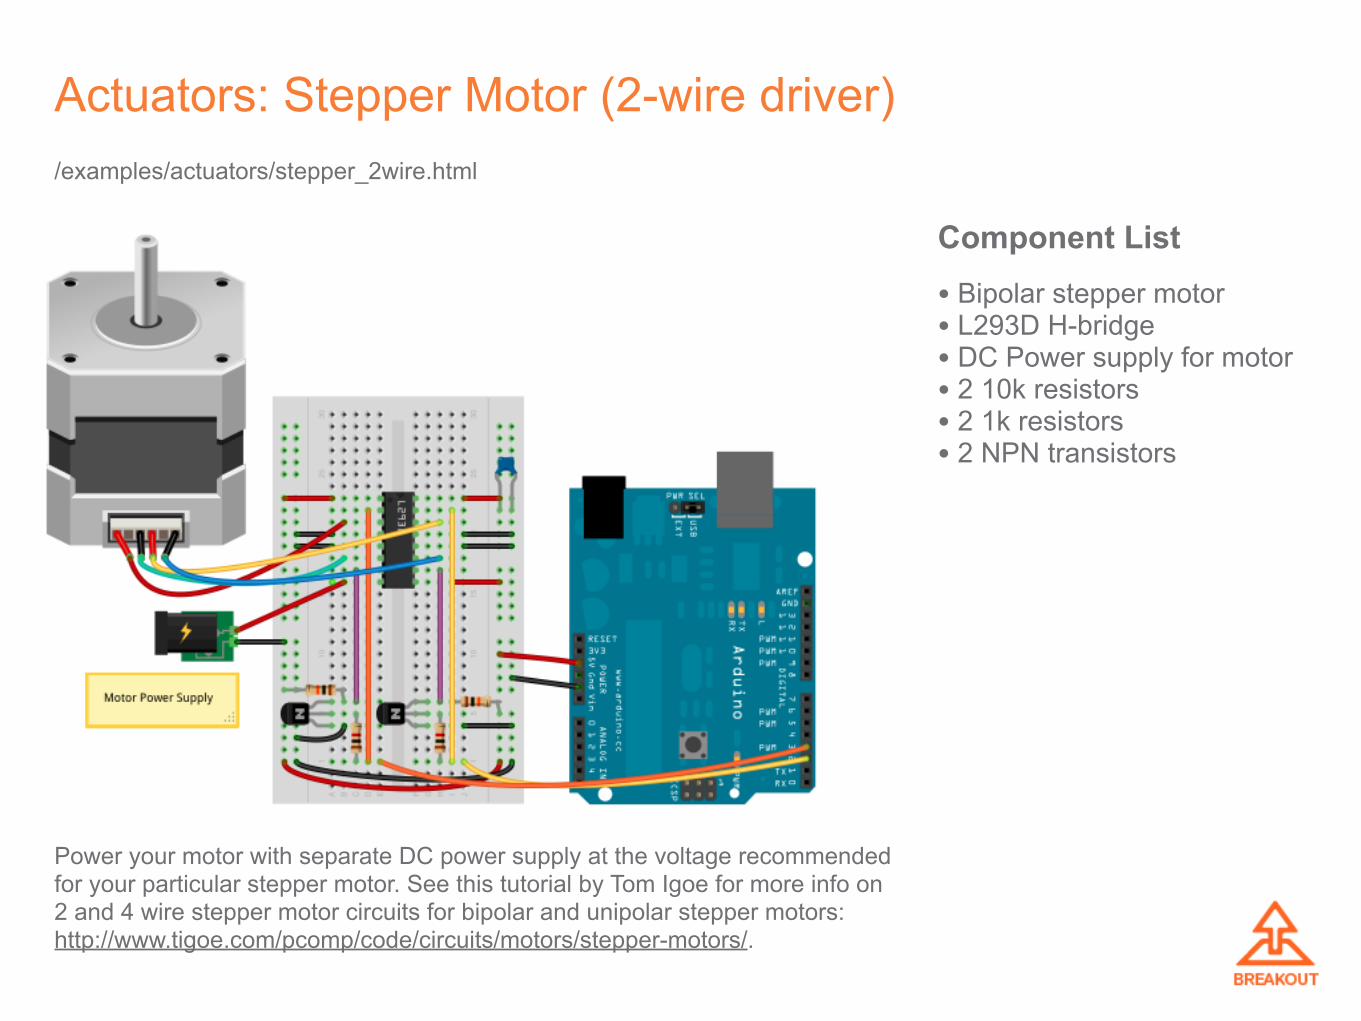
• Bipolar stepper motor• L293D H-bridge• DC Power supply for motor• 2 10k resistors• 2 1k resistors• 2 NPN transistors
Component List
Actuators: Stepper Motor (2-wire driver)/examples/actuators/stepper_2wire.html
Power your motor with separate DC power supply at the voltage recommended for your particular stepper motor. See this tutorial by Tom Igoe for more info on 2 and 4 wire stepper motor circuits for bipolar and unipolar stepper motors: http://www.tigoe.com/pcomp/code/circuits/motors/stepper-motors/.
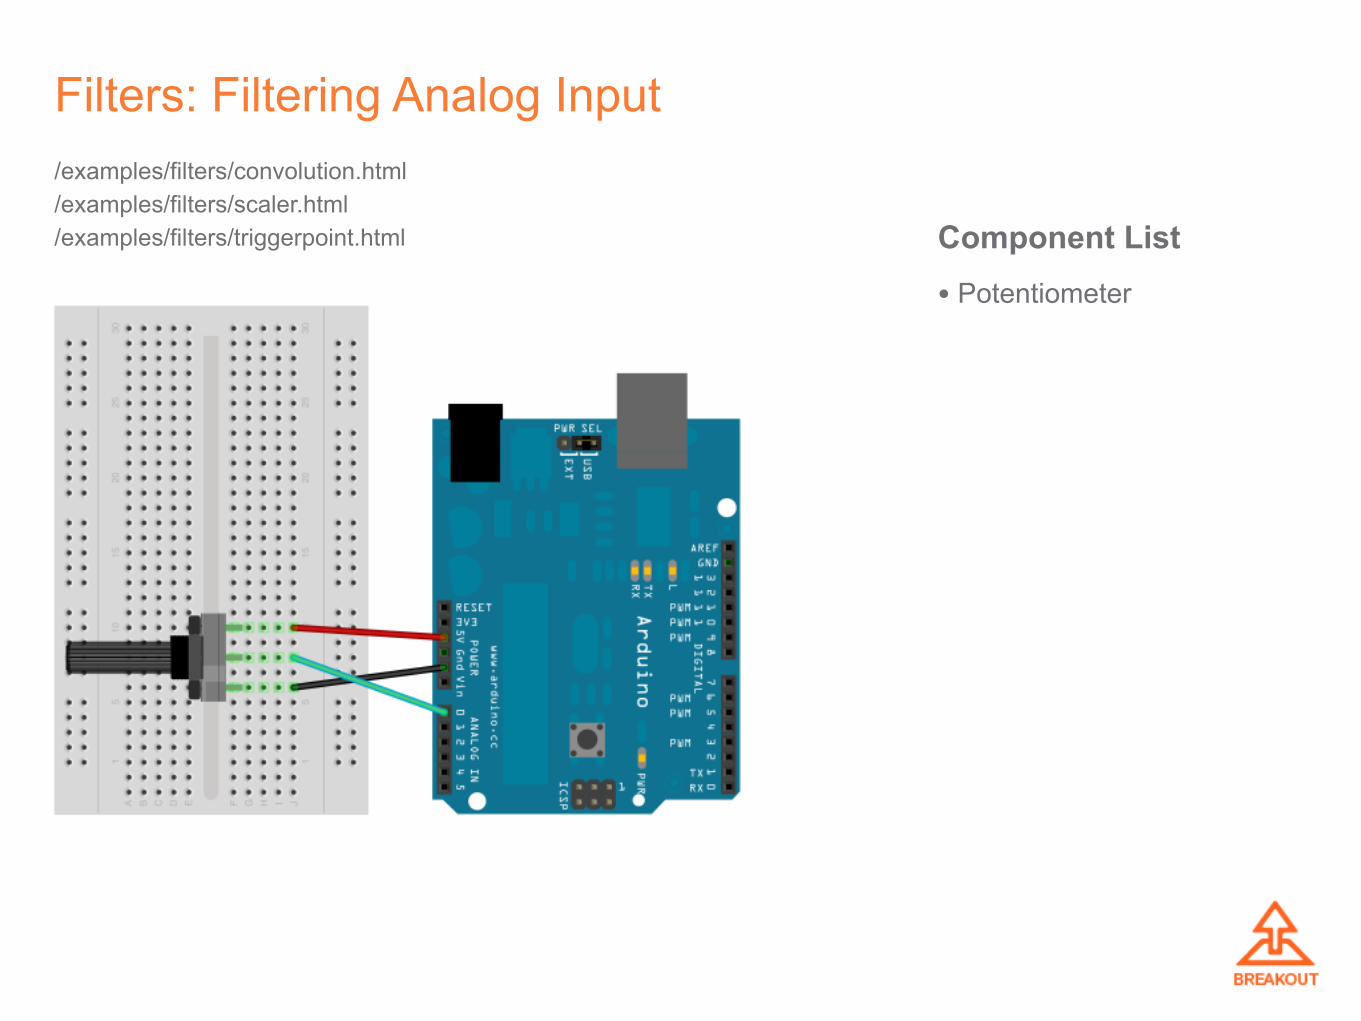
• Potentiometer
Component List
Filters: Filtering Analog Input/examples/filters/convolution.html/examples/filters/scaler.html/examples/filters/triggerpoint.html
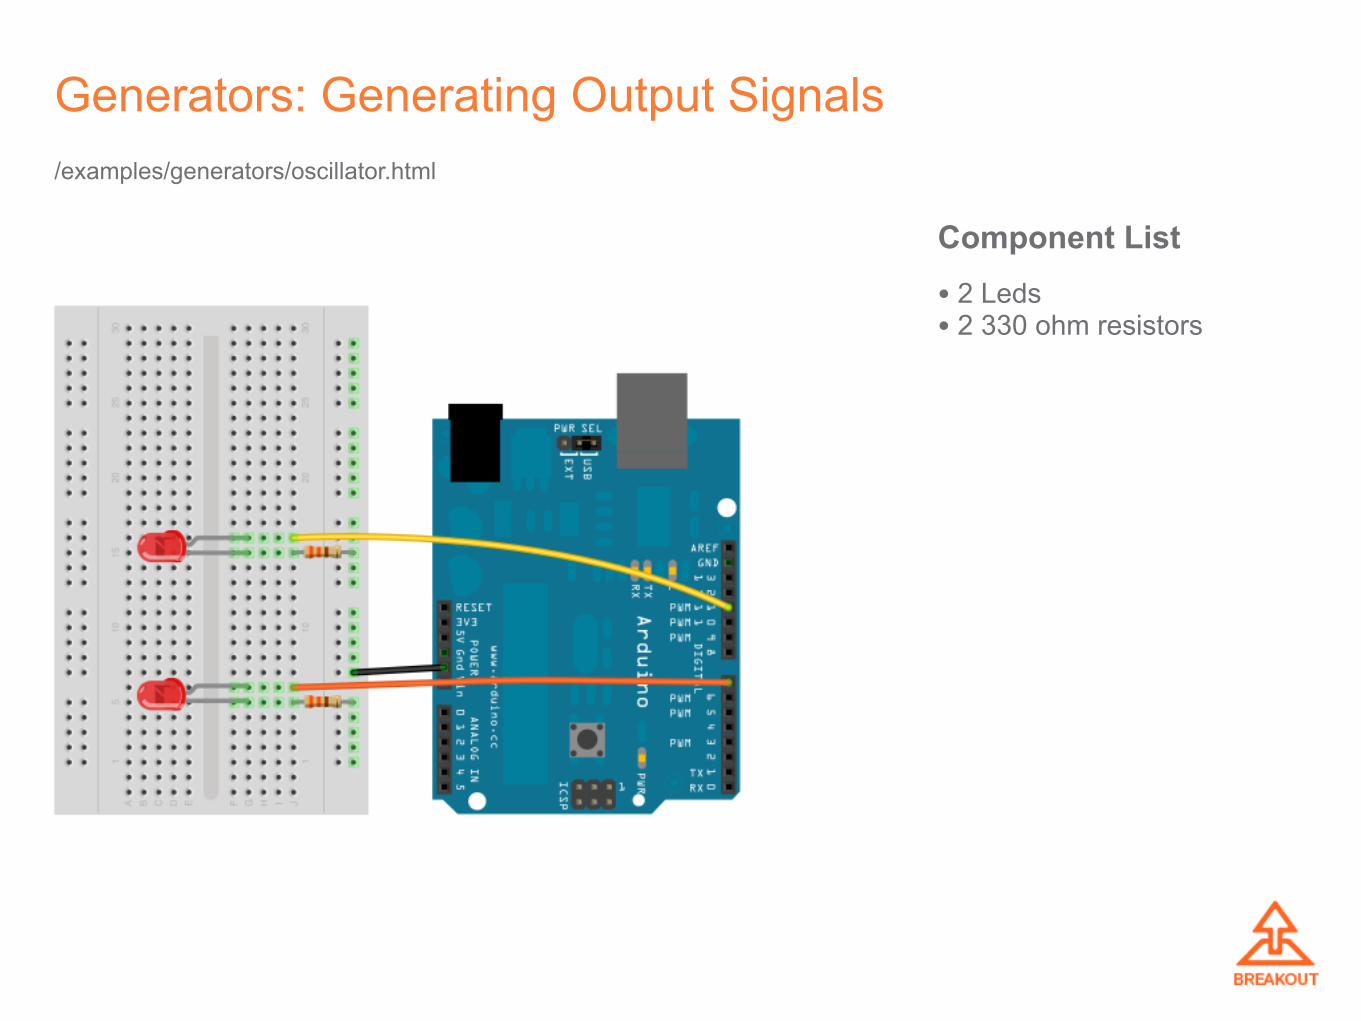
• 2 Leds• 2 330 ohm resistors
Component List
Generators: Generating Output Signals/examples/generators/oscillator.html
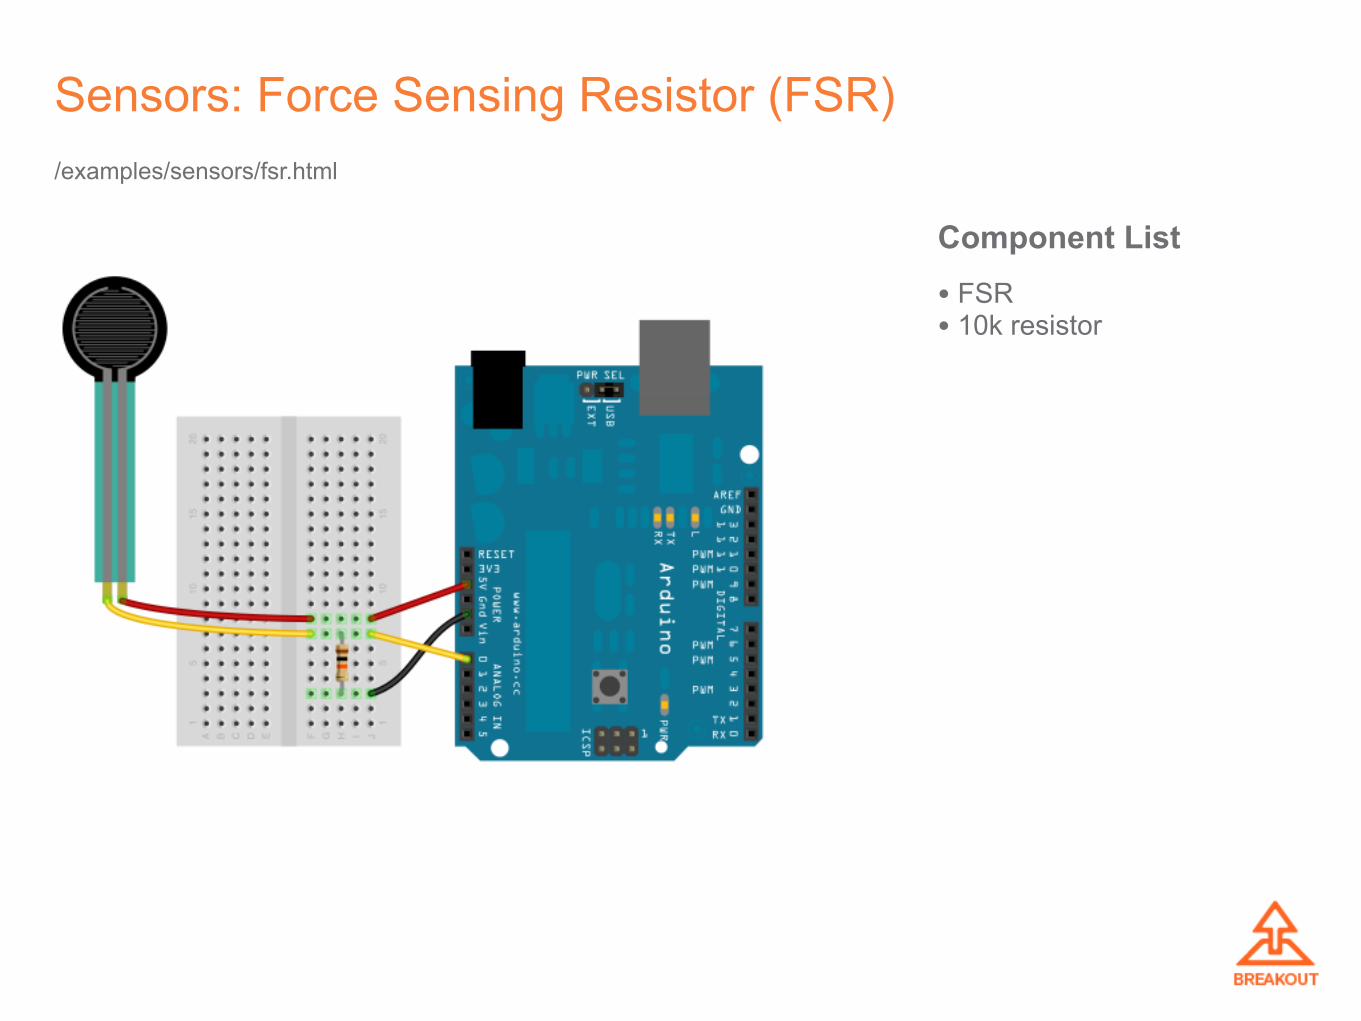
• FSR• 10k resistor
Component List
Sensors: Force Sensing Resistor (FSR)/examples/sensors/fsr.html
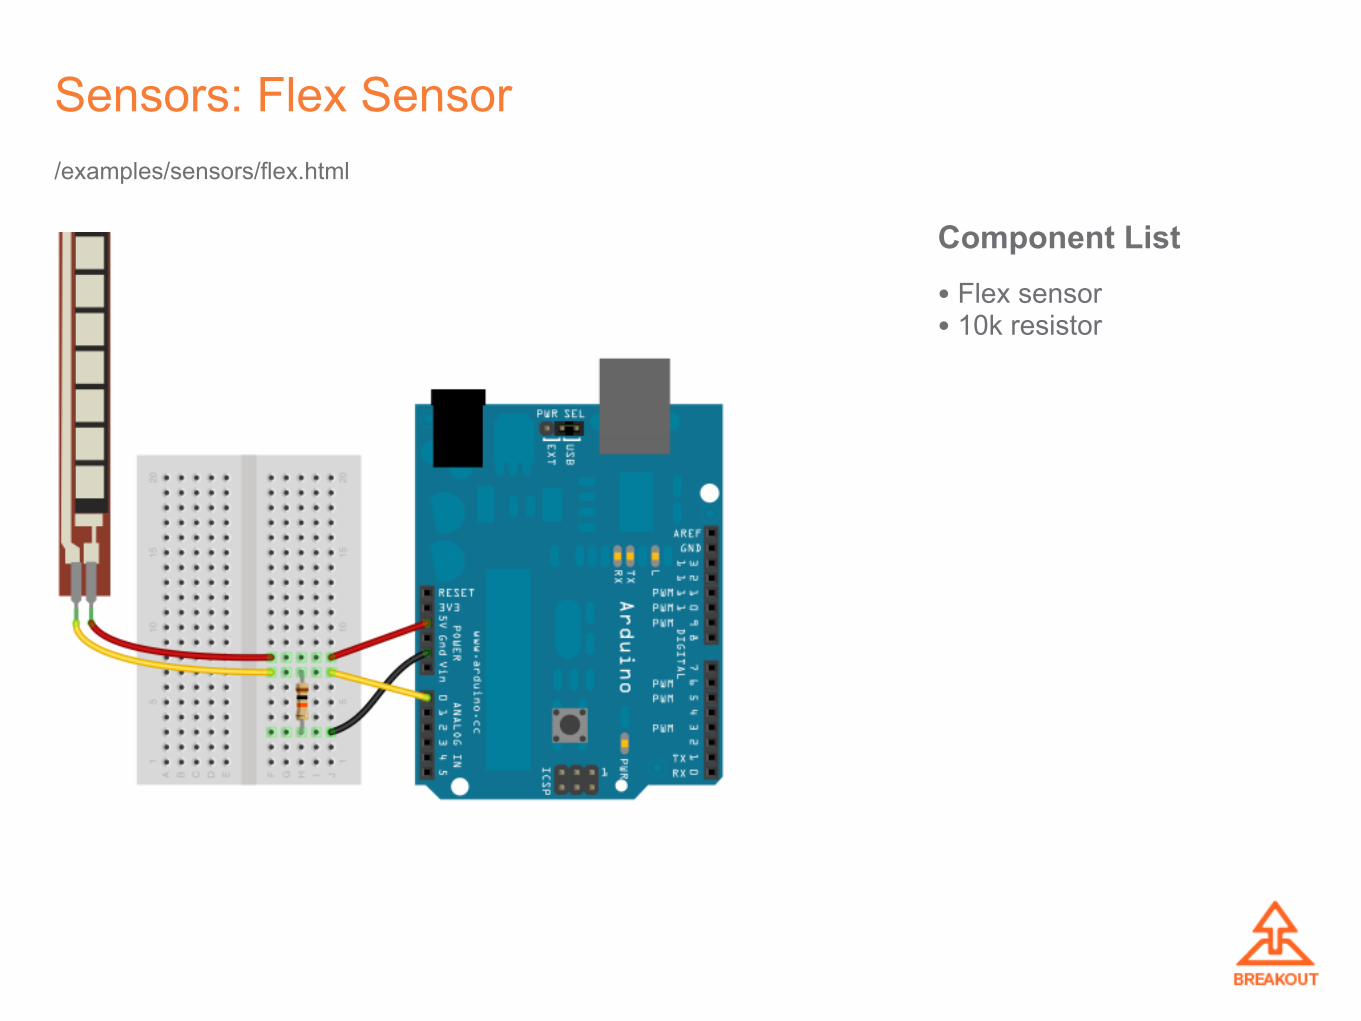
• Flex sensor• 10k resistor
Component List
Sensors: Flex Sensor/examples/sensors/flex.html

• LM335 temp sensor• 330 ohm resistor
Component List
Sensors: Temperature Sensor/examples/sensors/temperature.html
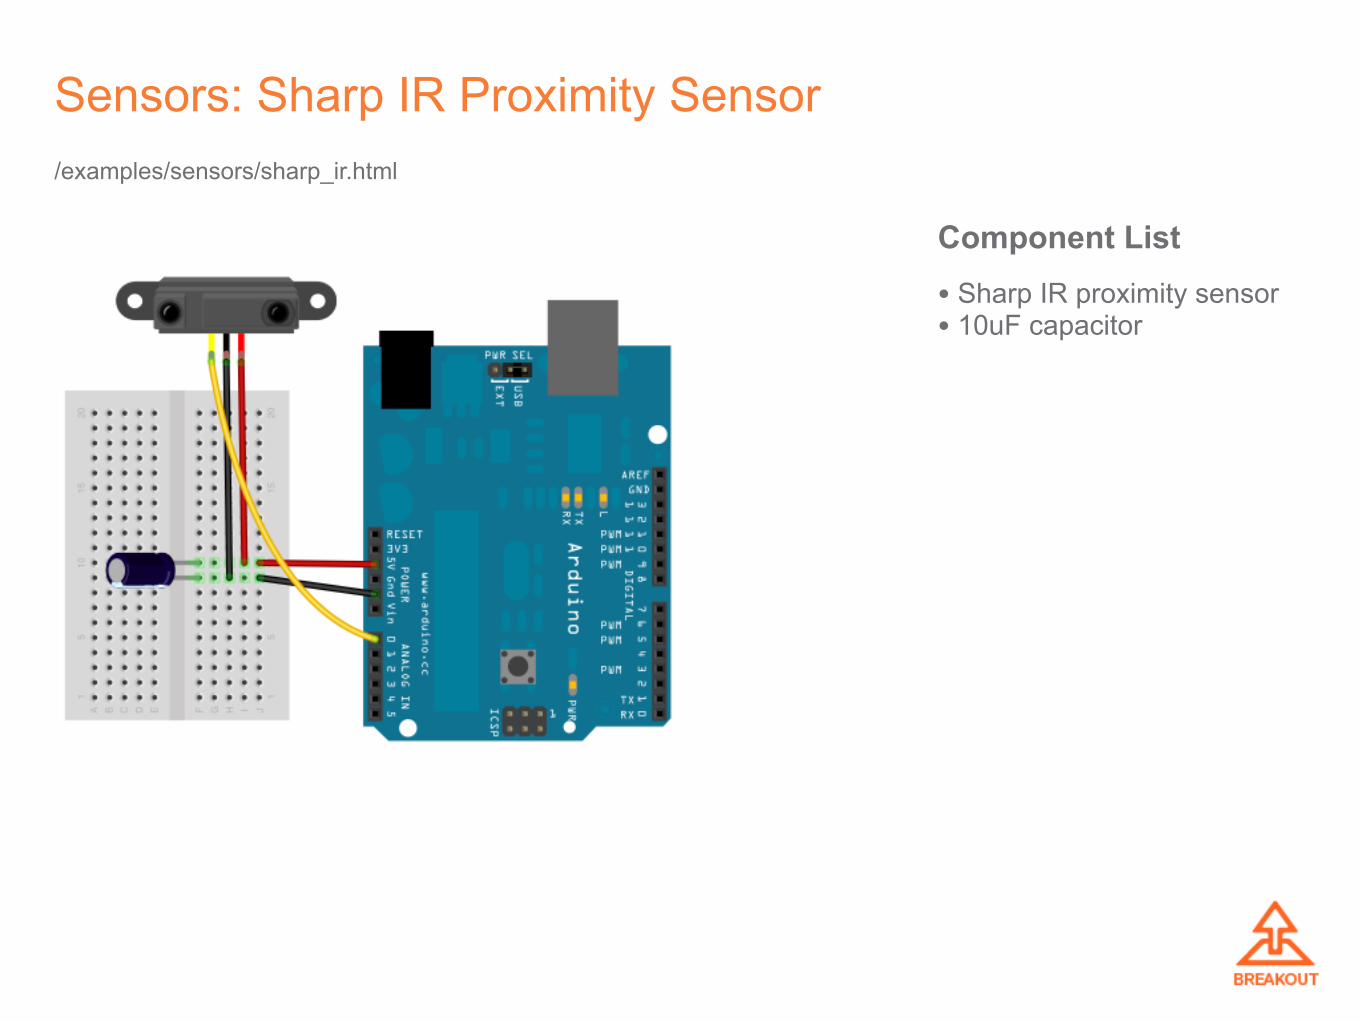
• Sharp IR proximity sensor• 10uF capacitor
Component List
Sensors: Sharp IR Proximity Sensor/examples/sensors/sharp_ir.html
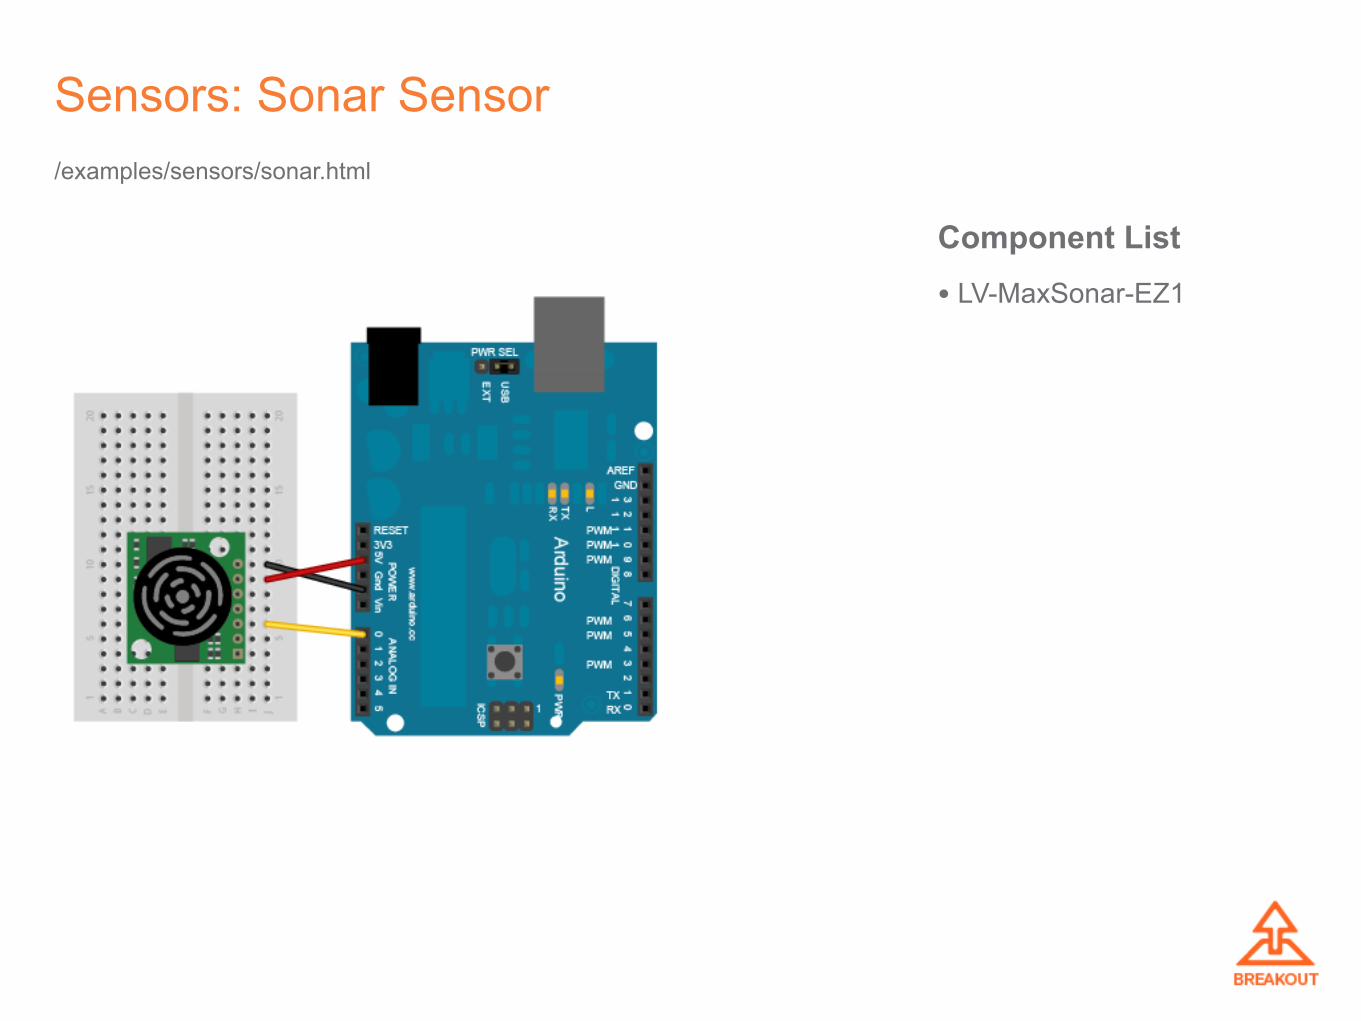
• LV-MaxSonar-EZ1
Component List
Sensors: Sonar Sensor/examples/sensors/sonar.html
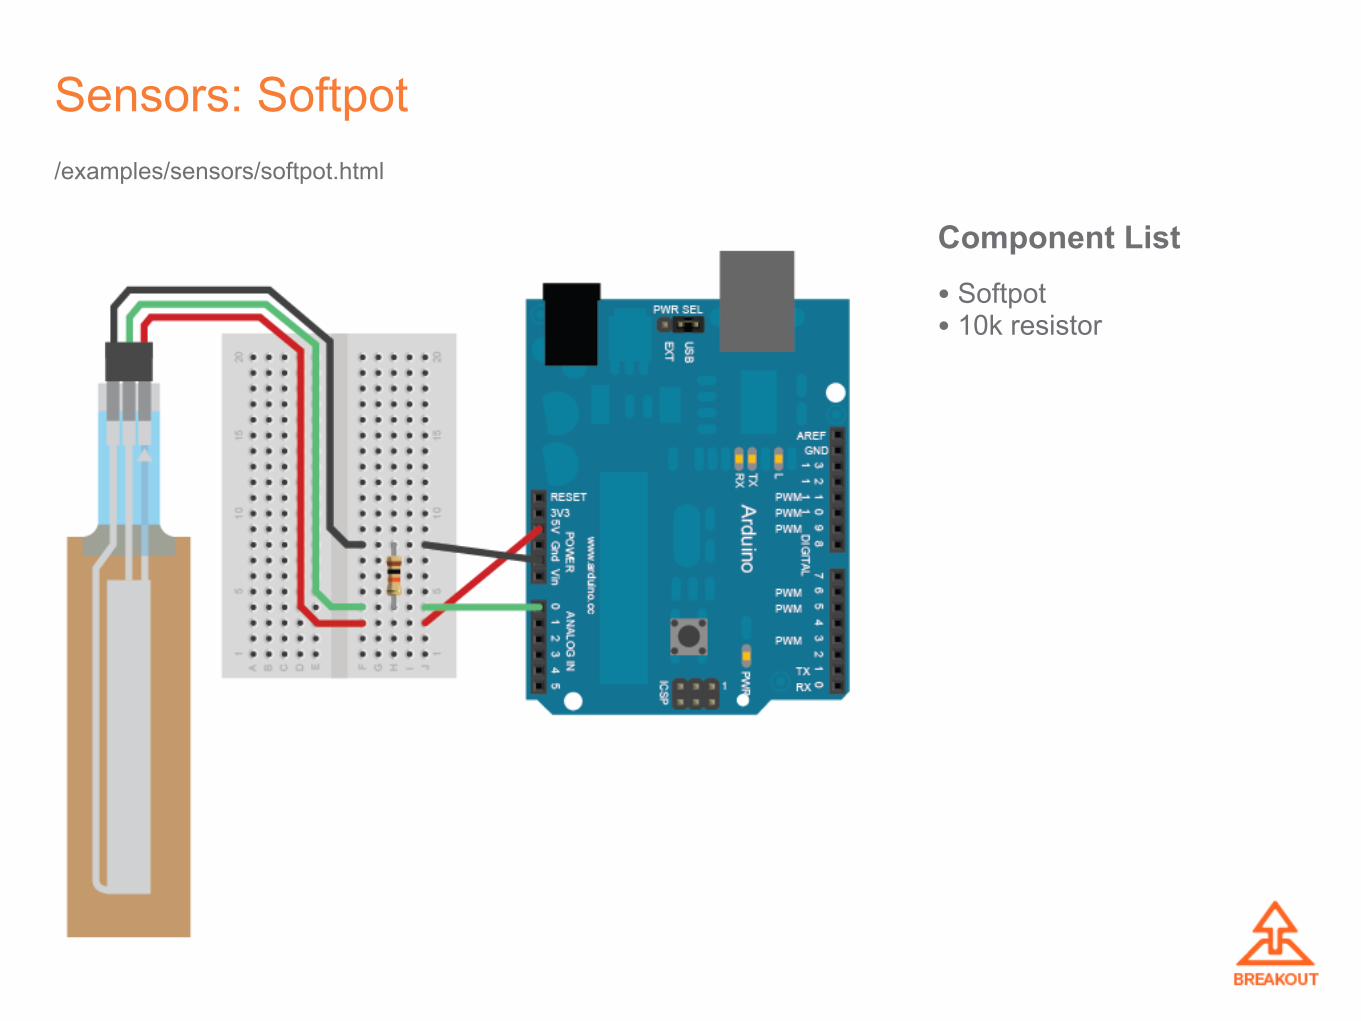
• Softpot• 10k resistor
Component List
Sensors: Softpot/examples/sensors/softpot.html

• ADXL335 (or 330)• Button• 10k resistor
Component List
Sensors: Analog Accelerometer/examples/sensors/analog_accelerometer.html/examples/sensors/calibrate_accelerometer.html/examples/three_js/accelerometer.html/examples/processing_js/accelerometer.html
The analog accelerometer examples should work for any analog accelerometer. The ADXL335 just happens to the the accelerometer use for this schematic.

Component List
Sensors: HMC6352 Compass
• HMC6352 compass• Arduino FIO, Uno or other I/O board
/examples/sensors/hmc6352.html/examples/processing_js/compass.html
Arduino FIO with XBee wireless connection
Arduino Uno or other board
Unlike the other I2C sensors in this document, the HMC6352 is 5v tolerant so you can use it with any I/O board.

Component List
Sensors: HMC5883 3-axis Magnetometer
• HMC5883 magnetometer• Arduino FIO, or Pro Mini (3.3v), or other 3.3v I/O board
/examples/sensors/hmc5883.html
You must use this sensor with a 3.3v or lower I/O board or use a logic level converter if using an I/O board at a higher voltage.
See Appendix A for an example of wiring a low voltage I2C sensor to a 5v I/O board.
Arduino FIO with XBee wireless connection
Arduino Pro Mini 3.3v with FTDI Basic Breakout 3.3v
- OR -

You must use this sensor with a 3.3v or lower I/O board or use a logic level converter if using an I/O board at a higher voltage.
Arduino FIO with XBee wireless connection
Arduino Pro Mini 3.3v with FTDI Basic Breakout 3.3v
- OR -
Component List
Sensors: ADXL345 3-axis Accelerometer
• ADXL345 accelerometer• Arduino FIO, or Pro Mini (3.3v), or other 3.3v I/O board
/examples/sensors/adxl345.html
See Appendix A for an example of wiring a low voltage I2C sensor to a 5v I/O board.

• ITG3200 gyro• Button• 10k resistor• Arduino FIO, or Pro Mini (3.3v), or other 3.3v I/O board
Component List
Sensors: ITG3200 3-axis Gyroscope
You must use this sensor with a 3.3v or lower I/O board or use a logic level converter if using an I/O board at a higher voltage.
/examples/sensors/itg3200.html/examples/processing_js/gyro.html
Arduino FIO with XBee wireless connection
Arduino Pro Mini 3.3v with FTDI Basic Breakout 3.3v
- OR -
See Appendix A for an example of wiring a low voltage I2C sensor to a 5v I/O board.
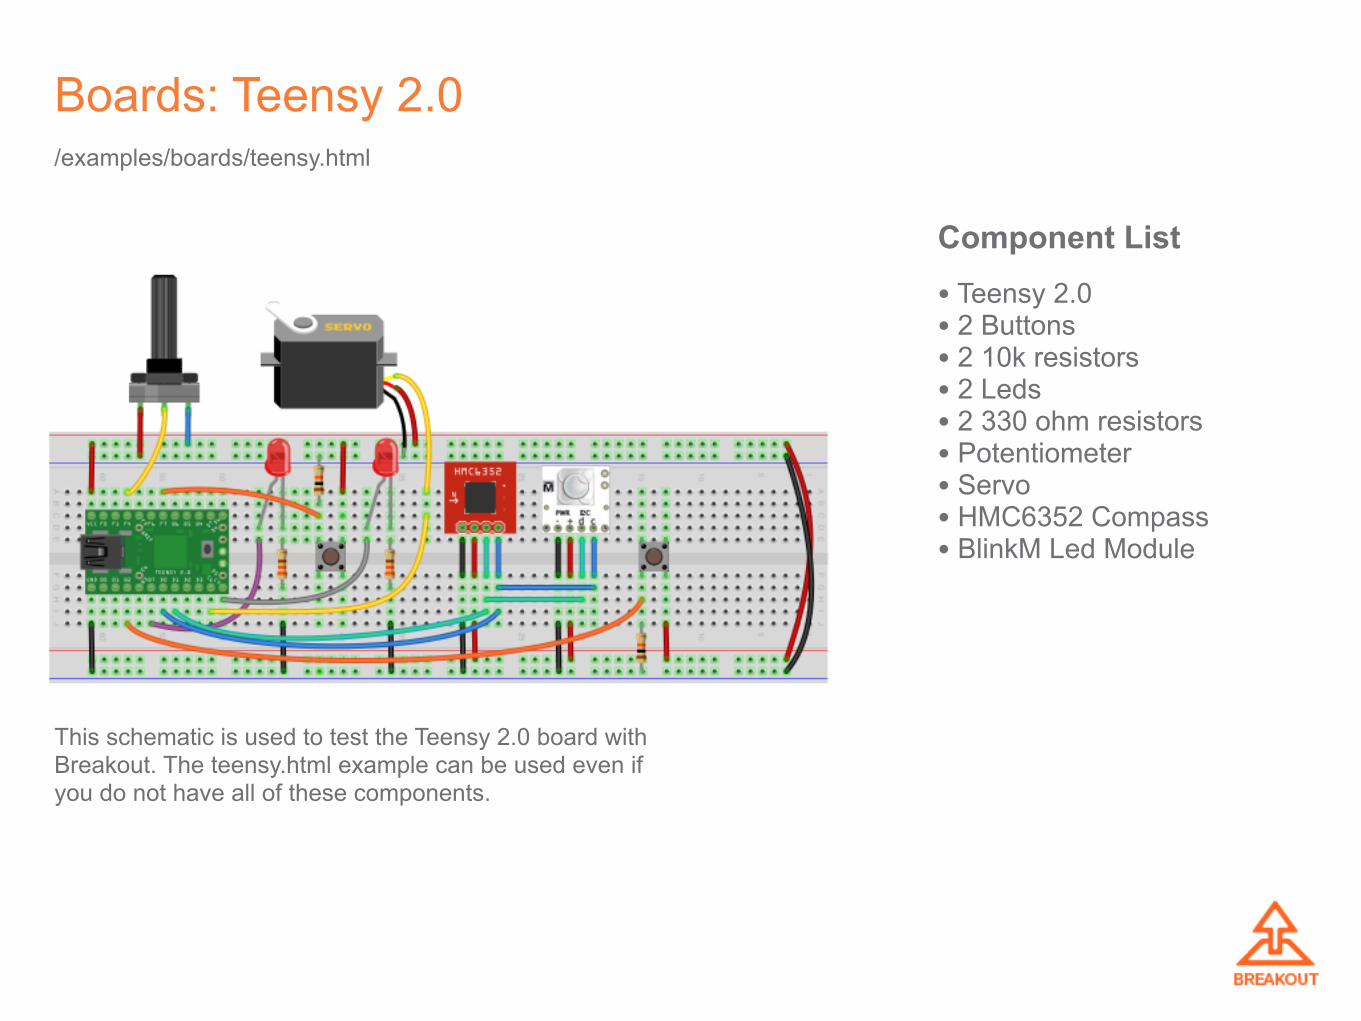
• Teensy 2.0• 2 Buttons• 2 10k resistors• 2 Leds• 2 330 ohm resistors• Potentiometer• Servo• HMC6352 Compass• BlinkM Led Module
Component List
Boards: Teensy 2.0/examples/boards/teensy.html
This schematic is used to test the Teensy 2.0 board with Breakout. The teensy.html example can be used even if you do not have all of these components.

• Arduino Mega• 2 Buttons• 2 10k resistors• 1 Led• 1 330 ohm resistors• Potentiometer• Servo• HMC6352 Compass• BlinkM Led Module
Component List
Boards: Arduino Mega/examples/boards/mega.html
This schematic is used to test the Arduino Mega board with Breakout. The mega.html example can be used even if you do not have all of these components.

• Arduino Uno (or other similar)• 2 Buttons• 2 10k resistors• 2 Leds• 1 RGB Led• 5 330 ohm resistors• Potentiometer• Servo• HMC6352 Compass• BlinkM Led Module
Component List
Boards: Arduino Uno/examples/boards/uno.html
This schematic is used to test the Arduino Uno (or similar) board with Breakout. The uno.html example can be used even if you do not have all of these components.
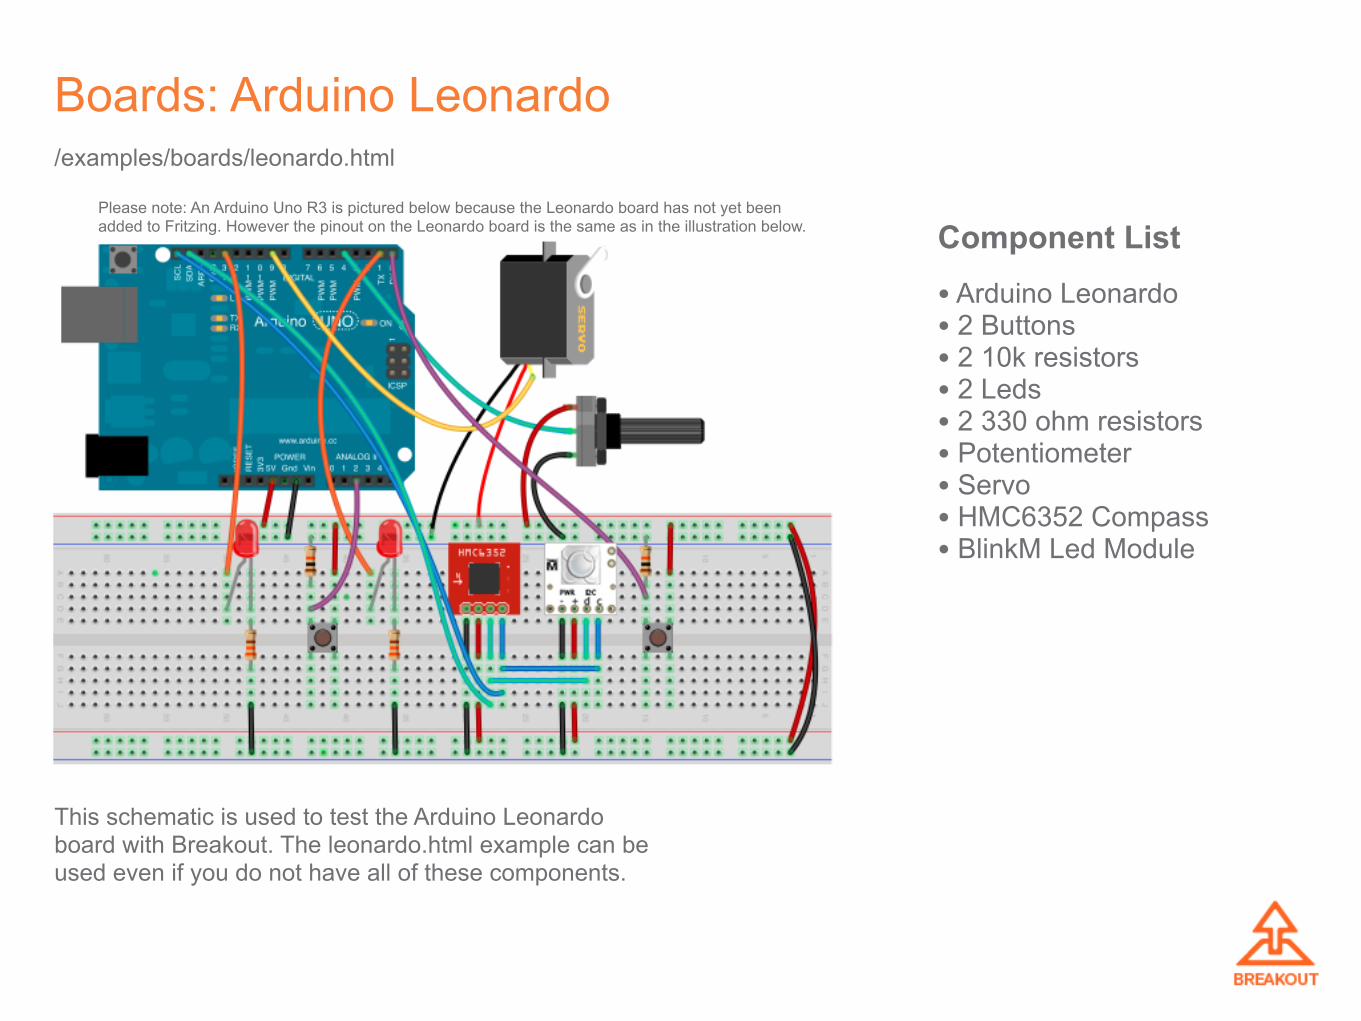
• Arduino Leonardo• 2 Buttons• 2 10k resistors• 2 Leds• 2 330 ohm resistors• Potentiometer• Servo• HMC6352 Compass• BlinkM Led Module
Component List
Boards: Arduino Leonardo/examples/boards/leonardo.html
This schematic is used to test the Arduino Leonardo board with Breakout. The leonardo.html example can be used even if you do not have all of these components.
Please note: An Arduino Uno R3 is pictured below because the Leonardo board has not yet been added to Fritzing. However the pinout on the Leonardo board is the same as in the illustration below.
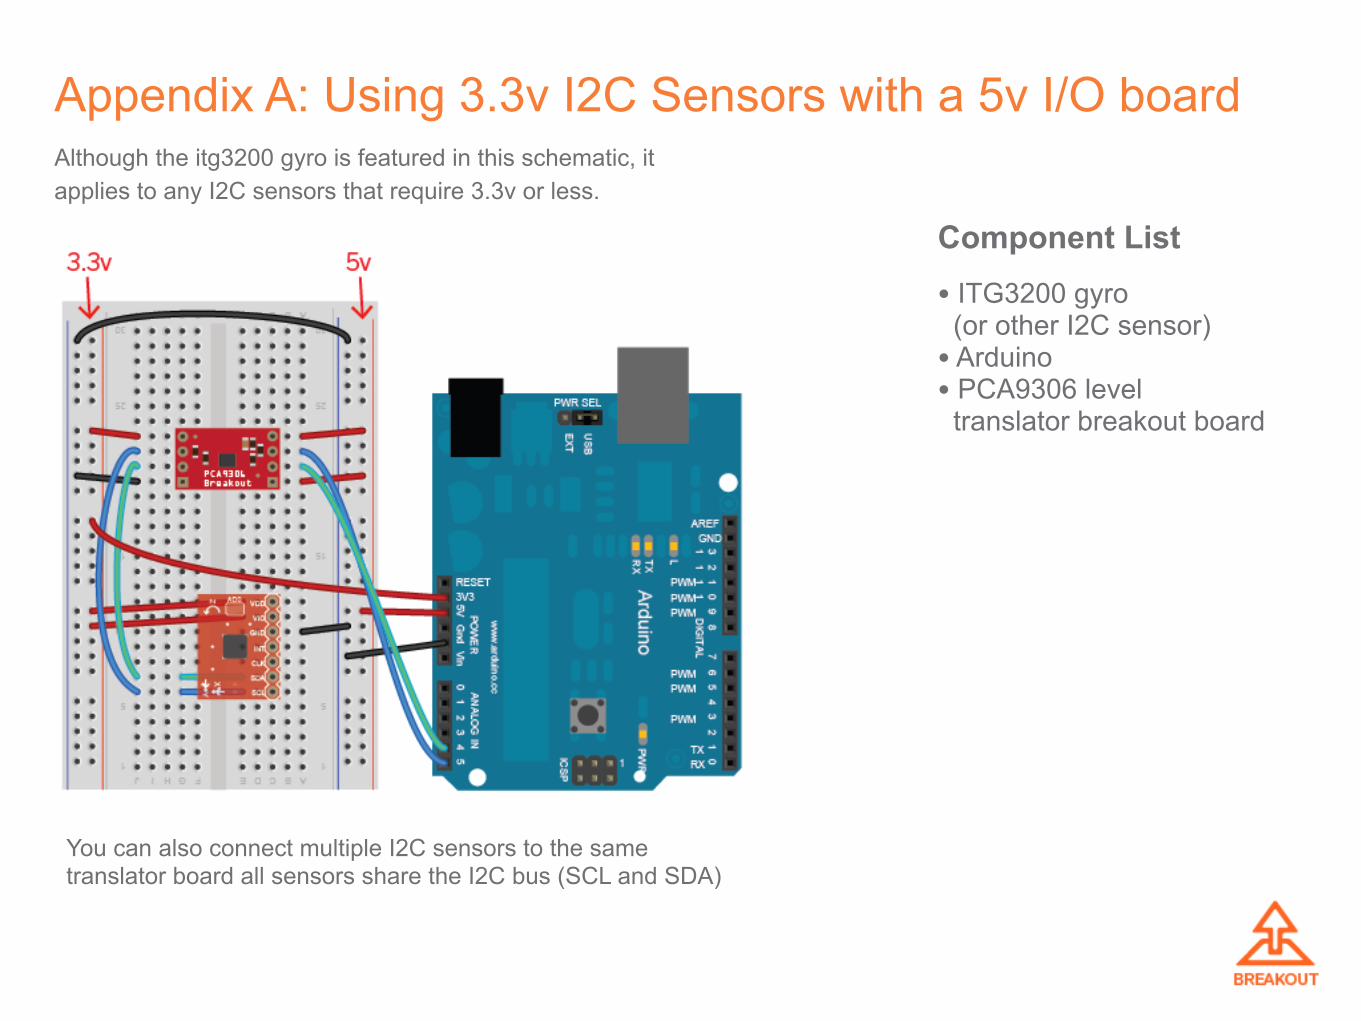
• ITG3200 gyro (or other I2C sensor)• Arduino• PCA9306 level translator breakout board
Component List
Appendix A: Using 3.3v I2C Sensors with a 5v I/O boardAlthough the itg3200 gyro is featured in this schematic, it applies to any I2C sensors that require 3.3v or less.
You can also connect multiple I2C sensors to the same translator board all sensors share the I2C bus (SCL and SDA)