schedule guide - ningapi.ning.com/.../scheduleguide.pdfschedule process flow ... schedule guide ......
TRANSCRIPT

Schedule Guide

SCHEDULE GUIDE
Schedule Features . . . . . . . . . . . . . . . . . . . . . . . . . . . . . . . . . . . . . . . . . . . . . . . . 5
Schedule Process Flow . . . . . . . . . . . . . . . . . . . . . . . . . . . . . . . . . . . . . . . . . . . . 6
Accessing the Schedule . . . . . . . . . . . . . . . . . . . . . . . . . . . . . . . . . . . . . . . . . . . 7
Accessing Another User’s Schedule . . . . . . . . . . . . . . . . . . . . . . . . . . . . . . . . . 7
Accessing Another User’s Schedule through the Dropdown on the Left Side of the Schedule 7Accessing Another User’s Schedule through the Schedule Menu 9
Accessing a Client’s Schedule . . . . . . . . . . . . . . . . . . . . . . . . . . . . . . . . . . . . . . 9
Components of the Schedule Page . . . . . . . . . . . . . . . . . . . . . . . . . . . . . . . . 10
Hiding Client Names . . . . . . . . . . . . . . . . . . . . . . . . . . . . . . . . . . . . . . . . . . . . . 11
Viewing a Week at a Glance . . . . . . . . . . . . . . . . . . . . . . . . . . . . . . . . . . . . . . 11
Using the Calendar Pane . . . . . . . . . . . . . . . . . . . . . . . . . . . . . . . . . . . . . . . . . 12
Setting Up Staff Shifts . . . . . . . . . . . . . . . . . . . . . . . . . . . . . . . . . . . . . . . . . . . 13
Adding Staff Shift Overrides . . . . . . . . . . . . . . . . . . . . . . . . . . . . . . . . . . . . . . 13
Setting Up iCalendar Feeds . . . . . . . . . . . . . . . . . . . . . . . . . . . . . . . . . . . . . . . 14
Proprietary Information: For Use by Qualifacts and Our Customers Only Page 2

SCHEDULING ACTIVITIES
Scheduling Clients . . . . . . . . . . . . . . . . . . . . . . . . . . . . . . . . . . . . . . . . . . . . . . . 16
Find Staff . . . . . . . . . . . . . . . . . . . . . . . . . . . . . . . . . . . . . . . . . . . . . . . . . . . . . . 17
Scheduling Groups . . . . . . . . . . . . . . . . . . . . . . . . . . . . . . . . . . . . . . . . . . . . . . 18
Scheduling Staff Activities . . . . . . . . . . . . . . . . . . . . . . . . . . . . . . . . . . . . . . . . 18
Scheduling Recurring Activities . . . . . . . . . . . . . . . . . . . . . . . . . . . . . . . . . . . 19
Using a Template to Schedule Activities . . . . . . . . . . . . . . . . . . . . . . . . . . . . 21
Copy a Scheduling Template 21Apply Templates to the Schedule 22Canceling Appointments Scheduled with Templates 23
Entering Batch Activities . . . . . . . . . . . . . . . . . . . . . . . . . . . . . . . . . . . . . . . . . 24
Scheduling Conflicts . . . . . . . . . . . . . . . . . . . . . . . . . . . . . . . . . . . . . . . . . . . . . 24
How to Confirm Scheduling Conflicts . . . . . . . . . . . . . . . . . . . . . . . . . . . . . . 27
Maintaining Mileage Records . . . . . . . . . . . . . . . . . . . . . . . . . . . . . . . . . . . . . 28
Adding Mileage Records 28Accessing Other Staff Member’s Mileage Record 28Adding Mileage Records for Other Staff Members 29Deleting Mileage Records 29
Proprietary Information: For Use by Qualifacts and Our Customers Only Page 3

WORKING WITH SCHEDULED ACTIVITIES
Editing Scheduled Activities . . . . . . . . . . . . . . . . . . . . . . . . . . . . . . . . . . . . . . 31
Viewing Client Information . . . . . . . . . . . . . . . . . . . . . . . . . . . . . . . . . . . . . . . 32
Marking the Status for Client Activities . . . . . . . . . . . . . . . . . . . . . . . . . . . . 33
Marking the Status for Group Activities . . . . . . . . . . . . . . . . . . . . . . . . . . . . 35
Using the Impacted Appointment List . . . . . . . . . . . . . . . . . . . . . . . . . . . . . . 36
Rescheduling Appointments in the Impacted Appointment List 37Removing Appointments from the Impacted Appointment List 38
Schedule an Activity Through a Service Document . . . . . . . . . . . . . . . . . . 39
Attaching Service Documents to Activities . . . . . . . . . . . . . . . . . . . . . . . . . 40
Scheduling a Client’s Next Appointment . . . . . . . . . . . . . . . . . . . . . . . . . . . 41
Modifying the Number of Appointments Associated with Recurring Activities 42
Proprietary Information: For Use by Qualifacts and Our Customers Only Page 4

Schedule Guide
The CareLogic Schedule is a flexible tool that is used to add and maintain activities (services) and to view the activities on the schedules of other staff members and clients. The Schedule allows client, group, and staff activities to be scheduled. Status is changed by staff. If the activity is marked as Kept, it is processed by the nightly run of the Claim Engine. If the activity is marked with Error, Canceled by Client, Canceled by Therapist, or Did Not Show, the activity will not be processed by the Claim Engine because the activity is not billable.
The following topics are included in this section:
• Schedule Features
• Schedule Process Flow
• Accessing the Schedule
• Accessing Another User’s Schedule
• Accessing a Client’s Schedule
• Components of the Schedule Page
• Hiding Client Names
• Viewing a Week at a Glance
• Using the Calendar Pane
• Setting Up Staff Shifts
• Adding Staff Shift Overrides
• Setting Up iCalendar Feeds
Schedule Features
The Schedule allows the user to:
• Access and maintain activities.
• Access the schedule of clients and other staff members.
• Schedule client, group, and staff activities.
• Edit scheduled activities.
• Change the status of activities to Checked In, In Session, Kept, Error, Canceled by Client, Canceled by Therapist, or Did Not Show.
• Complete service documentation associated with an activity.
• Schedule a client’s next appointment.
• Set up schedule availability, including in which organizations and days of the week employees will be available for appointments.
Proprietary Information: For Use by Qualifacts and Our Customers Only Page 5

• Enter batches of activities that occurred in the past into the system.
Schedule Process Flow
1. Schedule Appointment - In order to schedule an appointment, the client must have been entered into an active episode through Point of Entry. Appointments can be scheduled through Point of Entry, the Front Desk or the Schedule itself.
2. Client or Group Arrives for the Appointment ‐ Once the appointment date and time arrives, the client or group comes in to meet with the clinician.
3. Status the Appointment ‐ During the session, the appointment status can be marked as Checked In or In Session. After the session, the appointment should be marked with one of the following statuses.
‐ Error ‐ This status is used to indicate the appointment was scheduled in error. If the appointment status is marked as an Error, the process ends because there is no activity to bill.
‐ Kept ‐ This status is used to indicate the clinician and the client met for the appointment. If the appointment is marked as Kept it will be processed during the nightly run of the Claim Engine.
‐ Co-Staff ‐ This status is used to indicate that an employee is involved in an activity, but is not the primary staff member involved. The primary staff member would mark the same activity Kept and would appear on the subsequent claim.
‐ CBC (Canceled By Client) ‐ Unless the system is set up to bill activities that are marked CBC, the process ends at this point because there is no activity to bill.
Proprietary Information: For Use by Qualifacts and Our Customers Only Page 6

‐ CBT (Canceled By Therapist) ‐ The process ends at this point because there is no activity to bill.
‐ DNS (Did Not Show) ‐ Unless the system is set up to bill activities that are marked DNS, the process ends at this point because there is no activity to bill.
Accessing the Schedule
Users that interact with consumers will have access to their own schedule. This allows users to schedule client, group, and staff activities, enter service documentation, and mark appointment statuses. To access the schedule:
• Click Schedule in the navigation bar.
• From other screens within the Schedule tab, the Schedule can be accessed by clicking the Show Menu arrow in the status bar and selecting My Schedule.
Accessing Another User’s Schedule
Users with access to the Schedule can view the schedule of other users. Accessing other users schedules can be accomplished two ways:
Accessing Another User’s Schedule through the Dropdown on the Left Side of the Schedule
1. Click the Schedule Tab.
If an appointment is marked as CBC, CBT, or DNS, a memo can be added to the client’s chart to further explain if needed.
Proprietary Information: For Use by Qualifacts and Our Customers Only Page 7

2. Click the Staff Schedule dropdown on the left side of the screen.
3. Click the name of the staff member whose schedule it is desired to view.
Proprietary Information: For Use by Qualifacts and Our Customers Only Page 8

Accessing Another User’s Schedule through the Schedule Menu
1. Navigate to Schedule > Show Menu > Staff Schedule.
2. Select the name of the other user and click Submit.
Accessing a Client’s Schedule
To access a client’s schedule, perform a client search. Once the search results are returned, the client’s schedule can be accessed.
1. In the Client Search field in the navigation bar, enter the client’s full or partial name, client ID number, social security number, or date of birth and press Enter.
Proprietary Information: For Use by Qualifacts and Our Customers Only Page 9

2. Click the desired client’s Schedule button.
Components of the Schedule Page
The Schedule page provides a view of the scheduled activities (services) for the selected day. By default, staff members can add, update, and delete services at the organization they are logged in to and its child organizations. In addition, staff members can view services that they have sched‐uled at other organizations.
Schedule page components:
• The first column will contain either the C, G, and S buttons or a Schedule button. For time intervals that do not have a scheduled activity, the C, G, and S buttons appear in this column. For time intervals that have an activity scheduled, the Schedule button appears.
‐ C Button ‐ Used to schedule client activities. (See Scheduling Clients.)
‐ G Button ‐ Used to schedule group activities. (See Scheduling Groups.)
‐ S Button ‐ Used to schedule staff activities. (See Scheduling Staff Activities.)
‐ Schedule Button ‐ Used to edit scheduled activities. (See Editing Scheduled Activities.)
• Begin and End Columns ‐ List the time increments by which the schedule is set up. By default, the activity length is set to 30 minutes.
• Client Column ‐ For client activities, this column lists the client name and ID number as a hyperlink to the client’s ECR. For group activities, this column lists the group name.
Once the status of an activity is marked as Kept, the Begin and End time show the times that the clinician enters in the Time From and Time To fields.
Proprietary Information: For Use by Qualifacts and Our Customers Only Page 10

• Activity Column ‐ Shows the activity that is scheduled.
• Status Column ‐ Shows the status of the appointment.
• SvcDoc Column ‐ Used to attach service documentation to an activity.
• Next Column ‐ Used to schedule clients’ next appointments.
Hiding Client Names
By default, the Schedule page lists the client name and ID number for scheduled client services. To protect the privacy of clients, it is possible to modify the Schedule so that only the client’s ID number is displayed.
1. Navigate to the Schedule and click the Hide Client Names button in the status bar.
Viewing a Week at a Glance
By default, the schedule is displayed a day at a time. It is possible to view the schedule in Week at a Glance mode. This is a summary view of the activities that are scheduled for the selected week.
1. Navigate to the Schedule and click the Week at a Glance button in the status bar.
The Schedule’s view can be changed to view only the client’s ID number by pressing the Hide Client Names button. This can be done to protect the privacy of clients if needed.
The Hide Client Names view is saved until it is changed back to the original view. The Show Cli-ent Names button can be used to return to the original view.
Proprietary Information: For Use by Qualifacts and Our Customers Only Page 11

Using the Calendar Pane
The calendar pane, located on the left side of the Schedule page, allows the user to view other dates on the calendar.
The calendar pane contains the following features:
• Previous Week ‐ Used to access previous weeks’ schedules.
• Next Week ‐ Used to access future weeks’ schedules.
• Date Field ‐ Allows the user to enter a date or pick it from a pop‐up calendar and view the corresponding schedule.
Proprietary Information: For Use by Qualifacts and Our Customers Only Page 12

Setting Up Staff Shifts
The Staff Shifts/Organizations module is used to set up the staff member’s availability and allows the creation and modification of a staff member’s shifts. Shift information is used by CareLogic to warn a user if they are scheduling an appointment where no shift is available.
1. Navigate to Schedule > Show Menu > Staff Shifts/Organizations.
2. Click Add Shift.
3. Fill out the needed information and click Submit. The staff member’s schedule is saved and listed on the Staff Shifts/Organizations page.
Adding Staff Shift Overrides
If an activity is scheduled outside of a staff member’s availability, CareLogic allows the override after the user is warned and asked if they are sure they wish to schedule the activity.
Proprietary Information: For Use by Qualifacts and Our Customers Only Page 13

From time to time it is necessary to change a staff shift to accommodate all staff members. Staff shift overrides can be added if needed.
1. Navigate to Schedule > Show Menu > Staff Shifts/Organizations.
2. Click View Overrides.
3. Click Add Override.
4. Fill out the override information and click Submit in the status bar. The staff member’s shift override is saved and listed on the Staff Profile - Organization Override page.
Setting Up iCalendar Feeds
CareLogic allows providers to export their CareLogic schedules to their Outlook, Google Calen‐dar, or iCal calendars to view scheduled appointments when not logged into CareLogic.
The iCalendar feed is a one‐way transmission of schedule information. The CareLogic schedule can be displayed in second party calendars, but second party calendar appointments do not flow back into CareLogic.
Block Staff Activities, Per Diem Activities, and Order Activities are not pulled into the iCal feed. Appointments are pulled from 30 days prior to the current date and to the furthest date in the future that a scheduled appointment exists.
Proprietary Information: For Use by Qualifacts and Our Customers Only Page 14

1. Navigate to Schedule > Show Menu > iCalendar Feed.
2. Click on the iCalendar Address URL to copy the iCal feed address to the computer’s clipboard or, if needed, right click the link and pick Save Target As.
3. Open the calendar application and add the file in the appropriate location.
Each provider must set their iCal feed up independently.
Because the iCal feed deals with sensitive consumer information, extra precautions should be taken to ensure HIPAA compliance.
Proprietary Information: For Use by Qualifacts and Our Customers Only Page 15

Scheduling Activities
The Schedule allows client, group, and staff activities to be scheduled.
This section includes the following topics:
• Scheduling Clients
• Find Staff
• Scheduling Staff Activities
• Scheduling Recurring Activities
• Entering Batch Activities
• Scheduling Conflicts
• How to Confirm Scheduling Conflicts
• Maintaining Mileage Records
Scheduling Clients
In order to schedule an activity, the client must be actively enrolled in a treatment program. If scheduling a client who is not enrolled in a treatment program is attempted, the Schedule page cannot be completed.
1. Navigate to Schedule > Show Menu > New Client Activity, or click the C button on the Schedule page.
2. Fill out the needed information and click Submit in the status bar. The client activity is saved and listed on the Schedule and Front Desk Schedule pages.
Proprietary Information: For Use by Qualifacts and Our Customers Only Page 16

Find Staff
The Find Staff feature is an enhanced staff search with filters for age range, payer, credential, and specialty.
1. Navigate to Schedule > Show Menu > New Client Activity, or click the C button on the Schedule page.
2. Select the Find Staff link.
3. Fill out the needed information and click Submit at the bottom of the search form.
Proprietary Information: For Use by Qualifacts and Our Customers Only Page 17

4. Select one provider and click Submit in the search form. The selected staff will be entered on the Schedule a Client Activity page.
Scheduling Groups
When a group activity is scheduled, the individual clients who make up the group are assigned to the activity.
1. Navigate to Schedule > Show Menu > New Group Activity, or click the G button on the Schedule page.
2. Fill out the needed information and click Submit in the status bar. The group activity is saved and listed on the Schedule page. The individual clients who are assigned to the group are listed at the bottom of the Schedule page, under the heading, Group Members.
Scheduling Staff Activities
Staff activities are used to designate times on the schedule when the staff member is unable to see scheduled clients. Some examples of staff activities include block activities, weekly meetings,
Proprietary Information: For Use by Qualifacts and Our Customers Only Page 18
lunch, and short‐term leaves.
Block activities allow time to be blocked on the schedule to work with unscheduled clients. For example, a staff member may block off a period of time to perform intake assessments for clients. This activity is classified as a block activity because the staff member has not scheduled specific clients during that time. Instead, the staff member has designated a period to perform intake assessments on any clients that need an intake at that time. Once the client intake assessments are complete and the clients are admitted into the treatment facility, activities can be scheduled, which follow the appropriate steps for client activities.
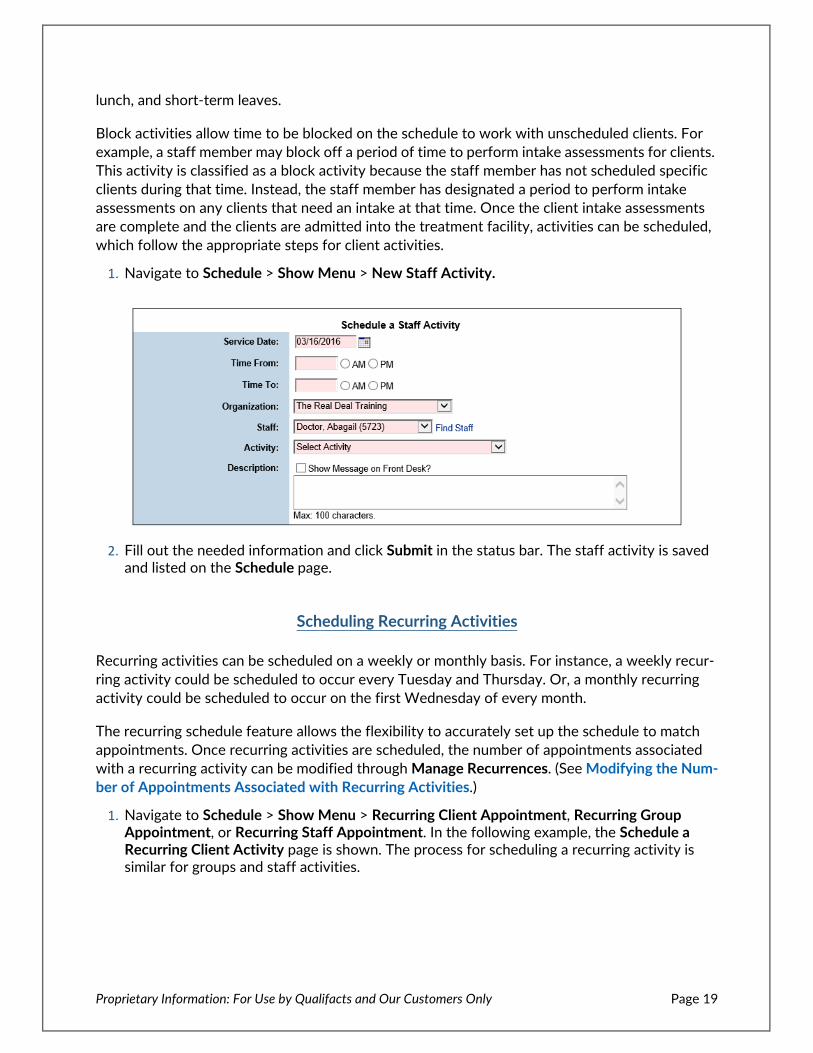
1. Navigate to Schedule > Show Menu > New Staff Activity.
2. Fill out the needed information and click Submit in the status bar. The staff activity is saved and listed on the Schedule page.
Scheduling Recurring Activities
Recurring activities can be scheduled on a weekly or monthly basis. For instance, a weekly recur‐ring activity could be scheduled to occur every Tuesday and Thursday. Or, a monthly recurring activity could be scheduled to occur on the first Wednesday of every month.
The recurring schedule feature allows the flexibility to accurately set up the schedule to match appointments. Once recurring activities are scheduled, the number of appointments associated with a recurring activity can be modified through Manage Recurrences. (See Modifying the Num-ber of Appointments Associated with Recurring Activities.)
1. Navigate to Schedule > Show Menu > Recurring Client Appointment, Recurring Group Appointment, or Recurring Staff Appointment. In the following example, the Schedule a Recurring Client Activity page is shown. The process for scheduling a recurring activity is similar for groups and staff activities.
Proprietary Information: For Use by Qualifacts and Our Customers Only Page 19

2. Fill out the needed information and click the Recurrence tab.
3. Fill out the needed information and click Submit.
Proprietary Information: For Use by Qualifacts and Our Customers Only Page 20

4. Confirm the recurrences by checking the corresponding boxes and click Submit.
Using a Template to Schedule Activities
Using templates to drop multiple segments of time onto schedules can be time saving and effi‐cient.
1. Navigate to Administration > Show Menu > Scheduling Template Administration.
2. Click Add Template.
3. Fill out the needed information and click Submit. The template is saved and added to the Scheduling Templates List, where it can be copied, applied, or deleted if need be.
Copy a Scheduling Template
It is easy to copy a template to make slight variations on a theme.
Scheduling templates are limited to Staff and Client activities alone, and cannot be used for Group activities. Only system administrators have the permission necessary to create schedule templates.
Proprietary Information: For Use by Qualifacts and Our Customers Only Page 21

1. Navigate to Administration > Show Menu > Scheduling Template Administration.
2. Click Create Copy for the template that needs copying.
3. Fill out the needed information and click Submit. The copied template is available on the Scheduling Templates List and can be modified as needed.
Apply Templates to the Schedule
Once templates have been created, they need to be applied to the Schedule to be effective.
1. Navigate to Administration > Show Menu > Scheduling Template Administration.
Scheduling templates are limited to Staff and Client activities alone, and cannot be used for Group activities. Only system administrators have the permission necessary to copy schedule templates.
Scheduling templates are limited to Staff and Client activities alone, and cannot be used for Group activities. Only system administrators have the permission necessary to apply templates to the Schedule.
Proprietary Information: For Use by Qualifacts and Our Customers Only Page 22

2. Click Apply to Schedule.
3. Fill out the needed information and click Submit. The template is applied to the Schedule and the appointments are scheduled accordingly.
Canceling Appointments Scheduled with Templates
It is possible to cancel appointments that have been scheduled with a template in the event that the staff member involved has to be absent for some of the effected days, like they would if they scheduled a vacation.
1. Navigate to Schedule > Show Menu > Cancel Templated Appointments.
Proprietary Information: For Use by Qualifacts and Our Customers Only Page 23

2. Fill out the needed information and click Submit. The template scheduled appointments are removed for the dates described.
Entering Batch Activities
The Batch Activity Entry module is used to enter multiple activities into CareLogic. This module can be used by staff members who treat clients in the field or by staff members who do not have access to their schedule during the day. After meeting with clients, the staff member can use Batch Activity Entry to enter the activities into the system.
1. Navigate to Schedule > Show Menu > Batch Activity Entry.
2. Fill in the claim information and click Submit. The activities are entered into the system and their status is marked as Kept.
Scheduling Conflicts
Scheduling conflicts do not prevent services from being scheduled. When a scheduling conflict occurs, the system displays a message describing the conflict in the status bar. Below are some common scheduling conflicts and their explanations:
The activity you are attempting to schedule overlaps with an existing appointment for this client.
There are two options when the scheduling conflict occurs:
• Confirm the appointment even though the conflict exists.
Staff members can use the Batch Activity Entry module to enter activities for other staff mem‐bers.
There is a configuration available that allows overlapping client activities. When enabled, over‐lapping services appear as scheduling conflicts that can be confirmed. If it is not enabled, the system will not allow the scheduling of overlapping services. Contact Qualifacts Support if the configuration needs to be turned on or off.
Proprietary Information: For Use by Qualifacts and Our Customers Only Page 24

• Reschedule the appointment.
The activity you are attempting to schedule overlaps with an existing entry for this staff.
When employment records are set up in the Employee module, each staff member is granted or denied the ability to schedule two overlapping appointments (multi‐book appointments). When a staff member, who has been granted the ability to multi‐book appointments, schedules an over‐lapping appointment, the system displays this message as a warning.
There are two options when the scheduling conflict occurs:
• Confirm the appointment even though the conflict exists.
• Reschedule the appointment.
The scheduled activity is outside the staff’s availability.
The Organization by Day module is used to define the times that staff members are available to meet with clients. If a staff member is scheduled for an appointment that falls outside of their Organization by Day schedule, the system displays this message as a warning.
There are two options when the scheduling conflict occurs:
• Confirm the appointment even though the conflict exists.
• Reschedule the appointment.
The activity selected does not go with this group.
When the client groups are set up, there is an option to associate an activity with the group. This means each time the group is scheduled, the related activity should be used. If the group is sched‐uled to a different activity, the system displays this message as a warning.
There are two options when the scheduling conflict occurs:
• Confirm the appointment even though the conflict exists.
• Reschedule the appointment.
The client that you are attempting to schedule has another activity on this service date.
This message appears when the same client is scheduled for more than one activity on the same service date.
There are two options when the scheduling conflict occurs:
• Confirm the appointment even though the conflict exists.
• Reschedule the appointment.
Staff does not speak the same language as the client.
Primary and secondary languages are defined in the Demographics module when staff members and clients are set up in the system. If a service is scheduled for a staff member and client who do
Proprietary Information: For Use by Qualifacts and Our Customers Only Page 25
not speak the same language, the system displays the warning.
There are two options when the scheduling conflict occurs:
• Confirm the appointment even though the conflict exists.
• Reschedule the appointment.
Client does not have an authorization for this service.
Each time a service is scheduled, the system identifies the payer, determines if an authorization is required, then verifies that an authorization is available for the service. If a service for a client is scheduled, but a payer authorization does not exist, the system displays this message as a warn‐ing.
There are two options when the scheduling conflict occurs:
• Confirm the appointment even though the conflict exists.
• Reschedule the appointment.
The client does not have an active Referring Physician Date Range.
If the system is using the Referring Physician Configuration, it will look to see if the client has an active client relationship PCP/Referring Physician Date Range entry that covers the date of ser‐vice. If the Show Program configuration is also being used, the system checks to see if the client service requires a Referring Physician. If the client does not have an active client relationship PCP/Referring Physician Date Range entry that covers the date of service, a scheduling conflict error will appear.
The activity you are attempting to schedule is not on the client’s service plan.
This scheduling conflict appears any time a client is scheduled for an activity that is not listed on the client’s most recent, signed treatment plan if the agency is configured to validate scheduled services based on activities included in the client’s treatment plan.
The language check is a default configuration. Contact Qualifacts Support if the configuration needs to be disabled.
Though activities can be scheduled without an authorization, if one is required and the activity is marked Kept anyway, the Claim Engine will generate an error and move the claim into Failed Claims.
Though activities can be scheduled without an active PCP/Referring Physician Date Range, if one is required and the activity is marked Kept anyway, the Claim Engine will generate an error and move the claim into Failed Claims.
Proprietary Information: For Use by Qualifacts and Our Customers Only Page 26

There is no active panel for this payer.
Payer panels are set up before payer billing configurations, during which the payer panel can be selected. If a payer panel has been selected for a payer, the system checks that the staff member selected is authorized to provide services.
This scheduling conflict may appear under two scenarios:
• There is no payer panel set up for the organization selected when scheduling the service.
• There client payer’s payer panel is not valid for the service date selected when scheduling the service.
Staff member is not authorized to provide this service
Payer panels are set up before payer billing configurations, during which the payer panel can be selected. If a payer panel has been selected for a payer, the system checks that the staff member selected is authorized to provide services. The reason this warning is a scheduling conflict, instead of a scheduling error, is because the staff member selected may be authorized to provide services under the payer panel, but they may not be authorized to provide services for the particular pro‐gram or the activity selected when scheduling the service.
How to Confirm Scheduling Conflicts
When a scheduling conflict occurs, confirm it in order to schedule the appointment. The process of confirming scheduling conflicts is the same, regardless of the type of conflict.
1. A scheduling conflict message appears in the Attention field of the Schedule a Client Activity page.
2. After reviewing the scheduling conflict, select Yes in the Are you sure you want to schedule this activity? field and click Submit.
Proprietary Information: For Use by Qualifacts and Our Customers Only Page 27

Maintaining Mileage Records
CareLogic provides the ability to enter and track mileage for staff members and run reports to ensure accurate reimbursement for staff travel. The My Mileage module allows staff mileage associated with providing client care and staff travel associated with administrative tasks to be entered in the system.
Adding Mileage Records
1. Navigate to Schedule > Show Menu > My Mileage.
2. Click Add New Mileage.
3. Fill out the needed information and click Submit.
Accessing Other Staff Member’s Mileage Record
It is possible to access other staff’s mileage records.
1. Navigate to Schedule > Show Menu > Alternate Mileage.
Proprietary Information: For Use by Qualifacts and Our Customers Only Page 28

2. Search for a staff member, once found click Submit.
Adding Mileage Records for Other Staff Members
CareLogic also makes it possible to add mileage records for other users.
1. Navigate to Schedule > Show Menu > Alternate Mileage. Search for a staff member, once found click Submit.
2. Click Add New Mileage.
3. Fill out the needed information and click Submit.
Deleting Mileage Records
Staff members with administrative privileges have the ability to delete mileage entries for alter‐nate staff members. Other users only have the ability to delete their own mileage records.
Proprietary Information: For Use by Qualifacts and Our Customers Only Page 29
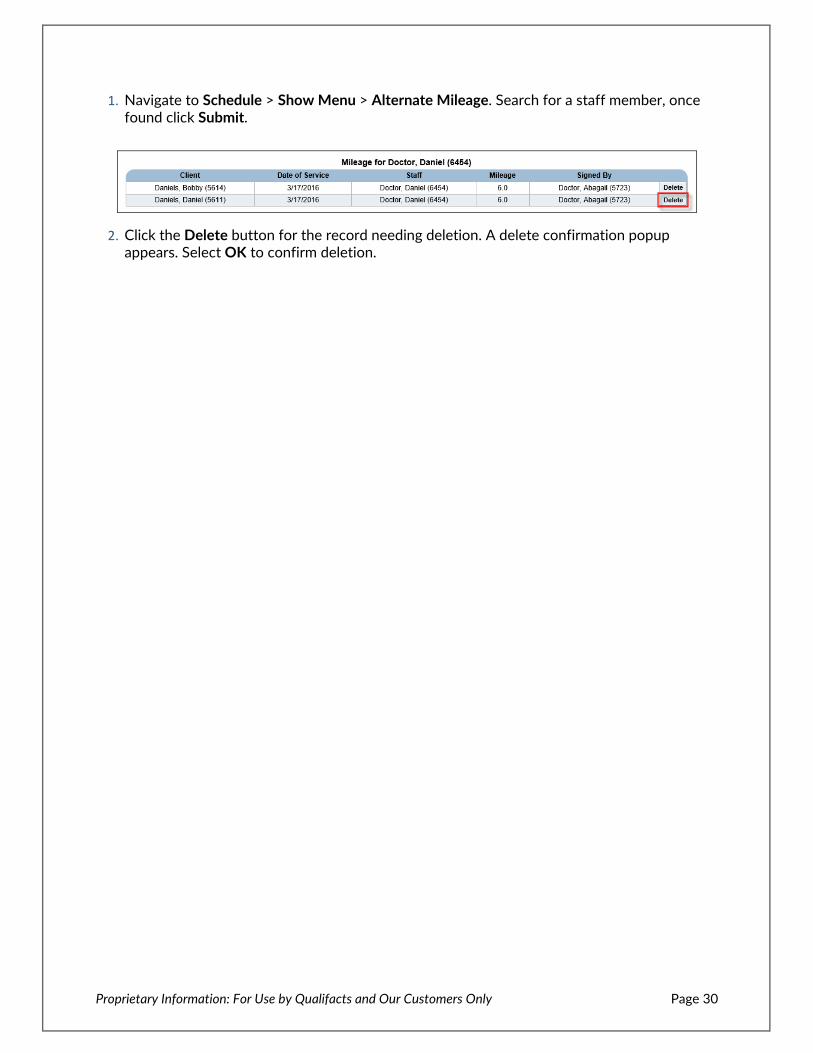
1. Navigate to Schedule > Show Menu > Alternate Mileage. Search for a staff member, once found click Submit.
2. Click the Delete button for the record needing deletion. A delete confirmation popup appears. Select OK to confirm deletion.
Proprietary Information: For Use by Qualifacts and Our Customers Only Page 30

Working with Scheduled Activities
Once an activity (service) is scheduled, it appears on the staff member’s Schedule. There are sev‐eral features on the Schedule page that enable the user to work with the activity after it is sched‐uled.
This section includes the following topics:
• Editing Scheduled Activities
• Viewing Client Information
• Marking the Status for Client Activities
• Marking the Status for Group Activities
• Schedule an Activity Through a Service Document
• Attaching Service Documents to Activities
• Scheduling a Client’s Next Appointment
• Modifying the Number of Appointments Associated with Recurring Activities
Editing Scheduled Activities
Once an activity is scheduled, the details of the activity can be edited as long as the status of the activity has not been marked. This applies to all three types of activities: client, group, and staff.
1. Navigate to Schedule and click the Schedule button of the activity needing to be edited.
Staff members who have access to multiple child organizations are able to view all of their scheduled activities in the Schedule. However, only activities scheduled at the organization cur‐rently logged into can be modified. Activities that are scheduled at other organizations appear in read‐only mode. In order to modify these activities, the staff member must log into the appropri‐ate organization.
Proprietary Information: For Use by Qualifacts and Our Customers Only Page 31

2. Make the desired edits to the scheduled activity and click Submit.
Viewing Client Information
It is possible to view a client’s ECR from the Schedule as long as they are scheduled for an activity.
1. Navigate to Schedule.
2. Click the name of the client whose information is needed. The ECR for the selected client appears. (See the Client Guide for information about the ECR.)
Proprietary Information: For Use by Qualifacts and Our Customers Only Page 32

Marking the Status for Client Activities
A client activity can be marked with any of the following statuses: Kept, Co-Staff, Checked In, In Session, CBC (Canceled By Client), CBT (Canceled By Therapist), DNS (Did Not Show), or Error.
1. Navigate to Schedule and click the status button for the client activity needing update.
Appointment Status must be marked before CareLogic will allow adding any required service documentation. After the activity is marked as Kept, the Claim Engine will process the activity during its nightly run.
If desired, the Kept radio button can be restricted by privilege level, so that staff without access will not have Kept as an option. Contact Qualifacts Support for help setting up Kept button priv‐ileges.
Proprietary Information: For Use by Qualifacts and Our Customers Only Page 33

2. Pick the radio button for the desired status and fill out any needed information.
3. At this point there can be two options: Submit or Submit and Continue to Document.
• Submit marks the status according to the radio button picked. Note that the button under the SvcDoc column says No-Add. This indicates that the service documentation is still need‐ing to be filled out.
• Submit and Continue to Document is only available if the status radio button is marked as Kept or In Session. When clicked, it takes the user directly into the service documentation for the activity at hand.
‐ If the service documentation has been started but not completed, the button in the SvcDoc column will read Yes.
‐ If the service documentation is completed and signed, the button in the SvcDoc column will read Yes-Signed.
If the appointment is scheduled for a future date, it cannot be marked as Checked In, In Session, or Kept unless the system is configured to allow so. Contact Qualifacts Support for help with this configuration.
Proprietary Information: For Use by Qualifacts and Our Customers Only Page 34

Marking the Status for Group Activities
Group activities can be marked with the following statuses for each individual client: Kept, Co-Staff, In Session, CBC (Canceled By Client), CBT (Canceled By Therapist), DNS (Did Not Show), Not Scheduled, or Error.
1. Navigate to Schedule. Click the button in the status column for the group activity needing update.
If desired, the Kept radio button can be restricted by privilege level, so that staff without access will not have Kept as an option. Contact Qualifacts Support for help setting up Kept button priv‐ilege.
The Appointment Status of any activity must be marked and submitted before adding any required service documentation. After the activity is marked as Kept, the Claim Engine will pro‐cess the activity during its nightly run.
Because there are multiple clients with different statuses in a group, the following order of oper‐ations logic is used to determine the status to display for the group: Kept > Checked In > In Ses-sion > DNS > CBC > CBT > Error. As long as one client in the group has a status of Kept, the group status will be Kept. If all the clients cancel (CBC) except one client who does not show (DNS), the higher order status is displayed for the group, DNS.
Proprietary Information: For Use by Qualifacts and Our Customers Only Page 35

2. Select the status for each individual client using the dropdown in the Status column.
3. Click Submit.
Using the Impacted Appointment List
The Impacted Appointment List is a holding place for appointments that have been marked as Canceled By Therapist (CBT). It is used to manage missed appointments and to help reschedule them.
When a client appointment is canceled by the therapist using the CBT status, the Do you want to place this client appointment on the Impacted Appointment List? field appears.
Proprietary Information: For Use by Qualifacts and Our Customers Only Page 36

If Yes is selected when the status is submitted, the appointment will be sent to the Impacted Appointment List. To access the Impacted Appointment List:
1. Navigate to Schedule > Show Menu > Impacted Appointment List.
2. Search using the available fields and press Submit.
Rescheduling Appointments in the Impacted Appointment List
Appointments can be easily rescheduled in the Impacted Appointment List.
1. Navigate to Schedule > Show Menu > Impacted Appointment List > Search using the avail‐able fields and press Submit.
Proprietary Information: For Use by Qualifacts and Our Customers Only Page 37

2. Click the Reschedule button for the desired activity.
3. Fill out the needed information and click Submit.
4. Pick an available time.
5. Fill out the needed information and click Submit. The appointment has been rescheduled and is removed from the Impacted Appointment List.
Removing Appointments from the Impacted Appointment List
Proprietary Information: For Use by Qualifacts and Our Customers Only Page 38

Rescheduling an appointment will remove it from the Impacted Appointment List. If rescheduling is not an option, the appointment can still be removed.
1. Navigate to Schedule > Show Menu > Impacted Appointment List > Search using the avail‐able fields and press Submit.
2. Check the Remove box for the appointment needing removal and click Remove Selected. The appointment is removed from the Impacted Appointment List.
Schedule an Activity Through a Service Document
Service documents can be configured so that activities can be scheduled as a part of filling out the service document. This feature allows staff members to meet with clients on an unscheduled basis, and then schedule the activity after the fact when they complete the service document. Once an activity is scheduled through a service document, it is automatically marked as Kept, which means it will be processed by the nightly run of the Claim Engine.
1. Access a service document that has been configured to schedule an activity.
2. Click Schedule Service.
Scheduling a service through a service document still must pass scheduling validation (see Scheduling Conflicts) and scheduling rules (see the System Administration Guide).
Proprietary Information: For Use by Qualifacts and Our Customers Only Page 39

3. Fill out the needed information and click Submit. The activity is saved and the status of the activity is marked as Kept. During the nightly run of the Claim Engine, the activity will be pro‐cessed for billing.
Attaching Service Documents to Activities
Once the status of an activity is marked as Kept or In Session, service documentation can be added. This can be done immediately using the Submit and Continue to Document button or, if desired, the status can be submitted and the service document can be filled out at a later time. The following describes filling out service documentation after the activity has been marked Kept on the Schedule:
1. Navigate to Schedule.
2. Click the No - Add button. The service document appears.
Proprietary Information: For Use by Qualifacts and Our Customers Only Page 40

3. Complete the service document
Scheduling a Client’s Next Appointment
There is a quick and easy way to assign a client’s next appointment from the Schedule page.
1. Navigate to the Schedule.
2. Click the Next button for the client whose next appointment needs to be scheduled.
3. Fill out the needed information for the next appointment and click Submit in the status bar.
Proprietary Information: For Use by Qualifacts and Our Customers Only Page 41

4. To select an appointment time, click the time slot.
5. Fill out the needed information and click Submit.
Modifying the Number of Appointments Associated with Recurring Activities
Once recurring activities have been scheduled, the Manage Recurrences module can be used to increase the number of appointments or discontinue the remaining appointments associated with the recurring activity. (To schedule a recurring activity initially, see Scheduling Recurring Activi-ties.)
1. Navigate to Schedule > Show Menu > Manage Recurrences.
Proprietary Information: For Use by Qualifacts and Our Customers Only Page 42

2. Click the recurring appointment it is desired to change.
• To increase the number of appointments associated with the recurring activity, click Copy Forward Recurrence.
‐ Fill out the needed information and click Submit.
• To discontinue the appointments associated with the recurring activity, click Error Remaining Activities.
The recurring activity is extended by the number of appointments entered. For example, if 10 is entered in the Number of Occurrences field, there are 10 new appointments added to the recur‐ring activity schedule. If there were 30 in the original recurring appointment, there will now be 40 total.
Proprietary Information: For Use by Qualifacts and Our Customers Only Page 43
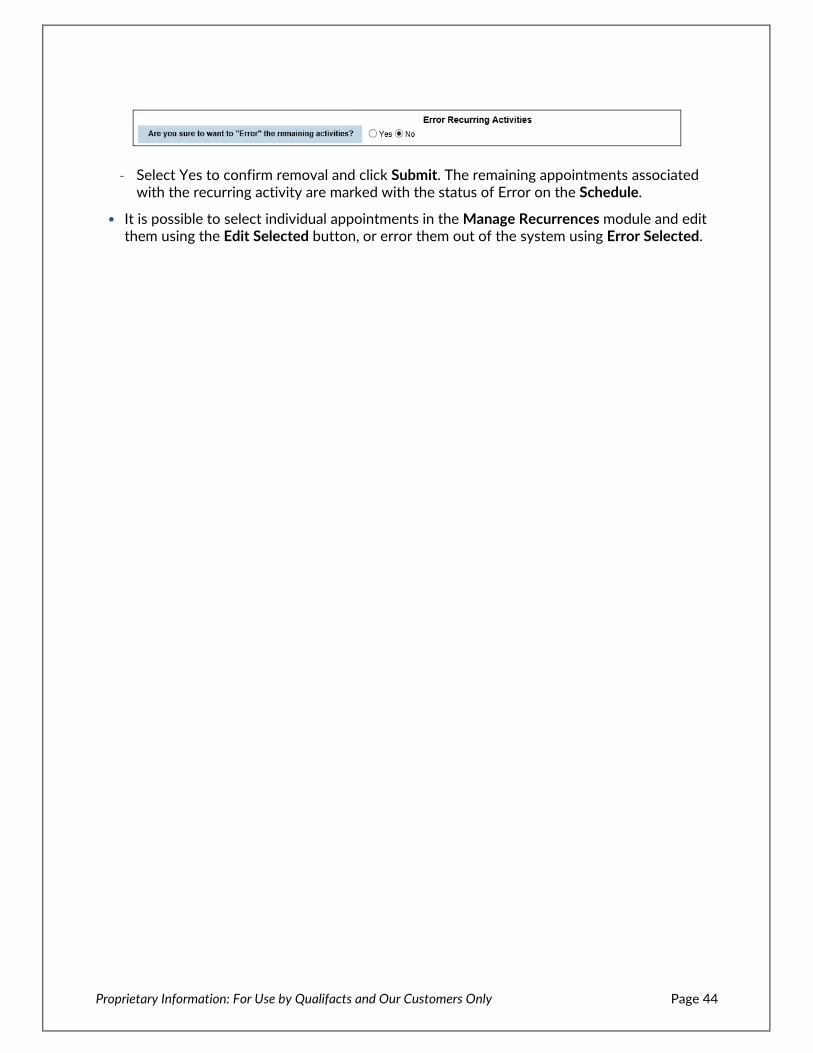
‐ Select Yes to confirm removal and click Submit. The remaining appointments associated with the recurring activity are marked with the status of Error on the Schedule.
• It is possible to select individual appointments in the Manage Recurrences module and edit them using the Edit Selected button, or error them out of the system using Error Selected.
Proprietary Information: For Use by Qualifacts and Our Customers Only Page 44