sasha negotiated report
TRANSCRIPT
8/6/2019 Sasha Negotiated Report
http://slidepdf.com/reader/full/sasha-negotiated-report 1/6
Level Two Digital Animation
by Sasha Lawrence
My 'Negotiated Brief' Project Report –
Making 'Poppy' into a Stop-Motion Puppet I have now completed the work for the negotiated brief project – this is an evaluative report of how
I approached the project , my achievements (the knowledge and skills I have gained to allow a
creative approach in animation) and the problems have encountered and solved along the way.
What was the project?
The project was called the 'negotiated brief' as I had to
propose a brief and negotiate it with the tutors for acreating a piece of work for animation – focusing on trying
something new and out of my comfort zone. I saw the
project as a great opportunity to learn about stop motion
and to build a stop-motion puppet:
An introduction to Stop-motion...
In the negotiated brief project I wanted to educate myself
about the world of stop motion, as it is a technique I am
greatly interested in but have not had the opportunity to doyet. I wanted to expand my knowledge by making a stop-
motion puppet and using this to begin animating:
My approach to the project:
Initially I had to write a brief, setting myself tasks to
achieve for the project - to help me gain a better
understanding of stop-motion (taking into account what I
could realistically achieve within the deadline of the 8th
of
June) I decided these were:
– To design a character for a stop motion puppet – To make a test puppet that can be animated
– To animate puppet
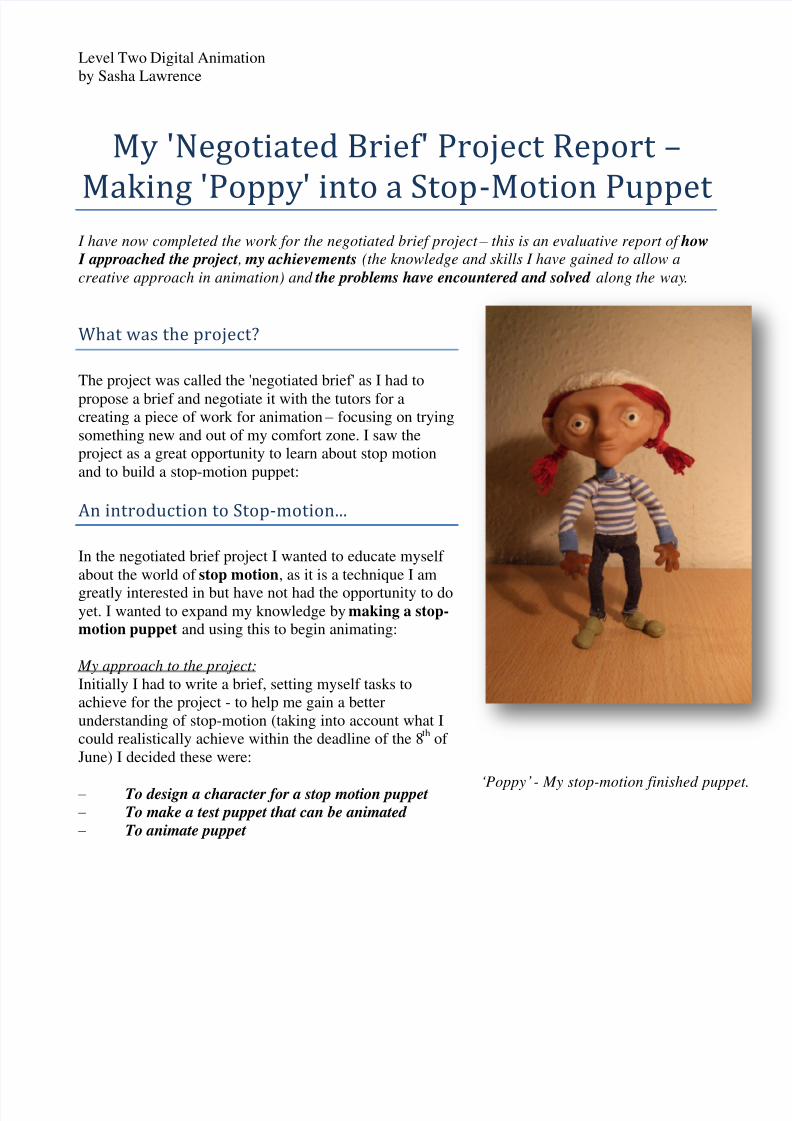
‘ Poppy
’ - My stop-motion finished puppet.
8/6/2019 Sasha Negotiated Report
http://slidepdf.com/reader/full/sasha-negotiated-report 2/6
Level Two Digital Animation
by Sasha Lawrence
Task 1 - To design a character for a stop
motion puppet
I wanted to focus more on how a character design could be turned into a technical design for a stop-
motion puppet, so rather than designing a character from scratch I took inspiration from my designs
and character turnarounds of 'Poppy' from my pre-production bible 'Poppy and The Pasty Factory' –
who I thought would work great as a stop-motion puppet. I learnt from Ann's notes on Character
Design for stop-motion about not just focusing on the aesthetics of the puppet but also how she will
move or her 'key poses' (that define the character's style and movement) I thought about Poppy's
gestures and posture in that she's a feisty, quirky young girl who stands out from the crowd with her
skinny frame and big pasty shape head.
To turn my initial character designs into a technical drawing I had to take into account in the
construction design of my character:
The materials needed – I had to research how to actually go about creating a stop-motion
armature and looked the advantages and disadvantages of materials that were available to
create the style of puppet I wanted. I took reference from Ann's notes and the book 'Stop
Motion: Craft Skills for Model Animation' by Susannah Shaw and the internet. I had take
note of my budget in create a simple armature, given that professional ball and socket
jointed armature can be expensive and require enginerring skills and would out the material
I could order to work with in time.
Keeping her light – I had to think about how the slim joints (such as wrists and ankles)could still be strong.
Change of clothes -I changed my design to long sleeved top and trousers, rather than shorts
as the clothes are still the style of my character, just means less exposed skin. (I still used
latex for the hands)
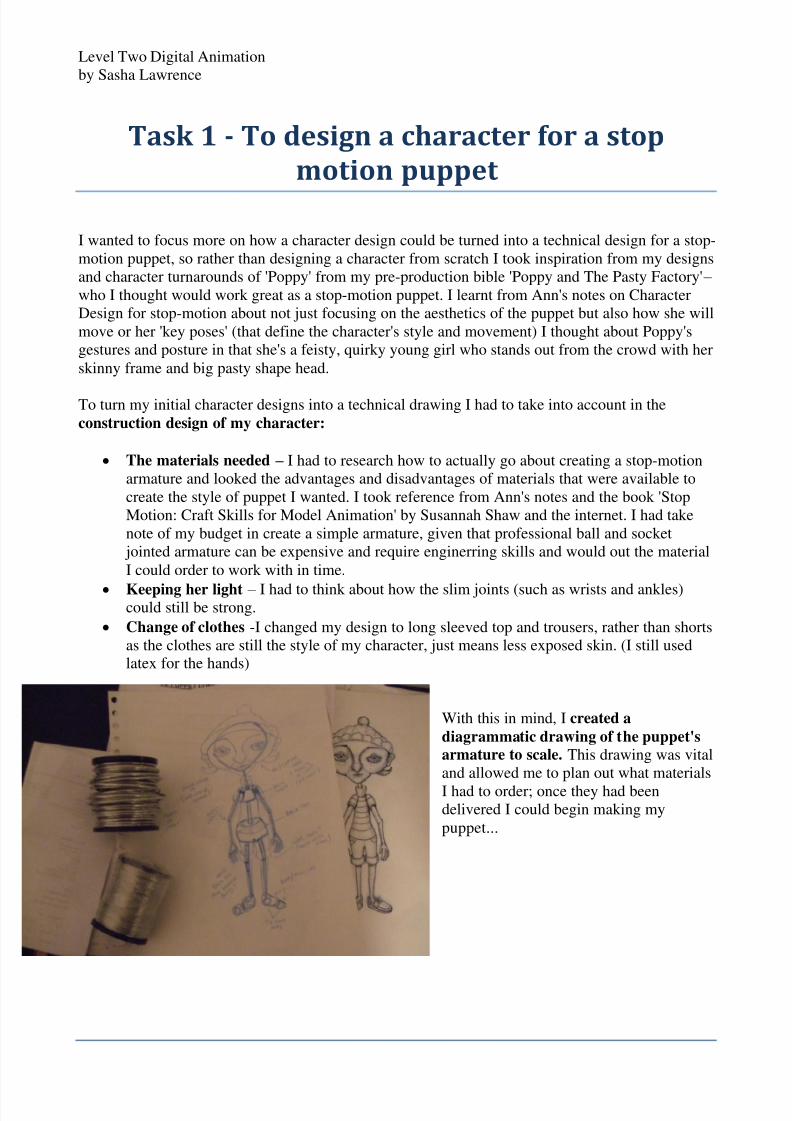
With this in mind, I created a
diagrammatic drawing of the puppet's
armature to scale. This drawing was vital
and allowed me to plan out what materials
I had to order; once they had beendelivered I could begin making my
puppet...
8/6/2019 Sasha Negotiated Report
http://slidepdf.com/reader/full/sasha-negotiated-report 3/6
Level Two Digital Animation
by Sasha Lawrence
T ASK 2 - MAKE A TEST PUPPET THAT CAN BE ANIMATED.
The various body parts needed for my puppet:
The Body
– Balsa wood body too weak.
I initially I planned on making my puppet using twisted aluminium wire
(1mm and 2mm) and balsa wood, with a Super Sculpey head - This is where
I hit a problem as I needed a solid material for limbs (or bone of the puppet)
to allow the puppet to only bend on the joints. As my character is skinny I
decided to try out balsa wood (as it is light and easy to saw/sand) and carved
all the limbs for the arms, legs, and torso and experimented with twisting
different thickness’s of wire to get the right strength and flexibility. Iassembled the balsa shoulders, twisted wire and balsa torso together using
Araldite, this was okay but as soon as I put holes in the tiny balsa limbs, they
split completely. Also with the added weight of the large head putting extra
pressure on the body, I needed to look for an alternative material that would
be still light but a lot strong for the limbs...
K&S Aluminium Body.
So I solved this problem by finding a model shop in Truro (as I couldn't rely on getting it ordered
and delivered on time) and bought some K&S Aluminium Tubing. (I bought aluminium as opposed
to brass as it is easier to cut and they had the sizes I wanted in that metal) I bought different sizes as
K&S are designed to fit inside each other, and this enabled me to also have the hands, feet and head
to be detachable - meaning I could work on them and even replace them if they break.
I used a saw to cut/and sanded all the limbs and the lengths that would be needed for the replaceable
body parts and began to glueing them together with more twisted aluminium wire. I eventually
assembled a study looking armature, but still not strong enough! As soon as I tried to add the weight
of the head I finding the torso joint would make the puppet fall no matter how much Araldite I used.
I think this wasn't helped by using tubing rather than square K&S (usually brass) as the 2 joints of
the torso couldn't sit at right angles and rolled off each other. I experimented with using balsa to
house the the torso joints however I needed something a lot stronger – as so took another trip to a
model shop.
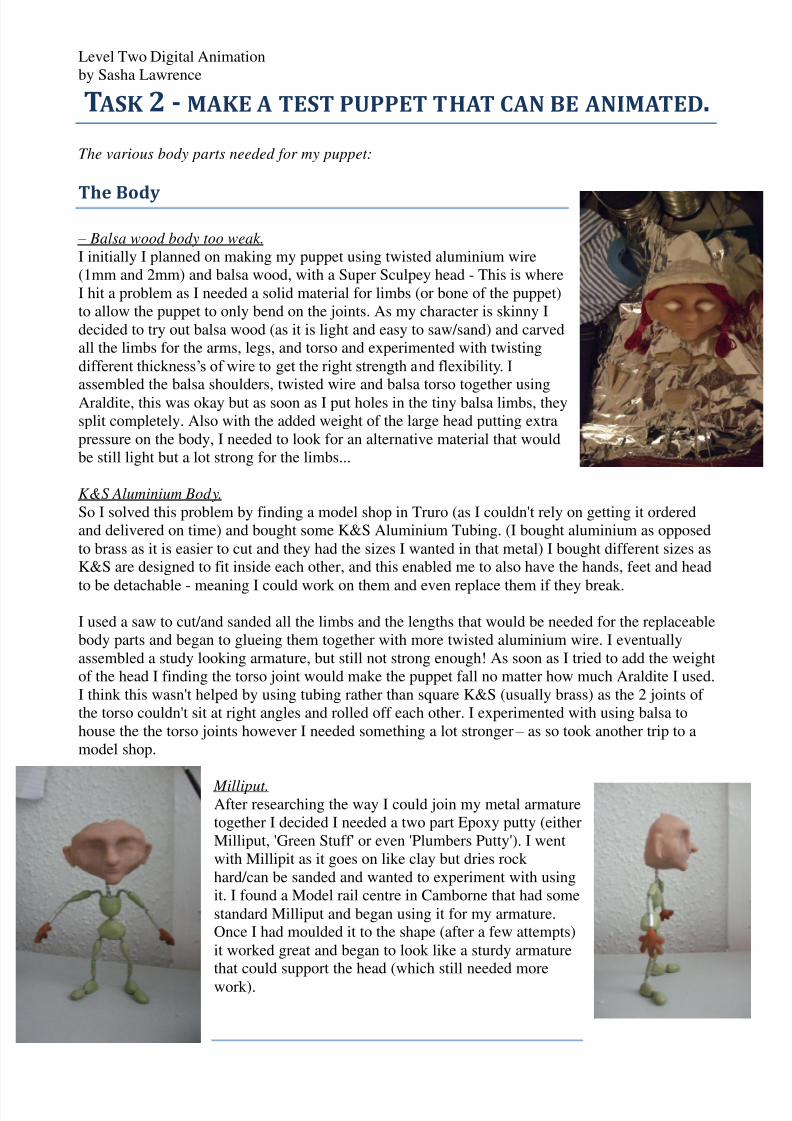
Milliput. After researching the way I could join my metal armature
together I decided I needed a two part Epoxy putty (either
Milliput, 'Green Stuff' or even 'Plumbers Putty'). I went
with Millipit as it goes on like clay but dries rock
hard/can be sanded and wanted to experiment with using
it. I found a Model rail centre in Camborne that had some
standard Milliput and began using it for my armature.
Once I had moulded it to the shape (after a few attempts)
it worked great and began to look like a sturdy armature
that could support the head (which still needed more
work).
8/6/2019 Sasha Negotiated Report
http://slidepdf.com/reader/full/sasha-negotiated-report 4/6
Level Two Digital Animation
by Sasha Lawrence
Head.
For the head I decided to experiment with a new material 'Super Sculpey' which is a type of clay
which you bake and is great to sculpt with. I sculpted the head using my character turnarounds
(which were a big help as I kept returning to them to see if each feature was correct) Although I
read the instruction I learnt a valuable lesson about conditioning the clay before baking it – which I
did do thoroughly before hand but just before baking I added more clay to bulk out the cheeks -
which caused the lightening of the skin on that area (which isn't idea as the sculpey is a nice skin
colour but I could of solved this by painting the skin lighter as Poppy has quite a pale complexion,
but felt it wasn't too noticeable).
Once I had the finished head, I could look at whether the new improved Aluminum/Milliput
armature would support it – I lightened the head even more by sawing off the part of the head thatwould not been seen and was hidden under a hat and bulked it out using foam.
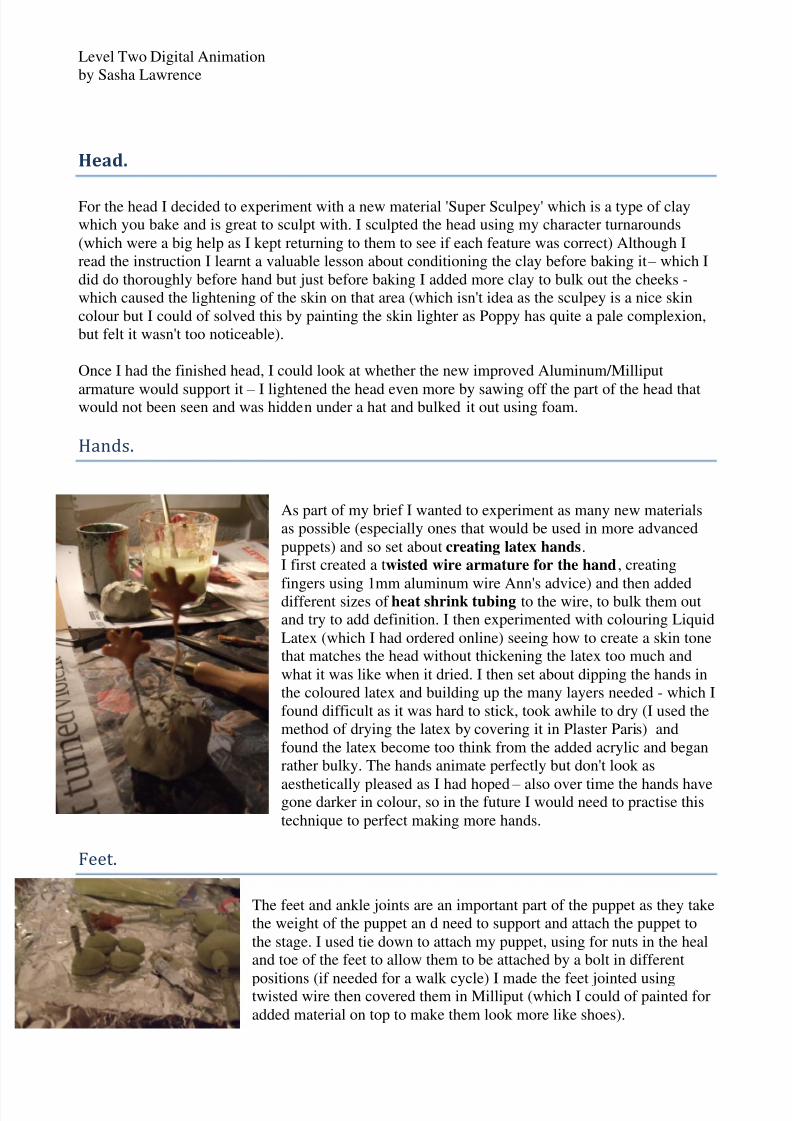
Hands.
As part of my brief I wanted to experiment as many new materials
as possible (especially ones that would be used in more advanced
puppets) and so set about creating latex hands.
I first created a twisted wire armature for the hand, creating
fingers using 1mm aluminum wire Ann's advice) and then addeddifferent sizes of heat shrink tubing to the wire, to bulk them out
and try to add definition. I then experimented with colouring Liquid
Latex (which I had ordered online) seeing how to create a skin tone
that matches the head without thickening the latex too much and
what it was like when it dried. I then set about dipping the hands in
the coloured latex and building up the many layers needed - which I
found difficult as it was hard to stick, took awhile to dry (I used the
method of drying the latex by covering it in Plaster Paris) and
found the latex become too think from the added acrylic and began
rather bulky. The hands animate perfectly but don't look as
aesthetically pleased as I had hoped – also over time the hands havegone darker in colour, so in the future I would need to practise this
technique to perfect making more hands.
Feet.
The feet and ankle joints are an important part of the puppet as they take
the weight of the puppet an d need to support and attach the puppet to
the stage. I used tie down to attach my puppet, using for nuts in the heal
and toe of the feet to allow them to be attached by a bolt in different
positions (if needed for a walk cycle) I made the feet jointed usingtwisted wire then covered them in Milliput (which I could of painted for
added material on top to make them look more like shoes).
8/6/2019 Sasha Negotiated Report
http://slidepdf.com/reader/full/sasha-negotiated-report 5/6
Level Two Digital Animation
by Sasha Lawrence
Eyes.
I tried to keep the facial features as neutral as possible in Poppy's head (such as her mouth) to
enable emotion to be conveyed through replacement eyes as this is important part of a character
performance.
My first attempt was with 'Replacement Eyes' made from Fimo and Super Sculpey – which I
shaped, baked and painted the various eye shapes of a closing eye. I made the backs flat and
attached them to the face using Black Tack (Super strong blue tac or 'Black Magic' which I found
online) so I could replace them. This worked fine until they completely broke apart, so I need to
find a more durable solution..
So, I found two white glass beads which would fit perfectly for eyes and carved eye-sockets in the
head so they could fit inside and still be moved/animated with a pin through the tiny hole in the
beads. I used black tack for the pupil, and to secure them into their sockets, then added Super
Sculpey on top for the eye lids (which worked great when animating a blink!)
Clothing.
To add the finishing touches to my puppet once the armature had been complete I found sum fabrics
that were a perfect scale for Poppy. I made sure I kept as close to my design as possible for colours
as the character has a certain 'sea-side' or 'Cornish' style. I used my sewing skills to make a wool
hat, stripe top (using stretch t-shirt material – to avoid crawl) using the templates in Ann's notes and
measuring to the puppet, and jeans (using stretch 'jegging' cotton material – to avoid the weight of
real denim). I also got hold of bright red wool that would make her hair stand out – which is
important to her character as it is where her name 'Poppy' came from.
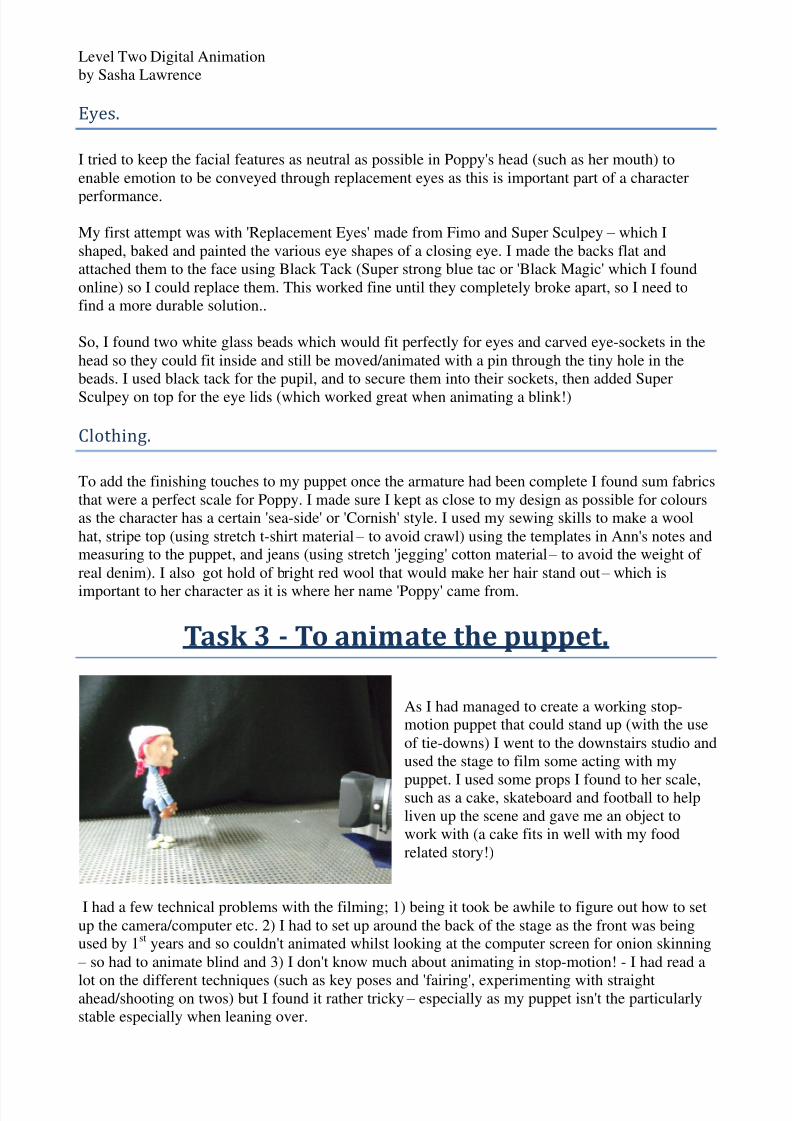
Task 3 - To animate the puppet.
As I had managed to create a working stop-
motion puppet that could stand up (with the use
of tie-downs) I went to the downstairs studio and
used the stage to film some acting with my
puppet. I used some props I found to her scale,such as a cake, skateboard and football to help
liven up the scene and gave me an object to
work with (a cake fits in well with my food
related story!)
I had a few technical problems with the filming; 1) being it took be awhile to figure out how to set
up the camera/computer etc. 2) I had to set up around the back of the stage as the front was being
used by 1st years and so couldn't animated whilst looking at the computer screen for onion skinning
– so had to animate blind and 3) I don't know much about animating in stop-motion! - I had read a
lot on the different techniques (such as key poses and 'fairing', experimenting with straightahead/shooting on twos) but I found it rather tricky – especially as my puppet isn't the particularly
stable especially when leaning over.
8/6/2019 Sasha Negotiated Report
http://slidepdf.com/reader/full/sasha-negotiated-report 6/6
Level Two Digital Animation
by Sasha Lawrence
Despite encountering numerous problems along the way of creating my stop-motion puppet - I feel
I have solved these and for my first attempt am proud of what I have achieved. Especially within
such a tight deadline - I have learnt more about time-management and using my initiative to solve
technical problems and source materials. It also helped to work in a group and collaborate with
others who were completing a similar brief, as we could communicate and help each other out
(learning from each other’s mistakes and triumphs in techniques/materials – given that stop-motion
is mostly about trial and error).
The main reason for setting the brief was as an introduction to stop-motion, as I haven’t had much
experience the technique. I think I have achieved this as I now feel more educated about creating a
stop-motion puppet and the level of thought, hard work and craftsmanship that goes into their
creation. I hope to continue my journey into the stop-motion field after this project and preparing
me for future stop motion projects and unlocking the medium’s potential!