saptips - material types
TRANSCRIPT

SAPtips
Page
�
SA
Pti
ps J
ourn
alOc
tobe
r / N
ovem
ber 2
007
Volum
e V Is
sue 5
SAPtips.com SAPtips © 2007 Klee Associates, Inc.
Editor’s Note: Mastering Material Masters—hard to say, even harder to do. Jocelyn Hayes has been tackling this issue for the last eleven years, and even she admits, there’s a lot to learn – way too much for one article! In this first article in a three-part series, Jocelyn focuses on Material Type. Read up as she delves into the configu-ration and setup of this very important component in Material Masters. And if you want even more, keep an eye out for our announcement of our SAPtips Mastery Level Workshop - Materials Management Overview.
IntroductionBack when I first started SAP® consulting eleven years ago, one of my first SAP projects had me leading the Material Master conversion. At the time, I thought, this should be easy – right? WRONG! Material Masters are the “Masters of Logistics” and if you set them up incorrectly, you will lead your company down a path of inefficiency and inconsistency. Many articles have been written about best practices in Material Masters and here I will try to focus on just one component of con-figuring and setting up Material Masters – the material type – the base of the base of logistics. Configuration of the material type determines what data will be required and the purpose of the material when you create the Material Master.
This article is the first installment of a three-part series on Mastering Material Masters. Later installments will explain how to configure the screens to streamline Material Master entry for the end user, and a white paper detailing Best Practices of Material Master deployment and maintenance.
Overview of Material TypesWhen you create a new material, you have to select the industry sector and material type. Let’s forget about the industry sector for now – I have yet to see a client put that field to good use. The material type, on the other hand, drives the entire use and usefulness of the Mate-rial Master. It determines the purpose of the material – is it configurable, is it a raw material? It determines whether the master number is assigned internally or externally (check out my upcoming paper for some guidelines on the infamous “internal vs. external”
assignment question). The material type determines the fields you see on the various user views (tabs) and the order of those views. The material type also deter-mines the procurement type (in-house or external) and whether changes in material value are updated to the Financial Accounting module.
Many standard material types exist in the standard SAP system. I would highly suggest you select the one that fits the material with which you are working and plan to copy it to your own custom material type. The example in this article will be to copy from a KMAT (configurable material) to a ZMAT.
Copy Standard Material Type to Custom Material TypeIf you have users who create only a single material type, you can further simplify Material Master entry by assigning that material type to a special Create transac-tion. To do so, follow the path in the IMG:
Logistics – General > Material Master > Basic Settings > Material Types > Assign Material Types to Special “Create” Transactions
Note: The menu path (see Figure 1) in SAP remains the same (the material type description you see in the IMG does not change the material type you see in the SAP menu). For this, you will have to request your SAP Administrator to either change the menu or create a Z transaction for your use, which you can also have them add to the menu.
Field SelectionI remember the first time I went through and looked at all the fields in the Material Master – it was overwhelming.
Mastering Material Masters Part I - Material Types: Make Them Work For You
By Jocelyn Hayes, SAPtips Director of Training and Consulting
Cover Story
Material masters are the “Masters
of Logistics” and if you set
them up incorrectly, they’ll lead
your company down a path of
inefficiency and inconsistency.

SAPtips
Page
�
SA
Pti
ps J
ourn
alOc
tobe
r / N
ovem
ber 2
007
Volum
e V Is
sue 5
SAPtips.com SAPtips © 2007 Klee Associates, Inc.
4On Logistics/MM
These days, my first goal when I arrive at a client is to see how many fields in the standard Mate-rial Master I can eliminate. Now, SAP configuration is a bit daunt-ing in this area and the IMG Help is, let’s just say, “light”.
I err on the side of lots of custom configuration with the end goal of making the screens more user friendly and less error prone. Let’s face it, if you were a new SAP user and had to look at twelve user views in the Material Master, but only had to popu-late ten actual fields, you would immediately question the intel-ligence of the system – it seems quite wasteful to the end user.
In the steps that follow, we’ll discuss Assigning Fields to Field Selection Groups, Maintaining Field Selection for Data Screens, Defining Industry Sectors for Industry –Sector-Specific Field Selection, Defining Plant-Specific Field Selection and Plant-Specific Screen Select, and Defining Lock Relevant Fields.
Step 1: Assign Fields to Field Selection GroupsThis is really SAP data that you should not attempt to change. However, if you have created your own custom fields that you want to appear in the Material Master
– this is where you would assign them to a field selec-tion group. To add one, click New Entries, and complete the data in Figure 2. Use Field Section Group numbers 111-120 as these are the customer-designated values for Field Selection Groups (SAP has reserved the others).
You can also group all the fields that you wish to hide together into one field selection group to make them easier to hide. I’ll explain this further next step.
Figure 1: SAP Material Master – Create Special Menu
Figure 2: New Field Selection Group Entry

SAPtips
Page
�
SA
Pti
ps J
ourn
alOc
tobe
r / N
ovem
ber 2
007
Volum
e V Is
sue 5
SAPtips.com SAPtips © 2007 Klee Associates, Inc.
4On Logistics/MM
SAP assigned long texts to a dummy field (i.e., LTEXT_BEST is for Purchase Order Text) so that you can define the entire screen as hidden, displayed, mandatory, or optional.
Step 2: Maintain Field Selection for Data ScreensIn the next section of this article (Material Types), I will discuss the configuration for the material type – see the discussion in that section under “General Tab” to see where you will be assigning the Field Reference to the Material Type. The Field Reference determines which fields are hidden, displayed, mandatory, or optional when you create the Material Master.
The Field Reference can be for a material type, an industry sector, or a transaction code. When creating a Material Master, all of these Field References are taken into account when determining whether a field is hid-den, displayed, mandatory, or optional. Table 1 shows the convention for Field Selection control.
For example, if you are entering a Material Master for Industry Sector M, which has in its Field Reference to Hide Field X, and material type KMAT, which has in its Field Reference to Require Field X, then Field X will actually be hidden because Hide trumps Required.
To create the Field Reference, it is wise to copy from an existing Field Reference rather than starting from scratch. The selection of the Field Reference from which you copy is up to you, but I suggest you use the Field Reference that is the default from the material type from which you copied to create your custom material type. In my example, I copied material type KMAT, which carries with it Field Reference KMAT. I copied material type KMAT to ZMAT and I will copy Field Ref-erence KMAT to ZMAT as well. To copy a Field Refer-ence, select the Field Reference as shown in Figure 3 and click the copy icon.
You will now be on the “Change View ‘Field Selection for Data Screens’: Detail” screen (see Figure 4), from which you can define which Field Selection Groups are hidden, optional, mandatory, or displayed.
Table 1: Field Selection Control
Priority Function Character
1. Hide -
2. Display *
3. Required +
4. Optional .
Figure 3: Selecting Field Reference to Copy
Figure 4: Change View ‘Field Selection for Data Screens’: Detail Screen

SAPtips
Page
�
SA
Pti
ps J
ourn
alOc
tobe
r / N
ovem
ber 2
007
Volum
e V Is
sue 5
SAPtips.com SAPtips © 2007 Klee Associates, Inc.
4On Logistics/MM
You can click the Where Used icon to see which Material Types use the Field Selection – see Figure 5 for an example of the Where-Used screen. Note that for the screen shot in Figure 5, I had already assigned the Field Selection ZMAT to the Material Type ZMAT.
You can also drill into the detail of each Field Selection Group (click ) to see which fields are assigned to each Field Selec-tion Group. Figure 6 displays this screen.
Step 3: Define Industry Sectors for Industry – Sector-Specific Field SelectionAs discussed in Step 2, in addi-tion to the material type driv-ing the behavior of a field when creating a Material Master, the Industry Sector also drives this behavior. If you want to create additional Industry Sectors, you can do so in this step. You can either reference an existing Field Reference or you can go back to Step 2 and copy a Field Reference to a new one for your own use. To create one, simply select New Entries and complete the screen as shown in Figure 7, specifying the Industry Sector, Description, and the Field Reference.
Step 4: Define Plant-Specific Field Selection and Plant- Specific Screen SelectAnother driving value of deter-mining field behavior is the plant. The plant can be assigned to a Field Selection in this step. To add a new plant, click New Entries and enter data as shown in Figure 8.
You can also restrict the maintenance status in this step. The maintenance status is simply the views, tabs, or user departments available for entry on the Material Master – see Figure 9.
Figure 5: Field Reference Where-Used List
Figure 6: Detail of Field Selection Group – Displays Fields Included in Field Selection Group
Figure 7: Create Industry Sector
Figure 8: Assign Plant to Field Reference
Another driving value of
determining field behavior is the
plant.

SAPtips
Page
�
SA
Pti
ps J
ourn
alOc
tobe
r / N
ovem
ber 2
007
Volum
e V Is
sue 5
SAPtips.com SAPtips © 2007 Klee Associates, Inc.
Step 5: Define Lock Relevant FieldsYou can define a field as Lock Relevant if you want the value to be entered into them once and never changed. Keep in mind that if you select this, and you have a scheduled change for a material, you will lose the scheduled change.
To mark a field to be locked after initial entry, simply find the field in the list and select the “lock relevant” indicator.
Material TypesIn this section, I will illustrate how to configure material types. First, review the material types that exist in the stan-dard SAP system and find the one that suits the needs of the materials that are going to be created. Select the material type that you want to copy and click the Copy icon – see Figure 10.
Once you have clicked the Copy icon, you will be taken to the Create Material Type screen. Enter a name for your new material type – I have entered ZMAT in this example.
General Data TabFigure 11 displays the fields in the Gen-eral Data Section of the Material type creation screen. Complete this screen as shown in Table 2.
Figure 9: Maintenance Statuses
Figure 10: Copy Material Type
Figure 11: Create Material Type: General Data
FieldName Description
FieldReference Thefieldreferencewascreatedintheprevioussectionofthisarticle–inourexample,thefieldreferenceisalsoZMAT.Thefieldreferencedetermineswhichfieldsaremandatory,optional,hidden,anddisplayonly.
Sref:materialtype ScreenReferenceMaterialType.Thescreenreferencedetermineswhichscreensappearandtheorderofthescreens,whencreatingaMaterialMasterrecord.
AuthorizationGroup AuthorizationGroupisrequiredtolimitcertainusersfrombeingabletocreatecertainmaterialtypes.ThefirstcheckSAPperformswhenauserattemptstocreateanewmaterialistodetermineiftheyhaveaccesstothe‘CreateMaterial’transaction.Thesecondcheckistoverifytheyhaveaccesstocreatethatmaterialtype.Youcanleavethisblankifyoudonotwanttorestrictormaintainthematerialtypestobecreatedbyspecifiedusers.
X-plantmatistatus Cross-PlantMaterialStatuscanrestrictamaterialtobeusedforspecificpurposesoractions.AnotherconfigurationstepexistsintheIMGtoconfigurethebehavioroftheselectablestatuses.Forexample,amaterialtypemaynotbeabletobeprocured,sotheconfigurationofthematerialstatuswouldindicateawarningorerrormessagetoauserwhoistryingtoprocurethatmaterialtype.
Itemcategorygroup ItemCategorygroupdrivestheprocessingofthematerialtypeinthesalesorder.ThecombinationofitemcategorygroupandordertypedeterminestheitemcategorydefinedforaSalesOrderlineitem.
WithQtyStructure IfamaterialiscostedwithaQuantityStructure,turnonthisindicatortoimprovesystemperformance.YoucanoverridethischeckboxinindividualMaterialMasters.
InitialStatus SettheInitialStatusindicatorifthisisabatchmaterialandtheinitialbatchofthismaterialshouldbesetto‘restricted’.
Externalno.assignment Checkthisifyouwanttoallowthematerialmastertobenumberedw/ocheck externally(assignedbytheuser)withoutSAPcheckingtomake surethenumberiswithinavalidrange.
Table 2: General Tab Field Completion
4On Logistics/MM
SAPtips
Page
�
SA
Pti
ps J
ourn
alOc
tobe
r / N
ovem
ber 2
007
Volum
e V Is
sue 5
SAPtips.com SAPtips © 2007 Klee Associates, Inc.
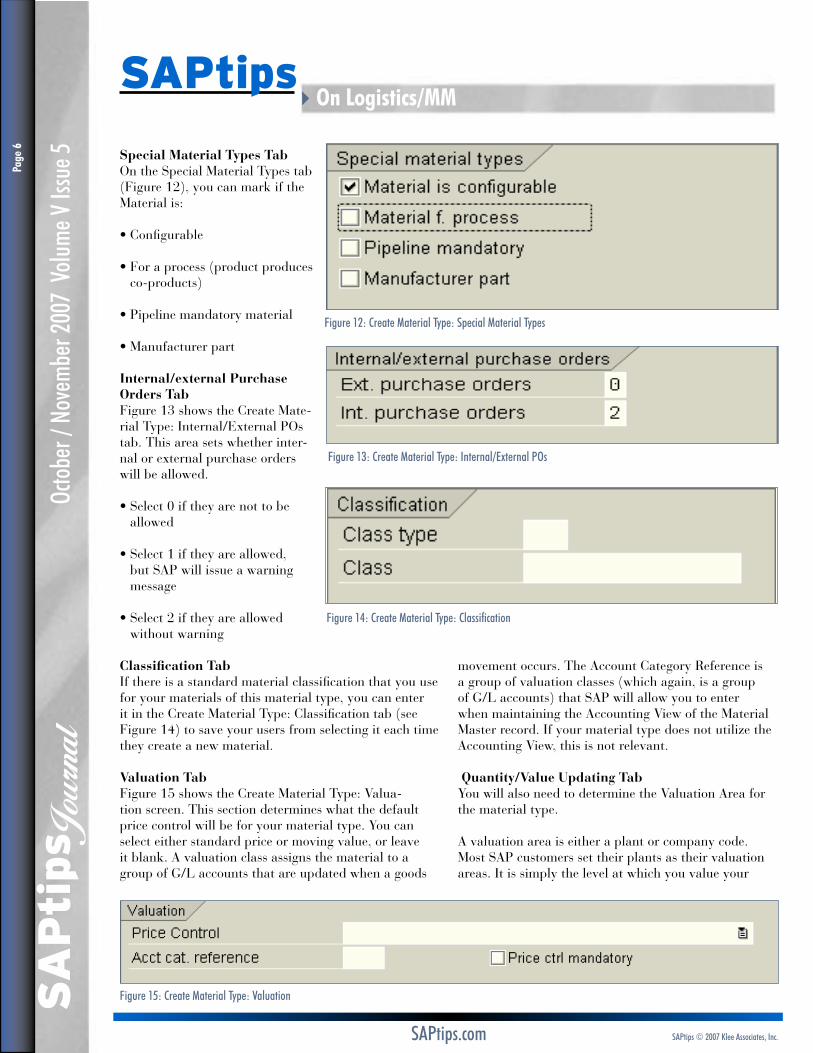
Special Material Types TabOn the Special Material Types tab (Figure 12), you can mark if the Material is:
• Configurable
• For a process (product produces co-products)
• Pipeline mandatory material
• Manufacturer part
Internal/external Purchase Orders TabFigure 13 shows the Create Mate-rial Type: Internal/External POs tab. This area sets whether inter-nal or external purchase orders will be allowed.
• Select 0 if they are not to be allowed
• Select 1 if they are allowed, but SAP will issue a warning message
• Select 2 if they are allowed without warning
Classification TabIf there is a standard material classification that you use for your materials of this material type, you can enter it in the Create Material Type: Classification tab (see Figure 14) to save your users from selecting it each time they create a new material.
Valuation TabFigure 15 shows the Create Material Type: Valua-tion screen. This section determines what the default price control will be for your material type. You can select either standard price or moving value, or leave it blank. A valuation class assigns the material to a group of G/L accounts that are updated when a goods
movement occurs. The Account Category Reference is a group of valuation classes (which again, is a group of G/L accounts) that SAP will allow you to enter when maintaining the Accounting View of the Material Master record. If your material type does not utilize the Accounting View, this is not relevant.
Quantity/Value Updating TabYou will also need to determine the Valuation Area for the material type.
A valuation area is either a plant or company code. Most SAP customers set their plants as their valuation areas. It is simply the level at which you value your
Figure 12: Create Material Type: Special Material Types
Figure 13: Create Material Type: Internal/External POs
Figure 14: Create Material Type: Classification
Figure 15: Create Material Type: Valuation
4On Logistics/MM

SAPtips
Page
�
SA
Pti
ps J
ourn
alOc
tobe
r / N
ovem
ber 2
007
Volum
e V Is
sue 5
SAPtips.com SAPtips © 2007 Klee Associates, Inc.
stock – either by quantity or value. You have the choice to display the quantity and value of your stock within the Material Master record. If you need to be able to see this information in the Material Master, you can select it here; but keep in mind that it does add a load to your system to track it at this level (see Figure 16).
User Departments TabFigure 17 shows the User Departments setting for the material type. In this grid, you select which views (also called user departments, represented by tabs when you create a Material Master) you will need to maintain for this material type
ConclusionIn this article, we covered how to define the behavior of fields in the Material Master – meaning whether they were mandatory, optional, hidden, or display only. We covered how to configure new material types. These steps represent some of the more difficult areas of configuration for the Material Master. Keep an eye out for the next installment where I will demonstrate how to configure the screens to streamline Material Master entry for the end user, and a white paper detailing Best Practices of Material Master Deployment and Mainte-nance.
Jocelyn Hayes, Director of Consulting and Training for SAPtips, has over ten years of SAP experience. She has enjoyed a successful consulting career for a Big 4 firm as well as independently. Jocelyn’s focus primarily has involved the Logistics modules of SAP, and has also developed ESA Roadmaps using NetWeaver™ tools, including Visual Composer, XI, Enterprise Portal, and BI. She also led a CRM Business Process Reengineering project. Contact Jocelyn at [email protected].
≈
Figure 16: Create Material Type: Quantity/Value Updating
Figure 17: Create Material Type: User Departments
4On Logistics/MM

SAPtips
Page
�
SA
Pti
ps J
ourn
alOc
tobe
r / N
ovem
ber 2
007
Volum
e V Is
sue 5
SAPtips.com SAPtips © 2007 Klee Associates, Inc.
SAPtipsThe information in our publications and on our Website is the copyrighted work of Klee Associates, Inc. and is owned by Klee Associates, Inc. NO WARRANTY: This documentation is delivered as is, and Klee Associates, Inc. makes no warranty as to its accuracy or use. Any use of this documentation is at the risk of the user. Although we make every good faith effort to ensure accuracy, this document may include technical or other inaccuracies or typographical errors. Klee Associates, Inc. reserves the right to make changes without prior notice. NO AFFILIATION: Klee Associates, Inc. and this publication are not affiliated with or endorsed by SAP AG, SAP AG software referenced on this site is furnished under license agreements between SAP AG and its customers and can be used only within the terms of such agreements. SAP AG and mySAP are registered trademarks of SAP AG. All other product names used herein are trademarks or registered trademarks of their respective owners.
≈
Journal