sap roambi cloud sap businessobjects enterprise plugin guide€¦ · sap roambi cloud – sap...
TRANSCRIPT

1
SAP Roambi Document Version: 9.1 - 2017-06-12
SAP Roambi Cloud – SAP BusinessObjects Enterprise
Plugin Guide
2
Table of Contents
I. Overview
Introduction
How it Works
II. Setup
Requirements
Roambi Requirements
Created a Roambi View to be used as a template
Install and configure RoambiScript
Business Objects Enterprise (BOE) Requirements
Roambi Configuration
Creating API Key
Setting up RoambiScript
III. How to Use
Step 1: Create the Template
Step 2: Set up the Profile
Create Profile
Step 3: Create Publication
Review the Publication Summary
Sending the Publication to Enterprise Recipients
Add Plugin to BOE
Appendix A: Troubleshooting and Common Issues
Appendix B: Resources
3
I. Overview
Introduction
The Roambi Publisher Extension simplifies the process of updating a Roambi report with
data coming from a Web Intelligence report.
Additionally, with a publication, you can schedule the delivery of reports and create
personalized data for different recipients.
SAP Business Objects Enterprise Publisher Extension has provided a framework for 3rd
party developers to execute scripts during the publication process. This Roambi
publication extension is leveraging Roambi API (SAP Roambi Publisher SDK) behind the
scenes. SAP Roambi will respect the row level data permissions as specified in BOE.
The key benefit of using this publication extension, is the report creator will not need to
script its own API, but leverage the existing BOE interface and entities to deliver Web
Intelligence reports as Roambi views.
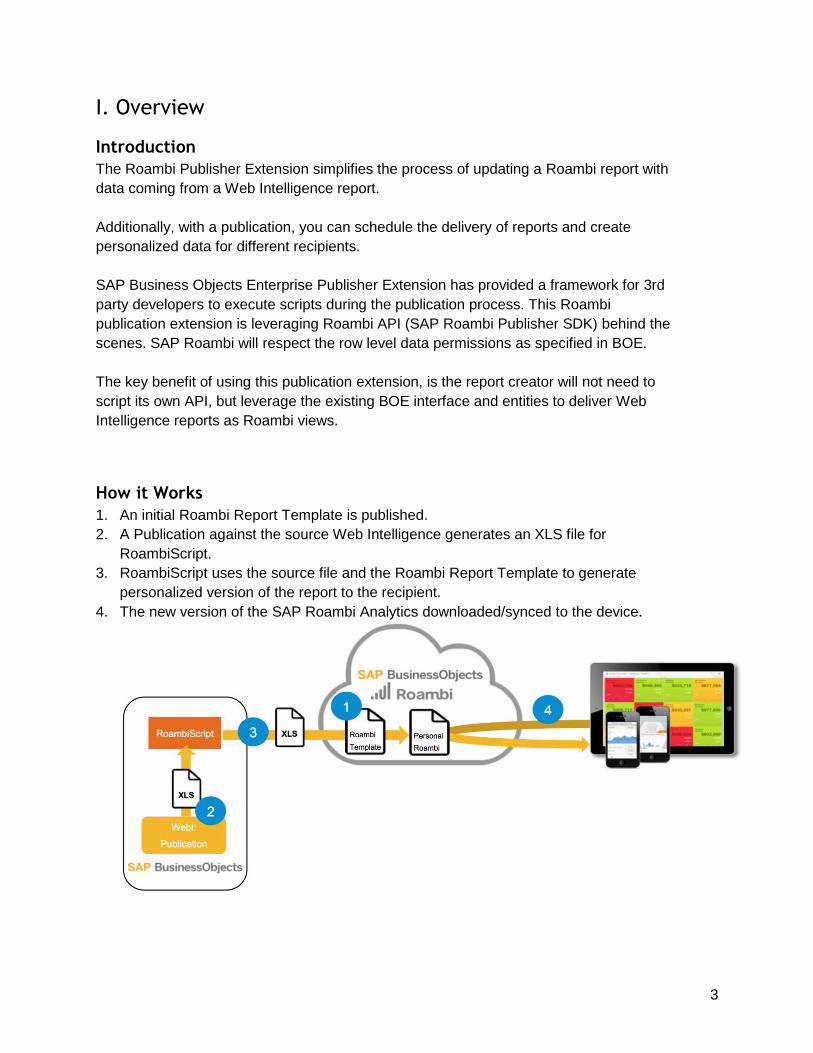
How it Works
1. An initial Roambi Report Template is published.
2. A Publication against the source Web Intelligence generates an XLS file for
RoambiScript.
3. RoambiScript uses the source file and the Roambi Report Template to generate
personalized version of the report to the recipient.
4. The new version of the SAP Roambi Analytics downloaded/synced to the device.

4
II. Setup
Requirements
SAP Roambi Cloud Configuration Requirements
1. Administrator access to SAP Roambi Cloud
2. Create an Roambi Cloud API Client Key
3. Invite BOBJ end-user(s) into the Roambi Cloud Account
4. Publish a Roambi report to be used as a template
SAP BusinessObjects Enterprise (BOE) Configuration Requirements
1. SAP BOE version 4.0, 4.1 or 4.2.
2. Permissions to add BOE plugins (need folder access to the BOE server
installation path)
3. Install and configure RoambiScript (Roambi Pub SDK)
4. Install Roambi BOE Publication Extension
5. Administrator access to BOE Central Management Console (CMC)
6. BOBJ end-user details has correct email address
Roambi Configuration
Create a Roambi Cloud API Client Key
As mentioned previously, the Roambi BOE Publisher extension leverages the Roambi
API to facilitate the creation of personalized reports. No programming or API knowledge
is required to use the extension, but the publisher extension needs to be registered as
an API client.
1. Login as an administrator to your Roambi account
2. Navigate to the administration console by accessing the "Administration" button
from the gear icon in the upper right corner of the Roambi home screen
3. Navigate to the "API Clients" section in the administration console

5
4. Tap the "Create New API Client" button
5. Input the Name, Description and a Redirect URI (The Redirect URI is part of the
configuration if you are using Single Sign. If you are not using SSO, this field still needs
to be completed but you can use any valid URL, but note that you need to keep it
consistent when you specify the Redirect URI in the RoambiScript client so that it can call
back to the app during authentication) for your API client.
6. Check the box to indicate that you have read and agreed to the Roambi API
Terms of Use.
7. Tap the "Done" button in the upper right.
Keep the details of the API client readily available, as it will be used in the next section.

6
Invite BOBJ end-user(s) into the Roambi Cloud Account
Recipients of the Roambi reports will need to be members of the Roambi Cloud Account
in order for them to have access. To invite new users or groups:
1. Login as an administrator to your Roambi Account
2. Tap the "Invite Users" icon, available from the home screen
3. Navigate to "People" within the administration console
4. Tap on the + button to reveal and select the "Invite Single User" or “Invite
Multiple Users” option
5. For Single User invites, fill out the form while ensuring that the email address
matches the user’s email address in BOE. Tap the "Invite" button in the upper
right corner.
For Multiple Users, click the download link to get a CSV template to fill out and
upload here.
Publish a Roambi report to be used as a template
The Roambi BOE Publication Extension generates personalized Roambi reports to your
recipients by using an existing Roambi report as a template. If you have not created a

7
Roambi Report before, please review our Getting Started material and select a Roambi
Template to create your first report.
Tips on creating the Roambi report template is covered in Step 2 of the “How to Use”
section.
SAP BOE Configuration
To enable the Roambi BOE Publication Extension, it requires placing two jar files on the
BOE server:
● SAP Roambi Pub SDK (RoambiScript):
roambi-api-cli.jar
An API utility that the BOE publication will use to communicate to Roambi Cloud.
● Roambi BOE Publication Extension:
roambi-boe-14-x-publication-extension-2.0.2.jar
BOE Publication extension to set Roambi delivery options
Setting up RoambiScript
1. For more information on RoambiScript, please follow this Kbase
2. Download the SAP Roambi Pub SDK from SAP Service Marketplace.
3. Create a folder on the BOE Server that can be easily referenced. In this
documentation, the roambi-api-cli.jar (SAP Roambi Pub SDK) is saved in
the C:\roambiscript folder.
4. In the terminal or command prompt, navigate to the location of roambi-api-
cli.jar (eg. C:\roambiscript ) and run the following command to generate a
properties file:
java -jar roambi-api-cli.jar configure
(Note: JAVA_HOME/bin folder must be in the Path environment variable)
5. After executing the above command, answer the prompts based on the details
from your API client in Roambi. This will create a roambi-api-cli.properties file:

8
If your network uses a proxy to connect to internet, then you will need to add
additional parameters to the properties file. Follow the instructions in this KBase.
Please note the roambi-api-cli.jar installation path (in this example it is
C:\roambiscript). The publisher extension will need to reference this directory
path.
6. Test RoambiScript to ensure that it is working properly before applying the BOE
Publication Extension.
In the command prompt, navigate to the roambi-api-cli.jar install
path (eg. C:\roambiscript )
Run the following command:
java -jar roambi-api-cli.jar ls --folder <admin email>
<admin email> should be the email address of the admin account used to
configure RoambiScript.
This will list the contents of the Admin’s personal folder and will display
”Run: 1. Failure: 0” on the last line to indicate the command was
successful.
If you receive ”Failure: 1” then check the /logs folder in the
RoambiScript installation path for more details (eg. C:\roambiscript\logs)
Setting up Roambi Publisher Extension
1. Download the Roambi BOE Publication Extension from the SAP Service
Marketplace. Depending of your version of BOE, this is the Roambi BOE
Publication Extension jar file you need to use:
BOE 4.0: roambi-boe-14-0-publication-extension-2.0.2.jar

9
BOE 4.1: roambi-boe-14-1-publication-extension-2.0.2.jar
BOE 4.2: roambi-boe-14-1-publication-extension-2.0.2.jar (same jar as BOE
4.1).
2. Move the Roambi BOE Publication Extension jar file into BOE’s
publishingPlugins folder:
C:\Program Files (x86)\SAP BusinessObjects\SAP BusinessObjects Enterprise
XI 4.0\java\lib\publishingPlugins
Note: This will depend on your BOE installation path. The above folder path is
the default path for BOE 4.0)
3. Restart BOE Server Intelligence Agent.
a. Open Central Configuration Manager:
b. Restart Server Intelligence Agent. Wait a few minutes until all services
are up and running. You can monitor this by clicking the “Manage
Servers” icon in the toolbar.
III. How to Use We will use an example to illustrate all the steps you need to perform to create a
personalized Roambi report for your recipients powered by BOE. Here we will cover the
process in 4 steps:
1. Establish the Use Case.

10
2. Create the Roambi Report Template
3. Create a Profile
4. Create a Publication
Step 1: Establish the Use Case
Our sales team have been requesting to visualize and review their sales reports. While
they can get by on creating their own Excel charts on the desktop, it is inefficient, not
standardized, and not the best use of the sales team time. Additionally, with sales team
traveling most of the time, easy mobile access is a must.
The IT team identified SAP Roambi as a suitable solution. They can transform each Web
Intelligence reports into Roambi reports. However, they recognize this is not scalable
especially with how quickly the sales team is growing, and each sales rep have different
level of data access. They want to avoid having to create multiple Web Intelligence
reports and multiple Roambi reports.
Additionally, they gathered the following requirements:
● Sales want to see revenue, profitability, and sales by state and product lines.
● Wants a dashboard like presentation, and not spreadsheet
● Reports should be updated daily
● Sales reps should only be able to see the metrics for their respective state (e.g.
Tony, the Account Rep in Texas, should only see data from Texas)
● Sales manager should be able to see all the states under their supervision (e.g.
Ally, the US Sales Manager, will see data from All the states)
● Managers should have the ability to filter data to specific states
Step 2: Create the Template
When creating a Roambi report as a template, the general workflow is:
1. Determine the data to be shared with your recipients. Decide if all recipients will
get the same data or it will be filtered by specific category, product, or country.
2. Create or select a Web Intelligence report that contains the data. As a best
practice, remove any header, footer, and additional formatting from the report.
3. Export the report as Excel file.
4. Upload to SAP Roambi Cloud and create your Roambi report.
5. Review and refine the Roambi View
As with all design processes, creating a Roambi report will take few iterations and
practice. General recommendation is to work through the steps outlined here, and get
early feedback from recipients before investing on perfecting the smaller details.

11
In regards to the example use case for the sales team, the first step is to gather the
necessary sales data by state. The IT team created a Web Intelligence report that
contains the following dimensions and measures
Sample Web Intelligencentelligence Report for Sales Team
The report contains all states that have sales presence including (California, Colorado,
Texas, etc.). The most important metric, Sales Revenue, is available. Additionally, IT
team added Margin to help calculate profitability and included other common sales
metrics. This report contains all the requested information to create a Roambi
Dashboard. The report is downloaded as an Excel report and uploaded to SAP Roambi
Cloud.
12
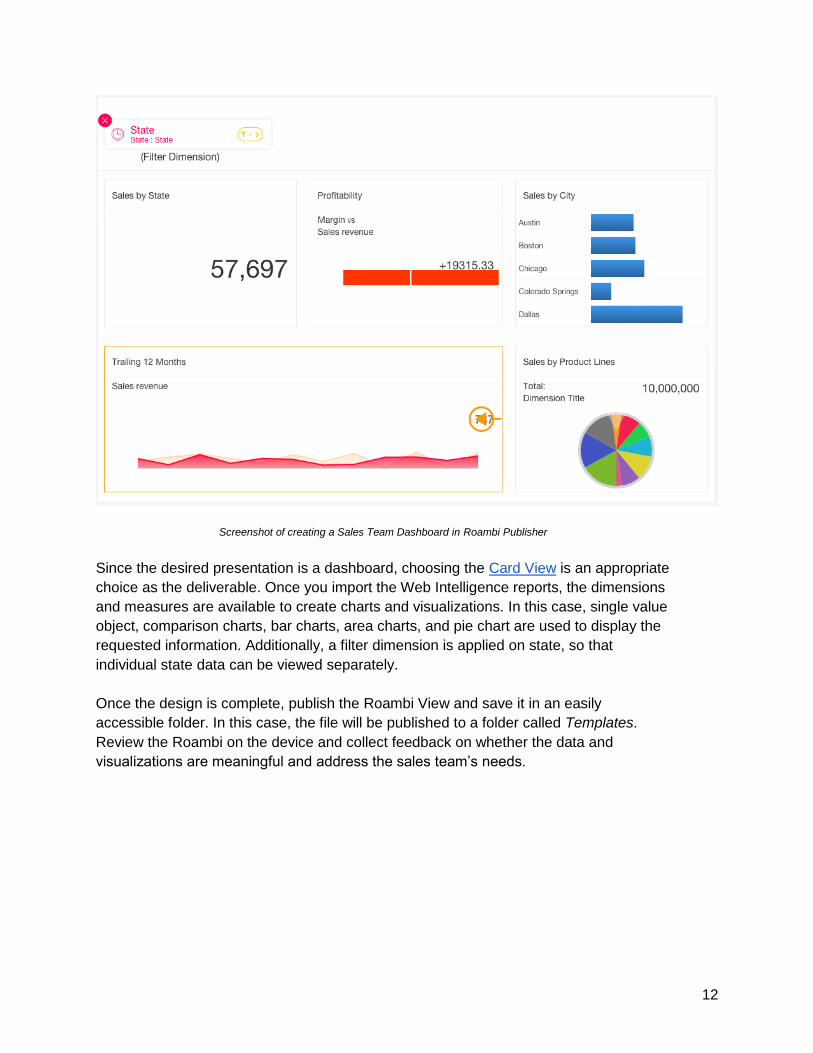
Screenshot of creating a Sales Team Dashboard in Roambi Publisher
Since the desired presentation is a dashboard, choosing the Card View is an appropriate
choice as the deliverable. Once you import the Web Intelligence reports, the dimensions
and measures are available to create charts and visualizations. In this case, single value
object, comparison charts, bar charts, area charts, and pie chart are used to display the
requested information. Additionally, a filter dimension is applied on state, so that
individual state data can be viewed separately.
Once the design is complete, publish the Roambi View and save it in an easily
accessible folder. In this case, the file will be published to a folder called Templates.
Review the Roambi on the device and collect feedback on whether the data and
visualizations are meaningful and address the sales team’s needs.

13
Screenshot of creating a Sales Team Dashboard on the iPad
Once the template is finalized, the remaining steps are to personalize the Roambi
reports and deliver them. These steps are all configured within the BOE interface. The
following steps assume you have no experience with BOE Publication. If you are already
familiar with BOE publications, please skip to Step 5: Adding Roambi Publication
Extension.
Step 3: Create Profile
To personalize the data for recipients, SAP BOE uses an object called Profile to facilitate
the mapping of the data. From SAP BOE Introduction to Publishing:
“Profiles are objects in the SAP BusinessObjects Enterprise system that
let you classify users and groups. They work in conjunction with
publications to personalize the content that users see. Profiles link
users and groups to profile values, which are values used to
personalize data within a report.”

14
This section outlines the steps to create profiles. It assumes that users or groups have
been created already. It is important to note that the users’ email will need to match the
email used in SAP Roambi Cloud. If using groups, the Group Name must match the
Group name in SAP Roambi Cloud.
1. Login to Central Management Console (CMC).
2. Choose Profiles.
3. Select Manage > New > New Profile.
4. Create a name for the Profile (example: Publication Demo Profile)
5. Select Profile Targets and click Add.
6. Select the appropriate universe and object that will be used as a filter for the
publication. In this case it is the eFashion universe and Object State.

15
7. Select Profile Values and determine the users and/or groups that will receive the
publication. When choosing a specific user, you can define the data value for
personalization.
In this case, Chris California will receive data only from California. Whereas Daniel
Sutoyo will receive data from a subset of states.
Once the steps are completed in creating a profile, it can be used to create personalized
publication for any Web Intelligence documents based on this universe and selected
object.
Step 4: Create Publication
Publication is a SAP BOE entity that enables you to schedule personalized reports. It
leverages the users and profiles that you created in the previous steps.
1. Login to BI Launch Pad or CMC.
2. Select a folder where the publication will be generated. In this case Public >
Publication Demo.
3. Click New > Publication to create the Publication.
16
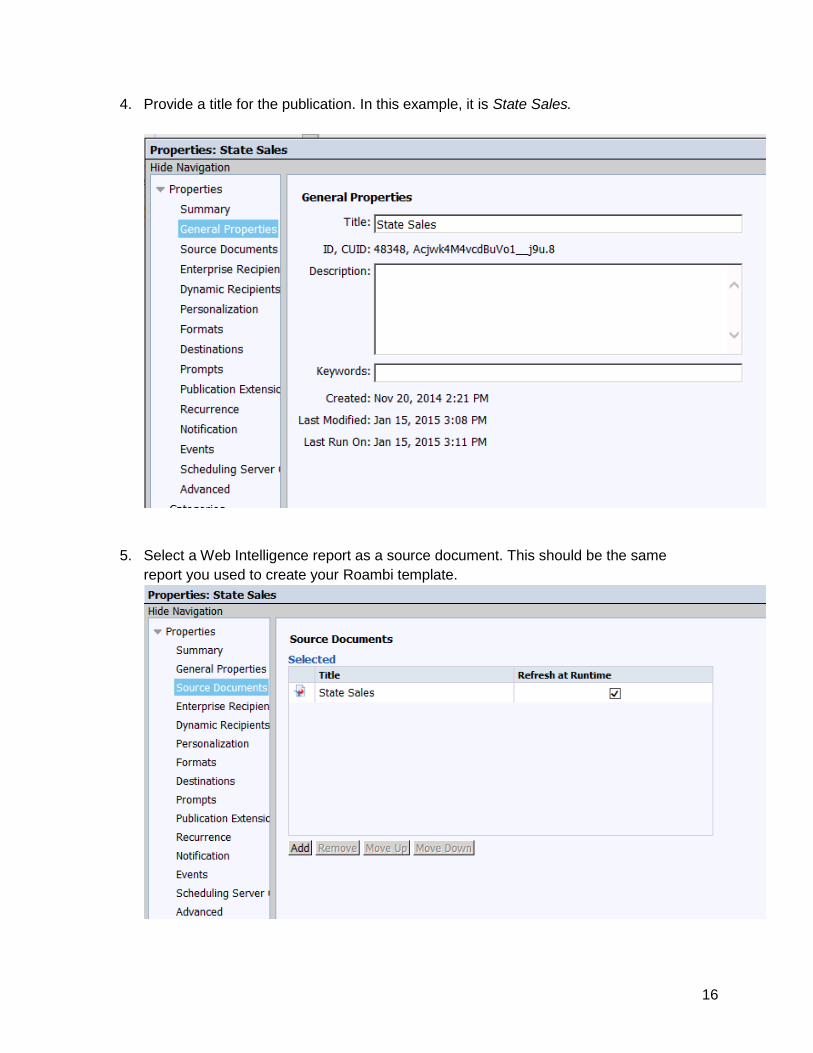
4. Provide a title for the publication. In this example, it is State Sales.
5. Select a Web Intelligence report as a source document. This should be the same
report you used to create your Roambi template.
17
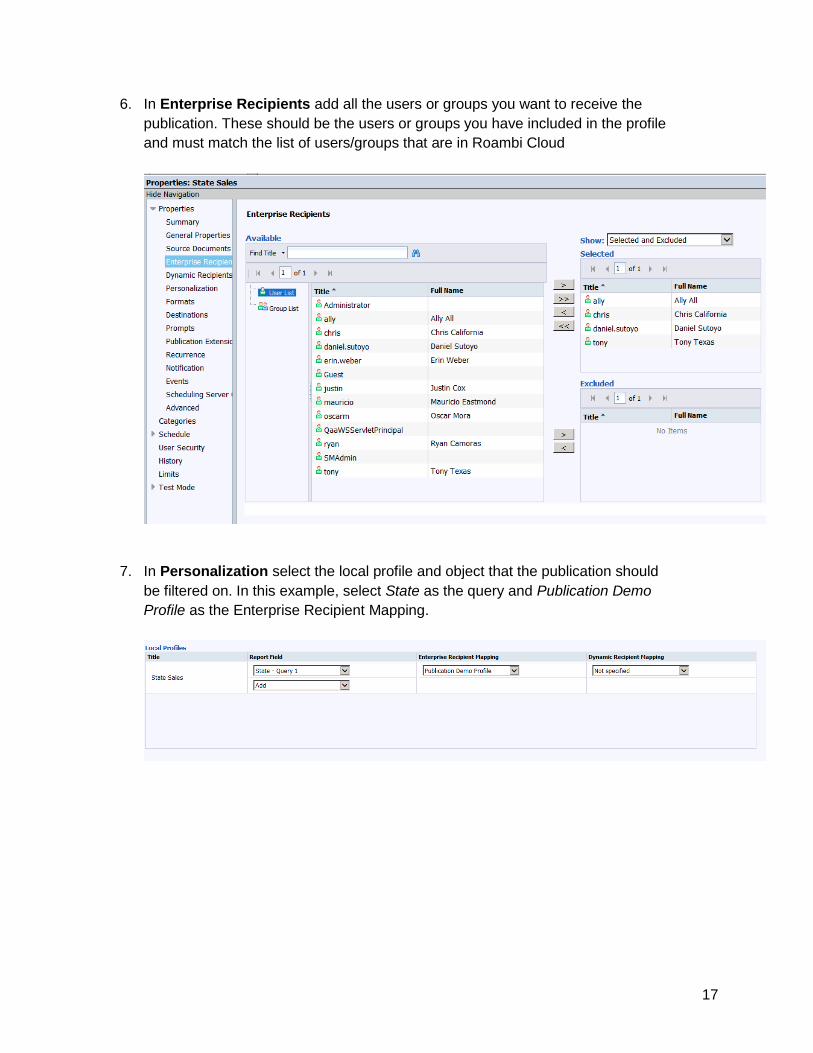
6. In Enterprise Recipients add all the users or groups you want to receive the
publication. These should be the users or groups you have included in the profile
and must match the list of users/groups that are in Roambi Cloud
7. In Personalization select the local profile and object that the publication should
be filtered on. In this example, select State as the query and Publication Demo
Profile as the Enterprise Recipient Mapping.

18
8. In Formats, at the minimum you will need to select Microsoft Excel as output
format.
9. In Destinations, select BI Inbox and check the “Deliver objects to each user”
option.
10. In Roambi Cloud Publication Extension, you will need to add the Roambi
Cloud Business Objects Publication Extension. Please refer to the table below for
instructions on the parameters.

19
Field Value
Publication Extension Name
RoambiBusiness (can be a custom title)
Class Name com.mellmo.roambi.businessobjects.publication.Pu
blicationExtension
Parameter
templatePath=<path to RBI
template>&roambiScriptFolder=<path to
RoambiScript>&destinationFolder=<path to
destination folder in Roambi File
System>&title<name of the Roambi
file>&cleanInbox<true or false>
Important Notes
templatePath (required):
Roambi Cloud path to the Roambi Report Template file
roambiScriptFolder (required):
The local path of the RoambiScript jar file.
destinationFolder (optional):
A valid, existing folder in the Roambi File System (RFS) to which the Roambi file will be
published. If not specified, the Roambi file will be published to users’ personal folder.
title (optional):
The Roambi file’s name. If not specified, the title will be the publication name. The title
can be a static title like “Sales Report” or it can be a dynamic title like 'Sales Report
{State - Query 1}'. In this case, the variable name enclosed in {} will be replaced by the
plugin with the value(s) used to generate the report. The variable name must be the
same as shown in the Report Field configured in the Personalization step of the
publication.
cleanInbox (optional):
If this parameter is “true”, the plugin will not create a copy of the excel file in users’
inboxes. If not specified it will default to “false”.
The parameter values highlighted in yellow must be URL Encoded (or the whole
parameter can be URL encoded):
templatePath=<path to RBI template>&roambiScriptFolder=<path to
RoambiScript>>&destinationFolder=<path to destination folder in

20
Roambi File System>&title<name of the Roambi
file>>&cleanInbox<true or false>
Example Parameter Values:
templatePath= /Template/State Sales
roambiScriptFolder= c:/roambiscript
destinationFolder= /Roambi Files
title= Sales Report
cleanInbox= true
Final Parameter to be entered: templatePath=%2FTemplate%2FState%20Sales&roambiScriptFolder=c%3A%2Froambi
script&destinationFolder=%2FRoambi%20Files&title=%20Report&cleanInbox=true
In the latest version, the whole parameter can be URL Encoded. You can encode with this URL encoder here. Note: Strongly encourage you to store the source and url encoded parameter path in a document for your own reference. Once
the publication extension is added, BOE does not let you edit it. You will have to remove and reinsert again.
11. The publication extension must be added in the list Before Publication Delivery

21
12. In Schedule, select the desired frequency to deliver the publication. You can
select Run Now, to send the personalized reports.
13. Open Roambi Analytics and review the reports are correctly filtered for recipients.

22
Appendix A: Troubleshooting and Common Issues
Where do I find RoambiScript, BOE Publication Extensions, and API Key?
RoambiScript: Find it in SAP Service Marketplace
Roambi BOE Publication Extension: Link
Roambi API Key: Please refer to How do I create a Roambi API client?
No reports are created after the Publication completes

23
The Publication needs to be successful before RoambiScript is executed to generate
any content.
Delete the contents in the C:\roambiscript\logs directory
Run the Publication again
First check the Publication history to confirm that was successful without errors.
If it failed, review the log provided for further details.
If successful, then check the C:\roambiscript\logs to see if a new log was created.
This indicates that RoambiScript may have encounted an error. Check the log
for further details.
How do I obtain log files?
There are two log files you can pull for troubleshooting purposes:
For BOE log files, right click on the BOE publication and click on History.
This will open a new pane of previous job runs. Clicking on the run entry will allow you
to view the log files and other exported files (if you specified in your destination).

24
For RoambiScript log file, go to the folder where you installed RoambScript.
There is a folder called log and will contain the latest events.
I am getting empty data set in my Roambi file
Please check the following items
1. You provisioned the right users, and you are using a provisioned user to test the
RBI contents
2. Check that your source report matches the dimensions used in the Roambi
Report.
3. The profile values and filters for the user actually matches the data in the source
report. Make sure you do not have additional query filter that restrict the data
than intended
4. Make sure the data entry matches your filter (e.g. “Texas_”). You can check this
by looking at the exported Web Intelligence or Excel report in the user’s BOE
inbox.
Profile mapping and query needs to be accurate. It uses an AND clause
Check that your RBI template can be accessed
I get an invalid path in log
The RBI is stored in the user’s My Documents folder. And the My Documents folder is
specific to the user’s email address. Please Double check that the user email address is
the same in BOE and in Roambi Cloud.
I get an invalid template path in log
Double check the user credential you are using for the api client key has access to the
RBI template and the folder that stores the RBI
My BOE log says it is complete, but I don’t see anything
Please check whether you have specified Excel as a format in the publication properties.
At the minimum, the Excel format must be selected.
How can I check if my data issue is a BOE issue or a Roambi Issue?
In the destination tab of the publication properties, select where you want to review the
exported file. For easy reference in BOE, select User InBox, and the in the format tab
25
select both Excel and Web Intelligence report. This way, you can complete the Roambi
RBI process and also look at the underlying data report in both Excel and Web
Intelligence report.
I still have issues with the plugin
Please contact support. Please be sure to provide the following information:
- BOE version
- Brief summary of what you are trying to accomplish
- Time of publication event
- RoambiScript Log (This can be found in the folder where you installed
RoambiScript)
- The publishing parameters you used
- Screenshot of Enterprise Recipients
- Screenshot of Profile Values

26
Appendix B: Resources
Introduction to BOE Platform Publication
General overview of BOE publication extension and how it can be used to personalize
data
Personalization in SAP BOE Publication
A more detailed step by step guide with additional screenshots and illustrations
BOE Introduction to Publishing (PDF)
An in depth guide to leveraging the publishing platform in BOE
Adding a Publication Extension to your Publication
Basic steps on adding a BOE publication extension
Understanding Publication bursting modes
This is a useful article if you have specific concerns on your database performance

27