s&s cycle,inc
TRANSCRIPT

S&S® Cycle,Inc.
14025 Cty Hwy G, PO Box 215Viola, Wisconsin 54664
Phone: 608-627-1497 • Fax: 608-627-1488Technical Service Phone: 608-627-TECH (8324)
Technical Service Email: [email protected]: www.sscycle.com
IMPORTANT NOTICE:Statements in this instruction sheet preceded by the following words are of special significance.
WARNING
Means there is the possibility of injury to yourself or others.
CAUTION
Means there is the possibility of damage to the part or motorcycle.
NOTE
Other information of particular importance has been placed in italic type.
S&S recommends you take special notice of these items.
WARRANTY:All S&S parts are guaranteed to the original purchaser to be free of manufacturing defects in materials and workmanship for a period of twelve (12) months from the date of purchase. Merchandise that fails to conform to these conditions will be repaired or replaced at S&S’s option if the parts are returned to us by the purchaser within the 12 month warranty period or within 10 days thereafter. In the event warranty service is required, the original purchaser must call or write S&S immediately with the problem. Some problems can be rectified by a telephone call and need no further course of action. A part that is suspect of being defective must not be replaced by a Dealer without prior authorization from S&S. If it is deemed necessary for S&S to make an evaluation to determine whether the part was defective, a return authorization number must be obtained from S&S. The parts must be packaged properly so as to not cause further damage and be returned prepaid to S&S with a copy of the original invoice of purchase and a detailed letter outlining the nature of the problem, how the part was used and the circumstances at the time of failure. If after an evaluation has been made by S&S and the part was found to be defective, repair, replacement or refund will be granted.
ADDITIONAL WARRANTY PROVISIONS: (1) S&S shall have no obligation in the event an S&S part is modified by any other person or organization.(2) S&S shall have no obligation if an S&S part becomes defective in whole or in part as a result of improper installation, improper maintenance, improper use, abnormal operation, or any other misuse or mistreatment of the S&S part.(3) S&S shall not be liable for any consequential or incidental damages resulting from the failure of an S&S part, the breach of any warranties, the failure to deliver, delay in delivery, delivery in non-conforming condition, or for any other breach of contract or duty between S&S and a customer. (4) S&S parts are designed exclusively for use in Harley-Davidson® and other American v-twin motorcycles. S&S shall have no warranty or liability obligation if an S&S part is used in any other application.
SAFE INSTALLATION AND OPERATION RULES:
Before installing your new S&S part it is your responsibility to read and follow the installation and maintenance procedures in these instructions and follow the basic rules below for your personal safety.
• Gasoline is extremely flammable and explosive under certain conditions and toxic when breathed. Do not smoke. Perform installation in a well ventilated area away from open flames or sparks. • If motorcycle has been running, wait until engine and exhaust pipes have cooled down to avoid getting burned before performing any installation steps. • Before performing any installation steps disconnect battery to eliminate potential sparks and inadvertent engagement of starter while working on electrical components. • Read instructions thoroughly and carefully so all procedures are completely understood before performing any installation steps. Contact S&S with any questions you may have if any steps are unclear or any abnormalities occur during installation or operation of motorcycle with a S&S part on it. • Consult an appropriate service manual for your motorcycle for correct disassembly and reassembly procedures for any parts that need to be removed to facilitate installation. • Use good judgment when performing installation and operating motorcycle. Good judgment begins with a clear head. Don’t let alcohol, drugs or fatigue impair your judgment. Start installation when you are fresh. • Be sure all federal, state and local laws are obeyed with the installation. • For optimum performance and safety and to minimize potential damage to carb or other components, use all mounting hardware that is provided and follow all installation instructions. • Motorcycle exhaust fumes are toxic and poisonous and must not be breathed. Run motorcycle in a well ventilated area where fumes can dissipate.
DISCLAIMER:S&S parts are designed for high performance, closed course, racing applications and are intended for the very experienced rider only. The installation of S&S parts may void or adversely effect your factory warranty. In addition such installation and use may violate certain federal, state, and local laws, rules and ordinances as well as other laws when used on motor vehicles used on public highways, especially in states where pollution laws may apply. Always check federal, state, and local laws before modifying your motorcycle. It is the sole and exclusive responsibility of the user to determine the suitability of the product for his or her use, and the user shall assume all legal, personal injury risk and liability and all other obligations, duties, and risks associated therewith.
The words Harley®, Harley-Davidson®, H-D®, Sportster®, Evolution®, and all H-D part numbers and model designations are used in reference only. S&S Cycle is not associated with Harley-Davidson, Inc.
Installation Instructions for S&S® Billet Oil Pump for Big Twin Engines
Instruction 51-10412-18-13
Copyright © 2011, 2013
by S&S Cycle, Inc.
All rights reserved. Printed in the U.S.A.
2
INTRODUCTION
The billet oil pumps introduced by S&S® in early 2000 replace all cast and billet pumps used previously. Current pumps are similar to previous ones with minor exceptions:
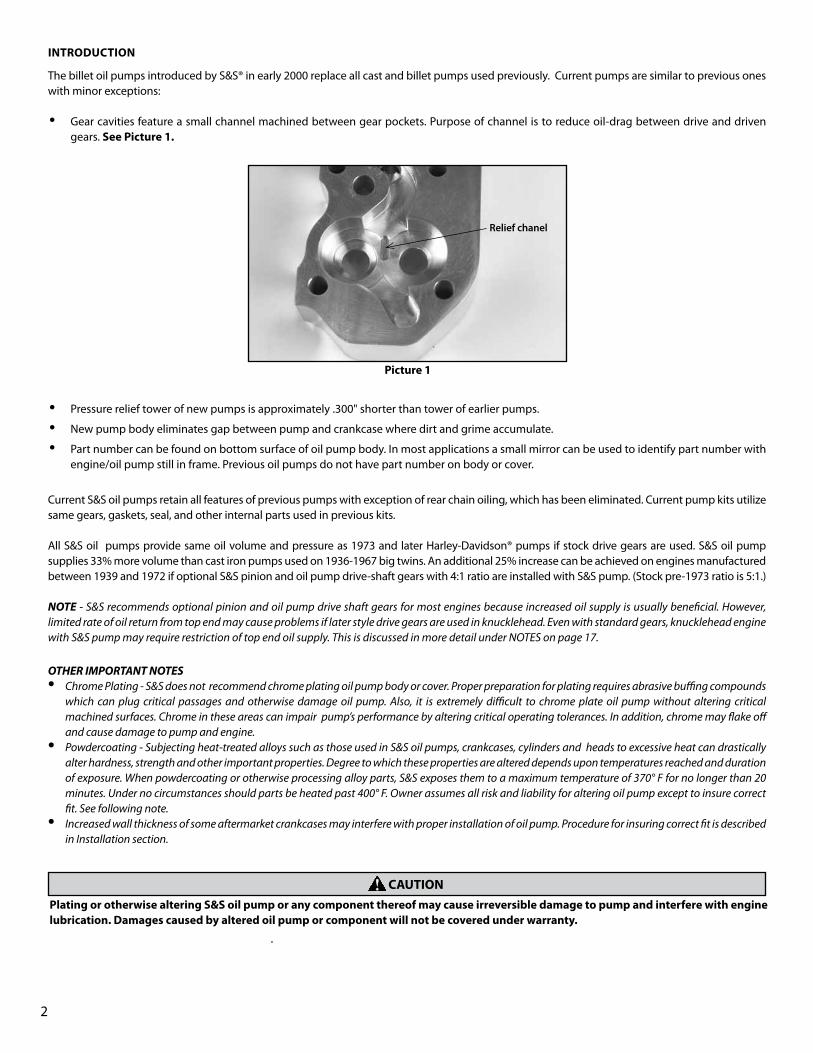
• Gear cavities feature a small channel machined between gear pockets. Purpose of channel is to reduce oil-drag between drive and driven gears. See Picture 1.
• Pressure relief tower of new pumps is approximately .300" shorter than tower of earlier pumps.
• New pump body eliminates gap between pump and crankcase where dirt and grime accumulate.
• Part number can be found on bottom surface of oil pump body. In most applications a small mirror can be used to identify part number with engine/oil pump still in frame. Previous oil pumps do not have part number on body or cover.
Current S&S oil pumps retain all features of previous pumps with exception of rear chain oiling, which has been eliminated. Current pump kits utilize same gears, gaskets, seal, and other internal parts used in previous kits.
All S&S oil pumps provide same oil volume and pressure as 1973 and later Harley-Davidson® pumps if stock drive gears are used. S&S oil pump supplies 33% more volume than cast iron pumps used on 1936-1967 big twins. An additional 25% increase can be achieved on engines manufactured between 1939 and 1972 if optional S&S pinion and oil pump drive-shaft gears with 4:1 ratio are installed with S&S pump. (Stock pre-1973 ratio is 5:1.)
NOTE - S&S recommends optional pinion and oil pump drive shaft gears for most engines because increased oil supply is usually beneficial. However, limited rate of oil return from top end may cause problems if later style drive gears are used in knucklehead. Even with standard gears, knucklehead engine with S&S pump may require restriction of top end oil supply. This is discussed in more detail under NOTES on page 17.
OTHER IMPORTANT NOTES • Chrome Plating - S&S does not recommend chrome plating oil pump body or cover. Proper preparation for plating requires abrasive buffing compounds
which can plug critical passages and otherwise damage oil pump. Also, it is extremely difficult to chrome plate oil pump without altering critical machined surfaces. Chrome in these areas can impair pump’s performance by altering critical operating tolerances. In addition, chrome may flake off and cause damage to pump and engine.
• Powdercoating - Subjecting heat-treated alloys such as those used in S&S oil pumps, crankcases, cylinders and heads to excessive heat can drastically alter hardness, strength and other important properties. Degree to which these properties are altered depends upon temperatures reached and duration of exposure. When powdercoating or otherwise processing alloy parts, S&S exposes them to a maximum temperature of 370° F for no longer than 20 minutes. Under no circumstances should parts be heated past 400° F. Owner assumes all risk and liability for altering oil pump except to insure correct fit. See following note.
• Increased wall thickness of some aftermarket crankcases may interfere with proper installation of oil pump. Procedure for insuring correct fit is described in Installation section.
Plating or otherwise altering S&S oil pump or any component thereof may cause irreversible damage to pump and interfere with engine lubrication. Damages caused by altered oil pump or component will not be covered under warranty.
Picture 1
CAUTION
Relief chanel
3
Picture 3
Picture 4
Picture 5
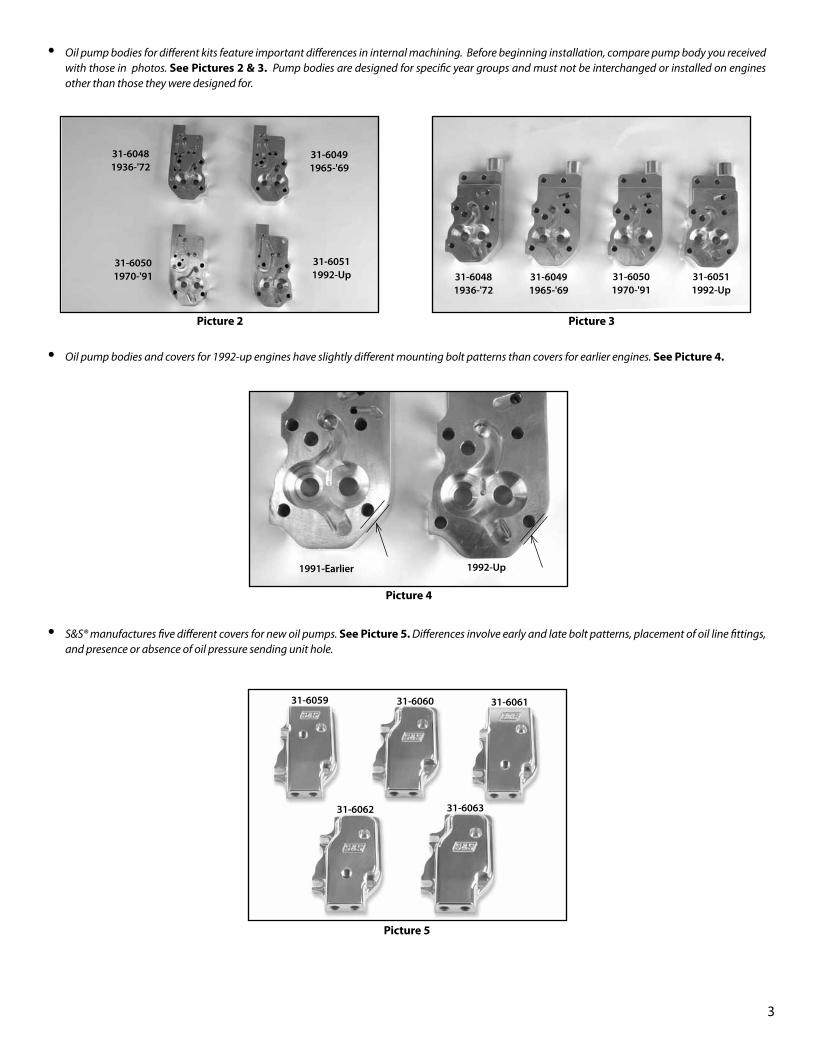
• Oil pump bodies for different kits feature important differences in internal machining. Before beginning installation, compare pump body you received with those in photos. See Pictures 2 & 3. Pump bodies are designed for specific year groups and must not be interchanged or installed on engines other than those they were designed for.
• Oil pump bodies and covers for 1992-up engines have slightly different mounting bolt patterns than covers for earlier engines. See Picture 4.
• S&S® manufactures five different covers for new oil pumps. See Picture 5. Differences involve early and late bolt patterns, placement of oil line fittings, and presence or absence of oil pressure sending unit hole.
Picture 2
31-60481936-'72
31-60491965-'69
31-60501970-'91
31-60511992-Up 31-6048
1936-'7231-60491965-'69
31-60501970-'91
31-60511992-Up
1991-Earlier 1992-Up
31-6059 31-6060 31-6061
31-6062 31-6063

4
• Covers #31-6059 and #31-6060 have 1991 and earlier mounting bolt pattern. Cover #31-6059 allows builder to choose top or bottom location for oil line fittings and has provision for primary chain oiler and oil pressure sending unit if desired. Cover #31-6060 accepts bottom-mount fittings only and has no provision for sending unit or primary chain oiler. See Picture 6.
Picture 6
• Covers #31-6061, #31-6062, and #31-6063 have 1992 and newer mounting bolt pattern. "Universal" cover #31-6061 allows builder to choose top or bottom location for oil line fittings and has additional provision for supply line fitting in face of cover. Cover #31-6062 has no provision for top-mounted oil line fittings but otherwise is similar to cover #31-6061. "Custom" cover #31-6063 accepts bottom-mount oil line fittings only. See Picture 7.
CAUTION
Picture 7
• Oil pump covers are described in more detail in Section 7.
Bottom-mount oil supply line fitting is not recommended for models with oil tank below transmission because of possibility of cavitation or "air lock" occurring during oil changes. See page 17 for information on preventing cavitation.
NOTES • Only one supply and one return hole will be used. • Hole #3 for oil pressure switch/gauge will supply adequate pressurized oil for top end lubrication in panhead-shovelhead and similar applications.
However, S&S® does not recommend this practice because oil from hole #3 bypasses hydraulic lifter filter screen. Builder assumes responsibility for any damages caused by using hole #3 for top end oil supply.
1. Top oil return hole2. Top oil supply hole3. Oil pressure switch or gauge hole4. Lower oil supply hole5. Lower oil return hole6. Middle oil supply hole7. Front chain oiler hole
1. Top oil return hole2. Top oil supply hole3. Oil pressure switch or gauge hole4. Lower oil supply hole5. Lower oil return hole6. Middle oil supply hole7. Front chain oiler hole
1 2 7
3
45 5 431-6059 31-6060
31-606131-6062 31-6063
6 6
45 4545
21

5
Hole #3 in #31-6059 cover and hole #6 in #31-6061 and #31-6062 covers must not be confused. Hole #3 is high-pressure site intended for oil pressure gauge or sending unit. Hole #6 is low-pressure site and may be used for oil supply line from tank only. Block off holes #3 and #6 with supplied pipe plugs if not used.
Some oil pump kits include optional parts such as drive shaft gear, pinion drive gear and/or breather gear kit. See Chart 1.
CAUTION
Pump KitPart No.
Pump BodyPart No.
Pump CoverPart No.
Drive Shaft Drive GearPart No.
Pinion Shaft Drive GearPart No.
Breather Drive GearPart No.
31-6200 31-6048 31-6059 N/A N/A
31-6201 31-6048 31-6060 N/A N/A N/A
31-6202 31-6049 31-6059 N/A N/A N/A
31-6203 31-6050 31-6059 N/A N/A N/A
31-6204 31-6050 31-6060 N/A N/A N/A
31-6205 31-6051 31-6061 N/A N/A N/A
31-6206 31-6051 31-6062 N/A N/A N/A
31-6207 31-6051 31-6063 N/A N/A N/A
31-6239 31-6050 31-6060 33-4230 33-4232 33-4253
31-6240 31-6050 31-6060 33-4230‡ 33-4232 33-4250†
31-6245 31-6048 31-6060 33-4230 33-4237§ 33-4253
31-6246 31-6048 31-6060 33-4230 33-4232 33-4253
31-6247 31-6051 31-6063 33-4230‡ 33-4232 33-4250
31-6248 31-6049 31-6059 33-4230 33-4232 33-4253
31-6249 31-6050 31-6059 33-4230 33-4232 33-4253
31-6292 31-6048 31-6059 33-4230 33-4237§ 33-4253
31-6293 31-6048 31-6059 33-4230 33-4232 33-4253
31-6294 31-6050 31-6059 33-4230 33-4232 33-4253
31-6295 31-6050 31-6059 33-4230‡ 33-4232 33-4250†
31-6296 31-6051 31-6062 33-4230‡ 33-4232 33-4250
31-6297 31-6050 31-6059 N/A N/A 33-4253
§ Pinion shaft drive gear, part #33-4237 for 1939 -1953 engines, is easily distinguished from 1954-later gears by inside diameter splines machined to fit early style splined pinion shafts
‡ Breather valve gear kit, part #33-4251 for 1977-later engines, has different pitch diameter than 1977-earlier gears and can be identified by circular channel machined in gear face.
† #33-4232 pinion shaft pump drive gear fits S&S 1958-later style tapered pinion shaft and stock 1954-1989 style tapered pinion shaft. Gear #33-4232 is 6-tooth and requires 24-tooth oil pump driveshaft gear. Resulting 4:1 ratio is same as stock 1973-up. Engines using 1990-later style straight pinion shaft must use stock pinion shaft pump drive gear.
NOTE - Installation of some oil pump kits may require crankcase modifications that generate metal filings. It is imperative that all filings, dirt and other contaminants be removed from crankcases, oil passages, oil pump and other engine components prior to assembly. Use appropriate parts cleaner and blow out oil passages with compressed air.
Metal filings, dirt and other foreign matter can cause extensive damage to oil pump and engine.
Compressed air and particles dislodged by compressed air are potentially harmful. Wear protective goggles when using compressed air and always direct air stream away from yourself and others nearby.
CAUTION
WARNING
Chart 1

6
INTRODUCTION
Read instructions completely and become thoroughly familiar with entire installation procedure before starting. A summary chart of installation steps is provided to help clarify installation. See Chart 2. All S&S® oil pump kits are listed with the specific year groups they fit followed by steps required for correct installation. Select Part # that corresponds to kit and follow required steps. Read following notes to determine if optional steps are desired.
Pump Kit Part No. Year Group Required Steps Optional Steps
31-6200 1936-'72 1,2,3,7,8,9 4 (1948-'69 only) §
31-6201 1936-'72 1,2,3,7,8,9 4 (1948-'69 only) §
31-6202 1965-'69 † 1,6,7,8,9
31-6203 1970-'91 1,3,7,8,9
31-6204 1970-'91 1,3,7,8,9
31-6205 1984-up S&S/1992-up Harley-Davidson® 1,7,8,9
31-6206 1992-up H-D® ‡ 1,7,8,9
31-6207 1992-up H-D ‡ 1,7,8,9
31-6239 1970-'77 ‡ 1,2,3,7,8,9 5 (1970-'72 only) §
31-6240 1978-'91 ‡ 1,3,7,8,9
31-6245 1948-'53 1,7,8,9
31-6246 1954-'64 ‡ 1,7,8,9
31-6247 1992-up w/pre-'89 pinion shaft ‡ 1,7,8,9
31-6248 1965-'69 † 1,6,7,8,9
31-6249 1970-'72 ‡ 1,2,3,6,7,8,9 5 §
31-6292 1948-'53 1,7,8,9
31-6293 1954-'69 ‡ 1,7,8,9 (6?)
31-6294 1970-'77 ‡ 1,2,3,6,7,8,9 5 (1970-'72 only) §
31-6295 1978-'91 ‡ 1,3,7,8,9
31-6296 1992-up w/pre-'89 pinion shaft ‡ 1,7,8,9
31-6297 1970-'72 1,2,3,6,7,8,9 5 §
S&S® recommends this optional step be performed if hydraulic lifters are used.
Installation of this kit requires use of 1973-later breather gear such as S&S part #33-4253 or #33-4250 to provide oil to primary chain. Kits #31-6203 and #31-6204 include neither of these breather gears. Be sure correct year breather gear, cam gear and pinion gear combination is used.
#33-4232 pinion shaft pump drive gear is designed to fit S&S 1958 and later style tapered pinion shaft and stock 1954-1989 tapered pinion shaft. Gear #33-4232 is 6-tooth and requires 24 tooth oil pump drive shaft gear. Resulting 4:1 ratio is same as stock 1973-up. Engines using 1990-later style straight pinion shaft must use stock pinion shaft oil pump drive gear.
NOTES • Installation steps vary between kits and engine year groups. Perform only those steps required for your engine and the oil pump kit you will install. S&S
urges you to review installation steps for your year group several times before beginning installation or performing any crankcase modification. • Optional steps can update 1948-1962 and 1966-1972 crankcases to 1973-up style oiling. Step 4 applies to all 1948-1969 crankcases except 1963-
1965 models. Step 5 applies to 1970-1972 crankcases only. Both procedures separate oil supplied to top and bottom ends to increase oil pressure to hydraulic lifters and top end. This helps prevent hydraulic lifters from collapsing at low RPM. While these two steps are not mandatory, S&S strongly recommends them for all engines using hydraulic lifters except 1963-1965 outside oiler panheads. It is also suggested that optional S&S high speed oil pump drive gears be used in all 1972 and earlier engines except knuckleheads. Exceptions for knucklehead and outside oiler panhead (step 4) will be discussed in more detail later.
Failure to perform all required steps may result in engine damage.
CAUTION
Chart 2
7
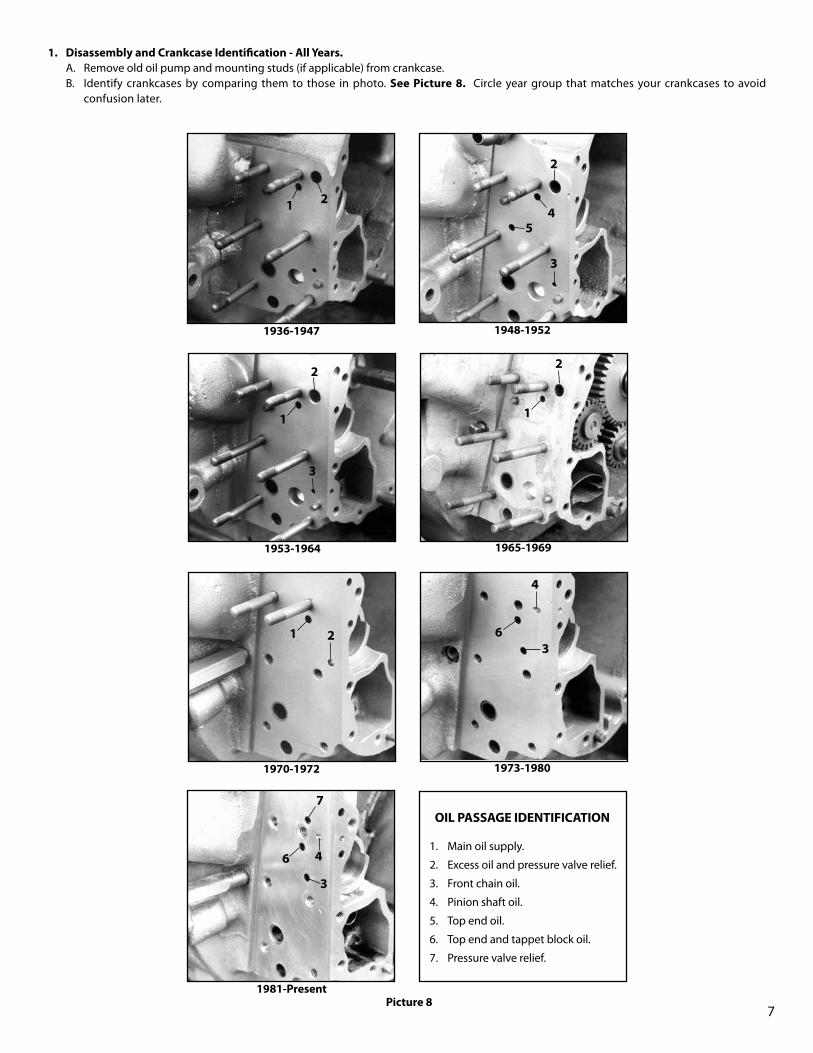
1. Disassembly and Crankcase Identification - All Years.A. Remove old oil pump and mounting studs (if applicable) from crankcase. B. Identify crankcases by comparing them to those in photo. See Picture 8. Circle year group that matches your crankcases to avoid
confusion later.
1. Main oil supply.
2. Excess oil and pressure valve relief.
3. Front chain oil.
4. Pinion shaft oil.
5. Top end oil.
6. Top end and tappet block oil.
7. Pressure valve relief.
OIL PASSAGE IDENTIFICATION
Picture 8
1 2
2
45
3
2
1
3
2
1
1 2
4
63
7
6 4
3
1936-1947 1948-1952
1953-1964 1965-1969
1970-1972 1973-1980
1981-Present

8
C. Confirm that adequate clearance exists between oil pump body and crankcase by temporarily installing pump assembly on crankcase and inspecting areas indicated in photo. See Picture 9. In some instances it may be necessary to remove small amount of material from pump body to obtain correct fit. See Picture 10.
Picture 9 Picture 10
NOTES • If modification of pump body is necessary, remove minimum amount of material required to properly position oil pump on crankcase. Take special care
not to damage gasket surfaces. After modification, clean pump body thoroughly with suitable parts cleaner and compressed air to remove metal filings generated during procedure. Remove all traces of solvent prior to installation.
• S&S® crankcases require no modification for S&S oil pump. S&S 1936-1969 generator- style cases are machined to accept S&S or stock cast iron or early alloy pump. S&S 1970-later alternator style crankcases are machined for 1981-1991 or 1992-up oil pump as specified at time of order. Both S&S and stock oil pump for specific year group can be installed without modification.
• S&S has used 1991-earlier and 1992-later style mounting bolt pattern in S&S engines. Confirm pattern prior to ordering replacement pump body or cover. See Picture 4. Oil pump gasket of known year can be used to positively identify mounting bolt pattern.
• Proper identification of crankcase is imperative to insure correct pump installation. Machining of some aftermarket crankcases may not be consistent with a specific year group. If in doubt about modifications required for aftermarket crankcase, contact crankcase manufacturer.
• Failure to clean oil pump before engine assembly may result in engine damage. • Improper oil pump installation due to incorrect identification of crankcase year group may result in engine damage.
2. Crankcase Modification - 1970-1972 Only - Plug 3⁄16" Oil Overflow Hole. A. If engine has been removed from chassis, CAREFULLY enlarge hole in photo (See Picture 11) with .203" (13⁄64") drill. If engine has not been
disassembled, apply grease to bit and both ends of hole to catch chips. Wrap masking tape around drill .225" from point to use as depth guide. If engine is in chassis, enlarging hole may be difficult. In this case hole may be tapped without enlarging, but extreme caution is required to avoid breaking tap off in hole.
CAUTION
Picture 11
Drill bit o.d. is close to hole size and may distort hole if drill is not steadied. Distorted hole may cause poor thread fit after hole is tapped.
CAUTION
9
B. Using 1⁄4 -20 tap, carefully tap hole deep enough for 1⁄4 -20 set screw provided in kit to rest flush with or slightly below gasket surface. See Picture 12. If necessary, reapply grease to both sides of hole before inserting tap. Use straight edge to confirm set screw does not protrude above gasket surface. See Picture 13.
Picture 13Picture 12
NOTE - Do not tap hole deeply enough for screw to be threaded completely through hole. Goal is to have screw tighten just as it becomes flush with or slightly below oil pump gasket surface.
C. Apply Loctite® to threads and install 1⁄4 -20 set screw.
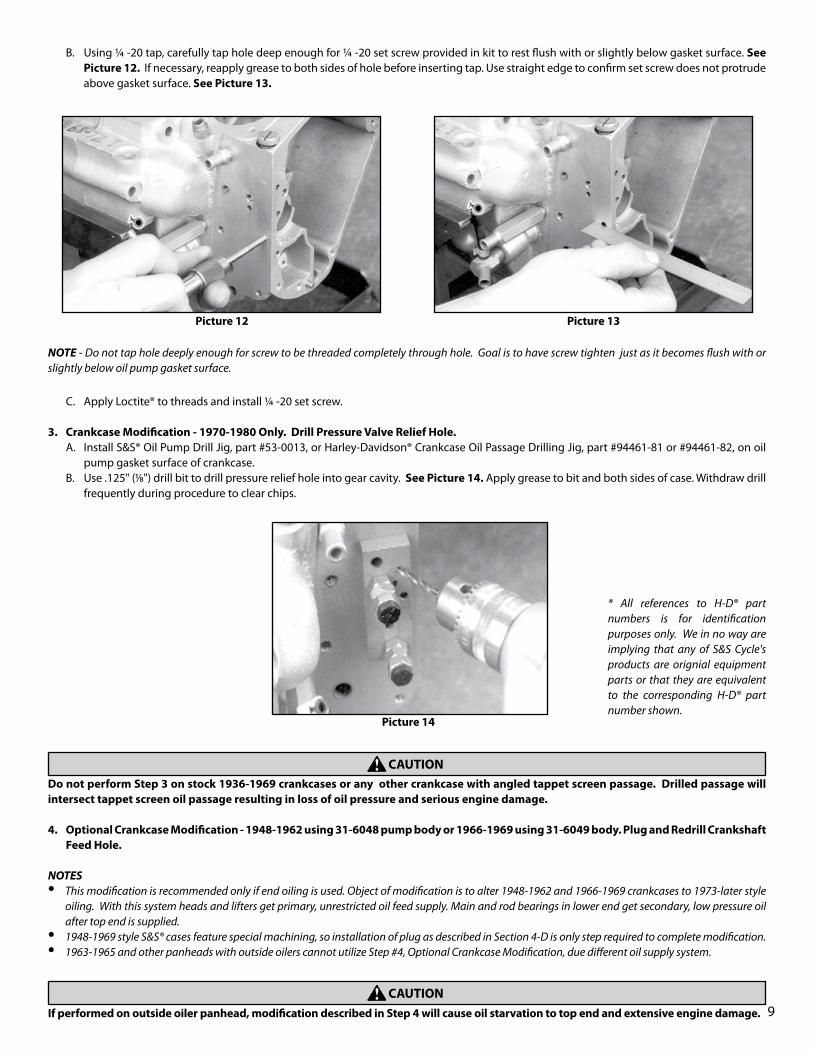
3. Crankcase Modification - 1970-1980 Only. Drill Pressure Valve Relief Hole.A. Install S&S® Oil Pump Drill Jig, part #53-0013, or Harley-Davidson® Crankcase Oil Passage Drilling Jig, part #94461-81 or #94461-82, on oil
pump gasket surface of crankcase. B. Use .125" (1⁄8") drill bit to drill pressure relief hole into gear cavity. See Picture 14. Apply grease to bit and both sides of case. Withdraw drill
frequently during procedure to clear chips.
Do not perform Step 3 on stock 1936-1969 crankcases or any other crankcase with angled tappet screen passage. Drilled passage will intersect tappet screen oil passage resulting in loss of oil pressure and serious engine damage.
4. Optional Crankcase Modification - 1948-1962 using 31-6048 pump body or 1966-1969 using 31-6049 body. Plug and Redrill Crankshaft Feed Hole.
NOTES • This modification is recommended only if end oiling is used. Object of modification is to alter 1948-1962 and 1966-1969 crankcases to 1973-later style
oiling. With this system heads and lifters get primary, unrestricted oil feed supply. Main and rod bearings in lower end get secondary, low pressure oil after top end is supplied.
• 1948-1969 style S&S® cases feature special machining, so installation of plug as described in Section 4-D is only step required to complete modification. • 1963-1965 and other panheads with outside oilers cannot utilize Step #4, Optional Crankcase Modification, due different oil supply system.
If performed on outside oiler panhead, modification described in Step 4 will cause oil starvation to top end and extensive engine damage.
CAUTION
CAUTION
Picture 14
* All references to H-D® part numbers is for identification purposes only. We in no way are implying that any of S&S Cycle's products are orignial equipment parts or that they are equivalent to the corresponding H-D® part number shown.

10
A. Wrap masking tape around .203" (13⁄64") drill bit .850" from point to use as depth guide. Carefully drill hole in Picture 15 .850" deep. See Pictures 15 and 16.
Picture 15 Picture 16
NOTE - Drill size is very close to hole size and may distort hole if drill is not steadied.
Distorted hole may cause poor thread fit after hole is tapped.
B. Using 1⁄4-20 tap, carefully thread hole deeply enough for 1⁄4 -20 set screw provided in kit to bottom out with screw head .540" to .600" below gear cover gasket surface. See Pictures 17 and 18. Remove tap periodically, clear chips, and install set screw to check depth.
CAUTION
Picture 17 Picture 18
NOTE - Do not tap hole deeply enough for set screw to block tappet screen oil feed passage. This will restrict oil supply to lifters and cylinder heads.
Restricted oil supply may cause extensive engine damage.
CAUTION
11
C. On 1948-1952 crankcases, blow air into intersecting hole in pump gasket surface to remove chips. On 1953-1969 crankcases, remove oil plug and lifter screen filter assembly and blow air into passage to remove chips. See Picture 19.
WARNING
Picture 19
NOTE - Before attempting to remove chips, remove set screw to allow chips to escape.
Compressed air and particles dislodged by compressed air are potentially harmful. Wear protective goggles when using compressed air and direct air stream away from yourself and others nearby.
D. Apply Loctite® to threads of 1⁄4 -20 set screw provided and install screw to depth of .540" to .600" below gear cover gasket surface.E. Install S&S® Oil Pump Drill Jig, part #53-0013, on crankcase oil pump gasket surface. See Picture 20.
Picture 20
F. Wrap masking tape around .187" (13⁄16") drill bit .750 “ (3⁄4”) from drill point. Using tape as depth guide, drill hole into pump gasket surface .375" (3⁄8") deep, until it breaks into passageway just tapped. (Hole to be drilled is 3⁄8" deep and drill jig is 3⁄8" thick; 3⁄8" + 3⁄8" = 3⁄4"). See Picture 20.
NOTE - Do not drill hole too deep. Hole must not extend into gear cavity side of crankcase.
Improperly drilled oil feed hole may cause oil to bleed off into gear cavity resulting in oil pressure loss and possible engine damage.
CAUTION

12
G. Remove drill jig and blow air into passage to remove chips. See Picture 21.
Picture 21
Metal filings, dirt and other foreign matter can cause extensive damage to oil pump and engine.
Compressed air and particles dislodged by compressed air are potentially harmful. Wear protective goggles when using compressed air and direct air stream away from yourself and others nearby.
5. Optional Crankcase Modification - 1970-1972 only, using #31-6050 pump body- Plug and Redrill Crankshaft Feed Hole
NOTE - This modification is recommended only if hydraulic lifters are used. Object of modification is to convert 1970-1972 cases to 1973 and later oiling to give lifters unrestricted oil pressure first. Then it provides main and rod bearings with lower-pressure oil after top end has been supplied.
A. Wrap masking tape around .203" (13⁄64") drill bit .375" (3⁄8") from drill point. Carefully enlarge hole in Picture 22. Using tape as depth guide,
drill hole .375" (3⁄8") deep. See Pictures 22 and 23.
CAUTION
WARNING
Picture 22 Picture 23
NOTE - Drill bit size is very close to hole size and may distort hole if drill is not steadied.
Distorted hole may cause poor thread fit after hole is tapped.
CAUTION

13
B. Using 1⁄4 -20 tap, Carefully tap hole deep enough for 1⁄4-20 allen head set screw supplied in kit to bottom out with screw head .125" to .150" below gear cover gasket surface. See Pictures 24 and 25. Remove tap periodically, clear chips, and install set screw to check depth.
Picture 24 Picture 25
NOTE - Do not tap hole so deep that screw blocks tappet screen oil feed passage, inadvertently restricting oil supply to lifters and cylinder heads.
Restricted oil supply may cause extensive engine damage.
C. Remove oil plug and lifter screen filter assembly. Blow air in top end supply hole directly below top right pump mounting bolt hole to remove chips and ensure that passage is not blocked. See Picture 26.
CAUTION
Picture 26
Compressed air and particles dislodged by compressed air are potentially harmful. Wear protective goggles when using compressed air and direct air stream away from yourself and others nearby.
WARNING

14
D. Remove 1⁄4 -20 set screw, apply Loctite® to threads and install screw to depth of .125" to .150" below gear cover gasket surface.E. Install S&S® Oil Pump Drill Jig part #53-0013 on gear cover gasket surface. See Picture 27. F. Using a .125" (1⁄8") bit, drill angled hole from passage just plugged until it breaks through pump gasket surface. See Pictures 27 and 28.
While drilling hole, withdraw drill frequently to clear chips.
Picture 27 Picture 28
G. Remove drill jig and blow compressed air into passage to remove chips. Note previous cautions regarding compressed air.
6. Crankcase Modification - 1966-1969 with kits using #31-6049 body, or 1970-1972 with kits using #31-6050 body - Drill Primary Chain Oil Supply Hole.
NOTE - Object of Modification 6 is to update early engines to meter primary chain oil automatically through breather gear rather than manually through external screw in pump body. Update requires use of 1973-later style breather gear such as S&S #33-4239. Gear is not included in kits #31-6202, #31-6203, or #31-6204 but may be purchased separately.
A. Install S&S® Oil Pump Drill Jig, part #53-0013, on oil pump gasket surface as shown in photo. See Picture 29.
Picture 29
B. Using .187" (13⁄16") drill bit CAREFULLY drill hole into pump gasket surface until bit breaks out in breather valve gear cavity. See Picture 29. If modification is done while engine is still assembled, apply grease to both sides of case to help catch chips.
NOTE - Drill hole slowly and carefully to avoid contacting opposite wall of cavity when drill breaks through.
Contacting breather cavity wall with drill may damage machined surface and make crankcase unusable.
C. Remove drill jig and clear chips away.D. Carefully debur hole in breather valve gear cavity.
CAUTION

15
7. Oil Pump Cover AssemblyS&S® manufactures five covers for current S&S oil pumps. Covers #31-6059 and #31-6060 have 1991-earlier mounting bolt pattern. Covers #31-6061, #31-6062, and # 31-6063 have 1992-later mounting bolt pattern.
First step in cover assembly is to identify cover and insure that cover is correct for application. See Picture 5 and Chart 1. Customer must then install oil line fittings and other required hardware, if applicable, in cover.
All covers require fittings for supply and return lines. Some covers offer more than one location for supply and/or return line fittings. Other covers provide for primary chain oiler and/or oil pressure sending unit in addition to supply and return fittings.Customer must decide which holes in cover will be used and block off holes not used with supplied pipe plugs. Correct identification of locations for supply, return, and other pump cover fittings is critical. See Pictures 6 and 7.
Incorrect placement of oil lines or oil line fittings can cause extensive engine damage not covered under warranty. See Appendix (Page 21) for correct routing of oil pump lines.
NOTES • Covers #31-6061 and #31-6062 are compatible with rigid oil return and supply lines found on 1992-up rubber-mount models. In these applications,
hole #6 in face of cover is used for supply line, hole in bottom left location is used for return line. After installing elbow fitting #50-8114 for return line, customer must install compression fitting #50-8120 (supplied in kit) in elbow rather than conventional hose fitting #50-8115. Fitting #50-8115 will be used for supply line fitting. For use with OEM rigid oil lines, return fitting must face forward, toward front of engine. Supply fitting will face downward at approximate 45° angle toward lower left corner of pump cover.
• Covers #31-6059 (early bolt pattern) and #31-6061 (late bolt pattern) appear similar, and both are compatible with rigid oil return line found on 1992-up rubber-mount models. HOWEVER, holes in face of covers have different functions. Hole #3 in face of cover #31-6059 is high-pressure site intended for oil pressure sending unit. Hole #6 in face of cover #31-6062 is low-pressure site for oil supply line from tank. This and differences in mounting bolt pattern prevent covers #31-6059 and #31-6061 from being interchangeable. See Picture 5.
• Always apply PTFE plumber's tape or pipe sealant such as Slic-tite to threads of fittings before assembling fittings or installing fittings in cover. Failure to install fittings correctly may damage cover and void warranty.
• Apply tape and pipe sealant to threads only. Avoid using excessive amounts that may protrude into and obstruct oil passages or contaminate engine oil. Incorrect use of PTFE tape or pipe sealant may cause engine damage not covered under warranty.
A. Cover #31-6059 - See Pictures 5 and 6. Fittings for oil supply and return lines can be placed in holes at either bottom or top of cover according to installerís requirements. Hole #3 in face of cover is intended for oil pressure sending unit. This hole cannot be used for supply or return line! Cover #31-6059 also has provision for primary chain oiler.
NOTE - Although hole #3 provides adequate pressurized oil for top end lubrication in Panhead-Shovelhead and similar applications, S&S recommends this site be used for pressure monitoring only. Oil from hole #3 bypasses hydraulic lifter filter.
1. Preparation - Apply PTFE tape or pipe sealant to threads of 2 ea. 90° elbow fittings #50-8114, 2 ea. hose fittings #50-8115, and 2 or 3 ea. 1⁄8 -27 pipe plugs #50-8331, depending on whether oil pressure sending unit/gauge will be used in hole #3. If 1992-up rigid return line is used, substitute compression fitting #50-8120 for 1 hose fitting #50-8115. If primary chain oiler is used, apply tape or sealant to 1⁄16 -27 hose fitting #50-8116. If primary chain oiler is not used, apply tape or sealant to 1⁄16 -27 pipe plug #50-8332.
2. Install elbow fittings in locations #1 or #5 (return) and #2 or #4 (supply). Hole #5 must be used for 1992-up rigid return line. If applicable, apply PTFE tape or pipe sealant to threads and install oil pressure gauge/sending unit (not supplied) in hole #3. Install 1⁄8 -27 pipe plugs in holes not used.
3. If primary chain oiler typically found in 1965-1984 models is used, install 1⁄16 -27 hose fitting in hole #7. If primary chain oiler is not used (belt primary drive or sealed primary housing), install 1⁄16 -27 pipe plug in hole #8.
4. Install hose fittings in elbows. Substitute compression fitting #50-8120 for hose fitting in hole #5 if 1992-up rigid return line is used. Compression fitting must face forward for use with rigid return line.
NOTE - 1992-up rigid supply line will require modification for use with cover #31-6059.
CAUTION
CAUTION

16
B. Covers #31-6060 and #31-6063 - See Pictures 5 and 6. Custom covers #31-6060 and #31-6063 are identical except that #31-6060 has early mounting bolt pattern and #31-6063 has late pattern. Custom covers provide for bottom-mount oil line fittings only and offer no provision for pressure sending unit, primary chain oiler, or 1992-up OEM rigid supply line. Custom covers are compatible with 1992-up rigid return line. 1. Preparation - Apply PTFE tape or pipe sealant to threads of 2 ea. 90° elbow fittings #50-8114 and 2 ea. 1⁄8 -27 hose fittings #50-8115. If
1992-up rigid return line is used, substitute compression fitting #50-8120 for one hose fitting #50-8115.2. Install elbow fittings #50-8114 in hole #5 (return) and hole #9 (supply). Install hose fittings #50-8115 in elbows. If 1992-up rigid return
line is used, substitute compression fitting for hose fitting in hole #5 elbow. Position elbow so open end of compression fitting faces front of motorcycle.
NOTE - Return fitting in hole #5 will normally be directed toward oil filter. For instance, return fitting will normally face forward in models with oil filter in front of crankcase.
C. Cover #31-6061 - See Pictures 5 and 7. Cover #31-6061 is often referred to as S&S® universal cover. It is supplied on S&S engines unless customer specifies otherwise at time of order. Universal cover is compatible with rigid supply and return lines used on 1992-up rubber mount models. Fittings for oil supply and return lines can be placed in holes at either bottom or top of cover as required by purchaser. Fitting for main oil supply line can also be installed in hole in face of cover.
NOTE - Hole #6 in face of cover #31-6061 can be used as main oil supply line only. Hole is low pressure site and cannot be used for top end oil supply or oil pressure monitoring.
1. Preparation - Apply PTFE tape or pipe sealant to threads of 2 ea. 90° elbow fittings #50-8114 and 2 ea. hose fittings #50-8115. Substitute compression fitting #50-8120 for one hose fitting #31-6010 if 1992-up rigid return line is used.
2. Install elbow fittings in holes #1 or #5 (return), and #2 or #4, or #6 (supply). Hole #5 will be used for 1992-up rigid return line. Hole #6 will be used for 1992-up rigid supply line.
3. Install hose fittings #50-8115 in elbows. If compression fitting #50-8120 is used for 1992-up rigid return line, install in hole #5 elbow.
NOTE - If rigid oil lines are used , return fitting must face forward, toward front of engine. Supply fitting will face downward at approximate 45° angle toward lower left corner of pump cover.
D. Cover #31-6062 - See Pictures 5 and 7. Fitting for main oil supply line fitting can be placed in hole in top of cover or hole in face of cover. Bottom hole is only location for return line fitting. Cover #31-6062 is compatible with 1992-up rigid return line.
NOTE - Hole in face of cover #31-6062 can be used as main oil supply line only. Hole is low pressure site and cannot be used for top end oil supply or oil pressure monitoring.
1. Preparation - Apply PTFE tape or pipe sealant to threads of 2 ea. 90° elbow fittings #50-8114, 2 ea. hose fittings #50-8115, and one 1⁄8-27 pipe plug #50-8331. Substitute compression fitting #50-8120 for one hose fitting if 1992-up rigid return line is used.
2. Install elbow fittings in holes #1 or #5 (return), and #2 or #4, or #9 (supply).3. Install hose fittings # 50-8115 in elbows. If compression fitting #50-8120 is used for 1992-up rigid return line, install in elbow in hole #5.
8. InstallationA. Confirm that adequate clearance exists between oil pump body and crankcase by temporarily installing pump assembly on crankcase and
carefully inspecting areas indicated in photo. See Picture 9. Do not install oil pump driveshaft gear or snap ring at this time. It may be necessary to remove a small amount of material from oil pump body to obtain correct fit. See Picture 10.
NOTES • Remove minimum amount of material required to properly position oil pump on crankcase. Avoid damaging gasket surfaces. After modification, clean
pump body thoroughly with suitable parts cleaner solvent and compressed air to remove metal filings generated during procedure. Solvent must be of type that will not harm driveshaft seal in oil pump body. Remove all traces of solvent prior to installation of pump.
• S&S includes both 1⁄4 -20 and 1⁄4 -24 mounting bolts in oil pump kits. Some 1⁄4 -24 bolts provided previously were black. All mounting bolts provided in current kits are plated. Visually compare threads and gently screw bolts into crankcase to confirm correct thread.
• S&S oil pump bodies, covers and gaskets may appear similar to other manufacturerís products but should not be interchanged due to possible differences that could impair oil pump function.
• Failure to confirm fit of pump on crankcase as described in Section 8-A may result in oil pump damage not covered under warranty. • Using oil pump components other than those provided by S&S® may result in oil leak, insufficient oil pressure and possible
engine damage.
CAUTION

17
• Many solvents are flammable and potentially toxic. Read solvent manufacturerís instructions prior to use. • Compressed air is potentially harmful, especially to eyes and skin. Wear goggles and other protective clothing during use, and direct air
stream away from yourself and others nearby.
B. Disassemble, clean, and inspect oil pump, then reassemble pump dry, without lubrication. (Pump will be lubricated in final step.) Inspect gaskets for loose bits of material that could dislodge and block oil passages.
C. Adjust primary chain oil supply (1936-1984 models with chain drive and dry clutch). Only oil pump bodies #31-6048 and #31-6049 andcover #31-6059 have provision for primary chain oiling.a. 1936-1964 models
1. Install 1⁄16 -27 pipe plug #50-8116 in hole #7 in top of cover.2. Install #31-6026 adjuster screw, #50-7008 brass washer, and #50-5000 lock nut into threaded hole in side of pump body. Gently
bottom screw three times to seat properly. See Picture 30.
WARNING
Picture 30
Chain oiler adjusting screw has tapered end and must be used. Substituting standard machine screw for tapered screw will result in large oil loss out breather. Oil may contact rear brake and tire, resulting in possible loss of control of motorcycle and injury to rider and others.
3. Turn screw out 1⁄2 turn and tighten locknut against brass washer and body.
NOTE - After engine has been run, it may be necessary to adjust screw to achieve desired oil flow to primary chain. Final screw setting is usually closer to fully closed position.
Overtightening screw may damage threads or adjusting screw seat in pump body.
b. 1965-1984 engines with primary chain drive and dry clutch1. Install #50-8116 hose fitting in threaded hole #7 on top of pump cover. 2. Connect hose fitting #50-8116 in hole #7 to primary chain oil line.3. For 1965-1972 engines using #31-6048 pump body, install #31-6026 adjuster screw, brass washer #50-7008, and lock nut #50-5000 into
threaded hole in side of pump body. See Picture 30. Gently bottom screw three times to seat screw. Turn screw out approximately 11⁄4 turns and tighten locknut against brass washer and oil pump body.
NOTE - Above setting should provide 1 to 13/4 oz: minute oil flow to primary chain @ 2500 RPM. This can be confirmed after engine has reached operating temperature by disconnecting hose to primary chain, operating engine at 2500 RPM and measuring oil delivered into measuring container during one minute.
Overtightening adjustment screw may damage oil pump body.
D. Rotate gears as preliminary check for bind, and to confirm that drive gear keys are properly installed.
WARNING
CAUTION
CAUTION

18
NOTES • Most S&S® oil pump gears have index marks. To assure proper gear mesh, marks must align when gears are installed in pump body. See Picture 31.
Marks in photo have been darkened; they normally appear as light punch marks.
Picture 31
• If bind occurs, determine whether problem is with supply or return gears by removing idler gear from either side and rotating pump. When binding gear is removed, pump will rotate freely. Problem can usually be corrected by rotating gear 180°.
Failure to correct bind may result in damage to oil pump or other engine parts.
E. Apply 20W50 engine oil to oil pump driveshaft and driveshaft bushing in crankcase. Install oil pump in crankcase in normal fashion, placing pump drive gear #33-4230 over driveshaft as shaft is passed through bushing and into crankcase gear compartment. Refer to Harley-Davidson® service manual or contact professional mechanic if unsure about installation procedure.
NOTE - A dab of Hylomar® or other thin gasket sealer in corners of gasket may be used to hold gasket in place if care is taken to avoid critical areas such as oil passages and interior of oil pump. Otherwise, gaskets should be installed dry.
Gasket sealant may interfere with engine lubrication if allowed to enter oil pump or passages machined in crankcase. Damage related to improper use of gasket sealant will not be covered under warranty.
F. Install driveshaft gear key and snap ring, taking care not to stretch or otherwise damage snap ring.
NOTE - Insure that drive shaft key and snap ring are installed properly. See Picture 32. If snap ring is installed incorrectly, sprung, or otherwise damaged, it may become dislodged or allow gear key to come out.
CAUTION
CAUTION
Picture 32
Correctly installed.
19
Loss of oil pump drive gear snap ring or key will result in disengagement of oil pump causing loss of oil pressure and possible engine damage.
G. Loosely install 2 ea. 1⁄4 x 11⁄2" bolts in upper holes in oil pump body, followed by pump cover and 4 ea. 1⁄4 x 23⁄4" mounting bolts. Do not tighten at this time.
NOTE - 1⁄4 -24 bolts must be used on 1948-1978 Harley-Davidson® crankcases, 1⁄4 -20 bolts on later H-D® and S&S® crankcases. Check thread fit by carefully installing bolts in crankcase before installing pump. Thread engagement should be smooth and free of resistance.
Use of incorrect mounting bolts will damage crankcase damage not covered under warranty.
H. While continually turning oil pump drive gear to check pump for binding, gradually tighten 23⁄4" bolts in X-pattern to final spec. of 90-120 in-lbs. If pump binds, loosen screws and shift pump slightly while rotating gears; pump should operate smoothly when correctly aligned on crankcase. Retighten bolts while turning driveshaft to confirm bind-free pump operation. Evenly tighten two remaining bolts to 90-120 in-lbs. If remaining bolts are inaccessible with torque wrench due to oil line fittings, temporarily remove fittings or carefully tighten bolts with thin box-end wrench.
I. Prime pump by removing oil pump check ball valve and injecting clean motor oil into pump supply fitting while turning oil pump drive gear. (A large plastic squeeze bottle works well for priming pump.) Replace check ball, spring, and cap after oil fills check ball cavity.
"Air lock" or cavitation can occur if trapped air is not released from oil pump after installation. It can occur with new pump as well as used pump that has been removed from engine, and interferes with oil circulation. It is installer's responsibility to remove trapped air by priming pump prior to running engine and to confirm correct pump operation with engine running.
J. Install pinion shaft oil pump drive gear, pinion gear, and remaining parts in gearcase following standard H-D procedure. Note that pinion shaft oil pump drive gear has chamfer on one side. Place gear on pinion shaft with chamfer toward shoulder on shaft, facing center of engine. Connect oil lines.
Installing pinion shaft oil pump drive gear backwards on pinion shaft may cause stress riser resulting in eventual failure of shaft. Damage caused by incorrect installation of gear or other parts is not covered under warranty.
9. Initial Startup and Post-operation Checks - All Years After pump has been installed and primed, oil lines connected in correct manner (See Appendix on page 21.) and oil tank filled to correct level,
confirm oil circulation with oil pressure gauge and by removing cap from oil tank and observing oil return to tank. If oil is not seen returning to tank, S&S recommends removing return line from tank and placing end in drain pan to confirm oil circulation.
NOTE - Engine oil circulates under pressure. Areas exposed to escaping oil should be covered with rags and engine turned off immediately after oil circulation is confirmed to minimize oil loss.
Oil on tires or brakes can cause loss of control of motorcycle resulting in serious injury to operator and others.
A. After confirming oil circulation, run engine for several minutes and check for leaks.B. If applicable, confirm flow rate of primary chain oiler.
CAUTION
CAUTION
CAUTION
CAUTION
WARNING

20
NOTES: • Low oil pressure is often blamed on oil pump when actual cause is worn bushings or another internal component. A new oil pump will not correct
problems caused by worn parts and excessive operating clearances. If low oil pressure exists after new oil pump is installed, check bearing clearances and other possible causes such as installation of different gear cover, tappet guides, etc.
• With engine hot, typical oil pressure reading is 3-4 PSI at 1000 RPM idle, 12-15 PSI at normal highway speeds or approximately 2500 RPM. Faulty oil pressure gauge should not be overlooked as possible source if low pressure reading is encountered. Harley-Davidson® warning light comes on at approximately 3 PSI, and is fairly reliable. Light may flicker at low RPM, but should quickly go out with slight increase in engine speed.
• Sudden clatter in previously quiet hydraulic lifter may indicate lifter failure OR excessively low oil pressure and should be investigated. It is not unusual for hydraulic lifters to clatter when a new or recently rebuilt engine is first started, but noise should disappear as lifters pump up. Time required depends on several factors including brand of lifter, oil viscosity, and temperature.
Models with oil tank below transmission require precautions to prevent air from entering oil pump during oil changes if custom cover #31-6060/6063 is used or if bottom oil supply fitting location (hole #4) is utilized on universal cover #31-6061. If oil lines are rubber, supply line from tank should be clamped during oil changes on these models, and clamp removed after tank has been refilled. If it is not possible to clamp lines, oil circulation must be confirmed after each oil change. It is not necessary to observe these cautions if holes 5 and 6 are used for models with oil tank below transmission.
• Increased oil volume generated by S&S® pump may overwhelm stock scavenging system in knucklehead top end. If oil return becomes a problem, it can be corrected by metering oil supply to heads. Oil fitting for top end supply line can be filled with solder and hole drilled in solder for this purpose. S&S has performed tests and has successfully operated engines including panhead and shovelhead with metering holes as small as .060". Some knucklehead owners have installed S&S carb main jet in cam cover top end oil supply fitting for same purpose, and adjusted oil flow with different size jets.
• For same reason noted above, stock knucklehead 5:1 ratio drive gears (25:5) may be preferable to 4:1 gears (24:6) used in later engines. In aftermarket knucklehead engines that utilize later 1958-'81 style tapered pinion shaft in place of splined knucklehead pinion shaft, 1954-1972 style pinion oil pump drive gear (HD #26349-54) may be used if corresponding 25-tooth gear is used on oil pump drive shaft. Correct 5:1 oil pump drive gears are available through V-Twin Manufacturing. Contact local dealer for retail purchase.
• Paper gaskets are supplied as standard with each kit. S&S recommends paper gaskets but can provide mylar gaskets for 1936 to 1991 engines if desired. Tests indicate that paper gaskets account For additional 2-3 PSI of oil pressure.
NOTE – All S&S and some H-D® crankcases have provision in rear of cam-side crankcase for three pipe-thread fittings. Hole #1 is for vent line from oil tank. Hole #2 is used to scavenge oil from primary housing in models that circulate engine oil through primary housing (typically 1965-1984). Hole # 3 is used as crankcase breather on 1992-earlier models and on S&S engines set up for crankcase breathing or combination crankcase-cylinder head breathing. Engine must have 1992-earlier style cam cover for crankcase breathing; otherwise, large oil losses will occur out Hole #3. Hole #1 will be used in all applications. Hole #2 will be used in applications which lubricate primary chain with circulating engine oil. Hole #3 will be used in most “crankcase breather” applications, excluding knucklehead and 1948-’64 panhead engines which utilize stock breather stud. Any hole not used (usually Hole #2, occasionally Hole #3) must be blocked with supplied pipe plugs.
CAUTION
21
APPENDIx: OIL LINE ROUTING
Most big twin oiling systems utilize three oil circuits: supply, return, and breather/vent. 1965-1984 models often utilize a fourth circuit for primary chain oiling. • Supply circuit delivers oil from tank to supply fitting of oil pump cover. See Pictures 6 & 7. In motorcycles with oil tank located above
transmission, supply fitting in oil tank is almost always located on bottom of tank at center or rear. In Harley-Davidson® DynaTM, Road King® and other models with oil tank below transmission, supply line exits oil tank on bottom of primary drive side, then crosses to cam side and connects with supply fitting on oil pump cover.
• To distinguish oil tank’s supply fitting from vent and return fittings, remove oil lines and pour small amount of oil into tank. With motorcycle in upright position, oil will flow out supply line fitting.
• Return circuit delivers oil from return fitting in oil pump cover (See Pictures 6 & 7), through oil filter and cooler (if applicable), to return fitting in oil tank.
• In horseshoe-type oil tanks, two fittings nearest front of oil tank are identical. Fittings may enter through upper area of tank or connect to fittings near bottom that are attached to standpipes inside tank. These fittings are for oil return and vent lines, and in most cases may be used interchangeably. Main exception is with oil tanks with “in tank” oil filter.
• Square oil tank used on 1965-1984 panhead and shovelhead has return line fitting in filler neck located in top center of oil tank; vent fitting is slightly forward of return fitting. In models with oil tank located below transmission, return fitting is on top of oil tank nearest center of motorcycle. Vent fitting is beside return fitting.
• Breather or vent circuit equalizes pressurize between oil tank and crankcase. See preceding paragraph for location of vent fitting in oil tank. Vent line runs from vent fitting on oil tank to Hole #1 in crankcase. See Picture 33.
Picture 33
• Primary chain oiling system used on 1965-1984 big twin requires three oil lines. Chain oil supply line originates at 1⁄4” hose fitting in top of oil pump cover (See Picture 6) and connects to 1⁄4” hose fitting near center of inner primary case. Primary housing vent line connects 3⁄8” fitting near center of inner primary cover to tee-fitting in vent line between crankcase and oil tank. Primary scavenge line connects 3⁄8” hose fitting at bottom, rear of inner primary cover to hole #2 (See Picture 33) in crankcase.

22
S&S® OIL PUMP KIT REPLACEMENT PARTS
1. Pump body assembly
A. Fits 1936-’72 . . . . . . . . . . . . . . . . . . . . . . 31-6048
B. Fits 1965-’69 . . . . . . . . . . . . . . . . . . . . . . 31-6049
C. Fits 1970-’91 . . . . . . . . . . . . . . . . . . . . . 31-6050
D. Fits 1992-’99 . . . . . . . . . . . . . . . . . . . . . . 31-6051
2. Shaft, idler (H-D#26327-68) . . . . . . . . . . . . . . . . 31-6004
3. Seal, drive shaft (H-D#26227-58) . . . . . . . . . . . 31-6005
4. Gear, return drive (H-D#26315-68A) . . . . . . . . . . 31-6013
5. Gear, return idler (H-D#26317-68A) . . . . . . . . . . 31-6014
6. Gear, supply drive (H-D#26328-74) . . . . . . . . . . 31-6015
7. Gear, supply idler (H-D#26326-62A) . . . . . . . . . . 31-6016
8. Shaft, drive (H-D#26346-70) . . . . . . . . . . . . . . . 31-6011
9. Key, drive shaft (H-D#26348-15) (1 pack) . . . . . . . . . . . . . . . . . . . . . . . . . . . . . . 50-8220-S (10 pack) . . . . . . . . . . . . . . . . . . . . . . . . . . . . . . . 50-8229
10. Plug, 1⁄8”-27 (H-D#45830-48) (1 pack) . . . . . . . . . . . . . . . . . . . . . . . . . . . . . . . . 50-8331 (10 pack) . . . . . . . . . . . . . . . . . . . . . . . . . . . . . . 50-1015
11. Ball, check valve (H-D#8866 & #8873) . . . . . . . . . 50-8091
12. Spring, check valve (H-D#26262-80)
(1 pack) . . . . . . . . . . . . . . . . . . . . . . . . . . . . . . . . 31-6022 (10 pack) . . . . . . . . . . . . . . . . . . . . . . . . . . . . . . 31-6092
13. Relief valve (H-D#26400-82) . . . . . . . . . . . . . . . 31-6082
14. Spring, relief valve (H-D#26207-83)
(1 pack) . . . . . . . . . . . . . . . . . . . . . . . . . . . . . . . . 31-6018 (10 pack) . . . . . . . . . . . . . . . . . . . . . . . . . . . . . . 31-6084
15. Screw, check valve & relief valve cover (H-D#26263-80) (1 pack) . . . . . . . . . . . . . . . . . . . . . . . . . . . . . . . . 31-6021 (5 pack) . . . . . . . . . . . . . . . . . . . . . . . . . . . . . . . . 31-7005
16. O-ring (H-D#11105) (1 pack) . . . . . . . . . . . . . . . . . . . . . . . . . . . . . . . . 50-8008 (10 pack) . . . . . . . . . . . . . . . . . . . . . . . . . . . . . . 50-8078
17. Pump cover assembly
A. Pre-1992 (Top/bottom fittings; accepts pressure gauge .) . . . . . . . . . . . . . . . . . . . . . . . . . . . . . . . . . . . . 31-6059
B. Pre-1992 (Custom bottom fittings only .) . . 31-6060
C. 1992-’99 (Universal) . . . . . . . . . . . . . . . . . . 31-6061
D. 1992-’99 (Bottom fittings or central supply fitting .) . . . . . . . . . . . . . . . . . . . . . . . . . . . . . . . . . . . . . . . . . 31-6062
E. 1992-’99 (Custom) . . . . . . . . . . . . . . . . . . 31-6063
Hardware kit, oil pump cover (N/S) . . . . . . . . . . . 31-6283 Includes oil fittings: 3 of #10 - Plug, 1⁄8”-27 1 of #18 - Fitting, front chain hose 2 of #19 - Plug, pipe 1⁄16”-27 x 1⁄4” 2 of #20 - Elbow, supply/return 2 of #21 - Fitting, supply/return 1 of #22 - Return fitting, compression
18. Fitting, front chain hose . . . . . . . . . . . . . . . . . 50-8116
19. Plug, pipe 1⁄16”-27 x 1⁄4” pipe . . . . . . . . . . . . . 50-8332
20. Elbow, supply/return (H-D#26338-68) (5 pack) . . 50-1007
21. Fitting, supply/return hose (H-D#63533-41) . . 50-8115
22. Return fitting, compression (H-D#63523-92) . 50-8120
23. Seal, tubing, 3⁄8” x 1⁄2” O .D . x 1⁄4” Viton . . . . . 50-8271
24. Screw, chain oiler adjusting . . . . . . . . . . . . . 31-6026
25. Locknut, chain oiler (1 pack) . . . . . . . . . . . . . . . . . . . . . . . . . . . . . . . . 50-5000 (10 pack) . . . . . . . . . . . . . . . . . . . . . . . . . . . . . . . 50-5001
26. Washer, chain adjuster (H-D#6156) . . . . . . . . . 50-7001
27. Set screw, 1⁄4”-20 (1 pack) . . . . . . . . . . . . . . . . . . . . . . . . . . . . . . . . 50-0069 (10 pack) . . . . . . . . . . . . . . . . . . . . . . . . . . . . . . . 50-0238
Primary chain oiler screw kit (N/S) . . . . . . . . . . . 31-6291 Includes chain oiler items: 1 of # 24 - Screw, chain oiler adjusting 1 of # 25 - Locknut, chain oiler 1 of # 26 - Washer, chain adjuster 1 of # 27 - Plug, adjusting screw
28. Screws, mounting SHCS A. 1⁄4”-24 x 11⁄2” - 1936 -’78 (HHCS) (1 pack) . . . . . . . . . . . . . . . . . . . . . . . . . . . . . . 50-5082 (10 pack) . . . . . . . . . . . . . . . . . . . . . . . . . . . . . . 50-0143
B. 1⁄4”-24 x 21⁄4” - 1936 -’78 (H-D#5430W) (1 pack) . . . . . . . . . . . . . . . . . . . . . . . . . . . . . . . 50-0088 (5 pack) . . . . . . . . . . . . . . . . . . . . . . . . . . . . . . . 50-0187
C. 1⁄4”-20 x 11⁄2” - 1979-’99 (H-D#2782W) (1 pack) . . . . . . . . . . . . . . . . . . . . . . . . . . . . . . . 50-0080
D. 1⁄4”-20 x 21⁄4” - 1979-’99 (HHCS) (1 pack) . . . . . . . . . . . . . . . . . . . . . . . . . . . . . . . 50-0078
E. 1⁄4”-20 x 1⁄2” - 1979–’99 (SHCS) (1 pack) . . . . . . . . . . . . . . . . . . . . . . . . . . . . . . 50-0079
29. Washer, 1⁄4” (1 pack) . . . . . . . . . . . . . . . . . . . . . . . . . . . . . . . . 50-7017 (12 pack) . . . . . . . . . . . . . . . . . . . . . . . . . . . . . . . 50-7013
30. Retaining ring (H-D#26348-36) (1 pack) . . . . . . . . . . . . . . . . . . . . . . . . . . . . . . . 50-8058 (10 pack) . . . . . . . . . . . . . . . . . . . . . . . . . . . . . . . 50-8106
31. Retaining ring, external (H-D#11002)
(1 pack) . . . . . . . . . . . . . . . . . . . . . . . . . . . . . . 50-8059 (10 pack) . . . . . . . . . . . . . . . . . . . . . . . . . . . . . . 50-8107
32. Gear, pump drive, 24T (H-D#26345-73) . . . . . . 33-4230
33. Gear, pinion shaft pump drive
A. 1939-’53 splined . . . . . . . . . . . . . . . . . . . 33-4237
B. 1954-’89 (H-D#26349-73, #26349-73A, #26349-84) . . . . . . 33-4232
34. Gear, steel breather valve (See breather gears in catalog)
35. Shim, steel breather (See breather shims in catalog)
36. Gasket rebuild kit (N/S) . Includes key, retaining ring .
A. 1936-’91 . . . . . . . . . . . . . . . . . . . . . . . . . . 31-6271
B. 1992-’99 . . . . . . . . . . . . . . . . . . . . . . . . . . 31-6273
37. Master rebuild kit - (N/S) Includes: gasket rebuild kit, seal, retaining ring, relief valve spring, check valve spring, check valve, ball, and cover screw o-rings .
A. 1936-’91 . . . . . . . . . . . . . . . . . . . . . . . . . . 31-6275
B. 1992-’99 . . . . . . . . . . . . . . . . . . . . . . . . . . 31-6278
38. Drill jig, oil pump . . . . . . . . . . . . . . . . . . . . . . 53-0013
Oil pump mounting hardware kit (N/S) . . . . . . . . 31-6288 Includes mounting bolts: 2 of 29A -1⁄4”-24 x 11⁄2” 4 of 29B -1⁄4”-24 x 21⁄4” 2 of 29C -1⁄4”-20 x 11⁄2” 4 of 29D -1⁄4”-20 x 21⁄4”
NOTE- All reference to H-D® part numbers is for identification purposes only. We in no way are implying that any of S&S Cycle’s products are original equipment parts or that they are equivalent to the corresponding H-D® part number shown.

23
16
14
13
19
37
20
21 10
2120
18
21
10
10
29
30
20
30
12
7
21
5
8
38
36
32
313524
27
2928
11
15
12
16
33
9
226
3
2625
24

24