sample preparation into ultra-thin sections.it.stlawu.edu/~slumic/temprep.pdf · electron gun of a...
TRANSCRIPT

1
Sample Preparation Into Ultra-thin Sections.
Contents
IntroductionTissue selectionFixation
GlutaraldehydeOsmium tetroxide OsO4Potassium permanganate - KMnO4Acroline
EmbeddingDehydrationResin infiltrationPolymerization
UltramicrotomyTrimming the capsuleMaking glass knivesThin sectioningStaining sections
Miscellaneous proceduresThick sections - light microscopyWhole mounts on coated grids
Arts and FormulaePhotography
Developing filmDeveloping prints

2
Introduction.
The Electron Microscope was developed from the coalescence ofseveral scattered ideas and hypotheses. The electron itself was discoveredat about 1897 and was shown to have wave properties in 1924. Much ofthe early work with electrons centered on how to generate electrons andhow to deflect or aim them. Various "lens" were contrived and by 1931,two German scientists were demonstrating the "first" EM which was largelya modified oscillograph. No specimens could be viewed but it waspredicted that an electron microscope would have much better resolutionthan the light microscope. By the late 1930's and early 1940, commercialEMs were available with moderate resolution. These were used mainly tostudy electron optics and to make improvements. Procedures for specimenpreparation came much later.
For the biologist, the EM is one of the most powerful tools availablefor cell and tissue studies. It should be realized that electron microscopy isnot a science on its own, but merely a technique or tool. A thoroughunderstanding of the EM and of cells and their ultrastructures are an assetto understanding most other areas of biology.
There are now many types of electron microscopes, but the two mostcommon types are the transmission electron microscope (TEM or just EM)and the scanning electron microscope (SEM). Simply put, the SEM scansthe surface of coated specimens with an electron beam and by detectingelectrons scattered (reflected) by the object, forms an image on a TV likemonitor. This image is usually aesthetically pleasing and has a resolutionof 50 µ and up. The TEM transmits a beam of electrons through aspecimen and forms an image based on the removal of electrons from thebeam by the specimen (basically a high resolution shadow). Resolution canattain <1 angstrom on research grade TEMs and the variety of specimenpreparations allows much greater versatility over the SEM. In essence,you can not only view the surface of specimens (bacteria, viruses,molecules, etc.) but you can also look inside the specimens using thinsectioning techniques. This coupled with cytochemical, isotope, andimmunochemical techniques permits a process oriented study of biologicalsystems.
The TEM usually generates electrons by saturating a tungstenfilament with current such that electrons cascade from it (much like theelectron gun of a black and white television). The filament and the rest ofthe microscope column are under a high vacuum so as to prevent oxidation

3
of the tungsten filament (what happens if you crack the globe of an
incandescent light bulb?). This vacuum is usually in the range of 10-6 to
10-7 µ of mercury and is achieved using a "diffusion" pump. For allpractical purposes, living tissues or cells cannot be viewed under the TEMsince the specimens are subjected to such high vacuum, heat and intenseradiation from the electron beam. This would suffice to kill the cells eitherby volatilization of water (and other low melting point substances),denaturation from heat, or ionizing radiation. In addition, the radiationundoubtedly causes many chemical changes to occur. Polymers oftenbecome insoluble and sublimation may occur.
The most popular and useful procedure used with EM is the thinsectioning technique. This technique can be broken down into thefollowing sections and each will be dealt with separately.
1. Tissue isolation2. Fixation with glutaraldehyde, OsO4 and occasionally KMnO43. Embedding in a plastic resin4. Ultramicrotomy5. Post-staining of thin sections
TISSUE SAMPLES:
Tissues must be killed and fixed in a way to stabilize their structuresin the EM environment and to accurately reflect the true structure of thetissue. The time between isolation of the tissue (e.g., dissection) andaddition of fixative should be minimized so as to avoid post-mortemchanges. The tissue size should be kept small. Blocks should be cut to lessthan 1mm3 in order to ensure thorough and quick penetration of fixativesand embedding solutions. Such size concerns are not pertinent to cellsuspensions. It is usual practice to suspend the cells in the preparativesolutions and to pellet the cells by centrifugation between steps. However,if a tissue block is too large, fixatives and embedding resins will usuallynot penetrate to the middle. Some tissues of low density (e.g., lung, roottips) are the exception. In the dense tissues, one can often note a "halo"effect.

4
Animal tissues pose a few unique problems for optimum preparation.Lacking rigid cell walls, the tissue is often limp and difficult to cut intosmall blocks (e.g., liver). This can be overcome by allowing larger pieces tobe fixed for a short period of time in the primary fixative (glutaraldehyde,10-15 minutes). The tissue will then be somewhat more firm and easilycut into smaller pieces.
Some tissues are hard and mineralized (e.g., bone) and must bedemineralized with chelating or acidic solutions. This is fairly rarehowever, and tissues such as hair and nails can be prepared withoutspecial treatment. Some animal tissues are fairly dense and longertreatment times may be necessary. This determination is made byexperience and/or trial and error.
Plant tissues also present some unique problems during preparation.There is usually a higher water content with most mature plant cellshaving a large central vacuole. This necessitates attention to thedehydration step of embedding. Another problem often encountered is thepresence of wax on certain plant surfaces which may retard thepenetration of fixatives and embedding solution. It may also cause theseparation of the tissue from the surrounding plastic upon trimming andsectioning. The waxes (cutin and suberin) may be partially removed withorganic solvents (acetone, ether) prior to processing. It is not necessary toremove all wax in that the solvents tend to make the waxy surface less ofa barrier and more tenacious to the plastic (similar to cleaning and
Cut in half
Dark with Osmium
Pale or White No Osmium
HALO EFFECT
TISSUE� BLOCK

5
abrading a surface before painting or gluing). Cell walls pose no specialproblems since they are hydrophilic gels.
FIXATION
As mentioned earlier, living tissues cannot be viewed with theElectron Microscope. The goal of specimen preparation is to preserve thetissue in a form which hopefully represents its' natural, in vivo form.Fixation serves to "kill" the cells, and to stabilize and preserve them andtheir structures during subsequent preparation steps. Throughout the lastthree decades, several chemical fixatives have been studies for use inspecimen preparation. Out of this, two fixatives have emerged as virtually"universal" and will be described here.
Glutaraldehyde - a five carbon structure with an active aldehyde on each end.
Glutaraldehyde is referred to as a bi-functional fixative due to the two terminalaldehydes and is usually used as the first of two fixatives. It is fairlystable in concentrated form and at cold temperatures (-20°C). At roomtemperature and especially when diluted to working strength (1-3%), it isunstable and impurities and polymers accumulate. Oxidation to glutaricacid is the usual consequence but this reaction is inhibited by low pHwhich is produced by the oxidation. Thus, it is somewhat of a self-limitingprocess, but also explains why buffered (pH 7) solutions are so unstable.The stock solution of glutaraldehyde (even when purchased new) shouldbe checked often for impurities. This is easily done spectrophotometricallywith a 0.5-1% solution. The aldehyde has an absorption maximum of about280 nm while impurities absorb maximally at 235 nm. The impurity peakshould be half the height of the aldehyde peak. The pH of the stocksolution should be above 3.5 as well. If impurities have accumulated tounacceptable levels, the glutaraldehyde can be easily redistilled in avented fume hood with the distillate collected at 100OC in small fractionsuntil the pH of the distillate is less than 4.0. It is then convenient to freezeseveral aliquots at -20°C at which it is chemically stable for many months.
Glutaraldehyde is relatively safe to use. Avoid skin and eye contactand never pipette by mouth. Use in a well ventilated area since strongfumes can irritate and mildly fix the epithelial lining of thenasopharyngeal tissues.
GLUTARALDEHYDE
6
Fixation and stabilization are due to the cross linking of structuresthat are reactive with aldehydes. Structures that are composed of proteins(enzymes, etc.), glycoproteins, nucleoproteins, lipoproteins, glycogen, andstarch (occasionally) will react with the aldehydes. Most structures withinthe cell have these components. Membranes loose their fluidity andusually become very permeable. Structures that do not react withglutaraldehyde will then tend to diffuse out of the cell. It is important tofollow this fixation step (often called a pre-fixation) with a second step(often called post-fixation) using another fixative (see next).Glutaraldehyde fixation does not cause significant shrinkage and can becarried out at room temperature. Cold temperatures cause much of thecytoskeleton of the cell to "dissolve" or disassemble, thus altering theultrastructural representation. A 1-3% buffered solution (pH 7) isrecommended and fixation should not exceed 60 minutes unless the tissueis naturally dense or impermeable (e.g., some insects and plant tissues).The choice of buffer is important. Veronal buffers (containing barbitals)should not be used with aldehyde fixatives and phosphate buffering may form a precipitate in the presence of calcium and uranyl ions. If thespecimen is known to contain these ions, use a different buffer (e.g., Tris,Hepes, cacodylate). Also, the use of phosphate buffers with theglutaraldehyde fixative occasionally causes a precipitin to form during thesecond fixation step with osmium tetroxide. To prevent this, wash thespecimen with saline or water after the first fixation so as to remove alltraces of the phosphate. This problem rarely arises however and its causeis not understood.
Osmium tetroxide - OsO4
Note: Osmium is extremely dangerous, the crystals, liquidand vapors are all hazardous. The vapors can fix the cornea and lensof the eye and both vapors and liquid are absorbed rapidly and act as anerve gas (it was in fact used as this in the World Wars) and attacks theCNS. Use only with proper ventilation (e.g., fume hood). It usually is purchased in crystalline form in preweighed sealed glassampoules. Always prepare the fixative solution in a fume hood. Reportany and all accidents immediately.
Usually a 1-2% buffered solution (see appendix) is used as the secondfixative and the fixation should be complete in 60-90 minutes since theosmium molecule is small and penetrates rapidly. Most workers agree thatosmium works by saturating double (or triple) bonds since it is such astrong oxidizing agent. For this reason, it is deposited at lipoidal sites quite

7
heavily thus causing them to look dark. Thus, membranes and lipiddroplets usually "stain" darkly with the osmium. It should be noted alsothat since osmium is used as an aqueous solution, it has a tendency to notreach the middle hydrophobic region of some membranes. This gives atri-layered appearance (dark-light-dark) to these membranes and is easilyseen at higher magnifications. The tissue specimen will begin to turn blackalmost immediately upon the addition of the osmium. The more dense thetissue, the darker it will appear. (That's how you will know if you get it onyou, your skin, clothes, etc. will turn black. If you do spill some onyourself, don't panic, wash it off with lots of water and immediately notifyyour instructor or health office). The tissue often becomes brittle whenover fixed in osmium. It is advisable to use this fixation at refrigerationtemperatures so as to decrease the volatility of the solution. The unusedsolution should be stored at 4°C in a scrupulously clean, foil wrapped 50mlvolumetric flask that is tightly corked (do not use ground glass or rubberstoppers - they leak). The long narrow neck of the flask retardsevaporation of the fixative and offers a "handle" to the user. Use a longtipped Pasteur pipette, taking care not to draw the osmium up into thepipetting bulb (bippy). The flask should be stored in a refrigerator, and besure it is well stoppered. If it leaks, the interior of the refrigerator willgradually turn black and there is a possibility that the osmium vapors canaccumulate in the confined space to dangerous levels. The osmiumsolution will appear purple or violet in color when degraded or"exhausted". It should be carefully pipetted into a flask containing 95%ethanol. This will degrade the osmium for later disposal. Keep this wasteflask in the fume hood at all times.
Potassium permanganate - KMnO4
Occasionally, an investigation may center on the study ofmembranous structures and the cytoplasmic matrix is not of interest. Inthis circumstance, a 1-2% buffered solution of KMnO4 can be used as the
sole fixative or in tandem with OsO4 (wash in between the two - they react
together). This is a rapid process and KMnO4 may also be used as a post
stain to enhance contrast from the Glutaraldehyde/OsO4 preparation. This
is usually not necessary however.
Most non-membranous structures are washed away in subsequentembedding steps. The time required for the fixation is usually 30 minutesand the KMnO4 kills the cells quickly, being a strong oxidizing agent. It
will permanently stain skin and clothing but it is not as hazardous as the

8
other fixatives. In fact, it is often used to treat fungal infections of theskin. That doesn't mean that you can drink it however, so it should not be pipetted by mouth. It is chemically stable when kept at 4°C. It binds tothe same structures as does OsO4 but is not as electron dense.
Acroline
A very toxic, flammable and volatile substance, it penetrates veryrapidly and is thus good for fixing large and dense tissues. It is notthought of as a "common" fixative since it is potentially hazardous to use.In addition, it does not fix lipids (in fact it dissolves them), denatures mostenzymes to inactive form and does not preserve the cytoskeletal networkvery well. If it is deemed absolutely necessary to use this aldehyde, bestresults are obtained by combining it with other aldehydes and followingwith osmium post-fixation. Partially degraded and polymerized solutionsappear to be as effective as fresh or redistilled acroline. Use extreme carewhen handling acroline. It is included here as a precaution to those whochoose to use it and to those who read reference to it.
EMBEDDING
The fixatives as well as most cellular components are aqueous. Theplastic resins that are used for embedding tissues are not miscible withwater. Thus, an intermediate solvent that is miscible with both waterand plastic resin is needed. Although there are many to choose from,acetone is probably the best. Some microscopists prefer ethanol, often outof habit from light microscopic procedures. Ethanol reacts with unboundOsO 4 to form a fine dense precipitate thus extensive washing after osmiumfixation is needed. Acetone, which does not react, requires only minimalwashing to remove the osmium and buffer salts. Methanol is less reactivethan ethanol but has no advantage over acetone. In essence, water isreplaced by solvent and solvent will be replaced with plastic.
DEHYDRATION
Use glass vials (or centrifuge tubes) since acetone can dissolve manyplastics. Although a graded series of acetone solutions is commonly used -it is unnecessary. A three step dehydration process is adequate, -50%,95%, and two changes of 100% acetone (re-distilled - stored with moleculardrying sieves, see appendix). It is essential that all water diffuses out of the tissue, otherwise holes will be created in the sections when viewedwith the EM since residual water will vaporize under the extreme vacuum.

9
Two changes of 100% acetone are a precautionary measure. As waterdiffuses into the first 100% acetone, it is no longer absolute. A secondchange dilutes out the water molecules even more. Use a Pasteur pipetteto add and remove the acetone solutions to and from your specimen vial(as opposed to transferring the tissue block to a new vial with the nextsolution).
Dehydration may cause some changes in the secondary and tertiarystructures of macromolecules and usually causes some shrinkage of thetissue. The shrinkage is usually proportional to the water content of thespecimen. Fixation lessens this effect. Do not let the tissue dry in air.Make transfers rapidly but neatly. During dehydration as during fixationand embedding steps, keep the vials capped. 100% acetone is hydroscopicand will absorb water from the air. Acetone will often dissolve unfixed orpoorly fixed components of cells such as saturated lipids (which do notreact with osmium) and chlorophyll and other lipoidal membranecomponents. Starch is difficult to fix but is often so highly polymerizedand cross-linked in vivo that it is often "naturally fixed". However, it willoccasionally be leached out during dehydration.
RESIN INFILTRATION
There are many types of plastic resins available for embeddingtissue, each having attributes. The three principle types of resins used arethe epoxy resins, polyester resins and methacrylate resins. The mostcommonly used resins are the epoxides Epon (Epon is no longer made butother similar resins are available with similar names e.g., Epox) andAraldite. They have adequate viscosity, are fairly stable under the intenseelectron beam, and are of very fine grain. The purpose of the embeddingmedium is to provide a stable, hard matrix throughout a tissue or cell inorder that very thin sections may be cut, usually on the order of 400-800A. Wax such as the light microscopist paraffin is not firm enough for suchthinness and it will melt under the electron beam. Epon and Araldite areboth epoxide resins and when polymerized are virtually indestructible andinsoluble (as are tissues embedded in them). Remember that water isreplaced with acetone and acetone is replaced by plastic.
Note - Epoxys can be irritating to skin and eyes; use with caution. Manyepoxides are known to be carcinogenic. The polymerized capsule howeveris not carcinogenic. Use acetone on a cloth or wipe to remove any resinsfrom your skin. For eye contact - flush with warm (not hot) water.
1 0
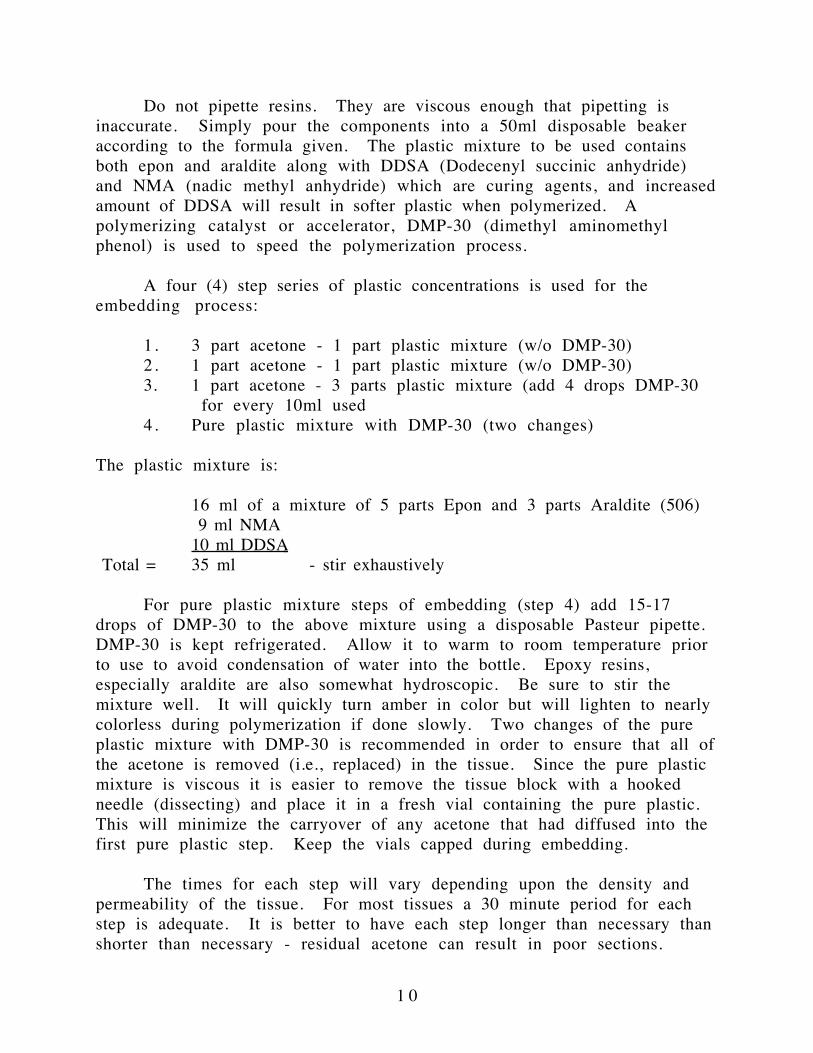
Do not pipette resins. They are viscous enough that pipetting isinaccurate. Simply pour the components into a 50ml disposable beakeraccording to the formula given. The plastic mixture to be used containsboth epon and araldite along with DDSA (Dodecenyl succinic anhydride)and NMA (nadic methyl anhydride) which are curing agents, and increasedamount of DDSA will result in softer plastic when polymerized. Apolymerizing catalyst or accelerator, DMP-30 (dimethyl aminomethylphenol) is used to speed the polymerization process.
A four (4) step series of plastic concentrations is used for theembedding process:
1. 3 part acetone - 1 part plastic mixture (w/o DMP-30)2. 1 part acetone - 1 part plastic mixture (w/o DMP-30)3. 1 part acetone - 3 parts plastic mixture (add 4 drops DMP-30
for every 10ml used4. Pure plastic mixture with DMP-30 (two changes)
The plastic mixture is:
16 ml of a mixture of 5 parts Epon and 3 parts Araldite (506) 9 ml NMA10 ml DDSA
Total = 35 ml - stir exhaustively
For pure plastic mixture steps of embedding (step 4) add 15-17drops of DMP-30 to the above mixture using a disposable Pasteur pipette.DMP-30 is kept refrigerated. Allow it to warm to room temperature priorto use to avoid condensation of water into the bottle. Epoxy resins,especially araldite are also somewhat hydroscopic. Be sure to stir themixture well. It will quickly turn amber in color but will lighten to nearlycolorless during polymerization if done slowly. Two changes of the pureplastic mixture with DMP-30 is recommended in order to ensure that all ofthe acetone is removed (i.e., replaced) in the tissue. Since the pure plasticmixture is viscous it is easier to remove the tissue block with a hookedneedle (dissecting) and place it in a fresh vial containing the pure plastic.This will minimize the carryover of any acetone that had diffused into thefirst pure plastic step. Keep the vials capped during embedding.
The times for each step will vary depending upon the density andpermeability of the tissue. For most tissues a 30 minute period for eachstep is adequate. It is better to have each step longer than necessary thanshorter than necessary - residual acetone can result in poor sections.

1 1
For the final step, use the 00 size polyethylene capsule moldsavailable. Fill them to about 2mm from the top and place your tissue blockto the bottom of the mold. Place a small paper label (written in pencil)around the top perimeter of the mold. For cell suspensions, pellet the cellswith centrifugation in the pure plastic mixture after the allotted time.Using a Pasteur pipette, draw off the pellet as a cell slurry and place 2-3drops of the slurry in the capsule molds. Layer pure plastic mixture overthis to within 2mm of the top and centrifuge the capsule mold in a table-top clinical centrifuge on a setting of 5 or 6 until the cells are concentratedat the tip of the mold. Then place a label around the top rim of thecapsule.
POLYMERIZATION:
Allow the tray(s) of capsules to stand (wrapped in aluminum foil)overnight at room temperature and then place the capsules in an oven at60°C for 2-3 days. If the correct amount of DMP-30 has been used, thecapsules should be adequately polymerized within 3 days and the plasticwill have lost most of the amber color. A good test for correctpolymerization is to try and dent one of the side ridges of the tip of thecapsule with a fingernail (after removing the capsule from the mold ofcourse). If there is an indentation from the fingernail the polymerizationat 60°C should continue until the capsule is hard enough to show noindentations. To remove the capsule from the mold, carefully cut the moldlengthwise with a razor blade and peel the cut edges from the top (not thetip) of the capsule. The capsule can then be easily removed. If the sidefacets near the tip show cracks and/or bulging, it usually indicates toorapid polymerization.
OTHER RESINS:
Relatively recently, a new monomeric resin called LR-White has beenintroduced from England. It is a single solution that is stable at 4°C and isused with 4 to 6 changes after dehydration which must be carried out withabsolute ethanol. Acetone can not be used since it generates free radicalswhich interfere with the polymerization reaction. Using ethanolnecessitates that excess osmium be thoroughly removed by washing. Thecapsules may be polymerized by heating to 50°C overnight butpolyethylene capsule molds should not be used since they are permeableto oxygen which also interferes with polymerization. The result will be"tacky" capsules and this may be avoided by using gelatin capsules as a

1 2
mold. Their only drawback is that the ends are rounded and are moredifficult to trim for sectioning.
The LR-White resin is a general purpose embedding medium that canbe used for light microscopy preparations. Under the electron microscope,the tissues have a tendency to look washed out or leached and they don'ttake up the post-strains (e.g., lead citrate) as well as the epoxy resinsdescribed above. Except for the convenience of not having to mix togetherthe plastic resin components, there is no overriding advantage apparentfor choosing LR-White. The same number of steps are needed foradequate infiltration. It is not as irritating or toxic as the epoxides,however, and this concern may merit its use for general studies orteaching.
ULTRAMICROTOMY
Now that the messy part is over with, it is time to master the skills ofelectron microscopy that require precision and perfection. Although it ismost convenient to hire technicians to do the microtomy and microscopy,you will not have an adequate appreciation for the results unless it islearned first hand and it is truly one of the few procedures that are mosteasily learned correctly by doing them and making mistakes. This is dueto the large number of variables that affect the quality of the result, i.e.,the micrograph. The steps needed to master this section include: trimmingthe capsule so as to expose the tissue for proper sectioning, making glassknife edges fitted with a water boat (for sections to float on when cut fromthe tissue (capsule) "face", the actual sectioning using the ultramicrotomeand placing the sections on "grids".
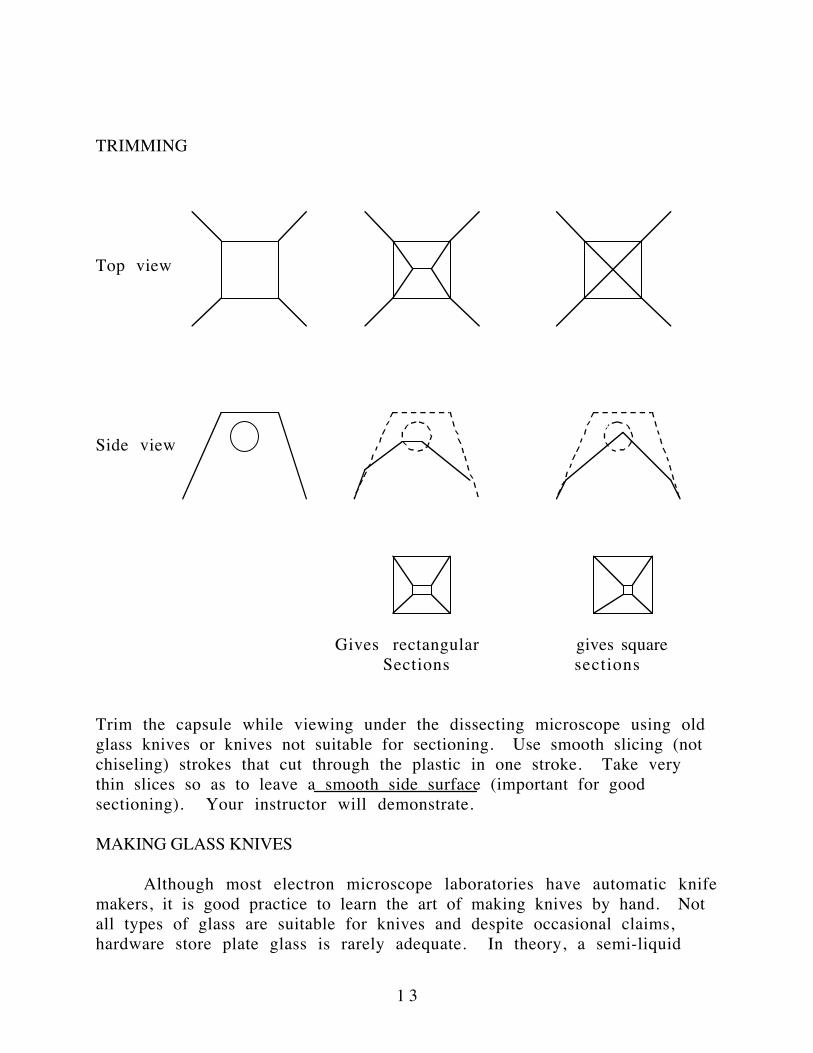
TRIMMING THE CAPSULE
This is easier to demonstrate than to explain in written form. Excessplastic surrounding the tissue must be trimmed away in a fashion that willyield a square or rectangular section. The capsule mold produced a 1mm2
face on the tip (see figure). This must be trimmed to a pyramid where thepyramid tip and sides are exposed tissue. The angle of the pyramid sides(called facets) should be about 45°. Too steep of an angle will not allowenough lateral support when sectioning while too flat (or low) of an anglewill cause the "face" being sectioned to enlarge too quickly duringsectioning. The tip of the pyramid may be a point (giving square sections)or a ridge (giving rectangular sections).
1 3
TRIMMING
Top view
Side view
Gives rectangular gives squareSections sections
Trim the capsule while viewing under the dissecting microscope using oldglass knives or knives not suitable for sectioning. Use smooth slicing (notchiseling) strokes that cut through the plastic in one stroke. Take verythin slices so as to leave a smooth side surface (important for good sectioning). Your instructor will demonstrate.
MAKING GLASS KNIVES
Although most electron microscope laboratories have automatic knifemakers, it is good practice to learn the art of making knives by hand. Notall types of glass are suitable for knives and despite occasional claims,hardware store plate glass is rarely adequate. In theory, a semi-liquid

1 4
knife edge is made by bringing two natural fractures to a 45° apex. Thequality (smoothness, sharpness and durability) of the edge depends uponthe density, temper and composition of the glass. For these reasons, mostlabs purchase good quality glass from vendors of EM supplies. The glassusually comes as one inch wide strips varying in thickness; usually 1/4,5/16, or 3/8 inches. The strips must be scrupulously cleaned with acetoneor alcohol. The glass can then be scored using a diamond glass scribeeither free hand or by using a simple Plexiglas scoring guide. Two scoresare made, one across (perpendicular to the length) the glass strip to yield a1" square piece and one diagonal score towards the first score. Both scoresare made at the same time and should be made with enough pressure so asto just see and "hear" the score. Be sure to align the edge of the diamondscribe flush with the guide edges to ensure a straight and precisely placedscore.

1 5
Use the glaziers pliers to first make the cross (perpendicular) fracture andthen the diagonal fracture. Do not touch the knife edge or sides with yourfingers. The contaminants of the fingerprint will prevent adhesion of thewater boat to be mounted on the knife. Examine the knife edge for itsshape and horizontal angle. Note the size of the spur, fracture ridge (burrline) and curve of the edge (see the diagram).
The boat can be made with short sections of black vinyl electrical tape cutin half lengthwise. Wrap the tape around the knife (diagonal side) so thatthe top edge of the boat is perpendicular with the vertical side of the knife.Do not leave a gap at the back of the boat and use your fingernail to sealthe adhesive against the glass sides (air bubbles disappear). Seal the backand sides of the boat with nail polish and allow to dry. The knife may thenbe used or stored under cover. It is not a good practice to store knives forlong periods of time (no more than 2-3 days) since they have a tendencyto clutter up the microtome area and to get dull.
THIN SECTIONING (using the Sorvall Porter-Bloom MT-1 ultramicrotome)
Ultramicrotomy is one of the most difficult techniques to mastersince there are many variables contributing to the cutting process. Someof these are:
plastic hardness vibrat ionknife quality t empera tu reknife angle humidi tyboat water level cutting speedtrimmed edge smoothness tongue in wrong position

1 6
A good deal of patience is necessary along with steady hands. First,read the instruction manual for the ultramicrotome and memorize eachcontrol and component. It is convenient to begin a microtomy session byresetting the specimen holder arm to the rearmost position. Remove theknife holder and secure the specimen capsule in the collet holder. Be surethat the knurled ring securing the ball and socket pivot is tight. Thisshould be done with the specimen arm hook clamp in place so as to notdamage the lead alloy threaded advancing rod inside the microtome. Anew knife may be secured in the holder and placed in its lockingmechanism. You should not have to move or adjust the cool light sourcewhich may be turned on at the start of the session. Unhook the specimenarm and rotate the sectioning knob to bring the specimen to knife edgeheight. Then manually advance the knife stage to within 1-2 mm of thespecimen. Both should now be in view through the dissecting microscope.Adjust the microscope to the highest magnification and focus. Add fresh,clean distilled water to the boat so as to have a silver reflection from thesurface. This will occur with the water surface slightly concave and thewater should be adjacent to the knife edge.
Once the knife and specimen are roughly aligned manually the upperhalf of the knife stage may be advanced manually using the course andfine advance controls until cutting the first sections from the tip of thespecimen. With the first piece of plastic section (it will probably be fairlythick) the knife may then be advanced using the fine advance adjustmentwhich is calibrated in microns. Advance the fine control one half micron ata time to create a "face". If done correctly, each time the face comes intoview under the microscope it should appear mirror-like. At this point it isadvisable to back the knife edge away from the specimen using the fine orcoarse adjustment control and to move the knife edge laterally to a newarea. Secure the knife using the locking lever and slowly advance theknife to the specimen face once more. If the light and water level areadjusted correctly, as you advance the knife you should eventually see thereflection of the knife edge in the mirror-like face. The knife edge and itsreflection can be thought of as two lines which should be parallel. If theyare parallel, it will ensure that the first section that is taken by the newknife edge will not section only part of the face. Although it is difficult tohave the lines exactly parallel one can usually come close by adjusting thespecimen block using the ball socket pivot. It is extremely important thatthe first section using the new area of the knife be as thin as possible.Otherwise the knife edge will dull. Most problems arise with beginningmicrotomy due to improper water level, too fast a cutting stroke, wrongknife angle (this should be about 5°) and a dull knife edge. Unfortunately,

1 7
this technique is one which is learned most rapidly by doing it and makingmistakes. Your instructor will help you understand the problems as theyarise.
If you are successful at getting good sections they will appear gold orsilver. The thickness of the sections is determined by their refractive coloras calibrated on the thickness chart provided with the microtome. Goldsections are 800-900 A thick, yield better contrast but slightly lessresolution. If maximum resolution is needed, gray sections on the order of300-400 A can be attempted. This, however, is extremely difficult andrequires a good deal of experience in attaining.
The sections should float on the water and should adhere to oneanother in the form of a ribbon. As the knife edge cuts through the plastic,it causes the sections to become compressed. This may be alleviated byexposing the sections to vapors of organic solvents such as chloroform orether. This is done by merely dipping a long handled cotton swab in thesolvent and holding it close to but not in contact with the sections near theknife edge while viewing through the microscope. The sections will appearto become smooth and large and this will be very noticeable to the eye.The sections are then ready to be maneuvered to the center of the boat tobe picked up on the grids.
PLACING SECTIONS ON GRIDS
If a noticeable amount of water has evaporated from the boatcausing a more concave surface, it is advisable to add a small amount ofwater to the boat so the surface is nearly level before moving the sections.The sections may be maneuvered using a fine needle (a 0000 stainlesssteel insect mounting pin slightly bent at the tip pressed onto a woodenhandle is convenient.) After centering the sections they may be adhered tothe proper grid by grasping the grid in fine tweezers (Pick up the grid onlyby the very edge) and bending the grid against the bottom of the petridish so that it may be placed dull side down on the surface of the waterand sections. Be careful as you touch down on the surface of the sectionsthat they are oriented in the middle of the grid. Do not push hard enoughthat you break the surface tension of the water. You need only to barelytouch the surface and the sections along with a small drop of water willadhere to the grid. If the water droplet does not spread out evenly on thegrid it signifies that the grids are dirty. If this is the case you will usuallyfind that the sections have become wrinkled and do not span over theholes. If this is the case the grids must be cleaned (see appendix). Thesections on the grids are now ready to be stained.

1 8
STAINING
Additional contrast of the EM image can be gained by staining thetissue sections with heavy metals. The strains most commonly used areuranyl acetate and lead citrate. Both metals apparently bind at sites ofosmium deposition and lead also binds with (i.e. stains) nucleic acids andglycogen.
Lead Citrate
Lead citrate (Reynold's) is perhaps the best stain available since itcan be used at a high pH and stains a wide variety of cellular componentsincluding nuclear components, ribosomes, membranes, microfilaments andglycogen. The precise chemical nature of the binding is not wellunderstood. Care must be taken since lead citrate will react withatmospheric CO2 to form a fine precipitate of lead carbonate.
To Stain Sections:
Pour a generous amount of either sodium or potassium hydroxidepellets around the perimeter of a plastic disposable petri dish. Place thecover on the dish. Carefully place (don't drop) a 2-3 mm drop of leadcitrate (one for each grid to be stained) on the center surface using aPasteur pipet and lifting the plate cover just enough to give the pipetclearance. The drops will not spread but will remain as droplets. Place thegrids, with section side down, on top of the droplets and cover the plate.The grids will float. Do not breath onto the petri dish while placing gridson the drops of stain. Stain for 15-20 minutes. Remove the grids andimmediately but gently dip and stir them in a weak NaOH solution (or KOH- one or two pellets in 30-40 ml dHOH in a small beaker). Only a fewseconds are needed. Rinse the grids in distilled water by gently dippingand stirring; blot dry by pressing the surface of the grid not havingsections on a piece of filter paper. This will "wick" most of the water away.Also blot (wick) away the water between the tweezer tips so the grid canbe placed in a holder without being wetted by a fountain pen-like action.The grid will air dry quickly and is ready for viewing under the EM.Throw the petri dish away after taping it shut.

1 9
Uranyl Acetate
Uranyl acetate may be used during the dehydration process bymaking the 50% acetone up to 2% with the stain. Uranyl acetate is notsoluble in pure acetone. An aqueous solution of 2% concentration can beused to float or dip sections mounted on grids. Epon and Araldite do nottake up aqueous stains well unless they are alkaline. Organic solventsolutions will usually leave a fine precipitate on the sections and is notoften used. Rinse the solutions well with distilled water. Caution - uranylacetate is radioactive. Do not pipette by mouth or spill.
Phosphotungstic acid
May be used as a "negative" stain in that it does not bind particularlywell to anything but instead caused areas other than cellular (organic)material to appear dark. It is especially useful for viewing molecules suchas proteins (e.g., antibody, DNA) and suspensions of subcellular structuressuch as membranes (e.g., mitochondria - elementary particles, etc.) Usuallya 1-2% aqueous solution is used to stain a tissue block during dehydrationfor about 30 minutes.
OTHER PROCEDURES
Thick Sections:
It is generally not advisable to begin a structure oriented study atthe electron microscope level. Some form of light microscopy is usuallyperformed to become familiar with the general structure, orientation andon occasion, to locate a specific site within the specimen. Specimensprepared for the electron microscope can be thick sectioned andappropriately stained for light microscopic examination with ease.
The trimmed specimen capsule is mounted in the ultramicrotome thesame as for thin sectioning. A knife is also secured and may or may nothave a boat. The "face" is formed in the usual manner and thick sections(2-3 µ ) are made using the fine advance adjustment control. The sectionsoften have a tendency to roll up like a scroll. This can be prevented byusing a new knife edge and a slow smooth cutting stroke. The sections arethen placed on a clean microscope slide with enough water present topermit positioning of the sections in an orderly arrangement. The slide isdried, lightly heat fixed and stained for 5 minutes with Toluidine blue.Excess dye is rinsed off with distilled water and the sections are thendestained (excess stain in the sections) with ethanol (90-95%) for 2

2 0
minutes. The slide is dried and a cover slip is secured with a small drop ofthe pure plastic mixture used for the embedding procedure. A vial of thismixture (with DMP-30 added) may be kept for several months in thefreezer (-20°C). The section may be viewed to see if they are ofappropriate quality and can be labeled and stored after curing the plasticmixture (used for mounting the cover slip) on a warming plate set at 60°C.Place a weight on the cover slip to insure that it will press the sections flatagainst the glass slide.
Whole mounts:
It is often necessary to view a whole or solid object such as abacteria, virus, or molecules. For this, it is routine to place the specimen ona film-coated grid and to coat the object with a thin film of metal. Thegrids are usually coated with a Formvar film of varying thickness. A 0.25%solution in anhydrous ethylene dichloride is kept in a tightly sealedvolumetric. Water will cause holes in the film. A small drop of thesolution is gently laid onto the convex (mounded) surface of distilled waterin a petri dish. The Formvar will spread into a very thin film and thesolvent will evaporate almost immediately. Carefully place clean gridsonto the film surface dull side down using tweezers. The film is thicker atthe center of the dish. Do not allow vibrations while making the film. Thecoated grids can be recovered from the plate surface by carefully droppinga piece of filter paper onto (over) the surface allowing it to wet completely.Then remove the paper, invert it (grids face up) and place it on absorbenttowels to blot excess water away. After the paper has dried, the grids maybe recovered by raising them straight up off of the paper using sharptweezers. The grids may then be used or stored.
Specimens are usually applied to the coated grids by aspiration or byplacing a small drop of water suspension on the surface and allowing it todry .
2 1
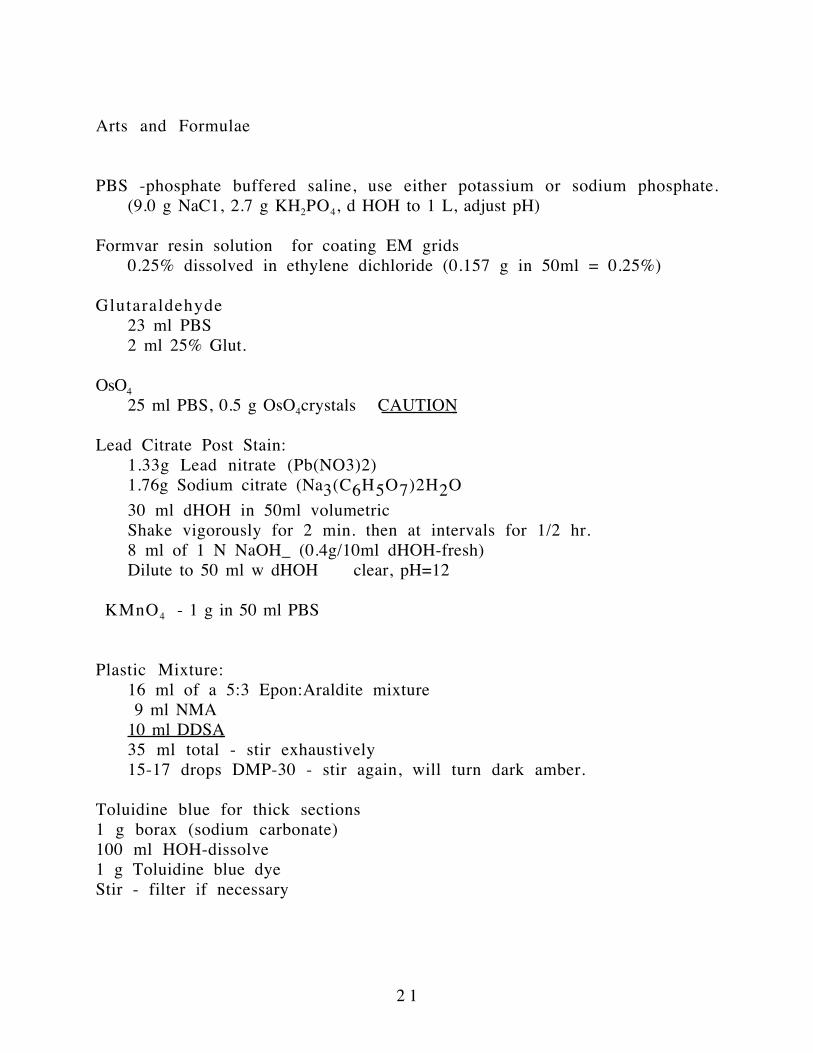
Arts and Formulae
PBS -phosphate buffered saline, use either potassium or sodium phosphate.(9.0 g NaC1, 2.7 g KH2PO4, d HOH to 1 L, adjust pH)
Formvar resin solution for coating EM grids0.25% dissolved in ethylene dichloride (0.157 g in 50ml = 0.25%)
Glutaraldehyde23 ml PBS2 ml 25% Glut.
OsO4
25 ml PBS, 0.5 g OsO4crystals CAUTION
Lead Citrate Post Stain:1.33g Lead nitrate (Pb(NO3)2)1.76g Sodium citrate (Na3(C6H5O7)2H2O
30 ml dHOH in 50ml volumetricShake vigorously for 2 min. then at intervals for 1/2 hr.8 ml of 1 N NaOH_ (0.4g/10ml dHOH-fresh)Dilute to 50 ml w dHOH clear, pH=12
KMnO4 - 1 g in 50 ml PBS
Plastic Mixture:16 ml of a 5:3 Epon:Araldite mixture 9 ml NMA10 ml DDSA 35 ml total - stir exhaustively15-17 drops DMP-30 - stir again, will turn dark amber.
Toluidine blue for thick sections1 g borax (sodium carbonate)100 ml HOH-dissolve1 g Toluidine blue dyeStir - filter if necessary

2 2
Cleaning copper grids
Immerse grids in a 2-4 N HC1 solution for 5 minutes (a drop of detergentwill help the grids sink)Rinse with distilled water and then acetone in a filter funnel attached to avacuum flask. Use filter paper in the funnel and allow the grids to air dry.Place grids in a covered glass (paper bottom) petri dish (plastic allowsstatic charge to occur).
Specimen Preparation with L. R. White
I . Fixation
A. Dissect tissue into 1mm3 cubes shortly after procurement.B. Place cubes in Phosphate Buffered Saline (PBS) for a 10 minute
wash.C. Transfer to a solution of 2% glutaraldehyde in Phosphate
Buffered Saline. (60 min.)D. Wash in PBS for 10 minutes.E. Transfer blocks of tissue to an osmium tetroxide solution;
consisting of the following: (60-90 minutes)1. 5 ml. of PBS2. 5 ml. of 0.1 N HC13. 15 ml. of distilled HOH4. 0.5g OsO4 crystals
I I . DehydrationA. Transfer blocks to 50% ethanol (15 min.)B. Transfer blocks to 75% ethanol (15 min.)C. Transfer blocks to 95% ethanol (15 min.)D. Transfer blocks to 100% ethanol (Twice) (15-20 min./switch)
I I I . Infil trationA. Transfer blocks to L.R. White resin (45 min.) four (4) times in
oven at 60° C.B. Place blocks in gelatin capsules (1/cap.) and fill to rim with L.
R. White resin.
IV. PolymerizationA. Polymerize 20-24 hours at 60°C.B. Remove the capsule when fully polymerized.

2 3
Photography
Making negatives:
The films should be exposed according to the instructions in the EMoperating manual. Generally speaking, contrast is enhanced by longerexposures with low illumination. However, exposures longer than 1 secondare more prone to blurring from vibration in the building, thus negatingthe fine resolution of the EM. It is desirable to have as much contrast inthe recorded image as possible. It is often advantageous to slightly overexpose the film so as to have a "dense" negative. In this case, you wouldadjust the illumination (with the condenser lens control) to indicate justless than a 1 second exposure on the exposure meter and expose (timerset) for 1 second.
Film development:
The 35mm film is developed as follows:Dektol (D-72 straight) = 2 minutesWater (tepid)= 2 changesHypo (Fixer)= 5 minutes (save hypo)Water wash= 5 minutesDistilled water rinse - dry
Plate film is developed in trays or tanks as follows:D-19 (2:1 water:D-19)= 4 minutesWater wash (stop bath)= 10 secondsHypo (Fixer - save)= 8 minutesWater wash= 5 minutes
Printing - Black and White
Additional contrast can be gained during the printing process byusing high contrast paper or polycontrast paper and high contrast filters.Also, a certain amount of contrast can be gained by again using a longerexposure with low illumination.
The exposure and illumination settings can be determined by using"test strips" or an exposure guide on a test print. This consumes a sizeablequantity however, and it is best to acquire a "feel" for proper exposures bypractice. Most print papers have a generously wide exposure latitude butthe exposure should be such so as to allow the image to develop within 1-

2 4
1.5 minutes in developer. Among the most often used print papers isKodak Kodabromide polycontrast RCII paper in E or F surface. RC standsfor "resin coated" which eliminates the need for a print dryer and itshortens processing as well. The E and F surfaces differ in that the Esurface is a "matte" surface and the F surface is more "glossy".
Paper development is as follows:
Dektol (D-72, 2:1, water:D-72)= 1-1.5 min.Stop bath (indicator)= 10-15 sec.Hypo (can be used)= 3-5 min.Water wash= 5 min.Squeegee and air dry
The instructor will demonstrate the use of the photographic enlarger.It is fairly straight-forward. Take care to remove dust from the negativeand lenses. Always leave the darkroom clean. Wipe up hypo spills sincedry hypo is a fine white powder and can easily contaminate surfaces ofnegatives and lenses.
Rinse hands well before handling paper or touching the enlarger orlight switch. It is alright to transfer paper and hands from developer tostop bath to hypo but it is not good practice to go the other way. Rinsehands thoroughly of hypo before going back to the developer or stop bath.
Prints may be conveniently labeled using transfer letters andnumbers available in most office supply stores. These transfer markingsare virtually permanent but can be removed by gently scraping with ascalpel or razor blade.
Magnification (recorded when the film was exposed) can bemultiplied by the magnification factor of the enlarger and represented bya "micron" or other unit measure on the print as a line or bar.
Prints should be stored out of direct sunlight in a dry environment.There may be a tendency for the prints to curl or roll up due to absorptionof moisture by the paper backing while the emulsion remains relativelymoisture free (since it is fairly thin). The prints may be mounted onvarious types of poster board by glue adhesives or by heat sensitive "drymounting" sheets (essentially a wax that melts and adheres to the printand mount). The print image is virtually permanent if stored or cared forproperly.