sam connect users guide july11 - houghton mifflin … district sam servers to sam connect sam...
TRANSCRIPT

SAM Connect User’s Guide
Updated July 22, 2011
Copyright © 2011, 2010, 2005 by Scholastic Inc. All rights reserved. Published by Scholastic Inc.
PDF0059 (PDF)
SCHOLASTIC, SCHOLASTIC ACHIEVEMENT MANAGER, SYSTEM 44, RBOOK, SCHOLASTIC U, SCHOLASTIC READING COUNTS!, READ 180, and associated logos and designs are
trademarks and/or registered trademarks of Scholastic Inc. Other company names, brand names, and product names are the property and/or trademarks of their respective owners.

SAM Connect User’s Guide
SAM Connect User’s Guide Updated 07.22.11 Table of Contents • 2 TM ® & © Scholastic Inc. All rights reserved. PDF0059 (PDF)
Table of Contents
Overview ....................................................................................3 About This Manual ...........................................................................3
Setting Up SAM Connect ..........................................................5 Registering District SAM Servers to SAM Connect...........................5 Creating SAM Connect Administrator Accounts ...............................6 Naming SAM Servers .......................................................................9 Matching Schools ...........................................................................10
Using SAM Connect ................................................................13 Accessing the Home Screen ..........................................................13 The Home Tab ...............................................................................13 The Menu Bar ................................................................................14 The Updates Tab............................................................................15
Opting In to the Update Manager .............................................................. 15 Setting Up the Update Manager................................................................ 20 Using the Updates Tab .............................................................................. 21 The Dashboard Screen .............................................................................. 22 The Update Settings Screen...................................................................... 24 The Available Updates Screen .................................................................. 25 The Scheduled Updates Screen ............................................................... 26 The Completed Updates Screen ............................................................... 27 The SRC! Quiz Preferences Screen ......................................................... 28 The View Servers Screen .......................................................................... 29 Scheduling Updates ................................................................................... 30 Automatic Updates ..................................................................................... 30 Individually Scheduled Updates ................................................................ 31 Schedule All Updates Now ........................................................................ 33
The Admins Tab .............................................................................34 The Service Dates Tab...................................................................35 The School Match Tab ...................................................................36
The School Match Wizard.......................................................................... 37 The Authentication Tab ..................................................................39
The Authentication Dashboard .................................................................. 39 School View Screen ................................................................................... 40 Importing Rosters ....................................................................................... 41 Adding Users .............................................................................................. 43 Editing Users............................................................................................... 44 Deleting Users ............................................................................................ 45
Technical Support ...................................................................46

SAM Connect User’s Guide
SAM Connect User’s Guide Updated 07.22.11 Overview • 3 TM ® & © Scholastic Inc. All rights reserved. PDF0059 (PDF)
Overview
SAM Connect is a suite of utilities that allows districts to better manage Scholastic’s Enterprise Edition and Next Generation programs. SAM Connect links districtS’ Scholastic Achievement Manager (SAM) Servers to Scholastic’s central server over the Internet, enabling authentication for many of Scholastic’s Web-based services and products as well as electronic software updates and point releases (with active Product Support Plans).
About This Manual
There are two sections to this manual, which covers establishing the district’s SAM Connect account as well as using the SAM Connect services and functions:
• Setting Up SAM Connect explains everything customers need to do before they begin using SAM Connect, specifically:
Registering District SAM Servers to SAM Connect: Districts must register each of their SAM Servers with SAM Connect in order to initiate contact between them.
Creating SAM Connect Administrator Accounts: SAM Connect requires an administrator at the district level to manage SAM Connect and establish other administrator accounts.
Matching Schools: In order for the connection between SAM Servers and SAM Connect to function efficiently, districts must correctly identify each school in SAM in the Profile and Contact tabs, so that SAM Connect matches their information to Scholastic servers.
• Using SAM Connect explains how to use the SAM Connect Home Screen, create additional SAM Connect administrators, and use the Update Manager and Authentication Tab.
While Scholastic recommends that customers register every SAM Server at the district before they log on to SAM Connect, they are not required to do so. If a new SAM Server is installed later, districts may register the server at any time. However, all servers must be registered before districts may fully use SAM Connect services.
SAM Connect User’s Guide
SAM Connect User’s Guide Updated 07.22.11 Overview • 4 TM ® & © Scholastic Inc. All rights reserved. PDF0059 (PDF)
This manual covers setting up and using SAM Connect. For other SAM reference issues, see the guide below. All manuals are available at the Scholastic Education Product Support website.
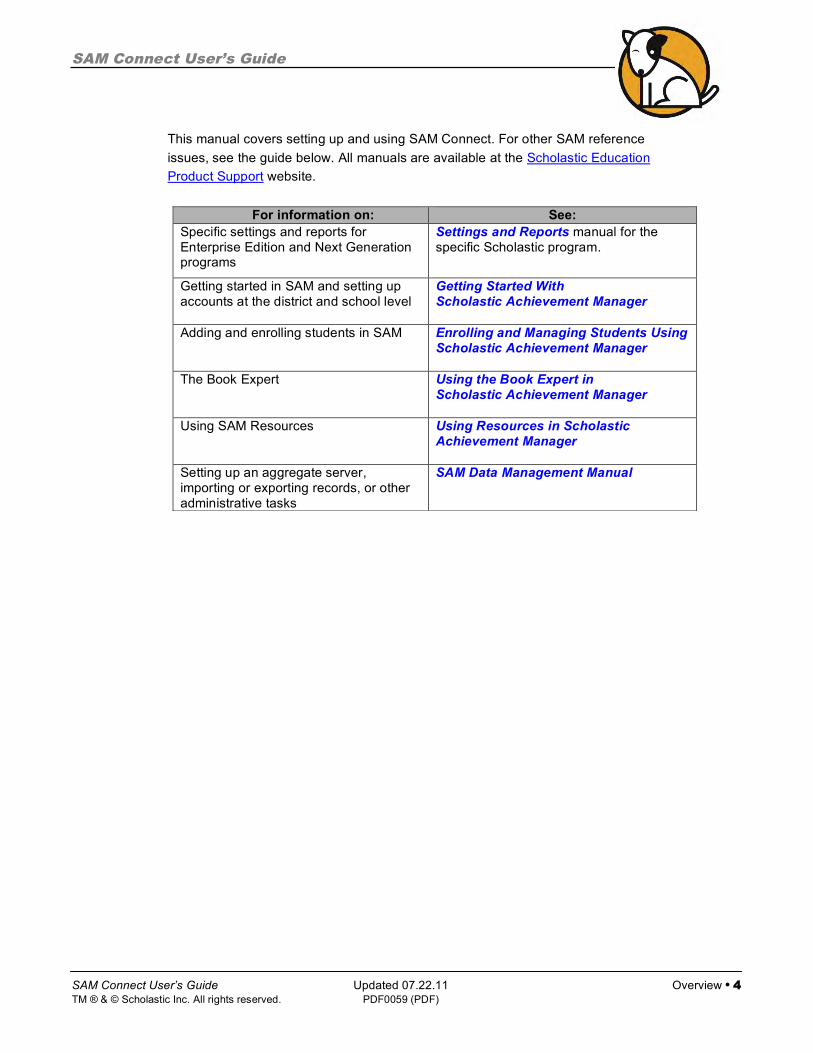
For information on: See: Specific settings and reports for Enterprise Edition and Next Generation programs
Settings and Reports manual for the specific Scholastic program.
Getting started in SAM and setting up accounts at the district and school level
Getting Started With Scholastic Achievement Manager
Adding and enrolling students in SAM Enrolling and Managing Students Using Scholastic Achievement Manager
The Book Expert Using the Book Expert in Scholastic Achievement Manager
Using SAM Resources Using Resources in Scholastic Achievement Manager
Setting up an aggregate server, importing or exporting records, or other administrative tasks
SAM Data Management Manual

SAM Connect User’s Guide
SAM Connect User’s Guide Updated 07.22.11 Setting Up SAM Connect • 5 TM ® & © Scholastic Inc. All rights reserved. PDF0059 (PDF)
Setting Up SAM Connect
Before districts may use SAM Connect, they must:
1. Register each SAM Server with SAM Connect;
2. Identify at least one SAM Connect administrator (either when they register their first SAM Server or by calling Technical Support);
3. Check that SAM Connect has correctly matched their schools on its SAM Server to the SAM Connect Server.
Registering District SAM Servers to SAM Connect
SAM Servers must be registered with SAM Connect to be able to use the service and receive server updates.
To register a SAM Server with SAM Connect, install SAM Server v1.9 or later on the server computer, or upgrade the existing SAM Server to v1.9 or later. After the software is installed, the installer prompts users to register the server and download a registration key. Users do not need to have administrator permissions in SAM Connect to register a server. For more information, see the Installation Guides for any Enterprise Edition or Next Generation program.
SAM Connect User’s Guide
SAM Connect User’s Guide Updated 07.22.11 Setting Up SAM Connect • 6 TM ® & © Scholastic Inc. All rights reserved. PDF0059 (PDF)
Creating SAM Connect Administrator Accounts
The user registering SAM Connect becomes the SAM Connect administrator. The SAM Connect administrator may create other administrators and manage optional services, such as changing the Update Manager settings. Each district must have at least one SAM Connect administrator, but may create as many as it needs.
There are two ways to create a SAM Connect administrator account:
• Create an administrator account during SAM Server installation or upgrade by checking Request SAM Connect Account on the Server Registration online form. See the SAM Server Installation section of any Installation Guide for more information.
OR
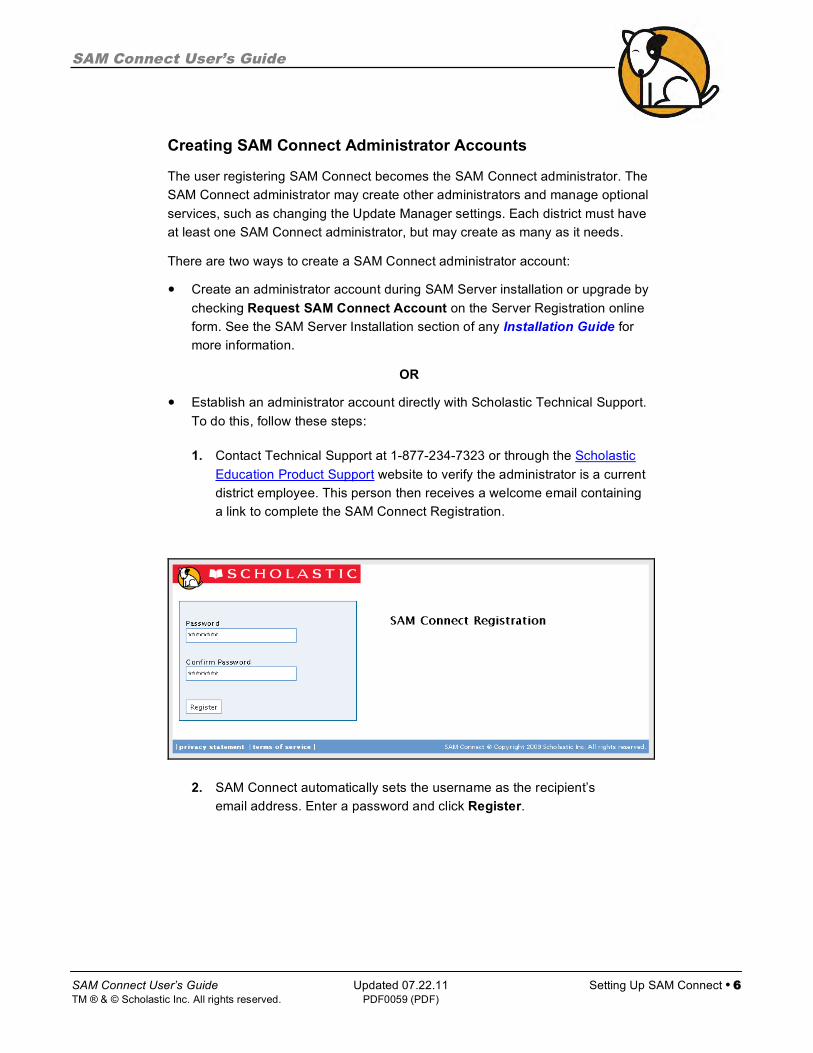
• Establish an administrator account directly with Scholastic Technical Support. To do this, follow these steps:
1. Contact Technical Support at 1-877-234-7323 or through the Scholastic Education Product Support website to verify the administrator is a current district employee. This person then receives a welcome email containing a link to complete the SAM Connect Registration.
2. SAM Connect automatically sets the username as the recipient’s email address. Enter a password and click Register.
SAM Connect User’s Guide
SAM Connect User’s Guide Updated 07.22.11 Setting Up SAM Connect • 7 TM ® & © Scholastic Inc. All rights reserved. PDF0059 (PDF)
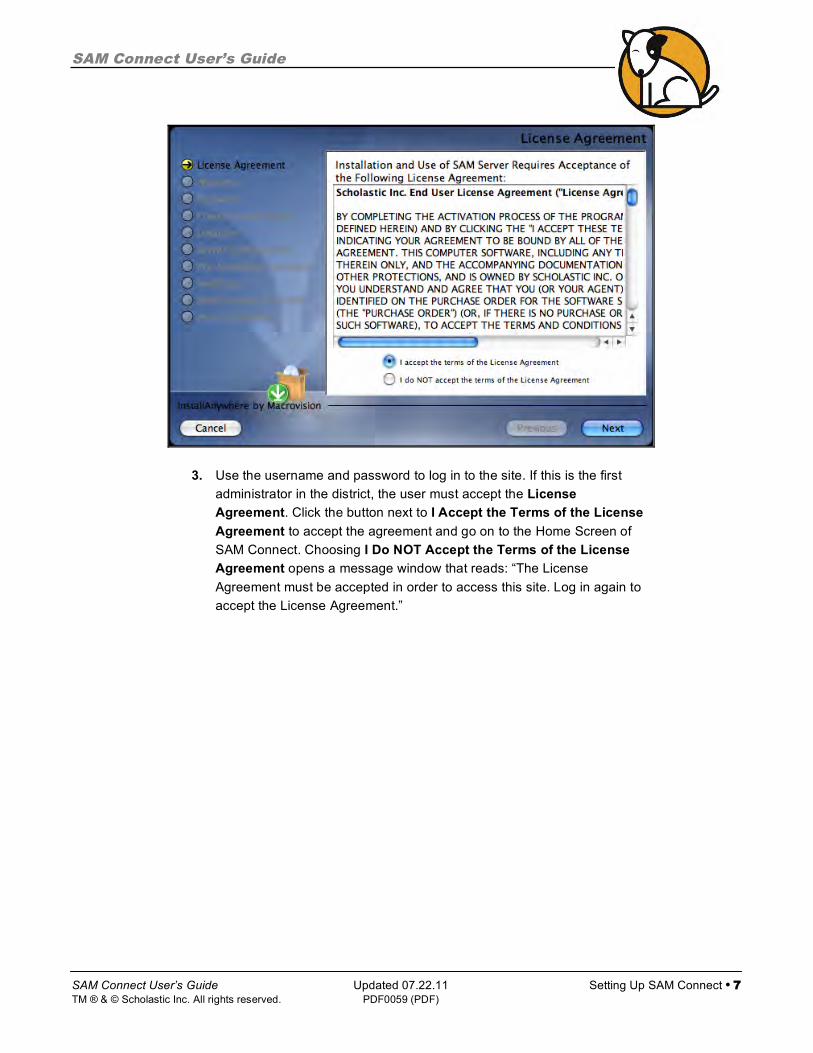
3. Use the username and password to log in to the site. If this is the first administrator in the district, the user must accept the License Agreement. Click the button next to I Accept the Terms of the License Agreement to accept the agreement and go on to the Home Screen of SAM Connect. Choosing I Do NOT Accept the Terms of the License Agreement opens a message window that reads: “The License Agreement must be accepted in order to access this site. Log in again to accept the License Agreement.”

SAM Connect User’s Guide
SAM Connect User’s Guide Updated 07.22.11 Setting Up SAM Connect • 8 TM ® & © Scholastic Inc. All rights reserved. PDF0059 (PDF)
4. When the License Agreement is accepted, or if the district already has one administrator who has accepted it, the SAM Connect Home Screen appears.
With an administrator account established, the SAM Connect administrator may establish other SAM Connect administrators, opt in to optional services, and set permissions. The new SAM Connect administrator has Read Only privileges until the Update Manager (page 15) is activated.
To create additional SAM Connect administrator accounts, use the Admins tab on the Home Screen (page 34).

SAM Connect User’s Guide
SAM Connect User’s Guide Updated 07.22.11 Setting Up SAM Connect • 9 TM ® & © Scholastic Inc. All rights reserved. PDF0059 (PDF)
Best Practices for Naming SAM Servers
• Server names MUST BE unique. Having two servers with the same name in the same SAM deployment will cause errors in data reporting and result in inaccurate reporting.
• Avoid generalities in naming servers (“the Scholastic server,” “the reading server,” “the math server”).
• Use either a district or school name in the server’s name (“Quincy District 1,” “Quincy Middle School”).
• If a server is dedicated to one program or suite of programs, use the name of the program in the name of the server (“Quincy District_R180”).
Naming SAM Servers
Name the district’s SAM Server(s) as part of the SAM Connect registration process. Naming conventions are important, as they directly affect the ability to identify servers.

SAM Connect User’s Guide
SAM Connect User’s Guide Updated 07.22.11 Setting Up SAM Connect • 10 TM ® & © Scholastic Inc. All rights reserved. PDF0059 (PDF)
Matching Schools
District SAM Servers must be matched to SAM Connect in order for optional features to fully function, as well as to authenticate and access the Interactive Teaching Systems (ITS) for READ 180, READ 180 Next Generation, and System 44®. SAM Connect attempts to match schools based on the school name and mailing address as entered in SAM.
Registered SAM Servers synchronize with SAM Connect about once every 30 minutes. When a registered SAM Server informs SAM Connect of a change in data, SAM Connect attempts to match that school.
READ 180 Next Generation Users: Data received in SAM Connect is reported in the Teacher and Leadership Dashboards in READ 180 Next Generation. In order for this data to be reported correctly and
accurately, it is vital that the SAM Servers that communicate with SAM Connect be properly matched. Data from unmatched servers will be incomplete and can possibly result in inaccurate analysis.
If SAM Connect cannot match a school on a SAM Server, it sends an email to the SAM Connect administrator explaining the problem and providing a link to the School Match tab on the SAM Connect Home Screen.
There are two ways administrators may manually match schools. Scholastic highly recommends following Option A, as it ensures that a match remains once it is made, even if the school’s information moves to another database. Administrators are directed to Option B if SAM Connect detects mismatched schools while trying to opt in to optional services.

SAM Connect User’s Guide
SAM Connect User’s Guide Updated 07.22.11 Setting Up SAM Connect • 11 TM ® & © Scholastic Inc. All rights reserved. PDF0059 (PDF)
Option A: For each SAM Server with a non-matching school, follow these steps:
1. Sign in to SAM and double-click the school in the SmartBar that needs to be fixed to open the school’s Profile Screen.
2. Click the Edit School Profile link in the upper right corner of the screen to open the Edit School Profile window. On the Profile tab, update the School Name field so that it is the full school name.

SAM Connect User’s Guide
SAM Connect User’s Guide Updated 07.22.11 Setting Up SAM Connect • 12 TM ® & © Scholastic Inc. All rights reserved. PDF0059 (PDF)
3. On the Contact tab, update the School Address Line, City, State, and ZIP Code fields so that they are the correct mailing address.
The SAM Server will update this information at the next scheduled SAM Connect synchronization. The SAM Server synchronizes with SAM Connect approximately every 30 minutes.
Option B: Use the School Match tab (page 36) in SAM Connect to match schools.

SAM Connect User’s Guide
SAM Connect User’s Guide Updated 07.22.11 Using SAM Connect • 13 TM ® & © Scholastic Inc. All rights reserved. PDF0059 (PDF)
Using SAM Connect
The SAM Connect Home Screen is the Web-based interface where administrators may manage their SAM Connect account and optional services.
Accessing the Home Screen
To access the Home Screen, go to this URL: https://samconnect.scholastic.com. Enter the email username and password and click Login to go to the Home tab.
The Home Tab
The Home tab provides general overall information about SAM Connect. The five tabs access the different functions of the program. Tabs that require special permissions do not appear for administrators who do not have those permissions.

SAM Connect User’s Guide
SAM Connect User’s Guide Updated 07.22.11 Using SAM Connect • 14 TM ® & © Scholastic Inc. All rights reserved. PDF0059 (PDF)
The Menu Bar
The Menu Bar appears in the upper right corner of every screen and includes the following options:
• Profile: This opens the Edit Administrators screen, displaying the data for the administrator currently logged in.
• Terms of Use: This links to the License Agreement accepted by the administrator when installing the SAM Server and registering with SAM Connect.
• Help: This opens the Frequently Asked Questions screen.
• Logout: This logs the user out of SAM Connect.
• Logged In: This displays the name of the administrator logged in.
Once a district has registered its servers and created at least one SAM Connect administrator, that district may use SAM Connect in read only mode. Once an optional service is activated, administrators may access tabs for those services, and they are no longer read only.

SAM Connect User’s Guide
SAM Connect User’s Guide Updated 07.22.11 Using SAM Connect • 15 TM ® & © Scholastic Inc. All rights reserved. PDF0059 (PDF)
The Updates Tab
Administrators with permissions to manage optional services may view the Update Manager screens as Read Only until opting in to the service.
Opting In to the Update Manager
The Update Manager enables users to schedule server updates, point release updates, and content updates to registered SAM Servers. To activate the Update Manager, a SAM Connect administrator with Manage Server permissions must opt in to the service. Once the Update Manager is activated, it remains active for the district and any user may schedule automatic updates for each SAM Server.
To opt in to the Update Manager:
1. Register all of the district’s SAM Servers with SAM Connect and log into SAM Connect as an administrator.
2. Click the Updates tab.

SAM Connect User’s Guide
SAM Connect User’s Guide Updated 07.22.11 Using SAM Connect • 16 TM ® & © Scholastic Inc. All rights reserved. PDF0059 (PDF)
3. Click I Want To Manage My District’s SAM Server Updates.

SAM Connect User’s Guide
SAM Connect User’s Guide Updated 07.22.11 Using SAM Connect • 17 TM ® & © Scholastic Inc. All rights reserved. PDF0059 (PDF)
4. SAM Connect displays a list of the district’s currently registered SAM Servers. If the list is complete, click Next. If more servers need to be added, click Cancel and register the missing servers with SAM Connect.

SAM Connect User’s Guide
SAM Connect User’s Guide Updated 07.22.11 Using SAM Connect • 18 TM ® & © Scholastic Inc. All rights reserved. PDF0059 (PDF)
5. SAM Connect displays a list of every school name on the district’s registered SAM Servers. If this list is complete, click Next. If this list is missing school names, click Cancel. A school name is missing because its SAM Server is not registered. Register the missing servers with SAM Connect.
6. SAM Connect attempts to match the schools on the registered SAM Servers. If every district school matches an existing school entry, click Next. If there are schools whose names or addresses don’t match, SAM Connect displays their names here, as they exist on the SAM Servers. See page 10 for instructions on matching schools.

SAM Connect User’s Guide
SAM Connect User’s Guide Updated 07.22.11 Using SAM Connect • 19 TM ® & © Scholastic Inc. All rights reserved. PDF0059 (PDF)
7. SAM Connect lists each SAM Server that the district has registered with SAM Connect and the programs installed on each server. If the list is correct, click Submit. If there is an error in the list, click Cancel and contact Scholastic Technical Support (page 46).
8. Click Finish to go to the Update Settings heading to set up the Update Manager.

SAM Connect User’s Guide
SAM Connect User’s Guide Updated 07.22.11 Using SAM Connect • 20 TM ® & © Scholastic Inc. All rights reserved. PDF0059 (PDF)
Setting Up the Update Manager
After opting in to the Update Manager, the Update Settings Screen appears.
These settings must be initialized before automatic updates may be scheduled:
• Time Zone: Select the time zone from the Update Customer Time Zone pull-down menu. Click the Save Time Zone button to save the setting.
• Automatic Update Settings: Choose to receive updates automatically or schedule the updates as they become available. Set server updates to automatically install during the Update Window by clicking the Automatic Update Settings checkbox (the default setting is unchecked, or not set to Auto Update). Click Save Auto Update Preference when finished.
• Update Window: If using Automatic Update, set the time Automatic Update should run in the Modify Update Window section. Set the Update Window to a day and time when students or teachers are not accessing the SAM Server. The update window must be at least six hours long. Days apply to the Start Time. Click Mon and set Start to 10 P.M. to set Update Window from 10 P.M. Monday night to 6 A.M. Tuesday morning (the default is Friday 11 P.M. to Saturday 5 A.M. and Saturday 11 P.M. to Sunday 5 A.M.). When finished, click Save Update Windows Settings to see a summary of the selection.
When Update Manager is set up, administrators with permissions to manage optional services may change the settings at any time.

SAM Connect User’s Guide
SAM Connect User’s Guide Updated 07.22.11 Using SAM Connect • 21 TM ® & © Scholastic Inc. All rights reserved. PDF0059 (PDF)
Using the Updates Tab
The Updates tab is where administrators choose how to receive server updates, set the Update Window for automatic updates, and choose which servers or programs they need to update.
Only administrators with permissions to manage optional services may access this tab.
The Updates tab consists of the following screens:
• Dashboard
• Update Settings
• Available Updates
• Scheduled Updates
• Completed Updates
• SRC! Quiz References
• All Servers
When users first access the Updates tab, they arrive at the Dashboard. Access the other screens by clicking the headings in the menu.

SAM Connect User’s Guide
SAM Connect User’s Guide Updated 07.22.11 Using SAM Connect • 22 TM ® & © Scholastic Inc. All rights reserved. PDF0059 (PDF)
The Dashboard Screen
The Dashboard provides a snapshot of update settings. It has several panels:
• Update Settings: Shows the current settings for the district’s Auto Update, Time Zone, and Update Window options. To change these settings, click Update Settings or the Edit Settings link to open the Update Settings Screen.
• Available Updates: Shows which updates are currently available to the district for download to registered SAM Servers. Updates are listed by Program, Version, and the Number of Servers the update applies to. Each time the update is successfully applied to a server, the number of servers decreases by one. If the district is receiving Auto Updates, updates appear in the Scheduled Updates list instead. Click More Details to access the entire list in a separate screen.
• Scheduled Updates: Shows which updates are scheduled for the district’s registered SAM Servers, displayed with the Scheduled Date, Program, Version number, and Server name. Once a scheduled update is completed, the listing moves to the Completed Updates list. To access the entire list, click More Details.

SAM Connect User’s Guide
SAM Connect User’s Guide Updated 07.22.11 Using SAM Connect • 23 TM ® & © Scholastic Inc. All rights reserved. PDF0059 (PDF)
• Completed Updates: Shows updates that have been applied to the district’s SAM Servers, displayed with the Scheduled Date, Completed Date, Program, Version number, and Server name. To access the entire list in a separate screen, click More Details.
• Snapshot: Shows how many active SAM Servers and schools on these servers are registered with SAM Connect, as well as the district’s Update Manager status.
• Alerts: Shows how many SAM Servers have not synchronized with SAM Connect within the last 4 hours and the last 12 hours (servers should typically synchronize approximately once every half hour). Click the number to access the All Servers screen for more information.

SAM Connect User’s Guide
SAM Connect User’s Guide Updated 07.22.11 Using SAM Connect • 24 TM ® & © Scholastic Inc. All rights reserved. PDF0059 (PDF)
The Update Settings Screen
The Update Settings Screen enables administrators to choose whether to receive updates automatically. Administrators may also reset the Update Window and Time Zone from this screen. See page 30 for instructions on scheduling updates.
The screen is divided into three sections:
• Modify Update Window: Allows users to change the times of scheduled updates. To change settings, select the day of the week and hour of the day to begin updates, and click the Save Update Window button to save changes.
• Auto Update Settings: Allows users to choose to receive updates automatically. To change the setting, click the checkbox to apply Auto Updates, or leave the checkbox empty to individually apply updates. Click Save Auto Update Preference to save changes.
• Update Customer Time Zone: Allows users to change time zone settings. To change settings, select the district’s time zone and click the Save Time Zone button to save changes.

SAM Connect User’s Guide
SAM Connect User’s Guide Updated 07.22.11 Using SAM Connect • 25 TM ® & © Scholastic Inc. All rights reserved. PDF0059 (PDF)
The Available Updates Screen
The Available Updates Screen displays the updates that administrators may apply to district SAM Servers by Program, Version Number, and the Number of Servers to which it may be applied. Software updates are available to all users. Point releases are available to customers with active Product Maintenance and Support Plans. SRC! quiz updates are available to customers with an active SRC! Content Renewal Plan.
Administrators may filter the table to see available updates displayed by program or by server by using the links at the top of the screen. They may filter the list by program using the pull-down menu. There is also a Schedule link that may be used to schedule the update. Once the update is scheduled, it moves from the Available Updates Screen to the Scheduled Updates Screen (page 30). If the district is set to receive updates automatically, no updates appear on this list; available updates appear automatically on the Scheduled Updates Screen.
Administrators may apply updates in two ways:
• Schedule All Updates Now: Click the Schedule All Available Updates Now link at the top of the screen to apply every displayed update to every eligible server immediately.
• Schedule Updates Individually: Click the Schedule link next to the selected update to apply updates to servers individually.

SAM Connect User’s Guide
SAM Connect User’s Guide Updated 07.22.11 Using SAM Connect • 26 TM ® & © Scholastic Inc. All rights reserved. PDF0059 (PDF)
The Scheduled Updates Screen
The Scheduled Updates Screen displays any update currently scheduled to be applied to a SAM Server.
Once an update is applied to a SAM Server, that update moves from this list to the Completed Updates Screen. To cancel an update, click the Cancel link; to select a different Start Hour or Day for an update, click the Reschedule link.
Each row in the table represents one program update on one server. The table displays the following:
• Starting After: The Start Hour selected for the update on that server;
• Program: The program being updated;
• Program Version: The program’s version number;
• Server: The server where the update is being applied;
• Actions: Any action taken (cancellations, reschedulings) during the update.

SAM Connect User’s Guide
SAM Connect User’s Guide Updated 07.22.11 Using SAM Connect • 27 TM ® & © Scholastic Inc. All rights reserved. PDF0059 (PDF)
The Completed Updates Screen
The Completed Updates Screen displays each attempt to update district SAM Servers. Each row in the table lists the following:
• Status: The success or failure of update attempts. Failed updates instantly appear on the Available Updates screen;
• Scheduled At: The time the update was scheduled to start;
• Completed At: The time the update completed;
• Program: The program being updated;
• Version: The program’s version number;
• Server: The server where the update was applied;
• User: The SAM Connect administrator who scheduled the update;
• Hide: A link that hides the row in the table. Click the Hide link to hide the row. Click Show Hidden Updates to show previously hidden updates.

SAM Connect User’s Guide
SAM Connect User’s Guide Updated 07.22.11 Using SAM Connect • 28 TM ® & © Scholastic Inc. All rights reserved. PDF0059 (PDF)
The SRC! Quiz Preferences Screen
The SRC! Quiz Preferences Screen allows users to set preferences for using SAM Connect to automatically update SRC! quizzes.
This service is available only to districts with an active SRC! content plan.
Use the boxes to set the servers that will receive updated quizzes. Click All to have SAM Connect update all the SRC! quizzes on a particular server, or use the boxes to select the grades on the server that will receive updated quizzes.
When finished, click Save SRC Quiz Preferences to save the selections.
SAM Connect User’s Guide
SAM Connect User’s Guide Updated 07.22.11 Using SAM Connect • 29 TM ® & © Scholastic Inc. All rights reserved. PDF0059 (PDF)
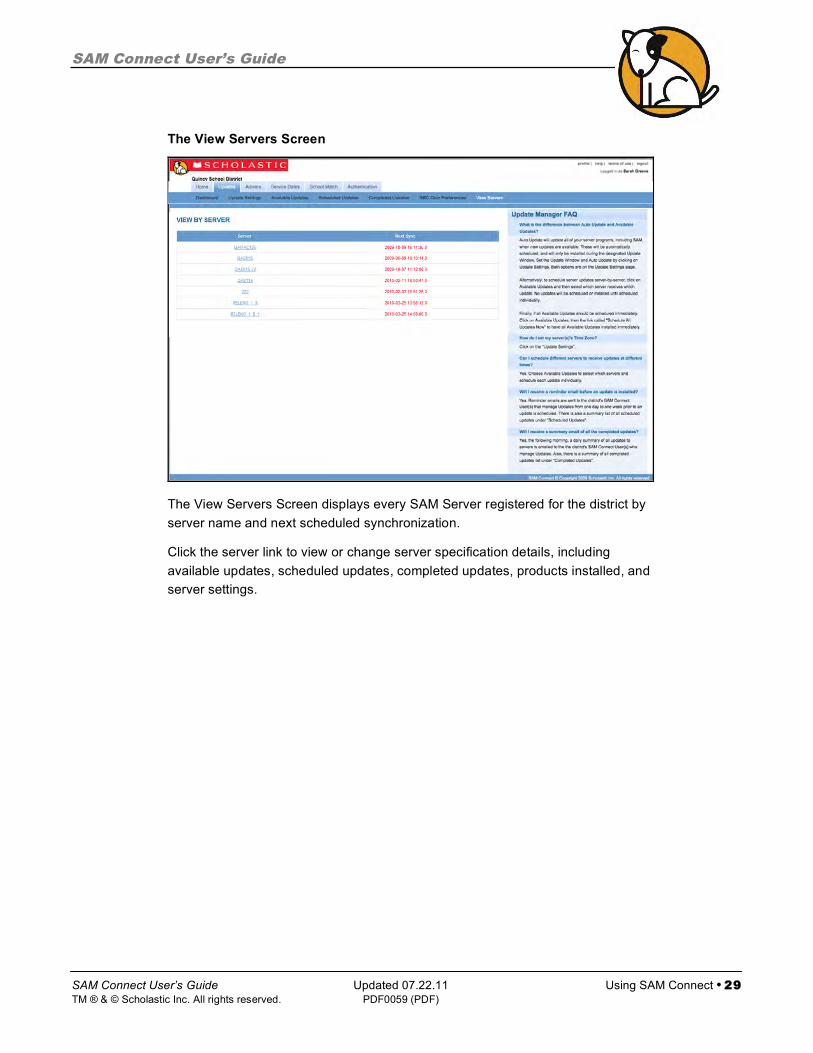
The View Servers Screen
The View Servers Screen displays every SAM Server registered for the district by server name and next scheduled synchronization.
Click the server link to view or change server specification details, including available updates, scheduled updates, completed updates, products installed, and server settings.

SAM Connect User’s Guide
SAM Connect User’s Guide Updated 07.22.11 Using SAM Connect • 30 TM ® & © Scholastic Inc. All rights reserved. PDF0059 (PDF)
Scheduling Updates
There are three ways in which administrators with permissions to manage server updates may schedule updates:
• Automatic Updates: If administrators select the Auto Update checkbox on the Update Settings Screen (page 24), the district receives updates automatically as they become available and only during their established Update Window days and/or start times.
• Individually Scheduled Updates: If administrators do not select the Auto Update checkbox on the Update Settings Screen (page 24), they may apply any available update to individual servers at any time and schedule them individually.
• Schedule All Updates Now: If administrators do not select the Auto Update checkbox on the Update Settings Screen (page 24), they may apply every available update to every server immediately.
Automatic Updates
Administrators choosing Automatic Updates set their district’s update settings once. To set the Auto Update settings:
1. Click the Updates tab.
2. Click Updates Settings.
3. Under Modify Update Window, select the Start Hour, End Hour, and days of the week that updates are applied. These should be hours when no one is using the servers, and backups are not scheduled.
4. Click the Save Update Window button.
5. Under Auto Update Settings, select the check box for Install Updates.
6. Click Save Auto Update Preference to save and activate these settings.
Whenever Scholastic makes a SAM Server update available, administrators with permissions to manage server updates receive an email explaining that a new update is available. The new update appears in Scheduled Updates (page 26), and administrators may either reschedule the update or allow the update to proceed as scheduled.
When the servers are updated, SAM Connect sends an email to all administrators with permissions to manage optional services announcing whether or not the update was successful, and the date and time it was completed. In addition, the Completed Updates Screen lists the server, date, time, and specific update applied.

SAM Connect User’s Guide
SAM Connect User’s Guide Updated 07.22.11 Using SAM Connect • 31 TM ® & © Scholastic Inc. All rights reserved. PDF0059 (PDF)
Individually Scheduled Updates
Districts that choose to control their updates directly may apply available updates individually to each server by not selecting the Auto Updates checkbox in the Update Settings Screen (page 24).
Administrators with permissions to manage server updates who choose to individually schedule updates receive an email alerting them that the new update is available. The update is also listed on the Available Updates Screen. To individually apply an update:
1. Click the Updates tab.
2. Click Available Updates (the list may be sorted by program or server and may be filtered by program).
3. Click the Schedule link next to the Update being applied to go to the Scheduling Wizard.
4. Clicking the Schedule link for a server requires selecting a program. Clicking the Schedule link for a program requires selecting a server. Select the checkboxes for any server or program in the list (or select the checkbox at the top of the list to select everything) and click Next when done.

SAM Connect User’s Guide
SAM Connect User’s Guide Updated 07.22.11 Using SAM Connect • 32 TM ® & © Scholastic Inc. All rights reserved. PDF0059 (PDF)
5. Select the date and time to begin the update, then click Next. If SAM Connect cannot update the server at the selected time (if, for example, the server cannot sync with SAM Connect), it will attempt the update again during the next day or hours allotted in the Update Window.
6. If satisfied with the selections on the Confirmation Screen, click Next.
When the Individually Scheduled Update option is complete, the update moves from the Available Updates Screen to the Scheduled Updates Screen (if the update applies only to some servers, it remains on the Available Updates Screen with the number available decreased). Administrators with permissions to manage server updates receive an email explaining which servers will be updated and when. Each server downloads the update at the selected time, and sends a second email confirming the process is complete. The Completed Updates Screen lists the server, date, time, and update applied.

SAM Connect User’s Guide
SAM Connect User’s Guide Updated 07.22.11 Using SAM Connect • 33 TM ® & © Scholastic Inc. All rights reserved. PDF0059 (PDF)
Schedule All Updates Now
Districts that choose to update servers individually may apply available updates to every eligible server at once. Administrators for these districts should not select the Auto Updates checkbox in the Update Setting Screen (page 24).
Administrators with permissions to manage server updates will receive an email when new updates are available. Updates are also listed on the Available Updates screen. To apply all available server updates immediately:
1. Click the Updates tab.
2. Click Available Updates.
3. Click the Schedule All Available Updates Now link.
4. Click OK to update each of the listed servers with the available updates. Click Cancel to return to the previous screen.
After clicking OK, every eligible server downloads the updates upon next synchronization with SAM Connect. In other words, all Available Updates will begin to be applied to all servers within the next 30 minutes. Administrators with permissions to manage server updates receive an email explaining that the update has been completed, and the Completed Updates Screen lists the server, date, time, and specific update applied.

SAM Connect User’s Guide
SAM Connect User’s Guide Updated 07.22.11 Using SAM Connect • 34 TM ® & © Scholastic Inc. All rights reserved. PDF0059 (PDF)
The Admins Tab
The Admins tab allows SAM Connect administrators to create additional SAM Connect administrator accounts as well as manage all administrator accounts.
To create a new SAM Connect administrator account:
1. Click the Add Admin button from the Admin tab.
2. Fill in the information on the Add Admin Screen and hit Submit.
3. The administrator roster appears with the new administrator account listed.
To manage administrator accounts, click the Edit button next to the account name to edit that account’s information and permissions.
To delete an administrator account, click Delete next to the account name.

SAM Connect User’s Guide
SAM Connect User’s Guide Updated 07.22.11 Using SAM Connect • 35 TM ® & © Scholastic Inc. All rights reserved. PDF0059 (PDF)
The Service Dates Tab
The Service Dates tab lists all the district’s subscriptions with Scholastic by District/School, Type of Service, and Expiration Date. There are four types of services:
• READ 180 Interactive Teaching System (ITS): Provides teachers with online access to the rBook® Teacher’s Editions and the three Resources for Differentiated Instruction books;
• Product Maintenance and Support Plan: Provides districts and schools various technical support plans;
• Scholastic Hosting Services: Provides a dedicated and secure application server for schools or districts;
• Scholastic Reading Counts! ® Quiz Subscriptions: Provides monthly delivery of SRC! quizzes as part of a district’s Student Access Fee or District Plan.

SAM Connect User’s Guide
SAM Connect User’s Guide Updated 07.22.11 Using SAM Connect • 36 TM ® & © Scholastic Inc. All rights reserved. PDF0059 (PDF)
The School Match Tab
The School Match tab displays all unmatched schools in the district. The table displays the schools by address as entered in SAM (Address as Entered), and by the nickname of the SAM Server where the school is listed (SAM Server Name).
Click the Match button in the school’s row to open the School Match Wizard, or click Mark as “Test School Only” if the listed school is not an actual school (some districts create fake schools for the purpose of running reports).

SAM Connect User’s Guide
SAM Connect User’s Guide Updated 07.22.11 Using SAM Connect • 37 TM ® & © Scholastic Inc. All rights reserved. PDF0059 (PDF)
The School Match Wizard
To use the School Match Wizard:
1. Click the School Match tab to display a list of unmatched schools. The school name is displayed as it is registered on one of the district’s SAM Servers. If a district has created schools in the SAM Client merely for administrative purposes (to run different sets of reports, for instance), select the Mark as “Test School Only” checkbox for that school. Otherwise, click the Match button to open the School Match Wizard.
2. Enter the ZIP code of the selected school and click Go to display a list of every school in the Scholastic Customer Database in that ZIP code.

SAM Connect User’s Guide
SAM Connect User’s Guide Updated 07.22.11 Using SAM Connect • 38 TM ® & © Scholastic Inc. All rights reserved. PDF0059 (PDF)
3. If the unmatched school is on the list, select the button for that school and click Match to open a confirmation screen.
4. The confirmation screen lists the name as it appears on the district server and as it appears in the SAM Connect database. Click Finish to return to the School Match tab to match another school.

SAM Connect User’s Guide
SAM Connect User’s Guide Updated 07.22.11 Using SAM Connect • 39 TM ® & © Scholastic Inc. All rights reserved. PDF0059 (PDF)
The Authentication Tab
The Authentication tab allows SAM Connect administrators to view the district’s Web-based programs (including Scholastic U™, Expert 21, the Interactive Teaching System, the Training Zone, and others) and manage access to them.
The Authentication tab works in one of two ways, depending on whether a district’s servers are registered with SAM Connect:
• Schools and Districts with Registered SAM Servers: SAM Connect administrators from districts with servers registered to SAM Connect may use the Authentication tab to view the district’s Web-based programs and the users in their district who have access to these programs. User information on the Authentication Tab is read-only for schools or districts with servers registered to SAM Connect. Administrators may change the displayed information in SAM (see Getting Started With Scholastic Achievement Manager) and these changes will be reflected on the Authentication Tab at the next SAM Connect update.
• Schools and Districts without Registered SAM Servers: Administrators from districts that do not have SAM installations, or whose school or district servers are not registered to SAM Connect, may use the Authentication Tab to import rosters of users or add, edit, or delete user profiles.
The Authentication Dashboard
Clicking the Authentication tab opens the Authentication Dashboard. The pull-down menu lists all schools that have purchased Scholastic Web-based programs (including Scholastic U, Expert 21, the ITS, the Digital Training Zone, and others). Click the pull-down menu, then click the school name to open the School View Screen for that school. The menu also lists the District Office; select this to manage district administrators.

SAM Connect User’s Guide
SAM Connect User’s Guide Updated 07.22.11 Using SAM Connect • 40 TM ® & © Scholastic Inc. All rights reserved. PDF0059 (PDF)
School View Screen
Clicking a school on the pull-down menu opens the School View Screen. The School View Screen contains two tables:
• Available Products and Services: This table shows the Web-based programs purchased by the district as clickable links. Click the links to open the login screen for that program.
• Authentication User Profiles: This table shows the profiles of the school’s Authentication users (those users who have been enrolled in the school’s Web-based programs). If the selected school has a registered SAM server, the users will be teachers and administrators present on the SAM server associated with the school. The table will be read-only since user profiles are edited in SAM. If the school has a nonregistered SAM account, then the table will have live links to add new user profiles, import rosters, edit user profiles, and delete user profiles.

SAM Connect User’s Guide
SAM Connect User’s Guide Updated 07.22.11 Using SAM Connect • 41 TM ® & © Scholastic Inc. All rights reserved. PDF0059 (PDF)
Importing Rosters
Scholastic recommends registering district servers with SAM Connect. Rosters from registered SAM servers are automatically imported into SAM Connect and are updated to reflect any changes. Administrators of SAM Connect accounts without registered servers may import a roster of users from a *.csv file. To import a roster, select the school from the pull-down menu and click the Import Roster link to open the Roster Import Screen.
The *.csv file should contain the following fields for each user at the school level:
• First Name: The user’s first name;
• Last Name: The user’s last name;
• Username: The user’s username;
• Password: Passwords must be 6 to 16 characters, one of which must be a numeral, and not use the user’s first or last name or a combination of the two;
• Email Address: The user’s email address;
• User Role: Enter “1” for teachers, “2” for school administrator, or “3” for technical administrator. To add a district administrator, return to the dashboard and select District Office from the pull-down menu;
• District User ID: The unique user ID associated with each user in the district.
Click Download a sample CSV Roster Template to view a sample of a correctly formatted *.csv roster file.

SAM Connect User’s Guide
SAM Connect User’s Guide Updated 07.22.11 Using SAM Connect • 42 TM ® & © Scholastic Inc. All rights reserved. PDF0059 (PDF)
Once the *.csv roster file is correctly formatted, click Browse to select the file for importing. When the correct file is displayed in the Select CSV File window, click Import CSV File to import the file. To stop and restart the process, click Cancel. When the *.csv file is imported successfully, the User Roster Confirmation Screen appears, displaying a list of all user profiles in the *.csv roster file.
From the User Roster Confirmation Screen, administrators may edit or delete user profiles. When all user profiles are displayed correctly, click Submit Roster.
If the imported roster contains formatting errors, an error message appears at the bottom of the User Roster Confirmation Screen. Use the Edit link to correct the highlighted errors, then click Submit Roster again. Click Cancel to cancel the import.
Each teacher profile in the district that uses Scholastic’s Web-based programs must have a unique username. If two or more teacher profiles have the same username, these accounts are temporarily disabled until the usernames are modified, either through the roster tab of SAM if the server is registered, or through the edit function of the Authentication Dashboard.
When the roster is successfully imported, all users appear on the School View Screen.

SAM Connect User’s Guide
SAM Connect User’s Guide Updated 07.22.11 Using SAM Connect • 43 TM ® & © Scholastic Inc. All rights reserved. PDF0059 (PDF)
Adding Users
Administrators from districts with registered SAM servers do not need to add users or update the user list in SAM Connect. Changes made to user profiles in SAM will be automatically updated in SAM Connect. See Getting Started With Scholastic Achievement Manager for more information. In these districts the user list appears as read-only.
Administrators of SAM Connect accounts without registered servers can add users through the School View Screen. To add a new user, click Add New User Profile from the School View Screen to open the Create New User Profile window.
Fill in the fields, choose the user’s role from the pull-down menu (administrator or teacher), then click Save to save the user profile in SAM Connect. The user’s profile appears on the user profile list. Click Cancel to return to the School View Screen.
SAM Connect User’s Guide
SAM Connect User’s Guide Updated 07.22.11 Using SAM Connect • 44 TM ® & © Scholastic Inc. All rights reserved. PDF0059 (PDF)
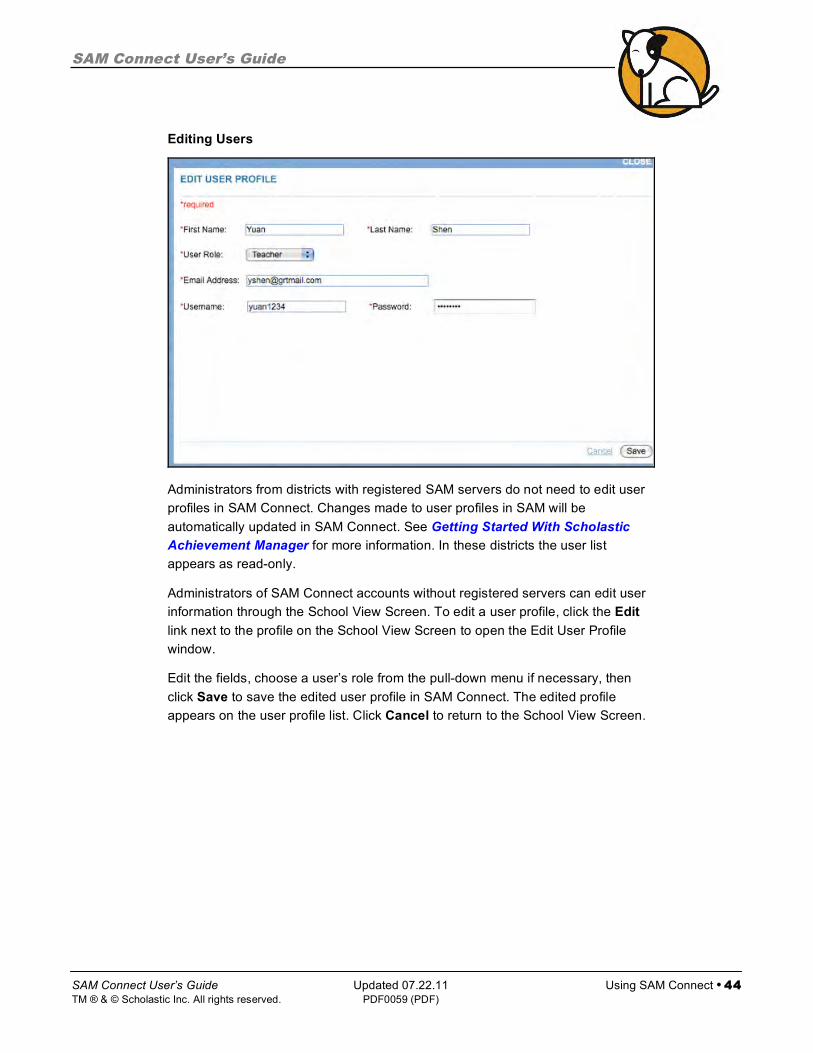
Editing Users
Administrators from districts with registered SAM servers do not need to edit user profiles in SAM Connect. Changes made to user profiles in SAM will be automatically updated in SAM Connect. See Getting Started With Scholastic Achievement Manager for more information. In these districts the user list appears as read-only.
Administrators of SAM Connect accounts without registered servers can edit user information through the School View Screen. To edit a user profile, click the Edit link next to the profile on the School View Screen to open the Edit User Profile window.
Edit the fields, choose a user’s role from the pull-down menu if necessary, then click Save to save the edited user profile in SAM Connect. The edited profile appears on the user profile list. Click Cancel to return to the School View Screen.

SAM Connect User’s Guide
SAM Connect User’s Guide Updated 07.22.11 Using SAM Connect • 45 TM ® & © Scholastic Inc. All rights reserved. PDF0059 (PDF)
Deleting Users
Administrators from districts with registered SAM servers do not need to delete users in SAM Connect. Changes made to user profiles in SAM will be automatically updated in SAM Connect. See Getting Started With Scholastic Achievement Manager for more information. In these districts the user list appears as read-only.
Administrators of SAM Connect accounts without registered servers can delete users through the School View Screen. To delete a user profile, click the Delete link next to the profile on the School View Screen to open the Delete User Profile window.
Review the profile, then click Delete to delete the user profile in SAM Connect and return to the School View Screen. The deleted profile should not appear on the user profile list. Click Cancel to return to the School View Screen.

SAM Connect User’s Guide
SAM Connect User’s Guide Updated 07.22.11 Technical Support • 46 TM ® & © Scholastic Inc. All rights reserved. PDF0059 (PDF)
Technical Support
For questions or other support needs, visit the Scholastic Education Product Support website at: http://www.scholastic.com/sam/productsupport.
At the site, users will find program documentation, manuals, and guides, as well as Frequently Asked Questions and live chat support.
For specific questions regarding the Scholastic program suite, contact customer service to speak to a representative for each EE program at:
• 1-800-283-5974 (all EE products)
• 1-800-927-0189 (other versions)
For specific questions about using SAM with your Scholastic programs, click Help in the Quick Links along the top of any screen in SAM