safe work practices for large vehicle tire servicing
TRANSCRIPT

About WorkSafeBCWorkSafeBC (the Workers’ Compensation Board) is an independent provincial statutory agency governed by a Board of Directors. We are funded by insurance premiums paid by registered employers and by investment returns. In administering the Workers Compensation Act, WorkSafeBC remains separate and distinct from government; however, we are accountable to the public through government in our role of protecting and maintaining the overall well-being of the workers’ compensation system.
WorkSafeBC was born out of a compromise between B.C.’s workers and employers in 1917 where workers gave up the right to sue their employers or fellow workers for injuries on the job in return for a no-fault insurance program fully paid for by employers. We are committed to a safe and healthy workplace, and to providing return-to-work rehabilitation and legislated compensation benefits to workers injured as a result of their employment.
WorkSafeBC Prevention Information LineThe WorkSafeBC Prevention Information Line can answer your questions about workplace health and safety, worker and employer responsibilities, and reporting a workplace incident. The Prevention Information Line accepts anonymous calls.
Phone 604.276.3100 in the Lower Mainland, or call 1.888.621.7233 (621.SAFE) toll-free in Canada.
To report after-hours and weekend incidents and emergencies, call 604.273.7711 in the Lower Mainland, or call 1.866.922.4357 (WCB.HELP) toll-free in British Columbia.
WorkSafeBC PublicationsMany publications are available on the WorkSafeBC web site. The Occupational Health and Safety Regulation and associated policies and guidelines, as well as excerpts and summaries of the Workers Compensation Act, are also available on the web site: worksafebc.com
Some publications are also available for purchase in print:
Phone: 604 232-9704Toll-free phone: 1 866 319-9704Fax: 604 232-9703Toll-free fax: 1 888 232-9714Online ordering: worksafebc.com and click on Publications; follow the links for ordering
© 1997, 2001, 2006 Workers’ Compensation Board of British Columbia. All rights reserved. The Workers’ Compensation Board of B.C. encourages the copying, reproduction, and distribution of this document to promote health and safety in the workplace, provided that the Workers’ Compensation Board of B.C. is acknowledged. However, no part of this publication may be copied, reproduced, or distributed for profit or other commercial enterprise, nor may any part be incorporated into any other publication, without written permission of the Workers’ Compensation Board of B.C.
2006 edition
ISBN 0-7726-5492-1
Table of Contents
INTRODUCTION 1
EXPLANATION OF TERMS 2
TRAINING OF WORKERS 4
DEMOUNTING AND MOUNTING “MULTI-PIECE RIM” WHEELS 6
Demounting 6Mounting 11
DEMOUNTING AND MOUNTING “SINGLE-PIECE RIM” WHEELS 18
Demounting 18Mounting 19
INSTALLING A TIRE ASSEMBLY 22
Disc Wheels 22Demountable Tire Assemblies 23

Acknowledgments
WorkSafeBC (The Workers' Compensation Board of B.C.) thanks the following organizations and their representatives for their assistance in preparing this manual:
• Accuride Canada Inc.• Goodyear Canada Inc.• Kal Tire• Rimex Supply Ltd.

Introduction • 1
Introduction
The job of tire servicing can be extremely hazardous. An inflated large vehicle tire contains tremendous stored energy. Improper handling and assembly of the tire or rim/wheel can cause the components to explode. The result may be costly damage, serious injury or death.
This manual describes acceptable servicing practices. However, it does not replace service and safety manuals which are supplied by all manufacturers and distributors of large vehicle tires and wheels.
It must be emphasized that the manufacturer’s instructions must be followed when working with rims and tires.

2 • Explanation of Terms
Explanation of Terms
Demounting Deflation and removal of tire from wheel assembly.
Disc Wheel A combination of a rim and a disc permanently attached to the rim.
Installing aTire Assembly Transferring and attaching a
tire assembly onto a vehicle axle hub.
Large Vehicle A truck, trailer, bus or an off-road machine. It does not apply to automobiles, pick-up trucks or vans using automobile tires or truck tires designated “LT”.
Mounting a Tire Assembling or putting together the tire and wheel components, including inflation.
Rim The part that supports the tire. There are two main types of rims: single-piece rim (usually tubeless) and multi-piece rim (usually tube type but some are tubeless). The single-piece rim is a continuous one-piece assembly. The multi-piece rim is an assembly consisting of a base and a side ring or both a side and lock ring.
Explanation of Terms • 3
Tire Assembly An assembly of tire, tube (where appropriate) and wheel components.
Trajectory Any potential path or route that a rim/wheel component may travel during an explosive separation, or the sudden release of pressurized air.
Wheel The part or group of parts that provides the method of attachment of the assembly to the axle of a vehicle and the means to contain the tire and/or tube.
4 • Training of Workers
Training of Workers
The Workers’ Compensation Board regulations require the employer to provide adequate instruction and training to workers who operate various machinery and equipment. In terms of tire servicing, this training must include the following:
1. How to properly demount tires, including proper deflation.
2. How to inspect rim/wheel components for mismatch and damage. Damage includes corrosion and rust buildup, metal cracks, deformed flanges, sprung side and/or lock rings, broken or cracked discs, damaged rim bases, worn tubes or flaps, bent or broken beads in the tires.
3. How to mount tires properly to rims/wheels. This means the proper procedure to follow, the proper tools and safety equipment to use, the assembly inspections to make and the inflation steps to take.
4. How to use restraining devices properly.
5. How to handle tire assemblies and rims/wheels properly. This may include the use of mechanical aids in the handling of heavy tire assemblies.
6. How to install and remove tire assemblies.
7. How to inflate tires mounted on the vehicle.
Training of Workers • 5
The employer must ensure each worker demonstrates the abilities to perform these tasks safely.
In addition, the appropriate personal protective equipment must be used when servicing tires, e.g., safety shoes must be worn at all times, eye protection must be worn in operations where there is a hazard of eye injury.
6 • “Multi-Piece Rim” Wheels
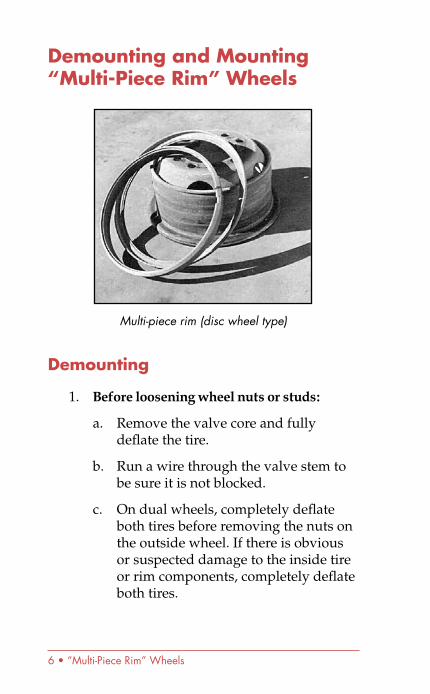
Demounting and Mounting “Multi-Piece Rim” Wheels
Multi-piece rim (disc wheel type)
Demounting
1. Before loosening wheel nuts or studs:
a. Remove the valve core and fully deflate the tire.
b. Run a wire through the valve stem to be sure it is not blocked.
c. On dual wheels, completely deflate both tires before removing the nuts on the outside wheel. If there is obvious or suspected damage to the inside tire or rim components, completely deflate both tires.
“Multi-Piece Rim” Wheels • 7
d. For demountable dual wheels (Dayton wheels), loosen the nuts from the studs but do not remove them completely off the studs until pressure is released between the rims and the cast spoke wheel. Releasing of pressure is achieved by tapping or prying the tire rim assembly until it is loose on the wheel.
2. Remove the wheel nuts and take the wheel assembly off the vehicle.
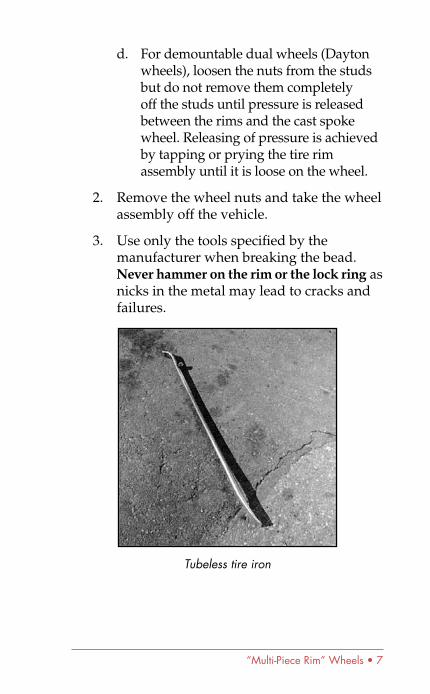
3. Use only the tools specified by the manufacturer when breaking the bead. Never hammer on the rim or the lock ring as nicks in the metal may lead to cracks and failures.
Tubeless tire iron
8 • “Multi-Piece Rim” Wheels
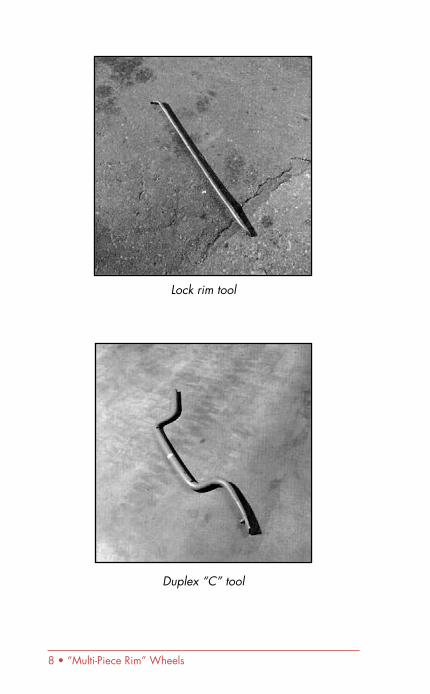
Lock rim tool
Duplex “C” tool
“Multi-Piece Rim” Wheels • 9
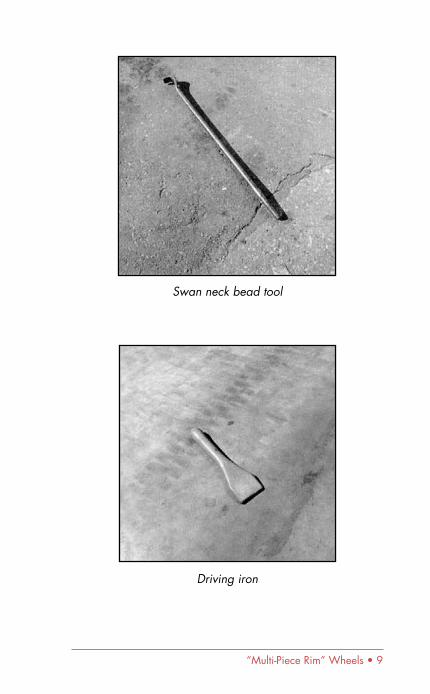
Swan neck bead tool
Driving iron
10 • “Multi-Piece Rim” Wheels
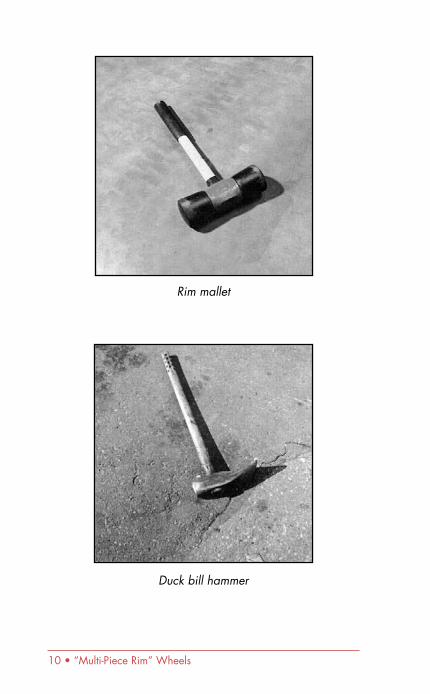
Rim mallet
Duck bill hammer
“Multi-Piece Rim” Wheels • 11
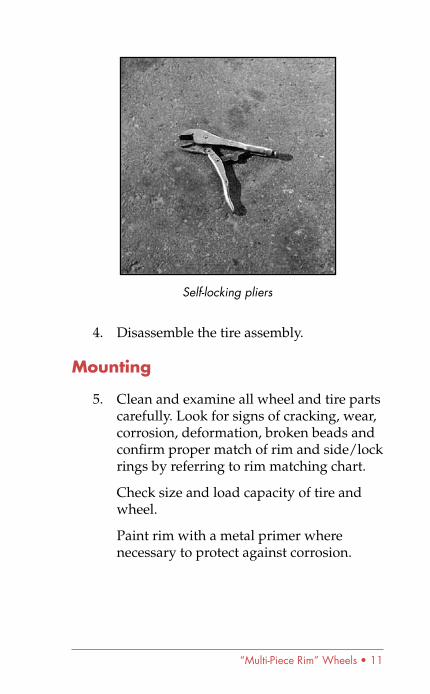
Self-locking pliers
4. Disassemble the tire assembly.
Mounting
5. Clean and examine all wheel and tire parts carefully. Look for signs of cracking, wear, corrosion, deformation, broken beads and confirm proper match of rim and side/lock rings by referring to rim matching chart.
Check size and load capacity of tire and wheel.
Paint rim with a metal primer where necessary to protect against corrosion.
12 • “Multi-Piece Rim” Wheels
Bent, cracked, worn or badly corroded parts must never be re-used. They can be deadly for you or the next person handling the wheel. Do not attempt to weld or braze wheel assemblies or components unless permitted by the manufacturer. Never weld on a rim with a mounted tire.
6. Reassembly
a. Lubricate tire beads and mating rim parts with an approved rubber lubricant.
b. Put the rim parts into place.
Lever or “walk” the locking rings into their grooves and check the fit of the metal parts. The end gap should be correct and the parts should not be loose.
c. Under no circumstances should you “air-up” a wheel if you are not sure that the locking rings or other components are in good condition and are positioned properly.
If you have any doubts at this point, disassemble and recheck all parts for:
• WEAR OR CORROSION
• DEFORMATION
• SIZE AND TYPE MATCH
“Multi-Piece Rim” Wheels • 13
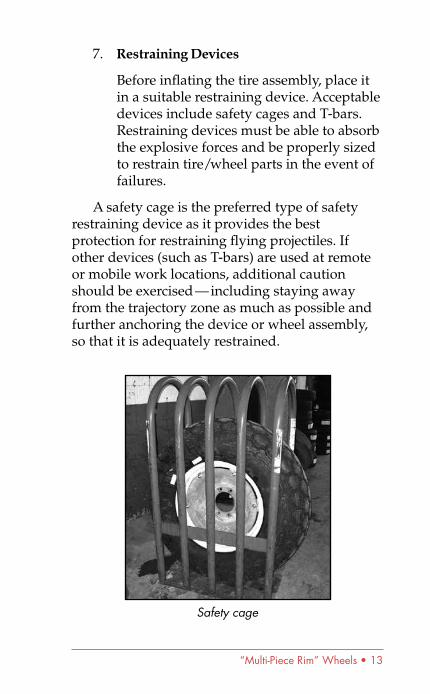
7. Restraining Devices
Before inflating the tire assembly, place it in a suitable restraining device. Acceptable devices include safety cages and T-bars. Restraining devices must be able to absorb the explosive forces and be properly sized to restrain tire/wheel parts in the event of failures.
A safety cage is the preferred type of safety restraining device as it provides the best protection for restraining flying projectiles. If other devices (such as T-bars) are used at remote or mobile work locations, additional caution should be exercised — including staying away from the trajectory zone as much as possible and further anchoring the device or wheel assembly, so that it is adequately restrained.
Safety cage

14 • “Multi-Piece Rim” Wheels
Safety T-bar
8. Inflate tire using a clip-on air chuck with an in-line valve and pressure gauge while standing outside the trajectory. Never leave an air line unattended while inflating a tire.
Clip-on air chuck with in-line gauge
“Multi-Piece Rim” Wheels • 15
a. With the tire in the restraining device, inflate to 10 psi (69 kPa), and check that the parts fit.
DANGER SIGNALS INCLUDE:
• Excessive play
• Ring end gap too wide or too narrow (see manufacturer’s instructions)
• Any apparent misalignment
b. Inflate to the recommended pressure.
c. If working with tube-type tires, deflate completely to avoid localized overstretching of the tube.
d. Reinflate to the manufacturer’s recommended pressure and recheck the tire assembly before removing it from the restraining device.
NOTE: When a tire has been driven flat or at 80% or less of its recommended pressure, do not reinflate it without first removing and disassembling the tire assembly to check for damage in the tire and wheel components.
9. Stay out of the trajectory when handling multi-piece rim tire assemblies.
16 • “Multi-Piece Rim” Wheels
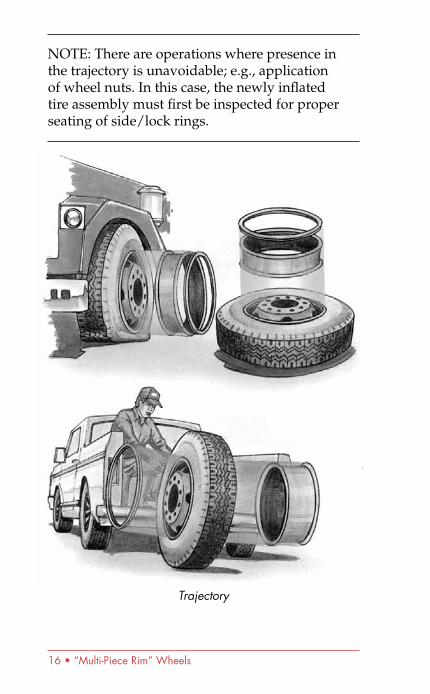
NOTE: There are operations where presence in the trajectory is unavoidable; e.g., application of wheel nuts. In this case, the newly inflated tire assembly must first be inspected for proper seating of side/lock rings.
Trajectory
“Multi-Piece Rim” Wheels • 17
10. Do not apply heat to a multi-piece wheel or wheel component.
11. Never pour or spray any flammable substance such as gasoline or ethyl ether into a tire and ignite it so that the resulting explosion seats the beads of a tubeless tire.
18 • “Single-Piece Rim” Wheels
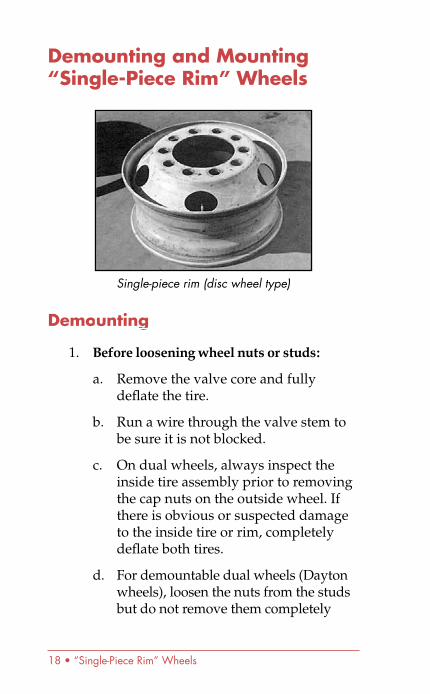
Demounting and Mounting “Single-Piece Rim” Wheels
Single-piece rim (disc wheel type)
Demounting
1. Before loosening wheel nuts or studs:
a. Remove the valve core and fully deflate the tire.
b. Run a wire through the valve stem to be sure it is not blocked.
c. On dual wheels, always inspect the inside tire assembly prior to removing the cap nuts on the outside wheel. If there is obvious or suspected damage to the inside tire or rim, completely deflate both tires.
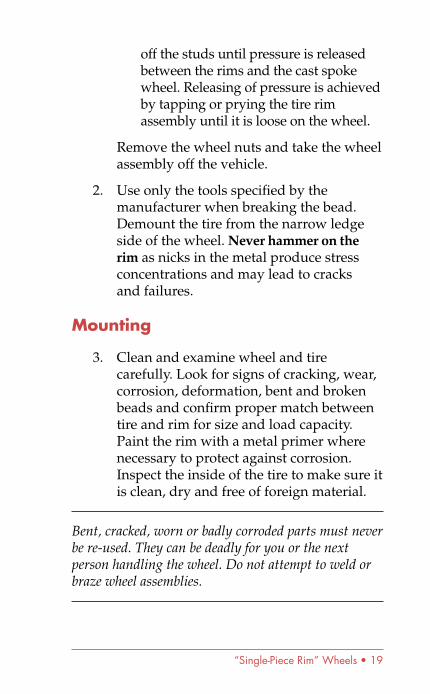
d. For demountable dual wheels (Dayton wheels), loosen the nuts from the studs but do not remove them completely
“Single-Piece Rim” Wheels • 19
off the studs until pressure is released between the rims and the cast spoke wheel. Releasing of pressure is achieved by tapping or prying the tire rim assembly until it is loose on the wheel.
Remove the wheel nuts and take the wheel assembly off the vehicle.
2. Use only the tools specified by the manufacturer when breaking the bead. Demount the tire from the narrow ledge side of the wheel. Never hammer on the rim as nicks in the metal produce stress concentrations and may lead to cracks and failures.
Mounting
3. Clean and examine wheel and tire carefully. Look for signs of cracking, wear, corrosion, deformation, bent and broken beads and confirm proper match between tire and rim for size and load capacity. Paint the rim with a metal primer where necessary to protect against corrosion. Inspect the inside of the tire to make sure it is clean, dry and free of foreign material.
Bent, cracked, worn or badly corroded parts must never be re-used. They can be deadly for you or the next person handling the wheel. Do not attempt to weld or braze wheel assemblies.
20 • “Single-Piece Rim” Wheels
4. Reassembly
a. Lubricate the tire beads and the mating rim surfaces with an approved rubber lubricant.
b. Work the tire beads one at a time over the rim flange from the narrow ledge side into the well of the rim using the proper tire tools.
5. Restraining Devices
WorkSafeBC recommends that before the tire assembly is inflated, it be placed in a suitable restraining device. Acceptable devices include safety cages and T-bars. Restraining devices must be able to absorb the explosive forces and be properly sized to restrain tire/wheel parts in the event of failures.
A safety cage is the preferred type of safety restraining device as it provides the best protection for restraining flying projectiles. If other devices (such as T-bars) are used at remote or mobile work locations, additional caution should be exercised — including staying away from the trajectory zone as much as possible and further anchoring the device or wheel assembly, so that it is adequately restrained.
6. WorkSafeBC recommends inflating the tire to the recommended pressure using a clip-on air chuck with an in-line valve and pressure gauge while standing outside the trajectory. Inspect the tire and rim for proper seating

“Single-Piece Rim” Wheels • 21
before removing the tire assembly from the restraining device. If the tire bead is not fully seated, deflate the tire completely and repeat the mounting procedure. Never leave an air line unattended while inflating a tire.
NOTE 1: If a bead expander is used, it must be removed before the valve core is installed and as soon as the tire assembly becomes airtight.
NOTE 2: When a tire has been driven flat or at 80% or less of its recommended pressure, inspect for damage. Inflate cautiously, as it may be subject to sidewall failure.
7. Stay out of the trajectory when inflating tire.
8. Do not apply heat to a wheel or wheel component.
9. Never pour or spray any flammable substance such as gasoline or ethyl ether into a tire and ignite it so that the resulting explosion seats the beads of a tubeless tire.
An example of one type of inspection for an aluminum rim prior to remounting. Refer to the manufacturer's
recommendations for rejection criteria.
22 • Installing a Tire Assembly
Installing a Tire Assembly
Disc Wheels
1. Check wheel studs for damage. Replace any damaged or distorted studs. For tire assemblies mounted to dual wheel axles, also check to ensure the maximum difference between the diameters of the tires does not exceed 1⁄4" or a circumferential difference of 3⁄4". Any difference in the diameter of dual wheels leads to excessive wear.
2. Check that the mounting surfaces on the wheels, studs, nuts and hubs are clean and smooth. Remove any grease, dirt, rust or burrs.
3. Use the proper cap nuts. Disc wheels can be stud or hub located and the cap nuts used with each type varies. Incorrect cap nuts may lead to loss of torque, broken studs and cracked wheels. Follow the manufacturer’s specifications.
4. Use the proper tightening sequence and torque levels. The tightening sequence and torque levels required will depend on the make and model of disc wheel. Always follow the manufacturer’s instructions.
5. After the first 80 to 160 kms of operation, recheck and retighten cap nuts to the recommended torque level using the proper tightening sequence.
Installing a Tire Assembly • 23
Demountable Tire Assemblies
1. Check all studs, clamps and spacer bands for damage. Replace any damaged or distorted parts. For duals, also check to ensure the maximum difference between the diameters of the tires does not exceed 1⁄4" or a circumferential difference of 3⁄4". Any difference in the diameter of dual wheels leads to excessive wear. In addition, it is important not to mix radials and bias ply tires on the same axle due to different load/deflection characteristics of these two types of tires.
2. Check that the mounting surfaces on the rims, cast spoke wheels, studs, nuts, clamps and spacer bands are clean and smooth. Remove any grease, dirt, rust or burrs.
3. Place the inflated tire assembly on cast spoke wheel.
For dual wheels, place the inside tire assembly on the cast spoke wheel as far as possible, then the spacer band and the outer tire assembly. Guard against misalignment.
4. Install the proper rim clamps and nuts.
5. Use the proper tightening sequence and torque levels. The tightening sequence and torque levels required will depend on the make and model of rim/wheel. Always follow the manufacturer’s instructions.
24 • Installing a Tire Assembly
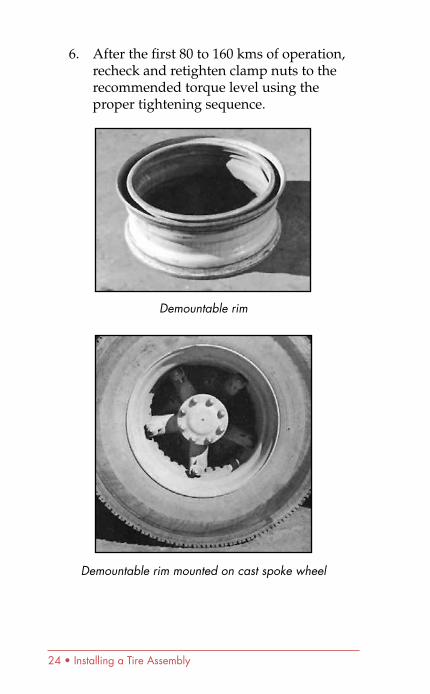
6. After the first 80 to 160 kms of operation, recheck and retighten clamp nuts to the recommended torque level using the proper tightening sequence.
Demountable rim
Demountable rim mounted on cast spoke wheel
WorkSafeBC officesVisit our Web site at worksafebc.com
Abbotsford2774 Trethewey Street V2T 3R1Phone 604.276.31001.800.292.2219Fax 604.556.2077
Burnaby450 – 6450 Roberts Street V5G 4E1Phone 604.276.31001.888.621.7233Fax 604.232.5950
Coquitlam104 – 3020 Lincoln Avenue V3B 6B4Phone 604.276.31001.888.967.5377Fax 604.232.1946
Courtenay801 30th Street V9N 8G6Phone 250.334.8765 1.800.663.7921Fax 250.334.8757
Kamloops321 Battle Street V2C 6P1Phone 250.371.60031.800.663.3935Fax 250.371.6031
Kelowna110 – 2045 Enterprise Way V1Y 9T5Phone 250.717.43131.888.922.4466Fax 250.717.4380
Nanaimo4980 Wills Road V9T 6C6Phone 250.751.80401.800.663.7382Fax 250.751.8046
Nelson524 Kootenay Street V1L 6B4Phone 250.352.28241.800.663.4962Fax 250.352.1816
North Vancouver400 – 224 Esplanade Ave. W. V7M 1A4 Phone 604.276.31001.888.875.6999Fax 604.232.1558
Prince George1066 Vancouver Street V2L 5M4Phone 250.561.37001.800.663.6623Fax 250.561.3710
Surrey100 – 5500 152 Street V3S 5J9Phone 604.276.31001.888.621.7233Fax 604.232.7077
Terrace4450 Lakelse Avenue V8G 1P2Phone 250.615.66051.800.663.3871Fax 250.615.6633
Victoria4514 Chatterton Way V8X 5H2Phone 250.881.34181.800.663.7593Fax 250.881.3482
Head Office / Richmond Prevention Information Line: Phone 604.276.31001.888.621.7233 (621.SAFE)
Administration:6951 Westminster HighwayPhone 604.273.2266
Mailing Address:PO Box 5350 Stn TerminalVancouver BC V6B 5L5
After hours health & safety emergency604.273.7711 1.866.922.4357 (WCB.HELP)
R13/09

R14/07 Printed in Canada BK62