sacd production sacd production guide guide€¦ · dsd "tips and tricks" 22 ... pyramix...
TRANSCRIPT

SACD Production Guide
Production GuideSACD

No part of this documentation may be reproduced in any form whatsoever or be stored in any data retrieval system without prior written permission of the copyright owners.
This documentation is supplied on an as-is basis. Information contained within this documenta-tion is subject to change at any time without notice and must not be relied upon.
All company and product names are ™ or Registered Trademarks ® of their respective owners. Windows Vista, Windows XP and Windows 2000 are trademarks of Microsoft Corporation.
Merging Technologies makes no warranties express or implied regarding this software, its qual-ity, performance, merchantability or fitness for a particular purpose. The software is supplied “as is” you, the purchaser, are assuming the entire risk of the results of using this Merging Technolo-gies software.
In no circumstances will Merging Technologies, its owners, directors, officers, employees or agents be liable to you for any consequential, incidental or indirect loss or damages including loss of time, loss of business, loss of profits, loss of data or similar resulting from the use of or inability to use the Merging Technologies hardware and or software or for any defect in the hardware software or documentation.
© Copyright Merging Technologies Inc. 2009. All rights reserved
Merging TechnologiesLe Verney 1070 Puidoux Switzerland
Tel: +41 21 946 04 44 • Fax: +41 21 946 04 45www.merging.com

SACD Production Guide : Contents 3
SACD Production Guide : Contents

SACD Production Guide : Contents Page 4
Overview 6System Configurations 6
DSD Projects Formats 6DSD project and DXD Mixing Project 6
I/O Hardware and Settings 7DSD Audio Input/Output 7
Synchronization Setting 9Software Settings 10
Sigma Delta Modulator Setting 10
DSD Surround Mapping 10DSD Project (64fs 1-bit) 11DXD (DSD 8fs) Mixing Project 11
Opening an Existing DXD Mixing Project 12
Opening an Existing DSD Project 13
Metering & Levels 13Maximum Allowable Signal, HF noise and DC levels 13
Creating a DSD 'Edited Master' 15Generating a DSD Master 15
Viewing DSD Edited Master Properties 19
DST: Encoding and Estimation 19DST Estimator 19
DST Encoder 20
SACD Text 20Delivery To an SACD Authoring Facility 21
DSDIFF Audio File Specifics 21
Information to Accompany Files 21
Hybrid SACDs 22
DSD "Tips and Tricks" 22One Last thing to Remember: 24
SACD Production Information 25Index 26

SACD Production Guide :
SACD Production Guide : Page 5
SACD Production Guide
Document: Pyramix™ SACD Production Guide 3.01
Date: 21st July 2009

Overview
With the DSD option, Pyramix is capable of recording, editing and mixing DSD audio to the full 'Scarlet Book' spec-ification for a 'DSD Edited Master' file.
In simplified terms, creating an SACD is a six-step stage process:
1. Create audio content in the DSDIFF file format (Record/Edit/Mix/Master)
2. Create an SACD 'Edited Master' file in the DSDIFF format
3. If applicable, use DST encoding to increase disc capacity.
4. Authoring, including the creation of SACD Text
5. Creation and verification of an SACD 'Cutting Master' file
6. Manufacturing
This guide will focus on using Pyramix to create and deliver audio content to an SACD authoring facility. Because Pyramix DSD behaves almost identically to the PCM version, it is assumed that you are familiar with the basic oper-ation of Pyramix, including the use of PQ markers and the mixer. There are also helpful references to further infor-mation about steps 2, 3 and 4, presented in various parts of this guide.
Although you might think that this format produces a rather large quantity of data, DSD produces the same amount of data that 32bit / 88k2 requires for on-disk storage in Pyramix (1 bit*64fs = 32 bit*2fs = 16 bit*4fs, etc.). Pyramix V 4.2 can handle up to 8 I/O channels (8 input + 8 Output) of DSD audio.Three system configurations will be available:
System ConfigurationsWith 1 Mykerinos board, two channels of DSD I/O are available
With 2 Mykerinos boards, eight channels of DSD I/O are available
With 4 Mykerinos boards, sixteen channels of DSD I/O will be available in the soon to be released V 5.0
Note: The actual number of playable 'Tracks' in the EDL will vary with host CPU power, Disk I/O bandwidth and the number of Mykerinos cards
DSD Projects Formats
DSDIFFThe ‘native’ format of DSD audio is a 1-Bit data stream with a sampling rate of 2.8224 MHz (or 64 times 44.1 kHz also known as 64fS). Pyramix stores the data in the DSDIFF format (Direct Stream Digital Interchange Format) The file extension is ".dff", which has been defined by Sony and Philips. Although you might think that this format pro-duces a rather large quantity of data, DSD produces the same amount of data that 24bit/88k2 requires for on-disk storage in Pyramix (1 bit 64fs = 32bit 2fs).
DSD project and DXD Mixing ProjectA 1 Bit audio stream such as DSD cannot be mixed or edited directly. (at least no-one has found a way of doing it yet without ending up with more bits which then have to be converted back to a 1 bit stream). Therefore, two dif-ferent types of DSD sessions have been defined:
DSD 64fs ProjectIn a DSD Project you can:
• Record and Playback pure 1-bit 64fs DSD audio.
• Overdub (without listening to real-time edits in source material)
• Audition final ‘Edited Master' DSD files in pure DSD mode with no unnecessary conversions and with the lowest Annex-D (40k-100k) noise.
SACD Production Guide : Overview Page 6

DXD (DSD 8fs) Mixing ProjectMerging has adopted the official Philips DXD format for DSD editing, which is recognised and accepted by Sony. DXD stands for Digital eXtreme Definition. This is an 8fs 32 bit float format, offering several advantages for mix-ing and processing DSD audio.
In a DXD Mixing Project you can:
• Edit and mix DSD audio (with effects) in real time.
• Seamlessly punch-in/out and overdub recording while listening to previously edited material. All record-ing in this mode is still at 64fs. The edited material is transcoded via 8fs for real-time playback during the overdubbing.
When you create a new Pyramix project in order to work with DSD audio, you will need to choose one of the above session types.
I/O Hardware and Settings
DSD Audio Input/OutputIn order to be able to physically input and output DSD audio to and from Pyramix, an A/ D and D/A converter is required. Currently available DSD converters mainly use the SDIF or AES/EBU formats for the digital transfer of the DSD signals, and thus an SDIF or AES/EBU daughter card is required in order to connect one of these external con-verters to Pyramix. Due to the high sample rate, a DSD stream has to be distributed across several AES/EBU pairs.
Selecting I/O formatAssuming you have both SDIF and AES/EBU cards in your system you must first choose either SDIF or AES/EBU for your DSD audio connections. To do this you must first close Pyramix and open the VS3 Control Panel. On the DSD tab, you'll find the Daughter Card Priorities setting. Simply select the one that you require and click on Save when you close the VS3 Control Panel. If necessary, you may set the input format to be different from the output format.
DSD to AES/EBU MappingsTwo different mappings have been defined thus far:
• The Sony format transmits up to 3 channels of DSD audio over 4 AES/EBU pairs.
• The P3D format transmits up to 2 channels of DSD audio over 3 AES/EBU pairs.
SACD Production Guide : I/O Hardware and Settings Page 7
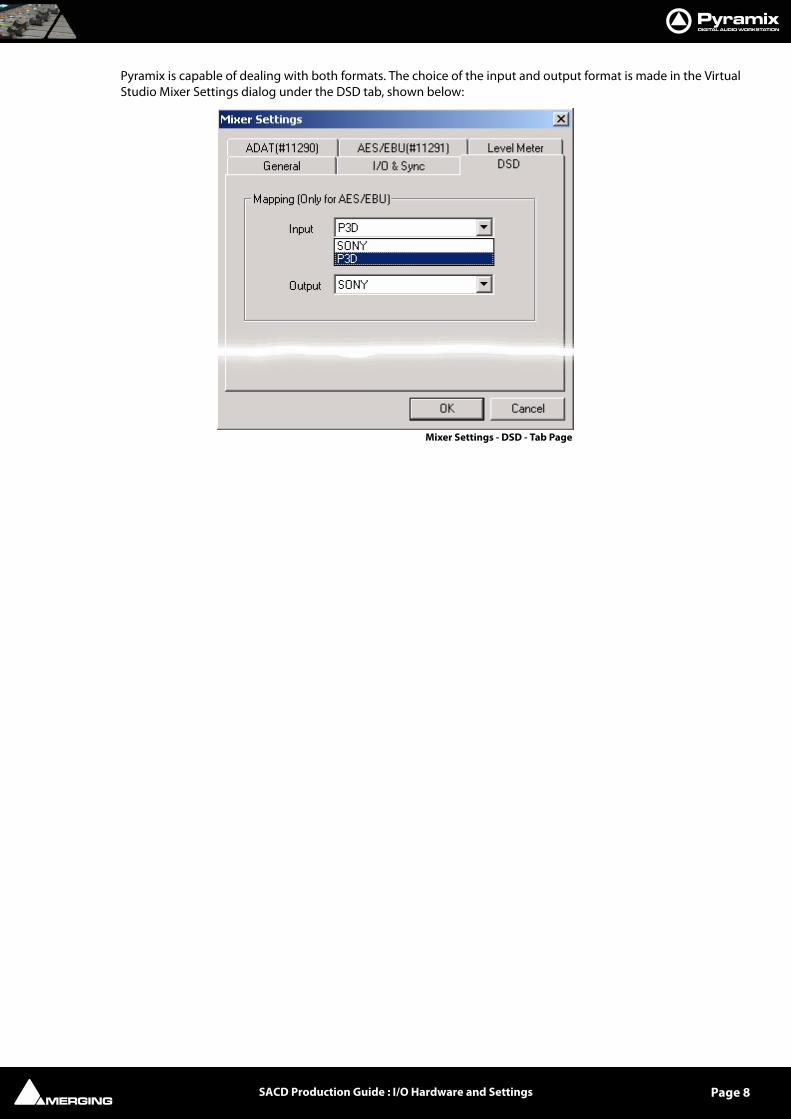
Pyramix is capable of dealing with both formats. The choice of the input and output format is made in the Virtual Studio Mixer Settings dialog under the DSD tab, shown below:
Mixer Settings - DSD - Tab Page
SACD Production Guide : I/O Hardware and Settings Page 8

The following table shows how the eight possible input/output DSD streams are mapped to the I/O's of the AES/EBU daughtercard in the Sony format
This table shows how the eight possible input/output DSD streams are mapped to the I/O's of the AES/EBU daugh-tercard in the P3D format:
As may be seen, using the P3D format, only six channels can be transmitted to or from Pyramix.
SDIF SettingsPyramix allows for the use of either SDIF-2 or SDIF-3 protocols when using an SDIF daughter card for DSD. Which one to use will depend on your A/D and D/A converter. Check with your A/D & D/A converter manufacturer to determine which format to use. If you hear distorted audio on playback (and it isn't intentional!) then try selecting the other option. These settings can be found within the relevant SDIF daughter card's tab in the mixer settings window.
Synchronization Setting
All the DSD capable A/D and D/A converters we have tested to date generate and expect Wordclock at the stan-dard nominal 44.1 kHz frequency and not at 88.2 kHz. Therefore Pyramix MUST be set to expect 44.1 kHz Word-clock reference when operating in DSD mode and slaving to an externally generated Wordclock signal.
DSD stream number AES/EBU input/output pair AES/EBU I/O numbers
1-3 1-4 1/2, 3/4, 5/6, 7/8
4-6 5-8 9/10, 11/12, 13/14, 15/16
7,8 9-12 17/18, 19/20, 21/22, 23/24
DSD stream number AES/EBU input/output pair AES/EBU I/O numbers
1,2 1-3 1/2, 3/4, 5/6
3,4 5-7 9/10, 11/12, 13/14
5,6 7,8 17/18, 19/20, 21/22
Mixer Settings - SDIF Card - Tab Page
SACD Production Guide : Synchronization Setting Page 9

Failure to do this prevents Pyramix from properly locking to the external source and correctly decoding the incom-ing DSD bit streams. This results in full scale digital noise on the outputs.
Important! You must ensure the "Wordclock is Input at 44.1k x 2" checkbox is NOT checked when oper-ating in DSD mode.
Software Settings
Sigma Delta Modulator SettingTwo user selectable types of Sigma Delta Modulator algorithm are currently supplied. SDM type B is the original and under certain circumstances may be preferable to SDM type D, which is the default setting. There will be more SDM variations available in the future.
Either type may be chosen per channel or for all channels.
However, in most situations we recommend using the default SDM D (dithered) modulator, which offers the best clarity for most programme material.
To select the type of SDM, open the Record Tab from the Project Information and Settings window.
Project > Information & Settings: RECORD
Pressing the Settings button opens this pop-up window:
Select the desired SDM using the drop-down lists. If the Same SDM for all channels box is checked only Channel 1 can be selected, the rest are greyed out. The Channel 1 setting will then apply to all channels.
DSD Surround Mapping
Pyramix' surround bus outputs are arranged as L/C/R/SL/SR/LFE.
Mixdown Options SDM Dialog
SACD Production Guide : Software Settings Page 10

However, the SACD standard uses a different order, namely: L/R/C/LFE/SL/SR. When creating a DSD surround 'Mix-down' using DXD mode, Pyramix will re-arrange the order of the channels in the output file to match the SACD standard.
However, when importing a pre-existing surround mix you have to arrange the outputs in L, R,C, SW, SL, SR order (6 channel master) or L, R, C, SL, SR (5 channel master). For 2.1, 3.0, 3.1 and 4.0 you must add enough 'dummy' channels (actual DSDIFF files of silence) so that your final multi-channel DSD file has 5 channels. If you wish to make a 4.1 channel disk, then you will have to add a dummy file for the channel that you are leaving out of the standard 5.1 configuration (in this case, probably the centre channel.)
If you are mastering previously mixed surround DSD material, then you can use either the surround output buss, or a multi-channel mono/stereo buss, making sure that you have arranged the channels in the appropriate order. In terms of DSP usage, the surround mix buss is slightly more efficient than the multiple mono/stereo mix busses.
DSD Project (64fs 1-bit)
In this type of project, Pyramix acts as a pure DSD recorder/playback device without any real-time digital editing or level changing capabilities. The Virtual Studio Mixer really only functions as a DSD signal router in this mode, despite the appearance of the interface. The incoming DSD streams are stored directly on the hard disk using the native 1 Bit / 2.8224 MHz format. The maximum number of discrete I/O channels, which can be recorded or played back simultaneously, is two on a system with 1 Mykerinos board or eight on a system with 2 boards or more boards and 16 on a system with 4 or more Mykerinos boards, when this option becomes available.
DXD (DSD 8fs) Mixing Project
The DXD Editing Project enables you to do real-time editing, mixing and processing of DSD audio. Since it is impossible to do these mathematical operations on 1-Bit streams, the DSD audio data streams are first transcoded into a DXD 32 Bit floating point / 352.8 kHz format. (352.8 kHz is eight times the standard sampling rate of 44.1 kHz or 8fS.) This format maintains the excellent noise floor and transient response performance of DSD. The signal remains in this format until the output of the mixer, where a final re-modulation step occurs which transcodes the resultant signals back to the 1 Bit / 64fs/2.8224 MHz format.
DSD Project signal flow
SACD Production Guide : DSD Project (64fs 1-bit) Page 11

The transcoding processes are carried out in real time by the host PC and the Mykerinos DSP card, respectively.
Apart from the specific DSD mode I/O capabilities, (depending upon the number of Mykerinos boards) you can use all the editing and mixing functions of Pyramix as well as all the DSD capable native plug-ins.
The Algorithmix 'De-Noiser/De-Scratcher' native plug-ins are limited to 96KHz PCM operation.
Opening an Existing DXD Mixing ProjectWhen an existing DXD Mixing Project is opened, Pyramix offers the choice of opening it as either a DSD (DSD 64fs) project or a DXD (DSD 8fs) Mixing Project.
Would you like to convert this DXD Mixing Project into a DSD only Project ?
If the answer is YES the project will be opened in DSD mode and the DXD mixer will be replaced by a default mono mix 8x8.
If the answer is NO the project will be opened in DXD Mixing mode as it was created
DXD Mixing Project signal flow
Convert DXD Mixing Project to DSD Project mode? Dialog
SACD Production Guide : DXD (DSD 8fs) Mixing Project Page 12

Opening an Existing DSD ProjectWhen an existing DSD project is opened, Pyramix offers the choice of opening it as either a DXD (DSD 8fs) project or a DSD (DSD 64fs) project.
Would you like to convert this DSD Mixing Project into a DXD Mixing Project ?
If the answer is YES the project will be opened in DXD Mixing mode. (Though all your media files will remain in DSD IFF format)
If the answer is NO the project will be opened in DSD Project mode as it was created
Metering & Levels
Metering AlgorithmPeak level metering in DSD Recording mode uses a true Annex-D compliant metering algorithm. This meter offers both high peak accuracy (within +/-0.1 dB) above -12 dB and good out-of-audio band noise rejection under - 15 dB for accurate background noise checking.
Reference LevelAll DSD peak-meters are aligned to "0 dB SACD". The SACD reference level ("0dB SACD") is defined as -6dB FS PCM. Final DSD Edited Masters can have levels as high as +3.1dB SACD, a.k.a -2.9dB FS PCM for very short durations. In practice, for safety, we recommend a general rule of not going over 0 dB SACD. Levels higher than this value will be clipped if using the same master for doing the CD layer of the SACD master and might also have an adverse effect on SACD playing time. Even worse, such a master may be rejected by SACD manufacturing facilities.
Noise ShapingDSD requires a considerable amount of ultrasonic noise-shaping to maintain it's highly linear in-band audio qual-ity. To pass ‘Scarlet Book’ compliance testing, this noise must be kept below a strictly defined maximum accept-able level.
Maximum Allowable Signal, HF noise and DC levels
Signal Level (a.k.a. modulation level)Maximum Peak should only very occasionally be allowed to reach +3.1 dB with respect to the SACD 0dB Audio Reference Level in accordance with Annex D3. As a general rule, we recommend keeping the Maximum. Peak level at 0 dB SACD.
Annex D (40-100kHz) Noise LevelHF Noise should be below -20dB with respect to the SACD 0dB Audio Reference Level in accordance with Annex D4 of the SACD 'Scarlet Book.'
DC levelIt is recommended that the DSD DC Offset is less than - 50 dB with respect to the SACD 0dB Audio Reference Level in accordance with Annex E4 of the SACD 'Scarlet Book.'
Convert DSD Project to DXD Mixing Project mode? Dialog
SACD Production Guide : Metering & Levels Page 13

Meter Frequency RangePyramix allows you to specify the bandwidth for it's signal level meters, so that the ultrasonic noise levels can be monitored for proper compliance:
DSD Peak Filter frequency range is chosen from the drop down menu in the Mixer Settings : Level Meter page.
If you are viewing the Pyramix VU meter plug-in in an SACD mastering project, then only use the Peak meter dis-play (not the VU) to determine the correct maximum signal levels (0-20KHz) for Scarlet Book compliance. To view the 40KHz-100KHz HF noise band, use only the VU meter display, as this noise measurement is specified using the RMS method.
Viewing the 40kHz - 100kHz BandThis VU meter plug-in can also be configured to display the 40K-100k band, allowing you to use both the VU meter plug-in and the built-in Pyramix metering to simultaneously view the 0-20KHz band and the 40-KHz-100KHz band. Please see the Tips & Tricks section for details.
Red Book CD ImageWhen creating the Red Book CD Image, there are no level changes between the PCM data displayed at 352.8 kHz and the PCM data displayed at 44.1 kHz. However, there may be a small difference of the peak value (0.1 to 0.2 dB) due to the filtering out of high frequency noise content, which is still present at 352.8 kHz but obviously removed
Mixer Settings - Level Meter Tab Page
SACD Production Guide : Metering & Levels Page 14

at 44.1 kHz. The + 6 dB gain makeup is already introduced when converting from DSD to PCM in the DSD editing mode. Therefore, exceeding '0dB' SACD will result in a clipped 44k1/16 bit (Redbook) file.
Creating a DSD 'Edited Master'
OverviewA DSD 'Edited Master' is a specific type of DSDIFF file that is used to deliver audio content to an SACD authoring facility. All audio is stored in one multi-channel file of 2, 5 or 6 channels. In its file header is the data that will be used for creating a 'Scarlet Book' compliant SACD disc image, including:
• Loudspeaker configuration (2, 5 or 6 channel)
• Markers (Start, stop, index)
• Edited Master ID
• Artist
• Title
More information about the DSDIFF EM (Edited master) can be found in Chapter 4 of Specifications DSD Inter-change File Format. This document can be downloaded from the Philip's SACD web site:
http://www.superaudiocd.philips.com/InformationCenter/NO/FArticleSummary.asp?lNodeId=3404&channel=3404&channe-lId=N3404A3601
Generating a DSD MasterA DSD master can be generated in two different ways: via Render mode or Mixdown mode, both of which are available in the Project > Generate CD/SACD Edited Master dialog. The Target Settings, Image Format combo box offers the choice of:
• CD Image (Red Book)
• SACD Edited Master - Rendering Mode
• SACD Edited master - Mixing Mode
Method 1 : Creating an 'SACD Edited Master' using 'Render' mode:Choose the SACD Edited Master (Render) method if you have a project that only requires fades/cross fades and clip-based level changes, i.e. none of Pyramix' mixing capabilities are required.
Note: ‘Render’ mode can only apply level changes (fade in, fade out, crossfades and clip gain). No panning, channel routing, equalization or other effects will be applied. These fades and level changes cannot be auditioned in real time in DSD 64fs mode, use DXD 8fs mode. Using 'Render' mode, only audio that occurs during a fade, crossfade or level change is processed at 8fs. Otherwise, the source, 64fs DSD audio, is copied unchanged into the DSD 'Edited Master' file. Additionally, the source audio for this export function must be entirely DSDIFF format. Failure to heed this warning will result in nasty noises in your master file!
Here are some specific procedures that must be followed to create a valid DSD 'Edited Master' file, before using 'Render' mode:
• Make sure the first clip/audio starts at or after 00:00:02:00, because the SACD export module starts pro-cessing at 00:00:00:00 and requires this 'pre-roll' time of at least two seconds. Silence will be added from this point on when there is no audio clip available.
• Place CD start and stop (if applicable) markers as necessary. In Render mode, these markers must only be in the Project timeline and not in a specific track group. Place the CD start markers at least 7 frames before the start of the audio, due to the slow fade in time of some SACD players.
SACD Production Guide : Creating a DSD 'Edited Master' Page 15

• Remember, an SACD 'Edited Master' needs at least 1 SACD track as defined by your PQ marker placement.
Now you're ready to create the SACD 'Edited Master' file. Choose Project > Generate CD Image/SACD Edited Master. Then select SACD Edited Master - Render from the Image Format combo box. This method includes full management of Track and Index offsets, as created in the Pyramix EDL, as well as the ability to generate a standard DSDIFF Edited Master in any of the SACD supported channel configurations (2, 5 and 6 channel)
PQ marker Placement
SACD Production Guide : Creating a DSD 'Edited Master' Page 16

To generate a multi-channel DSD Edited Master with the Render mode, the tracks in the EDL must be arranged in this order:
• L, R, C, LFE, SL, SR (6 channel master) on Pyramix EDL tracks 1 through 6
• L, R, C, SL, SR (5 channel master) on Pyramix EDL tracks 1 through 5
• L, R (2 channel master) on Pyramix EDL tracks 1 and 2
For "Non-standard" masters (3.0, and 4.0), you must add enough 'dummy' channels (actual DSDIFF files of silence) so that your final multi-channel DSD file has 5 channels. If you wish to make a 2.1, 3.1 or 4.1 channel disk, then you will have to add a dummy file for the channel(s) that you are leaving out of the standard 5.1 configuration
Method 2 :Create an SACD 'Edited Master' using the full set of mixing tools in PyramixAdd your PQ markers as necessary. Unlike the Render method, there is no requirement for the audio to be placed at a specific start time in the EDL. You should still maintain a 7 CD frame offset before any PQ start marker.
Choose Project > Generate CD Image / SACD Edited Master. This opens a dialog box with the same name. The DSD IFF Settings button allows you to choose which modulator will be used to convert the 8fs audio back to 64fs, 1 bit. Leave this on the SDM D setting unless you have a specific reason to do otherwise.
If you are choosing to output this Project as a CD image (Redbook) file, choose the Sampling Rate Conversion Quality and Noise Shaping Order that you require. In general, the 8th order dither works best for a wide variety of material and therefore is the default setting.
Generate CD Image / SACD Edited Master - Render mode Window
SACD Production Guide : Creating a DSD 'Edited Master' Page 17

Both stereo and multi-channel SACD Edited Master files can be created this way, but, of course, a Redbook CD can only be created from a 2-channel source. This 2-channel source could be any two channels listed in the Mix Sources section.
If you choose this method to make your Edited Master file, the EDL audio may be in either DSDIFF or DXD 352k8 PCM formats. Therefore, any up-converted PCM projects will use this method for SACD Edited Master creation.
Non-Standard MastersCreating a Non-standard output file (2.1/4.0, etc.) in Mixdown mode is simple - just avoid assigning or panning any audio to the unwanted output busses and perform a multi-channel Generate CD/SACD Image-Mixdown Mode command as you normally would. The resultant DSD Edited Master file will contain the necessary channels of 'digital silence'.
Generate CD Image / SACD Edited Master - Mixing mode Window
SACD Production Guide : Creating a DSD 'Edited Master' Page 18

Viewing DSD Edited Master PropertiesAfter you have successfully created the DSD Edited Master file, A DSD Info plug-in allows the properties of this type of file to be viewed in Windows Explorer. Right-click on any DSD file and select Properties, then choose the DSD / DST info tab. When Pyramix DSD is installed, this extra function is automatically installed into Windows Explorer.
DST: Encoding and Estimation
DST, or Direct Stream Transfer ™, is Philips' lossless encoding system that reduces the amount of data that needs to be stored on the SACD disk. On playback in an SACD player, the compressed data is re-constituted exactly as it was prior to the DST encoding. The direct benefit of this lossless encode /decode process is extended playing time on an SACD.
DST EstimatorYou may wish to use the built-in DST Estimator to determine the final 'on-disk' file sizes of your project. If you have both multi-channel and stereo programmes, (destined for one SACD disk) that exceed sixty minutes in length, this would be a very useful test to perform.
Using DSD Estimator
Windows Explorer DSD /DST Info Plug-in
SACD Production Guide : DST: Encoding and Estimation Page 19

After creating your SACD Edited Master file, go to the Media Management window and right-click on this newly created file. One of the options will be a DSD Estimator - simply follow the directions in the DST Estimator win-dow, as shown below:
DST EncoderIf you wish to use the built-in DST Encoder, then the following procedure should be used:
In the Media Management window, right-click on the DSD Edited Master file that you wish to encode and then choose the DST Encoder. For Encoding Strategy, choose 00 or 01 for a stereo DST file, 00122 for a 5 channel DST file or 001233 for a 6-channel DST file.
Note: If the DSD file that you are attempting to estimate or encode is not a true SACD Edited Master then the right-click options will be greyed-out.
After a minute or two of calculation, the remaining time to create the DST file will be displayed along with a Progress Bar. Depending upon the number of channels to be processed, this procedure can take several hours for a six channel file. The processing speed is also highly dependent upon how powerful the PC is.
CheckingIn Pyramix, there is no way to play (QC check) the DST- encoded file, so we do not currently recommend sending masters to an authoring facility in the DST format.
SACD Text
The Super Audio CD specification supports text information on both layers of a hybrid SACD. For the DSD layer the information can be album specific details such as album name, track title, performer, composer, arranger, etc. The text information can be created via the Philips Super Audio CD Text Editor program or the Sony SACD Text Edi-tor program. Both of these programs are free of charge and can be downloaded from their respective web sites:
http://www.superaudiocd.philips.com/InformationCenter/NO/FArticleSummary.asp?lNodeId=2560&channel=2560&channe-lId=N2560A3400
This application runs under Windows NT/2000/XP and comes with full documentation and 'Wizard' support.
http://www.sonyoxford.co.uk/pub/dsd/sacd-txt-ed/index.html
(Then follow the instructions)
Saving SACD Text FilesA text file generated by one of these two editors should be saved in the *.stt file format and written to the same tape that contains the DSD files it refers to. The native file format for the Philips editor is a *.lbm file, so use the Save As STT File command in the Action menu to create the appropriate file type.
DST Estimator Window
SACD Production Guide : SACD Text Page 20

Alternately, you can send this file separately on a floppy disk or via e-mail directly to the authoring facility.
Delivery To an SACD Authoring Facility
Currently, DSD 'Edited Masters' are best delivered on AIT I or II tapes, using 'Windows Backup' software on either Windows NT, 2000 or XP. The following information should be included on the submitted tape:
• .stt format SACD Text file (one for each disc in the album)
• DSD Audio content (Stereo only or Stereo and Multi-channel) Audio format: DSDIFF EM files with a .dff extension
DSDIFF Audio File Specifics
StereoA stereo file (obviously!) contains two channels: SLFT, SRGT
6 ChannelA six-channel master file is required for:
• '5.1' a.k.a. '3/2/1' programme: MLFT, MRGT, C, LFE, LS, RS
• '4.1' a.k.a. '2/2/1' programme: MLFT, MRGT, Digital Silence, LFE, LS, RS
• '3.1' a.k.a. '3/0/1' programme: MLFT, MRGT, C, LFE, Digital Silence, Digital Silence
• '2.1' a.k.a. '2/0/1' programme: MLFT, MRGT, Digital Silence, LFE, Digital Silence, Digital Silence
5 ChannelA five-channel master file is required for:
• '5.0' a.k.a. '3/2/0' programme: MLFT, MRGT, C, LS, RS
• '4.0' a.k.a. '2/2/0' programme: MLFT, MRGT, Digital Silence, LS, RS
• '3.0' a.k.a. '3/0/0' programme: MLFT, MRGT, C, Digital Silence, Digital Silence
Both the Stereo and multi-channel audio files for a project can be written to the same tape.
Information to Accompany FilesThe following essential information should be supplied with the AIT tape (written on insert card of tape):
1. Label
2. Catalogue number
3. Performer(s)
4. Album
5. Number of discs in album
6. Stereo or stereo & multi-channel
7. In case of multi-channel: the number of channels
Hybrid SACDsIf you are making a hybrid SACD that includes a 'Redbook' layer, then this programme should be submitted on a Redbook CD-R, DDP on Exabyte tape or a Sony 1630 tape. Check with the authoring facility to determine the best format for submitting this material.
SACD Production Guide : Delivery To an SACD Authoring Facility Page 21

DSD "Tips and Tricks"
How To:…Configure Pyramix' metering to view both the 0-20KHz band and the 40KHz-100KHz band simultaneously:1. You'll need to have your DSD project open in the DXD Mixing Project mode to use this trick.
2. Insert a 'VU Meter' plug-in on the output buss.
3. Next, open the VU meter and click the middle mouse button until only the red-colored meter display is shown (VU)
4. Right-click on the VU meter plug-in and left-click on the 'Scale' tab.
5. Select the 40k-100k band at the bottom of the window
6. Go to the 'Align' tab and drag the 'VU Ref' slider fully to the right ('0dB')
7. Now, the basic Pyramix level meter on the channel strips will show the in-band audio level and the 'VU Meter' plug-in will show the ultrasonic noise level.
…Speed up the process of DSD 'Edited Master' creation(if you only want to change levels and/or perform fade/cross fade edits with no mixing required)
First, open your project as a DXD Mixing Project; Then using the Change Clip Gain command, adjust the levels of the audio clips in the EDL as desired, but do not use the mixer itself for this task. Finally, as described above, choose the SACD Edited Render mode (File > Generate CD Image/SACD Edited Master/Image - Format = 'Ren-der')
…Change the DSD editing project EDL to a different sample rate.(If you want to use an external DSD to PCM converter and create a 'Redbook' CD Image.)
This no longer strictly necessary in Pyramix 4.2, as a Redbook CD Image can be created directly from the Gener-ate CD/SACD Image dialog. However, you may have other reasons to use an external DSD to PCM converter.
First, turn off Auto-Ripple and make sure that the Markers/Tracks Sync indicator says Markers Locked. Next, make sure that the audio that you have already externally converted to 44k1Hz/16 bit PCM is available in the Media Management window (This is also the DSD project used to generate the DSD 'Edited Master' file that was the source for the now-converted 44k1Hz/16 bit audio). Drag this file into the EDL of the DSD project that you are going to convert You'll notice that it appears to be acceptable in this EDL, even though it is at a very different sam-ple rate. (Playback will be 8x faster!) That's ok, because we just want to line it up visually with the existing DSD audio.
Having matched the visual positioning between the DSD and PCM audio, place text markers at the beginning and end of the PCM file. Choose Save As and call the project something descriptive like "DSD Project_PQ_conform_converted_PCM44k1".
Now the interesting part: remove all of the audio and choose File > Convert Project. Select the settings that you require ( the defaults will probably all be OK) and invoke the conversion. In a second or two, you now have a 44k1 PCM project. Go to the Media Management window (or the library) and drag in the previously noted PCM file, lin-ing it up with the markers that we placed at the head and tail of the file.
Now, that delicate and tedious PQ marker placement that you did for the DSD audio is exactly available for your externally converted 44k1/16 bit audio file. There is no need to use this method when converting to or from one PCM sample rate to another: You can just change the sample rate in the Mixer Settings window or use the Con-vert Project command, whichever is appropriate to your project.
…Use Pyramix 'Render' EffectsAll ‘Render' effects (Project > Render) are available in Pyramix DSD, with the exception of the Direct-X/VST 'FX Rack'. Algorithmix' Nova (spectral interpolator) works with up to eight simultaneous channels, as will the Prosoniq MPEX time and pitch manipulation plug-in.
…Drag in a CD image to visually conform a DSD re-master
SACD Production Guide : DSD "Tips and Tricks" Page 22

Simply drag the imported CD audio file (Project > Import choose CD Import) from the Media Management win-dow into the Pyramix Timeline and don't assign it to any mixer inputs. Zoom in to a level appropriate for match-ing the existing DSD material with the CD. Just remember to mute the CD tracks or remove them prior to any mixing or image creation tasks.
…Edit and add PQ markers to both 2 and 6 channel programme simultaneouslyUsually, the two and six channel material will be musically identical. If you have editing tasks or 'Render' type pro-cessing that is common to both stereo and multi-channel programme, then simply line them up in the EDL and group all eight tracks by creating a track group and then assigning all eight tracks to that group. Edit as necessary and then add your PQ marks and CD/SACD Text information. Save the project under two different names, using the Save As command and then delete the stereo material from the multi-channel project and vice versa. Keep a copy of the eight-channel original, just in case…
This allows you to only add PQ marks once and ensure timing consistency between your 2 channel and multi-channel programmes. If you include the above tip about visually conforming an imported CD then you can do all three programmes at once!
…Do multiple processing passes, avoiding ultrasonic noise build-up It is extremely important to keep the number of re-modulation steps to an absolute minimum. A re-modulation occurs every time a DSD file is processed in Pyramix and this causes additional ultrasonic noise to be generated. If you know you will be applying multiple processes to a DSD file, then we suggest that you use Pyramix to keep these files in DXD 352k8/32 bit 'PMF' file format until the final 'Mixdown' or CD Image /SACD Edited Master gener-ation. So, simply choose 'PMF' and '32 bit' for each time you need to manipulate the audio and then DSD file for-mat ('Mixdown' function) or Generate CD Image/SACD Edited Master for the final step. Your final Mixdown (If you remembered to choose the DSD file format!) or Edited Master Generation automatically re-modulates the DXD 32-bit 'PMF' audio back to 1 bit DSD.
Another reason to use this approach would be where there is insufficient DSP power to do all of the required pro-cessing in one pass. Using this format, there will be no sonic penalty for multiple 'Mixdown' and/or Rendering passes...
…Convert PCM (at any supported sampling rate) to DSDDSD is a very bit-efficient format for storing high-resolution audio on a disk. Converting PCM to DSD for release on an SACD allows the maximum quality to be extracted from your PCM sources, regardless of the original sampling rate (especially if you are creating surround projects at 176k4 or 192k sampling rates.)
There are a several different ways to achieve this conversion, depending on both the source audio and your mixer configuration. Please be aware that Pyramix DSD uses a lot more DSP resources than a 1fs or even 2fs PCM project does. For this reason, the project that you want to convert to DSD should not use any internal busses or use a mixer 'matrix' larger than 8 inputs and 8 outputs.
If your existing PCM project's mixer doesn't meet these criteria, then perform a normal 'Mixdown', at the current sampling rate, placing the mixed audio in the EDL. Save a copy of the project with only the mixed audio remaining in the EDL and proceed to the 'Basic Method' section below.
'Edit density' of the EDL is not an issue, just the desired number of playback tracks, which will vary from a mini-mum of eight, which is standard, to possibly sixteen, if you have a very fast PC with Ultra320 SCSI capability.
Basic Method
1. Save the project under a new name, indicating the conversion to Pyramix DSD.
2. From the Project menu, choose Convert and select 352.8 KHz and PMF'
3. If you wish to save disk space, then choose Consolidate and a handle length that will allow you to manipu-late your edits as necessary. At 32-bit resolution, 352k8 sampling rate audio requires 84.7 Megabytes per track minute.
4. Invoke the conversion and take a break - this may take a while!
5. When completed, the EDL will look just like it did at the old sampling rate, prior to this 'Project Conversion'.
6. Create a new Global Library (see the main User Manual) and Alt-Shift drag the entire EDL into this new library. Give the library entry a name and save/close the existing project.
SACD Production Guide : DSD "Tips and Tricks" Page 23

7. Create a new DXD Mixing Project and configure the EDL and mixer as necessary. If you create a Template file for this kind of project, you can save some time and effort for future conversions.
8. Open the Pyramix Library that you created in Step 6 and drag the relevant library item into the Timeline
9. Now you can follow the procedure for a creating a DSD Edited Master file using the Generate CD Image / SACD Edited Master (Mixdown)' method, described elsewhere in this guide.
Alternative Method
If you are importing previously mixed PCM files into Pyramix for conversion to DSD, then you just create a new Pyramix PCM project at the same sampling rate as these files and drag the audio in from the Media Management window. Simply make sure that the disk containing the required files is Mounted. Then proceed to the Basic Method described above.
…Convert ProTools Sessions to Pyramix DSD projectsIf your ProTools session is at a 44k1Hz or 48kHz sampling rate, then you can use the ProTools Interchange module in Pyramix (an extra cost option) to convert your ProTools session to a Pyramix DSD project. The procedure is iden-tical to the conversion of PCM projects to Pyramix DSD projects, with the first step being to convert the ProTools session to a Pyramix project. See the documentation for the ProTools Interchange module for details.
…Convert ProTools HD Sessions to Pyramix DSD projectsIf your ProTools session is at an 88k2Hz (or higher) sampling rate, then you cannot use the ProTools Interchange module in Pyramix. However, you can perform a 'Bounce' in ProTools HD and save the file in AIFF or WAV/BWF for-mat. Then use this file as the basis for a PCM to DSD conversion as described above.
…Use Generate CD Image / DSD Edited Master to extract only a selection/segment of the original DSD file-with no losses.In the Timeline, select the portion of audio that you want to keep and delete the rest. Move the audio in the Time-line so that it begins at 00:00:02:00 and place a PQ start marker at the beginning of this clip and a PQ stop marker at the end of the clip. Select File > Generate CD Image / DSD Edited Master choose SACD Edited Master - Ren-der Mode to generate a new DSDIFF file. The file will be an exact copy of the source material, only trimmed to the size that you specified.
…Import DSD audio files from a Sony Sonoma systemBecause the Sonoma's default file format is not DSDIFF, you must export the audio from the Sonoma ('Capture the EDL') as if you were creating a DSD 'Edited Master' file. This will require setting at least two PQ markers (beginning and end of file). The resultant audio file from this 'Export' is in the DSDIFF format and fully compatible with Pyra-mix.
…Do a real-time Generate CD Image / SACD Edited Master (Mixdown)'For stereo projects, simply check the Real-time box in the Generate CD Image / SACD Edited Master window and that's it. Pyramix' time code generator is available, as is the ability to use external effects, routed via the mixer.
For multi-channel projects, unfortunately this will not work, due to the immense amount of computation power required for more than two channels of processing and re-modulation.
One Last thing to Remember:Leave the 'Dither' function of the Pyramix mixer switched Off at all times when using Pyramix DSD. It simply isn't necessary and any dithering/noise-shaping required in the conversion to a Redbook CD image file is performed in the Generate CD Image / SACD Edited Master window.
SACD Production Information
This guide is not intended as a DSD / SACD primer. It simply details the DSD capabilities of Pyramix and offers some operational advice.
SACD Production Guide : SACD Production Information Page 24

A page of information and various downloadable documents pertaining to SACD production including the new Super Audio CD Text Editor is now available at the following address:
http://www.licensing.philips.com/information/sacd/
and
www.superaudiocd.philips.com
Plus other Philips web sites and documents…
SACD Production Guide : SACD Production Information Page 25

SACD Production Guide
IndexNumerics2 Channel 215 Channel 216 Channel 21
AAES/EBU Mappings 7AIT tapes 21Annex D (40-100kHz) Noise Level 13Artist 15avoiding ultrasonic noise build-up 23
CCD Image 14Convert PCM to DSD 23
DDC level 13Digital eXtreme Definition 7Dither 24dither 17DSD Info 19DSD Project 6DSD Recording 11DSD/DST info 19DSDIFF 6DSDIFF Audio File Specifics 21DST Encoder 20DST Estimator 19DXD 7DXD Mixing Project 7DXD Mixng 11
EEdit and add PQ markers to 2 and 6 ch programme 23Edited Master 15Edited Master ID 15Exabyte tape 22
HHybrid SACDs 22
II/O format 7Information to Accompany Files 21
LLevels 13Loudspeaker configuration 15
MMarkers 15Meter Frequency Range 14Metering 13Metering Algorithm 13Mix 17
Nnative plug-ins 12Noise Shaping 13Noise Shaping Order 17Non-Standard Masters 18
OOpening an Existing DSD Project 13Opening an Existing DXD Mixing Project 12
PP3D 7Peak Filter 14Philips Super Audio CD Text Editor 20Projects 6ProTools 24ProTools HD 24Pyramix 'Render' Effects 23
RReal-time 24Red Book 14Reference Level 13Render 15
SSACD Text 20Sampling Rate Conversion Quality 17Saving SACD Text Files 20
SACD Production Guide Page 26

Scarlet Book 14SDIF Settings 9Sigma Delta Modulator 10Signal Level 13Sonoma 24Sony 1630 tape 22Sony format 7Sony SACD Text Editor 20Stereo 21Surround Mapping 10Synchronisation 9
System Configurations 6
TTitle 15
VViewing DSD Edited Master Properties 19Viewing the 40kHz - 100kHz Band 14visually conform a DSD re-master 23
SACD Production Guide : Index Page 27