sabhrs financials training -...
TRANSCRIPT

SABHRS Financials Training
Billing and Accounts Receivable Items
State of Montana Updated May 20, 2017

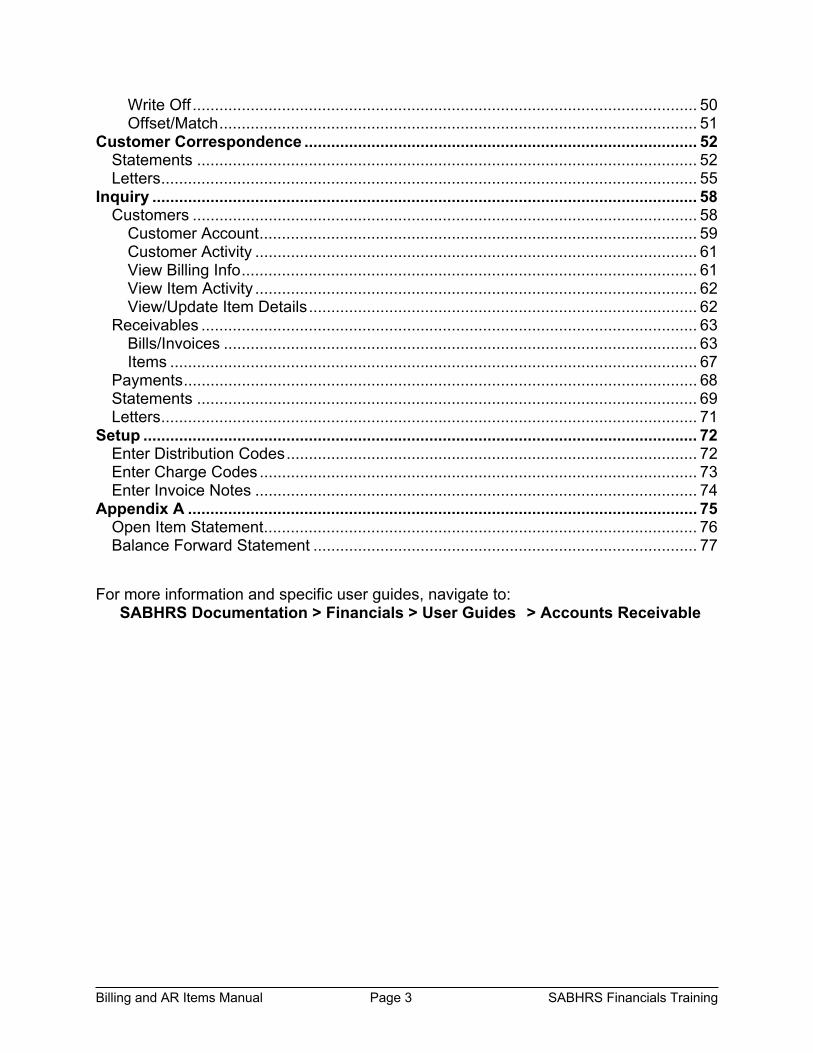
Table of Contents
Customers ..................................................................................................................... 4 Search for a Customer ................................................................................................. 4 Enter a Customer ......................................................................................................... 6
General Info ............................................................................................................. 7 Bill To Options .......................................................................................................... 9 Miscellaneous General Info .................................................................................... 10 General Info Links .................................................................................................. 10
Overview ...................................................................................................................... 14 Billing ........................................................................................................................... 14
Enter Customer Bill Online ........................................................................................ 14 Enter Header Information ....................................................................................... 15 Enter Line Information ............................................................................................ 16 Process Bill ............................................................................................................ 18 View/Print Customer Invoice .................................................................................. 19
Create Invoices for Multiple Customers ..................................................................... 20 Change Status of Bills (Group) .............................................................................. 20 Generate Invoices .................................................................................................. 20
Locate Bills ................................................................................................................ 23 Search by Business Unit ........................................................................................ 23 Search by Customer .............................................................................................. 25
Reprint Invoices ......................................................................................................... 25 Receivables ................................................................................................................. 27
Enter an Item Group .................................................................................................. 28 Group Control......................................................................................................... 28 Pending Item 1 ....................................................................................................... 30 Pending Item 2 ....................................................................................................... 32 Accounting Entries ................................................................................................. 33 Group Action .......................................................................................................... 34
Deposits ....................................................................................................................... 35 Express Deposit......................................................................................................... 35
Totals ..................................................................................................................... 36 Payments ............................................................................................................... 37 Action ..................................................................................................................... 39
Regular Deposit ......................................................................................................... 40 Totals Page ............................................................................................................ 41 Payments ............................................................................................................... 42
Apply Payments ......................................................................................................... 43 Build Worksheet ..................................................................................................... 43 Finalize Worksheet ................................................................................................. 46
Maintenance ................................................................................................................ 48 Adjust Receivables .................................................................................................... 48
Billing and AR Items Manual Page 3 SABHRS Financials Training
Write Off ................................................................................................................. 50 Offset/Match ........................................................................................................... 51
Customer Correspondence ........................................................................................ 52 Statements ................................................................................................................ 52 Letters ........................................................................................................................ 55
Inquiry .......................................................................................................................... 58 Customers ................................................................................................................. 58
Customer Account .................................................................................................. 59 Customer Activity ................................................................................................... 61 View Billing Info ...................................................................................................... 61 View Item Activity ................................................................................................... 62 View/Update Item Details ....................................................................................... 62
Receivables ............................................................................................................... 63 Bills/Invoices .......................................................................................................... 63 Items ...................................................................................................................... 67
Payments ................................................................................................................... 68 Statements ................................................................................................................ 69 Letters ........................................................................................................................ 71
Setup ............................................................................................................................ 72 Enter Distribution Codes ............................................................................................ 72 Enter Charge Codes .................................................................................................. 73 Enter Invoice Notes ................................................................................................... 74
Appendix A .................................................................................................................. 75 Open Item Statement ................................................................................................. 76 Balance Forward Statement ...................................................................................... 77
For more information and specific user guides, navigate to: SABHRS Documentation > Financials > User Guides > Accounts Receivable

Billing and AR Items Manual Page 4 SABHRS Financials Training
Customers Agencies can use the Billing and Accounts Receivable (AR) Items modules to enter, monitor, and maintain amounts owed to the state and payments made by the customer(s). Because customer lists are maintained by each agency, only those customers with whom an agency does business and their debts or “items” will be displayed when conducting a search. Once a customer and an associated item have been established, agencies can then invoice, track, and send statements and dunning letters to these customers based on the age of the item. Search for a Customer To ensure accuracy and a complete record of what is owed by each customer, it is extremely important that the same customer does not have duplicate entries in the database. Therefore, before adding new customers, you should conduct a thorough search to verify that the customer does not already exist in the database. Search for customers by navigating to: Customers > Customer Information > General Information The search function is very powerful, with numerous ways to search.
Not only are there several fields to choose from, but you can also choose a different criterion from the drop down list next to each field name, to expand the search.

Billing and AR Items Manual Page 5 SABHRS Financials Training
Enter any information known about the customer and click the Search button. To avoid the addition of duplicate customers, it is recommended you search in a variety of ways to ensure the new customer is not already listed with a slightly different name. If the customer is found, you may view existing customer information by selecting the customer’s record.
When you have determined the customer is not in the database and needs to be entered, navigate to the Add a New Value page.

Billing and AR Items Manual Page 6 SABHRS Financials Training
Enter a Customer This section describes the procedure for entering new customers into the SABHRS system. To enter a customer, navigate to: Customers > Customer Information > General Information
Before adding a new customer, conduct a thorough search to ensure the customer does not already exist.
Click the Add a New Value tab or link. By default, your agency number will populate the SetID field and the Customer ID field will populate with “NEXT.” When the entry is saved, the next available number will be assigned to the new customer.
Click the Add button.
Billing and AR Items Manual Page 7 SABHRS Financials Training
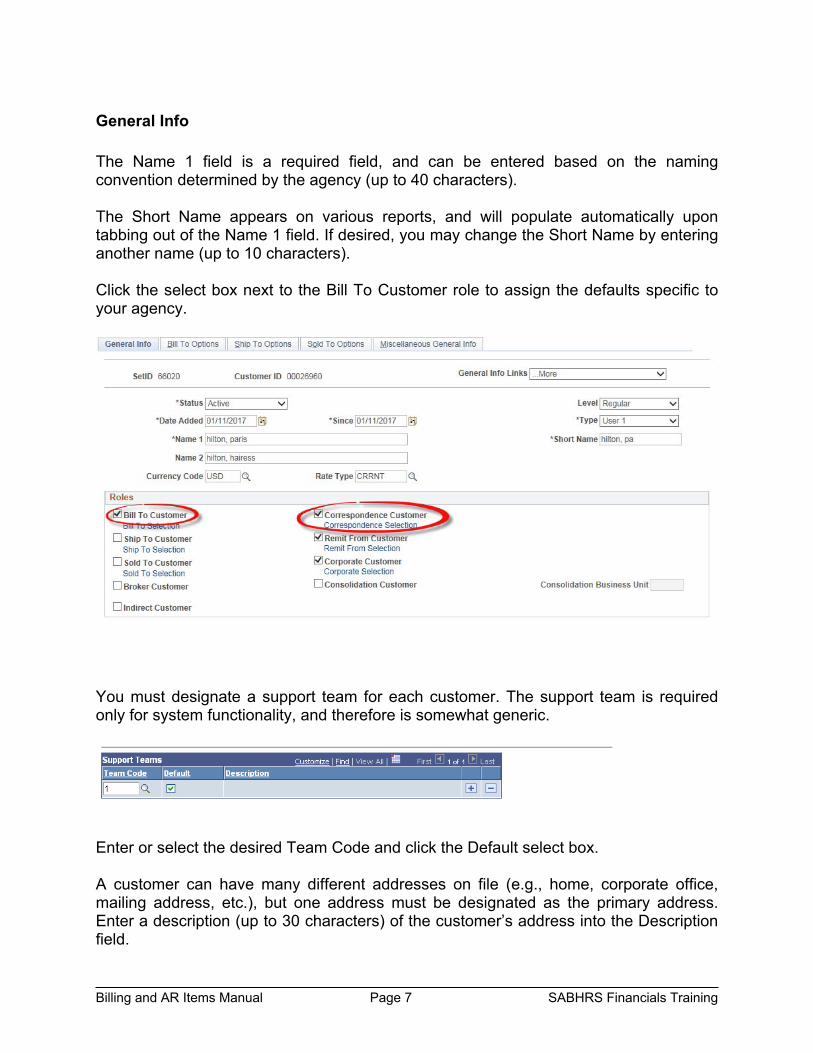
General Info The Name 1 field is a required field, and can be entered based on the naming convention determined by the agency (up to 40 characters). The Short Name appears on various reports, and will populate automatically upon tabbing out of the Name 1 field. If desired, you may change the Short Name by entering another name (up to 10 characters). Click the select box next to the Bill To Customer role to assign the defaults specific to your agency.
You must designate a support team for each customer. The support team is required only for system functionality, and therefore is somewhat generic.
Enter or select the desired Team Code and click the Default select box. A customer can have many different addresses on file (e.g., home, corporate office, mailing address, etc.), but one address must be designated as the primary address. Enter a description (up to 30 characters) of the customer’s address into the Description field.

Billing and AR Items Manual Page 8 SABHRS Financials Training
Click the select boxes next to the fields Bill To, Primary (if this address will be the primary), and Correspondence Address. Complete the street address, city, state, postal code, and any other information you wish to store for this address. To add additional addresses for this customer, click the Add a new row button in the Address Locations section and fill out the associated fields.
Billing and AR Items Manual Page 9 SABHRS Financials Training
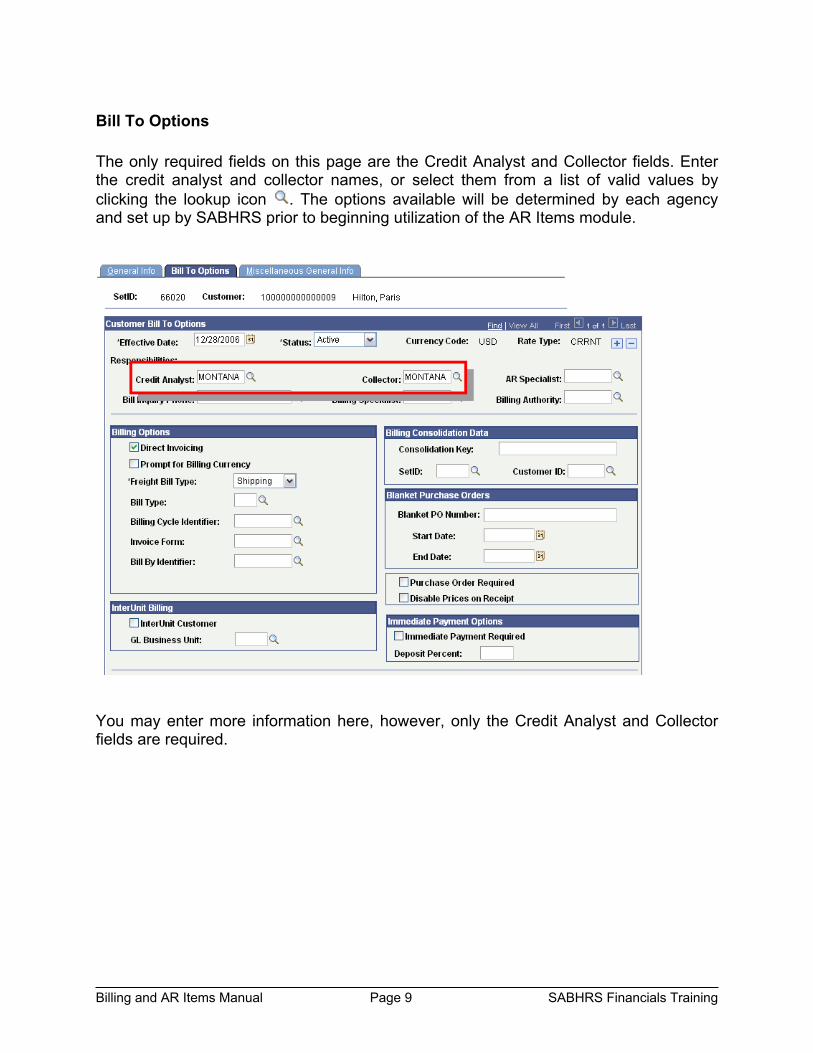
Bill To Options The only required fields on this page are the Credit Analyst and Collector fields. Enter the credit analyst and collector names, or select them from a list of valid values by clicking the lookup icon . The options available will be determined by each agency and set up by SABHRS prior to beginning utilization of the AR Items module.
You may enter more information here, however, only the Credit Analyst and Collector fields are required.

Billing and AR Items Manual Page 10 SABHRS Financials Training
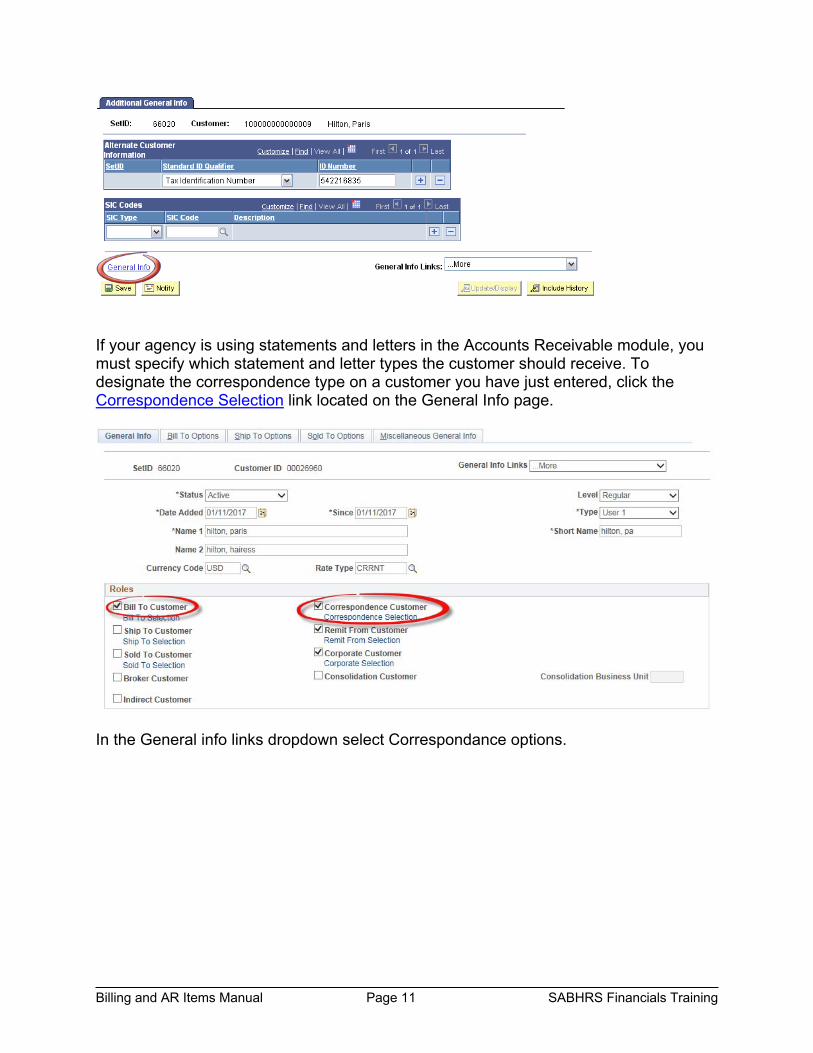
Miscellaneous General Info If you wish to maintain more information on the customer, such as name 2, name 3, for example, save the customer, navigate to the Miscellaneous General Info tab, and enter the desired information. Be sure to save after updating the information.
General Info Links Although users are only required to store minimal information about a customer, the system has the capability to store much more optional information. To store additional information about a customer, from the General Info Links drop down list, select the type of information you wish to record.
Note: If the customer has recently been created, you must exit the record and re-open the customer record in order to view these links.
Enter desired information, and click the General Info link to return to the previous page.
Billing and AR Items Manual Page 11 SABHRS Financials Training
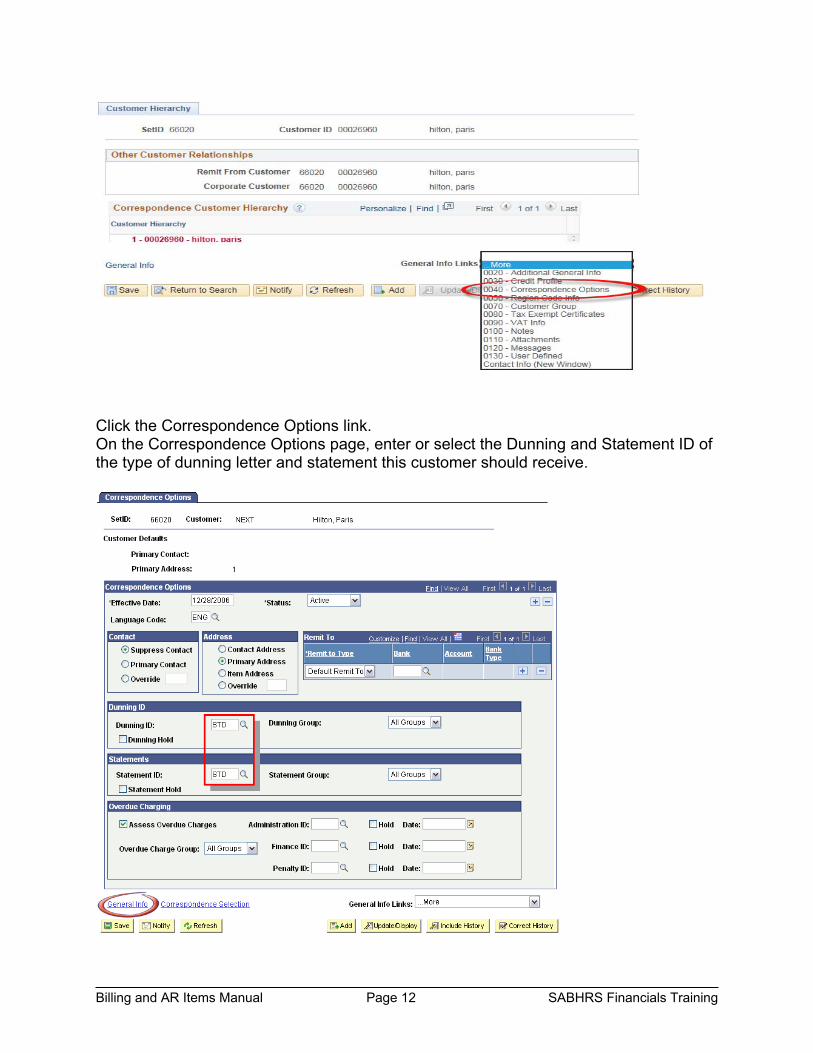
If your agency is using statements and letters in the Accounts Receivable module, you must specify which statement and letter types the customer should receive. To designate the correspondence type on a customer you have just entered, click the Correspondence Selection link located on the General Info page.
In the General info links dropdown select Correspondance options.
Billing and AR Items Manual Page 12 SABHRS Financials Training
Click the Correspondence Options link. On the Correspondence Options page, enter or select the Dunning and Statement ID of the type of dunning letter and statement this customer should receive.

Billing and AR Items Manual Page 13 SABHRS Financials Training
When finished, click the General Info link to return to the General Information page.
Typically, there is only one option available for selection – the open item template. However, if an agency has decided to use a balance forward statement or letter, you may select the balance forward template also.

Billing and AR Items Manual Page 14 SABHRS Financials Training
Overview A “receivable” is an amount of money due the state, such as a fine, taxes, fees, registration, etc. In order for an agency to track customers and the money owed by those customers, the agency must first enter the receivable into the SABHRS system through one of two ways:
1) entering a bill through the billing component (or interface system) or 2) entering an item through the Accounts Receivable component.
When a receivable has been entered as a bill and processing has completed, the products/services for which the customer was billed becomes an AR Item, and any maintenance tasks or payments against that bill are performed in the AR component. Agencies not using an interface to create bills can create those bills online by using entry types and reason codes to load the items and accounting entries into the AR component, or by sending the accounting entries directly to the general ledger and loading items into the AR component.
Billing Enter Customer Bill Online To create a bill, either individually or in a group, navigate to: Billing > Maintain Bills > Standard Billing
Click the Add a New Value tab and enter or select the desired business unit. Select or enter the Bill Type Identifier.
ONL uses entry type and reason code to load accounting entries and items into the accounts receivable module. GLA loads user-entered accounting entries directly to the general ledger and items into the accounts receivable module.

Billing and AR Items Manual Page 15 SABHRS Financials Training
Enter or select the Bill Source and the Customer to be billed. Click the Add button.
Enter Header Information If desired, enter an Invoice Date or enter a range of dates for the invoice in the From Date and Through Date fields.

Billing and AR Items Manual Page 16 SABHRS Financials Training
To enter a header note, click the Notes link. Select or enter the Std Note and Note Type, or enter the desired text into the Note Text field.
Click the Internal Only Flag select box to make the comments available only to SABHRS users.
Enter Line Information On the Line – Info 1 tab, click the Table lookup icon and select the desired option. In the Identifier field, enter or select the desired Identifier (the product or service for which the customer is being billed). In the Quantity field, enter the number of items being billed to the customer and click the Refresh button.

Billing and AR Items Manual Page 17 SABHRS Financials Training
To enter a Line note, click the Notes link. Select or enter the Std Note and Note Type, or enter the desired text into the Note Text field. Click the Internal Only Flag select box to make the comments available only to SABHRS users. Click the Save button and navigate back to the Line – Info 1 page. If additional rows are necessary, click the Add a New Row button for each row needed. To view the distribution lines of previous bills, click the Accounting link. Note: Users may opt to fill out the line information manually instead of using charge codes. To enter information manually, input the product or service (up to 30 characters) into the Description field. Enter the number of billed items in the Quantity field, and enter the price per item in the Unit Price field. Click the Accounting line and enter the required field values. When finished entering the distribution coding, return to the Line – Info 1 tab or click Save.
Billing and AR Items Manual Page 18 SABHRS Financials Training
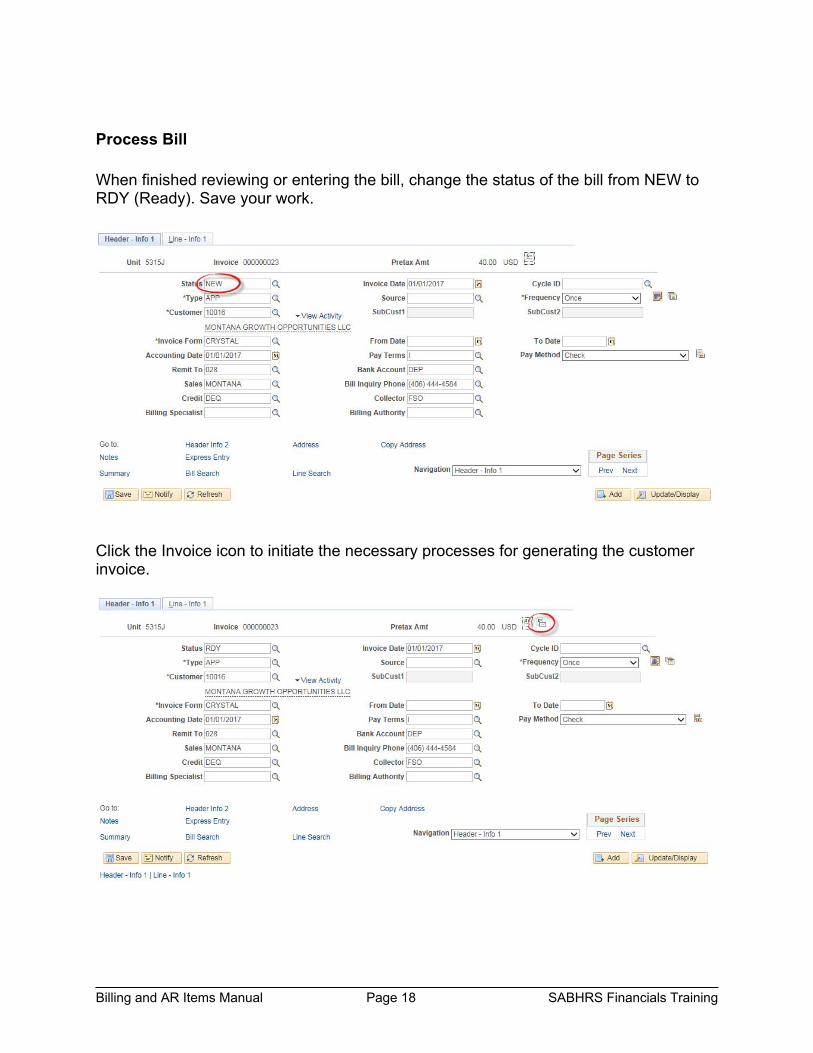
Process Bill When finished reviewing or entering the bill, change the status of the bill from NEW to RDY (Ready). Save your work.
Click the Invoice icon to initiate the necessary processes for generating the customer invoice.

Billing and AR Items Manual Page 19 SABHRS Financials Training
View/Print Customer Invoice When the process has completed, navigate to the Report Manager to view and print the invoice. Click the Report Link (or in the Department of Environmental Quality, “MTDEQINV1”) to view and print the customer invoice.
A Second screen with a MTDEQINV1.pdf link will appear, select this link and an Adobe pdf will open on your screen. Note: After bill processing has completed, the products/services for which the customer was billed will become Accounts Receivable Items, and maintenance tasks performed in that component.

Billing and AR Items Manual Page 20 SABHRS Financials Training
Create Invoices for Multiple Customers In order to generate invoices for a customer, the bills must first be set to a ready status, which can be done for a group or range of bills at the same time.
Change Status of Bills (Group) To change the status of multiple bills at one time, navigate to: Billing > Maintain Bills > Change Status of Bills Select an existing or set up a new run control ID. On the Status Change page, select the current bill status that is to be changed. From the drop down list, select the desired New Bill Status.
Select the desired range (e.g., invoice ID, customer ID, bill type, etc.) by clicking the associated radio button. Enter or select the appropriate Business Unit and click the Run button. On the process scheduler page, click the OK button.
Generate Invoices Process all bills with a RDY status by navigating to:

Billing and AR Items Manual Page 21 SABHRS Financials Training
Billing > Generate Invoices > Non-Consolidated > Single Action Invoice Select an existing or enter a new run control ID. On the Single Action Invoice page, select Batch Standard by selecting the appropriate radio button. Enter the business unit in the appropriate field.
To view the bills that will be converted to items, click the Bills to be Processed icon.
Click the Return button to return to the Single Action Invoice page. Initiate the process to generate the invoices by clicking the Run button.
Billing and AR Items Manual Page 22 SABHRS Financials Training
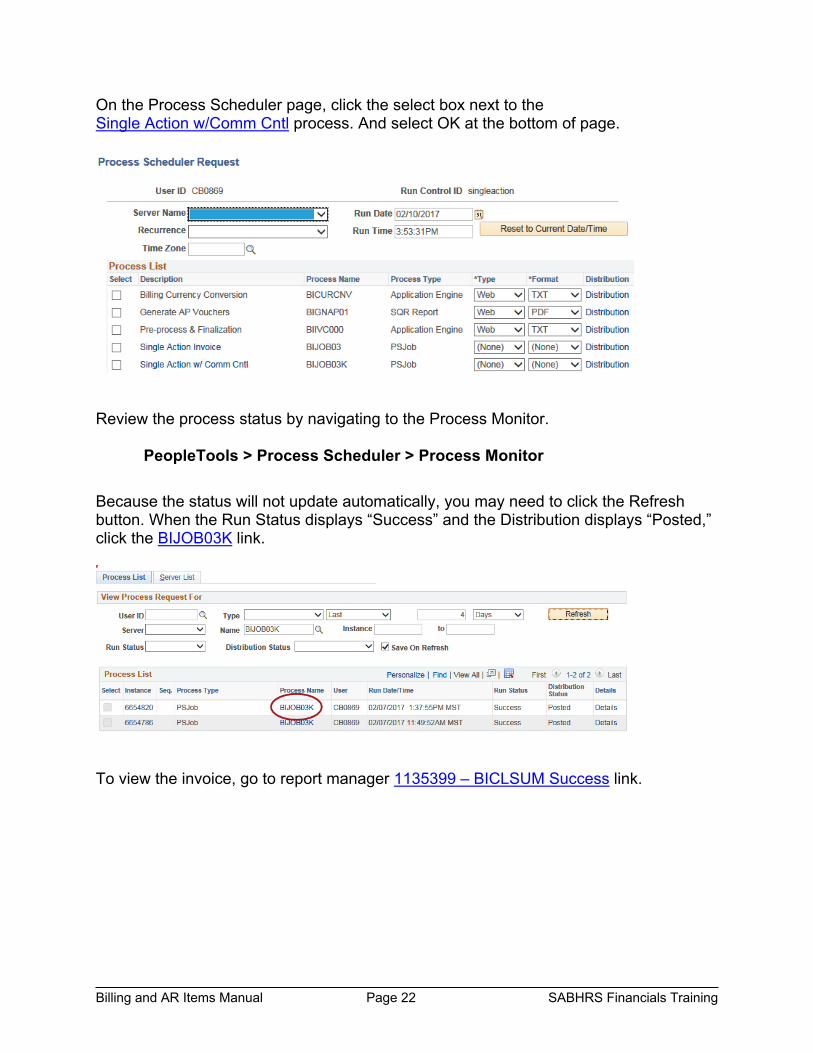
On the Process Scheduler page, click the select box next to the Single Action w/Comm Cntl process. And select OK at the bottom of page.
Review the process status by navigating to the Process Monitor. PeopleTools > Process Scheduler > Process Monitor
Because the status will not update automatically, you may need to click the Refresh button. When the Run Status displays “Success” and the Distribution displays “Posted,” click the BIJOB03K link.
To view the invoice, go to report manager 1135399 – BICLSUM Success link.

Billing and AR Items Manual Page 23 SABHRS Financials Training
Click the View Log/Trace link, then click the BICLSUM link.
Print the invoice at a local or network printer. Locate Bills
Search by Business Unit Review lines of a bill that has not yet been invoiced by navigating to: Billing > Locate Bills > Lines Not Invoiced ~OR ~ Review lines of a bill that have already been invoiced: Billing > Locate Bills > Lines Invoiced Enter the business unit and any other desired search criteria and click the Search button. Tip: To search in multiple business units, change the Business Unit operand to “in.” Then enter each business unit in which you wish to search, separated by commas (no spaces allowed).

Billing and AR Items Manual Page 24 SABHRS Financials Training
The system will display a list of bills that have not yet been invoiced. Select the bill you wish to review. Click the icon to further filter the results for this customer.
View additional information about the bill by selecting the bill and clicking the links at the bottom of the page. Invoices can be initiated by selecting the bill for which an invoice is desired, then clicking the Accounting link and the Invoice icon .

Billing and AR Items Manual Page 25 SABHRS Financials Training
Search by Customer Review bills that have not yet been invoiced by navigating to: Billing > Locate Bills > Bills Not Invoiced ~OR ~ Review bills that have already been invoiced: Billing > Locate Bills > Bills Invoiced When searching by bills that have/not been invoiced, you must enter both a billing business unit and the customer ID.
Click the Search button to retrieve bills for the desired customer. Reprint Invoices Invoices can be reprinted for a customer by navigating to: Billing > Generate Invoices > Non-Consolidated > Reprint Invoices Enter a new or select an existing run control ID. Select the range of invoices to be reprinted (e.g., invoice id, customer id, etc.) by selecting the appropriate radio button.
Billing and AR Items Manual Page 26 SABHRS Financials Training
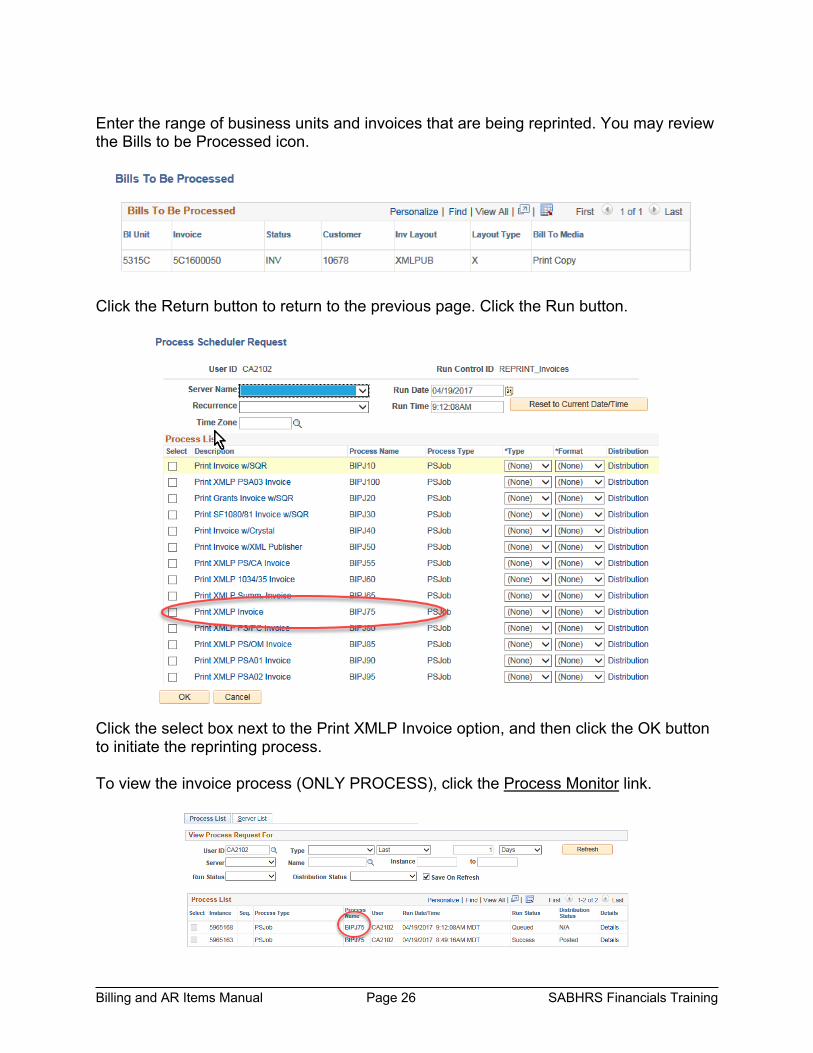
Enter the range of business units and invoices that are being reprinted. You may review the Bills to be Processed icon.
Click the Return button to return to the previous page. Click the Run button.
Click the select box next to the Print XMLP Invoice option, and then click the OK button to initiate the reprinting process. To view the invoice process (ONLY PROCESS), click the Process Monitor link.

Billing and AR Items Manual Page 27 SABHRS Financials Training
Click the BIPJ75 link, then click the BIXPJ03 link.
Click the View the invoice, go to the Report Manager. Main Menu > Reporting Tools > Report Manager.
A separate window will open up Adobe Acrobate Reader with your invoice.
Receivables Agencies not using the Billing component may still create receivables by entering the money owed by the customer as Items. Items are most efficiently entered as a group, and can be entered in various ways, based on your agency’s needs and business processes. For example, you can enter several items for a single customer, or enter the same type of item for several customers.
Billing and AR Items Manual Page 28 SABHRS Financials Training
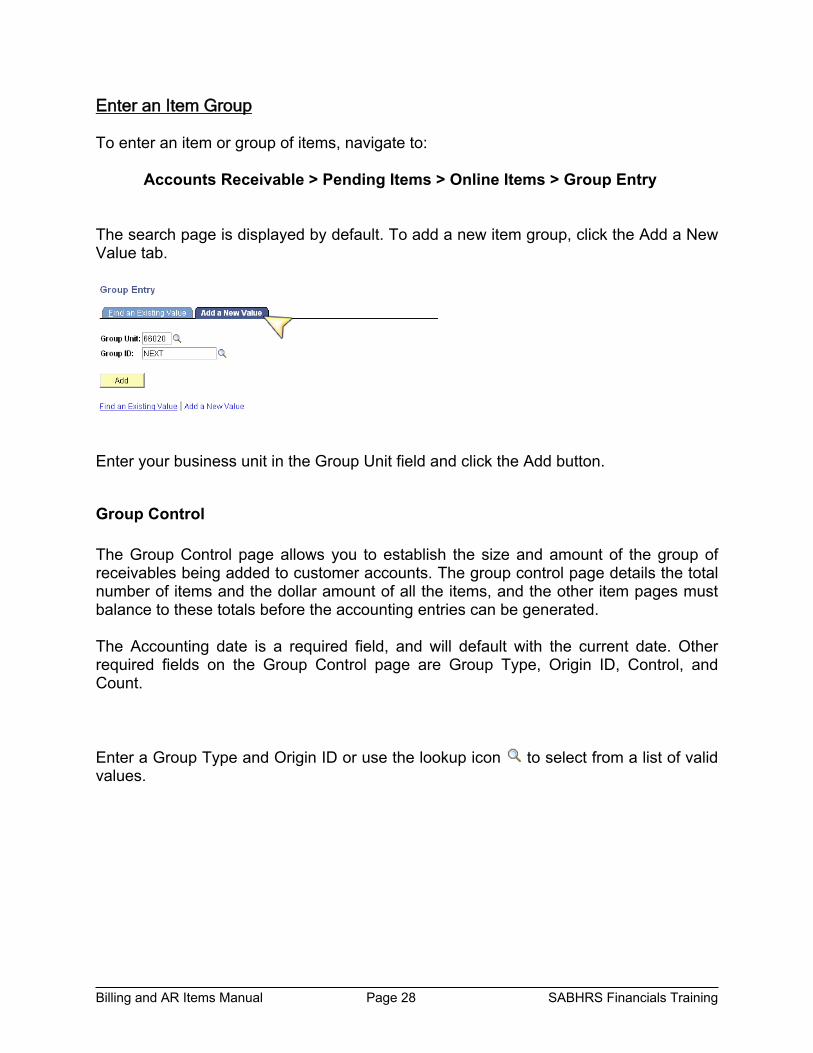
Enter an Item Group To enter an item or group of items, navigate to:
Accounts Receivable > Pending Items > Online Items > Group Entry The search page is displayed by default. To add a new item group, click the Add a New Value tab.
Enter your business unit in the Group Unit field and click the Add button.
Group Control The Group Control page allows you to establish the size and amount of the group of receivables being added to customer accounts. The group control page details the total number of items and the dollar amount of all the items, and the other item pages must balance to these totals before the accounting entries can be generated. The Accounting date is a required field, and will default with the current date. Other required fields on the Group Control page are Group Type, Origin ID, Control, and Count. Enter a Group Type and Origin ID or use the lookup icon to select from a list of valid values.

Billing and AR Items Manual Page 29 SABHRS Financials Training
In the Control Totals section, enter the Control total (total amount of all the items) and the Count (total number of items in this group).
A customer owes taxes and has a penalty for late/unpaid taxes. In this case, even though there is only one customer, you would enter a count of two - one for the taxes owed and one for the penalty.
Example 1
New student loans have been granted to three different students for the semester. In this case, even though the loan is the same for each student, you would enter a count of three – one for each student.
Example 2

Billing and AR Items Manual Page 30 SABHRS Financials Training
Pending Item 1 Click the Pending Item 1 tab or link to go to the Pending Item page. Required fields on this page include Item ID, Customer, Amount, Entry Type, and Reason. The Accounting Date, As of Date, Business Unit, and AR Distribution are required fields, but will populate automatically.
Type a unique name or description for the receivable item in the Item ID field.
You must use a unique Item ID for each item you add to a customer’s account. For example, you could have two customers with a “Taxes” item, but could not have two “Taxes” items for the same customer without something that made the ID unique, such as “2007 Taxes.”
Enter the Customer ID in the Customer field, or select it from a list by clicking the lookup icon . Enter the Amount of this item in the amount field. Select an Entry Type from the drop down list; entry types are established by each agency based on their needs. The Reason code creates the accounting entries that will post to the journal when the item posts. Select a Reason from the drop down list.
The AR Dist field is required, but will default based on the entry type you selected and should not be changed.

Billing and AR Items Manual Page 31 SABHRS Financials Training
The Payment Terms manage the time frame in which a customer is required to pay the receivable. You may use the lookup icon to select the desired terms from the available values, if different than the default. Insert additional rows for the remaining items in the group by clicking the Add a new row button . You may move through the items by clicking the show previous or next row buttons, or view all items by clicking the View All link. Delete unneeded rows by clicking the Delete Row button .
Remember that the number of items you enter must equal the control totals you entered on the Group Control page.
Add the remaining items by entering an Item ID, customer ID, amount, and selecting an Entry Type and Reason Code for each item. At this point, most agencies will be finished entering customer items and would only need to save the group. All that remains, essentially, is for the approver to mark the items to post to customer accounts. Once approved, the items will be posted to the affected customer accounts during the nightly batch process.
Billing and AR Items Manual Page 32 SABHRS Financials Training
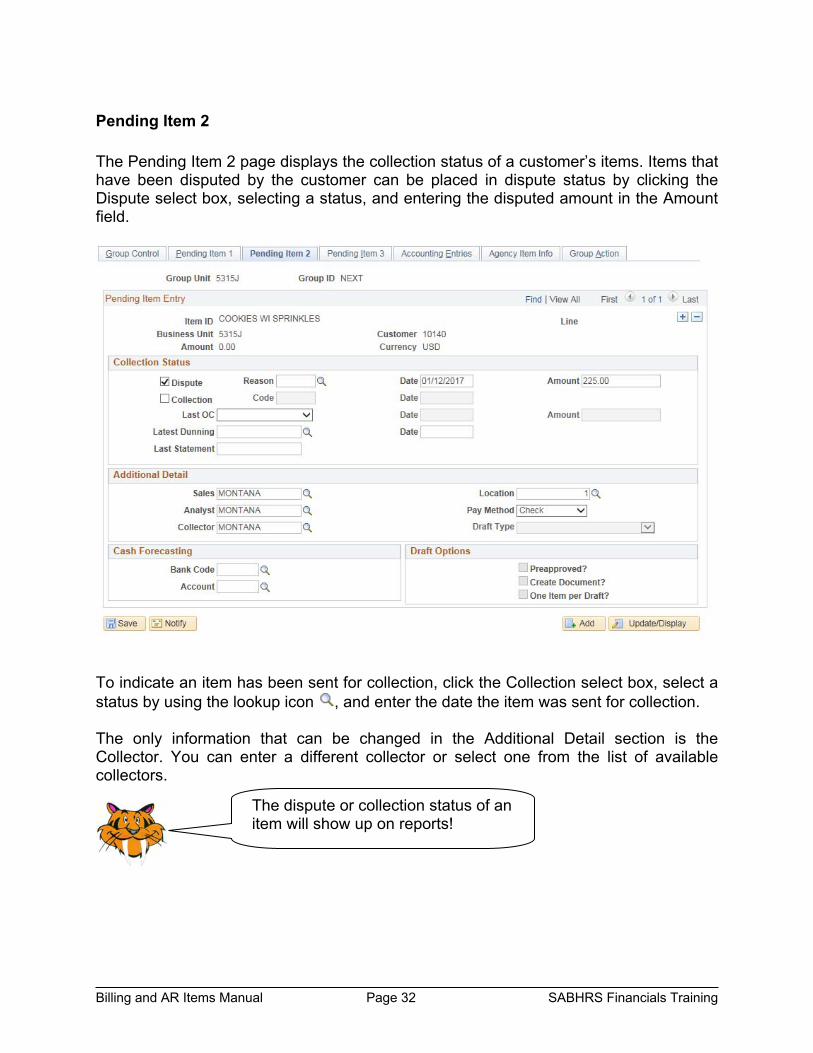
Pending Item 2 The Pending Item 2 page displays the collection status of a customer’s items. Items that have been disputed by the customer can be placed in dispute status by clicking the Dispute select box, selecting a status, and entering the disputed amount in the Amount field.
To indicate an item has been sent for collection, click the Collection select box, select a status by using the lookup icon , and enter the date the item was sent for collection. The only information that can be changed in the Additional Detail section is the Collector. You can enter a different collector or select one from the list of available collectors.
The dispute or collection status of an item will show up on reports!

Billing and AR Items Manual Page 33 SABHRS Financials Training
Accounting Entries Items must have accounting entries generated for them before they can post to the customer’s account and become classified as revenue due the state. Accounting entries can be created in a number of ways: Create icon – entries are created online Batch process – entries are generated overnight by an automated process SpeedCharts – entries are created by exploding speedchart(s)
The Accounting Entries page will only be used if the approver wishes to view the coding prior to the items posting or if your agency is going to use speedcharts to create coding that varies from the defaults that are associated with the entry type and reason code you selected when entering the items. Typically, the group will be approved and the accounting entries generated overnight during an automated process. To use speedcharts to create coding for an entered item, click the SpeedChart button.
Enter the desired speedchart key or select it from a list of valid values by clicking the lookup icon . You may use a different speedchart for each item in the group, if desired. Click the Save button after each item to which you have applied a speedchart.

Billing and AR Items Manual Page 34 SABHRS Financials Training
Group Action The approver must set the group to post by selecting Batch Standard from the Posting Action drop down list.
The approver must click the OK button after selecting the post action. Once marked approved to post, the items will post to the affected customers’ accounts during the nightly batch process.
Billing and AR Items Manual Page 35 SABHRS Financials Training
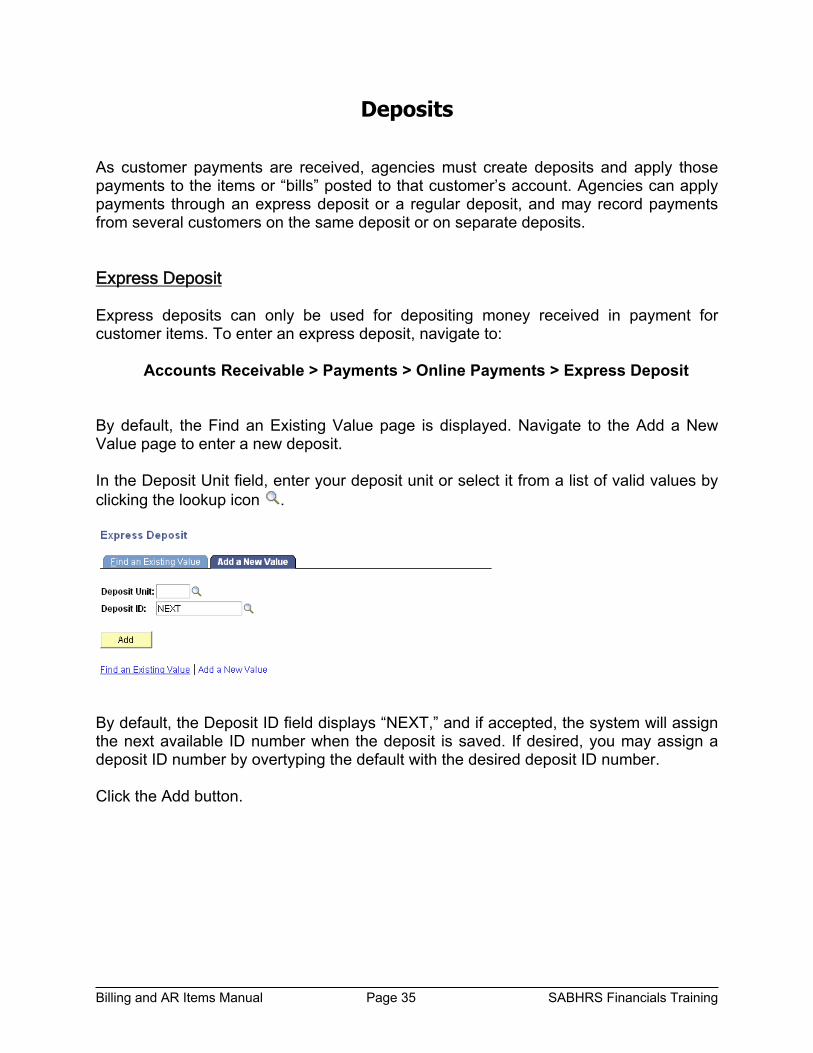
Deposits As customer payments are received, agencies must create deposits and apply those payments to the items or “bills” posted to that customer’s account. Agencies can apply payments through an express deposit or a regular deposit, and may record payments from several customers on the same deposit or on separate deposits. Express Deposit Express deposits can only be used for depositing money received in payment for customer items. To enter an express deposit, navigate to:
Accounts Receivable > Payments > Online Payments > Express Deposit By default, the Find an Existing Value page is displayed. Navigate to the Add a New Value page to enter a new deposit. In the Deposit Unit field, enter your deposit unit or select it from a list of valid values by clicking the lookup icon .
By default, the Deposit ID field displays “NEXT,” and if accepted, the system will assign the next available ID number when the deposit is saved. If desired, you may assign a deposit ID number by overtyping the default with the desired deposit ID number. Click the Add button.
Billing and AR Items Manual Page 36 SABHRS Financials Training
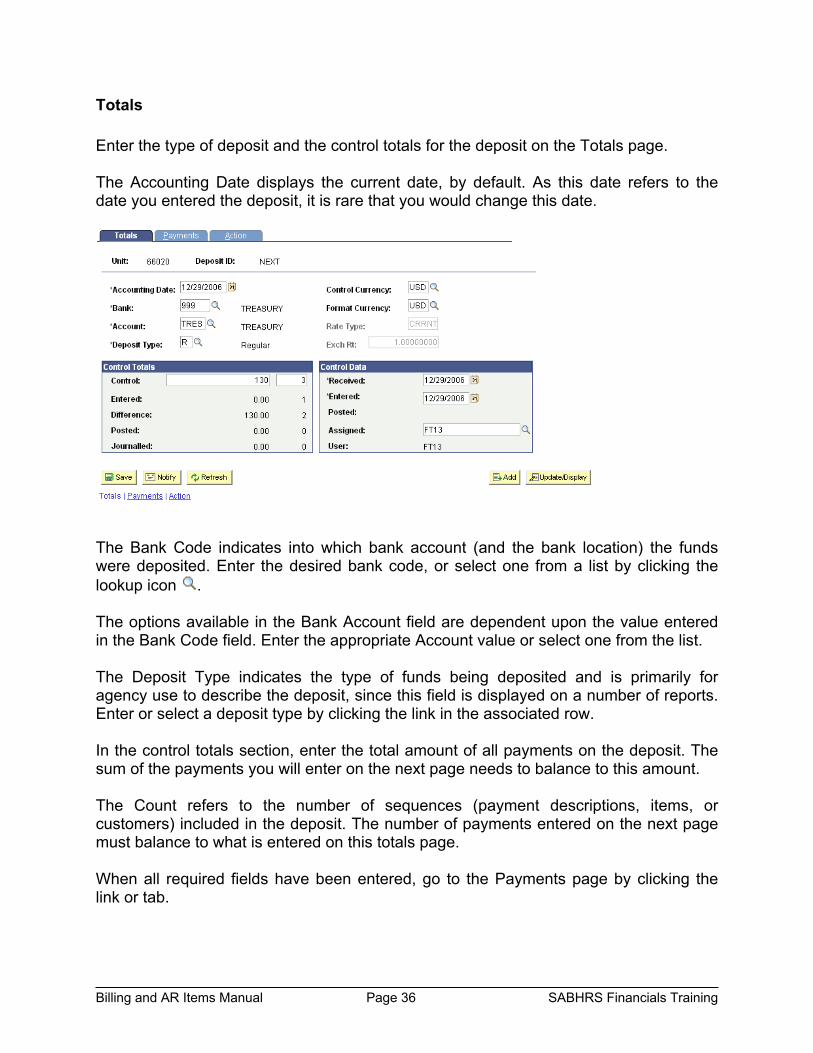
Totals Enter the type of deposit and the control totals for the deposit on the Totals page. The Accounting Date displays the current date, by default. As this date refers to the date you entered the deposit, it is rare that you would change this date.
The Bank Code indicates into which bank account (and the bank location) the funds were deposited. Enter the desired bank code, or select one from a list by clicking the lookup icon . The options available in the Bank Account field are dependent upon the value entered in the Bank Code field. Enter the appropriate Account value or select one from the list. The Deposit Type indicates the type of funds being deposited and is primarily for agency use to describe the deposit, since this field is displayed on a number of reports. Enter or select a deposit type by clicking the link in the associated row. In the control totals section, enter the total amount of all payments on the deposit. The sum of the payments you will enter on the next page needs to balance to this amount. The Count refers to the number of sequences (payment descriptions, items, or customers) included in the deposit. The number of payments entered on the next page must balance to what is entered on this totals page. When all required fields have been entered, go to the Payments page by clicking the link or tab.

Billing and AR Items Manual Page 37 SABHRS Financials Training
Payments On the payments page, enter a description and the amount of each payment sequence on the deposit.
In the Item ID field, enter or select the item ID to which the payment should be applied.
If the payment amount is different from the remaining balance of the item, you must type the amount to be applied to this item in the Pay Amount field.
A customer’s payment can be applied to more than one item by entering multiple rows in the Reference Information section. Insert additional rows as necessary for the other payments on the deposit by clicking the Add new rows button .
In the prompt box that appears, enter the number of additional rows desired and click the OK button. For each new row inserted, enter the item to which the payment should be applied and the amount to be applied.

Billing and AR Items Manual Page 38 SABHRS Financials Training
Insert a new row for the next payment sequence by clicking the Add a New Row button.
Enter the payment ID, amount, receivable item, and amount to be applied to the item as specified above. When finished entering all items to which the payment is to be applied, click the Save button.

Billing and AR Items Manual Page 39 SABHRS Financials Training
Action When all payment sequences have been entered and items to which the payments should be applied have been identified, an approver must mark the deposit to post (“approve” the deposit) so that the customer’s account will be credited with the payments. To mark the deposit to post, navigate to the Action tab and click the Batch Standard button. Accounting entries will be created during the nightly batch process.
It is not necessary to save the deposit after marking it to post.
Billing and AR Items Manual Page 40 SABHRS Financials Training
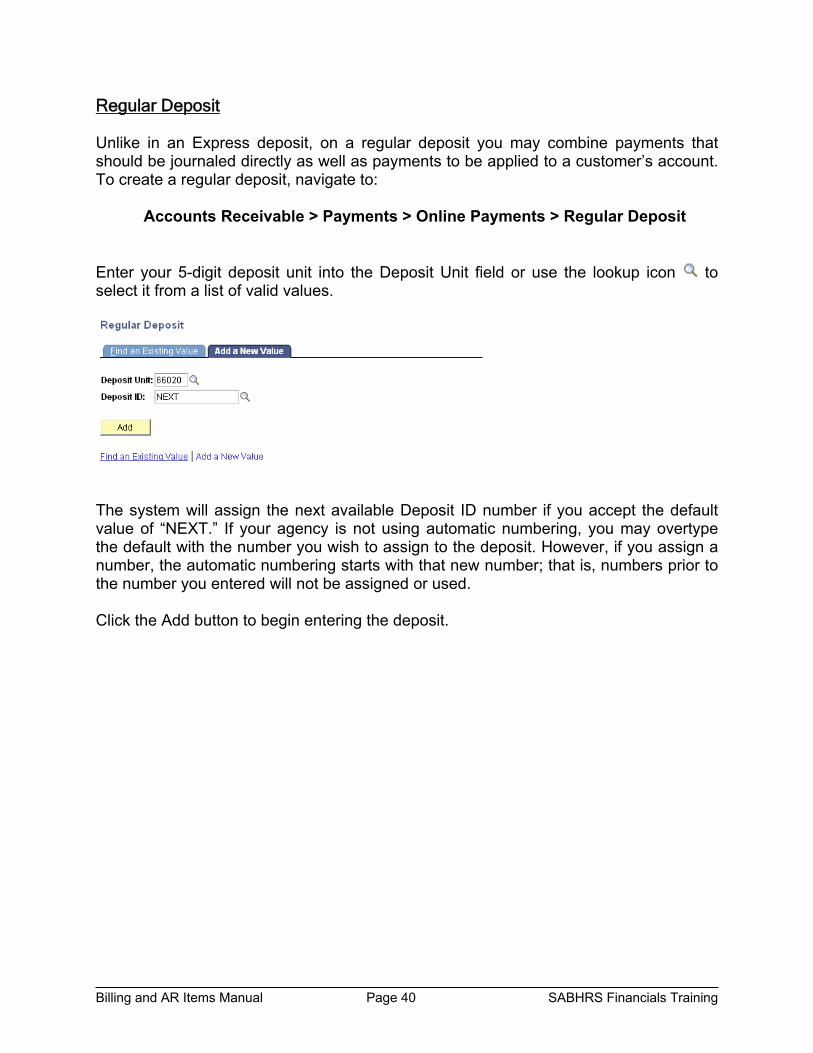
Regular Deposit Unlike in an Express deposit, on a regular deposit you may combine payments that should be journaled directly as well as payments to be applied to a customer’s account. To create a regular deposit, navigate to: Accounts Receivable > Payments > Online Payments > Regular Deposit Enter your 5-digit deposit unit into the Deposit Unit field or use the lookup icon to select it from a list of valid values.
The system will assign the next available Deposit ID number if you accept the default value of “NEXT.” If your agency is not using automatic numbering, you may overtype the default with the number you wish to assign to the deposit. However, if you assign a number, the automatic numbering starts with that new number; that is, numbers prior to the number you entered will not be assigned or used. Click the Add button to begin entering the deposit.

Billing and AR Items Manual Page 41 SABHRS Financials Training
Totals Page Enter the control totals for the deposit on the Totals page.
The Accounting Date displays the current date, by default. As this date refers to the date you entered the deposit, it is rare that you would change this date. The Bank Code indicates into which bank account (and the bank location) the funds were deposited. Enter the desired bank code, or select one from a list by clicking the lookup icon . The options available in the Bank Account field are dependent upon the value entered in the Bank Code field. Enter the appropriate Account value or select one from the list. The Deposit Type indicates the type of funds being deposited and is primarily for agency use to describe the deposit, since this field is displayed on a number of reports. Enter or select a deposit type by clicking the link in the associated row. In the control totals section, enter the total amount of all payments on the deposit. The sum of the payments on the Payments page needs to balance to this amount. The Count refers to the number of sequences (payment descriptions or customers, for example) included in the deposit. The payments entered on the next page must balance to what is entered on this totals page. When all required fields have been entered, click the Payments tab to go to that page.

Billing and AR Items Manual Page 42 SABHRS Financials Training
Payments The Payments page allows you to input a sequence or description for each payment on the deposit. You should insert a new row (sequence) for each payment that will be applied towards a customer account. You may also insert a row(s) for payments that are not applied to a specific customer account, but are being journaled directly. Insert additional rows as needed by clicking the Add a Row button . Enter a payment ID and amount for each sequence (“count”) on the deposit.
After entering the Payment ID (basically a description) and tabbing out of the field, the screen will “blink” momentarily while the information on the page is being refreshed. Keep this in mind when tabbing from one field to another on this page and give the page time to refresh before attempting to enter information into the next field. For those payments that will be applied to customer accounts, either enter the customer ID number into the Cust ID field, or select it from a list of valid values by clicking the lookup icon . The Business Unit field will populate by default when the customer ID has been selected. When you have entered all the payments and associated customers, click the Save button.
Remember that you must enter the same number and amount of payments as you entered in the control totals section on the Totals page.

Billing and AR Items Manual Page 43 SABHRS Financials Training
Apply Payments After entering the payments and affected customers, you must specify to which items the customer’s payment is to be applied. Building a worksheet allows users to apply the desired payment amounts to selected items.
Build Worksheet To build the worksheet, navigate to: Accounts Receivable > Payments > Apply Payments > Create Worksheet
If you navigated through the menu to the Worksheet Selection page, your business unit and the ID of the deposit upon which you were just working should be displayed by default. By entering the desired parameters, you can search by a number of other options, as well. Click the Search button to display the worksheets associated with the deposit. Select the desired worksheet by clicking a link in the associated row.

Billing and AR Items Manual Page 44 SABHRS Financials Training
After selecting the worksheet, the customer and payment information appears.
Click the Build button to display the customer’s items.
Billing and AR Items Manual Page 45 SABHRS Financials Training
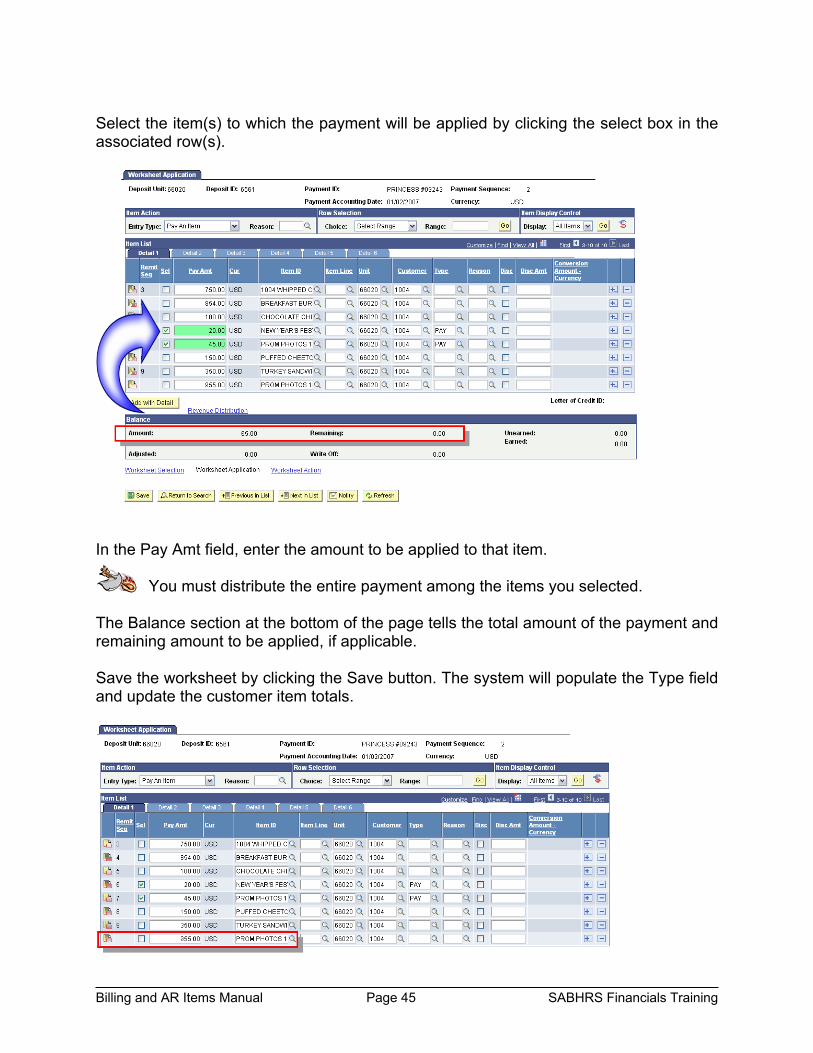
Select the item(s) to which the payment will be applied by clicking the select box in the associated row(s).
In the Pay Amt field, enter the amount to be applied to that item.
You must distribute the entire payment among the items you selected.
The Balance section at the bottom of the page tells the total amount of the payment and remaining amount to be applied, if applicable. Save the worksheet by clicking the Save button. The system will populate the Type field and update the customer item totals.
Billing and AR Items Manual Page 46 SABHRS Financials Training
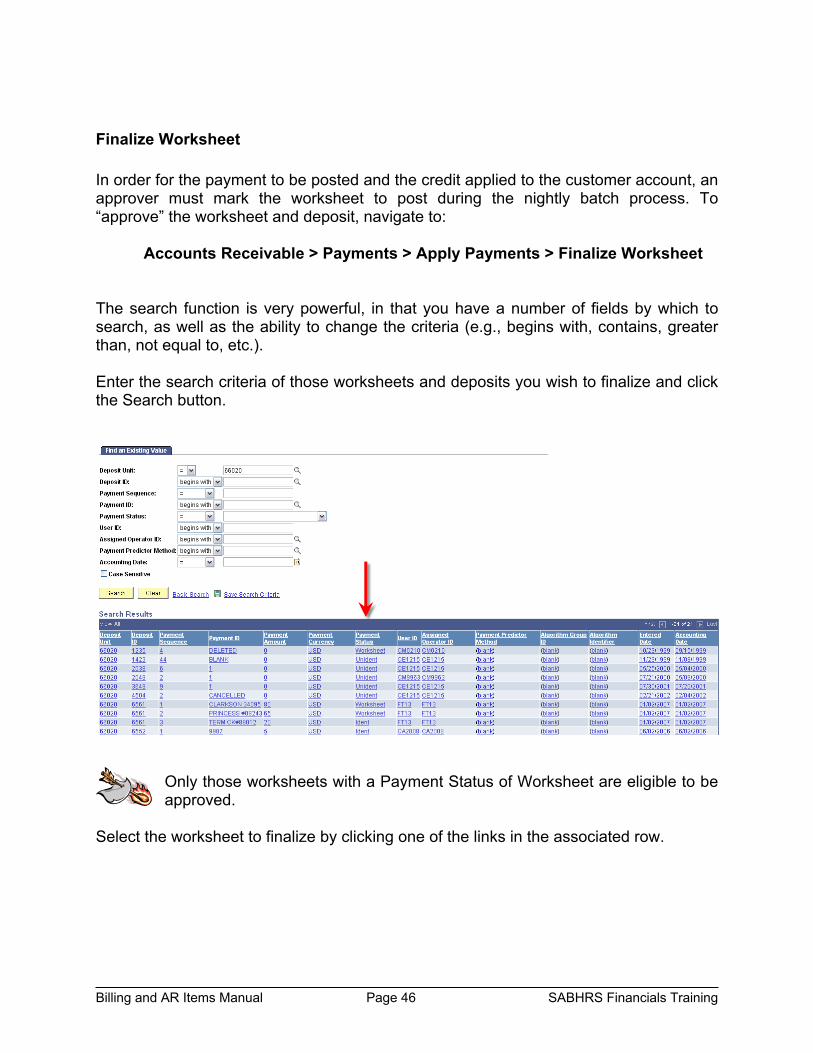
Finalize Worksheet In order for the payment to be posted and the credit applied to the customer account, an approver must mark the worksheet to post during the nightly batch process. To “approve” the worksheet and deposit, navigate to: Accounts Receivable > Payments > Apply Payments > Finalize Worksheet The search function is very powerful, in that you have a number of fields by which to search, as well as the ability to change the criteria (e.g., begins with, contains, greater than, not equal to, etc.). Enter the search criteria of those worksheets and deposits you wish to finalize and click the Search button.
Only those worksheets with a Payment Status of Worksheet are eligible to be approved.
Select the worksheet to finalize by clicking one of the links in the associated row.

Billing and AR Items Manual Page 47 SABHRS Financials Training
Select Batch Standard from the Posting Action drop down list and click the OK button.
The accounting entries will be generated during the nightly batch process. No further approval is necessary for the deposit to post.
It is not necessary to click the Save button, as clicking the OK button automatically saves the worksheet.

Billing and AR Items Manual Page 48 SABHRS Financials Training
Maintenance Adjust Receivables Occasionally it may be necessary to adjust the balances of an item or a customer’s account (e.g., due to bankruptcy, payment by interunit journal, error, settlement, etc.). You may adjust an item or portion of an item balance by creating a maintenance worksheet. To create a maintenance worksheet, navigate to:
Accounts Receivable > Receivables Maintenance > Maintenance Worksheet > Create Worksheet
Click the Add a New Value tab to create a new worksheet.
Enter your business unit in the Worksheet Business Unit field. Click the Add button.
You may access a worksheet previously entered by using the Find an Existing Value page to search for the worksheet.

Billing and AR Items Manual Page 49 SABHRS Financials Training
On the Worksheet Selection page, enter the customer ID number in the Cust ID field or select it from a list of valid values by clicking the lookup icon . The Business Unit field will populate by default once the customer ID has been selected or entered.
Click the Build button. The Worksheet Application page displays the open items that are available for adjustment. When you wish to remove a portion of the balance previously posted to a customer’s account, you will “write off” the desired amount. On occasion, if a payment was not applied to a specific item and a negative amount appears on the customer account, you may need to offset the payment with the item to resolve the account. In this case, you would use the Offset action to match the positive and negative amounts on the customer’s account.

Billing and AR Items Manual Page 50 SABHRS Financials Training
Write Off To adjust (write off) an item or a portion of an item on a customer’s account, select the write off action from the Entry Type drop down list.
Select the item(s) to be adjusted by clicking the select box in the appropriate row and enter the amount to be adjusted in the Balance field, or leave the existing amount in place to write off the remaining balance of the item. Enter or select the reason for the adjustment in the Reason column.
When finished, click the Save button. The worksheet must be approved before the customer’s account can be updated in the batch process.
Billing and AR Items Manual Page 51 SABHRS Financials Training
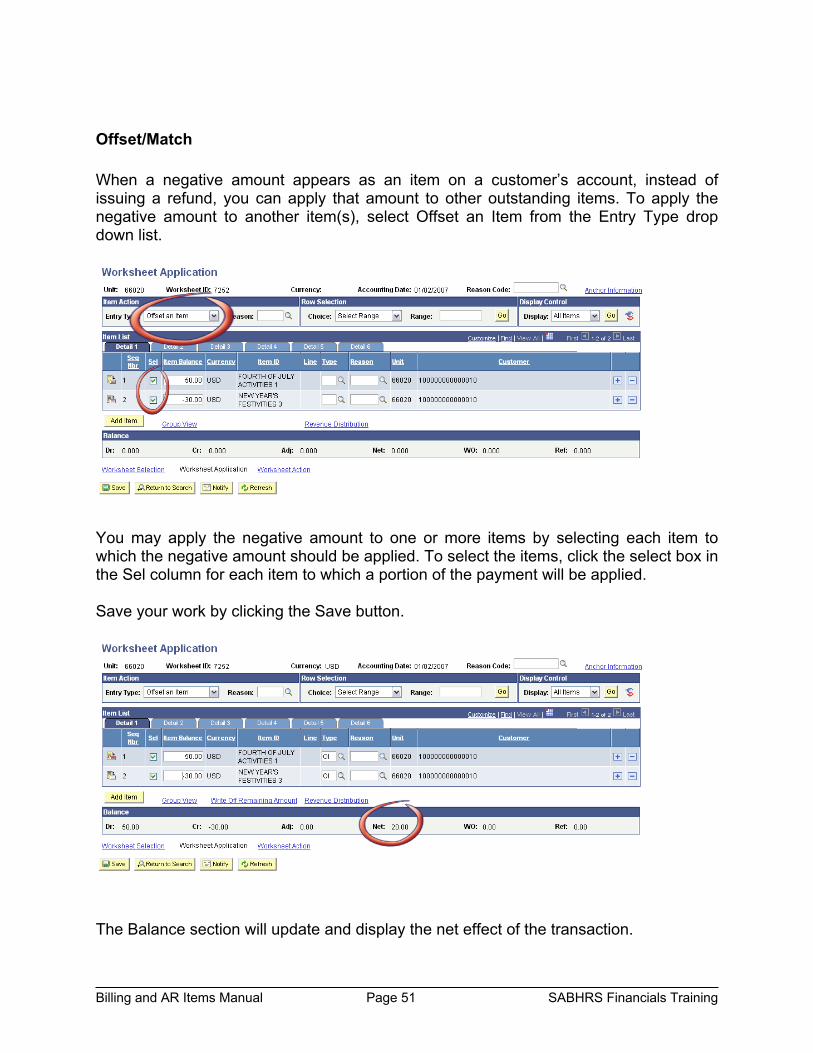
Offset/Match When a negative amount appears as an item on a customer’s account, instead of issuing a refund, you can apply that amount to other outstanding items. To apply the negative amount to another item(s), select Offset an Item from the Entry Type drop down list.
You may apply the negative amount to one or more items by selecting each item to which the negative amount should be applied. To select the items, click the select box in the Sel column for each item to which a portion of the payment will be applied. Save your work by clicking the Save button.
The Balance section will update and display the net effect of the transaction.

Billing and AR Items Manual Page 52 SABHRS Financials Training
Customer Correspondence The system provides flexibility in the statements and letters function that allows agencies to customize their customer communication in the way that best fits with their procedures and processes. Statements and letters can be created for all customers, a single customer, or a group of designated customers. You may optionally include finance and overdue charges, up to two different one-time charges, and with simple or compound interest, if desired. Agencies may print as many copies of the document as desired, and can review the document online, should a customer call with a question. Statements and letters automatically print the customer’s mailing information, and are formatted to fit into a window-sized envelope, for ease and efficiency in mailing. Statements Many agencies utilize the customer statements component as a way to invoice or bill the customer for receivables. To create customer statements, navigate to:
Accounts Receivable > Customer Interactions > Statements > Create Customer Statements
Select an existing run control or create a new one by clicking the Add a New Value tab.
Enter the desired run control ID (remember, no spaces allowed) and click the Add button. On the parameters page, enter the desired As of Date for the statements. Enter your business unit in the Unit field, or select it from a list of valid values by clicking the lookup icon . Enter or select the same value in the SetID field.

Billing and AR Items Manual Page 53 SABHRS Financials Training
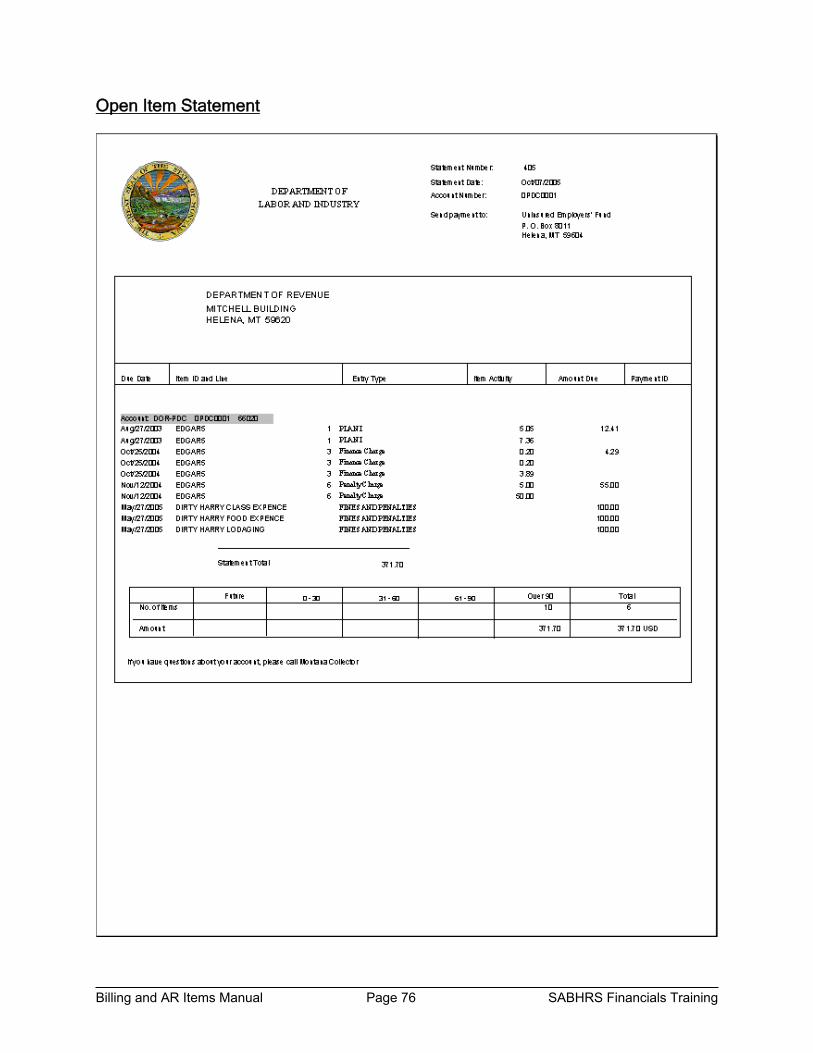
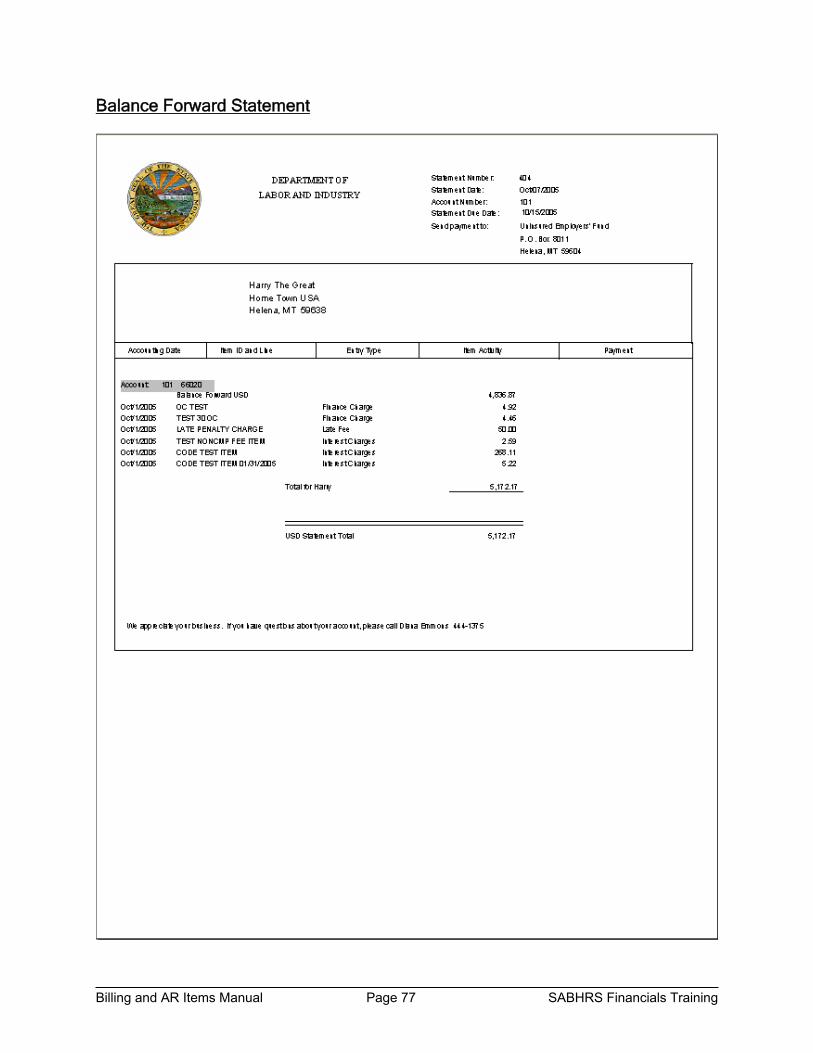
Select the type of statement you wish to produce by clicking the appropriate select box, such as Open Item or Balance Forward.
The Open Item statement lists all items owed by the customer, any payments received from the customer, and the age of the accounts (e.g., 10-30 days, over 90 days, etc.). The Balance Forward statement (which is less commonly run) lists the total amount of previous items that have not been paid off yet, and the new items added to the customer’s account, similar to a bill for a credit card. (See Appendix A for examples of each) If you wish to create a statement for a single customer, enter the customer ID in the Customer field, or select it from a list by clicking the lookup icon . By default, all statement groups are selected. If desired, you may send statements to a specific group of customers established by your agency by selecting the group from the Statement Group drop down list. When all parameters have been entered, click the Run button. On the Process Scheduler page, you may enter the date on which you want the statements generated or leave the current date in the Run Date field to run the statements immediately. Click the PS/AR Statements Select box and click the OK button to run the statements.

Billing and AR Items Manual Page 54 SABHRS Financials Training
To view the statement process, navigate to the Process Monitor. When the Run Status indicates success and the Distribution Status displays Posted, click the STATEMNT link in the Process Name column.
Click the link that corresponds with the type of statement you selected previously.
To view the report, go to Report Manager
Billing and AR Items Manual Page 55 SABHRS Financials Training
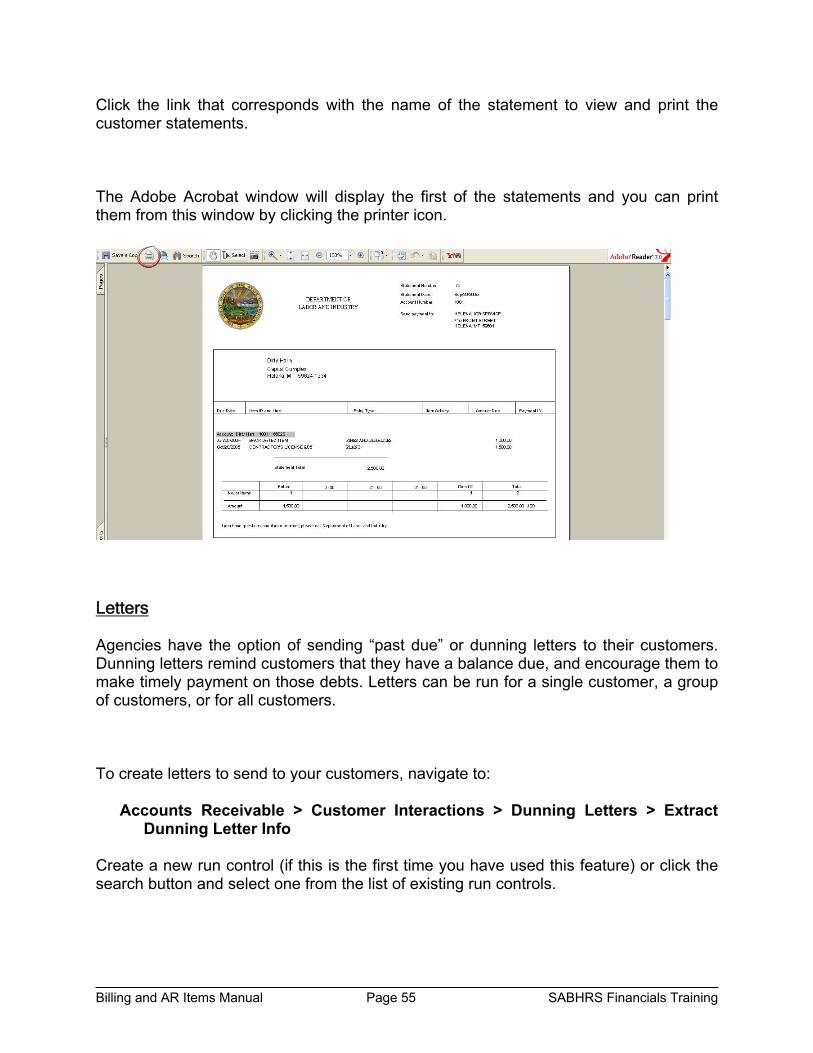
Click the link that corresponds with the name of the statement to view and print the customer statements. The Adobe Acrobat window will display the first of the statements and you can print them from this window by clicking the printer icon.
Letters Agencies have the option of sending “past due” or dunning letters to their customers. Dunning letters remind customers that they have a balance due, and encourage them to make timely payment on those debts. Letters can be run for a single customer, a group of customers, or for all customers. To create letters to send to your customers, navigate to:
Accounts Receivable > Customer Interactions > Dunning Letters > Extract Dunning Letter Info
Create a new run control (if this is the first time you have used this feature) or click the search button and select one from the list of existing run controls.
Billing and AR Items Manual Page 56 SABHRS Financials Training
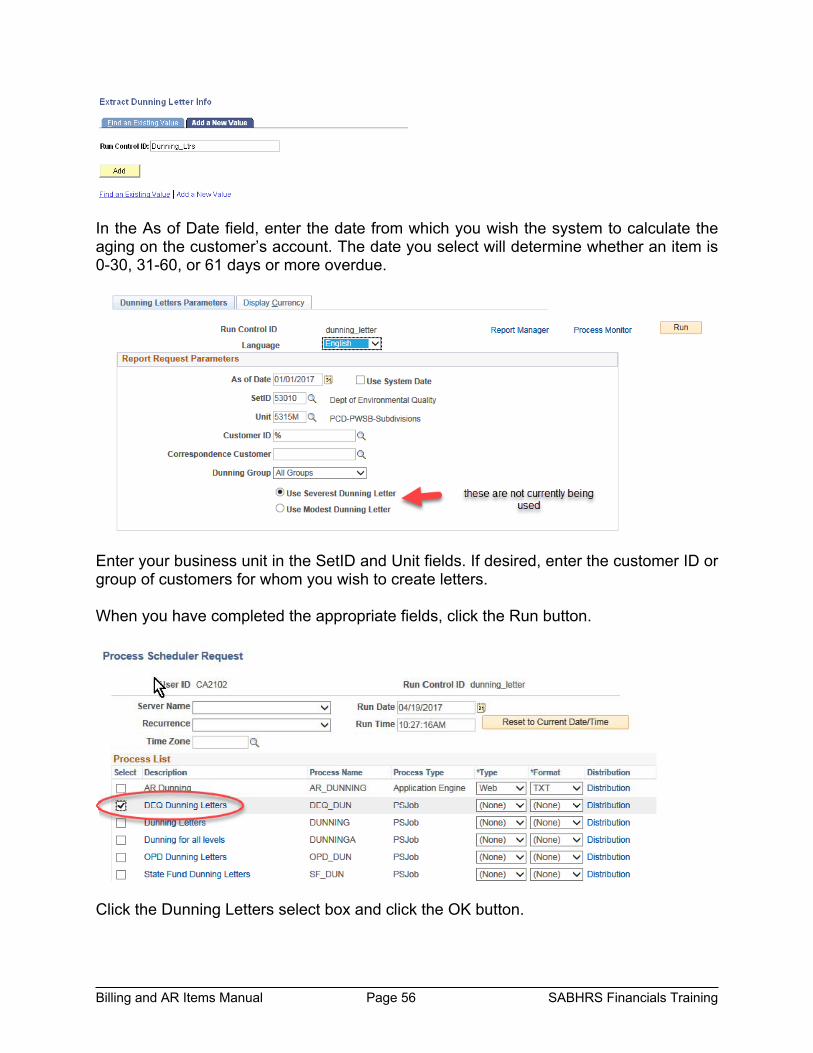
In the As of Date field, enter the date from which you wish the system to calculate the aging on the customer’s account. The date you select will determine whether an item is 0-30, 31-60, or 61 days or more overdue.
Enter your business unit in the SetID and Unit fields. If desired, enter the customer ID or group of customers for whom you wish to create letters. When you have completed the appropriate fields, click the Run button.
Click the Dunning Letters select box and click the OK button.
Billing and AR Items Manual Page 57 SABHRS Financials Training
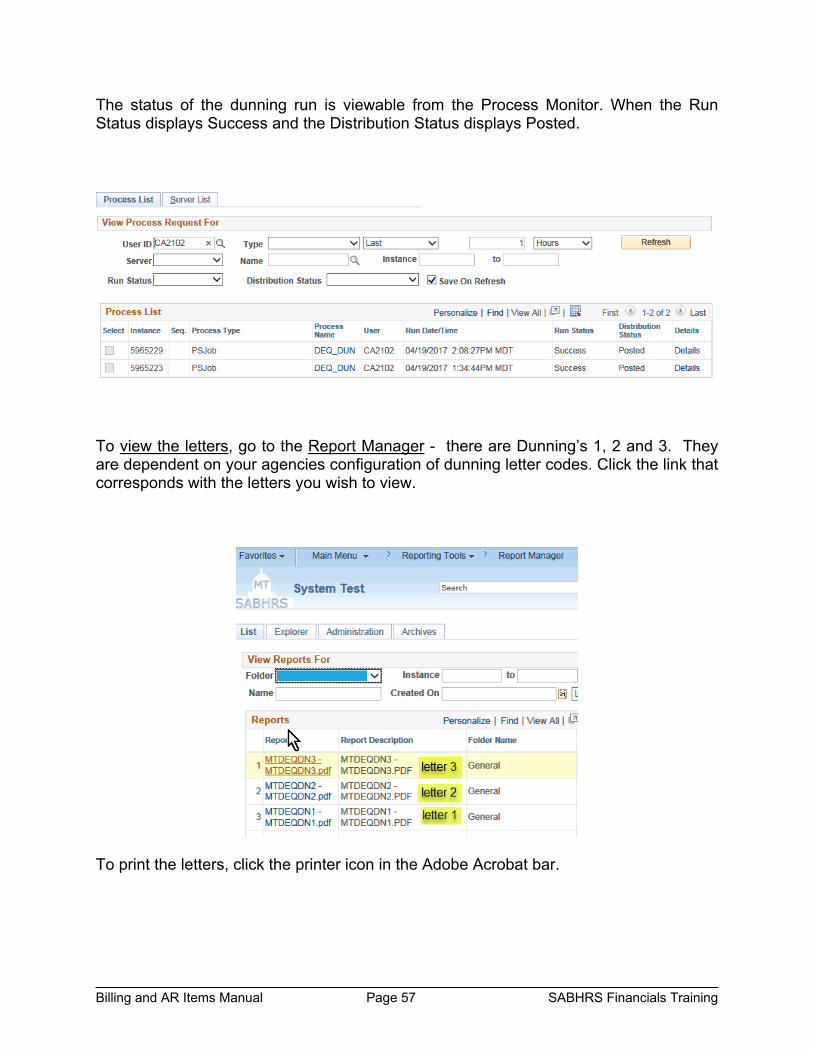
The status of the dunning run is viewable from the Process Monitor. When the Run Status displays Success and the Distribution Status displays Posted.
To view the letters, go to the Report Manager - there are Dunning’s 1, 2 and 3. They are dependent on your agencies configuration of dunning letter codes. Click the link that corresponds with the letters you wish to view.
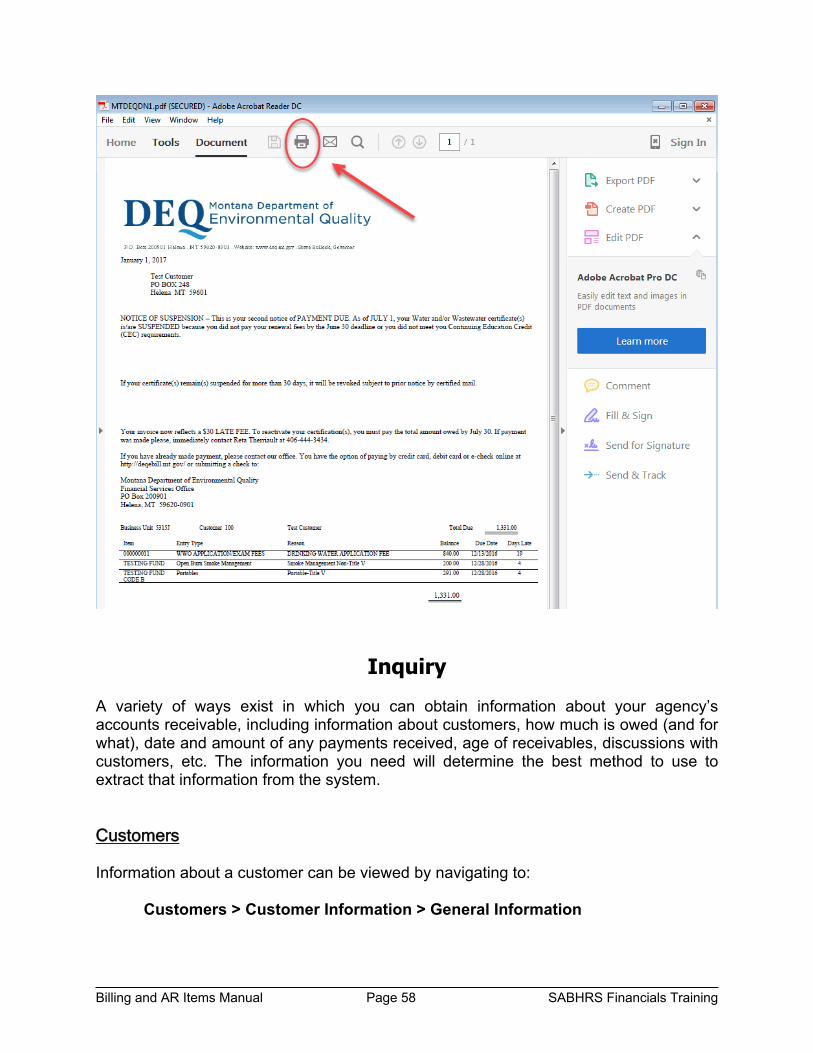
To print the letters, click the printer icon in the Adobe Acrobat bar.
Billing and AR Items Manual Page 58 SABHRS Financials Training
Inquiry A variety of ways exist in which you can obtain information about your agency’s accounts receivable, including information about customers, how much is owed (and for what), date and amount of any payments received, age of receivables, discussions with customers, etc. The information you need will determine the best method to use to extract that information from the system. Customers Information about a customer can be viewed by navigating to: Customers > Customer Information > General Information

Billing and AR Items Manual Page 59 SABHRS Financials Training
Customer Account
To get information about customers, such as how much is owed by a customer, date and amount of any payments, and a summary of the most recent activity on an account, navigate to:
Accounts Receivable > Customer Accounts > Customer Information > Account Overview
In the SetID and Unit fields, enter your business unit or select it from a list of valid values by clicking the lookup icon .

Billing and AR Items Manual Page 60 SABHRS Financials Training
Enter or select the customer ID in the Customer field and click the Search button. You may click any link on the page for more detail, if desired.
Click the Profile link or tab to view customer information and for links to the customer’s pending items, payments, or the complete list of items for the customer.
Billing and AR Items Manual Page 61 SABHRS Financials Training
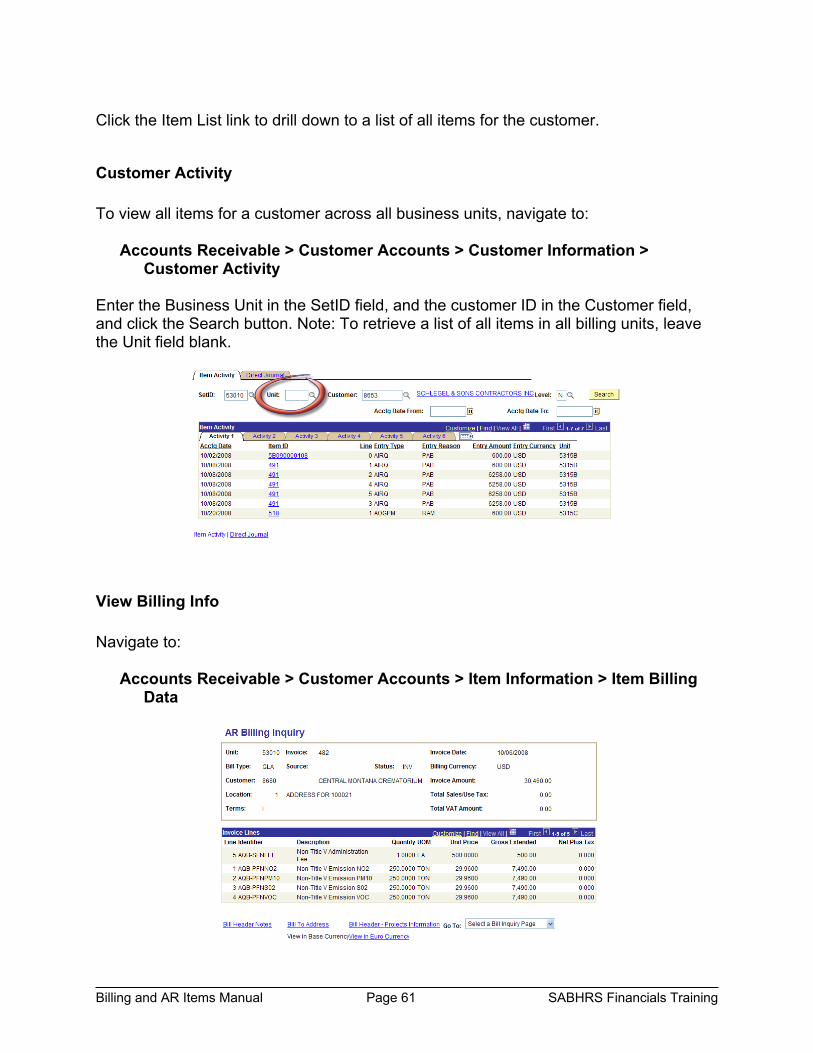
Click the Item List link to drill down to a list of all items for the customer.
Customer Activity To view all items for a customer across all business units, navigate to:
Accounts Receivable > Customer Accounts > Customer Information > Customer Activity
Enter the Business Unit in the SetID field, and the customer ID in the Customer field, and click the Search button. Note: To retrieve a list of all items in all billing units, leave the Unit field blank.
View Billing Info Navigate to:
Accounts Receivable > Customer Accounts > Item Information > Item Billing Data
Billing and AR Items Manual Page 62 SABHRS Financials Training
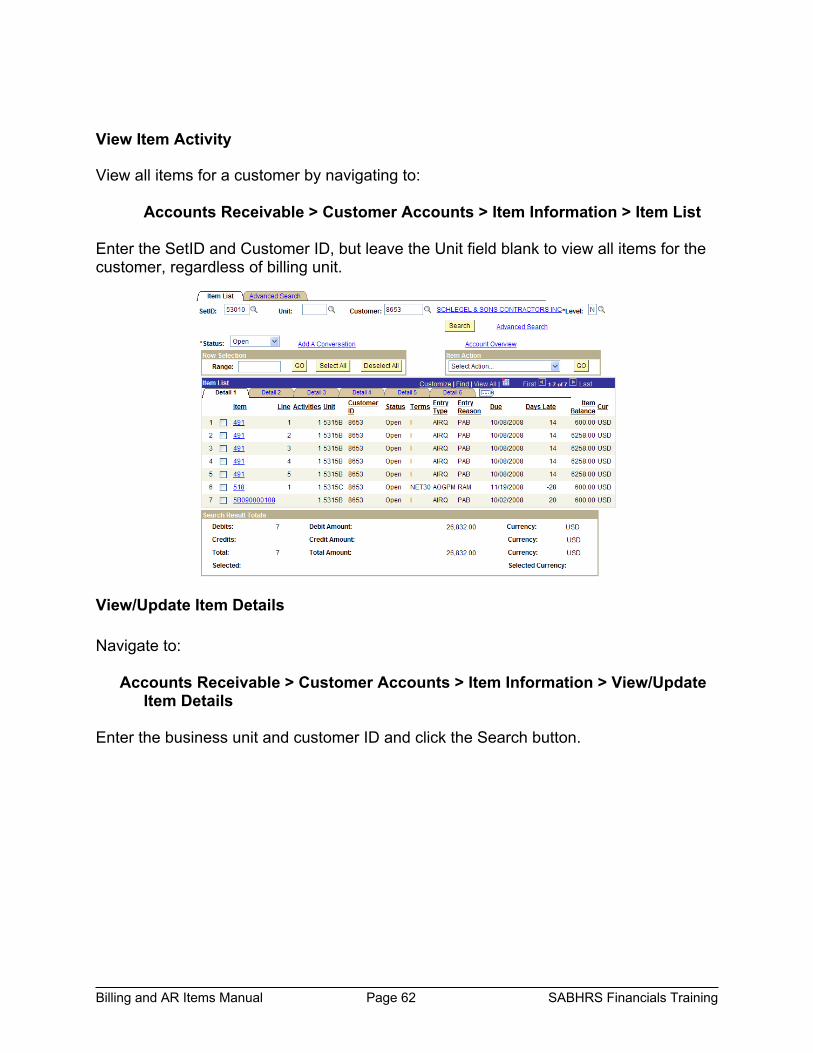
View Item Activity
View all items for a customer by navigating to:
Accounts Receivable > Customer Accounts > Item Information > Item List Enter the SetID and Customer ID, but leave the Unit field blank to view all items for the customer, regardless of billing unit.
View/Update Item Details Navigate to:
Accounts Receivable > Customer Accounts > Item Information > View/Update Item Details
Enter the business unit and customer ID and click the Search button.
Billing and AR Items Manual Page 63 SABHRS Financials Training
Receivables
Bills/Invoices
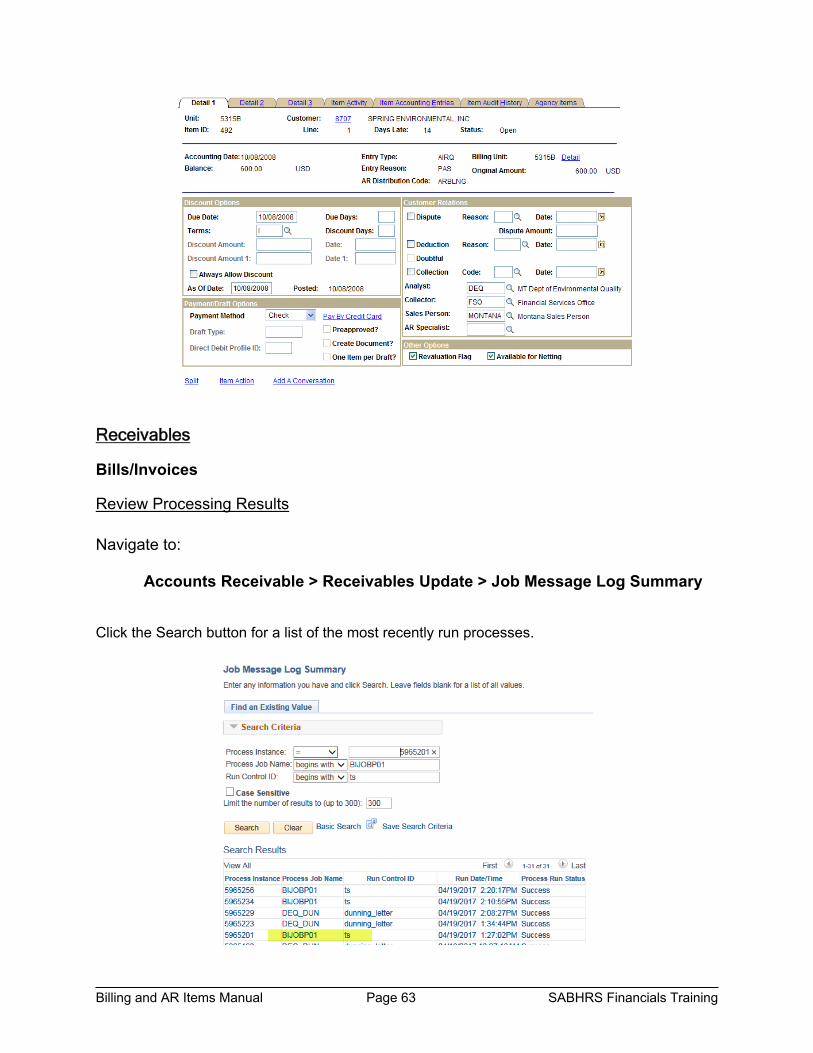
Review Processing Results
Navigate to:
Accounts Receivable > Receivables Update > Job Message Log Summary Click the Search button for a list of the most recently run processes.

Billing and AR Items Manual Page 64 SABHRS Financials Training
Click the most BIJOBP01 link closest to the top of the list to view the summary.

Billing and AR Items Manual Page 65 SABHRS Financials Training
Review Invoice Errors Invoices that have errors can be viewed by navigating to: Billing > Review Processing Results > Review Invoice Errors Click the Search button to retrieve the list of invoices with errors.
Review Billing Information Billing information can be reviewed in summary or detail format, by pending items, by groups of items, by invoice, or by journal, depending upon user preference. To review billing information, navigate to: Billing > Review Billing Information
View by: Description Notes Summary View summary of any bill Details View details of any bill; similar to info in Bill
Entry
AR Pending Items View groups of all bills loaded into AR Complete groups always show posting action of “No Action”
Review Entries by Invoice
View accounting entries by individual invoice
Use Billing BU
Review Entries by Journal
View accounting entries by journal Use General Ledger BU

Billing and AR Items Manual Page 66 SABHRS Financials Training
Correct Edit Errors To correct Edit errors, navigate to: Billing > Maintain Bills > Correct Staged Acctg Errors Enter the business unit(s) and/or invoices you wish to correct and click the Search button.
View Budget Checking Errors Navigate to:
Commitment Control > Review Budget Check Exceptions > Revenues > Billing Invoice
Enter the billing Business Unit and any other desired information, such as the type of exception. Click the Search button.
Select the transaction to review by clicking one of the links in the associated row. Note: The transaction can be re-budget checked from this page, when appropriate.
Billing and AR Items Manual Page 67 SABHRS Financials Training
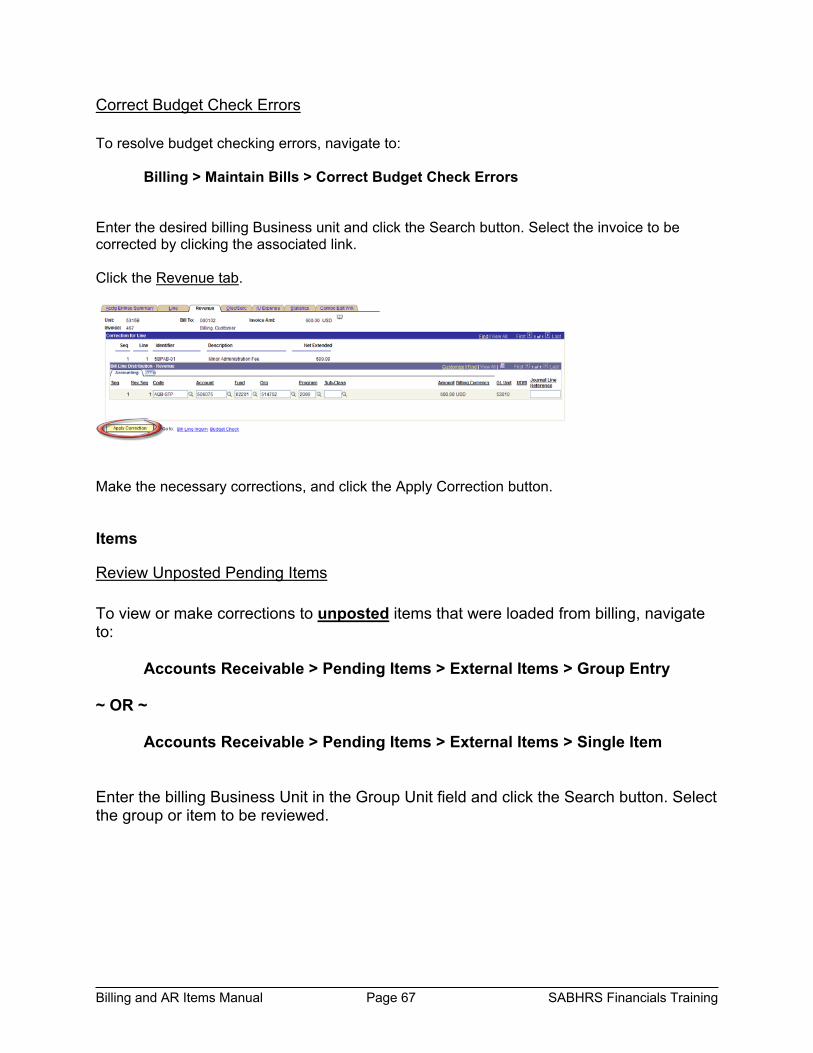
Correct Budget Check Errors To resolve budget checking errors, navigate to: Billing > Maintain Bills > Correct Budget Check Errors Enter the desired billing Business unit and click the Search button. Select the invoice to be corrected by clicking the associated link. Click the Revenue tab.
Make the necessary corrections, and click the Apply Correction button.
Items
Review Unposted Pending Items
To view or make corrections to unposted items that were loaded from billing, navigate to:
Accounts Receivable > Pending Items > External Items > Group Entry ~ OR ~ Accounts Receivable > Pending Items > External Items > Single Item Enter the billing Business Unit in the Group Unit field and click the Search button. Select the group or item to be reviewed.

Billing and AR Items Manual Page 68 SABHRS Financials Training
Review All Pending Items
To review a list of all pending items, navigate to: Accounts Receivable > Pending Items > Review Items Enter the billing Business Unit and any other criteria and click the Search button. Select the group or item to review by clicking the associated link. Payments
Review Payments
Navigate to: Accounts Receivable > Payments > Review Payments > By Unit All Payments Incomplete Deposits Incomplete Payments Payment Status
Billing and AR Items Manual Page 69 SABHRS Financials Training
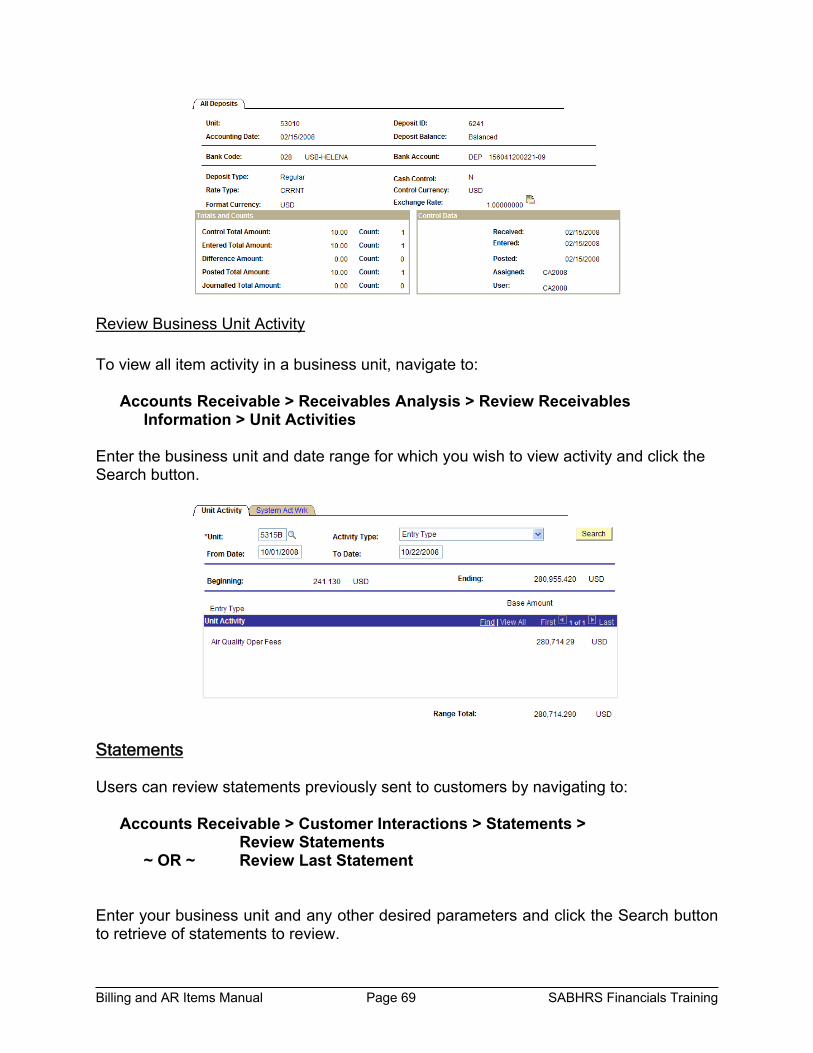
Review Business Unit Activity
To view all item activity in a business unit, navigate to:
Accounts Receivable > Receivables Analysis > Review Receivables Information > Unit Activities
Enter the business unit and date range for which you wish to view activity and click the Search button.
Statements Users can review statements previously sent to customers by navigating to:
Accounts Receivable > Customer Interactions > Statements > Review Statements
~ OR ~ Review Last Statement Enter your business unit and any other desired parameters and click the Search button to retrieve of statements to review.

Billing and AR Items Manual Page 70 SABHRS Financials Training
Select the statement you wish to review by clicking a link in the associated row. The Statements page displays information related to the selected statement.

Billing and AR Items Manual Page 71 SABHRS Financials Training
Letters Users can view letters previously sent to customers by navigating to:
Accounts Receivable > Customer Interactions > Dunning Letters > History of Letters
Enter your business unit and any other desired parameters and click the Search button to retrieve of letters to review.
Select the letter you wish to review by clicking a link in the associated row. Use the Next in List and Previous in List buttons to move through the list of letters.
Billing and AR Items Manual Page 72 SABHRS Financials Training
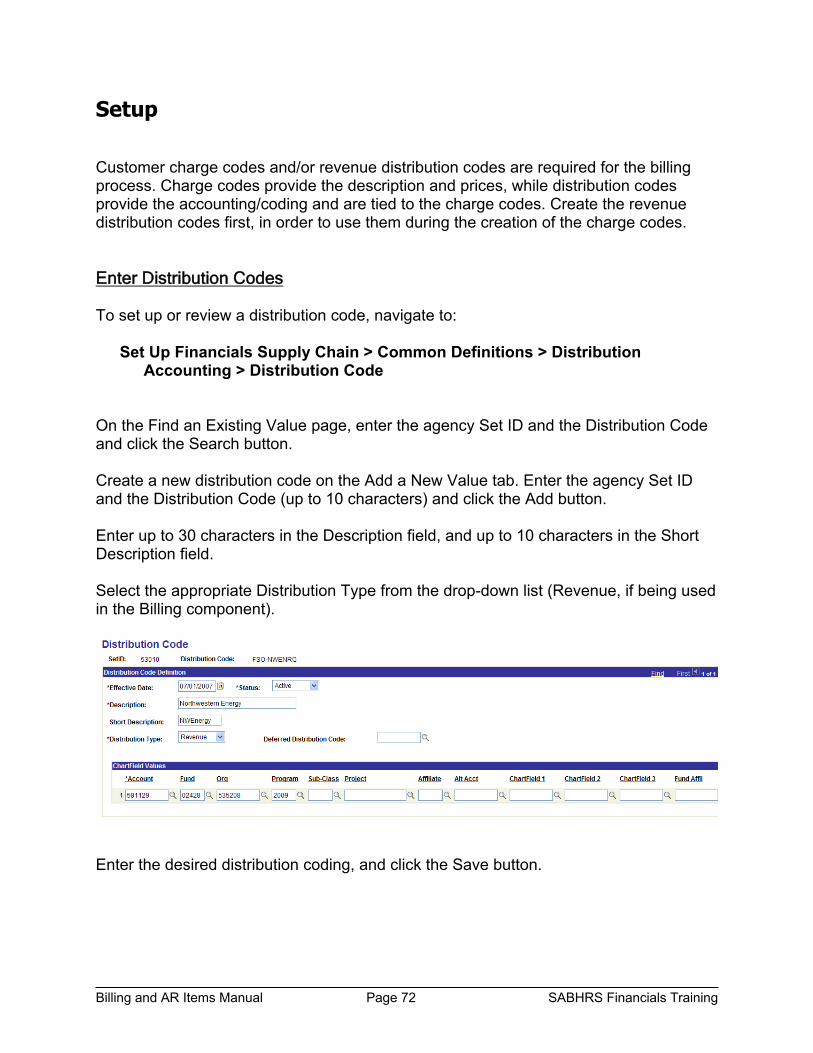
Setup Customer charge codes and/or revenue distribution codes are required for the billing process. Charge codes provide the description and prices, while distribution codes provide the accounting/coding and are tied to the charge codes. Create the revenue distribution codes first, in order to use them during the creation of the charge codes. Enter Distribution Codes To set up or review a distribution code, navigate to:
Set Up Financials Supply Chain > Common Definitions > Distribution Accounting > Distribution Code
On the Find an Existing Value page, enter the agency Set ID and the Distribution Code and click the Search button. Create a new distribution code on the Add a New Value tab. Enter the agency Set ID and the Distribution Code (up to 10 characters) and click the Add button. Enter up to 30 characters in the Description field, and up to 10 characters in the Short Description field. Select the appropriate Distribution Type from the drop-down list (Revenue, if being used in the Billing component).
Enter the desired distribution coding, and click the Save button.

Billing and AR Items Manual Page 73 SABHRS Financials Training
Enter Charge Codes To set up or review a charge code, navigate to:
Set Up Financials/Supply Chain > Product Related > Billing > Setup > Charge Code
Input the search criteria and click the search button to review an existing charge code. To create a new charge code, click the Add a New Value tab. Enter the agency Set ID and the new Billing Charge ID. Select USD for the Billing Currency and click the Add button. Select the desired Unit of Measure. In the List Price field, enter the cost per item. Enter a description of the item (up to 30 characters). If desired, enter additional information in the Long Description field.
Select or enter the desired Revenue Distribution Code. Ensure the Revenue Recognition Basis indicates Invoice Date. From the Transaction Type drop down list, select Sale. Ensure the Transaction Sub Type displays “None” and click the Save button.

Billing and AR Items Manual Page 74 SABHRS Financials Training
Enter Invoice Notes To review or enter new notes that can be printed on an invoice, navigate to:
Set Up Financials/Supply Chain > Common Definitions > Notes > Standard Notes
Select or enter the Set ID and desired Standard Note Code, and click the Add button. Update the Effective Date field, if necessary. Enter the note Description (up to 30 characters) and select the desired Note Type.
In the Text field, enter the information to be associated with the document when users opt to add a header or line note. Select or enter a document type from the Document field in the Print on Document section. Additional document types can be added by clicking the Add a new row button. Click the Save button.

Billing and AR Items Manual Page 75 SABHRS Financials Training
Appendix A
Billing and AR Items Manual Page 76 SABHRS Financials Training
Open Item Statement
Billing and AR Items Manual Page 77 SABHRS Financials Training
Balance Forward Statement