ruby on railsmak/archive/cmpe131/ror_rev1.0.3_26012017.pdf · melvin h’ng...
TRANSCRIPT

Ruby On Rails Installation Guide Installing Ruby On Rails on Windows PCs
Class Material for Prof. Ronald Mak
CMPE 131 Software Engineering I, Spring 2017
Melvin Ch’ng
Rev 1.0.3
January 26, 2017

Melvin Ch’ng [email protected]
1
Note:
The following guide was tested on machine running Windows 8.1 Professional 64-bit and
Windows 10 Professional 64-bit. It should work on any machine that runs on modern Windows
Operating System.
You may follow this video tutorial. However, you may receive “SSL_connect” error. If you received “SSL_connect” error after creating your Website or while trying to start your server, please read Chapter 3.1, Generate a new Rails Application.
If you received “SSL Certificate Error” while installing Rails or pull updates from RubyGems.org, please read Chapter 2.4, Change RubyGems’ Source.
#include <std_disclaimer.h>
/*
*
* Anyone including myself are not responsible for bricked computer,
* dead hard drives, thermonuclear war, or you getting fired
* because the installation failed. Please do some research if you
* have any concerns about all the installation files required in this
* guide before installing it! YOU are choosing to make these
* modifications, and if you point the finger at us for messing up
* your machine, we will laugh at you.
*
* I do not own, modify, or host any of the files included in this
* installation guide.
*
*/

Melvin Ch’ng [email protected]
2
Chapter 1. Obtaining Required Files
If you already have a copy of Ruby and Rails installed on your machine, it is recommended to remove them from your machine. To begin, determine your Windows Architecture and obtain the URL to the files from correct table below. Table 1.1. Required files for 32-bits Operating System
File File Name
Ruby 2.2.3 Installer rubyinstaller-2.2.3.exe
Development Kit DevKit-mingw64-32-4.7.2-20130224-1151-sfx.exe
Node.JS node-v4.6.0-x86.msi
Table 1.2. Required files for 64-bits Operating System
File Name File Name
Ruby 2.2.3 Installer rubyinstaller-2.2.3-x64.exe
Development Kit DevKit-mingw64-64-4.7.2-20130224-1432-sfx.exe
Node.JS node-v4.6.0-x64.msi
Note: It is highly recommended to use Ruby 2.2.3 instead of other version available.

Melvin Ch’ng [email protected]
3
Chapter 2. Installation
2.1 Ruby Installation
Run the Ruby Installer and the following screen should show up. Accept the license agreement and proceed to the next step by pressing the “Next” button.
Check “Add Ruby executables to your PATH” and complete the installation by pressing the “Install”
button.

Melvin Ch’ng [email protected]
4
2.2 DevKit Installation and Setup
The download is a self-extracting archive. When you execute the file, it’ll ask you for a destination for
the files. Enter a path that has no spaces in it. I recommend something simple, like C:\DevKit\. Click
“Extract” and wait until the process is finished.
Next, you need to initialize the DevKit and bind it to your Ruby installation. Open your favorite
command line tool and navigate to the folder you extracted the DevKit into.
cd C:\DevKit
Auto-detect Ruby installations and add them to a configuration file for the next step.
ruby dk.rb init
Install the DevKit, binding it to your Ruby installation.
ruby dk.rb install
A similar output as shown in the command line tool shows that the binding process is completed
successfully without any error.

Melvin Ch’ng [email protected]
5
2.3 Node.JS Installation
Run the Ruby Installer and the following screen should show up.
Accept the license agreement and proceed to the next step by pressing the “Next” button.
Complete the installation by going through each steps.

Melvin Ch’ng [email protected]
6
2.4 Change RubyGems’ Source
To avoid receiving SSL error when trying to install Rails or pull updates from RubyGems, open your
favorite command line tool and enter the following commands below.
gem sources -r https://rubygems.org/
gem sources -a http://rubygems.org/
A similar output as shown below will be generated from the command line tool after you inputted the
second command.
Input the character y to the command line tool to add http://rubygems.org/ to sources.
Note: The screenshot below shows the second command only. Please run both of the commands.

Melvin Ch’ng [email protected]
7
2.5 Rails Installation
Open your favorite command line tool and insert the following command below.
gem install rails
A similar output as shown below will be generated from the command line tool.
To verify that you have successfully installed both Ruby and Rails, enter the following command.
Ruby –v
Rails -v
A similar output as shown below will be generated from the command line tool.
Note: Please close all the command line tool windows on your desktop before proceeding to Chapter 3.

Melvin Ch’ng [email protected]
8
Chapter 3. Create a Rails Application
To create your website, it is highly recommending to create a folder name Code in the Ruby file
directory. The purpose the folder Code is to store all your source code folder. The Ruby folder location
may vary depending on your Operating System Architecture.
3.1 Generate a new Rails Application
To create a sample application named Blog, enter the following command to command line tool.
Rails new Blog
A similar output as shown below will be generated from the command line tool.
You may or may not receive “SSL_connect” error, as shown in the screenshot below.
It is recommended to not to skip the steps below even if you are not having “SSL_connect” error. To
resolve this error, navigate to the root of your source code and open “Gemfile” using your preferred text
editor. A sample screenshot of the opening Gemfile is shown below.

Melvin Ch’ng [email protected]
9
After opening the Gemfile, replace “https” with “http” (line 1) and save the file. The “SSL_connect”
should be resolved now.
Melvin Ch’ng [email protected]
10
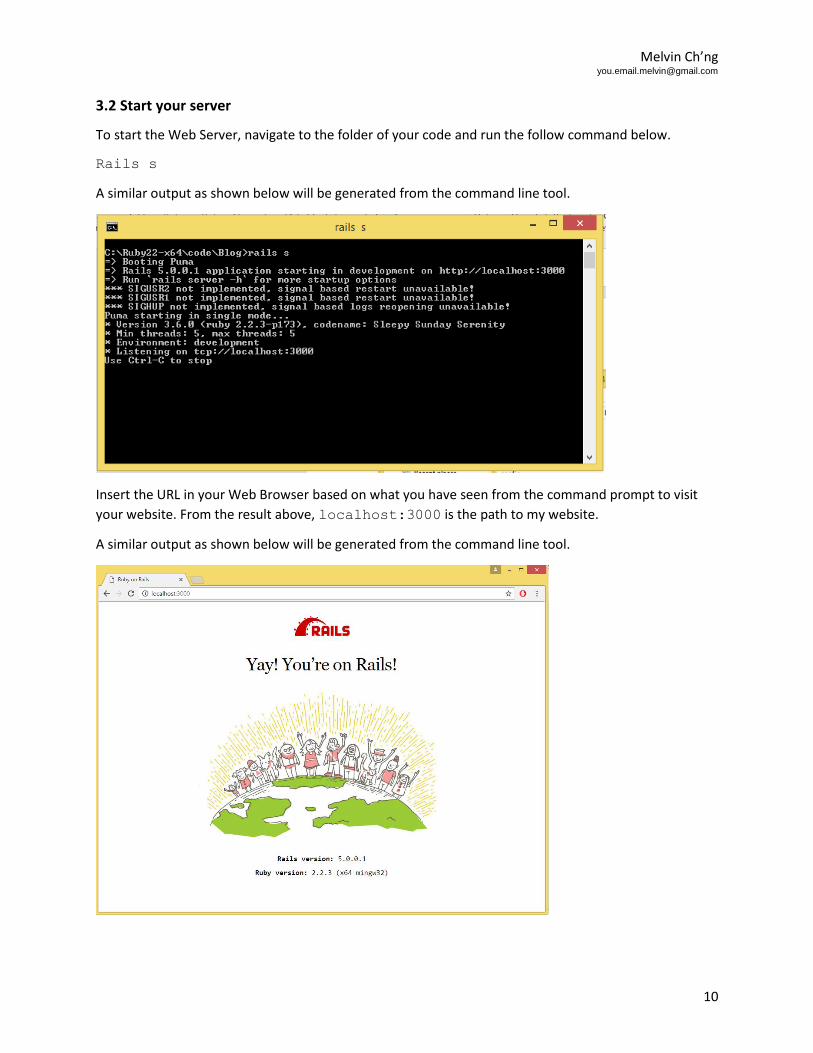
3.2 Start your server
To start the Web Server, navigate to the folder of your code and run the follow command below.
Rails s
A similar output as shown below will be generated from the command line tool.
Insert the URL in your Web Browser based on what you have seen from the command prompt to visit
your website. From the result above, localhost:3000 is the path to my website.
A similar output as shown below will be generated from the command line tool.

Melvin Ch’ng [email protected]
11
3.3 Generate a simple MVC
To verify that Ruby and Rails were installed correctly without any errors, use the command scaffold
generate a simple set of a model, views, and controller for Rails Application.
Rails g scaffold User name:string age:integer
A similar output as shown below will be generated from the command line tool.
Note: A second command line tool window is opened to prevent termination of local Web Server.
Run the command rake db:migrate to migrate the database generated by the command
scaffold to local database server.
A similar output as shown below will be generated from the command line tool.

Melvin Ch’ng [email protected]
12
Navigate to the index page of newly generated page by entering the path at your browser.
localhost:3000/users
The index page of Users will be generated as shown in the screenshot below.
To make sure that the application is working and does not throw any error when new data are
committed to the database, press the link “New User” to insert a new sample data set. A form will be
rendered. Populate the form with any sample data that you prefer and press “Create User”. A
screenshot of the form with sample data is attached below.

Melvin Ch’ng [email protected]
13
An alert message “User was successfully created” will be shown on the screen if the data is inserted into
the database. A screenshot of the alert message is attached below.
To redirect to the index page of Users, press the “Back” bottom. By looking at the screenshot of the
Command Line Tool, we can see that the Users index page was being rendered.
Picture below shows a picture of Users index page with the data that populated in the form earlier.
