rtr driver’s education manual
TRANSCRIPT

RTR Driver’s Education Manual
RTR PCA – Tech – Rev 02-09-2014 Page 1
Dear RTR Driver’s Ed Participant:
The RTR Driver’s Education Manual attempts to outline everything you’ll need to know to have
successful RTR Events. It is a useful overview for all levels of drivers but was written with newcomers
in mind. To this end, the manual is broken into four sections, each focusing on different levels of
knowledge and experience.
Section 1 – Introduction to RTR Driver’s Ed Events
For people who are new to track events and for experienced Driver’s Ed drivers who are new to “The
RTR Way”. It covers how to both prepare before you come to the event and what to do on the day of
the event. It gives an overview of what to expect when you get to the track, including who the people
are, what the track layout will be, and what the daily schedule will look like. Finally, it covers important
information that every driver should know while attending our events.
Section 2 – Key Driving Concepts
Section 2 reviews the cornerstones of street or track driving. We go over the importance of track
awareness, how to maintain traction, key components of braking, steering and accelerating, and the
basics of cornering.
Section 3 – Advanced Driving Techniques
Designed for the next two levels of students, Blue or White Run Group drivers, this section assumes
that the driver is confident in the basics of track driving and wishes to improve their driving by learning
new techniques and upgrading their equipment.
Section 4 – Reference Materials
For all drivers, this section includes track maps, get-ready checklists, a bibliography, and a glossary.
We hope you enjoy this manual. If you have any comments or suggestions, please email us at:

RTR Driver’s Education Manual
RTR PCA – Tech – Rev 02-09-2014 Page 2
SECTION 1 – INTRODUCTION TO RIESENTÖTER DRIVER’S ED EVENTS ............ 3
1.1 Driver’s Education Preparation ....................................................................................................................... 3
1.2 What to Expect at the Track ............................................................................................................................ 5
1.3 Ready, Set, Go ...................................................................................................................................................11
SECTION 2 – KEY DRIVING CONCEPTS ................................................................. 14
2.1 Track Awareness ............................................................................................................................................. 14
2.2 Traction ............................................................................................................................................................ 14
2.3 Braking ............................................................................................................................................................. 15
2.4 Steering and Cornering ................................................................................................................................... 16
2.5 Gear and Throttle Control ............................................................................................................................. 20
SECTION 3 – ADVANCED DRIVING TECHNIQUES ................................................ 22
3.1 Threshold Braking/Trail Braking .................................................................................................................. 22
3.2 Heel and Toe/Double Clutching ..................................................................................................................... 22
3.3 Advanced Car Stuff & Goodies ...................................................................................................................... 23
SECTION 4 – REFERENCE MATERIALS ................................................................. 26
4.1 Track Maps ...................................................................................................................................................... 26
4.1.1 Pocono East ..................................................................................................................................... 26
4.1.2 Pocono North ...................................................................................................................................27
4.1.3 Pocono Double Infield .....................................................................................................................28
4.1.4 Summit Point Main/Jefferson/Shenandoah ............................................................................ 29, 30
4.1.5 NJMP/Lightning ..............................................................................................................................30
4.1.6 Watkins Glen .................................................................................................................................. 31
4.1.7 Palmer Motorsports ....................................................................................................................... 32
4.2 Check list .......................................................................................................................................................... 33
4.3 Forms and waivers .......................................................................................................................................... 33
4.4 Glossary ............................................................................................................................................................ 34

RTR Driver’s Education Manual
RTR PCA – Tech – Rev 02-09-2014 Page 3
SECTION 1 – Introduction to RTR Driver’s Ed Events
Welcome to RTR Driver’s Ed. We hope that you leave our events with a better understanding of
precision driving skills, a more intimate knowledge of your car, and the desire to continue testing your
driving ability at other Driver’s Ed events.
If this is your first time at an RTR event, we have only one piece of advice - join the camaraderie.
You’ll learn more and will have a lot more fun if you get to know the other people at the track. There
are a wide variety of people attending, from those who have been doing track events for more than
20 years, to newcomers like you. There are people who discuss the finer points of gear tooth profiles,
and those who never look for their dipsticks. Some drive the latest models with PDK transmissions
and anti-lock brakes, while others drive 30-year-old classics with barely four speeds. They all have
one thing in common – they are interested in improving their driving skills.
This manual will reference run group categories in which we divide up drivers by skill level and
experience:
Green – Beginning students
Blue – Advanced students
White – Intermediate drivers
Black – Advanced drivers
Red - Instructors
Note: Some instructors run in the White and Black run groups
1.1 Driver’s Education Preparation
Clothing
Attire is extremely important. Track clothing should accomplish two things; keep you comfortable and
keep you safe.
On the track, you must wear short or long-sleeved shirts and long pants made of natural fibers (e.g.,
cotton, wool, linen). These materials are comfortable and are less flammable than synthetics. Your
clothing should allow for unrestricted movement to react quickly.
Driving footwear must be closed toe and the soles should be small and flat (no heavy hiking boots or fancy running shoes). Plain sneakers or leather driving shoes are ideal.
While not on track dress for the weather – shorts and t-shirts or polar fleece. Just remember to change before you get back in your car. It is a good idea to be prepared for a broad set of weather extremes.

RTR Driver’s Education Manual
RTR PCA – Tech – Rev 02-09-2014 Page 4
Safety Equipment
There is a wide variety of safety equipment available for you and your car, and each car club has its
own set of requirements. There is one piece of equipment that is MANDATORY for RTR Driver’s Ed
events – a helmet.
Your helmet must have a Snell rating that is either the current or just prior Snell rating (i.e. in 2021,
the current Snell rating is 2020 and the prior Snell rating is 2015) – either a Special Applications”(SA)
automotive helmet or a Motorcycle (M) helmet. DOT-only rated helmets are not acceptable. If you’re
buying a helmet specifically for Driver’s Ed events, get an SA helmet. Full-face helmets are
considerably safer than open-face helmets, and make using an electronic communicator between
Instructor and student much easier.
For information about other safety equipment including fire extinguishers, Driving suits, harnesses,
and roll cages, refer to Section 3.3.
Preparing Your Car
Pre-Event Inspection
Before attending a Driver’s Ed event, you must have your car inspected by a certified technician.
This inspection is required to ensure that your car is safe enough to drive under track conditions.
Check the RTR website www.rtr-pca.org for the latest tech form.
Self-Diagnosis during the Event
As the day wears on, your car will change because of the forces acting on it and you’ll need to
continually examine your vehicle. You should monitor at least the following throughout the
event:
1) Tire wear and pressure - Check your tires after every session for nicks, punctures, or worn
areas. Uneven tire wear is a sign that you should consider swapping tires (switch lefts and
rights). Check tire pressure after each track session. Tire pressure typically increase more
than 5 PSI during track sessions. Check “hot” tire pressures immediately following each run
group session as soon as you return to the paddock and adjust as necessary. Don’t forget to
add air before leaving each day, if you drive to and from the track.
2) Oil level and temperature - Check the oil level before every session and add oil as needed.
Get in the habit of checking the oil gauge on the track and monitor oil temperature regularly
while driving.
3) Coolant temperature - As with oil, monitor your coolant temperature regularly while on the
track. If you get a reading in the red zone or no reading (overheating coolant or bad gauge),
you should end your session early and analyze the situation in the paddock
4) Fuel level - You’ll consume considerably more gas on the track than on the street. If you’re
not sure whether you have enough to make it through an entire session, get more gas.
Running out of gas and shutting down the track for a tow is not the way to make friends..
5) Brakes - Many people take their brakes for granted. While your mechanic looked at your
brakes during the tech inspection, hard driving takes its toll on these most important safety
devices. Most newer cars have an indicator light that warns you when the brake pads are
getting thin. Still you should examine the brake pads yourself. If you don’t know how to do
that, ask your instructor! Note: If the brake pedal ever starts to feel “soft” or “spongy,” pit in
immediately, tell your instructor, and again, analyze the problem in the paddock.

RTR Driver’s Education Manual
RTR PCA – Tech – Rev 02-09-2014 Page 5
1.2 What to Expect at the Track
This section discusses what will happen when you get to the track, getting your parking space, registration, setting up your car, event staff, the layout of the area, and work assignments.
What to Do When You Get There
1) Get through the Gates - There will likely be a long line at the gate when you reach the track –
it sometimes takes more than a half an hour to get through, so leave yourself plenty of time in
the morning to get in and set up. RTR’s different venues have varying gate opening
procedures. Check the RTR Event welcome package for the schedule. When you get to the
front gate, you will have to sign a track liability waiver form. Everyone entering the track,
including drivers and spectators, must sign the track waiver each day.
2) Find a Spot to Park – Many people “mark” their parking area by laying down a tarp and putting
their belongings on top of or alongside their space. Allow plenty of room for you and your
neighbors to maneuver. Some tracks have garages available for drivers (e.g. Watkins Glen
and Pocono) on a first-come-first-served basis (or they are assigned by the event organizer).
A single garage stall is shared by two or three cars, so if you show up early, leave room for
others. Some participants bring their cars on trailers and need extra room to load and unload
their cars. Please be mindful of the space in front of the trailer for the tow vehicle.
3) Register for the Event – Registration is required prior to grid tech. Find the registration table
and tell the registrar your name and present your current, valid driver’s license. Lines are
formed based on your assigned run group (Green, Blue, White, Black, or Red). After signing
the PCA waiver, you will receive a wristband with the same color. You’ll also receive an event
schedule and be assigned a work assignment, if applicable. Bring your helmet to registration
so the tech team can confirm that your helmet has the current Snell rating.
4) Prepare your car for driving:
Provide a clear, unobstructed view from within the car — Remove all items that may obstruct your view (e.g., fuzzy dice hanging from mirror, unnecessary stickers, and items in rear window ledge).
Make your vehicle easily identifiable — your event welcome letter includes the car number
that you must use for this event. It is your responsibility to mark your car on both sides so
that this number is legible from at least 200 feet away. You may write the number on both
side-rear windows with white shoe polish, form the number with duct/painters tape on both
doors (careful, though, because duct tape is hard to take off), or make your own stick-on
numbers at home (contact paper works great and comes off easily). If you use magnetic
numbers, tape the leading edge down, as these numbers tend to fly off easily.
Protect yourself from flying objects — Remove all objects that may come loose, including
everything in the glove compartment, all floor mats (front and rear), radar detectors and
cellular phones, soda bottles under the seats, items in the map pockets, and the spare tire
(except for rear-engine Porsches, which use the spare for crash protection).
Prevent excessive tire wear and safety problems — Check your tire pressure on the day of
the event. Typically, hot tire pressures should be a little higher than what is recommended
in the Owner’s Manual or the door sticker. If you’re not sure where to start, ask someone
with a similar car or a Tech Inspector (see the section on “People at the Track”). Remember
that as tires warm, the pressure increases, so take this into account when filling your cold
tires with air.
Protect your car from on-track debris — you’ll notice that many people put duct/painters tape
on their headlights, leading edge of the hood, and on the backs of side-view mirrors. Debris
on the track can scuff or even break these items, and taping those helps protect the paint,
chrome, and glass.

RTR Driver’s Education Manual
RTR PCA – Tech – Rev 02-09-2014 Page 6
5) Go through Grid Tech - Each day you take your car on the track you will go through a morning
grid tech. This is a final check of your car to ensure that your car is ready for the track. The
grid technicians will check the items on the Tech/Grid Inspection Form. If you pass grid tech,
the technician will put an “Inspected” sticker on your windshield. You’ll need to go through Grid
Tech each morning you’ll be driving. Grid Tech closes just prior to the driver’s meeting. Anyone
missing or late to tech will have their tech inspection completed at the Inspectors’ convenience.
6) Go to the Drivers’ Meeting – Early each day of the event, RTR hosts a mandatory drivers’
meeting to introduce the organizers, discuss the schedule, review the flags, and explain the
rules of the event. All participants must be on time to the drivers’ meeting.
People at the Track
With the exception of the Corner Workers, your registration pack should clearly identify the names
of the people in each of the following key roles.
Track Chair — The Track Chair is responsible for the entire event. They will run the Drivers’
Meeting, coordinate the worker assignments, run or delegate the radio “control” (see Work
Assignment section), and is the ultimate authority on all issues.
Chief Instructors — The Chief Instructor is responsible for the in-car instructors and the
classroom activities. If you have questions or problems with your instructor, don’t hesitate to
discuss it with the Chief Instructor.
Registrars — The Registrar is in charge of verifying your registration, ensuring you sign the
PCA waiver, and has coordinated your welcome packet.
Safety Chair/Tech Inspectors — The Tech Inspectors ensure that your vehicle is safe and
prepared to drive on the tack. If it is not, you will have to address the condition or you will
not be permitted to drive.
Pit Marshall – The Pit Marshall is responsible to assemble cars in the hot pits, check for
run group eligibility and release cars to the track.
Corner Workers (AKA Flaggers) — Corner Workers are stationed at key points on the track,
where they act as communication devices for the drivers and the Crew Chief. Corner Workers
use flags to signal drivers, telling them about obstructions on the track, indicating that they
should pit in or pull over, or that there is a faster car overtaking them. One corner worker at
pit out, the Crew Chief, will direct cars onto the track from pit lane.
Your Instructor — Green and Blue Run Group drivers will be assigned an instructor. All
instructors have been approved by the RTR Chief Instructor and have a great deal of
experience on the track. Your instructor will ride in the passenger seat of your car and provide
instructions before you start out on the track, while you are driving, and after you pit in.
Drivers — All drivers are assigned to one of five run groups based on experience and ability.
Beginners are Green students. With experience and demonstrating advancing safety, skill
and track awareness Green students are promoted to Blue. When students have mastered
the basic techniques of performance driving and are safe to drive without an instructor they
drive with the White Run Group. The most experienced drivers are in the Black and Red Run
Group.
Students are promoted to the next level upon recommendation of their instructors. In the
advanced run groups (white and black), students will be “checked out” by the Chief Instructor
before being moved up. This requires a senior instructor riding along as an observer to
provide a second opinion. You may also hear students talking about being signed off or
soloed. This term is used when an Instructor feels that a Green or Blue student is doing well
enough to drive alone in their current run group, but should not be considered a run group
promotion.
RTR Driver’s Education Manual
RTR PCA – Tech – Rev 02-09-2014 Page 7
Layout of Paddock Area
There are four main parts of the paddock area:
Pit — The pit is the area just outside of the actual track, where cars enter and leave the track
(pit out and pit in, respectively). There is sometimes another area within the pit where cars
can line up to pit out (called the False Grid.) Even though speeds in the pit are to be kept to
a minimum, it is a hazardous place to stand unprotected.
Paddock/Garages — The paddock or garages are where you park your car between run
groups. If the track has garages, they are either assigned or taken on a first-come-first- served
basis and space is very limited. Pay attention to the area in which you park – don’t park too
close to another car, be aware of trailers which need room to unload cars, and keep your
space to a minimum.
Classroom — Our events include classroom sessions where beginners learn the basics of
driving at speed and more experienced drivers can learn advanced driving techniques.
Classroom attendance is mandatory for the Green and Blue run groups and highly suggested
for White.
Other — Depending on the track, you may have access to service station tools and supplies,
but don’t count on it. At nearly all tracks, there is a compressed air tank available and you
should also be able to buy gasoline, though it’s generally cheaper off track.
The Track Itself
Pit In/Out — As mentioned above, the pit area is just outside the track course and is mainly
used to send cars out on the track in a safe fashion, and to bring them in at the end of the
session. Drivers who are on the track should pay particular attention to cars pitting in and out.
Observe all instructions regarding the blend line and your car position to the first turn
Straights (Straightaways) — Straightaways are what they sound like – straight parts of the
track where you pick up speed before turning into a corner. Most tracks (like Watkins Glen or
Jefferson Circuit) have a front straight (in front of the pits or at the start/finish line) and a back
straight. Others have one long straight with multiple smaller straights (like Summit Point or
certain track configurations at Pocono Raceway). Straights are where you take a quick
breather, check your gauges, and loosen your grip on the wheel.
Corners — Corners are the most fun part of the track – where you get to use the steering
wheel and brakes. You’ll learn about increasing and decreasing radius turns and the theory
behind turn in, apex and track out. Corners are where you learn what your car, your tires, and
you were built to do.
Corner Workers/Flagging Stations — Corner workers are set up at intervals along the track
(not necessarily at corners, though) so that they can collectively see the entire track. The
corner workers are there to communicate to drivers, the Crew Chief, and RTR Event Control
and can summon help in an emergency. If you should encounter an issue that requires a
corner worker’s help, whatever the corner workers tell you is to be obeyed at all times. Corner
workers know whether there is other danger on the track and what help is on the way. In nearly
all situations, you should remain in your car and do not get out. The only exception to this rule
is if you know that your car is on fire!

RTR Driver’s Education Manual
RTR PCA – Tech – Rev 02-09-2014 Page 8
Communication
There are three ways to communicate while on the track; flags, hand signals, and in-car communication.
Flags — As mentioned previously, flags are the main source of communication on track. They
indicate unsafe situations (YELLOW, RED, WHITE, and BLACK flags), situations where courtesy
is indicated (BLUE flag), and the end of the session (the famous black and white CHECKERED
flag). The Track Chair will review the flags at each day’s drivers’ meeting, but basically the colors
correspond to the colors you find on the street: GREEN means go, YELLOW means slow, RED
means stop, and BLACK is trouble:
Standing YELLOW flag – This flag is shown by corner workers who are in sight of an
obstruction just off the track. For example, a car may have gone off track and is sitting on the
side waiting to come out, or a ground hog is sitting on the side thinking about crossing the
track. When you see a standing yellow flag, you should slow down, identify the hazard and
proceed with caution until you encounter a corner worker with no yellow flag. You may NOT
pass anyone in an area under a yellow flag. Occasionally, all corner workers will display a
standing yellow flag meaning that everyone on track should slow down and that no one may
pass. The first session of each day starts under a full standing yellow for a lap or two.
Waving YELLOW flag – This flag is shown by corner workers who are in sight of an
obstruction or incident ON the track. For example, a car is stalled or spun on the track, or
debris has been dumped on track, i.e., oil, coolant or stones or grass from a spin off track.
You should slow quickly when you see a waving yellow flag, and again identify the hazard.
Check your mirrors quickly before braking.
RED flag - This flag is usually waving and is shown when there is something dangerous up
ahead. You should safely slow down and come to a complete stop on the paved surface of
the track within view of a corner worker and off line. Wait in your car until the corner worker
indicates that you can safely drive to the pits. The red flag will be followed by a black flag
signaling all cars to pit in.
Standing BLACK flag - The black flag is the trouble flag. A standing black flag indicates that
everyone should pit in on this lap. Drive at a reduced speed to the pits.
Pointing BLACK flag – If you see this flag; it is meant for you. It indicates you need to pit in.
It can be due an issue with your driving or it can be due to an issue with your car. If you see
a black flag and you are not sure if it is pointed at you, pit in to be safe. Don’t ignore it.
BLUE flag (sometimes with a yellow stripe) – If you see this flag, there is a car overtaking
you from behind (either close behind, or further back but gaining quickly) and you should be
prepared to give that car a passing signal. Don’t assume you can speed up to stay in front of
them, just let the person pass you. If you’re indeed faster than they are, you’ll get an
opportunity to pass them later.
WHITE flag – The white flag indicates that there is a slow moving vehicle between you and
the next corner worker. Don’t slow down, just keep your eyes peeled for the vehicle.
GREEN flag – The green flag indicates that the track is open and hot.
CHECKERED flag – This flag indicates the session is over and you are on your cool down
lap. A cool down lap is used for you to get your cars brakes and engine cooled down. You
should continue around the track at a fast enough speed that will provide air to cool things off
but not fast enough that you will require heavy use of your brakes.
RTR Driver’s Education Manual
RTR PCA – Tech – Rev 02-09-2014 Page 9
Hand Signals — Communication between drivers on the track is accomplished solely
through the use of hand signals. There are four signals you must learn to give and recognize
– three to indicate passing and one to indicate pitting in. Unless you’re in a right-hand drive
car, you will always put your left hand out of the driver’s side window to signal. Don’t put your
hand out an open rooftop if you’re in an open car. It’s important to be consistent about this
because fellow drivers look to the left side of the car for signals.
PASS ME ON THE LEFT - Put your left hand straight out of the driver’s window pointing to
the left. Put your whole arm out there. This indicates that you want the ONE car directly
behind you to pass you on the left. If you want two cars to pass you, give one pass left signal
to the first car, wait for him to begin passing you, and then give the other pass left signal to
the car behind him.
PASS ME ON THE RIGHT - Put your left hand out and up over the top of your car, pointing
to the right side. Don’t lay your arm on the roof of the car and don’t point at the sky. Make it
clear that you want the driver to pass on your right. If you want two cars pass you, make two
clear signals.
NO THANKS – You don’t have to take a pass if it’s been offered to you. If you don’t want to
pass a car that just gave you a signal, follow directly behind the car that gave you the signal
and wave your hand back-and-forth above the steering wheel so the driver can see your
signal in his rear view mirror. And no, you can’t say no thanks to the checkered flag.
I’M PITTING IN - To signal that you are going to pit in (explaining why you are going so slowly
and are pulling off-line), hold your fist straight up out your window and leave it there until you
pull into pit lane. If you see someone giving a pit in signal, be aware that they are slowing
down and stay clear of them. The pit in signal is an implied pass.
In-Car Communication — Your instructor will communicate to you through either an electronic
two-way headset, hand signals, or by yelling. Each method has its own merits and you should
feel free to discuss those with your instructor.
Schedule
You’ll receive a schedule of the days’ events with your welcome letter or when you register. After you
go through Registration and Grid Tech, you will attend the daily Drivers’ Meeting. There you will learn
about the rules of the track, changes to the schedule, and a review of safety procedures. You’ll follow
the schedule to determine when your run group will stage and drive and your work sessions. RTR
prides itself on keeping to the schedule, but sometimes unforeseen incidents occur which take time
to correct. It is your responsibility to keep track of when your run group is staging, whether it complies
with the schedule or not.
Staging – To maximize the amount of time on the track, cars will stage about 10 minutes before
their session starts. The staging area will be identified during the driver’s meeting. Your instructor
will advise where to meet, so pay attention to your watch and be on time. If you don’t stage on
schedule you’ll lose valuable track time. Have your helmet on and seatbelts buckled a few
minutes before your session on track.
On Track – Sessions run approximately 20 to 30 minutes, depending on the track and the number
of participants. While this may seem like a short time, you’ll see that you quickly become both
mentally and physically tested and will be glad to come in for a breather.
Classroom sessions — Green and Blue Students will have regularly scheduled classroom
sessions throughout the event. These classes are mandatory for the Green and Blue groups and
highly suggested for the White group.
Work Assignments — It is very important that you be available and present for your work
assignment at the designated time. The event cannot function efficiently without the help of all
participants. We’re all volunteers.

RTR Driver’s Education Manual
RTR PCA – Tech – Rev 02-09-2014 Page 10
Work Assignments
If you have a work assignment, i.e., staging or pit out, your schedule will tell you when you should meet.
You will find your assignment in the event welcome letter or at registration. When it is your time to work,
meet at the designated area (this will be covered in the Driver’s meeting) with whatever you will need.
You may want to bring an extra jacket or raincoat, something to drink, a snack, and sunglasses. You do
not need to bring the newspaper. You will still be allowed to run in your driving session, so you will not
lose any track time. Just make sure to return to your assignment once your session is over if you are still
scheduled to work.
Working Pit Out — If you’re working the pit out assignment, you will be responsible for helping the
Pit Marshall safely direct cars onto the track. The Pit Marshall will tell you when you can let the cars
go. You must perform the following checks to ensure that each car is allowed on the track.
Run Group – Ensure that all drivers entering the track have the appropriate color wristband for that run group. Instructors (Pink wristbands) are allowed to drive during student
sessions. No one without a wristband is allowed on the track.
Instructors – Unless they have been soloed all Green and Blue Students must have
instructors wearing pink wristbands in their car. Soloed students will have yellow wrist
bands. Remember, if there are two people in the car, one of them must be an instructor.
Tech Inspection – Ensure that all cars have that day’s RTR inspection sticker on the windshield. If they don’t, send them back to the paddock area to get inspected.
General – Make sure the participants are wearing the appropriate attire with chin straps and seat belts buckled. Look at the hood and trunk to insure that they are closed. Look to see if the harnesses (if equipped) are secured on the passenger side if the seat is empty.
And basically make sure the car is ready to go out on course.

RTR Driver’s Education Manual
RTR PCA – Tech – Rev 02-09-2014 Page 11
1.3 Ready, Set, Go
You’re now ready to get on the track, almost. Just three more things to learn and all can involve your
instructor. Be sure to address any questions you have with them. You need to know how to position
yourself in your car so you can best use all your senses to monitor your surroundings. This involves
proper seating, steering wheel hand position and mirror adjustments. Next, you need to know what to
do in case you slide or start to spin. Finally, you need to know a little about track etiquette to ensure
that everyone has a good time out there.
IN THE CAR
Seating
Seating is surprisingly important because it allows you to maximize the amount of feedback you
receive from the car and provides you with a stable environment. If you’re seated properly you’ll
feel the vibrations in the steering wheel, brake pedal and the throttle. You’ll also feel the movement
of the car through the seat itself and will optimize your visual field by setting up the seat correctly.
The first time you REALLY try to sit appropriately in your
car will take some time. Seating for performance driving
is typically further forward than you’ll sit while driving on
the street.
Start by sitting IN the seat and really push your butt down
and wiggle around so that the small of your back is
pushed into the seat. That’s how you maximize the
surface area through which you’ll feel the vibrations.
While driving, you’ll use your left foot on the wheel well
or dead pedal to help push your body back into the seat
to maintain this stability.
Now, slide the seat back and forth until your feet can depress the pedals easily. A good test is to
see whether your right foot can cross over to depress the clutch all the way in. If you have to point
your toe to depress the clutch all the way, pull your seat forward. If your leg is bent when you press
the clutch in, push your seat back.
Next, set the seat-back so that your wrists fall directly over the steering wheel. This should allow you to turn the wheel easily and retain a good grip on it. Try to keep the seat back as vertical as possible. If you have questions, be sure to ask your instructor.
Adjusting Mirrors
Mirrors are very useful tools, but only when adjusted properly. After ensuring the side mirrors convey
the optimum information (i.e., with your car’s bodywork just barely visible as a reference point), adjust
your center- mounted rearview mirror to view somewhat to the right of center. This way you may see
in a direct line behind you and also cut down on the blind spot to your right-rear corner.
Steering Wheel Positioning
To maintain control of your car and judge the position of the steering wheel without looking, you need
to have your hands positioned properly. Use both hands! Place them at the 2 and 10 o’clock positions
or 3 and 9 o’clock. Hook your thumbs over the spokes if the wheel allows it. This allows you to use
your thumbs to pull the steering wheel down to the left or
right as opposed to pushing it. Don’t grip tightly!
You should steer with your fingers, not the palms of your hand. To
make small corrections, use your wrists instead of moving your
arms.

RTR Driver’s Education Manual
RTR PCA – Tech – Rev 02-09-2014 Page 12
JUST IN CASE
There is variability among drivers in their reaction times (the time it takes a driver to respond or react
to a given situation) and can range from a half to a whole second. At 100 MPH, you travel 147 feet
every second, so drivers with the fastest reaction times can do nothing about the next 73 feet. In other
words, at 100 MPH, your concentration needs to be at least 80 to 150 feet in front of you, because
anything closer has already happened. Cars also have reaction times depending on the type of input,
and although Porsches excel at this, it is up to you to take advantage of it. Even drivers with short
reaction times run into problems every once in a while, and in these cases, they rely on a few tricks
to save themselves.
In a Spin
You’ll know when you’re in a spin. The world seems to slow down and you’re a little puzzled by the
fact that everything seems to be moving around you. But there’s only one thing you have to remember
. . . “In a spin, both feet in.”
Both feet, by the way, means the brake and the clutch. If you have an automatic or PDK, push in the
brake and the dead pedal. You’ll come to an immediate stop. Take a breather, look for the nearest
corner worker and if you’re okay, give the thumbs up signal. When the corner worker signals you to
go back on track, look to make sure the track is clear and drive in the direction of traffic. Go
immediately to pit in. Remember that you may be bringing slippery mud and mayhem onto the track
surface, so proceed OFF LINE to the pit entrance. A constant pit in signal must be displayed to alert
high speed traffic approaching you.

RTR Driver’s Education Manual
RTR PCA – Tech – Rev 02-09-2014 Page 13
Skid Control
If you skid during straight-line braking, slowly let up on the brake pressure to release a locked wheel. You may immediately resume heavy brake pressure just below lock-up level.
If you skid through a corner, it usually involves the rear end breaking loose and sliding around toward the front. But it can be caught and corrected if done smoothly and carefully. Don’t panic; skids happen to everyone.
When you skid, just gently turn the steering wheel INTO the direction of the skid. Very often, you’ll overcorrect and will fishtail, or counter-skid. Simply turn the wheel in the other direction, but make sure you do it gently. The car will settle out and you can continue on.
If you try correcting and it just doesn’t work, the skid may turn into a spin, so BOTH FEET IN!
ETIQUETTE
There are a wide range of skills in every run group, so be aware of this fact and be polite about it. If you’re uneasy about being on the track, build your confidence slowly. Concentrate on learning the line and steering and braking smoothly. Look in your mirrors often and give passing signals when appropriate. If a car appears behind you that wasn’t in your mirrors the last time you looked they deserve a passing signal.
If you’re a more experienced driver in your group don’t intimidate slower drivers by driving on their bumpers. Stay a respectable distance behind and wait for a passing signal. Anyone who passes without a signal will be pulled off the track.
In the pit areas, be aware that it is often difficult for drivers to back up with all their safety gear. Leave extra room for drivers maneuvering their cars and offer to direct them safely to and from their spots.
If someone lends you a tool to fix your car, IMMEDIATELY return it to them when you’re finished. Many people have lost expensive tools by lending them to others who have forgotten to return them.

RTR Driver’s Education Manual
RTR PCA – Tech – Rev 02-09-2014 Page 14
SECTION 2 - Driving Concepts
2.1 Track Awareness
Most driving decisions are made based on visual input. Your eyes should be constantly searching for
additional inputs, increasing total awareness of your driving situation. Track awareness is teachable
and observable, particularly any lack of it, and is as equally important as driving skill. Your safety and
enjoyment as well as those around you depend on it.
Don’t concentrate on any one object in front of you; look far down the track and be prepared to react to
anything entering your visual field. Remember, you can’t do anything about the next 73 feet, so pay
attention to what you can affect. Your car will tend to follow your visual path, so look at where you want
to drive, not where you want to avoid. And stay aware of what’s behind you and beside you.
Vision: Never drive with any sort of vision impairment. If you need eyeglasses or contacts, wear them. If
something gets in your eye while on track, come into the pit area to deal with it. Never drive if you’re over
tired, either from lack of sleep or from too long a drive. You become visually and mentally impaired.
Alcohol: Not that we should have to remind you, but don’t drink and drive! Remember that the effects of
alcohol consumption last more than 24 hours, so limiting your alcohol intake at multi-day track events is
essential. No alcoholic beverages may be open at the track facility by participants or spectators until the
last vehicle is off the track at the end of the day and the track is deemed cold.
Drugs: Any drug, prescription or non-prescription, is potentially very hazardous. No illegal drug use will
be tolerated at the track. Many motion sickness drugs have side effects that impair your driving ability. So
think twice before popping ANY pills!
2.2 Traction
For a given tire on a given surface there is a finite amount of traction available. The traction is allocated
among directional control, braking, and acceleration. If you use 100% adhesion (traction) in any one of
these actions, there is none left for any other. That is, if you over-brake (leading to a skid), you can’t steer
or accelerate.
The most important aspect of a tire is the contact patch, or the area of the tire that is in contact with the
track at any point in time. For most cars/tires, the contact patch is about the size of a handprint. The size
of the contact patch, the weight or downward force on the tire, and the “stickiness” of the tire material
define the amount of traction you have.
TRACTION LIMIT
For every tire there is a theoretical maximum to how much it can “hold its place” – the traction limit. This
traction limit is the same in any direction, that is, it takes the same amount of force to break free a locked
wheel whether you push it forward, backward, sideways, or at an angle. It’s the same as if you’re moving
an armoire across a carpet – the armoire doesn’t care whether you push it toward the window or the door,
it won’t move in any direction unless you push it just hard enough. You can draw a circle around the tire
(or armoire) to indicate this limit – the larger the circle, the greater the traction.
When the force applied is greater than the traction limit (the force
vector is larger than the radius of the circle), you slide. For example, if
you hit the brakes too hard in a straight line, the tire will stop spinning,
but your car will skid forward because it has lost traction. If you’re
turning a corner while on the brakes too hard (as depicted in the
picture to the right), you will slide in the direction between the
cornering force and braking force.
What’s so great about a traction circle? It shows you that if you want maximum braking or accelerating, you want to minimize the cornering force. That is, brake in a straight line and accelerate in a straight line.

RTR Driver’s Education Manual
RTR PCA – Tech – Rev 02-09-2014 Page 15
SLIP ANGLES
A rolling tire with no side forces acting on it will naturally continue to roll in a
straight line. An applied side force, such as the centrifugal (outward moving)
force of cornering, will deflect the tire to some degree in the direction of the
force. As long as the total force applied doesn’t exceed the traction limit, the
car will tend to push in the direction of the force, and you will experience a
slip.
The angle defined by the difference between the direction in which the
wheels are moving and the direction the wheels are pointing is called the “slip
angle.” The feeling is “jeez, the wheels are turned way to the right, but I feel
like the car isn’t quite turning that much.” When you’re driving a straight line,
there is no side force applied, the slip angle is zero, and you feel like you’re
actually going in the direction the wheels are turned.
If the side force applied does exceed the traction limit, you’ll go into a slide (that definite uh-oh feeling!).
We will talk more about slides later.
Four factors affect the slip angle:
1) The side force acting on the wheel - tighter comers increase the slip angle
2) Tire pressure - increased pressure reduces the slip angle
3) Weight on the wheel - slip angle is reduced if weight on that wheel is increased, e.g., slip
angle reduces on front wheels during braking
4) Tilt or camber – the tilt of a wheel during cornering increases the slip angle
A car is said to have good road holding abilities if it has low or small slip angles. Any increase or decrease
of the slip angle will modify the path followed by that vehicle, especially differences between the front and
rear wheels. The result is OVERSTEER or UNDERSTEER (more about that later).
You reach maximum slip angle when the cornering force approaches the tire’s traction limit, a point at
which you can hear a faint squeal from the tires.
2.3 Braking
The brakes are the most powerful part of your car. Most people use only 20% to 40% of their brake
capacity, and often improperly.
You should use your brakes in a controlled manner. Don’t slam/stab them or lift off them quickly.
Everything should be done in a smooth motion (not soft, smooth). To use your brakes optimally, use a
hard squeeeeeeze on and gradual lift off. Jerking movements will transfer the weight of the car either to
the front or the back, reducing the traction on one set of wheels.
You can develop a feel for the brakes by using increasing levels of pedal pressure to approach threshold
braking. Threshold braking is using 100% of the available traction to stop the car at the point just before
wheel lock up. It is the fastest way to reduce speed. Any additional pressure on the brake pedal would
cause the wheels to lock.
For now, brake in a straight line to achieve maximum braking power. You’ll learn later about trail braking
once you’ve mastered the use of your brakes.

RTR Driver’s Education Manual
RTR PCA – Tech – Rev 02-09-2014 Page 16
Apex
ABS-EQUIPPED CARS
Some cars are equipped with ABS (Anti-lock Brake System). ABS is designed to give maximum
braking power without ever allowing tire lockup. It also allows steering control under heavy
braking conditions. You can press the brake pedal with all your might to experience ABS braking
in these cars. Note, however, that you’ll achieve optimal braking just prior to the ABS system
kicking in. When you sense impending lock-up in an ABS-equipped car, maintain the brake pedal
pressure; in a non- ABS car, release pedal pressure.
When the ABS kicks in, you’ll feel a gentle, rapid pulsing response through the brake pedal. This
is perfectly acceptable, and is even expected, in certain track situations.
2.4 Steering and Cornering
THE LINE
You’ll hear people talking about what is the best “line” to drive on a particular racetrack. “The line” is the
ideal route around the track – the one that allows you to go around the track the fastest. The ideal line will
let you go full throttle as long as you can while approaching a corner, brake as hard and as late as
possible, enter the turn and go back to full throttle on the way out.
The line is not the shortest route around the track – that would make you slow down too much, nor is it
the longest route – that would waste distance. It’s the route that gives you the best trade-off between
speed and distance.
The first thing to do at a new track is to learn the line and be able to drive it exactly the same way every
lap. You’ll learn the line through a combination of your instructor showing you the line, by driving it, by
reviewing it in the classroom, and by talking to other people who know the track. Then it’s just practice,
practice, practice.
. . . anatomy of a corner
The most difficult and fun parts of the track are the corners. Corners are
where you separate the good drivers from the great drivers.
There are three critical points in a corner: turn-in, apex, and track-out.
Many consider apex as the most important of these. Others consider turn-
in more important. We’ll show you why in the upcoming discussion. Apex
is the point on the inside of the corner that defines the radius of the turn. It
also indicates the point at which you change from entering the turn to
exiting the turn.
Turn-in
Point
Apex
Track-out
Point
The two points where this
imaginary circle hit the outside
of the track define the turn-in
(before
the apex) and track-out (after the apex) points. At RTR track events,
we mark these points with orange cones and your instructor will
point them out to you in your first few sessions. These three points
define the line through the turn.
Don’t drive cone to cone through the turn – make it one fluid arc
around the corner. You should try not to rely on the pylons, but
begin looking at natural markers on the track (a chip in the curbing
or a noticeable tree) to help you identify the key corner markers.

RTR Driver’s Education Manual
RTR PCA – Tech – Rev 02-09-2014 Page 17
IV. Straighte
and acceler
III. Unwind wheel thrott
and gradually
accelerate
II. Turn in and
modulate throttle
I. Brake in straight
line, complete
downshift
. . . getting through a corner
I. As you approach the corner, squeeze on your brakes. There may be cones marking braking zones
100-500 feet before the turn-in cone. Start by applying the brakes at the first braking marker. After
you’ve slowed down enough, downshift to the gear you want. Complete all braking and downshifting
before you reach the turn-in point. Try to get your outside wheels to hit within 6 inches of the turn-in
point.
Ideally, you should reach the turn-in point just as you have finished braking. If you find yourself coasting to this point after braking, try braking a little later (or deeper) on the next lap. If you find yourself too deep and end up fighting the corner, you’ve probably braked too late or not hard enough.
II. As you reach the turn-in, you should be looking
ahead to the apex. After you’ve released the
brakes and shifted into your gear in the brake zone,
turn the wheel and immediately begin to add
throttle, modulating your acceleration against the
cornering forces. Your turn should be smooth and
even, heading toward the apex along the curve.
n wheel
ate full
le
III. As you reach the apex, you should be looking toward track-out, steering toward it and continuing to
accelerate. Drive all the way out to track-out. Get as close to it as turn-in. The arc from turn-in to track-
out should all be with the same steering wheel position if you’ve executed the turn correctly.
IV. You should be at full acceleration and looking as far down the track as possible as you reach
track-out.
. . . missing the apex What happens if you miss the apex? You’re either too “early” or too “late” – with late being the preferred
of the two options. If you turn in early (a natural tendency), you’ll hit the inside of the corner before (earlier
than) the apex, the line you’re driving will have a larger radius than optimum and will point you off track
(oops!). If you turn in early, you’ll have to slow WAY down to drive the second half of the turn on a tighter
radius and stay on track. If you’re carrying too much speed, you may not have enough traction to keep
the car on the road track, don’t turn in early! This is why turn-in is just as important or more important that
apex. You can’t apex correctly without proper turn-in.
If you turn into the corner later than you
should, you’ll still be off line, but you’ll stay
on the track. The radius you’ll be taking will
be smaller than the ideal line, you’ll go
slower, apex past the ideal point and exit to
the inside of the track out point. But at least
you’ll be on the track! That’s why it’s better
to be late than early.
Late turn-in
Correct turn
Late Apex
Apex

RTR Driver’s Education Manual
RTR PCA – Tech – Rev 02-09-2014 Page 18
The corners pictured above are ideal or constant radius turns and you’ll encounter relatively few of
these on a real track.
. . . types of corners
INCREASING RADIUS TURN
Increasing radius turns are those that widen out at
the exit. The apex of these turns appears to be
earlier than one would expect – you have more room
to “track out” and can therefore turn in earlier. You
will be able to accelerate earlier in these turns
because you’ve “straightened out” earlier.
DECREASING RADIUS TURNS
Decreasing radius turns are very deceptive – they
get tighter and tighter as you go around them and
are difficult to negotiate. The apex for these turns
appears very late, so you should turn in much later
in order to have enough room to track out.
COMPOUND CURVES
Compound curves are where you have two or more
curves on top of each other – they are often called
“esses” (like at Watkins Glen.) For these situations,
you have to plan backwards, that is, figure out where
you have to be to make the last turn and make sure
that you drive the earlier turns in order to set yourself
up for the subsequent ones. Even if you have to be
late for the first turns, make sure you will get in and
out of the last one optimally.

RTR Driver’s Education Manual
RTR PCA – Tech – Rev 02-09-2014 Page 19
. . . oversteer and understeer
Driving through corners may sound easy, but the car doesn’t always go where you steer. As we
mentioned before, there is a slip angle where the tires head in a different direction than the
steering wheel is pointed. When the slip angle of the front wheels is smaller than that of the rear
wheels, the car will tend to OVERSTEER, or turn into the corner more than you’d expect.
Oversteer happens when the rear tires lose traction before the front tires do, and the rear swings
out, making the turn sharper.
When the slip angle of the front wheels is greater than that of the rear, the car will tend to
UNDERSTEER, or take a wider turn than usual. This happens when the front tires lose traction
before the back, making it difficult to steer or turn.
Depending on the design of your car, it will naturally have a tendency to either oversteer or
understeer.
Most cars will handle neutral at a moderate speed while cornering. Tighter corners, where you
go relatively slower, tend to promote understeer, while oversteer prevails in higher speed corners.
Cars that understeer slightly at low speeds tend to become neutral at higher speeds.
What does this all mean when you turn into a corner?
If your car begins to understeer, the front tires are losing traction and the car is not turning into
the corner as much you want it to. There are two things you can do:
1) Gently reduce throttle input until understeer diminishes (weight will shift to the front
tires which will help them regain control), or
2) Increase the amount of steering input (to aid in scrubbing off speed)
If your car oversteers, the rear wheels are losing their traction. The rear of the car is beginning to
slide out and is causing the front to turn into the corner excessively. If this continues, you will
soon be facing the traffic that was following you. There is only one course to follow. Turn the
steering wheel (open the wheel) in the direction the car is oversteering, thereby increasing the
radius of the turn and reducing slippage at the rear wheels.
. . . weight transfer
The springs of the car, being elastic and compressible, allow the car’s weight to shift under certain
conditions. This transfers weight forward during braking (front end dip or dive), rearward during

RTR Driver’s Education Manual
RTR PCA – Tech – Rev 02-09-2014 Page 20
acceleration, and sideways during cornering (body lean). Additional weight transferred to a tire
this way increases its traction limit.
In an understeering condition, easing the throttle lightly will cause a weight transfer to the front,
increasing the traction limit of the front wheels to counteract the effect of understeer.
In an oversteering condition, gentle acceleration transfers the weight to the rear, increasing the
traction limit of the rear tires and thereby decreasing the effect of oversteer.
Remember that weight transfer not only increases the traction limit of certain tires, it decreases
traction of the tires being unweighted! If weight transfer is not done SMOOTHLY, you’ll be in for
an unpleasant battle for control.
2.5 Gear and Throttle Control
The last skill to learn is gear and throttle control. Together these two help you achieve and maintain
optimum speeds. Not only do you have to know how to shift, but when to shift into a different gear. Once
in gear, you have to know how to use the throttle to quickly but smoothly get the RPM’s to the desired
level to maximize torque (for acceleration) without destroying your engine.
SHIFTING
Believe it or not, there are a lot of different ways to shift. It’s not just pressing the clutch, moving the lever
to the next gear, and disengaging the clutch. It can include “rowing through the gears”, “double clutching”,
or “heel-toeing”. The basics are the same, though:
1. Depress the clutch all the way (this disengages it, effectively separating the wheels from the
motor)
2. Move the lever out of the existing gear
3. Pause in neutral
4. Engage the next gear
5. Release the clutch (this re-connects the engine to the wheels)
As you shift up, go through the gears sequentially (e.g., from 1 to 2 and 2 to 3). When slowing down and
downshifting, you can skip gears to allow you to concentrate on braking instead of shifting as long as you
learn a technique to match the engine revs to the lower gear (see Section 3.2 – Heel and Toe/Double
Clutching.)
If you’re not shifting at that moment, don’t touch the clutch or the shift lever. You’ll wear out very
expensive parts of your car if you get in the habit of leaning on them, so learn to stay away now.
HOW TO USE THE GEARS
If your goal is maximum acceleration (typically coming out of a corner and building your way up on a
straight), shift to the next higher gear before reaching redline (about 1000 RPM’s below) so that the you
are always in the engine’s peak torque band. To find where your car’s torque is maximized, read your
Owner’s Manual. Don’t shift too early or you’ll lose power – keep the car at higher RPM’s in lower gears
instead of lower RPM’s in higher gears.
As you enter a corner, downshift into the gear that will put you in the maximum torque band while crossing
the turn’s apex so you’ll be able to accelerate out of the turn.
Advanced driving techniques can be applied equally in a car equipped with an automatic transmission
or PDK. If you’ve never used the gears on your automatic car, ask your instructor to teach you how to
use them. But realize the PDK is better at shifting than most drivers.

RTR Driver’s Education Manual
RTR PCA – Tech – Rev 02-09-2014 Page 21
THROTTLE CONTROL
You achieve good throttle control by using gentle throttle input. Just after you begin your turn-in, you’ll
gently squeeze on the throttle, shifting some of the car’s weight toward the back. If you step on the gas
too much too soon, you’ll experience understeer and won’t be able to control the direction of the car. If
you hesitate and lift off the throttle quickly, the weight will shift forward and you’ll feel “trailing throttle
oversteer.” You have to find just the right amount of gas and may have to “feather” the throttle to balance
the impact on traction.
After a long straight you may need a gear much lower than the gear you’re in. Be sure to sufficiently slow
before engaging a lower gear or else you may over-rev the engine and cause unwanted additional engine
braking.
A final point to keep in mind. DO NOT RIDE THE CLUTCH with your left foot. Keep it on the dead pedal
area unless you are actually using the clutch.

RTR Driver’s Education Manual
RTR PCA – Tech – Rev 02-09-2014 Page 22
SECTION 3 – Advanced Techniques
3.1 Threshold Braking/Trail Braking
Braking in a straight line and using 100% of the car’s potential braking ability is called “threshold
braking”. It is called “threshold” because to get 100% of the stopping power, you need to be at the
threshold of wheel lock-up – right on the edge. Threshold braking is tricky because with just a little
too much pressure on the brake pedal, the car will go into an uncontrolled skid. You shouldn’t use
threshold braking in every corner – use it for the end of long straights where the pavement is level
(no crown to the surface) and the braking zone is straight. Any time you go over threshold and into a
straight-line skid, you should rapidly but smoothly back off the brake pressure ever so slightly to
unlock the skidding wheels, but continue with high braking force.
The best drivers use “trail braking” to get the fastest lap times. In trail braking, you brake later into a
turn so that you’re still on the brakes after you’ve begun turning in. You can’t threshold brake and trail
brake at the same time; you transition from threshold to trail braking. Under threshold braking, you’re
using 100% of the car’s traction, leaving no traction left over for cornering. At the turn-in point, you
should reduce brake pressure so that you use approximately 70% of your traction for braking, leaving
the other 30% of the tire traction for cornering. By the time you reach the apex, you should be off the
brake and back on the throttle. Trail braking lets you start braking later down the straight and allows
you achieve a higher average speed between the turn-in point and the apex. Don’t complicate things
– finish your downshifting while you’re in a straight line, no matter what.
3.2 Heel and Toe/Double Clutching
One problem with entering corners is that you have to brake and shift at the same time. If you are
braking AND downshifting, your right foot is on the brake and the left is on the clutch. With the clutch
pedal down, the engine RPM’s drop and when the clutch is re-engaged in a lower gear, the low RPM’s
of the engine slow the faster spinning drive wheels, and may result in “chirping” of the tires and
sometimes skidding.
To this there is a (kind of) simple solution, Heel and Toe. During braking, keep the ball of your right
foot on the brake pedal and, with a turn of that foot, use your heel to depress the edge of the
accelerator pedal. Don’t squeeze on the accelerator, but give it a good sharp stab (known as a “blip”.)
With practice, you should be able to get the engine RPMs up high enough to “match” that of the gears
(drive train). As soon as the RPMs are up, re-engage the clutch and you should continue smoothly
into the corner. If you experience drag, you may not have “blipped” enough. If the car jumps forward,
you applied too much gas, and the RPMs are too high.
Because it is difficult to learn, you should practice Heel and Toe before you come to the track. The
major difference between street practice and track practice is that you routinely use the brakes with
much greater pressure on the track. The resulting position of the brake pedal in track braking is lower
and often better aligned with the gas pedal for rolling the heel or side of your foot over to blip the
throttle. Note that if you truly threshold brake while applying a heel and toe downshift, you must learn
to be very smooth with the ball of your foot on the brake pedal with absolutely no variation in braking
force while rotating your heel to blip the throttle.
There is another technique, called “double clutching” which is somewhat more complicated but
achieves the same goal of matching engine revs for smooth downshifts. Double clutching is also
easier on your transmission internals, so it is a good technique to develop for all driving situations.
When you first learn to double clutch, it will seem like your hands and feet just won’t work together.
It’s very easy to get flustered, especially if you’re trying it on a racetrack for the first time. It helps to
think of the process as doing two shifts to accomplish one: a shift to neutral, and a shift to the lower
gear. The shift to neutral is like any other shift - clutch in, move the gear lever, clutch out. The next
half of the double clutch is simply another shift - clutch in, move the shifter to the next lower gear,

RTR Driver’s Education Manual
RTR PCA – Tech – Rev 02-09-2014 Page 23
clutch out. The only difference is that when you stop in neutral you give the motor (throttle) a blip. The
second half of the procedure must happen rapidly before the extra RPMs created by the blip fall away.
From a mechanical standpoint, the major difference between Double Clutching and Heel and Toe is
that the blip of the throttle while the car is in neutral (clutch is engaged, clutch pedal out), synchronizes
the transmission gears.
Regardless of your belief in the capabilities of transmission synchronizers, the heel and toe and/or double clutching technique must ultimately be learned to be a competent advanced run group driver.
3.3 Advanced Car Stuff & Goodies
Fire Extinguishers
If you equip your car with a fire extinguisher it must be metal-to-metal mounted. While fires on the
track are extremely rare, they are dangerous. Corner workers have fire extinguishers with them, but
you are often far enough away from a corner worker that you would need the fire extinguisher close
at hand. Remember, your first course of action is to get out of the car or away from a fire.
Driving Suits
Another source of protection against fire is a fire retardant driving suit, including those made of
Nomex. The suits are expensive, but in general, the more you pay, the better protection you get. Also,
the suits offer extra comfort by relieving pressure points and preventing bunched-up material. Driving
suits are available as single layer, double layer, and triple layer. For better or worse, increased
protection often comes with a sweat quotient; some three layer suits can get quite warm on hot
summer days.
Harnesses
Harnesses (seat belts on steroids) are probably the best performance improvement you can buy. The
benefits of being securely anchored in the seat and not using a considerable amount of your strength
and concentration to simply keep your butt planted are difficult to compare to other performance
enhancements. Harnesses come in 3-point, 4-point, 5-point, and 6-point configurations. Only 5 and
6 point are permitted by PCA. Wider belts (3” wide shoulder and lap belts) are more comfortable, and
5-point or 6- point harnesses are the standard. Accessory shoulder pads also increase comfort (note
that due to the rare fire concern and the proximity to your face, fire retardant pads are advised). Your
life may depend on the harness, so don’t rig the installation; we advise that you use a track-oriented
shop to professionally install harnesses. Quick release or cam-lock harnesses (versus latch
mechanisms) are well worth their extra cost because of easier buckling.
Please install harnesses before contemplating sticky track tires, racing-type brake pads, or big turbos.
Your cornering speeds will be higher with harnesses than they would be with other modifications.
PCA requires that the driver and instructor have equal type restraints. It is not fair for the driver to be
well anchored in a harness, forcing the instructor to hold on for dear life with a standard 3-point factory
seatbelt. Note that proper harness installation typically requires either a harness guide bar or roll
bar/cage for the rear shoulder strap mount. Further, unmodified factory seats require special
consideration for mounting or harness selection. Ask for advice. According to the letter of the law,
harnesses are not legal for highway road use, so it is appropriate to retain your factory seat belts.
Insert the PCA requirements in full……..
Roll Bars/Cages/Harness Bars
A roll bar (steel hoops welded-in or bolted-in to the frame above and behind the driver) is strongly recommended in higher run group cars (White/Black/Red). There are bolt-in bars available that in no way disturb the car’s interior and can be removed without any evidence of having ever been installed. These are ideal for multi-use vehicles. Roll cages (a roll bar with extensions forward along the roofline and mounting forward along the front door sills) offer additional protection and chassis strengthening. A roll cage is

RTR Driver’s Education Manual
RTR PCA – Tech – Rev 02-09-2014 Page 24
unsafe for street driving (unless you always drive harnessed in with your helmet on) because of the potential for your head to hit a rigid bar (even if padded) next to or in front of your head in an accident.
PCA requires that at least a stationary roll bar be installed in all convertibles without factory metal hard tops. Pop-up roll bars alone are not sufficient protection without the factory hard top. Boxster and others require broomstick test compliance. The driver’s helmet must be below a broomstick spanning the windshield and roll bar above the driver’s head. All convertibles are required to have the top up when on track.
Harness bars (steel bars mounted horizontally behind the front seats) are a common first step for anchoring harnesses without the adding complexity of installing a roll bar. They also allow easier access to back seat storage for driving to and from the track.
Back seats become inaccessible for passengers with a roll bar, roll cage, or harness bar installed.
Arm Restraints
Arm restraints, straps that run from the lap belt of a harness to your forearms, keep your hands and
arms from flying outward in case of an accident. PCA requires arm restraints for all open cockpit cars
(e.g., Radical, 914 race-cars, Spyders, etc.).
Arm restraints are strongly recommended for convertibles, but they require a race-style lap harness
for proper installation.
· Driving Gloves Driving gloves serve two purposes; 1) they provide protection against fire, and 2) they allow you to
maintain a good grip on the wheel. Buy real driving gloves that are made of fire-resistant material, not
the fancy leather gloves with holes in the knuckles. Good gloves typically extend a third of the way
up your forearm and have silicone patches on the fingertips and palm. The silicone gives you a good
surface to grab the wheel with, and the cloth absorbs the sweat from your hands. Colors that contrast
with your vehicle color help other cars see your passing signals.
· Driving Shoes You should consider getting a good pair of driving shoes for four reasons. First, they have a rubber
sole that provides good traction so your feet stay on the pedals. Second, the soles are thin enough
that you can “feel” the pedals and sense what the car is doing. Third, most driving shoes are really
boots and the leather over your ankle provides some protection. Fourth, they’re smaller than standard
shoes or sneakers and fit between the pedals more comfortably.
· Tires There are (1) all-season street tires, (2) performance streetable track and competition tires (often
called Y or Z-rated tires) and typically installed on sports cars like Michelin Pilot Sport Cup 2, Pirelli
PZero or Dunlop Sport Maxx, (3) track and competition only tires (often called R compound tires) as
in Toyo R888’s and RA1’s, Yokohama Advan, and (4) race-only slicks like Hoosiers, Pirellis. A
common misconception is that you need to have sticky tires to have fun at the track. Nothing is further
from the truth. Sticky tires simply make it more difficult to learn the handling characteristics of your car
because they don’t talk back to you like street tires do. If you think you are addicted to this Driver’s Ed
stuff, please use the standard performance-oriented street tires for at least a couple of seasons before
considering track tires.
There are multitudes of opinions about the hot set-up for every wheel/tire budget. Ask many questions
of the experienced drivers or your instructor and develop your own opinion in over time.
· Brake Pads Original equipment type brake pads are sufficient for the first couple of years of Driver’s Ed
participation. The only thing you have to worry about is having sufficient life left in the pads for a couple
of days of hard use. Pad thickness will be inspected during the vehicle tech inspection. Bring extra
pads to the track – they’re extremely easy to change, so simply ask for assistance if it’s new to you.

RTR Driver’s Education Manual
RTR PCA – Tech – Rev 02-09-2014 Page 25
Performance “track pads” come in all styles and heat ranges, depending on your driving style and
vehicle weight. They provide considerably more stopping power when hot, but typically very little
stopping power when cold (typical of any street driving situation). Most beginners don’t generate
enough heat in their brakes to get track pads up to temperature and therefore provide poorer brake
performance. Very aggressive pads with tremendous stopping power create extreme brake rotor
wear, so everything is a compromise.
Many people who ultimately opt for the increased stopping power of track pads change the pads at
the end of the driver school before driving home. Put track pads into the category with sticky track
tires - future considerations for and with performance improvement.
· High-Temp Brake Fluid A lot of braking (as typical with most track driving) generates a lot of heat. Brake fluid is hydroscopic hygroscopic, meaning it tends to absorb moisture over time. The problem with water is its heavier than oil, collects in and near your calipers and boils when it reaches ~212 °F. Boiling means separation of molecules such that steam is generated and air bubbles result in the brake fluid. Unlike the fluid, air bubbles are readily compressible and if your brake fluid has a bunch of bubbles, the brake pedal will “get soft” or will go to the floor with no braking power. Not good.
You shouldn’t get bubbles in your brake fluid if it has been changed recently (explaining our tech requirement for replacing the brake fluid) and you don’t ride the brake all the way around the track while going full throttle. If regular brake fluid bleeding combined with regular brake fluid changes does not eliminate a boiling or fading problem, high temperature brake fluid should be considered.
There is a wet boiling point (temperature at which the fluid tends to boil) and a dry boiling point on all brake fluid labels. The wet boiling point is accurate for old brake fluid. The wet boiling point is always lower than the dry boiling point. Racing brake fluid has a higher dry boiling point, so it offers a higher factor of safety against boiling on the track.
· High Octane Fuels Octane is tied to engine performance (horsepower) and engine life. Most modern cars have knock sensors that “read” the octane of the fuel and adjust the engine timing accordingly. High octane fuel gives the best performance, but most stock cars have a limit to what the sensors can read, so super high octane track gas is a waste of money. Turbo-charged cars and modified cars (chipped, bigger intake manifold, different cams, free flow exhaust), are a different story.
Turbo cars go to extremely high compression at maximum boost. On the street this is no big deal, because it is impossible to be on maximum boost for any extended period of time. On the track, the objective is to have a turbo car on boost nearly all of the time. High octane track fuel is a relatively inexpensive (relative to an engine rebuild) insurance policy and should be considered a necessity on the track for turbo-charged cars running higher-than-stock boost pressure without other engine modifications.
Many of the aftermarket performance chips require higher octane fuels. Check with the chip literature. The highest octane fuels and most octane-increasing additives contain lead. This is disastrous for vehicles with catalytic converters and oxygen sensors. Make sure you are putting the appropriate fun stuff in your car
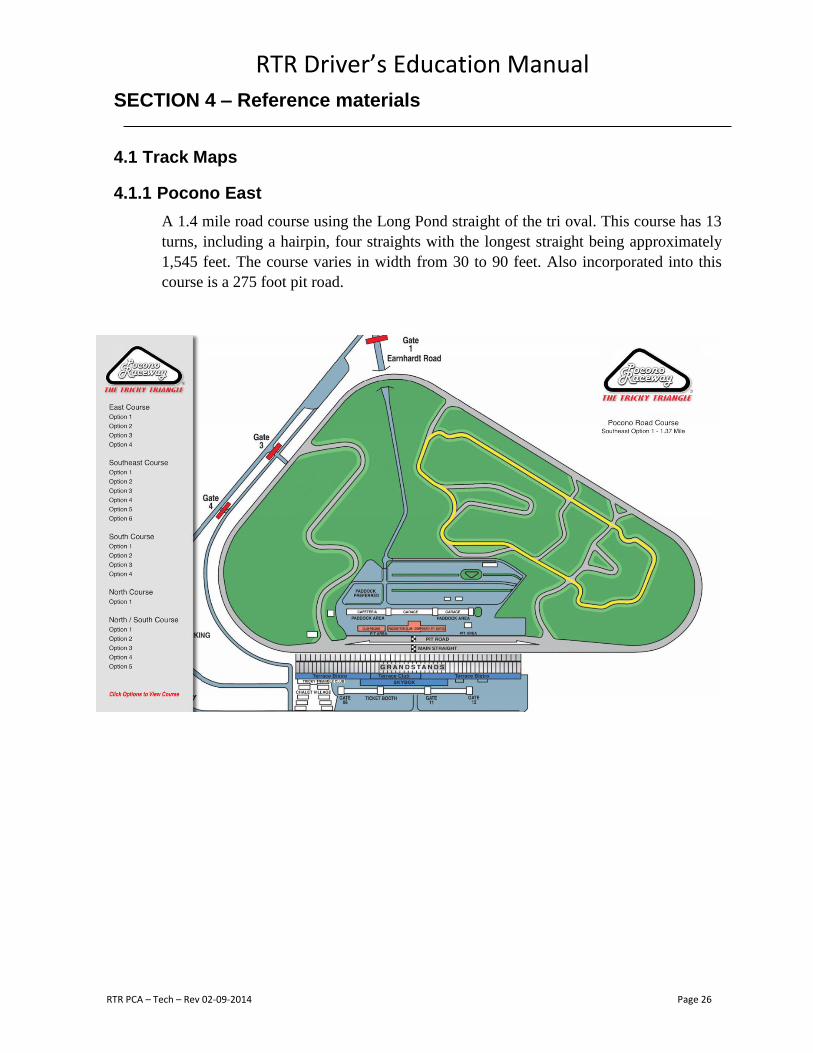
RTR Driver’s Education Manual
RTR PCA – Tech – Rev 02-09-2014 Page 26
SECTION 4 – Reference materials
4.1 Track Maps
4.1.1 Pocono East
A 1.4 mile road course using the Long Pond straight of the tri oval. This course has 13
turns, including a hairpin, four straights with the longest straight being approximately
1,545 feet. The course varies in width from 30 to 90 feet. Also incorporated into this
course is a 275 foot pit road.
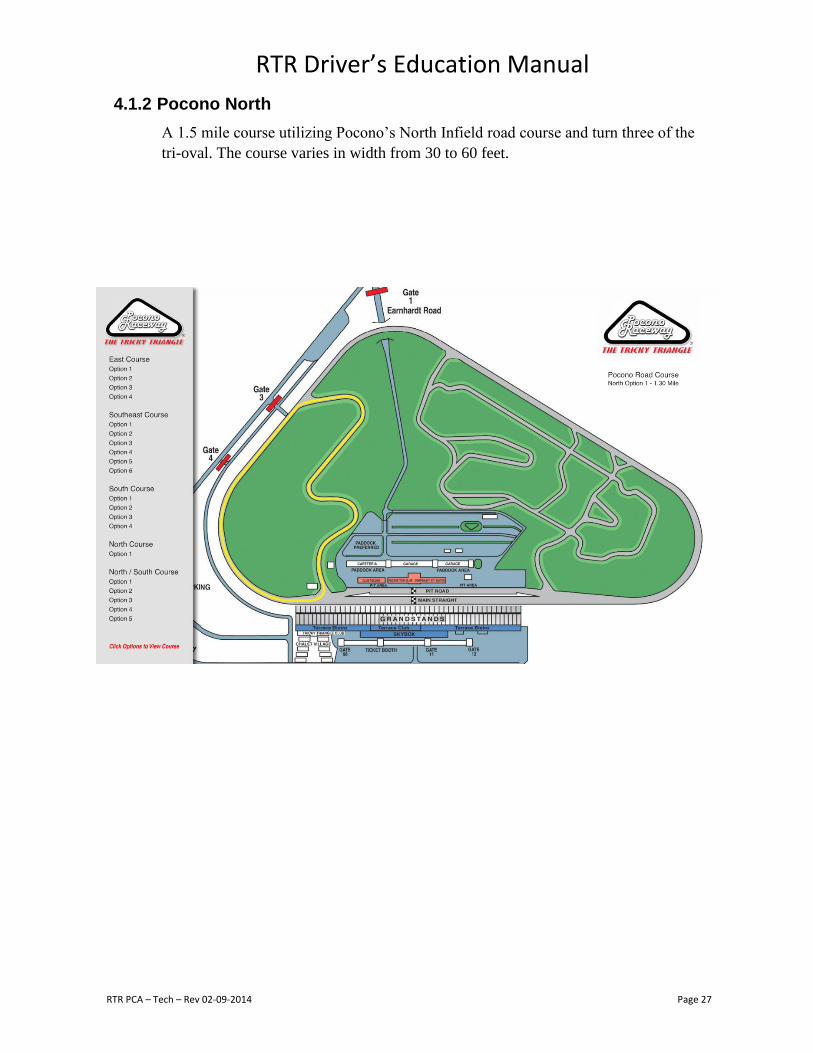
RTR Driver’s Education Manual
RTR PCA – Tech – Rev 02-09-2014 Page 27
4.1.2 Pocono North
A 1.5 mile course utilizing Pocono’s North Infield road course and turn three of the
tri-oval. The course varies in width from 30 to 60 feet.
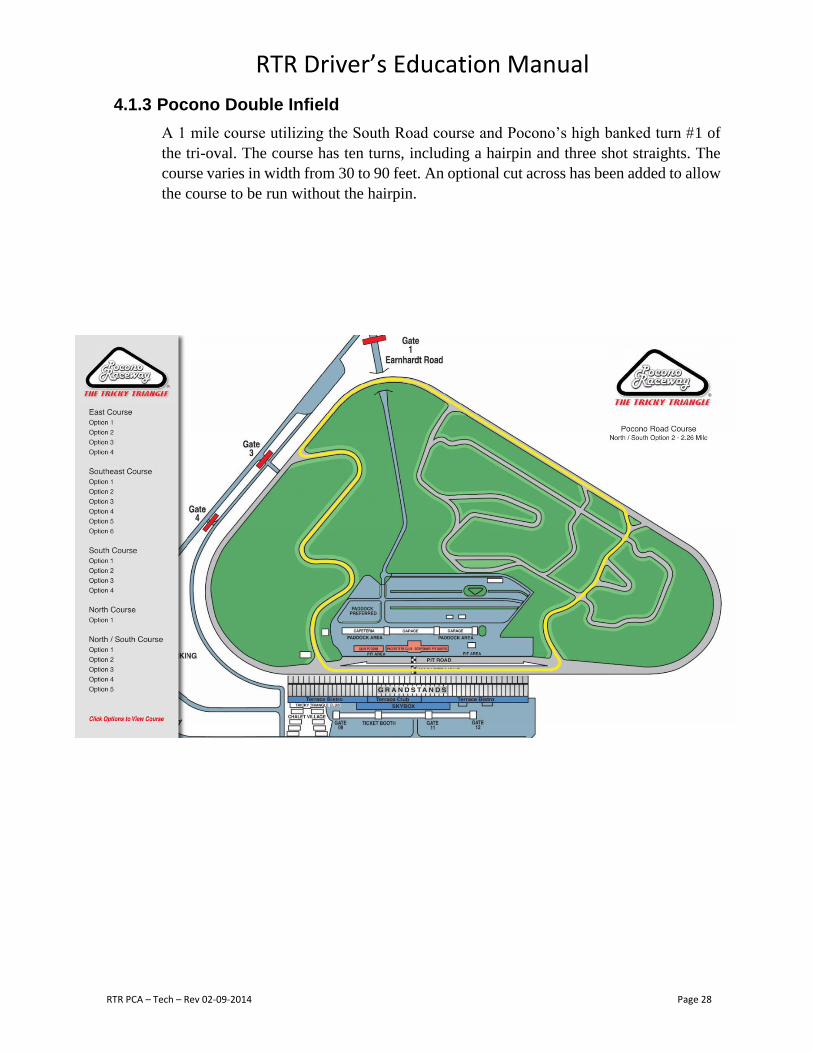
RTR Driver’s Education Manual
RTR PCA – Tech – Rev 02-09-2014 Page 28
4.1.3 Pocono Double Infield
A 1 mile course utilizing the South Road course and Pocono’s high banked turn #1 of
the tri-oval. The course has ten turns, including a hairpin and three shot straights. The
course varies in width from 30 to 90 feet. An optional cut across has been added to allow
the course to be run without the hairpin.

RTR Driver’s Education Manual
RTR PCA – Tech – Rev 02-09-2014 Page 29
4.1.4 Summit Point
Above is a diagram of Summit Point Main Track with corner numbers.
Below is a diagram of Jefferson Circuit with the corner numbers.

RTR Driver’s Education Manual
RTR PCA – Tech – Rev 02-09-2014 Page 30
4.1.4 Summit Point Below is Shenandoah Circuit at Summit Point Raceway.
4.1.5 NJMP Lightning

RTR Driver’s Education Manual
RTR PCA – Tech – Rev 02-09-2014 Page 31
4.1.6 Watkins Glen
Watkins Glen International is a 3.45 mile road course located near Watkins Glen, New York, at the south end of Seneca Lake.
Watkins Glen has hosted a remarkable variety of races over the years, including most of the various IMSA series, most of the various SCCA series, Formula 1, Indy Car, and NASCAR.
Pro races make up a very small part of the Watkins Glen Schedule; one or two SCCA National races and a large number of SCCA regionals occur at the track during the course of a year, as well as a large number of Club Dates put on by organizations such as the Porsche Club of America, the BMW Car Club of America, and so forth.
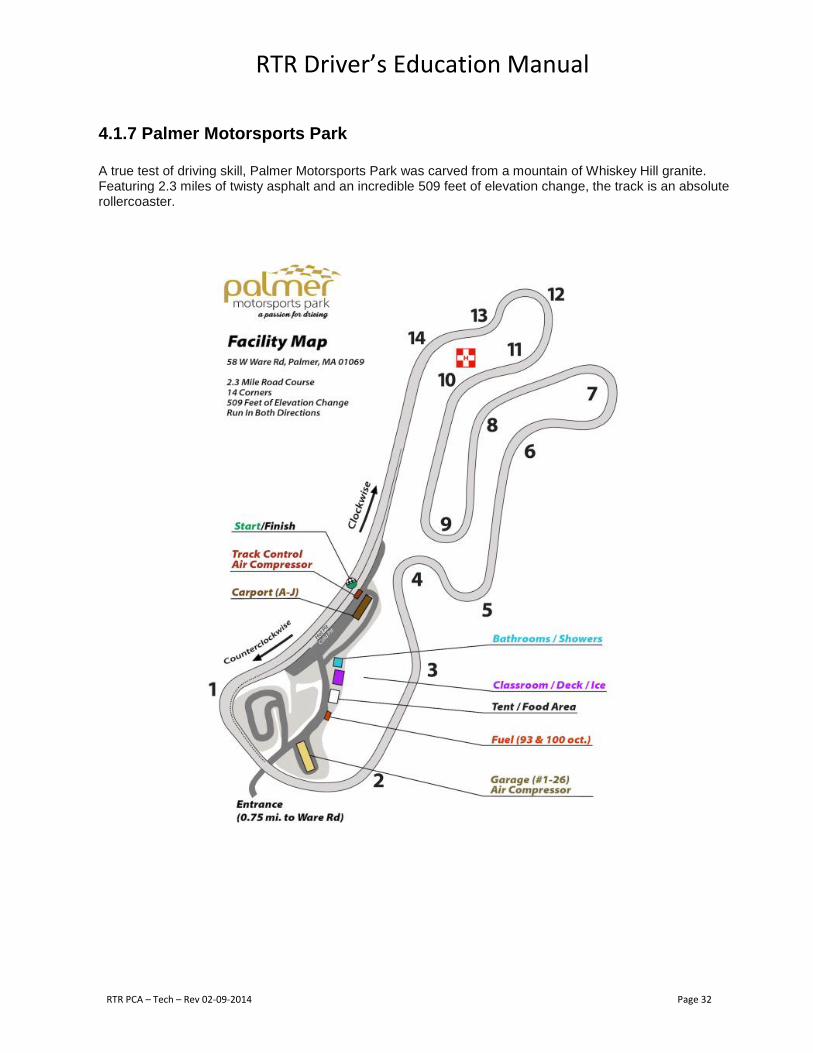
RTR Driver’s Education Manual
RTR PCA – Tech – Rev 02-09-2014 Page 32
4.1.7 Palmer Motorsports Park A true test of driving skill, Palmer Motorsports Park was carved from a mountain of Whiskey Hill granite. Featuring 2.3 miles of twisty asphalt and an incredible 509 feet of elevation change, the track is an absolute rollercoaster.
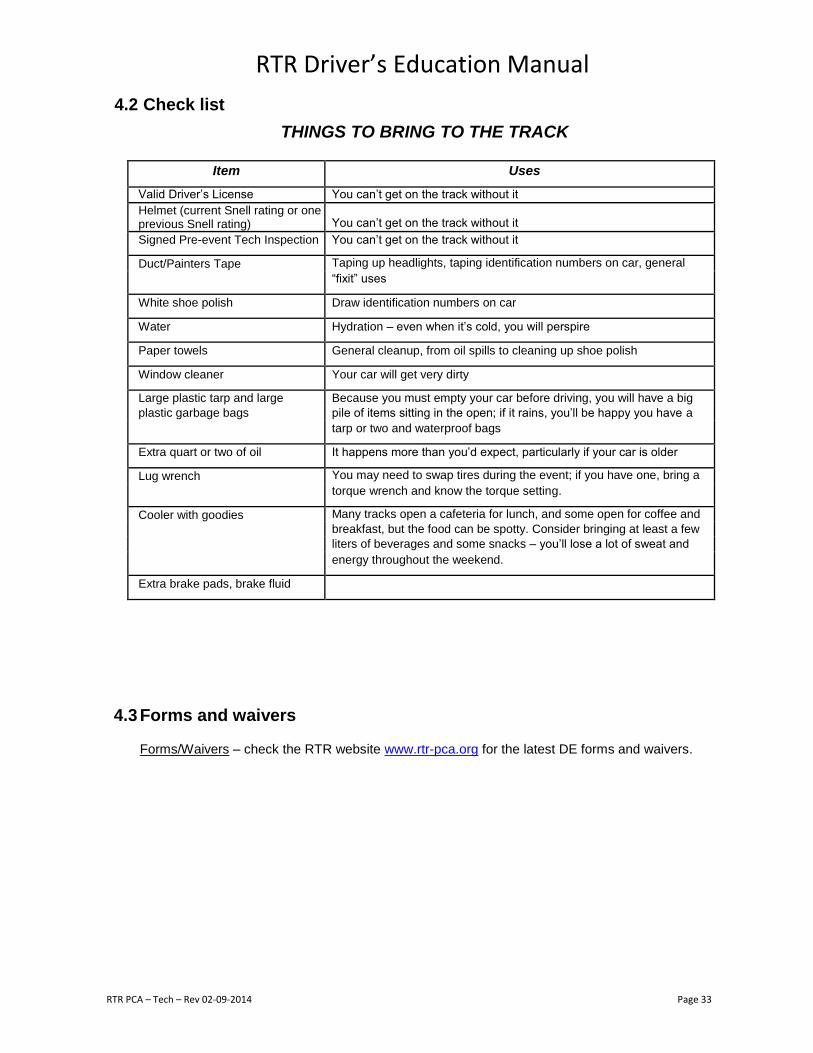
RTR Driver’s Education Manual
RTR PCA – Tech – Rev 02-09-2014 Page 33
4.2 Check list
THINGS TO BRING TO THE TRACK
Item Uses
Valid Driver’s License You can’t get on the track without it
Helmet (current Snell rating or one previous Snell rating)
You can’t get on the track without it
Signed Pre-event Tech Inspection You can’t get on the track without it
Duct/Painters Tape Taping up headlights, taping identification numbers on car, general
“fixit” uses
White shoe polish Draw identification numbers on car
Water Hydration – even when it’s cold, you will perspire
Paper towels General cleanup, from oil spills to cleaning up shoe polish
Window cleaner Your car will get very dirty
Large plastic tarp and large Because you must empty your car before driving, you will have a big
plastic garbage bags pile of items sitting in the open; if it rains, you’ll be happy you have a
tarp or two and waterproof bags
Extra quart or two of oil It happens more than you’d expect, particularly if your car is older
Lug wrench You may need to swap tires during the event; if you have one, bring a
torque wrench and know the torque setting.
Cooler with goodies Many tracks open a cafeteria for lunch, and some open for coffee and
breakfast, but the food can be spotty. Consider bringing at least a few
liters of beverages and some snacks – you’ll lose a lot of sweat and
energy throughout the weekend.
Extra brake pads, brake fluid
4.3 Forms and waivers
Forms/Waivers – check the RTR website www.rtr-pca.org for the latest DE forms and waivers.

RTR Driver’s Education Manual
RTR PCA – Tech – Rev 02-09-2014 Page 34
4.4 Glossary
STEERING & HANDLING
Reaction Time - The time it takes a driver to respond to an event requiring a response (about
0.50 to 1.0 second). A car also has added reaction time to input from the driver and is
approximately 0.25 to 2 seconds.
Center of Gravity - The point within the car where it is exactly balanced in all directions.
Weight Transfer - The transfer of weight from one side of the car to the other or front to back
due to acceleration or deceleration.
Slip Angle - The angle between the direction a tire is pointing and the direction it is moving.
Sawing - Rapid back-and-forth movement of the steering wheel by the driver, while turning into a
turn. Don’t do this.
Head Lean - Leaning the head excessively while turning. Don’t do this.
Understeer - A condition where the front wheels lose traction before the rear wheels, causing the
car to go straight. Requires slowing down and/or additional turning.
Oversteer - A condition in cornering when the car wants to turn into the corner, and the back end
tries to break loose. An over-reactive car.
Plowing or Pushing - Excessive understeer in turns.
Dead Pedal - The area immediately to the left of the clutch pedal. It is used as a rest spot for the left
foot when not depressing the clutch. It is also used as a bracing point for the left foot and leg during
hard cornering, to keep the body firmly in the seat.
Drift - Driving in a state of controlled skid while the car is gaining speed.
Skid - To make the tires slide rather than roll when braking, or to skid sideways.
Power Slide - Driving with oversteer induced by applying the gas, making the rear slide out from
under you.
Spin - An uncontrolled slide or skid.
Scrubbing - Causing the wheels to skid rather than roll around a corner which greatly decreases the
vehicle speed.
Throttle Steer - Applying the gas to introduce a steering action. Usually while exiting from a turn.
Also known as Power Oversteer.
Feathering - A gentle application of pressure on or off the gas pedal to maintain a constant speed.
Heel & Toe - To use the ball of the foot on the brake pedal while the heel is used to control the gas
pedal.
Double Clutch - To release the clutch in the middle of a gear shift (depress the clutch pedal) as the
shift lever passes through the neutral position. The shift therefore results in having the clutch pedal
depressed twice for a single gear shift. When the gear is in neutral, the driver “blips” the gas to rev up
the engine to match the engine revs with the transmission. Double clutching helps extend the life of
the transmission synchro rings and aids smoothing downshifts.

RTR Driver’s Education Manual
RTR PCA – Tech – Rev 02-09-2014 Page 35
ENGINE & TRANSMISSION
RPM - Revolutions per Minute, or how fast the engine is rotating. Also called “revs.”
Power curve – A plot of the horsepower and torque against engine RPM.
Over-Rev - To run the engine at higher RPM than is desirable or good for the engine.
Lug - To require larger power outputs (step on the gas hard) at too low an engine speed (RPM) than
is good for the engine (for example, going full throttle in 4th
gear at 2000 RPM).
Torque - The ability of the engine to produce twisting force. Torque is used for acceleration.
Shift Point - The RPM at which one shifts to another gear, either as an upshift or downshift.
Red Line - A designated range of RPM where possible engine damage or power loss occurs. Don’t
drive in this range.
Gear Chart - A chart showing the speed in each gear at various engine speeds (RPMs).
Riding the Clutch - Driving with the clutch partially disengaged or with excessive clutch slip in
matching shifts. Don’t do this.
Riding the Shifter - Driving with the hand resting on the shift lever. Don’t do this.
TIRES & BRAKES
Contact Patch - The small area (about 20 to 30 square inches) of the tire actually on the ground at
any point in time.
Traction - The ability of a tire to adhere to a surface. It is a function of weight, tire contact area and tire composition.
Traction Limit - The maximum forward, rearward or sideways force at the tires while accelerating,
braking or cornering.
Wheel Spin - To spin the wheels when accelerating (old timers called it “peeling”).
Pumping the Brakes - Modulating the brake pedal to raise the fluid level. It is not a braking technique.
It is used in emergency situations when air from boiling brake fluid has entered the system and caused
the pedal to go to the floor.
Engine Braking - Utilizing the engine to provide resistance to slow the car down, for example by
downshifting to a lower gear.
Lifting Off - To let up on the gas pedal to allow the engine to slow the vehicle.
Hard Braking - To decelerate using the brakes to their maximum capacity.
Trail Braking - Maintain a low and decreasing level of brake application into a turn in contrast to
complete release of the brakes before beginning the turn.
Braking Point - A designated point at which you begin to apply the brakes, usually a fixed distance
from a turn.
Stopping Distance - The distance required to stop the car from a specified speed (usually means
minimum distance and may or may not include the time required for the driver to activate the brakes
after an indication that braking is necessary).
Balance - The relationship between the load on the individual wheels and their ability to turn, brake,
or apply power. If they are near equal, the balance is good.

RTR Driver’s Education Manual
RTR PCA – Tech – Rev 02-09-2014 Page 36
ROADS & CURVES
Radius - The distance from the center of the circle defined by the arc path the car is traveling.
Largest Possible Radius - The largest radius, which can be drawn and still, stay on the road surface
at the start, apex, and end. The fastest line through a given comer.
Theoretical Apex - A point along a curve where the largest possible radius touches the inside edge
of the turn.
Practical Apex - A point along a curve where the path of a car should touch the inside edge of the turn.
Clipping Point - A point along a curve where a car actually touches the inside edge of the road.
Early Apex - When the practical apex occurs before the theoretical one, or when the driver
incorrectly judges the theoretical apex and arrives early.
Late Apex - When the practical apex occurs after the theoretical one, or when the driver incorrectly
judges the theoretical apex and goes arrives late.
Ideal Line - The best possible path through a turn considering all factors.
Turn-in Point - The point at which one begins the turning maneuver.
Track-out Point – The point at which one ends the turning maneuver and enters a straight.
Off Camber - When the road slopes away from the apex of the turn.
Straight - A portion of the road or track where the vehicle should only increase or maintain its speed.
Constant Arc - When the radius of the turn is constant.
Decreasing Radius Turn - A turn which gets tighter as it progresses.
Increasing Radius Turn - A turn that gets wider as it progresses.
S Curve - A curve shaped like an S. Two or more connected turns which alternate direction.
Hairpin - A very sharp turn which causes the road to exactly reverse its direction in a little over two widths
of the road.